NOTE
This product is no longer available on WooCommerce.com. This document has been left available for existing users, but will no longer be updated.
External Images allows your WooCommerce store to use images from any external URL as product images, including featured images, galleries, and variations, without storing them on your server.
Installation
↑ Back to topTo start using a product from WooCommerce.com, you can use the “Add to store” functionality on the order confirmation page or the My subscriptions section in your account.
- Navigate to My subscriptions.
- Find the Add to store button next to the product you’re planning to install.
- Follow the instructions on the screen, and the product will be automatically added to your store.
Alternative options and more information at:
Managing WooCommerce.com subscriptions.

Setup and Configuration
↑ Back to topGetting started
↑ Back to topOnce activated, navigate to the External Media menu item in your dashboard to access the external images importer.
Advanced configuration
↑ Back to topThe plugin offers several ways to import and use external images with WooCommerce.
Using the WooCommerce Product CSV Importer
This is the most powerful method for bulk-importing products with external images. The extension integrates directly with the built-in WooCommerce CSV importer.
Format Your CSV File
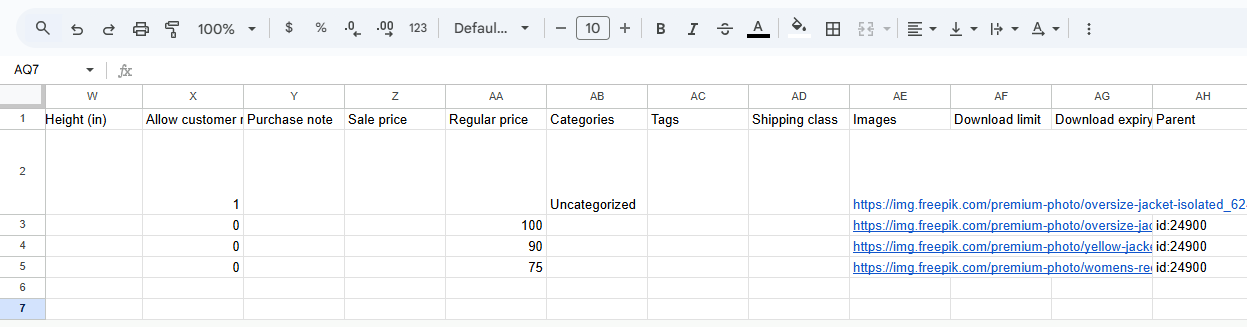
- In your product spreadsheet, use the standard
Imagescolumn. - To add a featured image and gallery images, place all URLs in the same cell, separated by commas e.g.
https://example.com/image1.jpg,https://example.com/image2.jpg,https://example.com/image3.jpg - The first URL will be used as the featured image. All other URLs will become gallery images.
- For product variations, enter the external image URL in the Images column for that specific variation’s row.
Import the CSV in WooCommerce
- Go to WooCommerce → Products and click Import.
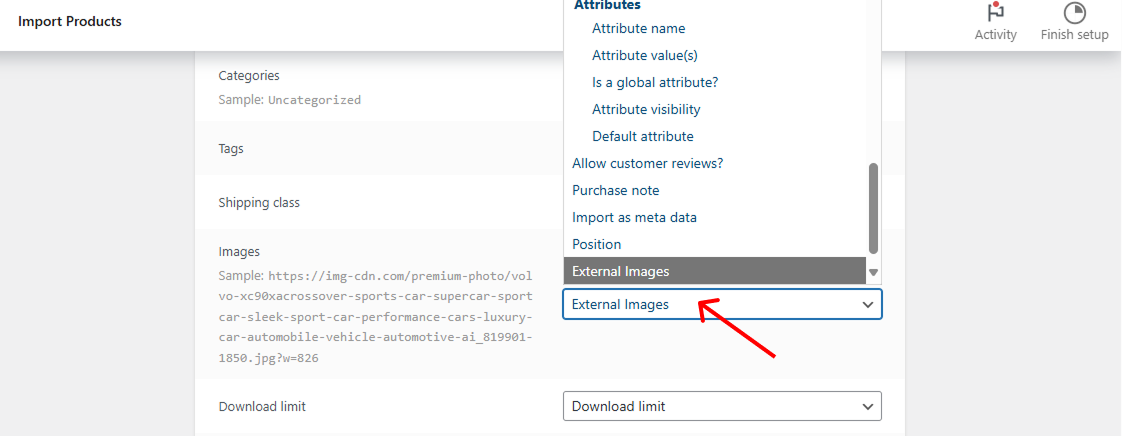
- Choose your CSV file and proceed to the Column Mapping screen.
- Map your
Imagescolumn to “External Images”. This is the crucial step that tells the plugin how to handle these URLs. - Click Run the Importer to finish.
Your products will be created or updated, with images displayed directly from the external URLs without using any server storage.
Manually Importing Images for Individual Products
You can also import external images first and then assign them to products when creating or editing them manually.
Import via URL Input:
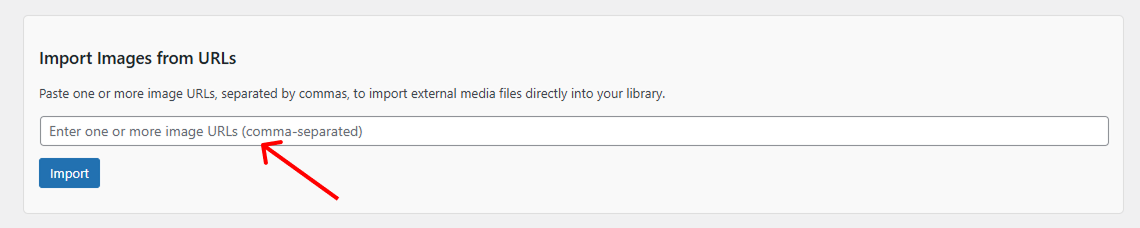
- Go to External Media in your WordPress dashboard.
- In the Import Images via URL Input section, paste one or more image URLs (separated by commas).
- Click Import.
Bulk Import from JSON or XML:
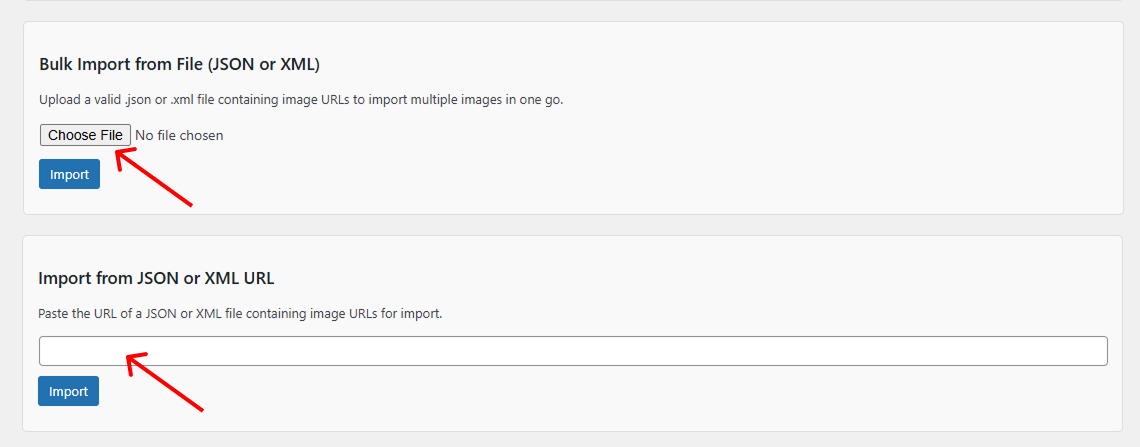
- Go to External Media.
- Find the Bulk Image Import from JSON or XML section.
- Choose your
.jsonor.xmlfile and click Import.
This process adds the external images to your Media Library as “virtual” attachments. You can then assign them as featured or gallery images from the product edit screen, just like any other media file.
Troubleshooting
↑ Back to top| Issue | Solution |
| Image not showing | Make sure the URL is valid, publicly accessible, and points directly to an image file (e.g., .jpg, .png). |
| Placeholder shown | Check that the External Images plugin is active |
| Gallery missing | Confirm that multiple URLs in your CSV file’s Images column are separated by commas. |
Questions & Support
↑ Back to topHave a question before you buy? Let’s connect by submitting a presales question. Already purchased and need some assistance? Please get in touch via the help desk.
FAQs
↑ Back to topHelp customers by answering commonly asked questions.
Can I use external images for featured images or product images?
Yes. You can use externally hosted images anywhere WordPress and WooCommerce normally expect an image upload, including featured images for posts and products, and in product galleries.
Where are my images stored? Does the plugin upload them to the Media Library?
No. Images remain hosted externally. The extension creates “virtual attachments” in your Media Library, allowing you to use them in WooCommerce without increasing server storage.
Can I use external images with variable products?
Yes. The plugin supports both simple and variable products. Each variation can have its own external image if needed.