Loyalty Points and Rewards with Member Card allows your WooCommerce store to reward customers not only for their purchases and everyday actions, but also during special occasions such as birthdays or major celebrations like Christmas, New Year, Eid al‑Fitr, Chinese New Year, and more.
You can easily configure how many points customers earn for each dollar spent and decide how many points can be redeemed for a specific discount amount. Points can be assigned at the product, category, or global level, and you remain in full control of the maximum discount available when redeeming points.
To make it even more engaging, the extension also includes gamification features such as daily login rewards, encouraging customers to return to your site every single day.
With this flexibility, you can turn every transaction, celebration, and daily interaction into a loyalty‑building moment that keeps customers coming back.
Installation
↑ Back to topTo start using a product from WooCommerce.com, you can use the “Add to store” functionality on the order confirmation page or the My subscriptions section in your account.
- Navigate to My subscriptions.
- Find the Add to store button next to the product you’re planning to install.
- Follow the instructions on the screen, and the product will be automatically added to your store.
Alternative options and more information at:
Managing WooCommerce.com subscriptions.

Users & Points Setting
↑ Back to topOverview
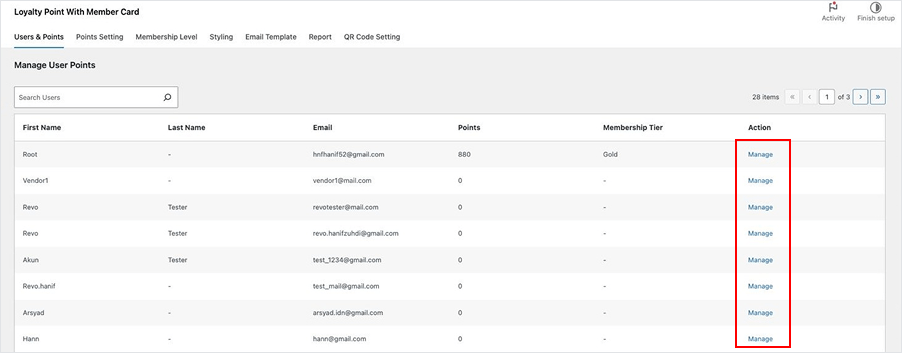
↑ Back to topUser & Points Settings menu managing individual customer loyalty data, giving the admin full visibility and control over each user’s point activities and membership
status. Whether you’re tracking how many points a user has earned, editing point balances manually, or reviewing user tiers, this menu provides a powerful,
organized interface to manage it all effectively. This menu includes:
- User profile
- Instantly see each user’s personal information (Name and Email), current loyalty tier (e.g., Bronze, Silver, Gold), and total active point balance.
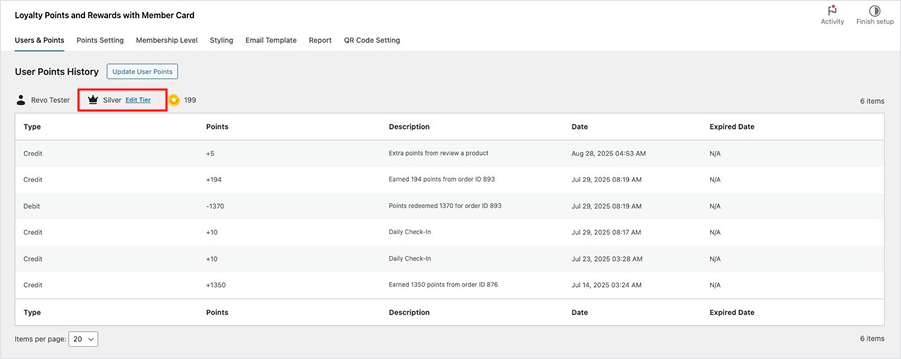
- Detailed Points History
- View a full log of all point transactions per user (User points amount, Type of point (earning or spending), Date of activity, Points earned or spent, Description of the action (e.g., “Order #1001”, “Birthday Reward”) and Expiry date for each point.
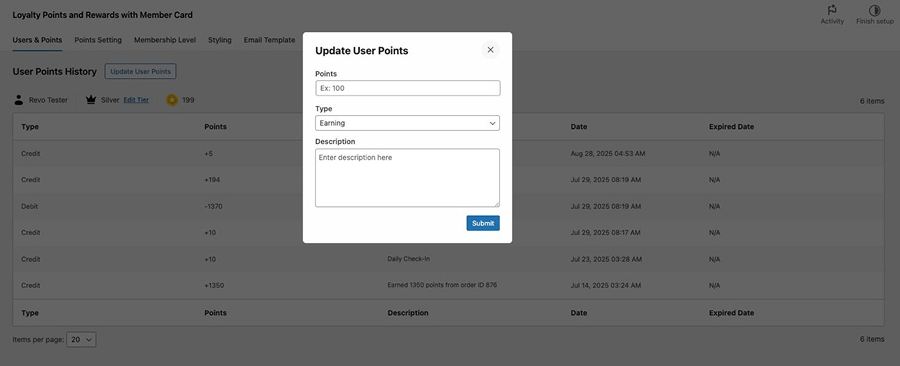
Update User’s Points
↑ Back to top- Log in to your WordPress admin dashboard.
- Go to: Loyalty Points and Rewards with Member Card Admin Dashboard > Users & Points Settings > Manage User
- Select Update User Points
- Enter how much points you want to update > select type > enter the description
- Select Submit
Edit Membership Tiers
↑ Back to top- Log in to your WordPress admin dashboard.
- Go to: Loyalty Points and Rewards with Member Card Admin Dashboard > Users & Points Settings > Manage User
- Select Edit Tiers
- Select Change Tier To > Add Notes (Optional)
- Select Save Changes. All changes will shown on Recent History

Points Setting
↑ Back to topOverview
↑ Back to topPoints Settings Menu allow the store admin to define how the entire points and rewards system functions across the WooCommerce store. To access this page, follow the steps below:
- Log in to your WordPress admin dashboard.
- Go to: Loyalty Points and Rewards with Member Card Admin Dashboard > Points Settings
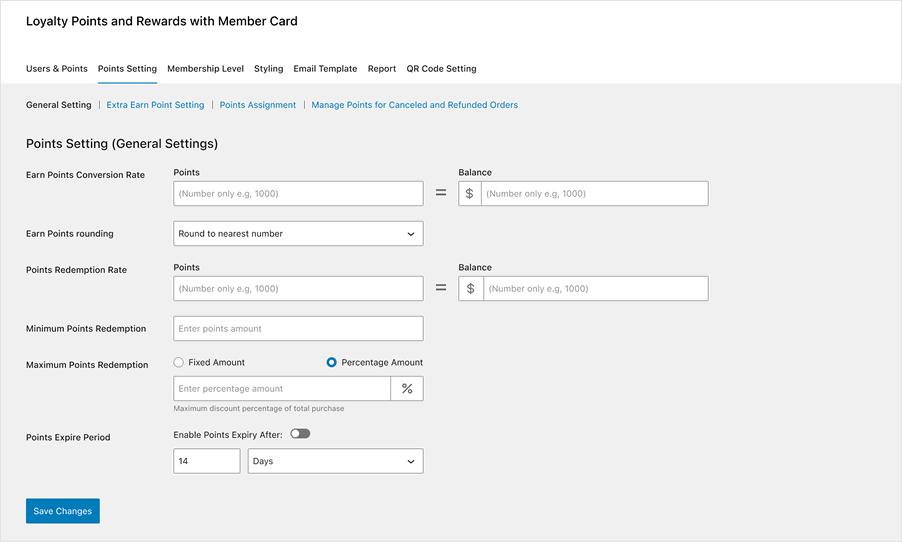
General Points Settings
↑ Back to topThis section controls the global earning and redemption logic of your rewards system. Here, the admin can define how customers earn and spend points.
- Earn Points Conversion Rate
- Set how much money customers must spend to earn points (e.g., earn 1 point for every $10 spent).
- Earn Points Rounding
- Choose how to round the points calculation (round up, down, or to the nearest).
- Points Redemption Rate
- Determine the value of each point when redeemed (e.g., 1 point = $0.05).
- Minimum Discount
- Set the minimum discount value a customer must apply in order to redeem points.
- Maximum Discount
- Set the maximum total discount that can be applied per transaction using points.
- Points Expiration Period
- Automatically set the expire of user’s points after a defined number of days, months, week or year. The expiration period begins when the points are granted to the user.
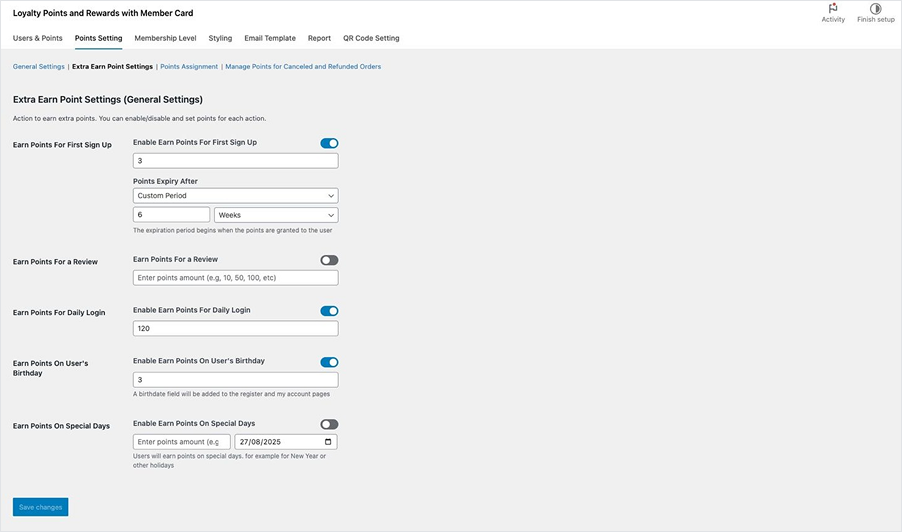
Extra Earn Point Settings
↑ Back to topThis section enables you to offer bonus points for specific user actions beyond purchases, helping you drive more engagement and retention.
- Earn Points for Sign Up
- Reward new users with welcome points upon registration.
- Earn Points from Review
- Incentivize product reviews with bonus points.
- Earn Points for Daily Login
- Encourage consistent engagement by rewarding users for logging in daily.
- Earn Points on User’s Birthday
- Automatically send birthday points to customers, creating a personal and memorable experience.
- Earn Points on Special Events
- Assign extra points for promotions such as holidays, anniversaries, or flash sales. You can set the date automatically.
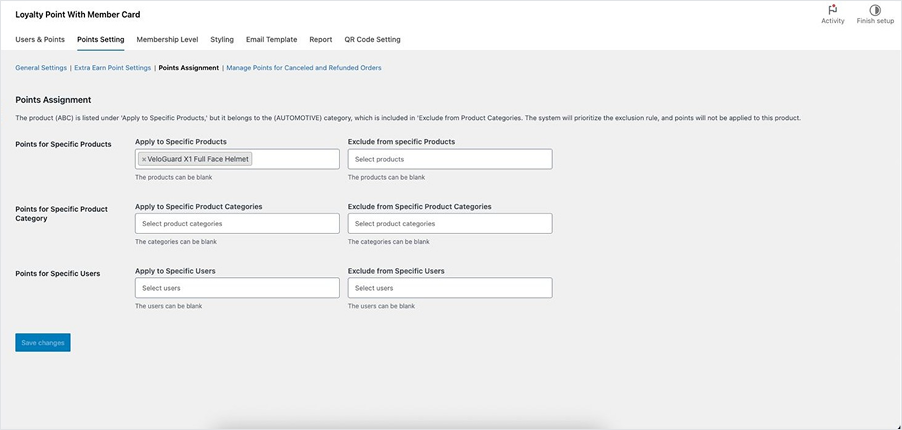
Points Assignment Settings
↑ Back to topTarget specific users, products, or categories with customized point offers. This setting allows you to implement personalized or promotional point strategies.
- Points for Specific Products
- Assign custom earning rates for individual products (e.g., double points on high-margin items).
- Points for Specific Product Categories
- Set category-wide point rules (great for promoting specific collections).
- Points for Specific Users
- Offer exclusive points to specific users like VIPs, influencers, or users with special privileges.
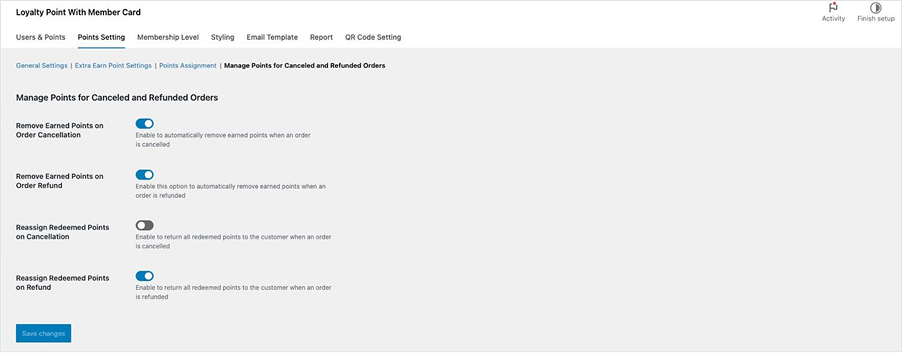
Manage Points for Canceled & Refunded Orders
↑ Back to topAutomate how your system responds when an order is canceled or refunded to maintain reward system integrity.
- Remove Earned Points on Order Cancellation
- Automatically deduct earned points from canceled orders.
- Remove Earned Points on Refund
- Revoke points if a customer is refunded after receiving them.
- Reassign Redeemed Points on Cancellation
- Return redeemed points back to the user’s balance if the order is canceled.
- Reassign Redeemed Points on Refund
- Restore used points when the customer receives a refund.
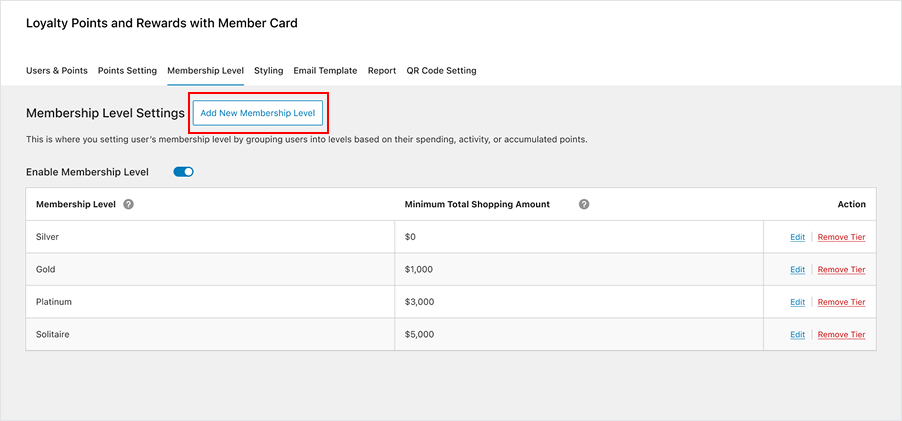
Membership Tiers
↑ Back to topOverview
↑ Back to topThe Membership Tiers Settings section allows you to create a powerful, tiered loyalty system that motivates customers to engage more with your store. By grouping
users into levels based on their spending, activity, or accumulated points, you can deliver exclusive rewards, better benefits, and a sense of achievement—all of
which increase retention and repeat purchases.
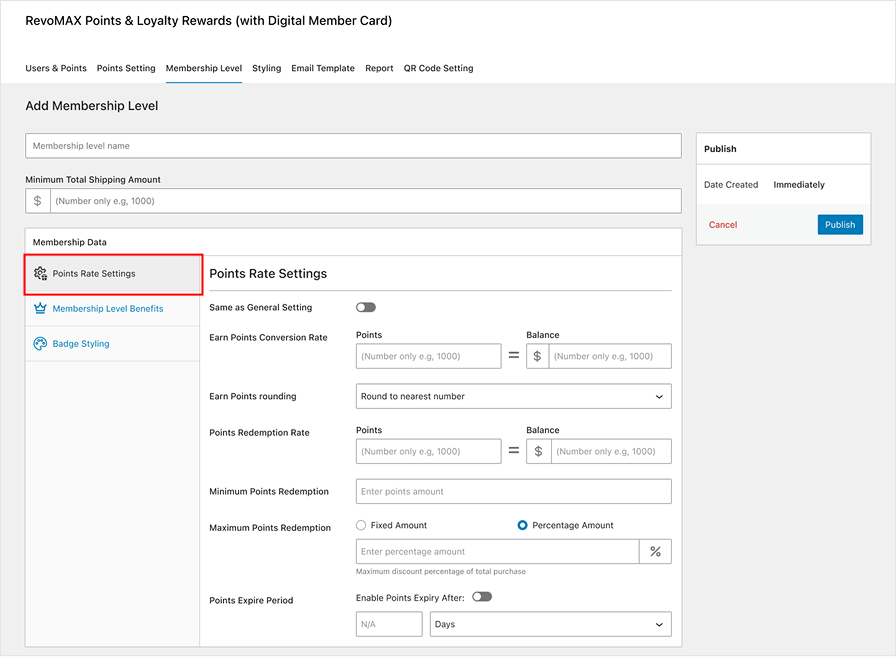
Add Membership Tiers
↑ Back to topTo add new membership tiers, follow the steps below:
- Log in to your WordPress admin dashboard.
- Go to: Loyalty Points and Rewards with Member Card Admin Dashboard > Membership Tiers
- Select Add New Membership
- Enter the Membership Level Name and Minimum Total Order Amount
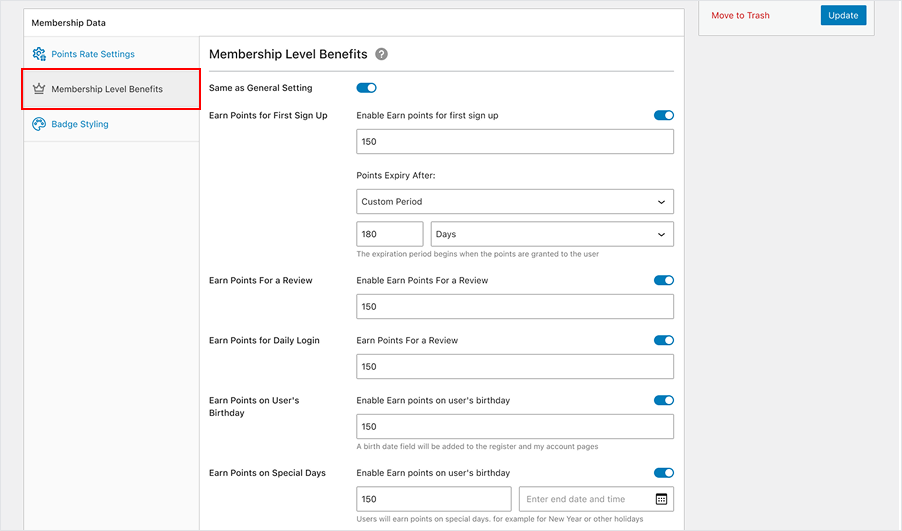
Setting Membership Level
↑ Back to topTo set points rate in each membership tiers, follow the steps below:
- Go to: Loyalty Points and Rewards with Member Card Admin Dashboard > Membership Tiers > Select Setting Tiers.
- Setting the Points Rate. Enable the “Same as General Setting” if you have the same settings as the general settings.
Styling
↑ Back to topOverview
↑ Back to topThe Styling section allows store owners to visually align the entire loyalty experience—from digital membership cards to pop-up messages and badges, so that it fits
seamlessly with the store’s identity. With this section, admins can fully brand and personalize the visual elements that customers interact with while earning or
spending points.
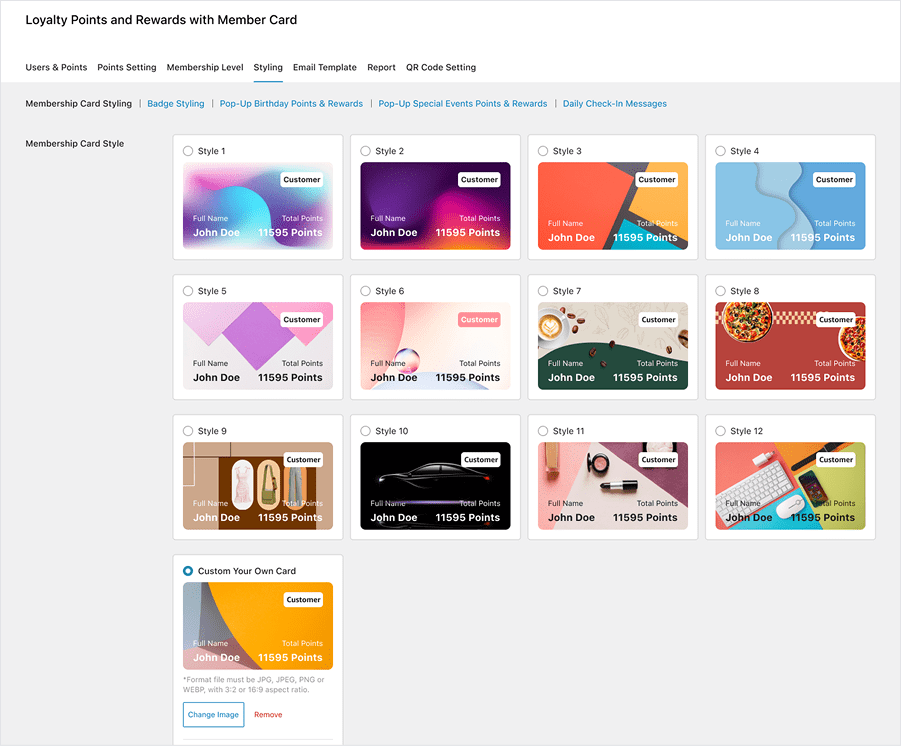
Membership Card Style
↑ Back to topThere are 12 ready-to-use membership card templates design that fits your business.
How To Custom Your Own Membership Card
- Log in to your WordPress admin dashboard.
- Go to: Loyalty Points and Rewards with Member Card Admin Dashboard > Styling
- Select Custom Your Own Card
- Upload your image
- Choose Text Color
- Select Save Changes
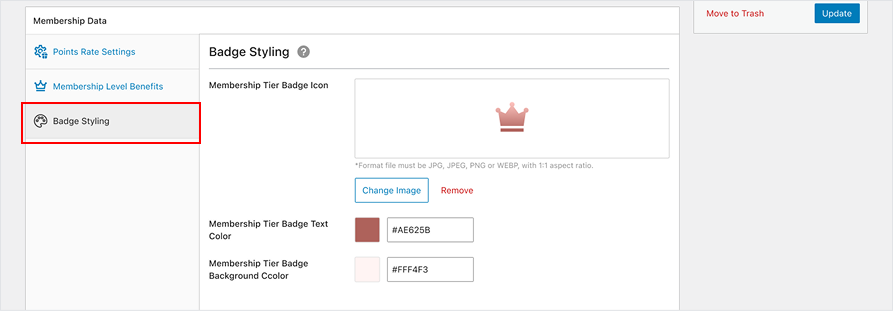
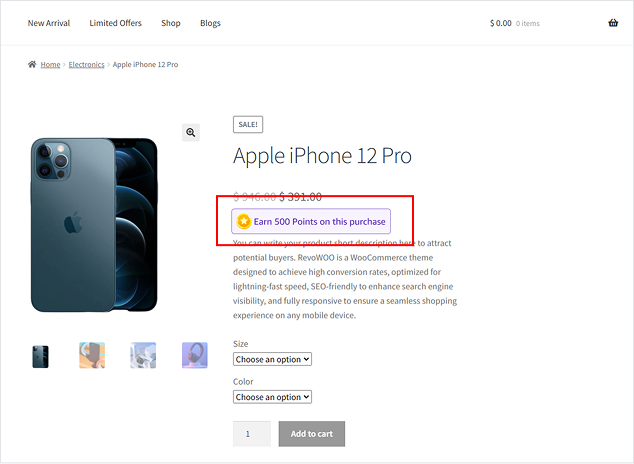
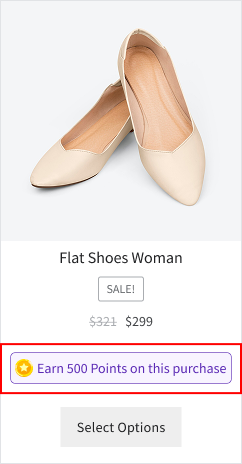
Customize Points & Reward Badge
↑ Back to topMake your point system visually noticeable with eye-catching reward badges. The badge will shown on product card and product detailed page
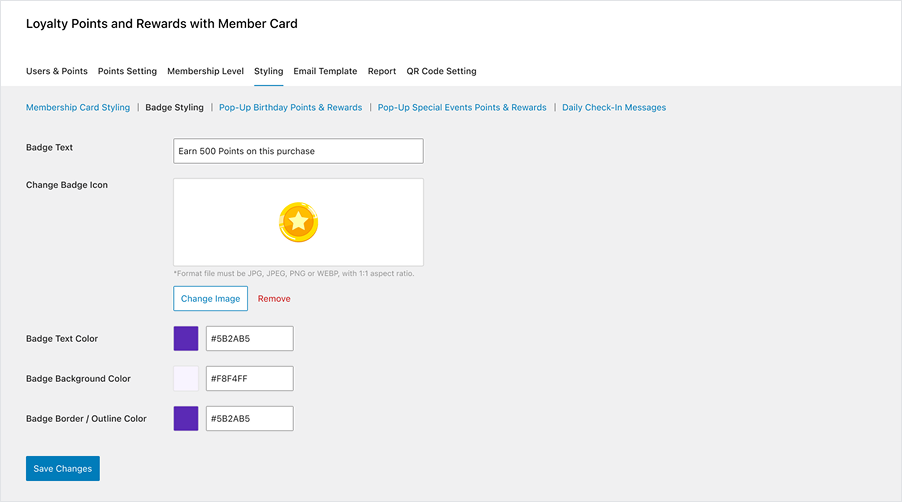
How To Customize Points & Reward Badge
- Log in to your WordPress admin dashboard.
- Goto: Loyalty Points and Rewards with Member Card Admin Dashboard > Styling > Points & Reward Badge Styling
- Enter Text for Single Product Points & Reward Badge
- Enter Text for Variable Product Points & Reward Badge
- Change Points & Reward Badge Text Color
- Change Points & Reward Badge Background Color
- Change Points & Reward Badge Border/Outline Color
- Change Points & Reward Badge Icon
- Select Save Changes
Customize Pop-Up Birthday Points & Rewards
↑ Back to topCelebrate your users’ birthdays with style! Personalized birthday experiences boost customer satisfaction and remind users that your brand sees them as individuals
—not just buyers.
How To Customize Pop-Up Birthday Points & Rewards
- Log in to your WordPress admin dashboard.
- Go to: Loyalty Points and Rewards with Member Card Admin Dashboard > Styling > Pop-Up Birthday Points & Rewards
- Enter Pop-Up Title
- Enter the Pop-Up Messages
- Change the Button Text
- Change Image Banner (default / upload image)
- Select Save Changes

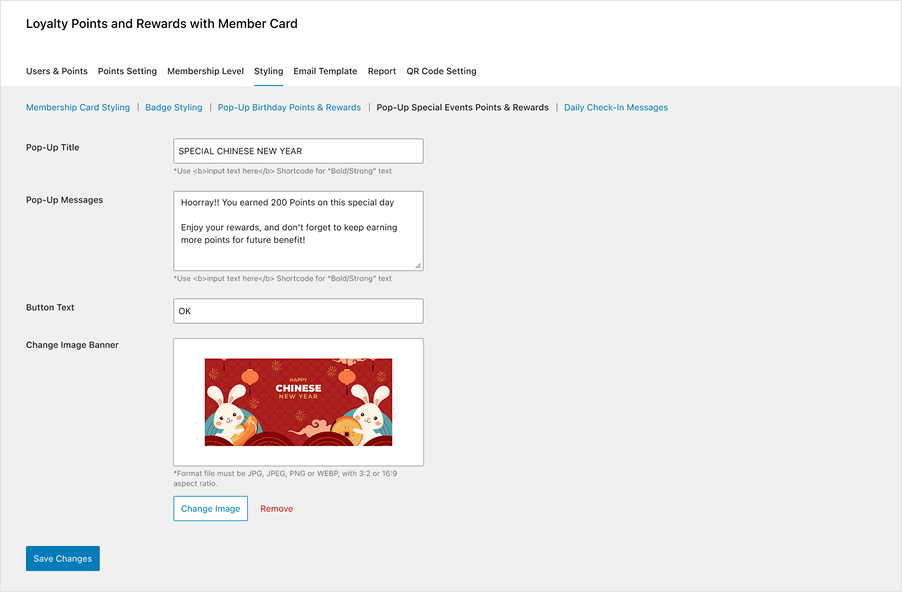
Customize Pop-Up Special Events Points & Rewards
↑ Back to topMake seasonal campaigns, store anniversaries, or flash reward events visually impactful. Visually festive pop-ups increase campaign participation and drive quick
conversions.
How To Customize Pop-Up Special Events Points & Rewards
- Log in to your WordPress admin dashboard.
- Go to: Loyalty Points and Rewards with Member Card Admin Dashboard > Styling > Pop-Up Special Events Points & Rewards
- Enter Pop-Up Title
- Enter the Pop-Up Messages
- Change the Button Text
- Change Image Banner
- Select Save Changes
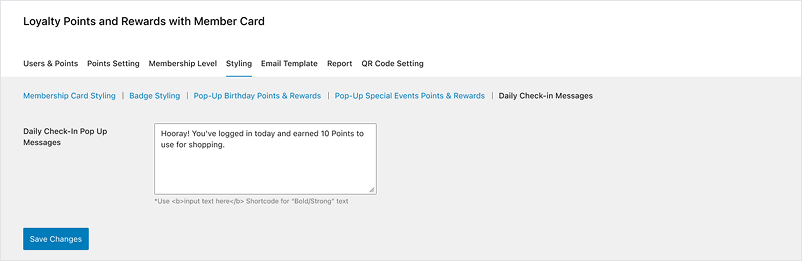
Customize Daily Check-in Messages
↑ Back to topEncourage consistent user engagement through polished check-in visuals. A visually clean and attractive check-in system builds habit-forming interaction with your
brand, which leads to higher loyalty and more frequent purchases.
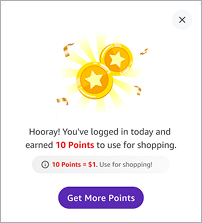
How To Customize Pop-Up Daily Check-in Messages
- Log in to your WordPress admin dashboard.
- Go to: Loyalty Points and Rewards with Member Card Admin Dashboard > Styling > Daily Check-in Messages
- Enter Daily Check-In Pop Up Messages
- Select Save Changes
Email Template Settings
↑ Back to topOverview
↑ Back to topThe Email Template Settings section gives store owners full control over how loyalty-related emails are crafted, styled, and delivered—ensuring every message feels
on-brand, professional, and personal. From welcoming new members to notifying customers of expiring points or tier upgrades, email notifications play a vital role in
building excitement, reinforcing value, and keeping your users active and informed.
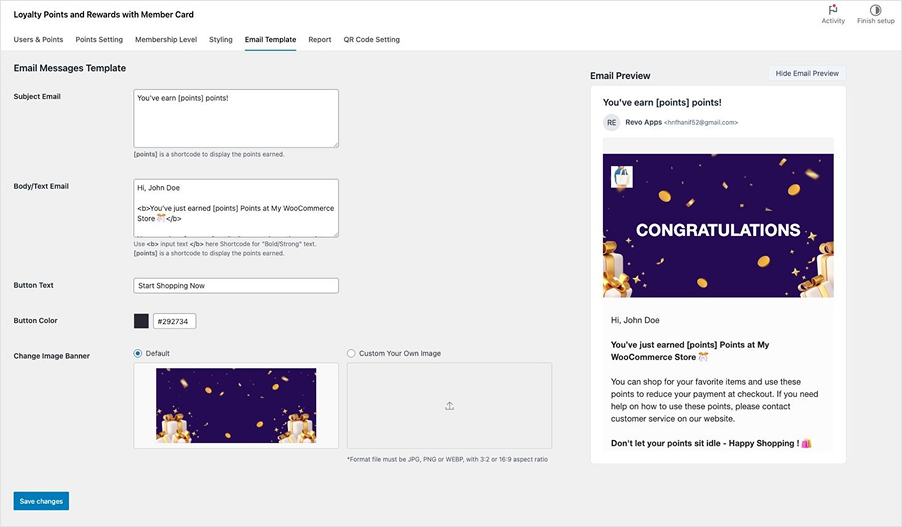
Customize The Email Template
↑ Back to top- Log in to your WordPress admin dashboard.
- Go to: Loyalty Points and Rewards with Member Card Admin Dashboard > Email Template
- Enter the Subject of Email
- Enter the Body/Text Email
- Enter the Button Text (CTA Button)
- Change the Button Color
- Change Image Banner (Default / Upload Image)
- Select Preview Email to make sure your email template is correct
- Select Save Changes
Reports Settings
↑ Back to topOverview
↑ Back to topThe Report Settings section allows store admins with an intuitive overview of how their loyalty program is performing. Designed to help optimizing your rewards
strategy, identifying your most loyal customers, or trying to minimize point expiration losses. This section display highest points, lowest points and almost expired
points from all your customers.
Highest Points
↑ Back to topGet a quick view of customers who currently hold the highest point balances. These users are your most engaged shoppers and potentially your most valuable. This
data can guide you to:
- Reward them with special offers
- Target them for exclusive campaigns
- Encourage them to redeem points before expiry
To access this page, follow this steps below:
- Log in to your WordPress admin dashboard.
- Go to: Loyalty Points and Rewards with Member Card Admin Dashboard > Reports.
- Select Highest Points.
- You can also search user by name or username.

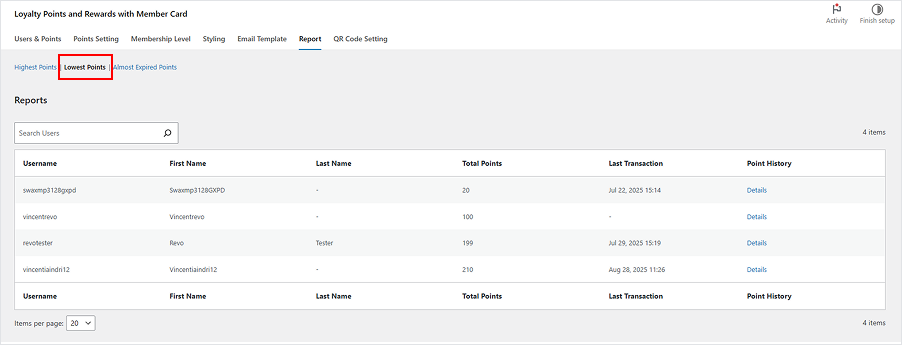
Lowest Points
↑ Back to topIdentify users with very low point balances either because they don’t shop often or haven’t engaged with the program. This data can guide you to:
- Launch reactivation campaigns
- Offer incentives to boost engagement
- Understand drop-off points in user behavior
To access this page, follow this steps below:
- Log in to your WordPress admin dashboard.
- Go to: Loyalty Points and Rewards with Member Card Admin Dashboard > Reports
- Select Lowest Points
- You can also search user by name or username
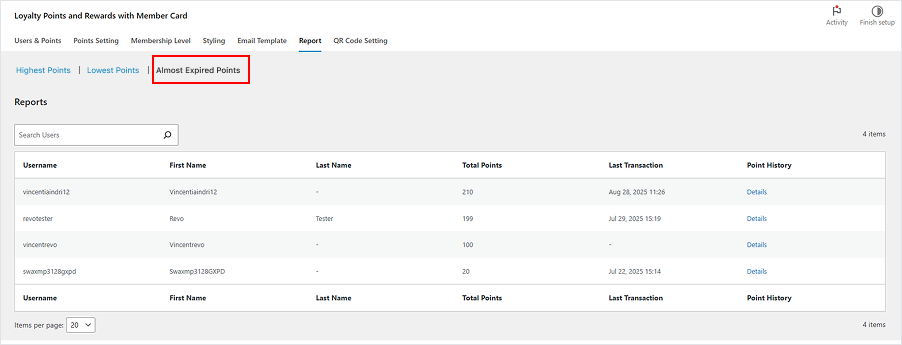
Almost Expired Points
↑ Back to topIdentify a list of customers whose points are about to expire soon. This data can guide you to:
- Sending reminder emails (manually or via email template)
- Reducing unused points
- Driving last-minute redemptions to boost sales
To access this page, follow this steps below:
- Log in to your WordPress admin dashboard.
- Go to: Loyalty Points and Rewards with Member Card Admin Dashboard > Reports
- Select Almost Expired Points
- You can also search user by name or username
QR Code Setting
↑ Back to topOverview
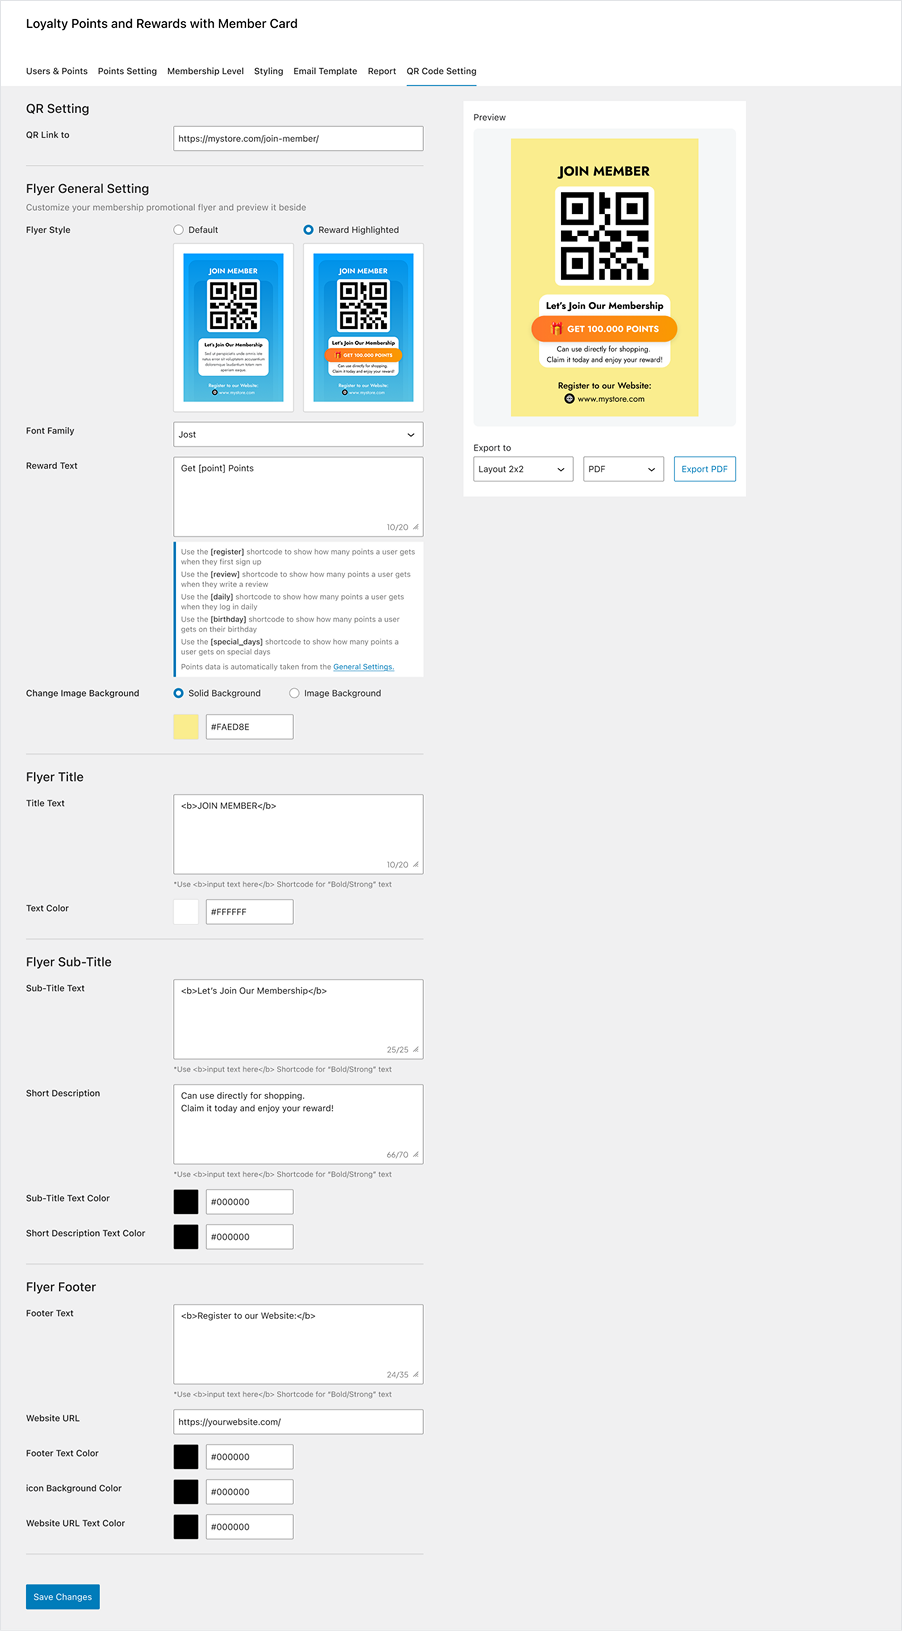
↑ Back to topPromote your loyalty program offline. QR codes make it easy for customers to join instantly. You can fully customize design stickers/flyers with a QR code linked to the membership registration page. Customers simply scan the code to sign up or log in to their account.
How to Customize Stickers/Flyers with QR Code
↑ Back to top- Log in to your WordPress admin dashboard.
- Go to: Loyalty Points and Rewards with Member Card Admin Dashboard > QR Code Setting
- Enter the QR Link
- Customize the flyer. Choose the Flyer Style > Default / Reward Highlighted
- Choose the Font Family
- Enter the short description te xt
- Change Image Background (Solid Color / Upload Image)
- Customize the title: Flyer Title > Change Title Text Color
- Customize the sub-title: Flyer Sub-Title > Change Sub-Title Text Color > Change Short Description Text Color
- Customize the footer: Flyer Footer > Enter Website URL > Change Footer Text Color > Change Icon Background Color > Change Website URL Text Color
- See the pre view beside setting to make sure all your changes is fit to your needs
- Select Save Changes
FAQs
↑ Back to top
Do you provide support?
Yes. We provide technical assistance via email or WhatsApp. Our team usually responds within 24–72 hours. Our working hours are Monday to Friday, 09:00–16:00 (GMT+7 / Indonesia time).
What are the benefits of using this extension?
You can quickly boost your sales and maintain customer loyalty, encouraging them to keep shopping on your site.
Is this extension easy to use?
Yes. We designed the UI/UX to be simple and intuitive, so you don’t need any learning curve. Everything works with easy drag‑and‑drop functionality.
Do you have documentation in PDF format?
Absolutely. If you need the documentation in PDF format, simply contact us after your purchase and we’ll send it to you.