My Account Tour addon allows your WooCommerce store to add a guided onboarding and product-education tool designed specifically for the WooCommerce My Account area.
It helps store owners walk customers through their my-account dashboard, explain key features, and reduce support requests, all through an interactive step-by-step tour.
My Account Tour not only improves onboarding for end-users, it also allows plugin authors, agencies, and eCommerce service providers to build guided experiences for their own My Account pages, helping store owners understand value faster and make fewer mistakes.
Installation
↑ Back to topTo start using a product from WooCommerce.com, you can use the “Add to store” functionality on the order confirmation page or the My subscriptions section in your account.
- Navigate to My subscriptions.
- Find the Add to store button next to the product you’re planning to install.
- Follow the instructions on the screen, and the product will be automatically added to your store.
Alternative options and more information at:
Managing WooCommerce.com subscriptions.

Setup and Configuration
↑ Back to topGetting started
↑ Back to topTo set up your store with My Account Tour plugin:
- Go to: WooCommerce > Settings > My Account Tour.
- To enable tours on endpoints, tick the associated checkboxes.
- Save changes.
- Visit My Account Page
/my-account/ - When an enabled endpoint is opened (Ex: Dashboard), you will see a:
Start Tour button. Click it to start the guided onboarding experience.
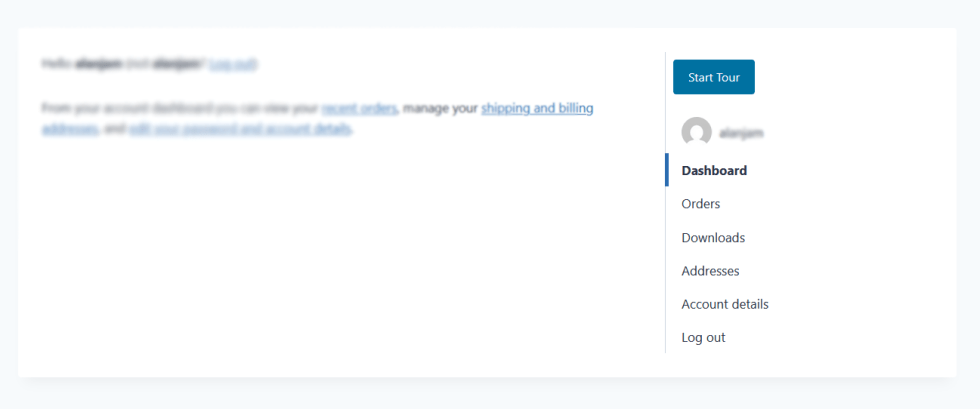
Only enabled sections will show the “Start Tour” button on the My Account page.
This plugin is plug-and-play. Simply install and activate it – choose the end-points where you want the tour to be displayed, with no additional configuration required.
Advanced configuration
↑ Back to topYou can enable tours for core WooCommerce sections like Dashboard, Orders, Downloads, Addresses, Account Settings, and if installed, WooCommerce Subscriptions pages.
General Setting
↑ Back to top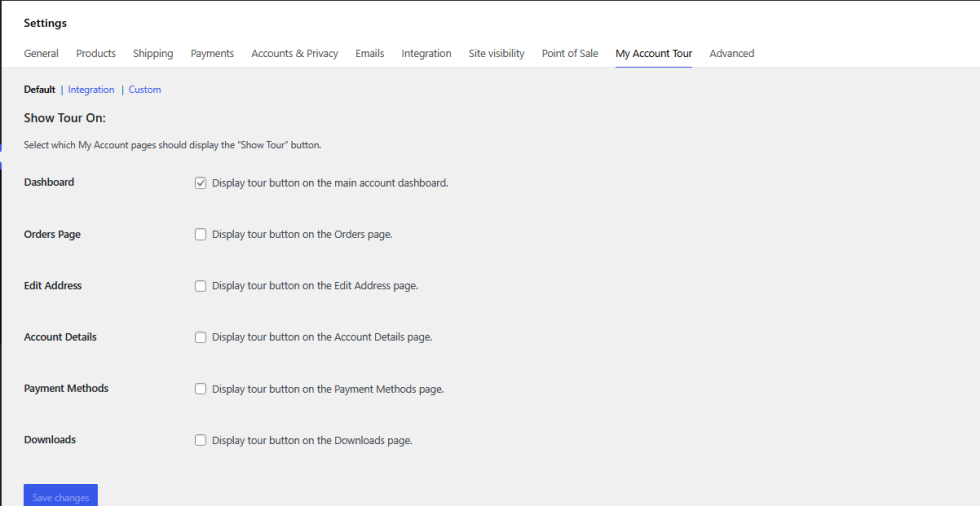
This is where you manage all tour settings and enable tours for supported account sections. Admin can control, on which end points the tour should be shown.
This settings panel is divided into three sections:
| Section | Purpose |
|---|---|
| Default | Enable tours for core WooCommerce My Account endpoints |
| Integration | Enable tours for plugins that we officially support (example: WooCommerce Subscriptions) |
| Custom | Area where 3rd-party plugin developers add options to show their tour checkbox. |
| New Section (Dynamic Sections) | For 3rd-party developers who need full modular control, including creating their own sub-sections. Note: This section is not available when you install the plugin. Will only display if an 3rd party dev, manually create it. |
This plugin is designed to be modular and extensible, meaning developers can easily add tours for custom My Account endpoints or third-party extensions. For example, support plugins, LMS platforms, subscription add-ons, and wallet systems can guide users through their dashboards in a structured, intuitive way.
Adding Tours to Custom EndPoints
↑ Back to topYou can extend My Account Tour for WooCommerce to support any custom My Account endpoint, including endpoints added by your plugins, themes, or custom code.
This guide explains how to create your own integration the correct way.
Important:
Always add the tour integration as a separate addon plugin.
We assume that
- You already created a custom My Account endpoint.
- You are familiar with basic plugin creation in WordPress. (Do follow the best security practices when creating a plugin for WordPress and WooCommerce)
- You’ve installed and activated the My Account Tour Plugin
Your addon must have at minimum:
- {file-name}.php (main PHP plugin file)
- {your-endpoint}.js (tour script)
- languages/ {file-name.pot}
The following example is supposed to work for an endpoint ‘tinywp‘. You should modify the codes to reflect your endpoint.
Step 1 – Add Admin Setting to Enable/Disable Tour
add_filter( 'pimat_myaccount_tour_custom_fields', function( $settings ) {
    $settings[] = [
        'name'    => __( 'Enable TinyWP Tour', 'text-domain' ),
        'type'    => 'checkbox',
        'id'      => 'pimat_myaccount_tour_enable_tinywp',
        'desc'    => __( 'Show tour button on TinyWP page.', 'text-domain' ),
        'default' => 'no',
    ];

    return $settings;
});

add_filter( 'pimat_myaccount_tour_custom_option_keys', function( $keys ) {
    $keys[] = 'pimat_myaccount_tour_enable_tinywp';
    return $keys;
});
The above code will add a new checkbox in the admin setting page under the “Custom” Section.
Step 2 – Register Your Tour Script With the Plugin
add_filter( 'pimat_myaccount_tour_registered_scripts', function( $scripts ) {
    $scripts['tinywp'] = [
        'file'     => 'assets/js/tinywp.js', // ← This should be your JS file location
        'option'   => 'pimat_myaccount_tour_enable_tinywp', // setting key as saved in step 1
        'function' => 'pimatStartTinyWPTour', // ← your JS function name
    ];

    return $scripts;
});
Step 3 – Show Start Tour Button Only on Your Endpoint
add_action( 'woocommerce_before_account_navigation', function() {
    if ( ! is_account_page() ) return;

    global $wp_query;
    if ( ! isset( $wp_query->query_vars['tinywp'] ) ) return;

    if ( 'yes' !== get_option( 'pimat_myaccount_tour_enable_tinywp' ) ) return;

    do_action( 'pimat_render_start_tour_button' );
});
If enabled, this code will display ‘Start Tour’ button for the specific endpoint.
Step 4 -Load the JS File Only on Your Endpoint
add_action( 'wp_enqueue_scripts', function() {
    if ( ! is_account_page() ) return;

    global $wp_query;
    if ( ! isset( $wp_query->query_vars['tinywp'] ) ) return;

    if ( 'yes' !== get_option( 'pimat_myaccount_tour_enable_tinywp' ) ) return;

    wp_enqueue_script(
        'tinywp-tour',
        plugin_dir_url( __FILE__ ) . 'assets/js/tinywp.js',
        [ 'jquery', 'wp-i18n' ],
        filemtime( plugin_dir_path( __FILE__ ) . 'assets/js/tinywp.js' ),
        true
    );

wp_set_script_translations( 'tinywp-tour', 'text-domain', plugin_dir_path( __FILE__ ) . 'languages' );  // Add this to make sure your Tour content is also translation ready. Do not remove this even if you plugin doesn't support translation.


    wp_localize_script( 'tinywp-tour', 'pimatTourData', [
        'endpoint' => 'tinywp',
        'function' => 'pimatStartTinyWPTour', // your JS function name, same as that in Step 2
    ]);
});
The modular design makes sure, the JS is loaded only for the specific endpoint.
Step 5 – Create Your Tour JS File
Important
- The file name and path MUST match exactly what you registered in the
pimat_myaccount_tour_registered_scriptsfilter. [Step 2]- The function name in the script MUST match the
functionvalue you passed in the array.- This file should always support WordPress translations (
wp.i18n).
// Example: assets/js/tinywp.js
document.addEventListener('DOMContentLoaded', function () {

    // Required — enables translation support
    const { __ } = wp.i18n;  // For making the tour content translation ready . Add this even if you don't want translations
//console.log("File Located");

    function pimatStartTinyWPTour() {
//console.log("Function Discovered");
        const content = document.querySelector('.woocommerce-MyAccount-content');
        if (!content) {
            return;
        }

        setTimeout(() => {
            const driver = new Driver({
                allowClose: true,
                showButtons: true,
                keyboardControl: true,
                opacity: 0.75,
            });

            const steps = [];

            // Add your tour steps here using this format:
            // const element = content.querySelector('YOUR_SELECTOR');
            // if (element) { ... }

            if (steps.length > 0) {
                driver.defineSteps(steps);
                driver.start();
            }
        }, 100);
    }

    // Must expose the function to the global scope
    window.pimatStartTinyWPTour = pimatStartTinyWPTour;
});
Similarly, you can modify the the tours for default endpoints too. Refer the documentation to override the default my-account endpoints using a custom plugin. Refrain from, overwriting the JS file directly in the My Account Tour plugin.
Clicking the Start Tour button.
↑ Back to topFor every endpoint, where the checkbox is enabled in admin setting page, the Start Tour button is displayed. On clicking the ‘Start Tour‘ begins the tour for that specific endpoint. The tour is entirely dependant on how the JS file is designed.
The end-user can easily navigate within the tour using the Next and Previous button. Clicking on the close button, or anywhere outside the tour window, ends the tour.

Troubleshoot
↑ Back to topWhy tour button is not being displayed on selected endpoints?
As long as the Admin setting page has enabled for that specific endpoint, it’ll show the ‘Start Tour’ button. Once the user clicks on the start tour button, it’ll display the tour as structured in the JS code the specific endpoint.
Please note that the ‘Start Tour’ button will only appear if the woocommerce_before_account_navigation action hook exists in your My Account template. If your theme removes or overrides this hook, the button will not be displayed even when Admin setting has it enabled.
Why the custom endpoint tour data is not being translated?
The plugin is designed to be translation ready, so if the translation file exists for the particular language, it’ll be translated. If your endpoint file is not being translated, make sure the text-domain for custom endpoint plugin you installed, is same across the php file.
You also need to make sure the ‘My Account Tour for WooCommerce’ plugin also has a translation file in the language you need. The .po or .mo for the language should exist in the language folder, even though the file iteself is not completly translated.
There exists a ‘Show Tour’ button on my custom endpoint. But clicking on it loads the tour for dashboard endpoint.
This happens when the your custom-endpoint.js is not properly loaded on the my-account page. When your custom JS is not loaded, it loads the default dashboard.js file.
Make sure location of the JS file is correct in your php code.
FAQs
↑ Back to topHelp customers by answering commonly asked questions.
Will "Start Tour" button be displayed on all endpoints?
No. Start Tour button will be displayed only on endpoints that store owners have it enabled. This modular design makes sure, the JS file are not un-necessarily loaded on disabled endpoints.
Is it possible to create tours for custom my-account endpoints?
Yes. It is possible to create tours for your custom my-account endpoints. This plugin is designed with extensibilty in mind, making it support custom tours out of the box.