Installation
↑ Back to topTo start using a product from WooCommerce.com, you can use the “Add to store” functionality on the order confirmation page or the My subscriptions section in your account.
- Navigate to My subscriptions.
- Find the Add to store button next to the product you’re planning to install.
- Follow the instructions on the screen, and the product will be automatically added to your store.
Alternative options and more information at:
Managing WooCommerce.com subscriptions.

General Level Settings
↑ Back to topConfiguration
↑ Back to topAfter you have installed and activated the Plugin, Go to WooCommerce > Product Condition. Here you can create multiple rules for product conditions. You can also manage already created rules in this section.

To add a new rule, you need to configure the following:
- Rule Title: Set the title for the rule.

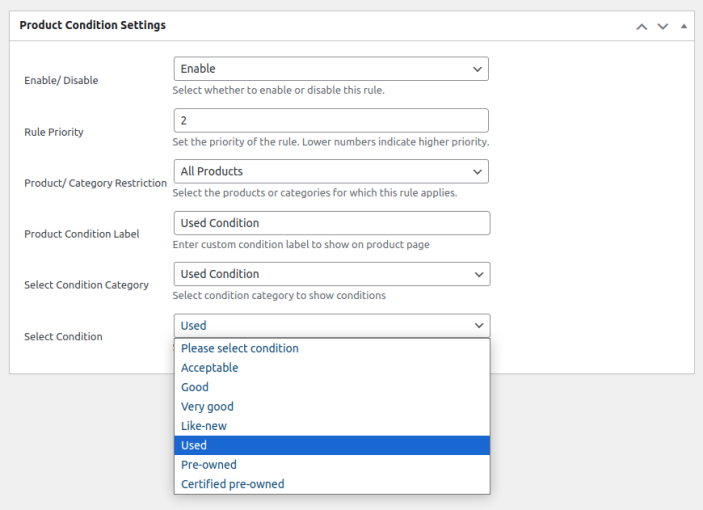
Product Condition Settings
↑ Back to top- Enable / Disable: Select whether to enable or disable this rule.
- Rule Priority: Set the priority of the rule. Lower numbers indicate higher priority.
- Product / Category Restriction: Select the products or categories for which this rule applies.
- Include / Exclude: Select whether to include or exclude the selected products/categories.
- Product Condition Label: Enter custom condition label to show on product page
- Select Condition Category: Select condition category to show conditions
- New Condition.
- Used Condition.
- Damage Condition.
- Refurbished Condition.
- Custom Condition.
- Select Condition: Select condition to show on product
- Acceptable
- Good
- Very Good
- Like-New
- Used
- Pre-owned
- Certified Pre-owned
Product Level Settings
↑ Back to topTwo types of settings at the product level.
- Multiple Product Selections:
Go to the Products tab in the WordPress dashboard in the sidebar. Here you can select multiple products by clicking on the checkbox, and above in the table, select edit in the drop-down bulk action, and click on the apply button. Here you can see on the right side, under the Product Data heading,g all options for product condition available; these are:
- Don’t Use Global Level Settings: Checkbox option to ignore global level settings for these products.
- Product Condition: Option to enable or disable product condition on product level
- Product Condition Label: Enter custom condition label to show on product page
- Select Condition Category: Select the condition category to show conditions
- Select Condition: Select condition to show on the product

- Single Product Edit:
For Single product settings, go to the Products tab in the WordPress dashboard and edit any product, then go to the Product Condition tab in the Product Data section. Here you can configure the following in the Product Condition tab:
- Don’t Use Global Level Settings: Checkbox option to ignore global level settings for these products.
- Product Condition: Option to enable or disable product condition on product level
- Product Condition Label: Enter custom condition label to show on product page
- Select Condition Category: Select the condition category to show conditions
- Select Condition: Select condition to show on the product
