
Thank you for choosing Essential Wishlist for your WooCommerce store! This documentation will guide you through installing and configuring the extension. You can use the menu on the right to navigate to different sections.
Installation
↑ Revenir en haut- Download the nm-woocommerce-wishlist.zip file from your WooCommerce account.
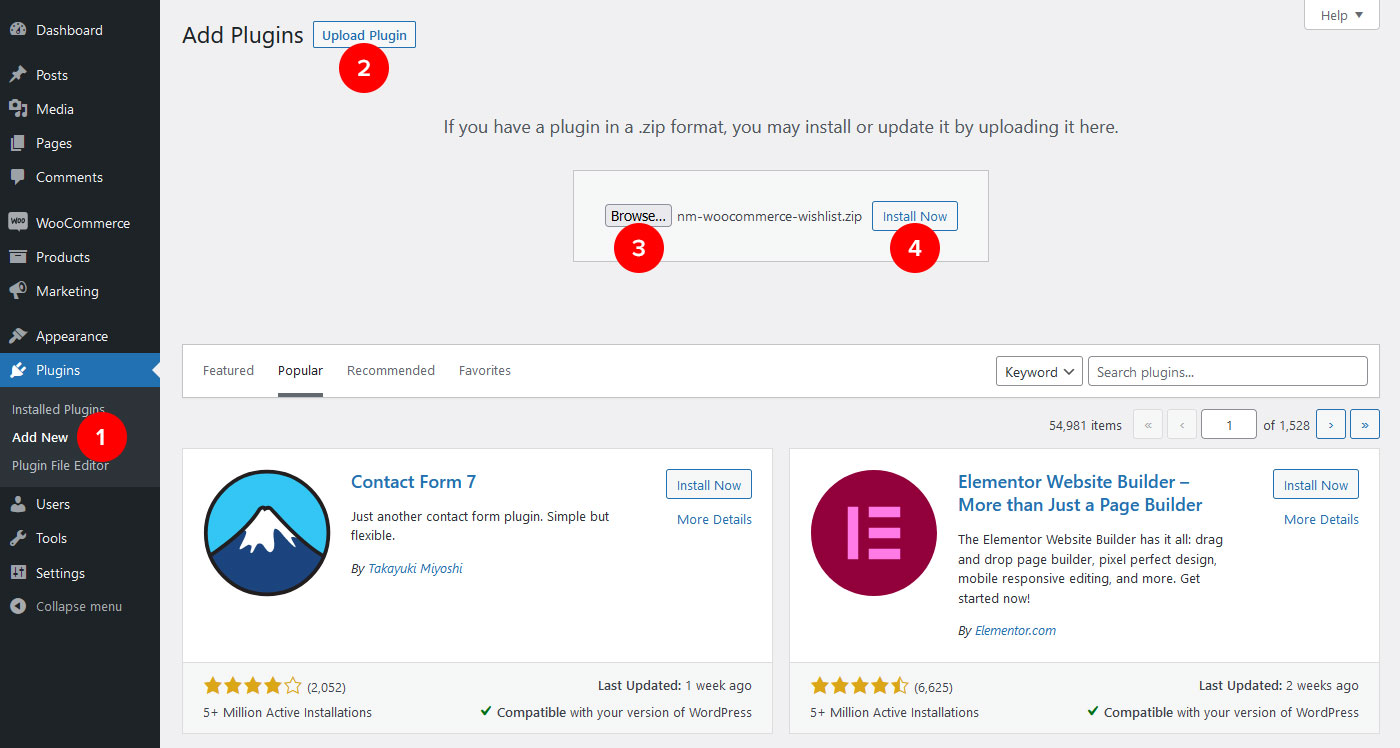
- Navigate to Plugins > Add New in the WordPress admin and select Upload Plugin.
- Click the “Browse” button and select the downloaded nm-woocommerce-wishlist.zip file on your computer.
- Click “Install Now” and activate the extension once the installation is complete.
More information at Install and Activate Plugins/Extensions.
Updates
↑ Revenir en hautConnect your site to its WooCommerce account to receive extension updates automatically via the WordPress admin. We recommend installing updates as soon as they become available.
Wishlist Page
↑ Revenir en hautIn addition to the side drawer/panel, a separate Wishlist overview page can be created using a WordPress shortcode. Follow the steps below to create it:
- Navigate to Pages > Add New in the WordPress admin.
- Enter a title for the page (for example, “Wishlist”) and then click the Publish button in the top-right corner.
- Click the “+” button below the page title, type “shortcode” into the search field and click the Shortcode block.
- Enter
[nmw_wishlist]into the Shortcode block’s text field. - Click the Update button in the top-right corner to update the page.
(see final step below image)
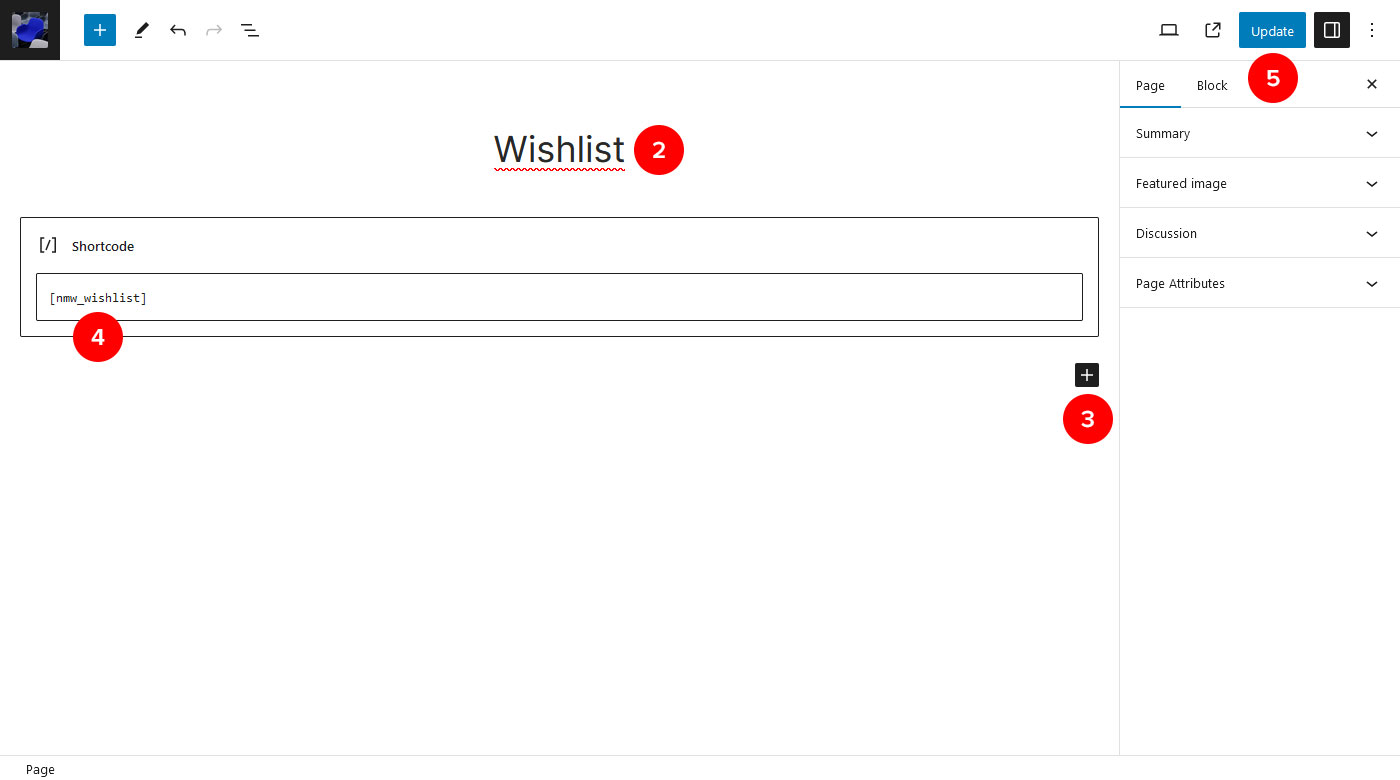
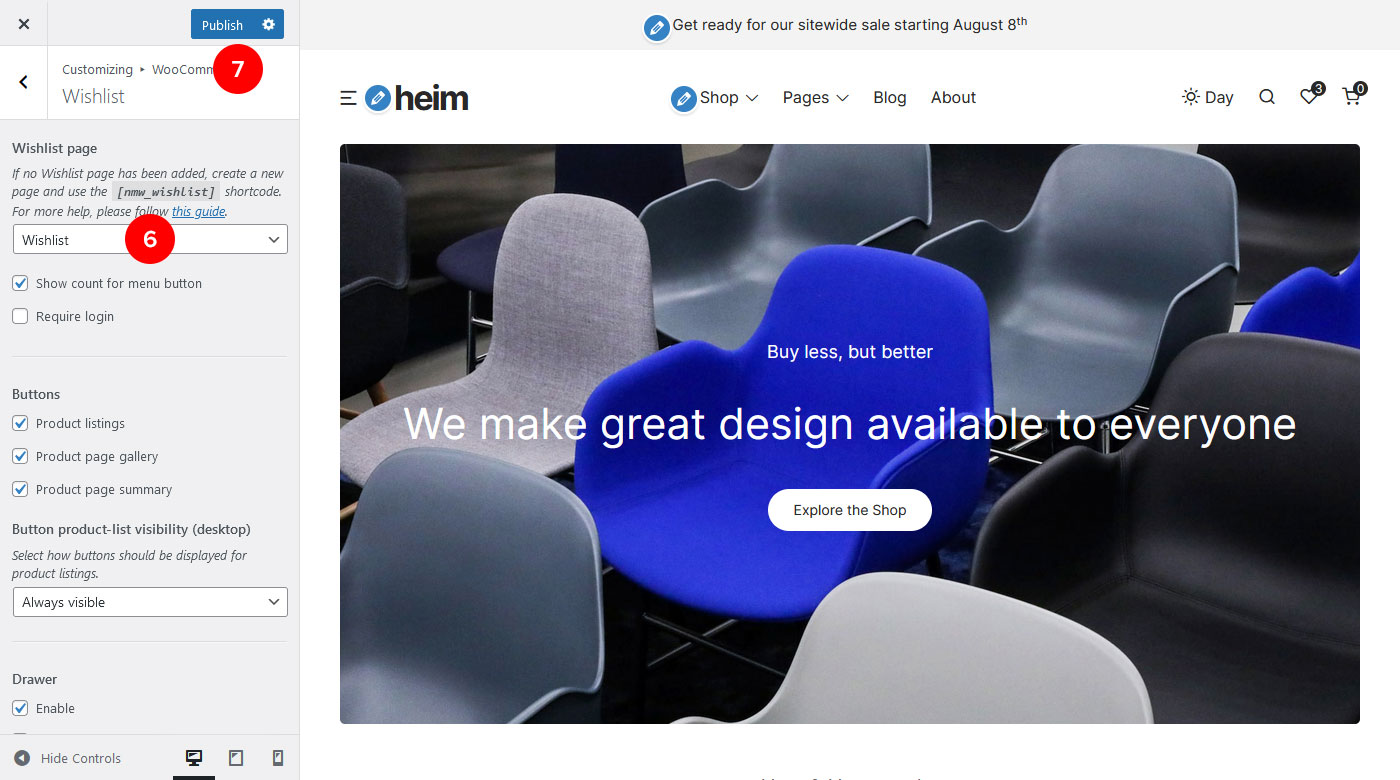
6. Finally, navigate to Appearance > Customize > WooCommerce > Wishlist in the WordPress admin and select the newly created page for the Wishlist Page setting.
Menu Link
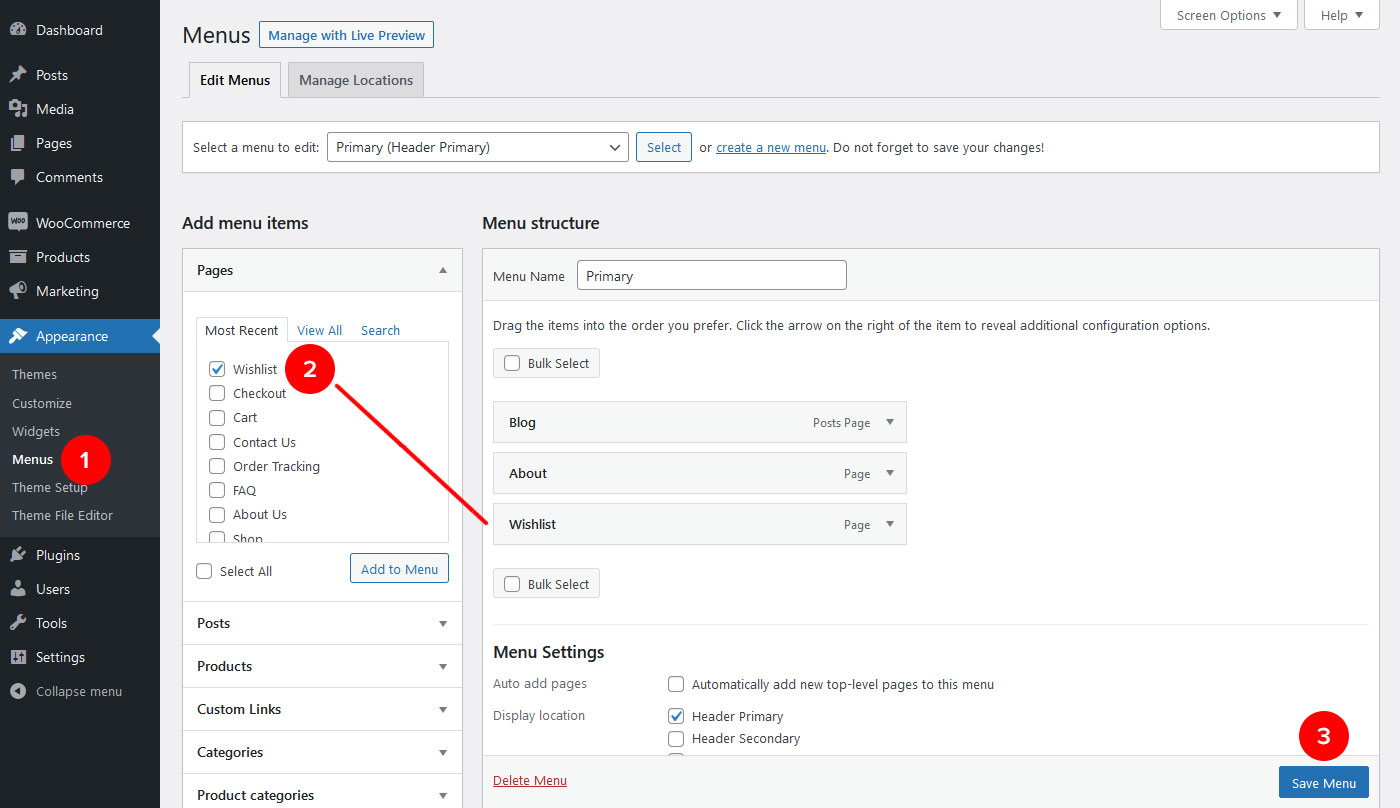
↑ Revenir en hautTo add a menu link for your Wishlist page (see the “Wishlist Page” guide directly above), navigate to Appearance > Menus in the WordPress admin and add your Wishlist page from the Pages section in the sidebar to your preferred menu:
Open Drawer Panel
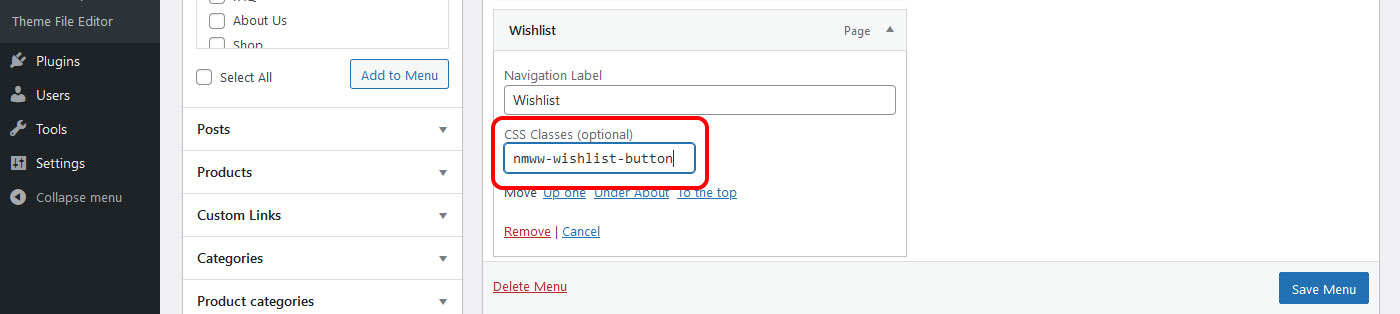
You can enter the class-name nmww-wishlist-button for the Wishlist menu-item’s CSS Classes field to make it open the Drawer panel when clicked:
Note: If the CSS Classes field is missing, click the Screen Options tab in the top-right corner of the page and check the CSS Classes option.
Customizer Options
↑ Revenir en hautThe extension’s customization options have been integrated with the WordPress Customizer and are available via Appearance > Customize > WooCommerce > Wishlist in the WordPress admin. Below is an overview of the various sections:
Missing an option?
If you’re missing an option, click the link below to send us a feature request, and we’ll take it into consideration.
Wishlist Page
↑ Revenir en hautThis is where you select the default Wishlist page (see the “Wishlist Page” section above), the following related options are also available:
- Menu Wishlist button/link: Show a count of how many items are added to the Wishlist.
- Require visitors to login before using the Wishlist.
Buttons
↑ Revenir en hautCustomize how the heart icon buttons for adding products to the Wishlist are displayed on your website.

- Display a button for product listings (like the WooCommerce shop catalog or specific Product Blocks).
- Display a button in the single product page gallery.
- Display a button in the single product page summary.
- Select how buttons should be displayed in product listings.
Drawer
↑ Revenir en hautConfigure the “drawer” panel that list products added to the Wishlist:
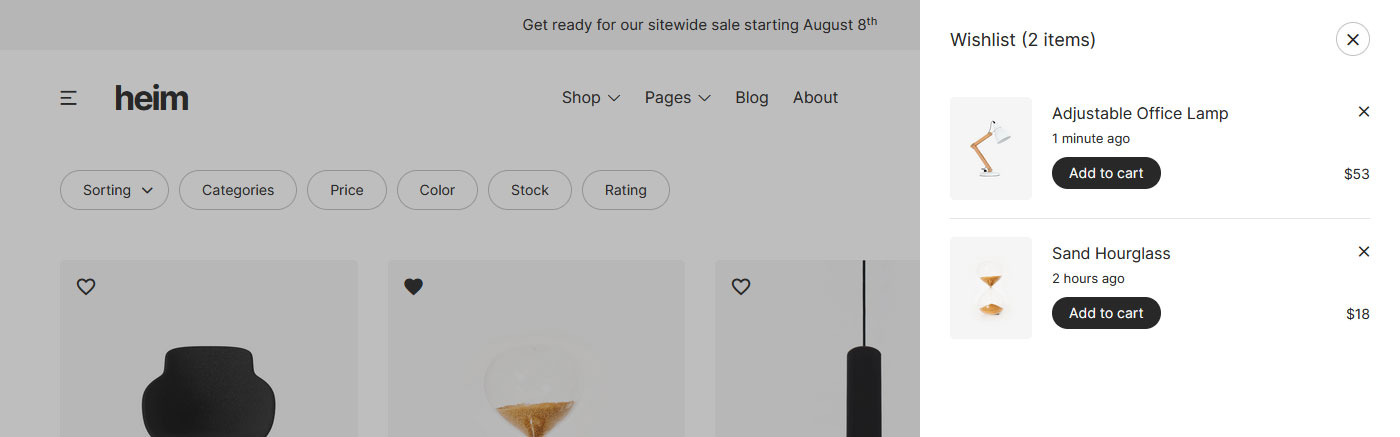
- Enable or disable the drawer panel.
- Choose if the drawer panel should open when adding a product to the Wishlist.
Sharing
↑ Revenir en hautEnter the content that should be displayed when someone shares your Wishlist from the main page:

- Enter a title. It’s recommended to include the name of your store in the title.
- Enter a general description for the Wishlist and/or your store.
- Add/upload a general image for the Wishlist and/or your store.
Note: Not all share buttons will use the options listed above.
Colors
↑ Revenir en hautSelect the colors that should be used for the heart-icon buttons and Wishlist:
- Buttons: Select a color for the various heart-icon buttons.
- Borders: Select a color for borders in the Wishlist.
- Foreground: Select a color for text/content in the Wishlist.
- Background: Select a color for the Wishlist background.
Support
↑ Revenir en hautNeed help?
If you still need help, click the link below to open a support ticket and we’ll get back to you as soon as possible:

