WooCommerce Role Based Discounts Plugin offers features for applying product-specific and customer-specific discounts, and simple or tiered pricing,. It includes scheduling options for automated discounts, inventory-based pricing adjustments, bulk price imports via CSV, customizable discount tables and offering a free shipping over certain cart value.
Additionally, it allows hiding prices or replacing the Add to Cart button with custom messages or a request-a-quote option.
Setup and Installation
↑ Back to top- Download the .zip file for Role Based Discounts for WooCommerce.
- Go to: WordPress Admin > Plugins > Add New to upload the file you downloaded with Choose File
- Now, Install and Activate the extension.
Configuration
↑ Back to topCreate New Price Rules
↑ Back to topNavigate to WooCommerce > Role Based Discount > Add Price Set
- Now, Add Title of the Price Rule
- In Customer field, you can select specific customers to apply the rule for
- In Customer Role, you can select the customer group like registered, not-logged in, wholesalers, VIP customers, etc
- Now, in Select Product, you can select the products to apply the role based pricing on.
- Select Category – Select your desired category to apply the role based pricing rule
- Tags – Apply the price rule to specific tags if you have any in your store

Note: You can also apply Role Based Discounts in Bulk. You just have to Select Products and Categories, and select specific user roles for which you want to apply pricing.
Schedule Discounts
↑ Back to topNavigate to WooCommerce > Role Based Discount > Add Price Set > and then Schedule Discounts & Pricing
Here, you can manage your promotional periods with ease by setting:
- Discount Start Date: Automatically activate price changes at the right time.
- Discount End Date: Ensure offers expire when intended.

Threshold Stock Amount
↑ Back to topSetting a threshold stock level will automatically disable discounts once your inventory dips below a specified amount.

Discount Types
↑ Back to topHere, you will find two type of discounts:
- Simple Discounts
- Tiered Pricing
1. Simple Discounts
In simple discounts, you can simply create discounts using percentage discounts or fixed discounts and apply it on above selected products, categories, and tags, including selected customer roles.

2. Tiered Pricing
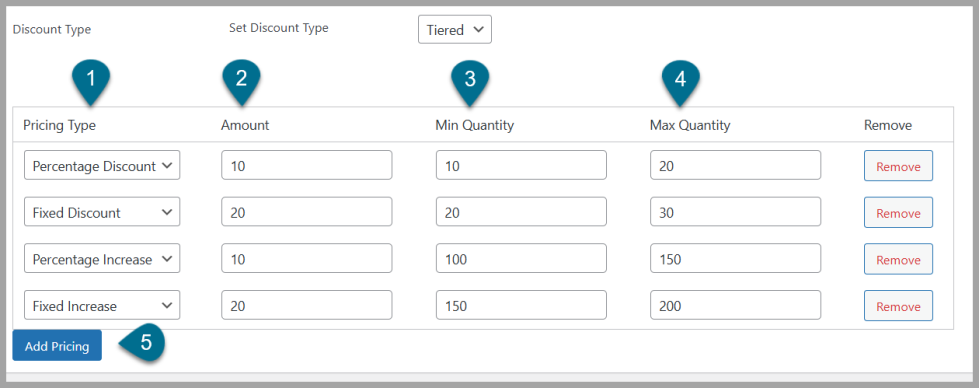
To create tiered pricing rules, go to WooCommerce > Role Based Discount and add a new price set. Select the Tiered discount type.
Here, you can set up bulk discounts or role based pricing for above selected user roles. You can also target specific products, categories, or tags for these discounts.
- Set Custom Prices: Apply a fixed price, or increase or decrease the price by a percentage or fixed amount.
- Amount: Specify the desired amount for the selected pricing type.
- Quantity-Based Pricing: Set minimum and maximum quantity thresholds to trigger specific pricing rules.
- Add Pricing: Add more pricing sets as much as you want. You can create multiple pricing rules to apply in your store. Once you’ve created the Price Sets , then
- Click on the Publish button to Save the Price Rules.

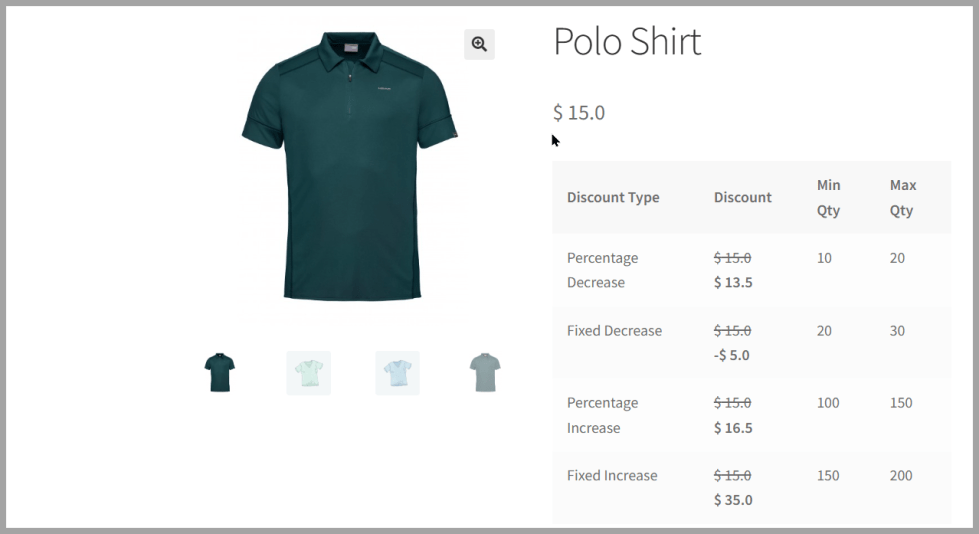
Discount Table
↑ Back to topNavigate to WooCommerce > Settings > Role Based Discount > And then General.
Here, you can enable the Discount table to display on the product page. You can also change the titles of discount table.

Discounted Price Criteria
↑ Back to topNavigate to WooCommerce > Settings > Role Based Discount > And then General. Here, you can choose to calculate discounts/surcharge based on
- Regular Price
- Sale Price
- Default Price

Hide Original (Strike-through) Price
↑ Back to topYou can hide the original (strike-through) price, and only the discounted price will be displayed on the frontend, including Product, Shop, Cart, and Checkout pages.
Navigate to WooCommerce > Settings > Role Based Discount > And then General. Here, you can check the Hide Strike-through Price option

Note: This change applies only to discounts created using this plugin. Any existing product sale prices will remain unaffected.
Hide Price and Add to Cart Button
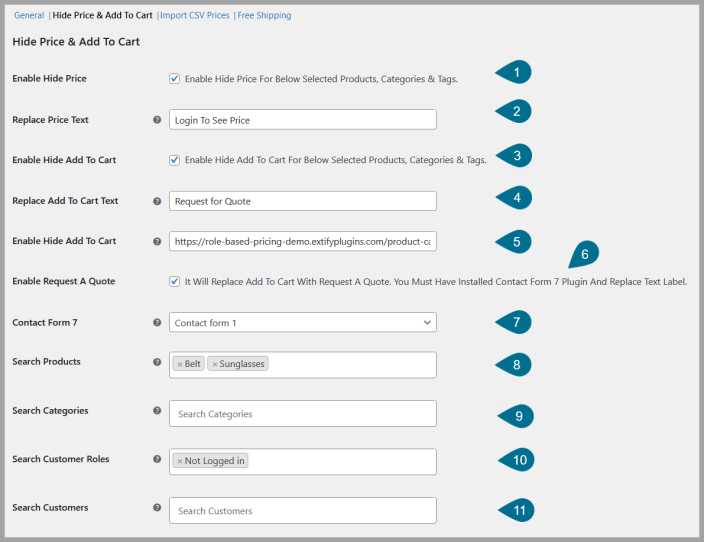
↑ Back to topIn WooCommerce > Settings > Role Based Discount > And then Hide Prices & Add to
Cart. Here, you can configure these settings.
- Enable Hide Price
- Replace Price Text
- Enable Hide Add to Cart
- Replace Add To Cart Text
- Hide Add To Cart Button Url
- Enable Request A Quote (It will replace Add To Cart button with request a quote. You must have installed Contact Form 7 plugin And replace text label.)
- Apply on Specific Products
- Apply on Specific Categories
- Apply on Specific Tags
- Apply to Specific Customer Roles
- Apply to Specific Customers

Offer Free Shipping as Discount
↑ Back to topGo to WooCommerce > Settings > Role Based Discount > And then Free Shipping.
Here, you can configure and offer offer free shipping when customers reach a specific cart total.
- Enable Free Shipping: Activate the free shipping feature
- Minimum Cart Amount: Enter minimum purchase amount required to qualify for free shipping.
- Maximum Cart Amount: Optionally set a maximum purchase amount to limit the free shipping offer.
- Message Before Free Shipping: Display a message to display before availing the free shipping award.
- Message After Free Shipping: Personalize the message that displays when customers meet the free shipping criteria.
Import CSV Prices
↑ Back to topNavigate to WooCommerce > Settings > Role Based Discount > And then Import CSV Prices.
Here, you can import pricing sets via CSV file. You can add in csv file and import the file in a single click. You can import:
- Price set title
- Product & category id
- Tag id
- Customer role
- Customer email
- Discount Type
- Discount Amount
- Minimum Quantity
- Maximum Quantity

