Installation
↑ Back to topTo start using a product from WooCommerce.com, you can use the “Add to store” functionality on the order confirmation page or the My subscriptions section in your account.
- Navigate to My subscriptions.
- Find the Add to store button next to the product you’re planning to install.
- Follow the instructions on the screen, and the product will be automatically added to your store.
Alternative options and more information at:
Managing WooCommerce.com subscriptions.

Initial Setup
↑ Back to topAfter activating the Store Wallet and Cashback extension, you can see Wallet & Cashback menu under WooCommerce. Click to open the extension settings and customer wallet details.
Manage Customer Wallets:
↑ Back to topYou can view and manage customers wallet details by navigating to WooCommerce > Wallet & Cashbacks > Customer Wallets. Here, you can create new wallet data and manage all the data created before, with some options like
- Create new wallet data
- View existing entries
- Implement Bulk Actions
- Filter wallet information
- Search data in the log
Filter:
Wallet data can be filtered using the following options:
- Select one: Choose an option in a dropdown, such as “less than,” “more than,” and “between.”
- Amount From: Filter a minimum amount of wallet balance, which will be applied as a filter when retrieving results.
- Amount To: Filter a maximum amount in the wallet. More specific.
Sort Grid
- User Name: Filter wallet data using the customer’s name for efficient tracking of customers.
- ID: Filter by user ID when wishing to retrieve specific entries.
- Location: Filter by location to get wallet data according to the customer’s location.
- Orders: Filter by the number of orders made by the customer.
- Wallet Balance: Wallet entries can be filtered by balance—either high or low
- Last Order: Filter by the date of the customer’s latest order.
Date: Filter the wallet data by the date it was created or updated.
Add New Wallet Data: You can choose to add a new customer wallet data by clicking on “Add New Wallet Data”.
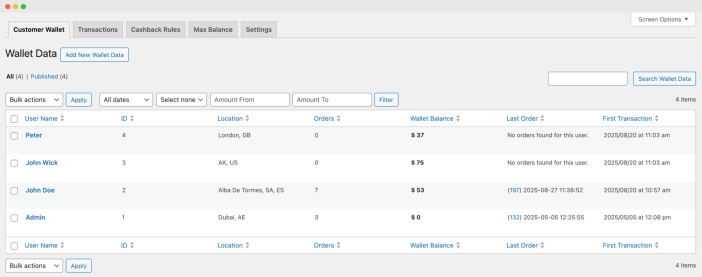
View Customer’s Wallet Details:
↑ Back to topClick on any customer to view wallet details like recent transactions, expiry and more.
Add Debit or Credit Transaction:
↑ Back to topYou can perform credit or debit transaction on customers wallet to either increase or decrease their wallet balance respectively. While adding new transaction you can also include transaction note for customer and add its expiry date if needed.

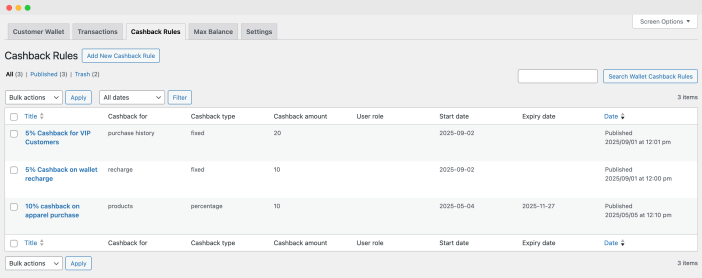
Cashback Rules:
↑ Back to topYou can manage customers cashback rules by navigating to WooCommerce > Wallet & Cashbacks > Cashback Rules. Here you can view list of created cashback rule and create new one as well.
- Title: Display the title of the rules.
- Cashback for: Display the target of cashback.
- Cashback type: Show the type of cashback, such as fixed or percentage.
- Cashback Amount: Display the exact value of the cashback amount based on the selected type.
- User role: Display the user role, such as admin, retailer, or wholesale customer, etc.
- Start Date: Show the activation date of cashback.
- Expiry Date: Show the expiry date of cashback.
Date: Show the created date of cashback.
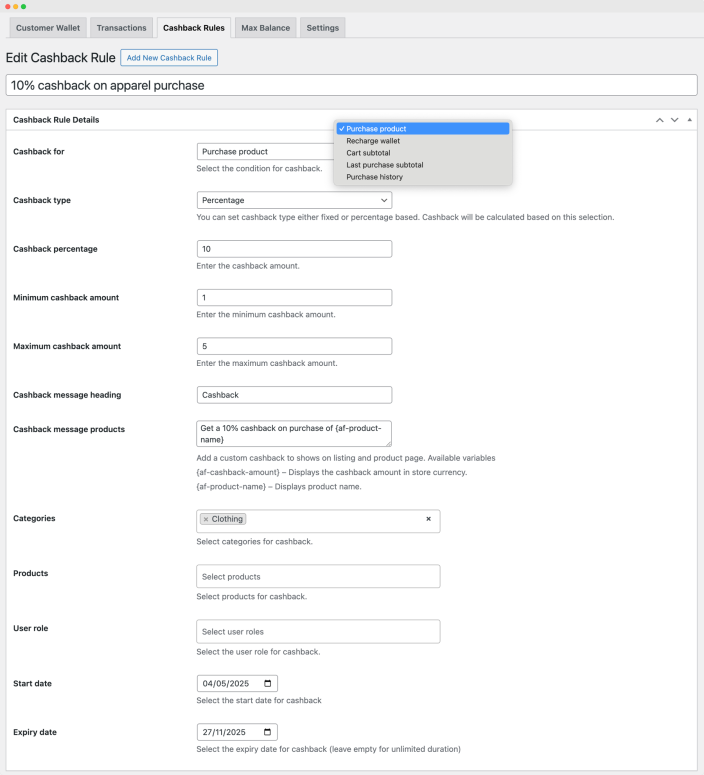
Creating a New Cash Rule:
↑ Back to topNavigate to WooCommerce > Wallet & Cashback > Cashback Rules and click the “Add New Cashback Rule” button at the top. After clicking “Add New,” you will see a new page where you have to provide the mentioned information:
Add title: You can add the title or label of cashback.
Cashback type: You can choose to setup cashback based on following 5 conditions,
- Product purchase: Cashback when customers purchase specific products or categories
- Wallet recharge: Cashback when customer deposit funds to their store wallet
- Cart subtotal: Cashback based on the current orders’ cart subtotal
- Last purchase subtotal: Cashback based on existing last purchase order subtotal
- Purchase history: Cashback based on the lifetime amount spent by the customer in your store
Cashback amount type: Choose between a fixed cashback amount or a percentage of the product price. In case of percentage amount, the cashback will be awarded based on product price, cart total, order history or wallet recharge amount depending on cashback rule type you have selected above.
Min/Max cashback limit: Incase of percentage cashback, you can set the minimum and maximum cashback amount that should be award to a customer.
Cashback message: You can choose to add custom message to display on product or cart page to inform customers about cashback offer. You can customize message using different variables.
User Role: Define which customer roles can receive the cashback. This enables you to setup cashback rewards based on customer types like VIP, B2B, Wholesale and more.
Start & Expiry Date: Set the time period during which the cashback offer is valid.
Transactions Log:
↑ Back to topThe “Transaction History” section allows you to see your customers’ wallet activity. You are able to filter the history by:
- User ID: Filter by user ID to find all transactions associated with a user’s user ID.
- Reference: Filter by reference number to find specific transactions.
- User Name: Display the name of the user in a grid.
- Email: Display the user’s email address.
- Amount: If you just want to review all transactions for a specific amount, you can sort by the amount column and review as required.
- Transaction Type: Transactions can be filtered by credit/debit/adjustment.
- Date: Transactions are sorted by date and can be viewed that way.
- Expiry Date: Transactions hold a lot of data in the wallet, so you may wish to sort by expiry date.
- Status: You can view the status of the transaction. Pending status is when order has been created by not met the specific status criteria to be converted into active cashback reward.
![]()
Transactions Detail:
↑ Back to topClick on any transaction to view its details like amount, reason expiry, origin and more.
Max Store Wallet Balance:
↑ Back to topYou can add a maximum limit of aggregate customer wallet balance that can reach in your store.
- Max Balance: Enable this option to turn on a maximum wallet balance restriction.
- Wallet Amount: The wallet balance limit.
- Note: Entering 0 means there is no limit (unlimited allowed balance).
- Add New Amount: Specify a new wallet balance amount, if applicable.
- Date: The date & time a new balance amount is added or updated.

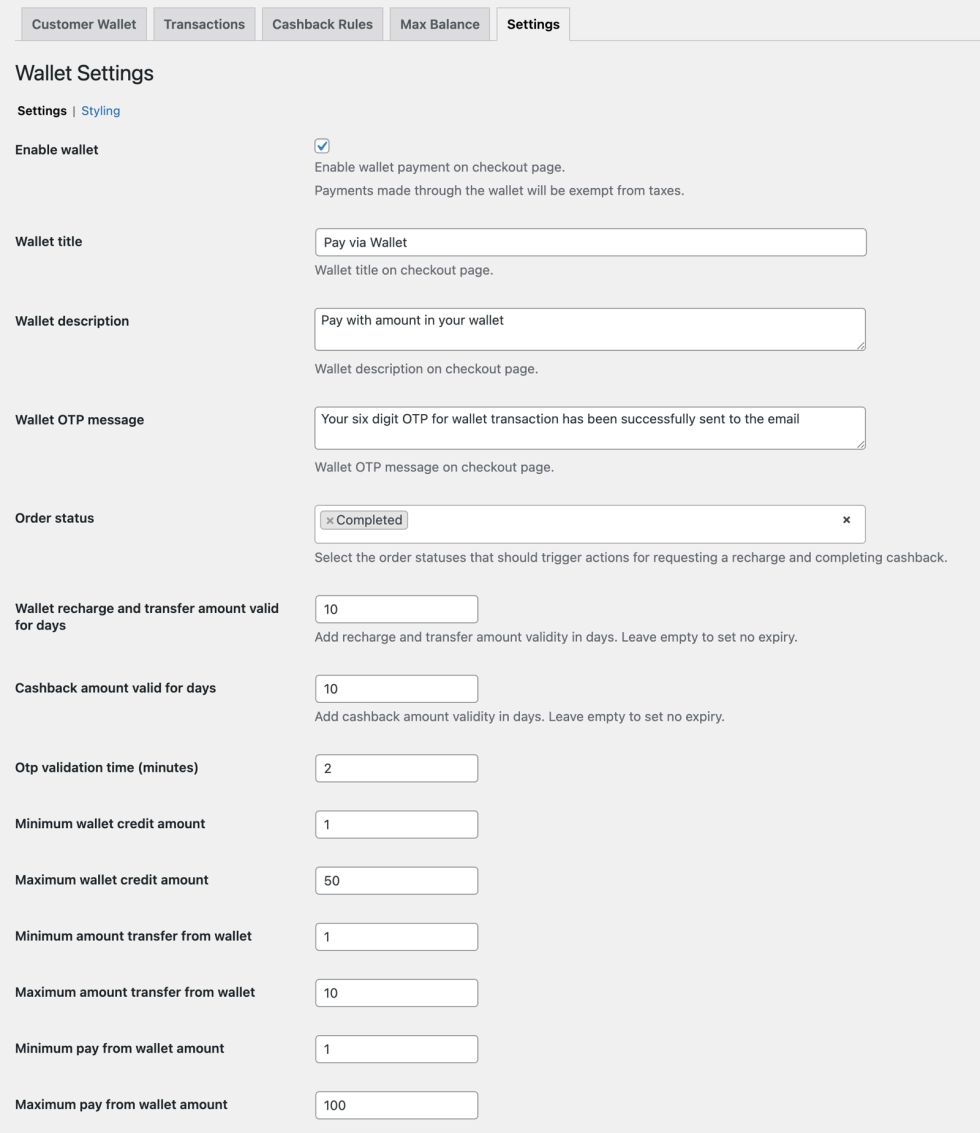
Wallet Settings:
↑ Back to top- Enable Wallet: Enable the wallet payment method on the checkout page.
- Wallet Title: Title the wallet payment method on the checkout page.
- Wallet Description: Describe the wallet payment method on the checkout page.
- Wallet OTP Message: Generate the message on the checkout page when the user’s wallet transaction requires an OTP. Order Status Settings
- Order Status: Select one or more order statuses that will trigger actions for wallet recharge and cashback completion.
- Options: Pending payment, Processing, On hold, Completed.
- Recharge and Transfer Amount Validity: Enable this option if you want a validity for the recharge and transfer amounts.
- Wallet Recharge and Transfer Amounts Valid for (Days): Indicate how many days the recharge and transfer amounts are valid for.
- Cashback Valid for (Days): You must determine how long the cashback amounts should be valid for.
- Validation Time for OTP (Minutes): Establish the time limit for OTP validation.
- Minimum Amount Credited in Wallet: Establish the minimum amount when crediting to the wallet.
- Maximum Amount Credited in Wallet: Establish a maximum amount when crediting to the wallet.
- Minimum Amount Transfer from Wallet: Establish the minimum amount a user can transfer from the wallet.
- Maximum Amount Transfer from Wallet: Establish the maximum amount a user can transfer from the wallet.
- Minimum Pay from Wallet Amount: Establish the minimum amount the user can pay from the wallet.
- Maximum Pay from Wallet Amount: Establish the maximum amount the user can pay from the wallet.
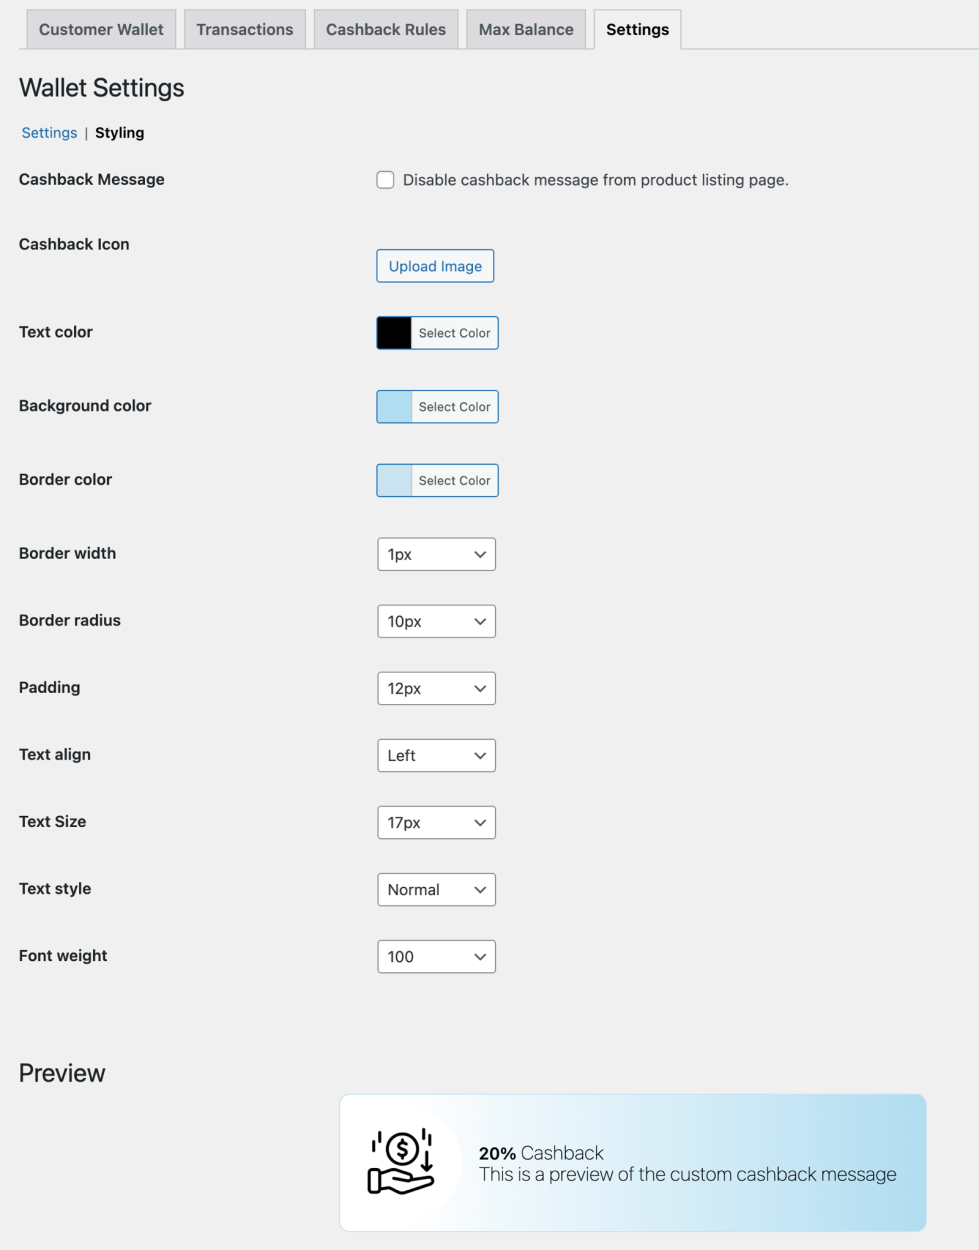
Styling Options:
↑ Back to top- Hide Cashback Message: Decide if you want to hide the cashback message on the product listing page.
- Text Color: Choose the color for the cash back message font.
- Background Color: Choose the background color for the cashback icon.
- Border Color: Choose the color for the border of the cashback icon.
- Border Width: Choose the width of the border around the cashback icon.
- Border Radius- Set how round you want the corner of the icon.
- Padding: Set the padding or space surrounding the icon.
- Text Align: Set how you want the text to look within the icon.
- Options: Left, Center, Right.
- Text Size: Choose the size of the text within the cash back icon.
- Text Style: Choose a text style for the cash back message.
- Font Weight: Set a font weight for the cash back message.
- Preview: See a live preview as you adjust any of the settings.