Thank you for choosing Sophia Pro for your site. This guide will walk you through the steps to install and customize the theme, ensuring a smooth and successful setup.

Getting Support
↑ Back to topNeed help? Our support team is available through the support portal with responses typically within 24 hours on business days. On weekends or holidays, responses may take longer, but we will assist you as soon as possible. Feel free to reach out with any questions or issues, we’re always ready to help!
Installation
↑ Back to topTo start using a product from WooCommerce.com, you can use the “Add to store” functionality on the order confirmation page or the My subscriptions section in your account.
- Navigate to My subscriptions.
- Find the Add to store button next to the product you’re planning to install.
- Follow the instructions on the screen, and the product will be automatically added to your store.
Alternative options and more information at:
Managing WooCommerce.com subscriptions.

Demo Content Import
↑ Back to topFollow these simple steps to recreate the Sophia demo layout.
- Go to Appearance > Demo Import in your WP Admin dashboard to access this page.
- Install WooCommerce If you want to use the demo products, install WooCommerce before importing.
- Download the demo content file Click the Download XML File button and save this file to your computer – you’ll upload it in step 4.
- Install WordPress Importer plugin Click the Install Plugin button. This official WordPress plugin handles the import process safely. Delete it after the demo import is complete.
- Import the demo content Click Go to WordPress Importer. Upload the XML file you downloaded in step 2. Make sure to check “Download and import file attachments” to get all images.
Child Theme Information
A child theme is not required for Sophia as it is a block theme.
Block themes store customizations in the database rather than in theme files, so your customizations will be preserved when the theme updates.
All template modifications made through the Site Editor are automatically protected from theme updates.
Updating Your Theme
↑ Back to topTo receive notifications for new versions and streamline the update process, we recommend staying current with the latest theme features and security improvements through your account dashboard.
Theme Customization
↑ Back to topThe Sophia theme is built for effortless customization. Open the Site Editor to adjust colors, fonts, and layouts, or mix and match pre-designed patterns to create a unique look that reflects your brand.
Using the WordPress Block Editor
↑ Back to topSophia is a block-based theme designed to work seamlessly with the WordPress Block Editor (Gutenberg). It offers a smooth and intuitive experience without the need for third-party page builders. The Block Editor allows you to create and customize content easily using blocks for text, images, videos, and more.
If you’re new to the WordPress Block Editor, you can explore its basic features and usage in the official WordPress Block Editor Documentation.
Homepage & Blog Setup
↑ Back to topHomepage Configuration
Your theme includes a dedicated front-page.html block template that automatically displays as your site’s homepage.
No configuration in Settings → Reading is required.
To customize your homepage content:
- Go to Appearance → Editor (Site Editor).
- In the left panel, open Templates → Front Page.
- Edit the layout and content using the block editor.
- Click Save to apply your changes.
Your customized Front Page will appear automatically on your site’s homepage, regardless of your Reading settings.
Video Tutorial: Customizing Your Homepage Layout
Blog Page Setup
If you want a separate page to display your blog posts, you have two options:
Option 1: Use the Blog Template (Recommended)
- Go to Pages → Add New.
- Name your page Blog (or any title you prefer).
- In the Page Settings sidebar, open the Template dropdown.
- Select Blog Left Sidebar, Blog Right Sidebar, or Default Blog (depending on your theme’s templates).
- Click Publish.
Your blog posts will now display automatically using the selected blog template — no Reading settings required.
Video Tutorial: Setting Up Your Blog Page
Option 2: Assign a Blog Page Using Reading Settings
If you prefer to use WordPress’s classic Reading Settings:
- Go to Settings → Reading.
- Under Your homepage displays, select A static page.
- Leave the Homepage field blank (your theme’s
front-page.htmlhandles this automatically). - From the Posts page dropdown, choose your Blog page.
- Click Save Changes.
Your blog posts will now appear on the Blog page using your theme’s home.html or index.html template.
Important Notes
- Block themes automatically handle front pages via templates — manual Reading settings are optional.
- The Front Page template takes priority over other templates for your homepage.
- The Posts Page (Blog) will use the first matching template:
home.html,index.html, or a custom page template if assigned.
Site Logo Setup
↑ Back to topFollow these steps to set up your site logo using the Site Editor:
- Open the Site Editor: While viewing any page on your site, ensure you are logged in with the admin bar enabled. In the admin bar at the top of the screen, click the Edit Site button.
- Locate the Site Logo Block: Once in the Site Editor, find the Site Logo block within the template you’re editing. This block is usually located in the header area.
- Upload or Select Your Logo: Click on the Site Logo block to upload a new logo or select one from your media library. Ensure the logo is appropriately sized and formatted.
- Save Your Changes: After setting up your logo, click Save in the top-right corner to apply the changes across your site.
Fallback Logo Feature
Sophia includes an intelligent fallback logo system that automatically displays a default Sophia logo when no custom logo is uploaded. This ensures your site always looks professional, even during initial setup.
How it works:
Automatic Display: If no custom logo is set, the theme automatically shows a styled fallback logo
Smart Detection: The system checks if a custom logo exists before showing the fallback
Seamless Integration: The fallback logo uses the same styling and positioning as custom logos
Easy Replacement: Once you upload your own logo, the fallback automatically disappears
To replace the fallback logo, simply upload your own logo following the steps above, and your custom logo will automatically replace the fallback logo across your entire site.
Assigning a Page Template
↑ Back to topVideo Tutorial: Assigning a Page Template (About Page Example)
In this tutorial, we’ll walk you through two different methods for building an About Us page, one quick method using Starter Patterns, and a second approach using the WordPress Patterns library.
Important: To avoid duplicate titles, we recommend selecting the “No Title” page template. This removes the default WordPress title that appears above your content, ensuring only the title from your page template shows.
Navigation Setup
↑ Back to topVideo Tutorial: Editing Your Header and Footer Navigation
Setting up your site’s navigation is essential for helping visitors navigate through your content:
- Locate the Navigation Block: Within the Site Editor, find the Navigation block, usually located in the header area of your template.
- Create a New Menu: Click on the Create a new menu link within the Navigation block.
- Add Menu Items: Begin adding menu items by clicking the + icon. You can add links to pages, posts, categories, or custom URLs.
- Save Your Changes: Once you’ve finished, click Save in the top-right corner to apply the changes to your site.
Site Header Setup
↑ Back to topTo update or change your site’s header template:
- Open the List View Panel: Ensure you are in the Site Editor. Open the List View panel on the left side of the editor.
- Select the Header Block: In the List View panel, locate and click the header block.
- Choose a New Header Template: In the Block settings panel, expand the Design option group to reveal available templates and choose the template you want to apply.
- Save Your Changes: Click Save in the top-right corner to apply the changes.
Accessing The Site Editor
↑ Back to topThe Site Editor is your main tool for customizing your Sophia theme. Here’s how to access it:
- From the Admin Bar: While viewing any page on your site, click the Edit Site button in the admin bar at the top.
- From the Dashboard: Navigate to Appearance > Editor in your WordPress admin dashboard.
- Direct Access: You can also access specific templates by going to Appearance > Editor > Templates and selecting the template you want to edit.
Returning To The Dashboard
↑ Back to topTo return to your store’s WP Admin dashboard from the Site Editor:
- Click the WordPress logo in the top-left corner of the Site Editor.
- Alternatively, click the Back to Dashboard link if available.
- You can also navigate directly by typing your site URL followed by
/wp-admin/in your browser.
Accessing the Templates
↑ Back to topTemplates control the layout and design of different page types on your site:
- Open Site Editor: Navigate to Appearance > Editor.
- Browse Templates: Click on Templates in the left sidebar to see all available templates.
- Select a Template: Click on any template to edit it (Homepage, Single Post, Page, etc.).
- Preview Templates: Hover over templates to see a preview before editing.
Editing the Front Page
↑ Back to topCustomize your homepage to make a great first impression:
- Access Front Page Template: Go to Appearance > Editor > Templates > Front Page.
- Edit Content: Click on any block to edit text, images, or other content.
- Add New Blocks: Use the + button to add new content blocks.
- Rearrange Sections: Drag and drop blocks to reorder sections.
- Save Changes: Click Save to apply your changes.
Accessing the Template Parts
↑ Back to topTemplate parts are reusable components like headers and footers:
- Open Site Editor: Navigate to Appearance > Editor.
- Browse Template Parts: Click on Template Parts in the left sidebar.
- Edit Parts: Select Header, Footer, or other template parts to customize them.
- Global Changes: Changes to template parts apply across your entire site.
Editing The Header
↑ Back to topCustomize your site’s header area:
- Access Header: Go to Appearance > Editor > Template Parts > Header.
- Edit Logo: Click on the site logo to upload your own logo.
- Modify Navigation: Edit menu items, add new pages, or change menu styling.
- Adjust Layout: Change header layout, colors, or spacing.
- Save Changes: Click Save to apply changes site-wide.
Editing Footer
↑ Back to topCustomize your site’s footer area:
- Access Footer: Go to Appearance > Editor > Template Parts > Footer.
- Edit Content: Modify footer text, copyright information, or contact details.
- Add Elements: Include social media icons, additional menus, or widgets.
- Style Footer: Adjust colors, typography, and layout.
- Save Changes: Click Save to apply changes across your site.
How to add custom CSS
↑ Back to topTemplates Customization
↑ Back to topCustomize Blog Pages
↑ Back to topBlog Index Page
- Open the Site Editor: While viewing the blog index page, click the Edit Site button in the admin bar.
- Alternatively: Navigate to Appearance > Editor > Templates > Blog Home.
- Choose Layout: Select from available blog layout templates.
- Customize Display: Adjust post excerpts, featured images, and metadata display.
- Save Changes: Click Save to apply your blog customizations.
Single Blog Posts
- Open the Site Editor: While viewing a blog post, click the Edit Site button.
- Alternatively: Navigate to Appearance > Editor > Templates > Single Post.
- Customize Layout: Adjust post title, content, author info, and related posts.
- Add Elements: Include social sharing, comments, or newsletter signup.
- Save Changes: Click Save to apply to all blog posts.
Blog Archive Pages
- Access Archives: Navigate to Appearance > Editor > Templates > Archive.
- Customize Layout: Adjust how category and tag pages display posts.
- Add Descriptions: Include category descriptions or custom content.
- Save Changes: Click Save to apply archive customizations.
Customize Regular Pages
↑ Back to topStandard Pages
- Edit Page Template: Navigate to Appearance > Editor > Templates > Page.
- Customize Layout: Adjust page title, content area, and sidebar options.
- Add Elements: Include contact forms, testimonials, or call-to-action sections.
- Save Changes: Click Save to apply to all standard pages.
Specific Page Customization
- Edit Individual Pages: Go to Pages > All Pages and select a specific page.
- Change Template: In the page editor, select Template and choose a different template.
- Custom Content: Add unique content blocks specific to that page.
- Update: Click Update to save page-specific changes.
Using Different Templates for Specific Pages
↑ Back to topCreate unique layouts for different types of content:
Create Custom Templates
- Open Site Editor: Navigate to Appearance > Editor.
- Add Template: Click Templates > Add New Template.
- Choose Type: Select Custom Template and give it a descriptive name.
- Design Layout: Add blocks and customize the layout for specific needs.
- Save Template: Click Save to create your custom template.
Assign Templates to Pages
- Edit Page: Go to Pages > All Pages and select the page.
- Template Settings: In the page editor, find the Template option.
- Select Template: Choose your custom template from the dropdown.
- Update Page: Click Update to apply the new template.
Pre-built Custom Templates
↑ Back to topSophia includes specialized templates for different business needs:
- Service Page: Optimized for showcasing individual services with pricing and booking options
- About Page: Perfect for team introductions and company story presentations
- Contact Page: Includes contact forms, location maps, and business information
- Landing Page: Conversion-focused design without header and footer distractions
- Portfolio Page: Designed for showcasing work samples and case studies
- Testimonials Page: Dedicated layout for customer reviews and success stories
Using Different Templates for Specific Posts/Pages
↑ Back to topAssign Templates to Blog Posts
- Edit Post: Go to Posts > All Posts and select the post
- Template Settings: In the post editor, find the Template option
- Select Template: Choose your custom template from the dropdown
- Update Post: Click Update to apply the new template
Video Tutorial: Resetting a Page Template to Theme Default
WooCommerce Setup
↑ Back to topShop Page Customization
↑ Back to topIf you’re selling products or services, customize your shop page:
- Access Shop Template: Navigate to Appearance > Editor > Templates > Product Catalog.
- Customize Layout: Adjust product grid, filters, and sorting options.
- Add Content: Include shop banners, promotional sections, or featured products.
- Style Products: Customize product card design and hover effects.
- Save Changes: Click Save to apply shop customizations.
Product Pages
↑ Back to topVideo Tutorial: Customizing Your Product Detail Page Template
Single Product Pages
- Edit Product Template: Navigate to Appearance > Editor > Templates > Single Product.
- Customize Layout: Adjust product images, descriptions, and purchase buttons.
- Add Elements: Include related products, reviews, or additional information tabs.
- Save Changes: Apply to all product pages.
Product Category Pages
- Access Category Template: Navigate to Appearance > Editor > Templates > Product Category.
- Customize Display: Adjust how products are shown within categories.
- Add Category Info: Include category descriptions and promotional content.
- Save Changes: Apply to all category pages.
Blocks
↑ Back to topAdding Block In The Block Editor (Page/Post)
↑ Back to topLearn how to add and customize blocks in your content:
- Open Editor: Edit any page or post to access the block editor.
- Add Blocks: Click the + button to browse available blocks.
- Search Blocks: Use the search function to find specific block types.
- Insert Blocks: Click on any block to add it to your content.
- Customize Blocks: Use the block settings panel to adjust appearance and functionality.
Common Block Types
- Paragraph: For text content
- Heading: For titles and headings
- Image: For photos and graphics
- Button: For calls-to-action
- Columns: For multi-column layouts
- Group: For organizing related content
Navigation Block (Site Navigation Menu)
↑ Back to topCreate and customize your site’s main navigation:
- Add Navigation Block: In the Site Editor, add a Navigation block to your header.
- Create Menu: Click Create navigation menu to start building your menu.
- Add Menu Items: Use the + button to add pages, posts, or custom links.
- Customize Appearance: Adjust menu styling, colors, and layout.
- Save Menu: Save your navigation changes.
Navigation Features
- Dropdown Menus: Create multi-level menu structures
- Mobile Menu: Responsive menu that works on all devices
- Custom Links: Add external links or anchor links
- Menu Styling: Customize colors, fonts, and spacing
Social Icons Block (Social Media Menu)
↑ Back to topAdd social media links to your site:
- Add Social Icons Block: Use the + button to add Social Icons block.
- Choose Platforms: Select from available social media platforms.
- Add Links: Enter your social media profile URLs.
- Customize Appearance: Adjust icon size, color, and layout.
- Position Block: Place in header, footer, or content areas.
Supported Platforms
Facebook, Twitter, Instagram, LinkedIn, YouTube, TikTok, Pinterest, Snapchat, WhatsApp, and many more popular platforms.
Patterns
↑ Back to topSophia Block Patterns
↑ Back to topSophia includes professionally designed patterns for common business needs:
Heading Patterns
- Heading with Central Semicircle and Three Circles: Four circular image frames – one large semicircle center with three smaller circles. Images automatically clip to shape.
- Heading with Central Masked and Three Circles: Three circular side images plus one center position for custom shapes (stars, hearts, hexagons, etc.). Create custom shapes in design software and upload as PNG or SVG.
- Heading with Single Image: Single full-width image header. Perfect for hero sections and page banners.
Adding Sophia Theme Patterns
↑ Back to topAccess and use the built-in theme patterns:
- Open Block Editor: Edit any page, post, or template.
- Access Patterns: Click the + button and select the Patterns tab.
- Browse Categories: Look for “Sophia” or business-specific pattern categories.
- Preview Patterns: Hover over patterns to see a preview.
- Insert Pattern: Click on any pattern to add it to your content.
Steps to Use Patterns
↑ Back to topFollow these steps to effectively use patterns in your design:
- Plan Your Layout: Decide what type of content you want to display.
- Select Appropriate Pattern: Choose a pattern that matches your content type.
- Insert Pattern: Add the pattern to your page or template.
- Customize Content: Replace placeholder text and images with your own content.
- Adjust Styling: Modify colors, fonts, and spacing to match your brand.
- Test Responsiveness: Preview on different devices to ensure proper display.
Video Tutorial: Reordering Patterns on Your Page
Pattern Customization Tips
- Replace Images: Upload your own high-quality images
- Update Text: Write compelling copy that speaks to your audience
- Brand Colors: Apply your brand colors consistently
- Call-to-Actions: Include clear next steps for visitors
- Contact Information: Keep all contact details up-to-date
Template Customization
↑ Back to topTemplate Customization Quick Guide
↑ Back to topSophia includes templates optimized for different business types and page purposes. Navigate to Appearance > Editor > Templates to view and edit all available templates.
Template Editing Process
- Access Templates: Navigate to Appearance > Editor > Templates.
- Select Template: Click on the template you want to customize.
- Edit Layout: Modify blocks, add content, or change design.
- Preview Changes: Use the preview function to see changes before saving.
- Save Template: Click Save to apply changes.
Available Templates Reference
↑ Back to topSophia includes 32 professionally designed templates for different page types and layouts:
General Templates
- index.html – Default fallback template for all content types with sidebar on left
- front-page.html – Custom homepage template with business-focused sections
- home.html – Alternative homepage template
- 404.html – Custom error page for missing content with search functionality
- search.html – Search results page with custom search interface
Page Templates
- page.html – Standard page template with medium width, no sidebar
- page-no-title.html – Page template without title display
- blank.html – Completely blank page (no header, footer, or styling)
- single-page-no-sidebar.html – Page without sidebar, medium width
- single-page-no-sidebar-full-width.html – Full width page without sidebar
- single-page-sidebar-on-left.html – Page with 27% sidebar on left, 73% content on right
- single-page-sidebar-on-right.html – Page with 73% content on left, 27% sidebar on right
Blog Post Templates
- single.html – Default single post template with author card, comments, and navigation
- single-post-no-sidebar.html – Blog post without sidebar
- single-post-no-sidebar-full-width.html – Full width blog post without sidebar
- single-post-sidebar-on-left.html – Blog post with 27% sidebar on left, 73% content on right
- single-post-sidebar-on-right.html – Blog post with 73% content on left, 27% sidebar on right
Blog Archive Templates
- blog.html – Blog index page with sidebar on left
- blog-no-sidebar.html – Blog archive without sidebar
- blog-no-sidebar-full-width.html – Full width blog archive without sidebar
- blog-sidebar-on-right.html – Blog archive with 73% posts on left, 27% sidebar on right
- archive.html – Category, tag, and date archive pages with custom heading
- author.html – Author archive page with author bio card
WooCommerce Templates
Product Archive Templates:
- archive-product.html – Main product archive with popup sidebar and filter button
- archive-product-sidebar-on-left.html – Product archive with 23% sidebar on left, 73% products on right (3 columns)
- archive-product-sidebar-on-right.html – Product archive with 73% products on left, 23% sidebar on right (3 columns)
Product & Shopping Templates:
- single-product.html – Individual product page with gallery, details, and related products
- cart.html – Shopping cart page with cart items, totals, and cross-sells
- checkout.html – Checkout page with billing, shipping, and payment forms (no header/footer)
- order-confirmation.html – Order confirmation page showing order details and addresses
- page-my-account.html – Customer account page with login form and image
Template Parts Reference
↑ Back to topTemplate parts are reusable components that appear across multiple templates. Access them at Appearance > Editor > Template Parts.
Core Template Parts
- header.html – Main site header with logo and navigation
- footer.html – Site footer with four columns and default sections
- sidebar.html – Standard sidebar for blog posts and pages
- page-content.html – Reusable page content structure with title and featured image
- post-content.html – Blog post content structure including category, title, meta, featured image, content, author card, navigation, and comments
WooCommerce Template Parts
- product-collection.html – Main product grid (4 columns, 12 products per page) with pagination
- all-products.html – Product collection layout (4 columns, 12 products per page)
- all-products-three-col.html – Product collection layout (3 columns, 9 products per page)
- product-template.html – Individual product card design with image, price, title, summary, and add to cart button
- sidebar-products.html – Product filter sidebar for shop pages
Template Parts Usage
Template parts are automatically included in templates but can be customized globally:
- Edit Template Part: Go to Appearance > Editor > Template Parts
- Select Part: Choose the template part you want to edit (Header, Footer, Sidebar, etc.)
- Make Changes: Modify the design, content, or layout
- Save: Click Save to apply changes across all templates using that part
Benefits of Template Parts:
- Consistency: Changes apply everywhere the part is used
- Efficiency: Edit once, update everywhere
- Flexibility: Mix and match parts to create custom templates
Theme Global Style Setup
↑ Back to topConfigure global styles to maintain consistency across your site:
Accessing Global Styles
- Open Site Editor: Navigate to Appearance > Editor.
- Click Styles: Click the Styles button (circle icon) at the top-right.
- Browse Options: Explore different style categories.
Style Categories
Colors
- Brand Colors: Set primary and secondary brand colors
- Text Colors: Configure heading and body text colors
- Background Colors: Set page and section backgrounds
- Accent Colors: Define button and link colors
Typography
- Font Families: Choose fonts for headings and body text
- Font Sizes: Set consistent sizing across your site
- Line Height: Adjust text spacing for readability
- Letter Spacing: Fine-tune text appearance
Layout
- Container Width: Set maximum content width
- Spacing: Configure padding and margins
- Border Radius: Set rounded corner styles
- Shadows: Add depth with shadow effects
Style Variations
↑ Back to topSophia includes 7 professionally designed color schemes that you can switch between instantly. Each variation maintains the same layout and typography while applying a cohesive color palette throughout your site.

Available Style Variations:
- Default: Classic tan and brown tones for spa and wellness businesses
- Warm, inviting atmosphere with soft peach and tan brown accents
- Perfect for: Beauty salons, spas, wellness centers
- Blue: Professional blue tones for medical and corporate sites
- Clean, trustworthy appearance with soft blue backgrounds
- Perfect for: Medical clinics, dental offices, professional services
- Coffee: Rich brown and cream tones for warm, welcoming sites
- Earthy, comfortable feel with coffee-inspired colors
- Perfect for: Lifestyle businesses, coaching, consulting
- Forest: Natural green tones for eco-friendly and wellness brands
- Orange : Energetic orange accents for modern, vibrant businesses
- Bold, contemporary look with warm orange highlights
- Perfect for: Fitness studios, modern salons, creative agencies
- Purple: Elegant purple tones for luxury and premium services
- Sophisticated, upscale feel with lavender and plum accents
- Perfect for: High-end salons, luxury spas, premium services
- Sage: Soft sage green for calming, natural aesthetics
- Serene, balanced appearance with muted green tones
- Perfect for: Meditation centers, yoga studios, natural wellness
How to Switch Style Variations:
- Open the Site Editor: Navigate to Appearance > Editor
- Click the Styles button (circle icon) in the top-right corner
- Browse the available style variations in the sidebar
- Click on any variation to preview it instantly
- Click Save to apply the new color scheme to your entire site
Video Tutorial: Switching Between Color Style Variations
Customizing Style Variations:
Each style variation can be further customized:
- Override individual colors while keeping the overall palette
- Adjust typography independently
- Modify spacing and layout settings
- Create your own custom variation based on any existing style
Applying Global Styles
- Select Style Elements: Choose what you want to customize.
- Make Adjustments: Modify colors, fonts, or spacing.
- Preview Changes: See how changes affect your site.
- Save Styles: Click Save to apply globally.
Performance & Support
↑ Back to topPerformance Optimization
Sophia is built for speed and optimal performance:
Built-in Optimizations
- Clean Code: Efficient, lightweight code structure
- Mobile-First Design: Responsive design that works on all devices
- Fast Loading: Optimized theme files for quick page loads
- SEO-Friendly: Proper heading structure and semantic markup
- Accessibility: WCAG compliant design elements
Performance Tips
- Optimize Images: Use appropriately sized, compressed images
- Choose Quality Hosting: Select a reliable hosting provider
- Use Caching: Install a caching plugin for faster load times
- Minimize Plugins: Only use necessary plugins
- Regular Updates: Keep WordPress, theme, and plugins updated
SEO Best Practices
- Proper Headings: Use heading hierarchy (H1, H2, H3)
- Alt Text: Add descriptive alt text to all images
- Meta Descriptions: Write compelling page descriptions
- Internal Linking: Link between related pages on your site
Recommended Font
↑ Back to topPreferred Font Choice
↑ Back to topFont Configuration
The designer’s preferred typeface for this theme is Switzer, as it best complements the overall style and visual balance of the design.
However, due to licensing restrictions, the Switzer font files are not bundled with the theme. You can still enjoy this font by downloading it for free from the official source and installing it manually.
If Switzer is not installed on your site, the theme will automatically fall back to system fonts (Apple system font, Segoe UI, Helvetica, sans-serif) to maintain a clean and consistent appearance.
Installation Instructions
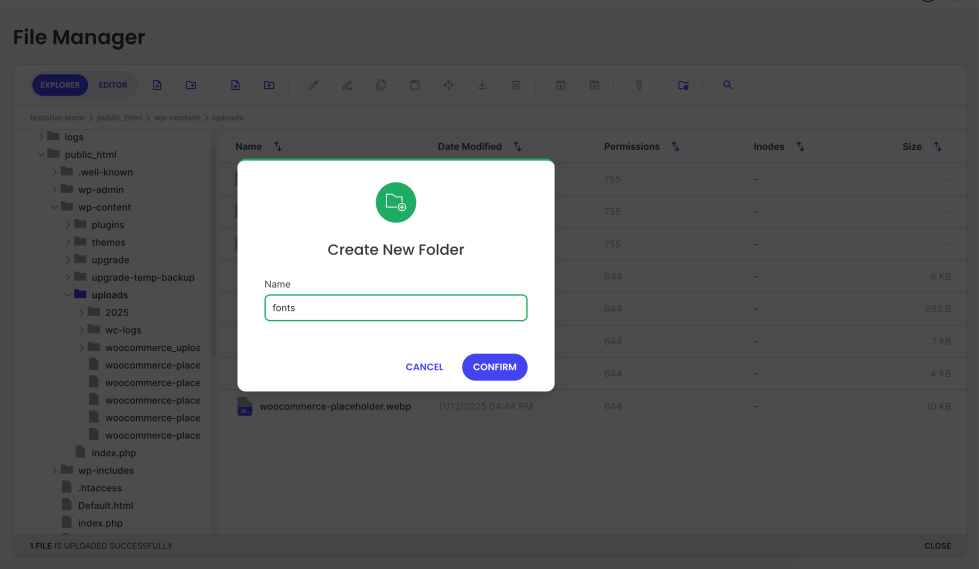
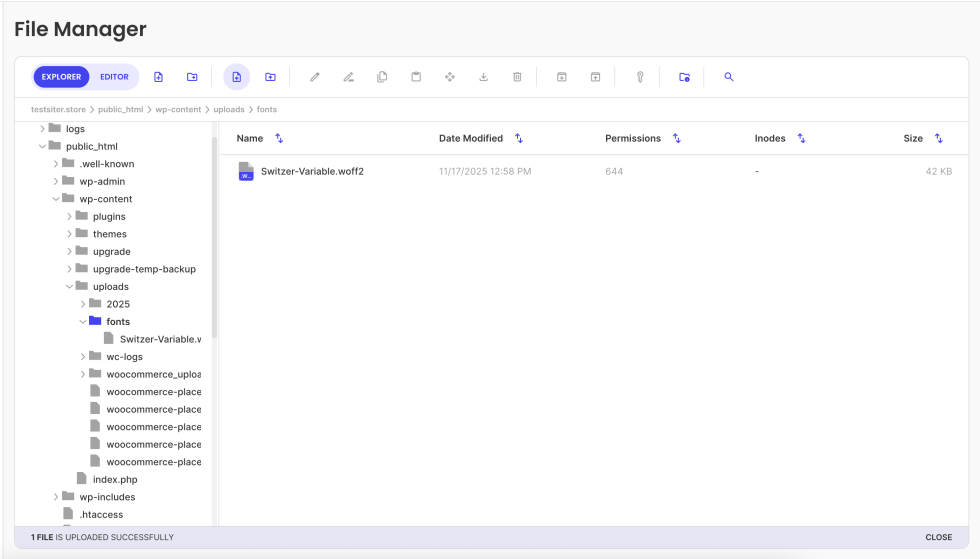
↑ Back to top- Visit the Fontshare Switzer page.
- Download the font files
- Once downloaded, navigate to the Web folder in the extracted files
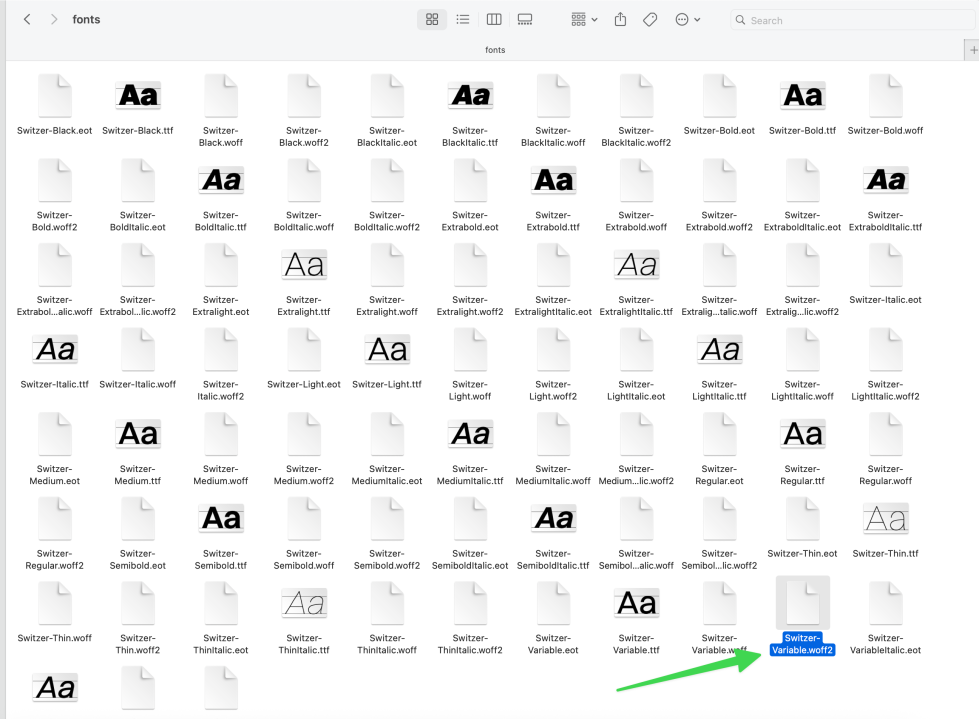
- Locate the
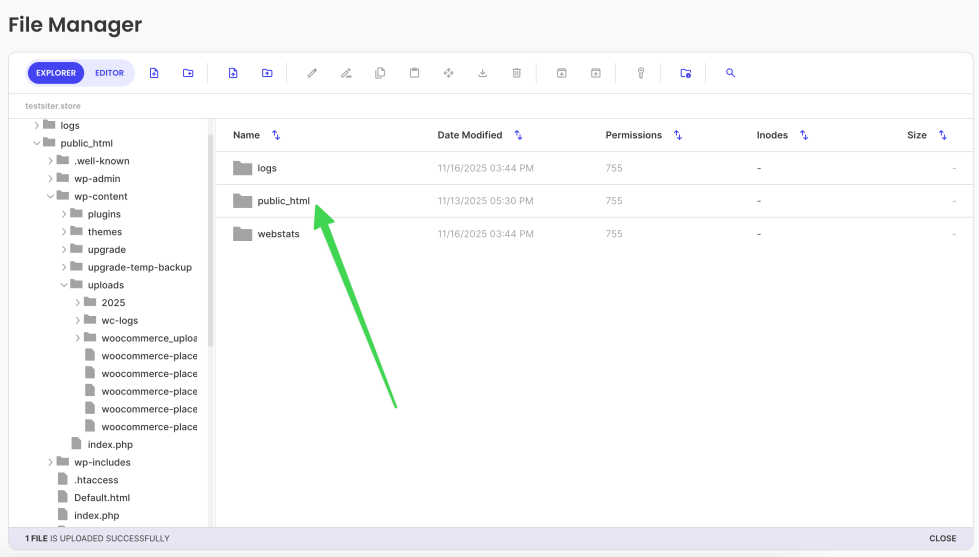
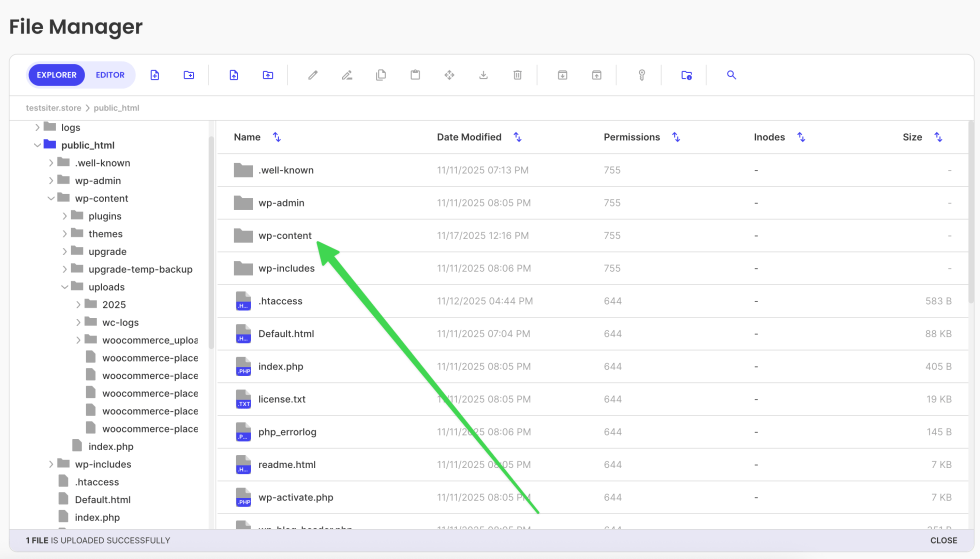
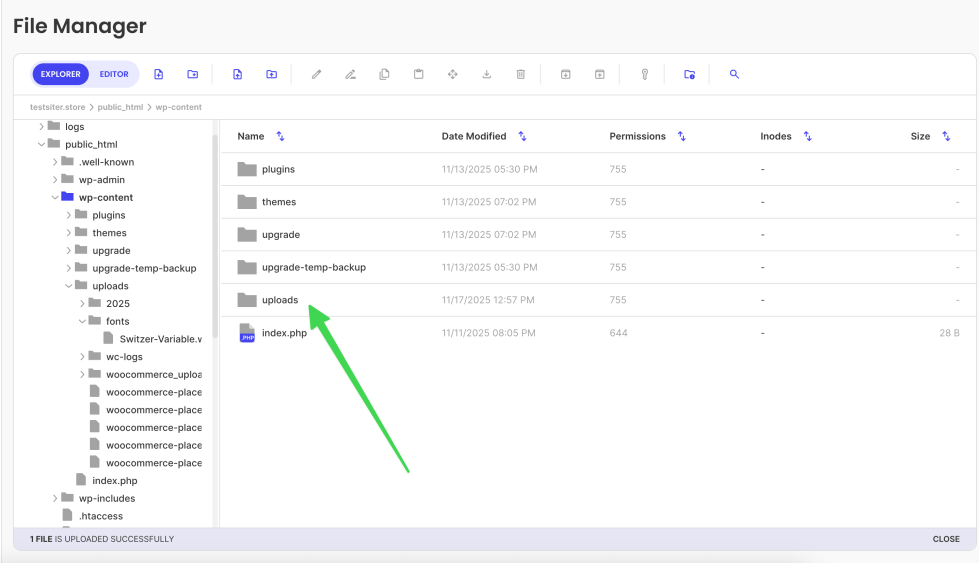
Switzer-Variable.woff2file - Upload this file to your website at:
/wp-content/uploads/fonts/Switzer-Variable.woff2- Use FTP, cPanel File Manager, or WordPress file manager
- Create the
fontsfolder if it doesn’t exist
- The font will automatically load on your site
Important: Do not upload via Site Editor > Styles > Typography as this will create a separate “Switzer Variable” font that won’t integrate with the theme’s design. Use the manual upload method above for proper integration.
Troubleshooting
↑ Back to top- Ensure file path is exactly:
/wp-content/uploads/fonts/Switzer-Variable.woff2 - Check folder permissions (755 recommended)
- Clear cache if using caching plugins
- Verify the file name matches exactly (case-sensitive)
FAQs
↑ Back to topQuick answers to common questions
What are Sophia Blocks?
Sophia Blocks are custom-built WordPress blocks designed specifically for the Sophia theme. They integrate seamlessly with the WordPress block editor (Gutenberg) to help you create beautiful, professional pages without any coding knowledge.
Are these custom blocks or standard WordPress blocks?
These are custom WordPress blocks created exclusively for the Sophia theme. Unlike the standard blocks that come with WordPress, Sophia Blocks are specially designed to match your theme’s unique style and provide features tailored to your specific needs.
Will the blocks work if I switch themes?
The blocks are specifically designed for the Sophia theme and work best within that environment. If you switch themes, the content will remain, but the block functionality will not display correctly. We recommend keeping the Sophia theme active for the best experience.
Do I need any plugins to use Sophia Blocks?
No plugins required! Sophia Blocks are built directly into the theme. Once you activate the Sophia theme, all blocks are automatically available in your WordPress editor. No additional plugins, no extra installations, no complicated setup.
How do I add Sophia Blocks to my site?
Simply activate the Sophia theme, and all custom blocks are instantly available. Here’s how to use them:
Create or edit any page/post
Click the “+” button to add a block
Look for the “Sophia Blocks” category
Select the block you want to use
Customize it with your content
It’s that easy!