Instant Order Edit gives WooCommerce store administrators a visual command center for order management. With this plugin, you can:
- View all orders organized by status in a drag-and-drop visual board
- Filter orders by customer, payment method, or date range instantly
- Update order statuses with simple drag-and-drop actions (no page reloads)
- Track workload distribution with real-time count badges on each status column
- Customize which order statuses appear and arrange them in your preferred sequence
Perfect for streamlining daily order processing, improving team coordination, and identifying fulfillment bottlenecks at a glance.
Installation
↑ Back to topTo start using a product from WooCommerce.com, you can use the “Add to store” functionality on the order confirmation page or the My subscriptions section in your account.
- Navigate to My subscriptions.
- Find the Add to store button next to the product you’re planning to install.
- Follow the instructions on the screen, and the product will be automatically added to your store.
Alternative options and more information at:
Managing WooCommerce.com subscriptions.

Setup and Configuration
↑ Back to topAccess the Plugin
↑ Back to topAfter activating Instant Order Edit for WooCommerce, you’ll see “Order Flow” under the WooCommerce sub menu. Click to open the interface.
Two tabs will appear:
- Settings: Customize your board preferences and workflow
- Order Board: Your main visual workspace for managing orders
Settings Configuration
↑ Back to topClick the Settings tab to customize how your order board displays and operates.
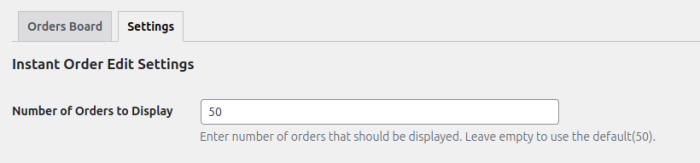
Number of Orders to Display
↑ Back to topSet how many orders appear when you first open the board. Higher limits let you see more orders at once, while lower limits load faster.
Order Status to Display
↑ Back to topSelect which order statuses appear as columns on your board.
Available Statuses:
- Pending Payment
- Processing
- On-Hold
- Completed
- Cancelled
- Refunded
- Failed
- (Plus any custom statuses you’ve created)

How to Customize:
- Check statuses you want to display
- Uncheck statuses you want to hide
- Click Save Changes
Example: If you never use “Refunded” or “Failed” statuses, uncheck them to simplify your board and focus only on active workflow stages.
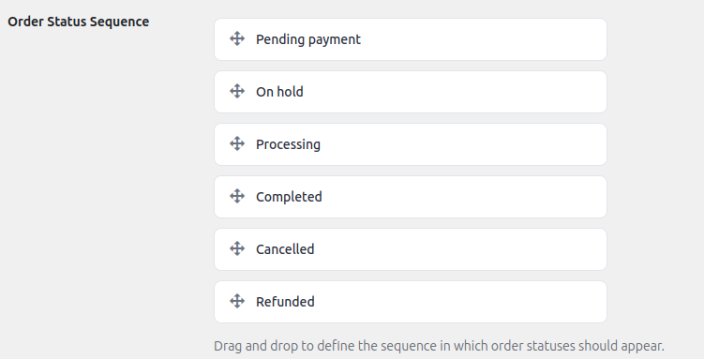
Order Status Sequence
↑ Back to topArrange the order in which status columns appear on your board by dragging status names up or down.
Use Case: Place frequently-used statuses like “Processing” first for faster access, and less-used statuses like “Cancelled” last. This creates a workflow that matches how your team actually processes orders.
Using the Order Board
↑ Back to topVisual Layout
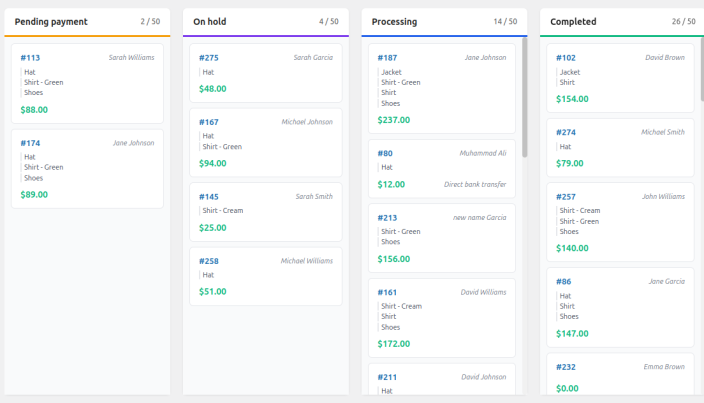
↑ Back to topOrders display as cards organized into columns by status. Each card shows order number, customer name, products in the order, order total, and payment method. Count badges on each column display active orders in that status versus total loaded orders (e.g., “Processing 14/50” means 14 Processing orders out of 50 total loaded).
Drag-and-Drop Status Updates
↑ Back to topTo change an order’s status, click and hold any order card, drag it to the desired status column, and release. The order status updates automatically without page reloads.
Filtering and Searching Orders
↑ Back to topUse the search and filter tools at the top of the board to find specific orders or narrow your view.
Search Field
↑ Back to topThe main search field lets you find orders by:
- Order number (e.g., “7123”)
- Customer name (e.g., “John Smith”)
- Customer email (e.g., “customer@example.com“)
- Product name (e.g., “Blue T-Shirt”)
Type your search term in the field and click the Filter button to see results.

Customer Filter
↑ Back to topUse the customer dropdown to select a specific customer and view all their orders across all status columns. Perfect for handling customer service inquiries, select their name to instantly see their complete order history.

Date Range Filter
↑ Back to topFilter orders by time period using preset ranges or custom dates:
Preset Options: Today, Yesterday, Last 7 Days, Last 30 Days
Custom Range: Select “Custom Range,” choose start and end dates, then click Filter.
Use Case: Review weekly performance by filtering to “Last 7 Days” or focus on today’s orders during daily processing.

Payment Method Filter
↑ Back to topSelect a payment gateway (Cash on Delivery, PayPal, Credit Card, etc.) to display only orders using that payment method. Useful for batch-processing COD orders separately from prepaid orders.

Applying Filters
↑ Back to topAfter selecting your search criteria and filters, click the Filter button to update the board. You can combine multiple filters (e.g., specific customer + date range + payment method) for precise targeting.
Active Filter Tags
↑ Back to topApplied filters appear as removable tags below the search area. Click the X on any tag to remove that filter.
Loading More Orders
↑ Back to topBy default, the board displays the number of orders you set in Settings. For high-volume stores, scroll to the bottom of any status column and click Load More to display additional orders. The count badges update to reflect total loaded orders.
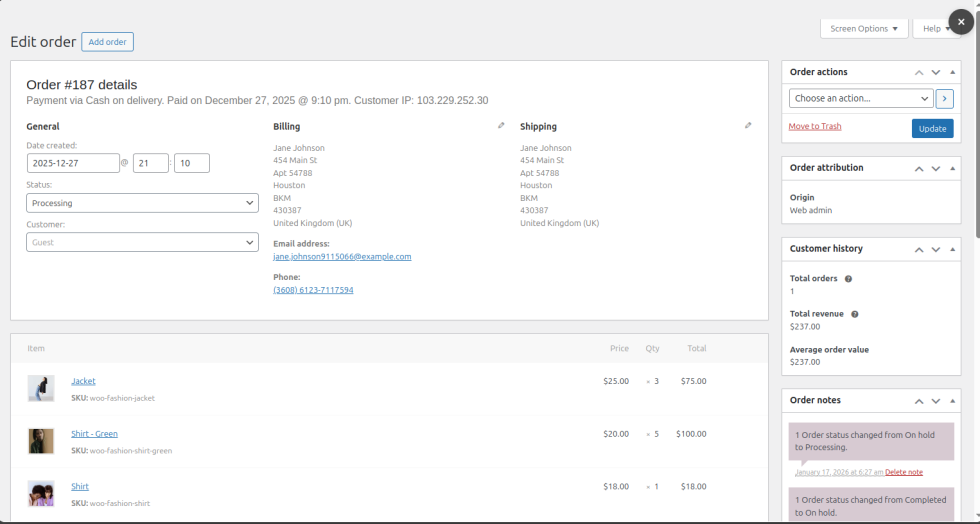
Accessing Full Order Details
↑ Back to topClick any order card to open WooCommerce’s native order editor in a popup. Make detailed edits (add products, update addresses, add notes, refund items, etc.), and changes sync automatically with the Order Board when you return.