NOTE
This product is no longer available on WooCommerce.com. This document has been left available for existing users, but will no longer be updated.
LitCommerce allows your WooCommerce store to connect with a sales channel and manage multichannel selling from one dashboard. You can publish products in bulk, sync inventory and pricing, and import orders back to WooCommerce for faster fulfillment.
This guide walks you through the core workflow, from connecting accounts to listing, syncing, and order management.
Installation
↑ Back to topTo start using a product from WooCommerce.com, you can use the “Add to store” functionality on the order confirmation page or the My subscriptions section in your account.
- Navigate to My subscriptions.
- Find the Add to store button next to the product you’re planning to install.
- Follow the instructions on the screen, and the product will be automatically added to your store.
Alternative options and more information at:
Managing WooCommerce.com subscriptions.

1. Getting Started
↑ Back to topPrerequisites
↑ Back to topHere are a few things to prepare before you begin.
- A live WooCommerce store with admin access
- An active seller account on the sales channel to connect
- Consistent SKUs and variants for cleaner matching during listing and syncing
- A small starter product set for the first publish and sync
- A staging site for testing, especially with heavy custom code or many plugins
Install LitCommerce for WooCommerce
↑ Back to top- Log in to the Admin Dashboard.
- Click Plugins, then choose Add New.
- Search for LitCommerce.
- Click Install Now, then click Activate.
After activation, LitCommerce appears in the left navigation menu.
Connect LitCommerce and a sales channel
↑ Back to top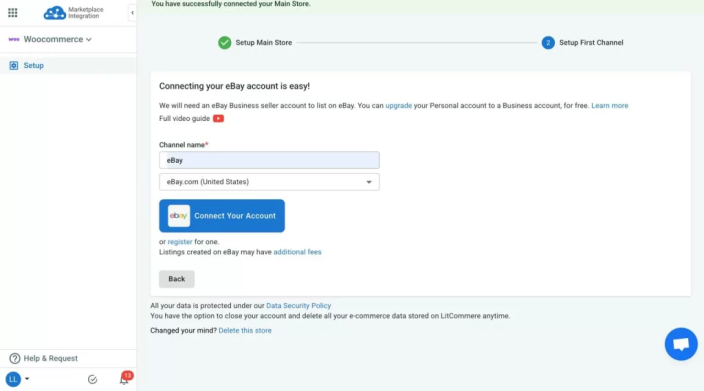
- Open LitCommerce from the left menu in WordPress.
- Click Connect to LitCommerce to begin.
- Sign in to LitCommerce, or create an account if needed.
- Select Connect a sales channel (for example: Amazon, Etsy, eBay, TikTok Shop, etc.).
- Sign in to the sales channel and grant permissions when prompted.
- Choose the store region, set a channel name, then click Connect.
The store and sales channel are now connected, and product import can begin.
Note
If the connection page does not appear, go to Plugins → Installed Plugins, find LitCommerce, and click Settings.
2. Prepare products for a sales channel
↑ Back to topThis step helps align products between WooCommerce and a sales channel. It also ensures listings have the required fields before going live. Choose the scenario that matches the current setup.
Case 1: List WooCommerce products to a sales channel
↑ Back to topThis path fits stores that have products in WooCommerce and want to publish them to a sales channel. Products from WooCommerce are imported into LitCommerce first, so listings can be prepared and published in a controlled workflow.
Option A: Manual publish (draft-first)
Manual publish works well when only a selected set of products should go live first. Drafts also make it easier to review required fields before publishing.
- Open LitCommerce app.
- In the left sidebar, go to All Products and review the imported catalog.
- Select the products to publish by checking the boxes. Bulk selection is supported.
- Click Select Action, then choose Add to Channel Drafts.
- Select the target sales channel, then click Add as Draft.
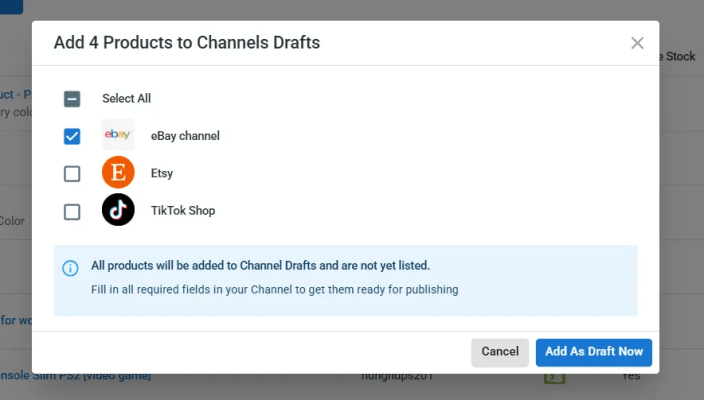
Draft listings are created on the sales channel, but they are not live yet. This stage is used for review and edits.
Edit draft listings before publishing
A sales channel may require extra details that do not exist in WooCommerce. Common examples include category selection, attributes, shipping settings, or policy-related fields.
- Open the sales channel from the left sidebar in LitCommerce.
- Go to the Drafts tab.
- Click a product title to open the listing editor.
- Complete the required fields shown in the editor.
- Save changes, then continue to the next draft item.
Templates and Recipes can speed up this step for large catalogs. Templates apply one type of setting in bulk, and Recipes combine multiple templates for consistent listing setup.
Publish listings live
After required fields are complete, listings can go live on the sales channel.
- Return to the draft listing screen.
- Click Save & Publish to publish the listing.
- Confirm the action when prompted.
Published listings move from Drafts to Active.
Option B: Quick/Auto publish (bulk listing workflow)
Quick/Auto publish is designed for faster listing at scale. This option is useful when many products need the same setup rules.
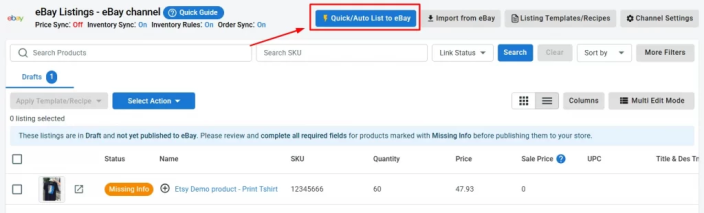
- In LitCommerce, go to Add / Manage Sales Channels.
- Select the sales channel (like Etsy, eBay, TikTok Shop, Reverb,…), then click Quick/Auto Publish.
Step 1: Select products
- Select all products from WooCommerce, or
- Filter products by simple conditions, such as product type, tags, or status.
Step 2: Listing setup
- Apply Templates, or apply a Recipe, to fill common required fields in bulk.
- Review the summary to confirm the correct templates are applied.
Step 3: Save and schedule (optional)
- Save the setup for reuse on future products.
- Turn on automated publishing if a scheduled workflow is preferred.
Step 4: Publish
- Click Publish to start bulk listing.
- Review the results once publishing finishes.
Tip: A small test batch helps confirm category and attribute settings before publishing a full catalog.
Case 2: Import sales channel listings and create them on WooCommerce
↑ Back to topThis path fits stores that already have active listings on a sales channel, but do not have the same products created in WooCommerce yet. Importing brings channel listings into LitCommerce first, so they can be reviewed and then created on WooCommerce.
Import listings from a sales channel
- Open LitCommerce in the WordPress dashboard.
- In the left sidebar, select the connected sales channel.
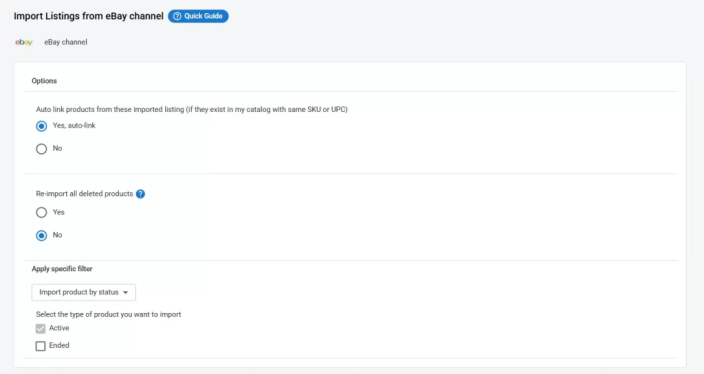
- Click Import from sales channel to pull existing listings into LitCommerce.
- Review the import options if they appear, then start the import.
- Wait for the import to finish, then refresh the channel product list.
After the import completes, the sales channel products will appear inside LitCommerce for review.
Review imported items before creating them on WooCommerce
Some channel listings may include data that does not map perfectly to WooCommerce. A quick review helps avoid incomplete products.
- Check SKU and product title for consistency.
- Review variants to ensure options are clear and complete.
- Confirm images and pricing look correct.
Create imported listings on WooCommerce
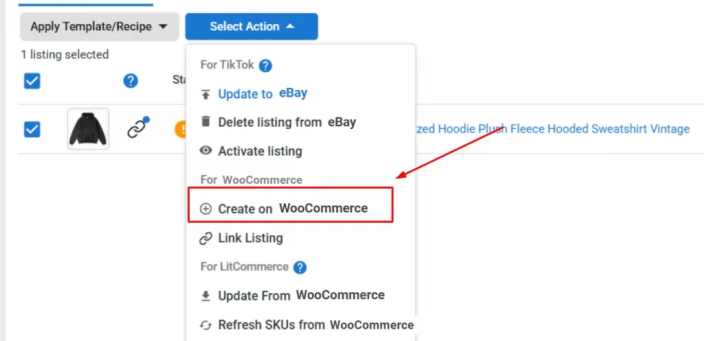
- Select the imported items to create on WooCommerce. Bulk selection is supported.
- Click Select Action, then choose Create on WooCommerce.
- Confirm the action when prompted.
- Open WooCommerce Products to verify the newly created items.
Note: If an item fails to create, missing data is usually the reason. A quick update to SKU, variant options, or required fields often resolves it.
Case 3: Link products on WooCommerce and a sales channel
↑ Back to topThis path fits stores that already sell on both WooCommerce and a sales channel. Linking matches the same product across platforms, so syncing updates the correct listing instead of creating duplicates.
When linking matters: Link products before turning on sync for inventory, price, or orders. Linking keeps reporting cleaner and helps avoid stock errors across channels.
Link products automatically
Automatic linking works best when SKUs match.
- Open LitCommerce in the WordPress dashboard.
- In the left sidebar, select the sales channel.
- Click Import to bring channel listings into LitCommerce.
- Review the linking status in the product list.
- Use auto-link if it is available, then confirm the results.
Link products manually
Manual linking helps when SKUs do not match, or when multiple items look similar.
- In the channel product list, find items marked as unlinked.
- Hover over the unlinked indicator, then select Link to a product.
- Search for the matching WooCommerce product by name or SKU.
- Select the correct item, then click Select to confirm.
- Repeat for remaining unlinked listings.
When linking is complete, the product status updates from unlinked to linked.
Tip: Consistent SKUs make linking faster and reduce sync issues later.
3. Turn on syncing (inventory, price, and orders)
↑ Back to topSyncing helps keep WooCommerce and a sales channel aligned after listings go live. It also reduces manual updates and lowers the risk of overselling. This step focuses on three core sync areas: Pricing, Inventory, and Orders.
Before you enable sync
A single “source of truth” should be chosen for daily updates. In most workflows, WooCommerce acts as the main catalog, then updates are pushed to the sales channel. This approach helps avoid conflicting changes.
Enable sync for a sales channel
- Open the connected sales channel in LitCommerce.
- Go to Channel Settings.
- Find the Pricing, Inventory, and Order sections.
- Turn on the sync switches needed for the workflow.
- Confirm the changes when prompted.
Pricing synchronization
↑ Back to top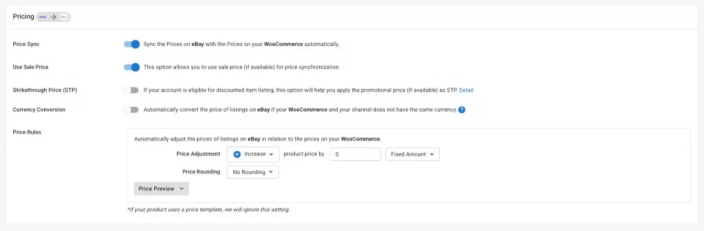
Pricing sync keeps listing prices consistent between WooCommerce and the sales channel.
- In Channel Settings, scroll to Pricing.
- Turn on Price Sync.
- Choose whether standard price or sale price should be synced, if the option is available.
- Set Price Rules when pricing needs adjustment per channel.
Price Rules help apply a consistent formula at scale. A fixed amount or a percentage can be added or deducted, depending on the pricing strategy.
Note: Pricing sync works best when price changes are made in WooCommerce first. If prices are edited directly on the sales channel, those changes may not carry back into WooCommerce.
Inventory synchronization
↑ Back to top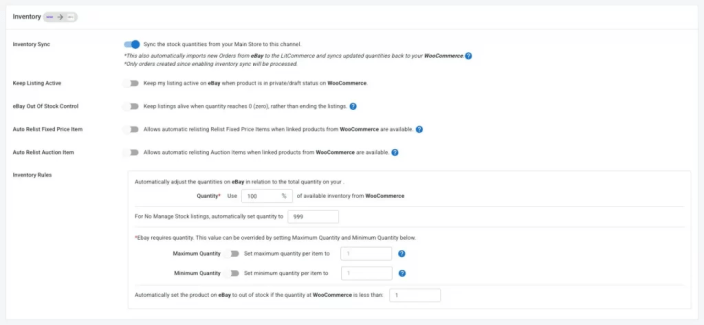
Inventory sync keeps stock levels aligned to reduce overselling.
- In Channel Settings, scroll to Inventory.
- Turn on Inventory Sync.
- Review available inventory options, such as stock behavior at zero quantity.
- Set Inventory Rules if a buffer or min/max display is needed.
Inventory Rules are useful for controlling how quantity is shown on the sales channel. A buffer can also help avoid overselling during busy periods.
Note: Inventory sync works more reliably when WooCommerce is the place where quantity changes happen first.
Order synchronization
↑ Back to top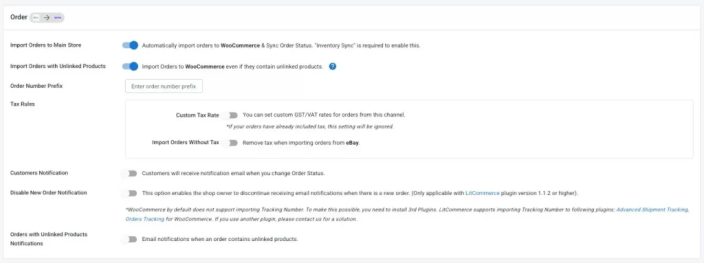
Order sync imports new channel orders into WooCommerce, so fulfillment can stay centralized.
- In Channel Settings, scroll to Order.
- Turn on Import Orders to Main Store.
- Review order options, such as order number format and store notifications.
- Save changes to start importing new orders.
Some orders may include items that are not linked to WooCommerce products yet. Those orders may be flagged for review, depending on settings.
Tip: Unlinked items are easier to manage when SKUs are consistent across WooCommerce and the sales channel.
4. Manage sales channel orders in WooCommerce
↑ Back to topOnce order sync is enabled, WooCommerce becomes the central hub for processing orders from your sales channel. This step explains where to find imported orders, how to fulfill them, and how to keep order updates consistent across systems.
View imported orders
- Open the WooCommerce dashboard in WordPress.
- Go to WooCommerce → Orders.
- Filter or search by order status, date, or order number to locate sales channel orders.
Imported orders follow your normal WooCommerce workflow, so existing fulfillment steps can stay the same.
Troubleshooting
↑ Back to topIf something does not work as expected, start with the checks below. This section covers the most common issues with connecting a sales channel, creating listings, and syncing data.
Connection issues
↑ Back to topThe sales channel will not connect, or authorization fails.
Check these items first.
- Confirm the sales channel account is active and has the right permissions.
- Confirm the correct region was selected during setup.
- Try reconnecting the channel from the LitCommerce channel settings.
If the issue continues, disconnect the channel and connect again to refresh permissions.
The connection keeps disconnecting.
Start with a quick reset.
- Reconnect the sales channel in LitCommerce.
- Confirm the store domain and HTTPS setup are stable.
- Check whether security plugins are blocking the connection flow.
If disconnects happen repeatedly, contact support with the time and screenshots.
The LitCommerce setup page does not appear in WordPress.
Use the plugin settings as an alternative entry point.
- Go to Plugins → Installed Plugins.
- Find LitCommerce, then click Settings.
- Return to the LitCommerce menu and try the connection again.
Product import issues
↑ Back to topProducts do not appear after import.
Review the store catalog status.
- Confirm products are published and not set to private or draft.
- Confirm product visibility is not restricted by catalog settings.
- Run the import again for a small set of products to verify results.
Variants are missing or incorrect.
SKU structure usually causes this issue.
- Confirm each variant has a unique SKU.
- Confirm attributes and variations are set correctly in WooCommerce.
- Re-import the product after the variant data is corrected.
Images do not import or look incomplete.
Start with basic checks.
- Confirm product images exist in WooCommerce and load correctly.
- Confirm image URLs are accessible and not blocked by the site.
- Re-import the product to refresh media data.
Listing issues
↑ Back to topA listing stays in Draft and will not publish.
Missing required fields are the most common reason.
- Open the listing editor and review required fields for the sales channel.
- Fill in missing category and attributes, then save changes.
- Try publishing a small batch before publishing the full catalog.
Bulk publish fails for some products only.
A few items may have special requirements.
- Check whether those products have missing SKUs or unsupported variants.
- Review each failed item for category, attribute, or image limits.
- Apply Templates and Recipes to standardize settings across the batch.
Category or attribute mapping looks wrong.
Start with a simple reset.
- Re-check the category selection for the product or template.
- Re-apply the correct template to affected items.
- Publish one product first to confirm the mapping works.
Sync issues
↑ Back to topInventory does not update on the sales channel.
Confirm sync is enabled and the product is linked.
- Turn on Inventory Sync in channel settings.
- Confirm the item is linked to the correct WooCommerce product.
- Update quantity in WooCommerce, then check the channel again.
Overselling still happens.
A buffer rule can reduce risk during busy periods.
- Check whether inventory rules or minimum quantity settings are applied.
- Keep a small buffer to reduce oversell during fast sales spikes.
- Confirm stock updates happen in WooCommerce first.
Prices do not update as expected.
Rules and update direction are common causes.
- Turn on Price Sync in channel settings.
- Review price rules and markup settings for the channel.
- Update price in WooCommerce first, then verify the channel price.
Sale price does not sync.
Sale price often needs a separate setting.
- Confirm sale price sync is enabled, if the option is available.
- Confirm the sale price exists and is active in WooCommerce.
Orders do not import into WooCommerce.
Start with core settings.
- Turn on Order Sync and Import orders to main store.
- Confirm the sales channel connection is active.
- Check for unlinked products that may block the import.
Orders import, but some items are missing or unlinked.
Linking usually resolves this.
- Confirm SKUs match between WooCommerce and the sales channel.
- Link the correct products in LitCommerce, then re-check the order.
Duplicate order notifications are sent.
WooCommerce emails can overlap with channel workflows.
- Review WooCommerce order notification settings.
- Disable the notification that causes duplicates, if needed.
Contact support
↑ Back to topIf the steps above do not solve the issue, contact our team via cs@litcommerce.com
or use the direct chat inside the app.
FAQs
↑ Back to topHelp customers by answering commonly asked questions.
Can multiple sales channels be connected at the same time?
Yes. Multiple sales channels can be connected and managed from the same LitCommerce dashboard. Each channel can also have its own settings for listing and syncing.
For the first time connecting to a sales channel, you can only add one, and then after that, you can add as many as you want.
Can existing channel listings be matched automatically, or is manual linking required?
Automatic linking works best when SKUs match across WooCommerce and the sales channel. If SKUs do not match, manual linking may be needed to select the correct product.
Can inventory display be adjusted without changing the real stock in WooCommerce?
Yes. Inventory rules can adjust what quantity is shown on the sales channel. This helps keep a buffer, hide exact stock levels, or cap visible quantity per listing.