WooCommerce store owners will need something that tracks WooCommerce orders and other data. Tracking conversions and other user activity is necessary to understand customer behavior so you can serve clients better through other channels. The WooCommerce Conversion Tracking is an essential plugin for this reason.
This plugin inserts the Pixels you obtain from different ad channels, like Facebook, Google Ads, Twitter, and lets you send the data triggered by different user actions to these channels. This lets you perform better ad campaigns by targeting the right users.
When you are integrating any advertising campaign, they provide various tracking codes (mainly JavaScript) to insert them in various pages of your site so that it can track how the conversion is happening.
This plugin also inserts those JavaScript tracking scripts on WooCommerce cart page, checkout success page and after user registration. So you can track who are adding your products to cart, who are buying them and who are registering to your site.
Getting Started
↑ Back to topIn order to run WooCommerce Conversion Tracking, you will need the following:
Requirements
↑ Back to top- WooCommerce 3.0 or greater
- WooCommerce Conversion Tracking Free
- PHP version 5.2.4 or greater
- MySQL version 5.0 or greater
Installation of FREE Version
↑ Back to top- To install the WooCommerce Conversion Tracking FREE plugin, search and download the plugin directly from your WordPress dashboard.
- Go to wp-dashboard >Plugins >Add New. Then search & find WooCommerce Conversion Tracking from the search bar on the top right, as shown below.
- You will see the plugin in the results. Click on Install Now.

Then click on Activate.

This will complete the installation process of the Free version.
You can now view WooCommerce Conversion Tracking Free under your Plugins directory.

Installation
↑ Back to topTo start using a product from WooCommerce.com, you can use the “Add to store” functionality on the order confirmation page or the My subscriptions section in your account.
- Navigate to My subscriptions.
- Find the Add to store button next to the product you’re planning to install.
- Follow the instructions on the screen, and the product will be automatically added to your store.
Alternative options and more information at:
Managing WooCommerce.com subscriptions.

This completes the installation process of the Pro version.
Pro Version Interface
↑ Back to topAfter installation, view WooCommerce Conversion Tracking PRO in wp-dashboard→WooCommerce→ Conversion Tracking.
Settings
↑ Back to topYou can limit or give access to WooCommerce Conversion Tracking in accordance with your preferred users or based on their roles. Out of the box when you install the plugin, you will get 6 types of user roles in the Settings tab. They are:
- Editor
- Author
- Contributor
- Subscriber
- Customer
- Shop manager
User role permissions
↑ Back to topNavigate to WP Admin Dashboard → WooCommerce → Conversion Tracking → Settings (tab).

After that, you will find the following screen including the user roles:

From here, you can select user roles at your disposal by checking the boxes. You can see we have selected Editor, Author, Contributor in the above screenshot. Any checked user will be able to access the Conversion Tracking Integrations option.
Note: 1
Checked Users having the administrative role will find the Conversion Tracking plugin within WooCommerce menu items. However, checked users who don’t have the administrative role will find the Conversion Tracking within Tools menu items.
Note: 2
Checked Users who don’t have administrative role won’t see the Settings and License tabs. However, by default, they are allowed to see the Integrations and Facebook Product Catalog tabs.
Facebook Conversion Tracking for WooCommerce
↑ Back to topThis article is about how to track WooCommerce Conversions for Facebook.The following sections show how you will set up Pixel ID for Facebook paid ads conversion for your WooCommerce site.
Pixel ID for Facebook
↑ Back to topTo use Facebook Pixel ID, you need to turn on the Facebook option from the WooCommerce Conversion Tracking plugin. Navigate to –
WP Admin Dashboard → WooCommerce → Conversion Tracking→ Integrations→ Facebook.
Configuration
Click on the toggle button to get the Facebook Pixel ID option.
Next, insert the Pixel ID of your Facebook account.
Click on the link given to find the Pixel ID.
You will be redirected to Facebook Events Manager. Here you will find the data and statistics relating to your paid ads campaigns.
To find your Pixel ID, click on the drop-down located above the screen on the top left. Find Pixels under Events Manager.
Copy the Pixel ID you will find located above under your event name.
Now, copy this ID.
Paste it on your WC Conversion Tracking plugin in your WordPress dashboard in the field given.
After pasting the ID hit Save Changes button and you are done with the Facebook integration with WooCommerce Conversion Tracking!
The PRO Version allows you to enter unlimited Pixel IDs for Facebook. So that if you have different agents looking after your WooCommerce site, the data will be sent to all those separate accounts automatically through the plugin.
In WooCommerce Conversion Tracking it is possible to use multiple Facebook pixel IDs to track events from different Facebook IDs. This is very much important to establish privacy and security of your main pixel id’s data. With the multiple Pixel ID functions, you can give access to different users like agencies, partners and even different in-house agents.
How to Use Multiple Pixel IDs
↑ Back to topNavigate to WP Admin Dashboard → WooCommerce → Conversion Tracking → Integrations → Turn on Facebook with the toggle button.

Next, click on Add New button:

You can create as many Facebook integrations as you need by clicking on the Add New button. You just need to use certain Facebook IDs for each of them to see the conversions from certain Facebook Ad accounts.
Events for Facebook
↑ Back to topWhen an action on your website occurs, your Facebook pixel logs it as an “event.” You can use events to track conversions, optimize for conversions and build audiences by adding the appropriate code to your website.
With WooCommerce Conversion Tracking, you will be able to track the following 8 events on your Facebook:
- Add To Cart
- Initiate Checkout
- Purchase
- Complete Registration
- View Product
- View Product Category
- Search Product
- Add To Wishlist
You can select to track all or some of the events.
Configuration

When you enter your Facebook Pixel ID, the plugin will pass data for these events to your Facebook Events Manager. You will be able to see all data relating to the events under the Events tab.
The Events tab shows the event name, status, activity and events received.
Name: This is the type of event detected by the pixel.
Status: This shows when the event was received by the tracker.
Activity: This shows the relative number of events received over time.
Events Received: The total number of events received for this event category.
You can easily see on this page how many Page Views and Product/Content Views happened in total. You can also see the total Add To Carts, Product Category Views, Purchases and Initiate Checkouts. And the time when they were received.

Under the Activity tab, you can view the exact time when the event was received, the name of the event, the device that was used when the action was triggered, parameters, and referring URL.
Event Time: The date and time when the action was triggered and detected.
Event Category: The type of event received
Device: The type of device used to take the action which triggered this event.
Parameters: The parameters sent with an event e.g. content ids, content type, product
Referring URL: The URL of the page where the event occurred.

You can also view all these data graphically under Events.

To change the date range, click on data sources and from the drop-down, choose the time period for which you want to track the conversion events on your website.

Facebook Product Catalog
↑ Back to topIn order to upload your website’s products to Facebook Product Catalog List, you need to have your website’s Product Catalog URL which can be found in WooCommerce Conversion Tracking. Read this documentation to know the process.
Login to WP Admin Dashboard → WooCommerce → Conversion Tracking → Facebook Product Catalog (tab).
Facebook Product Catalog URL
To find the URL, navigate to WordPress Admin Dashboard → WooCommerce → Conversion Tracking → Facebook Product Catalog.
When you select the Facebook Product Catalog tab, you will be able to see an auto-generated Product Catalog URL at the bottom of the page pretty much like this:
You will need this URL to have your website’s products inserted automatically in Facebook’s product CatalogList. However, you will also see the following fields:
Authentication Field
You can set the Authentication field to use the Facebook Product Catalog option of WooCommerce Conversion Tracking to establish privacy and security. To do so, go to WP Admin Dashboard → WooCommerce → Conversion Tracking → Facebook Product Catalog (tab). Check the authentication field to set username and password:

Don’t forget to click on the Save Changes button.
Note: If you set a username and password, you will be required to enter them when you are uploading products to Facebook Product Catalog list using the Data Feed URL. Take a look at the following screenshot:

You can read the How to Use Your WooCommerce Conversion Tracking’s Data Feed URL / Product Catalog URL in Facebook Product Catalog segment of this page to learn more.
Exclude Product Field
While you are uploading products to Facebook Product Catalog, you can exclude products by using Product Types and Categories. Just check the Type and Categories that you don’t need to upload.

Don’t forget to click on the Save Changes button.
How to Use Your WooCommerce Conversion Tracking’s Data Feed URL / Product Catalog URL in Facebook Product Catalog
If you want to run Facebook Dynamic Ads or Collection Ad format you will have to upload the list of the products that you want to promote. This list is called Facebook Product Catalog or simply Catalog (sometimes it is also called Product feed or Data Feed). The products that you are including in the product catalog contains information such as Product ID, Description, Name, URL, Image URL and other attributes which are used to create the Ads for those products.
To use the Product Catalog URL simply follow the steps:
Step: 1
First off, log in to your Facebook account. You will see an Ad option on the left bottom corner of the screen. Here is a screenshot:

Click on Ad option and after that, you will be redirected to the following page. Hit the Close button.

Step:2
Now, click on the Ads Manager menu button.

After that, you will see a mega menu popping out on the screen. Select Catalogs from the menu items.

Step:3
Now, click on Create Catalog button.

Step: 4
After that, you will have to select Catalog Type. For the products sold online, choose the E-commerce option. Then hit the Next button:

Step: 5
Now, give a unique Catalog name and after that hit the Create button.

Step: 6
In this stage, you will get a success message mentioning that you have created a Catalog successfully. Now, click on View Catalog button.

Step: 7
Click on the Add Products button:

Step: 8
Next, you will get two options to upload your products – One is Upload Once and the other is Set a Schedule.

Select the Set a Schedule option.
Step: 9
If you do so, then you will get an input option to insert your website’s Data Feed URL. Enter the Data Feed URL that you found in WooCommerce Conversion Tracking.

Step: 10
In this stage, you may have to insert the Username and Password that you set up in the WooCommerce Conversion Tracking’ Authentication Field. You can skip this stage if you didn’t set up the authentication field. If you did then insert the Username and Password in the following field:

Step: 11
After inserting the Product Catalog URL hit the Start Upload button and you are done!

Twitter Conversion Tracking for WooCommerce
↑ Back to topThis article is about how to track WooCommerce Conversions for Twitter.
The following sections show how to set up and track Twitter paid ads conversions for your WooCommerce site.
Events for Twitter
↑ Back to topYou can track three events on Twitter with the help of WooCommerce Conversion Tracking. One is Add to Cart, another is Purchase and the other is Complete Registration. Configuring these three events in WooCommerce Conversion Tracking is more or less same. Follow this documentation to learn the process.
Activate Twitter Channel
At first, navigate to WP Admin Dashboard → WooCommerce → Conversion Tracking→ Integrations → Twitter. After that, turn on the toggle button to activate Twitter:
Add to Cart
When your visitor adds an item to his/her Cart, WooCommerce Conversion Tracking can track and records this event’s details. Here are four examples of Add to Cart event:

How to Track “Add to Cart” Event on Twitter
To avail the service, follow these instructions:
Step: 1
Navigate to WP Admin Dashboard → WooCommerce → Conversion Tracking. Next, check the “Add to Cart” box of Twitter. You will be required to enter the Website Tag Id which can be found in your Twitter Ads Account.
Step: 2
To find a single event website tag id, visit your Twitter Account’s Ads dashboard → Tools → Conversion Tracking → Create New Conversion Event. After creating a New Conversion Event you will have to select a Conversion Type. Select the type “Custom” from the list. Make sure that you have checked the Use a single event website tag radio box. Check the Create a tailored audience box too.
Step: 3
Hit the Save conversion event button. After doing so, you will get a Custom Website Tag ID.
Step: 4
Copy this Custom Website Tag ID and paste it into WooCommerce Conversion Tracking.

This is how you can track Add to Cart event on Twitter with the help of WooCommerce Conversion Tracking.
Purchase
When your customer places an order the event is called a Purchase. Suppose, a customer of yours has placed the following order:

How to track “Purchase” event on Twitter
To avail the service, follow these instructions:
Step:1
Navigate to WP Admin Dashboard → WooCommerce → Conversion Tracking. Next, check the “Purchase” box of Twitter:

When you check the Purchase box, you will have to insert a Universal Tag ID which can be found on your Twitter Ads account.
Step: 2
To find the Universal Tag ID, visit your Twitter Account’s Ads dashboard → Tools → Conversion Tracking → Create New Conversion Event. After creating a New Conversion Event you will have to select a Conversion Type. Select the type “Purchase” from the list. Make sure that you have checked the Use a universal website tag radio box.
Step: 3
Hit the Save conversion event button. After doing so, you will get a Universal Website Tag ID.
Step: 4
Copy this Universal Website Tag ID and paste it into WooCommerce Conversion Tracking. After that click on Save Changes button.
This is how you can track Purchase event in Twitter with the help of WooCommerce Conversion Tracking.
Complete Registration
This event is triggered when any visitor completes sign up process on your WooCommerce website.
How to track “Complete Registration” event on Twitter
To avail the service, follow these instructions:
Step: 1
Navigate to WP Admin Dashboard → WooCommerce → Conversion Tracking. Next, check the “Registration” box on Twitter:
When you check the Registration box, you will get a field for inserting a Website Tag Id.
Step:2
Visit your Twitter Account’s Ads dashboard → Tools → Conversion Tracking → Create New Conversion Event.
After creating a new conversion event, you will have to select a conversion type. Select Sign up from the list of conversion type. After that, check the Use a single event website tag radio box. Next, check the Create a tailored audience box.
Step: 3
Hit the Save conversion event button. If you do so you will get a website tag id.

Step: 4
You will have to copy this Website Tag ID and paste it into WooCommerce Conversion Tracking.
Finally, click on Save Changes button and you are done.
Note: You must have a paid Twitter Ads account to track these events.
Google Ads Conversion Tracking for WooCommerce
↑ Back to topRetarget your visitors and clients better within the Google Ad network using WooCommerce Conversion Tracking plugin. Send client data directly to Google Ads server from your WooCommerce store. Run better ads campaigns by targeting the right users.
The following sections are guides to:
- Setting up Google Ads Account ID
- Google Ads Events
Google AdWords Account ID
↑ Back to topTo track Google AdWords conversions, you need to get a unique Account Id from your AdWords Account. Follow the steps to find the Account ID:
Steps to obtain Google AdWords Account ID
Step: 1
login to your Google AdWords account.
Step: 2
Hit the Tools icon as indicated by the red arrow.

If you do so, a mega menu will appear on the screen. Select Conversions from therein.
Step: 3
Next, click on the (+) button:

Step: 4

After that, select the kinds of conversions you want to track. To track sales and other options, select the Website option.
Step: 5
In this stage, you will be asked for creating an action. You will be able to see the following screen:

Give a random Conversion name, select an appropriate category option. Here, we have selected the Purchase/Sale tag. Then check the radio boxes for suitable Value and Count options that meet your needs. After that, click on CREATE AND CONTINUE button.
Step: 6
Now, it’s time to get the Account ID! Copy your Account ID from the global site tag.
Step: 7
Login to WP Admin Dashboard → WooCommerce → Conversion Tracking. Then, turn the toggle button on to activate Google Adwords functionality.
Step: 8
Next, paste the Account ID (as you copied in step: 6) in the given field:

Now hit Save Changes button and you are done configuring Google AdWords Account ID!
Events for Google Ads
↑ Back to topOnce you get the Google Ads Account ID, it would be just a matter of a single click to track any events that are happening within your WooCommerce website. If you couldn’t get the Account ID then, read this documentation to learn how to get the ID.
We assume that you have activated the ID in WooCommerce Conversion Tracking.
Purchase
This event of WooCommerce Conversion Tracking will help you see all the data when your customers place an order. Usually, the purchase event which takes place on your website looks pretty much like this:

To keep tracks of Purchase events, all you have to do is just check the “Purchase” box of WooCommerce Conversion Tracking.
Then create a Purchase event in Google AdWords so that you can get a Purchase Label. Copy the unique Purchase label and paste that Label in WooCommerce Conversion Tracking. Next, hit the Save Changes button and you are good to go!
How to get the Purchase Label for the Purchase event?
Step: 1
login to your Google AdWords account. Once you do that, you will be redirected to a new page.
Step: 2
Hit the Tools icon as indicated by the red arrow.
If you do so, a mega menu will appear on the screen. Select Conversions from therein.
Step: 3
Next, click on the (+) button:
Step: 4
After that, select the kind of conversion you want to track. To track sales and other actions, select the Websiteoption.
Step: 5
In this stage, you will be asked for creating an action. You will be able to see the following screen:

Give a Conversion name, select Purchase/Sale from the Category option. Next, check the Don’t use a value radio box from the Value option. After that, click on CREATE AND CONTINUE button.
Step: 6
In the next page, you will get the label id for the purchase event. Here is a screenshot:

You will have to copy the label (as underlined in the screenshot) and paste it into WooCommerce Conversion Tracking.
This is how you can track Purchase event in Google AdWords with the help of WooCommerce Conversion Tracking.
Complete Registration
This event of WooCommerce Conversion Tracking will help you see all the data when your customers complete any registration/sign up process. To keep tracks of Complete Registration events, all you have to do is just check the “Purchase” box of WooCommerce Conversion Tracking.
Then create a Complete Registration event in Google AdWords so that you can get a registration Label. Copy the unique Purchase label and paste that Label in WooCommerce Conversion Tracking. Next, hit the Save Changes button and you are good to go!
How to get the Registration Label for the Purchase event?
Step: 1
login to your Google AdWords account.
Step: 2
Hit the Tools icon as indicated by the red arrow.
If you do so, a mega menu will appear on the screen. Select Conversions from therein.
Step: 3
Next, click on the (+) button:
Step: 4
After that, select the kind of conversion you want to track. To track sales and other actions, select the Website option.
Step: 5
In this stage, you will be asked for creating an action. You will be able to see the following screen:

Give a Conversion name, select Sign-up from the Category option. Next, check the Don’t use a value radio box from the Value option. After that, click on CREATE AND CONTINUE button.
Step: 6
In the next page, you will get the registration label for the Complete Registration event. Here is a screenshot:
You will have to copy the label (as underlined in the screenshot) and paste it into WooCommerce Conversion Tracking.

This is how you can track Complete Registration event in Google Ads with the help of WooCommerce Conversion Tracking.
Perfect Audience Conversion Tracking
↑ Back to topPerfect Audience is an all-in-one retargeting platform for mobile, web, Facebook, and other channels. With WooCommerce Conversion Tracking for Perfect Audience, you can track the conversions that happen on your WooCommerce site and send the data to Perfect Audience.
The following sections show:
1. how to set up Advertiser ID for Perfect Audience
2. how to understand the Events on Perfect Audience
Perfect Audience Advertiser ID
↑ Back to topPerfect Audience is a retargeting web application. It lets marketers like you to bring back your website’s visitors through different types of advertisements including Facebook and banners.
If you are already using this ad platform for your WooCommerce store, you may need to track the conversions that are happening. WooCommerce Conversion Tracking helps you to track those conversions and certain behaviors of your visitors.
In this documentation, we will show you how to set up Perfect Audience Advertiser ID for WC Conversion Tracking. The successful configuration of the ID lets you track the conversions on your WooCommerce store.
Enabling Perfect Audience
At first, you have to install and activate the Pro version of WC Conversion Tracking on your WooCommerce store. Because only PRO version gives you the Perfect Audience Tracking feature.
- Now, navigate to – WP Admin Dashboard → WooCommerce → Conversion Tracking→ Integrations→ Perfect Audience.
- Enable the Perfect Audience using the toggle switch. This will give you some new options.
- Click on the link for Find the Advertiser ID here to obtain it.
4. In order to retrieve your advertiser ID, log in to your Perfect Audience account.
5. From Dashboard, navigate to – Manager → User Tracking.
6. On the upper right corner, you will find your Advertiser ID. Copy it.
7. Now, paste the ID on the Advertiser ID field under Perfect Audience.
8. Finally, hit the Save Changes button at the bottom of the page.
You have successfully configured Perfect Audience Conversion Tracking on your WooCommerce Store. Now, you can enable different events and track your customers’ behaviors.
Events for Perfect Audience
↑ Back to topWhen an event is fired/triggered by a visitor on your website, Perfect Audience can track that certain event with the help of WooCommerce Conversion Tracking.
The only thing that you need is the Advertiser ID to configure Perfect Audience with WooCommerce Conversion Tracking. Here are the events you can track in WooCommerce Conversion Tracking:
Make sure that you have checked all the event boxes that you want to track and created these events for your Perfect Audience account in order to track the events.
-
View Product
This event is triggered when a visitor clicks on a product and see the product. Suppose that one of your website’s visitor clicks on the following product:

The event is triggered when the product is viewed on a single page:

-
Add to Cart
When your visitor adds an item to his/her Cart, WooCommerce Conversion Tracking can track and record this event’s details.

In order to see the tracking details, you just have to visit your Perfect Audience account’s dashboard.
-
Initiate Checkout
Similar to the Purchase event, but it is measured immediately after the visitor or potential customer initiates the checkout process. Even if the visitor doesn’t the complete the purchase, you can still use this abandoned product data to re-market to the user and encourage them to complete their purchase in future.

-
Purchase
When your customer places an order the event is called a Purchase. You will also be able to track all sorts of purchase events with the help of WooCommerce Conversion Tracking.

-
Complete Registration
This event is triggered when any visitor completes a sign-up process on your WooCommerce website. You can also track this event if you check the Complete Registration radio box.

In order to track these events, you will have to create these events in your Perfect Audience account.
Create an Event
After having logged in to your Perfect Audience account, you will see the following screen:

Next, place your mouse on Manage and you will get some options right away.

Select Create Audience from the menu and you will get some fields to create an event.

Set an Audience Name and then click on Event.

When you click on Event, you must put a value for an event name. Here is a table of each event’s name and value:
| Event Name | Value |
|---|---|
| View Product | ViewContent |
| Add to Cart | AddToCart |
| Initiate Checkout | InitiateCheckout |
| Purchase | Purchase |
| Registration | Registration |
Suppose, we want to track Add to Cart event. To do so, type the value “AddToCart” in the blank place as demonstrated by the red arrow below:

Now, click on Create Audience button and you are good to go! You can check the track report when you visit the Perfect Audience dashboard. Here are a few events from the Dashboard:

You can also get more details of the events by selecting a certain event. Say, you select the Add to Cart Event.

Now, you will be taken to this screen which includes the detailed information of the Add to Cart event:

N.B. It will take a few days to get all the data about an event when it is fired.
Bing Conversion Tracking for WooCommerce
↑ Back to topBing is a search engine just like Google. Although it is not as popular as Google, people still use it for certain information. So, marketers often utilize this platform to run paid campaigns.
WooCommerce store owners might also want to run search or display ads on Bing. However, tracking conversion becomes an issue. Not everyone can add tracking codes for WooCommerce stores. Sometimes, developers take hundreds of dollars just to add few lines of code snippet.
If you are not a developer and not sure how to do it, you can use WooCommerce Conversion Tracking to integrate Bing Ads with your WooCommerce store. After adding the tracking, you can send conversion data to your Bing Ad platform and see how your campaigns are performing on your WooCommerce store.
Adding Microsoft Advertising (Bing Ads) UET Tag ID
↑ Back to topTo add UET tag in your site, at first, you need to go bing ads account and then follow these steps-
Navigate to Conversion tracking → UET Tags→Get Started
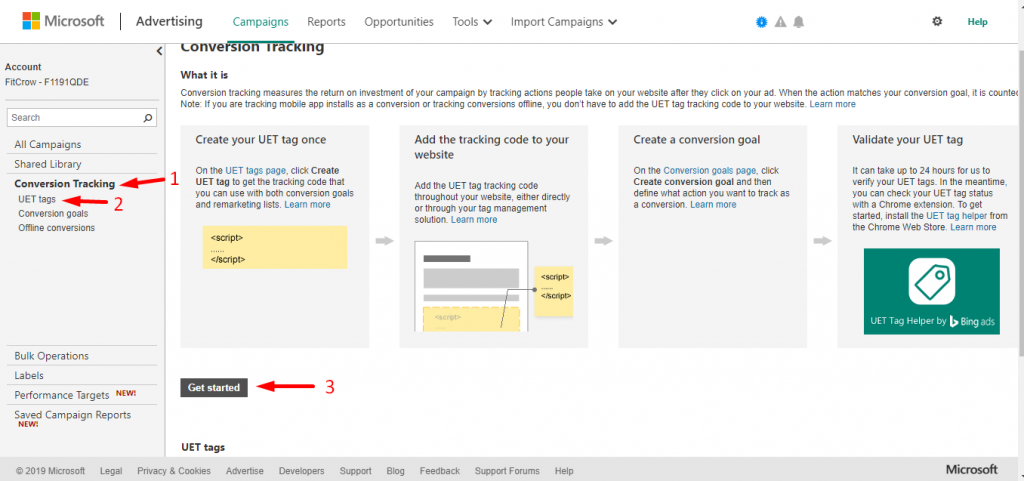
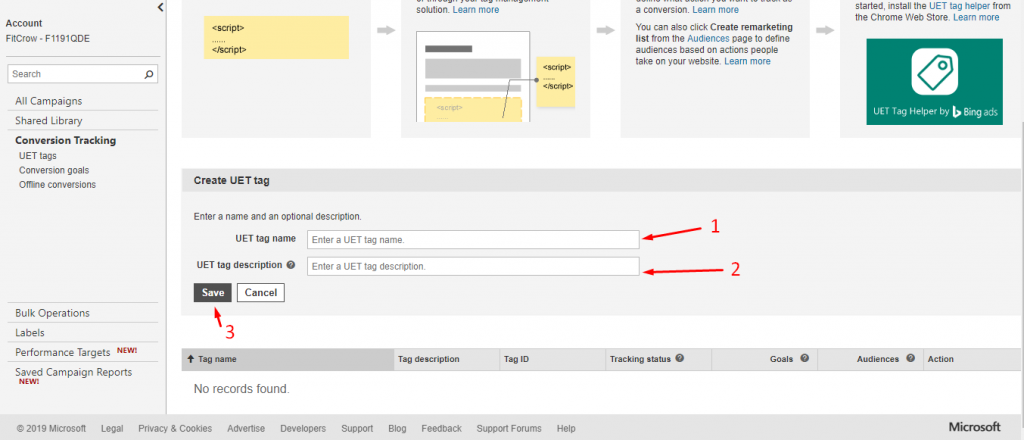
Click ”Create UET Tag” after clicking ”Get Started” . Now you need to give UET tag name and description and save this information.
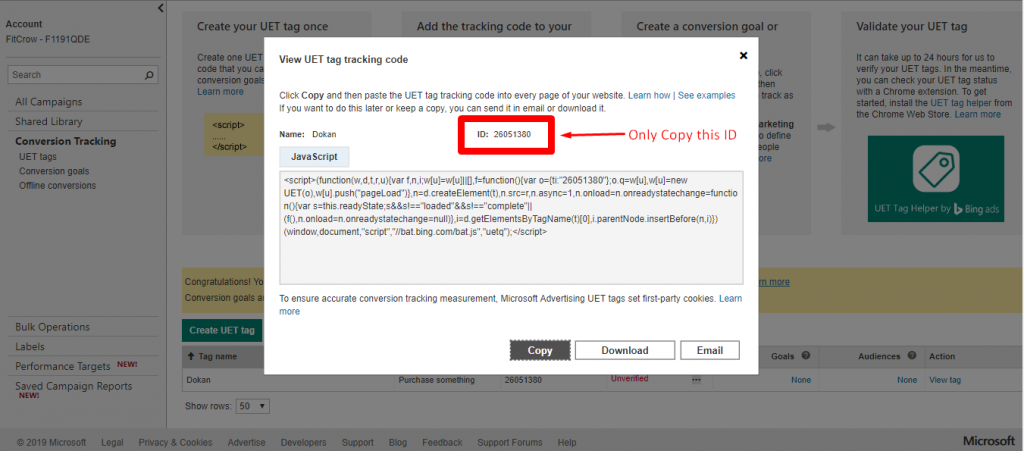
A Pop-up will appear with an ID and Javascript code when you save your information. If you don’t use WooCommerce Conversion Tracking you need to copy Javascript code into every page of your site.
If you use WooCommerce Conversion Tracking, you just need the ID and copy that for using in WCT.
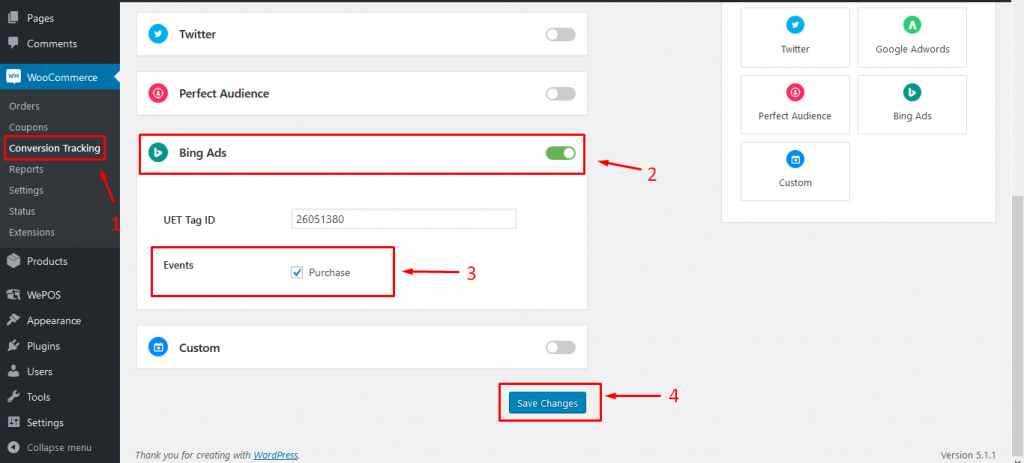
To use this ID, you will go to dashboard of your site.Now go to WooCommerce Conversion settings to activate bing ads tracking.
Go to WooCommerce → Conversion Tracking → Activate Bing Ads
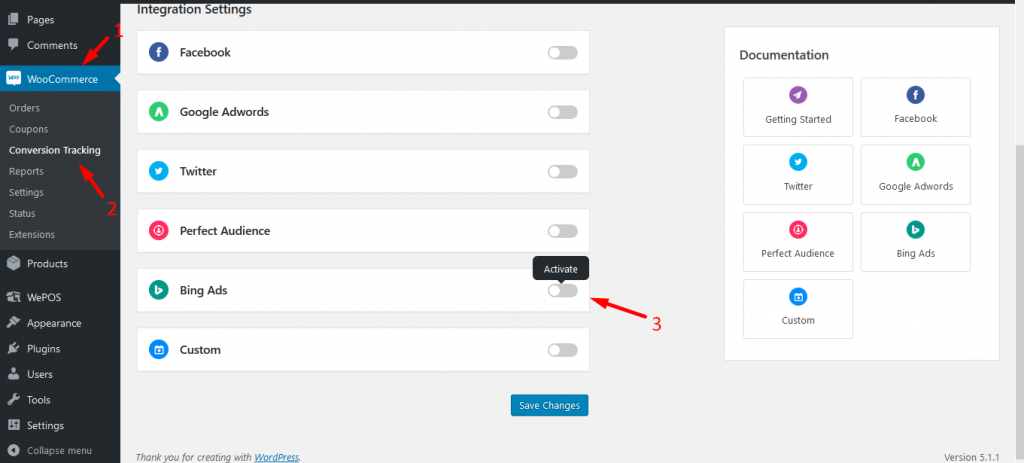
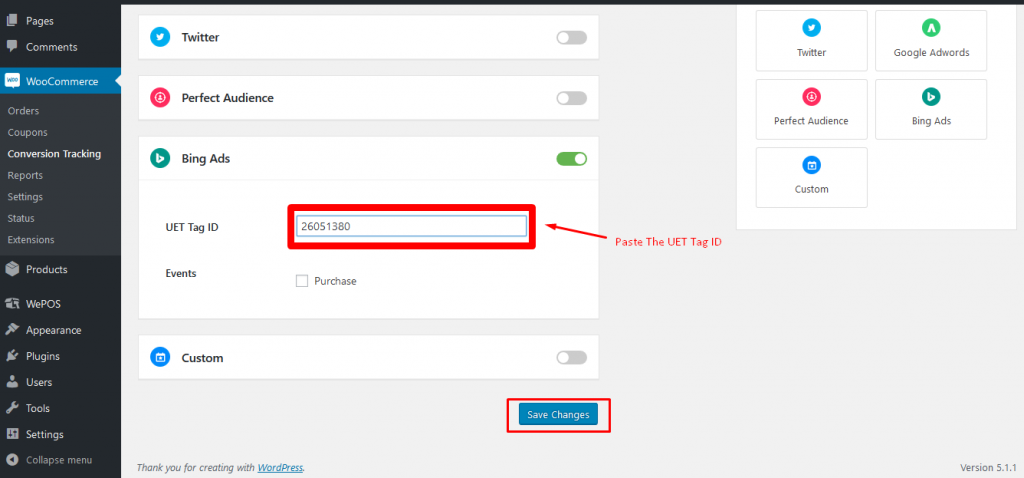
Now, Paste your Bing Ads UET Tag ID in ”UET Tag ID” box and save the change. Your (Microsoft Advertising ) Bing Adsconversion tracking will be activated.
Events for Microsoft Advertising (Bing Ads)
↑ Back to topOnce you have activated your bing ads conversion tracking, you can create your conversion goals or events. And WooCommerce Conversion Tracking can help you by activating event from WCT Settings.
How to Create Conversion Goals in
(Microsoft Advertising )Bing Ads
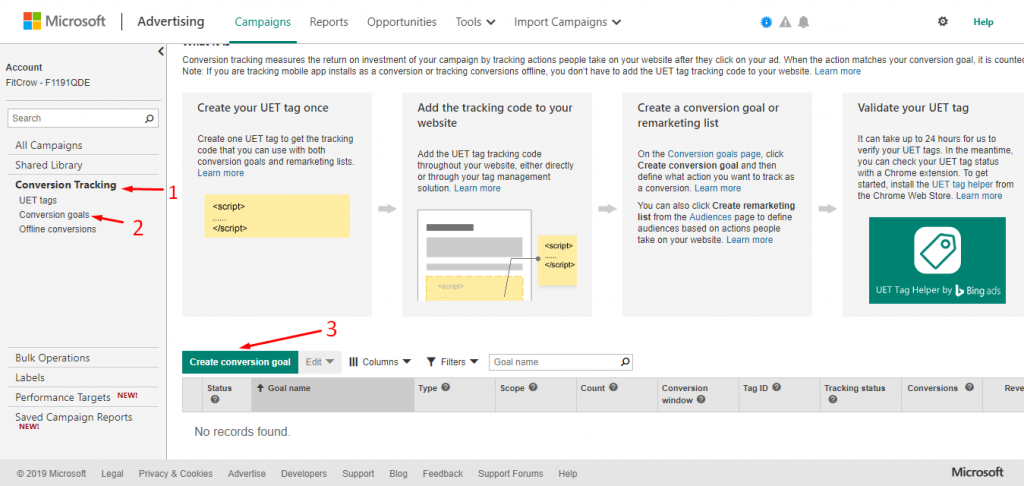
You can easily create conversion goals from Bing ads dashboard.Follow these steps to create your goals or events.
Go to Conversion Tracking → Conversion goals → Create Conversion goals
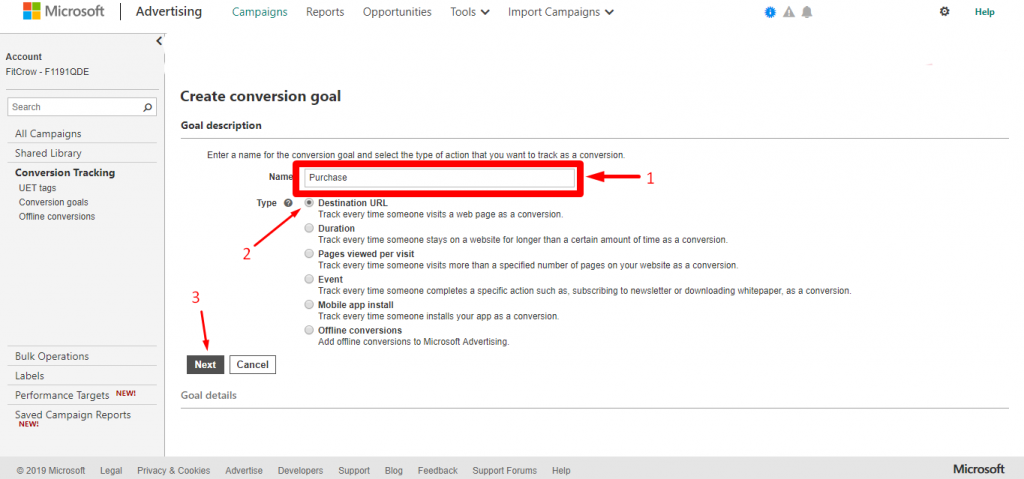
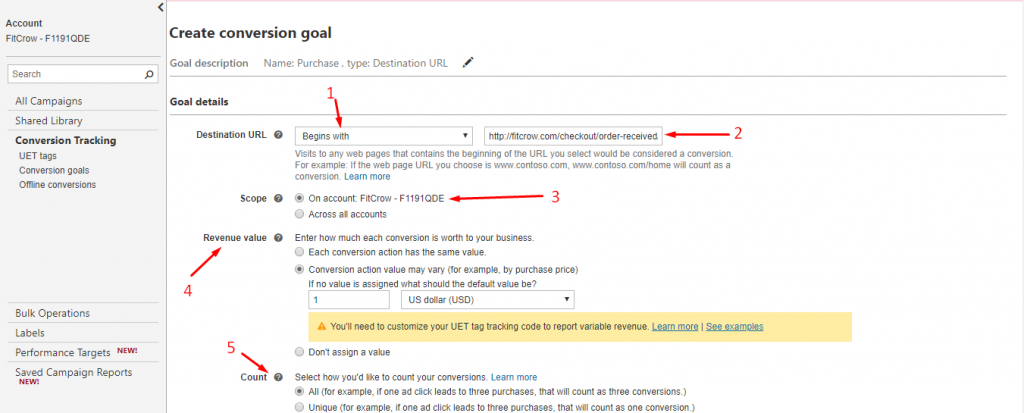
Give A name of your goal on this page like, ‘Purchase’. Now, select your goal type. If your goal is ‘purchasing something’, you can choose ”Destination URL” .Click ‘Next’ to complete your settings.
You have to choose your destination URL, scope, revenue value, count, conversion window and UET tag as required.
Destination URL – which URL fire as your conversion, will be provided here. URL can be set as begins with or equals to or contains.
Scope – For which ads account, you want to set goals.
Revenue value – Set your purchase price value here to get conversion value.
count – How do you want to count the conversion ,you will select here.
conversion window – Set your conversion tracking period here.
UET tag – Select which UET tag will follow this event or goals.
Check the below image to get an idea.
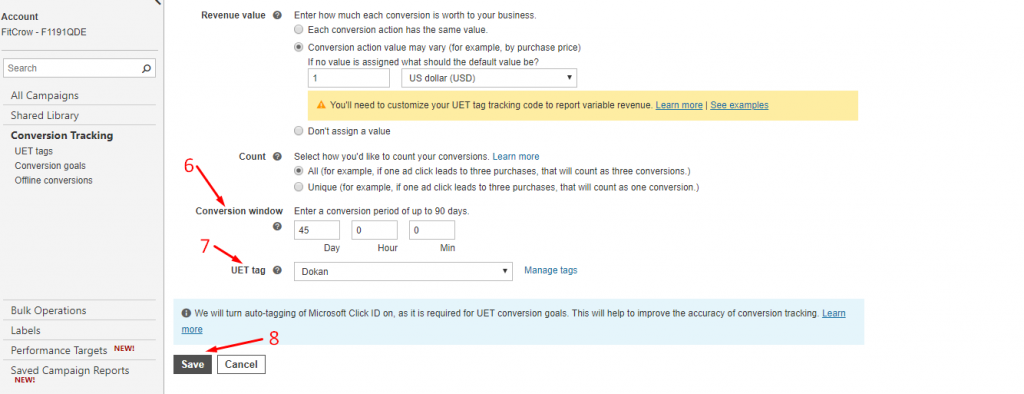
‘Save‘ details to create your conversion goals.
Activate Bing Ads Events on WooCommerce Conversion Tracking
↑ Back to topTo start event tracking using WCT, you need to go your site dashboard and follow this navigation.
Go to WooCommerce → Conversion Tracking → Bing Ads
→ Events → Click ‘Purchase’→ Save Changes
Custom Conversion Tracking for WooCommerce
↑ Back to topThe WooCommerce Conversion Tracking custom integration setting is important if you want to configure other social media platforms with WooCommerce Conversion Tracking. The procedure to configure other social media platforms is same. We assume that you want to configure Facebook manually. But how could you do it?
Successful Order Custom Integration Setting
↑ Back to topTurn on the toggle button for Custom channels from WP Admin Dashboard → WooCommerce → Conversion Tracking→ Integrations→ Custom.
Collect the JavaScript tag API from Facebook’s developer page.
| <!– Start Facebook Pixel Code –> | |
| <script> | |
| !function(f,b,e,v,n,t,s){if(f.fbq)return;n=f.fbq=function(){n.callMethod? | |
| n.callMethod.apply(n,arguments):n.queue.push(arguments)};if(!f._fbq)f._fbq=n; | |
| n.push=n;n.loaded=!0;n.version=‘2.0’;n.queue=[];t=b.createElement(e);t.async=!0; | |
| t.src=v;s=b.getElementsByTagName(e)[0];s.parentNode.insertBefore(t,s)}(window, | |
| document,‘script’,’https://connect.facebook.net/en_US/fbevents.js'); | |
| fbq(‘init’, ‘**********’); | |
| fbq(‘track’, ‘PageView’); | |
| </script> | |
| <noscript><img height=“1” width=“1" style=“display:none” | |
| src=“https://www.facebook.com/tr?id=**********&ev=PageView&noscript=1" | |
| /></noscript> | |
| <!– End Facebook Pixel Code –> |
https://gist.github.com/suzauddowla/da23cb5f57686db59389decb2f8faaf6
N.B. Enter Your Facebook Pixel ID instead of the asterisks(*).

After that, copy the script tag and paste it into WooCommerce Conversion Tracking’s Successful Order field:

Now, copy this piece of code:
fbq('track', 'Purchase', { });
Next, paste this code right there where it is marked by the red rectangle:

Now, put dynamic values in between the curly braces according to what you want to track. Here are some dynamic values: {customer_id}, {customer_email}, {customer_first_name}, {customer_last_name},{order_number}, {order_total}, {order_subtotal}, {currency}, {payment_method}
You must separate these values with commas. Take a look at the following screenshot:

Click on Save Changes and you are finished with the custom successful order event. This method is more or less same for the other social re-marketing platforms.
Registration Scripts Custom Integration Setting
↑ Back to topSuppose that we want to track visitors’ registration events on Facebook manually. But how could we do that?
Copy and paste the following code into WooCommerce Conversion Tracking:
| <!– Start Facebook Pixel Code –> | |
| <script> | |
| !function(f,b,e,v,n,t,s){if(f.fbq)return;n=f.fbq=function(){n.callMethod? | |
| n.callMethod.apply(n,arguments):n.queue.push(arguments)};if(!f._fbq)f._fbq=n; | |
| n.push=n;n.loaded=!0;n.version=‘2.0’;n.queue=[];t=b.createElement(e);t.async=!0; | |
| t.src=v;s=b.getElementsByTagName(e)[0];s.parentNode.insertBefore(t,s)}(window, | |
| document,‘script’,’https://connect.facebook.net/en_US/fbevents.js'); | |
| fbq(‘init’, ‘**********’); | |
| fbq(‘track’, ‘PageView’); | |
| </script> | |
| <noscript><img height=“1” width=“1" style=“display:none” | |
| src=“https://www.facebook.com/tr?id=**********&ev=PageView&noscript=1" | |
| /></noscript> | |
| <!– End Facebook Pixel Code –> |
N.B. Collect this JavaScript tag API from Facebook’s developer page. Enter your Facebook Pixel ID instead of the asterisk marks(*). This rule is same for other social media re-targeting platforms.
Take a look at the screenshot:

Now, copy this line of code ( you can find it in the same developer page of Facebook):
fbq('track', 'CompleteRegistration');
Paste the code right there as denoted by a red rectangle in the screenshot below:

Next, hit Save Changes button and you are done with configuring the Registration events manually.
N. B. In either of the cases, you must add the Facebook Pixel ID or the unique ID of the concerned social media re-targeting platform you are using. Here is a screenshot for a comprehensive understanding:

You have to replace the asterisks with your Facebook account’s Pixel ID right there where it is marked by the red arrows.