Auctions Made Easy for WooCommerce is a full-fledged Auctions plugin which can help you to create and manage Online Auctions in your WooCommerce Shop.
Installation
↑ Back to top- Download the .zip file from your WooCommerce account.
- Go to: WordPress Admin > Plugins > Add New and Upload Plugin with the file you downloaded with Choose File.
- Install Now and Activate the extension.
More information at: Install and Activate Plugins/Extensions.
Supported Auction Types
↑ Back to topNormal Auctions
↑ Back to top- In this type of auction, the Auction starts with a small price and bidders will have to bid a higher price than the last bid.
- At the end of the auction, the bidder with the highest price will be considered as the winner.
Reverse Auctions
↑ Back to top- In this type of auction, the Auction starts with a higher price and bidders will have to bid a lower price than the last bid.
- At the end of the auction, the bidder with the lowest price will be considered as the winner.
Sealed Auctions
↑ Back to top- In this type of auction, the bidders cannot know the bids placed by other bidders until the auction has ended. Once the auction has ended, the winner will be announced and all bidders can view the bids placed by other bidders.
- Sealed Auctions can be configured either as a Regular Auction or as a Reverse Auction.
Proxy Auctions
↑ Back to top- In this type of auction, the price bid by the bidders will not be directly visible to other users. Instead only a part of the original bid amount will be visible to other users. Every time a user places a bid which is less than the current highest bid, the system will automatically place a bid on behalf of the highest bidder. This process will continue until the highest bidder has been outbid.
- Both Regular and Reverse Auctions can be configured as Proxy Auctions. Once the auction has ended, the winner has to pay only the second highest/lowest bid amount (Decided based on Regular/Reverse Auction).
Unique Auctions
↑ Back to top- Unique Auction is a type of Sealed Auction ie the bidders cannot know the bids placed by other bidders until the auction has ended. Once the auction has ended, the winner will be announced and all bidders can view the bids placed by other bidders.
- Unique Auctions can be configured either as a Regular Auction or as a Reverse Auction.
- In order to to be a winner of a sealed auction, an user must place a bid which no other user has placed.
Setup and Configuration
↑ Back to topServer Cron Configuration
↑ Back to topAuctions Made Easy Requires Server Cron in order for the plugin to work. To setup Server cron do the following steps.
1. Login to the cPanel of your site
2. Locate “Cron Jobs” within the cPanel
3. Under the “Add New Cron Job” section, fill the following data
a. Common Settings
In this section, you can set up how frequently the Cron should run. For Example, if the value is set as “Once Per Minute”, then the cron will run once every minute. Once the cron is triggered, the following activities will be updated.
- Starting Future Auctions
- Ending Closed Auctions
- Automatically Relisting Failed Auctions
- Preventing the winners from making payment for auctions once the time has passed
b. Command
A Separate Cron job has to be created for each of the two commands.
i) Update Cron
wget -q -O – http://www.your-domain.com/?ans_auction_cron=update
ii) Relist Cron
wget -q -O – http://www.your-domain.com/?ans_auction_cron=relist
Plugin Settings
↑ Back to topThe Plugin settings can be accessed from Auctions Made Easy > Settings
General
General Settings

- Once the Plugin is installed, a page for displaying the auction products will be automatically created and assigned. If you want to modify the page in which the auction products are displayed, you can do so by selecting a different page in the “Auctions Page” option.
- You can customize how the Auction Products are displayed on the Auction Product Page by customizing the “Default Sorting in the Auction Page” option.
- If you want to run a Sealed auction, in your WooCommerce shop, enable the “Enable Sealed Auction” checkbox. When this option is enabled, an option to set the auction as sealed will be available in the product configuration page.
- If you want to run a Proxy auction, in your WooCommerce shop, enable the “Enable Proxy Bid Auction” checkbox. When this option is enabled, an option to set the auction as sealed will be available in the product configuration page.
- If you want to run a Proxy auction, in your WooCommerce shop, enable the “Enable Unique Bid Auction” checkbox. When this option is enabled, an option to set the auction as Unique Bid will be available in the product configuration page.
Auction Winner Payment Settings
- Once an auction has been won, the winner can make payment for the auction as per their convenience. Optionally, you can force the winner to make the payment within a specified time. The payment duration can be customized in the “Auction Winner Payment Duration” option.
- You can assign second highest bidder as winner when first highest bidder didn’t pay the payment on time by enabling the “Assign Second Highest Bidder as Winner when Fist Highest Bidder not Pay the Payment on Time” option. If second highest bidder also not pay the amount on time, then auction gets failed.
- If you wish to charge a extra fee from the winner when the payment is not paid on time, you can do so by enabling the “Charge Extra to the winner when the payment time limit is exceeded” option. You can set the tine limit and the fee in the Set Time Limit and Set Extra Charge Amount respectively.
- When an auction winner tries to make a payment, by default, all the enabled payment gateways will be visible in the checkout page. If you want to restrict the payment gateways, you can do by customizing the “Hide Selected Payment Gateways while Making Payment for Auctions using Buy Now Price and Won Auctions” option.
Note:
This payment gateways restricted in this option will also be hidden when the user tries to use the “Buy Now” button.
- By Default, the Auctions will reach “Completed” status when their payment order reaches “Processing or Completed”. If you want to customize the order status, you can do so by modifying the “Won Auctions and Buy Now Auctions will reach “Finished” status when the Order Status of the Payment Reaches” option.
Private Messages
If you want your users to contact you regarding their queries on auctions, you can place a contact form which will be visible on the auction product page. To display the contact form enable the “Allow Users to Send Private Messages to Admin” option.
Watchlist
- If you want your users to add auctions to a Watchlist, you can do so by enabling the “Enable Watchlist” option.
- When Watchlist is enabled, your customers add auctions to watchlist from Auctions Page, Shop Page, Category Page, Tag Page and Single Product Page.
Buy Now Price Section
- By default, In-order to win an auction users must participate and the Highest/Lowest Bidder(Based on Configuration) will be decided as the Winner. Optionally, your users can directly win the auction by paying the “Buy Now” Price. If you want to set a “Buy Now” price for your auctions, enable the “Enable Buy Now Price” option. Once enabled, the option to set a Buy Now Price will be visible in auction product configuration page.
- If you want to display the “Buy Now” Price for Guest users, you can do so by enabling the “Display Buy Now Price for Guest User” option.
- You can also customize when the “Buy Now” option should be displayed in an auction from “Show Buy It Now” option.
- If you wish to hide the Buy Now Price once the reserve price is met, you can do so by customizing the Hide Buy Now Price when the Auction reached the Reserve Price option.
Register Auction Section
- If you want your users to register themselves before participating in an auction, you can do so by enabling the “Enable Auction Registration”. When Enabled, an option to make Auction Registration Mandatory will be available in the product configuration page.
- You can also optionally charge a one-time registration fee. In order to pay the registration fee, a product will be needed. The product can be created from the “Register Fee Product” option.
- You can also optionally hide certain payment gateways while making payment for auction registration.
- By default, an auction registration which requires payment will be considered as successful when the payment order reaches “Processing or Completed”. If you want to change the order status, you can do so by customizing the “Order Status for Allowing Users to Bid for Auctions which Requires Registration with Fee” option.
Bidding Fee
- If you want to charge a one-time bidding fee before placing a bid, you can do so by enabling the “Enable Bidding Fee” option. When enabled, the option to set up the Bidding fee will be available in the product configuration page.
- In-order to pay the bidding fee, a product will be needed. The product can be created from the “Bidding Fee Product” option.
- You can also optionally hide certain payment gateways while making payment for bidding fee by customizing the “Hide Selected Payment Gateways while Making Payment for Auction Bidding Fee” option.
- You can also optionally hide certain payment gateways while making payment for bidding fee.
- By default, a bidding fee payment will be considered as successful when the payment order reaches “Processing or Completed”. If you want to change the order status, you can do so by customizing the “Order Status for Allowing Users to Bid for Auctions which Requires Bid Fee” option.
Auction Badges
- If you want to differentiate normal products from auction products, you can do so by adding a badge to the product image. To configure a badge, enable the “Enable Auction Badge” option.
- By default, an image will be selected. If you want to change the badge icon, you can do so by choosing a new image.
Auction Display Settings
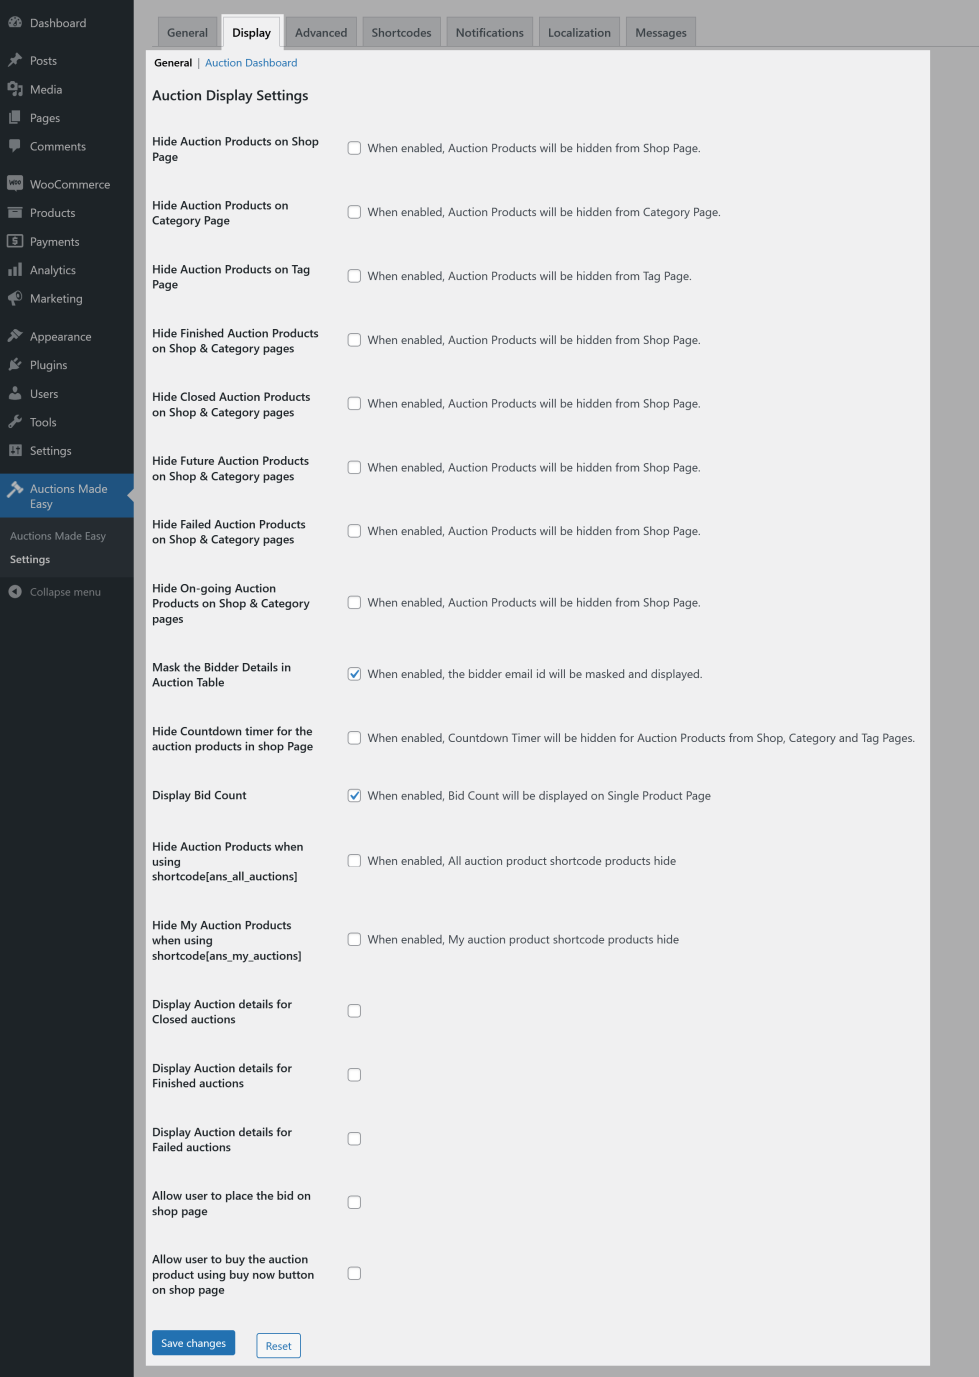
- By Default, Auction products will be visible in Shop page. If you want to hide the Auction Products on the shop page, you can do so by enabling “Hide Auction Products on Shop Page”.
- By Default, Auction products will be visible in Category page. If you want to hide the Auction Products on the category page, you can do so by enabling “Hide Auction Products on Category Page”.
- By Default, Auction products will be visible in Tag page. If you want to hide the Auction Products from the tag page, you can do so by enabling “Hide Auction Products on Tag Page”.
- By Default, Auction products will be visible in Shop & Category Pages . If you want to hide the Auction Products from the shop & category pages, you can do so by enabling “Hide Auction Products on Shop & Category Pages”.
- By Default, Failed Auction products will be visible in Shop & Category Pages . If you want to hide the Failed Auction Products from the shop & category pages, you can do so by enabling “Hide Failed Auction Products on Shop & Category Pages”.
- By default, the bidder name will be masked and displayed. If you want to display the name of the bidder, disable the “Mask the Bidder Details in Auction Table” option.
- By default, the bidder name will be masked and displayed. If you want to display the name of the bidder, disable the “Mask the Bidder Details in Auction Table” option.
- By default, the Countdown timer for the auctions will be displayed. If you want to hide the Count-down timer, enable the “Hide Countdown timer for the auction products in shop Page” option.
- By Default, the Bid count for the auction will be displayed in the single product page. If you want to hide the Bid Count, you can do so by disabling the “Display Bid Count” option.
- By Default, Auction products will be visible when using shortcode[[ans_all_auctions product_id = “product_id”] on a page. If you want to hide the Auction Products when using shortcode, you can do so by enabling “Hide Auction Products when using shortcode[ans_all_auctions]” option.
- By Default, My Auction products will be visible when using shortcode[[ans_my_auctions] on a page. If you want to hide the My Auction Products when using shortcode, you can do so by enabling “Hide My Auction Products when using shortcode[ans_my_auctions]” option.
- By default, auction details are not display for closed auctions. If you want to display the auction details for closed auctions, enable the Display Auction details for Closed auctions option.
- By default, auction details are not display for finished auctions. If you want to display the auction details for failed auctions, enable the Display Auction details for Finished auctions option.
- By default, auction details are not display for failed auctions. If you want to display the auction details for failed auctions, enable the Display Auction details for Failed auctions option.
- By default, place bid button not display on shop page. If you want to display & allow the user to place the bid on the shop page itself, enable the Allow user to place the bid on shop page option.
- By default, place bid button will not be displayed on the shop page. If you want to display & allow the user to place the bid on the shop page itself, enable the Allow user to place the bid on shop page option.
- By default, place buy now button will not be displayed on the shop page. If you want to display buy now button on the shop page itself, enable the Allow user to buy the auction product using buy now button on shop page option.
Auction Dashboard Display Settings
Here, you can hide the following in Auction Dashboard,
- Participated auctions,
- Won Auctions
- Lost Auction
- Register Auctions
- Auction Fee
- Watchlist
Payment
- If you want to force the user to add the payment card details before place the bid, enable the “Force the User to Add Payment Card Details to Place Bid” checkbox.
- If you want to charge automatically the auction price to the winner using their added card details on the site, enable the “Force the User to Add Payment Card Details to Place Bid” checkbox.
Advanced
General
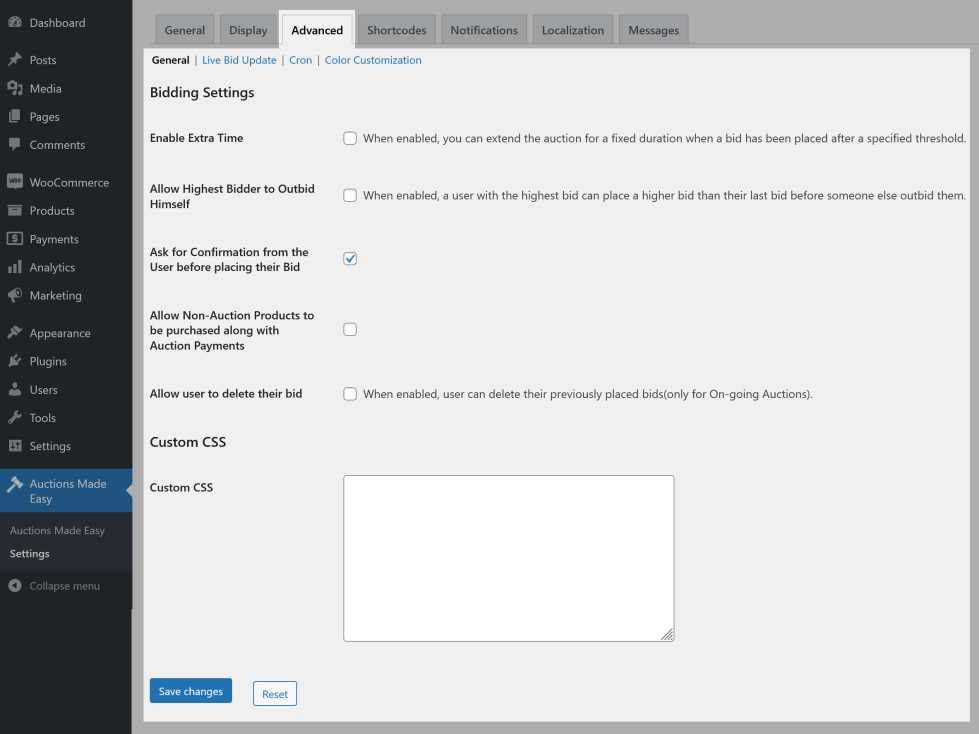
Bidding Settings
- You can extend the auction duration for a fixed duration if someone placed a last-minute bid. To enable the option enable the “Enable Extra Time” checkbox.
- If you want your bidders to outbid themselves, enable the “Allow Highest Bidder to Outbid Himself” option.
- By default, whenever a user tries to place a bid they will be asked for confirmation before placing the bid. If you want your user’s bid to be placed without confirmation, disable the “Ask for Confirmation from the User before placing their Bid” option.
- When making payments for auction, your customers can purchase other products in the same transaction. But, if you want to restrict such that your customers should purchase auction products separately, you can do so by disabling the “Allow Non-Auction Products to be purchased along with Auction Payments” option.
- By default, your users will not be allowed to delete their bids. If you want to allow your users to delete the bid, you can do so by enabling the “Allow user to delete their bid” option.
Bid Live Update Settings
- By Default, a Bid refresh button will be visible next to the current highest bid on the product page. The purpose of this button is to display the most recent bid without reloading the page. If you want to hide this button, you can do so by disabling the “Display Auction Refresh Button on Single Product Page” checkbox.
- If you want to display to most recent bid automatically to your users without the need for the user to refresh the page/press the refresh button, enable the “Enable Live Ajax” option.
Note:
Live Ajax feature will keep sending requests to your server continuously to fetch the most recent bid value. This can increase the server load.
Cron Settings
By default, Server Cron will be used for managing the Cron Actions. If you wish to use WP Cron, you can do so by customizing the Cron Type option.
Color Customization
You can customize the color of the Auction fields displayed to the user in this section.
Shortcodes
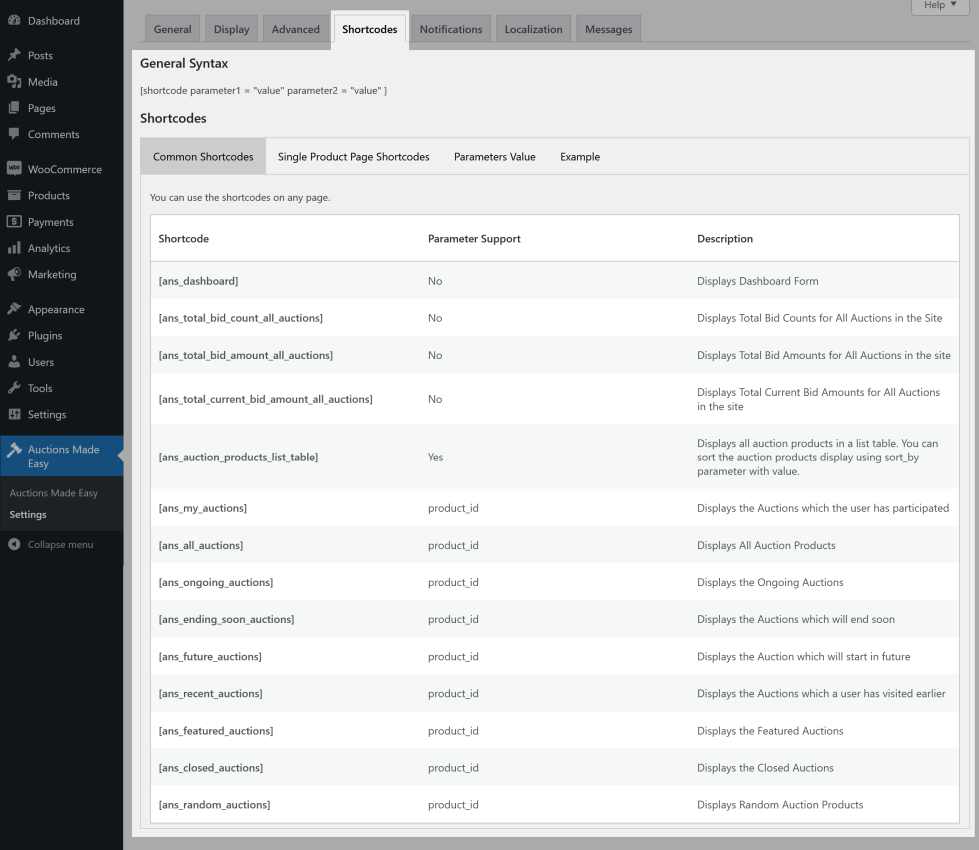
In this section, you can find the supported shortcodes along with their purpose.
Notification
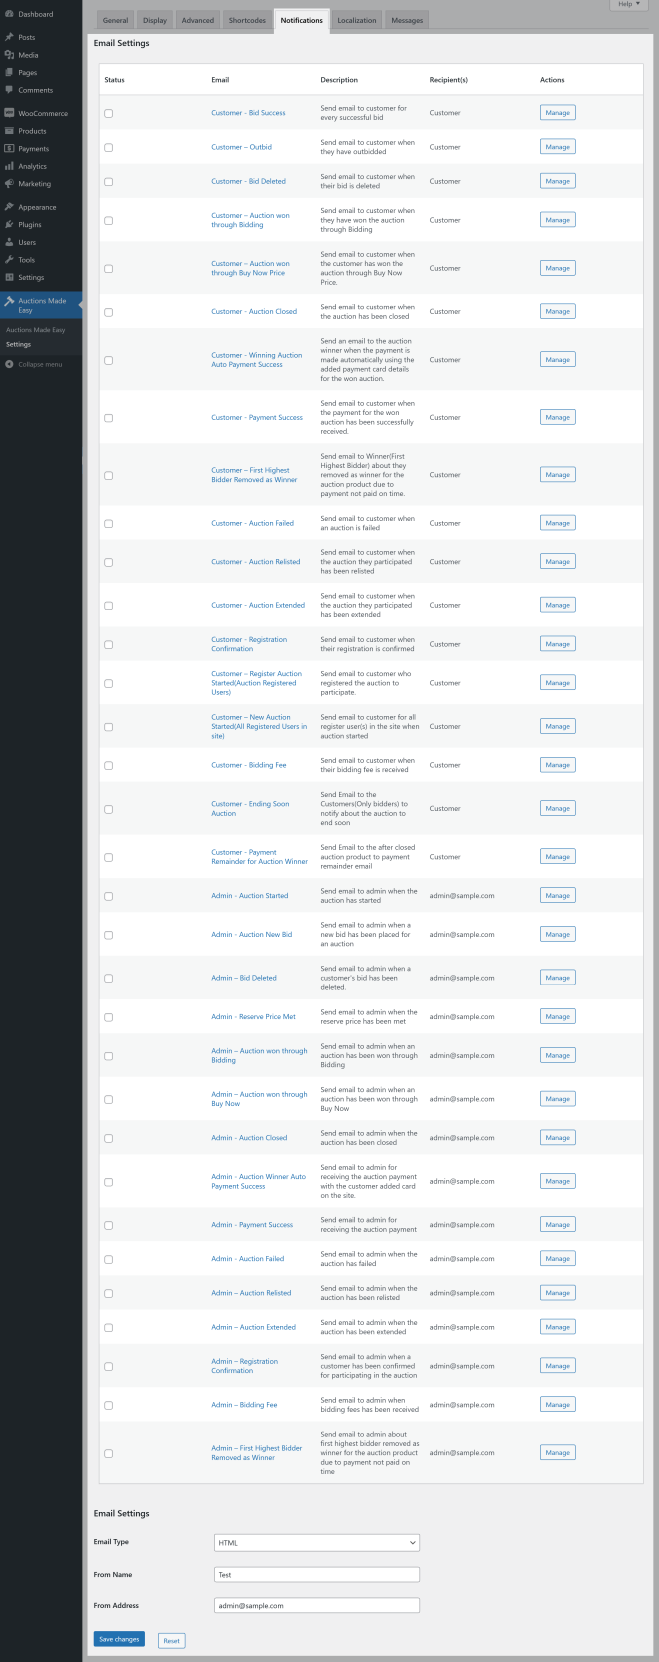
In this section, you can find the supported email notifications. Notifications can be turned On/Off as per preference.
Localization
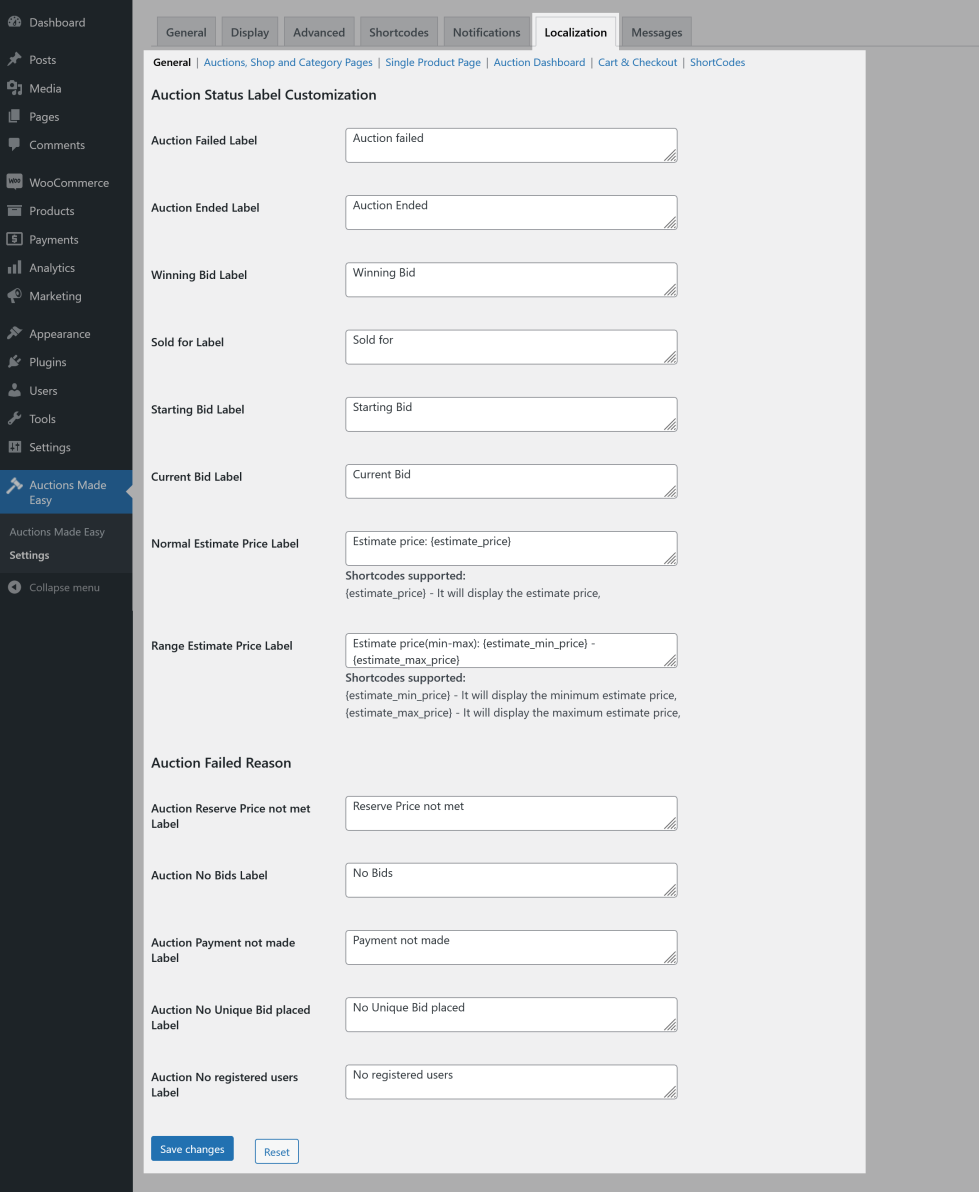
In this section, the labels displayed for the auction products can be customized.
Messages
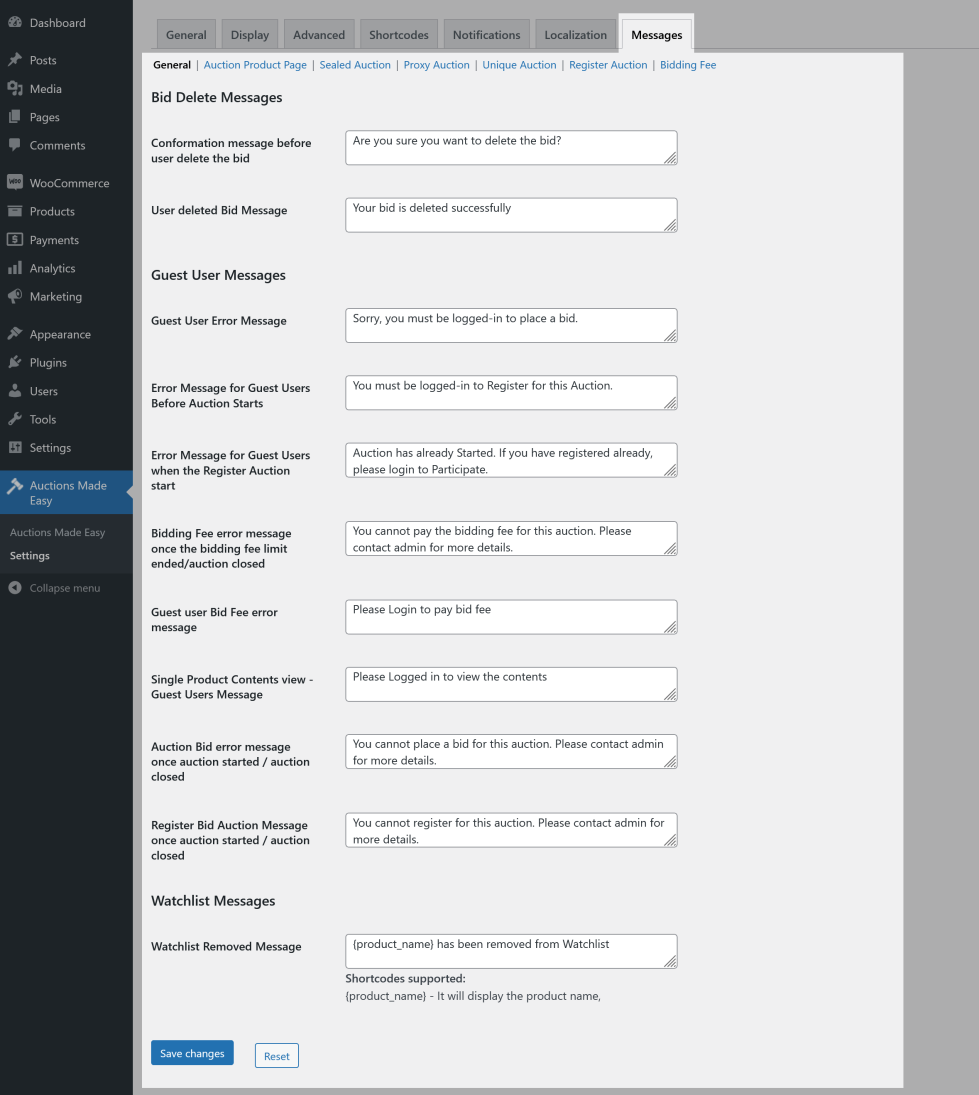
In this section, the messages displayed while interacting with Auction Products can be customized.
Usage
↑ Back to top- Once the Initial configuration is completed, an Auction Product has to be created.
- To create a new product go to WordPress Dashboard > Products > Add New
- In the Product Type selection, select “Auction”
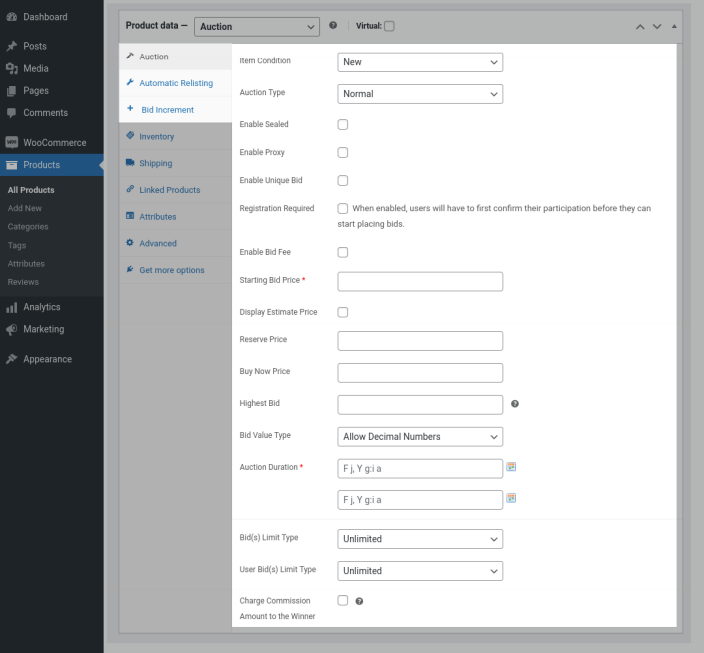
Auctions
↑ Back to topItem Condition
You can set the item condition as New or Used for the auction.
New: If the product is new, then you can select New option.
Used: If the product is old, then select Used option.
Auction Type
You can select auction type as Normal or Reverse.
Normal: A normal auction is known as the highest bid amount as a winner.
Reverse: Reverse auction is known as the lowest bid amount as a winner.
Starting Bid Price
You must set the starting bid amount price for the auction. The first bidder is not allowed to place the bid amount lower than the starting bid price.
Display Estimated Price
You can optionally set the estimate price of the auction product based on Normal or Range price.
Normal: You can set the regular price in normal(For example $10).
Range: You can set the price based on a range(Example $10 – $15).
Reserve Price
– You can optionally set the reserve price(Minimum price) for the auction. It will not be displayed in the frontend of the auction product page.
– The auction will be successfully finished only if the bid amount reaches the reserve price. If the reserve price is not met, then the auction fails.
Buy Now Price
You can set the Buy Now Price(highest price) of the auction to buy immediately.
Bid Value Type
Allow Decimal Numbers: If you select Allow Decimal Numbers option, then the bid amount can be decimal numbers or whole numbers.
Only Whole Numbers: If you select Only Whole Numbers option, bid amount should be a whole number.
Auction Duration
Start Date: Set Start date of the auction.
End Date: Set End date of the auction, it should be a future date.
Charge Commission Amount to the Winner
You can charge a commission amount to the winner, it can be a Fixed or Percentage value. The Amount will be added to the winning bid amount.
Automatic Relisting
↑ Back to topWhen an auction is finished or closed, you can optionally set it such that the lottery gets automatically relisted.
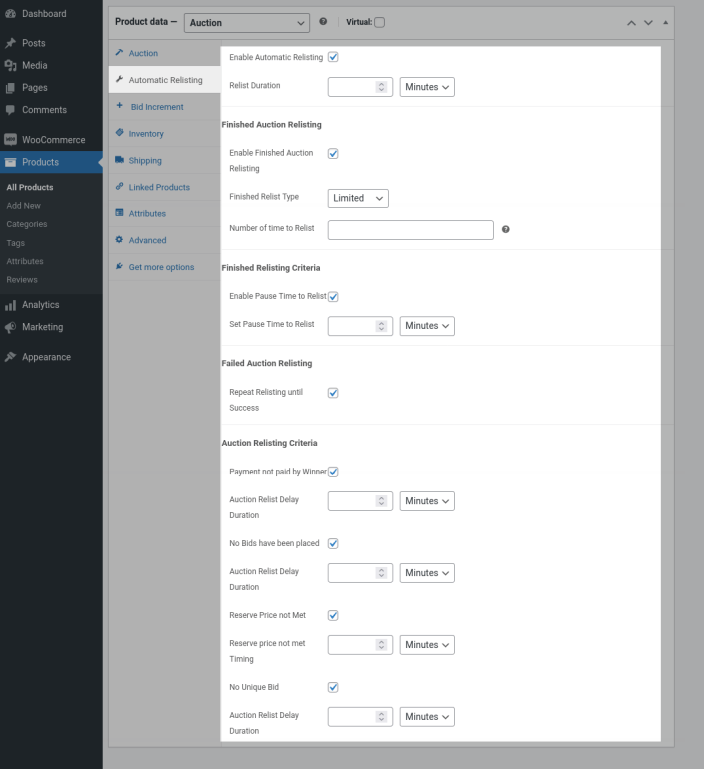
Enable Automatic Relisting
If you wish to enable Automatic Relisting, enable the Enable Automatic Relisting option.
Relist Duration
You can set the validity of the relisted auction in the Set Relist Duration option.
Finished Relisting
If you wish to relist Auction when it is successfully finished, you can do so by enabling the “Enable Finished Auction Relisting” option.
If you wish to relist the auction for an indefinite period, you can do so by setting the value as Limited in the Finished Relitst Type option.
If you wish to relist the finished auction after a pause, you can do so by enabling the “Enable Pause Time to Relist” option.
You can set the validity of the pause duration in the Set Pause Time to Relist option.
Failed Auction Relisting
If you wish to relist a auction when it has failed, you can do so by enabling the “Repeat Relisting until Success” option.
You can enable relist the failed auction for payment not paid by winner, by enabling Payment not paid by Winner option.
You can set the validity of the pause duration in the Auction Relist Delay Duration option.
You can enable relist the failed auction for no bids have been placed, by enabling No Bids have been placed option.
You can set the validity of the pause duration in the Auction Relist Delay Duration option.
You can enable relist the failed auction for reserve price not met, by enabling Reserve Price not Met option.
Bid Increment
↑ Back to topBid Increment
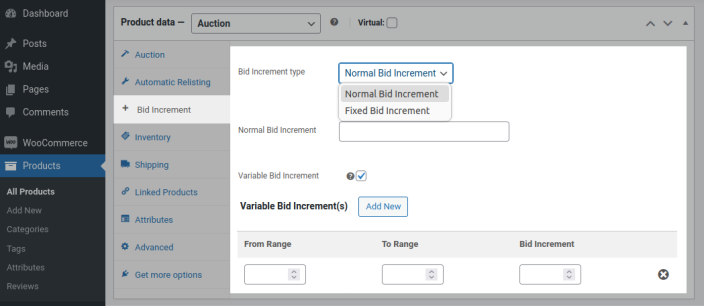
You can optionally enable Bid Increment for auction product which increases the minimum bid amount during bidding.
We have two types of bid increments.
(i) Normal Bid Increment
If you select normal bid increment option and set the bid increment value, then bid value increase based on Current bidded value.
Example
Current Bid: 60
Bid Increment: 5
Now user can bid 65 or more than 65(65, 66, 67) and the user cannot bid below 65.
(ii) Fixed Bid Increment
You can set bid increment value as fixed. Bidding amount will be increase by only fixed value.
Example
Current Bid: 60
Fixed Bid Increment: 5
Now user can bid 65, 70, 75, 80, etc and the user cannot bid 66, 72.
Variable Bid Increment (Optional)
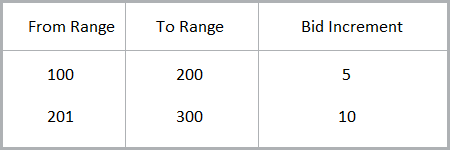
You can also optionally set different bid increment values based on bid value range(From Range & To Range)
Example
After Completing the configuration, publish the product. Your users will be able to participate in the auction.
Auction Dashboard
↑ Back to topAdmin Dashboard
↑ Back to top- To access the Auctions Admin Dashboard go to WordPress Dashboard > Auctions Made Easy > Auctions Made Easy
- From this dashboard, the Site Admin can view the following data
- Status of the Auction
- Bidders along with their Bid Amount
- Payment Status of Won Auction
- Auction Relist Status
- Bidders along with Bid Amount for each Relisting
- Start/End Any Auction
Customer Dashboard
↑ Back to topTo display the customer dashboard, place the shortcode “[ans_dashboard]”. Your Customer can access the following Details from the Customer Dashboard
- List of Participated On-going Auctions
- List of Won Auctions
- List of Lost Auctions
- List of Registered Auctions
- List of Bidding Fee Paid Auctions
- Auction Watchlist
Widgets
↑ Back to topTo configure the Wallet Widgets go to WordPress Dashboard > Appearance > Widgets. The following Widgets are Available
1. Auction Products
Displays the Auction Products. The Following Filters are available,
- Ending Soon Auctions
- Future Auctions
- Recent Auctions
- My Auctions
- Featured Auctions
- Random Auctions
- Closed Auctions
2. Auction Search
Displays the Auction product search widget.
3. Auction Watchlist
Displays the Products currently in the user’s watchlist.
4. Recently Viewed Auctions
Displays the auction recently viewed by the user.
Translation
↑ Back to topAuctions Made Easy for WooCommerce is translation ready, meaning you can edit the po files by which you can translate the text to any language. Steps to perform the translation are as follows. For example, a translation to French.
- Download and install Poedit
- Open the file auctions-made-easy-for-woocommerce > languages > auctions-made-easy-for-woocommerce.pot using Poedit.
- Create a new translation file by clicking Create new translation button.
- Choose the Source text and set its corresponding French text in Translation Text Area.
- Save the changes.
- Save the file name as auctions-made-easy-for-woocommerce-fr_FR.po.
- If you are using WordPress Version 3.9.13 or below, then in wp-config.php define the WPLANG as French. Syntax is define(‘WPLANG’, ‘fr_FR’);
- If you are using WordPress Version 4.0 or above, then go to WordPress dashboard > Settings > General and select the Site Language as French.
Questions and Feedback
↑ Back to topHave a question before you buy? Please fill out this pre-sales form.
Already purchased and need some assistance? Get in touch with us via the Help Desk.
