Installation
↑ Back to topTo start using a product from WooCommerce.com, you can use the “Add to store” functionality on the order confirmation page or the My subscriptions section in your account.
- Navigate to My subscriptions.
- Find the Add to store button next to the product you’re planning to install.
- Follow the instructions on the screen, and the product will be automatically added to your store.
Alternative options and more information at:
Managing WooCommerce.com subscriptions.

Configuration
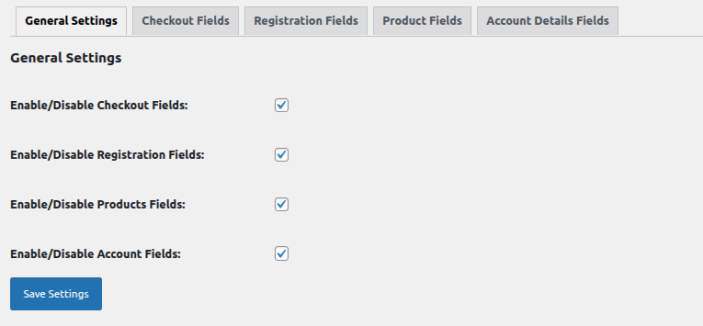
↑ Back to topAfter you have installed and activated the Custom Fields Manager for WooCommerce extension, You have four tabs which are General Settings, Registration Fields, Product Fields and Account Page.
General Settings:
↑ Back to top- Enable / Disable Checkout Fields: option to enable checkout Fields.
- Enable / Disable Registration Fields: option to enable Registration Fields.
- Enable / Disable Products Fields: Enable Product Fields Settings.
- Enable / Disable Account Fields: Check box option to enable account page fields.
Checkout Fields:
There are three sections of Fields that you can edit with the WooCommerce checkout page editor and also you can add custom section on checkout page.
- Billing – Billing address and payment section of checkout (payment must be enabled)
- Shipping – Shipping details section of checkout (shipping must be enabled)
- Additional – Additional Information section that appears after the billing and shipping sections of checkout, next to order notes (order notes must be enabled)
- Add Section – You can add custom section with custom fields to get extra information from customers during checkout.

Billing Fields:
Go to the Billing Field tab to customize the fields in the billing section. Here, you’ll find both custom and default WooCommerce billing fields. To modify a default checkout field, simply click the “Edit” button. You can drag and drop the fields to sort their order.
Add New Fields:
Click the “Add Field” button to create a new checkout field for the billing, shipping, or additional section. Once added, you can fully customize the field based on your preferences. Each field includes the following settings:
- Type – Select the type of field you need.
- Field Name – Define the field’s internal name.
- Label – Set the label to be displayed on the frontend.
- Enable – Enable or disable the field.
- Placeholder – Specify placeholder text.
- Field Class – Choose the field’s position or width (e.g., form row first/last, wide).
- Price – Assign a price to the field if needed.
- Required – Make the field mandatory for customers.
- Display for Specific Product or Category – Show the field only for certain products or categories in the cart.
- Hide for Specific Product or Category – Hide the field for specific products or categories.
- Repeat this Field – Repeat the field based on products in the cart or total cart items.
- Display for Specific User Roles – Show the field only to selected user roles.
- Hide for Specific User Roles – Hide the field from selected user roles.
- Add Conditions – Make the field dependent on another field. (Group relations use “OR,” while condition relations use “AND.”)
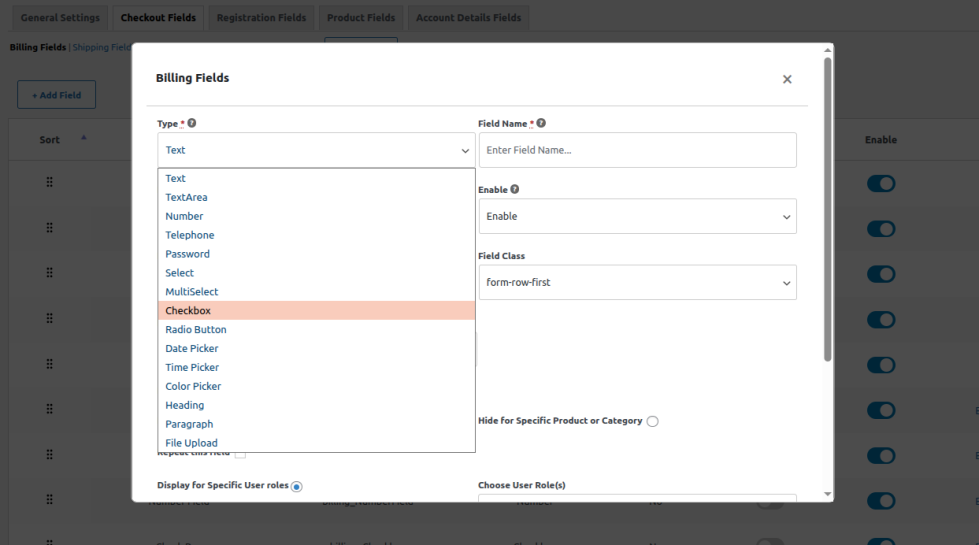
Note: In the “And” operation. all conditions must be true. In the “OR” condition, if any operation is true, the expression will be true.
Add Fields in Shipping & Additional Section
↑ Back to topGo to WooCommerce > Custom Fields > Checkout Fields and click Shipping or Additional Tabs and add the fields in the same way as we did for the billing section.
Add Custom Section:
↑ Back to topClick on a Add Custom Section button to create a new section on checkout fields and add fields in this section according to the Store requirements, you need to configure the following:
- Title: Enter custom section title.
- Section Name: Set the name of the new custom section.
- Display Position: Set the position of the custom section, Nine different positions available.
- Enable: Enable or disable custom section anytime.
- Repeat this Section: Repeat this section based on the product quantity or cart count.
- Display for specific products or categories: Show the section only for certain products or categories in the cart.
- Hide for specific products or categories: Hide the section only for certain products or categories in the cart.
- Display for specific User Roles: Show the section only to selected user roles.
- Hide for specific User roles: Hide the section only to selected user roles.
- Add Conditions: Group relations use “OR,” while condition relations use “AND.
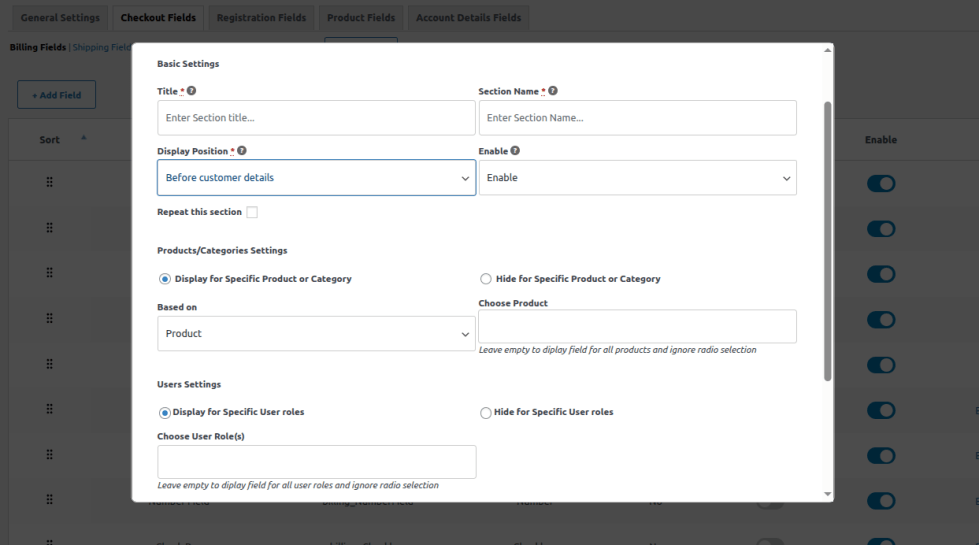
Note: Use the same procedure for adding fields in the custom section as we used in the billing section.
Registration Fields:
↑ Back to topHere you will find the following tabs: Registration Fields, Manage Roles, New User Settings, Email Settings, Configuration, reCaptcha Settings.
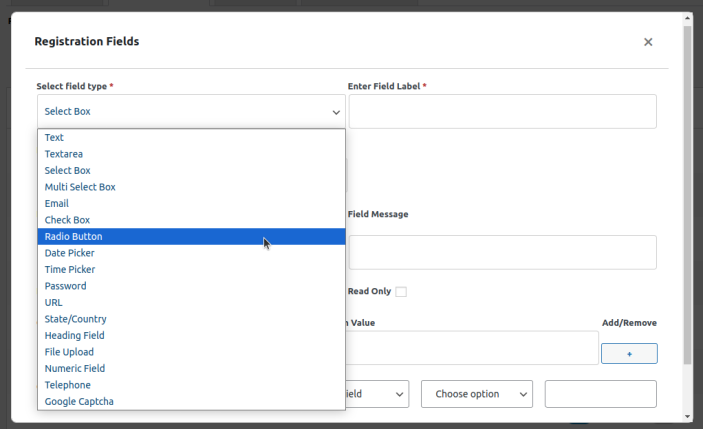
Registration Fields:
In this tab, you can add, edit, and manage custom registration fields. You can also sort the fields and choose from 17 custom field types. Additionally, you can set conditional logic to show or hide fields based on other fields.
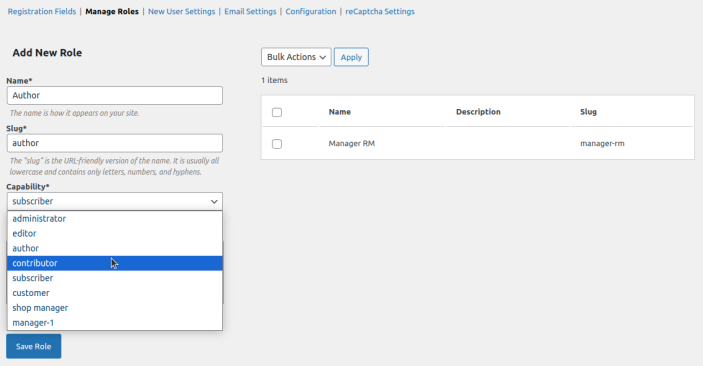
Manage Roles
Add new roles based on your store’s capabilities or remove existing ones.
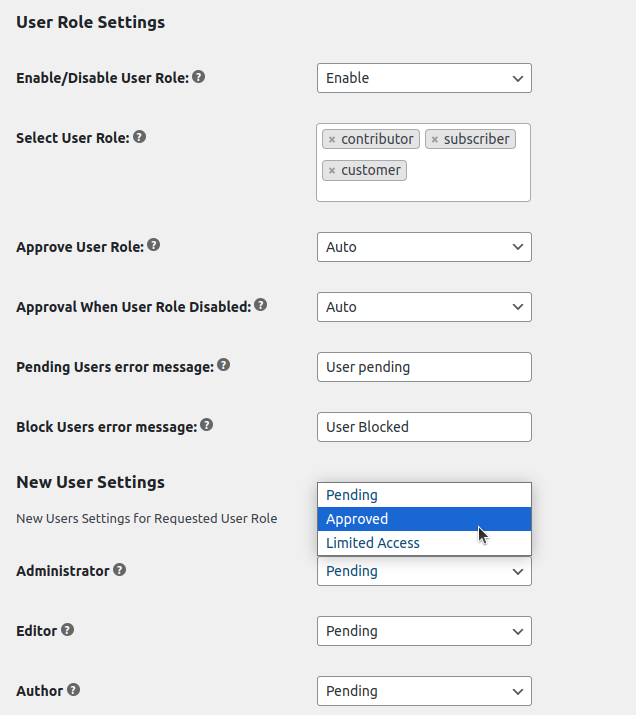
New User Settings
- Enable/Disable User Role: Turn a user role on or off for the frontend.
- Select User Role: Choose which user roles appear on the frontend.
- Approve User Role: Set approval to manual or automatic.
- Approve When Role Disabled: Choose approval settings for disabled roles.
- Pending User Error Message: Customize the message for pending users.
- Block User Error Message: Set a custom message for blocked users.
These settings let you define whether a requested user role is pending, approved, or has limited access by default.
Email Settings
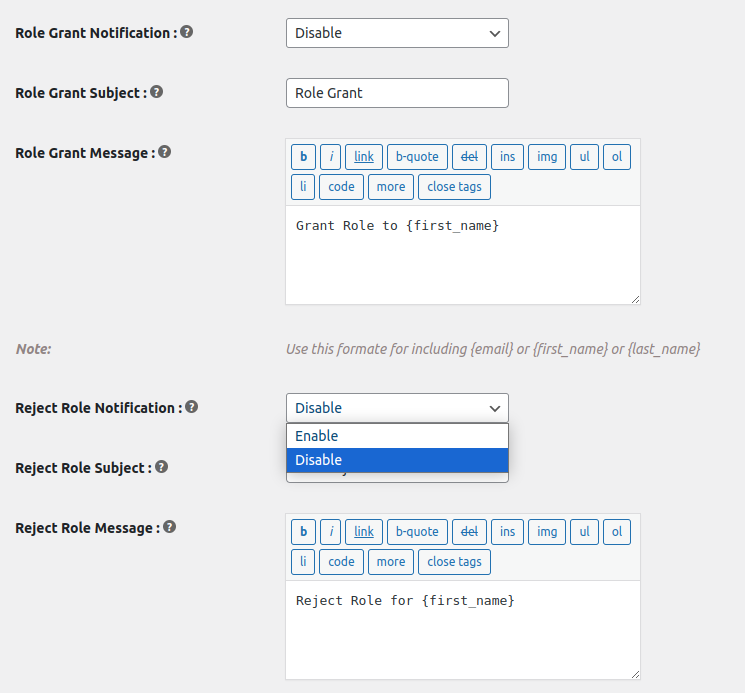
Set up email notifications for role grants, rejections, approvals, blocks, and limited access. Customize the email subject and message as needed.
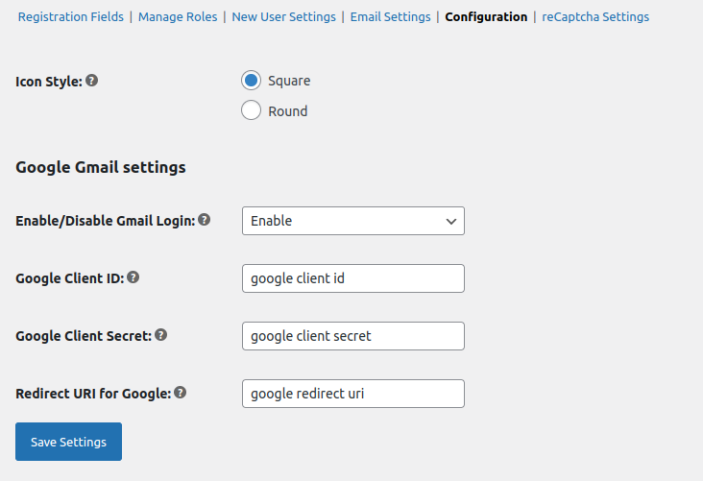
Configurations
- Icon Style: Choose icon style as square or round.
Google Gmail Settings:
- Enable / Disable Gmail Login: Option to enable or disable gmail login.
- Google Client ID: Add google client ID.
- Google Client Secret: Set the google client secret.
- Redirect URL for Google: Add Google Redirect URI
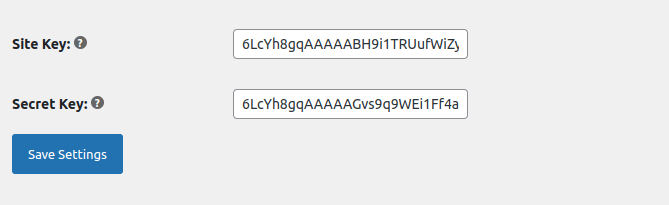
ReCaptcha Settings
- Site Key: Insert site key
- Secret Key: Insert the provided secret key
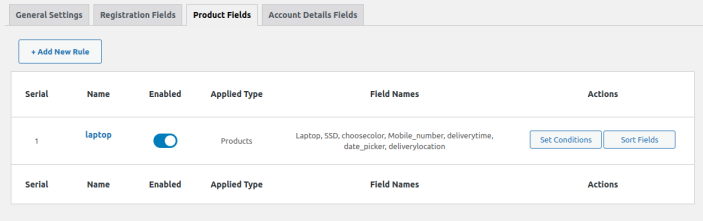
Product Fields:
↑ Back to topAdd New Rule
Click the Add New Rule button to create custom product fields for display.
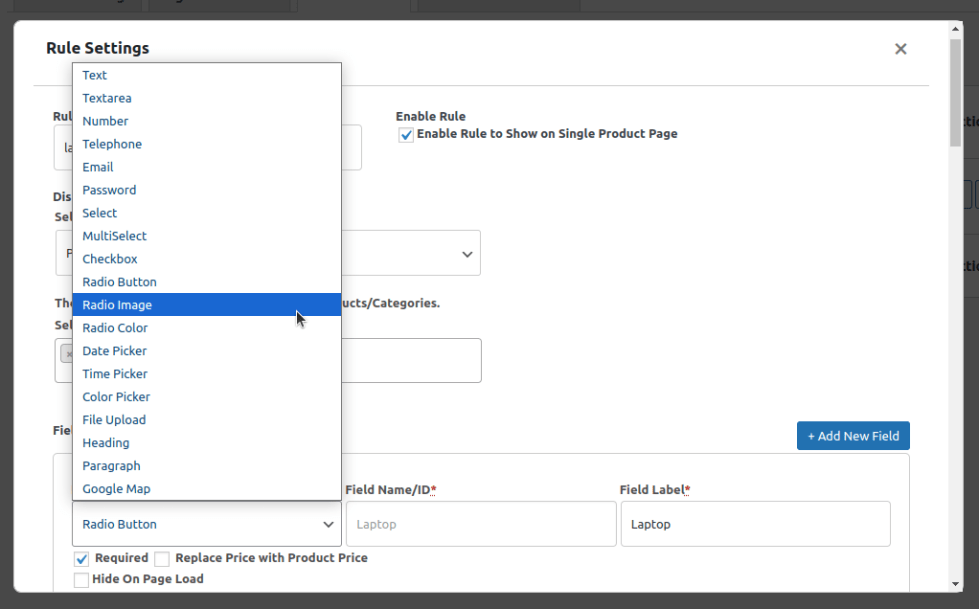
Rule Settings
After adding a new rule, set the Rule Name and enable or disable it.
Field Settings
Choose from 19 different field types and customize them with options like:
- Field Name
- Field Label
- Placeholder
- Field Price
- Mandatory Field
- Replace Price with Product Price
- And more!
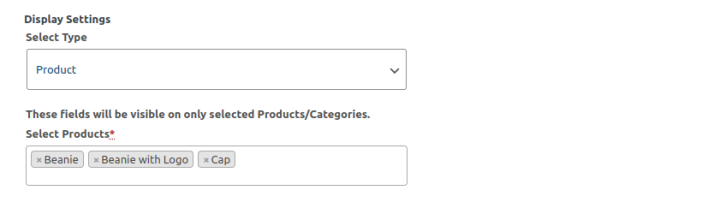
Display Settings
Select the products or categories where you want to show the fields from this rule.
Set Conditions
In Product Fields tab, you can set conditions for each rule by clicking the Set Conditions button in the Actions column. Use AND or OR conditions between fields:
- AND applies between conditions.
- OR applies between groups.

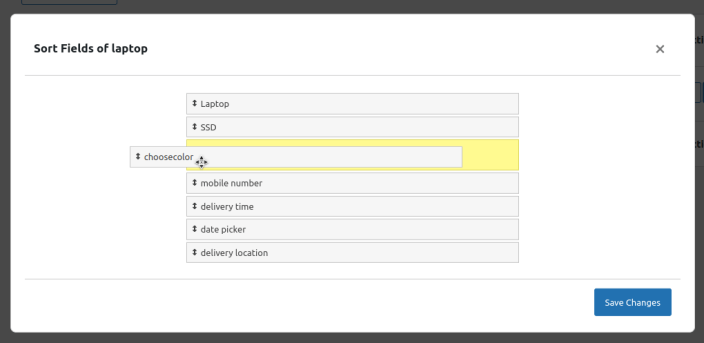
Sort Fields
In Product Fields, click the Sort Fields button in the Actions column to reorder the custom product fields for each rule.
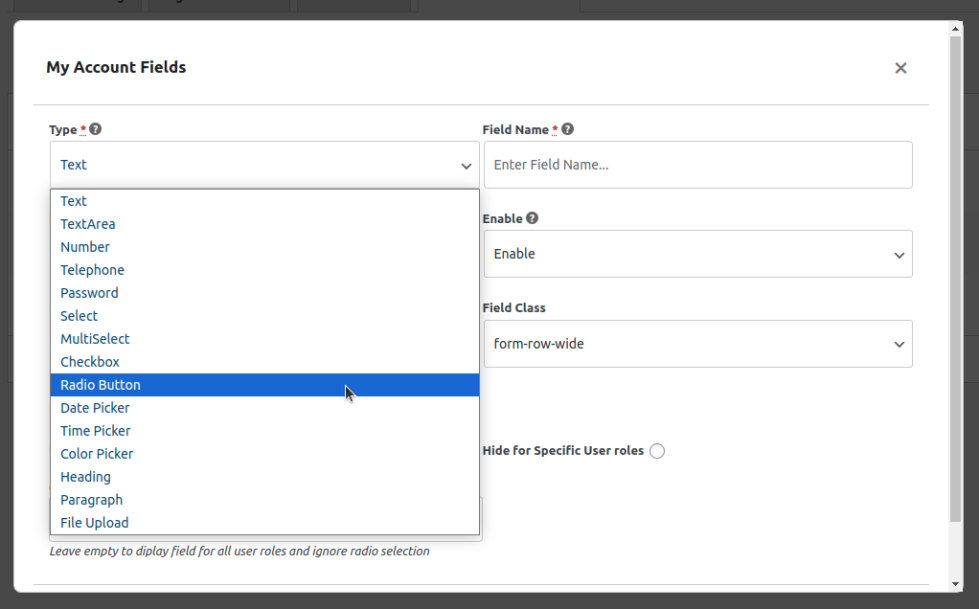
Account Page:
Click on the Add Field button to add new custom fields for my account page. You need to configure the following in the fields setting.
- Type: Select the type of field you need.
- Field Name: Set the name of the field.
- Label: Choose the label that will be displayed on the frontend.
- Enable: Enable or disable the field.
- Placeholder: Add a placeholder text
- Field Class: Define the position or width (e.g., first/last in a row, wide).
- Required: Make this field mandatory for customers.
- Display for Specific User Roles: Show this field only to selected user roles.
- Hide for Specific User Roles: Hide this field from specific user roles.