Thank you for choosing Gravia WordPress theme to build your WooCommerce website.
Getting Support
↑ Back to topSupport for this theme is available through our support portal. Our team aims to respond within 24 hours on business days. On weekends or holidays, responses may take longer, but we will assist you as soon as possible. Feel free to reach out with any questions or issues — we’re always ready to help!
Installation
↑ Back to topTo start using a product from WooCommerce.com, you can use the “Add to store” functionality on the order confirmation page or the My subscriptions section in your account.
- Navigate to My subscriptions.
- Find the Add to store button next to the product you’re planning to install.
- Follow the instructions on the screen, and the product will be automatically added to your store.
Alternative options and more information at:
Managing WooCommerce.com subscriptions.

Recommended plugins
↑ Back to top- WooCommerce.
- WP Form : The plugin is recommended for creating contact forms.
- WP Super Cache: The plugin is recommended for caching entire site.
Importing Demo Content
↑ Back to topTo import the demo content, follow these steps to install and set up the necessary plugins using the ODCI (One Click Demo Import) plugin.
Tip: You don’t need to import demo content! Every design you see in the demo is already available as ready-to-use patterns and templates. Simply insert patterns or change your page design to get started with a clean, clutter-free site.
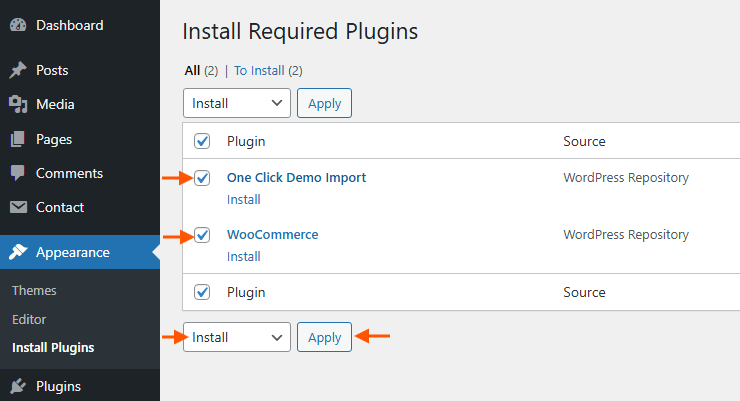
- Install the Required Plugins: The One Click Demo Import and WooCommerce plugins are required to import the demo content. To install them, follow these steps:
- Go to Appearance > Install Plugins.
- Select both the One Click Demo Import plugin and WooCommerce.
- Choose Bulk Actions > Install and click Apply.
- Wait for the installation to complete, click Return to the Dashboard. Now you’re ready to import the demo content.
- Import Demo Content: After activating the required plugins, proceed to import the demo content:
- Go to Appearance > Import Demo Data.
- Click the Import Demo Data button.
- Then, click Continue & Import to start the process.
- The demo content, including pages, posts, images, and settings, will be imported and automatically set up to match the demo.
Using a child theme
↑ Back to topA child theme is not required for general usage unless you want to add custom code (PHP, HTML, or CSS) to the codebase.
- Download the child theme zip file
- Navigate to Appearance > Themes and click Add New Theme. Click Upload Theme and then Choose File.
- Select the downloaded zip file and click Install Now
- Click Activate
We recommend activating the child theme before customizing templates. Template changes are saved to whichever theme is currently active. If you customize templates first and then switch to the child theme later, your changes will remain with the original theme and will not appear on the child theme.
Updating Your Theme
↑ Back to topTo receive notifications for new versions and streamline the update process, we recommend installing the WooCommerce.com Update Manager plugin and following the instructions on this page. This plugin ensures you stay current with the latest theme features and security improvements.
Using the WordPress Block Editor
↑ Back to topThis theme is a block-based theme designed to work seamlessly with the WordPress Block Editor (Gutenberg). It offers a smooth and intuitive experience without the need for third-party page builders. The Block Editor allows you to create and customize content easily using blocks for text, images, videos, and more.
If you’re new to the WordPress Block Editor, you can explore its basic features and usage in the official WordPress documentation: WordPress Block Editor Documentation.
Homepage Setup
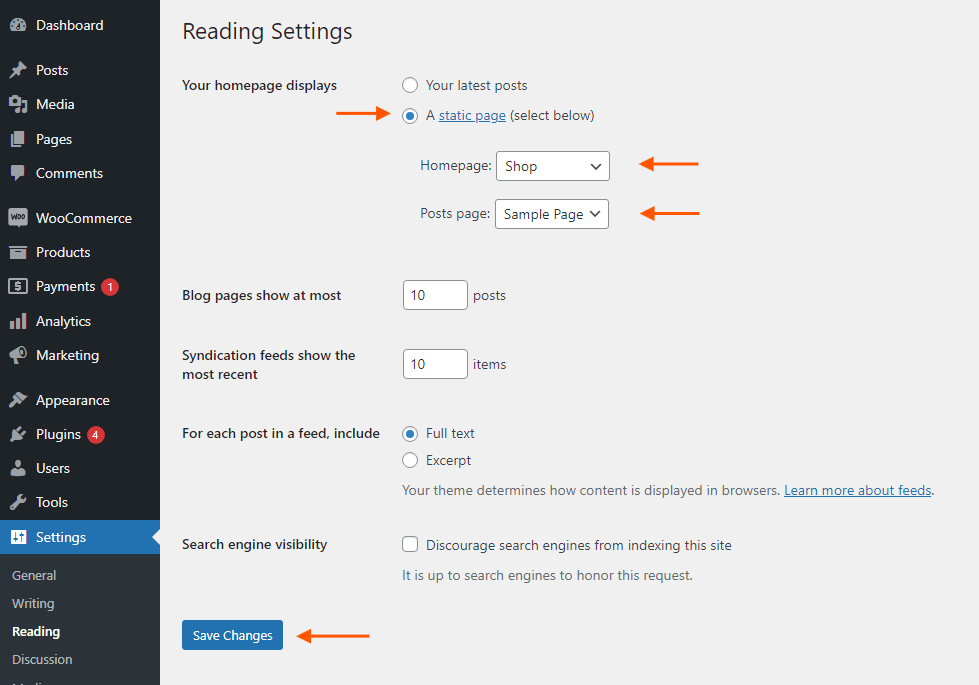
↑ Back to topAfter installation is completed, you can set one of the pages imported as your homepage. To set your home page:
- In your admin panel, go to Settings > Reading
- Select A Static Page option for the Your homepage displays option.
- In the dropdown, choose the page you want set as home.
- To edit the shop page, Go to Appearance > Editor.
- In the Site Editor, click the search icon, type “Product catalog”, and press Enter.
- This opens the Product Catalog template for the shop page. Customize it as needed.
Site Logo Setup
↑ Back to topFollow these steps to set up your site logo for a WordPress block theme directly from the front-end of your site.
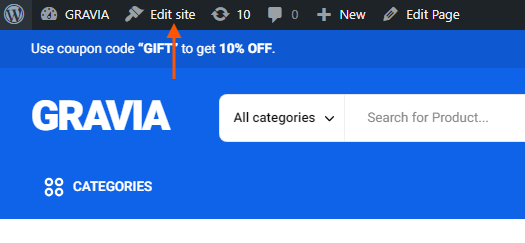
- Open the Site Editor While viewing any page on your site, ensure you are logged in with the admin bar enabled. In the admin bar at the top of the screen, click the Edit Site button. This will open the Site Editor directly in the current template.
- Locate the Site Logo Block Once in the Site Editor, find the Site Logo block within the template you’re editing. This block is usually located in the header area.
- Upload or Select Your Logo Click on the Site Logo block to upload a new logo or select one from your media library. Ensure the logo is appropriately sized and formatted.
- Save Your Changes Once you’ve finished, click Save in the top-right corner to apply the changes to your site.
Navigation Setup
↑ Back to topSetting up your site’s navigation is a key step in ensuring that visitors can easily navigate through your content. Follow these steps to create and customize a navigation menu using the Site Editor.
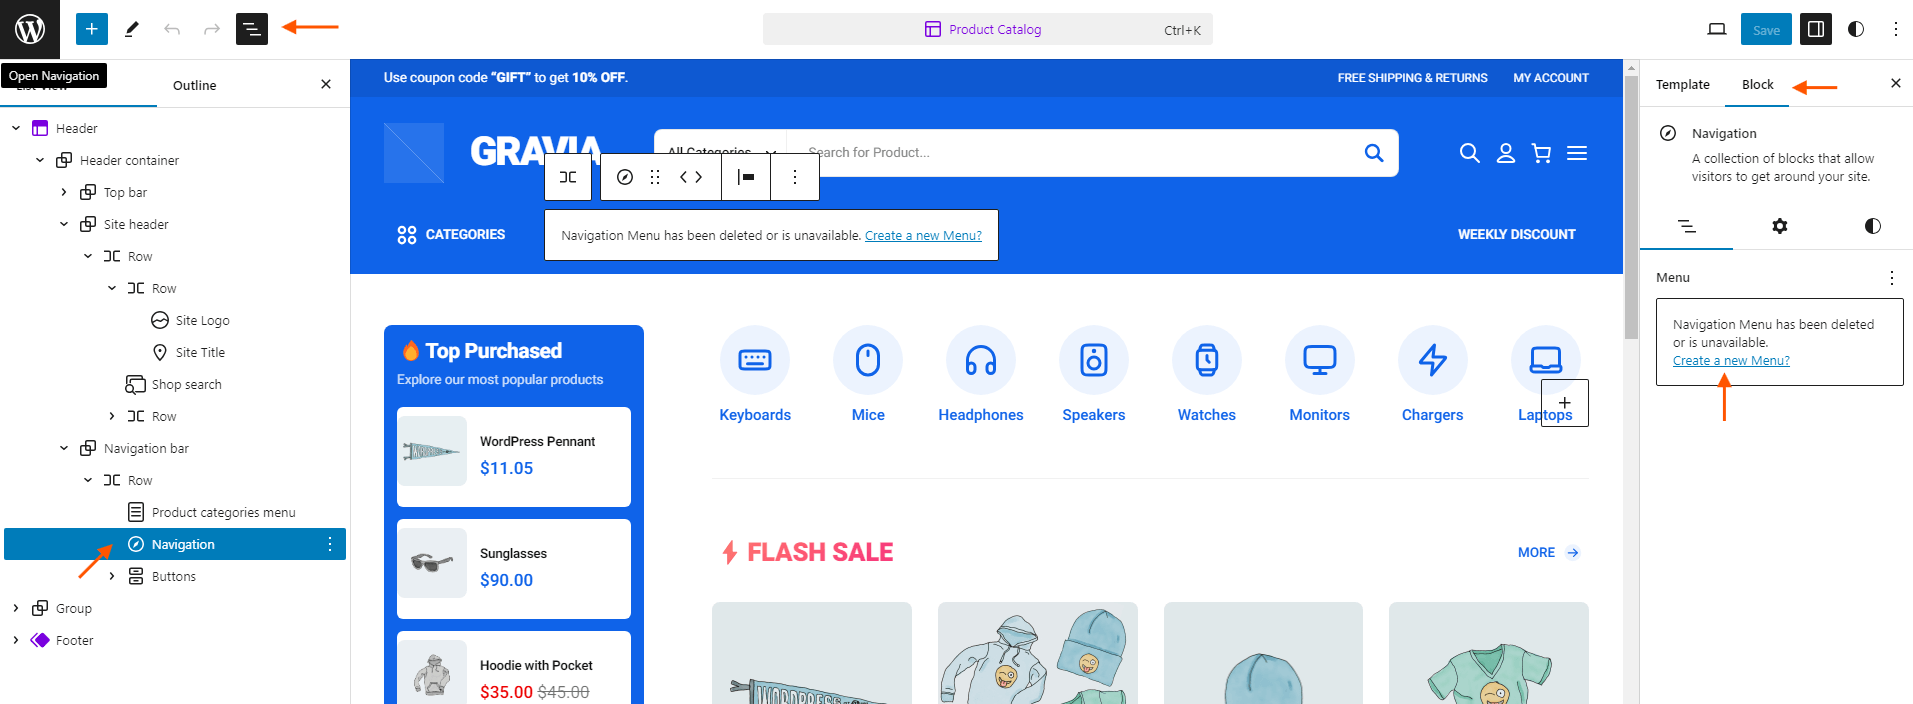
- Locate the Navigation Block Within the Site Editor, find the Navigation block, usually located in the header area of your template. This is where you will create and manage your menu.
- Create a New Menu Click on the Create a new menu link within the Navigation block. This will allow you to start building your menu from scratch.
- Add Menu Items Begin adding menu items by clicking the + icon. You can add links to pages, posts, categories, or custom URLs that you want to include in your navigation.
- Save Your Changes Once you’ve finished, click Save in the top-right corner to apply the changes to your site.
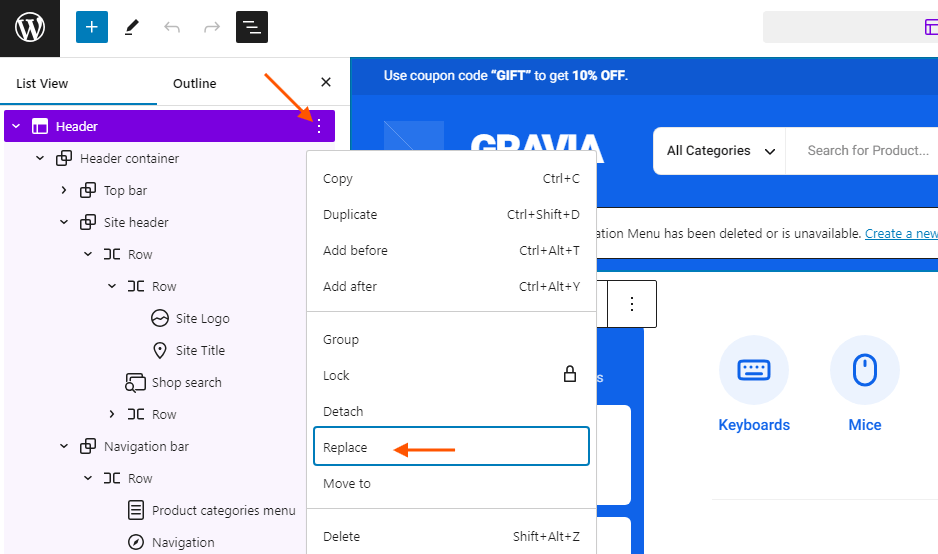
Site Header Setup
↑ Back to topTo update or change your site’s header template, follow these steps within the Site Editor.
- Open the List View Panel Ensure you are in the Site Editor. Open the List View panel, which displays a listing of blocks on the page. This panel is typically found on the left side of the editor.
- Select the Header Block In the List View panel, locate the header block. Click the three-dots button at the end of the header block name to access additional options.
- Replace the Header Template From the submenu that appears, click Replace. This will open the “Choose a Header” modal.
- Choose a New Header Template In the “Choose a Header” modal, browse through the available header templates and select the one you want to use.
- Save Your Changes Once you’ve finished, click Save in the top-right corner to apply the changes to your site.
Customize Blog Index Page
↑ Back to topYou can update or customize the blog index page using the Site Editor. Follow these steps
- Open the Site Editor: While viewing the blog index page, ensure you are logged in with the admin bar enabled. In the admin bar at the top of the screen, click the Edit Site button. This will open the Site Editor directly in the Blog Home template.
Alternatively, you can open the template by navigating to Appearance > Editor, clicking the Templates menu, and selecting the Blog Home template. - Choose a New Template (optional): In the Template settings panel, Expand the Design option group to reveal available templates, and Choose the template you want to apply.
- Customize the Layout Customize the layout as needed by adding blocks or inserting patterns.
- Save Your Changes Once you’ve finished, click Save in the top-right corner to apply the changes to your site.

Customize Single Blog Posts
↑ Back to topYou can update or customize the single blog post page using the Site Editor. Follow these steps
- Open the Site Editor: While viewing the blog post page, ensure you are logged in with the admin bar enabled. In the admin bar at the top of the screen, click the Edit Site button. This will open the Site Editor directly in the Single Posts template.
Alternatively, you can open the template by navigating to Appearance > Editor, clicking the Templates menu, and selecting the Single Posts template. - Choose a New Template (optional): In the Template settings panel, Expand the Design option group to reveal available templates, and Choose the template you want to apply.
- Customize the Layout Customize the layout as needed by adding blocks or inserting patterns.
- Save Your Changes Once you’ve finished, click Save in the top-right corner to apply the changes to your site.

Customize Blog Archive Pages
↑ Back to topYou can update or customize the blog archive page using the Site Editor. Follow these steps
- Open the Site Editor: While viewing a blog archive page (such as a category page or tag page), ensure you are logged in with the admin bar enabled. In the admin bar at the top of the screen, click the Edit Site button. This will open the Site Editor directly in the All Archives template.
Alternatively, you can open the template by navigating to Appearance > Editor, clicking the Templates menu, and selecting the All Archives template. - Choose a New Template (optional): In the Template settings panel, Expand the Design option group to reveal available templates, and Choose the template you want to apply.
- Customize the Layout Customize the layout as needed by adding blocks or inserting patterns.
- Save Your Changes Once you’ve finished, click Save in the top-right corner to apply the changes to your site.

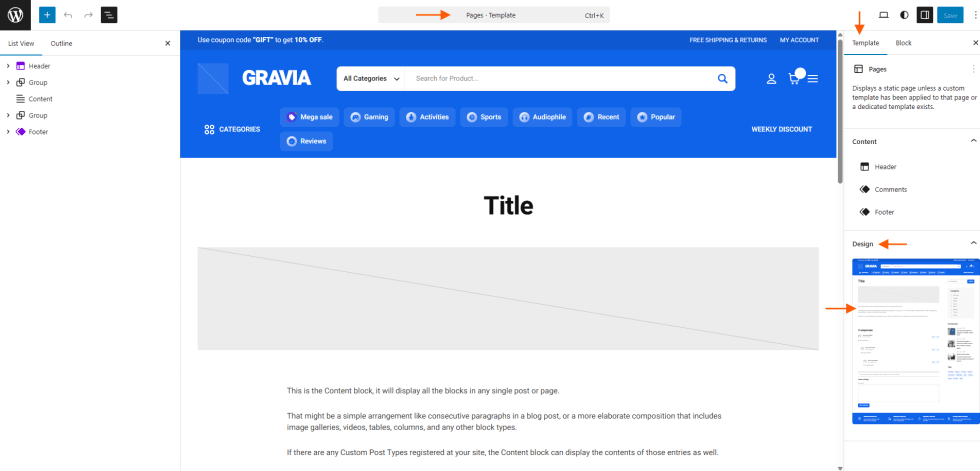
Customize Pages
↑ Back to topYou can update or customize pages using the Site Editor. Follow these steps
- Open the Site Editor: While viewing a page, ensure you are logged in with the admin bar enabled. In the admin bar at the top of the screen, click the Edit Site button. This will open the Site Editor directly in the Pages template.
Alternatively, you can open the template by navigating to Appearance > Editor, clicking the Templates menu, and selecting the Pages template. - Choose a New Template (optional): In the Template settings panel, Expand the Design option group to reveal available templates, and Choose the template you want to apply.
- Customize the Layout Customize the layout as needed by adding blocks or inserting patterns.
- Save Your Changes Once you’ve finished, click Save in the top-right corner to apply the changes to your site.
Using a Different Template for a Specific Post/Page
↑ Back to topYou can apply unique templates to individual posts and pages to create distinctive layouts that match your specific content needs. This allows you to showcase important content with custom designs while maintaining your site’s overall consistency.
Create a Custom Template
↑ Back to top- Open Site Editor by navigating to Appearance > Editor.
- Add New Template by clicking the Templates menu and selecting the Add template button.
- Select Template Type in the Add template popup, choose Custom template, then enter a name of the custom template and click Create

- Choose a New Template (optional): In the Template settings panel, Expand the Design option group to reveal available templates, and Choose the template you want to apply.
- Customize the Layout Customize the layout as needed by adding blocks or inserting patterns.
- Save Your Changes by clicking Save in the top-right corner of the editor to apply the new template to your content.
Assign custom template for a Specific Post/Page
↑ Back to top- Open Your Content by navigating to Posts > All Posts or Pages > All Pages and selecting the post or page you want to apply the created template.
- Select Custom Template in the Post panel, click Template > Change Template and choose your created template from the available options.
- Save Your Changes Once you’ve finished, click Save in the top-right corner to apply the changes to your site.

This theme provides pre-built custom templates that help you create unique page designs quickly and efficiently, saving you time while giving you creative flexibility.
- Blank Page: Removes site header and footer completely, giving you a clean canvas for fully custom designs like landing pages, promotional content, or standalone presentations.
- Canvas Page: Maintains site header and footer while removing sidebar and page title, perfect for content-focused pages where you want to preserve navigation and branding while maximizing content space.
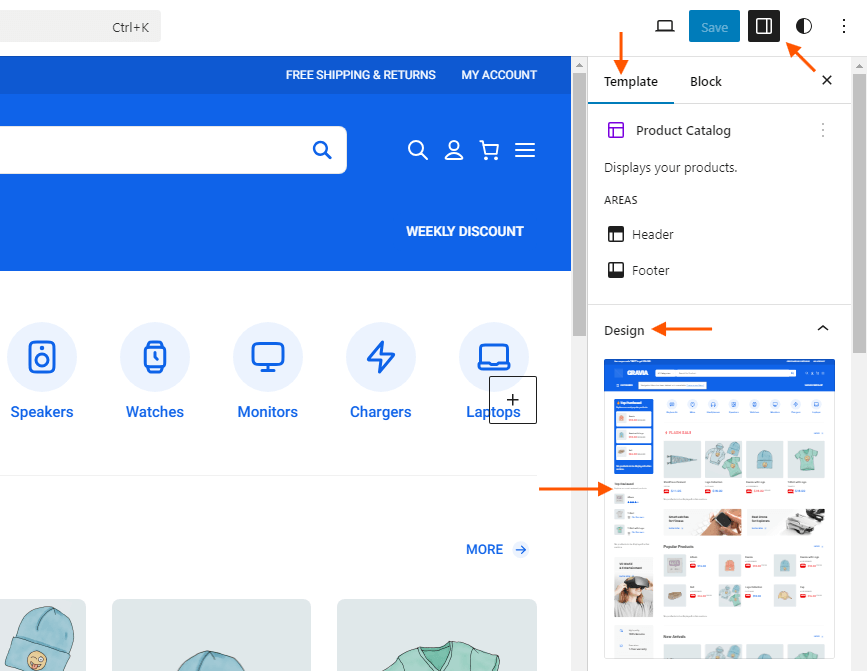
Customize Shop Page
↑ Back to topTo update or change the template for your shop page, follow these steps within the Site Editor.
- Access the Settings In the Site Editor, click the Settings button located beside the Save button in the top-right corner of the screen.
- Go to the Template Tab In the settings panel, click on the Template tab to view template options.
- Select the Shop Page Template (optional): Expand the Design option group to reveal available templates. Choose the template you want to apply to your shop page.
- Customize the Layout Customize the layout as needed by adding blocks or inserting patterns.
- Save Your Changes Once you’ve finished, click Save in the top-right corner to apply the changes to your site.
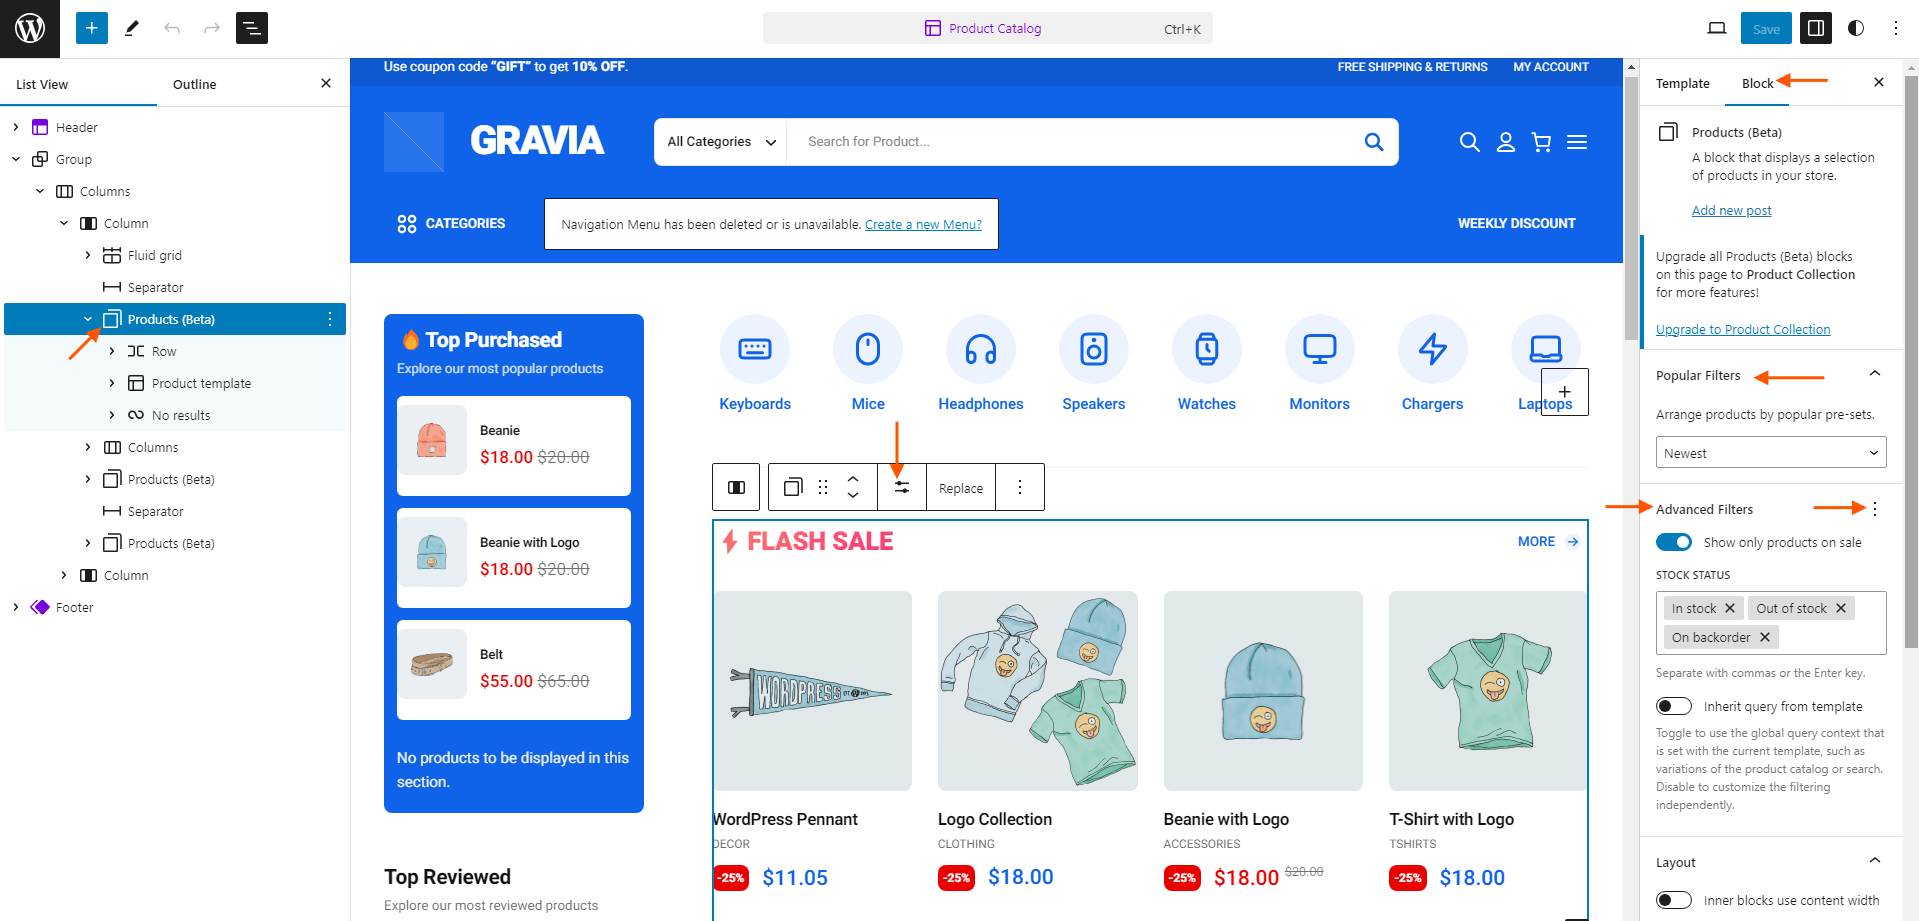
Product Listing Setup
↑ Back to topTo configure the product listing on your site, you’ll use the Products block, which is essentially a Query block. Follow these steps to change or filter the product listing.
- Select the Product Collection Block In the Site Editor, locate and click on the Product Collection block. The block name may vary depending on the current collection type, such as Featured, Top Rated, On Sale, Best Sellers, and New Arrivals. This block is used to display a listing of products.
- Change the product collection type. Click the Choose collection button on the floating bar and choose the collection type you want to apply.
Important Note: Changing the product collection type will reset the Product Template block. This is a known limitation of WooCommerce’s block system.
To preserve your customizations, copy all blocks within the Product Template block (Inside the Product Collection block) before making changes, then change the collection type as needed, and finally paste the copied blocks back into the Product Template block. This approach prevents blocks from resetting during the collection type change.
- Access Block Settings With the Products block selected, look for the block settings panel, usually located on the right side of the editor. Here, you can customize various options for the product listing.
- Change or Filter the Product Listing In the block settings panel, you’ll find options to change or filter the product listing. You can adjust the Filters settings to filter products by categories, tags, attributes, or other criteria. You can also choose how many products to display and set other display options as needed.
- Save Your Changes Once you’ve finished, click Save in the top-right corner to apply the changes to your site.
Customize Product Category Page
↑ Back to topYou can update or customize the product archive page using the Site Editor. Follow these steps
- Open the Site Editor: While viewing a product archive page (such as a product category page or product tag page), ensure you are logged in with the admin bar enabled. In the admin bar at the top of the screen, click the Edit Site button. This will open the Site Editor directly in the template that belongs to the current page.
Alternatively, you can open the template by navigating to Appearance > Editor, clicking the Templates menu, and selecting the template you want to customize- Products by Attribute: This template is for displaying the product attribute page
- Products by Brand: This template is for displaying the product brand page
- Products by Category: This template is for displaying the product category page
- Products by Tag: This template is for displaying the product tag page
- Choose a New Template (optional): In the Template settings panel, Expand the Design option group to reveal available templates, and Choose the template you want to apply.
- Customize the Layout Customize the layout as needed by adding blocks or inserting patterns.
- Save Your Changes Once you’ve finished, click Save in the top-right corner to apply the changes to your site.

Custom Template for Individual Category or Brand
↑ Back to topCreate targeted templates for specific product categories or brands to provide unique shopping experiences tailored to different customer segments. This approach allows you to customize layouts, styling, and content presentation based on your product categorization strategy.
- Open Site Editor by navigating to Appearance > Editor.
- Add New Template by clicking the Templates menu and selecting the Add template button.
- Select Template Type in the Add template popup, choose Products by Category or Products by Brand, then select the specific category or brand for your template.

- Choose a New Template (optional): In the Template settings panel, Expand the Design option group to reveal available templates, and Choose the template you want to apply.
- Customize the Layout Customize the layout as needed by adding blocks or inserting patterns.
- Save Your Changes Once you’ve finished, click Save in the top-right corner to apply the changes to your site.
Using Patterns in Custom Design
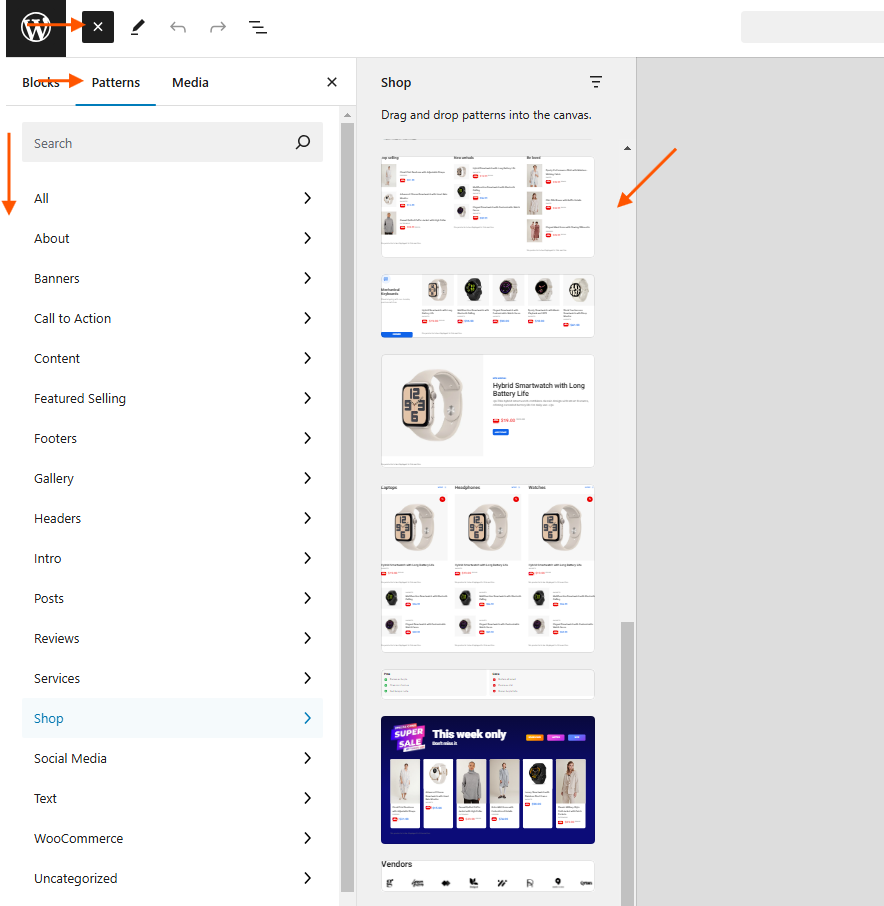
↑ Back to topIn WordPress, a pattern is a pre-designed layout made up of blocks like text, images, buttons, and columns. These patterns allow you to quickly add ready-made designs to your pages without starting from scratch. Using patterns saves time and helps create attractive pages easily, without the need for coding or design skills. This theme includes built-in design patterns such as image sliders, product sliders, product grids, galleries, and more to enhance your site’s functionality and visual appeal.
Steps to use patterns in the editor
- Open the editor: Go to Pages or Posts in your WordPress dashboard and select the page, post, or use the Site Editor to choose the area you want to edit.
- Add a New Block: In the editor, click the “+” button to add a new block where you want to insert a pattern.
- Select “Patterns”: From the block options, click on the “Patterns” tab to view the available patterns.
- Choose a Pattern: Browse through the patterns and select one that suits your design. Click on the pattern to insert it into your page.
- Customize the Pattern: Once the pattern is added, you can easily customize it by editing text, images, or other block elements to match your content.
- Save Your Changes Once you’ve finished, click Save in the top-right corner to apply the changes to your site.
Template Customization Quick Guide
↑ Back to topThis theme includes multiple templates for displaying different types of pages. You can view and edit all available templates by navigating to Appearance > Editor > Templates in your WordPress admin dashboard. Here’s a quick reference to help you identify which template serves which page type:
- All Archives – Displays any archive page when a specific archive template is not available (category, tag, author, or date archives)
- Blank Page – Custom page template for creating pages without site headers and footers
- Blog Home – Displays your main blog index page with latest posts
- Canvas Page – Custom page template for pages without titles and sidebars (keeps header and footer)
- Index – Fallback template when no other template is found, usually displays blog posts
- Order Confirmation – Displays the thank you page after customers complete their purchase
- Page My Account – Shows customer account dashboard with order history, profile settings, and account details
- Page: 404 – Displays when visitors access a page that doesn’t exist on your site
- Page: Cart – Shows shopping cart contents with item details and quantity controls
- Page: Checkout – Displays the checkout form where customers enter billing and payment information
- Page: Coming Soon – Shows a temporary page when your site is under construction or not ready to launch
- Pages – Default template for all regular pages (About, Contact, Privacy Policy, etc.)
- Product Catalog – Displays all products in a grid or list layout (main shop page)
- Product Search Results – Shows products that match customer search queries
- Products by Attribute – Displays products filtered by specific attributes (color, size, material, etc.)
- Products by Category – Shows products grouped by their assigned categories
- Products by Tag – Displays products filtered by their assigned tags
- Search Results – Shows all content (posts, pages, products) matching search terms
- Single Posts – Displays individual blog post pages with full content
- Single Product – Shows individual product pages with details, images, and purchase options
- Taxonomy Product Brand – Displays products filtered by specific brand or manufacturer
Theme Global Style Setup
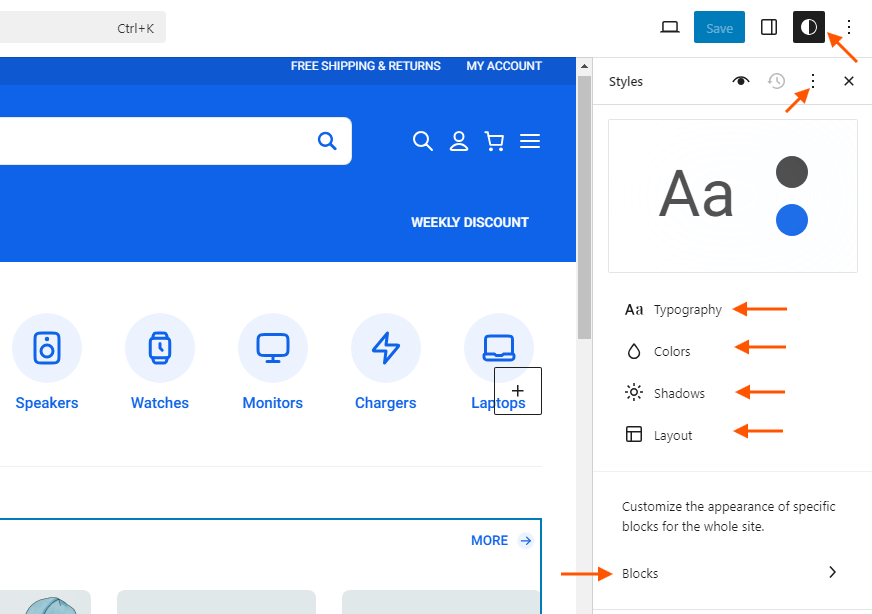
↑ Back to topTo configure the global styles for your theme, you will edit the theme settings through the Site Editor. This enables you to apply consistent styling across your entire site.
- Access Global Styles In the Site Editor, click on the Styles button located at the top-right of the screen. The button is represented by a circle with half white and half black.
- Edit Global Settings In the Styles panel, you can modify various global settings. This includes settings for colors, typography, spacing, and other design elements. Adjust these settings to apply global styles across your site.
- Preview and Adjust Preview the changes as you make adjustments to ensure they align with your design preferences. Make any necessary tweaks to get the desired look.
- Save Your Changes After finalizing the global styles, click Save in the top-right corner to apply the changes to your theme.
Theme Version Migration Guide
↑ Back to topThis guide helps you update your WordPress/WooCommerce theme to a new version. It explains what has changed and how to move safely without losing your settings or content. Follow the steps to make your update simple and smooth.
Migrating to Gravia 1.3.0 (Compatible with WooCommerce 10.2)
WooCommerce 10.2 updates block-based templates for better performance. If you’re on Gravia 1.2.9 or earlier, update the Product Archive template for compatibility. Follow these steps.
Before you start:
- Back up your site.
- Update WooCommerce to 10.2 and update Gravia to 1.3.0.
Updating the Products Archive Templates
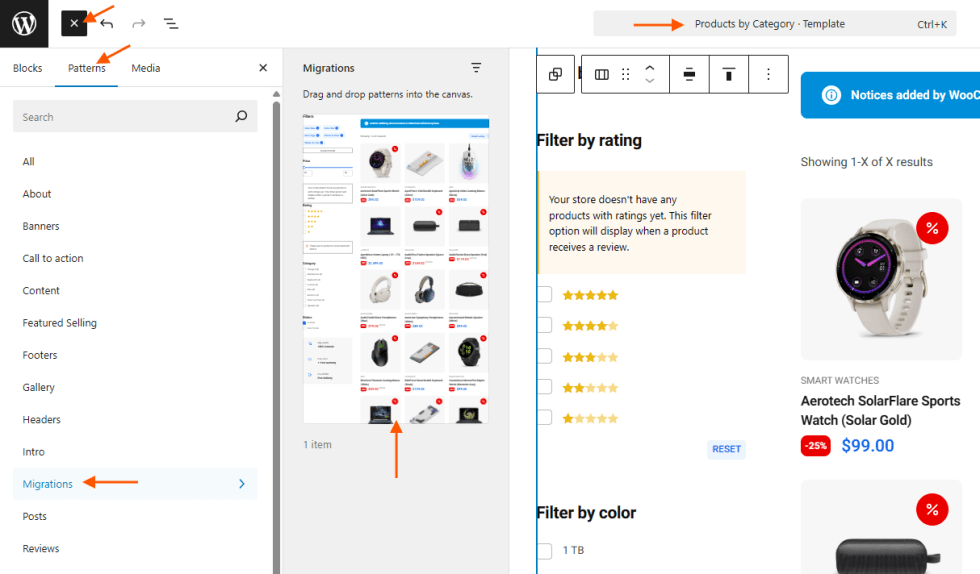
- Access the Site Editor: Go to Appearance > Editor.
- Select the Template: Click Templates in the sidebar, then choose Products by Category.
- Insert the New Block: Click + to add a block. Browse to Patterns > Migrations and select Archive content section with product filters for WooCommerce 10.2. Position it in place of the old one.
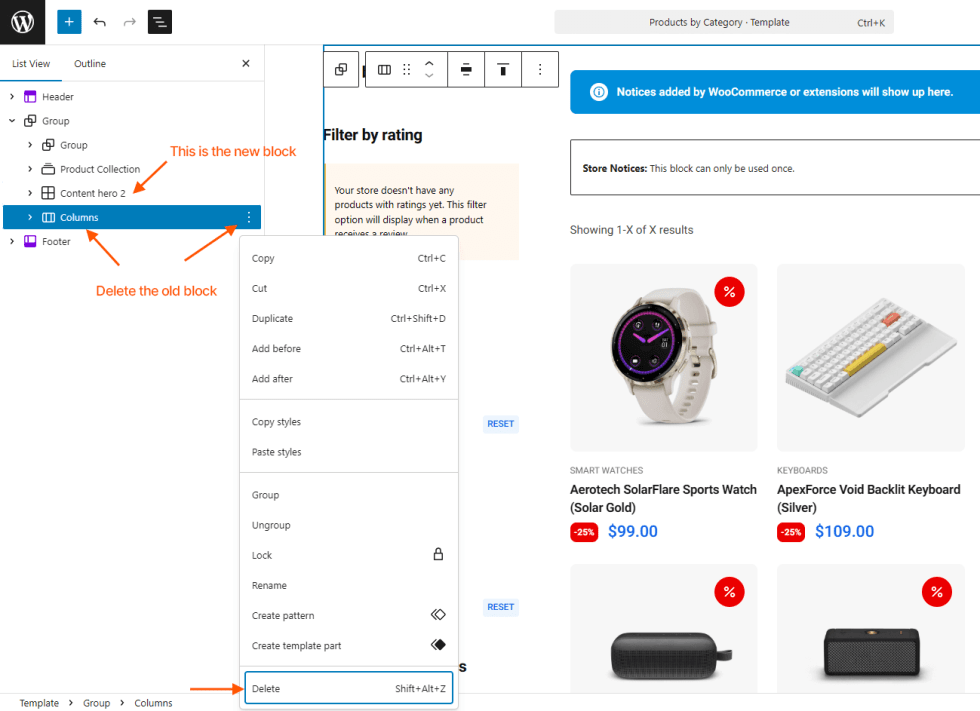
- Remove the Old Block: Select the Content Section block and delete it. If you’ve made customizations earlier, remember to move those blocks into the new one.
- Update other product archive templates: Do the same steps for these templates
- Products by Attribute
- Products by Brand
- Products by Tag
- Save Your Changes: Click Save (top-right). Clear caches to view updates.
Frequently Asked Question (FAQ)
↑ Back to topHow can I add the checkbox to accept Terms and Conditions and Privacy Policy on the payment page in WooCommerce?
- Set up a Terms and Conditions page: Go to WooCommerce > Settings > Advanced > Page setup, select a page under Terms and Conditions, and click Save changes.
- Set up a Privacy Policy page: Go to Settings > Privacy, select a page, and click Use this page.
- Edit the Checkout page: Go to Pages > All Pages, open Checkout page.
- In the Checkout editor, click the Terms and Conditions block and enable Require checkbox.
- Click Save.

How do I change the icon next to each product category in the top horizontal menu?
- Open Site Editor by navigating to Appearance > Editor then go to the Product Catalog template.
- Drag the mouse to select the icon. A popup will appear when the image is selected.
- Click the More button (the down arrow), then click “Inline image”.
- The “Select or Upload Media” window will appear. Choose an image to replace the icon, then click “Select”.
- Click Save.
Templates & Patterns
↑ Back to topHere is a list of built-in templates and patterns for quick and easy use.
- Address Card
- Brands – Layout 1
- Content Area – Left Sidebar
- Content Area – Right Sidebar
- Content Section – 1
- Content Section – 2
- Content Section – 3
- Content Side Header
- Cover Link – Horizontal
- Cover Link – Large
- Cover Link – Vertical
- Discount Section
- Features Section
- Payment Icon – Outline
- Payment Icon – Solid
- Posts – Layout 1
- Posts – Layout 2
- Posts – Layout 3
- Posts – Layout 4
- Posts – Layout 5
- Posts – Tiny Layout 1
- Pricing Item
- Pricing Table
- Product Feature List
- Product Review Section – 2
- Product Review Section
- Product Specs Table
- Products – Layout 1
- Products – Layout 2
- Products – Layout 3
- Products – Layout 4
- Products – Layout 5
- Products – Layout 6
- Products – Layout 7
- Products – Layout 8
- Products – Layout 9
- Pros & Cons – Small
- Quick Info
- Service Team
- Subscribe – Layout 1
- Super Sale Section
- Archive – Layout 1
- Archive – Layout 2
- Archive – Layout 3
- Archive – Layout 4
- Archive – Layout 5
- Blog – Layout 1
- Blog – Layout 2
- Blog – Layout 3
- Blog – Layout 4
- Blog – Layout 5
- Page – Right Sidebar
- Header – Style 2
- Header – Style 3
- Header – Style 4
- Header – Style 5
- Header
- Product Archive – Layout 1
- Product Archive – Layout 2
- Product Archive – Layout 3
- Product Archive – Layout 4
- Product Archive – Layout 5
- Shop – Layout 1
- Shop – Layout 2
- Shop – Layout 3
- Shop – Layout 4
- Shop – Layout 5
- Shop – Layout 6
- Shop – Layout 7
- Single – 1 Column
- Vendor Brands