Your users can notify lower price for products which they have found in other sites/shops. You can manage the notified request and respond to users by sending a coupon.
Installation
↑ Back to top- Download the lower-price-for-woocommerce.zip file from your WooCommerce account.
- Go to: WordPress Admin > Plugins > Add New and Upload Plugin with the file you downloaded with Choose File.
- Install Now and Activate the extension.
More information at: Install and Activate Plugins/Extensions.
Setup and Configuration
↑ Back to topTo access the plugin settings navigate to Lowest Price for WooCommerce > Settings
General
↑ Back to topGeneral Settings
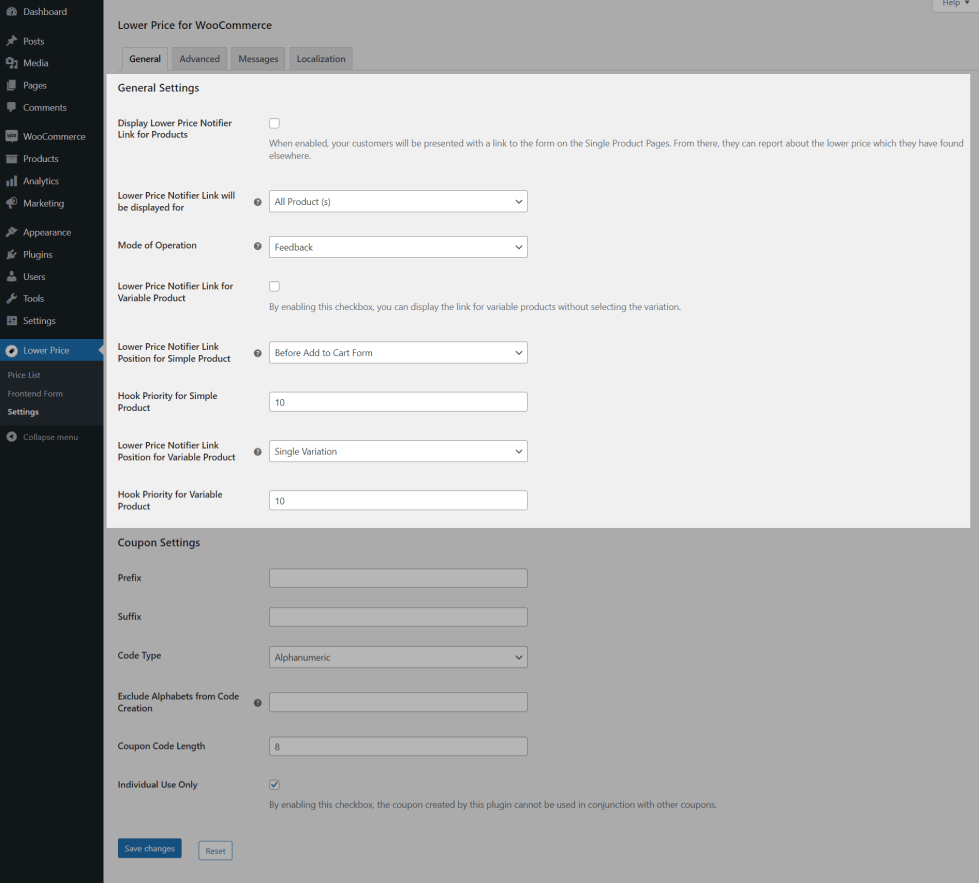
- Enable Display Lower Price Notifier Link for Products checkbox to allow your users to notify the lowest price information for the products which they have found on any other Sites/Shop.
- By default, the lower price notifier link will be displayed for All Products on your site. If you wish to display the lower price notifier link only for particular products/categories, then you can configure it using this option “Lower Price Notifier Link will be displayed for”.
- By default, users can notify the lower price information in “Feedback” Mode. You can change the mode using “Mode of Operation” option if needed.
- By default, the lower price notifier link will be displayed only after choosing the variation for variable products. If you wish to display the link without selecting the variation, then enable the Lower Price Notifier Link for Variable Product checkbox.
- You can display the Lower Price Notifier Link in various positions for both Simple & Variable Products using the Lower Price Notifier Link for Simple Product & Variable Product options.
Coupon Settings
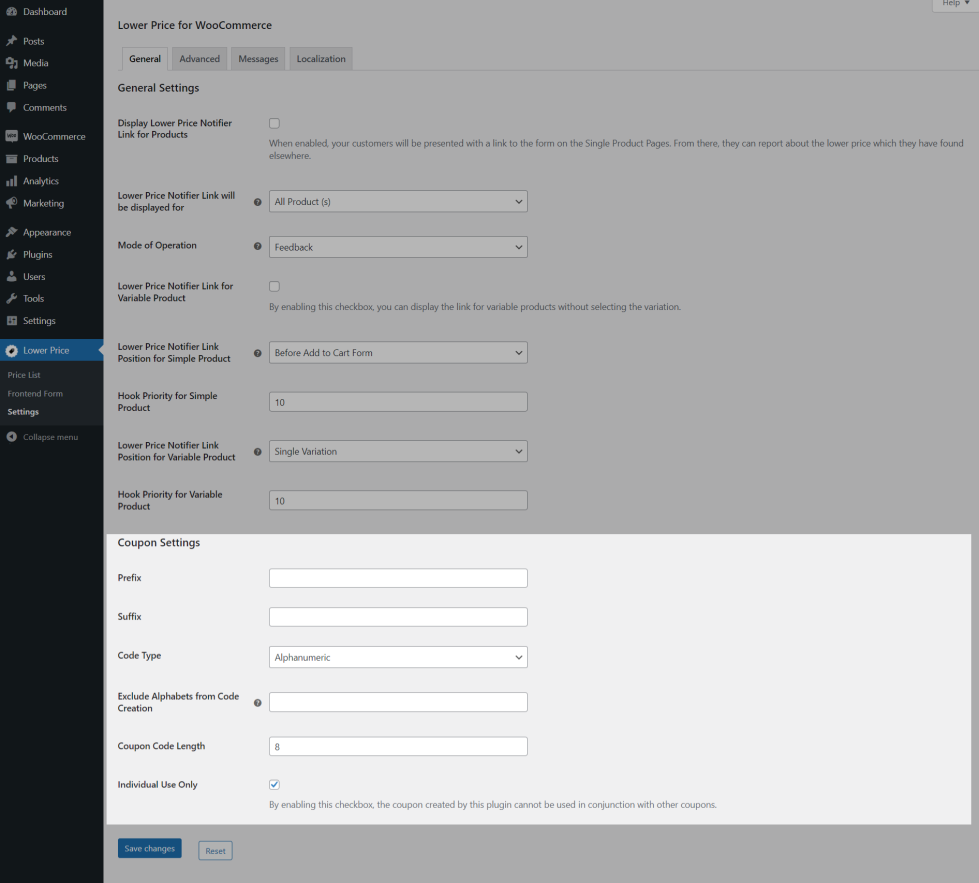
- By default, the coupon code will be generated in Alphanumeric values. If you wish to change it to Numeric, then select Numeric in Code Type option.
- You can set the coupon code prefix, suffix, code type & length in this settings.
- By default, users cannot use the coupon created by this plugin with other coupons. If you wish to avoid the scenario, then disable the Individual Use Only checkbox.
Advanced
↑ Back to topRestriction Settings
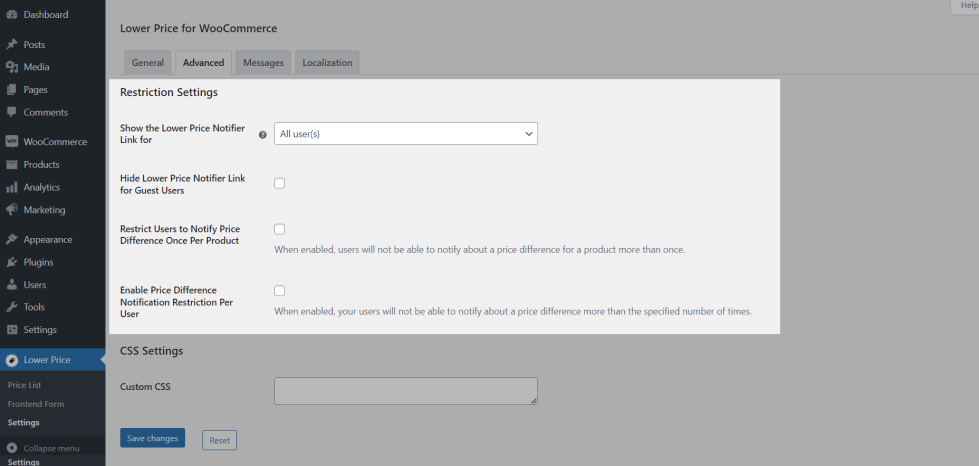
- By default, the lower price notifier link will be displayed for all users on your site. If you wish to display the lower price notifier link for particular users/user roles, then you can configure it using this option “Show the Lower Price Notifier Link for”.
- By default, the lower price notifier link will be displayed for guest users. If you wish to hide the lower price notifier link for them, then enable Hide Lower Price Notifier Link for Guest Users checkbox.
- If you wish to restrict your users not to notify more than one request per product, then enable Restrict Users to Notify Price Difference Once Per Product checkbox.
- If you wish to restrict your users to notify the lower price information for a specific number of times on your site, then enable Enable Price Difference Notification Restriction Per User checkbox and set the value in the Restriction Count field.
Custom CSS
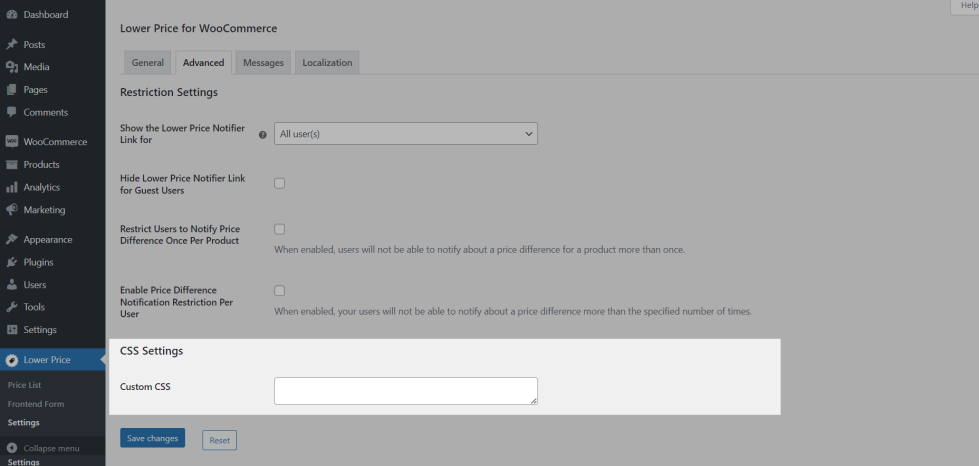
You can make use of your style for Lower Price Notifier link displays on product page.
Messages
↑ Back to top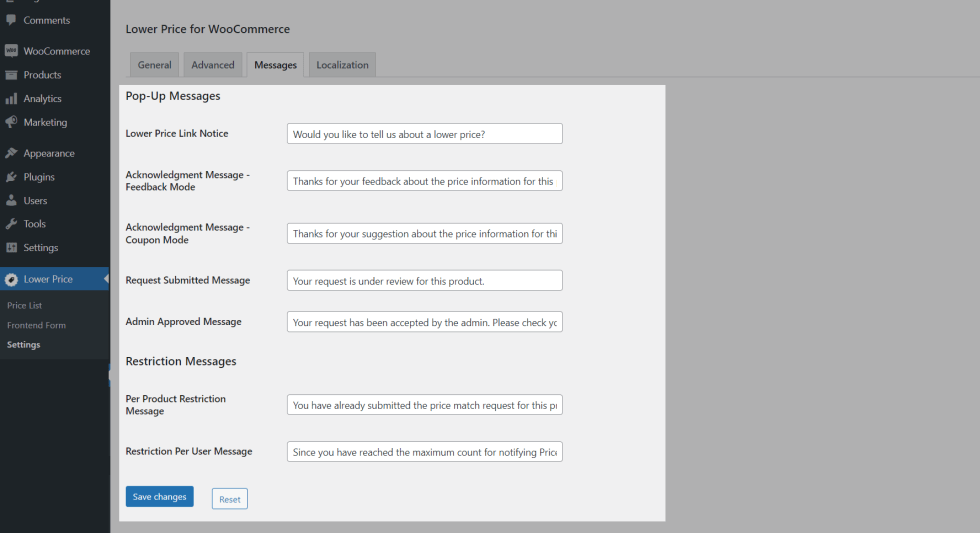
You can customize the messages displayed on the Product Page.
Localization
↑ Back to top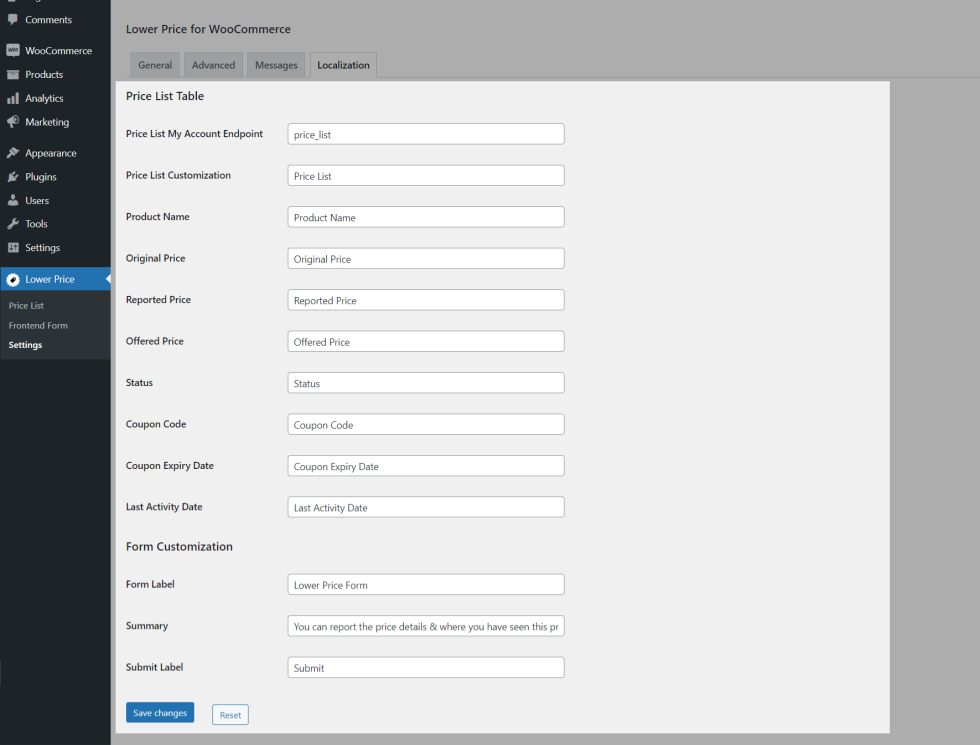
You can customize the column name of the price list table displayed on the My Account Page.
Frontend Form
↑ Back to top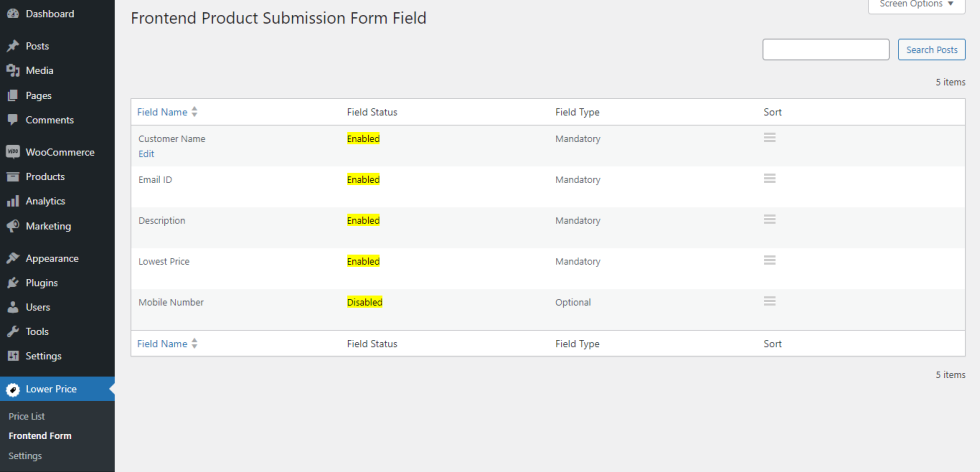
Form Fields for Frontend Product Price Submission can be managed under Dashboard > Lower Price > Frontend Form
Price List
↑ Back to top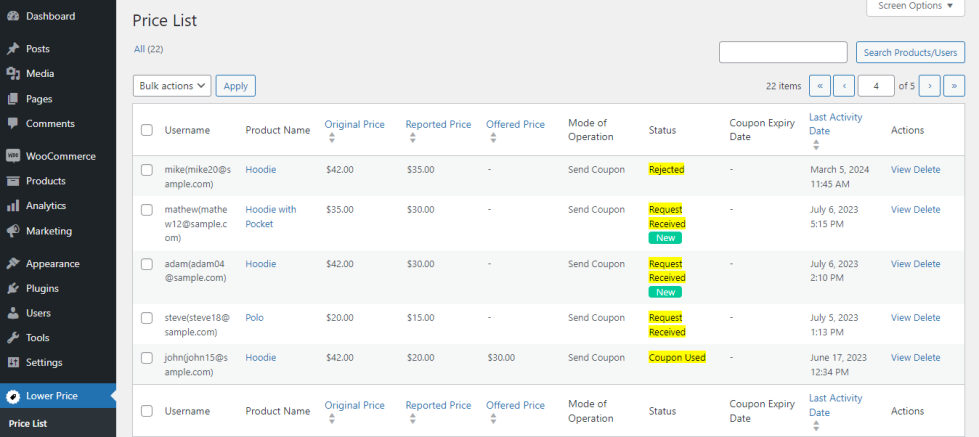
Lower price requests submitted by your users can be managed under Dashboard -> Lower Price -> Price List.
Available Modes
↑ Back to topThe following modes are available in Lower Price for WooCommerce,
Feedback
↑ Back to topIn this mode, your users can only notify about a lower price for a product. They cannot get any reward for notifying.
Send Coupon
↑ Back to top- In this mode, your users can get rewarded with a coupon code for notifying about a lower price.
- Once the user submits a lower price information for a product, the admin needs to review the details. If they are satisfied with the details provided, they can offer the user with a coupon code to match the product’s price which is offered in the other shop/site.
- In this mode, the user has to manually apply the coupon code to get a discount.
Auto Apply Coupon
↑ Back to top- In this mode also, your users can get rewarded with a coupon code for notifying about a lower price.
- The main difference between “Send Coupon Mode” and “Auto Apply Coupon Mode” is that in “Send Coupon Mode”, the user has to manually apply the received coupon in cart whereas in “Auto Apply Coupon Mode”, the user has to click the link provided in the email. The product will be automatically added to the cart along with the coupon code.
How Lower Price for WooCommerce Plugin Works?
↑ Back to top- Lower Price Notifier Link will be displayed on the product page.
- Using the link, users can notify the admin about the price information of products which they found in other shops/sites.
- A separate table will be displayed on each user account where they can check their price notified information and view the coupn code sent by the admin(Based on configuration).
- A list of the submitted requests will be displayed for the site admin’s review and they will also be notifed via email.
- Based on the admin inquiry, they can send an email to the users to purchase the notified product with the offered price using coupon(Only in Send Coupon Mode and Auto Apply Coupon Mode).
- Based on the mode configured, the users will have to manually apply the coupon to get a discount or the coupon will be auto-applied to their cart when they click the link provided in the email.
Translation
↑ Back to topLower Price for WooCommerce Plugin is translation ready meaning you can edit the po files by which you can translate the text to any language.
The steps to do the translation are as follows. For eg let us consider translation to French
- Download and install Poedit
- Open the file lower-price-for-woocommerce -> languages folder -> lower-price-for-woocommerce.pot using Poedit.
- Create a new translation file by clicking Create new translation button.
- Choose the Source text and set its corresponding French text in Translation Text Area.
- Save the changes.
- Save the file name as lower-price-for-woocommerce-fr_FR.po
- Then go to WordPress dashboard -> Settings -> General and select the Site Language as French.
Questions and Feedback
↑ Back to topHave a question before you buy? Please fill out this pre-sales form.
Already purchased and need some assistance? Get in touch with us via the Help Desk.
