Summary
↑ Back to topUber Direct Shipping for WooCommerce is a powerful integration that enables WooCommerce store owners to offer Uber Direct delivery services to their customers for food and non-food related deliveries. This plugin seamlessly connects your WooCommerce store with Uber’s delivery network, allowing you to provide fast and reliable delivery options to your customers.
Key Features
↑ Back to top- Real-time shipping rates from Uber Direct
- Automated order fulfillment
- Live delivery tracking
- Support for multiple delivery zones
- Customizable delivery options
- Integration with WooCommerce order management
Requirements
↑ Back to top- WordPress 6.0 or higher
- WooCommerce 6.3 or higher
- PHP 7.4 or higher
- SSL certificate (required for secure API communication)
- Active Uber Direct account
- An eligible country/area where Uber Direct delivery is available
- A store address (configured under WooCommerce > Settings > General) that inside this country/area.
Setup & Installation
↑ Back to topInstallation
↑ Back to top- Download the plugin zip file
- Log in to your WordPress admin panel
- Navigate to Plugins > Add New
- Click “Upload Plugin” and select the downloaded zip file
- Click “Install Now” and then “Activate”
How to get Uber Direct API keys
↑ Back to top- Visit the Uber Direct Developer Portal
- Create a new account or log in to your existing account
- Navigate to the Developer section
- Select between
Product credentials(Used on a live website), orTesting credentials(Used on a testing or staging website) - Create a new application
- On the API Keys tab, generate your API credentials:
- Application name
- Customer ID
- Client ID
- Client Secret
- On the Webhooks tab, create a new Webhook using the information provided on your Uber Direct settings page (e.g.
https://mywebsite.com/wc-api/uber-shipping-webhook/)
For more information on how to create an Uber Direct account with API keys, please refer to the official documentation.
Important: Please note that you must define your store address at WooCommerce > Settings > General and the Site Title in Settings > General Settings – Those WordPress/WooCommerce core settings are used for the pickup location request sent to the Uber API.
Configuring Settings
↑ Back to topStore Settings
To ensure Uber Direct Shipping works, your WooCommerce store / WordPress site must include the following:
- The store must have a valid address
- The WordPress site must have a name
- The phone number on the checkout page must be set to required
- The products to be shipped via Uber Direct must be enabled at the product level
- Uber Direct has a maximum weight limit of 50 lbs (22.65 kg / 22,650 grams / 800 oz) per delivery. Products (or total cart weight) exceeding this limit cannot be shipped via Uber Direct.
Please note that Uber Direct can only deliver in a range of ±16km or 10 miles.
Adding the Shipping Method
- In your WordPress admin panel, navigate to WooCommerce > Settings > Shipping
- Click on the “Shipping Zones” tab
- Either create a new shipping zone or edit an existing one
- Click “Add shipping method”
- Select “Uber Direct” from the dropdown menu
- Click “Add”
General Settings
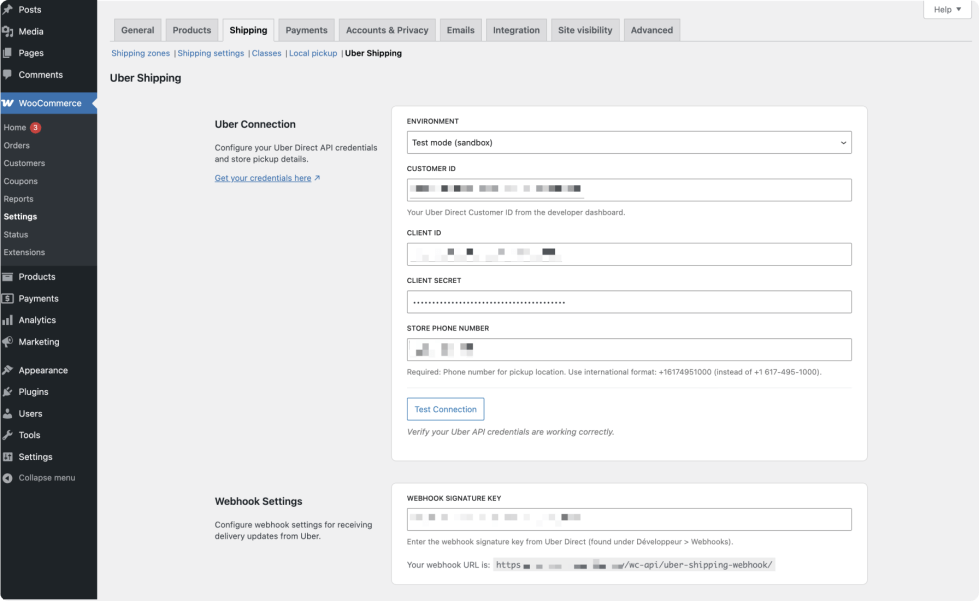
- In your WordPress admin panel, go to WooCommerce > Settings > Shipping > Uber Direct
- Select whether to use Test mode (Required Testing API keys) or Live mode (Reqires Product API keys)
- Enter your API credentials:
- Customer ID
- Client ID
- Client Secret
- Store Phone Number
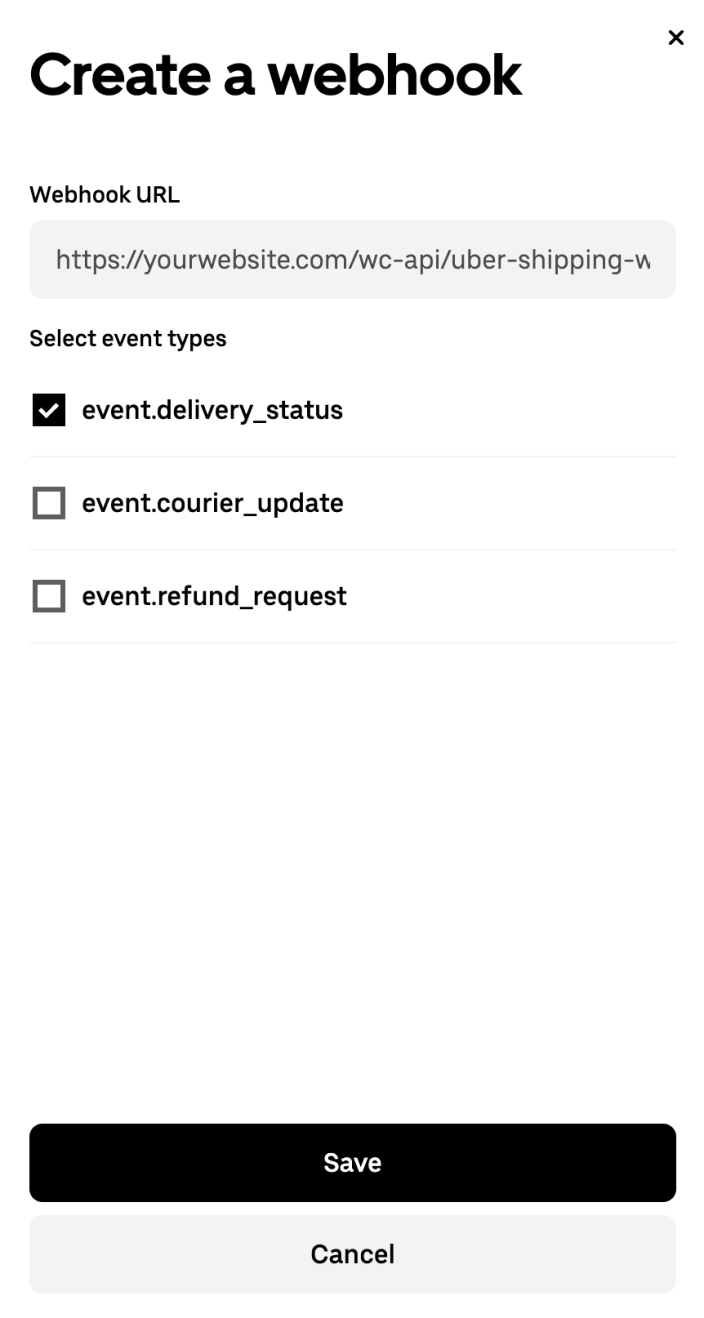
How to create the webhook signature key
- Log in at https://direct.uber.com/
- Click on Developer in the menu to the left
- Click the Webhooks tab in the main window
- Then click on Create a webhook
- For the URL, use https://yourwebsite.com/wc-api/uber-shipping-webhook/ (replace with your site URL or use the one generated automatically in the plugin settings)
- For the event types, check event.delivery_status
- Click the Save button
- The endpoint will appear in the webhooks list
- Click the three dots at the end of the line, and click Update
- You should now see a new field Webhook signature key
- Click the Copy button and paste it in the Uber Direct Shipping settings
Store Hours
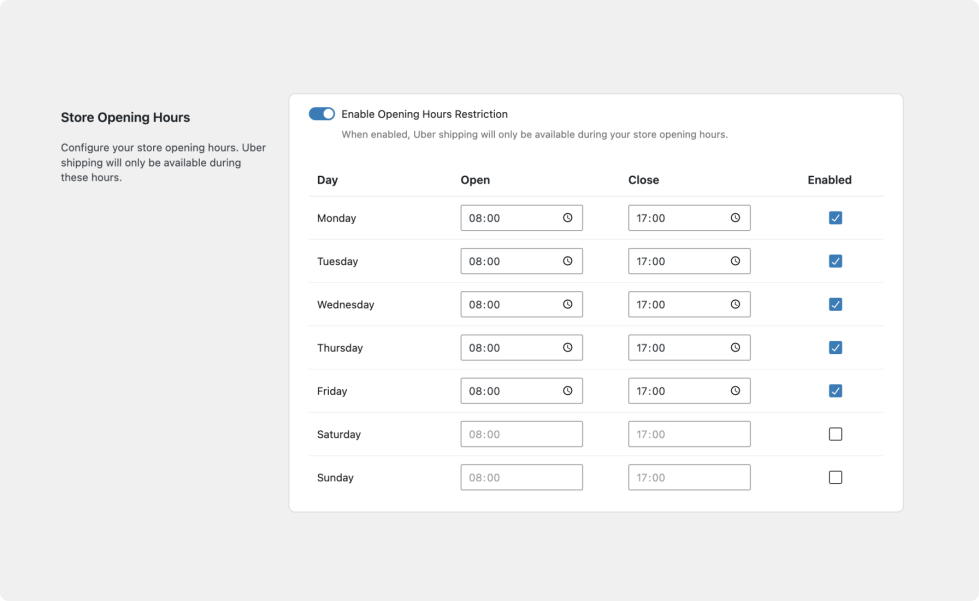
The Store Hours setting allows you to specify the hours during which your store is open and Uber Direct deliveries are available. When enabled, this feature ensures that the Uber Direct shipping method only appears on the checkout page if the purchase is made during your configured store opening hours.
Extra Settings
- Configure general settings:
- [Optional] Add specific store opening hours (When enabled, Uber shipping will only be available during your store opening hours.)
- Add the webhook signature key from Uber Direct (found under Developer > Webhooks).
- [Optional] Add an extra fee on top of the Uber delivery cost.
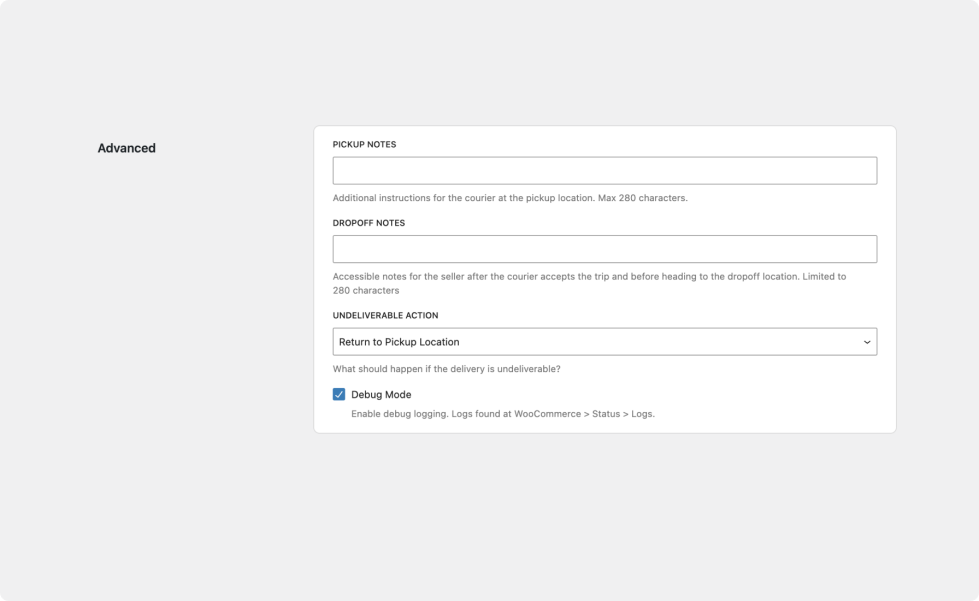
- Configure advanced settings:
- Enable Debug Mode: This allows each step of the Uber Delivery process to be logged. All debug logs are found at WooCommerce > Status > Log.
Usage
↑ Back to top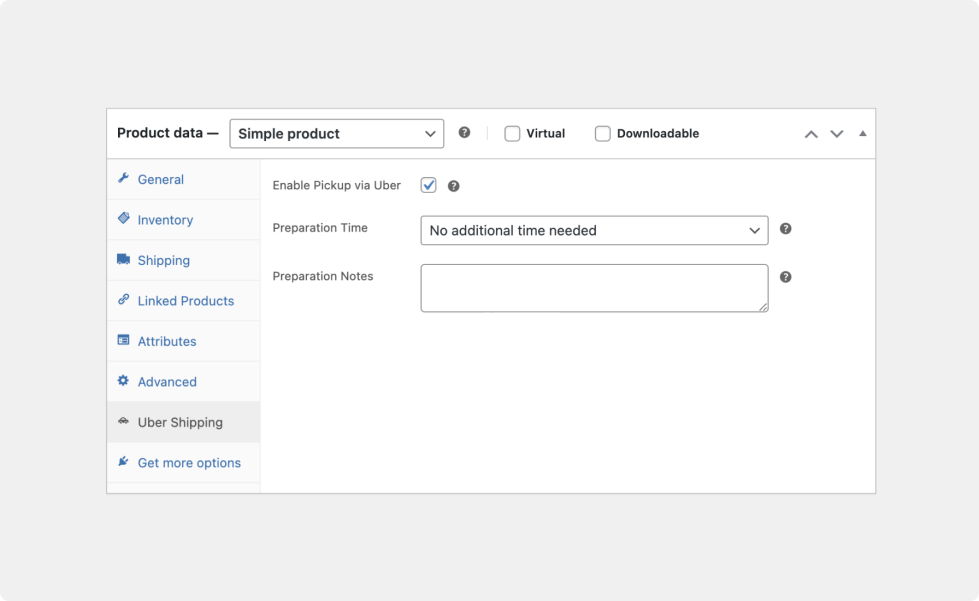
The Uber Direct Delivery shipping method will be visible on the frontend checkout page. Please note that the following conditions need to be met in order for the shipping method to be shown:
- The product needs to have weight and dimensions configured
- The product type needs to be eligible for Uber Direct Delivery (e.g. Simple or Variable)
- Uber Delivery should be enabled for each product in the cart
- The Uber Shipping API connection needs to be properly configured & active
- The shop address should be located in an area where Uber Direct Delivery is available
- The customer’s delivery address should be located within the delivery limits of the store
Privacy Policy Integration
↑ Back to topOverview
↑ Back to topThe plugin automatically registers privacy policy content through WordPress’s privacy API. This content is accessible in the WordPress admin under Settings → Privacy.
Implementation
↑ Back to topThe content includes:
- Data collection points
- Data sharing with Uber
- Types of information collected
- Purpose of data collection
How to Access
↑ Back to top- Navigate to WordPress admin
- Go to Settings → Privacy
- Click “Policy guide”
- Locate the “Uber Shipping” section
Customization
↑ Back to topTo modify the privacy policy content:
add_filter( 'uber_shipping_privacy_content', function( $content ) {
return 'Your custom privacy content';
});
Default Content
↑ Back to topThe default privacy notice includes:
- Delivery address collection
- Contact information handling
- Order details processing
- Link to Uber’s privacy policy
Best Practices
↑ Back to top- Review the privacy content after plugin installation
- Update your privacy policy when upgrading the plugin
- Ensure the content aligns with your local privacy laws
- Keep your privacy policy up to date with any changes in data handling
Uber Direct Customer ID Region Issue
↑ Back to topProblem Summary
↑ Back to topThe main issue: in some cases, Uber Direct customer IDs are tied to the geographic region where the account was created. If you created your Uber Direct account while located outside your business’s pickup region, Uber’s system will use your account’s registration location instead of the pickup address you send in API requests.
Example: If you created your account in Germany but your business operates in Belgium, Uber will calculate delivery distances from Germany, causing errors like:
“The dropoff location is outside the delivery radius of the pickup location (Max Radius: 10 miles, Calculated Distance: xxx miles).”
Root Cause
↑ Back to topCustomer ID Region Binding: Uber Direct customer IDs are permanently tied to the geographic region where the account was created, regardless of what pickup addresses you send in API requests.
Solution
↑ Back to topSimple Fix: Create New Account from Correct Location
The solution is straightforward – create a new Uber Direct customer account from your actual business pickup location:
Step 1: Create a New Customer Account
- Physically be in the pickup location (or use a VPN) when creating the account (this is extremely important since you’ll be geolocalized when creating the account)
- Go to Uber Developer Dashboard
- Create a new organization/app for your operations
- Set your business address to your actual pickup location
- Get your new credentials:
- Customer ID
- Client ID
- Client Secret
Step 2: Update Plugin Settings
- In WordPress admin, go to Uber Shipping settings
- Replace your credentials with the new ones
- Test a delivery quote – distances should now calculate correctly
Step 3: Verify Store Address
Ensure your WooCommerce store address matches your pickup location:
- Go to WooCommerce > Settings > General
- Verify all address fields are correct for your location
Alternative Options
↑ Back to topContact Uber Support
↑ Back to topYou can try contacting Uber Direct Support to:
- Ask if they can migrate your existing account to the US region
- Get guidance on multi-region setup
- Understand their account region policies
Troubleshooting
↑ Back to top“Scope is invalid”
↑ Back to topIt can happen that when our plugin connects to the Uber API, you get an error mentioning that “scope is invalid”? Our plugin already defines high-level scope (see scope as permissions), so if the issue persists you will have to contact the Uber Direct team at uberdirect@uber.com to fix this issue.
Phone number isn’t required
↑ Back to topFor the API request to be valid, the phone number on the checkout page must be set to required. You can easily set it as required when using the WooCommerce Checkout Block, however if you are using an FSE (Full site Editing) theme in conjunction with the classic checkout (the shortcode version of the checkout), you will not be able to set the phone number as required (with a non FSE theme, this can be done from the Appearance menu, in the Customize > WooCommerce section).
You have two options to fix this:
- Enable the checkout block
– edit the checkout page
– click “transform into block”
– click on the “shipping address” block
– mark phone field as required - Update the option in the database (be careful, do this only if you know what you’re doing, this can damage your site if done incorrectly)
– using a FTP software, edit the functions.php file of your theme and add this line and save
–update_option( 'woocommerce_checkout_phone_field', 'required' );
– refresh the page
– delete the line
– this a temporary code, you can also add it temporarily with a plugin like “Code Snippets”
Lastly you can force the field to be required with a plugin like “Checkout field editor” available on WooCommerce.com
FAQ
↑ Back to topQ: What is the difference between the Uber Direct API and Uber Eats API in WooCommerce? A: The Uber Direct API empowers merchants to deliver their goods using Uber Direct order delivery system. Once your an order is placed, a dedicated Uber courier will be dispatched to collect the order from the store and deliver it to the customer.
Uber Eats API on the other hand, provides merchants with more control over the store details (e.g. menu items & discounts) that customers can see on the Uber Eats app.
Note: This plugin is only focused on the Uber Direct delivery network that provides real-time shipping costs and tracking information as packages are picked up by couriers and delivered.
Q: Do I need an SSL certificate? A: Yes, an SSL certificate is required for secure communication with Uber’s API. This ensures that sensitive data like API keys and customer information are transmitted securely.
Q: What happens if the Uber Direct API is unavailable? A: In the unlikely event that the Uber Direct API is unavailable, alternative shipping methods configured alongside Uber Direct will be shown on the checkout page.
Q: I am having an error with “scopes”? A: The plugin defines scopes by default, those are eats.deliveries and direct.organizations. Those should be sufficient to make all API requests, so if you are experiencing any issues related to scopes, we recommend that you contact the Uber Direct support team at uberdirect@uber.com so that they can manually activate scopes tied to your account.
Q: Why aren’t shipping rates showing up? A: Common reasons include:
- Invalid API credentials
- No delivery zones configured
- Address validation issues
- API rate limits reached
- Customer is outside the delivery limits.