The WooCommerce Square extension is designed to bridge the gap between your WooCommerce store and Square. The extension serves a dual purpose, functioning seamlessly as both a product inventory sync and a payment gateway for receiving payments from customers. You have the flexibility to use either feature independently or both.
The extension offers SAQ-A PCI-compliant payment integration, including 3D Secure verification, and a variety of payment methods, including credit/debit cards, digital wallets (Apple Pay & Google Pay), Square Gift Cards, and more, to meet diverse customer preferences. In this document, we’ll cover on how to set up WooCommerce Square as your payment gateway, making it easy for your customers to make payments. Before you dig into the settings, please make sure that you have connected your Square account.
Requirements for Setting Up Square Payments
↑ Back to top- The shop location must be in a supported country: Square can only accept transactions from the following countries: US, CA, UK, AU, IR, ES, FR, and JP.
- Square account connected to WooCommerce: Make sure you have a Square account created (if you don’t have one yet) and the Square connection has been established with your WooCommerce store.
- Site currency must match your Square account currency: Square and WooCommerce must be set to the same currency to use the gateway.
- SSL certificate: To use the Square payment gateway, you must have an SSL certificate installed on your site. Click here to learn more about SSL certificates.
- Technical Requirements: To ensure WooCommerce Square payment works flawlessly, your site needs to meet the following technical specifications:
- PHP version 7.4 or higher
- WordPress 5.8 or higher
- WooCommerce 6.8 or higher
Payment Options with WooCommerce Square
↑ Back to topWooCommerce Square allows online stores to accept payments in various forms, making it a versatile option for merchants looking to cater to a wide range of customer payment preferences. The four specific payment forms that WooCommerce Square supports are:
Payment Settings
↑ Back to topFrom WooCommerce > Settings > Payment > Square, you can configure the following settings for the Square payment gateway:
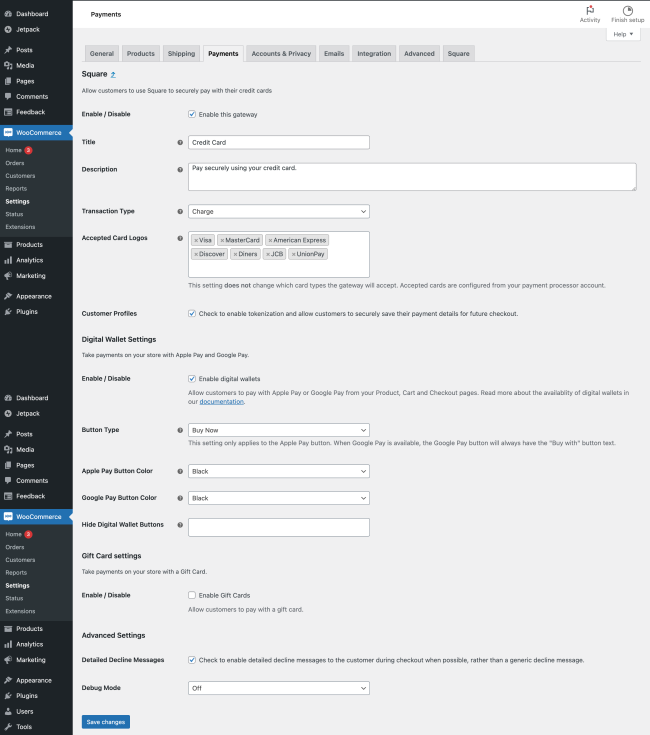
- Enable / Disable: Enable or disable Square as a payment option for customers. Check the box to enable credit card payments using Square on the checkout page.
- Title: Determine how the gateway should be labeled for customers at checkout and on the order received page.
- Description: The text added here appears below the Title field on the Checkout page. Limited HTML is allowed inside the description field.
- Transaction Type: This setting lets you choose how to handle payments with Square on your WooCommerce website. By selecting “Charge,” payments from customers are taken immediately. However, if you opt for “Authorization,” you’ll need to go in and manually confirm each payment yourself. It’s important to note that payments only authorized (but not completed yet) won’t show up in your list of transactions on Square. The system is set to use “Charge” as the default method.
- Charge Virtual-Only Orders: This option is about handling payments for orders that are only for virtual products. If you’ve set your payment method to “Authorization,” turning this on will automatically process payments for these orders with virtual products.
- Capture Paid Orders: This setting is for when you choose “Authorization” as your payment method. By turning it on, payments will automatically be processed as soon as orders are marked as paid, which includes orders that are being Processed or have been Completed. This means you won’t have to manually confirm payments for these orders later.
- Accepted Card Logos: This option lets you choose which credit card logos to display at checkout. It’s only about the logos you show to your customers; it doesn’t change the types of cards you can accept. For information on what cards are accepted, see Square’s accepted cards list.
- Customer Profiles: This feature allows customers to save their payment information for easier checkout in the future. It’s necessary if you’re offering subscriptions or taking pre-orders, as it helps streamline the payment process for these types of transactions.
- Digital Wallet Settings: This feature allows you to turn on or off, and make changes to, how Square digital wallets (like Apple Pay and Google Pay) work in your store. You can use these settings if your store is located in the US, UK, Canada, Ireland, France, Spain, or Australia and your store’s main currency is one of these: USD, GBP, CAD, EUR, or AUD.
- Detailed Decline Messages: This feature shows customers detailed explanations for declined transactions, instead of just a general error message, whenever possible.
- Debug Mode: This setting helps troubleshoot transaction issues by tracking detailed information. Use this feature to better understand and solve payment problems.
Capturing Authorized Payments
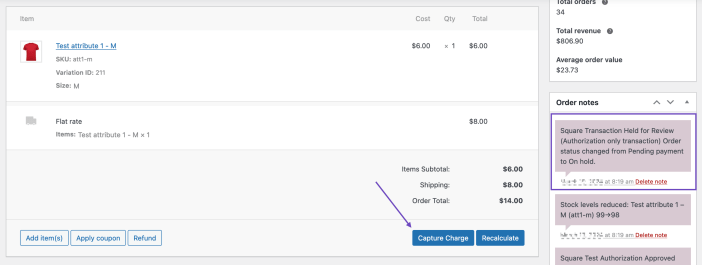
↑ Back to topWhen payment is authorized for an order, the order status will be set to “on hold”. You can edit the order by going to WooCommerce > Orders, then clicking on the order number to edit the order that needs to have the charge captured.
In the order you’ll see a “Capture Charge” button as shown below:
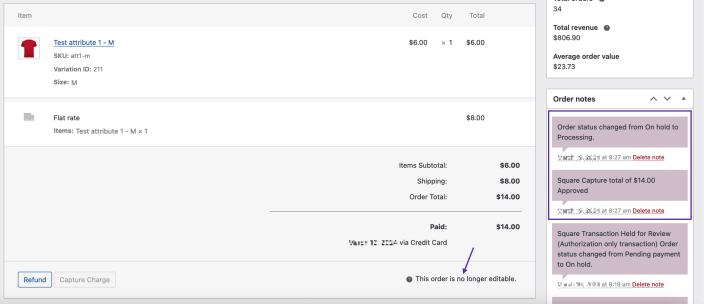
Once you’ve selected “Capture Charge” and saved the order, payments will be captured via the payment gateway, the order will no longer be editable, the order status will update to “processing” or “completed” for virtual and downloadable products, and the Order notes will be updated to reflect these changes.
Digital Wallets via WooCommerce Square
↑ Back to topYou can accept payments in your store using Apple Pay and Google Pay.
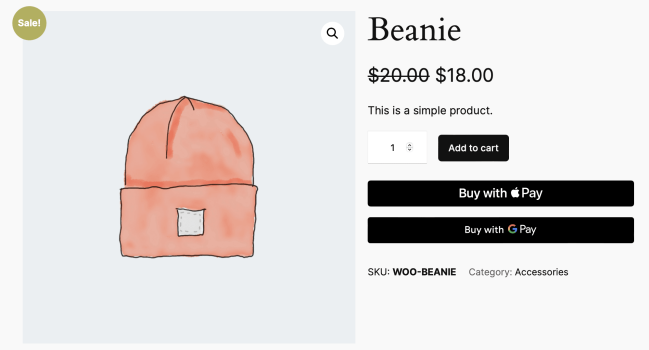
This feature is available if your store is in the United Kingdom, United States, Canada, Ireland, France, Spain, or Australia. Once you turn on digital wallets, your customers will see Apple Pay and Google Pay buttons when they visit the product, cart, and checkout pages of your store, depending on what’s available to them.
Setting Up Apple Pay
↑ Back to topGetting Started with Apple Pay
To start taking payments with Apple Pay, we need to confirm your store’s website is recognized by Square and Apple. Here’s how to get set up:
- Go to your WooCommerce settings: WooCommerce > Settings > Payments > Square.
- Turn on Digital Wallets. We’ll automatically check that your website is verified for you.
Checking Your Website Verification
To ensure everything is set up correctly:
- Enable Square logging by going to WooCommerce > Settings > Square.
- Visit your Square settings or Square payment method settings. This step helps verify your site with Apple Pay.
- Check your most recent Square log under WooCommerce > Status > Logs to see if Apple Pay has been verified.

If you find an error, look for “Unable to verify domain” in your log for details. If you had already verified your site before turning on logging, and don’t see any related logs, check again in a few hours.
Testing in Sandbox Mode
For developers testing the setup:
- Log into your Square Developer Dashboard at Square Developer Dashboard.
- Find your application that connects Square with WooCommerce.
- Click on Apple Pay in the side panel.
- Make sure you’re in the correct environment (sandbox or production).
- Check that your store is listed among the verified domains.
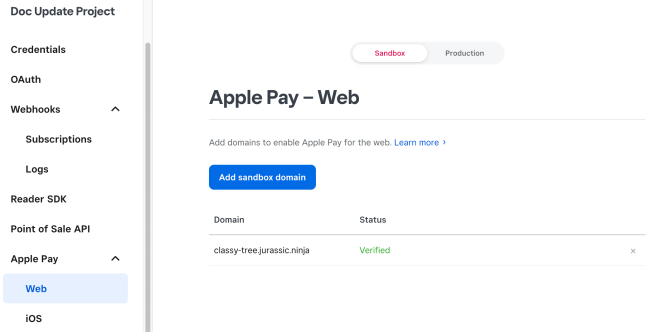
Note: Apple Pay buttons will appear on your store for users on supported Apple devices with a valid card in their Apple Wallet.
Setting Up Google Pay
↑ Back to topGetting Started with Google Pay
To accept Google Pay:
- Make sure digital wallets are enabled in your Square settings (WooCommerce > Settings > Payments > Square).
- Android users must have the Google Pay app installed.
- On a computer, you need a supported payment method linked to your Google account. You can manage your payment methods at https://pay.google.com.
Digital Wallet Settings
↑ Back to topWhen digital wallets are enabled for your store (United Kingdom, United States, Canada, Ireland, France, Spain, or Australia) , you’ll find these options in your gateway settings:
- Button Type: It lets you change the text on the Apple Pay button.
- Hide Digital Wallet Buttons: This option lets you choose not to display the Apple Pay™ or Google Pay buttons.
- Apple/Google Pay Button Color: It enables you to choose the color for the Apple Pay and Google Pay buttons separately.
Apple Pay button color options:
- Black
- White
- White with outline
Google Pay button color options:
- Black
- White
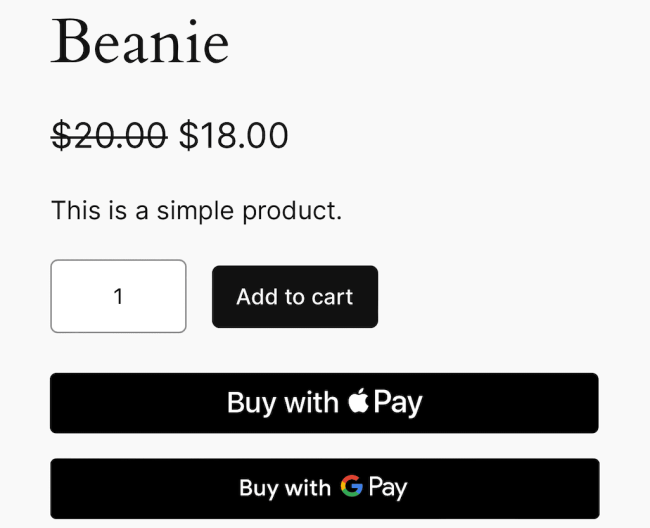
When customizing button colors or using custom CSS, make sure to follow Apple Pay and Google Pay brand guidelines.
Important: Digital wallet buttons will only appear if you have a compatible device and payment method in one of the supported regions.
- For Apple Pay to work, your customers need a supported payment method from a bank or card provider listed on the Apple Pay support page and a compatible Apple device. You can use the ApplePay Demo page on Apple.com to check if Apple Pay is available for you.
- For Google Pay, the button appears when there’s a saved payment method in the browser or device being used. Customers need a supported payment method saved to their Google Pay-supported browsers. For more help, visit Google Pay Help.
Gift Cards via WooCommerce Square
↑ Back to topSquare Gift Cards offer a flexible and customer-friendly way to shop and gift in your WooCommerce store.
Here’s how you can set up and manage Square Gift Cards, making the process straightforward and beneficial for both you and your customers.
Enabling Square Gift Cards
↑ Back to top- Activate Gift Cards in Settings: To start, navigate to
WooCommerce > Settings > Payments > Square > Gift Card Settings. Here, you’ll find the option to enable Square Gift Cards for your store.

When the ‘Gift Cards’ option is enabled:
- It adds the capability to split the payments between a Square Gift Card and either a Credit Card or CashApp Pay (if the store is eligible).
- If the Gift Card has insufficient funds, the customer can either opt to use a different gift card, or pay the remaining total using a credit card or CashApp Pay (if the store is eligible) through the Square payment method.
- For refunds done for orders made using split payments (Gift + Credit Card), the refund will be first done to the Gift Card and then the credit card.
- You can sell e-gift cards on your site by registering a WooCommerce product as a Square gift card.
- Customers can purchase a new gift card on your website, which will be delivered to them via email.
- Customers can add funds to an existing gift card by providing the GAN (Gift card account number).
Receiving Payment with Square Gift Cards
↑ Back to topCustomers can avail a Gift Card to make a purchase on your website. A customer can complete the payment entirely with a Gift Card if it has sufficient funds. In a scenario where it has insufficient funds, the customer will be shown the Credit Card option under the Square payment method to pay for the remaining balance.
For example, if the order total is $30 and the Gift Card has a balance of $5, the customer can split the payment and pay the remaining $25 with a credit card.
Please note that when splitting the payment, all other payment methods except Square will be hidden.
Important note: Certain product types that use tokenization for future charges cannot currently be purchased with Square Gift Cards, such as subscription products (created via the Woo Subscriptions extension) and Pre-Orders “Charge Upon Release” products (created via the WooCommerce Pre-Orders extension). When these products are in the Cart, the Gift Card payment method will not be shown.
Selling Square Gift Cards
↑ Back to topSetting Up a Gift Card Product
- Create a new simple or variable product.
- Mark the product as a gift card by enabling the Square gift card checkbox.
- Enter an amount for the gift card and click publish.
- The gift card product is now ready for purchase.
Note: To ensure that the website’s performance is not negatively affected by multiple API calls, a customer is limited to purchasing only 1 gift card per order
Gift card orders (Merchant View)
For orders related to the purchase or reloading of a gift card, merchants can see the gift card-related details, such as the amount, GAN (Gift card account number), etc., under the ‘Order notes’ section.
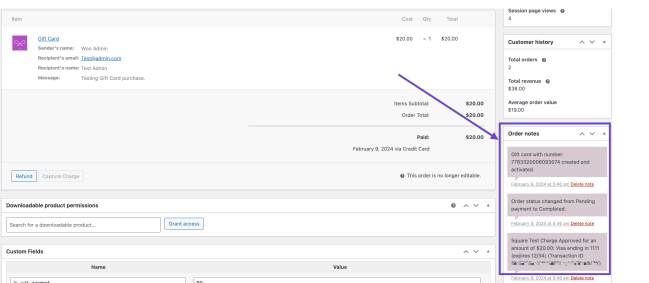
Purchasing a Square gift card (Customer View)
By visiting the gift card product page, customers can purchase a gift card by filling out the form, which the recipient will receive via email.
Note: Only the Square payment method can be used to purchase a gift card.
Adding value to a gift card (Customer View)
Customers who already possess a gift card can add additional funds to the gift card by entering their GAN (Gift card account number).
Email notification for the Square gift card recipient
Enable the Square gift card sent email notification under WooCommerce > Settings > Email, so that the recipient receives their gift card via email.

WooCommerce Analytics: The purchase of a Gift Card product is included in the calculation of gross sales but excluded from the net sales to align with the information displayed within the Square dashboard. You can find out more about the Gift Cards feature in the payments section of the Frequently Asked Questions page.
CashApp Pay via WooCommerce Square
↑ Back to topWooCommerce Square provides Cash App Pay payment method to your WooCommerce store. Cash App Pay allows you to accept payments directly on your store, with customers being able to pay using their Cash App account.
Please note that Cash App Pay is currently supported only when both the store and customer location is in the United States and the currency is USD.
To configure the Cash App Pay payment gateway, navigate to WooCommerce > Settings > Payment > Cash App Pay (Square). You can customize the following settings:
- Enable/Disable: Enable to allow customers to use this gateway at checkout.
- Title: Determine how the gateway should be labeled for customers at checkout and on the order received page.
- Description: The text shown under the title during checkout. Limited HTML is allowed.
- Cash App Pay Button Theme: Changes the theme of the Cash App Pay button. Options include Dark and Light.
- Cash App Pay Button Shape: Changes the shape of the Cash App Pay button. Options include Semiround and Round.
- Debug Mode: Enable this option when there are problems processing transactions. You can choose to log API requests directly on the checkout page, save them to the WooCommerce > Status > Logs page, or both.
Once the Cash App Pay payment method is configured, it will be listed among the available payment methods on the checkout and order pay page and customers will be able to pay using their Cash App account.
Important note: The Cash App payments method can only seen on the checkout page and not on the cart and product pages like other digital wallets.
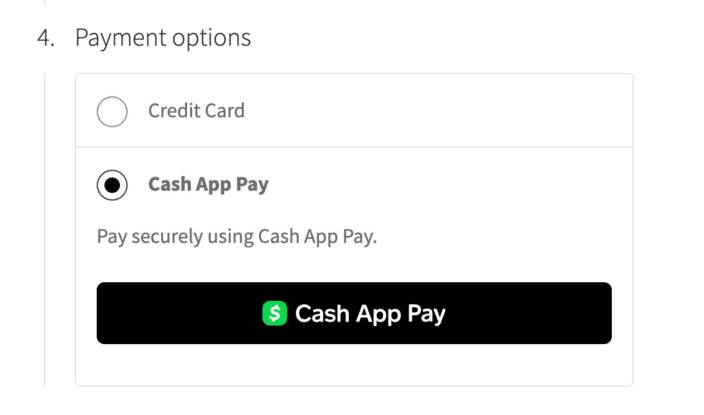
Important note: Cash App Pay cannot be stored as a “stored payment method” against a customer’s account, so a new Cash App transaction will be required with every order. Certain product types that use tokenization for future charges cannot currently be purchased with Cash App Pay, such as subscription products (created via the Woo Subscriptions extension) and Pre-Orders “Charge Upon Release” products (created via the WooCommerce Pre-Orders extension). When these products are in the cart, the Cash App Pay payment method will not be shown.
Advanced Settings
↑ Back to topDetailed Decline Messages
↑ Back to topEnable this option to give your customers specific reasons why their payment didn’t go through at checkout, instead of just telling them their payment was declined.
Debug Mode
↑ Back to topDebug mode is like a detective tool for your website. It helps you find out what went wrong during the payment process. It’s turned off when you first set things up, but you can choose to turn it on if you need it. Here are the options:
- Show on Checkout Page: If a customer’s payment isn’t going through, and you want to see what’s wrong right there on the checkout page, turn this on. It lets you see detailed error messages right where the problem is happening.
- Save to Log: This option keeps a record of any issues in a special log inside your website (you can find it under WooCommerce > Status > Logs). It’s useful for checking what went wrong later on. Log files start with
square_credit_card. - Both: You can choose both options if you want to see the errors on the checkout page and save them for later.
By using debug mode, you’re making a note of any hiccups in a log file, which can help you or a professional fix them later.
Square Error Codes
↑ Back to topShould you encounter any Square-related error codes within Error Logs, Checkout Page, or elsewhere, please refer to the common error codes returned by Square in this document.
FAQs
↑ Back to topCan I use Square for Subscriptions and Pre-Orders?
↑ Back to topIndeed! By turning on Customer Profiles in the Square settings, you can use Square for managing Subscriptions and Pre-Orders. Just a heads-up, you’ll need to enable a feature called tokenization to get started. Without this, you might see a message saying Square can’t be used for subscription transactions.
How does Square handle tax-inclusive pricing?
↑ Back to topSquare itself doesn’t handle tax-inclusive pricing directly. To keep things smooth, make sure your tax rates in Square and WooCommerce match up. If you’re using tax-inclusive pricing in WooCommerce, you’ll get a reminder to double-check this whenever you’re updating products.
Is it possible to divide my payment between a Gift Card and a Credit/Debit Card?
↑ Back to topCustomers have the option to partition their payment between a Square Gift Card and a Credit/Debit Card. For instance, if the total cost of an order is $30 and the Gift Card holds a $5 balance, the customer can apply the Gift Card towards the total and cover the remaining $25 with a Credit/Debit Card.
Can I use Square gift cards for subscription products?
↑ Back to topFor now, you cannot pay for subscription products with Gift Cards.
What order information is synced to Square from WooCommerce when an order is placed?
↑ Back to topWhen an order is placed in your WooCommerce store, only the order number and order total are synced to your Square account. No other order or product information, such as order line items, tax or SKUs is presently able to sync to Square. You can add your vote to the open feature request for this to be added in a future update.

