Installation
↑ Back to top- Download the .zip file from your WooCommerce account.
- Go to: WordPress Admin > Plugins > Add New > Upload Plugin > Choose File (for the file you downloaded in step 1).
- Install Now and Activate Plugin.
More information at Install and Activate Plugins/Extensions.
Setup & Configuration
↑ Back to topTo setup the Return for WooCommerce, in your WordPress admin menu, go to:
WooCommerce > Returns Center > Settings (In header options).
General Settings
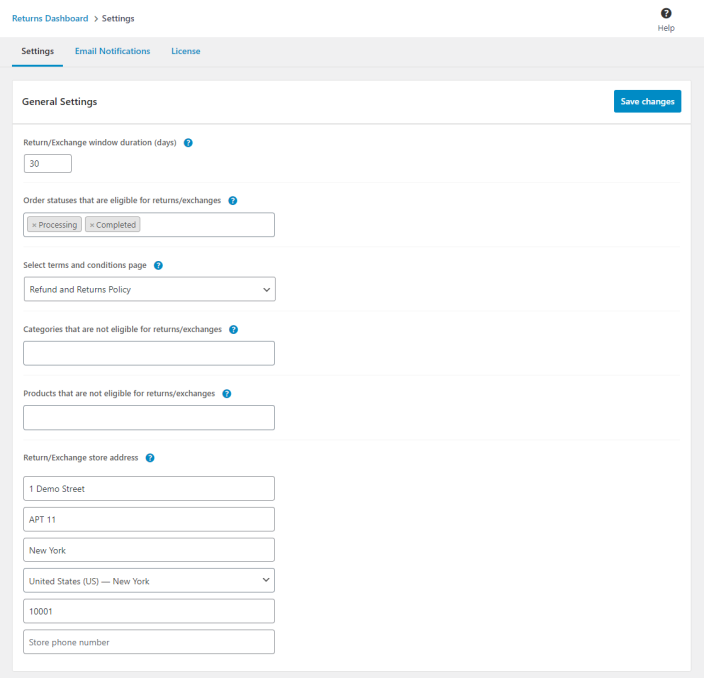
↑ Back to top- Return/Exchange window duration (days) – The number of days allowed for returns/exchanges.
- Order statuses that are eligible for returns/exchanges – The select order statuses which order statuses are eligible for return/exchange.
- Select terms and conditions page – This option allows to select a specific terms and conditions page within the return/exchange request form.
- Categories that are not eligible for returns/exchanges – The Product categories that will be not eligible for return/exchange.
- Products that are not eligible for returns/exchanges – The Products that will be not eligible for return/exchange.
- Return/Exchange store address – This option allows to input your store address for customers to return/exchange items to the designated location.
Return Settings
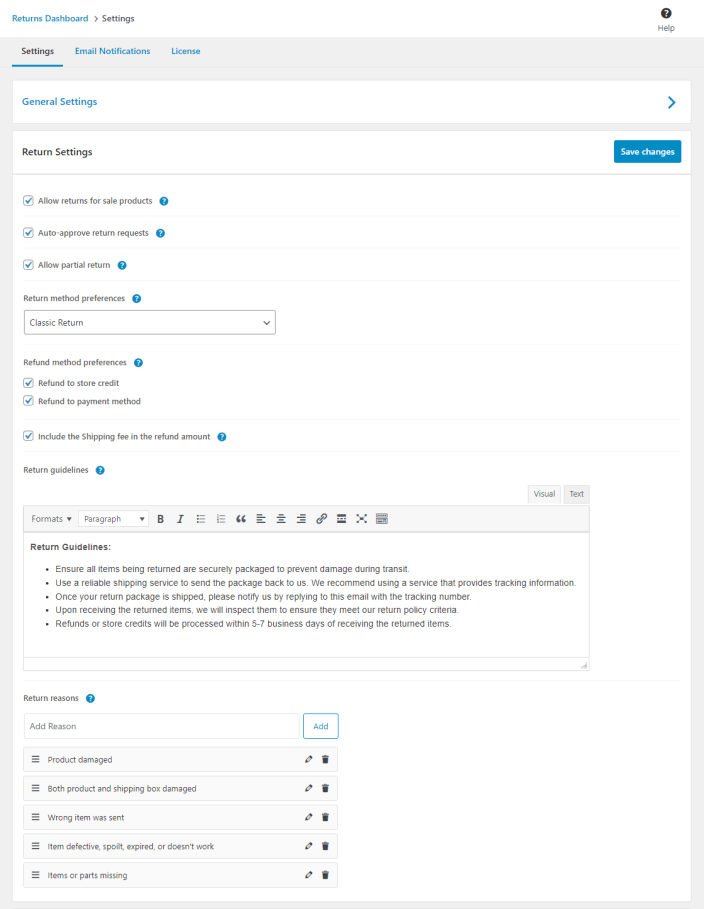
↑ Back to top- Allow returns for sale products – This option allows sale items to be eligible for returns.
- Allow partial return– This feature allows the partial return requests for individual order items.
- Auto-approve return requests – Activate this option for the automatic approval of return requests.
- Return method preferences – Allow this setting to offer multiple return method options.
- Refund method preferences – Allow this setting to offer multiple refund payment options.
- Include the shipping fee in the refund amount – This option allow to include shipping fee in refund amount.
- Return guidelines – This feature provides a space to input content outlining instructions for customers on how to return items.
- Add Reason for Return – Easily add or remove custom reasons for returns based on your preferences.
Exchange Settings
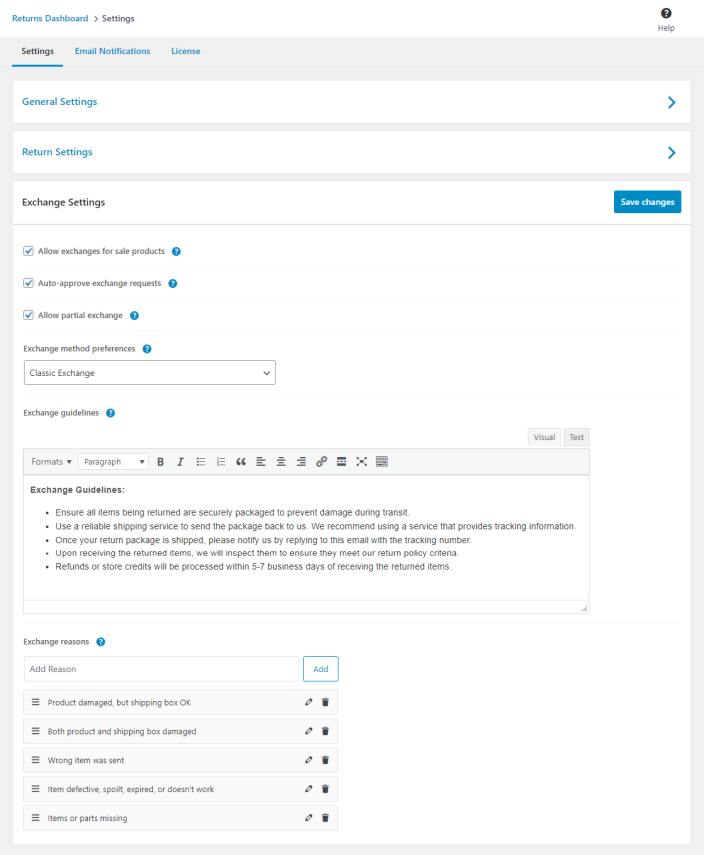
↑ Back to top- Allow exchanges for sale products – This option allows sale items to be eligible for exchanges.
- Allow partial exchange – This feature allows the partial exchange requests for individual order items.
- Auto-approve exchange requests – Activate this option for the automatic approval of exchange requests.
- Exchange method preferences – Allow this setting to offer multiple exchange method options.
- Exchange guidelines – This feature provides a space to input content outlining instructions for customers on how to exchange items.
- Add Reason for Exchange – Easily add or remove custom reasons for exchanges based on your preferences.
Email Notifications
↑ Back to topThe Email Notifications is return emails are automated sent to customers and/or administrators to keep them informed about the status and details of return requests and allowing for greater customization. These emails play a crucial role in providing transparency and improving communication throughout the return process.
Go to the WooCommerce > Returns Center > Settings > Email Notifications (In header options).
The Email Notifications tab serves as a redirect to customize return emails. This feature allows users to personalize the content and format of emails related to returns. By accessing the Email Notifications tab, users can customize the return email to their return instructions and communication requirements.

Customize the Return Email Notifications
↑ Back to topReturn Request Received (Customer) Email
↑ Back to topThe Return Request Received (Customer) email is automatically generated when a customer submits a return request for an order. This email serves as a confirmation to the customer, assuring them that their return request has been successfully received and is currently under review.
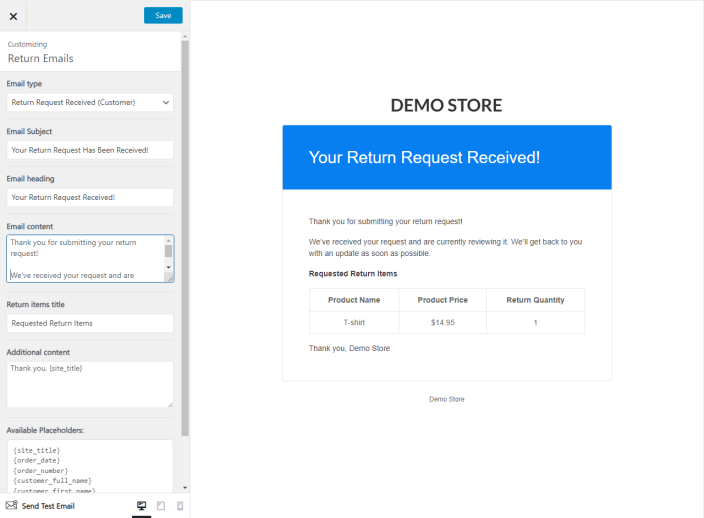
Customize Options:
- Email Subject – The subject of return emails.
- Email Heading – The heading of return emails.
- Email content – The email content of return emails.
- Return Items Title – The title of return requested items.
- Additional content – The additional content of return emails.
- Available variables:
{site_title}{order_date}{order_number}{customer_full_name}{customer_first_name}{customer_last_name}{customer_username}{store_address}{phone_number}
Return Request Received (Admin) Email
↑ Back to topThe Return Requested Received (Admin) email is an internal notification sent to administrators or relevant staff when a customer submits a return request. This email alerts the staff about the new return request, allowing them to promptly review and take necessary actions.
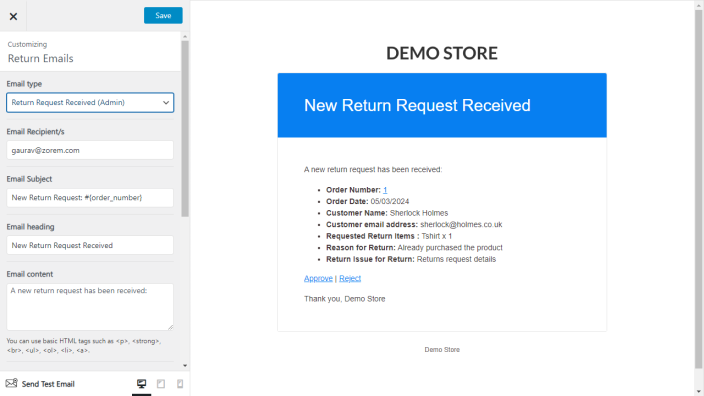
Customize Options:
- Email Subject – The subject of return emails.
- Email Heading – The heading of return emails.
- Email content – The email content of return emails.
- Return Items Title – The title of return requested items.
- Additional content – The additional content of return emails.
- Available variables:
{site_title}{order_date}{order_number}{customer_full_name}{customer_first_name}{customer_last_name}{customer_username}{store_address}{phone_number}
Return Approved (Customer) Email
↑ Back to topThe Return Approved (Customer) email is sent to the customer when their return request has been reviewed and approved by the administrator. This email includes details about the approval, any relevant instructions for returning the item, and may provide information on the expected refund process.
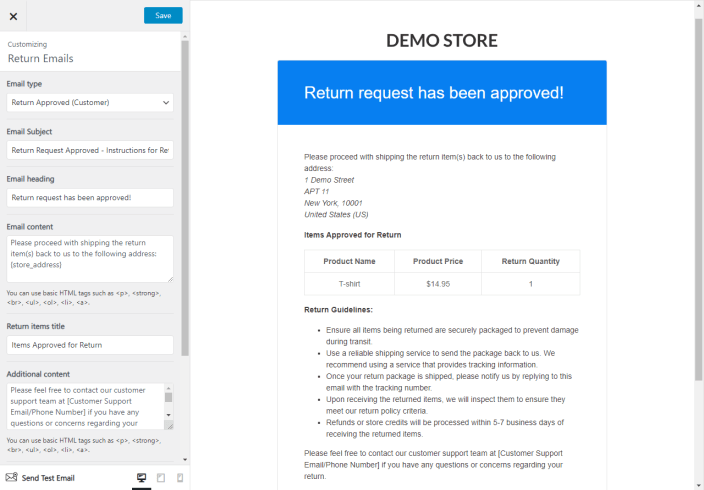
Customize Options:
- Email Subject – The subject of return emails.
- Email Heading – The heading of return emails.
- Email content – The email content of return emails.
- Return Items Title – The title of return requested items.
- Additional content – The additional content of return emails.
- Available variables:
{site_title}{order_date}{order_number}{customer_full_name}{customer_first_name}{customer_last_name}{customer_username}{store_address}{phone_number}
Return Rejected (Customer) Email
↑ Back to topThe Return Rejected (Customer) email is sent to the customer when their return request has been reviewed and rejected by the administrator. This email typically provides reasons for the rejection and any alternative steps or information the customer needs to be aware of.
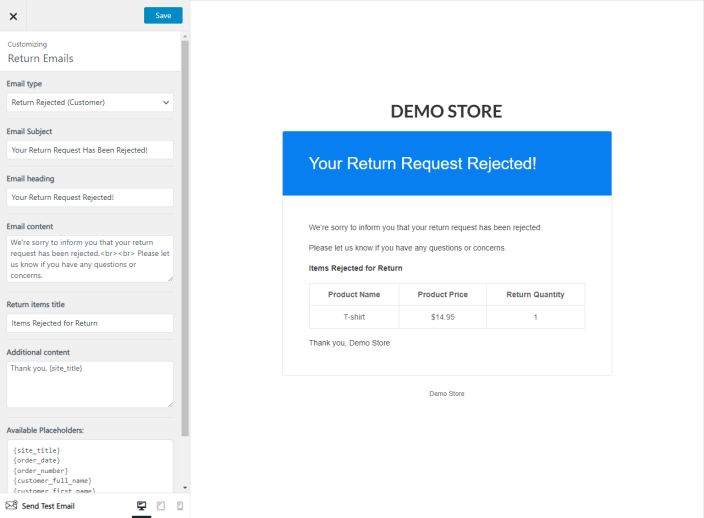
Customize Options:
- Email Subject – The subject of return emails.
- Email Heading – The heading of return emails.
- Email content – The email content of return emails.
- Return Items Title – The title of return requested items.
- Additional content – The additional content of return emails.
- Available variables:
{site_title}{order_date}{order_number}{customer_full_name}{customer_first_name}{customer_last_name}{customer_username}{store_address}{phone_number}
Returns Center
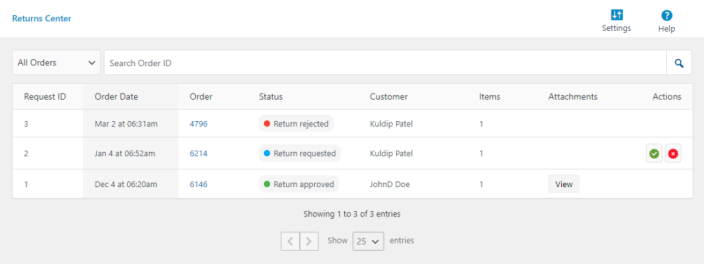
↑ Back to topA returns center is a portal interface that provides store owners with a centralized view of all return requests and related information. The return dashboard typically provides the following features:
- Return Management – Store owners can view, process, and manage return requests from a single location, including tracking the status of return shipments and processing refunds or exchanges.
- Analytics – The return dashboard may provide data and insights into return trends, such as the number of returns processed per day or the most frequently returned products.
- Return requested – This custom return status will be used when the customer will request for return and the custom return status email will be sent to the customer with the return items and details.
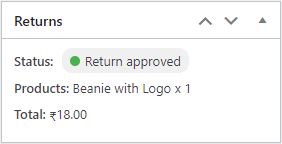
- Return approved – This custom return status will be used when the admin will approved for return request and the custom return status email will be sent to the customer with the return items and details.
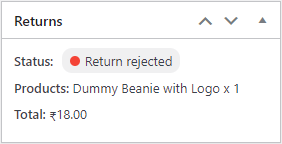
- Return rejected – This custom return status will be used when the admin will rejected for return request and the custom return status email will be sent to the customer with the return items and details.
Navigate to Woocommerce > Returns Center
Display Return Items Panel
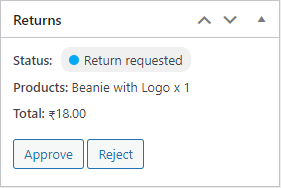
↑ Back to topThe Display Return Items panel within the edit order page offers a comprehensive overview of all return-related information associated with a particular order. Serving as a central hub for managing return requests, it facilitates efficient processing of returns.
Accessing the Panel, Navigate to the WooCommerce > Orders > Order Edit Page. Within the order edit page, look the sidebar on the right-hand side for panel.
Key Features:
- Return Item Details: Provides a clear list of all items included in the return request, showcasing essential details like product name, quantity, and price.
- Quick Actions: Utilize the quick actions to promptly approve or reject return request, ensuring efficient handling of return items.
Changing the Order Status for Returns
↑ Back to topThe “Return” order status will be updated for orders once all eligible items have been requested for return and all return requests, whether partially or fully, have been approved by the store admin.
Customer View
↑ Back to topThe return center form helps customers and businesses talk to each other when something is being returned. It makes sure things are correct, clear, and done quickly, making customers feel good about their experience. It also helps businesses make smart choices using the important information collected during returns.
Return a Request on Order View page
↑ Back to topCustomers can initiate a return request for items directly from the order view page. We provide an action button labeled “Return a Request” both in the order list and after displaying order details on the order view page, allowing customers to easily submit a return request for specific items.
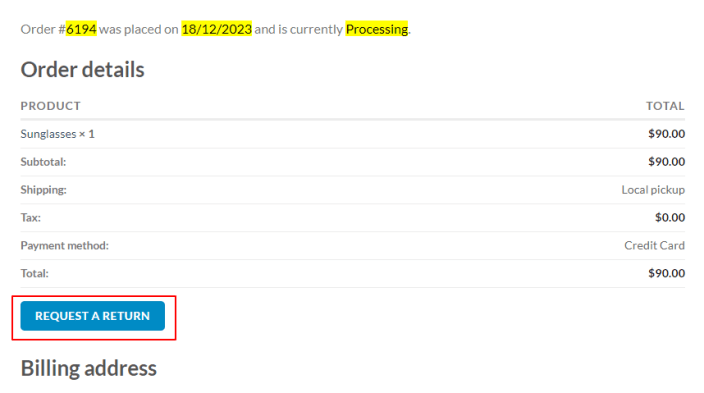
After clicking the ‘Return a Request’ button, you can see the return request form, as illustrated in the attached image below.
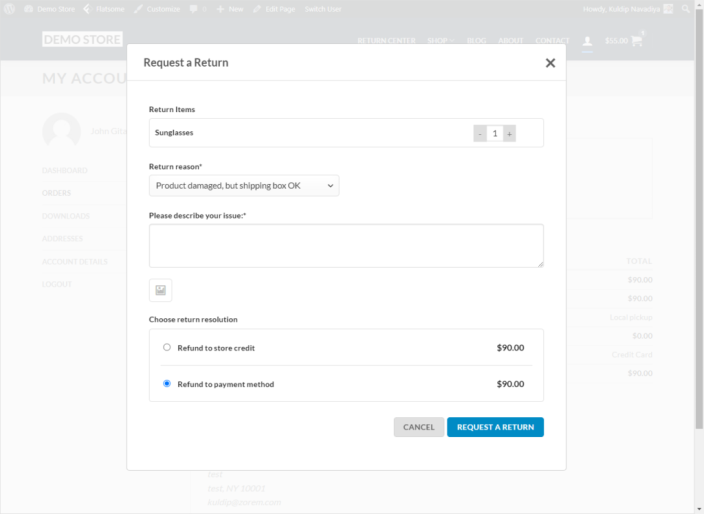
Refund to Store Credit
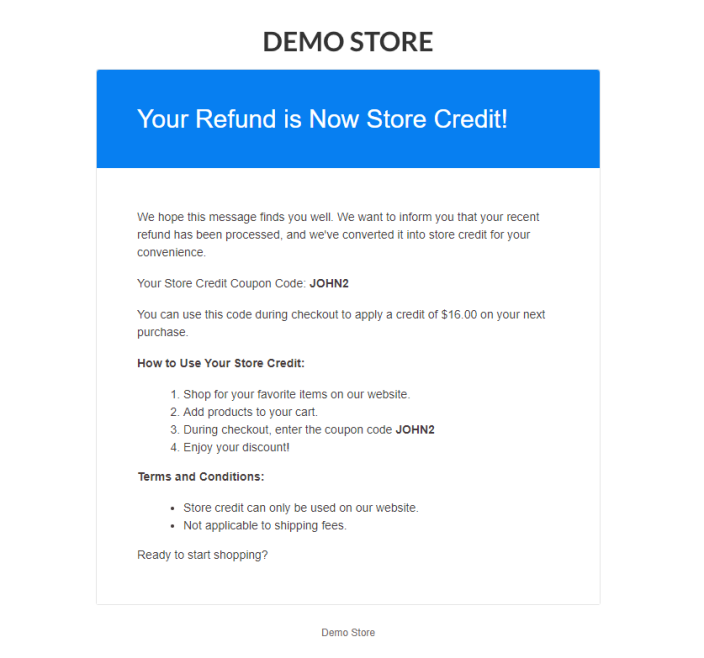
↑ Back to topWhen a customer submits a return request and selects the refund payment method as “Refund to Store Credit,” a streamlined coupon generation process is initiated. This process ensures efficient handling of refunds and provides customers with a convenient way to utilize their store credit for future purchases.
Coupon Generation Process:
↑ Back to top- Customer Submits Return Request: Upon submitting a return request, the customer selects the refund payment method as “Refund to Store Credit.”
- Return Request Approval: Once the return request is approved by the store administrator, the refund amount is processed as store credit.
- Coupon Generation: After approval, a coupon equivalent to the refund amount is automatically generated within the system.
- Email Notification: The generated coupon details, including the coupon code, and refund amount, are sent to the customer via email.
- Customer Redemption: The customer can then utilize the issued coupon during their next purchase on the store’s website.
