The PH Estimated Delivery Date Manager calculates and displays the estimated delivery dates of the products. The customers can view estimated delivery dates on the product page, cart page, checkout page, and through email. It allows estimates for all products, specific shipping classes, shipping methods, or shipping zones with customizable combinations.
This guide provides a comprehensive guide to setting up and using the plugin, offering essential knowledge and step-by-step instructions to help you get started seamlessly.
Installation
↑ Back to topTo start using a product from WooCommerce.com, you can use the “Add to store” functionality on the order confirmation page or the My subscriptions section in your account.
- Navigate to My subscriptions.
- Find the Add to store button next to the product you’re planning to install.
- Follow the instructions on the screen, and the product will be automatically added to your store.
Alternative options and more information at:
Managing WooCommerce.com subscriptions.

Setup and Configuration
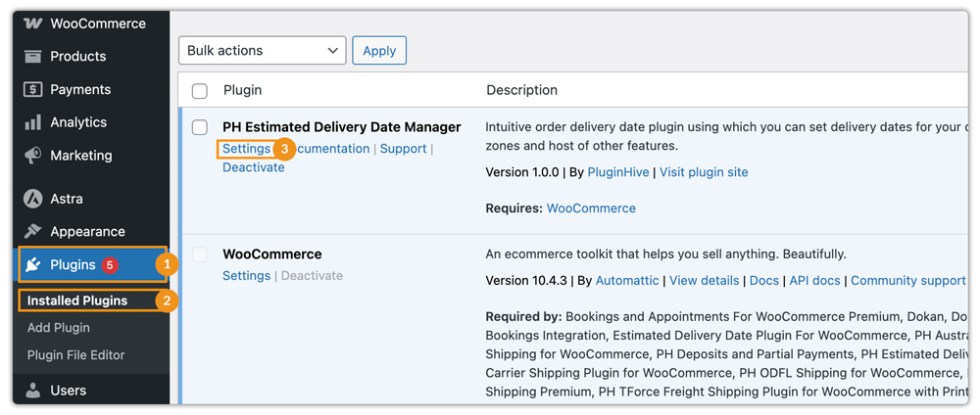
↑ Back to top1. Access the Plugin Settings
↑ Back to topAfter installing the Estimated Delivery Date plugin, you can navigate to the Plugin in two ways, as given below:
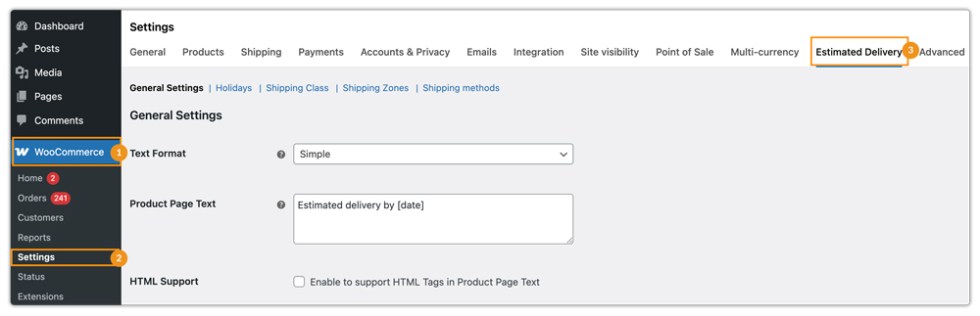
- Navigate to Dashboard and then WooCommerce > Settings > Estimated Delivery
- Or, navigate to Plugins > Installed Plugins > Settings under PH Estimated Delivery Date Manager
You will be able to set up the plugin with four tabs:
- General
- Holiday
- Shipping Class
- Shipping Zone
- Shipping Method
Let’s start with General Settings.
2. Configure General Settings
↑ Back to topYou can set up the following within the general settings:
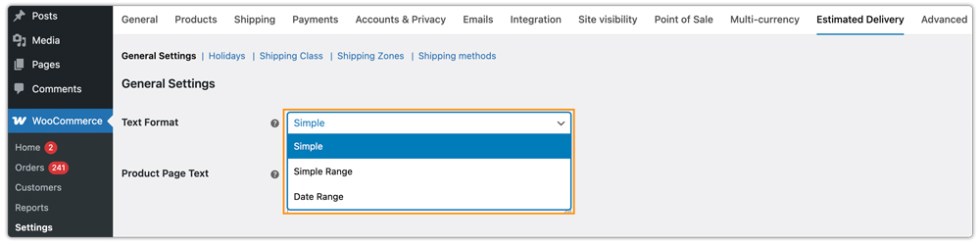
1. Choose Text Format: You can select a format for text display.
There are three available choices:
- Simple – Allows you to set a simple text display as defined in the Product Page Text field under the Text Format option. This format displays a single estimated delivery date.
Example display: Estimated delivery by April 6, 2026
- Simple Range – Allows you to display a delivery time range in days, not calendar dates. When this option is selected, the Product Page Text (Range) field is enabled instead of the Product Page Text field, allowing you to define custom text for the delivery range.
Example display: Estimated delivery in 3 – 5 days
- Date Range – Allows you to display a calendar-based date range within which the package is estimated to be delivered. Once you select this option, the following additional fields appear:
- Date Lower Range – Allows you to set a numerical value for the lower range of the delivery date.
For example, if the delivery date is April 6, 2026, and the Date Lower Range value is 1, the start date will be April 5, 2026.
- Date Higher Range – Allows you to set a numerical value for the higher range of the delivery date.
For example, if the delivery date is April 6, 2026, and the Date Higher Range value is 2, the end date will be April 8, 2026.
Example display: Estimated delivery by April 5, 2026 – April 8, 2026
2. Product Page Text: Enter the custom text with the date. This text is visible on the product page just above the add-to-cart button.
- Product Page Text (Simple): Enter the custom text with the date delimiter. For Example, estimated delivery by [date]
- Product Page Text (Range): Enter the custom text with the date range delimiter. This text is visible on the product page just above the add-to-cart button.
For Example, estimated delivery between [date_1] – [date_2] - Date Lower Range[date_1]: The plugin calculates a single date of delivery. So if you want to display a date range, specify the number of days in this setting, and the delivery date range will start with that number of days before the actual delivery date. For example, if the plugin calculates the delivery date as 04/05/2018, and you have set this option to 2, then the delivery date range would start from 02/05/2018.
- Date Upper Range[date_2]: Similar to the above setting, if you want to display a date range, specify the number of days in this setting, and the delivery date range will end that number of days after the actual delivery date. For example, if the plugin calculates the delivery date as of 04/05/2018, and you have set this option to 3, then the delivery date range would end at 07/05/2018.
Hence, the plugin will display the following message: Estimated Delivery Between 02/05/2018 – 07/05/2018
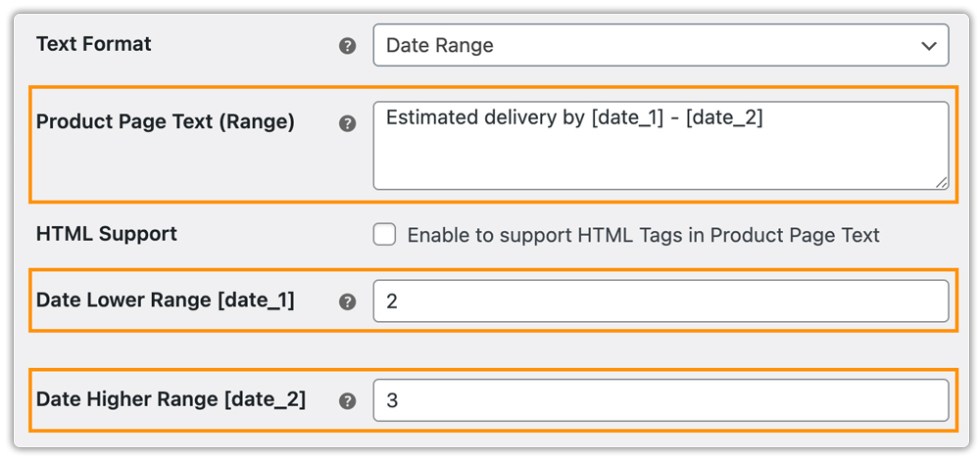
HTML Support: Enable this option to use HTML tags (like <b> or <span>) in the product page text for styling. If disabled, the text is shown as plain text.
3. Display Text: Enter text that gets displayed on Cart, Checkout, Admin Order, Order Received Page, and Email, beside which the estimated delivery date is shown.

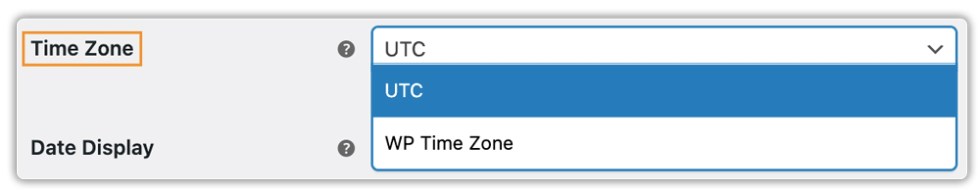
4. Time Zone: The plugin provides two time zones for calculating the delivery date.
- WP Time Zone – This is the time zone set in the General Settings section of your WordPress site. It reflects the site’s configured time zone, which may be a GMT offset or a city-based time zone.
- UTC – This time zone is the time standard commonly used across the world.
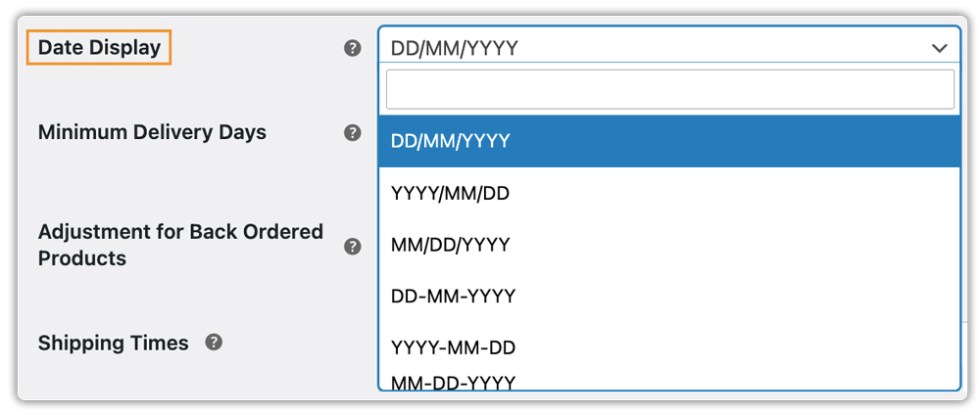
5. Date Display: Select the required date format from the drop-down list and available options as given below:
- DD/MM/YYYY
- YYYY/MM/DD
- MM/DD/YYYY
- DD-MM-YYYY
- YYYY-MM-DD
- MM-DD-YYYY
- DD.MM.YYYY
- YYYY.MM.DD
- MM.DD.YYYY
- DD MON YYYY
Add Custom Date: Choose the “Custom” option to define your own date format using the Custom Date Format field.
Supported format characters:
d – Day of the month (2 digits, leading zeros)
j – Day of the month (no leading zeros)
D – Day name (short, e.g., Mon)
l – Day name (full, e.g., Monday)
m – Month number (2 digits, leading zeros)
M – Month name (short, e.g., Jan)
F – Month name (full, e.g., January)
y – Year (2 digits)
Y – Year (4 digits)
Example: d M Y → 05 Jan 2026

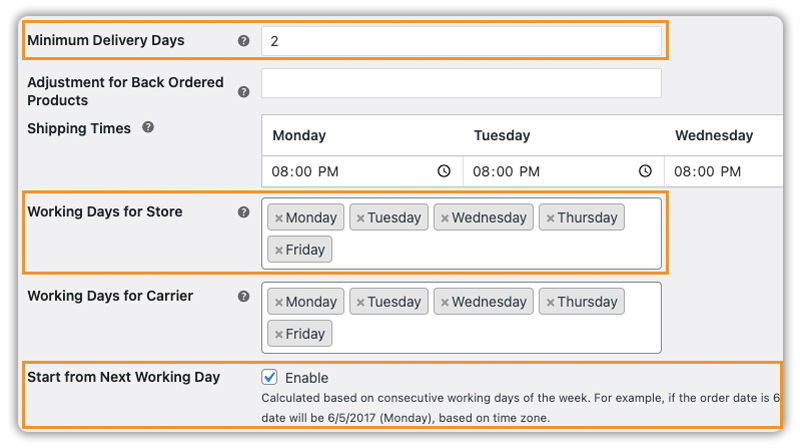
6. Minimum Delivery Days: Enter the minimum number of days for the delivery of all the products.

7. Adjustment for Back-Ordered Products: This setting adds extra days to the delivery estimate for back-ordered products, ensuring accurate timelines by factoring in restocking time.

8. Shipping Times: Set the delivery time limit for the selected day of the week.

9. Working Days for Store: Select the working days of your store, and according to these days, the date of delivery can be estimated.
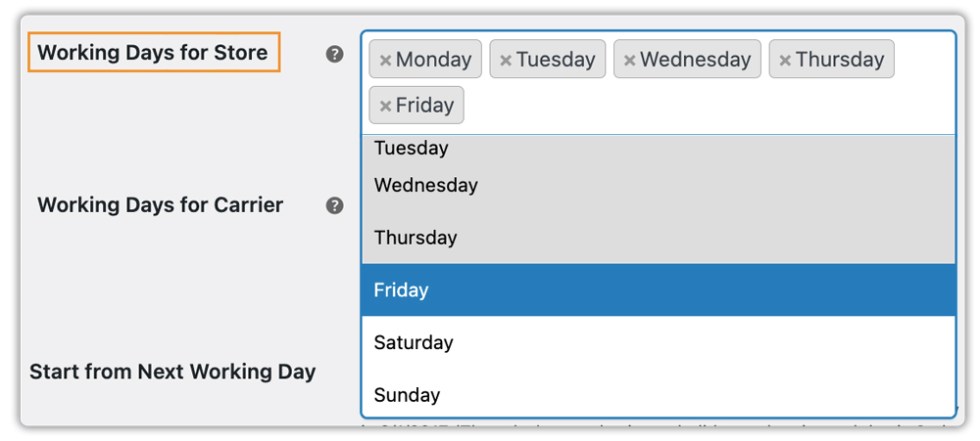
10. Working Days for Carriers: Choose the working days of the carrier, and the delivery date will be estimated based on their operational schedule.

11. Start From Next Working Day: You can calculate the estimated date based on your preferences by enabling or disabling this option.
- Disable – the plugin starts calculating the delivery from the same day the order is placed, only if the order is placed before the cut-off time.
- Enable – The plugin starts calculating the estimated delivery from the next working day. This means the current day (order day) is not counted, even if the order is placed before the cut-off time.

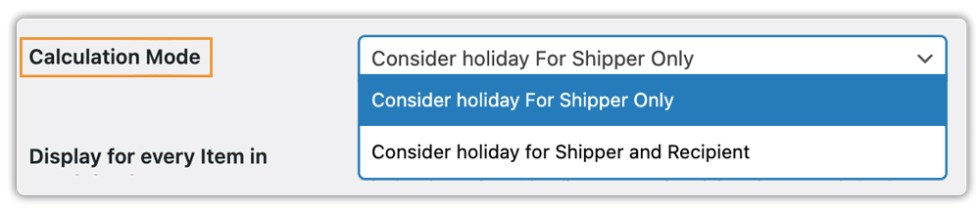
12. Calculation Mode: This option allows you to choose the holidays for the shipper and the customers. Based on your selection, the plugin will calculate delivery dates.
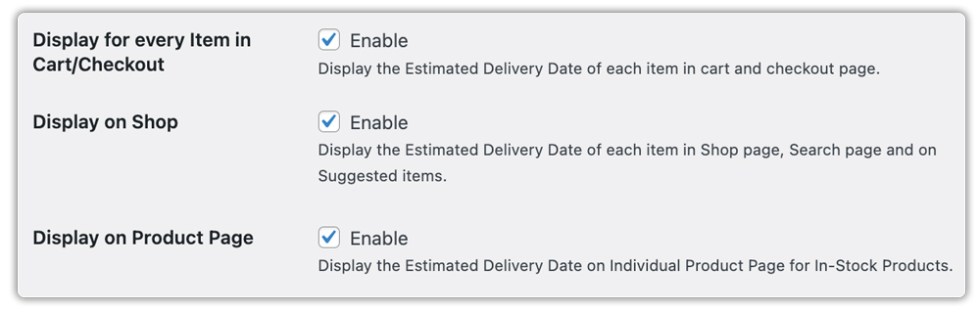
13. Display Estimated Delivery:
- Display on Product Page: Shows the estimated delivery date on individual product pages for in-stock products.
- For Every Item in Cart/Checkout: Shows the estimated delivery date for each item in the cart and at checkout.
- Display on Shop: Displays the estimated delivery date on the Shop page, Search page, and Suggested items.
14. Plain Text Mode:
When enabled, this removes all HTML tags from the text field on the product page, ensuring that the estimated delivery message appears as plain text without any formatting.

15. Consider Carrier Holidays:
If enabled, the plugin will factor in carrier holidays (such as public holidays when shipping services are unavailable) and automatically adjust the estimated delivery date accordingly.

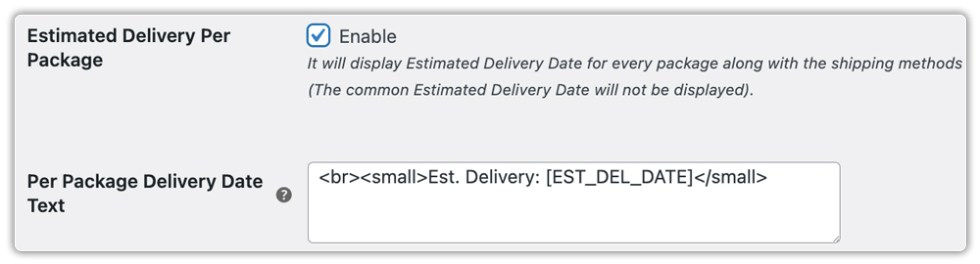
16. Estimated Delivery Per Package:
Instead of showing a general estimated delivery date for the entire order, this option displays a specific delivery estimate for each package based on the chosen shipping method.
Use the Per Package Delivery Date Text field to modify how the estimated delivery date appears.
17. Position for Estimated Delivery on Cart & Checkout:
This setting allows you to control where the estimated delivery date is displayed on the Cart and Checkout pages.
You can choose from the following positions:
- Above the Shipping Field – Displays the estimated delivery date above the shipping method selection.
- Below the Shipping Field – Displays the estimated delivery date below the shipping method selection.
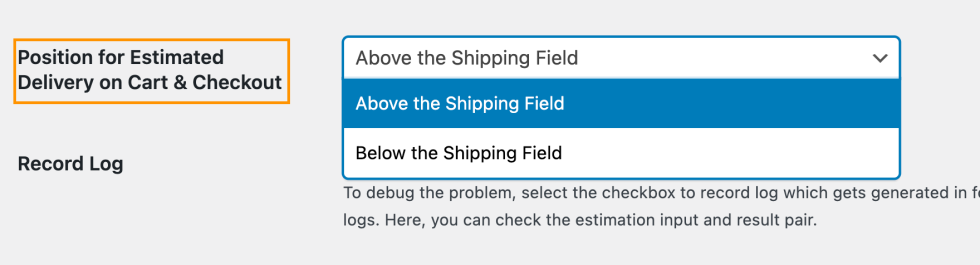
Note: This option is available only when Estimated Delivery Per Packageis disabled.
18. Record Log: To debug the problem, select the checkbox to record log, which gets generated in the folder wordpress\wp-content\uploads\wc-logs. Here, you can check the estimation input and result pair

Click Save Changes to save/update the General Settings.
3. Setting Up Holidays & Non-Working Days
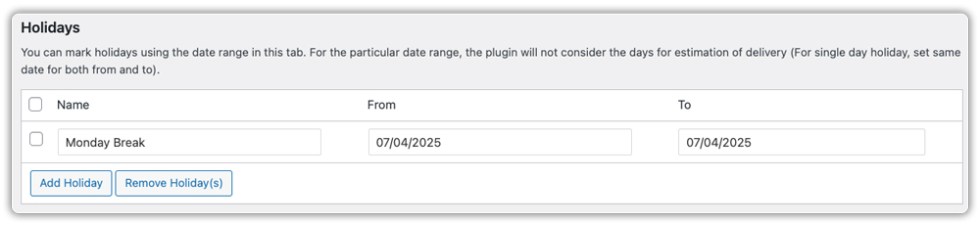
↑ Back to topAdmins can set holidays using a date range, ensuring those days are excluded from delivery estimation.
To access the Holiday setting, go to WooCommerce > Settings > Estimated Delivery > Holidays.
- Mark Holidays with a Date Range
- Enter a start and end date to define the holiday period.
- The plugin will exclude these days from the delivery estimation.
- Set a Single-Day Holiday
Use the same date for both the “From” and “To” fields to mark a single-day holiday. - Consider Holiday For:
This column becomes available when Consider Carrier Holidays is enabled in General Settings. It allows you to specify who the holiday applies to: Shipper or Carrier
- Add a New Holiday: Click the Add Holiday button to include a new holiday in the list.
- Remove Holidays: Select the holiday(s) and click the Remove Holidays button to delete them.
For example, Year End holiday:
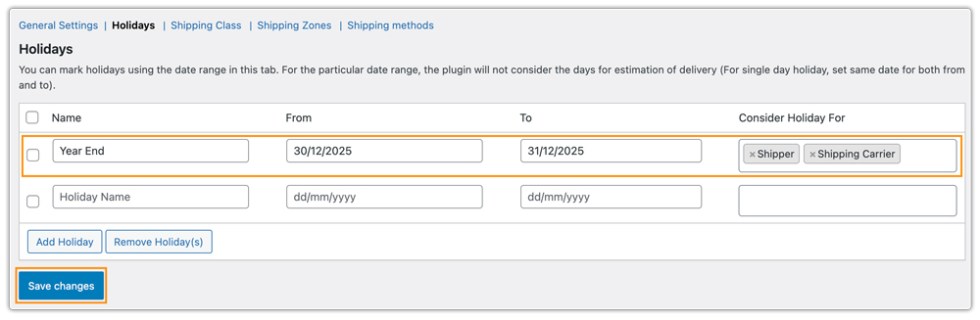
Click Save Changes to save/update the settings.
4. Shipping Class Settings
↑ Back to topAdmins can configure shipping classes to define specific handling and delivery timeframes for different types of products.
To set it up, go to the Estimated Delivery tab > Shipping Class,
- Add a Shipping Class: Enter the name of the Shipping Class in the provided field. This helps categorise products that require similar shipping conditions.
- Set Additional Delivery Days: Enter the number of extra days required for this shipping class. These additional days will be added to the estimated delivery time calculated based on the General Settings and shipping zone-specific days (if any).
- Define Cutoff Time: Click on the clock icon to set a Cutoff Time for order processing. Orders placed after the cutoff time will be processed on the next working day.
- Specify No Delivery Days: Select the specific days when deliveries will not be available (e.g., weekends or public holidays).
What is Cutoff Time?
The cutoff time is the deadline for processing orders on the same day. Orders placed after this time will be processed the following business day.
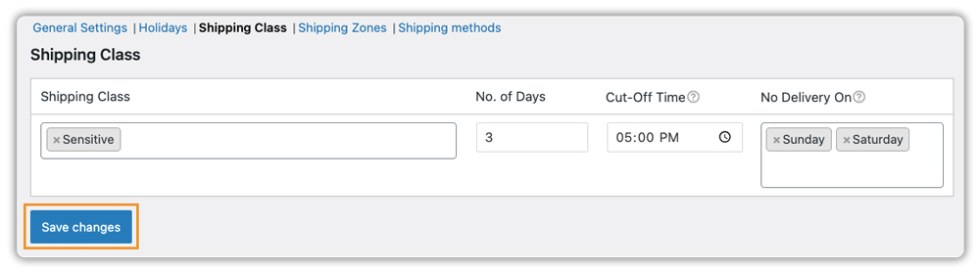
After configuring the days, click Save Changes to apply the settings.
5. Shipping Zones Settings
↑ Back to topAdmins can configure shipping zones to define delivery timeframes for different geographical areas. By default, there is a zone for locations not covered by any specific shipping zone.
To set it up, go to Estimated Delivery > Shipping Zones,
- Select the Shipping Zone: The list will display the WooCommerce Shipping Zones available in your store. Choose the appropriate zone to set delivery days.
- Set Additional Delivery Days: Enter the number of extra days required for deliveries to this shipping zone. These additional days will be added to the estimated delivery time calculated based on General Settings and shipping class-specific days (if applicable).
- Define Cutoff Time: Click on the clock icon to set a Cutoff Time for order processing in this zone. Orders placed after the cutoff time will be processed on the next working day.
- Specify No Delivery Days: Enter the specific days when deliveries will not be available (e.g., Sundays or public holidays).
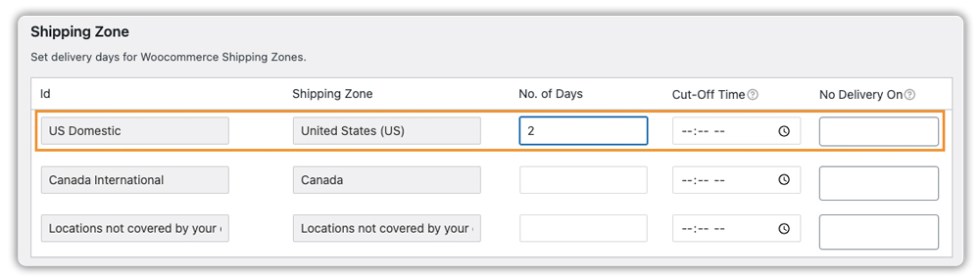
After configuring the settings, click Save Changes to apply the updates.
Note:
If WooCommerce’s default customer location is set to “Geolocate”, the plugin will automatically detect the customer’s location and apply the relevant shipping zone settings.
6. Shipping Method Settings
↑ Back to topAdmins can set the estimated delivery days for different shipping methods imported from WooCommerce. The final delivery estimate is calculated using the General Settings and shipping class specified days (if any).
To set it up, go to Estimated Delivery > Shipping Method,
- Add Method: Enter the shipping method(s) for which you want to set delivery estimates. You can find the shipping method value by inspecting it on the cart page.
- Enter No. of Days: Define the additional number of days required for the selected shipping method.
- Define Cut-Off Time: Set a specific time limit for processing orders. Orders placed after this time will be processed the next business day.
- Specify No Delivery On: Mention days when deliveries are not available (e.g., Sundays, public holidays).
- Define Working Days: Add which days are considered working days for this shipping method. (On non-working days, deliveries will not take place, but order pickup will be available.
- Remove Method(s): You can remove specific shipping methods along with their associated delivery estimate settings if they are no longer required.
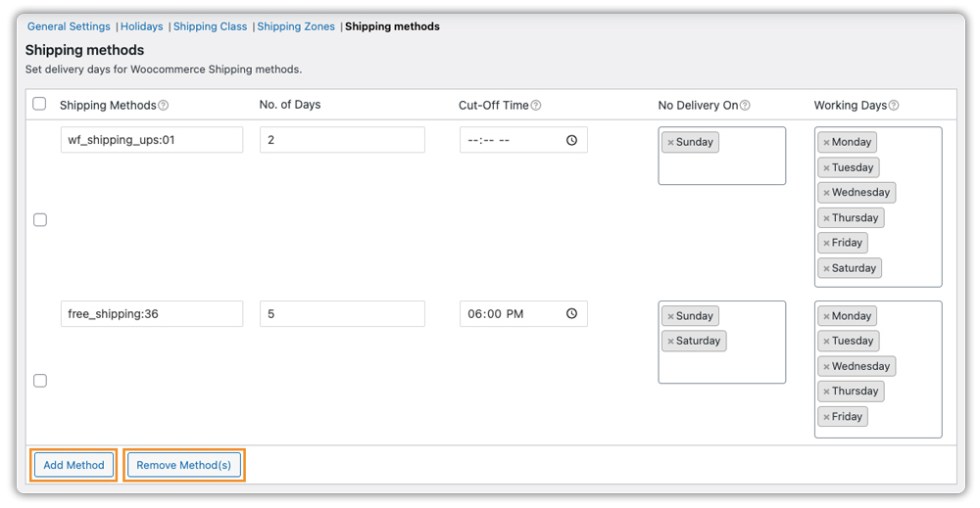
Once the settings are updated, click “Save Changes.”
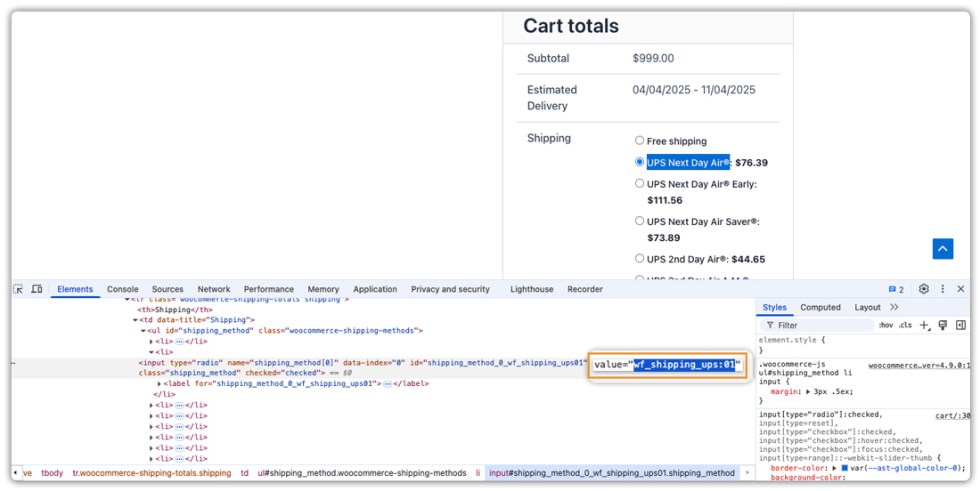
How to Find the Shipping Method Value:
- Go to the Cart page on your WooCommerce store and right-click on the shipping method you want to configure.
- Click Inspect to open the browser’s developer tools.
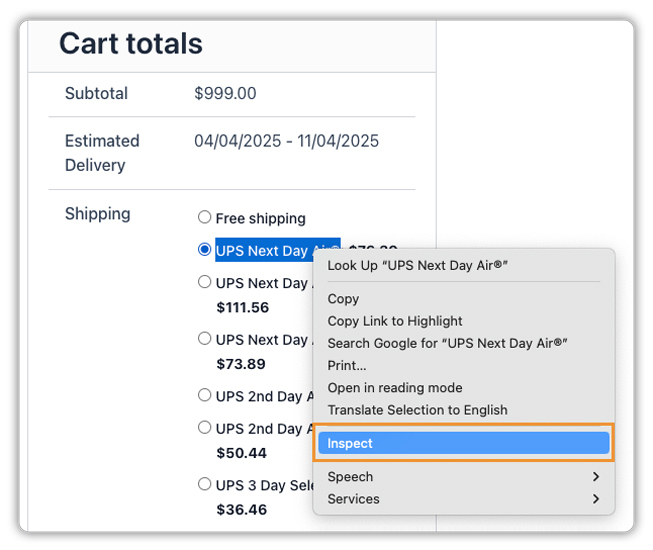
3. Copy the shipping method value and paste it into the plugin settings.
Usage
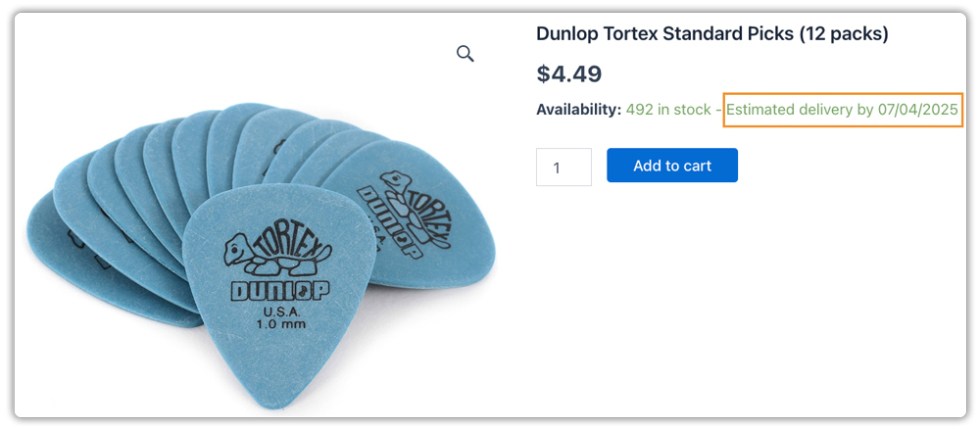
↑ Back to topProduct Page with Estimated Delivery Date
↑ Back to topAfter configuring the plugin, customers will see the estimated delivery date displayed on the product page.
Cart Page: How Delivery Dates Are Calculated
↑ Back to topThe estimated delivery date displayed at the cart page depends on various factors, including general settings, shipping class settings, and shipping zone settings. Below are three examples explaining how delivery dates are determined:
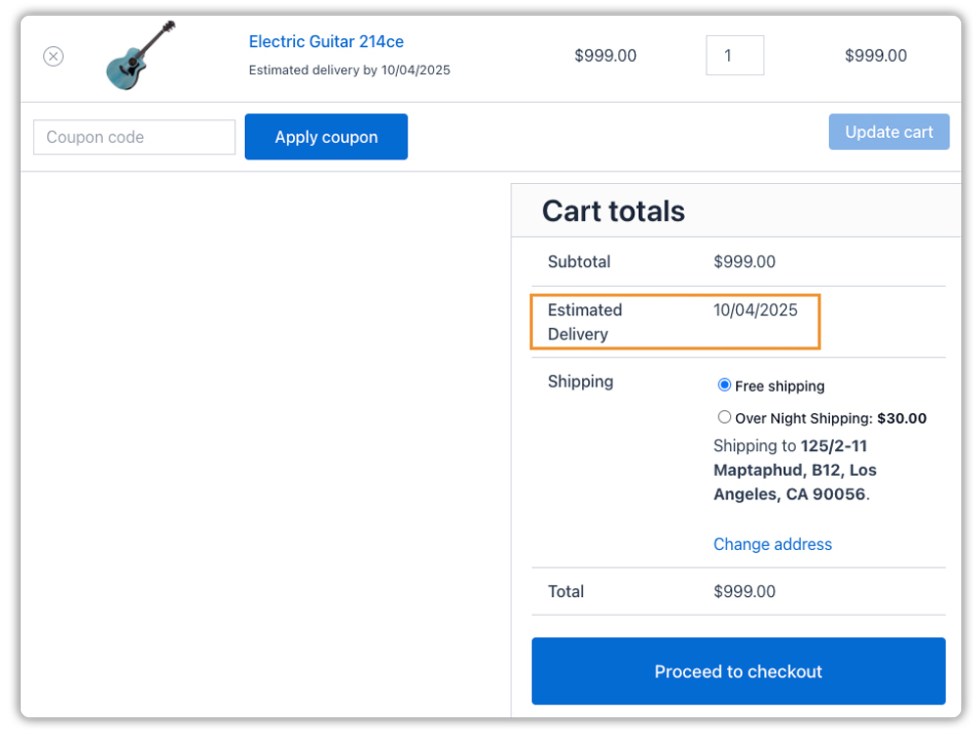
If order processing starts on 4th April,
Example 1: No specific shipping class or zone days are set
- General Settings:
- Enable start from the next working day.
- Minimum of 2 days required for delivery.
- Saturday and Sunday are non-working days.
- Holidays Settings: Monday (April 7th)
- Final Estimated Delivery Date: April 10th
Since April 5th and 6th are non-working days and April 7th is a holiday, the 2-day delivery period starts from April 8th. So, the estimated delivery date is April 10th.
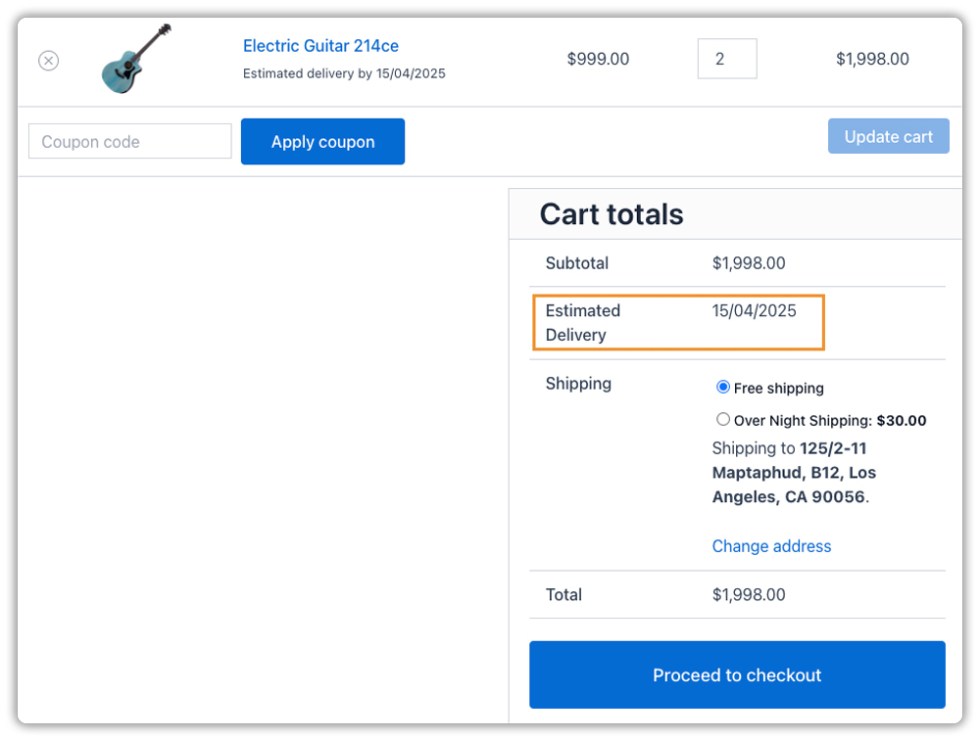
Example 2: Shipping class-specific days are set, but there are no shipping zone-specific days
- General Settings: Same as Example 1
- Shipping Class Settings:
- Select the shipping class
- Add the number of processing days. Here, 3

- Final Estimated Delivery Date: April 15th
As per general and holiday settings, Order processing begins on April 8th. With 2 processing days, it ends on April 10th. 3 more days (skipping weekend) for this particular shipping class. So, the final estimated delivery date is April 15th.
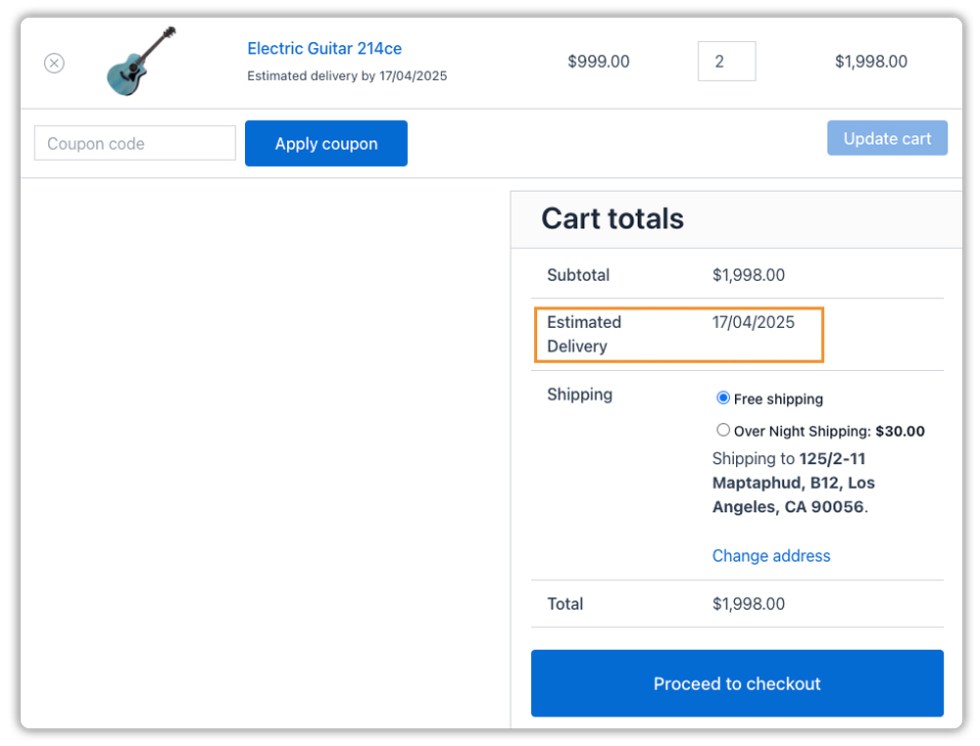
Example 3: Both shipping class and shipping zone settings are configured
- General Settings: Same as example 1
- Shipping Class Settings: Same as example 2
Shipping Zone Settings: Adds 2 more processing days to the US Zone.

- Final Estimated Delivery Date: April 17th
Previously, the delivery was estimated for April 15th. However, with 2 additional delivery days added in the US Zone, the new estimated delivery date shifts to April 17th.
Example 4: Shipping class, shipping zone, and shipping method settings are configured
General Settings: Same as example 1
Shipping Class Settings: Same as example 2
Shipping Zone Settings: Same as example 3
Shipping Method Settings:
- Select the free shipping method
- Number of days: 2
- No delivery on Friday for free shipping
- Working days: Tuesday, Wednesday, Thursday, Friday
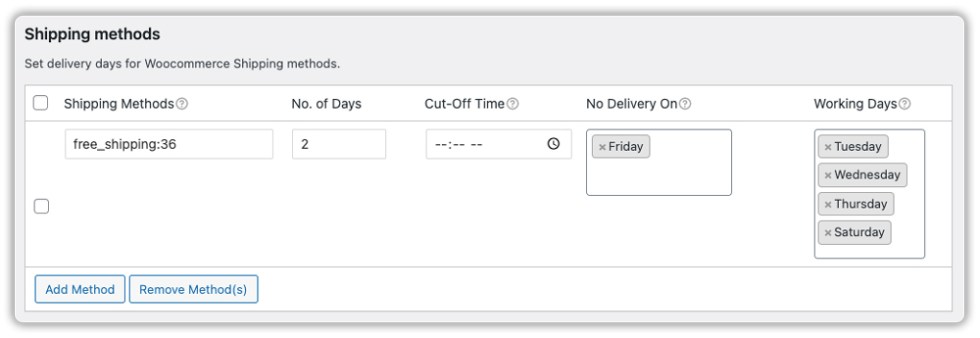
Final Estimated Delivery Date for free shipping: April 23rd
- Based on General Settings, Holiday Settings, Shipping Class, and Shipping Zone Settings, the initial estimated delivery date was Thursday, April 17th.
- The selected shipping method adds 2 more processing days. Friday (April 18th) is disabled as a delivery day. Since Saturday (April 19th) and Sunday (April 20th) are weekends, and Monday (April 21st) is a holiday, these days are skipped.
- As a result, the final estimated delivery date becomes Wednesday, April 23rd.

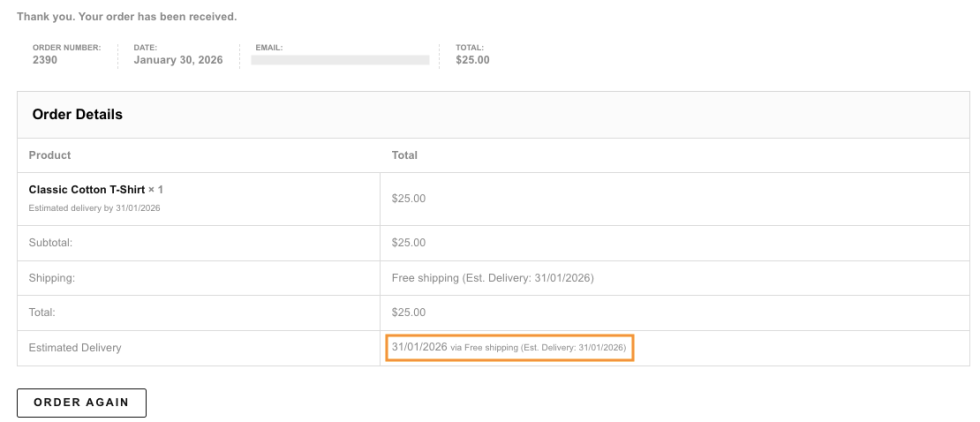
Order Received Page & Email Notifications
In addition to the product, cart/checkout pages, the plugin also displays the estimated delivery date on the Order Received (Thank You) page and in order-related emails sent to customers and store admins.
- Order Received Page: After placing an order, customers can see the estimated delivery date alongside their order details, helping reinforce delivery expectations post-purchase.
Email Notifications: The estimated delivery date is included in WooCommerce emails such as Order Confirmation Emails and Order Processing Emails, ensuring customers have easy access to delivery information without revisiting the store.
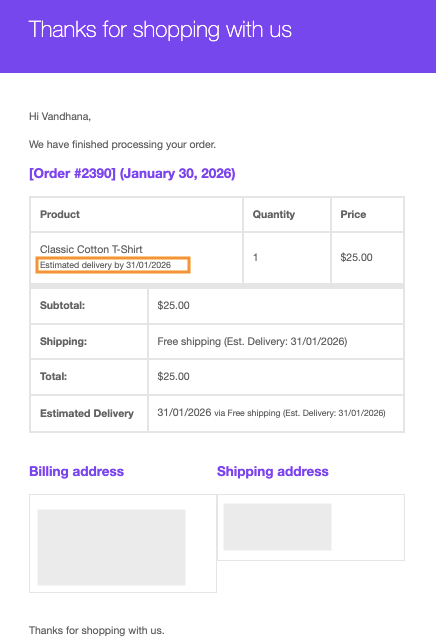
This ensures consistent communication of delivery timelines across all customer touchpoints.
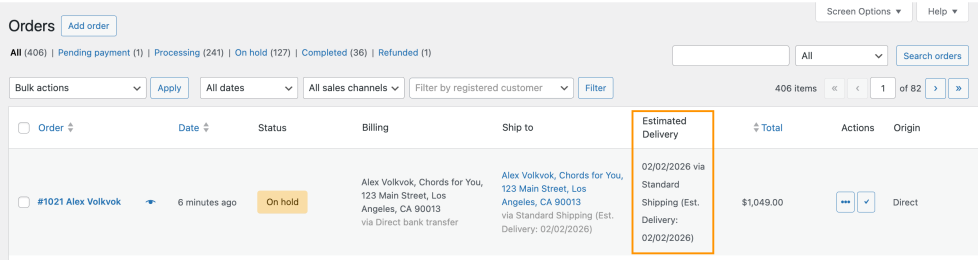
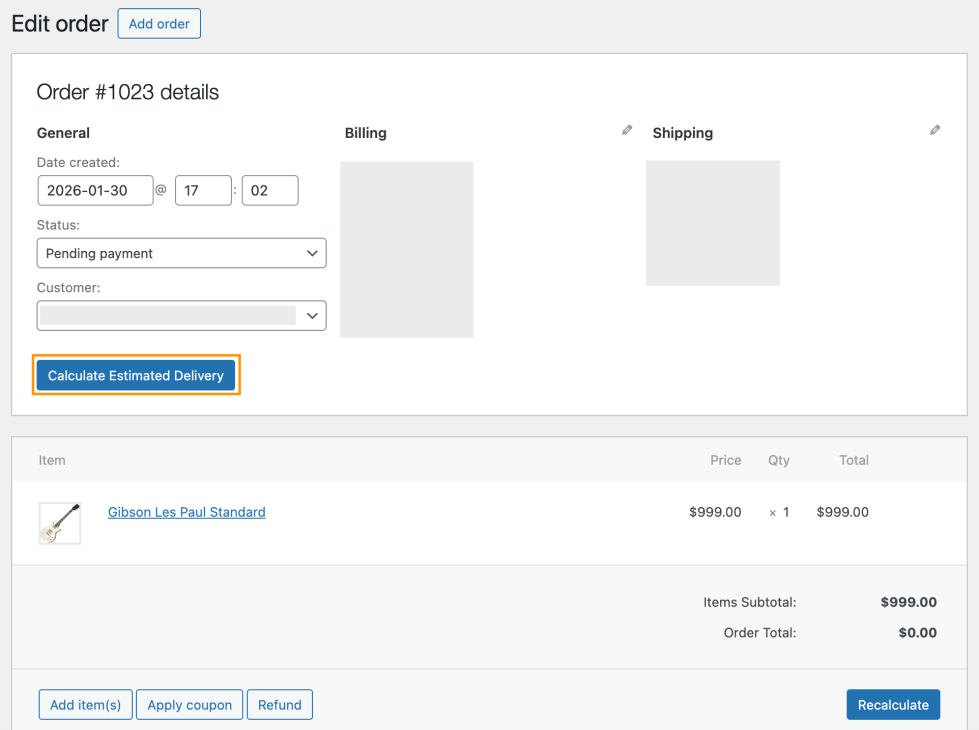
Estimated Delivery Details on the Order Page (Admin View)
The plugin displays estimated delivery information directly on the WooCommerce Orders page by adding an Estimated Delivery column. This allows admins to quickly view delivery timelines for all orders without opening individual order details.
In addition, on the Edit Order page, the plugin provides options to:
- View the estimated delivery date for the order
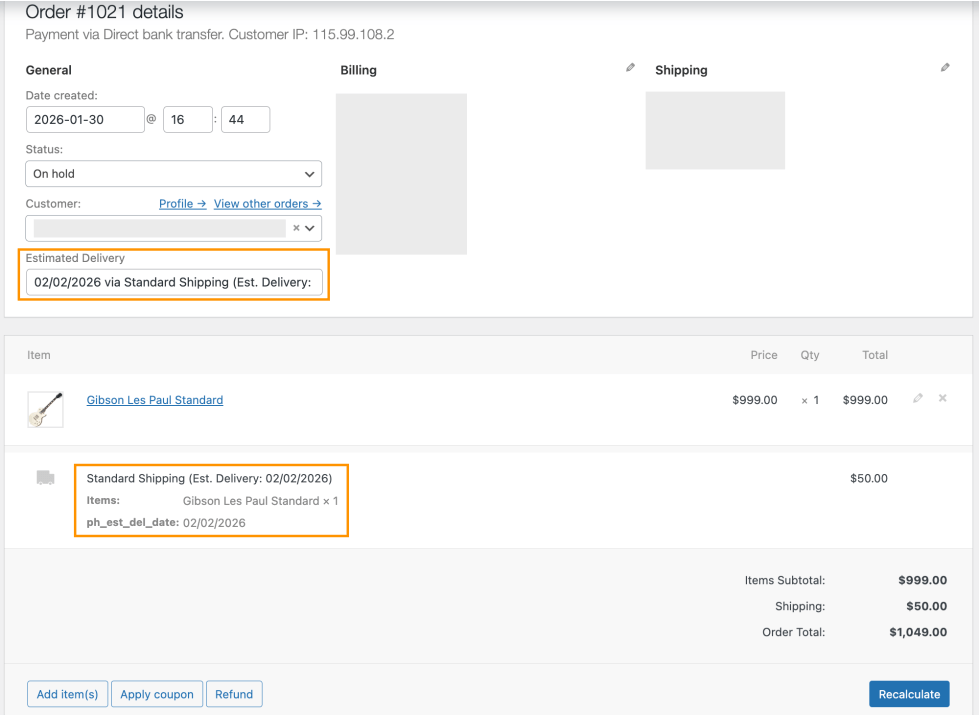
Manually calculate the estimated delivery date for manually created or updated orders
This is especially useful when orders are added manually from the admin dashboard or when delivery details need to be recalculated after order changes.