The Banner Images for WooCommerce plugin allows store admins to easily add banners to WooCommerce pages, including the shop page, product category pages, individual product pages, cart, checkout, and thank-you pages.
Use these WooCommerce banner images to highlight promotions, showcase bestsellers, announce seasonal sales, or reinforce your brand identity. Custom banners are a proven way to increase user engagement, improve the shopping experience, and drive more conversions.
Key Features of the Banner Images for WooCommerce Plugin
↑ Nach oben- Fully responsive banner images for both WooCommerce and WordPress websites
- Add WooCommerce banner images to individual product pages and product categories
- Display banner images on WordPress posts and post categories
- Support for banner images on Tag pages
- Add banners to default WooCommerce and WordPress pages, including the homepage, about page, etc.
- Show a banner image on the WooCommerce Thank You page to promote offers or messaging after purchase
- Display banners on WooCommerce Cart and Checkout pages to boost cross-sells or inform customers
- Enable or disable the plugin entirely via WooCommerce settings
- Toggle banner display with individual setting options per page or category
- Add custom redirect links and alt text to each banner image for better SEO and user experience
How to Install Banner Images for WooCommerce
↑ Nach oben- Download the .zip file from your WooCommerce account after purchase.
- In your WordPress admin dashboard, go to:
Plugins > Add New > Upload Plugin - Click Choose File, select the
.zipfile you downloaded, then click Install Now. - Once installed, click Activate Plugin to start adding banner images to your WooCommerce store.
With the Banner Images for WooCommerce plugin activated, you’re ready to customize your shop, product pages, categories, and more with engaging banners.
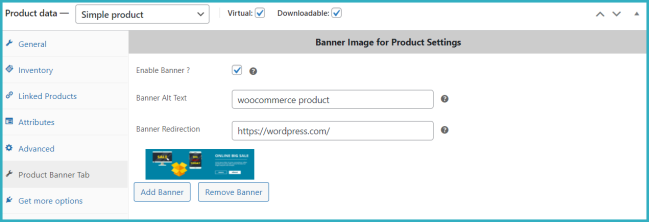
Adding Banner Images to WooCommerce Products and Categories
↑ Nach obenTo display WooCommerce banner images on product pages:
- Go to Products > All Products.
- Click Edit on an existing product or click Add New.
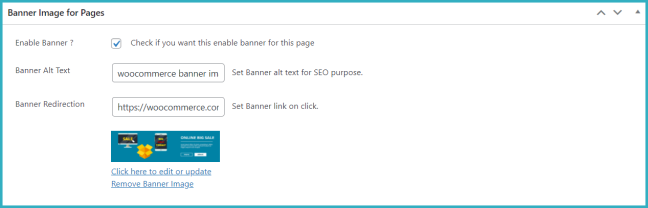
- In the Product Data panel, navigate to the Product Banner tab.
- Check Enable Banner to activate the banner display.
- Upload your banner image (supports PNG, JPEG, and GIF formats).
- Optionally, add a redirect link and SEO-friendly alt text.
To add category banner images in WooCommerce:
- Go to Products > Categories.
- Select a category and click Edit or Add New.
- You’ll find the banner settings where you can upload a banner image, add alt text, and include a redirect link.
These features allow you to easily add custom banners to WooCommerce product pages and categories without writing a single line of code.
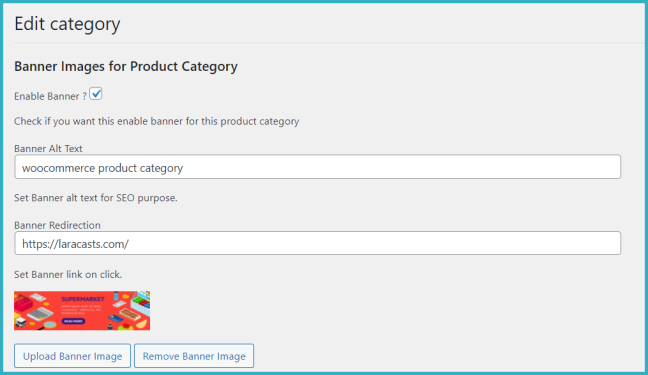
Adding Banner Images to WooCommerce Product Categories
↑ Nach obenThe same simple process applies when you want to enable WooCommerce category banners.
- Navigate to Products > Categories.
- Click Edit on an existing category or select Add New Category.
- In the Banner Image section, check Enable Banner.
- Upload your WooCommerce category banner image.
- Optionally, add alt text for SEO and a redirect link to drive traffic to promotions or product pages.
This feature allows you to add banner images to WooCommerce categories and enhance the visual appeal of your store without any coding.
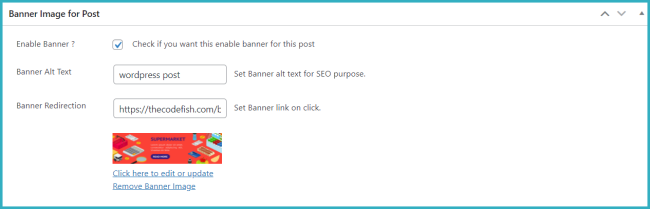
Add Banner Images to WordPress Posts and Categories
↑ Nach obenYou can easily add banner images to WordPress posts and their categories using the Banner Images for WooCommerce plugin.
- Go to Posts > All Posts, then click Edit on an existing post or Add New.
- In the Post Banner section, select Enable Banner.
- Upload your banner image.
- Optionally, add alt text for SEO and a redirect link to guide users to promotions or related content.
To add banners to WordPress post categories:
- Navigate to Posts > Categories.
- Click Edit or Add New Category.
- Enable the banner, upload an image, and set the alt text and redirect link as needed.
This lets you visually highlight content and improve engagement on your blog and content categories.
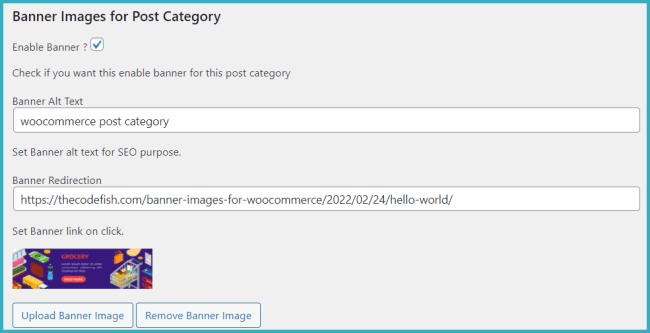
Add Banner Images to WordPress Post Categories
The same simple process applies when adding banner images to WordPress post categories.
- Navigate to Posts > Categories in your WordPress dashboard.
- Click Edit on an existing category or Add New Category.
- In the Category Banner settings, select Enable Banner.
- Upload your banner image.
- Optionally, add SEO-friendly alt text and a redirect link to promote sales, products, or special content.
This feature is perfect for bloggers and site owners looking to customize WordPress categories with banners and create a more engaging and branded user experience.
Add Banners to Default WordPress and WooCommerce Pages
↑ Nach obenTo display banner images on WooCommerce and WordPress pages, follow these steps:
- Navigate to Pages > All Pages in your WordPress admin panel.
- Click Edit on an existing page or Add New Page.
- Locate the Banner Image meta box.
- Upload your WooCommerce banner image, add SEO alt text, and an optional redirect link.
You can add banners to any page — including key WooCommerce pages like Cart, Checkout, My Account, or even custom WordPress pages. This is a powerful way to highlight promotions, sales, and announcements across your entire store or site without writing any code.
To add a Banner Image to your Page Category:
- Go to Pages > Categories in the WordPress admin.
- Select Edit on an existing category or Add New Category.
- In the Banner Image meta box, enable the banner and upload the image.
- Optionally, add SEO alt text and a redirect link for the banner.
This allows you to target specific categories with custom banners, driving engagement and increasing visibility for particular content or promotions.
Add Banner to WooCommerce Thank You Page
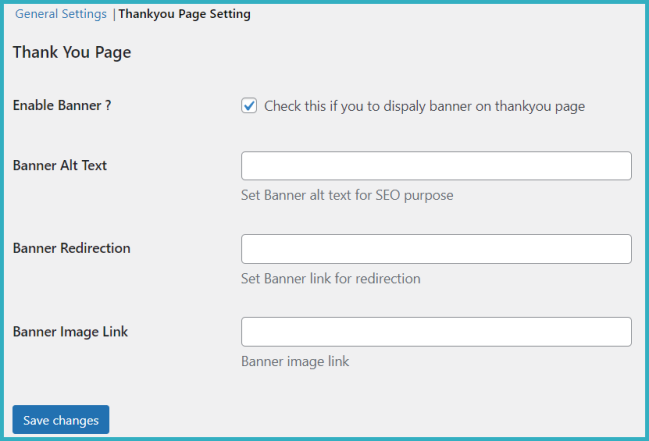
↑ Nach obenTo add a banner image to the WooCommerce Thank You page (order confirmation page):
- Navigate to WooCommerce > Settings.
- Click on Banner Images Settings.
- Go to the Thank You Page Settings and enable the banner.
- Upload your banner image and add alt text for SEO purposes.
- Optionally, include a redirect link to drive traffic to specific pages.
This enables you to display targeted promotional banners on the Thank You page, enhancing the post-purchase experience and offering an opportunity for cross-selling or promoting relevant products.
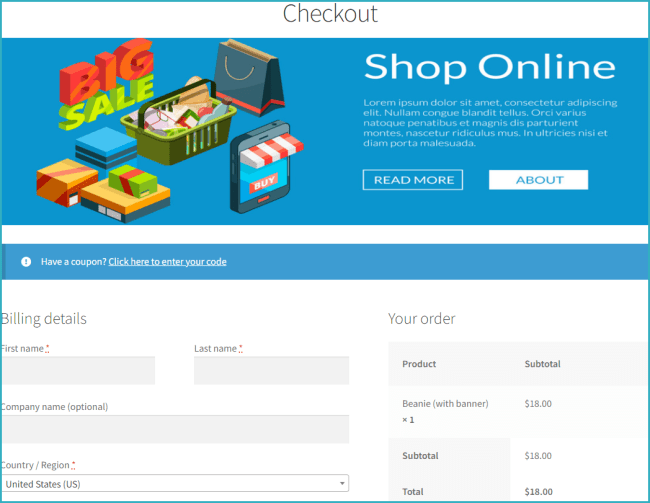
Add Banner Images to WooCommerce Cart & Checkout Pages
↑ Nach obenTo add banner images to your WooCommerce Cart and Checkout pages:
- Navigate to Pages > All Pages.
- Select the Cart or Checkout page you want to edit.
- In the meta box, enable the banner and upload your desired image.
- Add alt text for SEO optimization.
- Optionally, include a redirect URL for the banner to guide users to other pages.
This feature helps you enhance the shopping experience by promoting special offers, discounts, or important information on the Cart and Checkout pages.

Plugin Settings for Banner Images
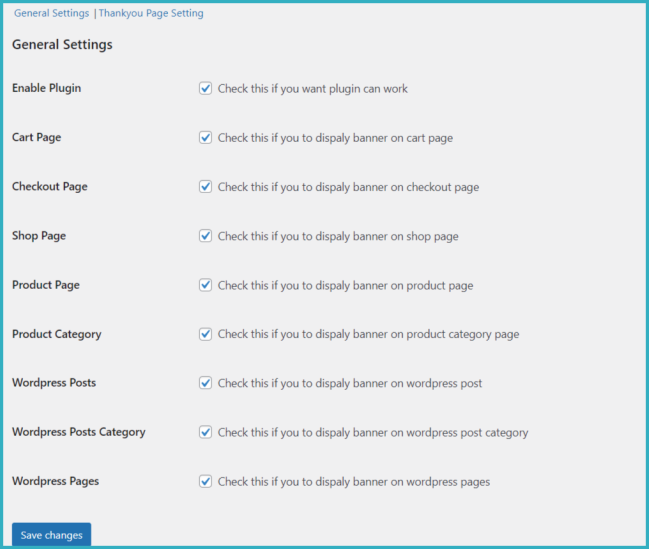
↑ Nach obenYou can access the plugin settings by going to WooCommerce > Settings > Banner Images Settings. From here, you have full control over the plugin’s functionality:
Enable/Disable the Plugin: Toggle the plugin’s activation for your WooCommerce store.
Enable/Disable Banners: Enable or disable banner images for all pages, categories, posts, and individual product pages.
This allows you to customize where and how banners appear across your store to maximize visibility and engagement.

Translation
↑ Nach obenBanner Images for WooCommerce includes a .pot language file for easy translation to multiple languages.