Installation Guide
↑ Back to top- Log in to your WordPress Admin Panel.
- Navigate to the WordPress Admin Dashboard > Plugins > Add New.
- Click the Upload Plugin button on the top left corner of your screen.
- Next, click the Choose File button in the below box.
- Select the zip file that you have downloaded and upload it.
- Navigate to the WordPress Admin Dashboard > WC Donation > Home.
Getting Started
↑ Back to top
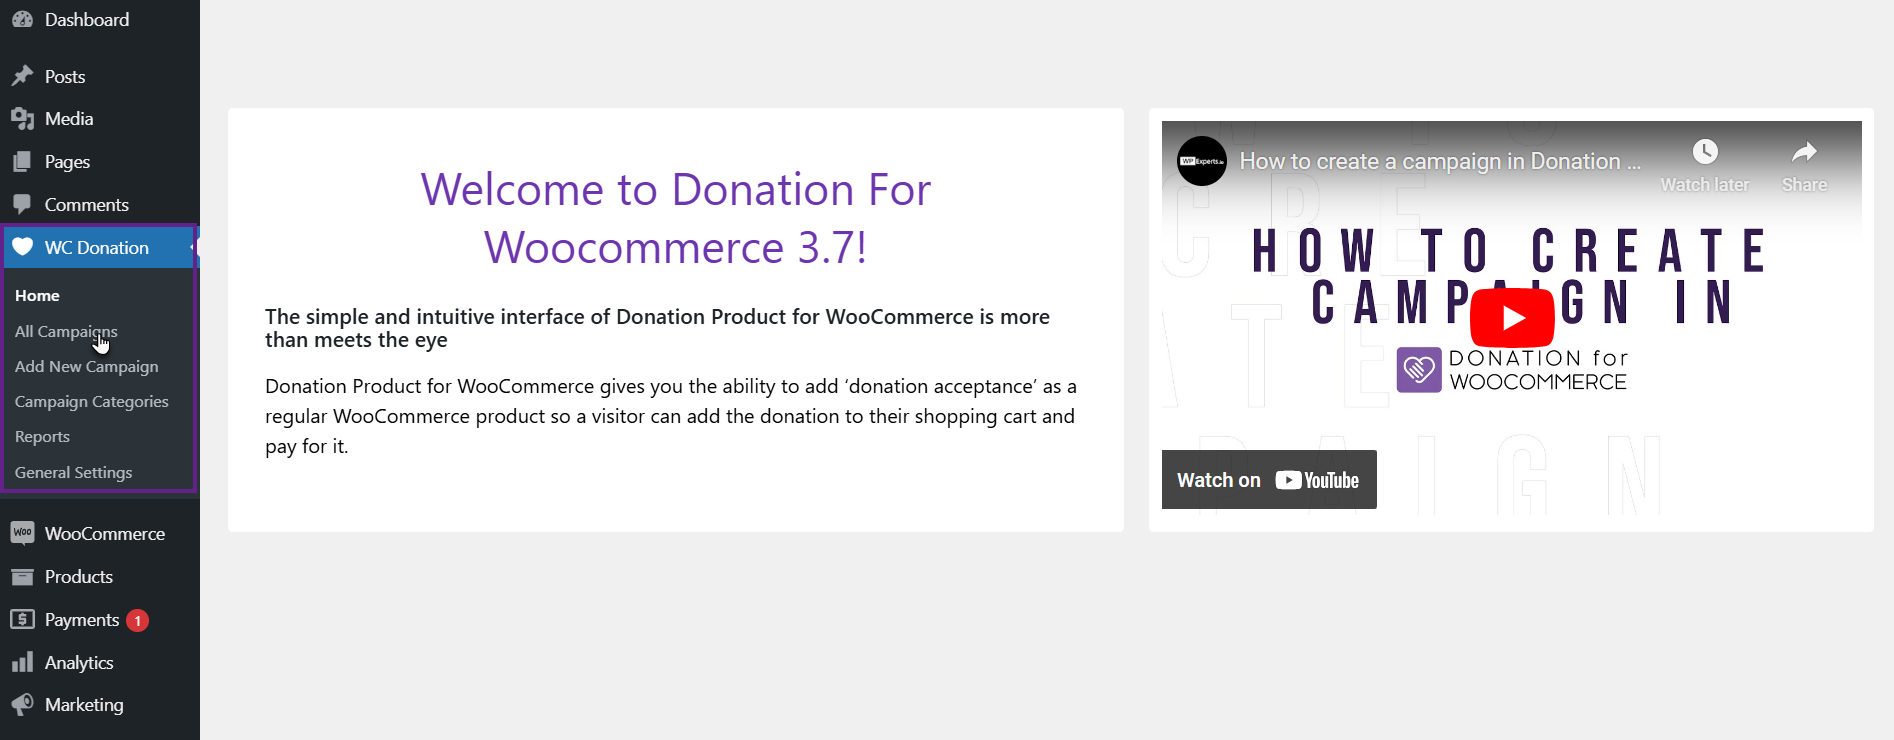
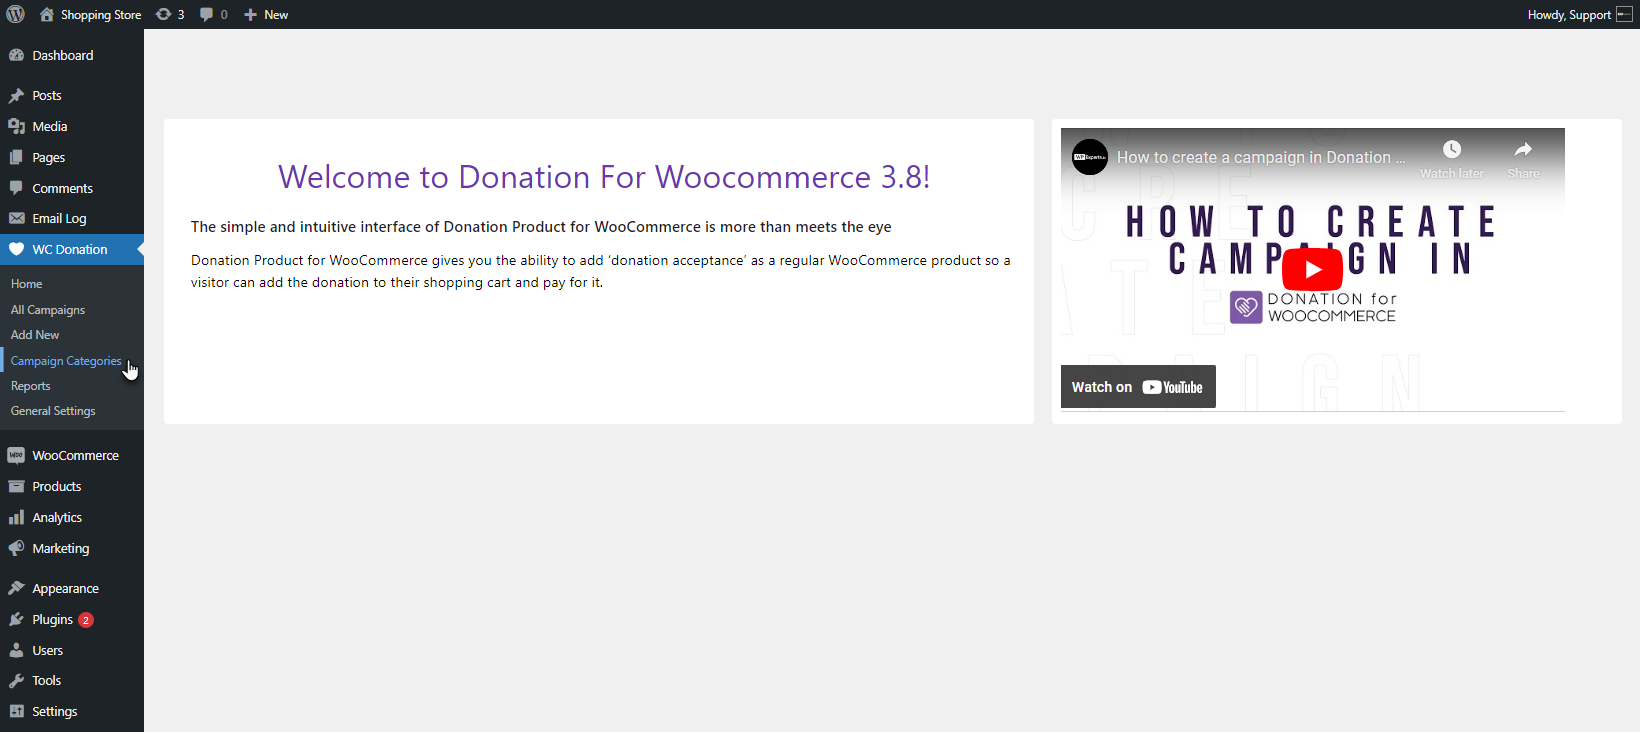
- You’re on the Home page. A small introduction will appear, and a video tutorial titled HOW TO CREATE CAMPAIGN IN DONATION FOR WOOCOMMERCE will be available.

Dashboard
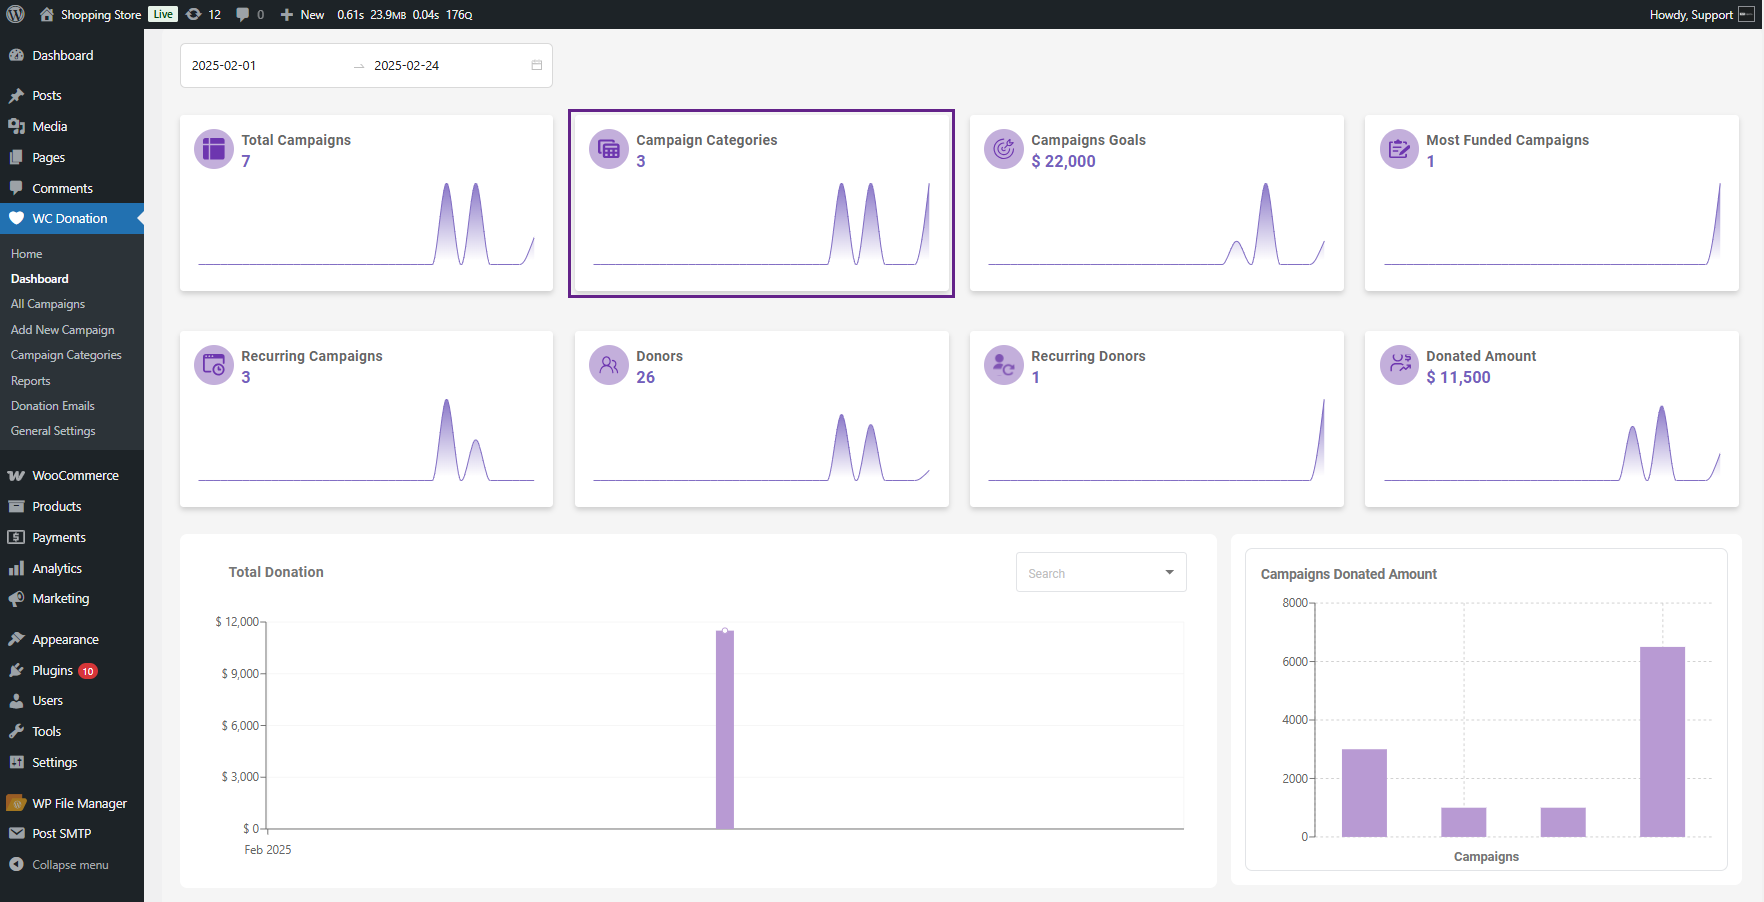
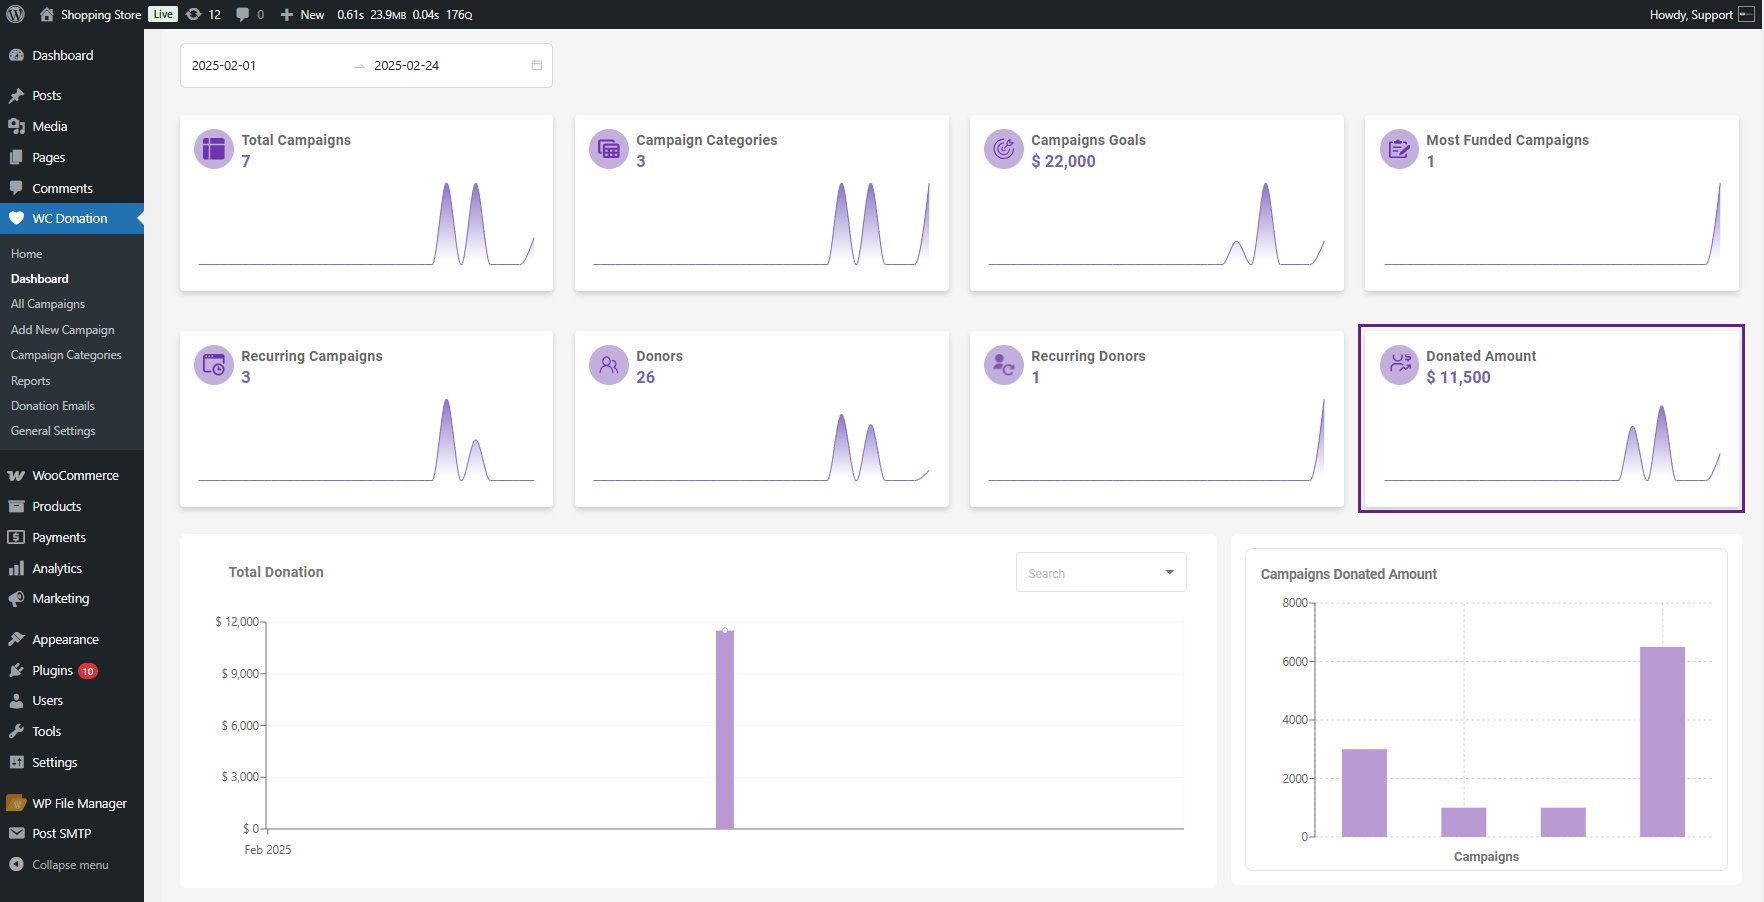
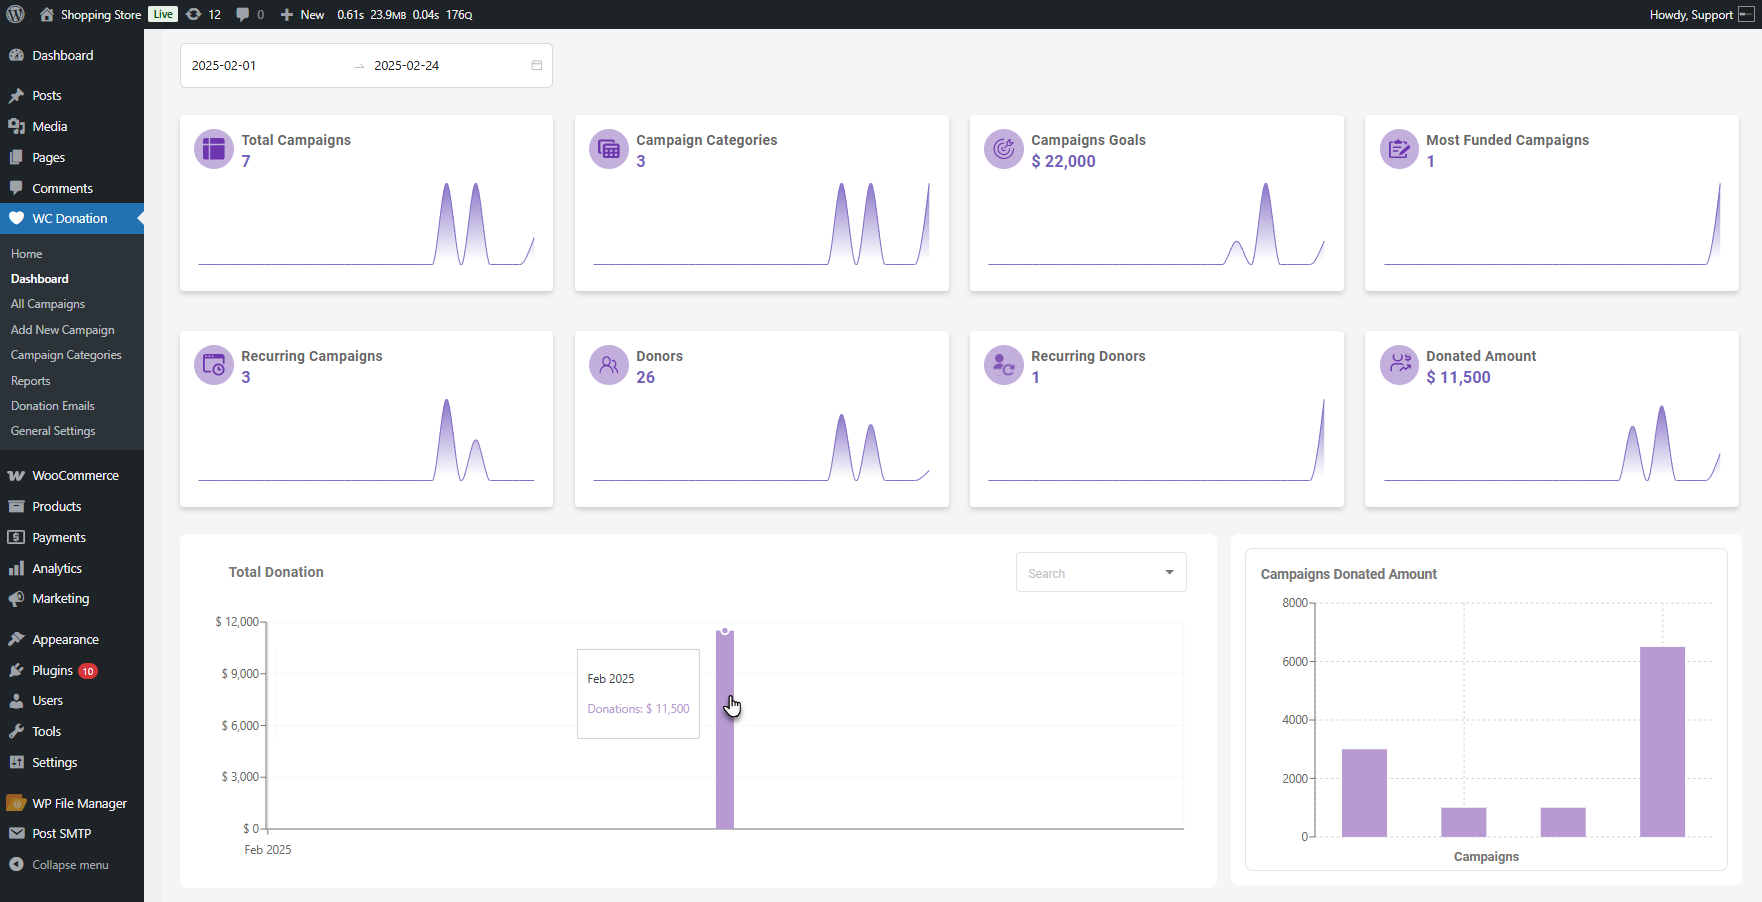
↑ Back to topThe Dashboard is more than just a welcome screen; it is your analytics hub. It provides real-time insights into how your campaigns are performing, helping you make data-driven decisions.
- Go to WordPress Admin Dashboard > WC Donation > Dashboard.
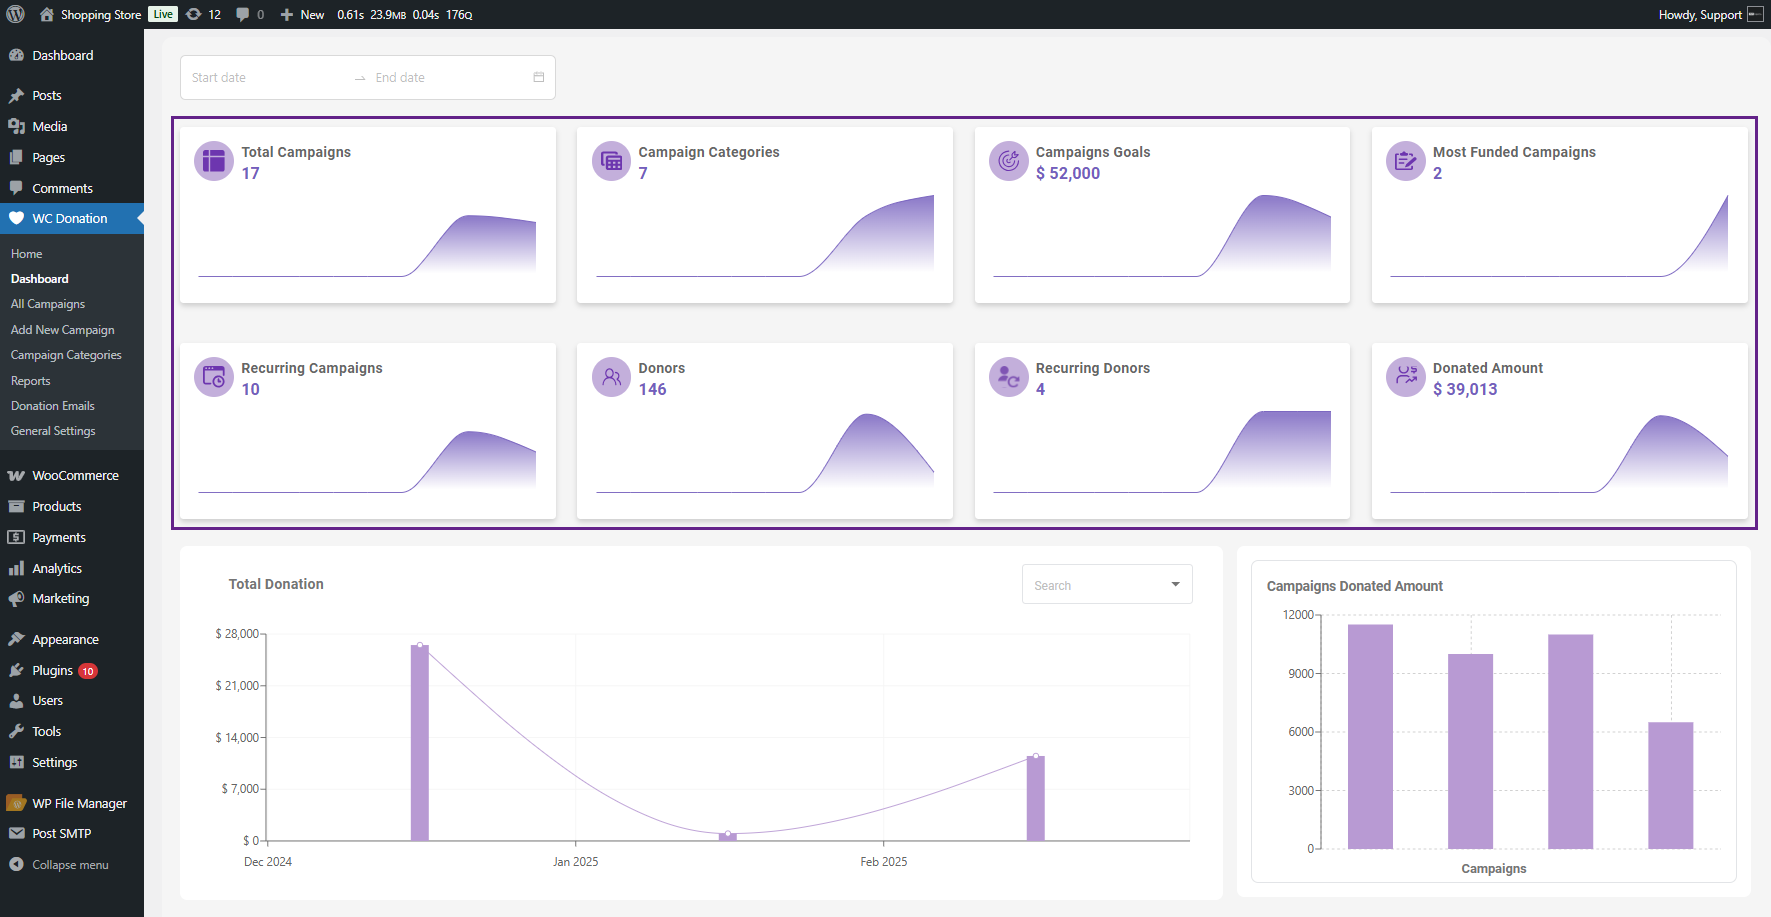
- The Dashboard will load for the admin, giving admin insights into key metrics and performance.
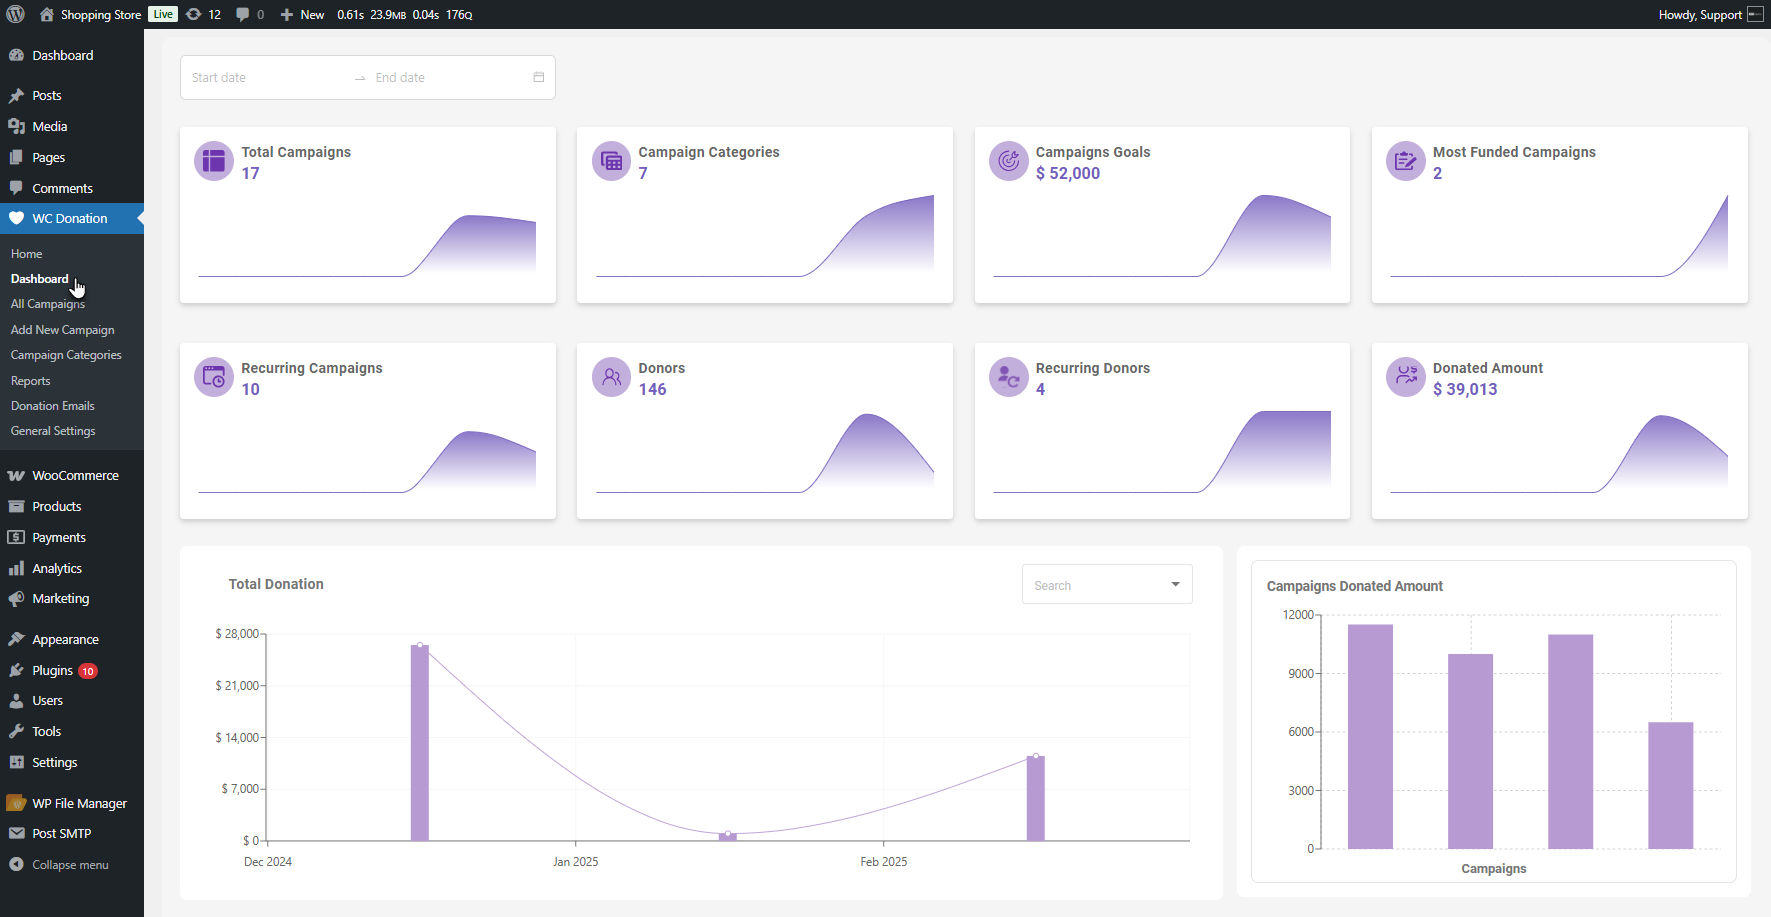
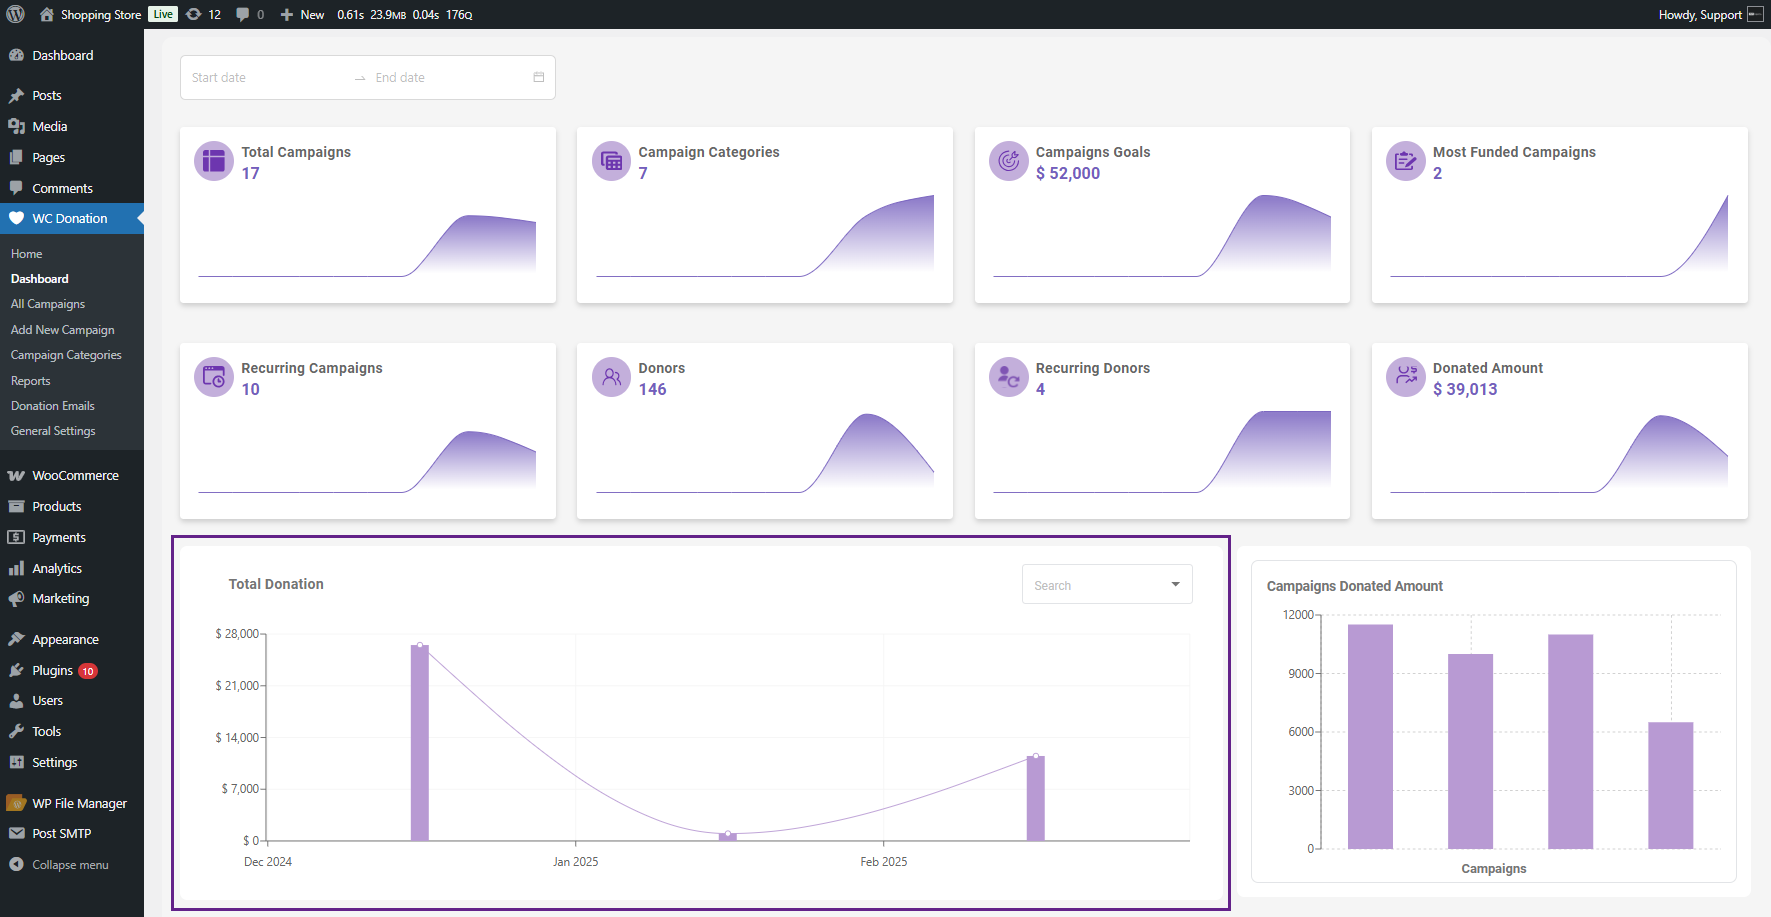
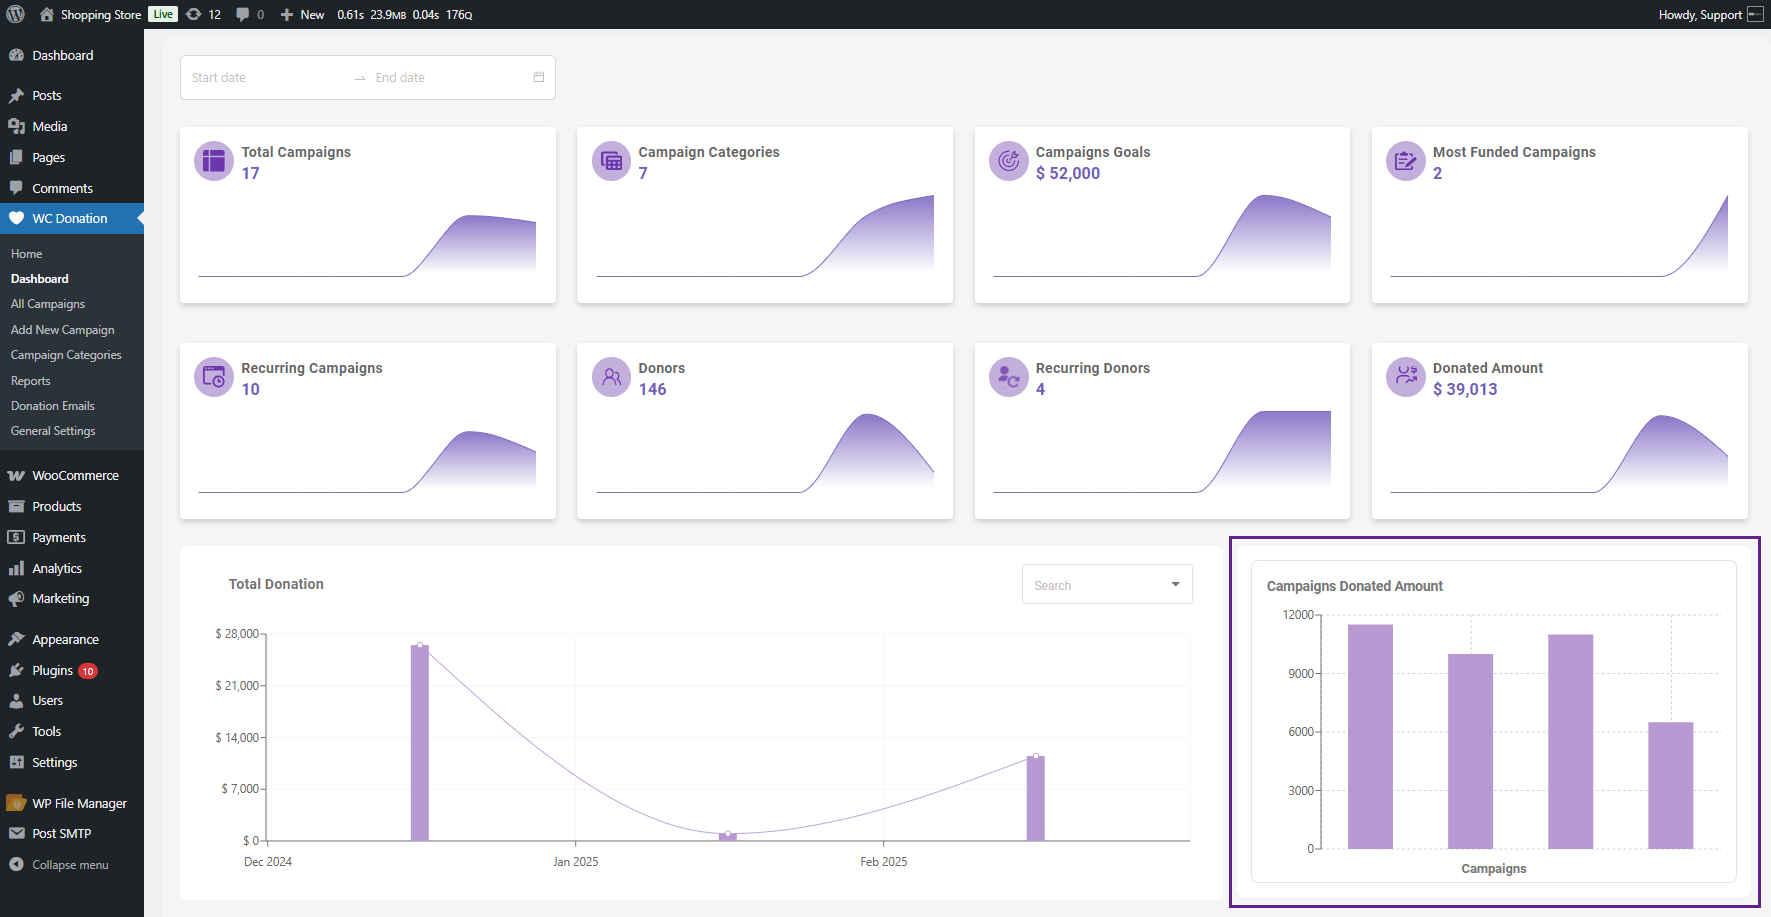
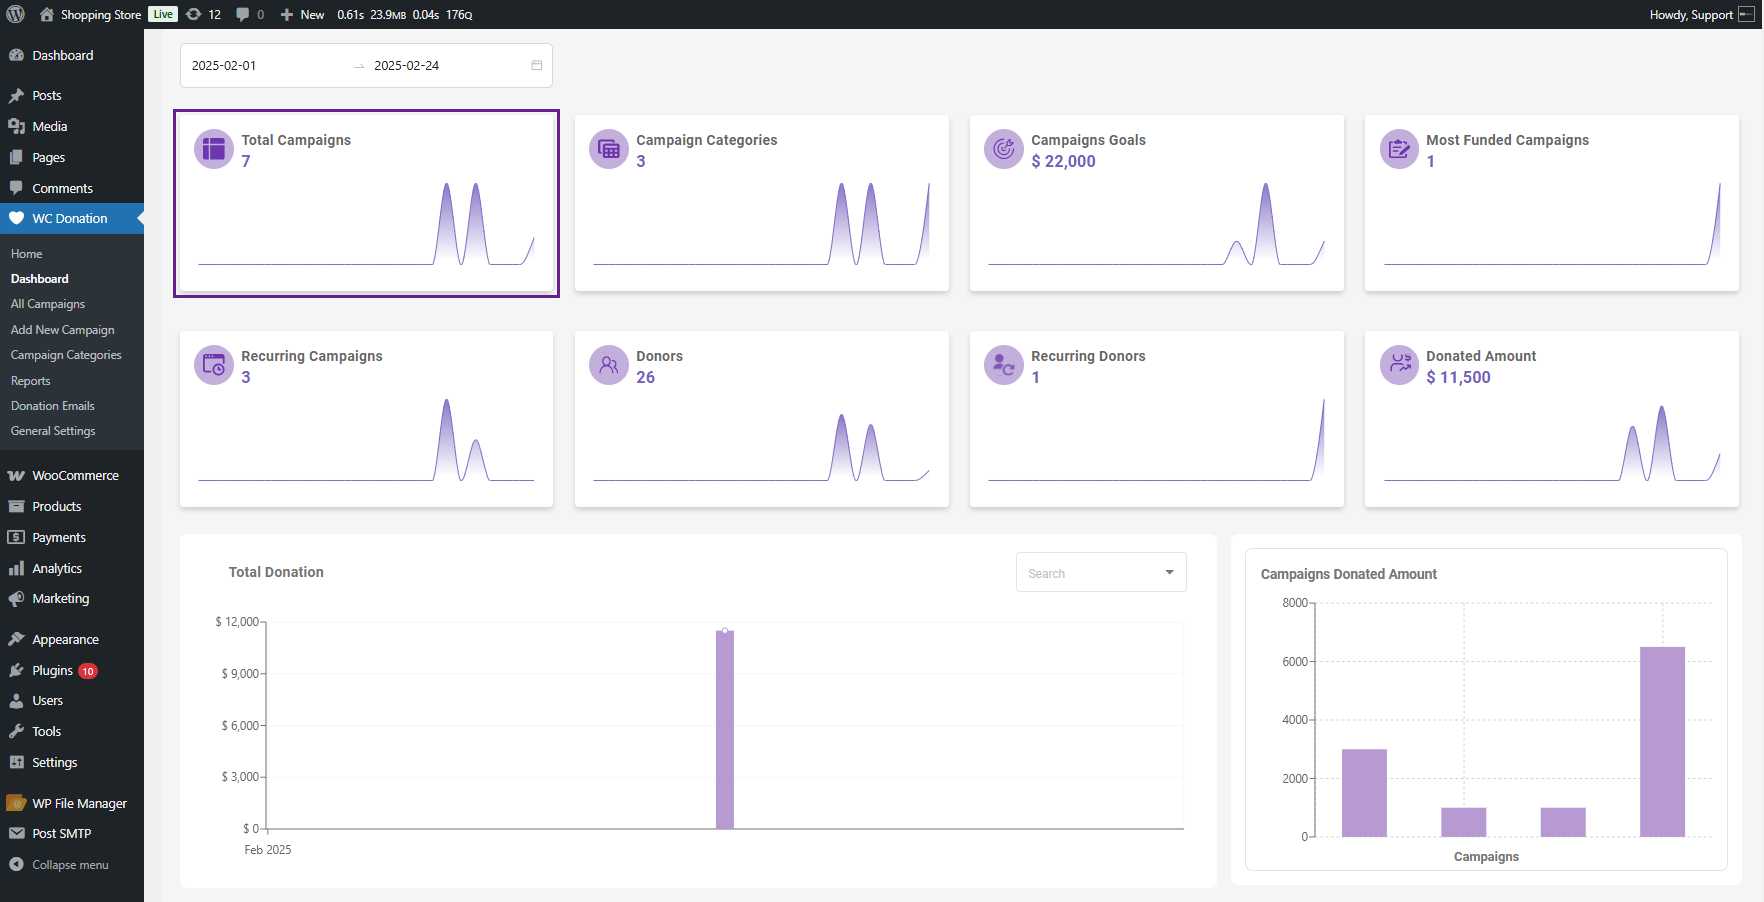
- The Dashboard is organized into four major sections.
- Top Summary Boxes:
A quick snapshot showing key donation statistics such as total donations, number of donations, and top-performing campaigns.
- Total Donation Graph
A timeline graph that displays how donation amounts change and grow over a selected period.
- Campaigns Donated Amount (Bar Graph)
A bar chart that compares the total donated amount across each donation campaign.
- Donation Campaign Details Table:
A detailed table listing every campaign along with its donation totals and performance metrics.
Top Summary Boxes
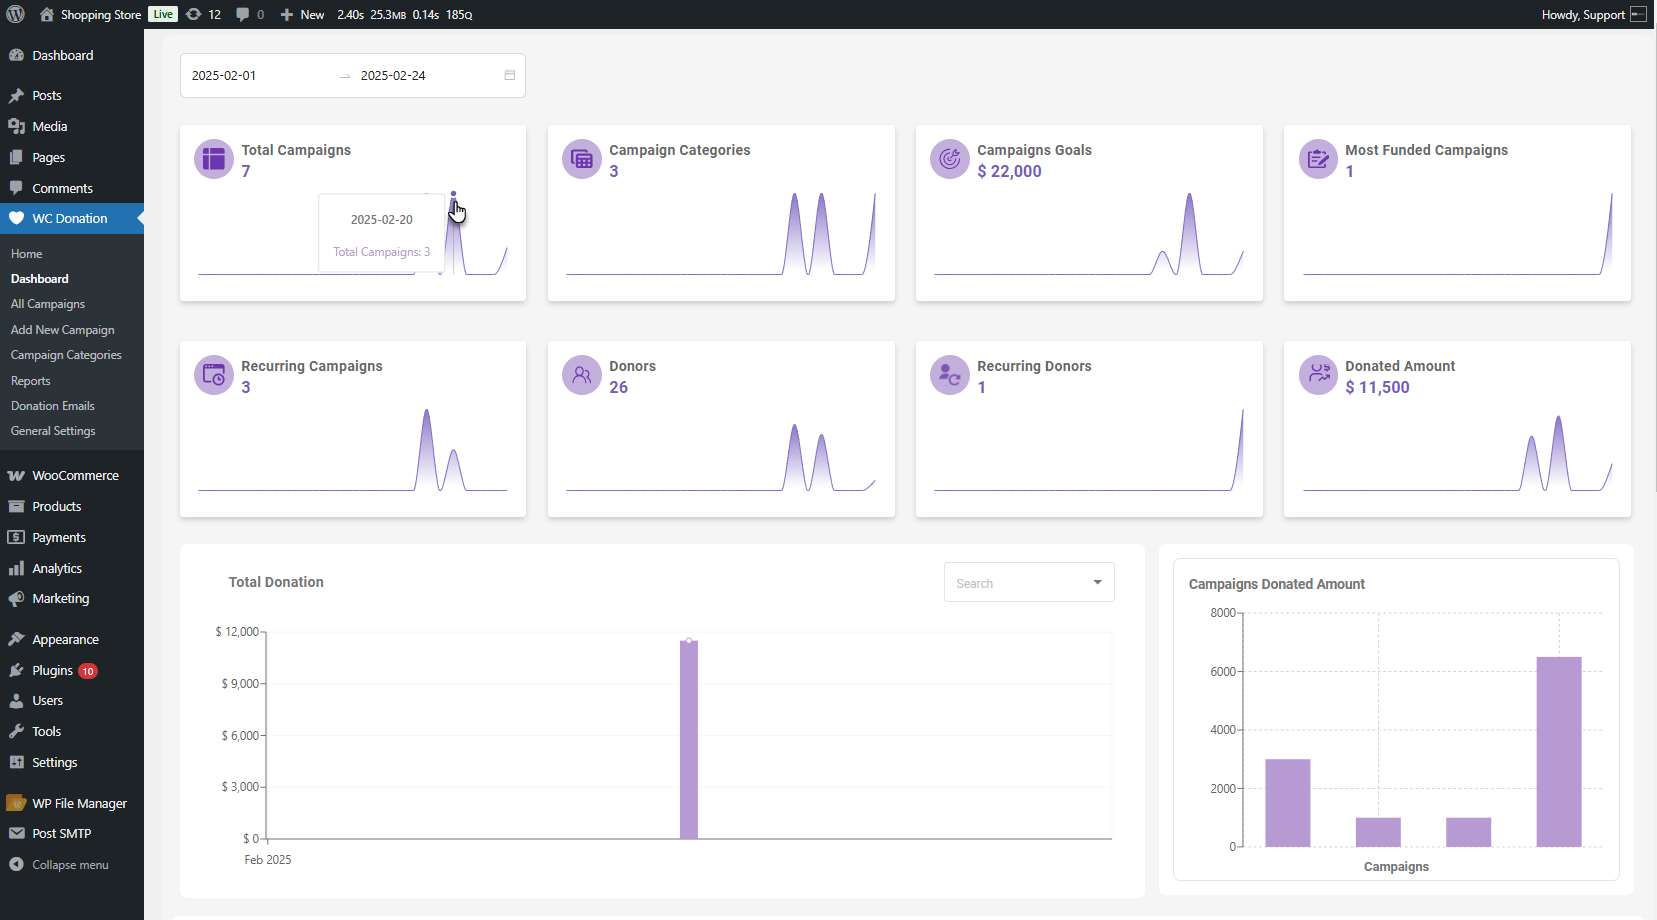
↑ Back to top- The admin can apply the date range filter to view data specific to the selected date range.
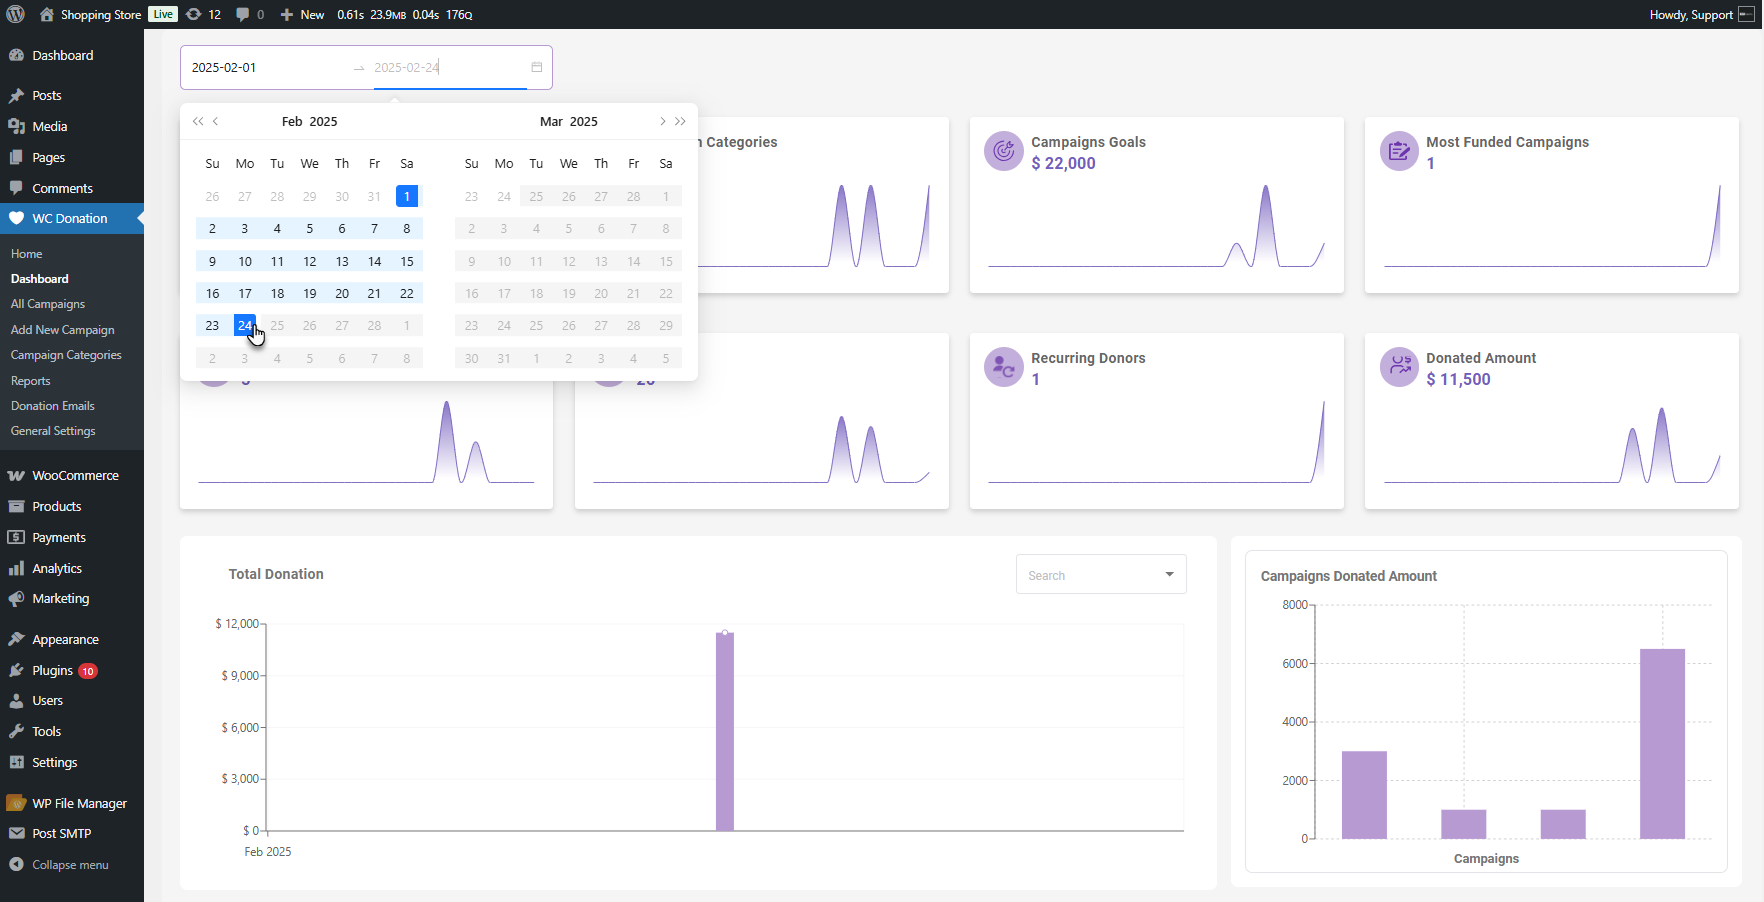
- These are the eight boxes at the top of the dashboard. Each box provides key performance metrics at a glance.
- Total Campaigns: This shows the number of donation campaigns in which orders have been made. The admin can hover over any instance to view a specific date.
- The admin can hover at any time to view the details of a particular point.
- Campaign Categories: Displays the number of categories for campaigns in which orders have been made.
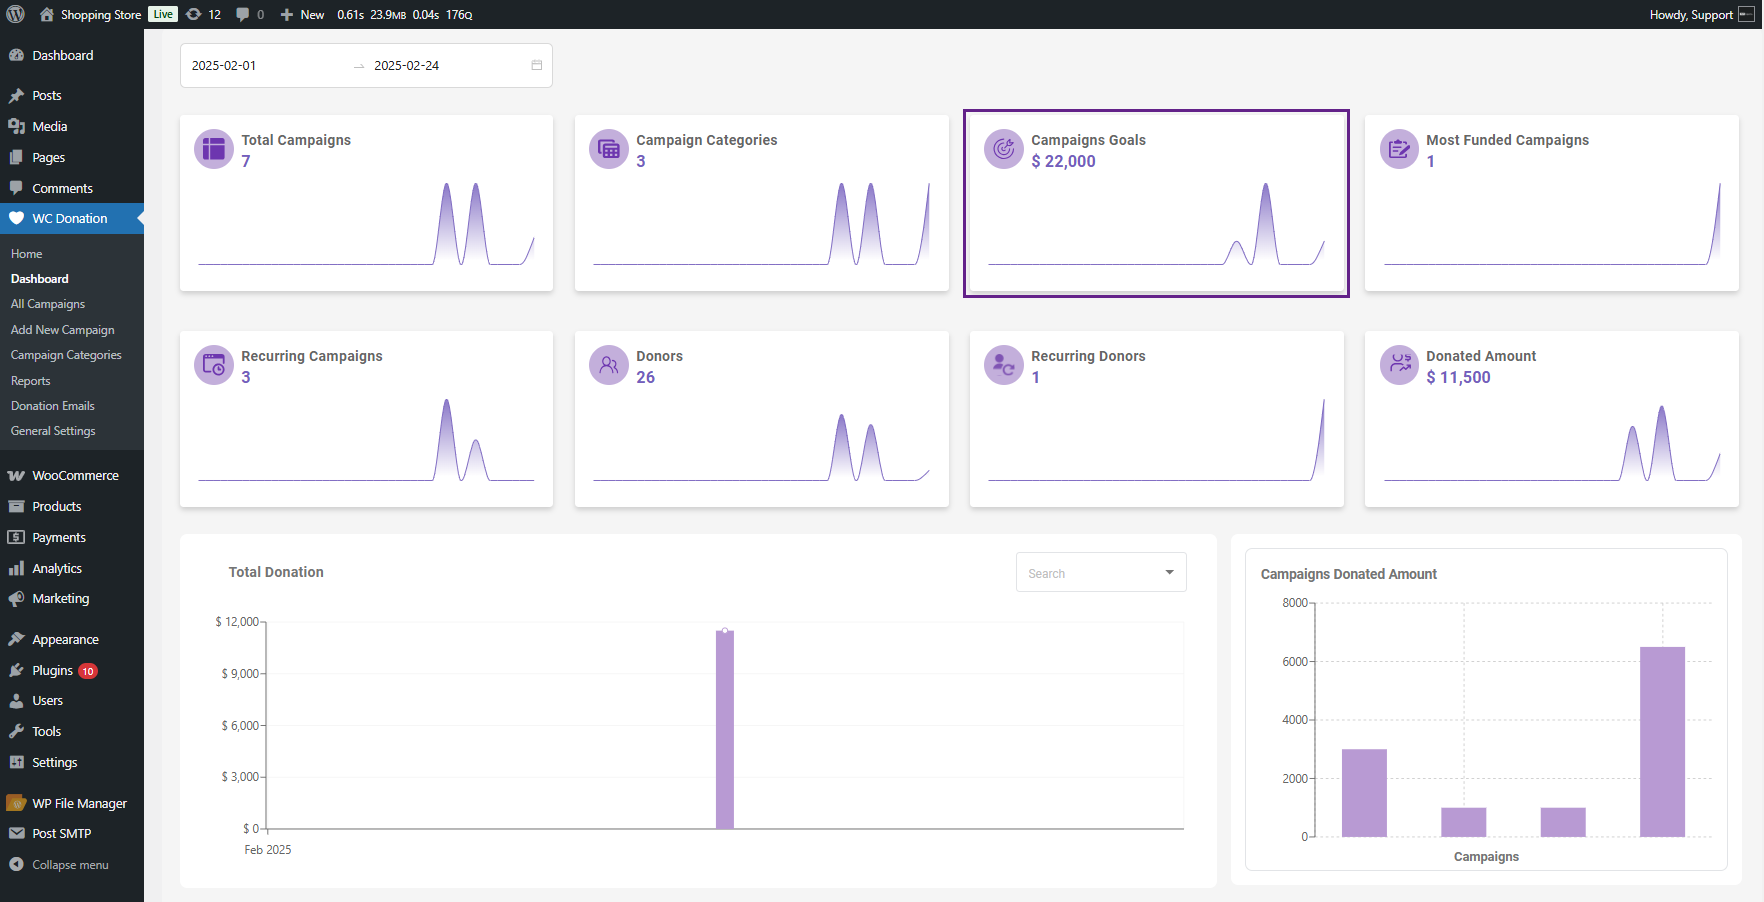
- Campaign Goals: Indicates the total monetary goal for all campaigns
- Most Funded Campaigns: Highlights the number of campaigns with the highest donation amounts.
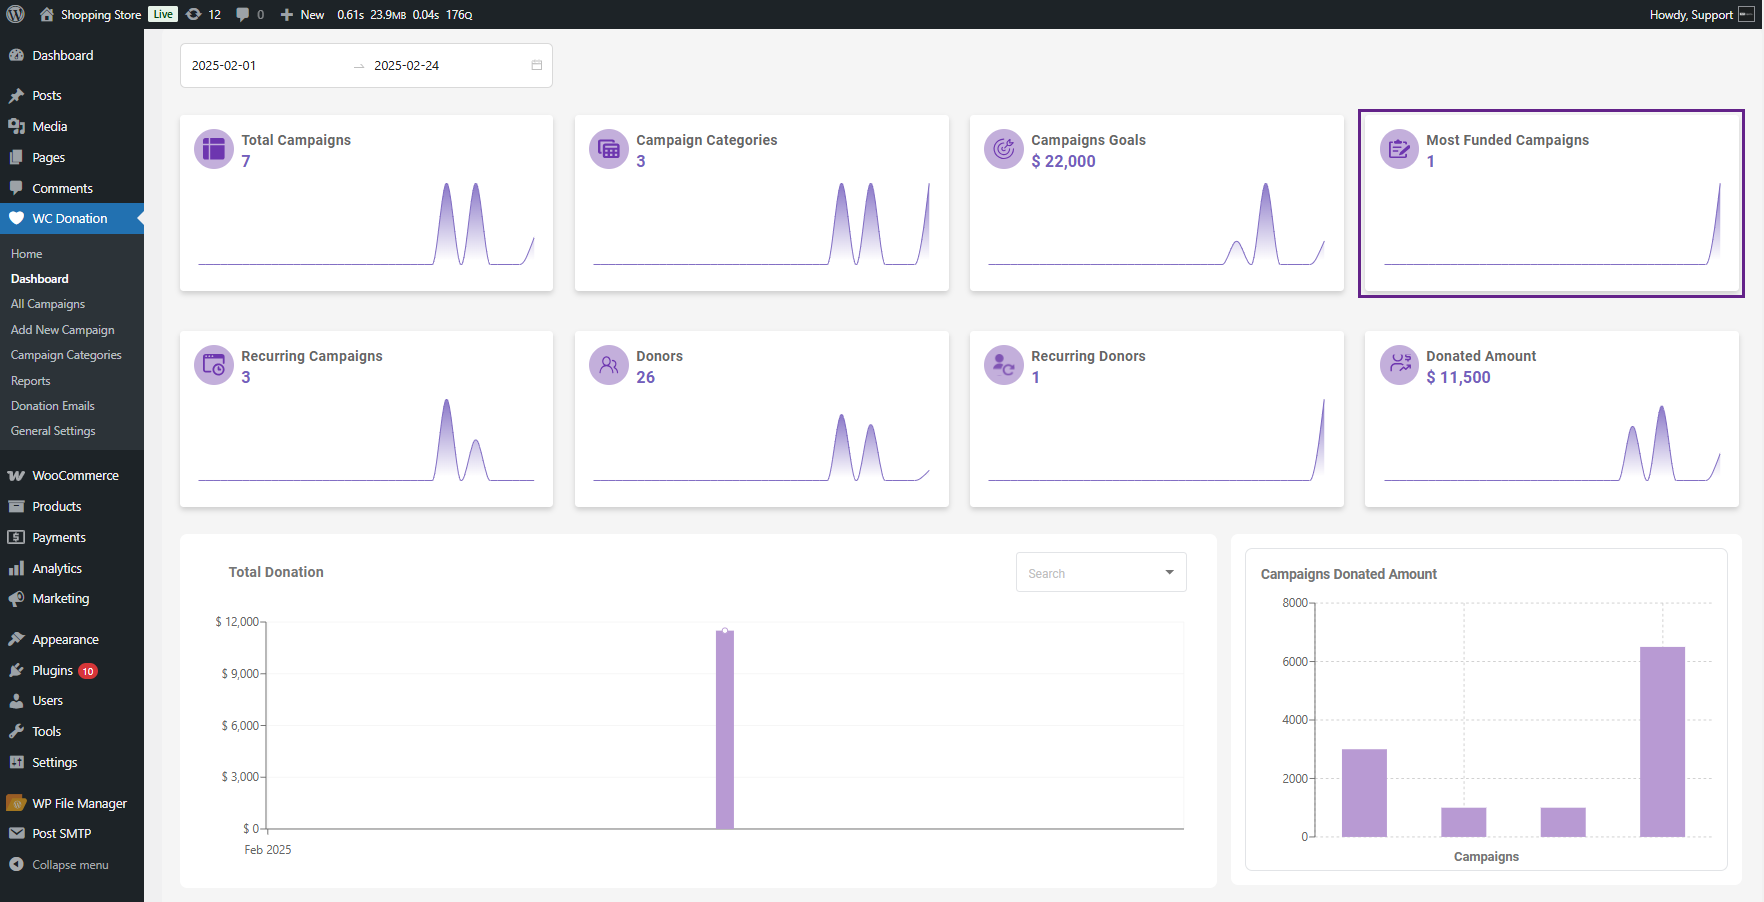
Note: A campaign will be listed in this box when its donation amount reaches 75% of the campaign goal.
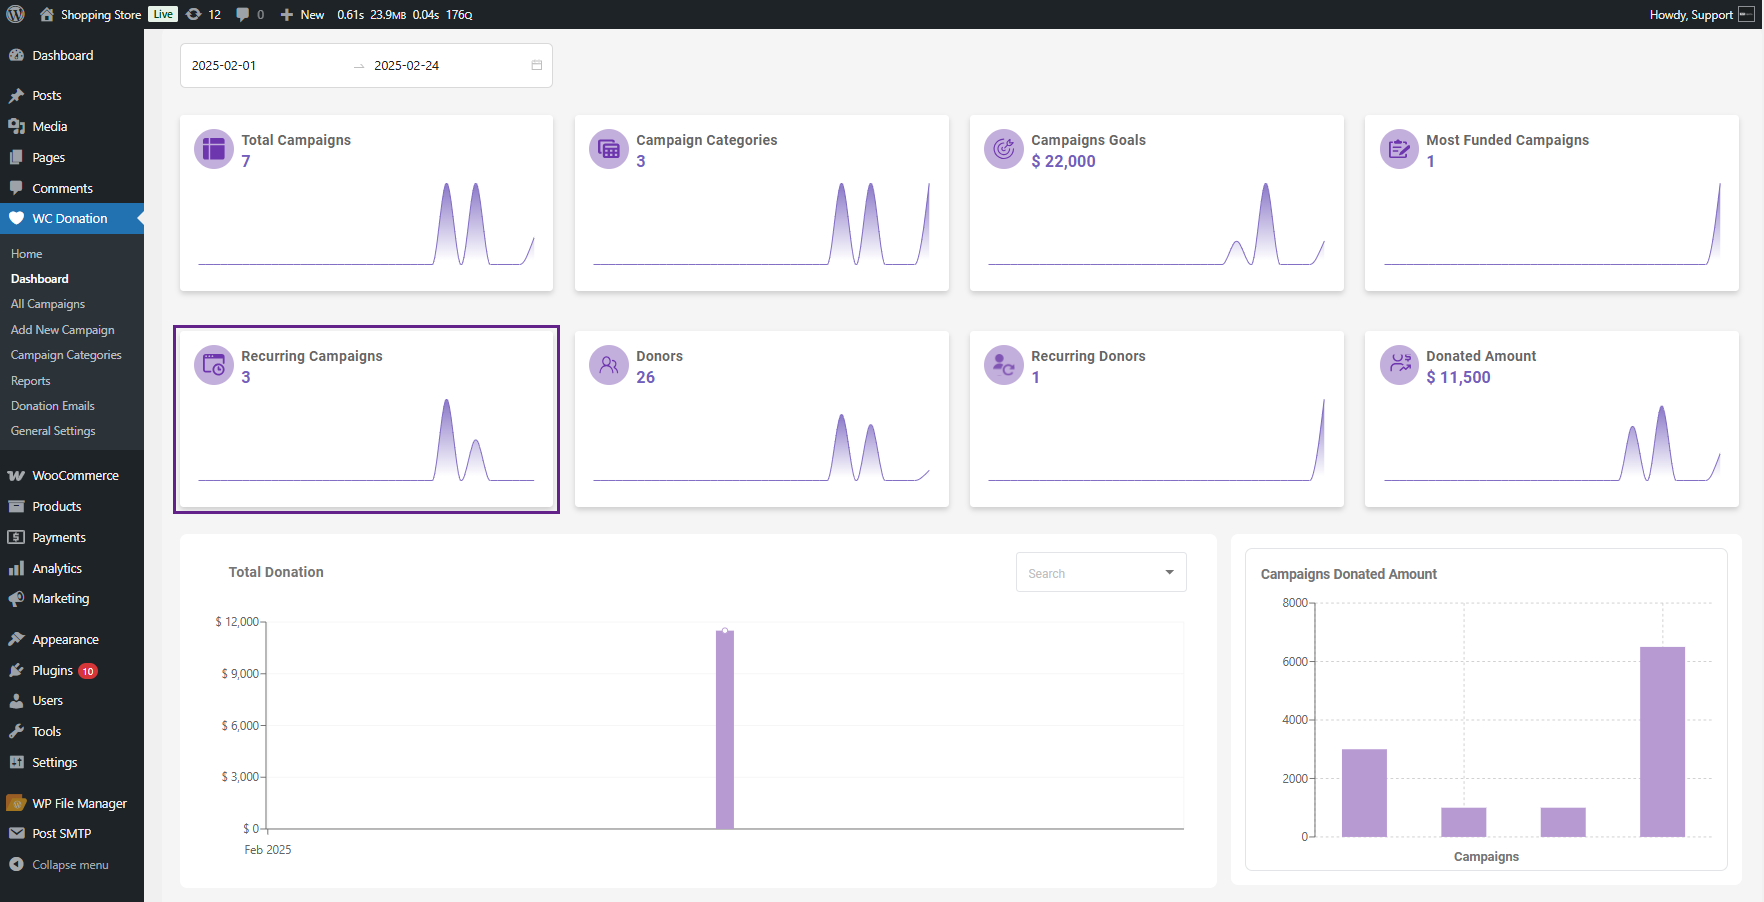
- Recurring Campaigns: Lists the number of campaigns that have recurring donation options.
- Donors: Displays the number of donors who participated across all campaigns.
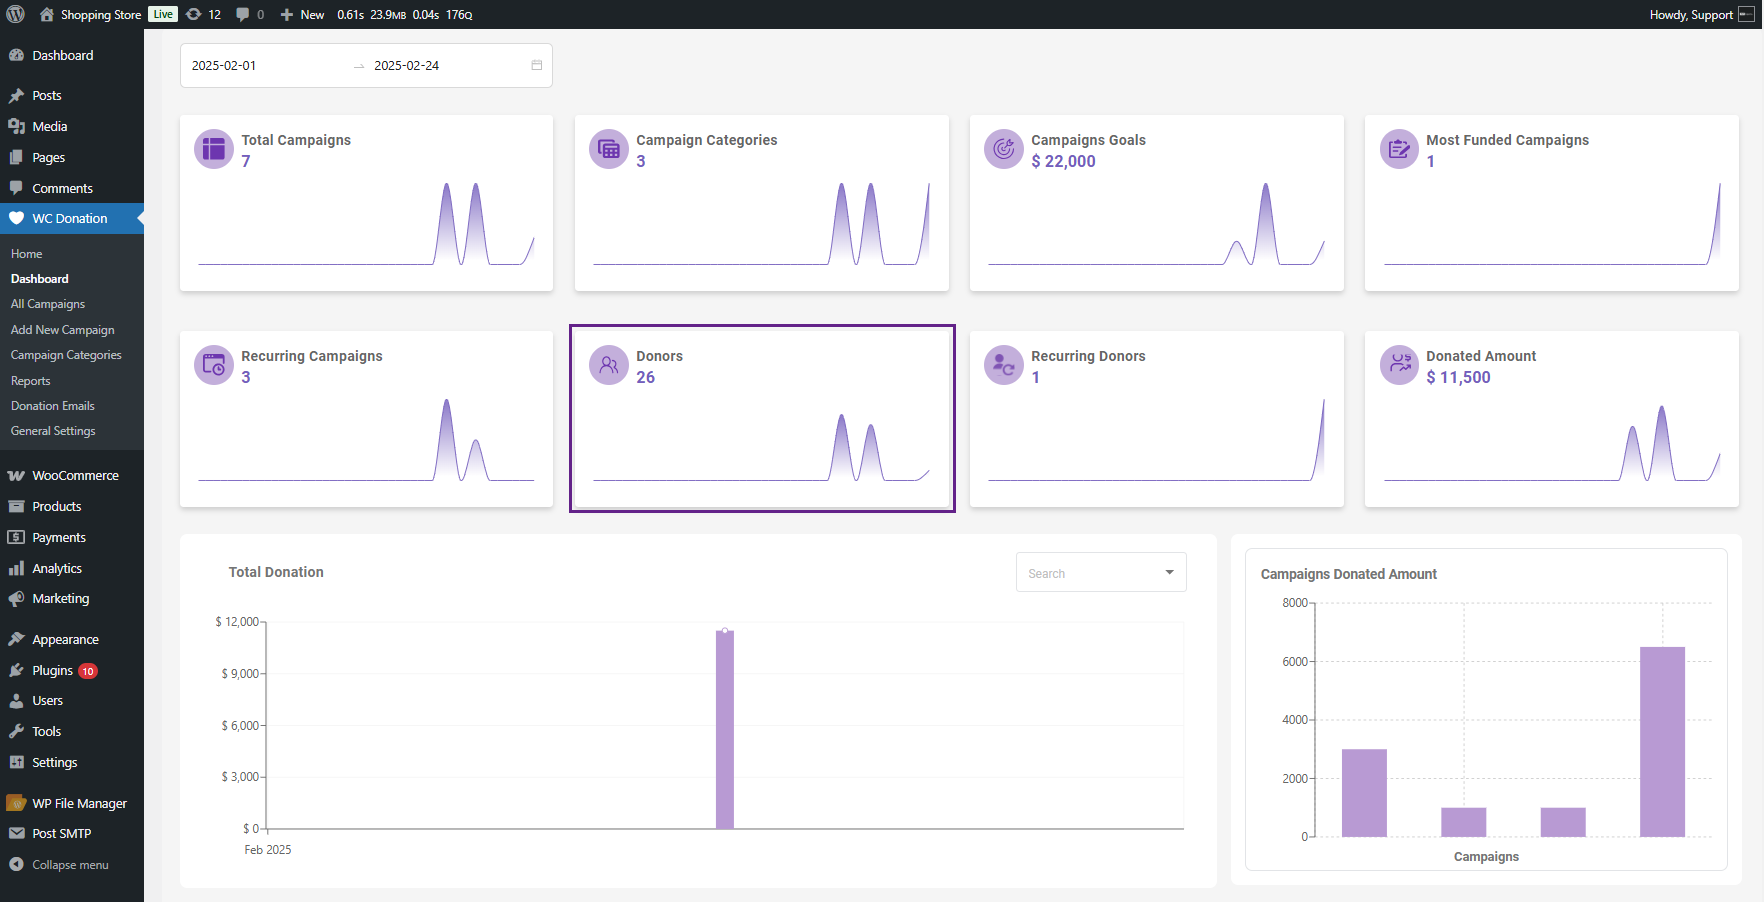
- Recurring Donors: This shows the number of donors who donate repeatedly.
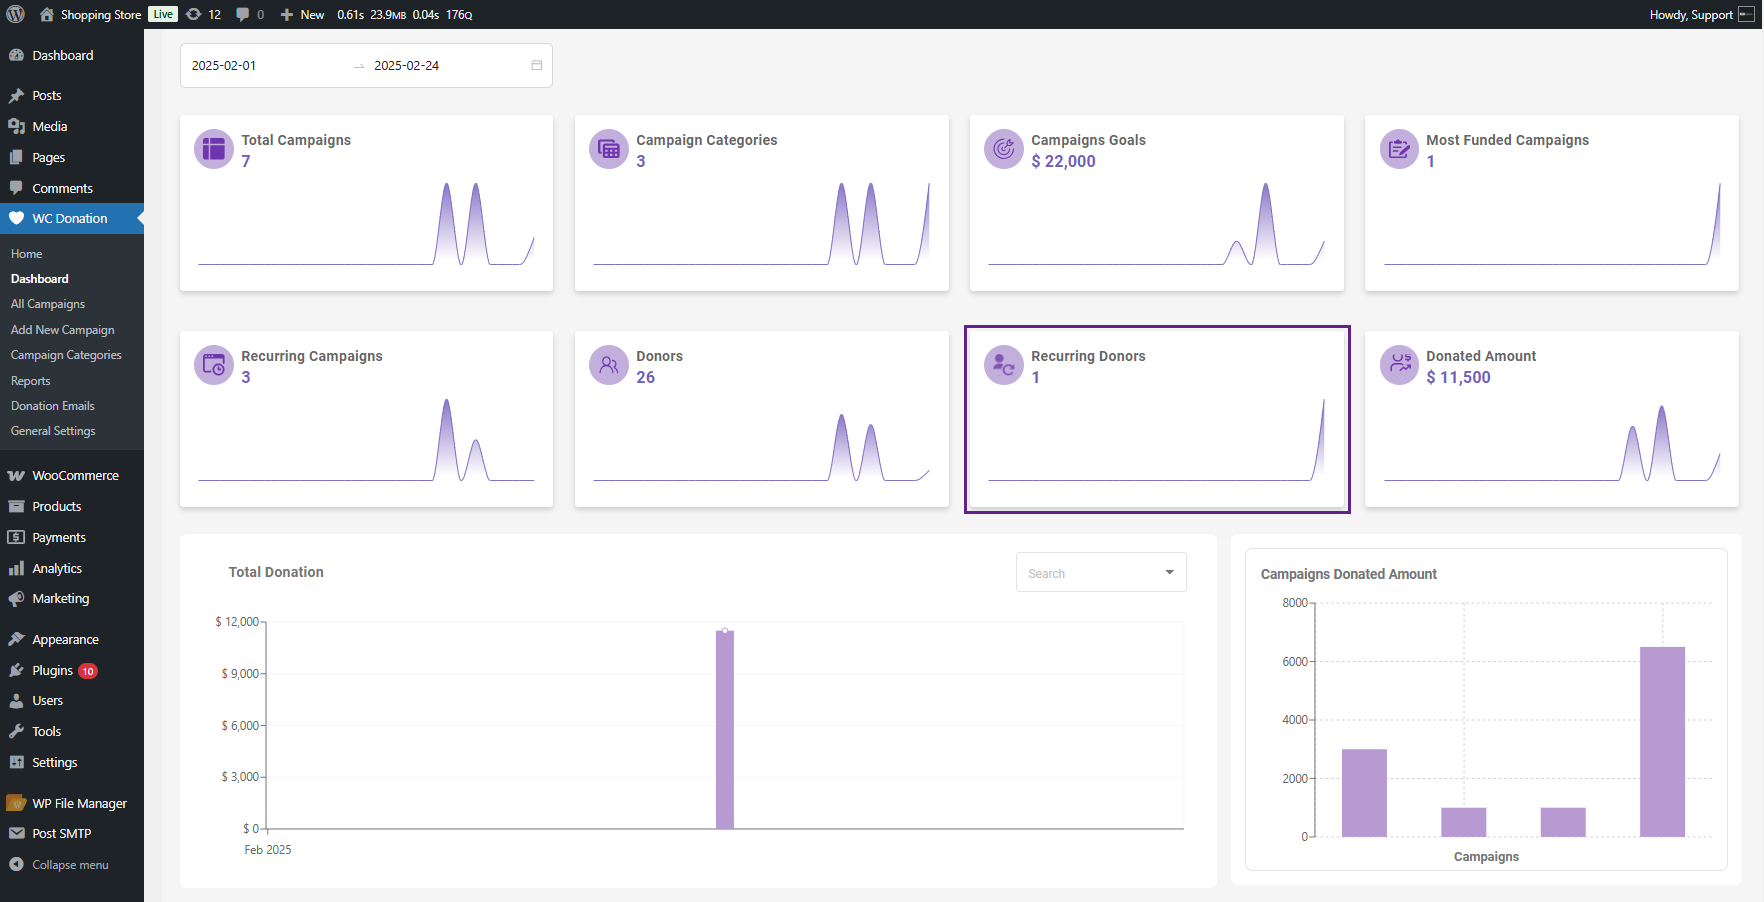
- Donated Amount: Displays the total amount donated across the number of campaigns.
Total Donation Graph
↑ Back to top- This graph displays a timeline view of the donations received during the selected date range.
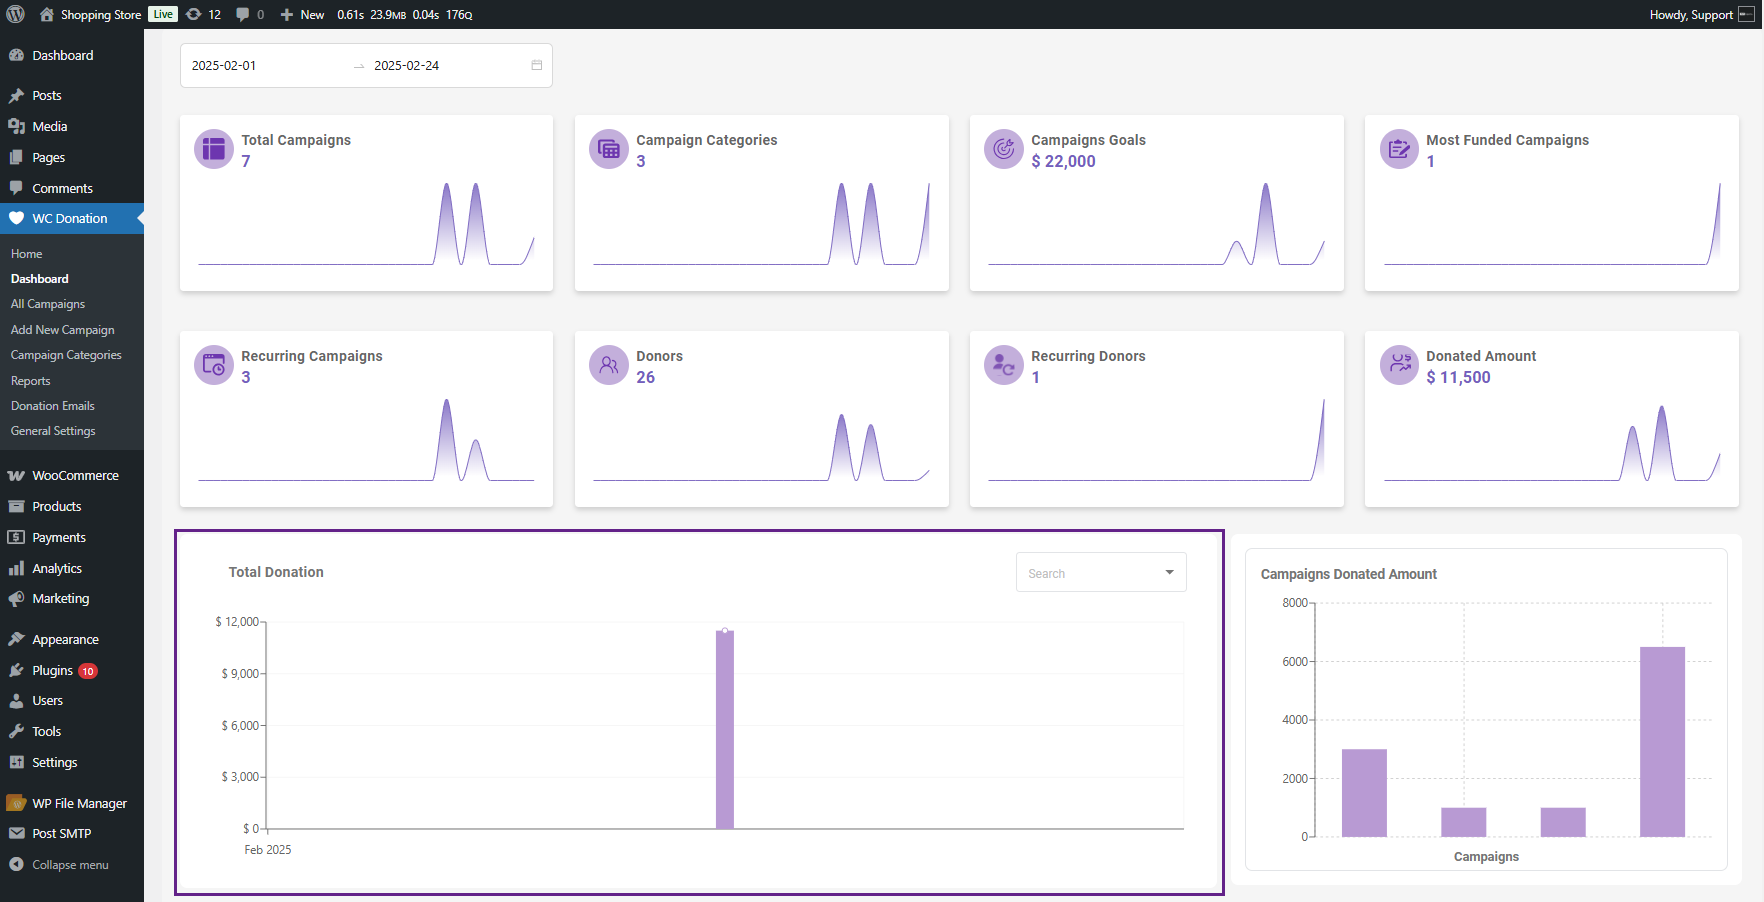
- The admin can hover on the bar to view the details.
- The admin can search for the details by using the sub-filter provided in the graph.
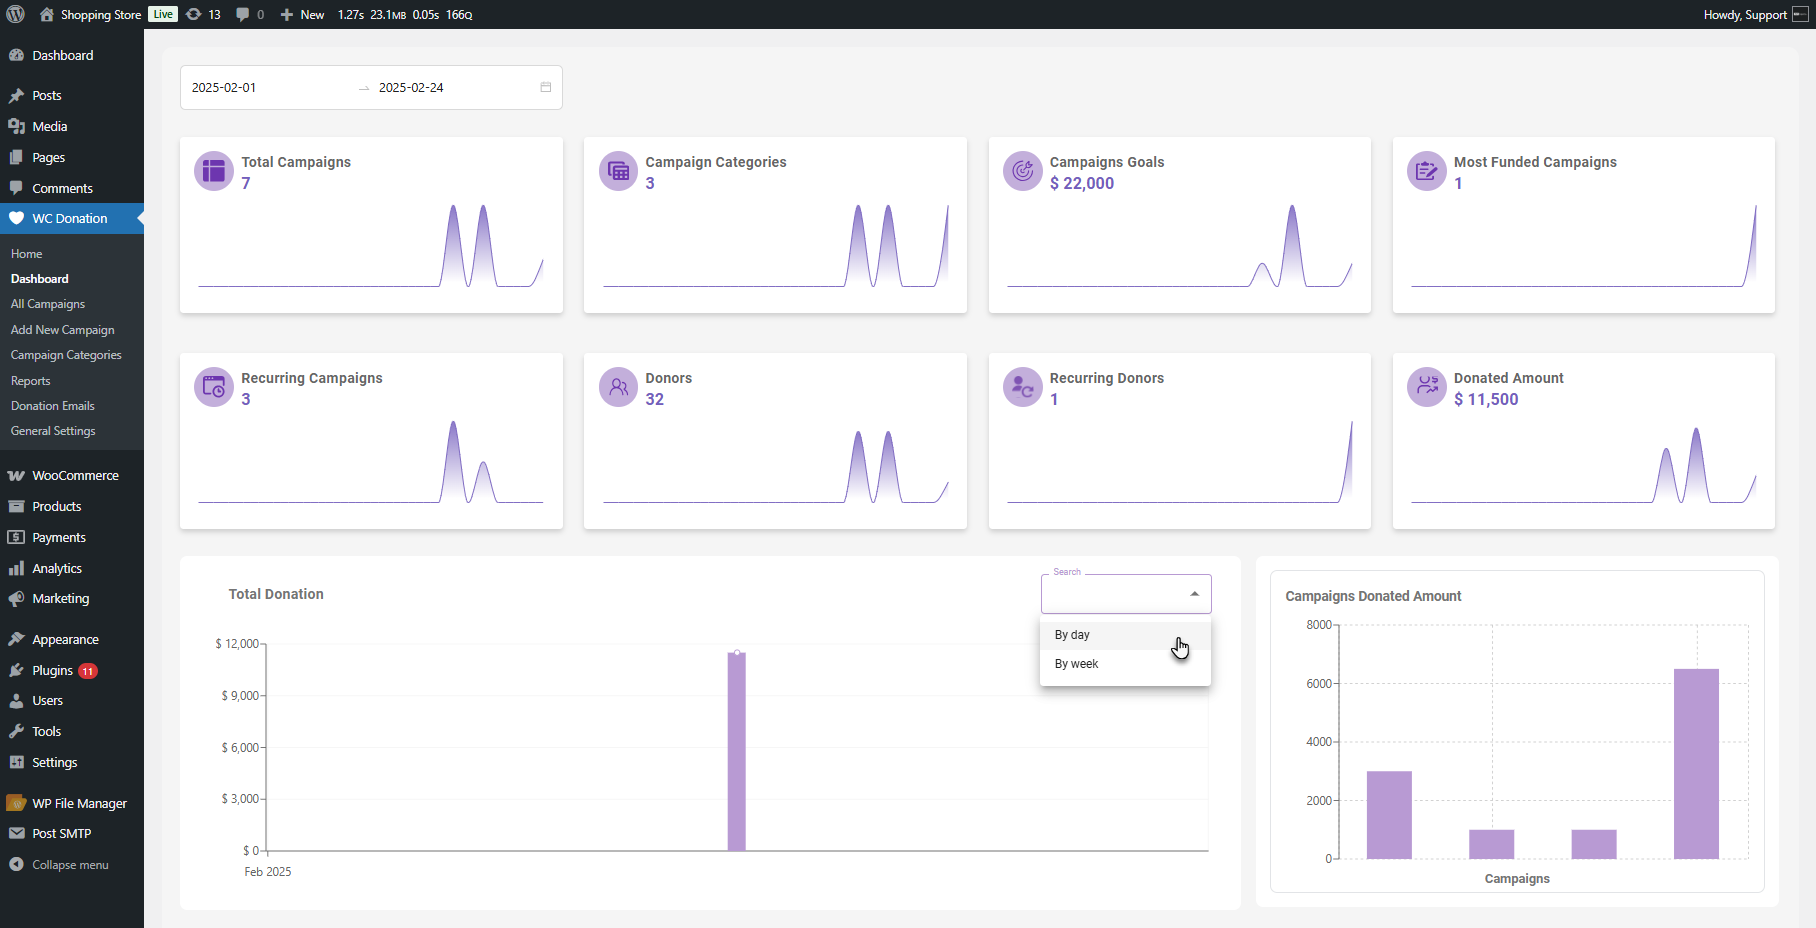
- The graph will appear for the filter chosen by the admin.

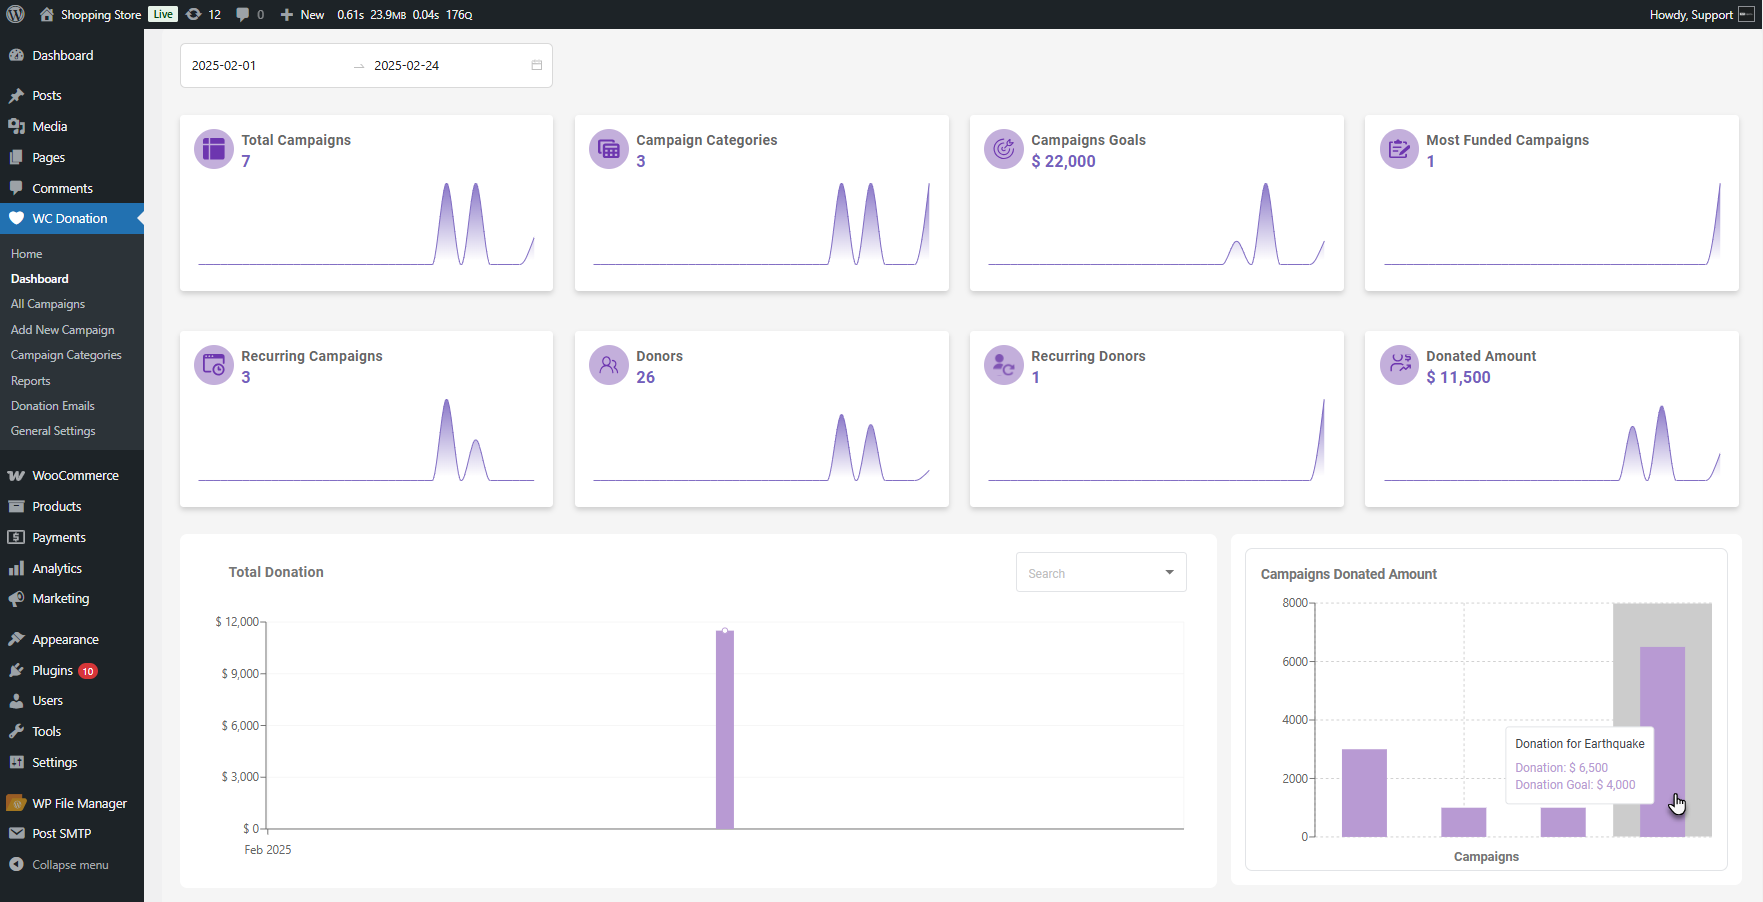
Campaigns Donated Amount (Bar Chart)
↑ Back to top- This graph displays the donation amount for each campaign in a comparative bar graph.

- The admin can hover on the bar to view the details. The total donated amount and donation goal will appear.
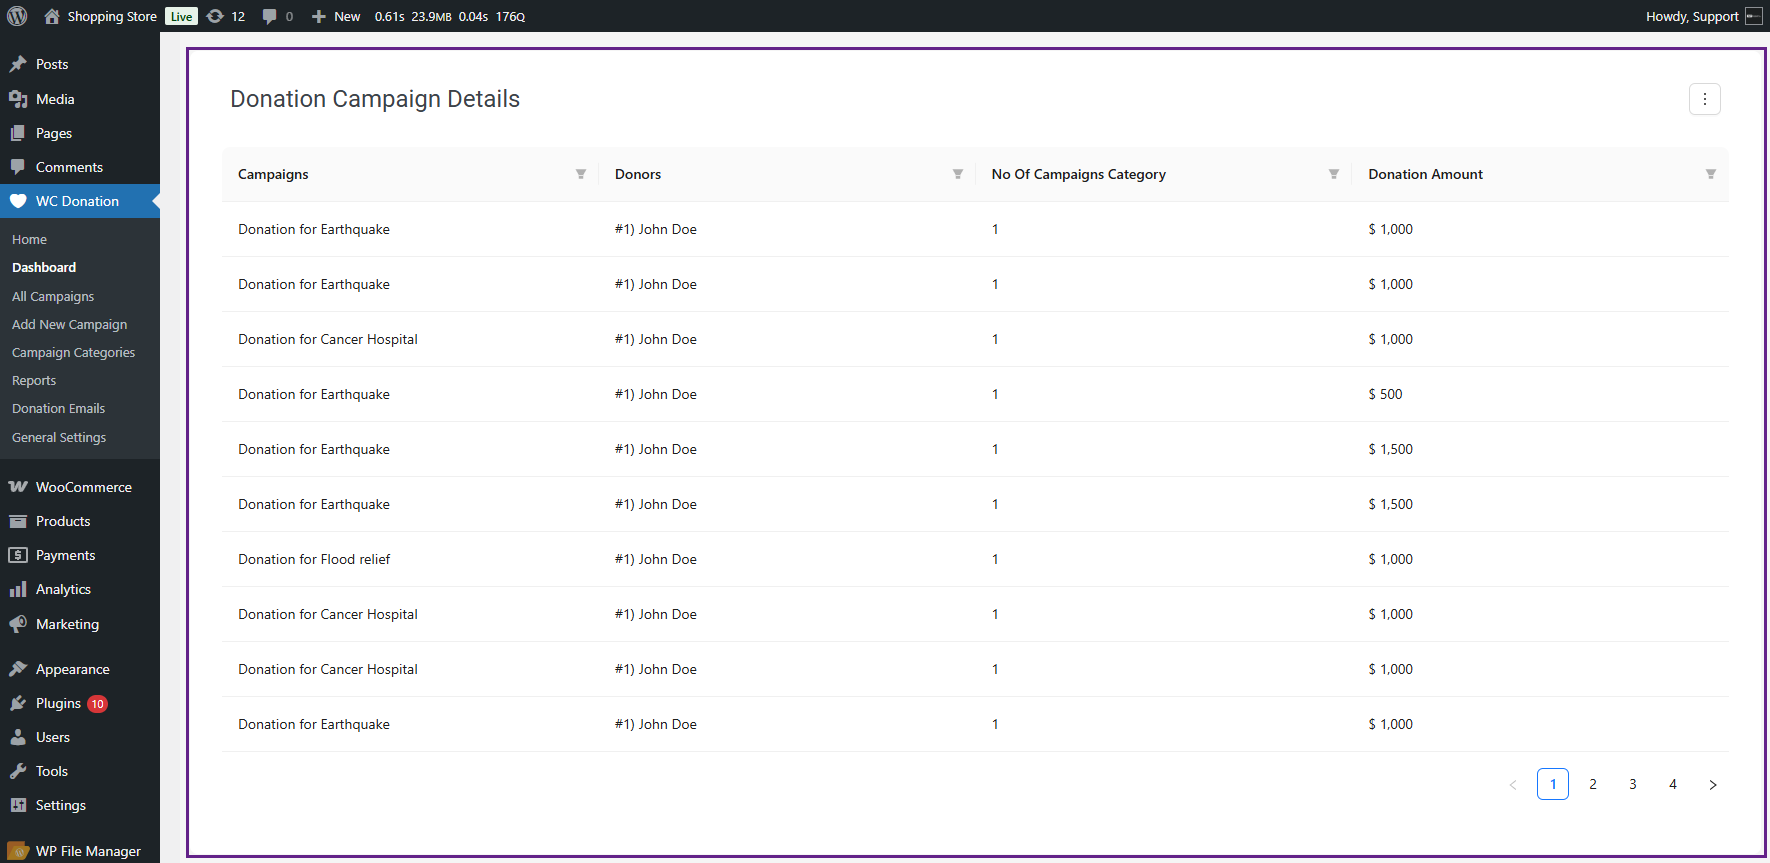
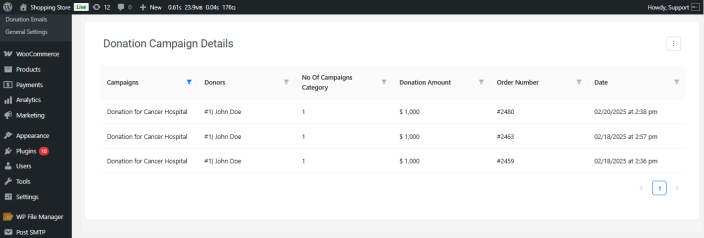
Donation Campaign Details Table
↑ Back to top- The table at the bottom provides a detailed view of each campaign. Four columns are displayed by default.
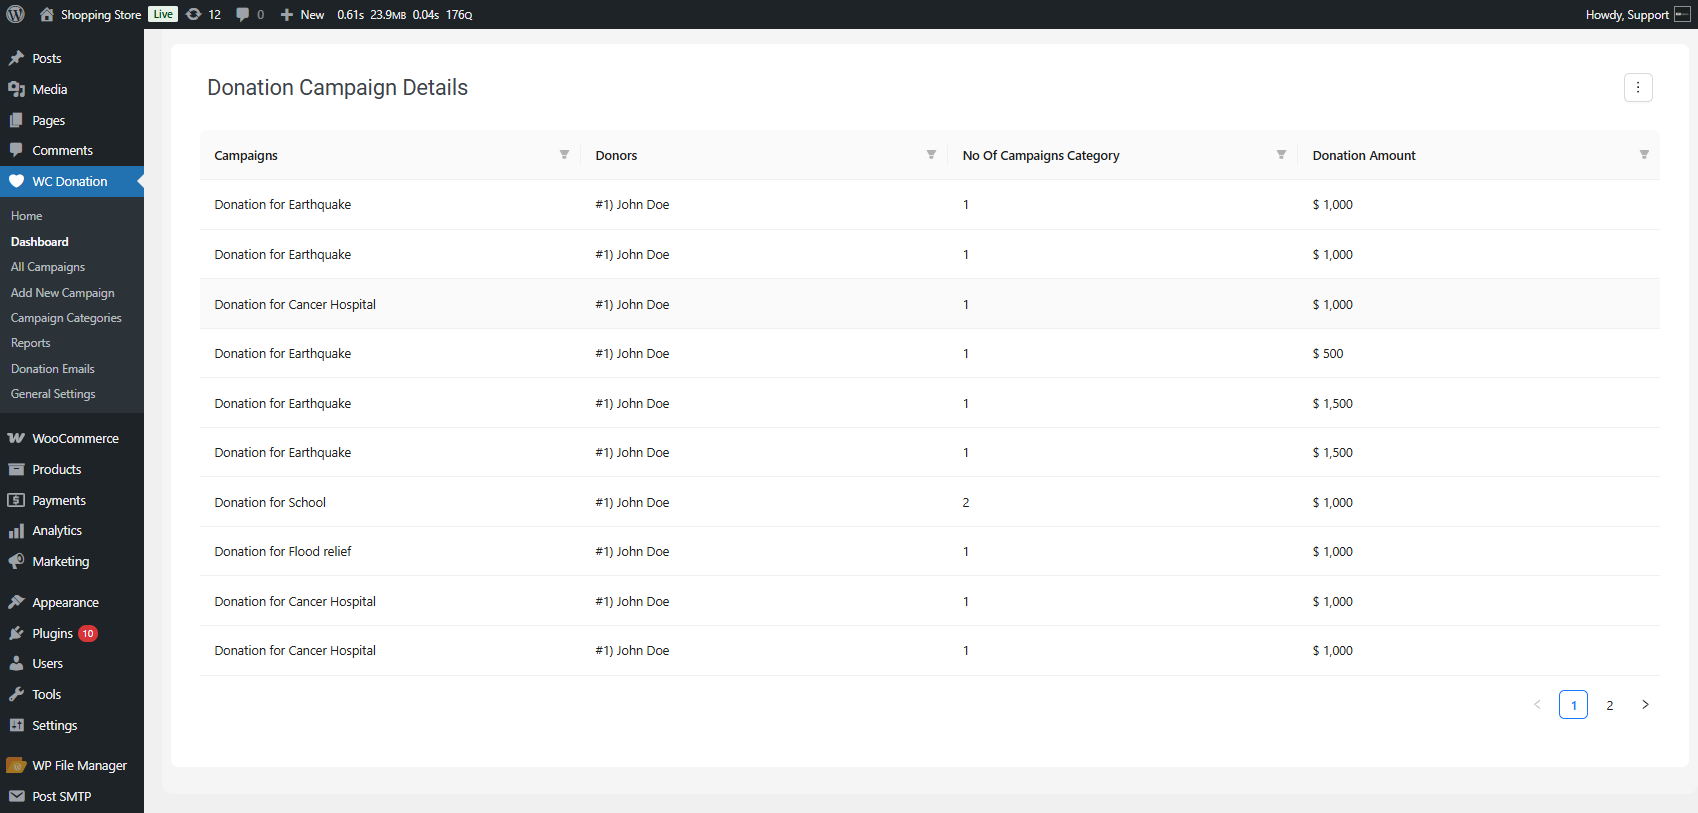
- The admin can add more columns by enabling them from the side option.

- The enabled columns will be added to the Donation Campaign details table.
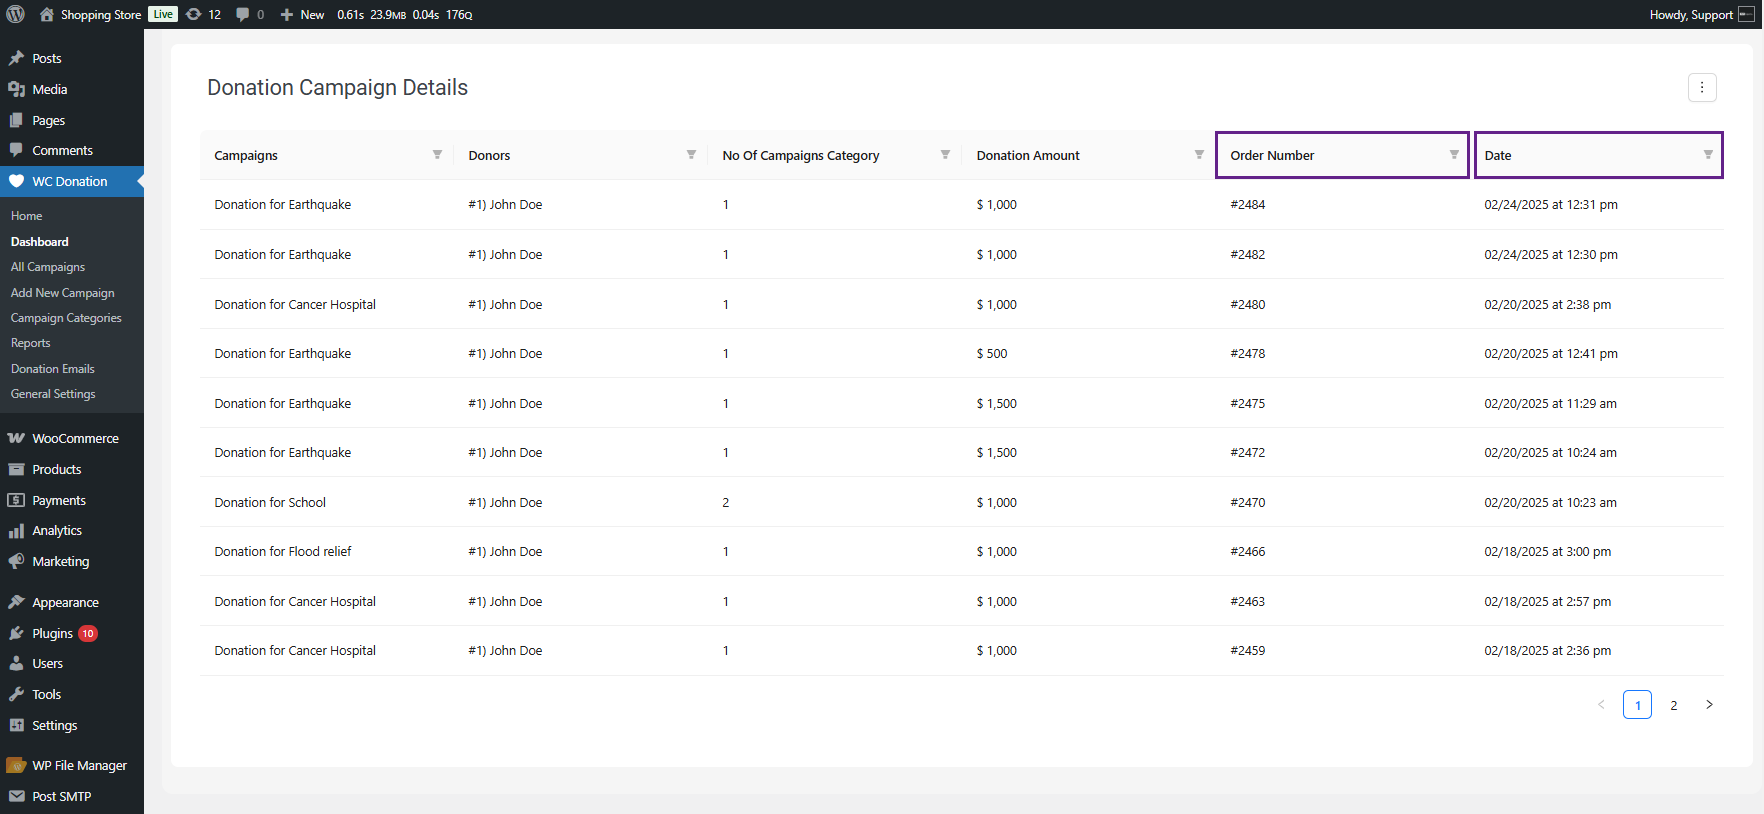
- A filter is available for every column. The admin can filter data as needed.

- The data will be filtered as per admin requirements.
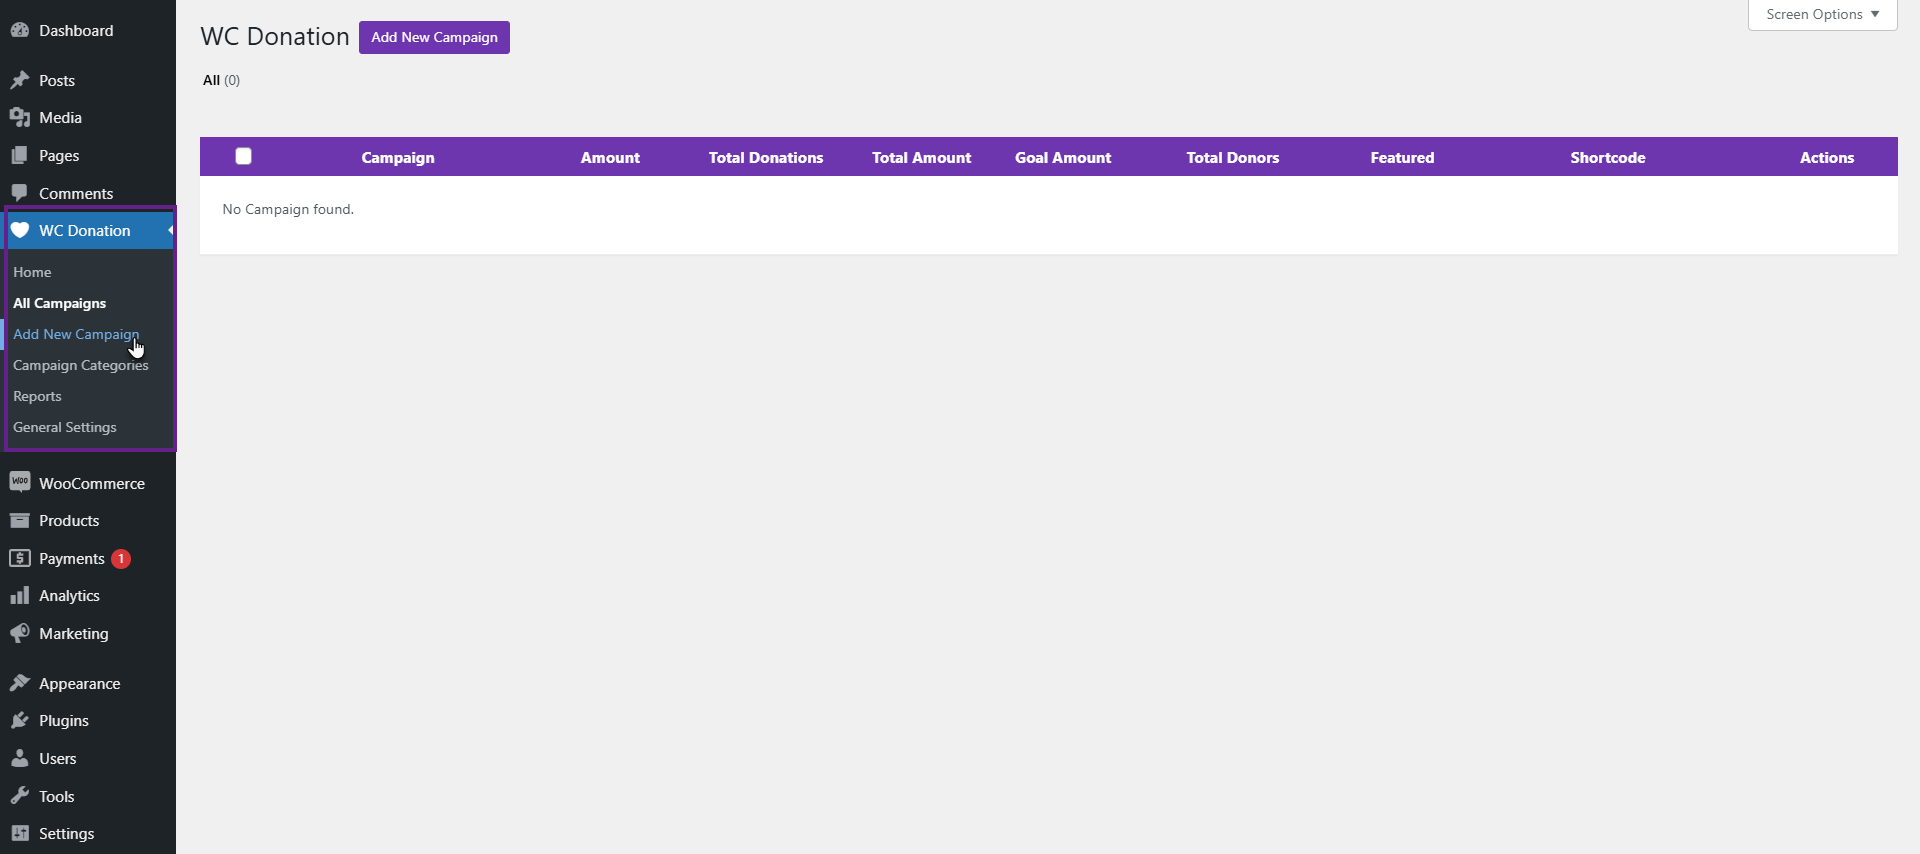
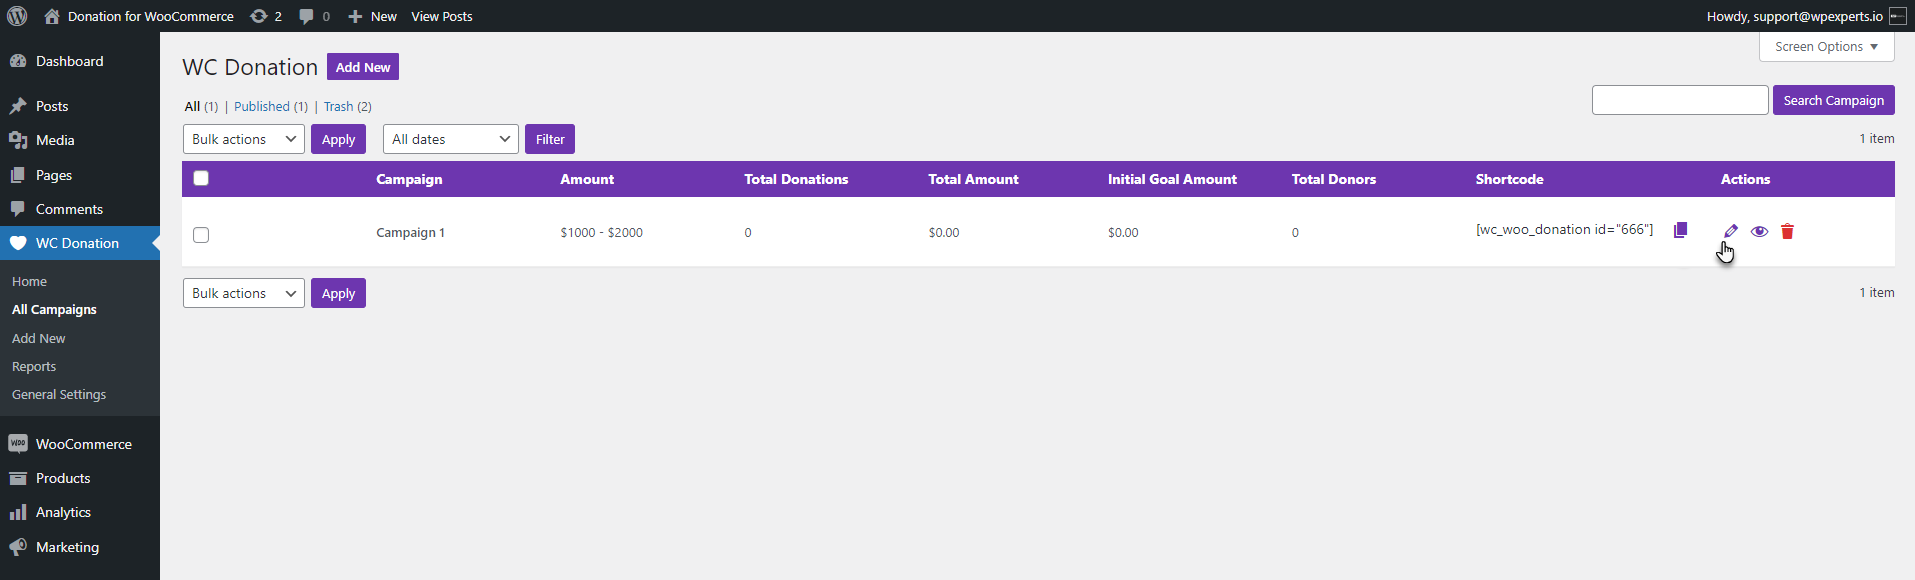
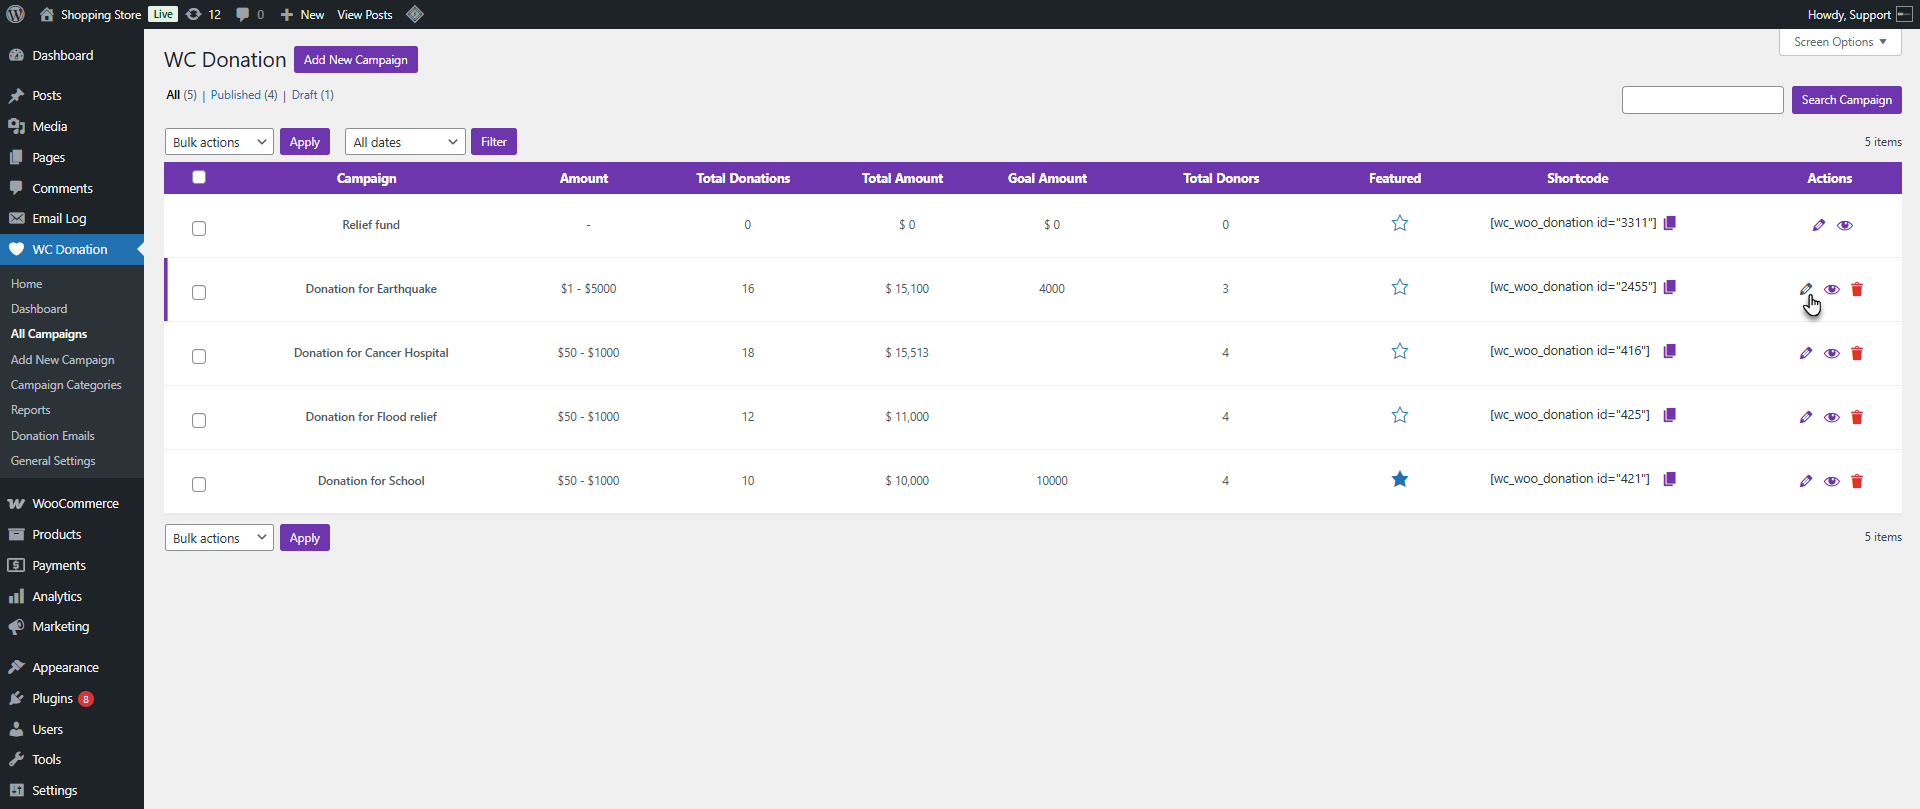
All Campaign
↑ Back to top- Navigate to the WordPress Admin Dashboard > WC Donation > All Campaign.
- Now you’re on the WC Donation page.
- All the campaigns will appear on this page with all the details.
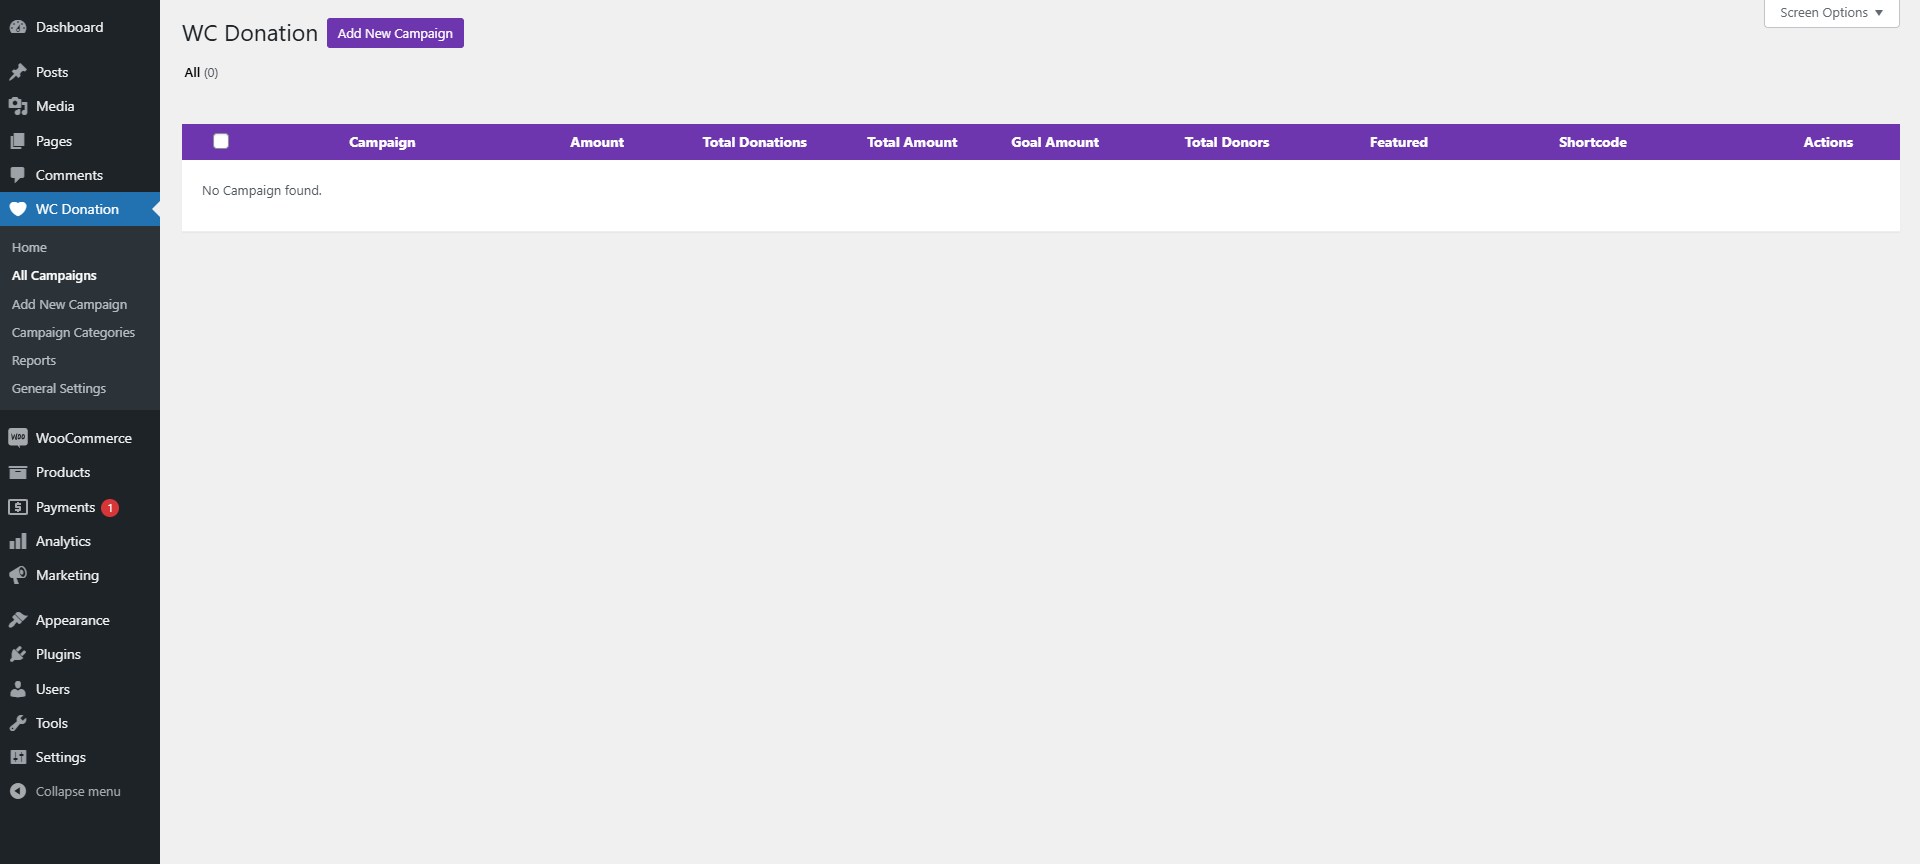
- Click on the Add New Campaign button to add a new campaign.
Add Title
↑ Back to top- Give a Title to your campaign.
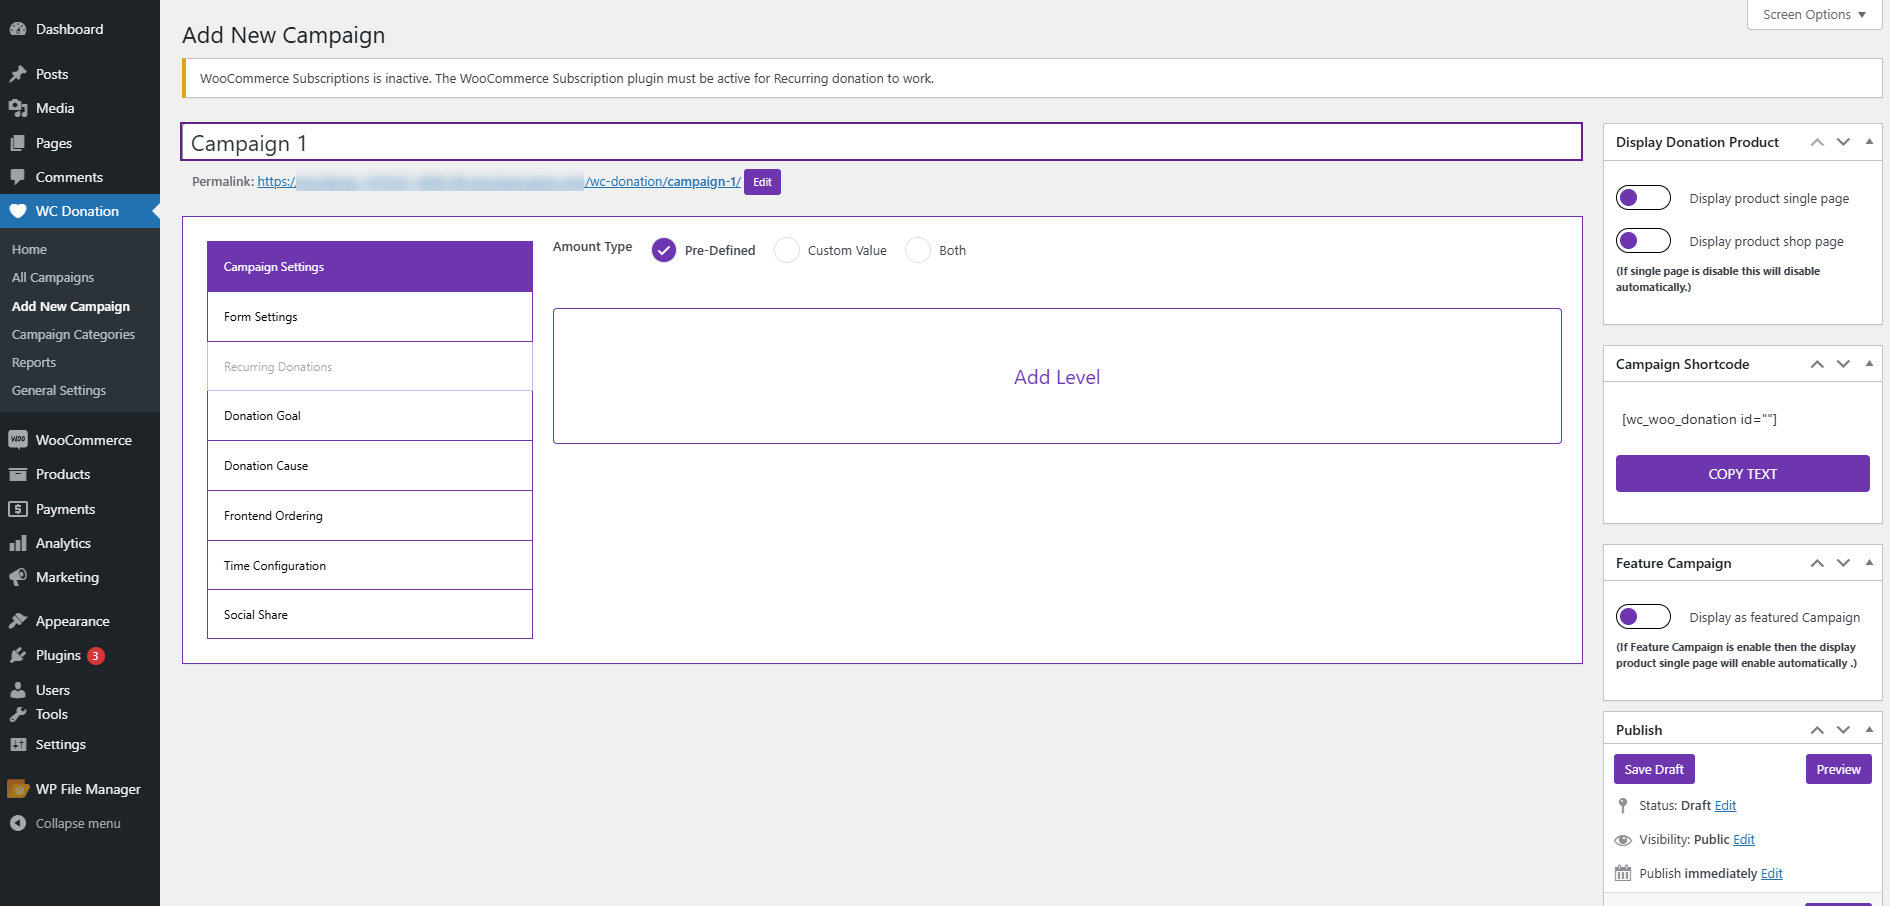
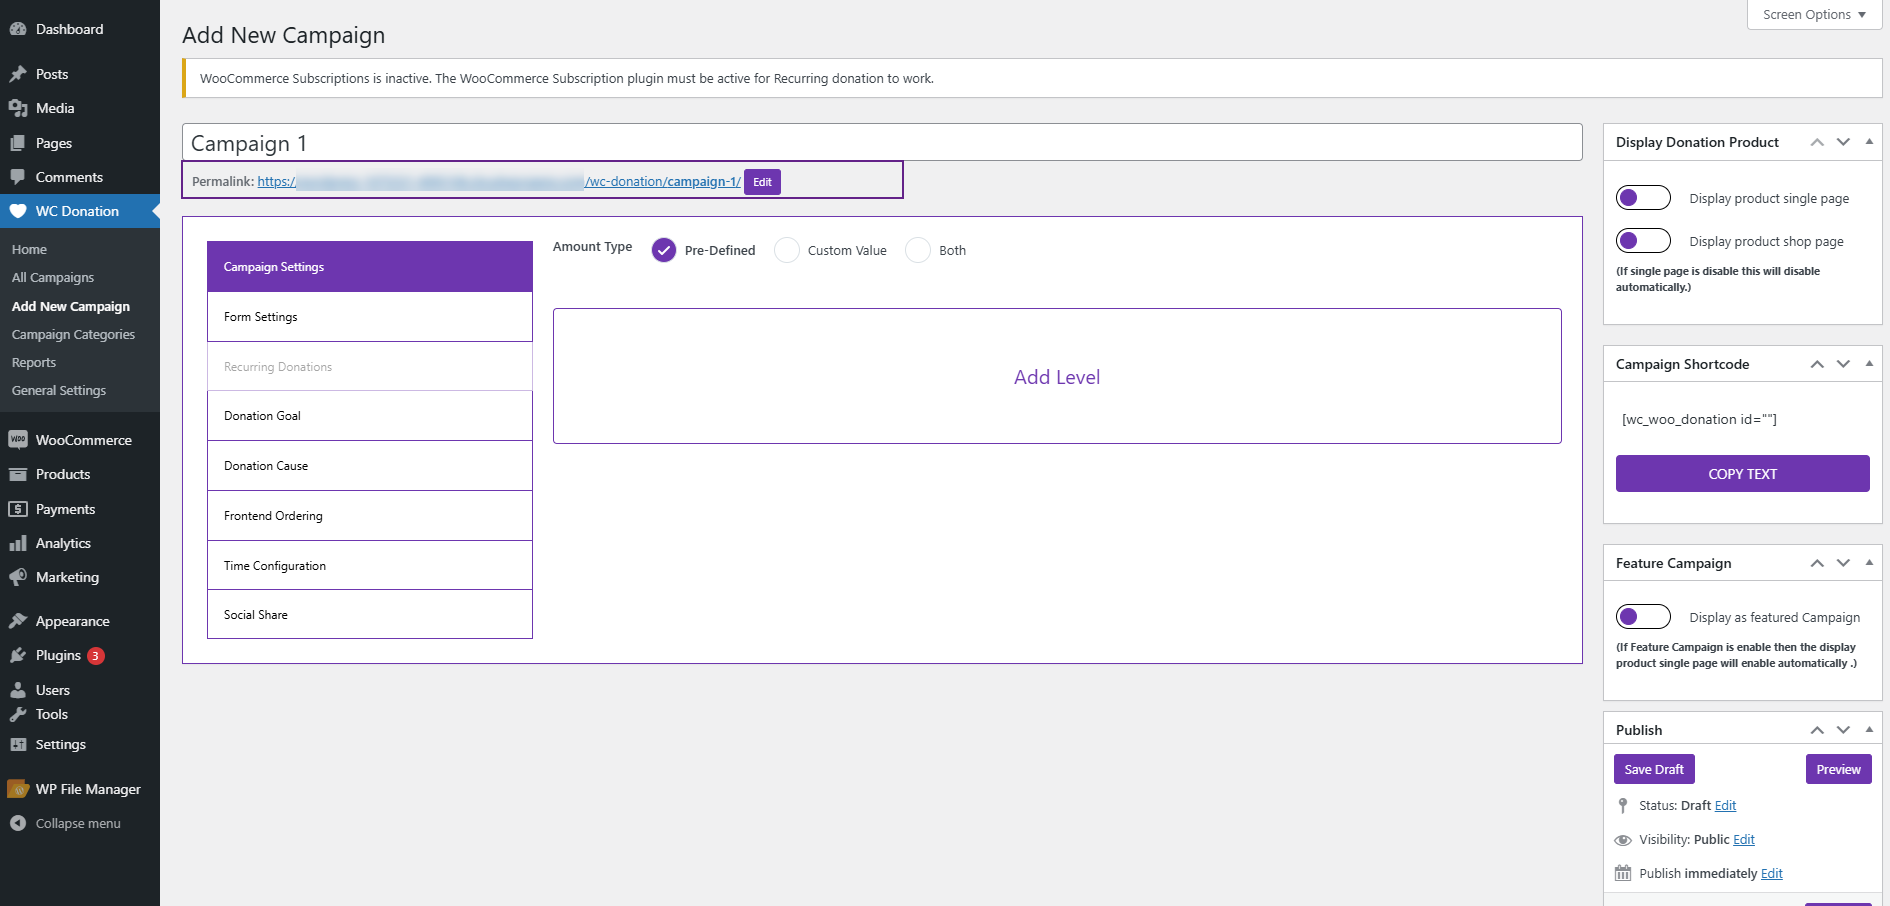
Permalink
↑ Back to top- Once the title is given to the campaign, a Permalink will appear below the title.
- The Administrator can also edit the Permalink according to their requirements.
Campaign Settings
↑ Back to top- Now you’re on the Add New Campaign page.

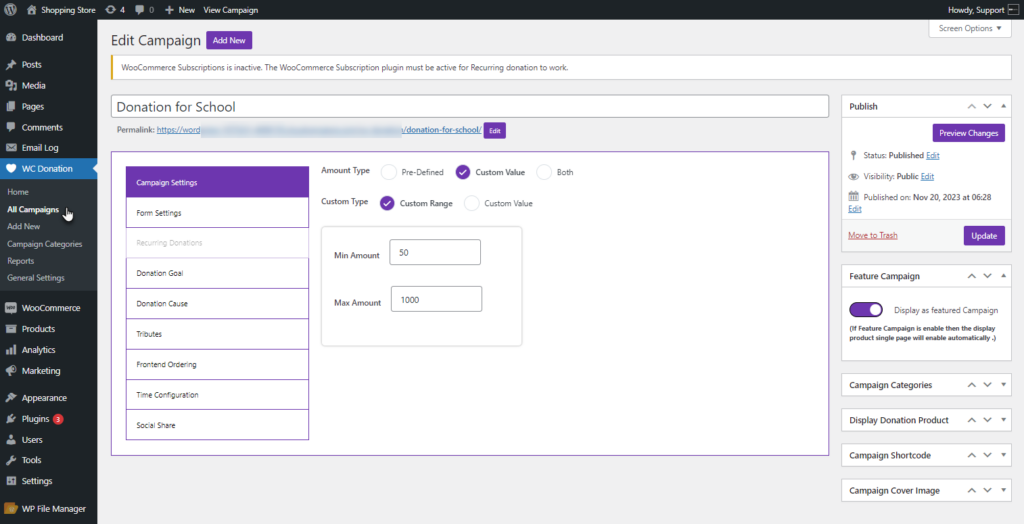
Amount Types
- Go to the Campaign Settings tab (You’ll be on the Campaign Settings by default).
- There are three Amount Types as mentioned below.
Pre-Defined
- The Pre-Defined will show the fixed value for donation.
- Click on the Add Level button.
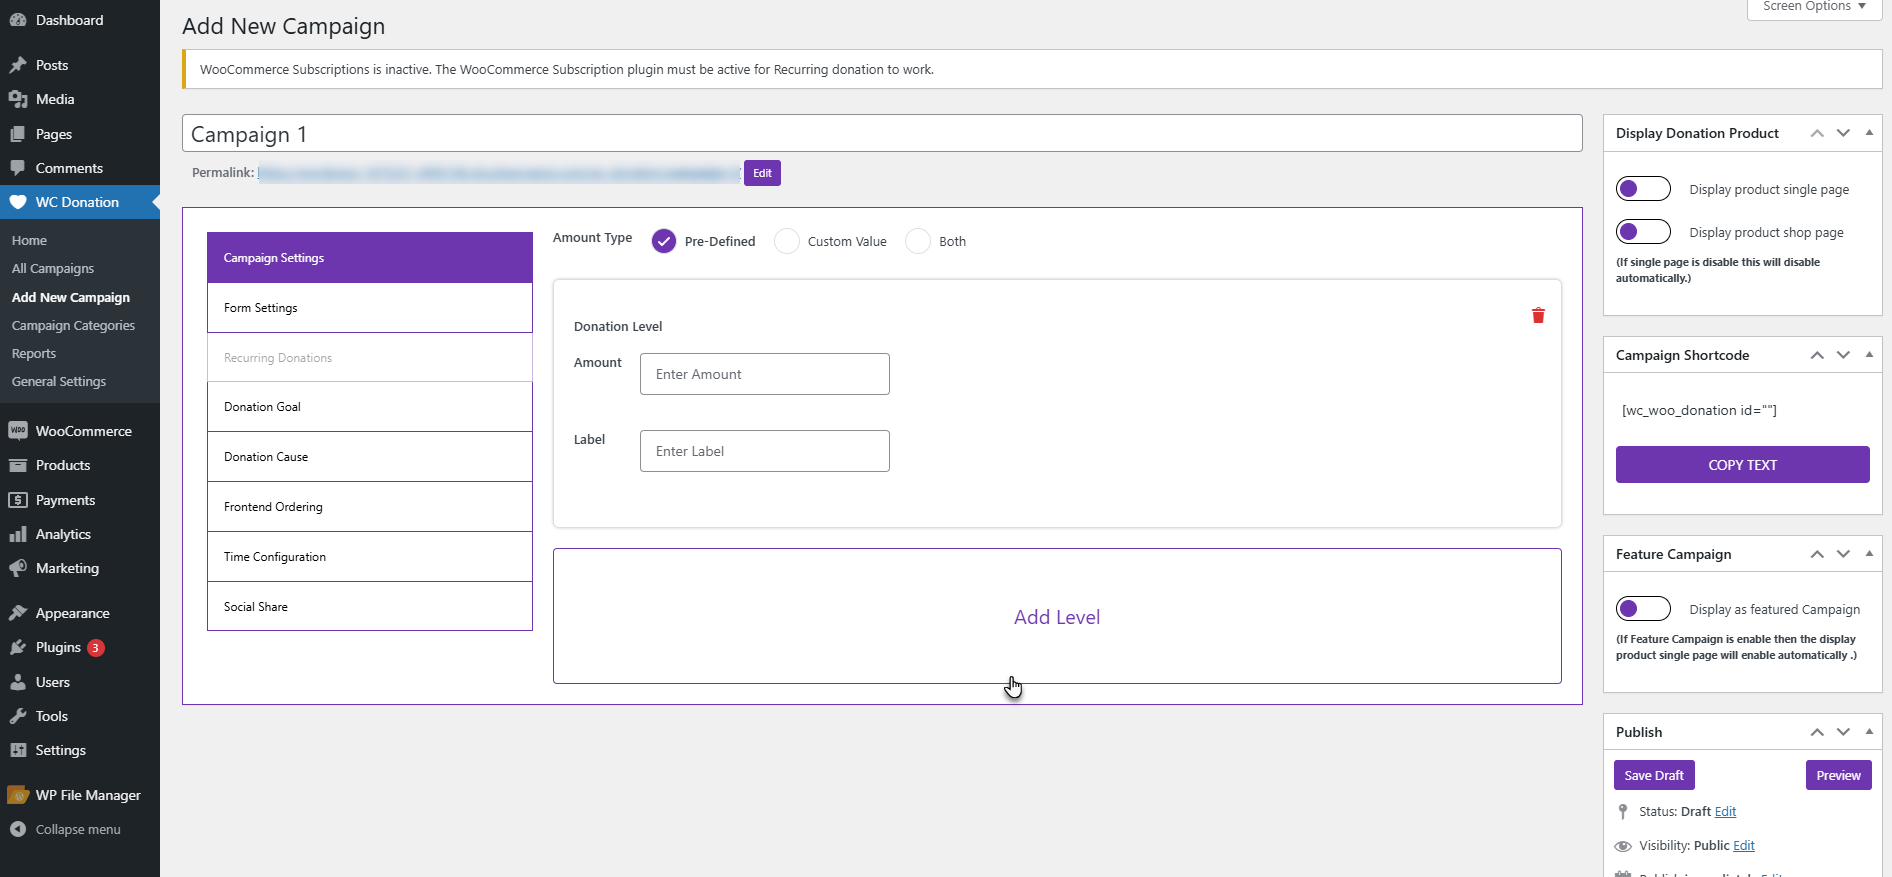
- A Donation Level tab will appear.
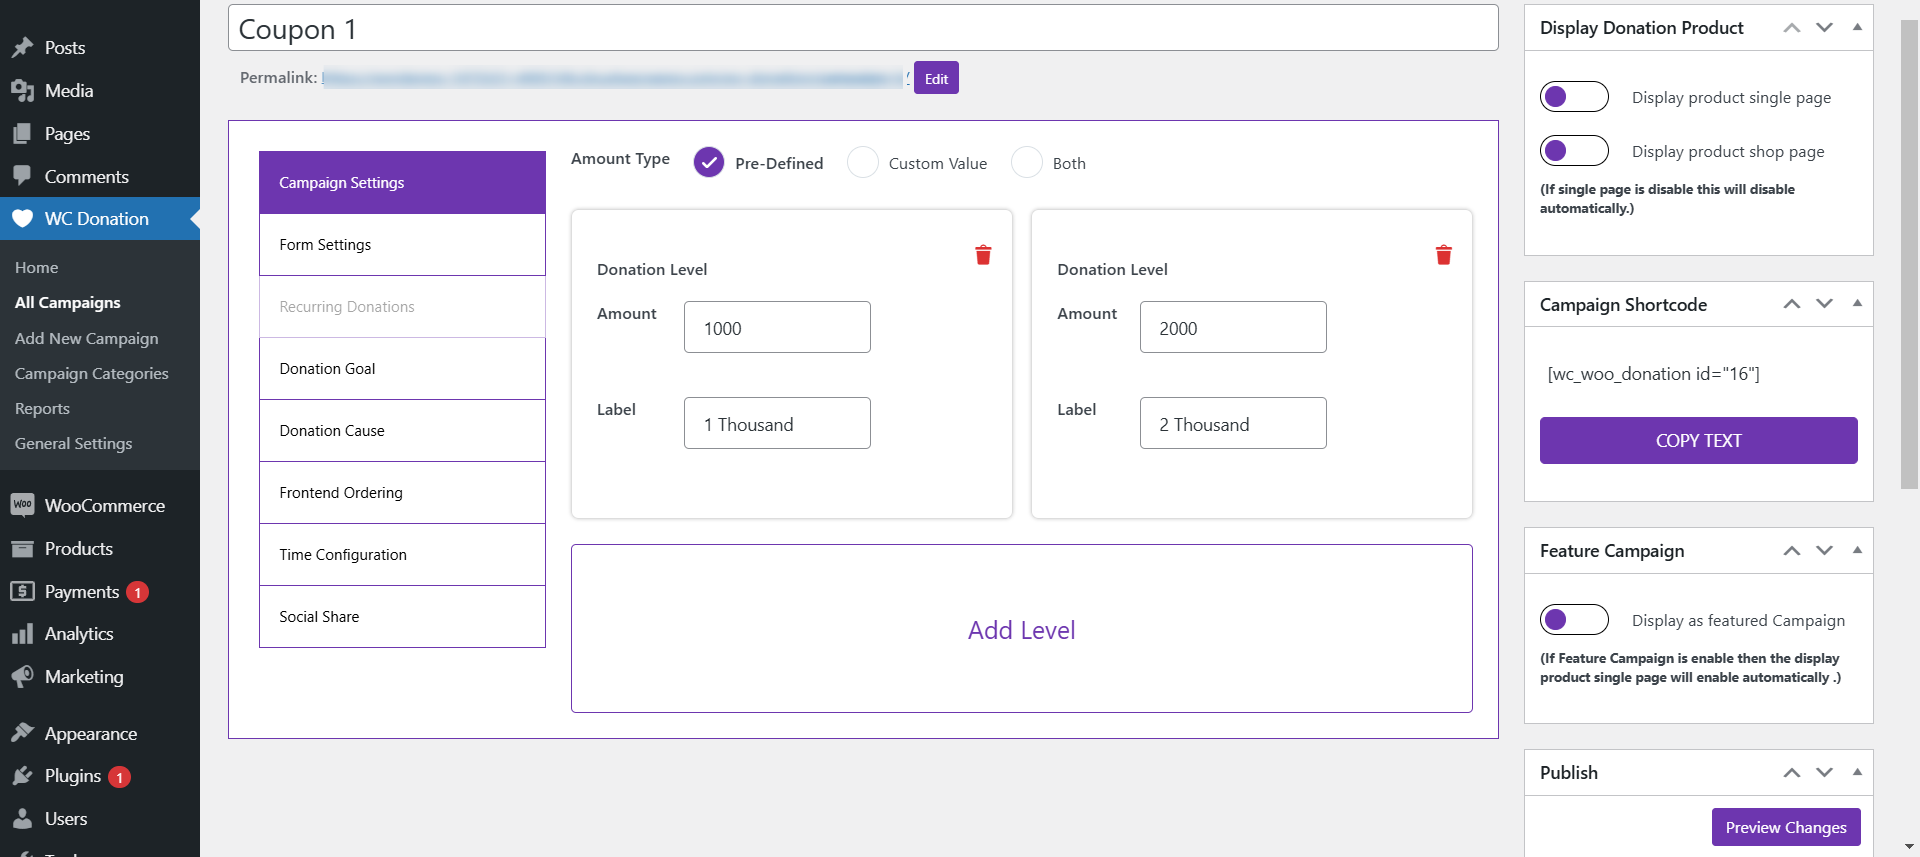
- We can add multiple Donation Levels for multiple amounts of a campaign with a fixed donation amount.
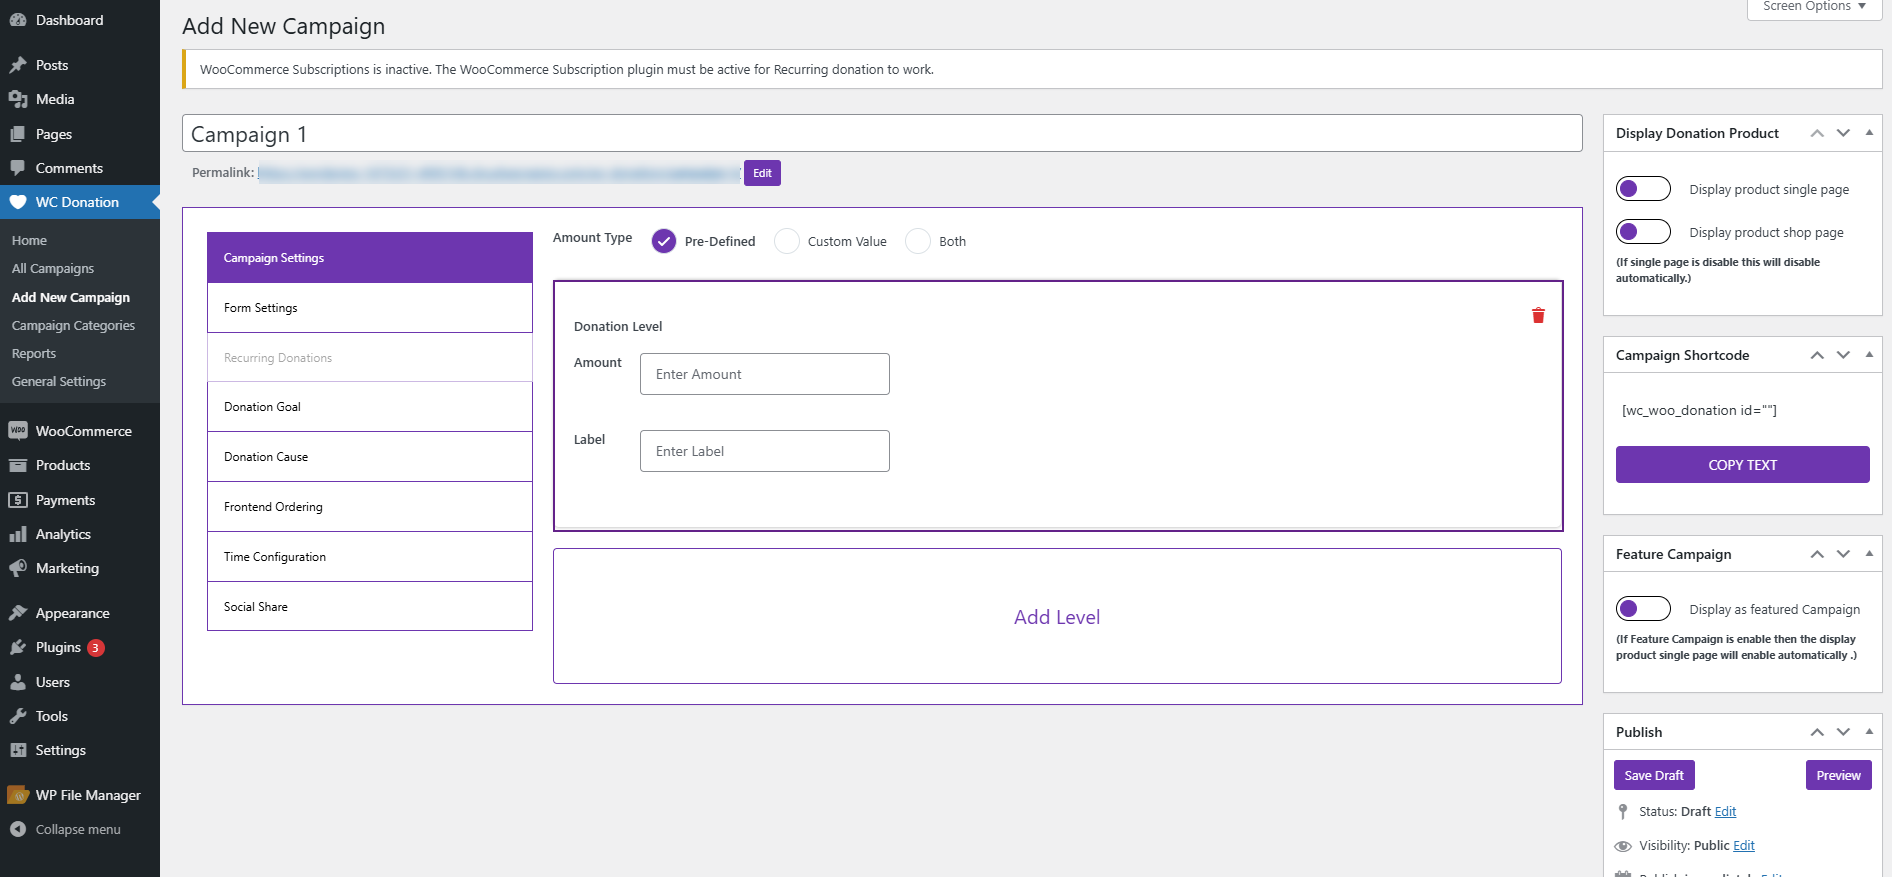
- Set the amount in digits or decimal values in the Amount section (The system will pick the donation value from here).
- Set the label in the Label section (It will be displayed at the donation dropdown value on the checkout page. The System will not pick the donation amount or any detail from here).
- Click on Add Level to show multiple amounts in the donation dropdown menu.

- You can also delete any donation level by clicking on the Trash icon of the donation level.
- You can see that the Donation Level is deleted successfully.
- Click on the Publish button in the Publish section.

- A Notification will appear indicating that the campaign has been published successfully.
- Now navigate to WordPress Admin Dashboard > WC Donation > All Campaign.
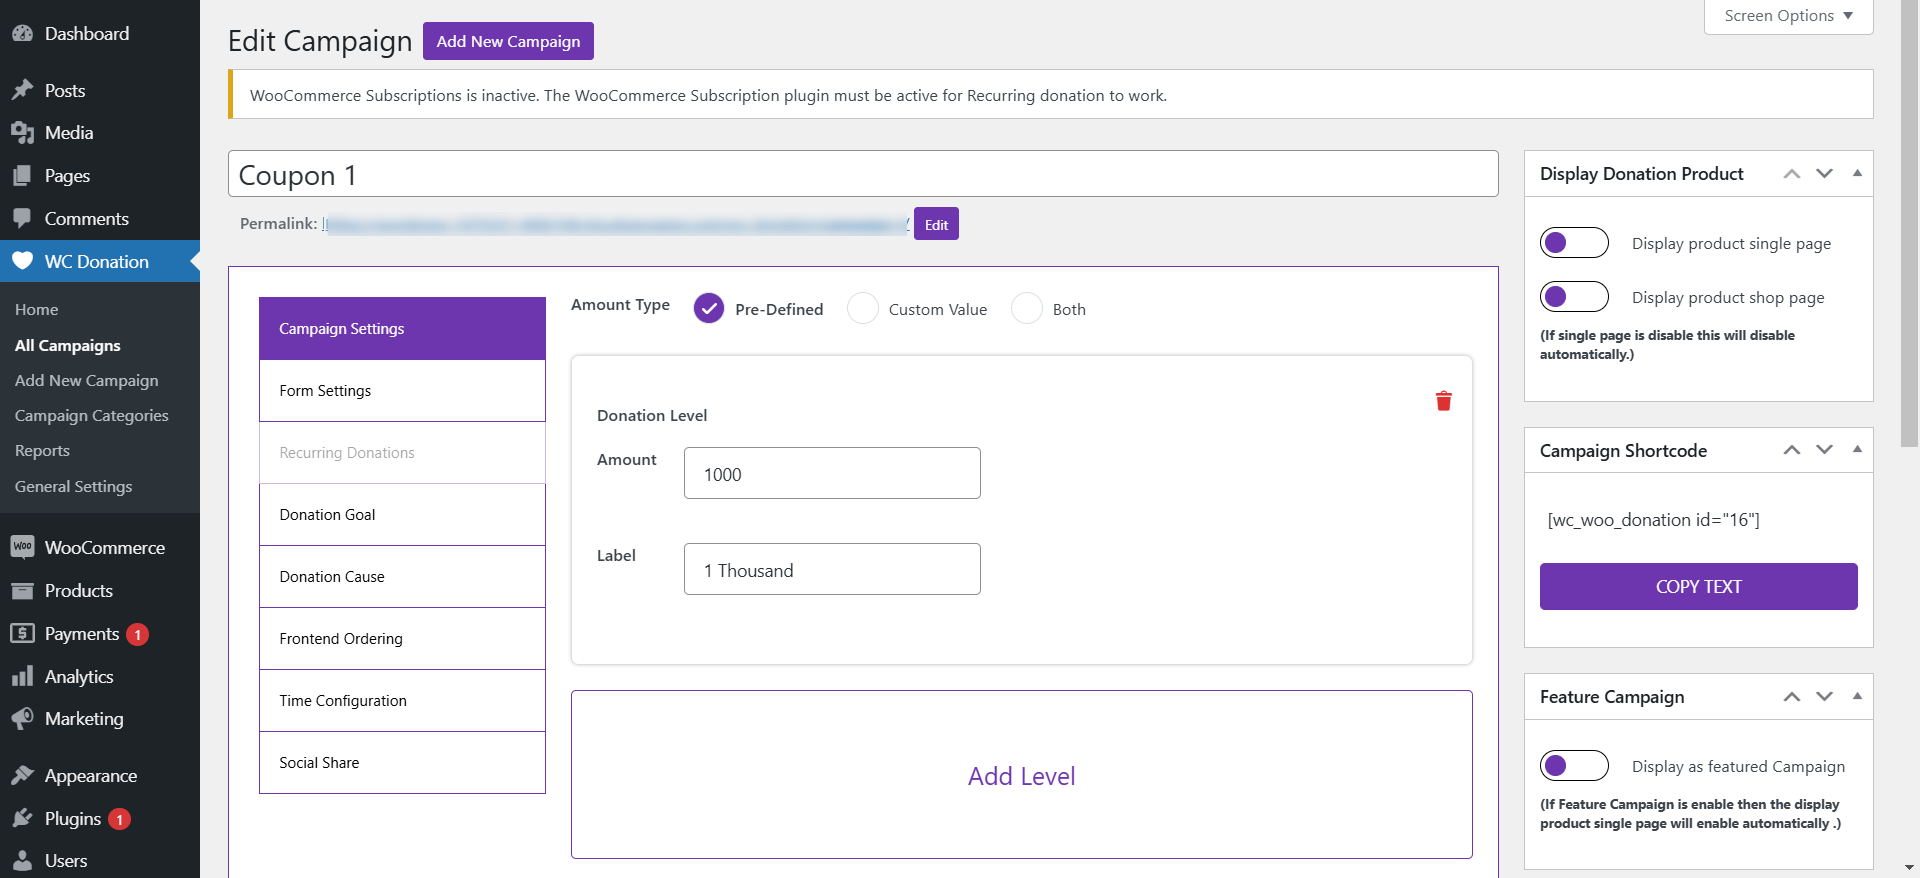
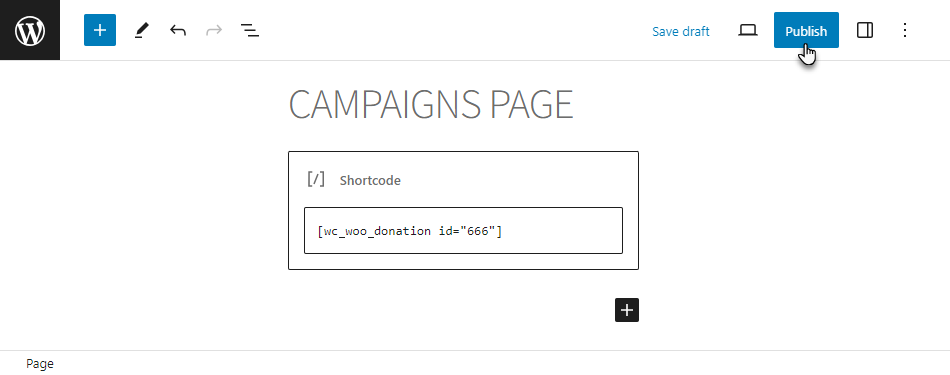
Campaign Shortcode
↑ Back to top- Now you’re on the WC Donation page.
- We can see that the campaign we created is now present on this page with all the details.

- Copy the shortcode of the campaign from the Shortcode column.

- Navigate to WordPress Admin Dashboard > Pages > Add New.

- A new page would open.
- Add the Title of the page.

- Click on the sign ➕ to add blocks.
- Select the Shortcode element.
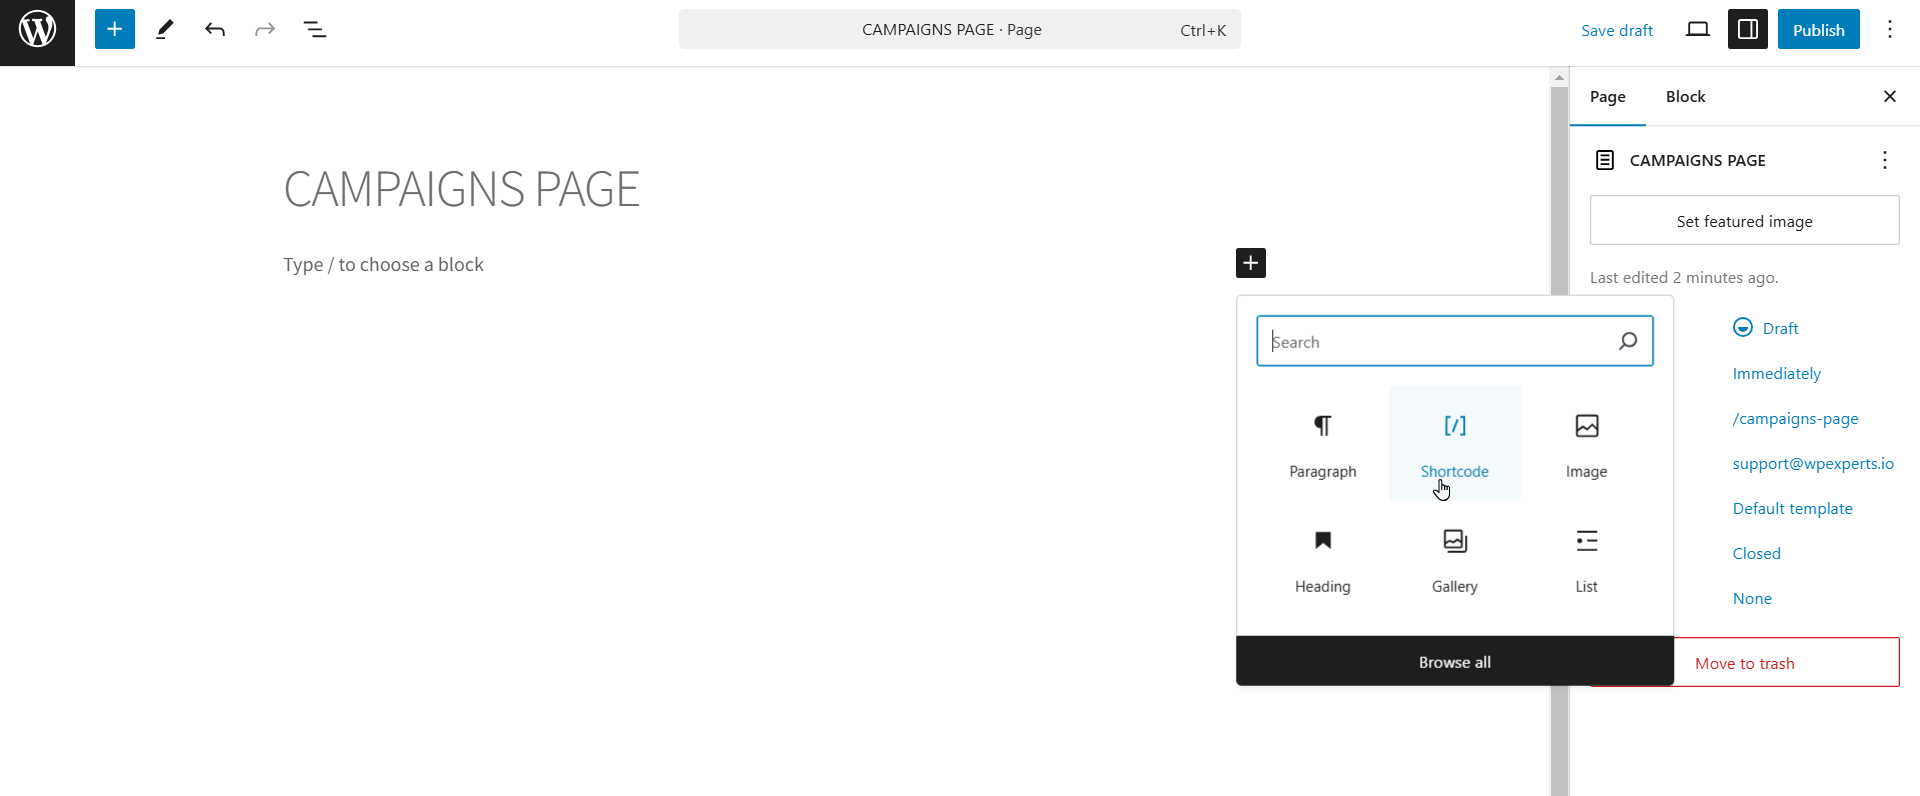
- Now paste the shortcode [wc_woo_donation id=”666″].
- Click on the Publish button.
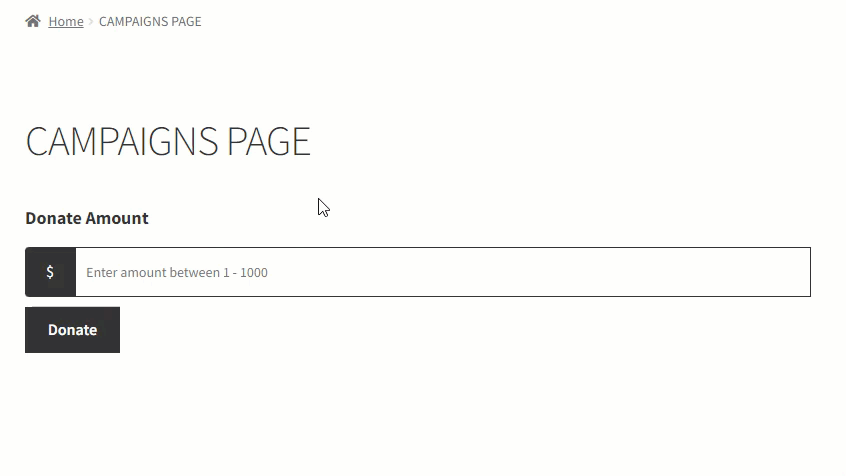
Front-End Impact
Amount Type – Pre-Defined
- When Pre-Defined is selected as Amount Type, we can see how the Donation Levels will appear on the Front-End.
Custom
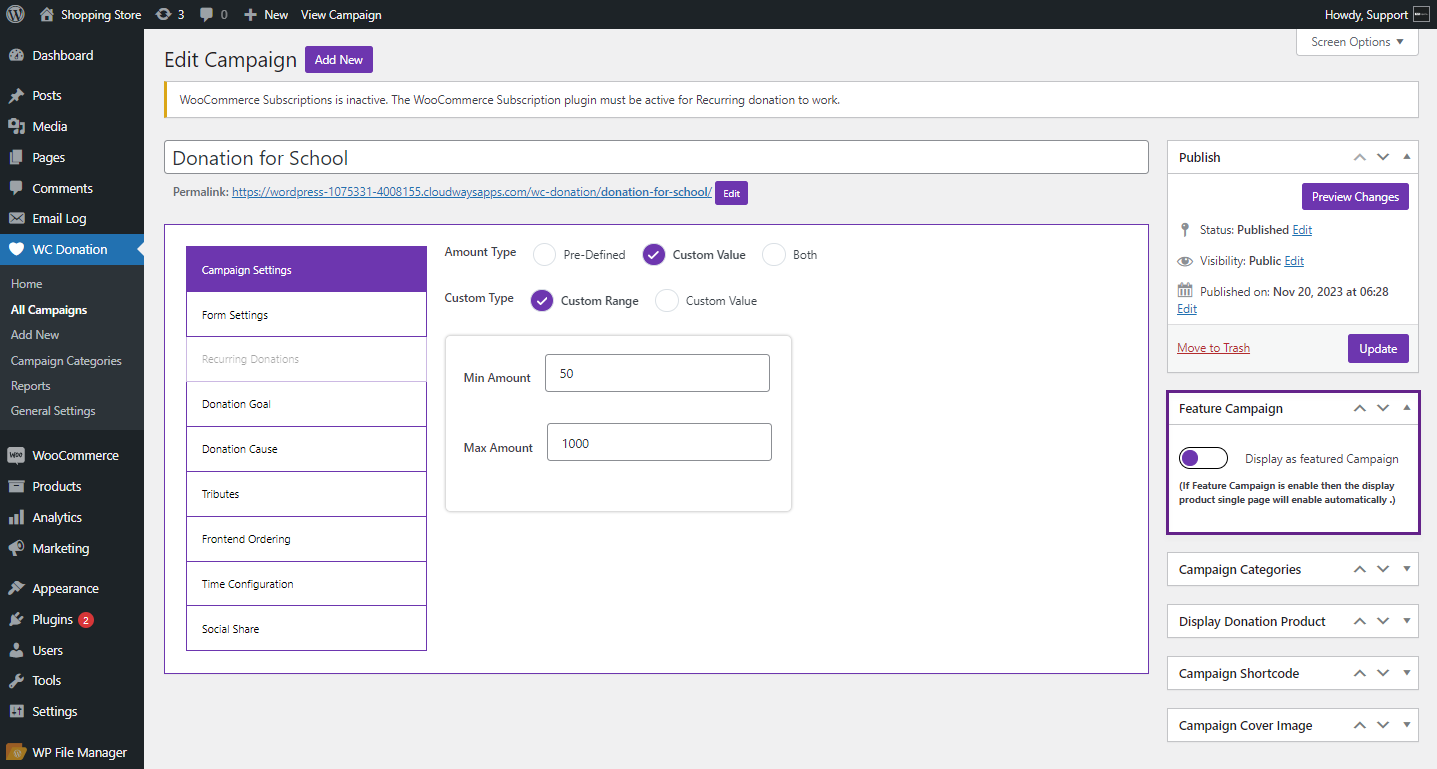
- Go to the Admin Dashboard > WC Donation > All Campaigns.
- Select the Custom Value option in the Amount Type section.
- Select the Custom Range option.
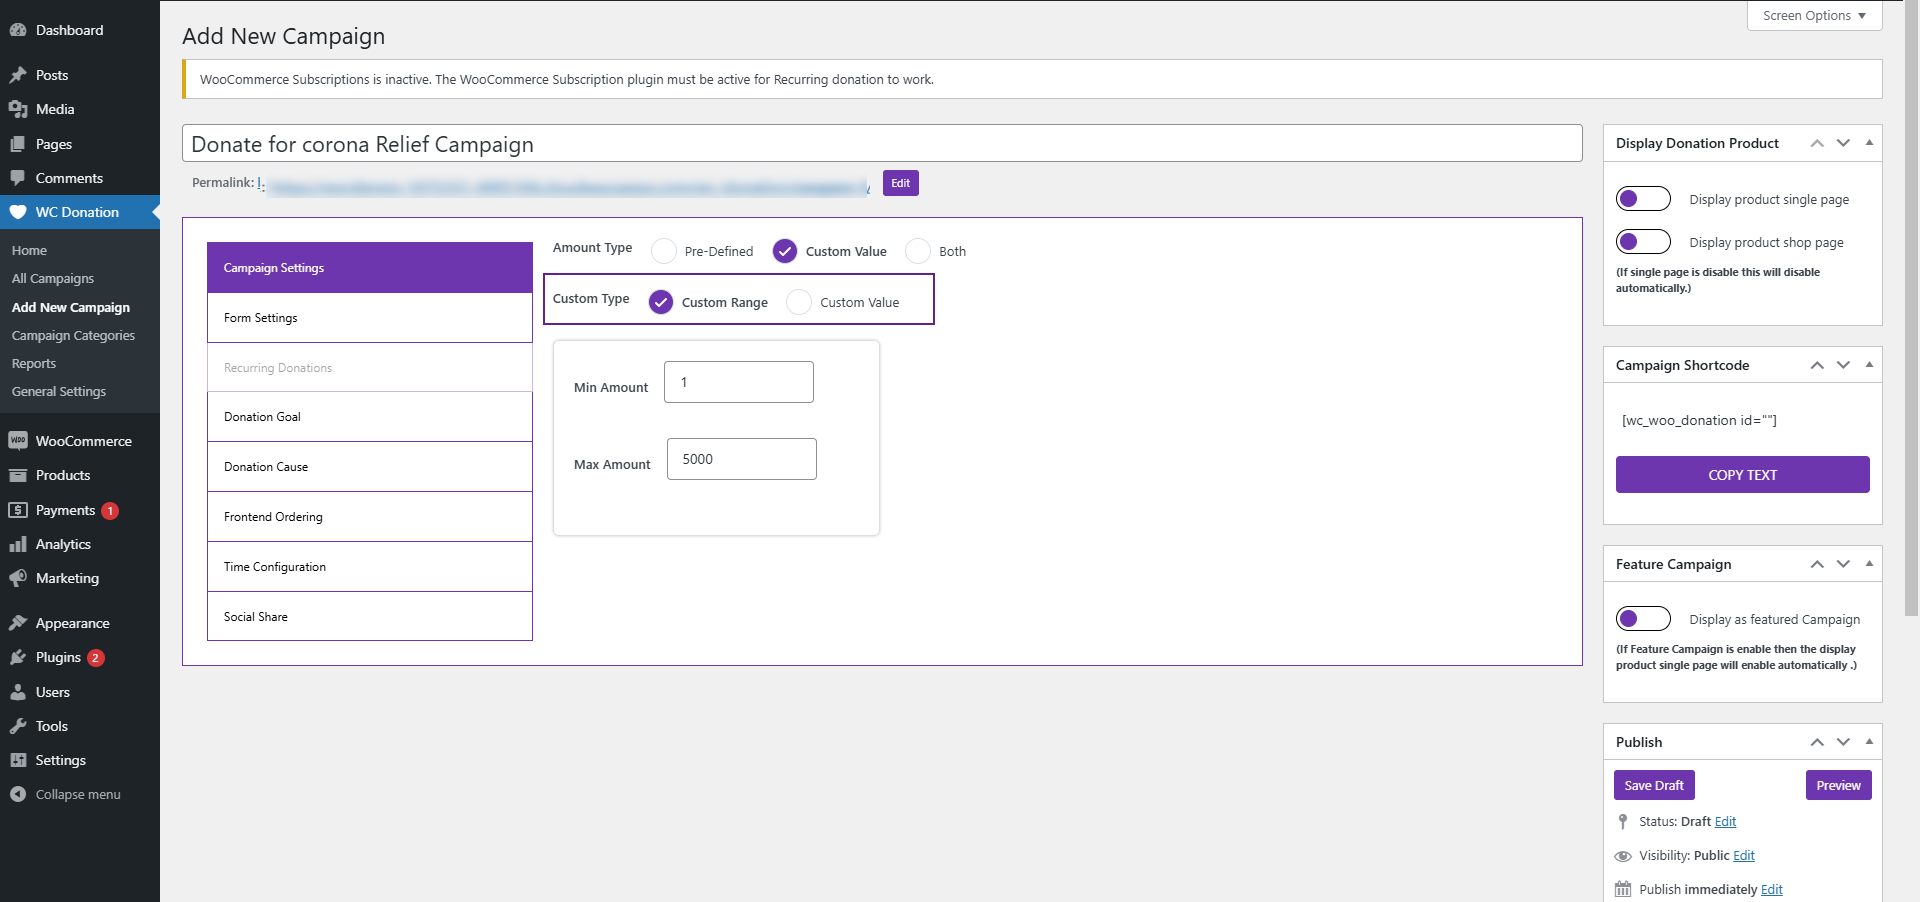
- Select the Custom Value option in the Custom Type section.
- After selecting the Custom Value option, a text box will appear for the user to input the desired placeholder text.

- Also, the same process would be repeated if the Admin selects BOTH section.

Front-End Impact
- Now, the user is not restricted and can enter any amount.
- Also, the placeholder appears in the field configured in the Back-End settings.

Amount types
The Amount Types setting defines how the donation amount will be displayed and how the user can donate. There are two primary options:
- Predefined Amount: The admin sets fixed donation amounts, and the user can only select from them.
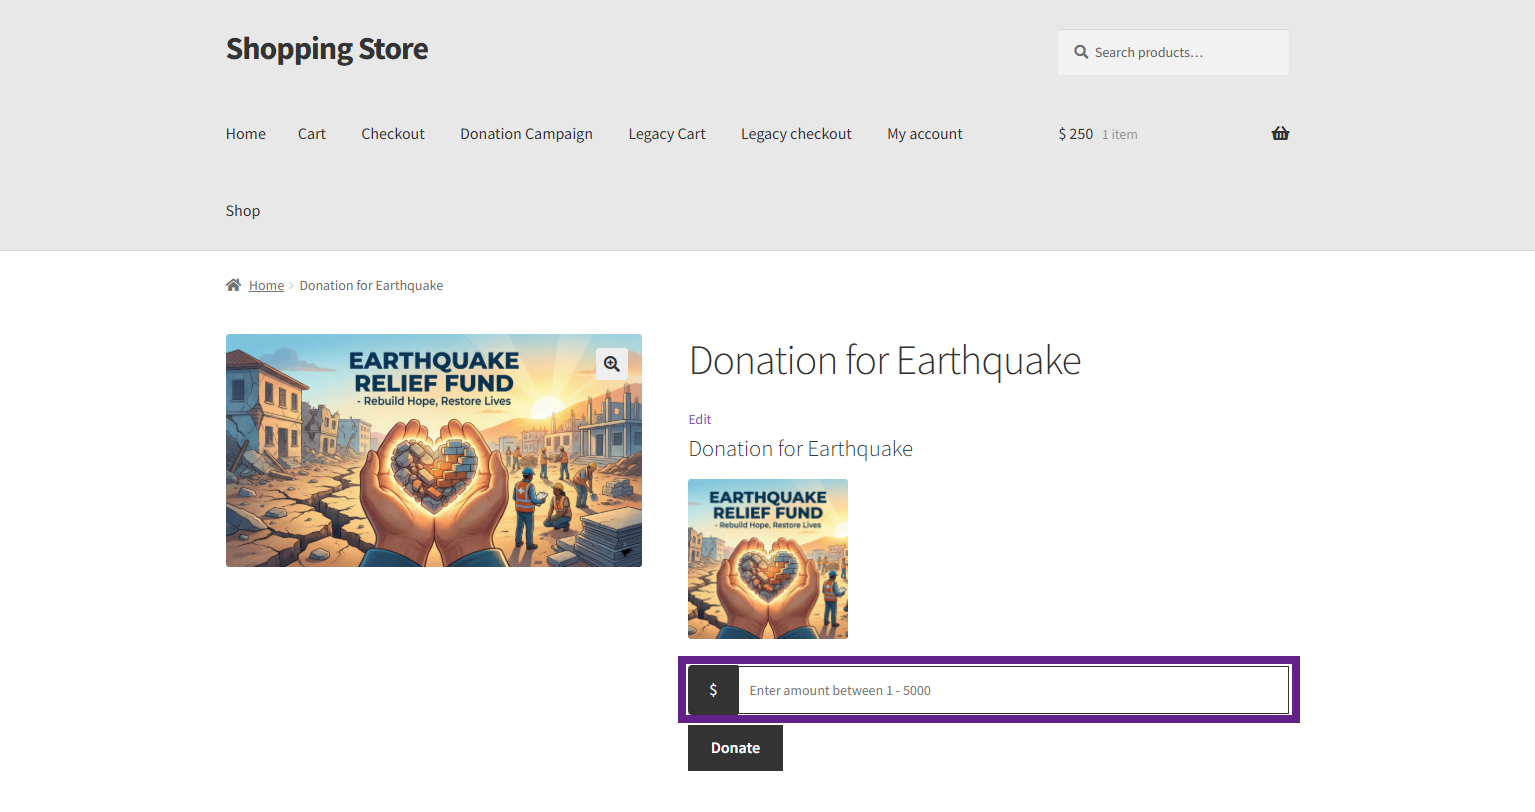
- Custom Amount The admin can either define a custom amount range or allow a completely open custom amount, and the user can manually enter the donation amount accordingly.
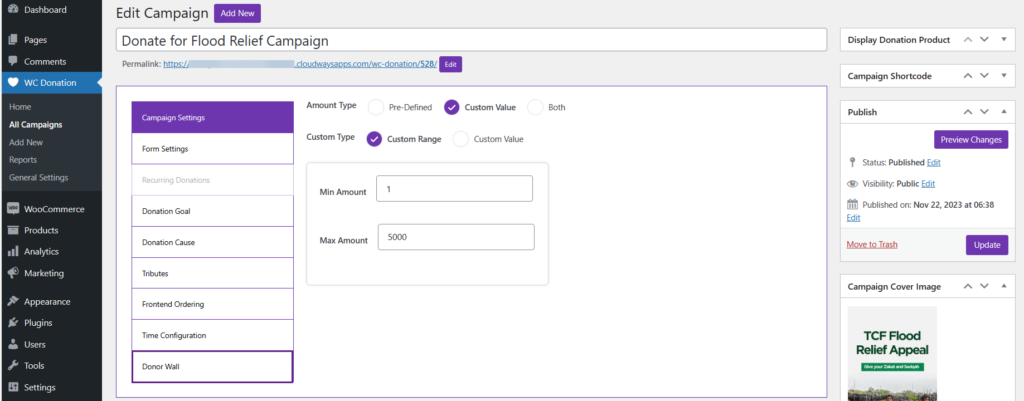
Custom Range
When the Custom range option is selected in the Custom amount field, the user can enter an amount within the admin-set limit.
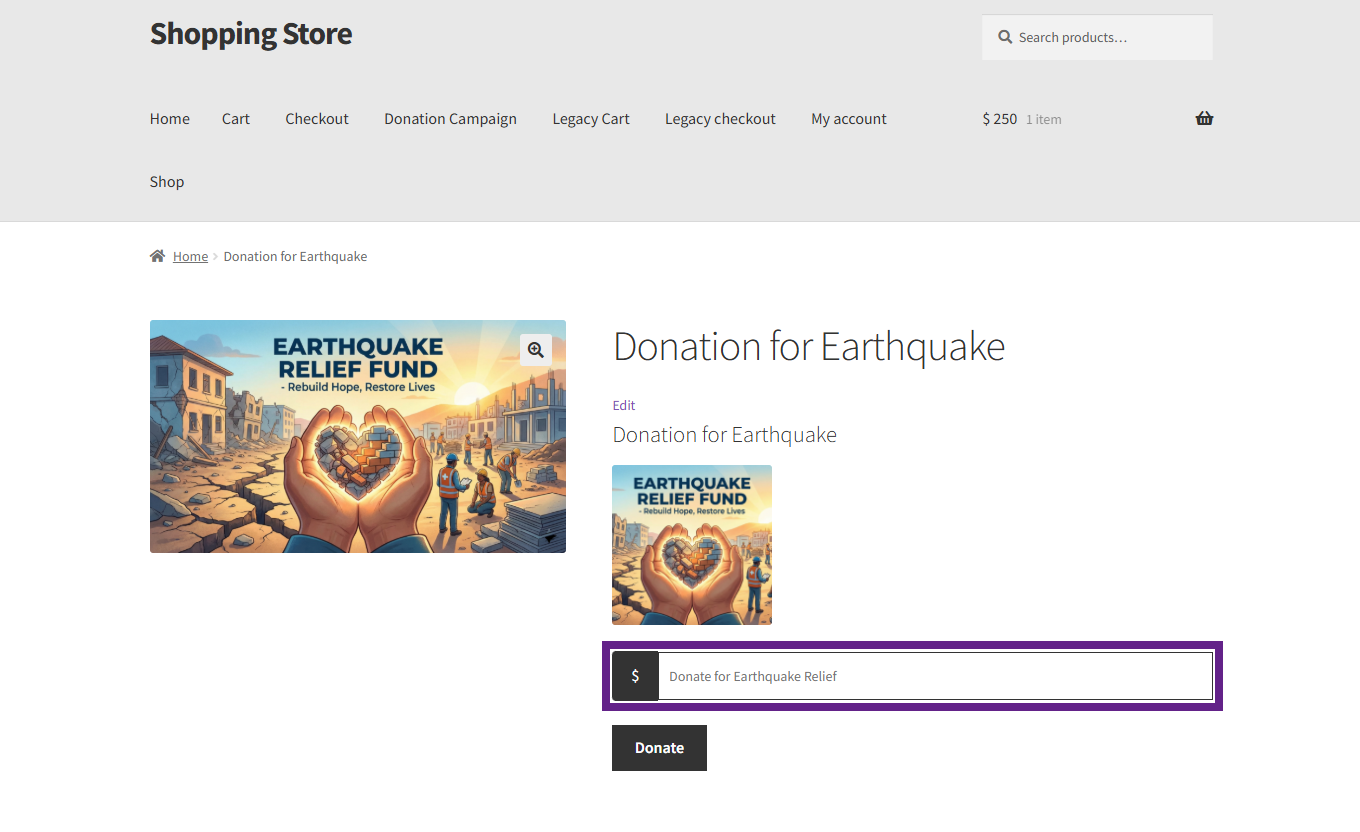
Custom Value
When the Custom Value option is selected in the Custom amount, the user can enter the amount as they choose.
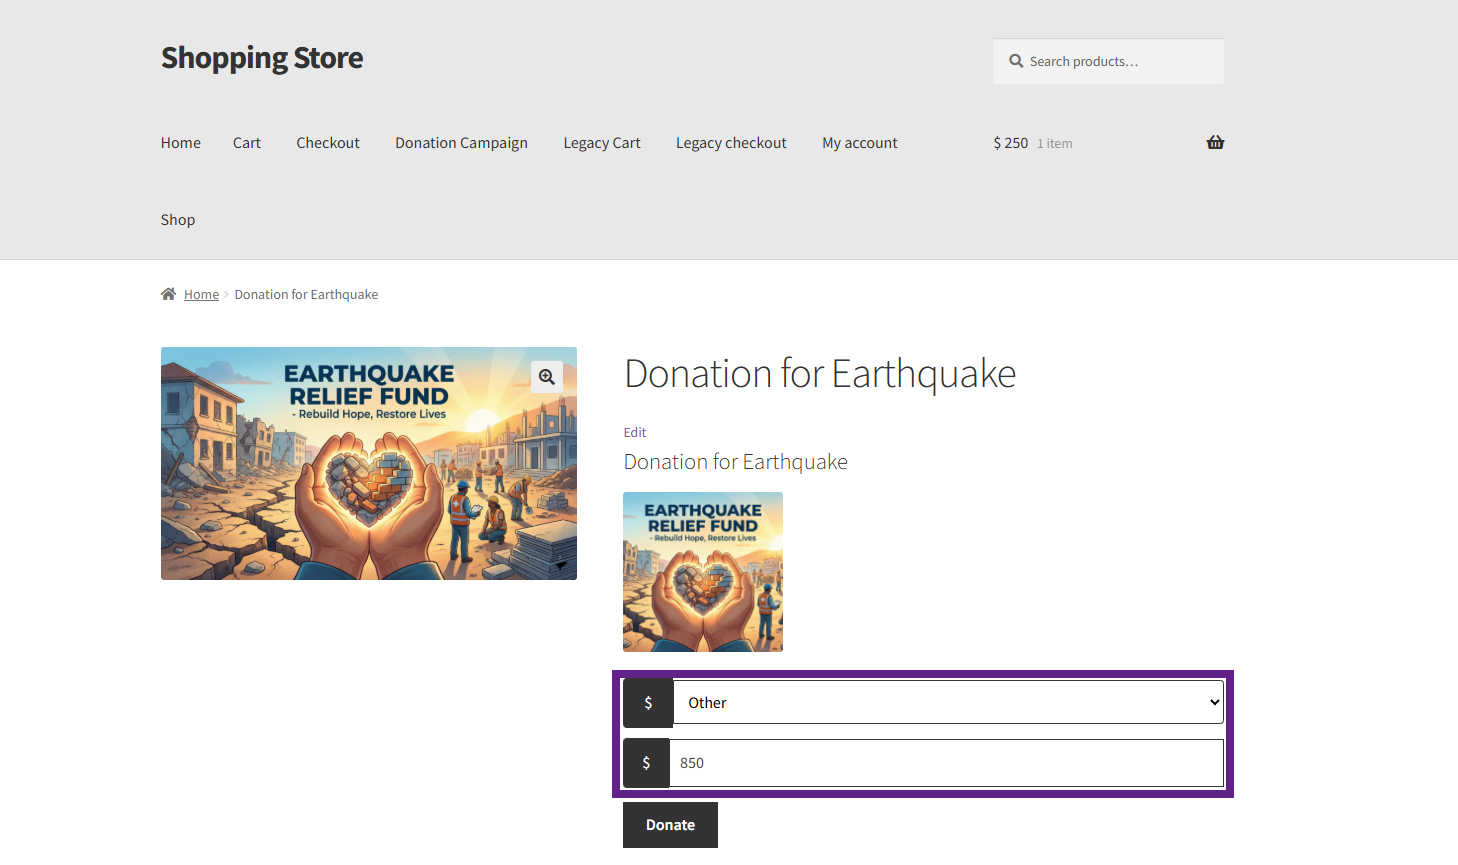
- Both (Predefined + Custom). The admin provides fixed donation options while also allowing the user to enter their own custom donation amount.
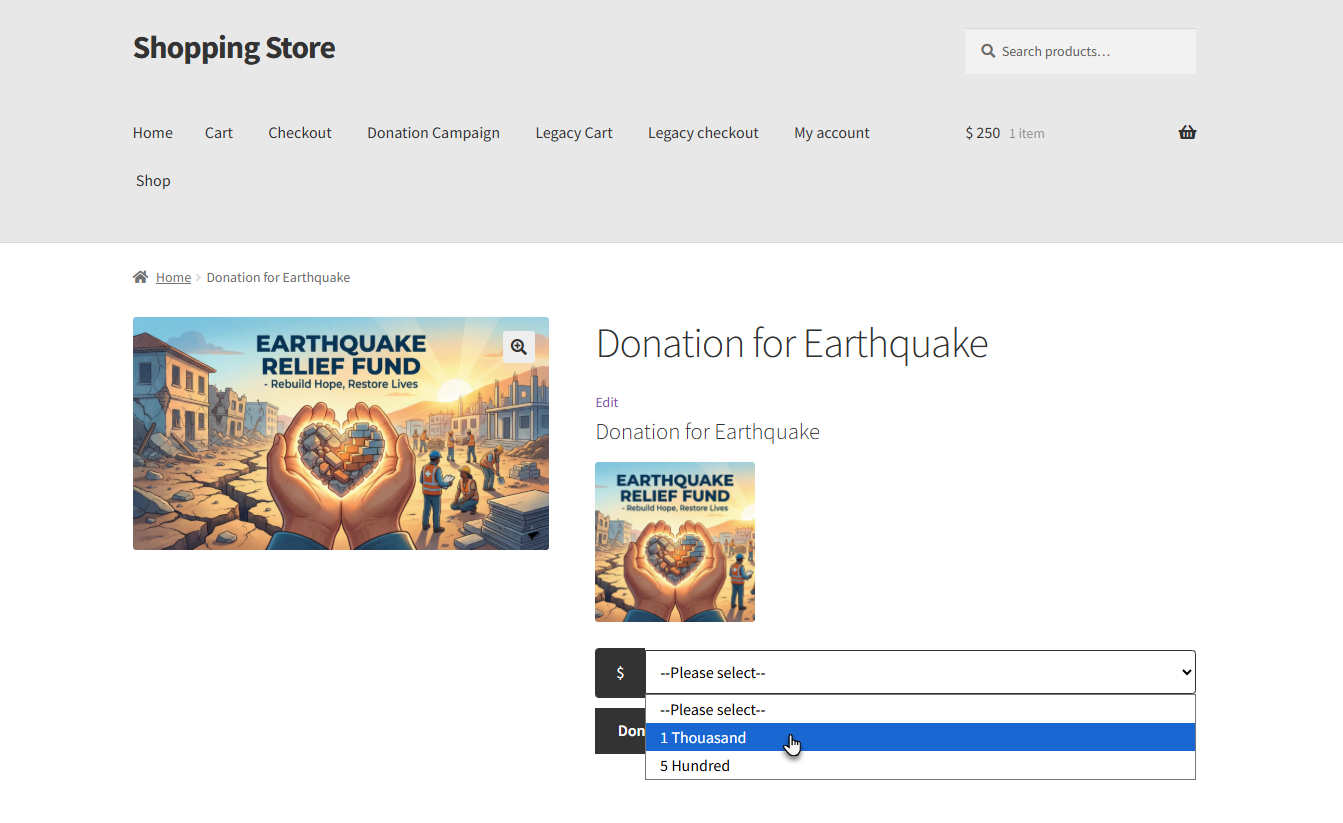
Predefinded
A dropdown will appear with all the predefined values, and the option Other refers to the custom amount.
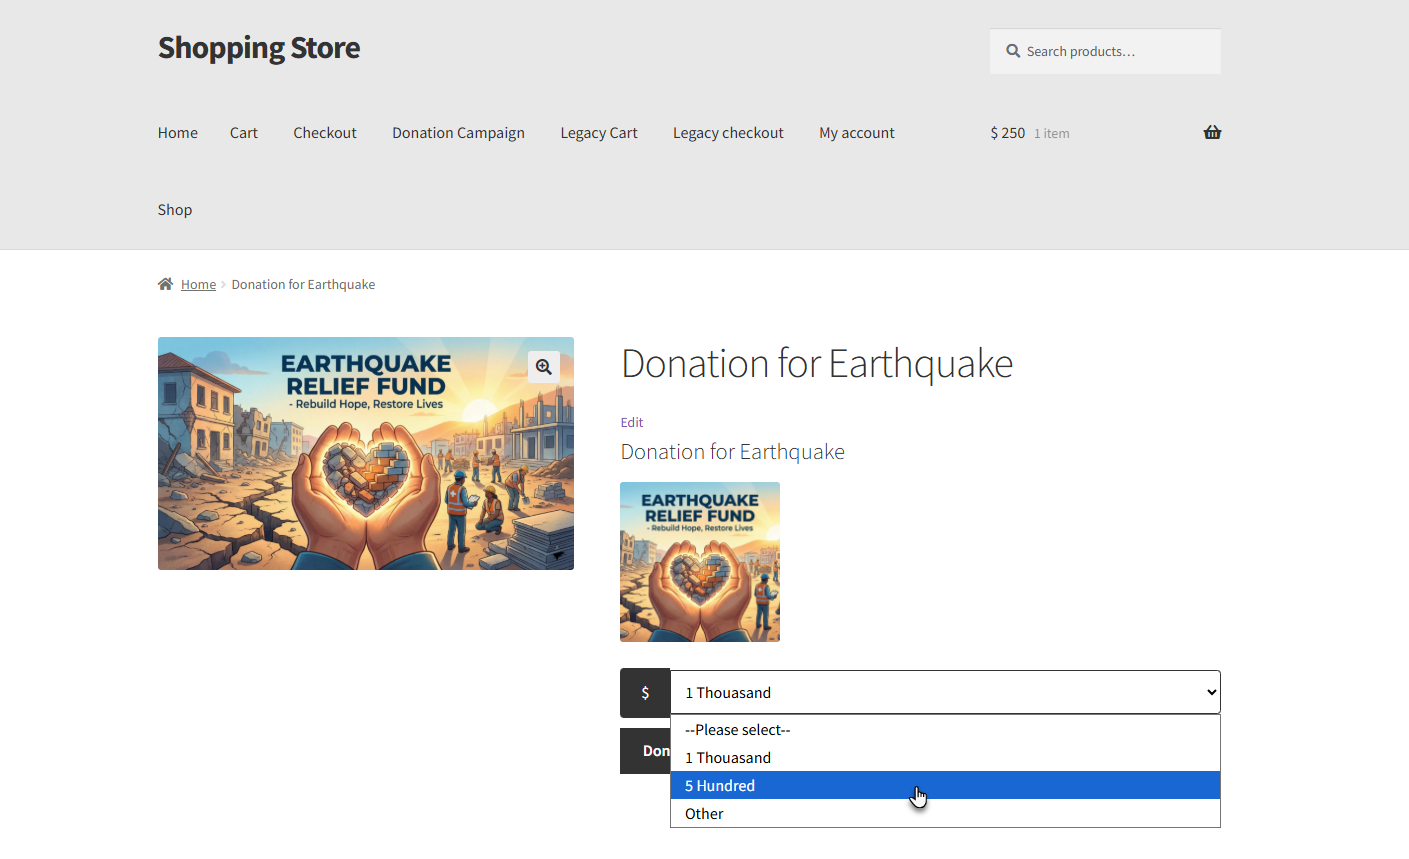
The admin can click on the Other option to enter a custom amount for the campaign.
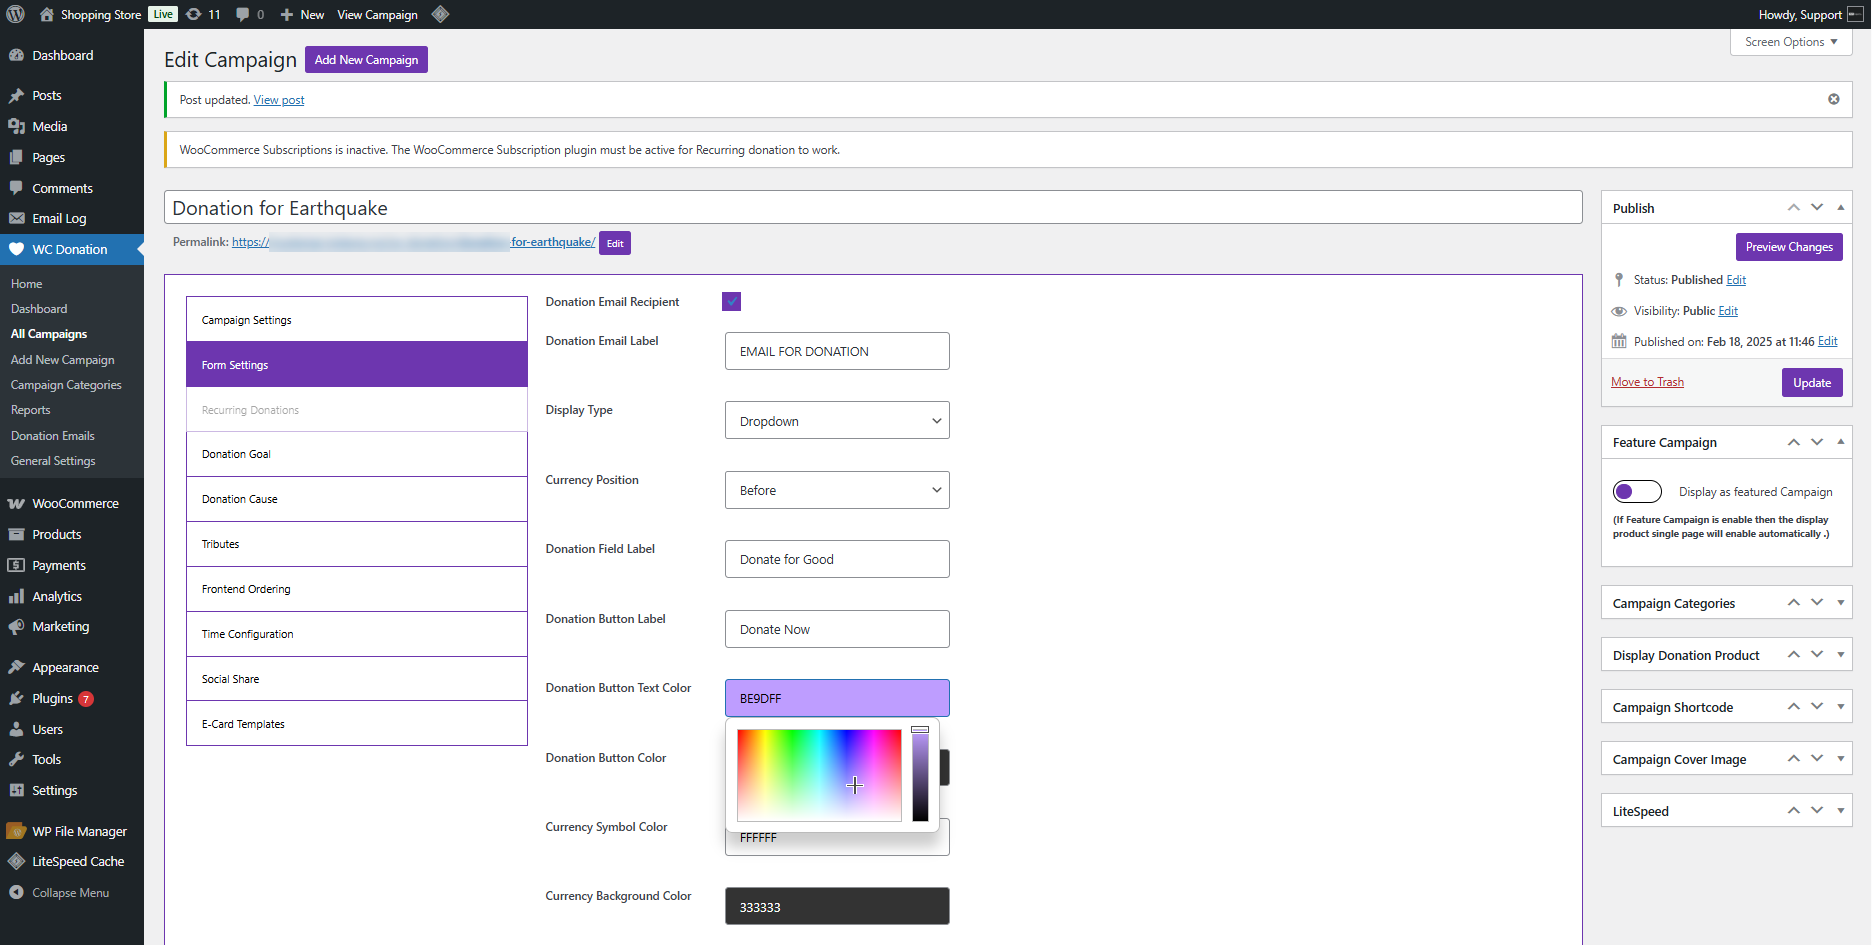
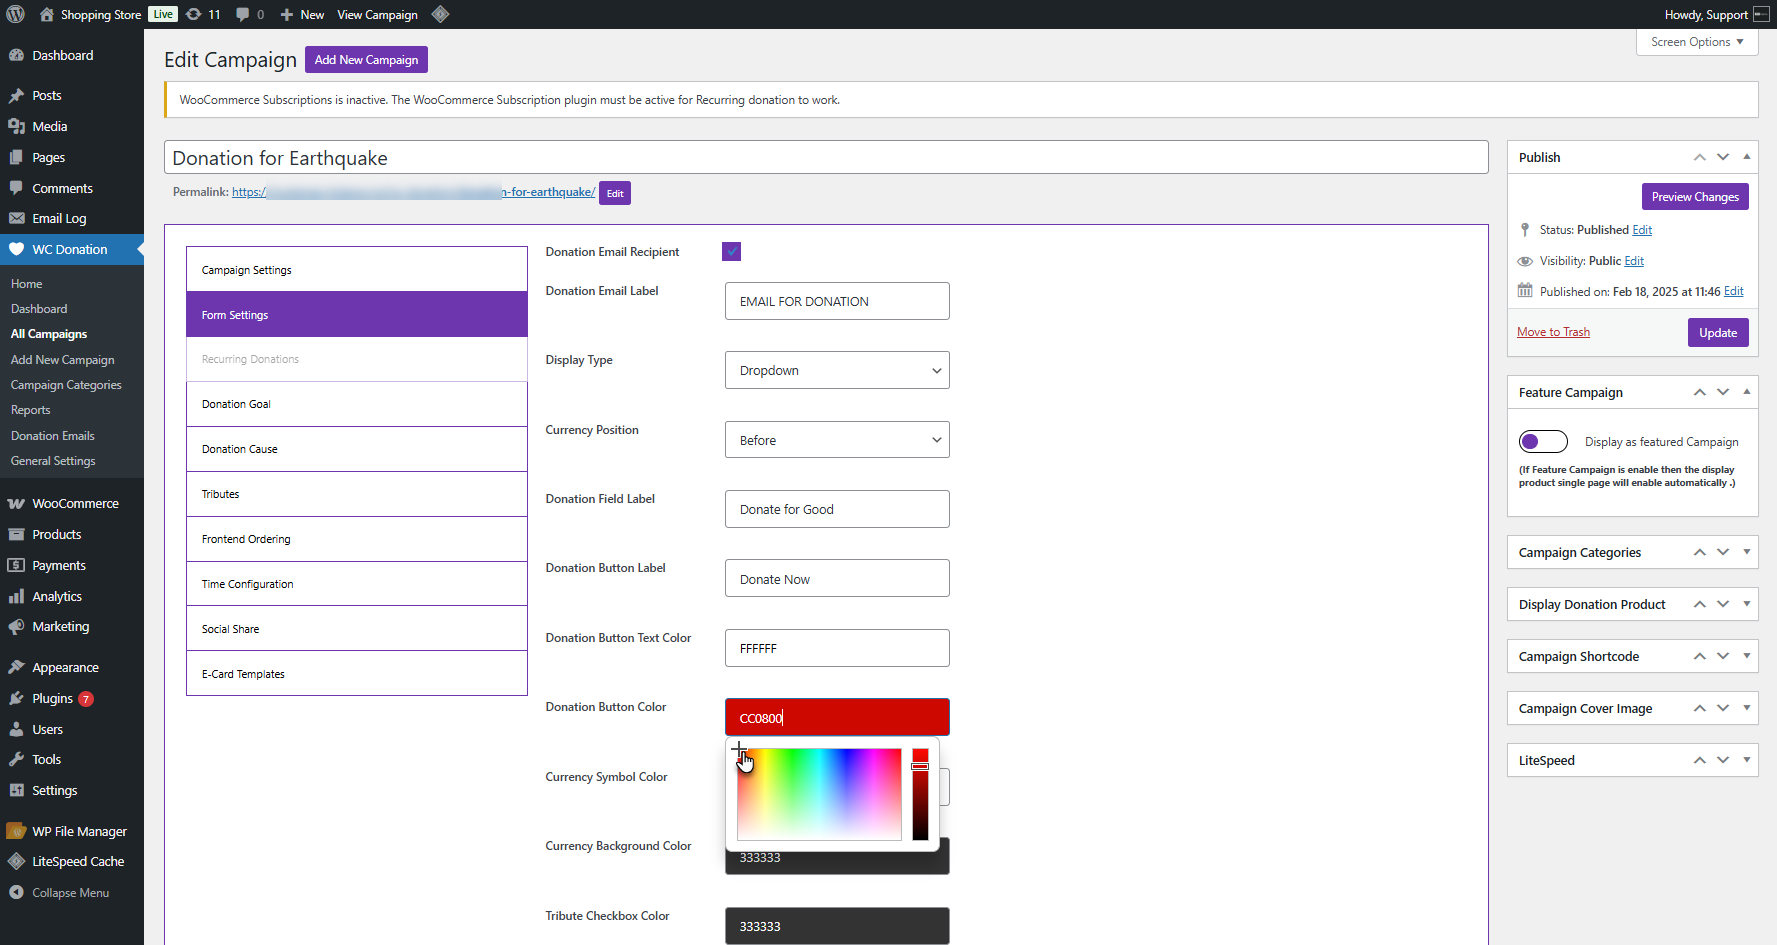
Form Settings
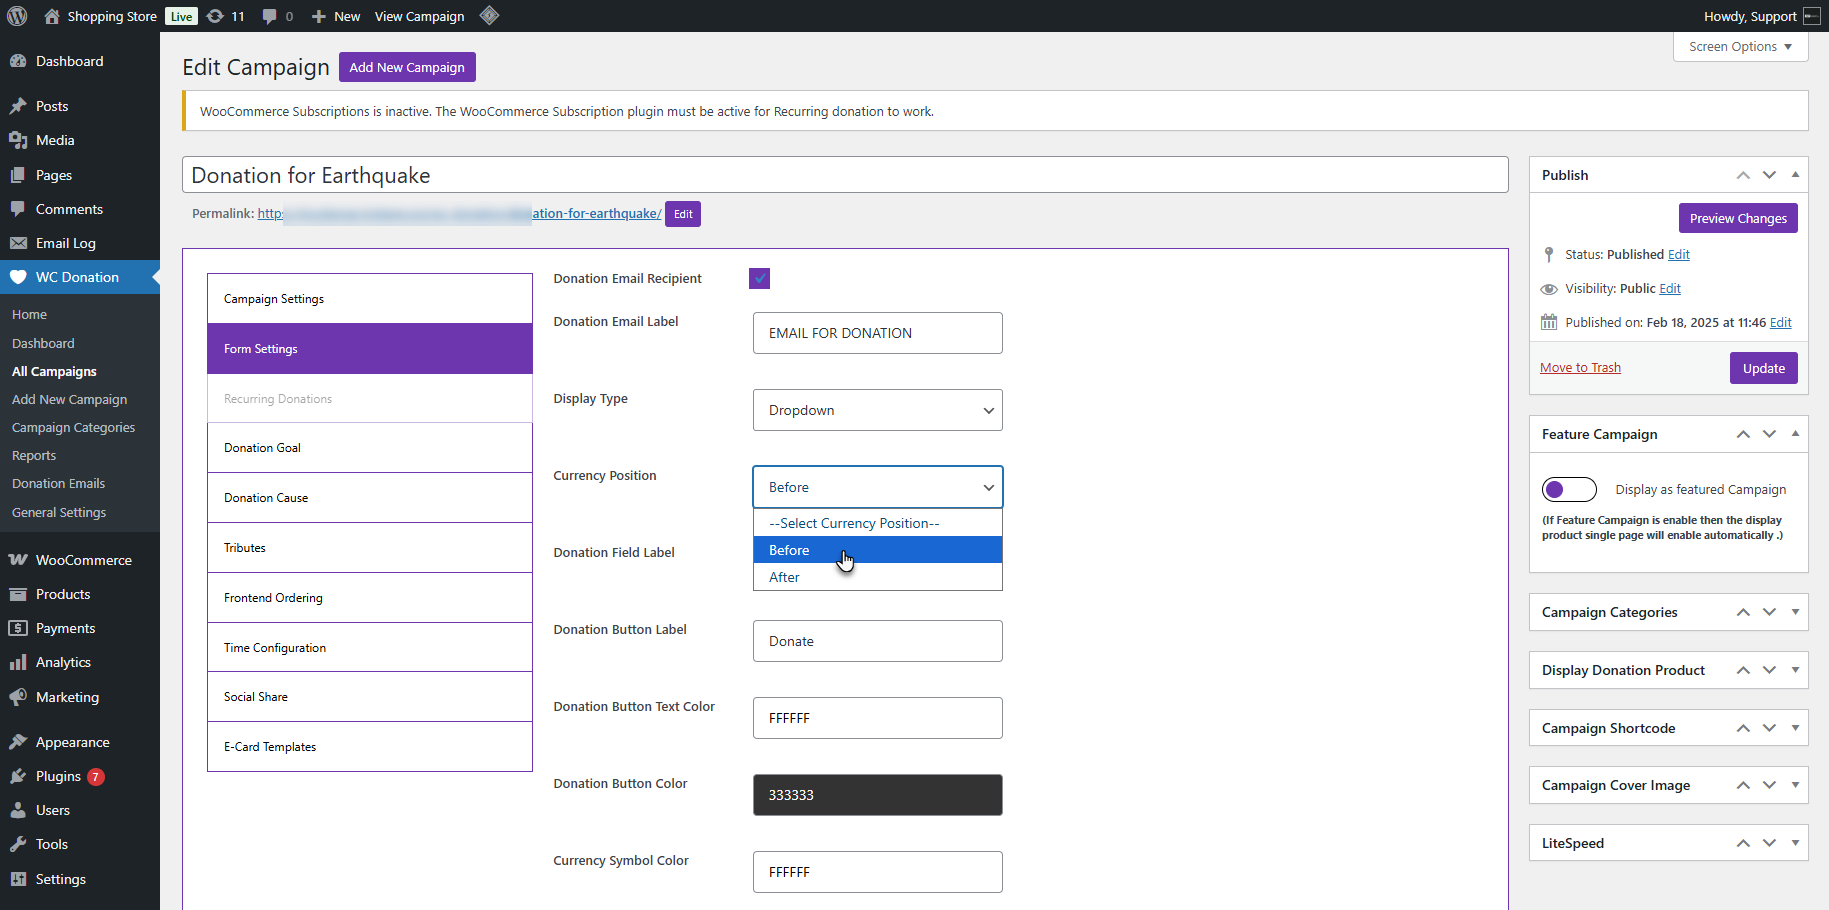
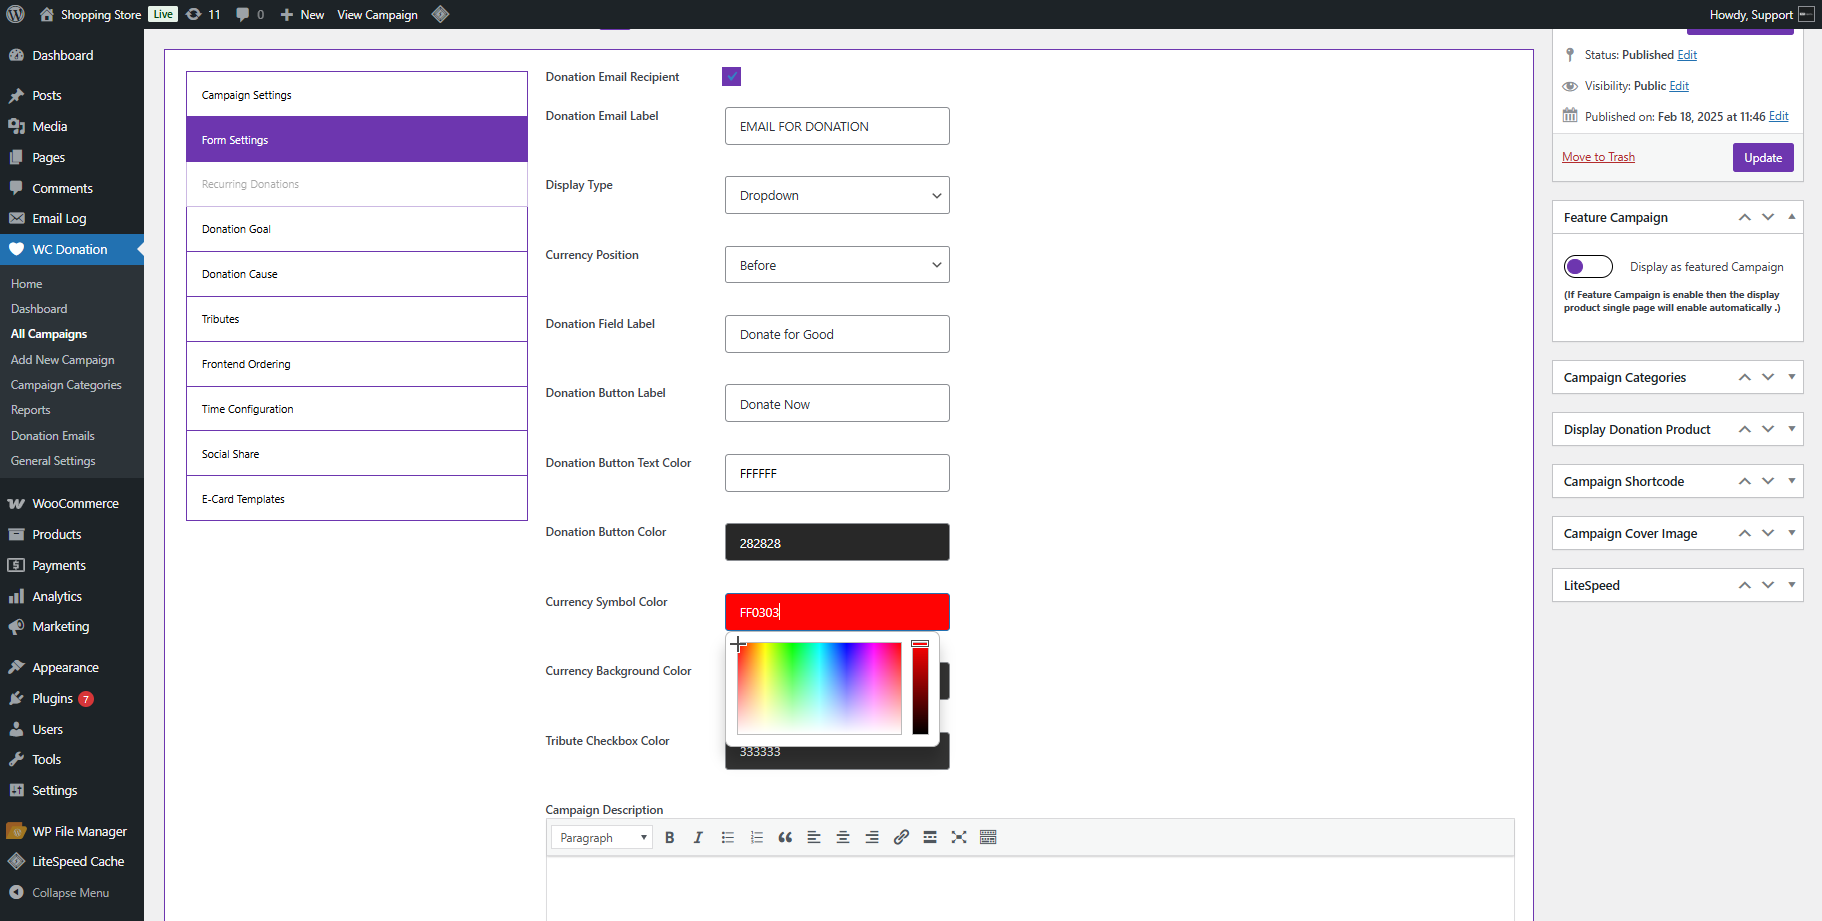
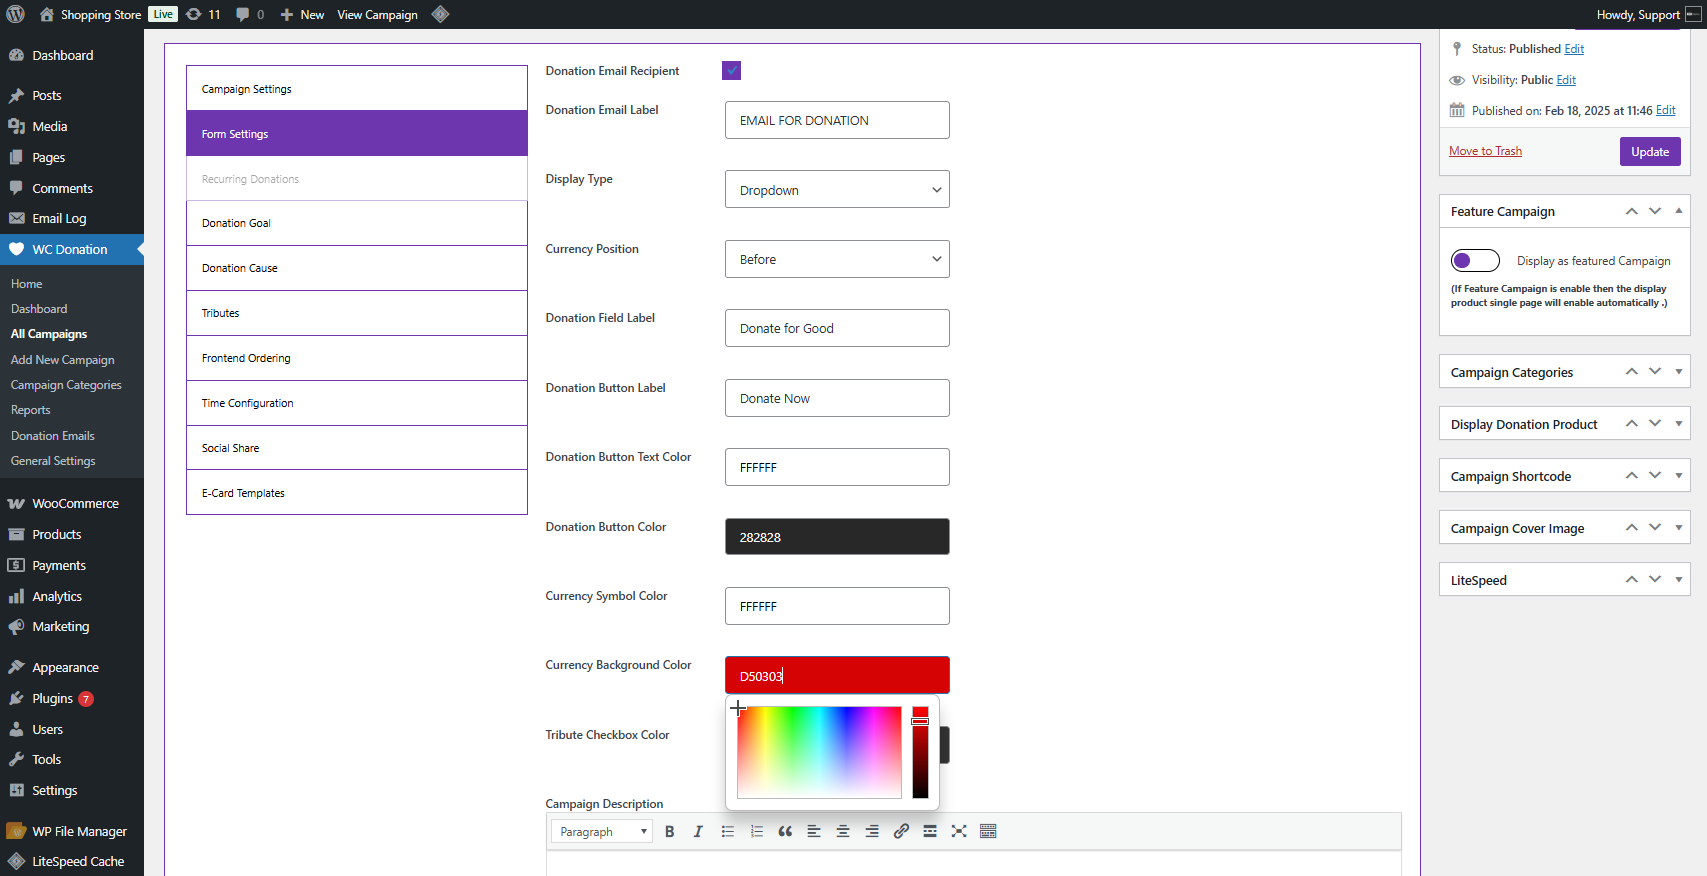
↑ Back to top- Go to the form settings. We have seven options in the form settings.
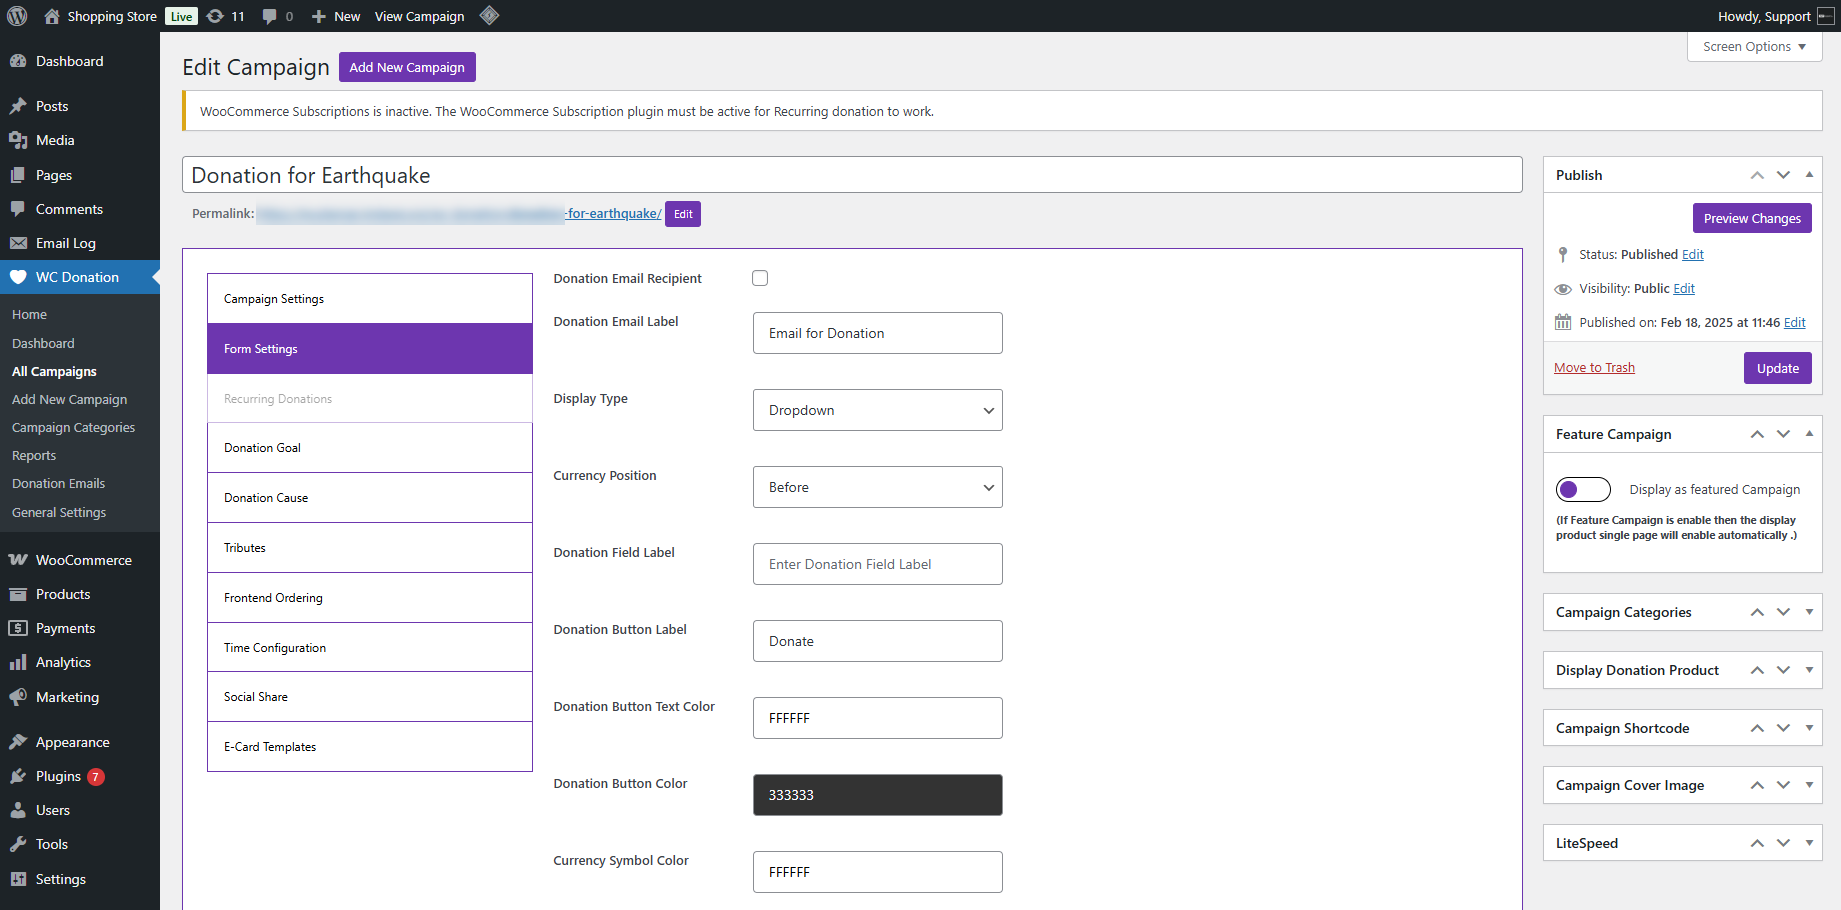
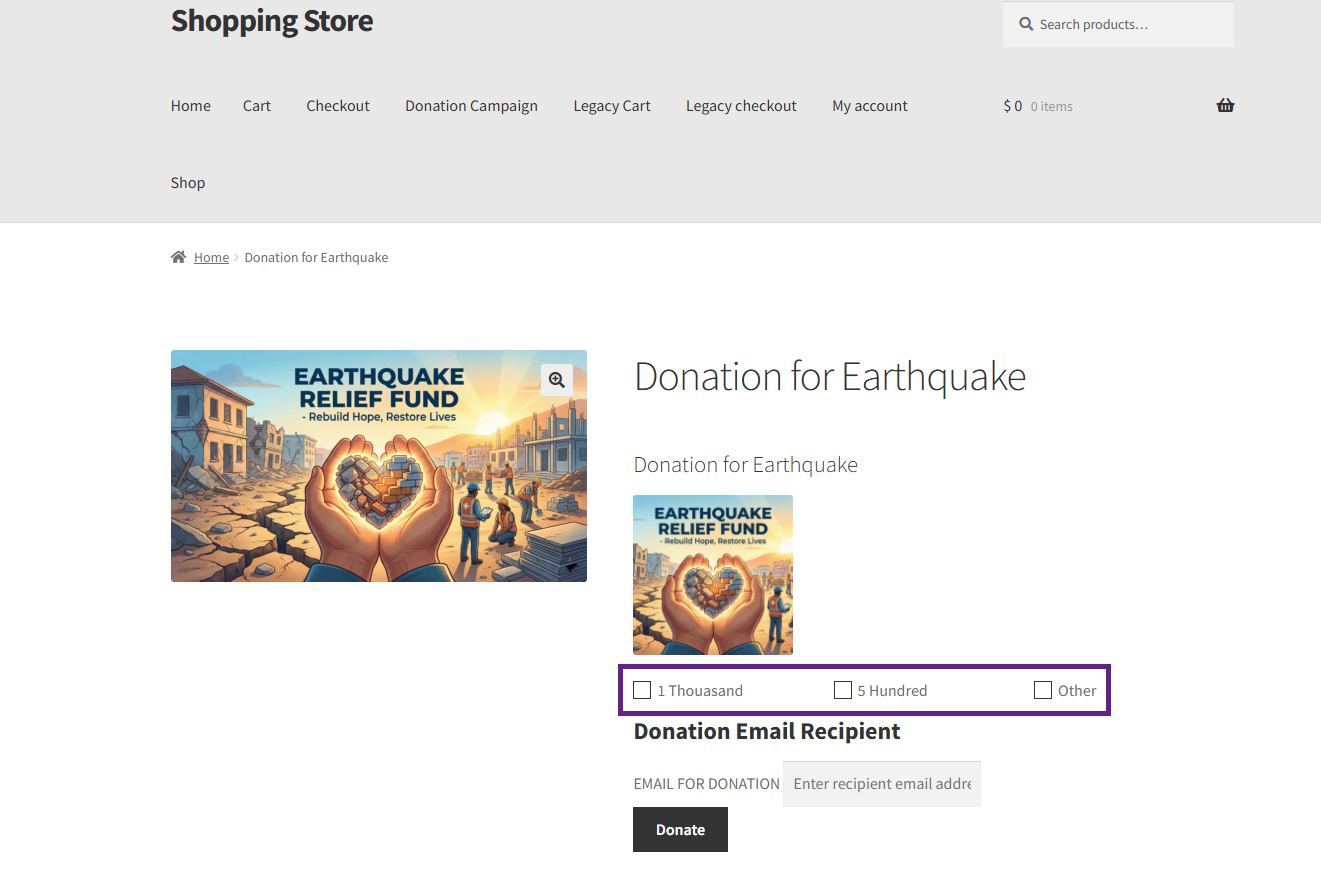
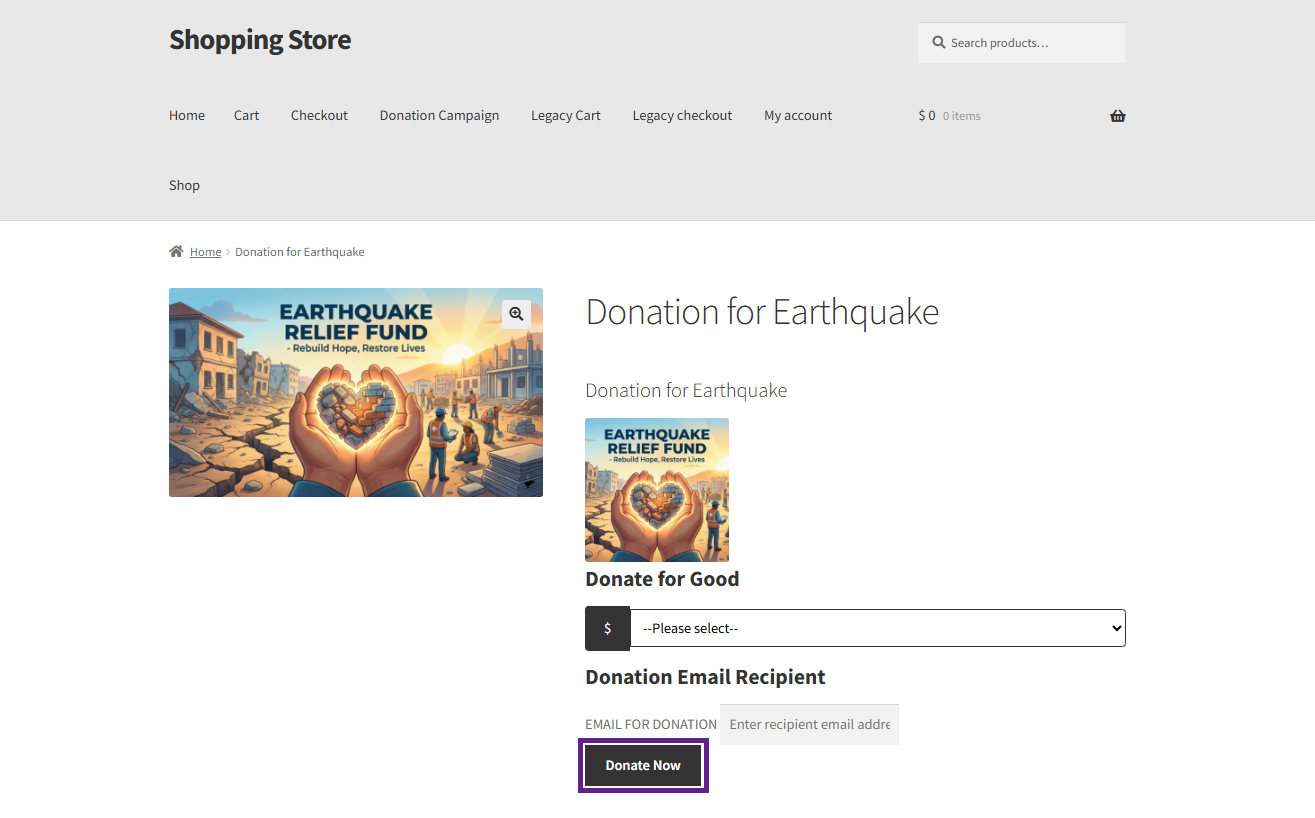
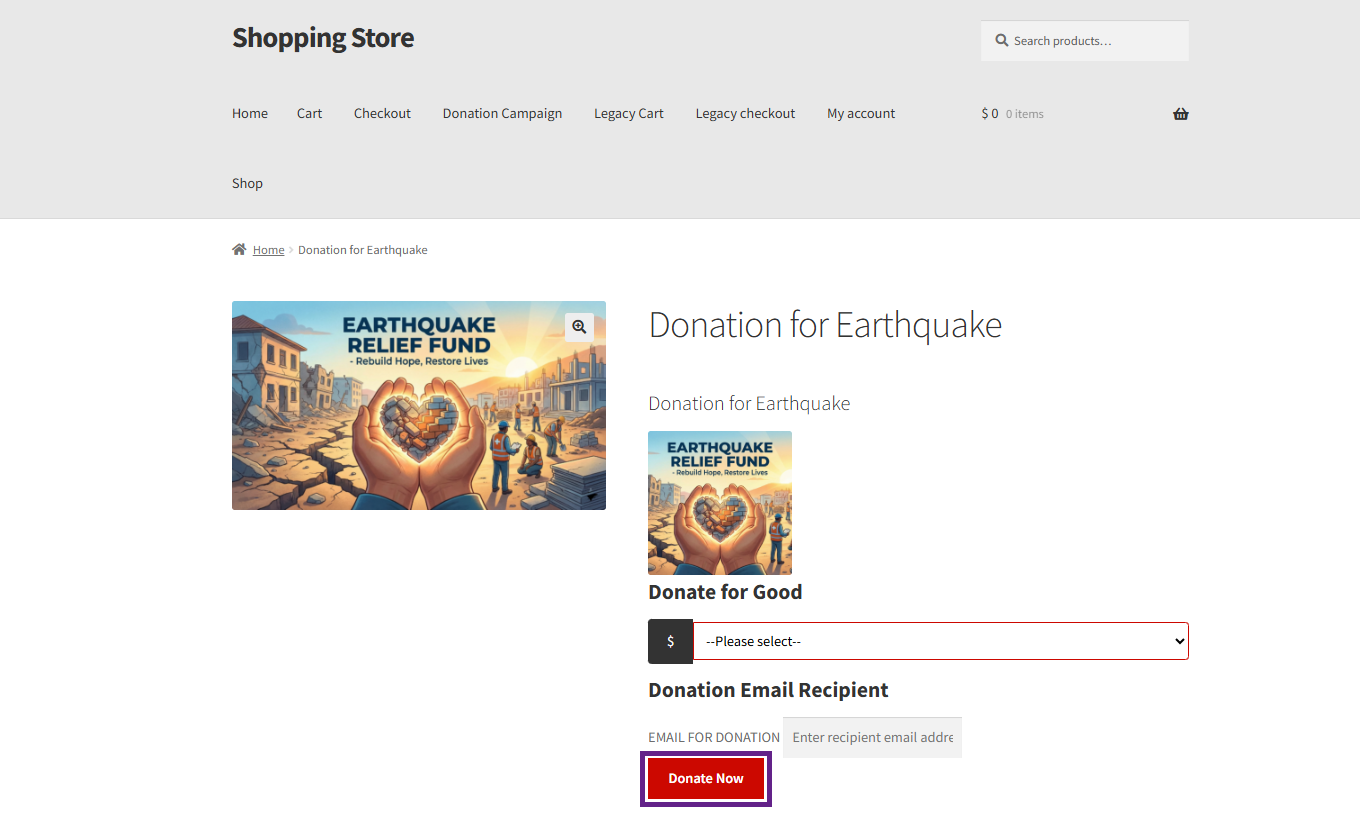
- The Donation Email Recipient option enables users to donate on behalf of another person by sending donation details to the recipient’s email address. Enabling this feature adds an email input field to the campaign page’s front end.

- The admin can add a label to the Donation email via the Donation Email label option.

Front End
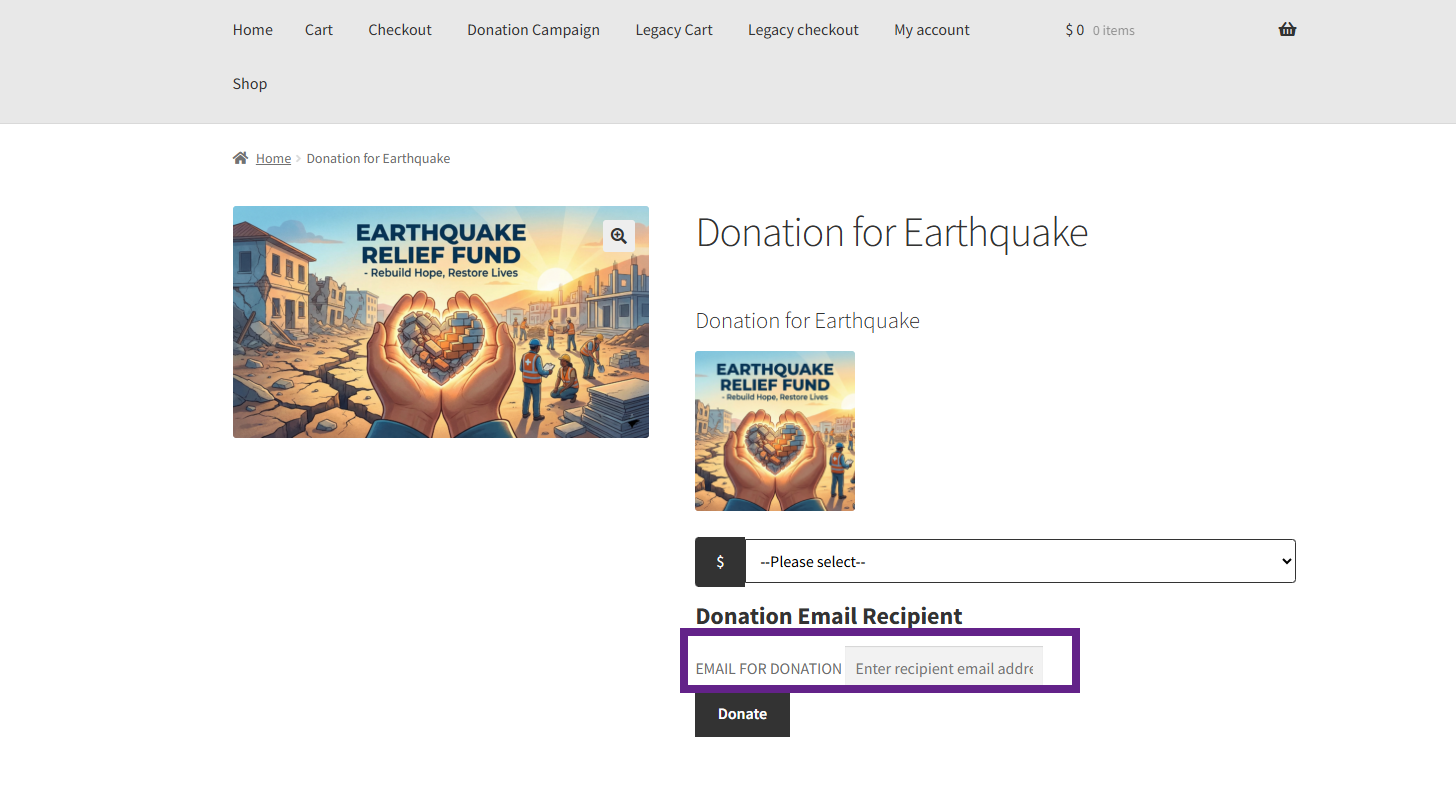
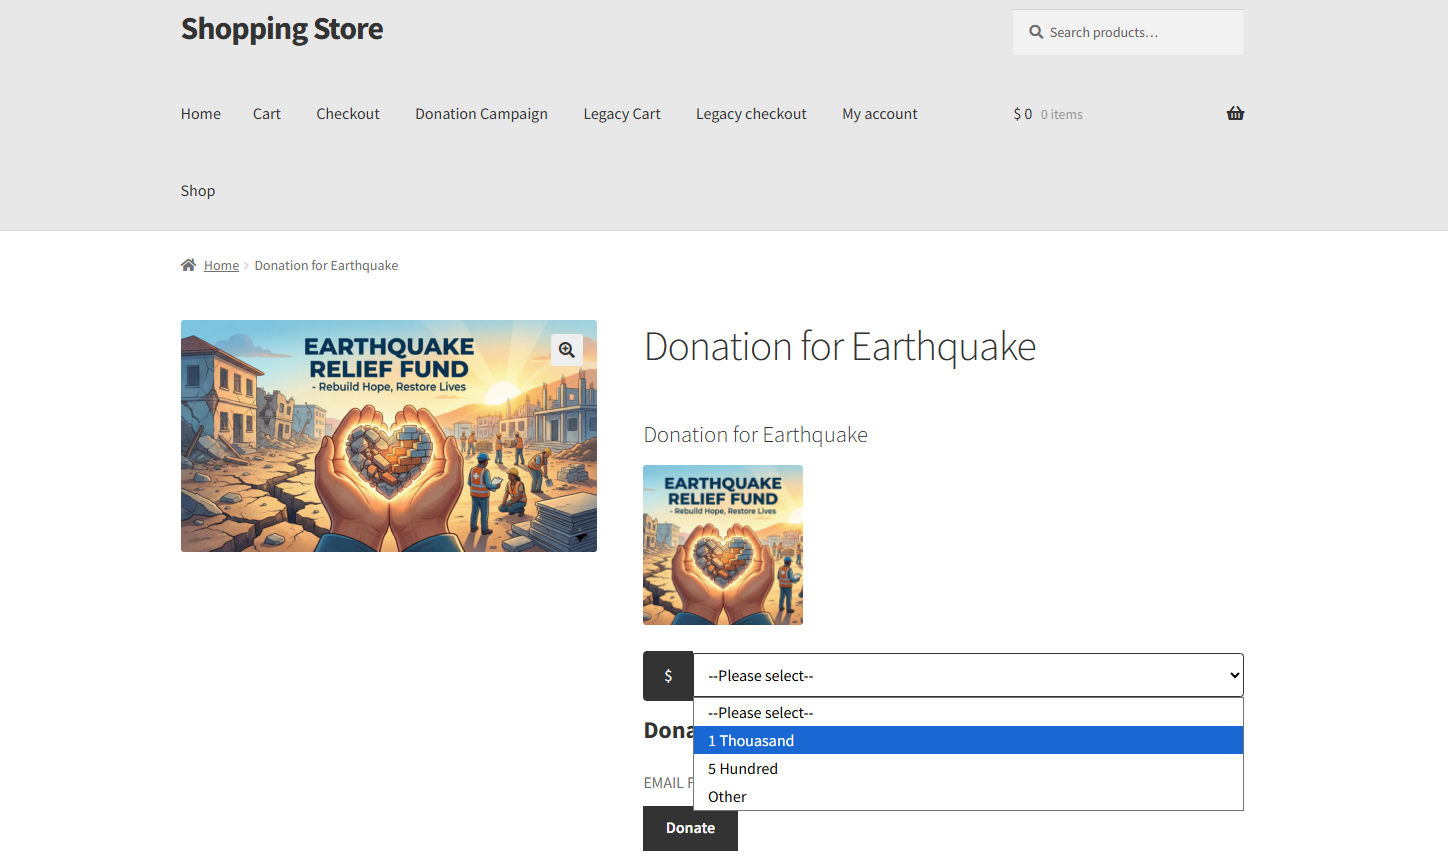
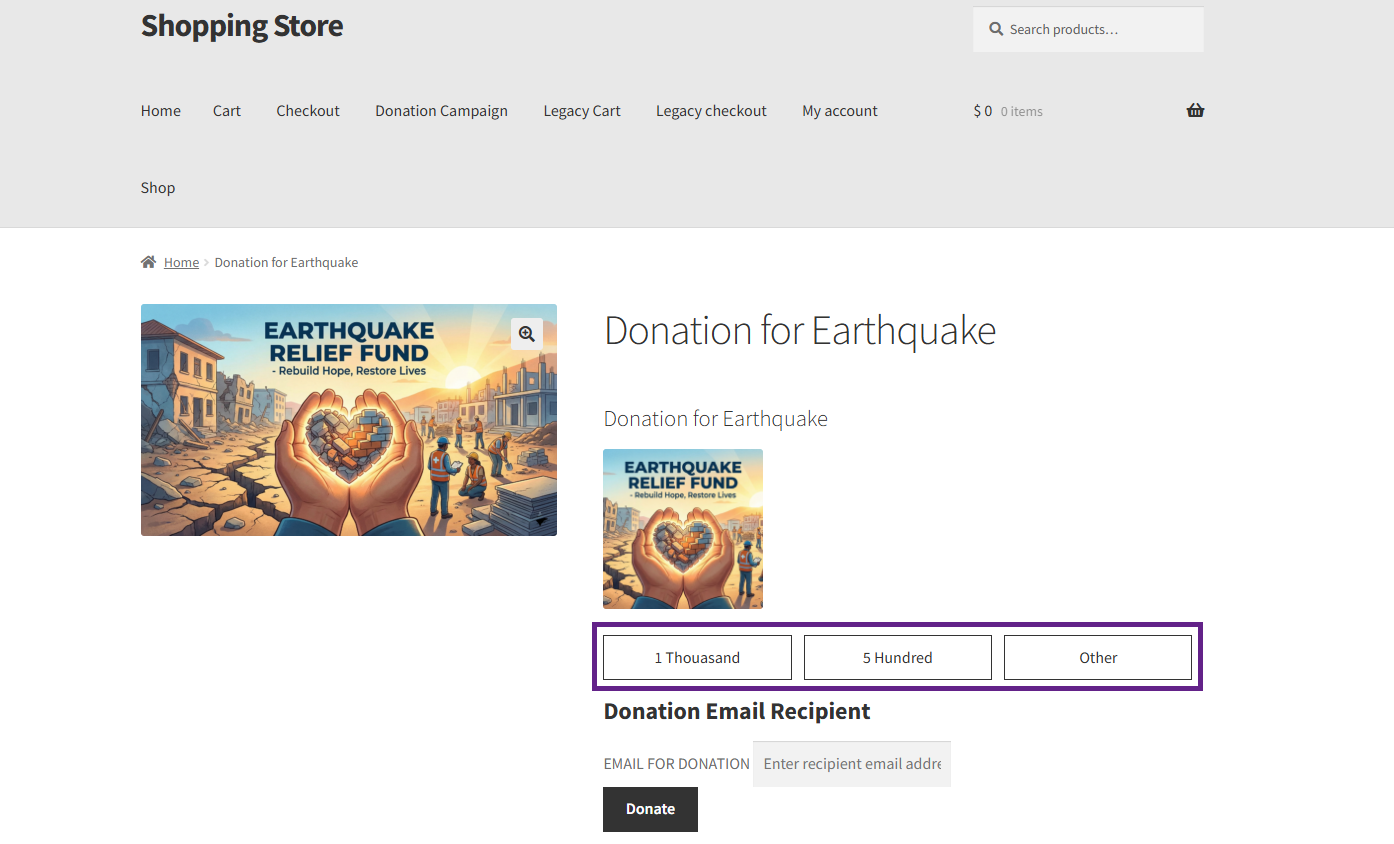
- The display type option lets the admin choose how the donation amount is displayed on the front end. There are three options available in the Display Type dropdown menu.
- Dropdown
- Radio
- Label
Front End
- Dropdown
- Radio
- Label
- The Currency Position option enables the admin to select the currency position. There are two options available in the Currency position.
- Before
- After
Front End
- Before
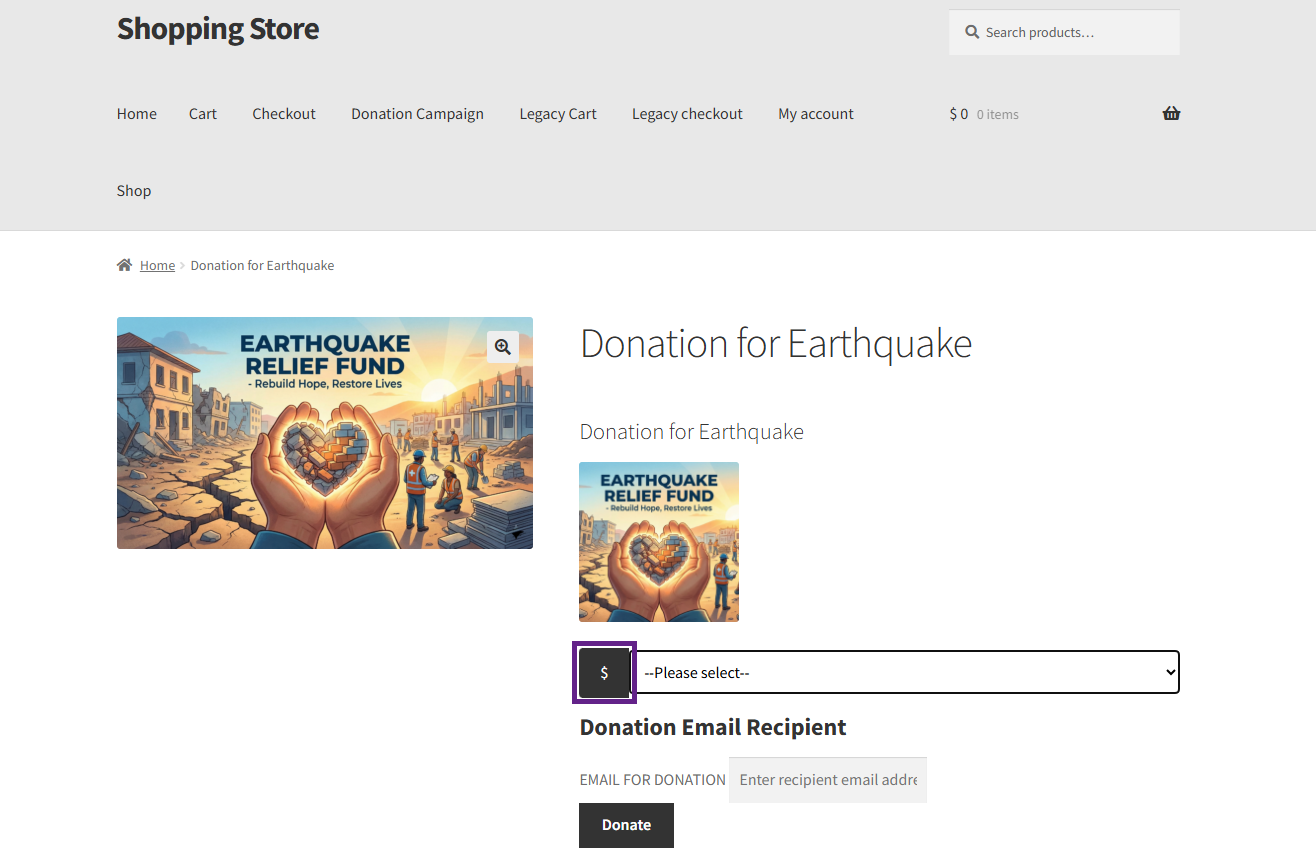
- After
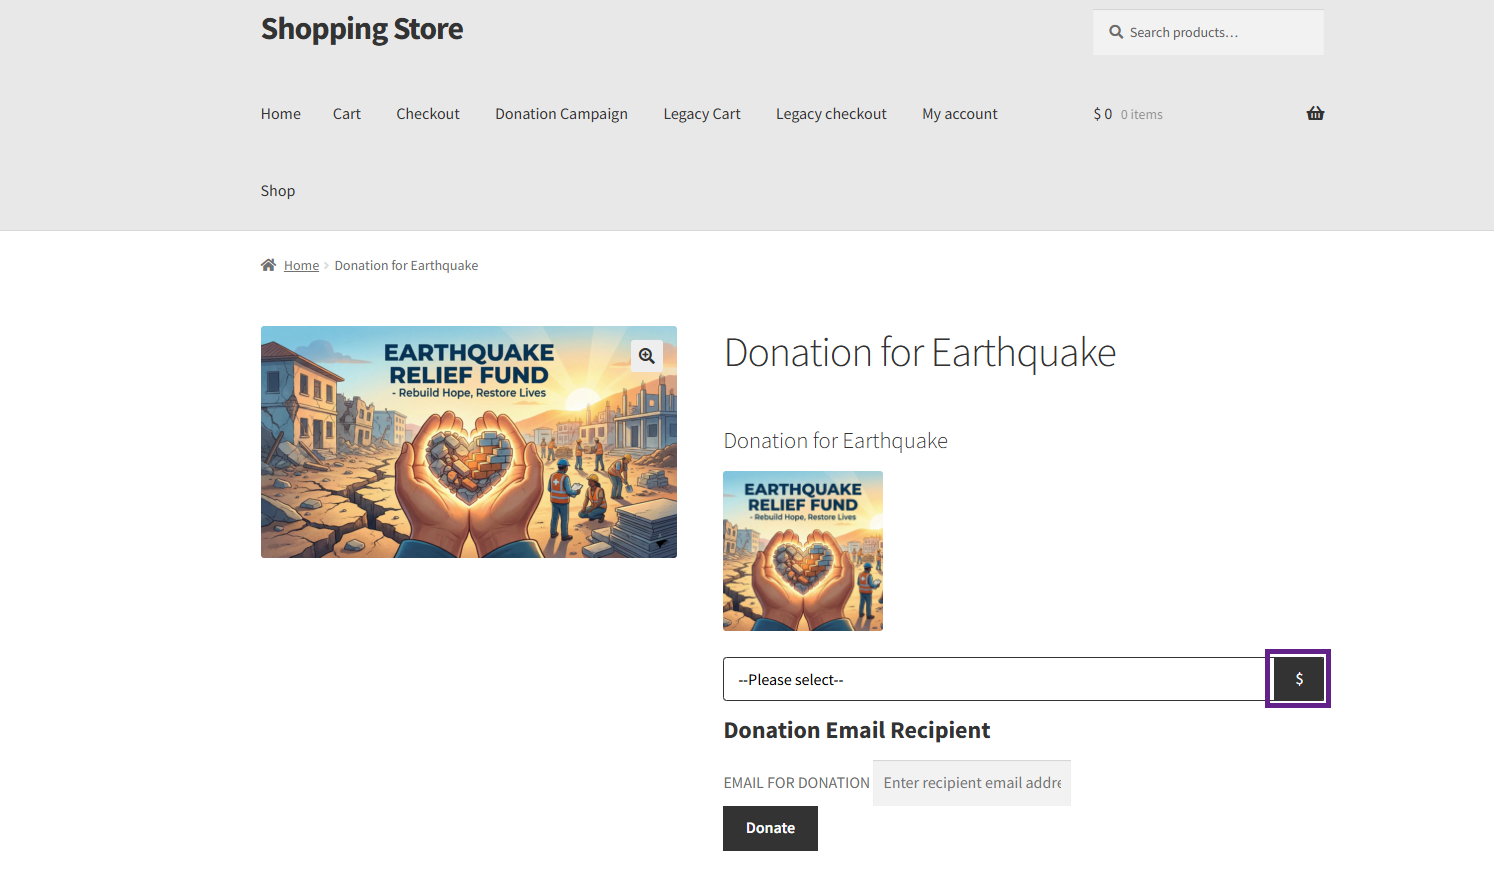
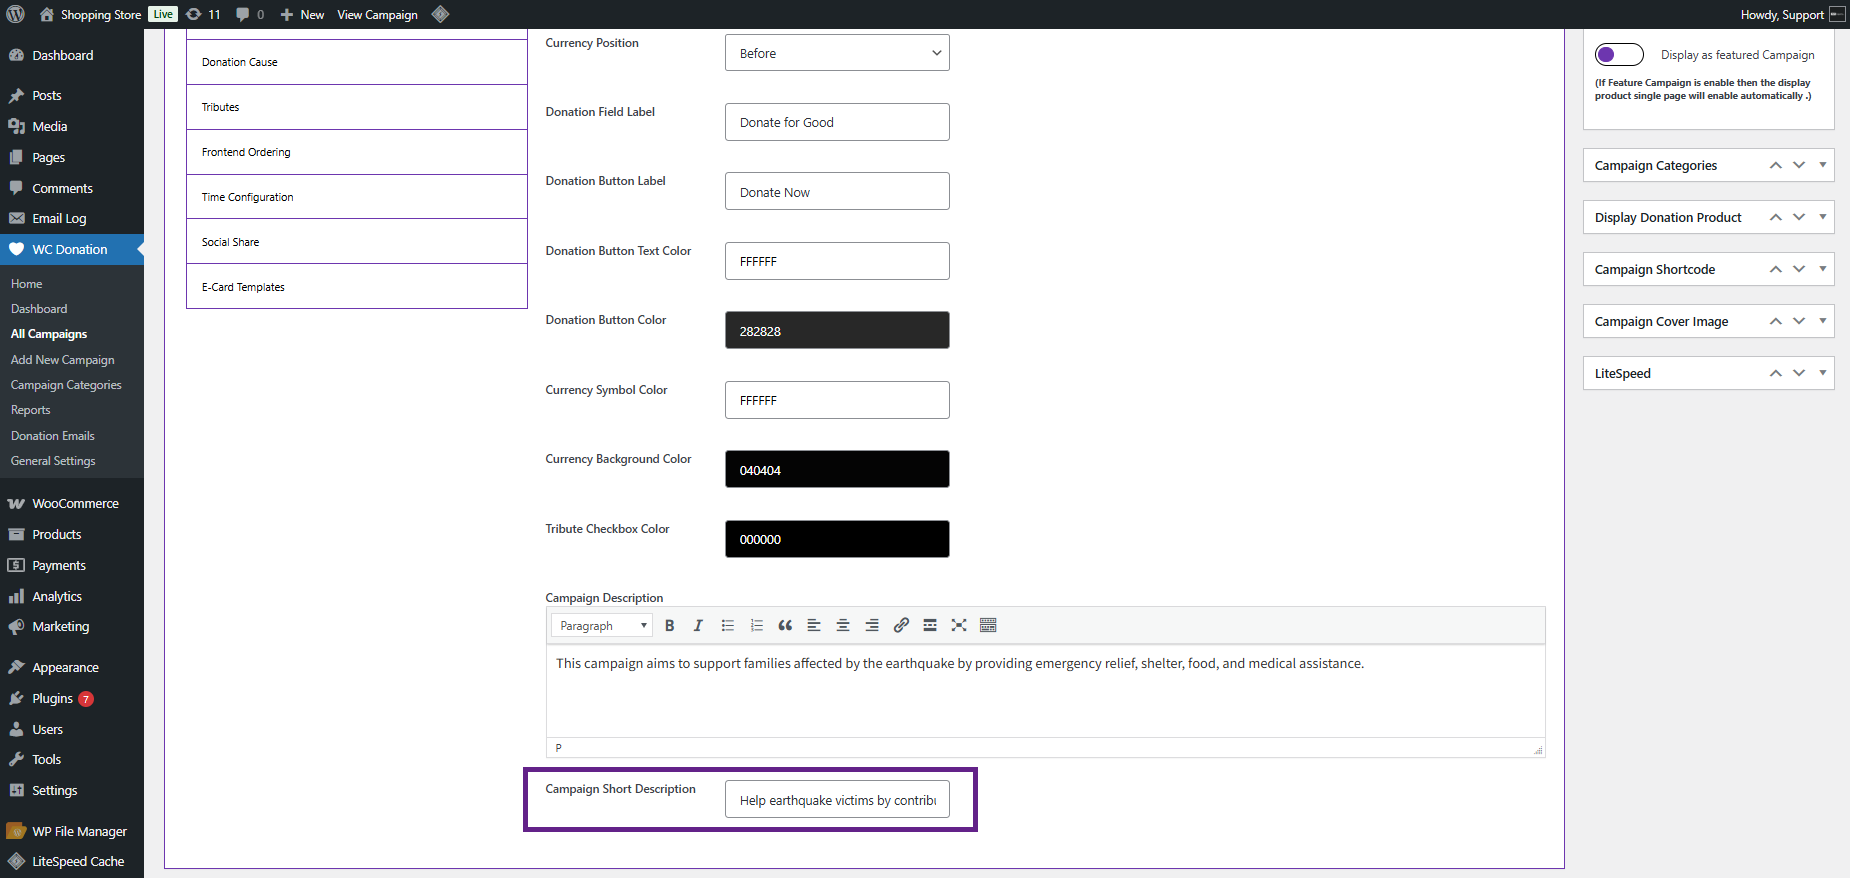
- In the Donation Field Label option, enter the text appearing as a Donation Field on the campaign.
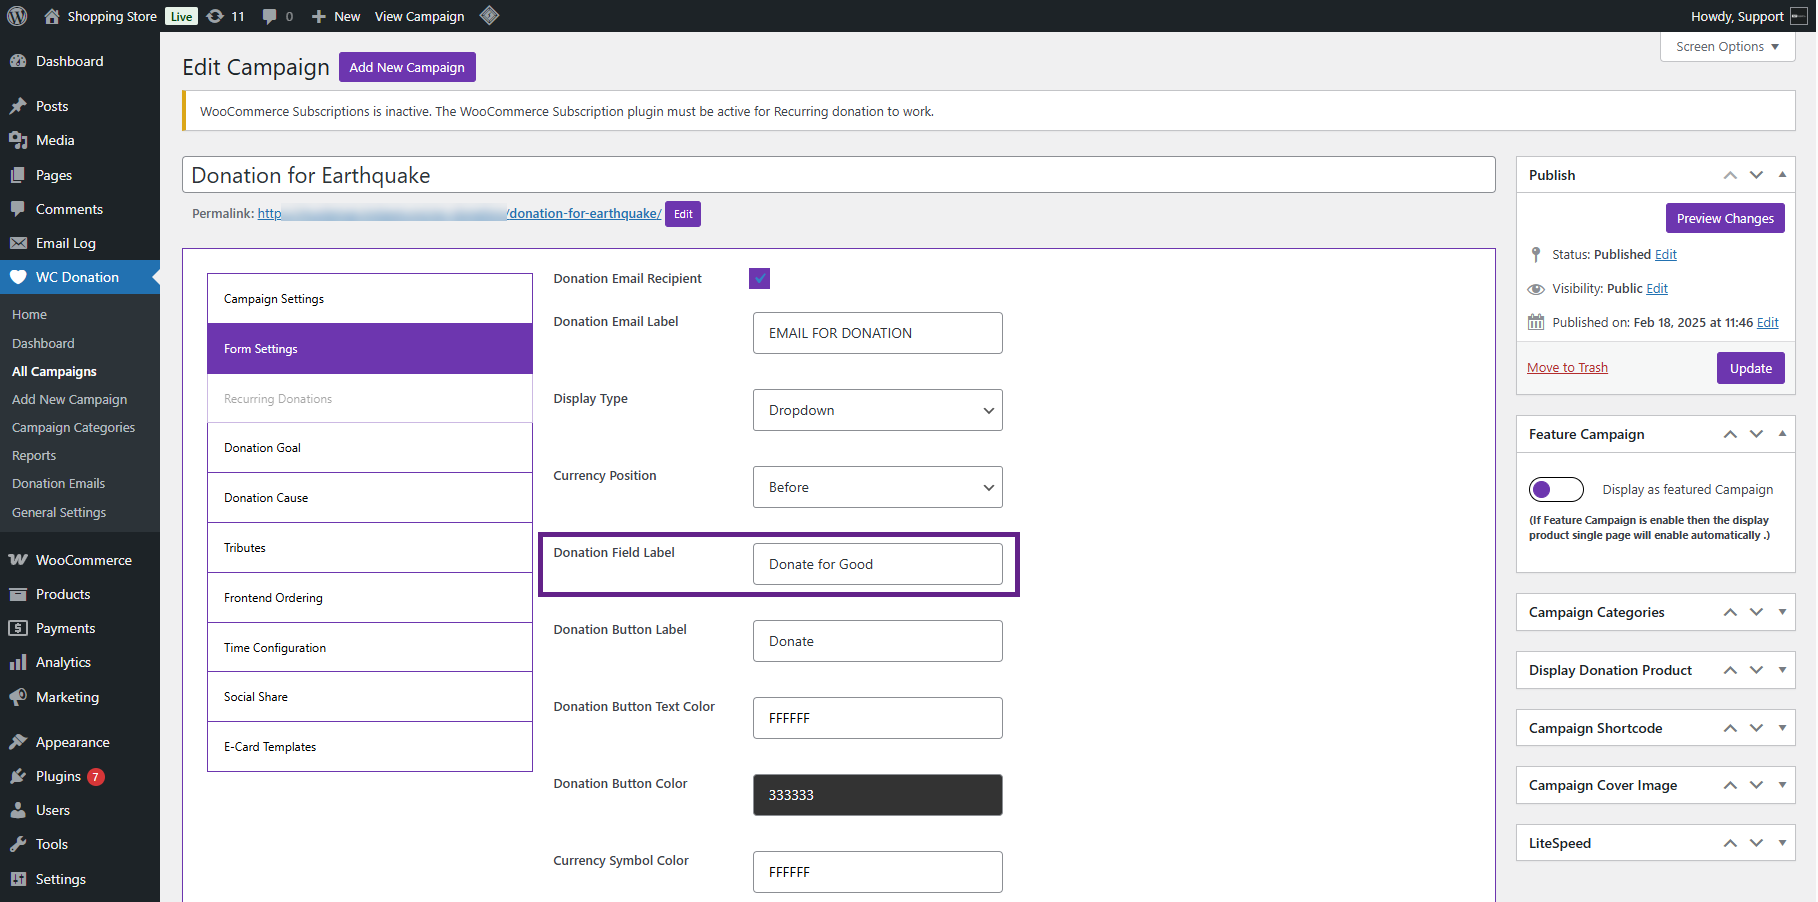
Front End
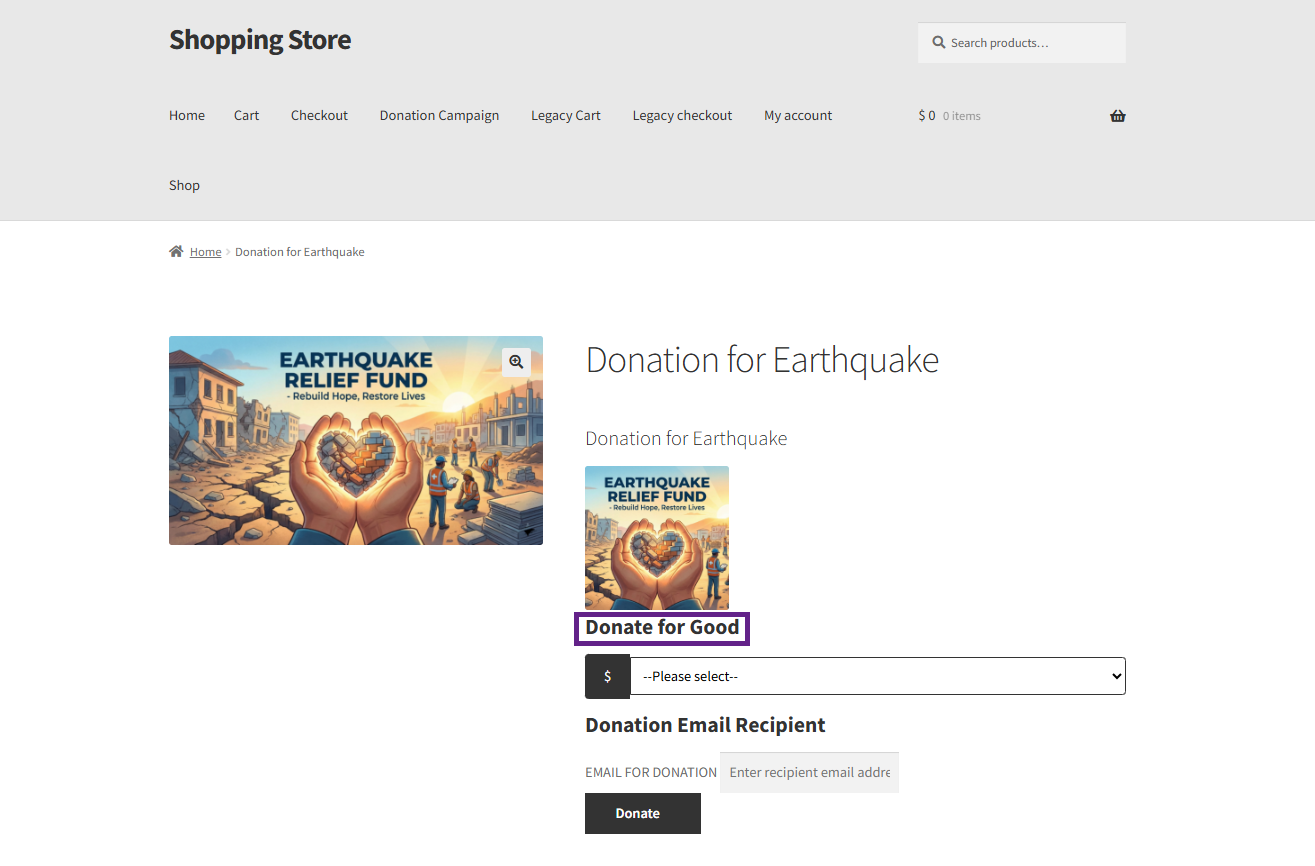
- In the Donation Button Label option, enter the text that will appear in the Donation Button on the campaign.
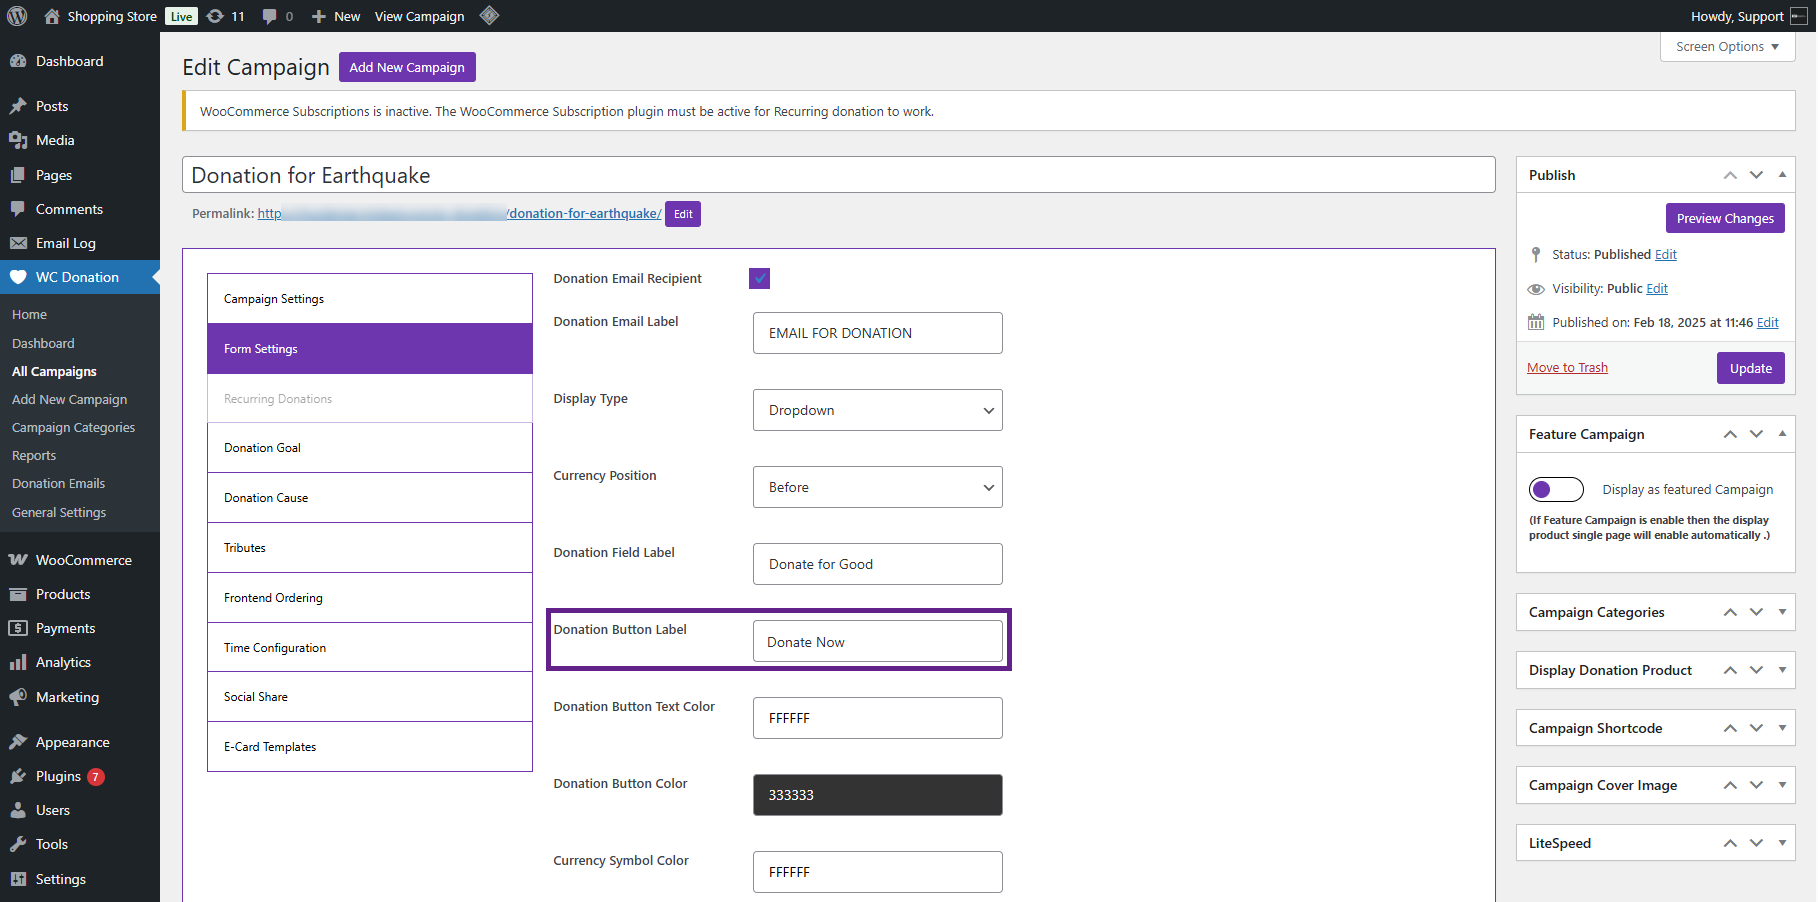
Front End
- In the Donation Button Text Color option, set the text color of the Donation Button on the campaign.
Front End
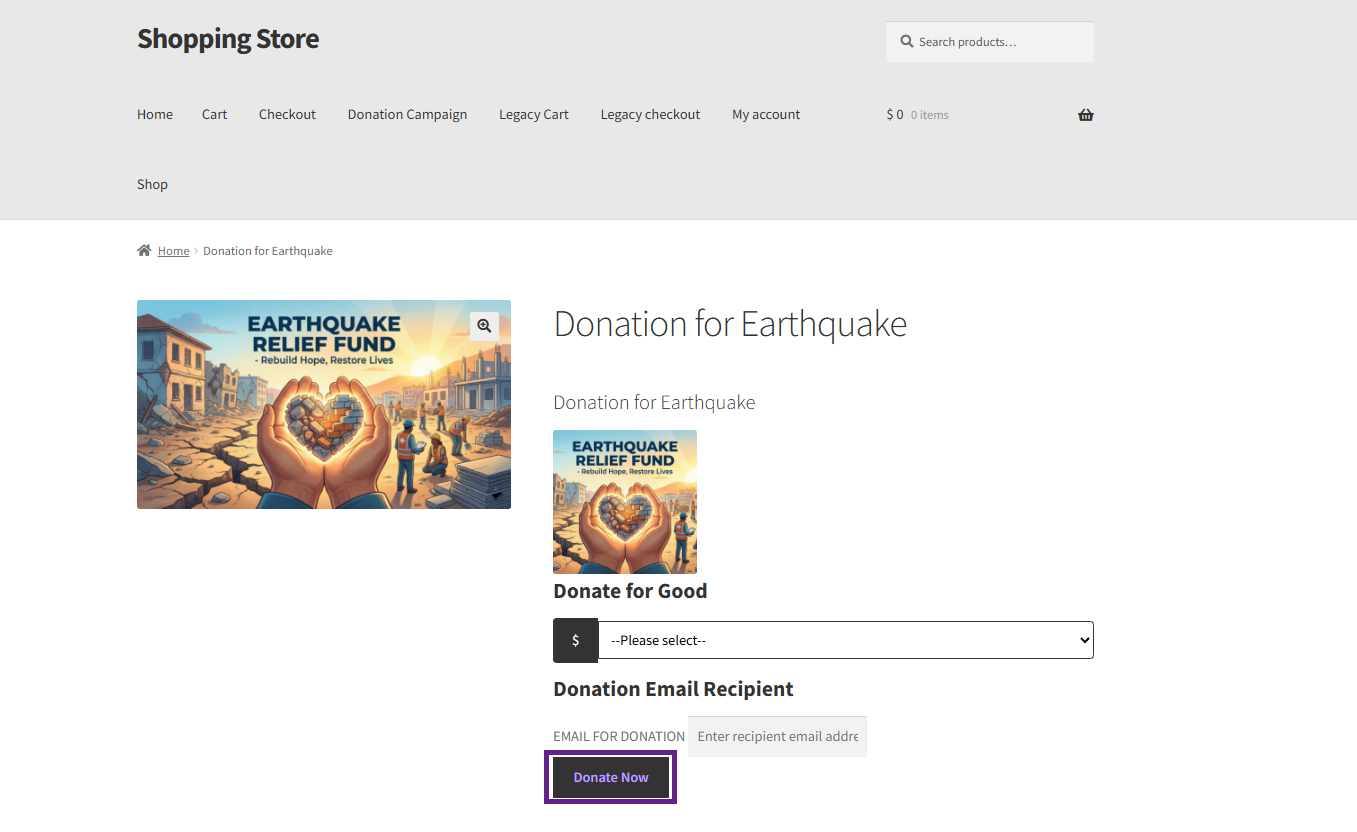
- In the Donation Button Color option, set the color of the Donation Button on the campaign.
Front End
- In the Currency Symbol Color option, set the color of the Currency Symbol on the campaign.
Front End
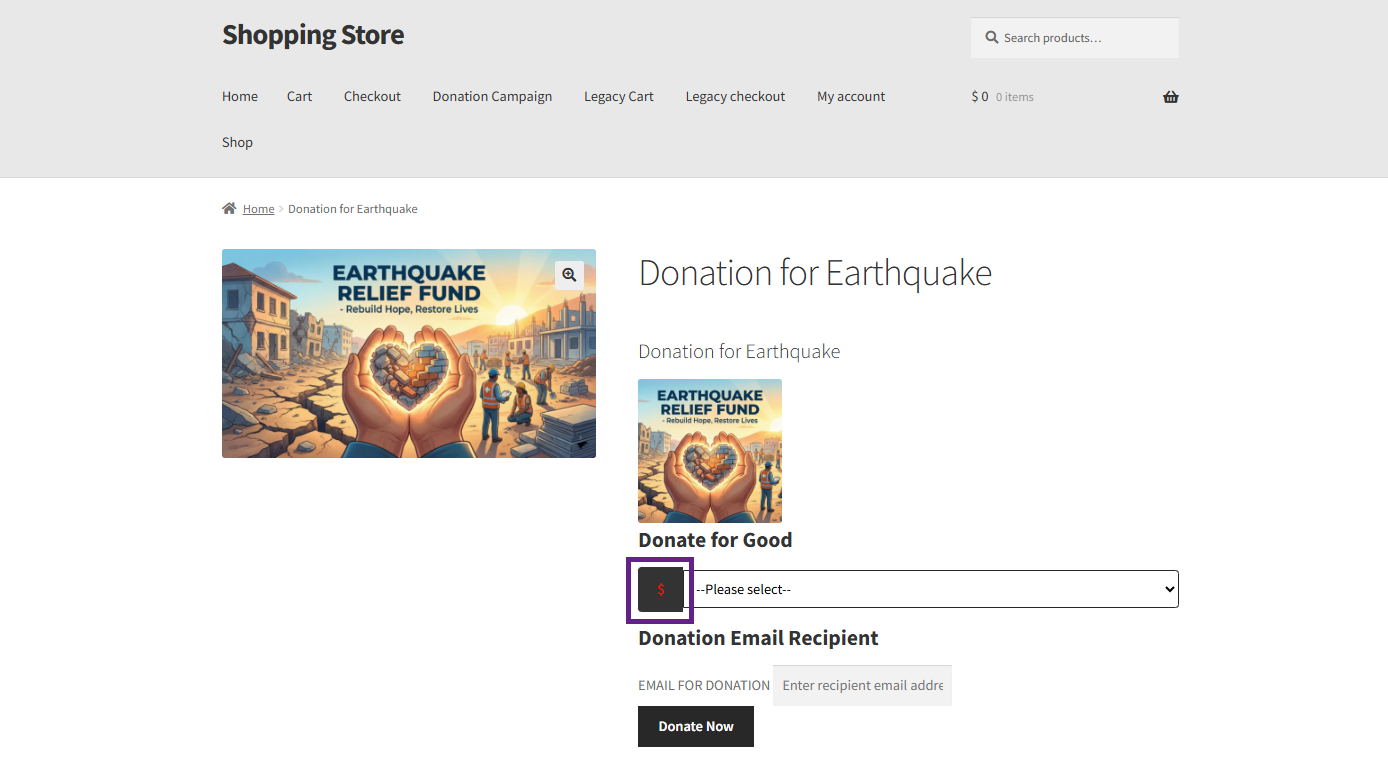
- In the Currency Background Color option, set the color of the Currency Background on the campaign.
Front End
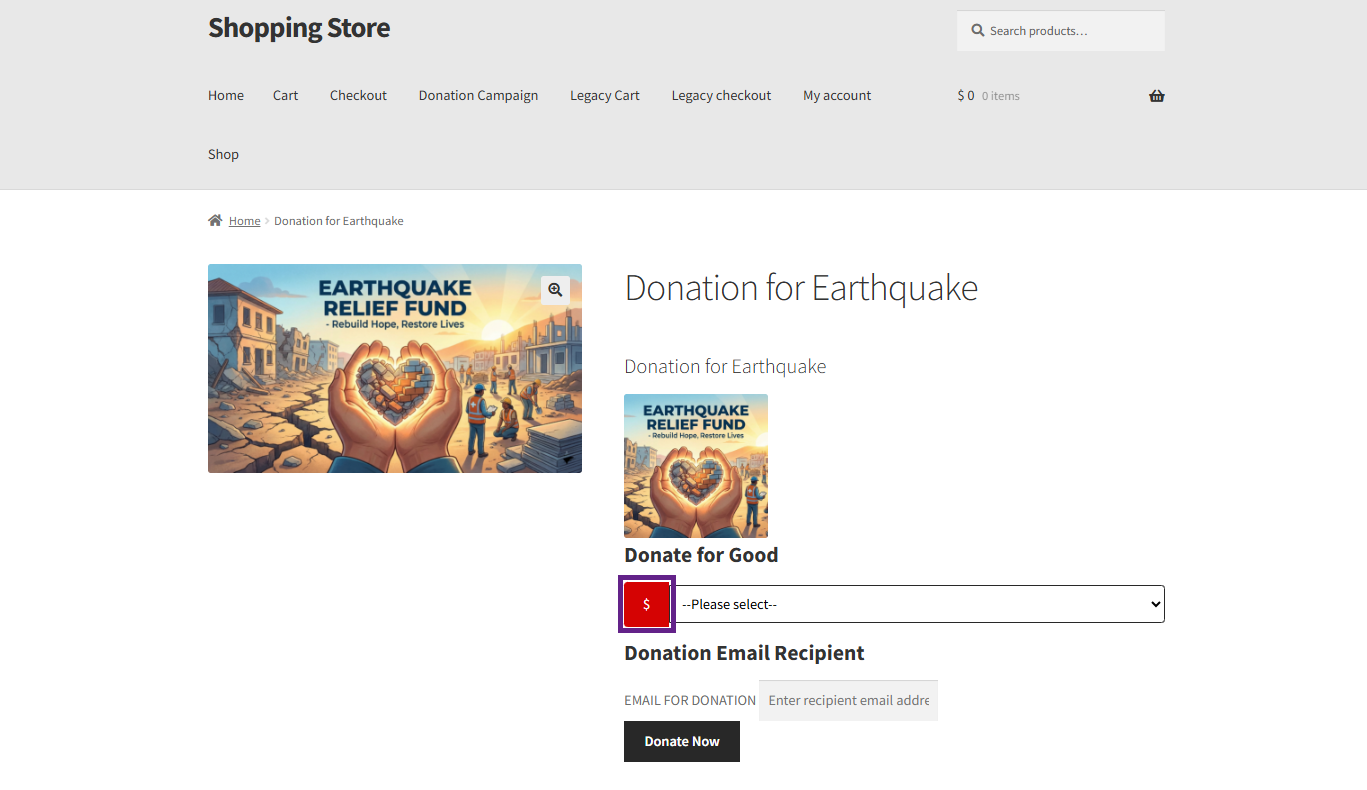
- In the Tribute Checkbox Color option, set the color of the Tribute Checkbox on the campaign.
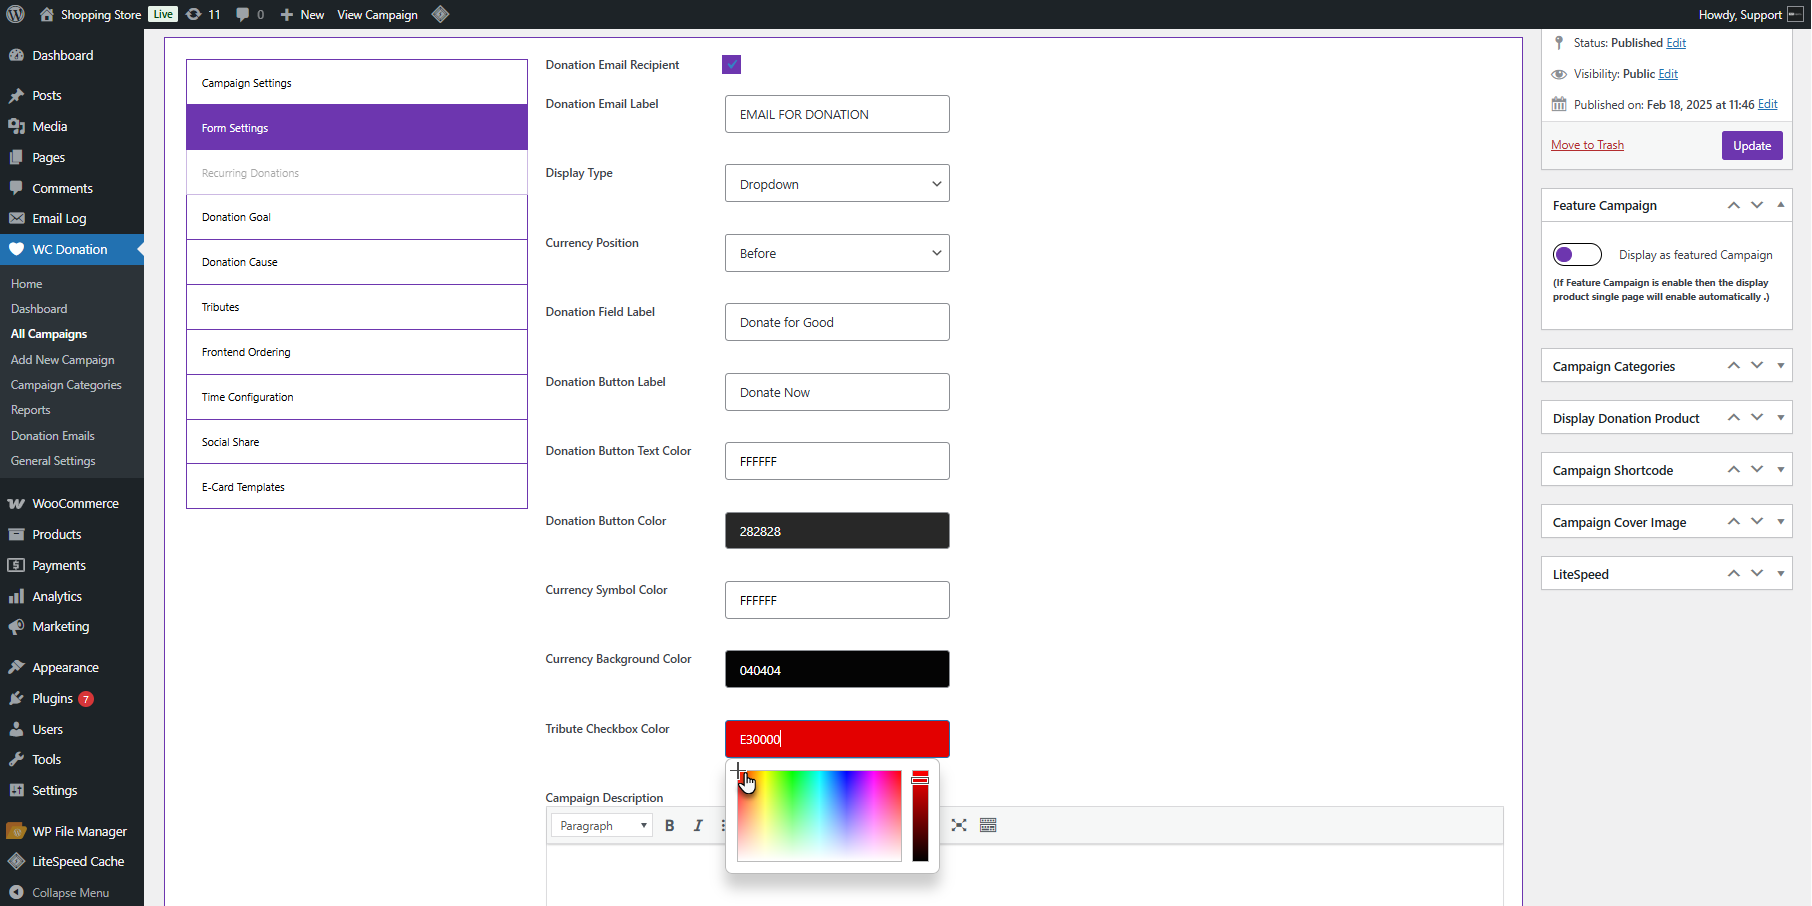
Front End
- The admin can add a comprehensive campaign description to the Campaign Description field, which will appear on the campaign page.
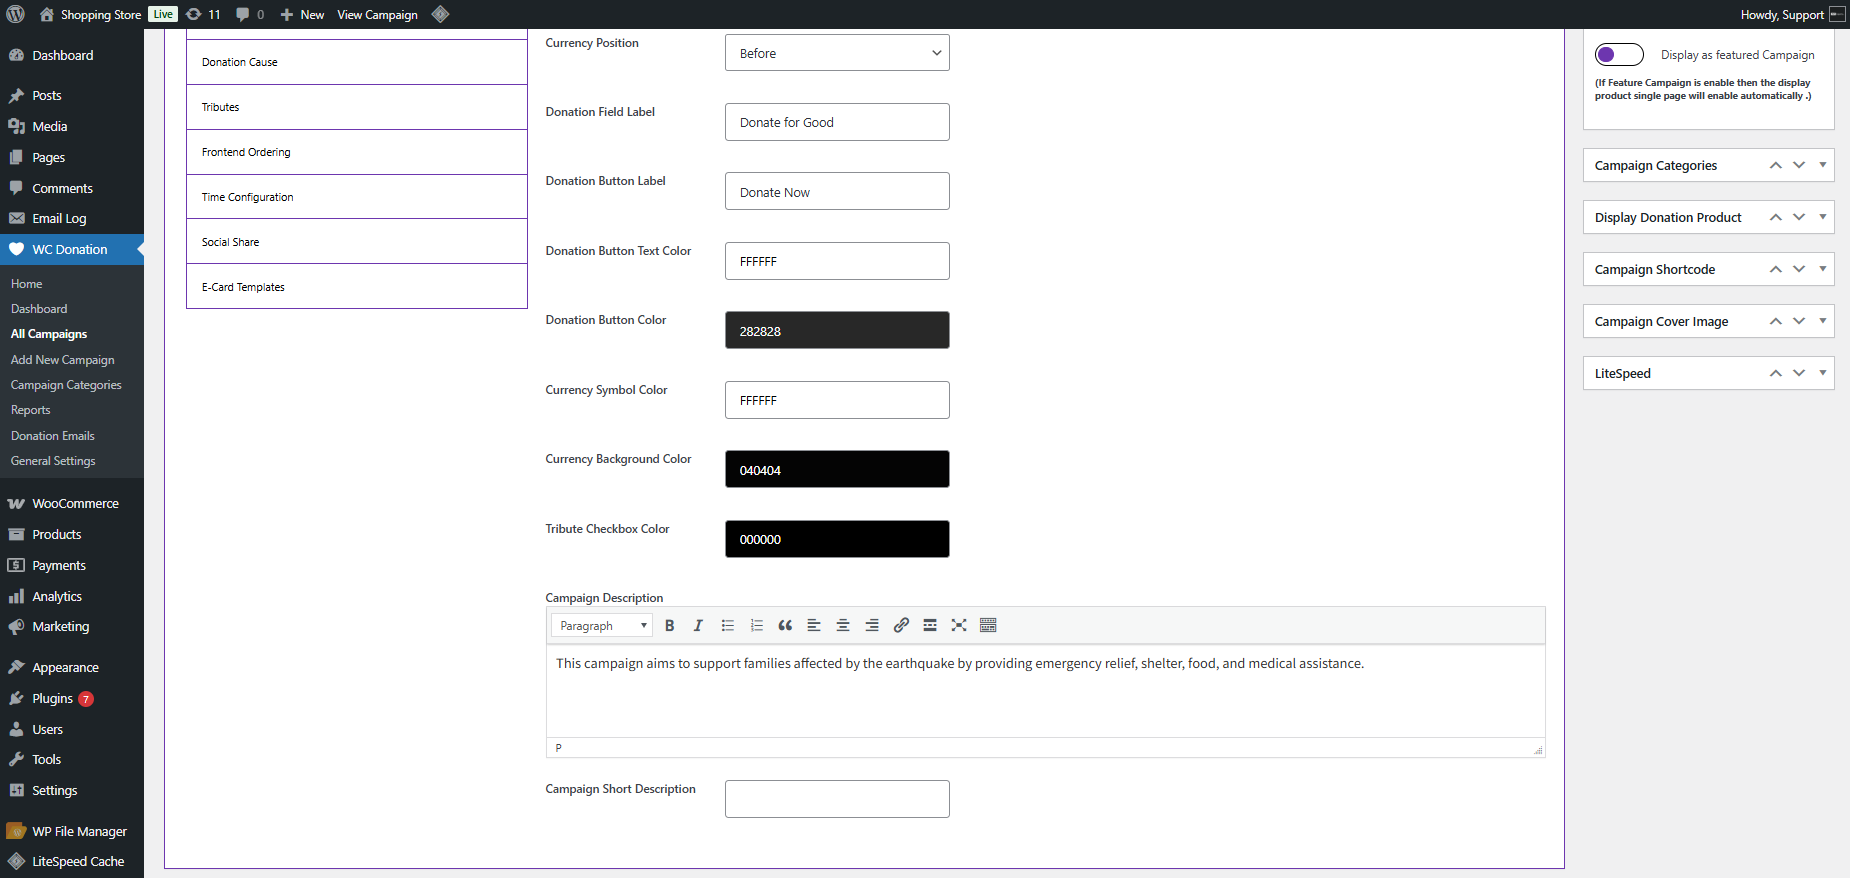
Front End
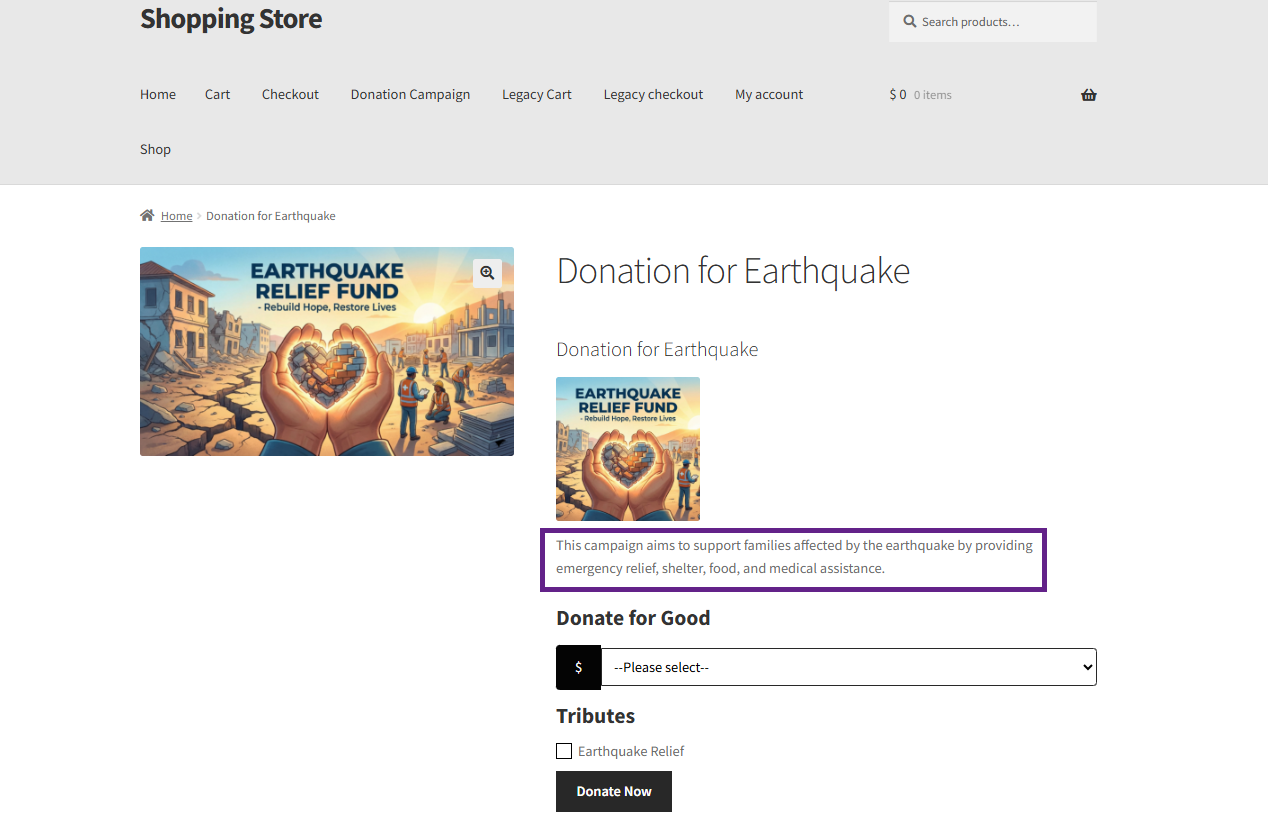
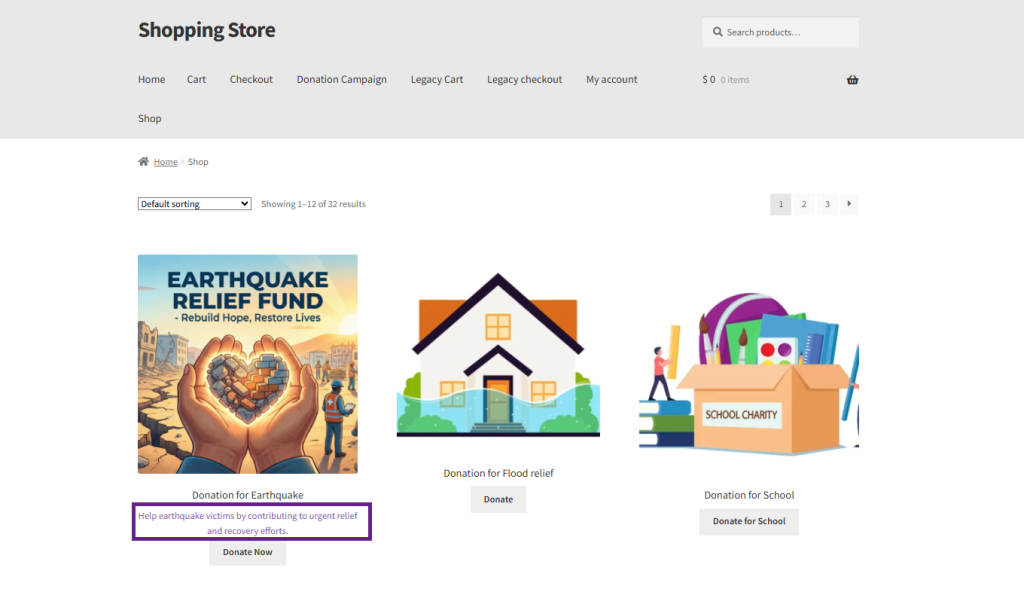
- There is a Campaign Short Description option. The admin can add a concise and summarized overview of the campaign.
Front End
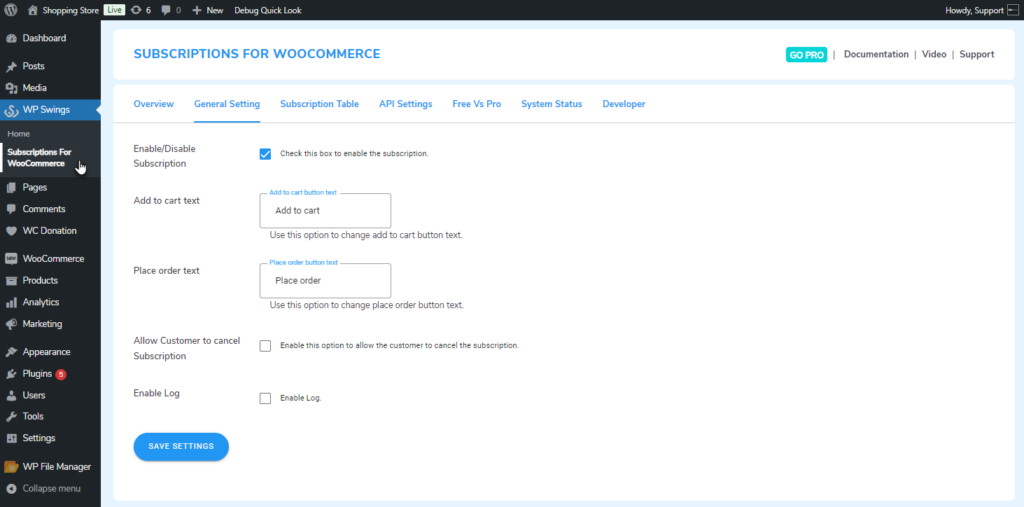
Recurring Donations (PAID)
↑ Back to topEnables advanced recurring donation functionality using WooCommerce Subscriptions for better subscription management and control.
- Download and install the WooCommerce Subscriptions.
- Follow the WooCommerce Subscriptions documentation to set up and configure the plugin.
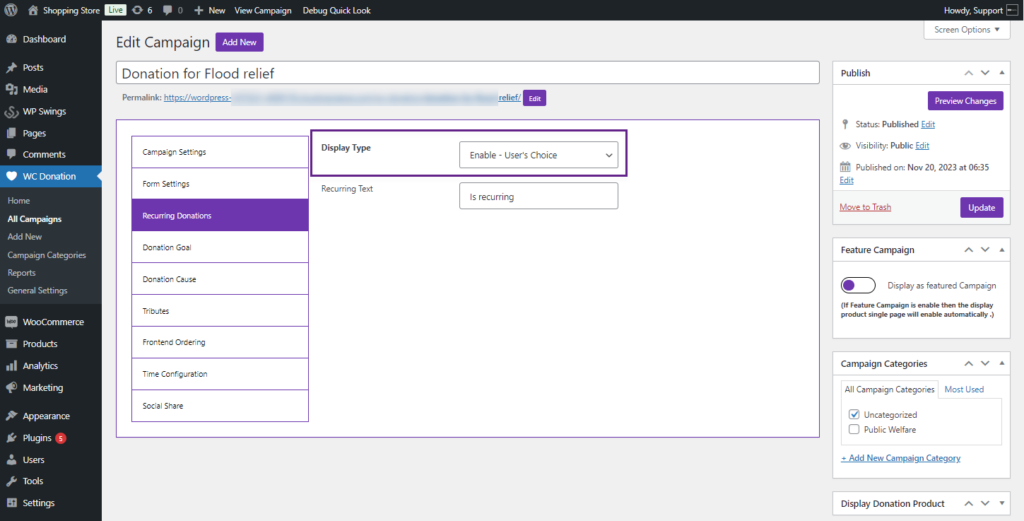
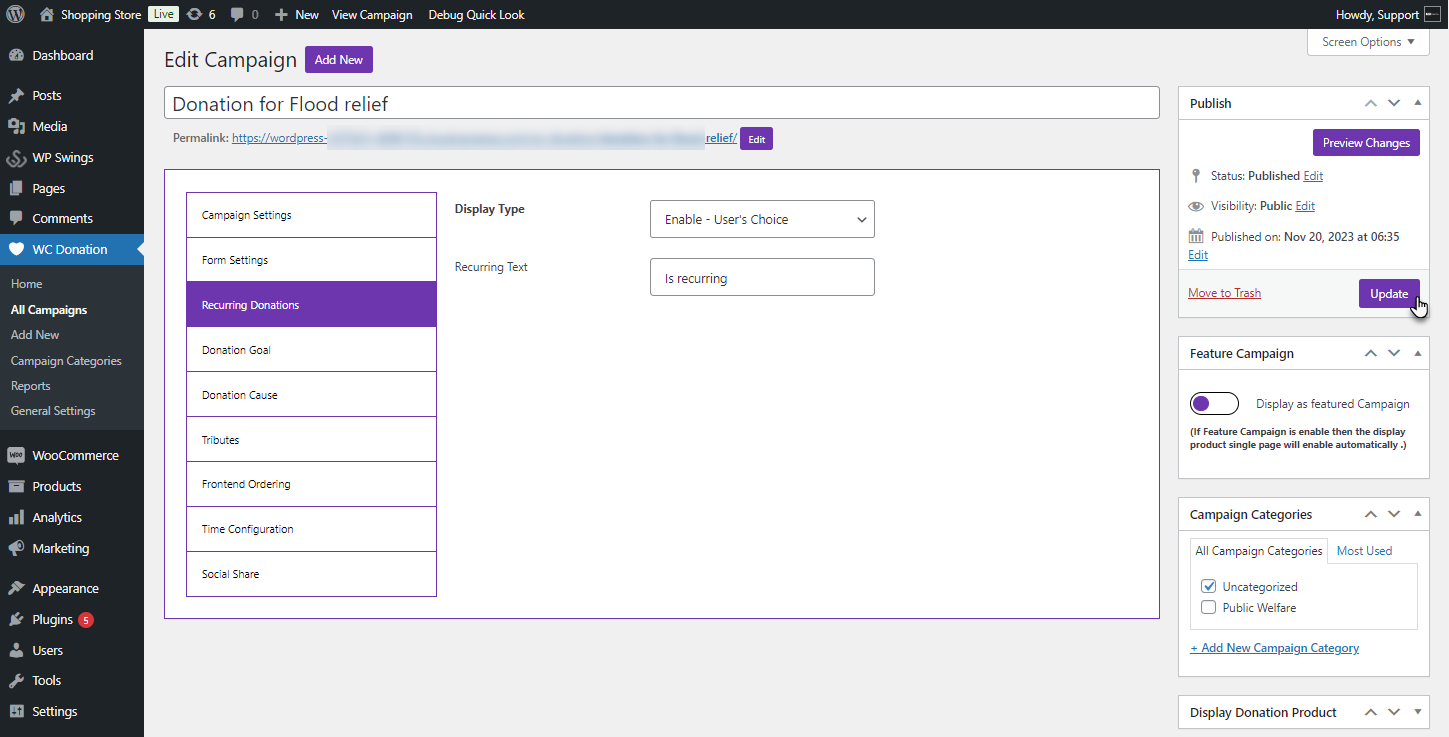
- Go to WordPress Admin Dashboard > WC Donation > All Campaigns > Edit Campaign.

- On the Edit Campaign screen, click on the Recurring Donations option.

- In the Display Type dropdown, select Enable User Choice.

- Click the Update button to save changes.

Front End Impact
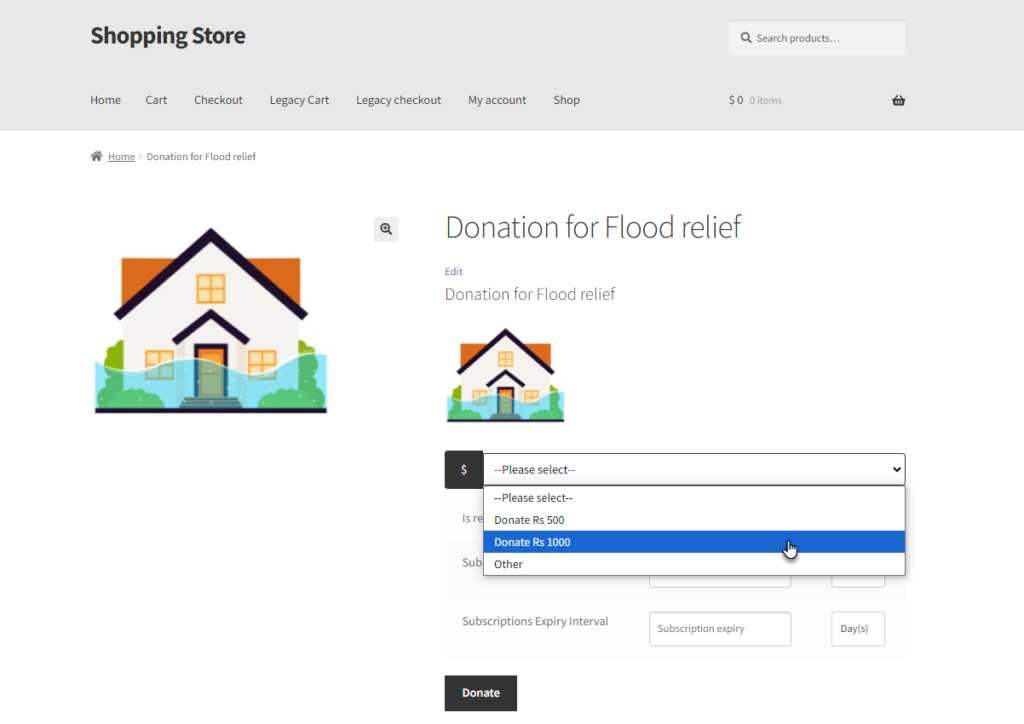
- Login to your account.
- Navigate to the Donation Single Product Page.

- Select the Donation Amount.

- Check the Is Recurring option.

- When the Is Recurring option is checked, the interval selection for recurring donations will appear.

Display Type
In this section, go to the Display Type option,
- Disable
- Enable – Admin’s Choice
- Enable – User’s Choice

- Choose Enable – User’s Choice from the dropdown menu.
- You can also set custom text for recurring donations in the Recurring Text option. However, if you don’t want to set any text, then Enter Donation Recurring would appear.
- Click on the Update button to save changes.

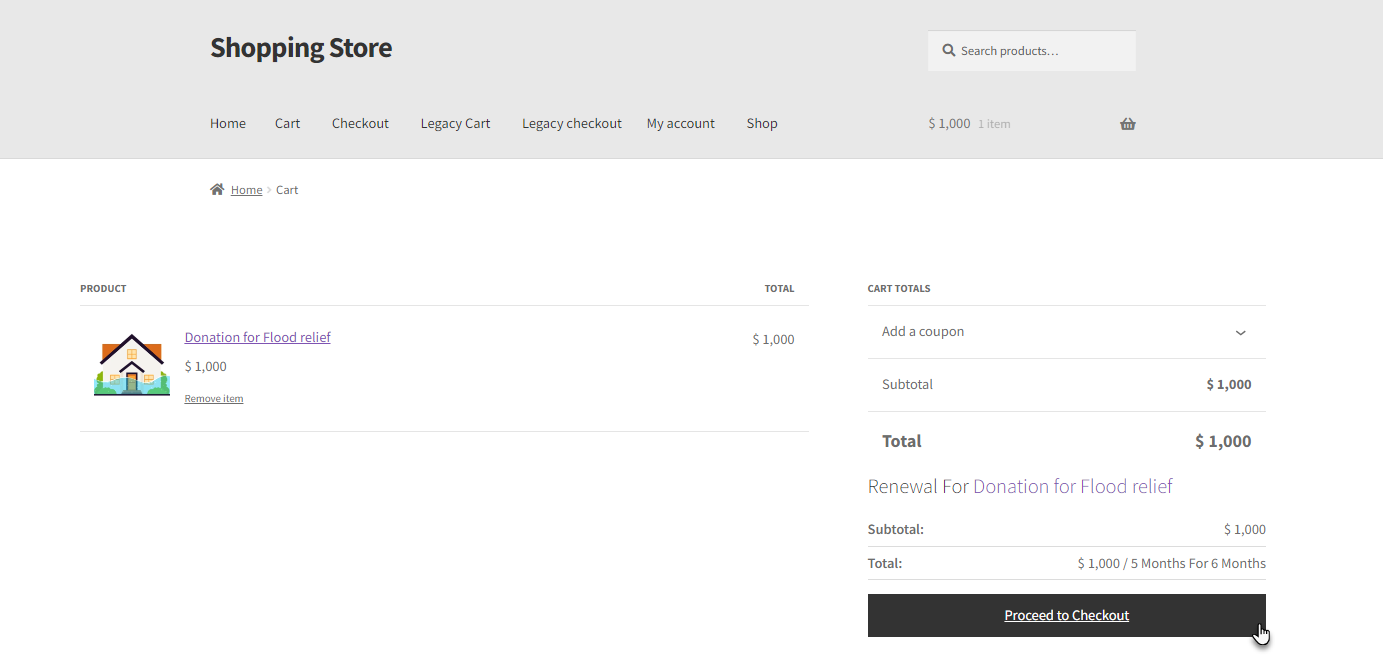
Front-End Impact
- The user will visit the website and select the donation.
- The user will select the Donation level.
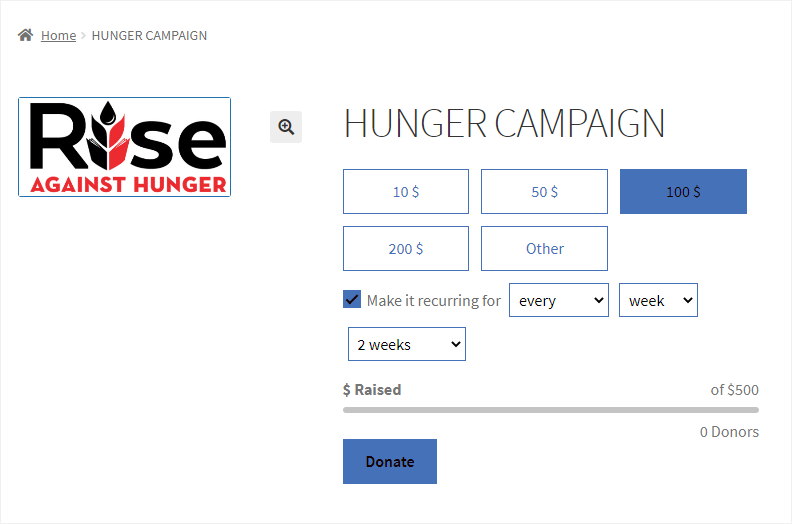
- Checkmark the checkbox to make it a recurring payment.
- Set the Intervals for the recurring payment cycles.
NOTE:
- Every (1 to 6 interval)
- Day/Week/Month/Year (to select any frequency)
- Till (length) For days, it will be 90 days, for a week it will be 52 weeks, for a month it will be 24 months and for a year it will be 5 years after the first purchase. If the user has set the frequency as ‘Every’ and selected ‘Month,’ then the number of months will be displayed; if the user selects 5 months, the donation will be deducted every month for 5 months, then it will automatically stop the deduction of the donated amount.
- Once your customer has purchased a product with a recurring donation, the donation will automatically be deducted according to the mentioned frequency.
- Once done, click on the Donate button.
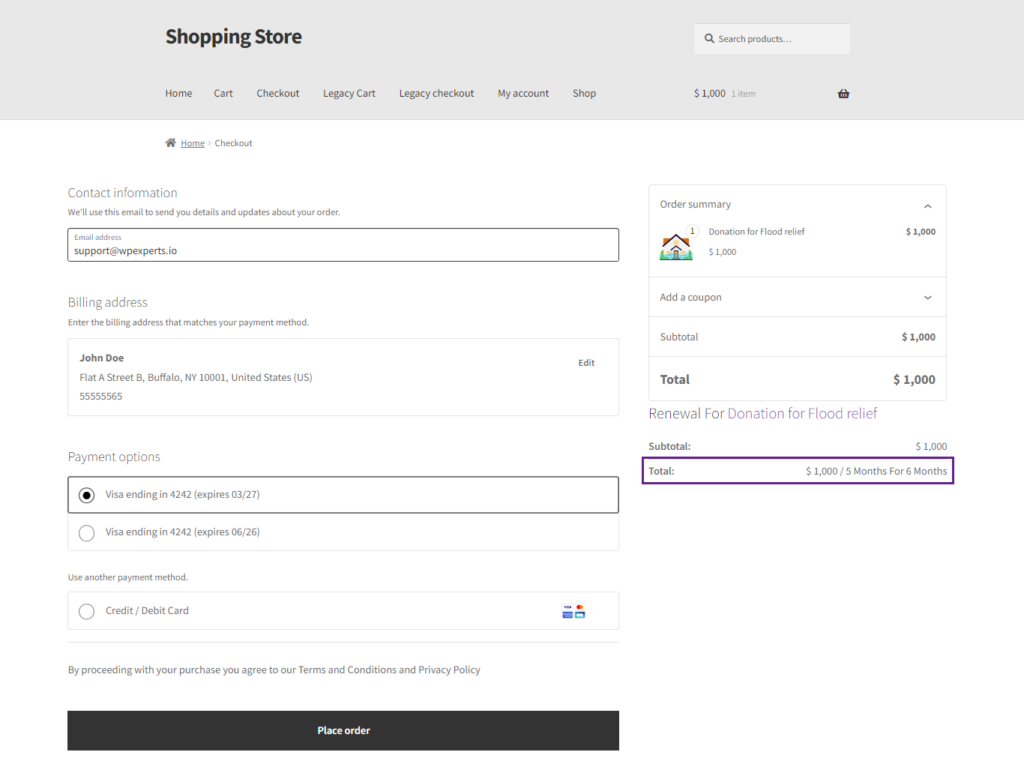
NOTE: Payment gateways like PayPal, Stripe, etc. should be activated when doing the recurring payments.
- The user would be redirected to the Checkout page.
- The user will enter the required credentials.
- The user can view the recurring payments cycles in the Recurring totals section.

- The user will click on the Sign up now button.
Subscription Tab
- The Admin would go to the Admin Dashboard > WooCommerce > Subscriptions.
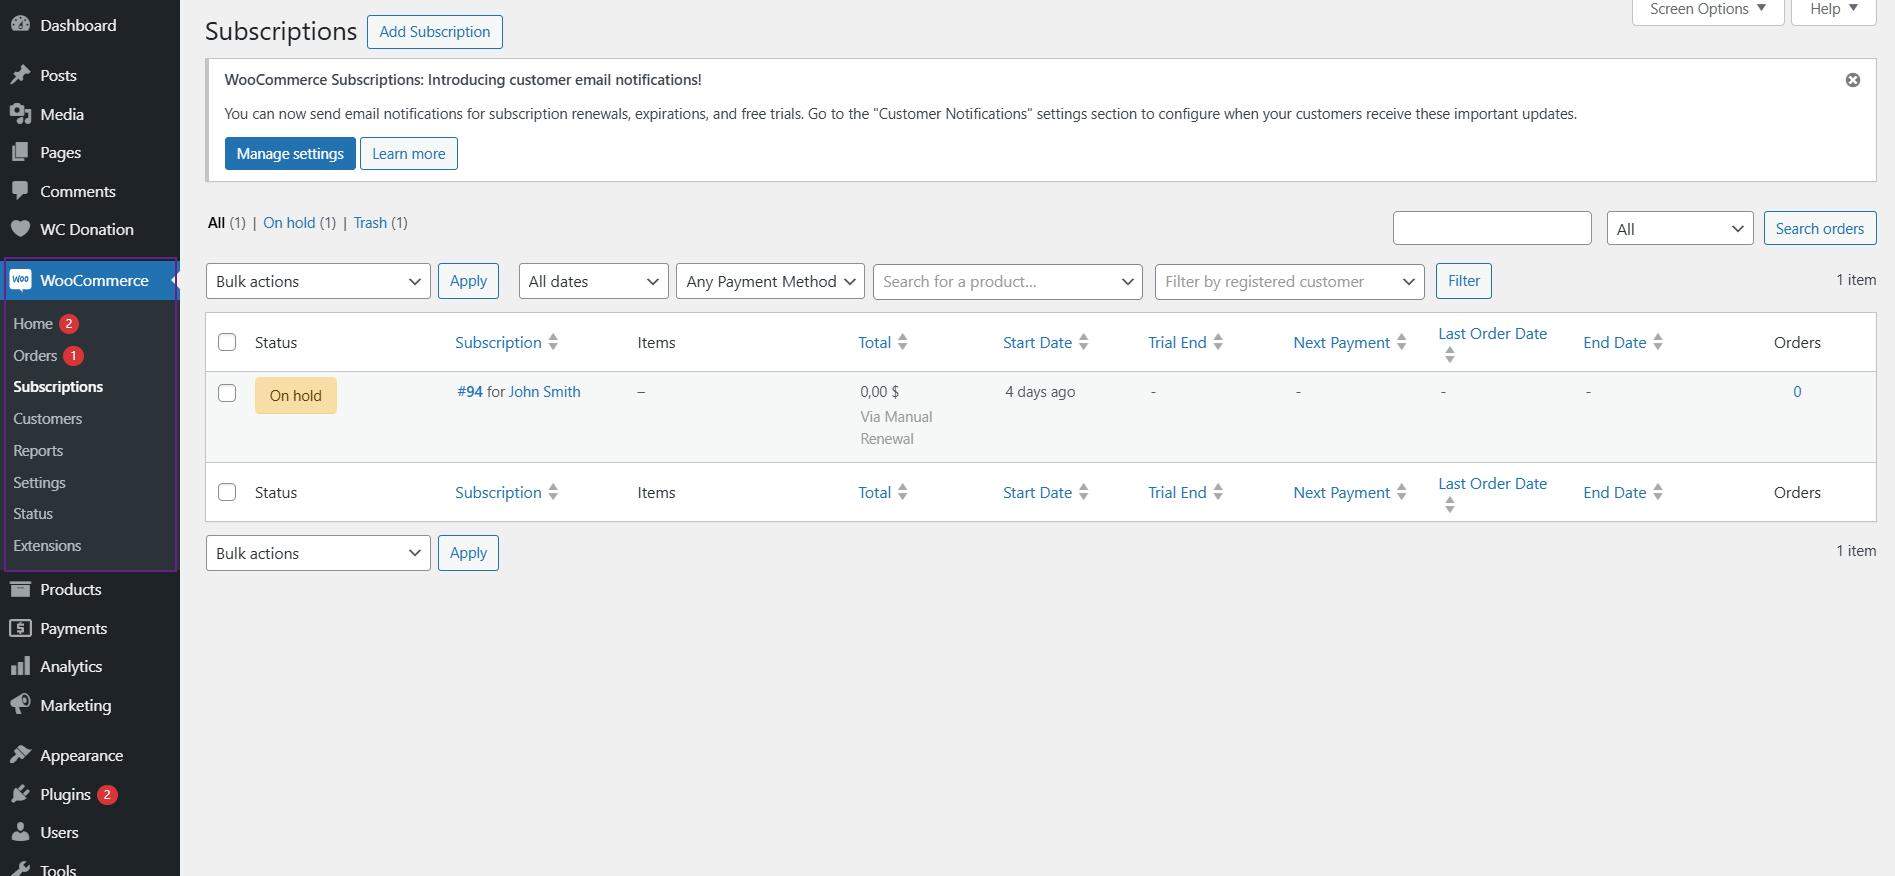
- Click on the subscription number in the Subscription column.
- In the image below, #94 is the subscription number.

- Click on the subscriptions.
- When we’re on the Edit Subscription page, on the right side of the page there is a Schedule section that will show the details of the Next Payment, End Date, and the Time zone.

Order Tab
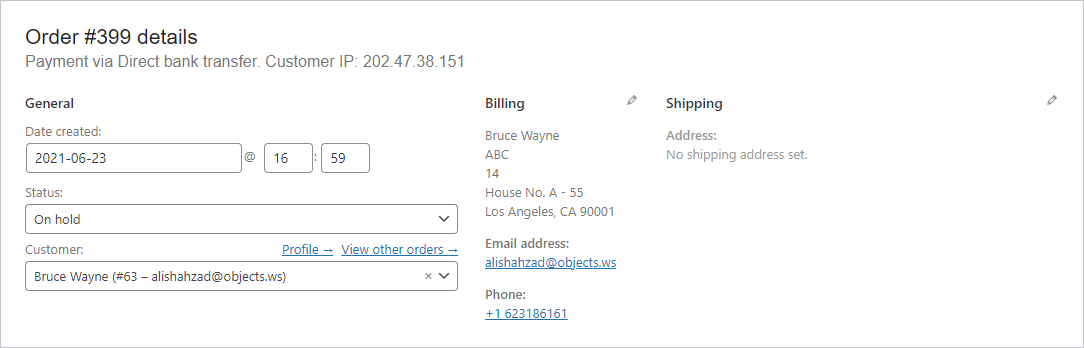
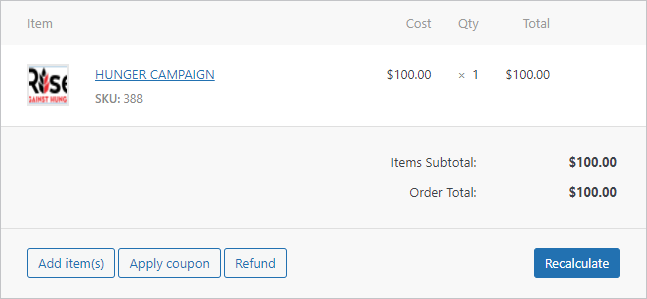
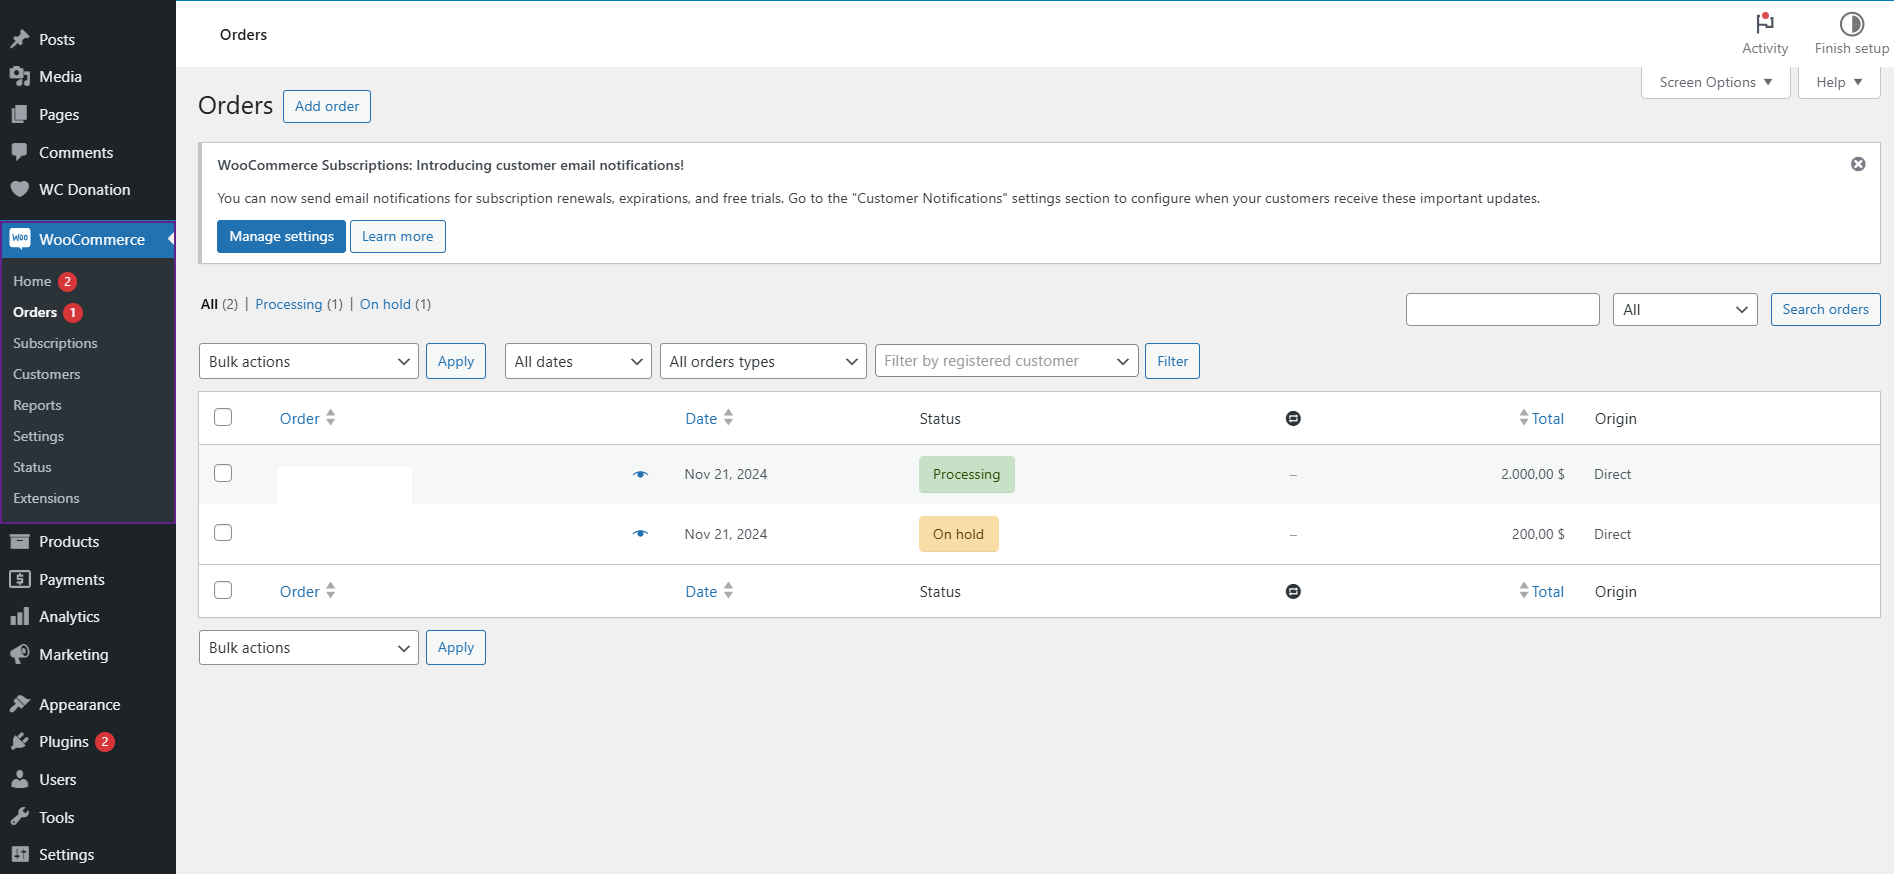
- The Admin would go to the Admin Dashboard > WooCommerce > Orders.
- Click on the Order.

- When we’re on the Edit Order page, all the details are available on this page.
Count of Donation
- Only orders with status (Processing and completed) will be counted as a total donation if there is any donation product in them. The total donation, Total Amount & Total Donor deducted on canceled & on-hold orders.
- In the campaign list, the admin can see the total no. of donations against each campaign along with its total amount.
On Complete
- The Admin would go to the Admin Dashboard > WooCommerce > Orders.
- Orders with the status Completed will be counted as a total donation if there is any donation product in them.

On Processing
- The Admin would go to the Admin Dashboard > WooCommerce > Orders.

- Orders with the status Processing will be counted as a total donation if there is any donation product in them.
Front-End Impact
On Complete and On Processing

On Hold
- The Admin would go to the Admin Dashboard > WooCommerce > Orders.
- Orders with the status On Hold will reduce the donation goal.

On Canceled
- The Admin would go to the Admin Dashboard > WooCommerce > Orders.

- Orders with the status of Canceled will reduce the donation goal.

Product Page – On Hold and On Cancelled

Recurring Donations (FREE)
↑ Back to topAllows donors to make recurring donations using the Subscription for WooCommerce by WP Swings plugin.
- Download and install the Subscriptions for WooCommerce from WP Swings.
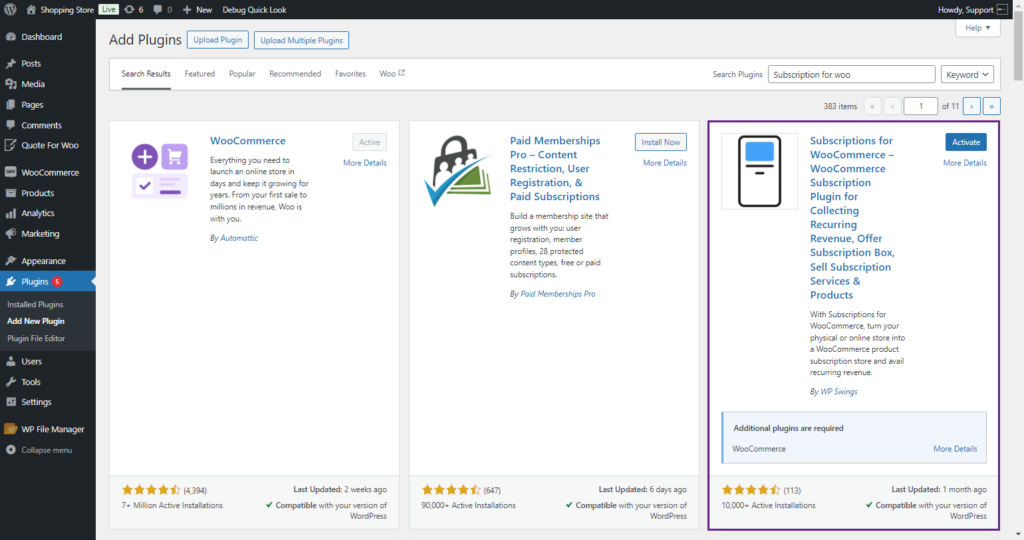
- Follow the Subscriptions For WooCommerce documentation to set up and configure the plugin.
- Go to the WordPress Admin Dashboard > WC Donation > All Campaigns.

- Hover on the Edit button to edit the campaign.

- Edit Campaign screen will appear. Navigate to the Recurring Donations tab.
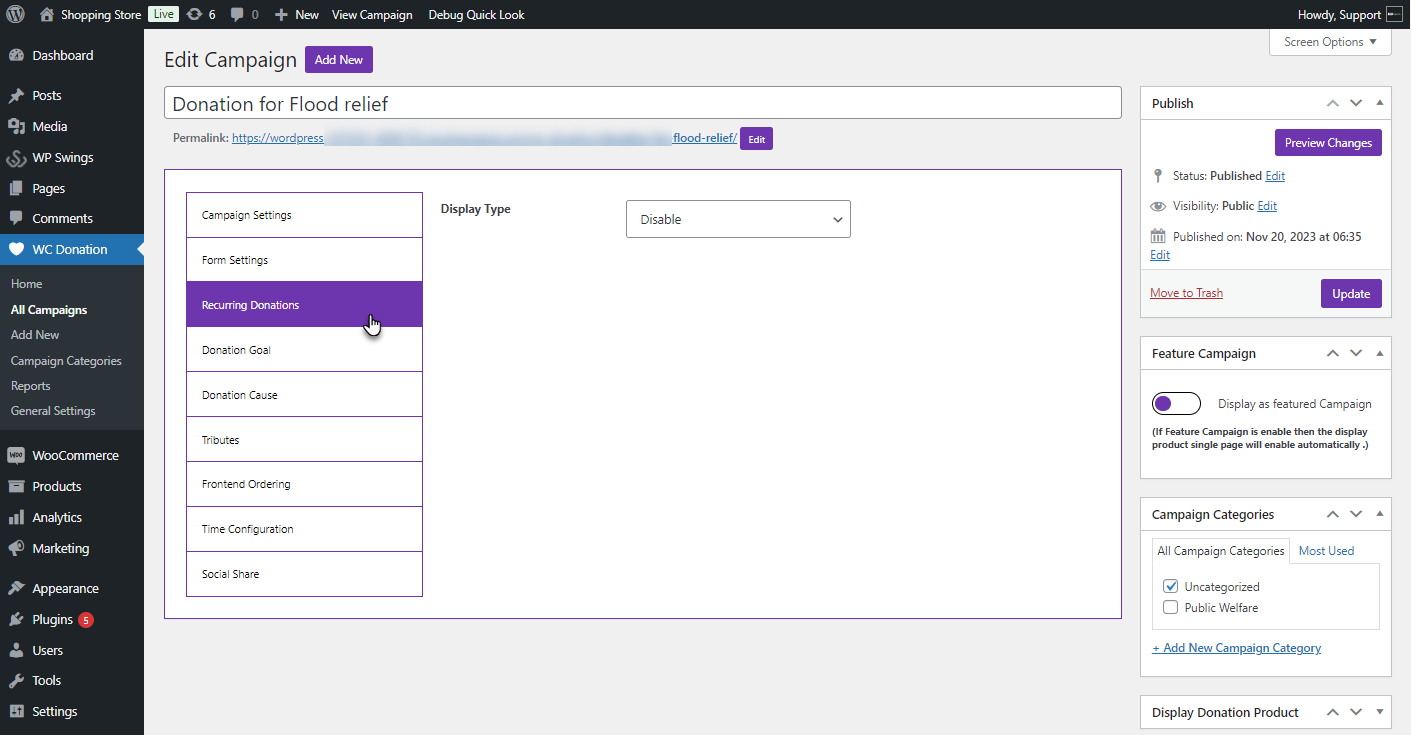
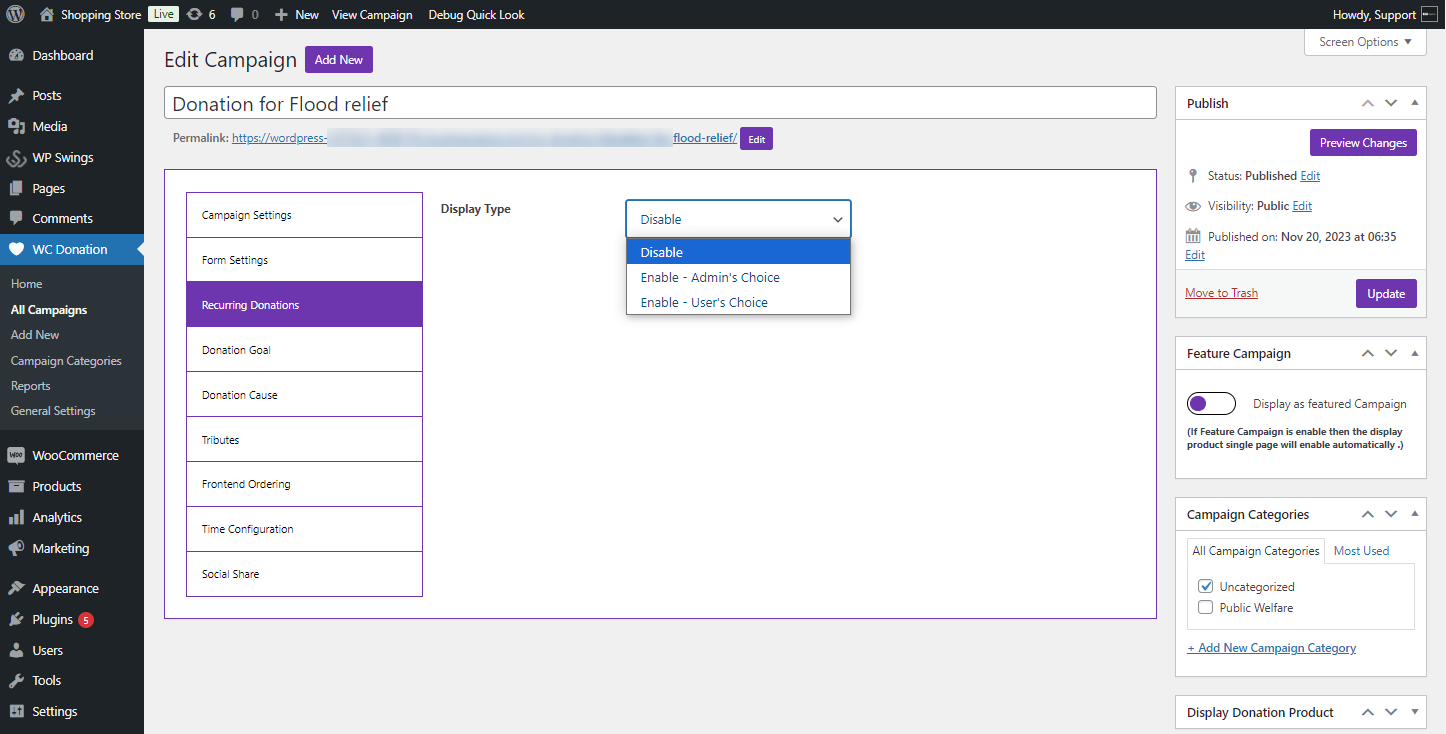
Display Type
- In the Display type, three options are provided.
- Disable
- Enable – Admin Choice
- Enable – Users Choice.
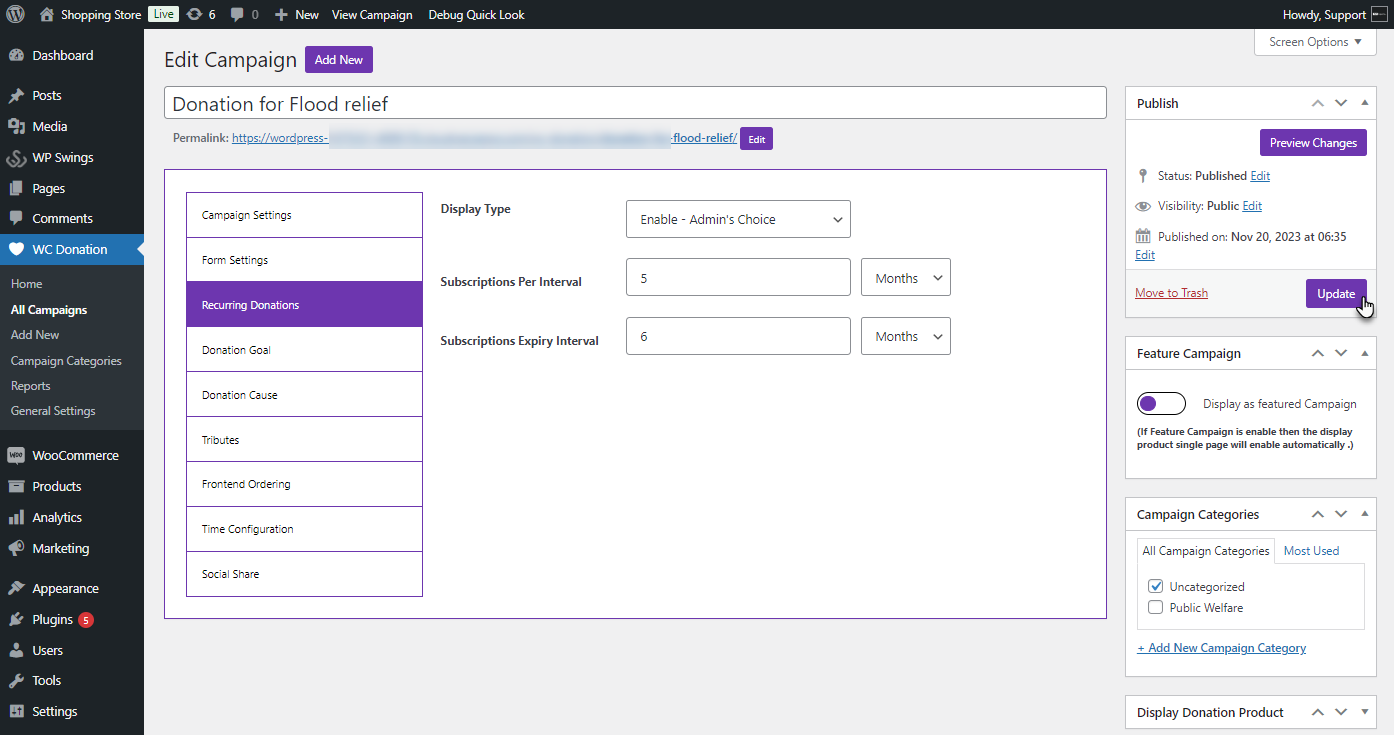
Enable – Admin’s Choice
- Select the Enable – Admin’s Choice option from the Display Type. This will allow the admin to configure recurring Donation settings.

- The admin can set the subscription interval in the Subscriptions Per Interval field. The interval can be set in Days, Weeks, Months, and Years. Whatever the interval value is set by the admin, the subscription will run according to that cycle. For example, if 5 months is selected, the subscription will be charged after every 5 months.
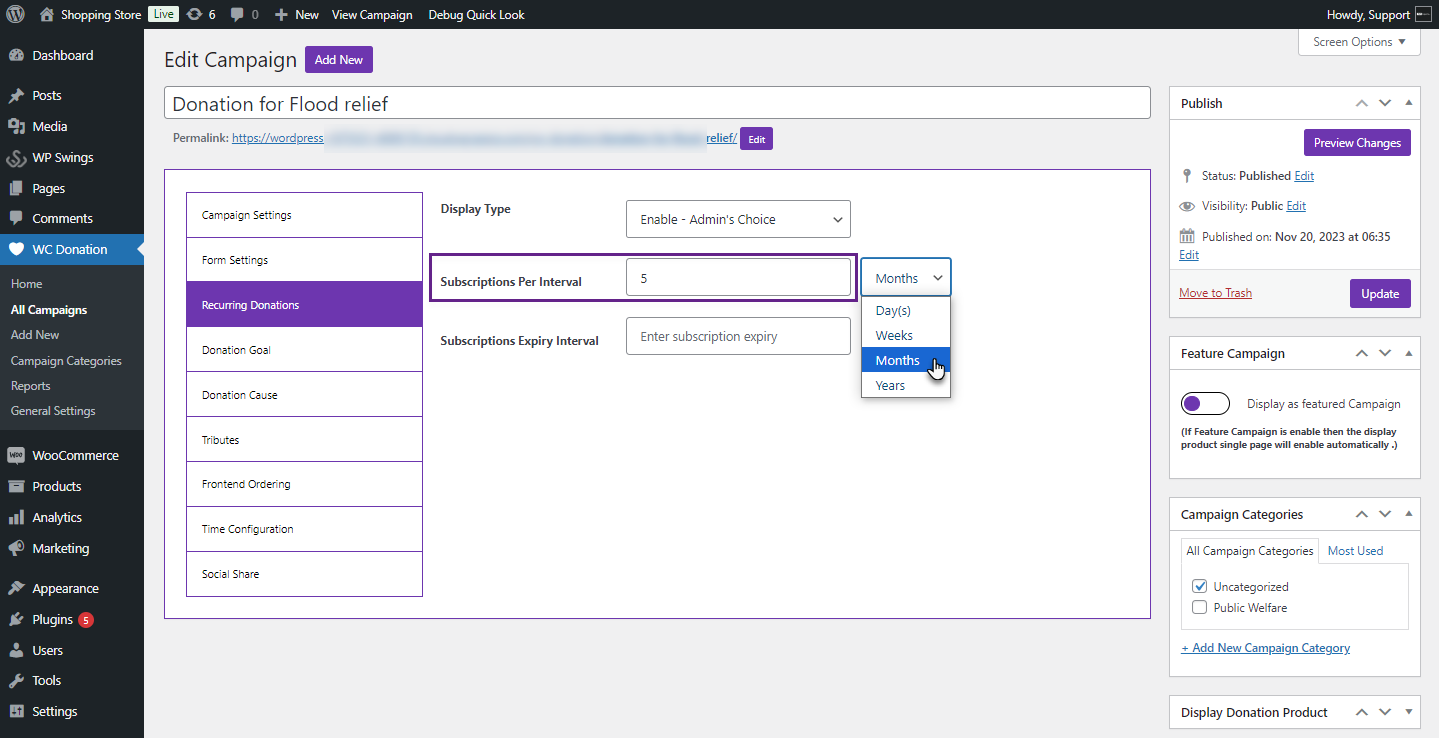
- The admin can set the subscription expiry interval in the Subscriptions Expiry Interval field. If left empty, the subscription will never expire. Whatever the value admin enters, the subscription cycle will no longer be active after that time. For example, if the expiry is set to 6 months, the subscription will expire after 6 months.

- Click on the Update button to save Changes.
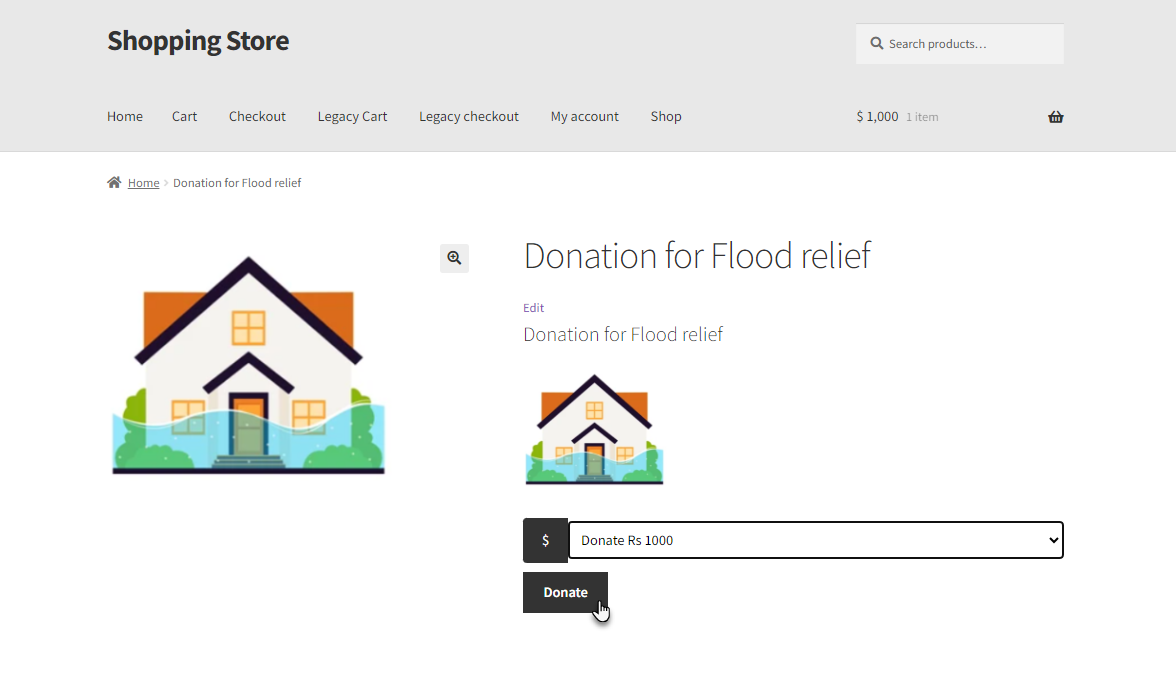
Front-End Impact
- Login to your account.
- Go to the Single Donation Page. Select the Donation amount.
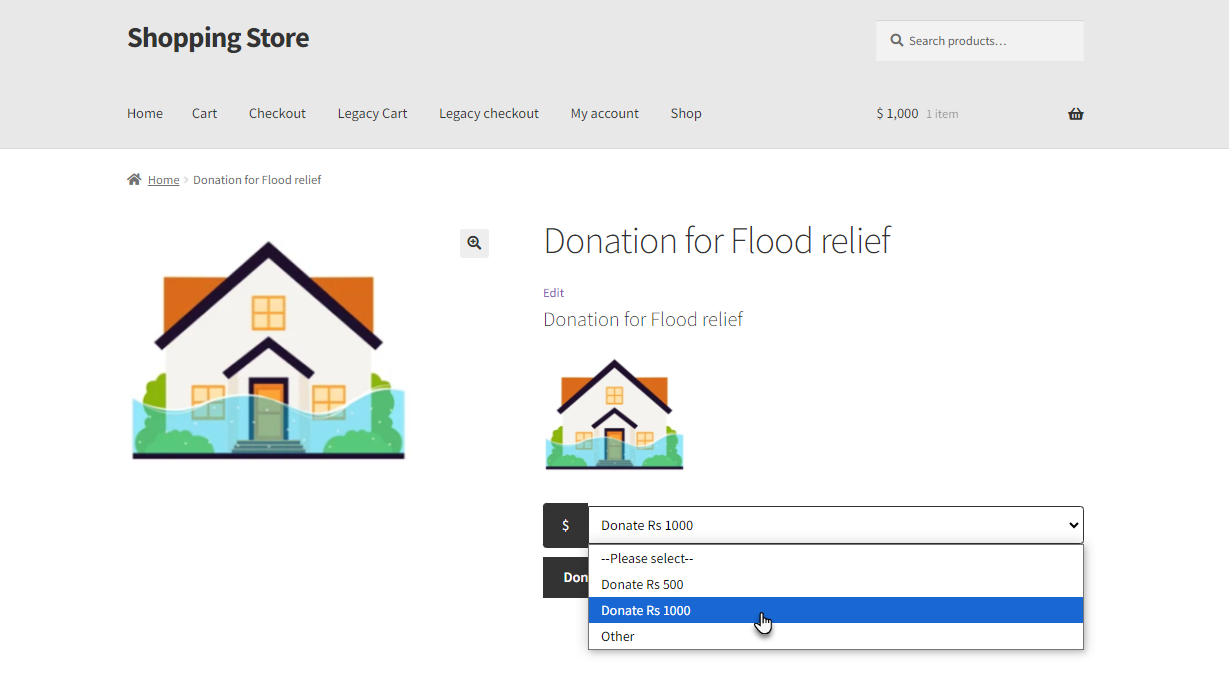
- Click on the Donate button.
- Go to the Cart page. The details of the Donation subscription will appear.
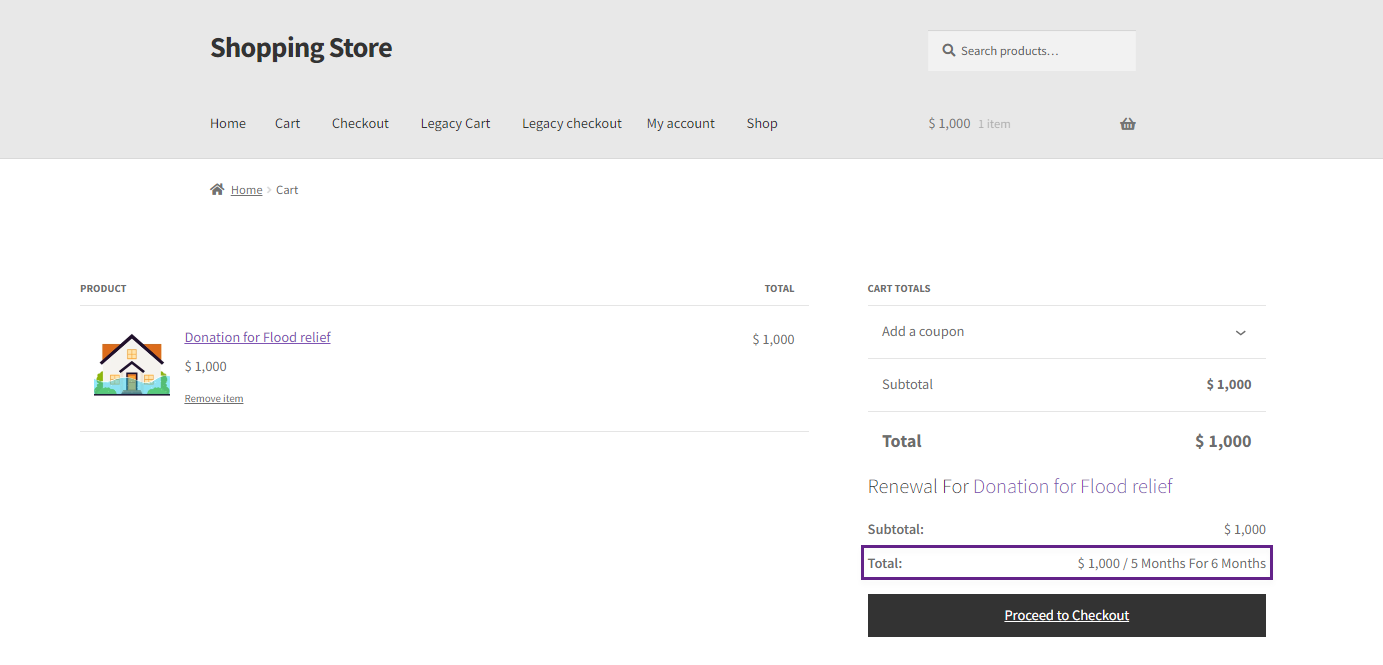
- Click on the Proceed to Checkout.
- The Subscription details will also be available on the Checkout page.
Enable – User’s Choice
- Select the Enable – User’s Choice option from the Display Type. This will allow the user to configure recurring Donation settings on the Single Donation Page on the Front End.
- The admin can change the Recurring text as needed.

- Click on the Update button to save changes.
Front-End Impact
- Login to your account.
- Go to the Single Donation Page. Select the Donation amount.
- Select the Is Recurring checkbox to enable the settings available.
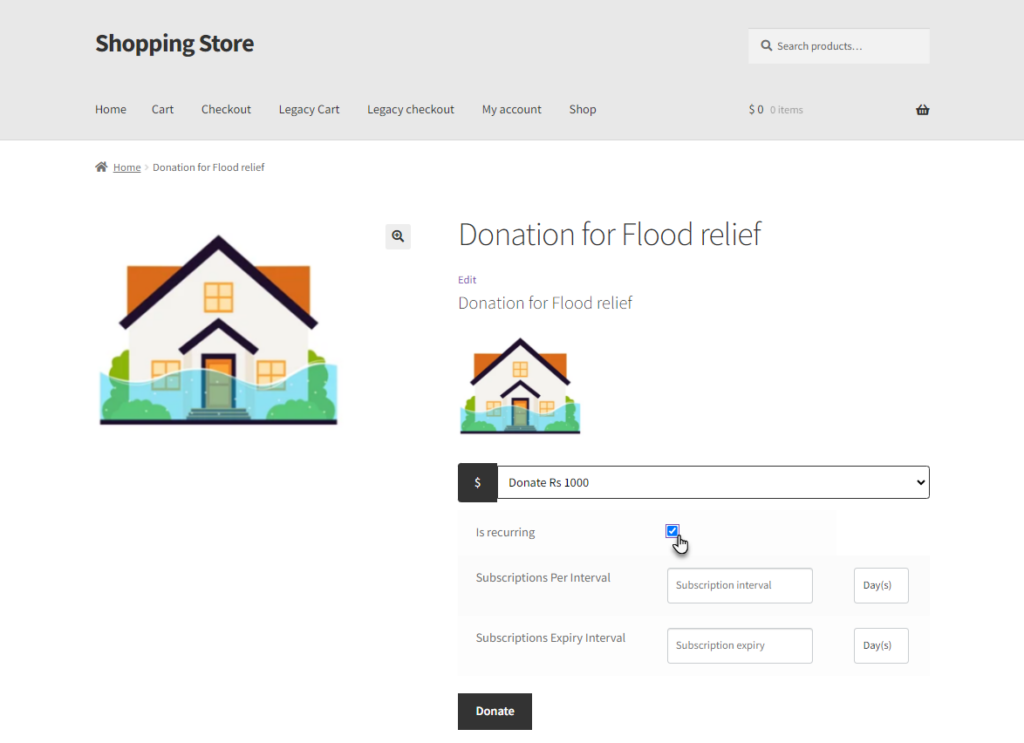
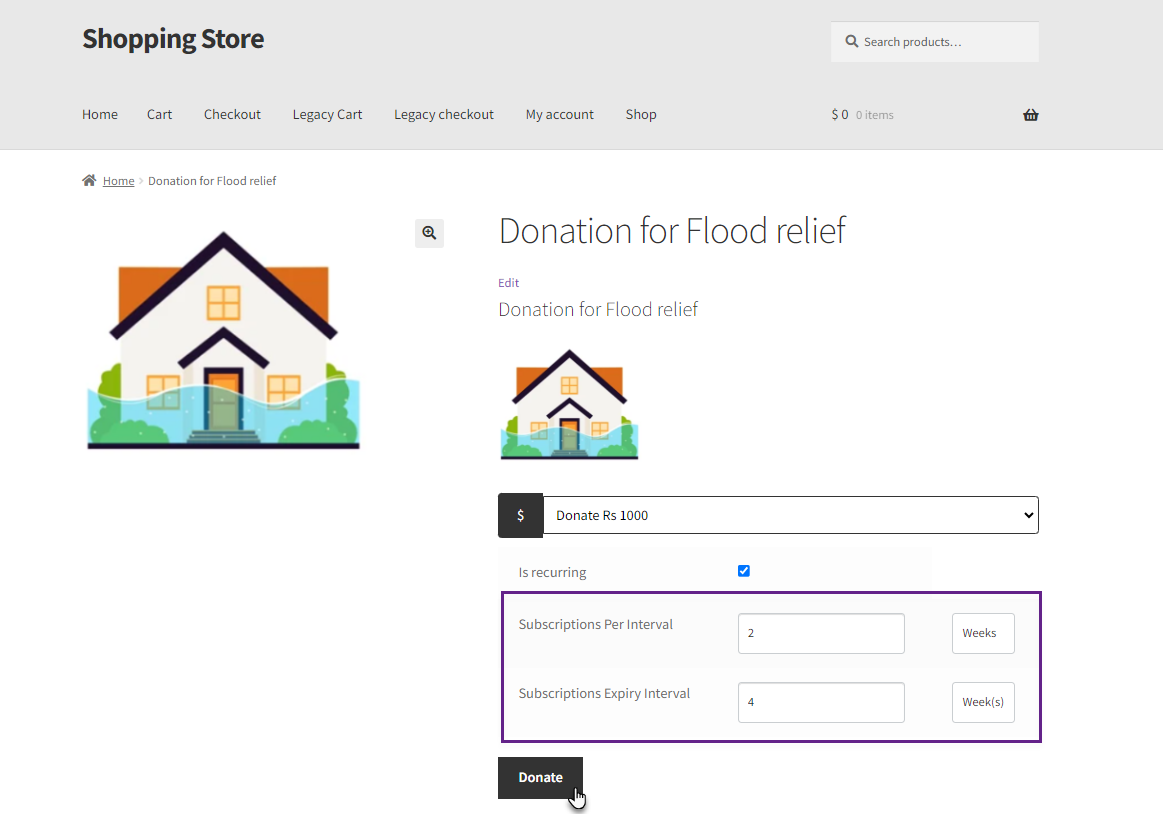
- Set the Subscriptions Per Interval and Subscriptions Expiry Interval as per needed and Click on the Donate button.
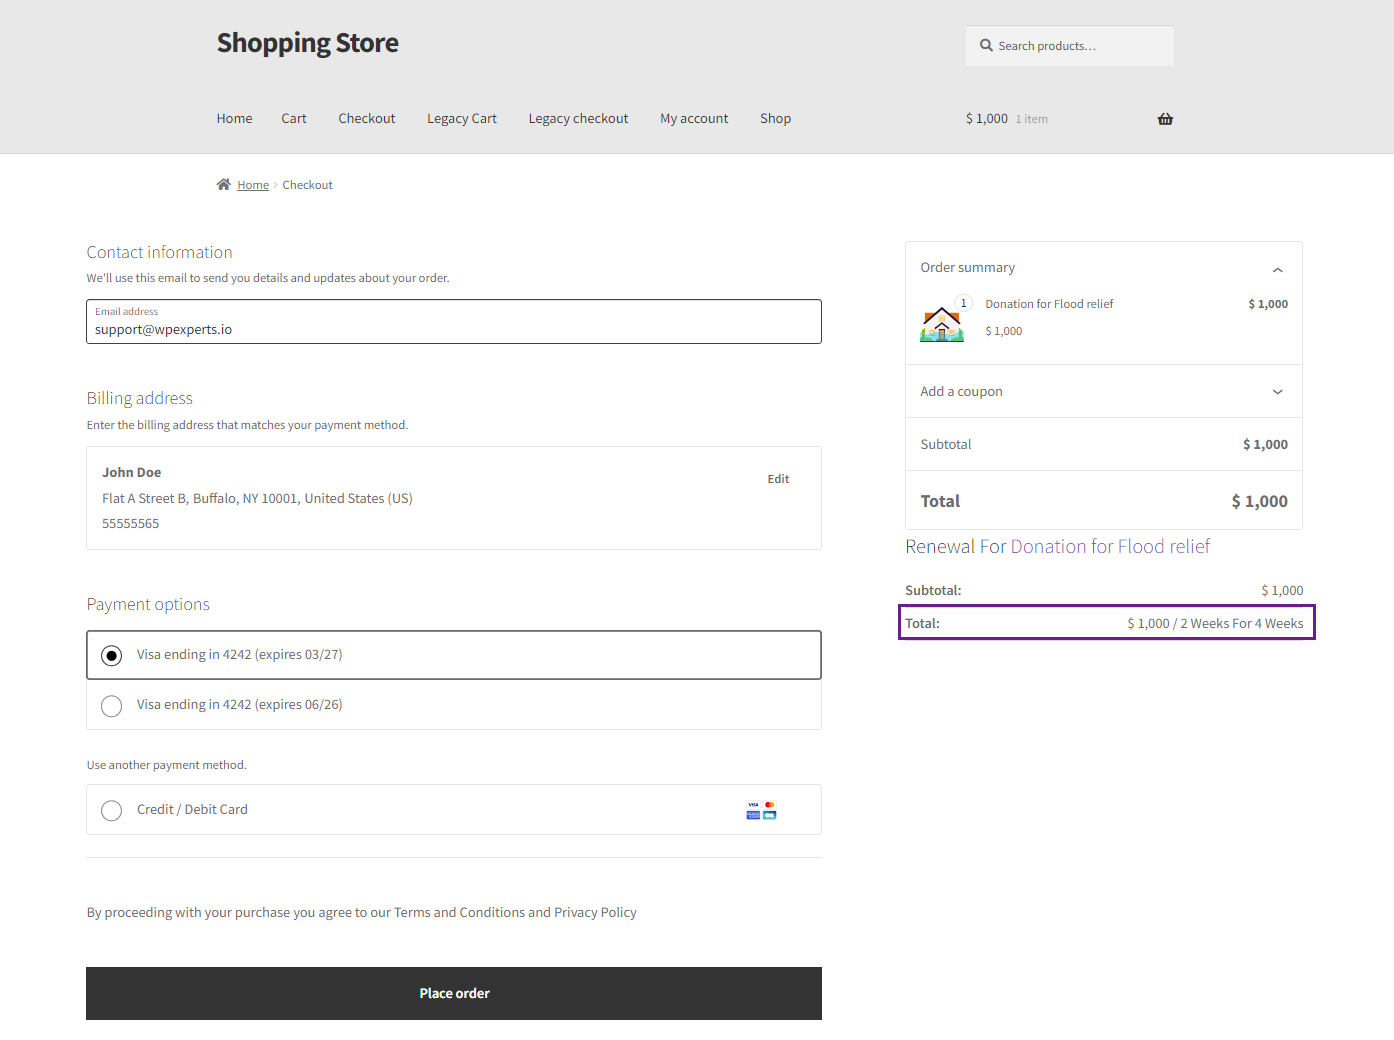
- The Donation Subscription details will appear on the Cart page.

- The Donation Subscription details will also appear on the Checkout page.
Subscription Table
- Once a subscription is made for a donation, the donation will be listed in the WP Swings subscription table. Go to WordPress Admin Dashboard > Wp Swings > Subscription For WooCommerce.
- Navigate to the Subscription Table. The Subscription-based Donations will be listed in the Subscription Table.

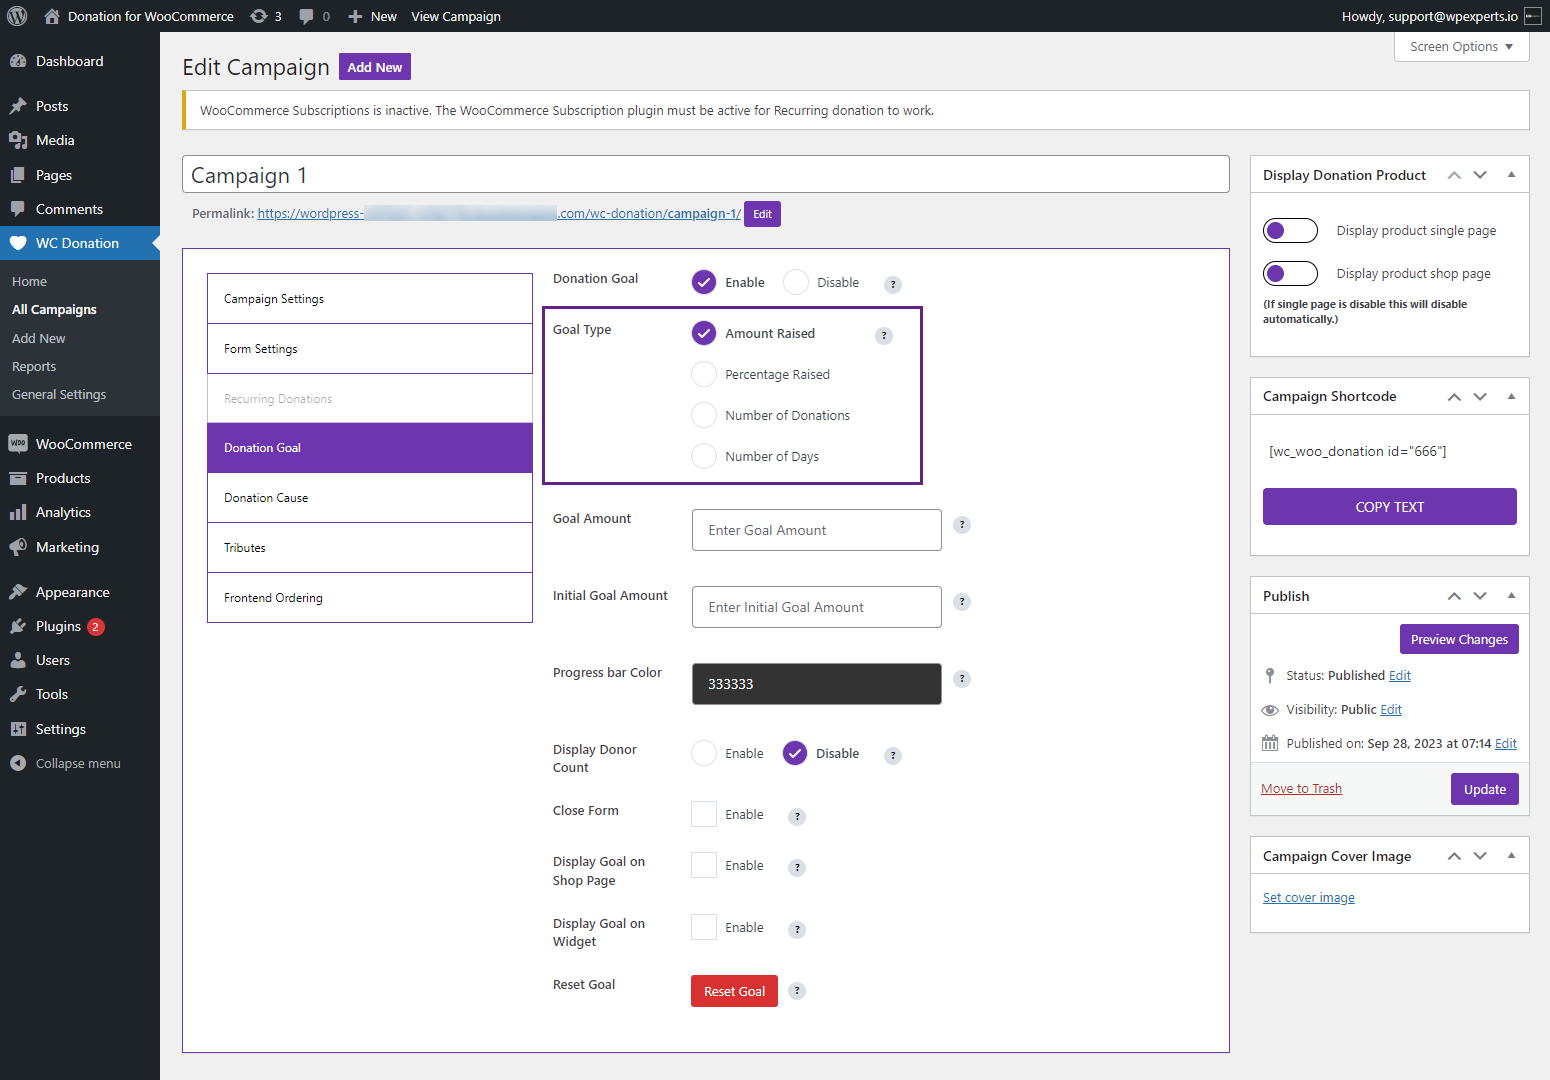
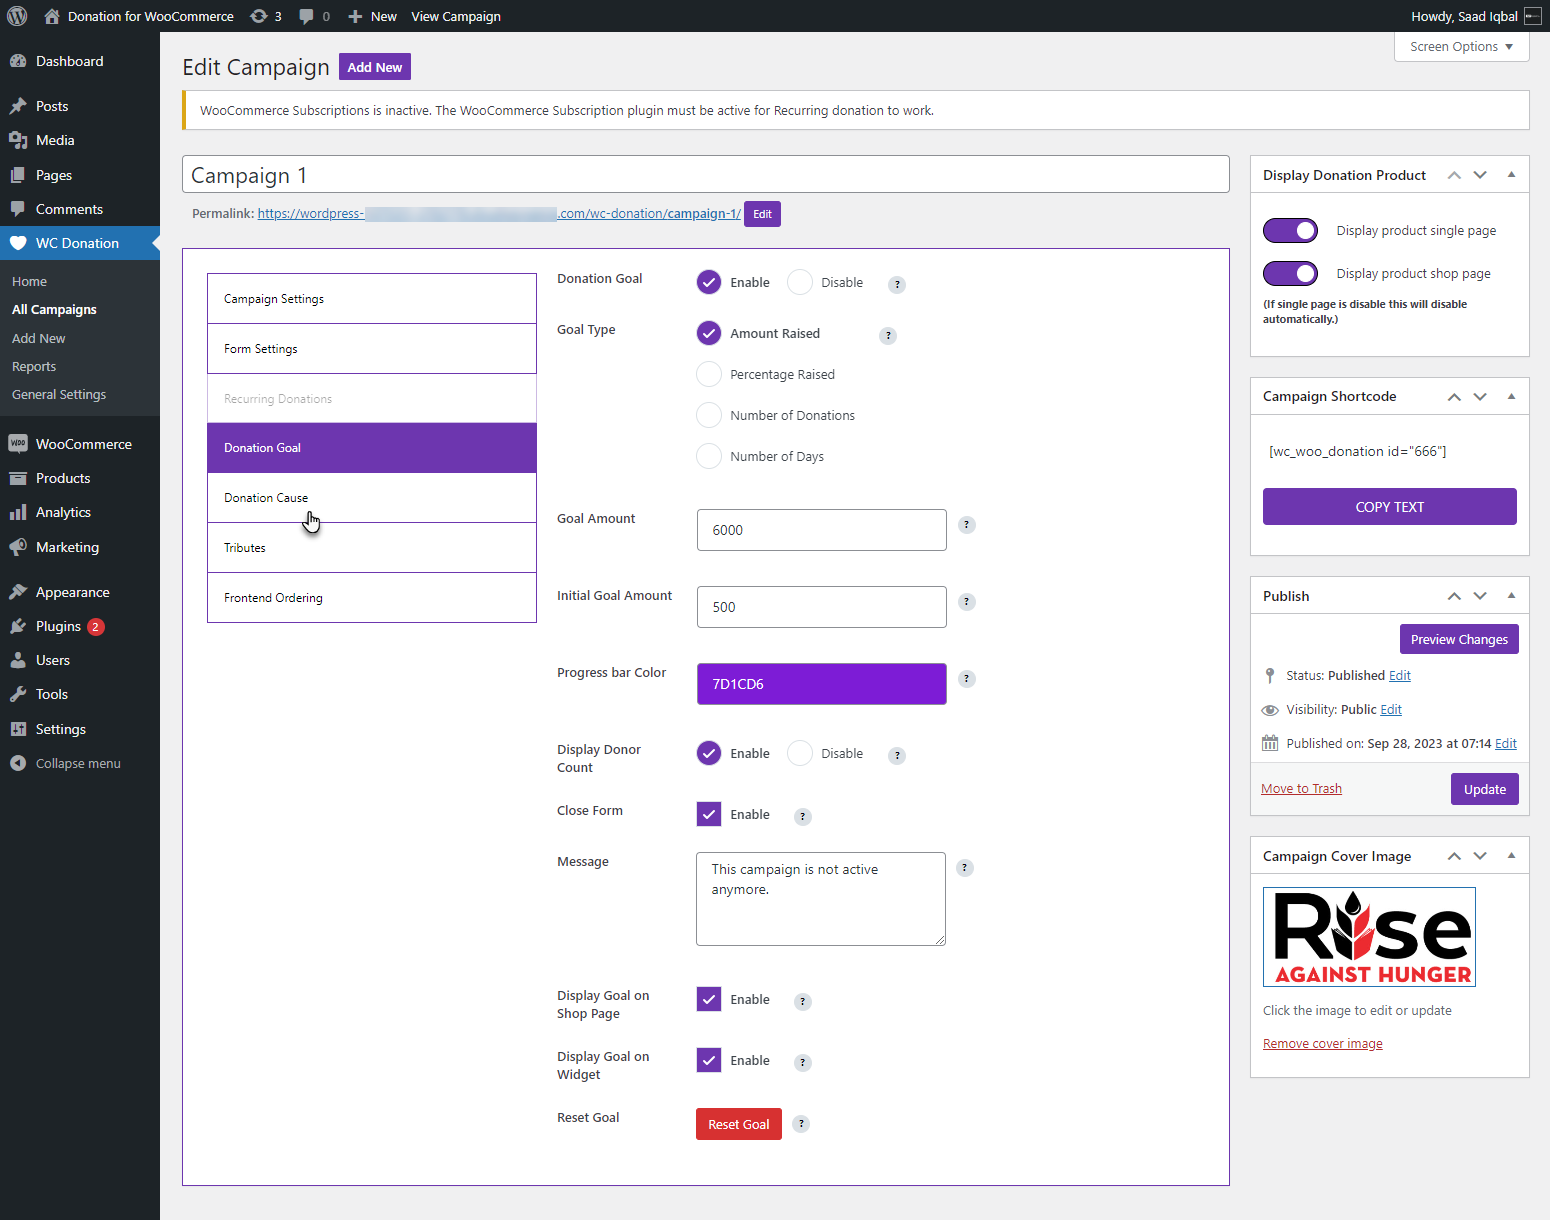
Donation Goal
↑ Back to top- Now you’re on the Donation Goal page.
- Donation for WooCommerce’s Goal feature helps you monitor the number of donations collected for a specific campaign and gives you the capability to display these targets to your customers.
- Your donation goal can be defined, measured, and displayed in many ways, including the total amount collected, percentage completed, number of donations received, number of days left, and unique donor count.

Donation Goal
- Select the Enable radio button to enable the donation goal.

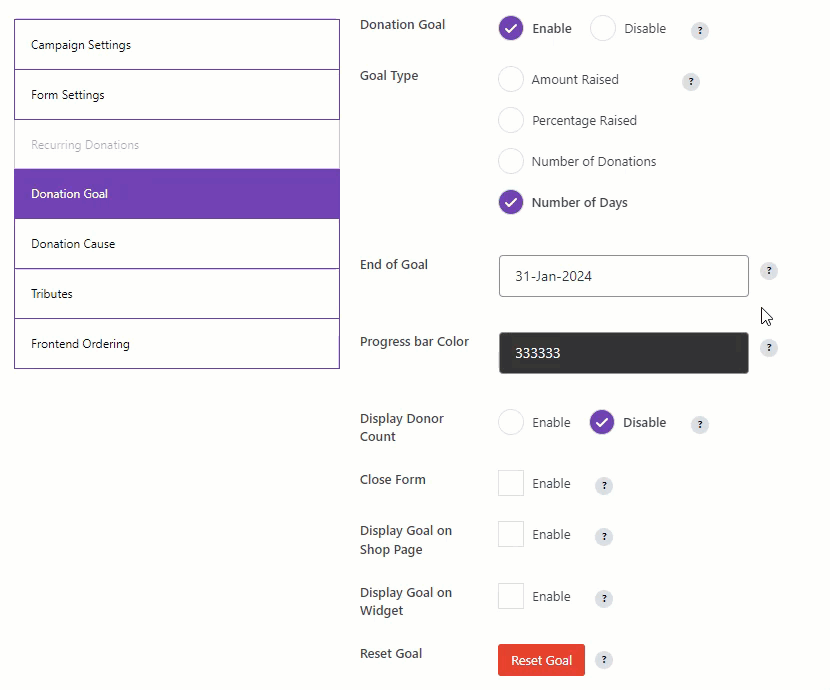
Goal Type
- In the Goal Type option, four goal types are available.
- Amount Raised
- Percentage Raised
- Number of Donations
- Number of Days

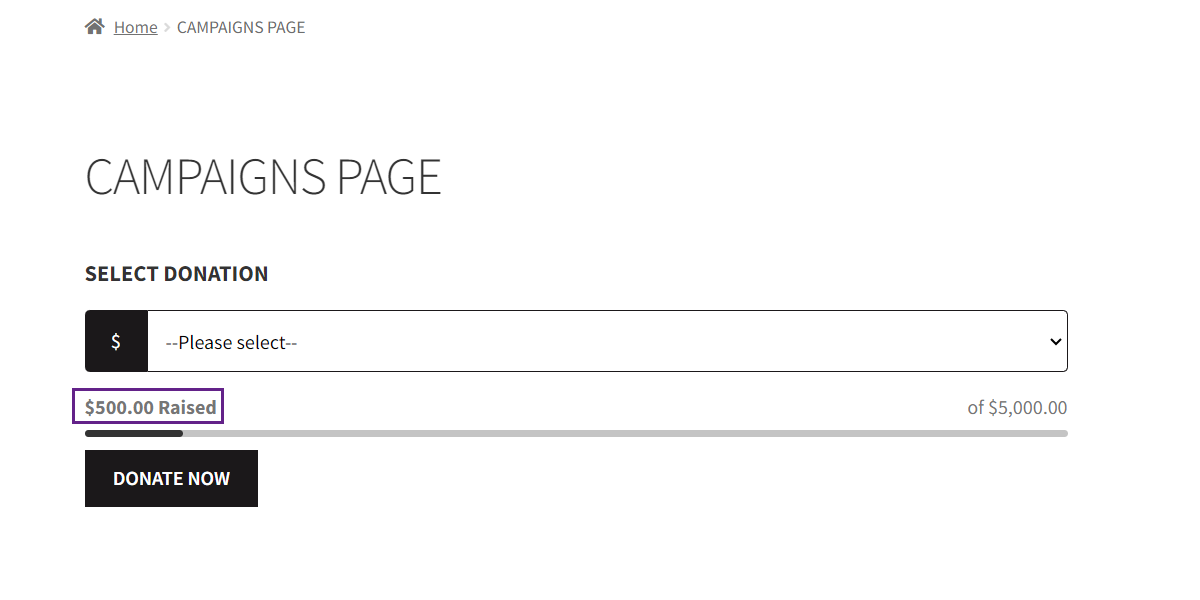
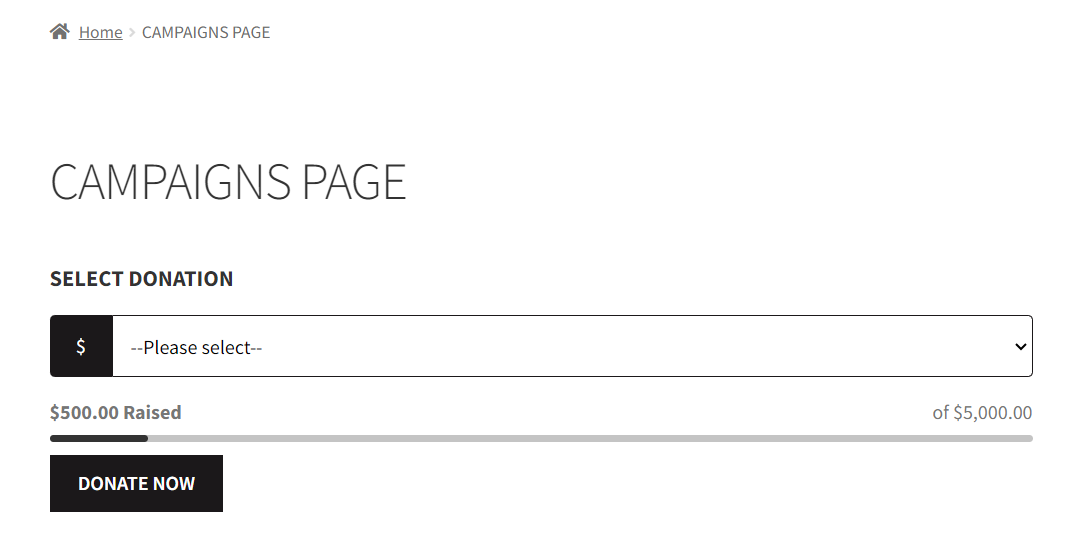
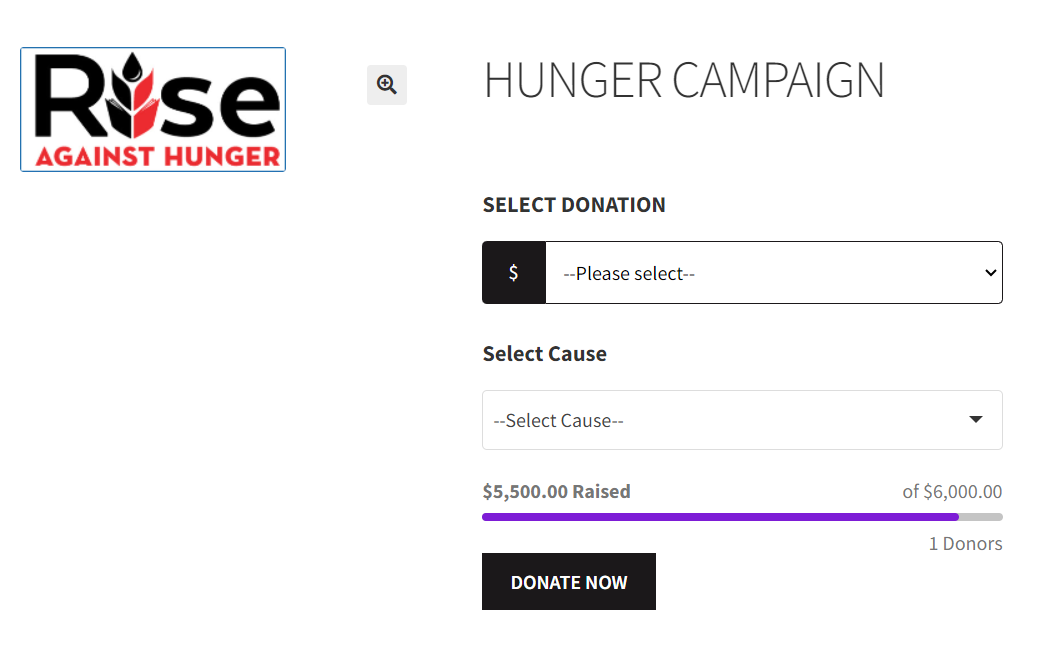
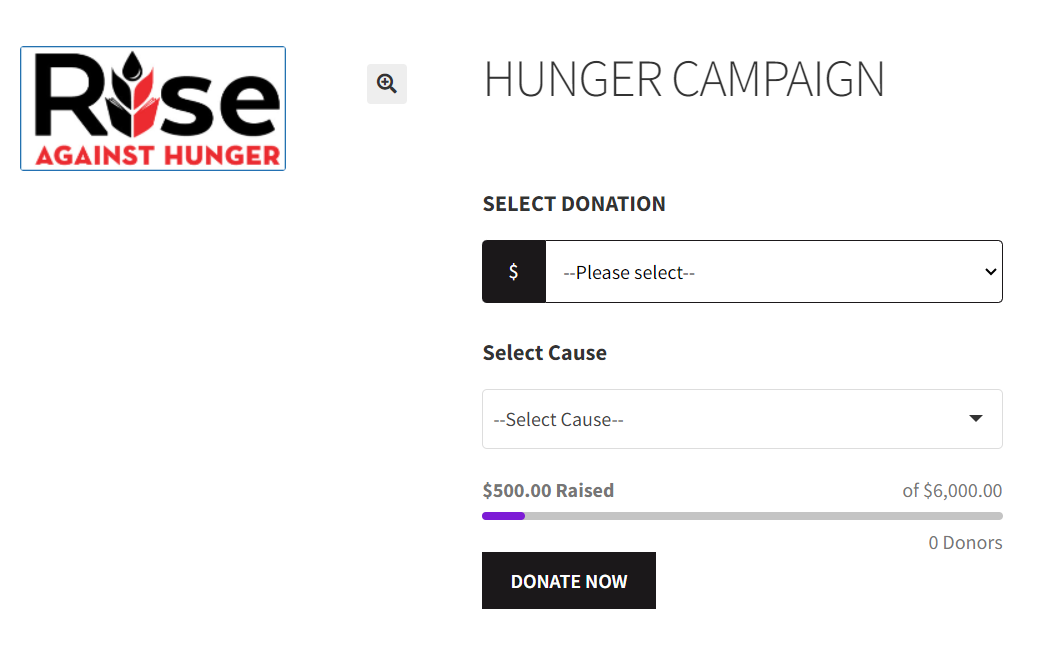
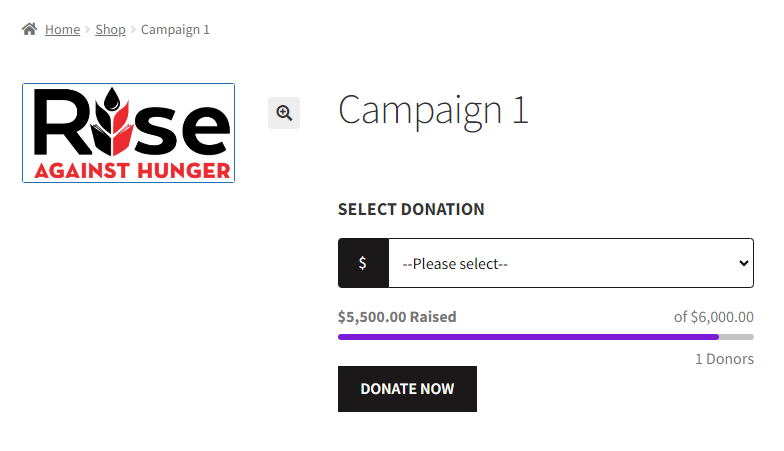
Goal Type – Amount Raised
- When the Amount Raised is selected as Goal Type option, a progress bar will appear on the campaign with the amount raised and the total amount on it.
Front-End Impact
- An amount raised option will be highlighted at the start of the progress bar.

NOTE: When Amount Raised and Percentage Raised is selected in the Goal Type option, two options will appear below:
- Goal Amount
- Initial Goal Amount.

Goal Amount
- Enter the Goal Amount and click the Update button.

Front-End Impact
- The Goal Amount will appear at the end of the progress bar, indicating that this is the total goal amount required to achieve the campaign goal.
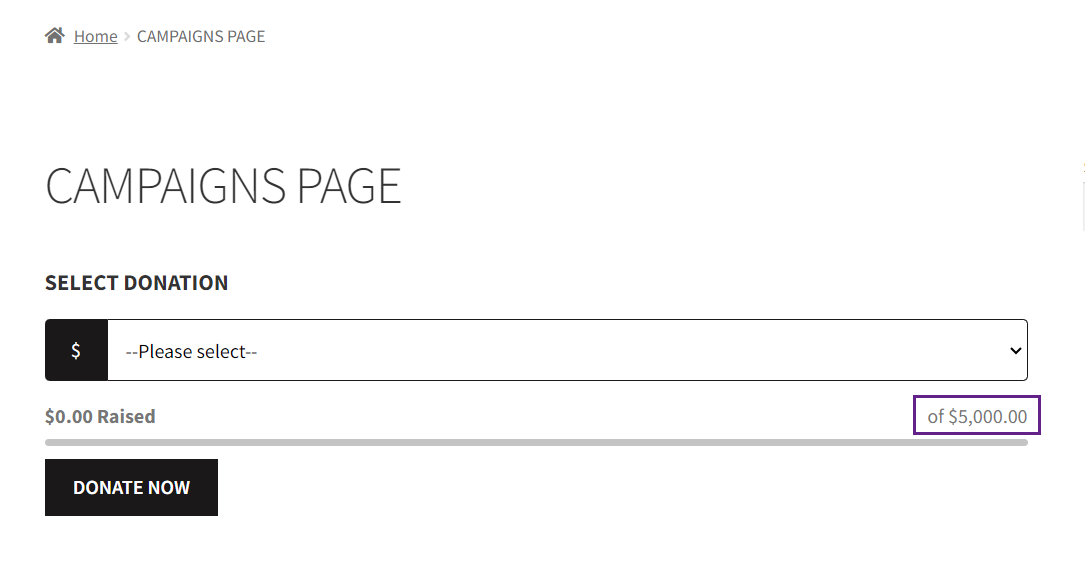
Initial Goal Amount
- Enter the Initial Goal Amount and click the Update button.

Front-End Impact
- The Initial Goal Amount will appear at the start of the progress bar, indicating that a certain amount has been raised.
Goal Type – Percentage Raised
- When the Amount Raised is selected as the Goal Type option, a progress bar will appear on the campaign with the amount raised and the total amount on it.

Front-End Impact
- The Initial Goal Amount will appear at the start of the progress bar, indicating that a certain amount has been raised.
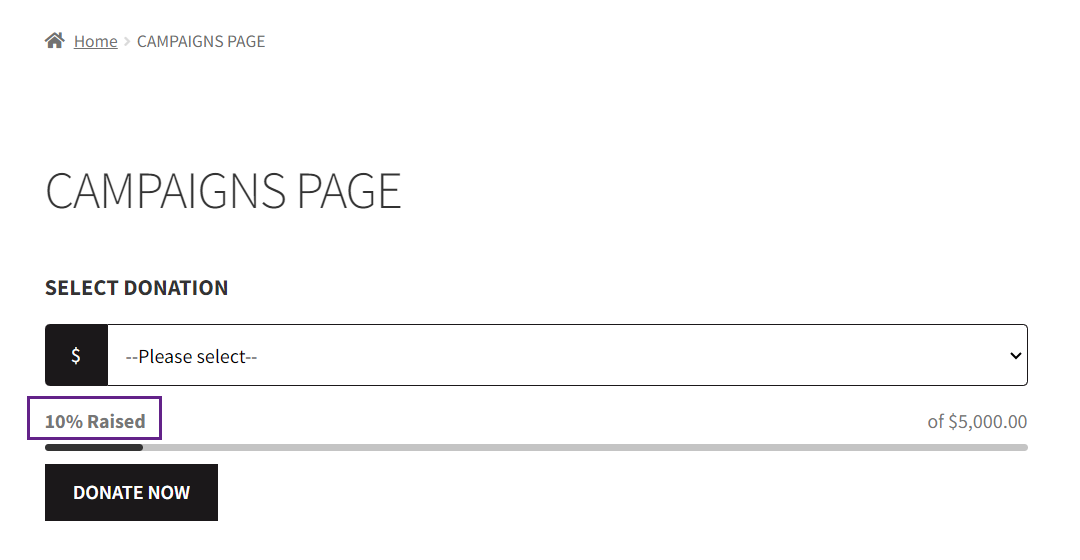
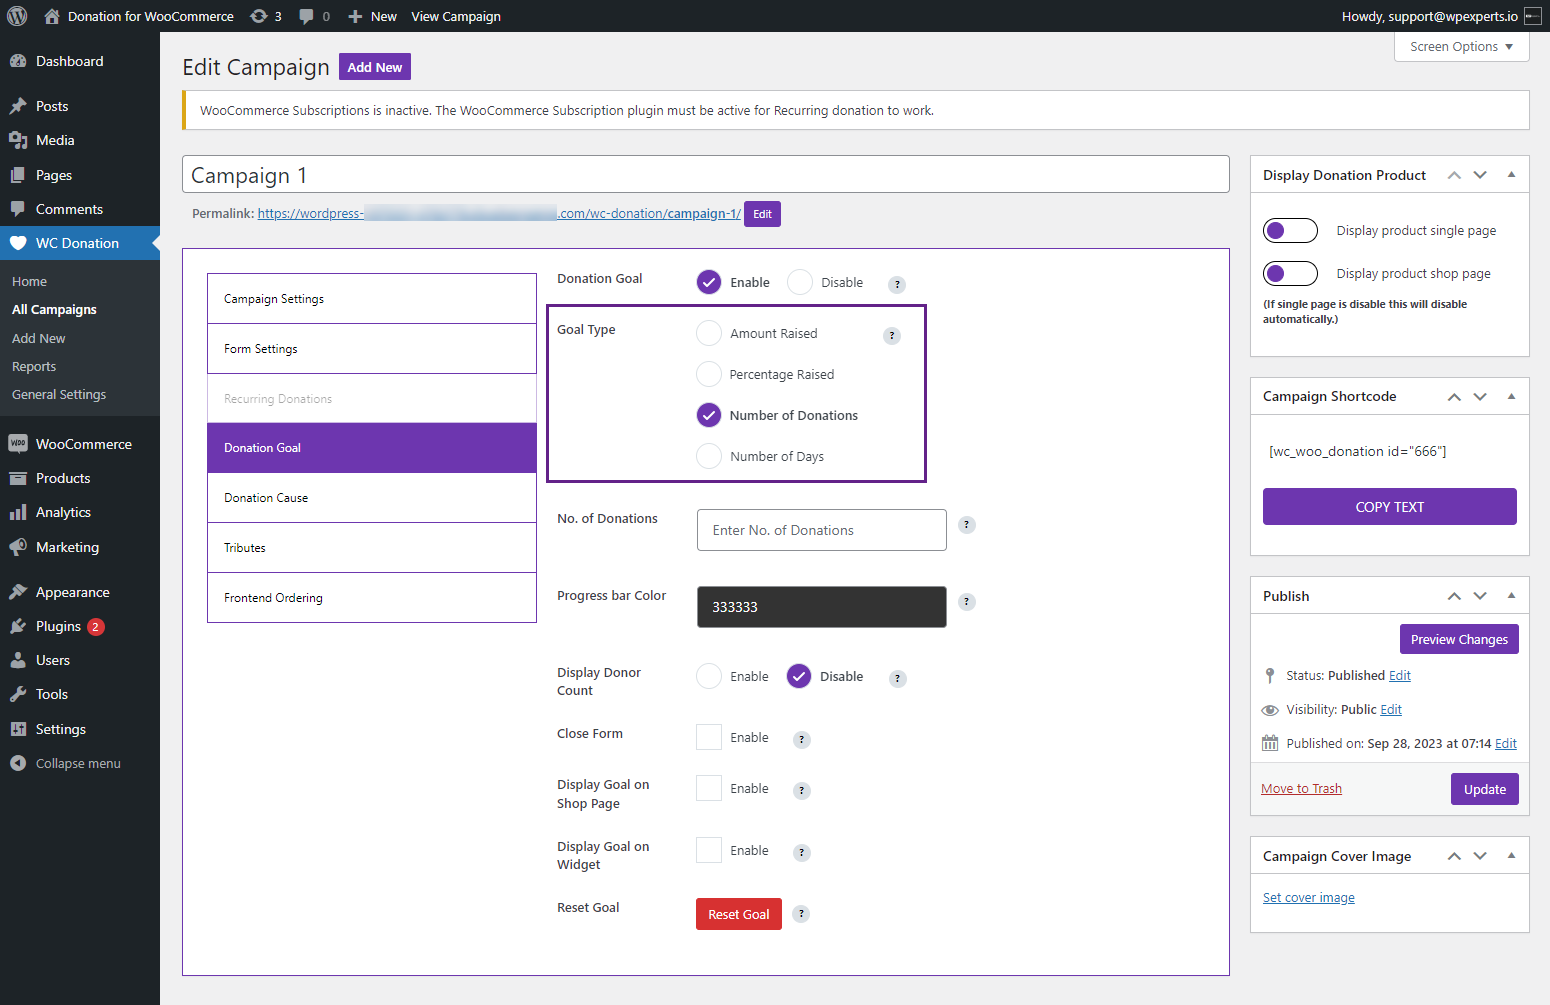
Goal Type – Number of Donations
- When the Number of Donations is selected as the Goal Type option, a progress bar will appear on the campaign with the no. of donations raised.
Front-End Impact
- The Number of Donations will appear at the start of the progress bar, indicating that a certain number of donations has been raised.

NOTE: When the Number of Donations is selected in the Goal Type option, an option will appear below, which is the No. of Donations.

No. of Donations
- Enter the No. of Donations and click the Update button.
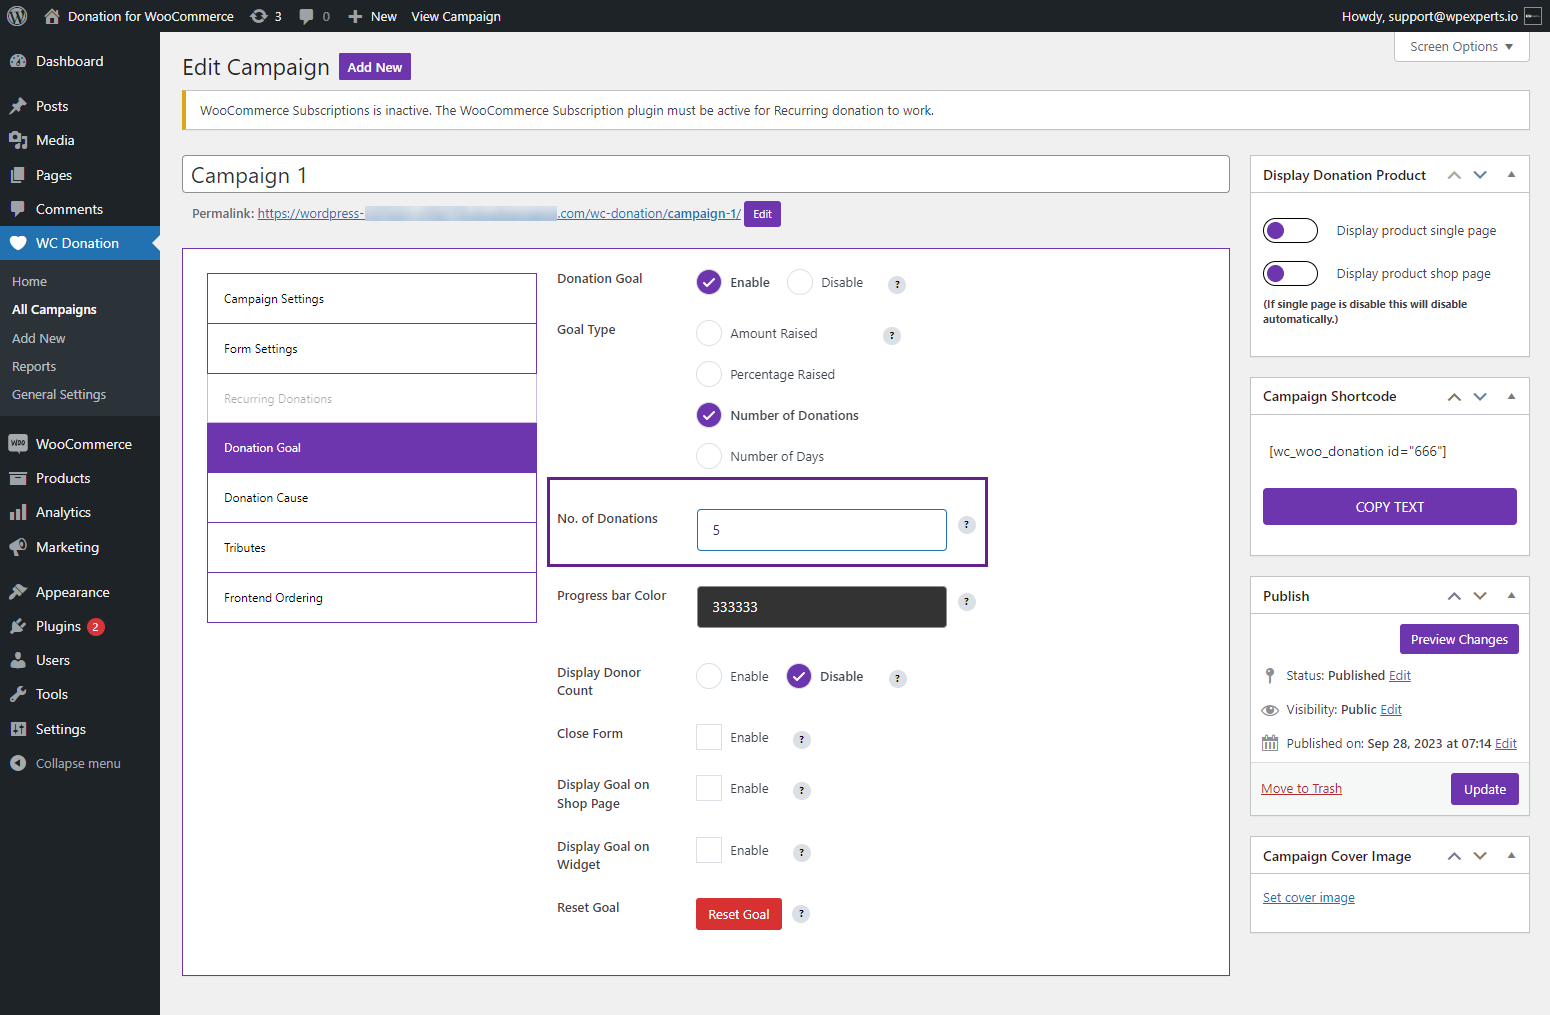
Front-End Impact
- The No. of Donations will appear at the end of the progress bar, indicating that this is the total no. of donations required to achieve the campaign goal.
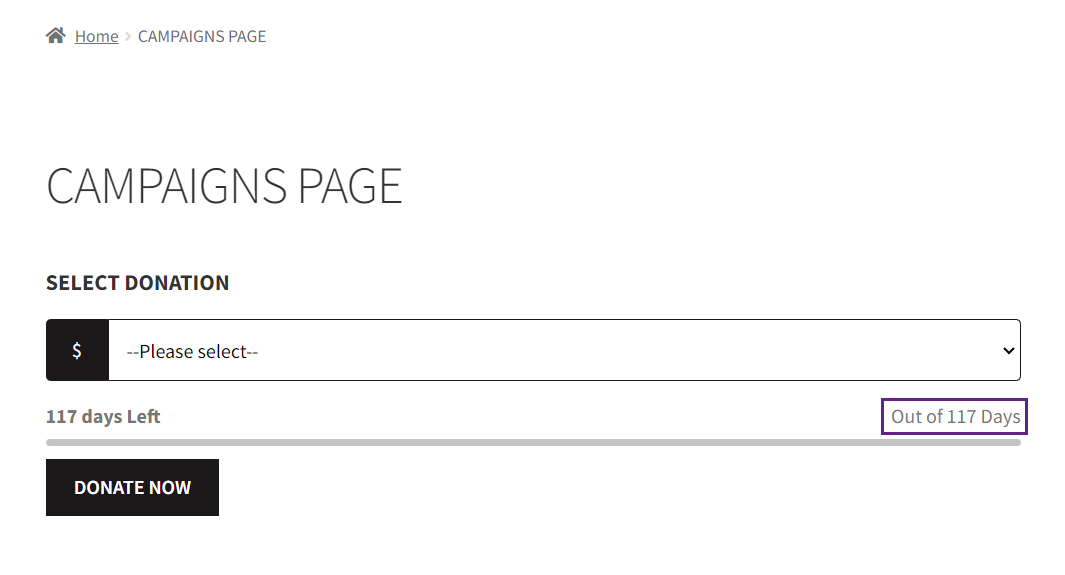
Goal Type – Number of Days
- When the Number of Days is selected as the Goal Type option, a progress bar will appear on the campaign with the number of days left for the campaign to be active.
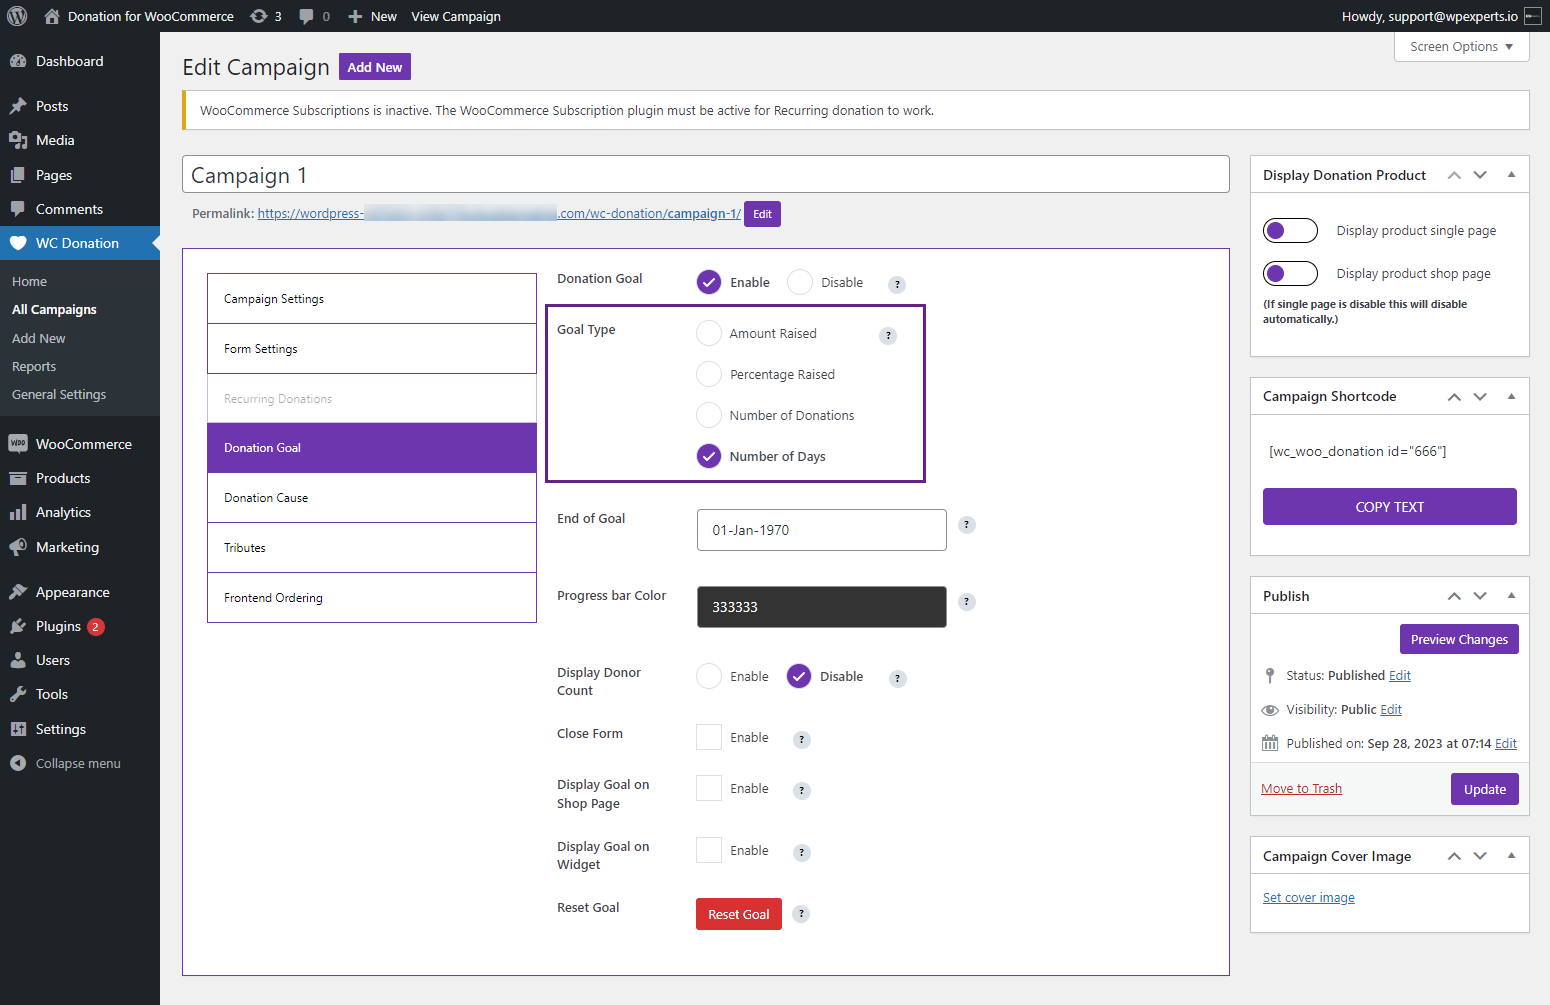
NOTE: When the Number of Days is selected in the Goal Type option, an option will appear below, which is the End of Goal.
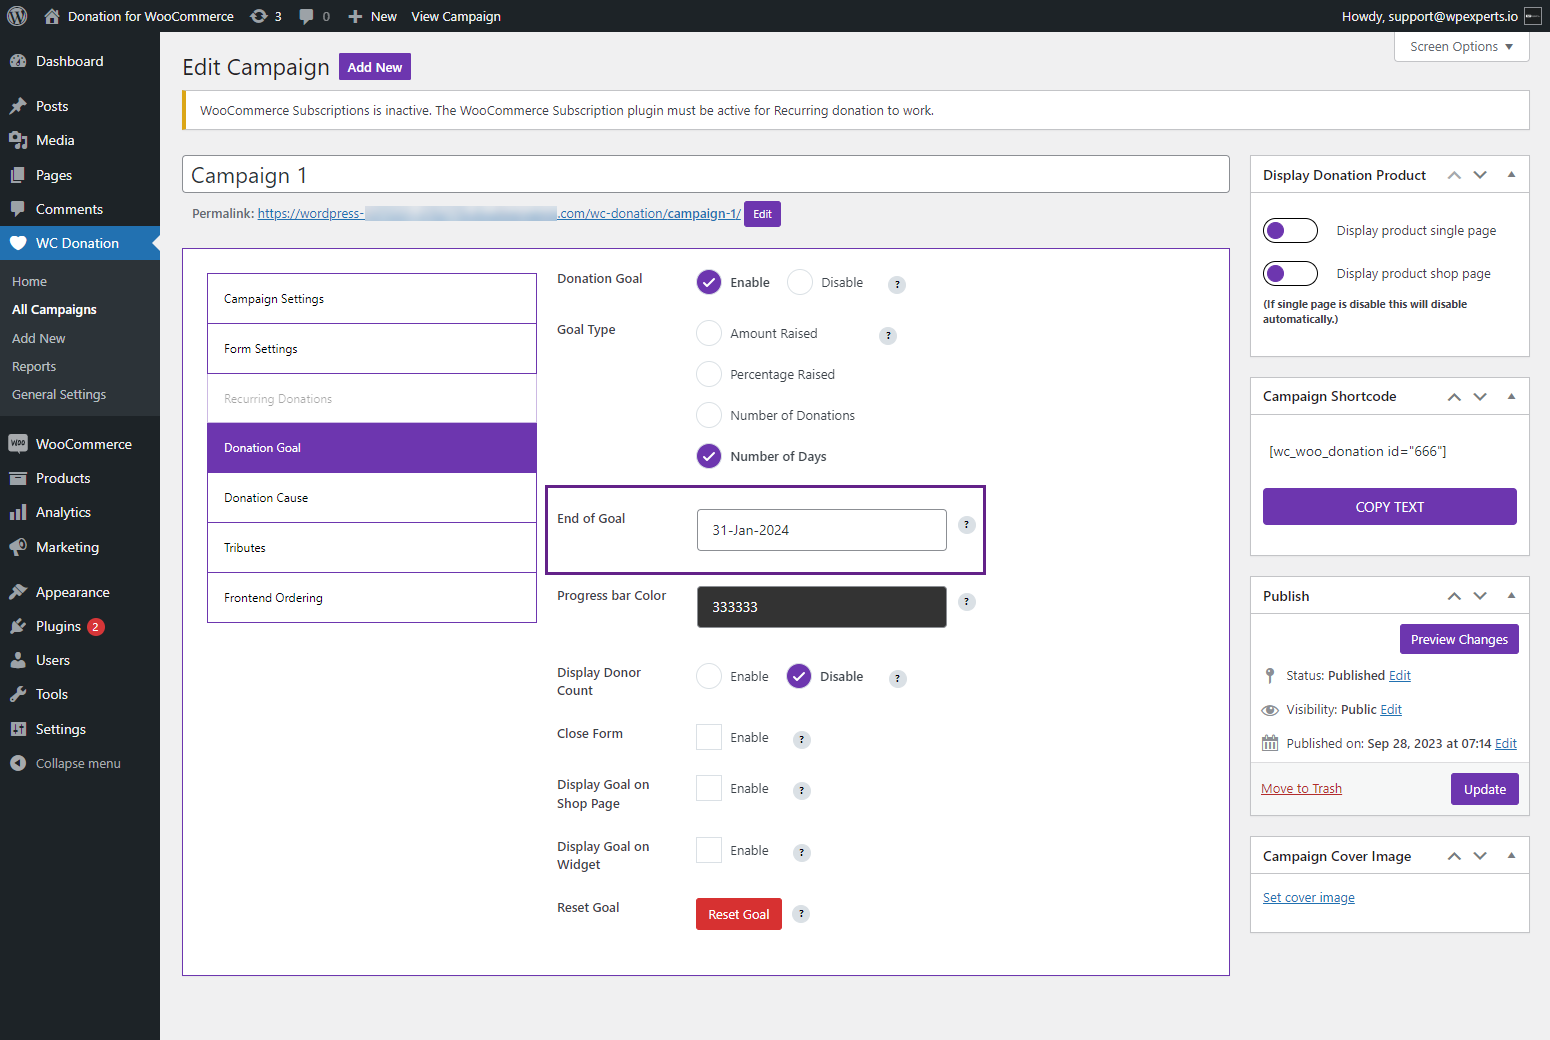
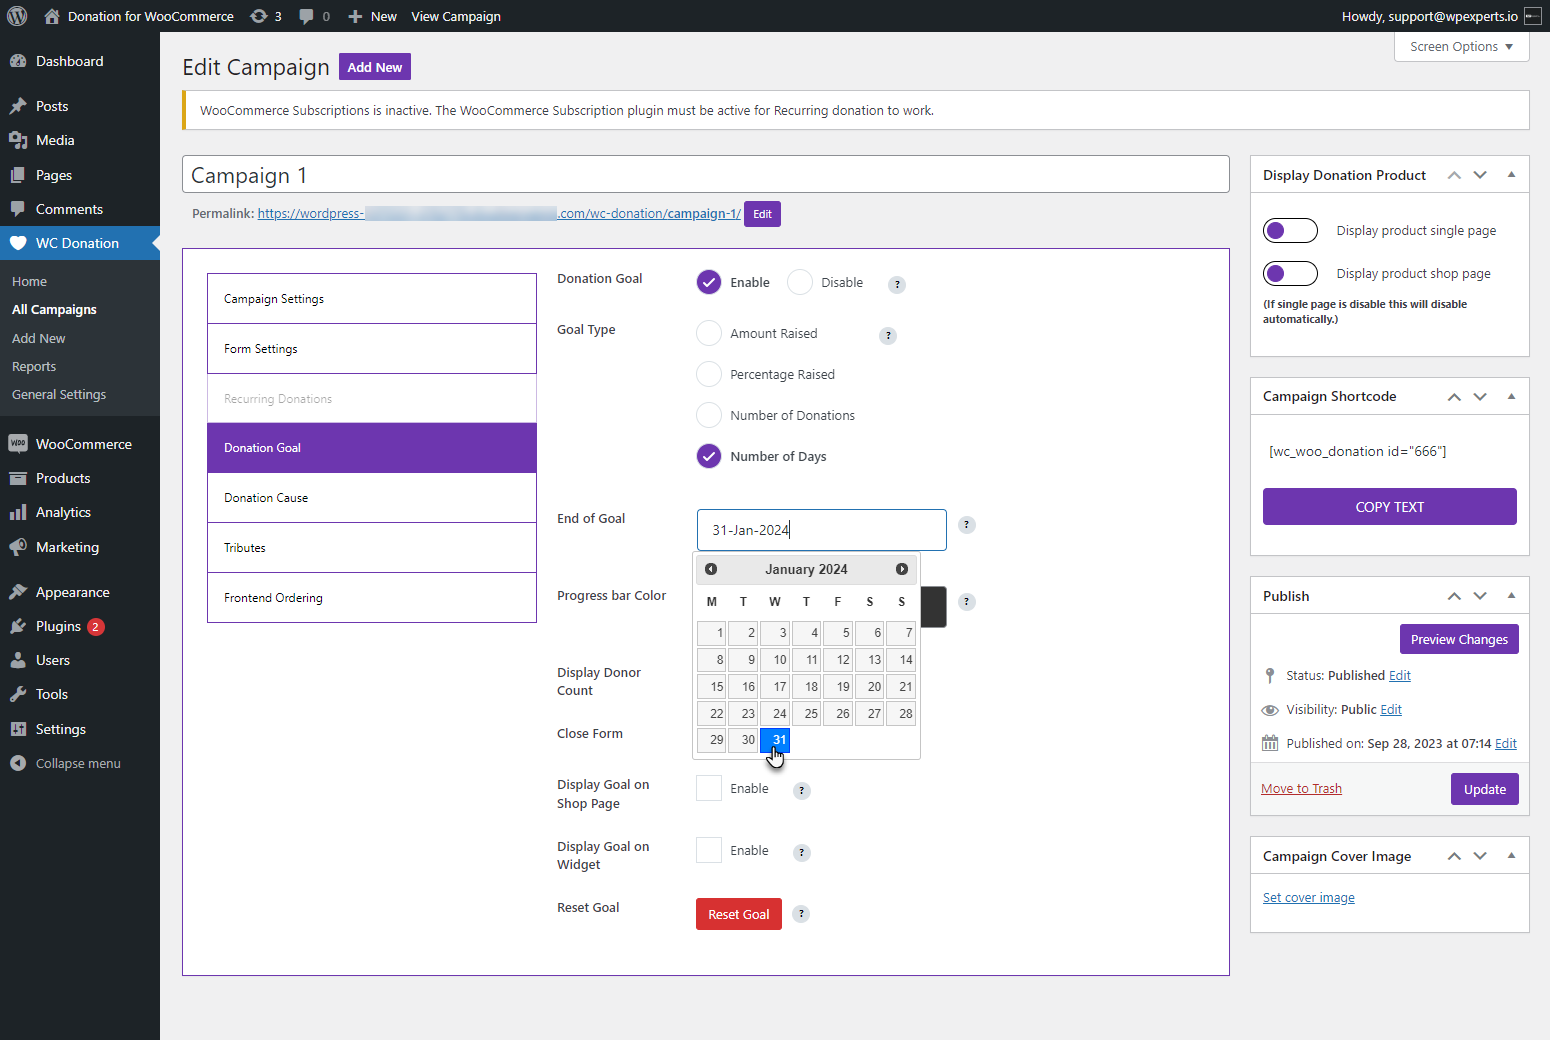
End of Goal
- Select the date in the End of Goal option and click the Update button.
Front-End Impact
- The End of Goal will appear at the end of the progress bar, indicating the number of days left to achieve the campaign goal.
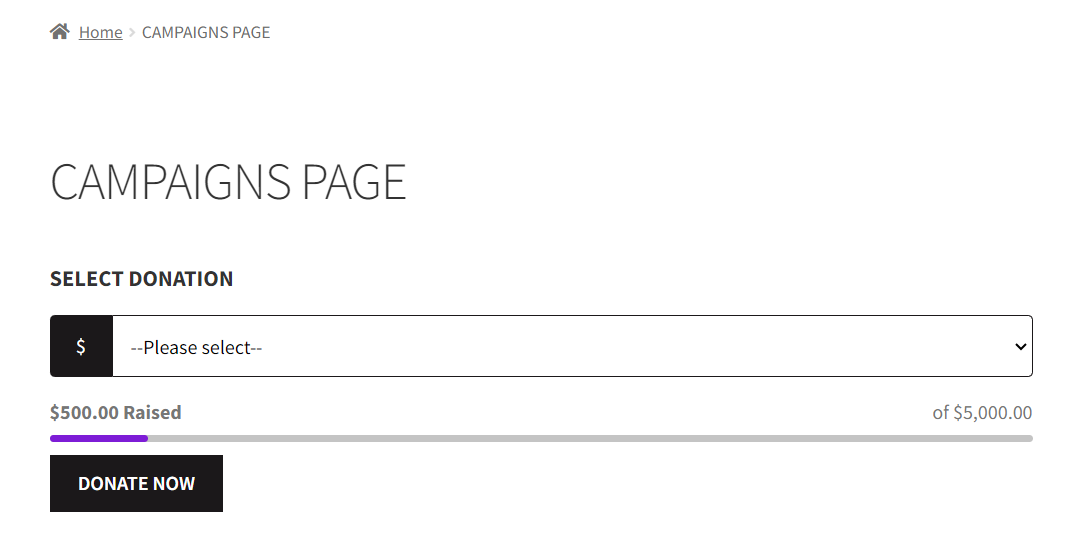
Progress Bar Color
- In the Progress Bar Color option, set the color of the progress bar of the campaign.
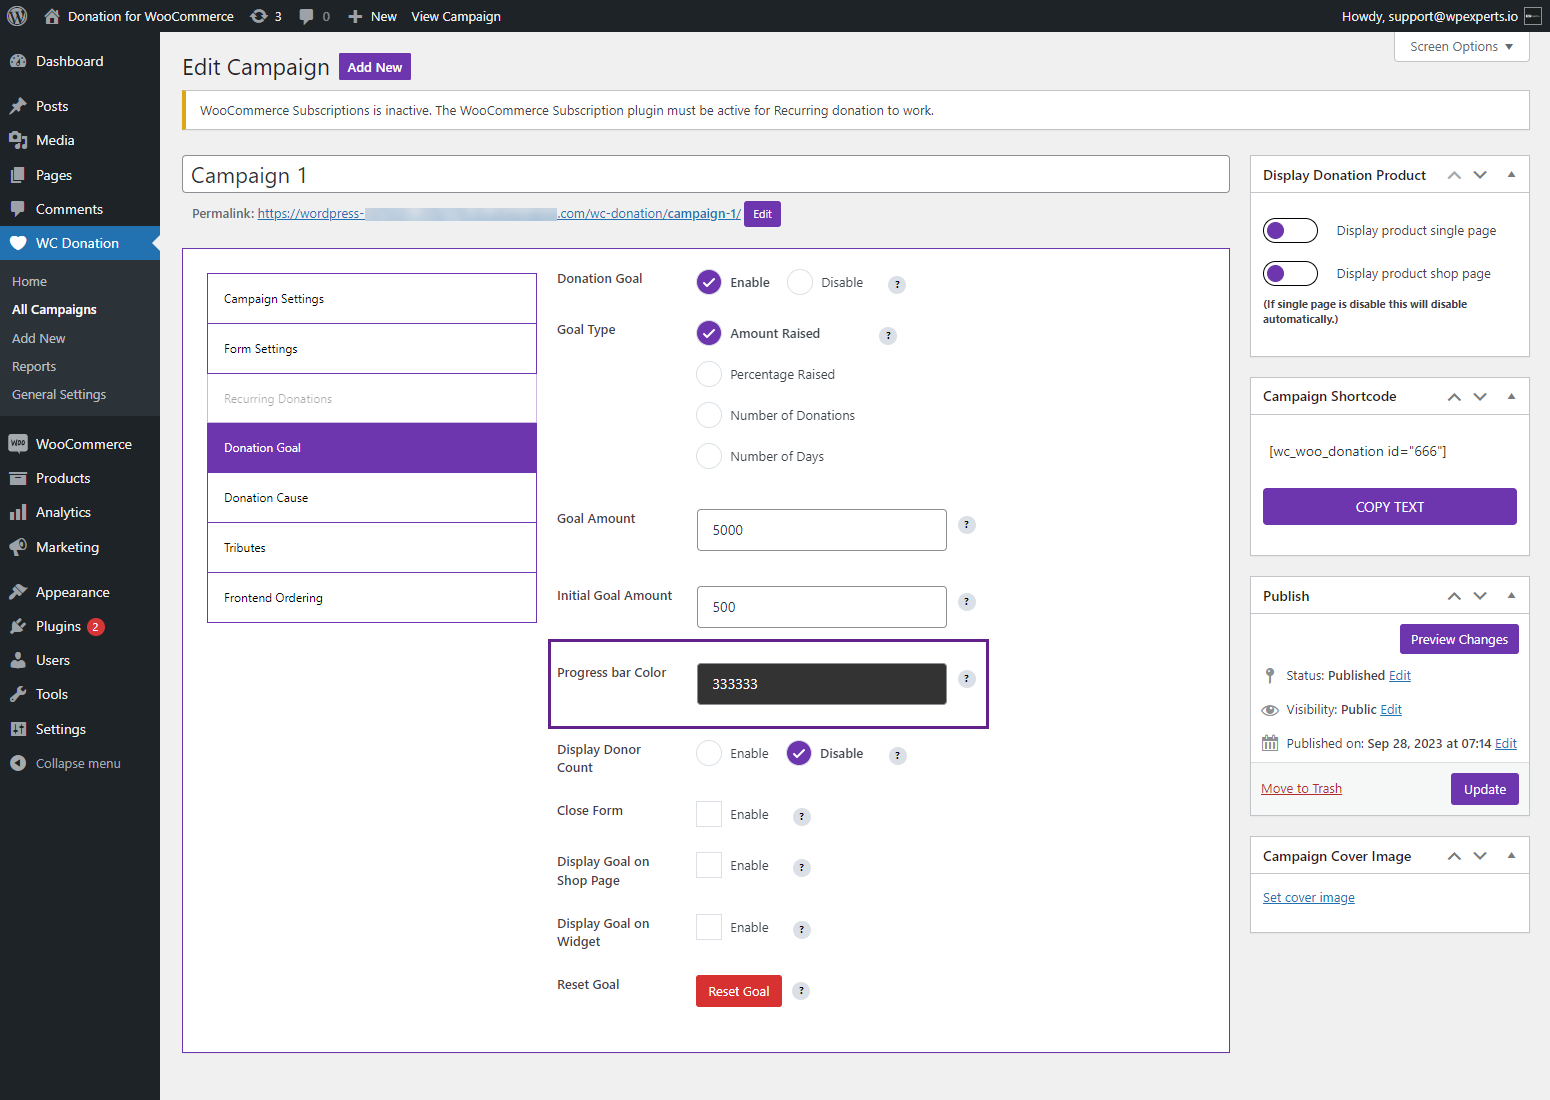
- Click on the field and select the progress bar from the color grid.
Front-End Impact
Before
After
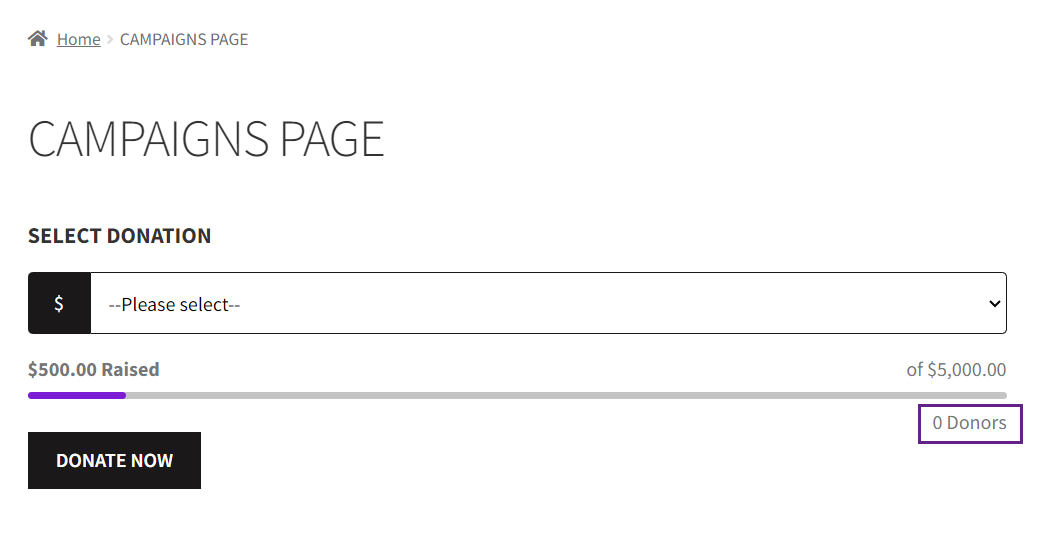
Display Donor Count
- In the Display Donor Count option, it displays unique donor counts and the number of individual donors in numbers. It counts the number of donations donated by different usernames, so if someone donates with the same username multiple times, it will count them as one.
- Select the Enable radio button and click on the Update button.
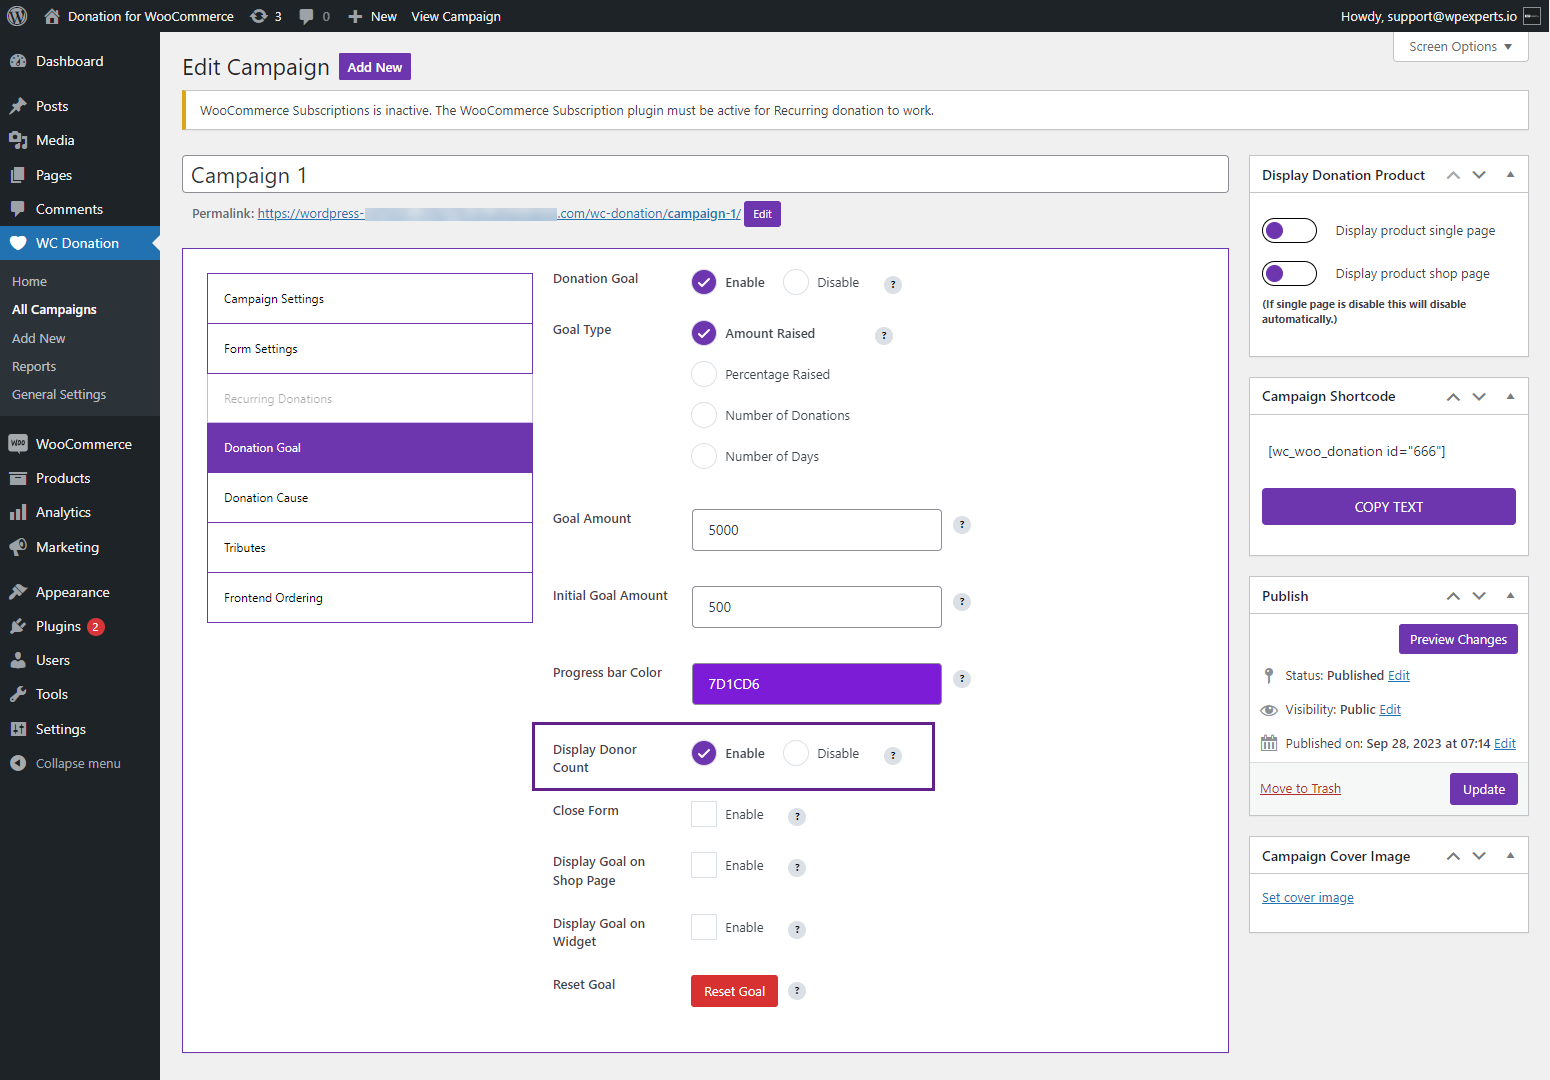
Front-End Impact
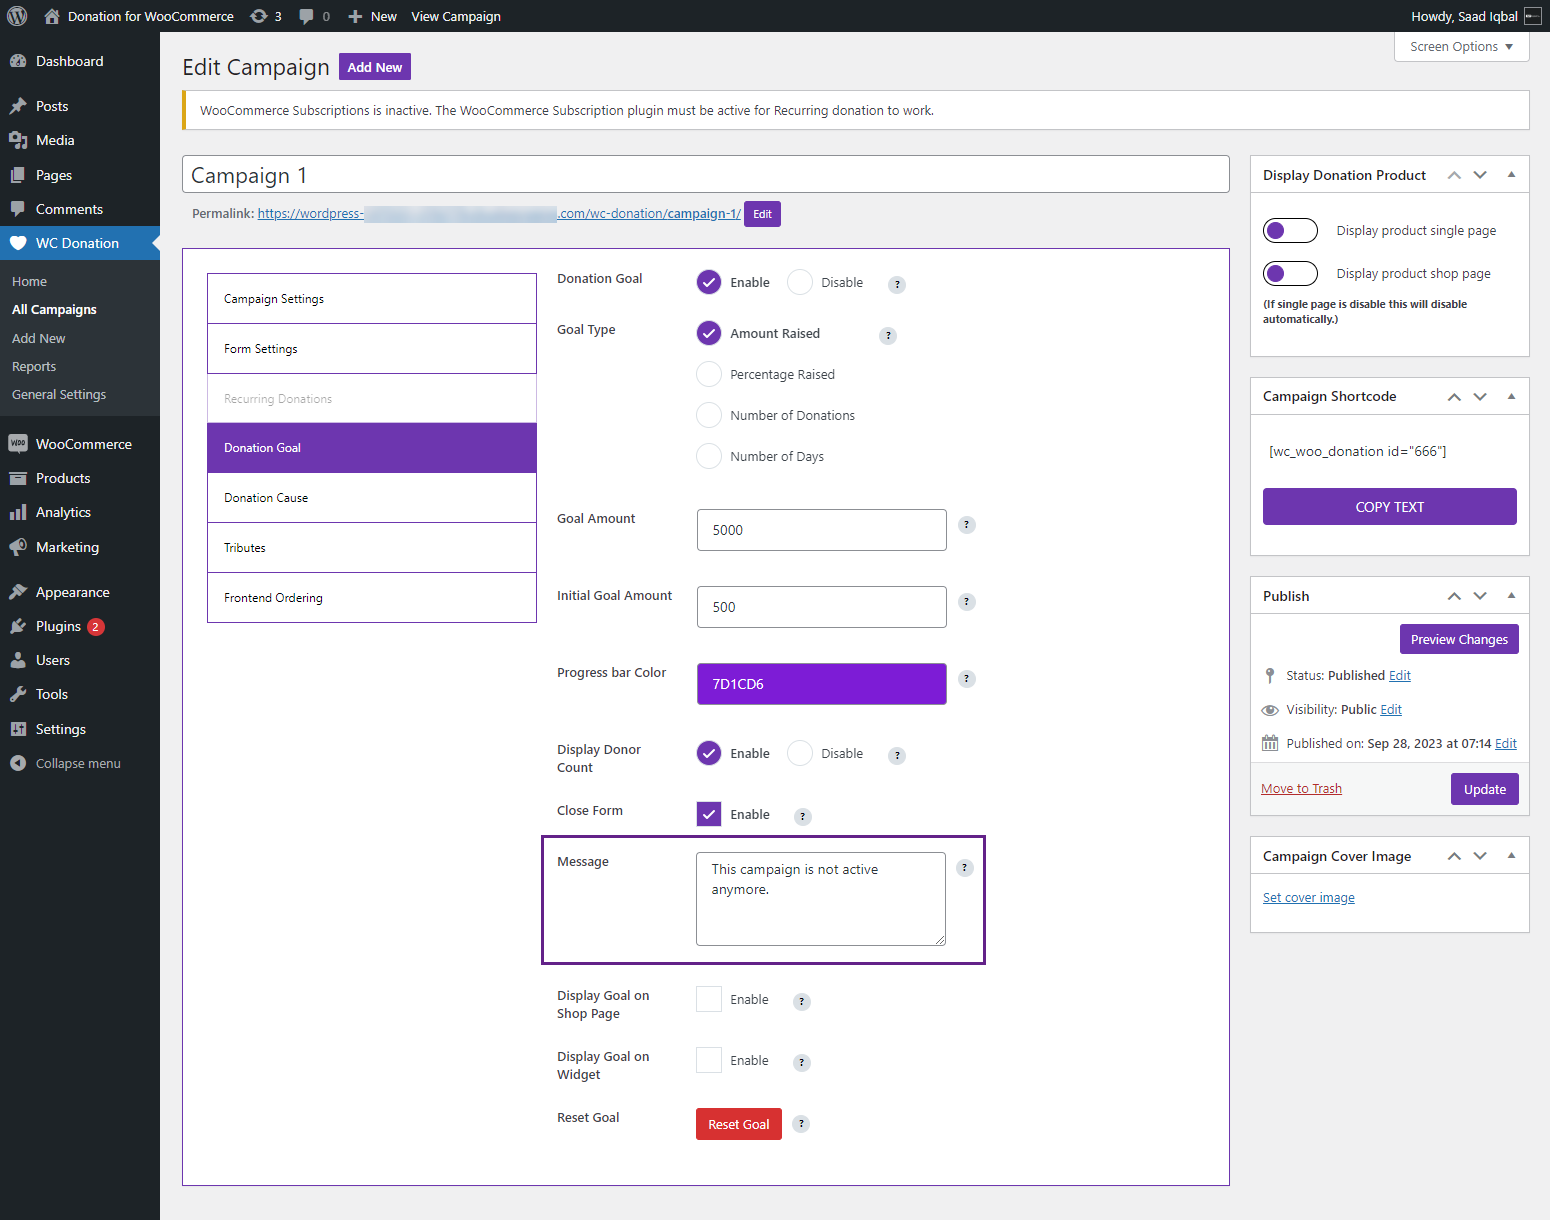
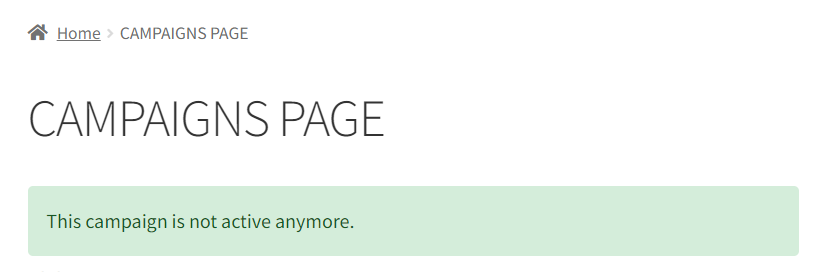
Close Form
- In the Close Form option, select the Enable radio button to close the specific form.

- Once done, a new option will appear below titled Message.

Message
- In the Message option, the donation form (donation box) automatically closes and displays a thank you message when the donation goal is achieved.
- Enter the Custom message in the message box.
Front-End Impact
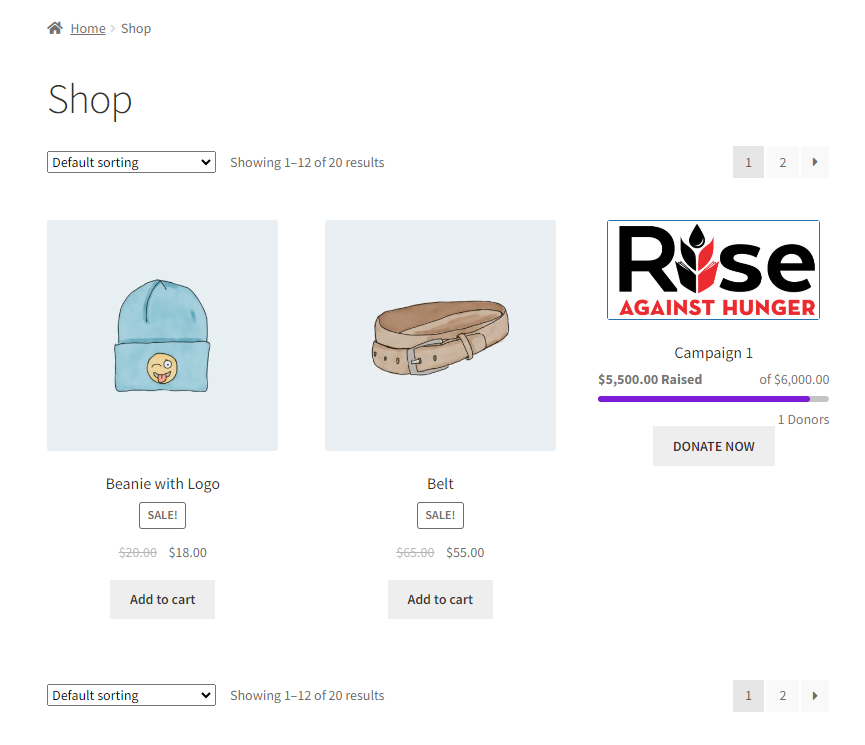
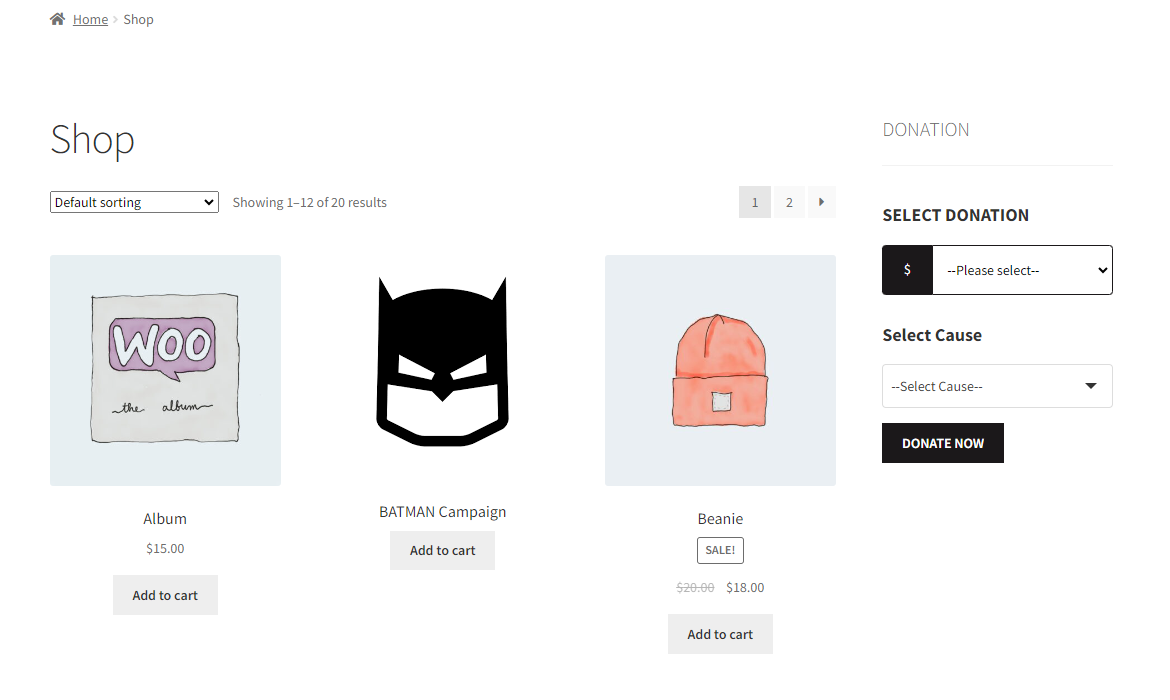
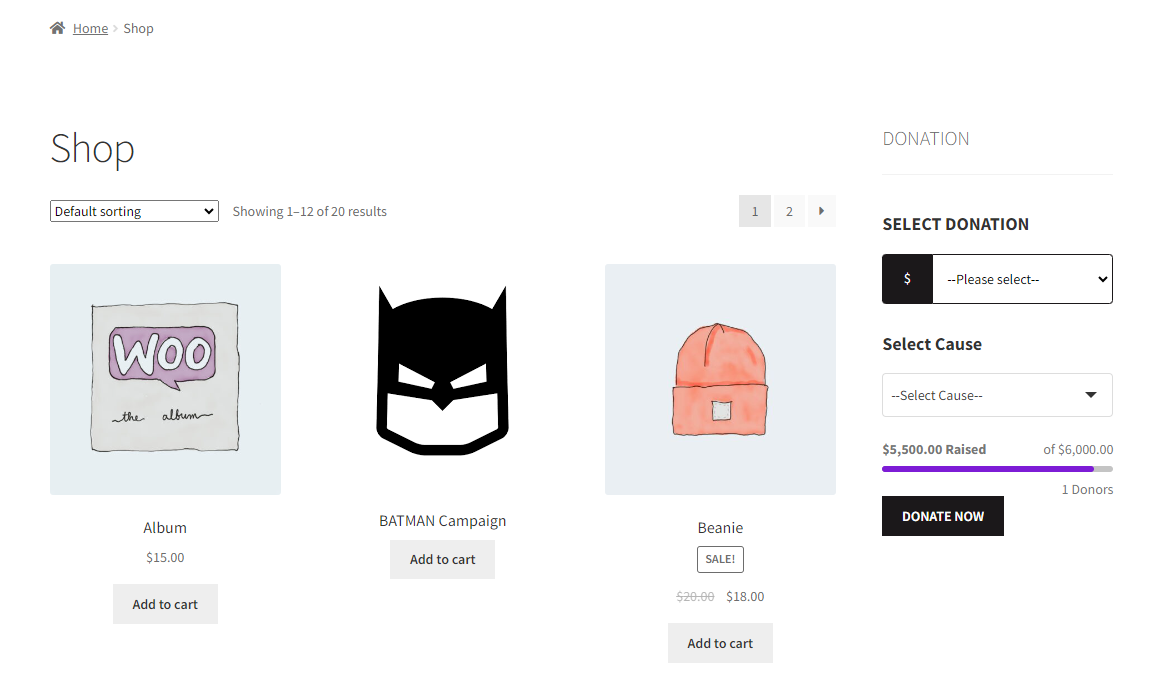
Display Goal on Shop Page
- In the Display Goal on Shop Page option, select the Enable radio button to show the goal progress bar on the shop page.
- Once done, click on the Update button.
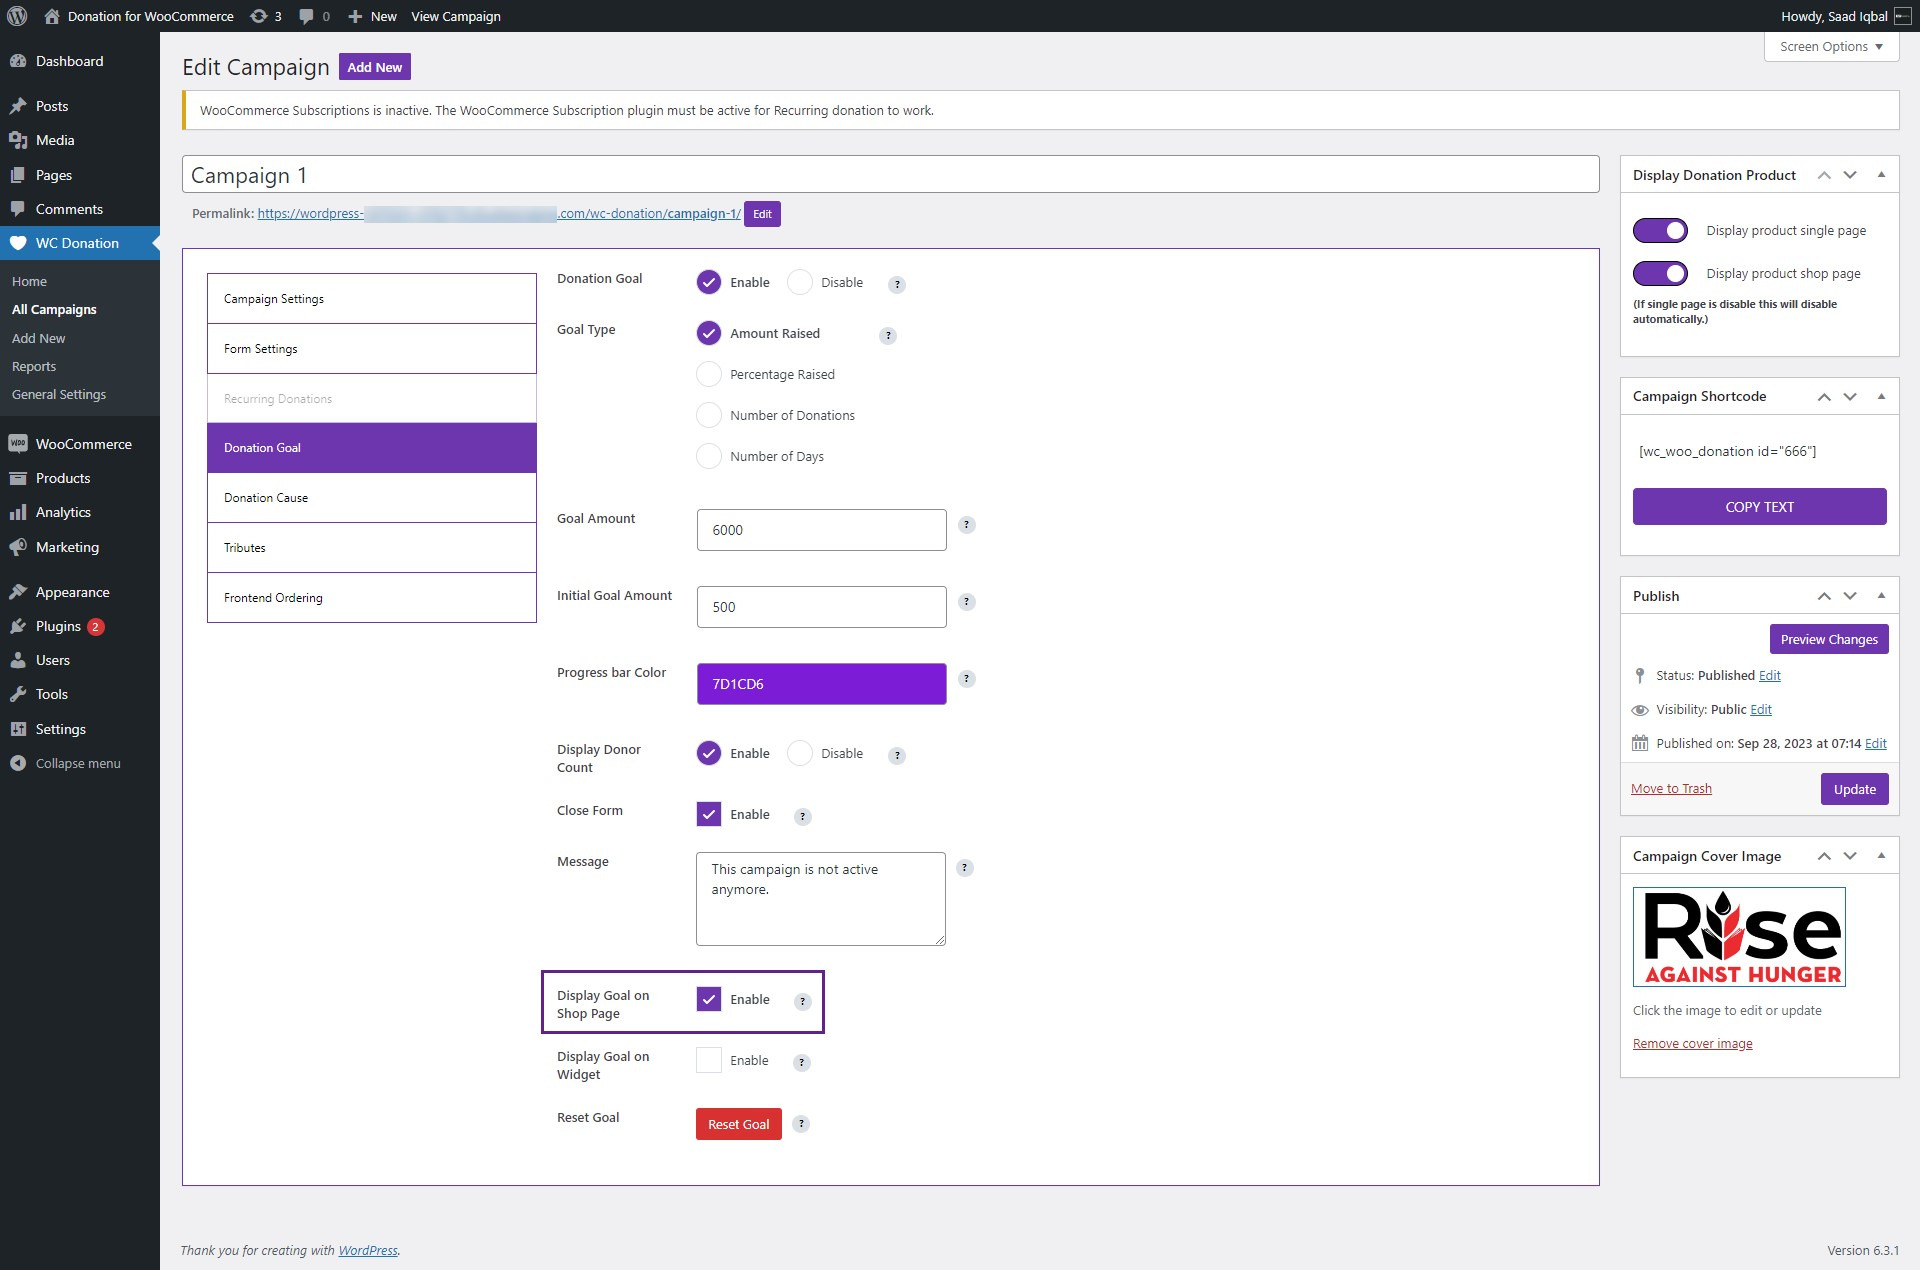
Front-End Impact
Before

After
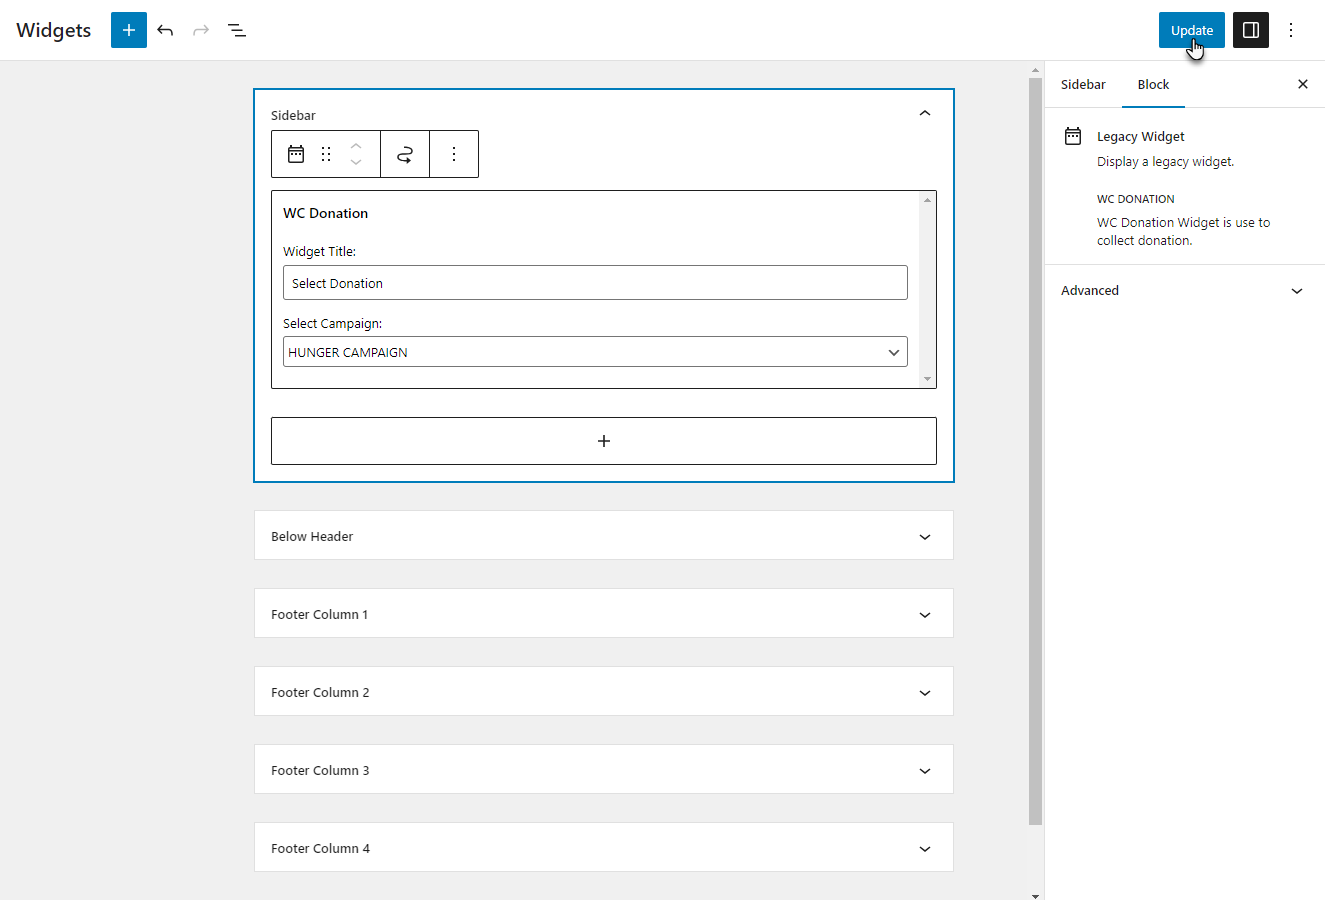
Display Goal on Widget
- In the Display Goal on Widget option, select the Enable radio button to show the campaign goal progress bar on the widget front-end.
- Once done, click on the Update button.
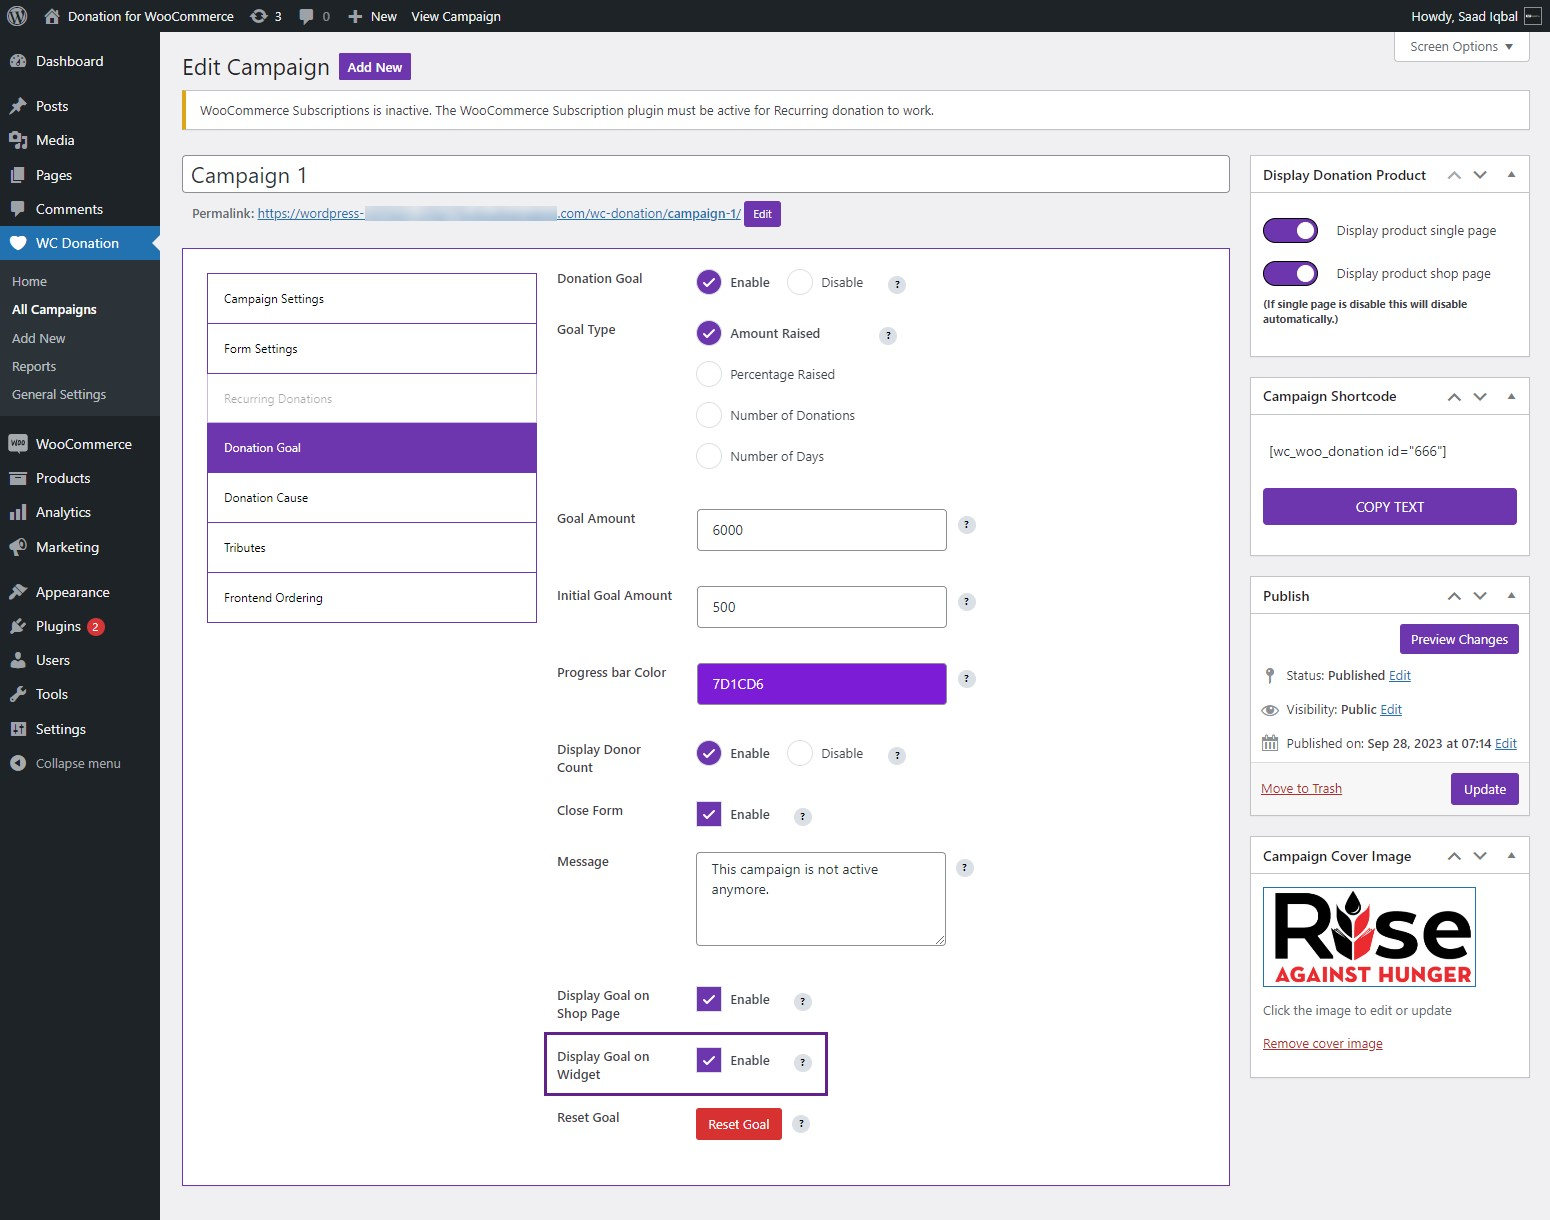
NOTE: Make sure to add the widget to apply this feature.
.

- Select any section where you want to put the widget and then click on the sign ➕ to add blocks.
- Select the WC Donation element.
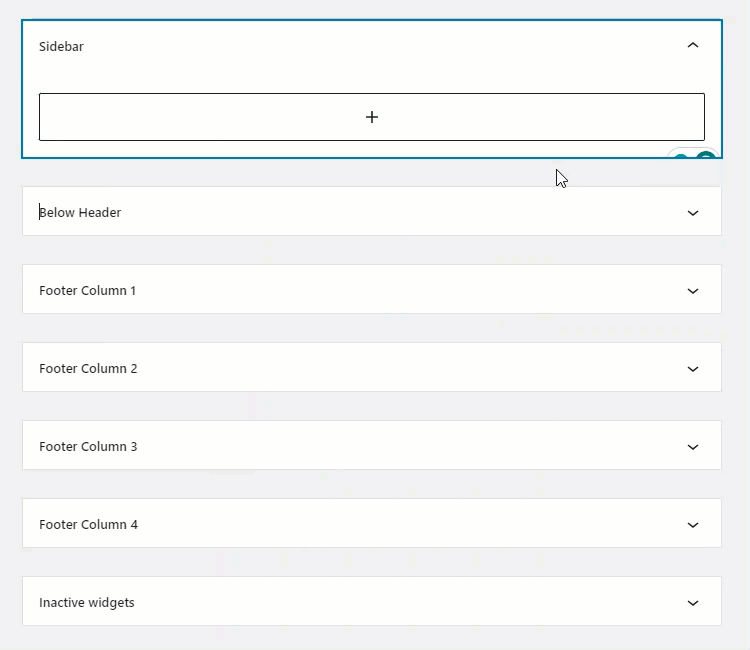
- Click on the Update button to apply your changes.
Front-End Impact
Before
After
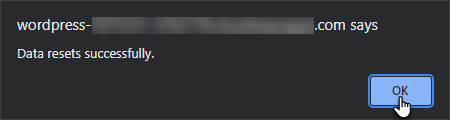
Reset Goal
- In the Reset Goal option, click the Reset Goal button to reset all the current goal progress of the campaign on the front-end.
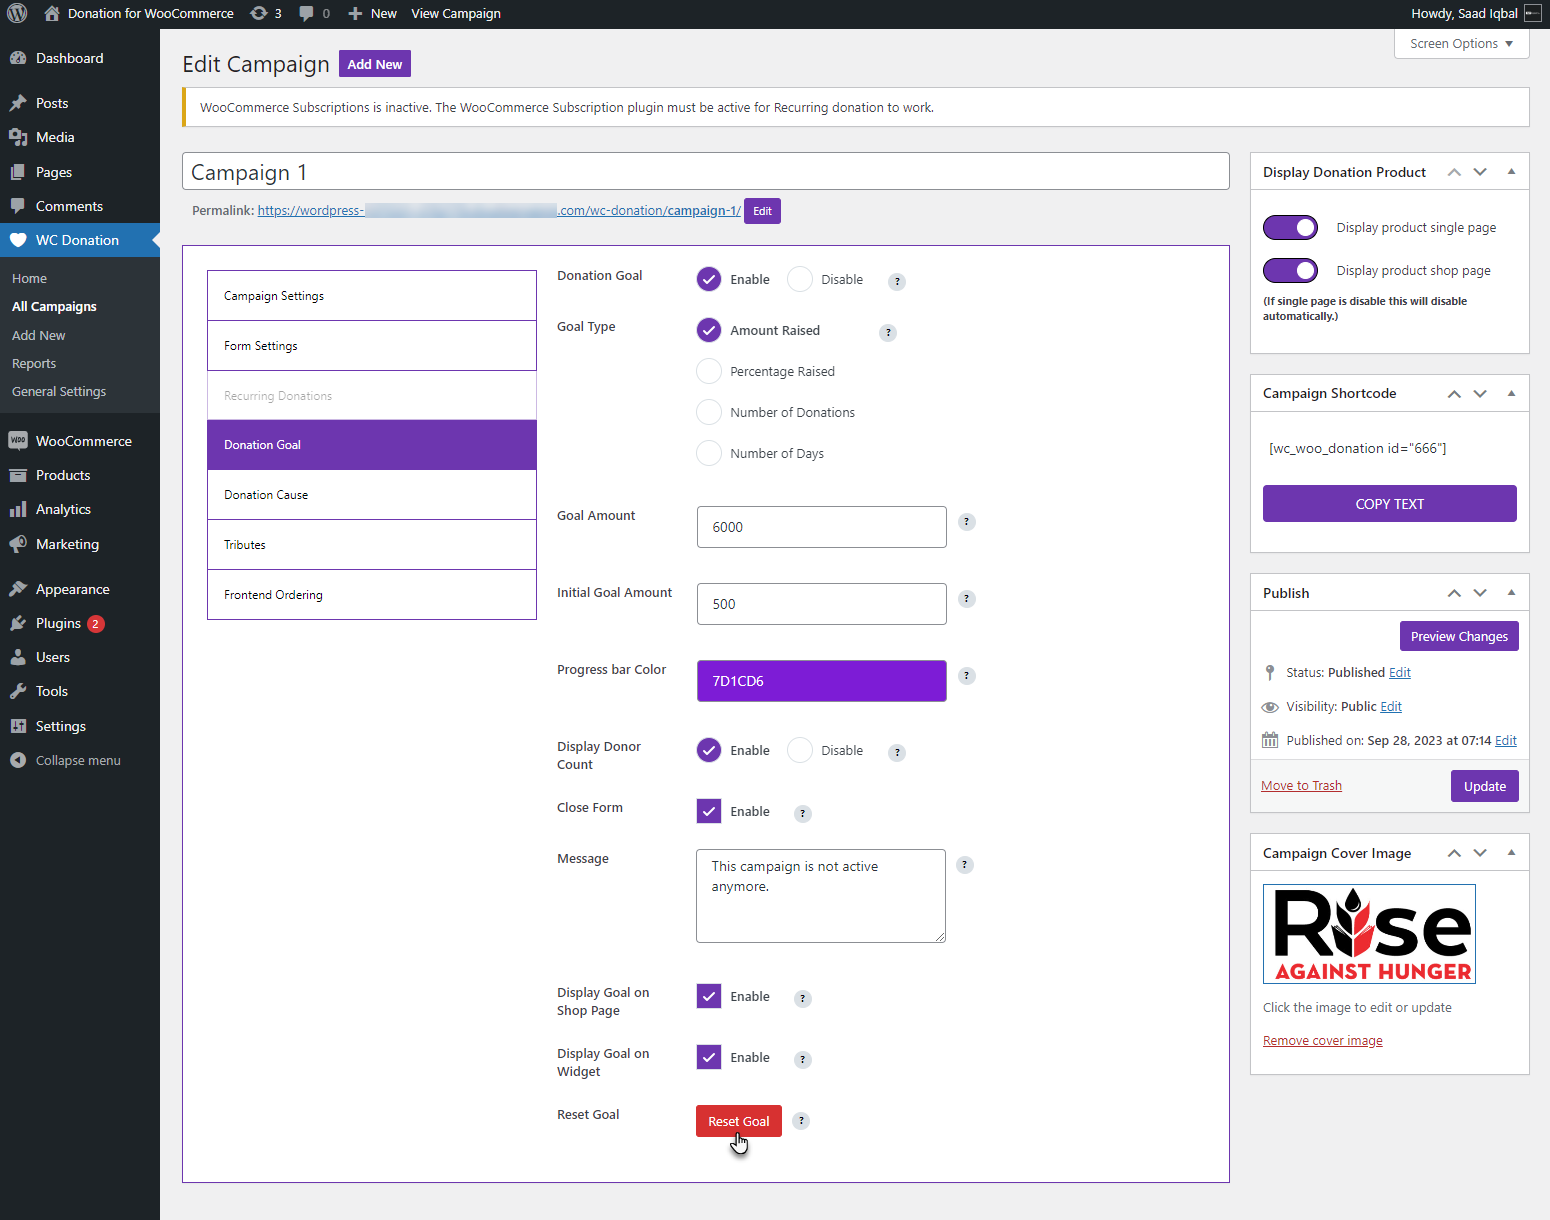
- A Warning popup will appear, notifying you that all your data will be lost.
- Click on the Reset button.
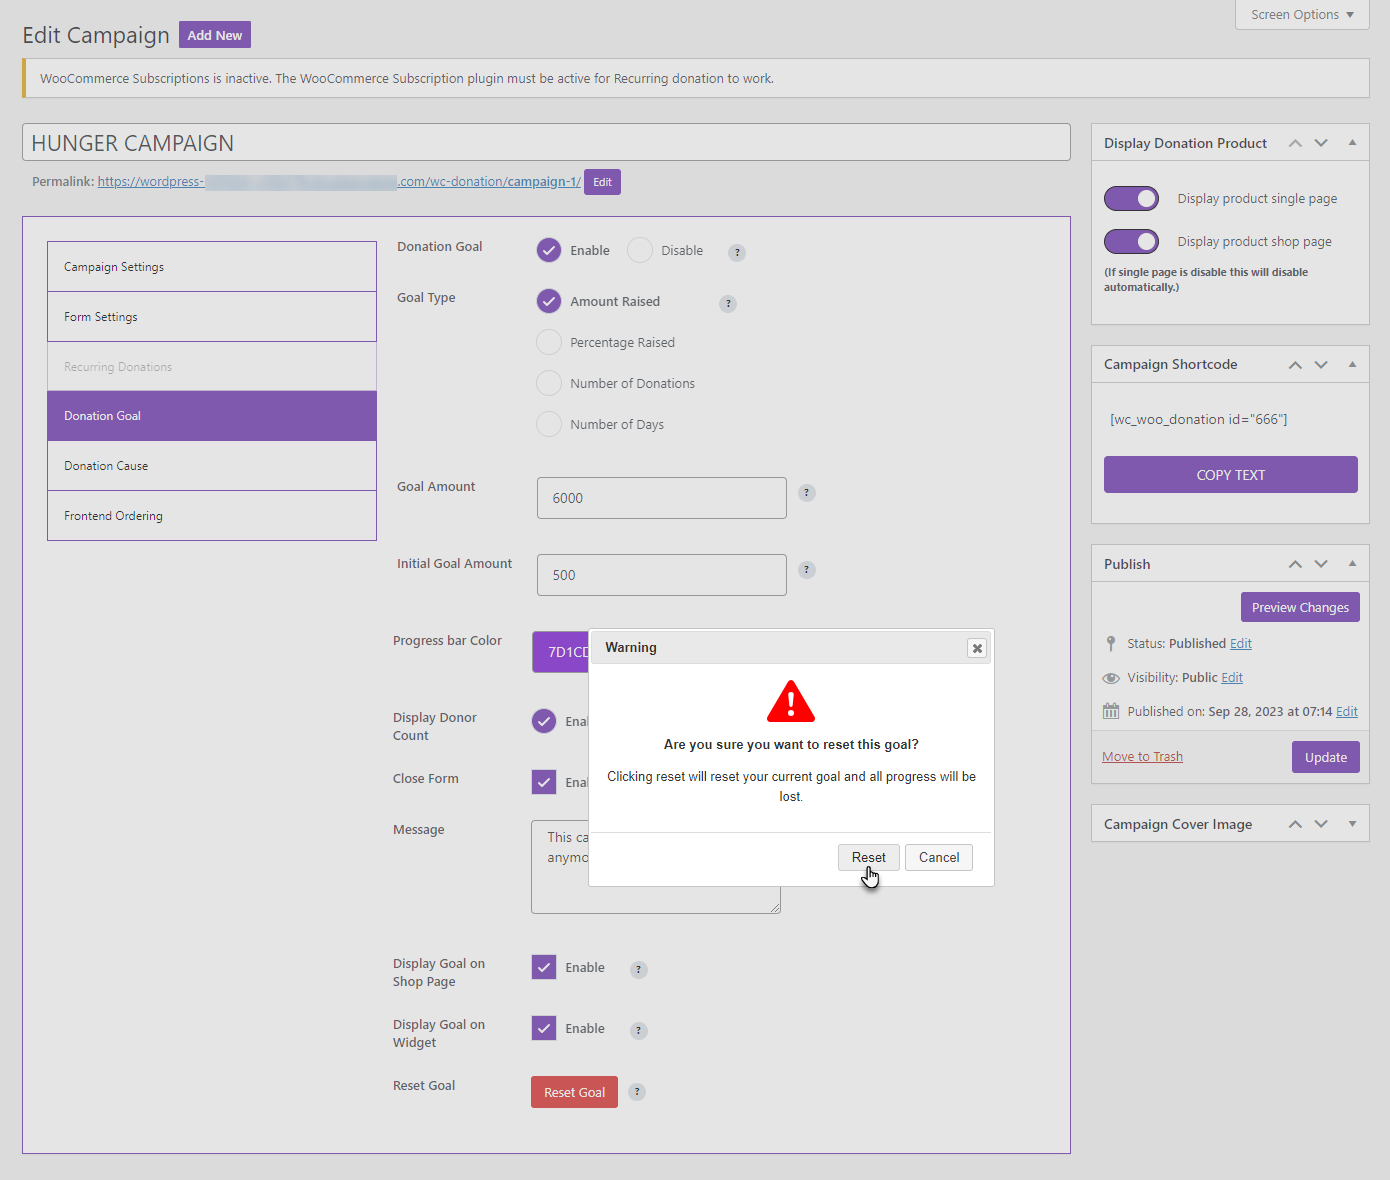
- Once done, a notification will appear that all your data is reset successfully.
Front-End Impact
Before
After
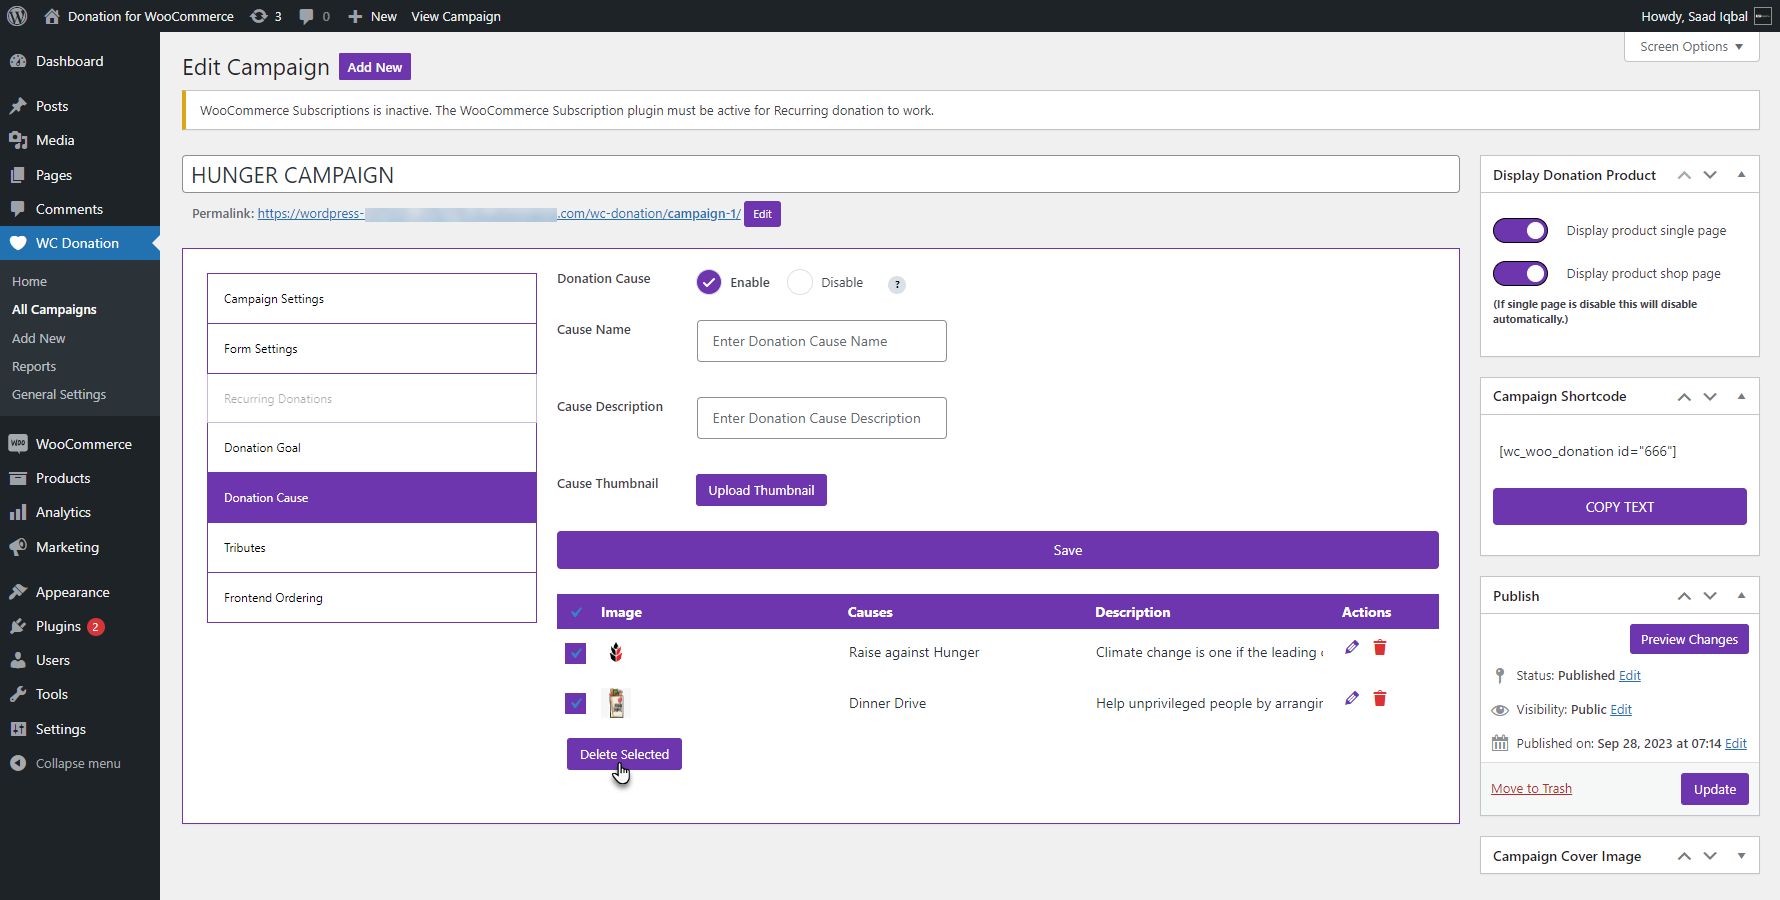
Donation Cause
↑ Back to topThe Donation Cause allows the admin to define a specific purpose or goal for a donation campaign, helping donors understand why they are donating and how the funds will be used.
- Go to the Donation Cause tab.
- We have four options in the Donation Cause tab.
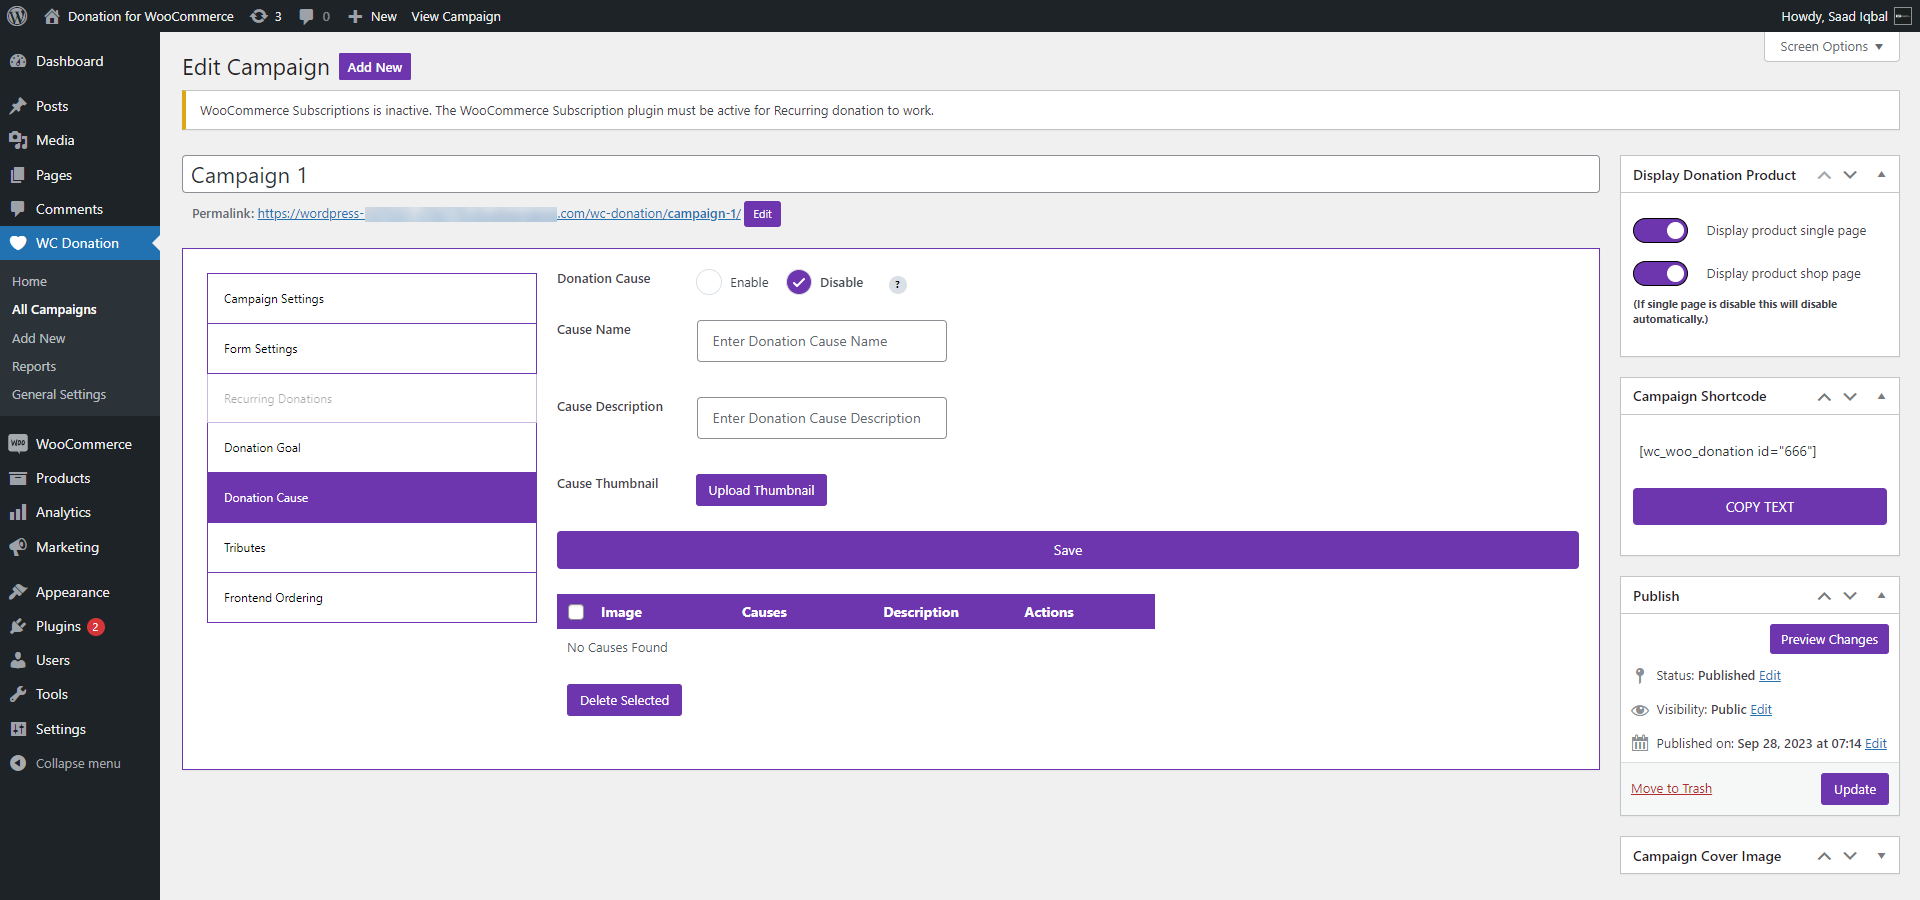
Donation Cause
- Select the Enable radio button to enable the donation goal.
Cause Name
- Enter the Cause Name.
Cause Description
- Enter the Cause Description.
Cause Thumbnail
- Select the Cause Thumbnail by clicking the Upload Thumbnail button.
- Once done, click on the Save button to save the donation cause.
- Once done, click on the Update button.
- The cause will be created successfully.

- Click on the Edit ( ???? ) sign to edit the donation cause.
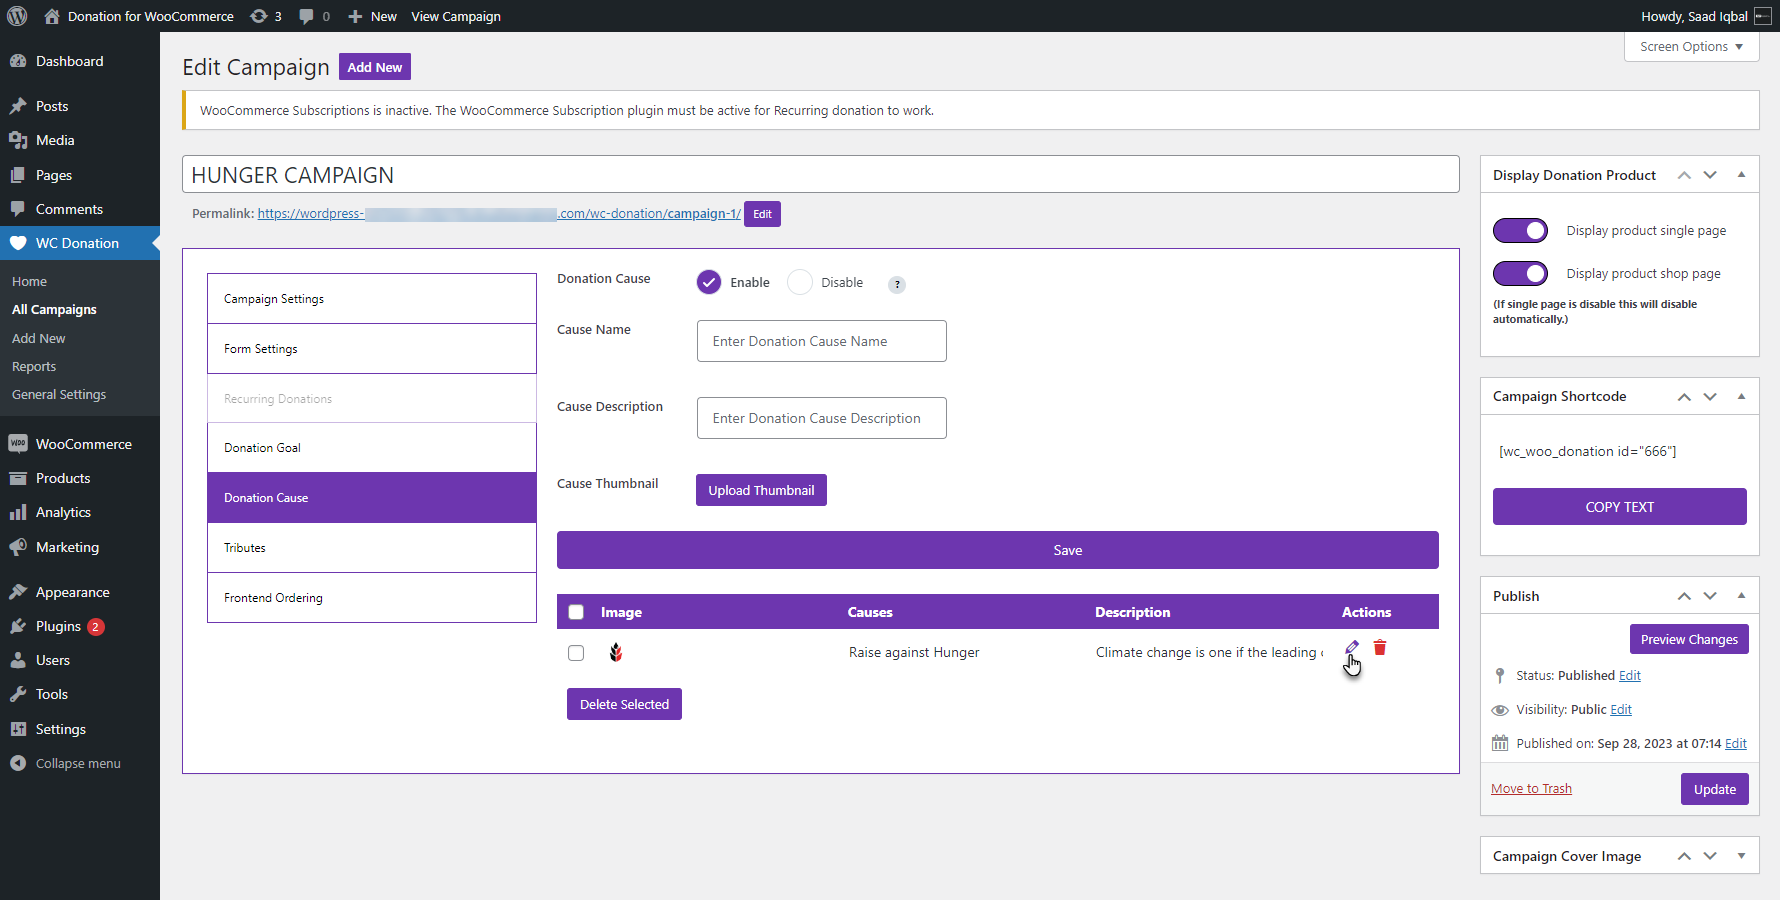
- Click on the Trash icon in the Actions column to delete the donation cause.

- Select multiple causes and then click the Delete Selected button to delete the selected donation causes.
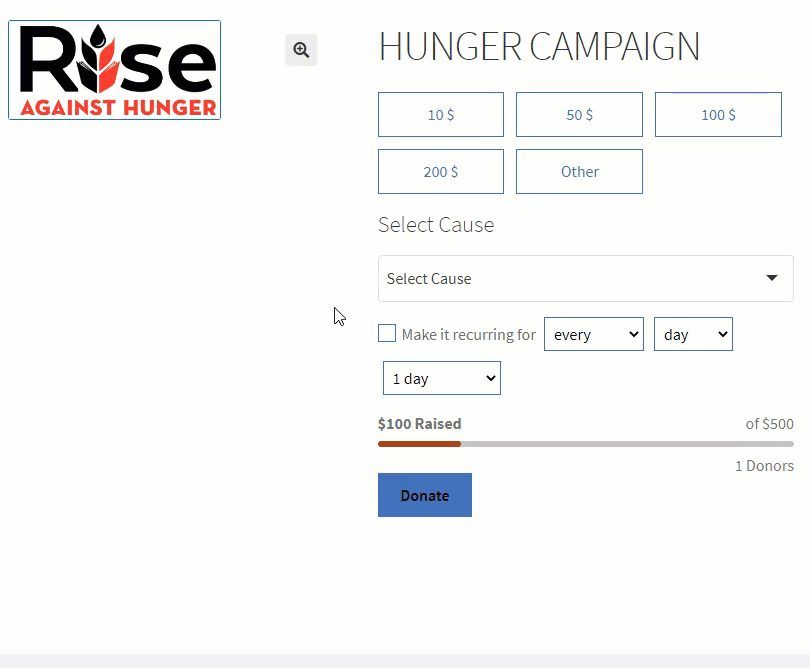
Front-End Impact
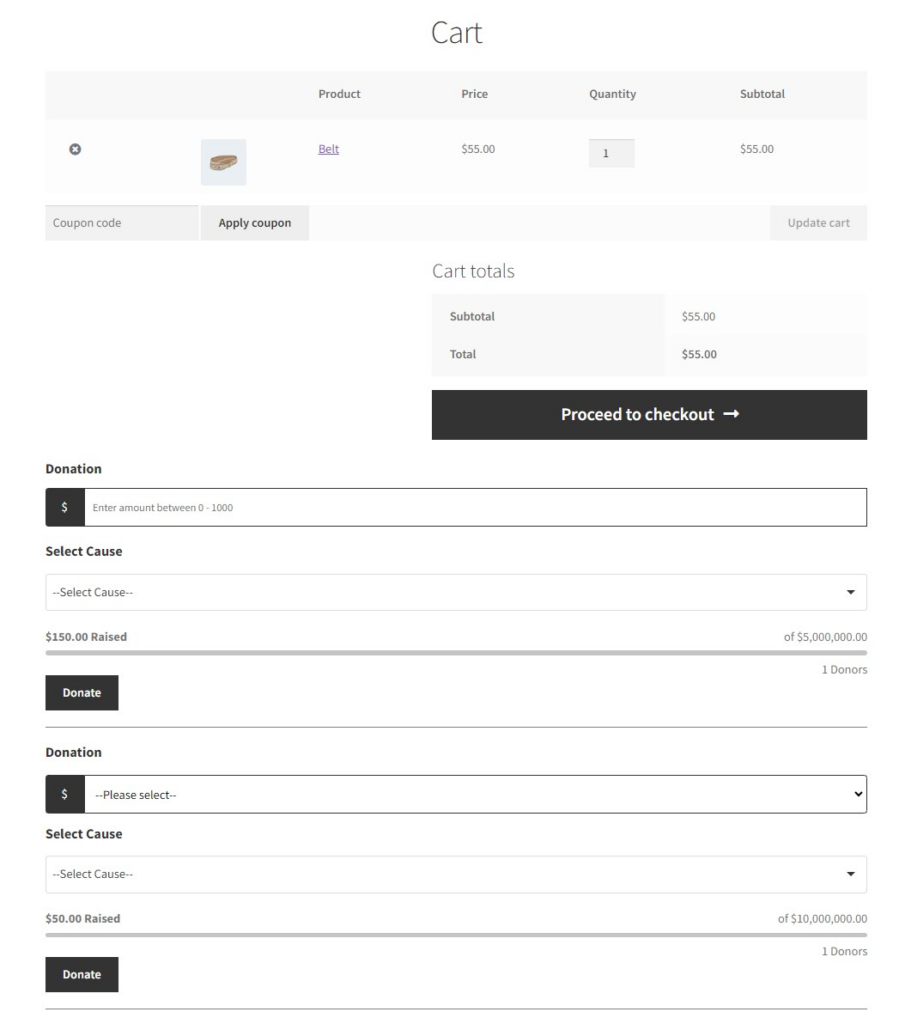
- The Donation Cause will be visible to the user on the donation page.
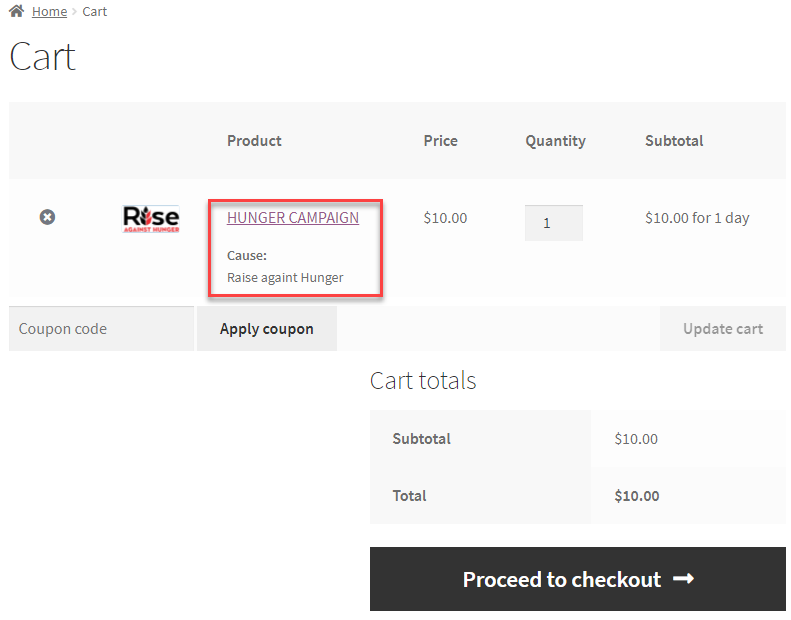
- The selected Donation Cause will also be highlighted on the Cart page.
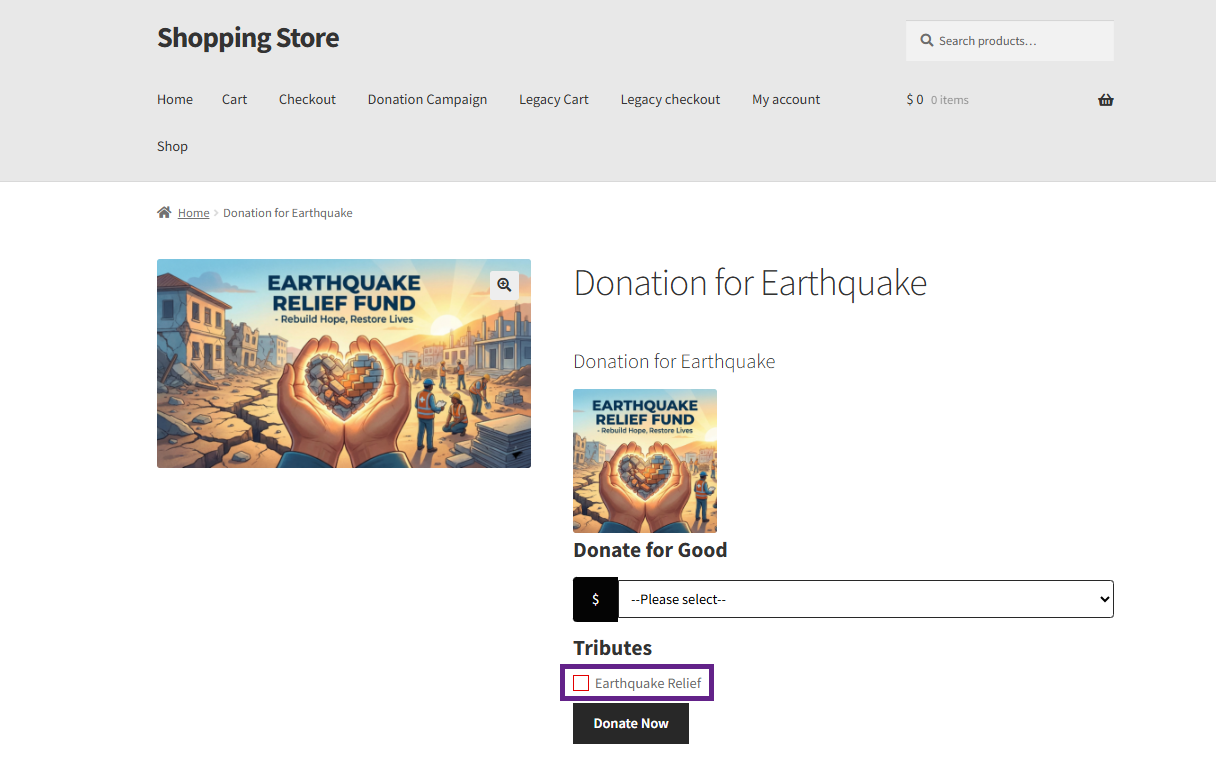
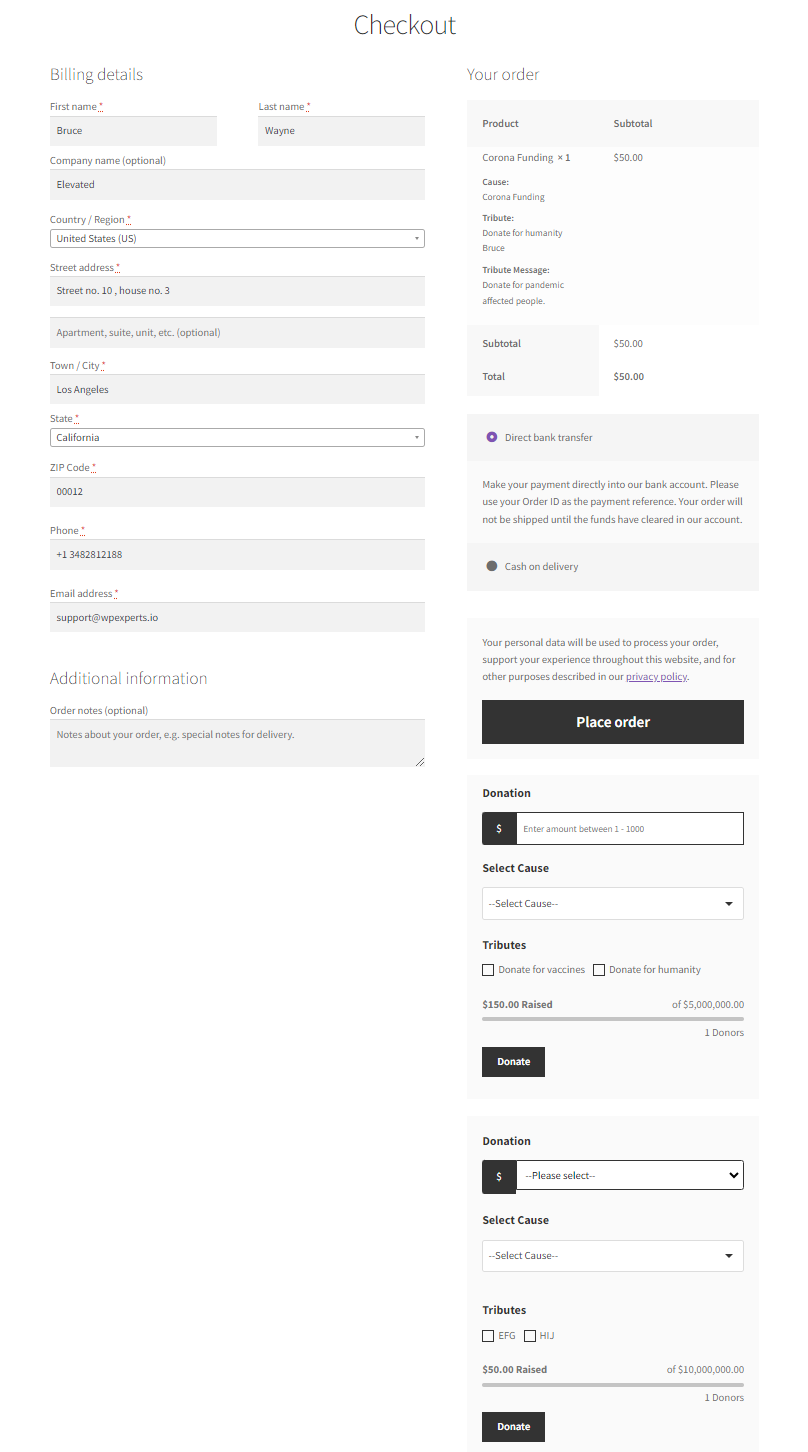
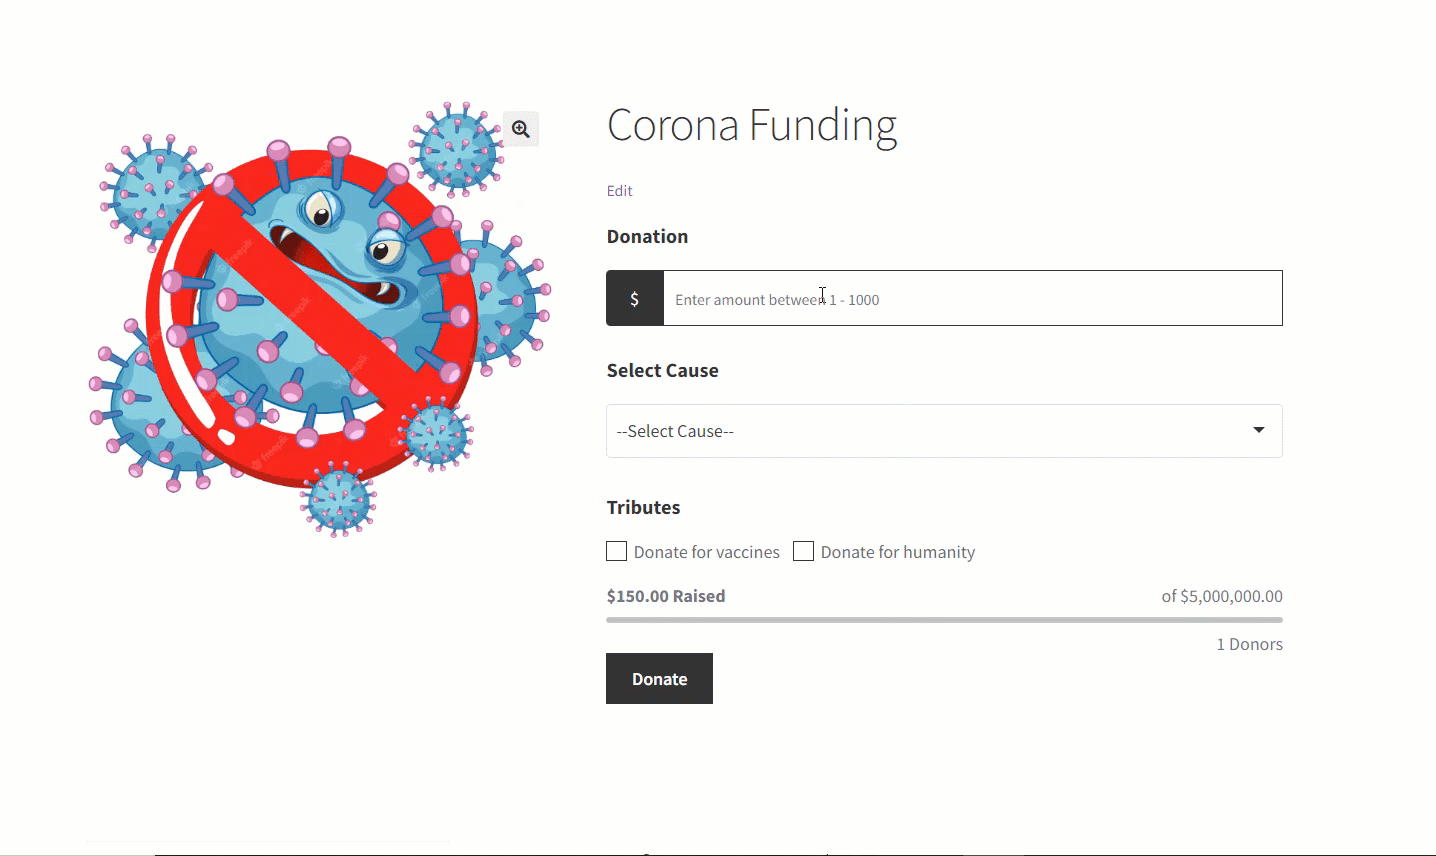
Tributes
↑ Back to topThe Donation Tribute feature allows admins to create multiple tribute options, enabling donors to select a tribute and make a donation in honor or memory of someone special.
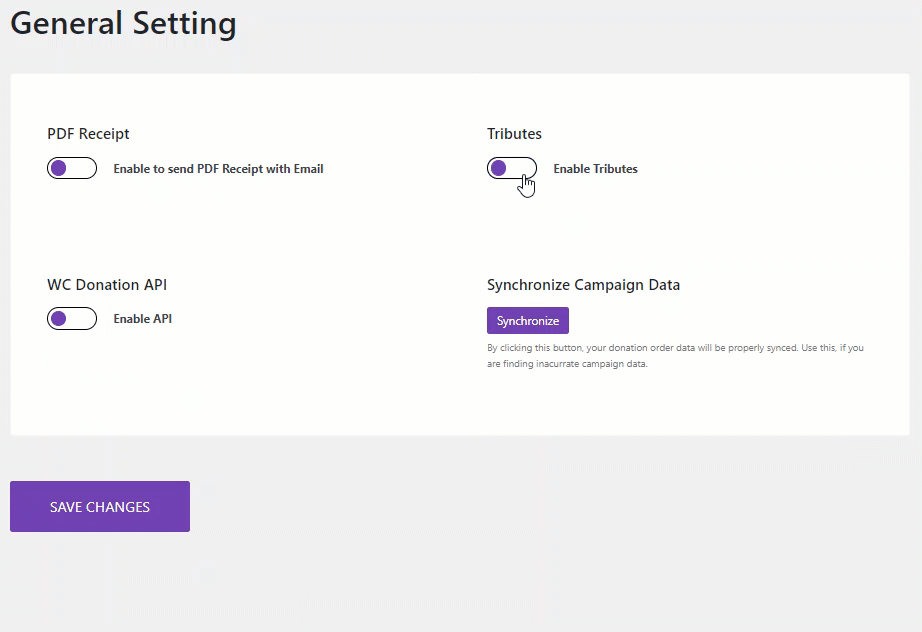
- Navigate to the WordPress Admin Dashboard > WC Donation > General Settings.
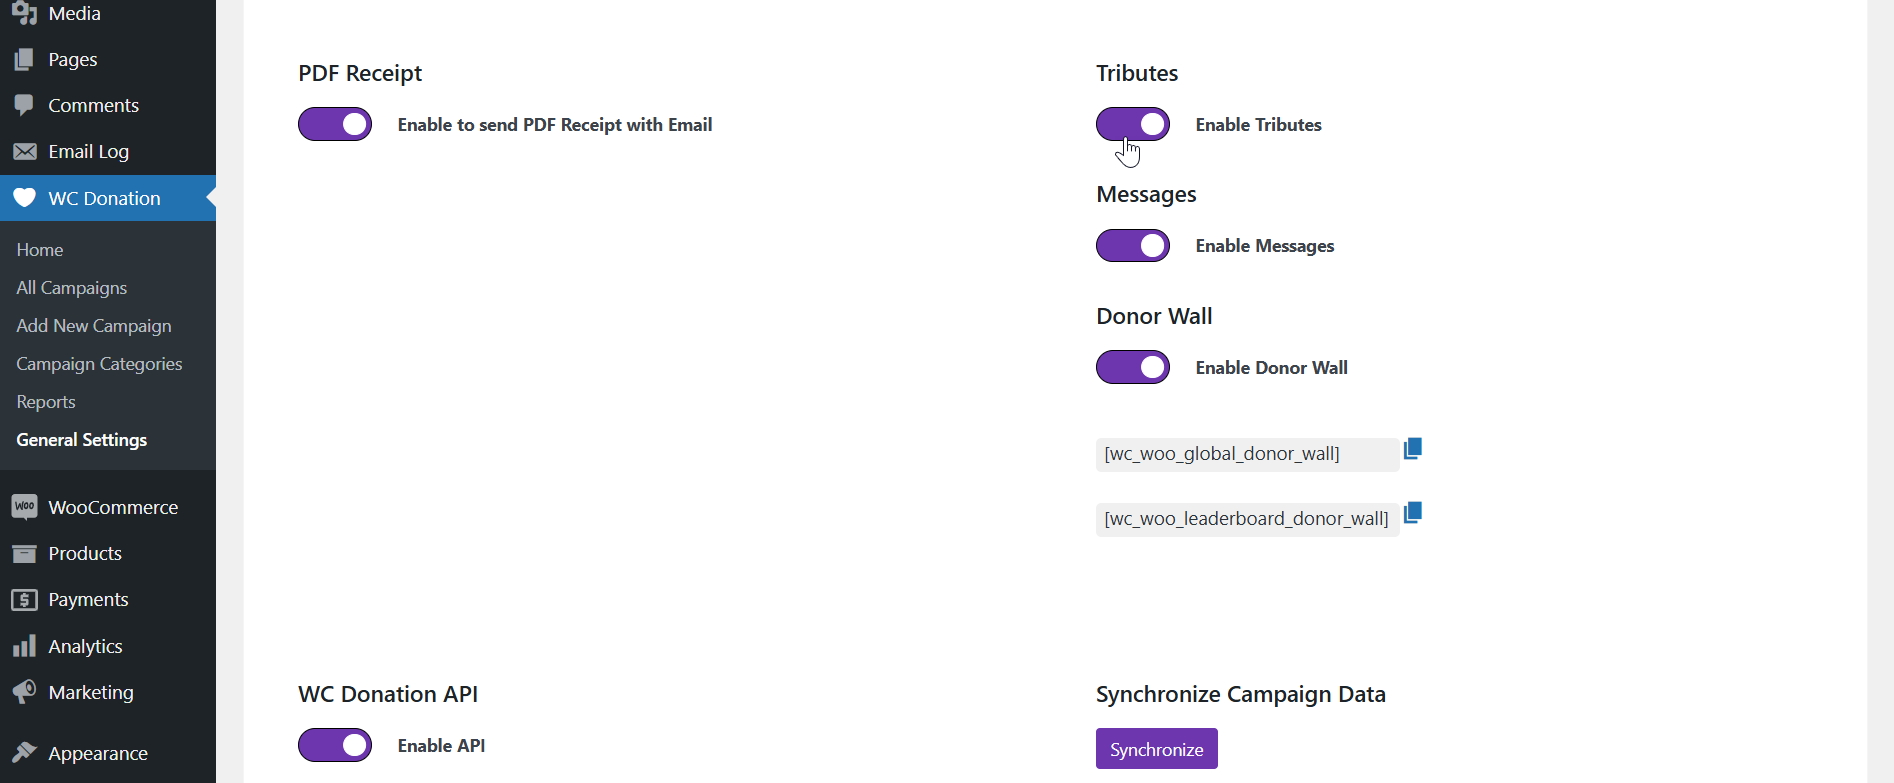
- Now you’re on the General Setting page.
- Go to the bottom of the page and enable the Tributes toggle button.
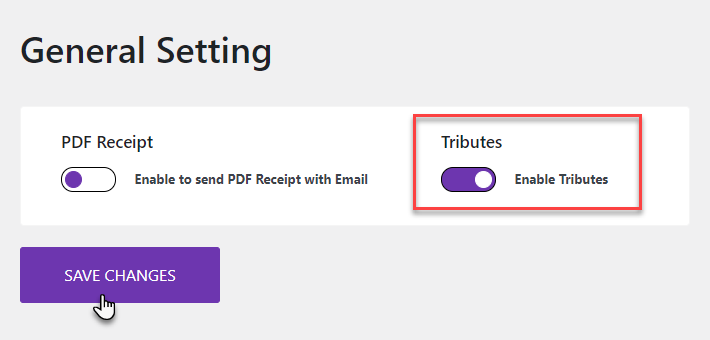
- Once done, click on the Save Changes button.
- Now navigate to the Admin Dashboard > WC Donation > All Campaigns.

- All the donation campaigns are present on the WC Donation page.
- Click on the Edit ( ???? ) sign in the Actions column.
- Go to the Tributes section.
- Click on the Add Level to add tributes.
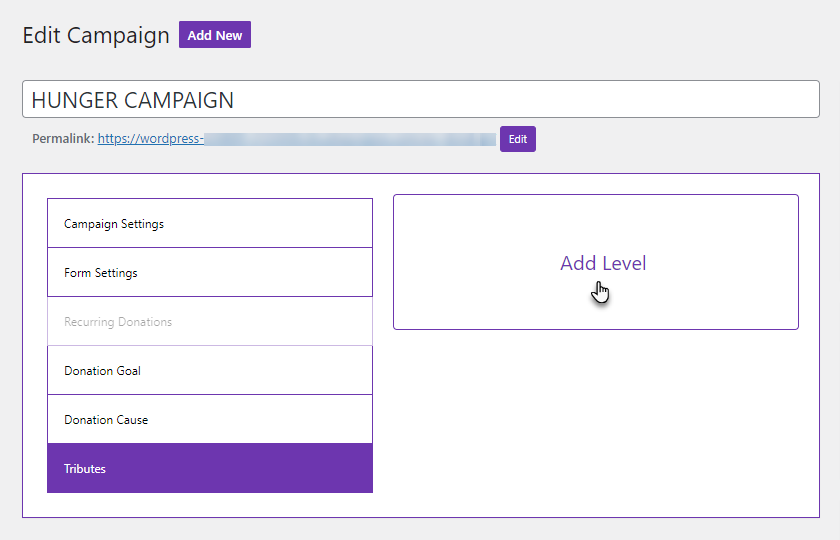
- Now, enter the label of your tributes.
- You can also delete a tribute by clicking on the Trash icon.

- Once done, click the Publish/ Update button to save your changes.
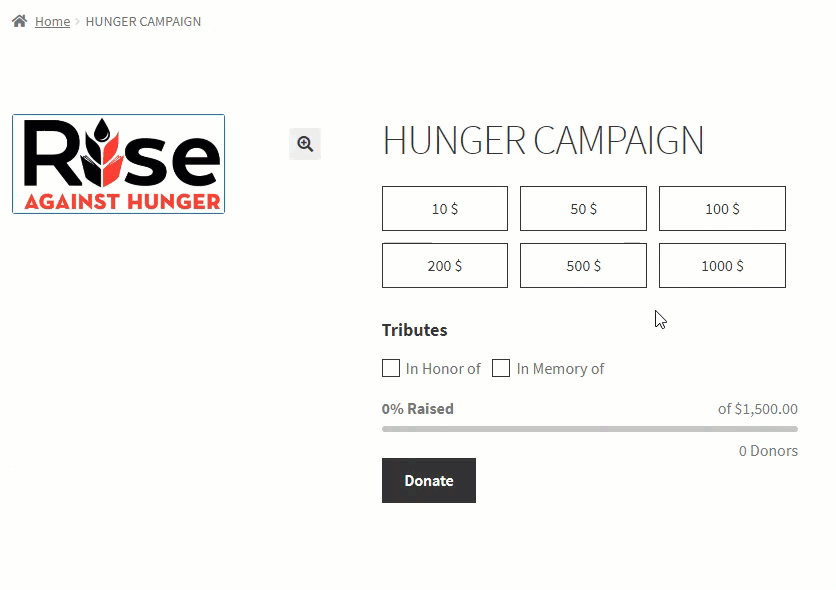
Front-End Impact
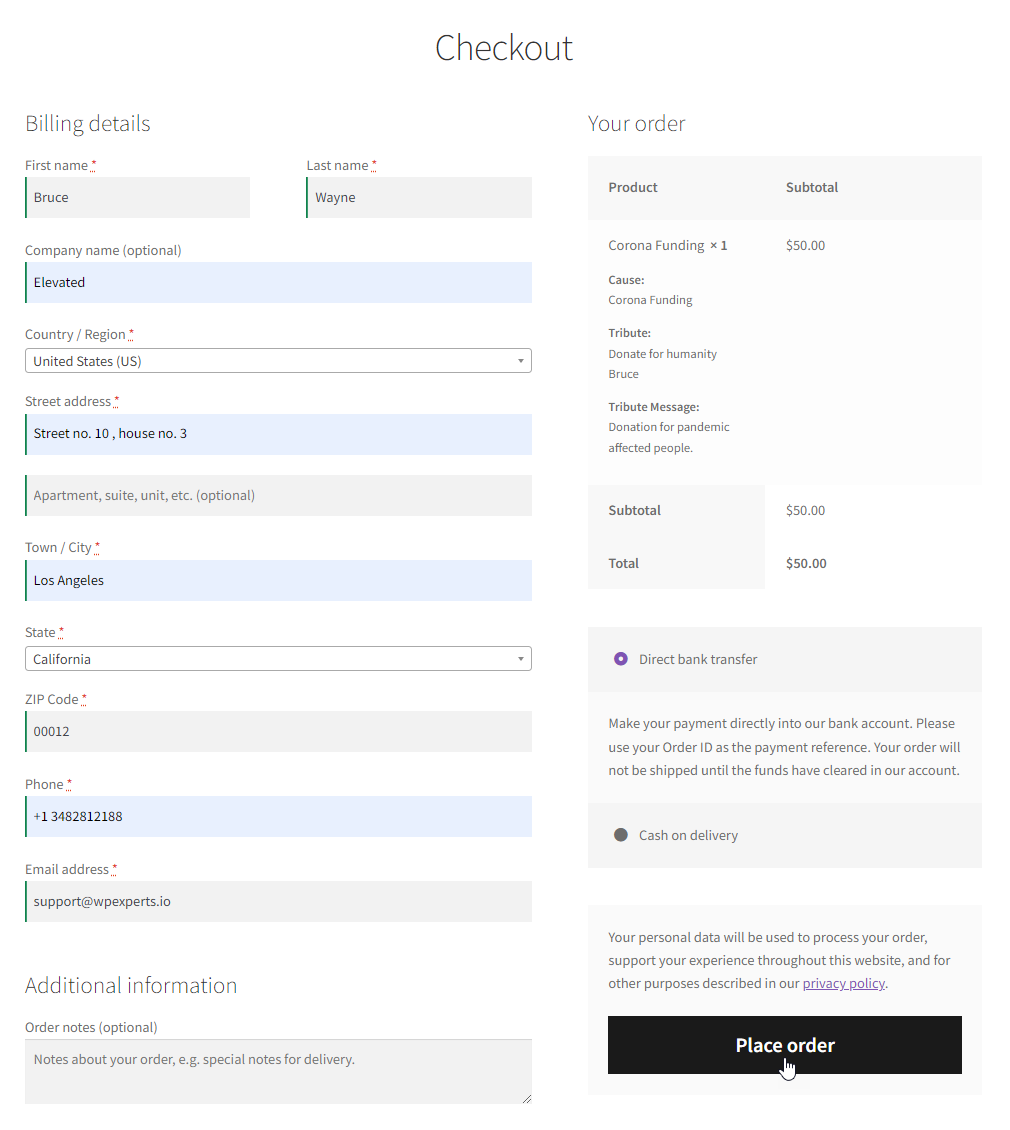
- The user will visit the website and select the donation.
- The user will select the Donation level.
- The user will select the Tribute and then enter the name from whom the user is tributing.
- Once done, the user will click on the Donate button.
- The user would be redirected to the Checkout page.
- The user will enter the required credentials.
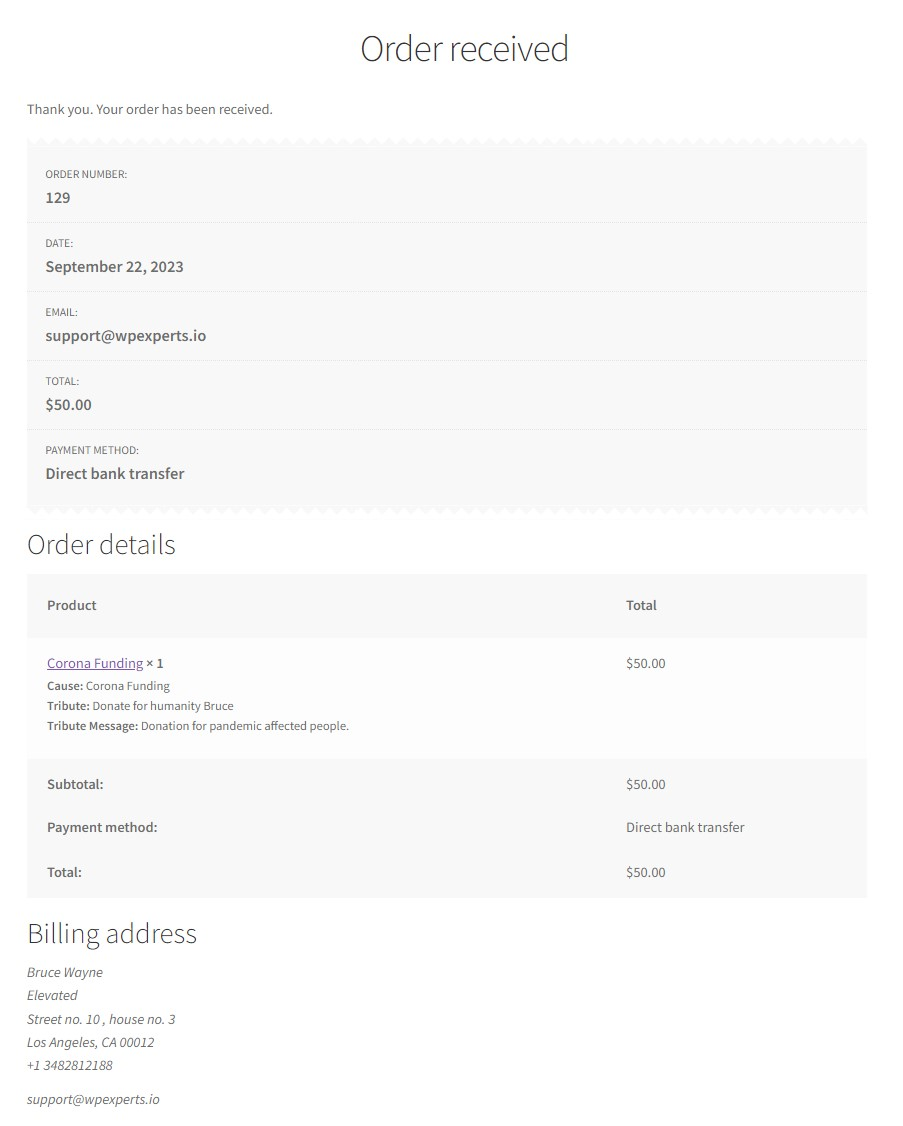
- Once done, the user clicks the Place Order button to complete the donation.
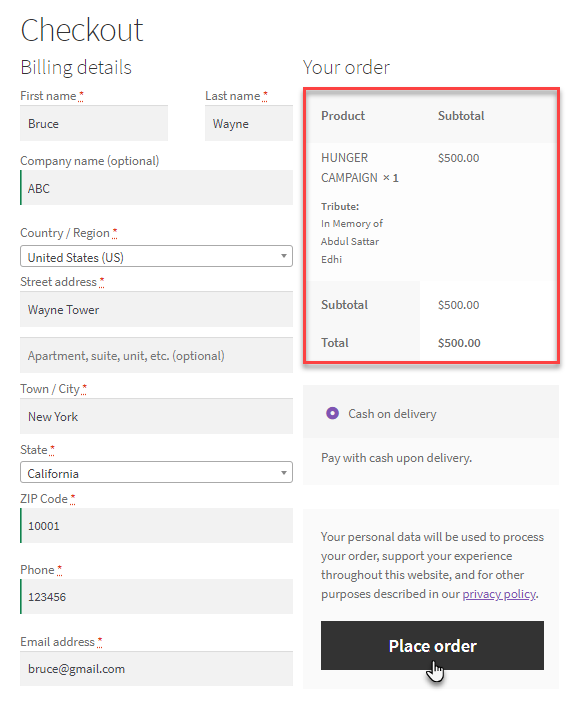
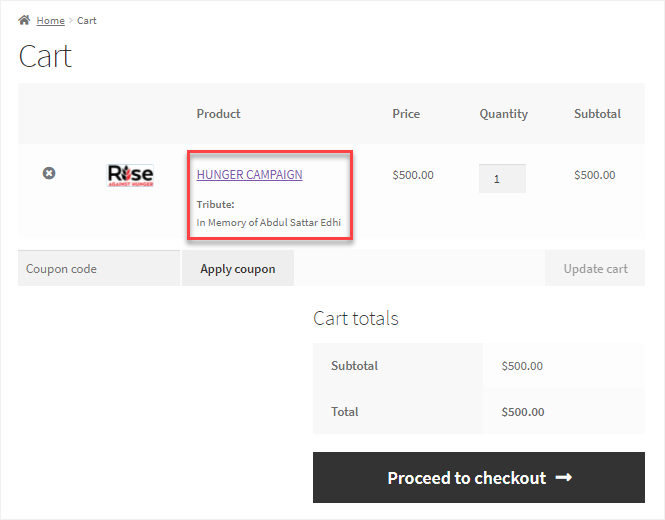
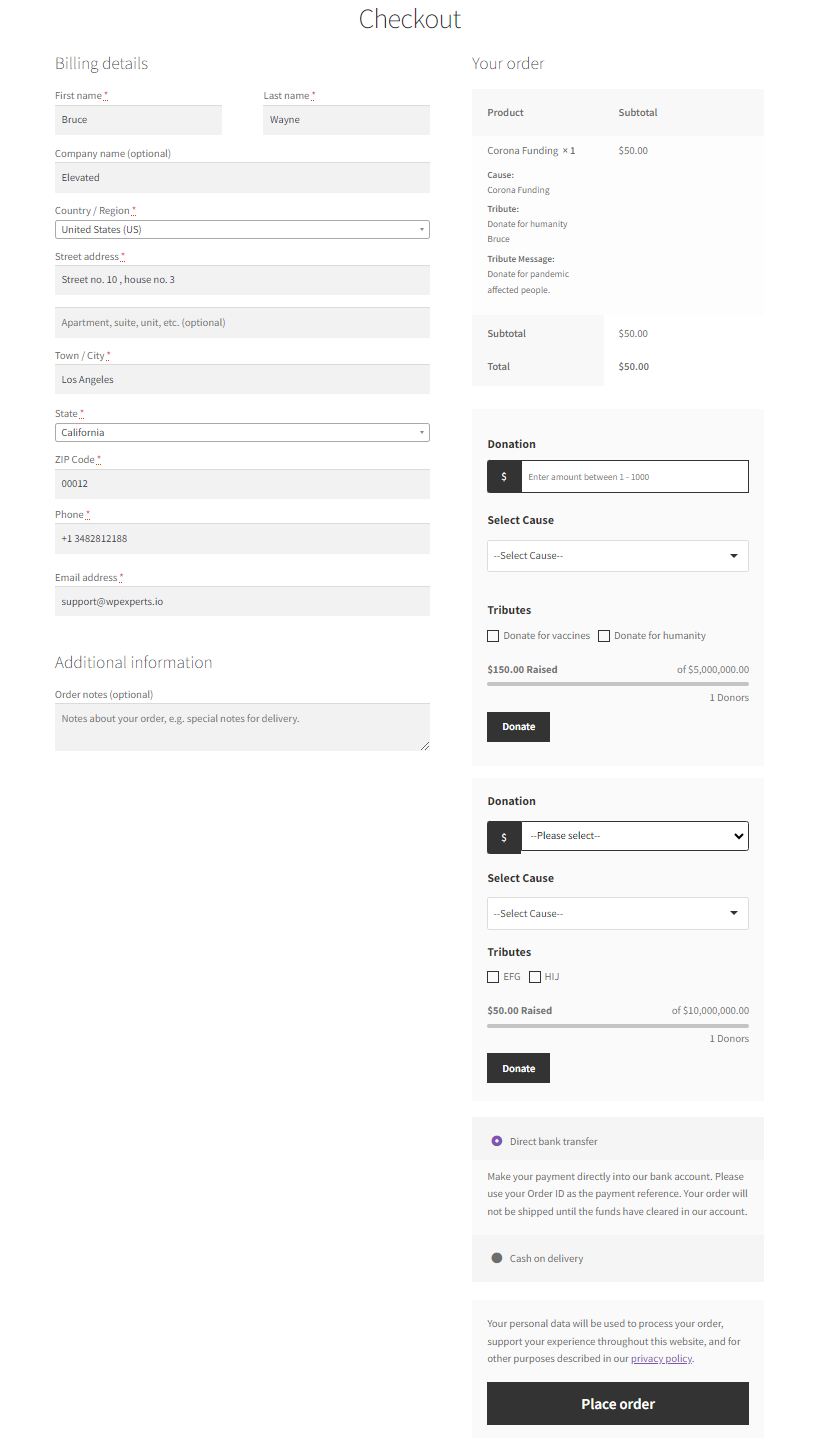
NOTE: Once the user is on the Checkout page, Navigate to the Cart page. We can see that the tribute is displayed under the item.
Frontend Ordering
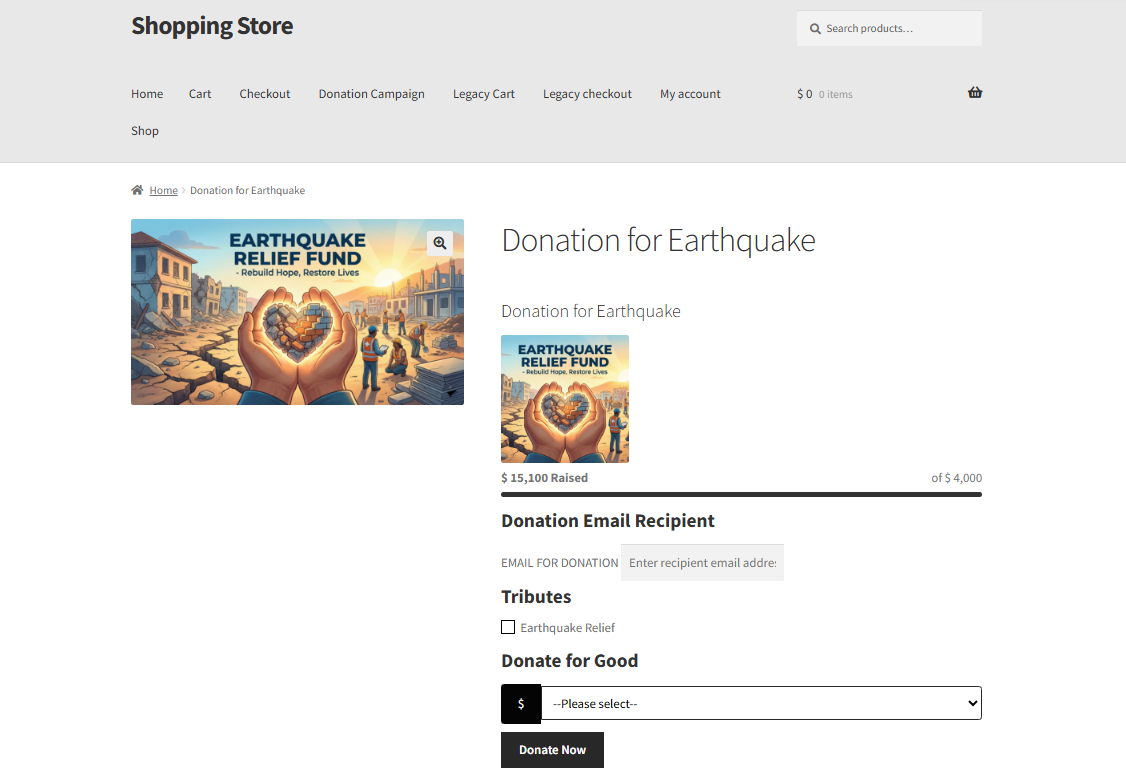
↑ Back to top- The Frontend Ordering feature allows the admin to control the display order of donation elements on the frontend donation form. Navigate to Admin Dashboard > WC Donation > Add New > Time Configuration.
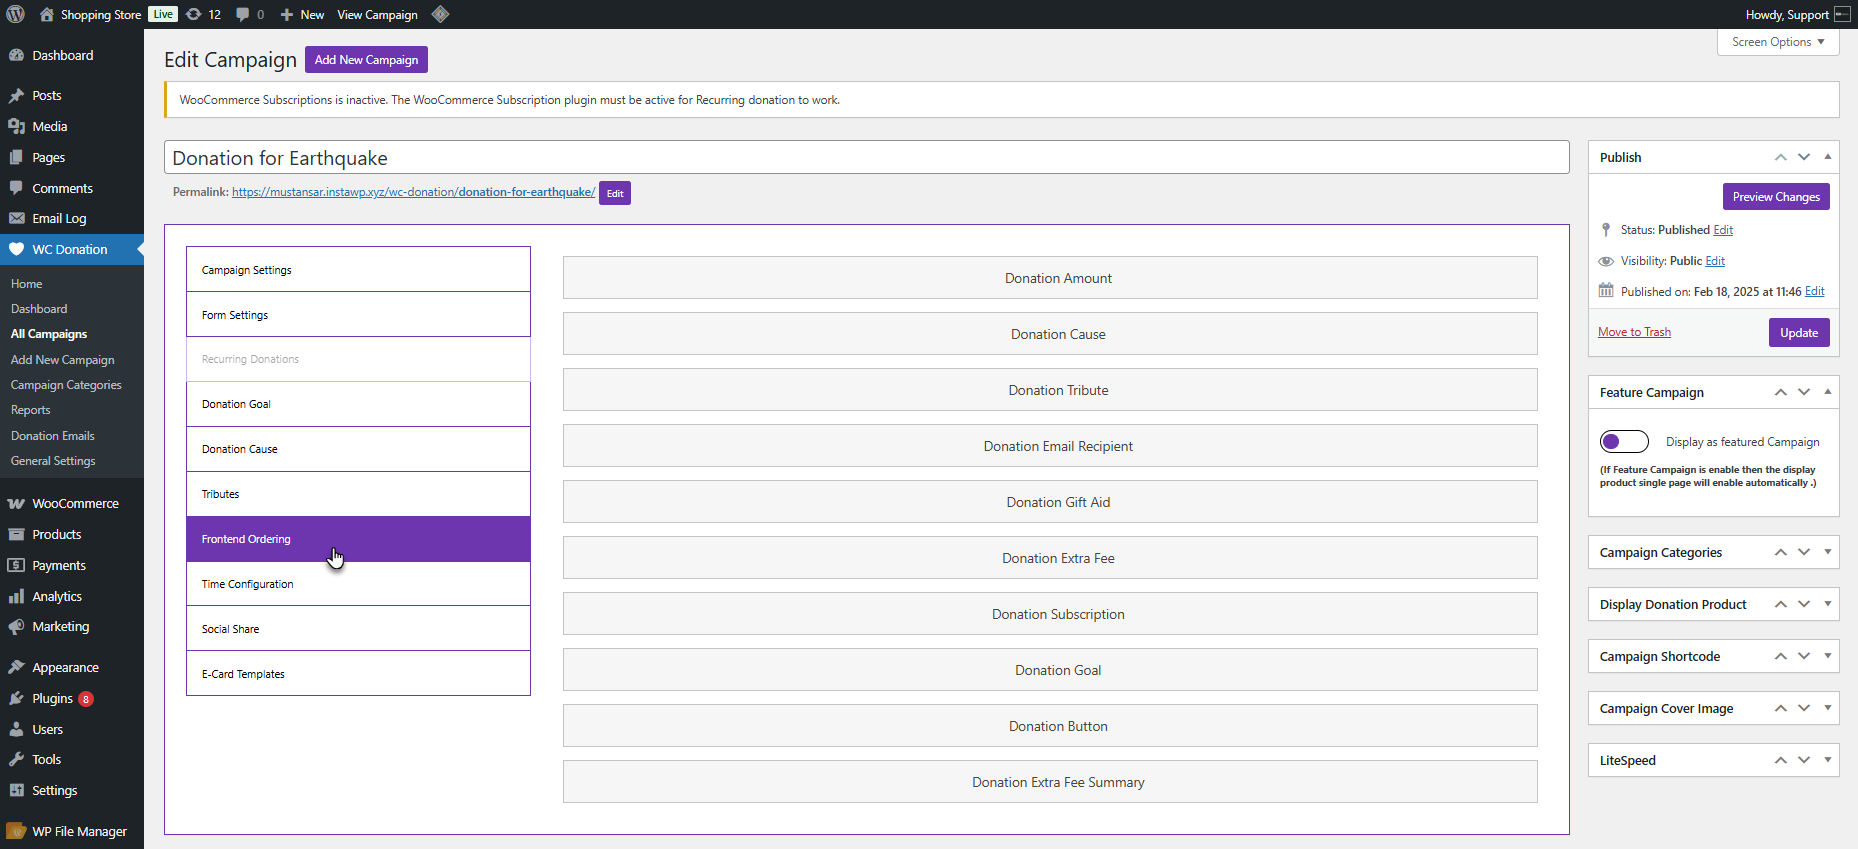
- Using this setting, the admin can arrange components such as Donation Amount, Donation Cause, Donation Tribute, Email Recipient, Gift Aid, Extra Fee, Subscription, Goal, and Donation Button in the desired sequence. The order set here is exactly how these elements will appear to users on the frontend.
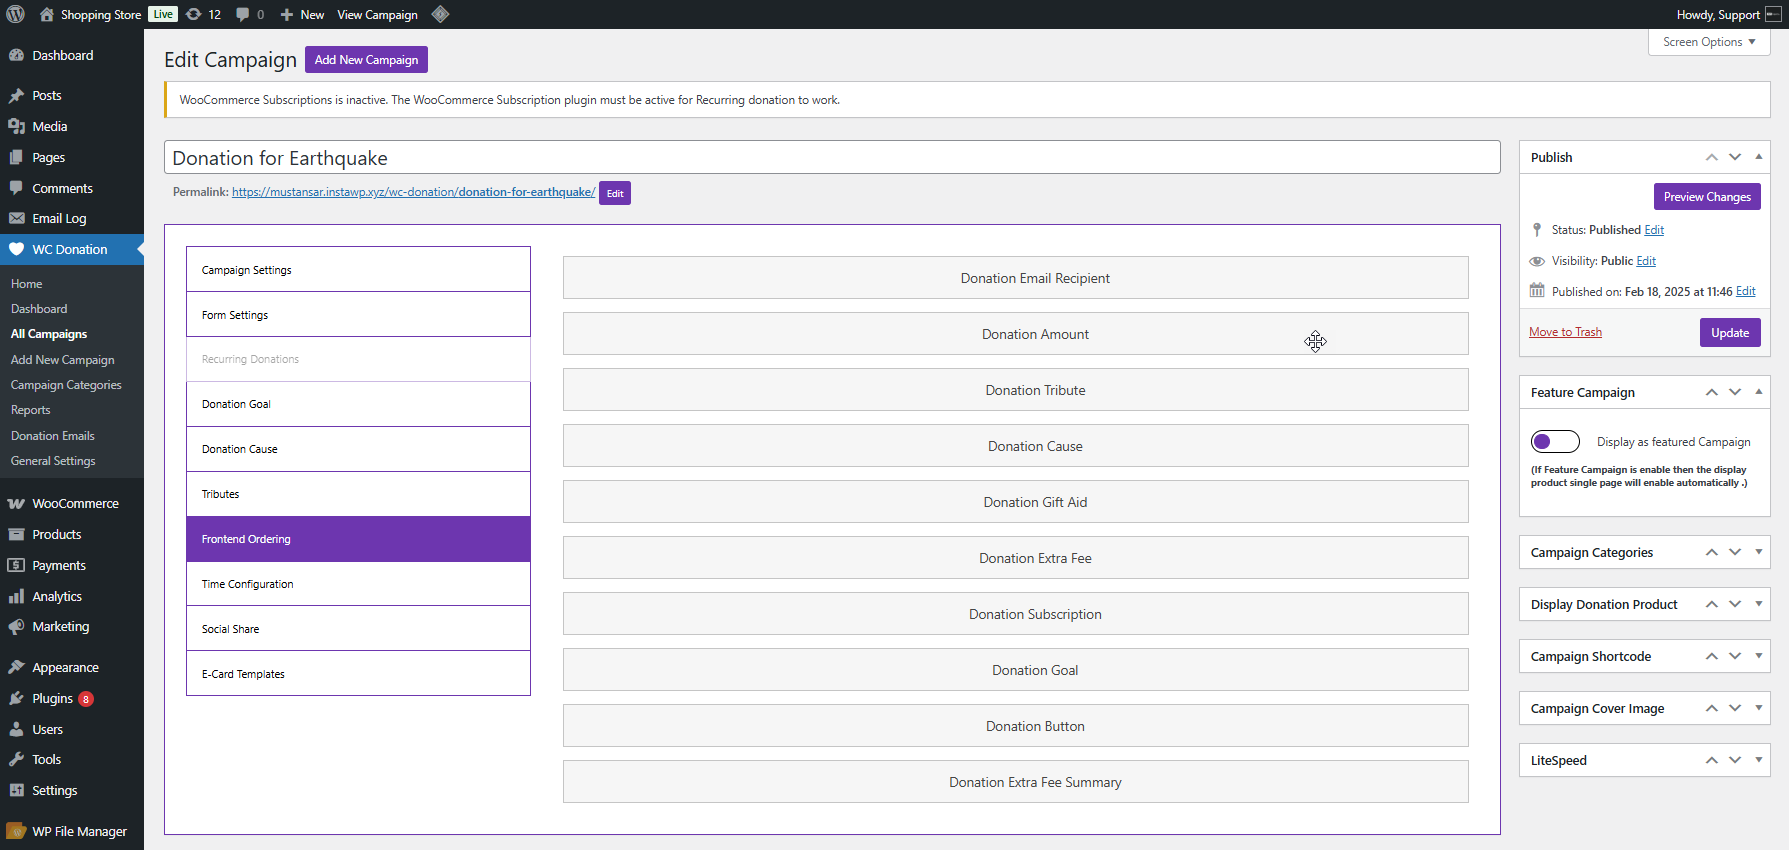
- Click on the update button to save changes.

Front End
- Before
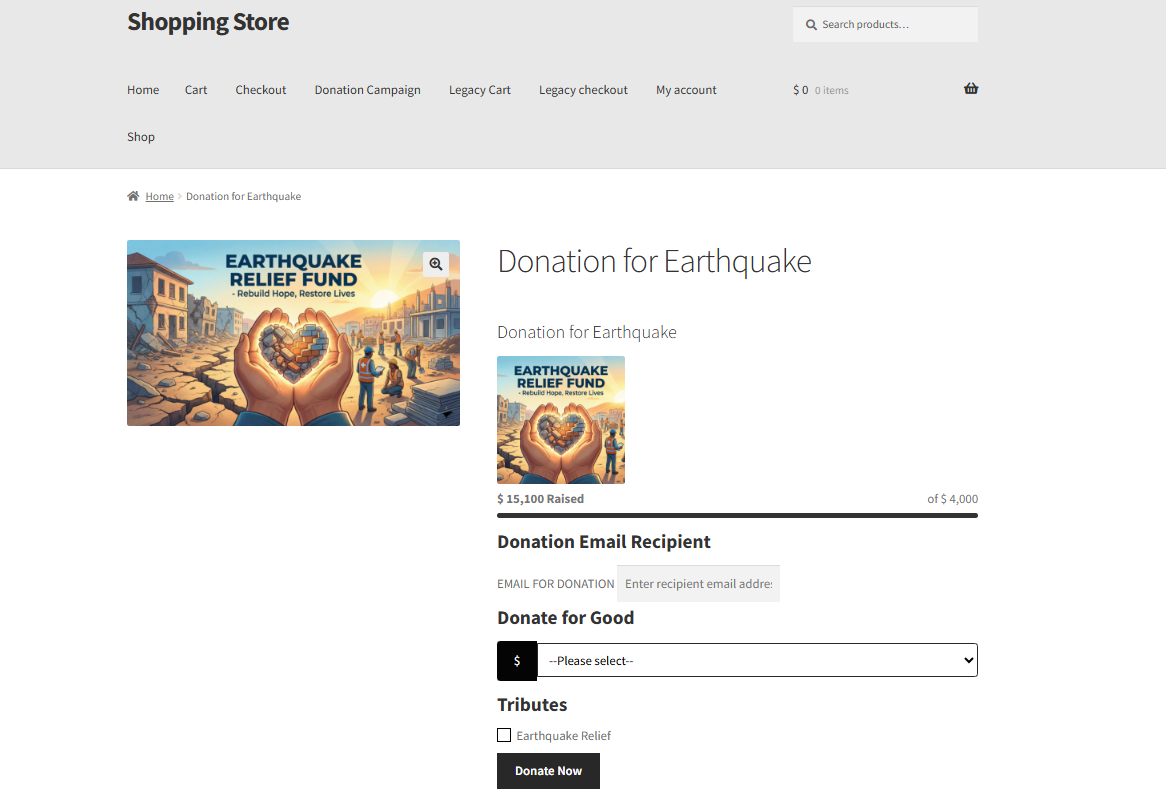
- After
Time Configuration
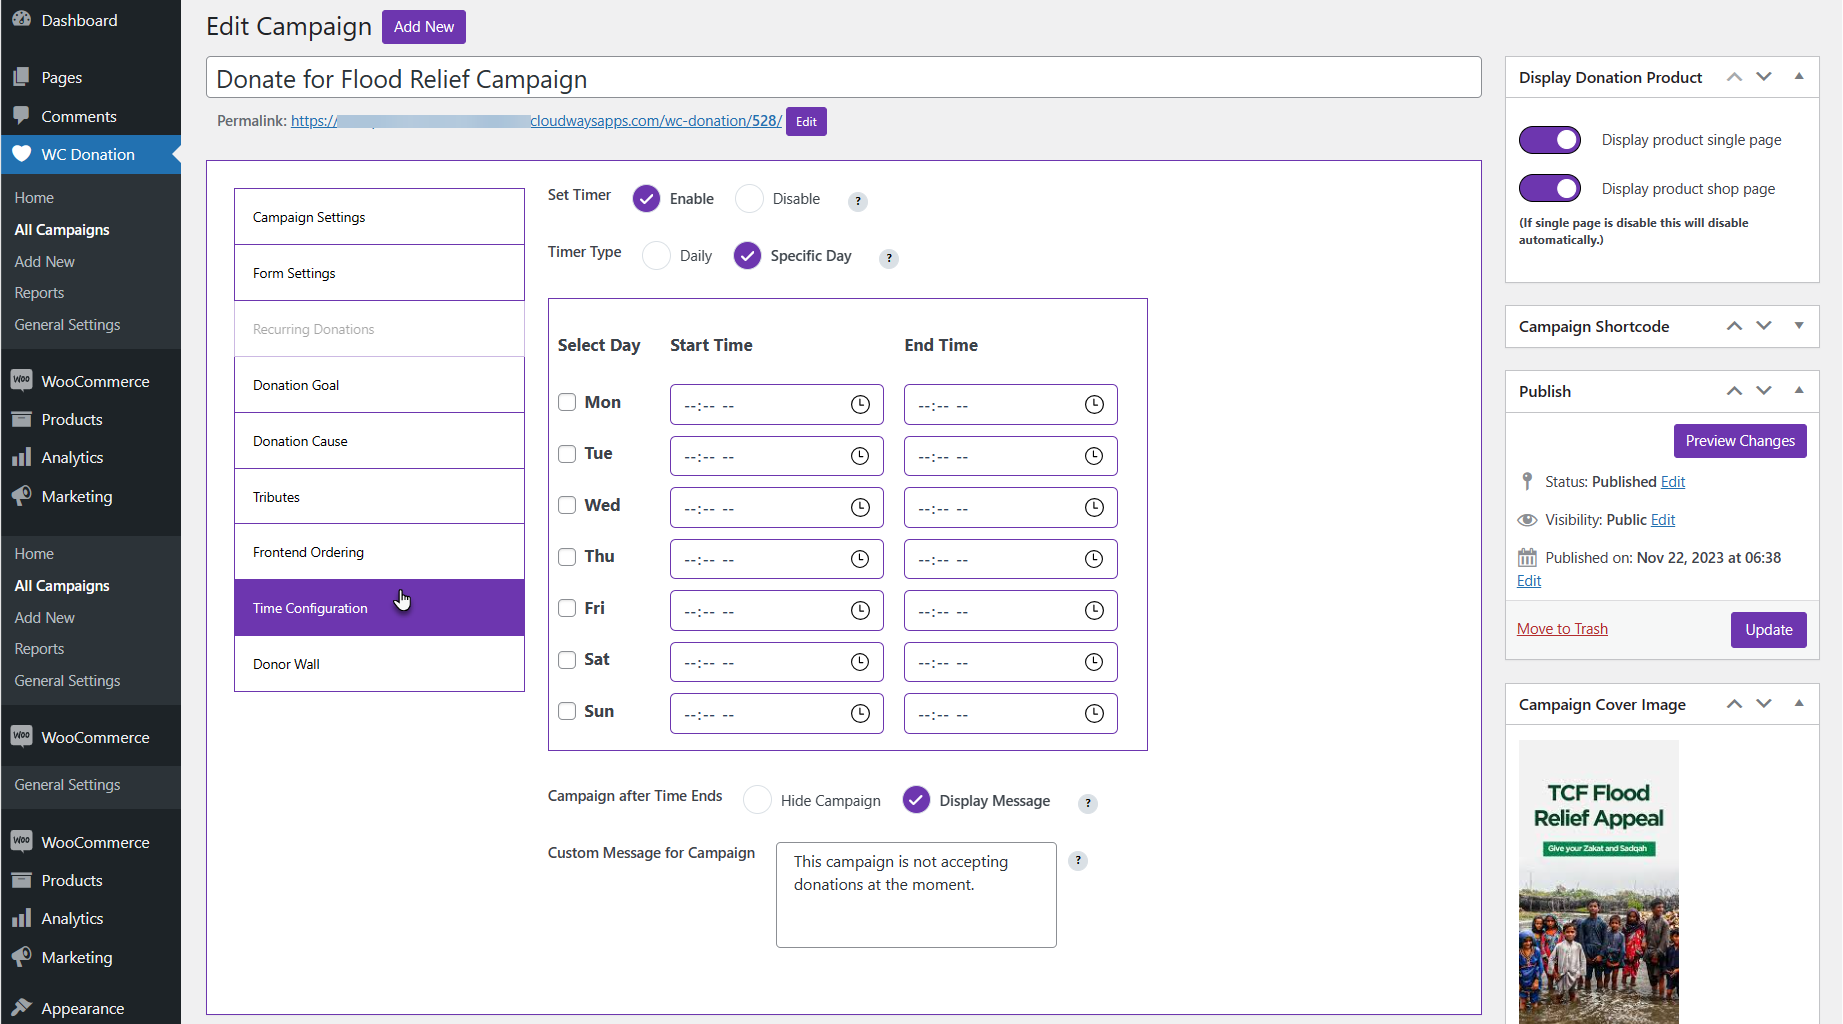
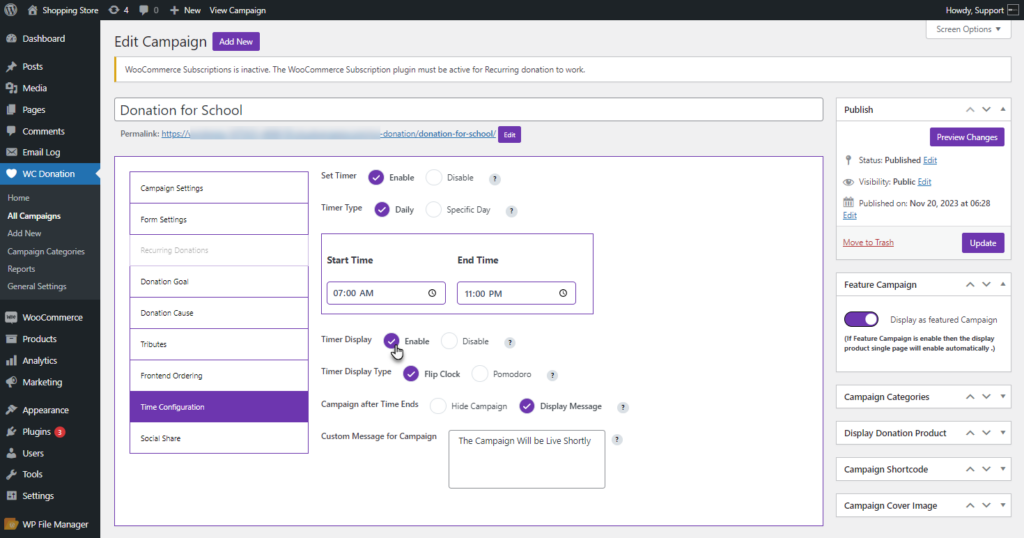
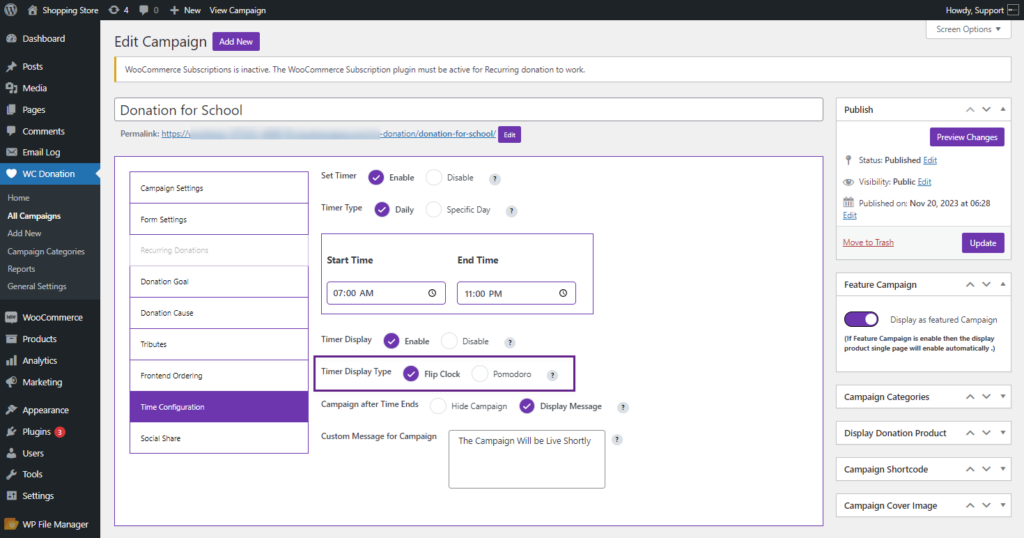
↑ Back to top- The Time Configuration feature allows the admin to control when a donation campaign is visible on the frontend by setting a time-based schedule. This feature helps admins run time-restricted campaigns, manage visibility, and create urgency for donors.
- Go to: Admin Dashboard > WC Donation > Add New > Time Configuration.
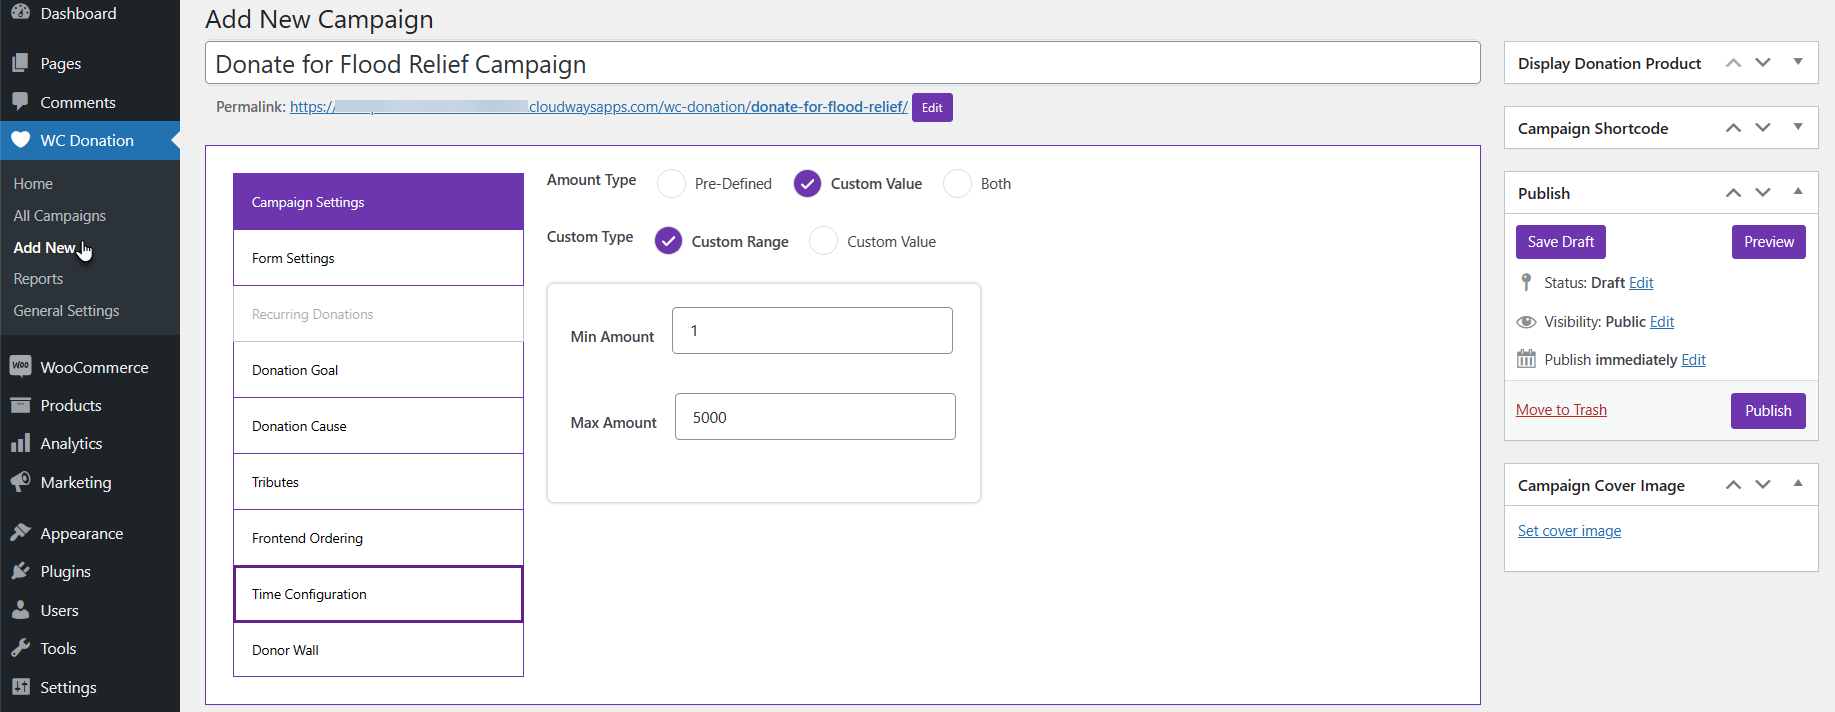
- In this tab, there are three options:
Set Timer
- When enabled, You can set the timer on this campaign.
Timer Type
- Select which type of timer you want for the campaign.
- Daily: A Start Time and End Time selection will become available if you choose the Daily option. Adjust the time as needed for the campaign to be visible on the Front-End.
- Specific Day: If Specific Day is chosen, a chart displaying all days will emerge, featuring Start Time and End Time options for each day. Adjust the times accordingly for the campaign to be visible on the Front-End.
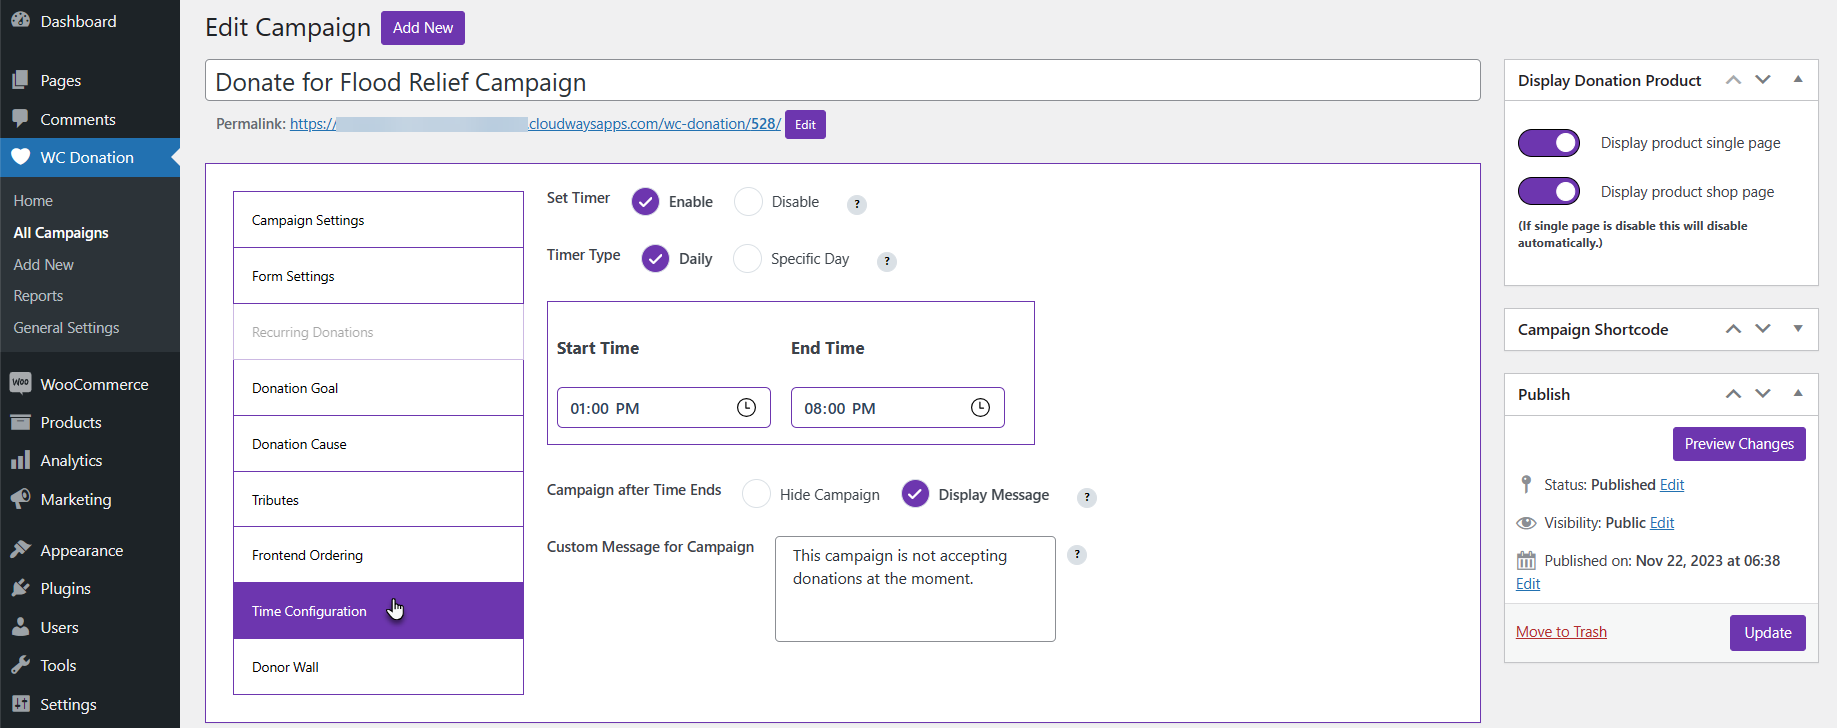
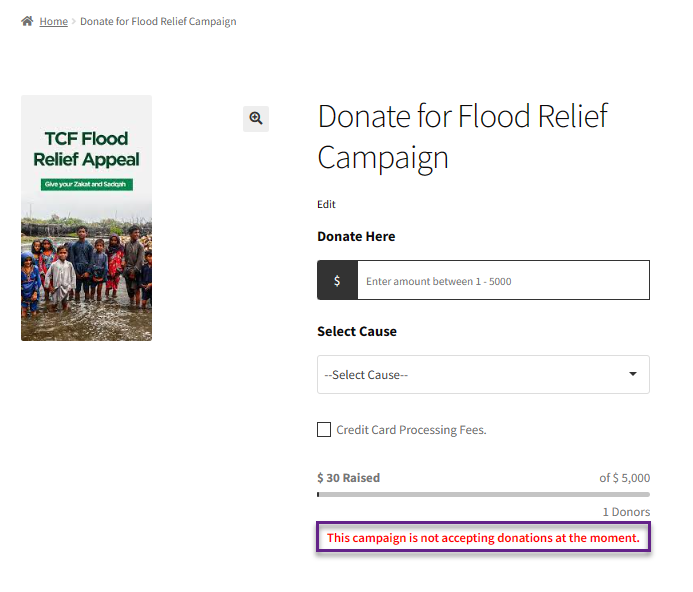
Campaign after Time Ends
- Choose the Select Campaign After Time Ends button to control the message visibility on the Front-End.
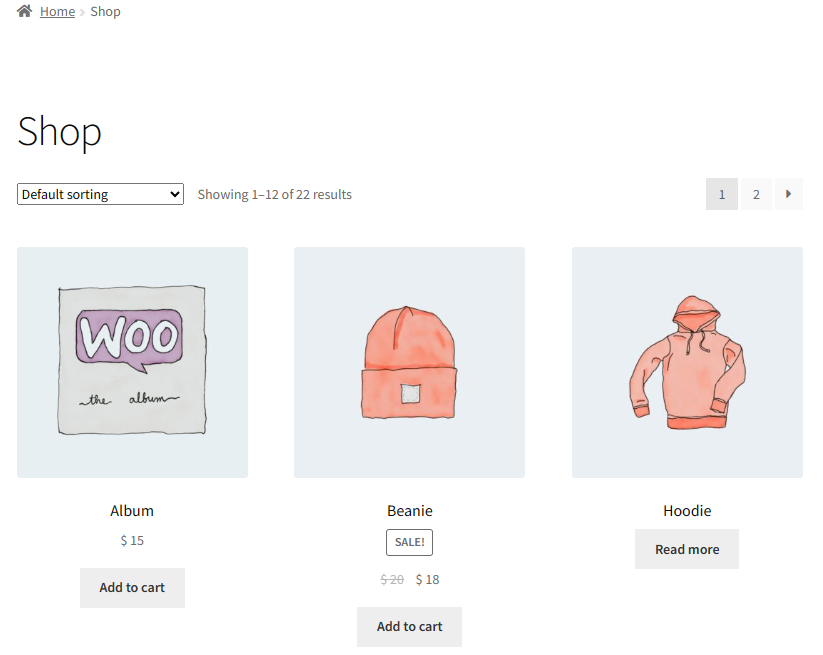
- Hide Campaign: When the Hide Campaign is selected, the campaign will disappear on the Shop page.
- Display Message: If the Display Message radio button is selected, the Custom message will appear instead of the campaign.
Front-End Impact – Hide Campaign
Before
After
Single Product Page/ Campaign Page using ShortCode
- When Hide Campaign is selected, the campaign will disappear on the Single Product Page and the Campaign Page(where the shortcode is used).

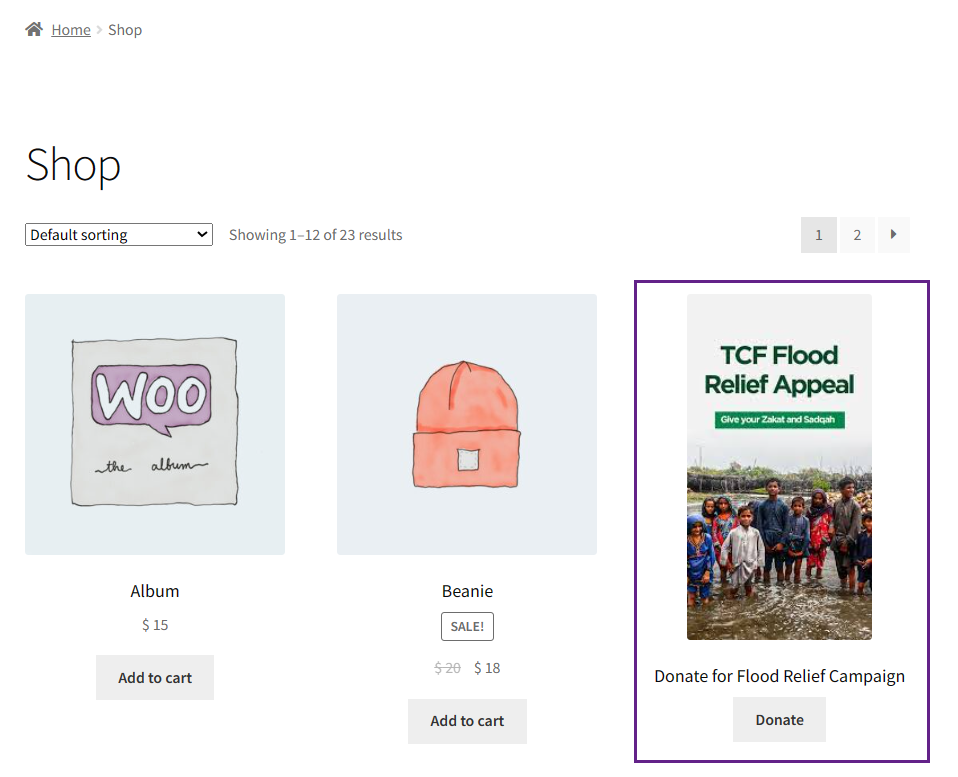
Front-End Impact – Display type (Display Message)
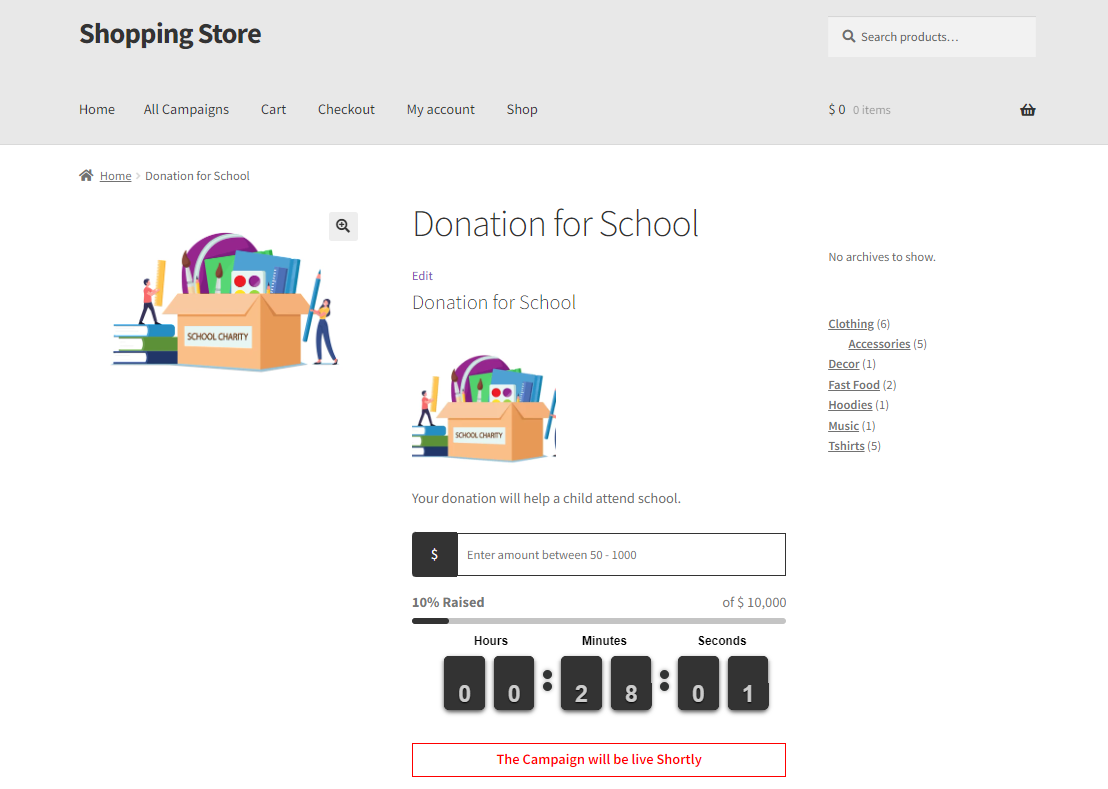
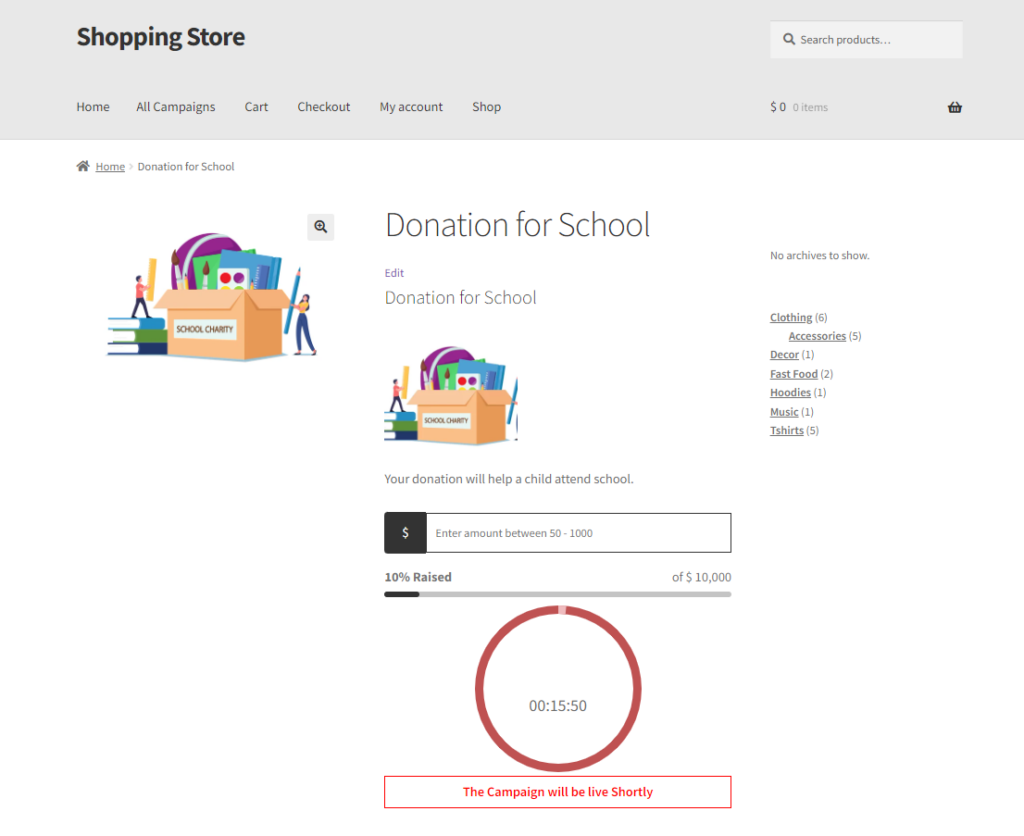
- A message will appear when a Display Message is selected, which is set in the Custom Message for Campaign option instead of the Donate Now button on the Shop page.
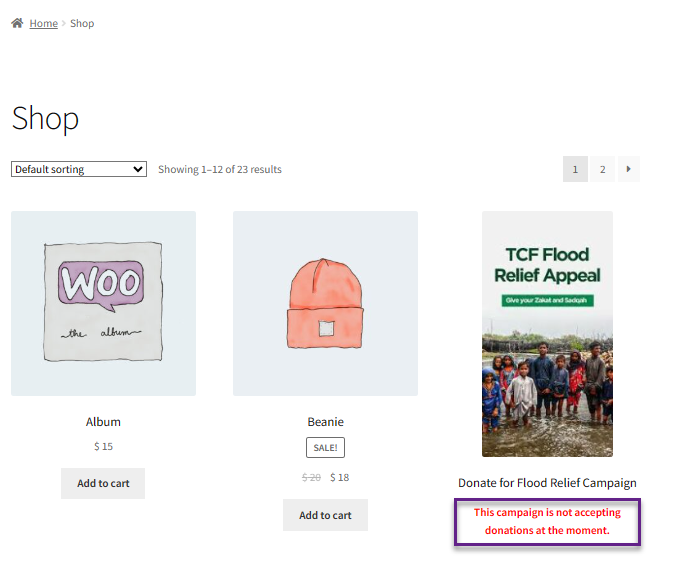
Single Product Page/ Campaign Page using ShortCode
- When Display Message is selected, a message will appear in the Custom Message for Campaign option instead of the Donate Now button on the Single Product Page and the Campaign Page(where the shortcode is used).
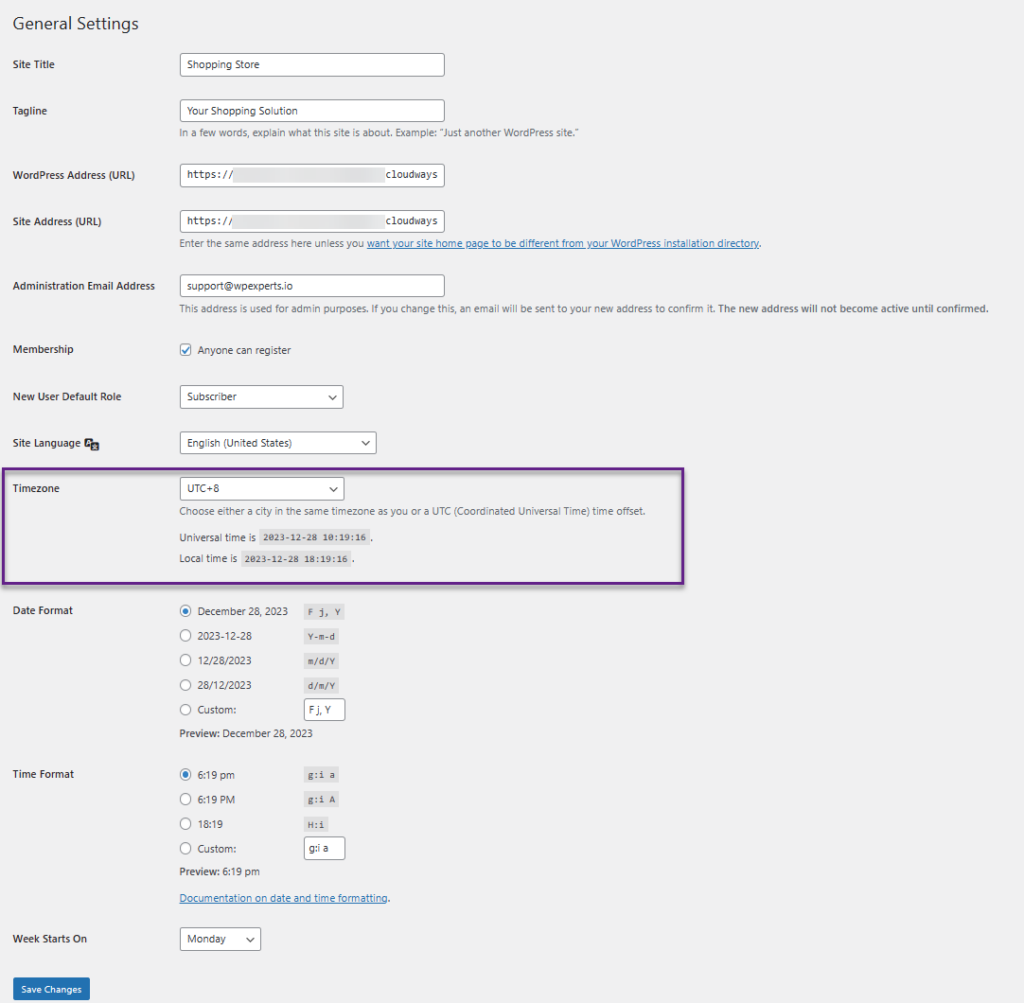
NOTE: Adjust the Timezone to match your location. This setting will be applied throughout the donation settings.
- Go To: Admin Dashboard > Settings.
- Adjust the Timezone to match your location. This setting will be applied throughout the donation settings.
Time Display
↑ Back to topThe Time Display Type option defines how the campaign timer is visually displayed on the frontend donation form.
- Flip Clock — Displays the remaining time in a digital flip-style countdown, clearly showing hours, minutes, and seconds.
- Pomodoro — Displays the remaining time using a circular, progress-based timer, providing a visual sense of time passing.
- Go to WordPress Admin Dashboard > WC Donations > All Campaigns > Edit Campaign.
- Navigate to the Time Configuration tab. Enable the Set Timer option, and set the Start and End times as needed.

- Enable the Timer Display option.
Time Display Type
- There are two types of Timer Display.
- Flip Clock
- Pomodoro
Flip Clock
- Select the Flip Clock from the Timer Display Type option.

- Click on the Preview button to review your changes.

- Click on the Update button to save changes.

Front-End Impact
- Login to your account.
- Go to the Single Donation page.
Pomodoro
- Select the Pomodoro from the Timer Display Type option.

- Click on the Update button to save changes.

Front-End Impact
- Login to your account.
- Go to the Single Donation page.
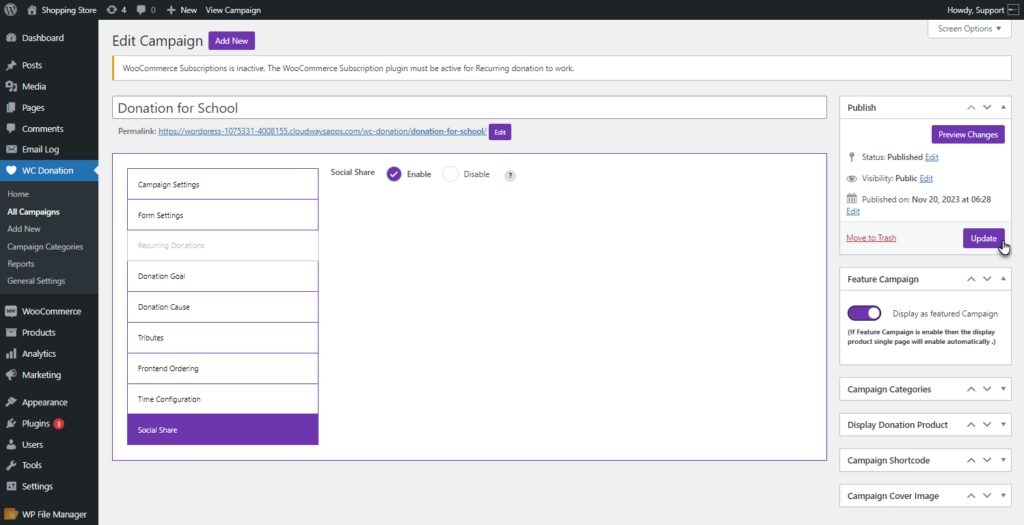
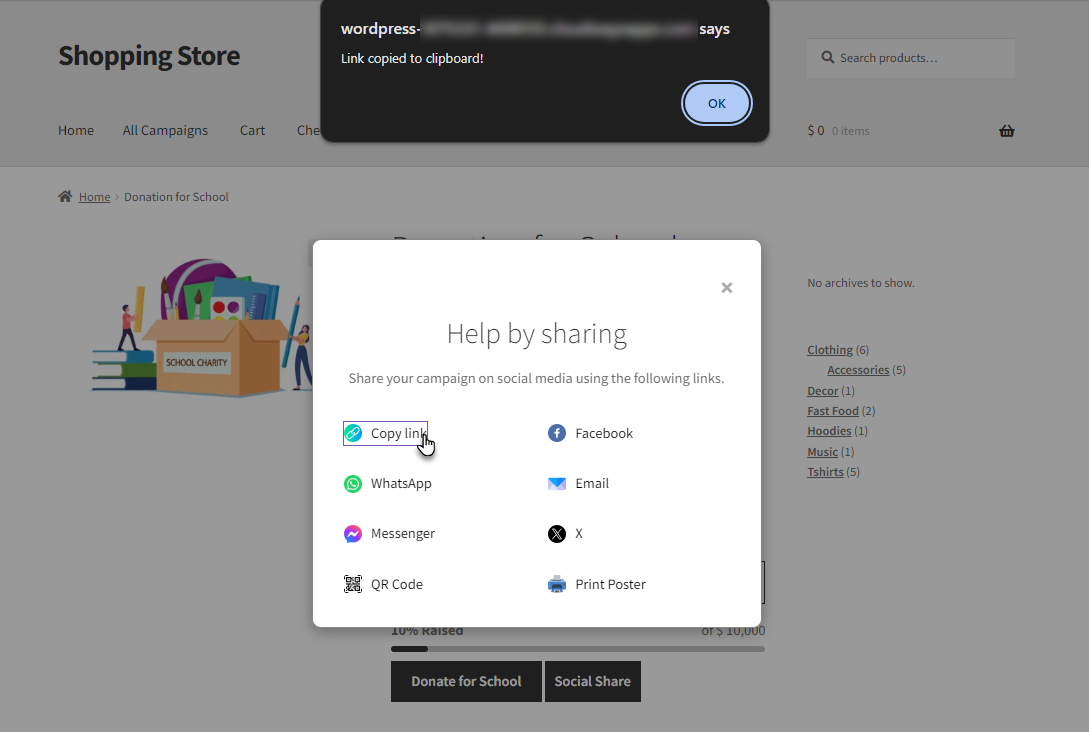
Social Share
↑ Back to top- The Social Share feature allows donors and admins to share the donation campaign across multiple platforms, helping increase campaign visibility and reach. When enabled, social sharing options appear on the frontend, allowing users to easily share the campaign link via supported social channels and encourage others to donate.
- Go to WordPress Admin Dashboard > WC Donations > All Campaigns > Edit Campaign

- Navigate to the Social Share tab. Enable the Social Share option.
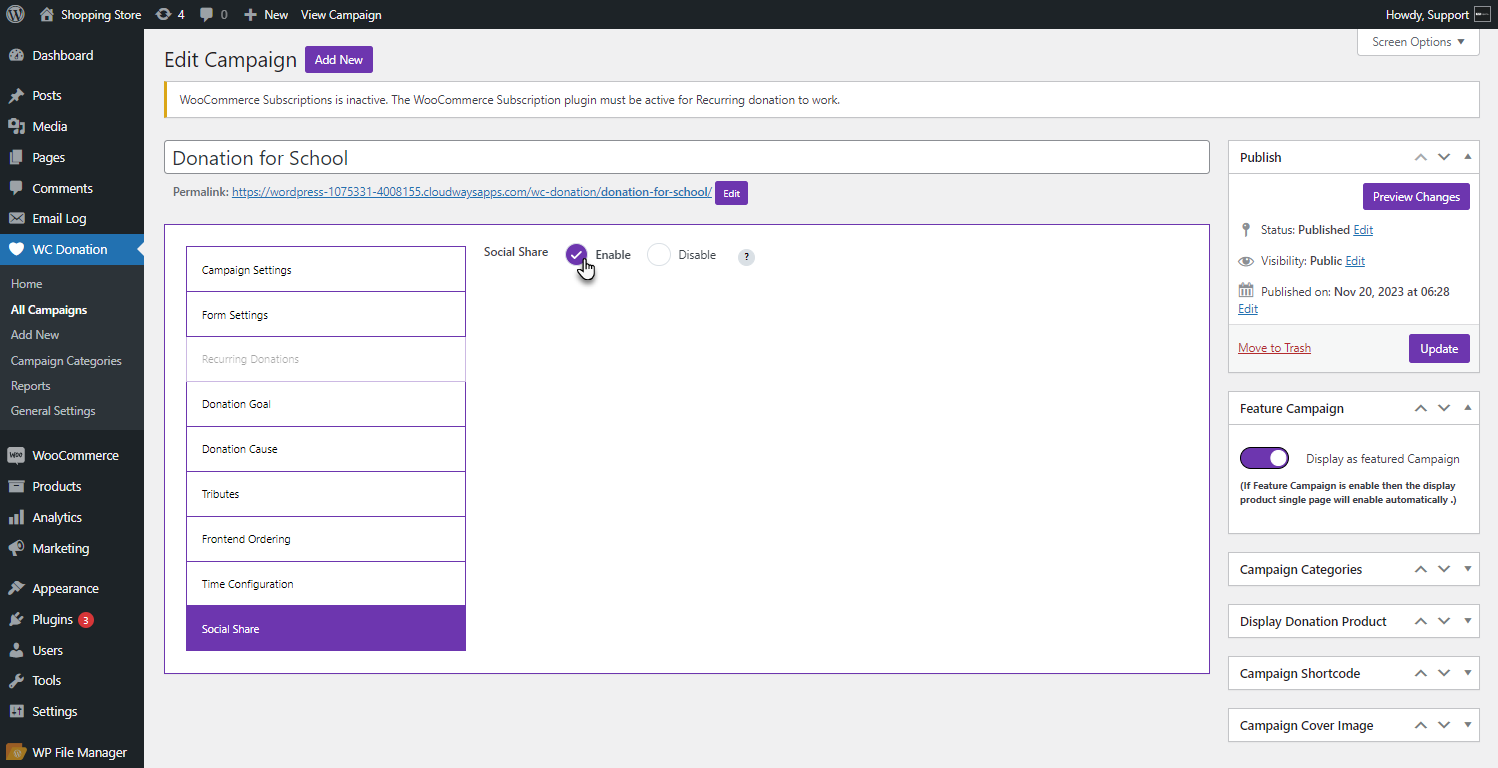
- Click on the Update button to save changes.
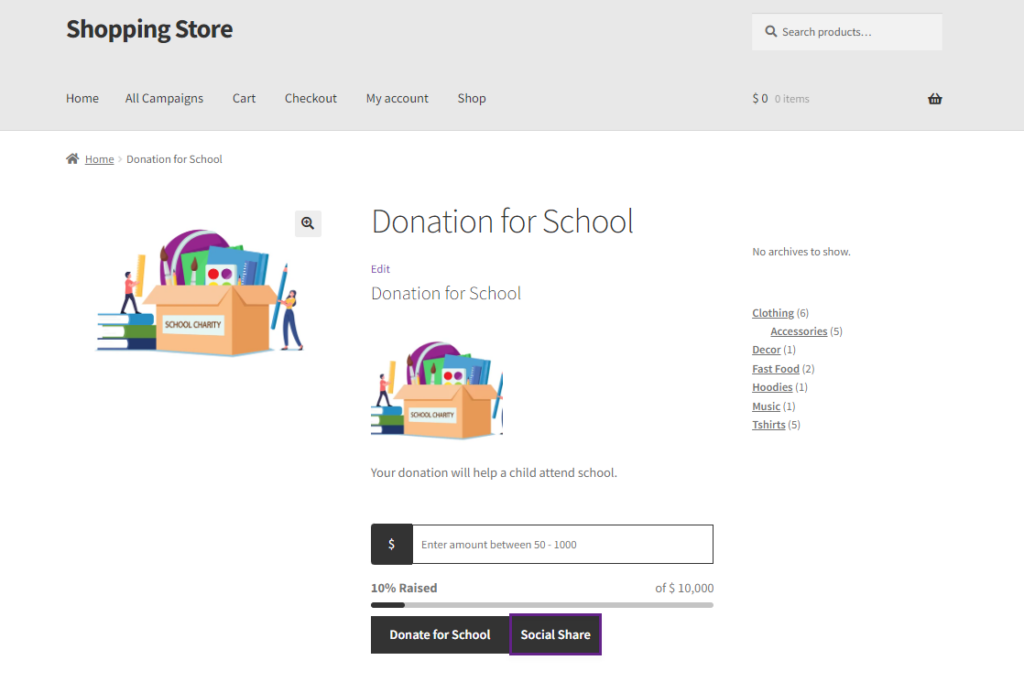
Front-End Impact
- Login to your account.
- Go to the Single Donation page. A Social Share button will appear on the page.
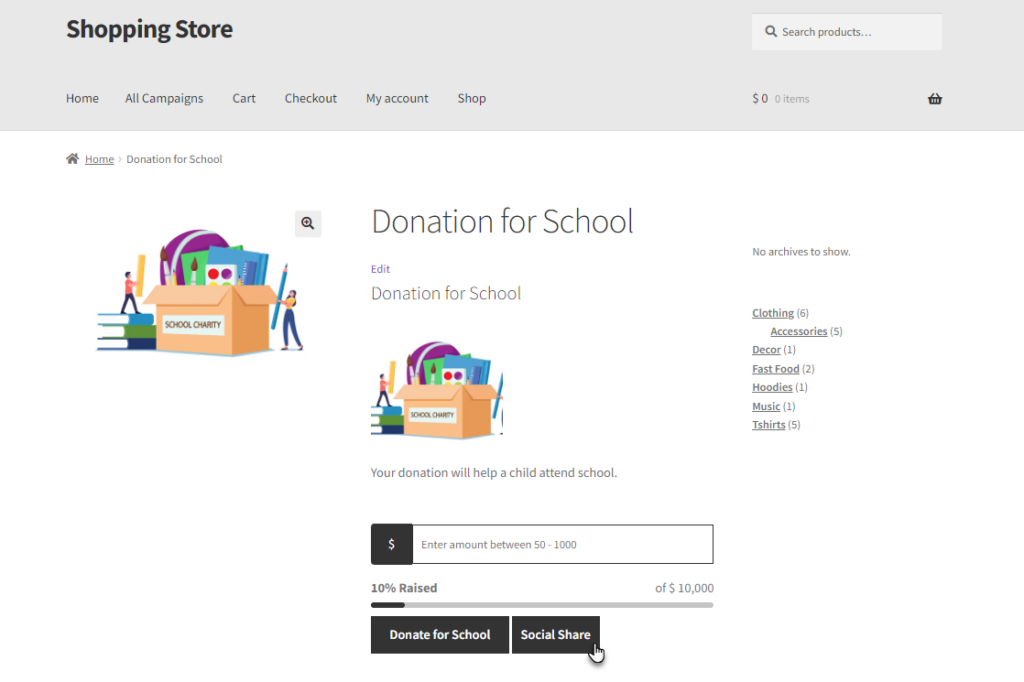
- Click on the Social Share button.
- The user can share the campaign through these links on the social media accounts.
- Copy Link: Allows users to copy the campaign URL to share via any platform or communication channel.
- Facebook: Facilitates sharing the campaign directly on Facebook, leveraging users’ social networks for wider visibility and engagement.
- WhatsApp: This feature enables users to share the campaign link directly with contacts or groups on WhatsApp, a popular messaging platform.
- Email: This option allows you to share the campaign link via email, suitable for personalized outreach and communication with contacts.
- Messenger: This feature allows users to share the campaign link via Facebook Messenger, facilitating one-on-one or group conversations about the cause.
- X (formerly Twitter): Allows users to share the campaign on Twitter, leveraging hashtags and mentions to amplify reach and engagement.
- QR Code: Generates a QR code for the campaign link, facilitating offline sharing and enabling scanning for quick access.
- Print Poster: Provides an option to generate a printable poster promoting the campaign suitable for physical distribution in community spaces or events.
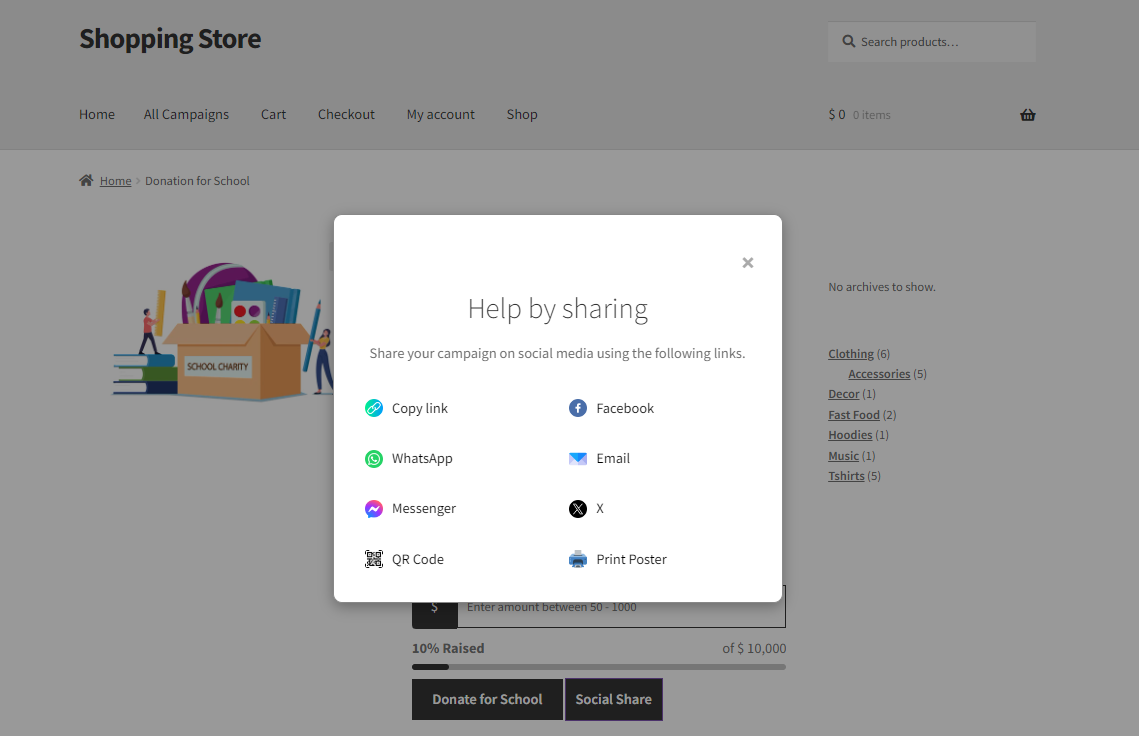
- For Example, Click on the Copy Link option. A link for the campaign will be copied and can be utilized as needed.
E-Card Templates
↑ Back to topThe E-Card Templates feature allows the admin to create and manage digital card templates that can be sent along with a donation to make it more personal and meaningful. Once an e-card template is added, the admin can include it in donation emails by using the Campaign E-Card Template tag.
- Go to WordPress Admin Dashboard > WC Donation > All Campaigns > Edit Campaign.

- On the Edit Campaign screen, click on the E-Card Templates option.

- Enable the E-Card Templates by selecting the Enable E-Card Templates option.

- Click the Add Template button to upload a template from your system or the media library.

- A popup will appear to choose the template. Click on Use this Template.

NOTE: Only PNG and JPEG formats are allowed for uploading in the E-Card template.
- To remove a template, click the Remove button.

- Click Update to save the changes.

- Now, Navigate to WordPress Admin Dashboard > WC Donation > Donation Emails > Edit Email.

- Use the DFW Fields dropdown to insert the E-Card Template tag into the email.

- Click Update to apply the settings.

Front End Impact
- When a user donates to a campaign and the order status is marked as Completed, as set by the admin, an email with E-Card Template will be triggered and sent to the user.

Campaign Categories
↑ Back to top- The Campaign Categories feature allows the admin to organize donation campaigns into categories, making it easier to manage campaigns in the backend and helping users find relevant campaigns on the frontend.
- Go to WordPress Admin Dashboard > WC Donations > Campaigns Categories.
- The Campaign Categories edit page will appear.
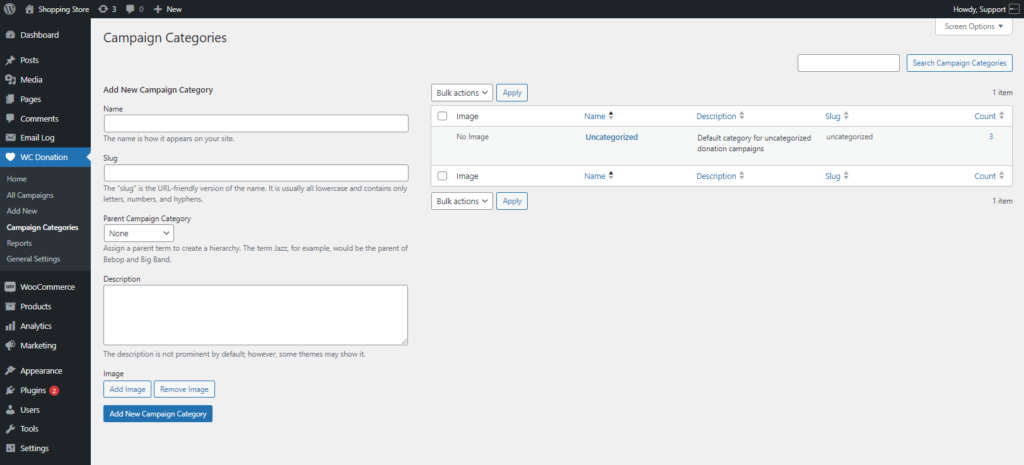
- The Admin can add a Name, Slug, Parent Campaign Category, Description, and Image for each category.
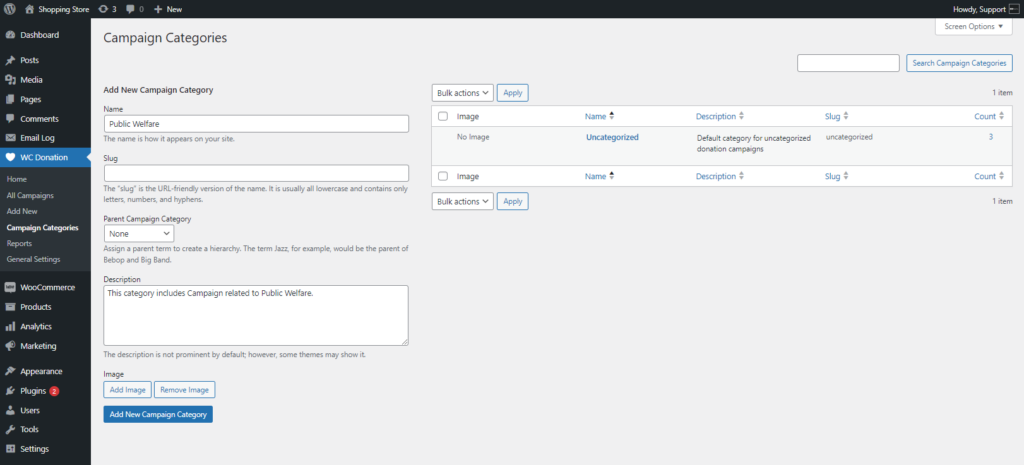
- Click on the Add New Campaign Category.
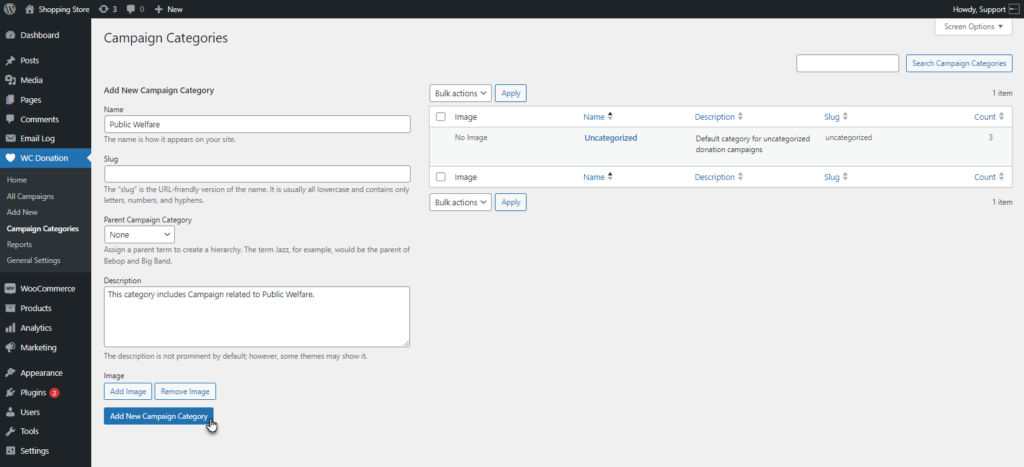
- A new Campaign Category will be created and listed in the table.
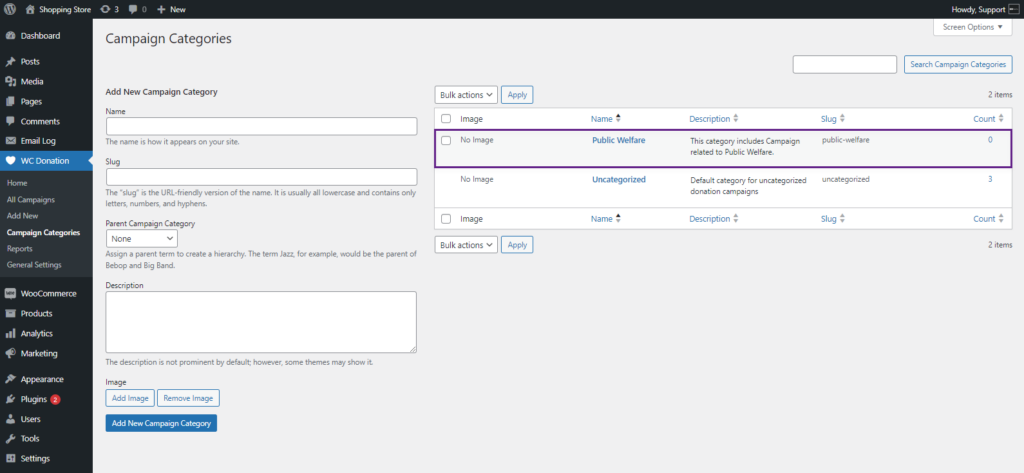
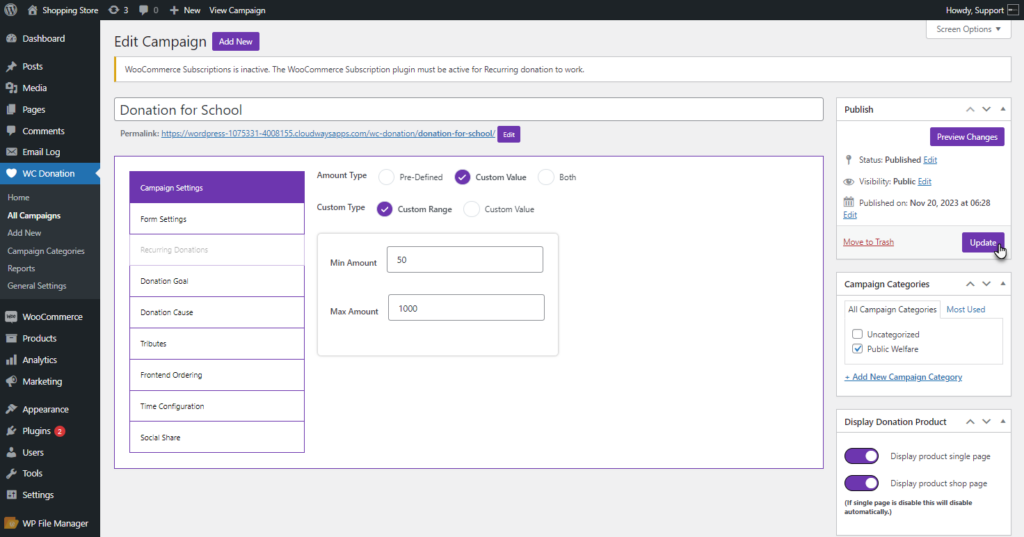
- Once done with creating a Campaign Category, Go to WordPress Admin Dashboard > WC Donations > All Campaigns > Edit Campaign.
- There will be a Campaign Category box in the sidebar.
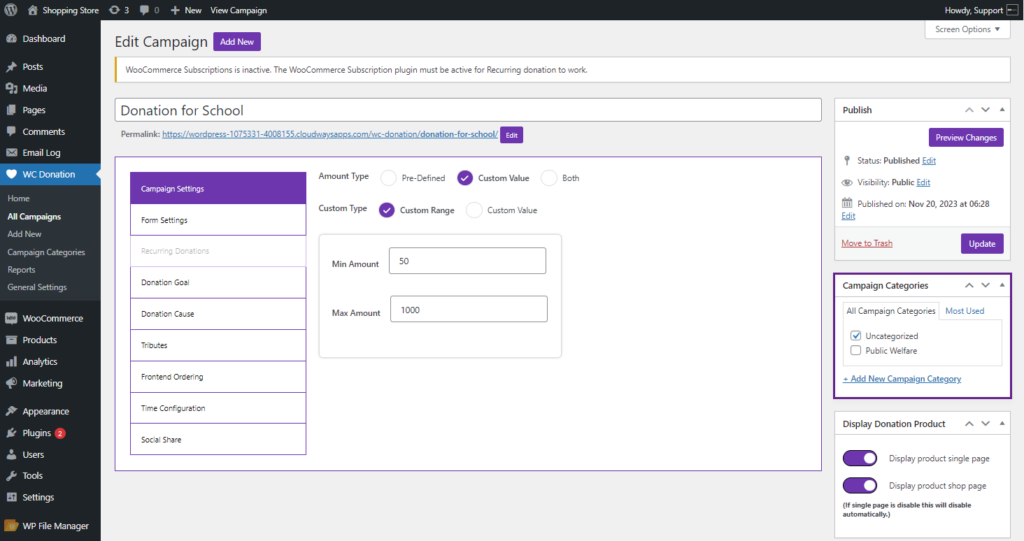
- Select a category for the Campaign.

- Click on the Update button to save changes.
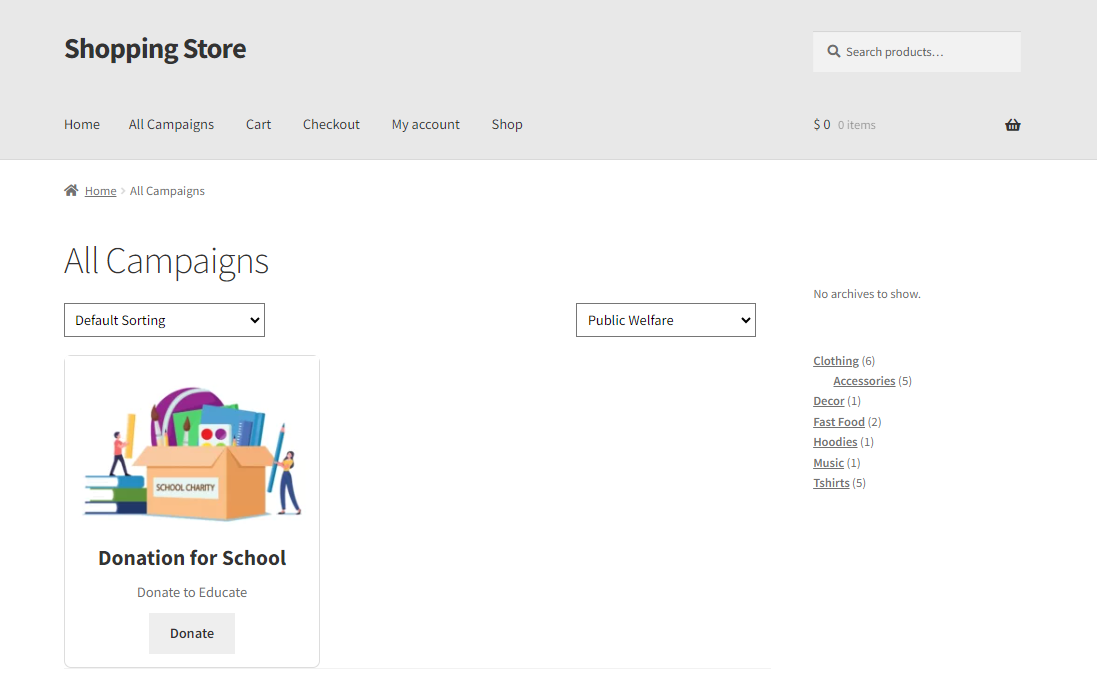
Front-End Impact
- Login to your WordPress account.
- Go to the All Campaign page. There will be an All Categories drop-down.
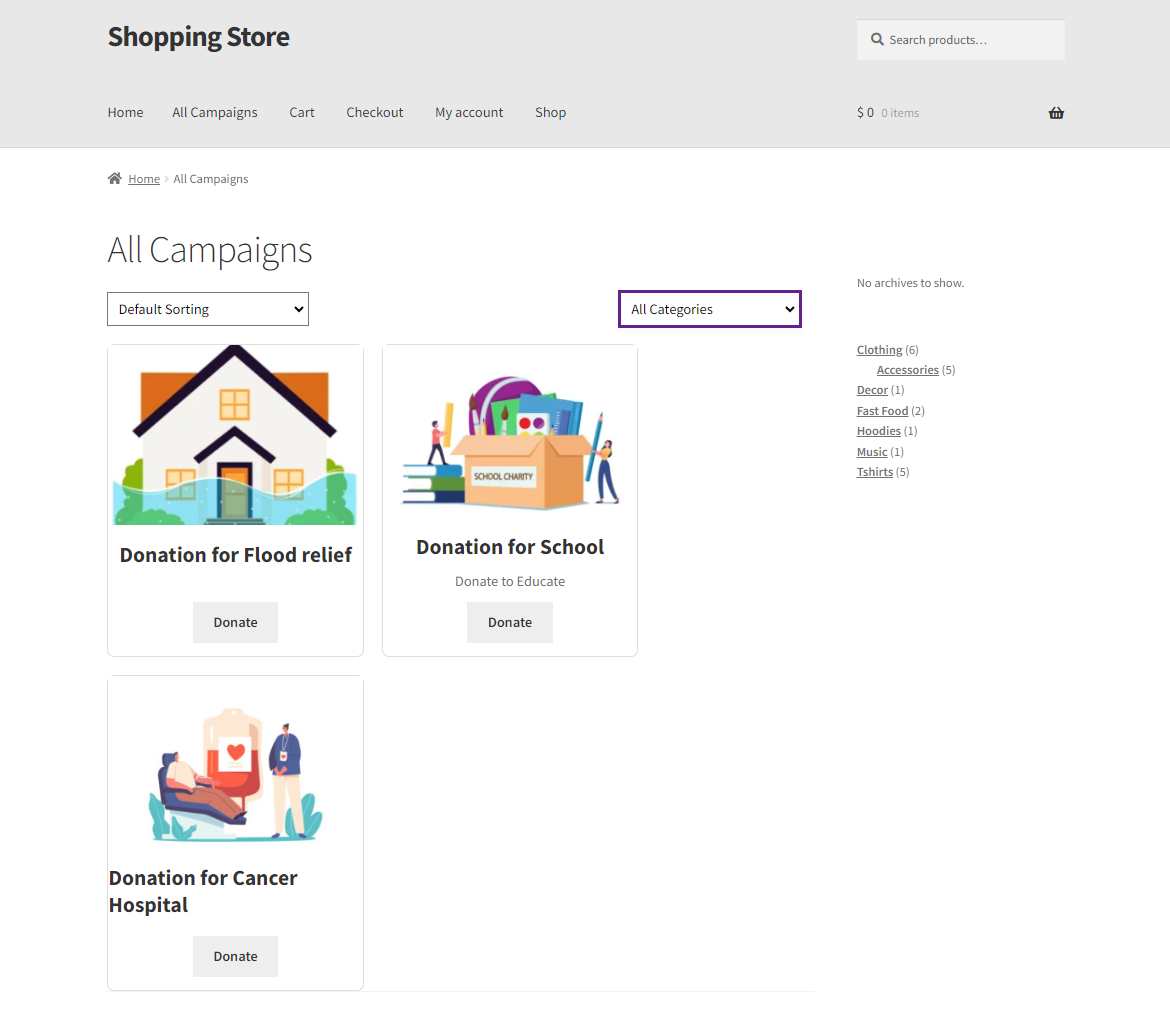
- Select a Category from the drop-down.
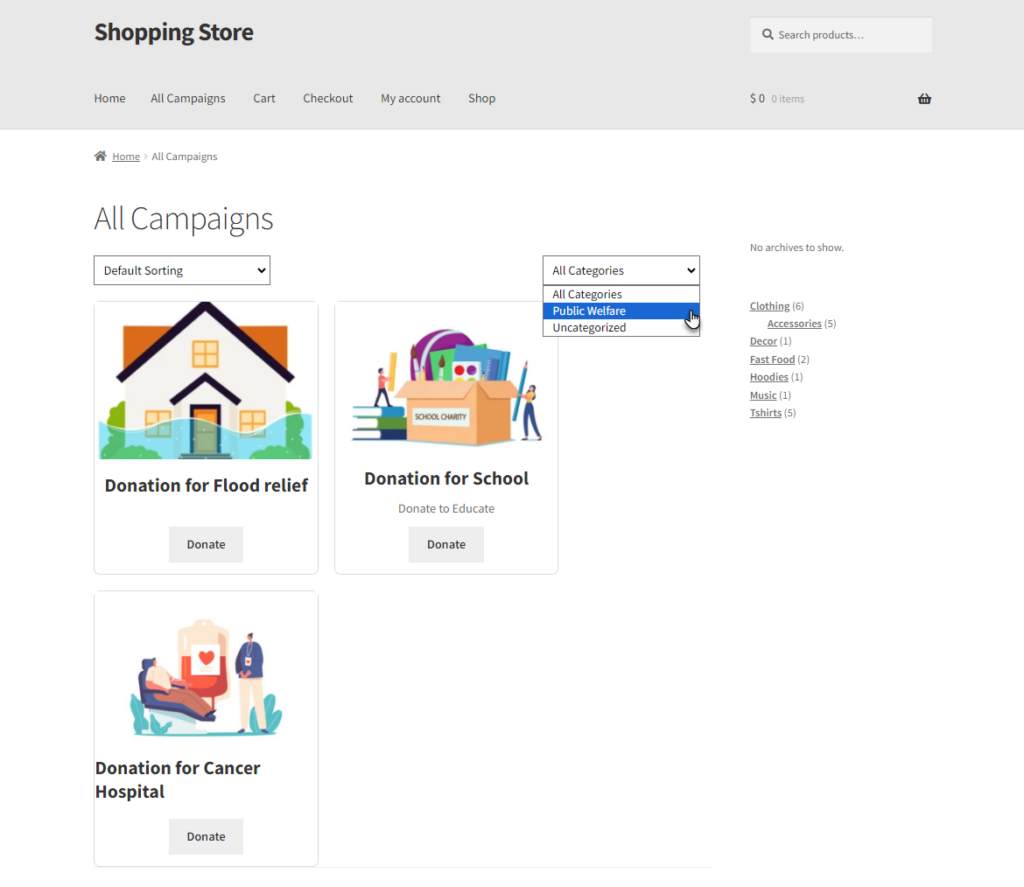
- The campaigns associated with the selected category will appear.
Campaign Cover Page
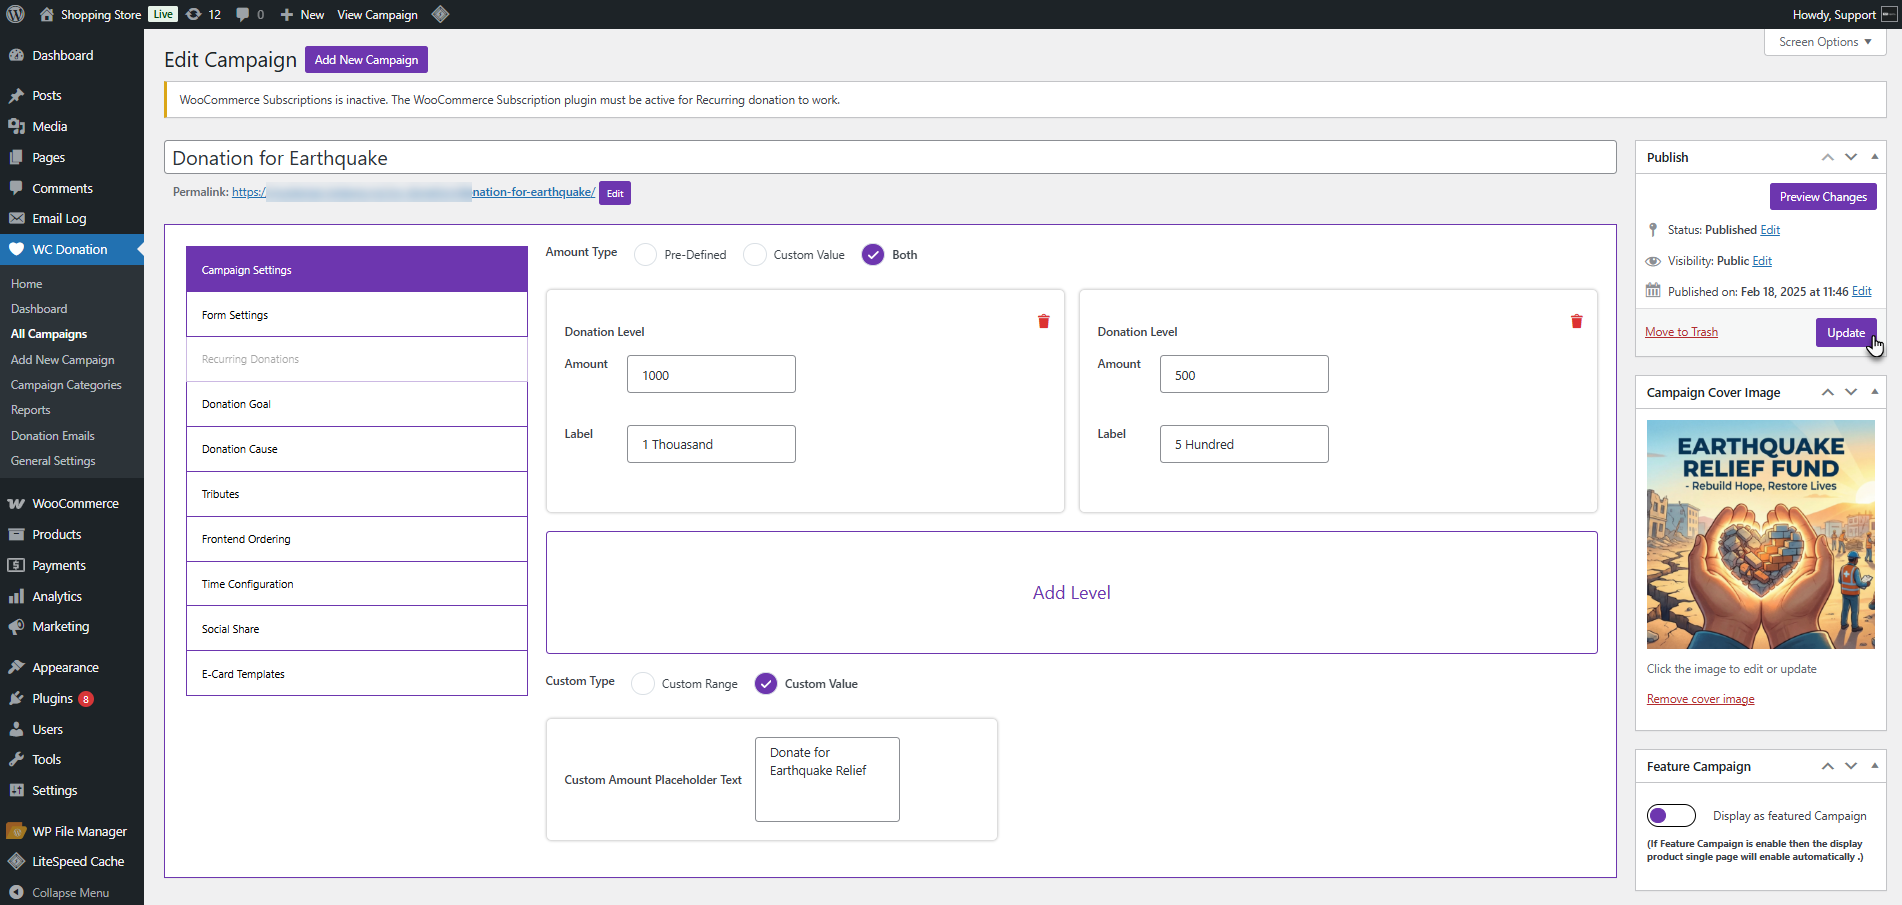
↑ Back to topThe Campaign Cover Image allows the admin to add a featured image to a donation campaign, which is displayed on the frontend to visually represent the campaign.
- To set a campaign cover image, Go to WordPress Admin Dashboard > WC Donations > All Campaigns and click Edit on the desired campaign.
- On the right-hand side, locate the Campaign Cover Image section and click Set Cover Image.
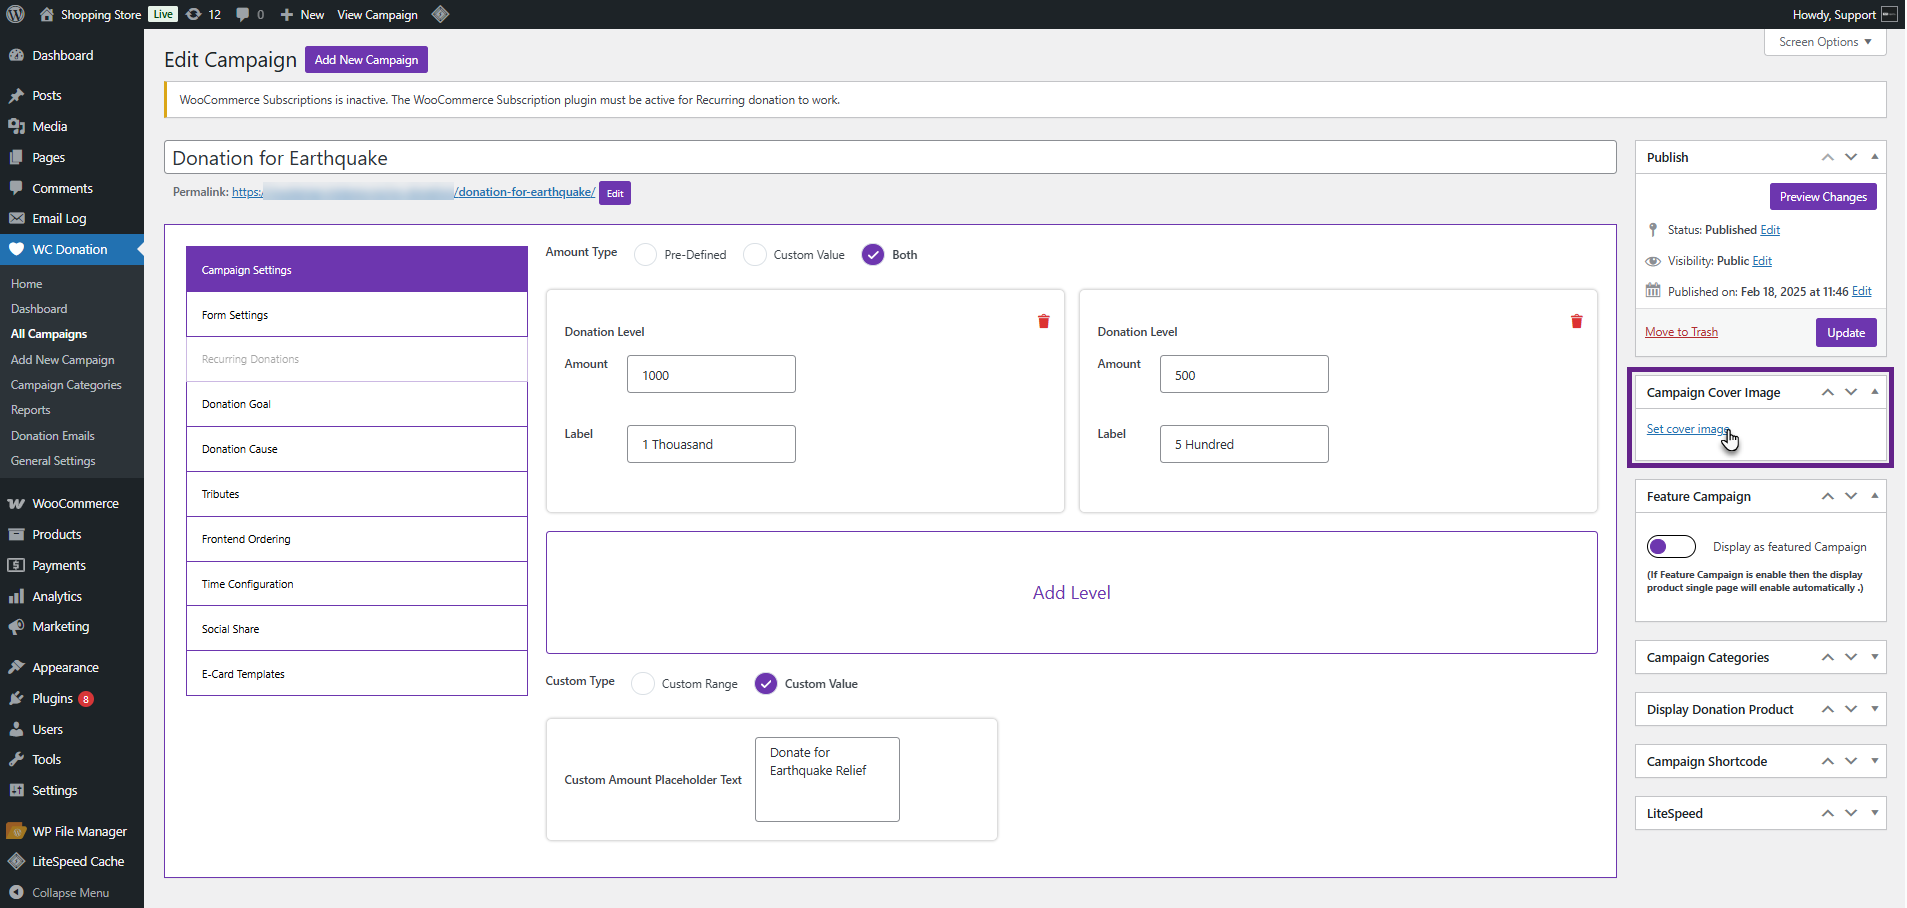
- Upload or select an image from the media library. Click Update to save and apply the cover image to the campaign.
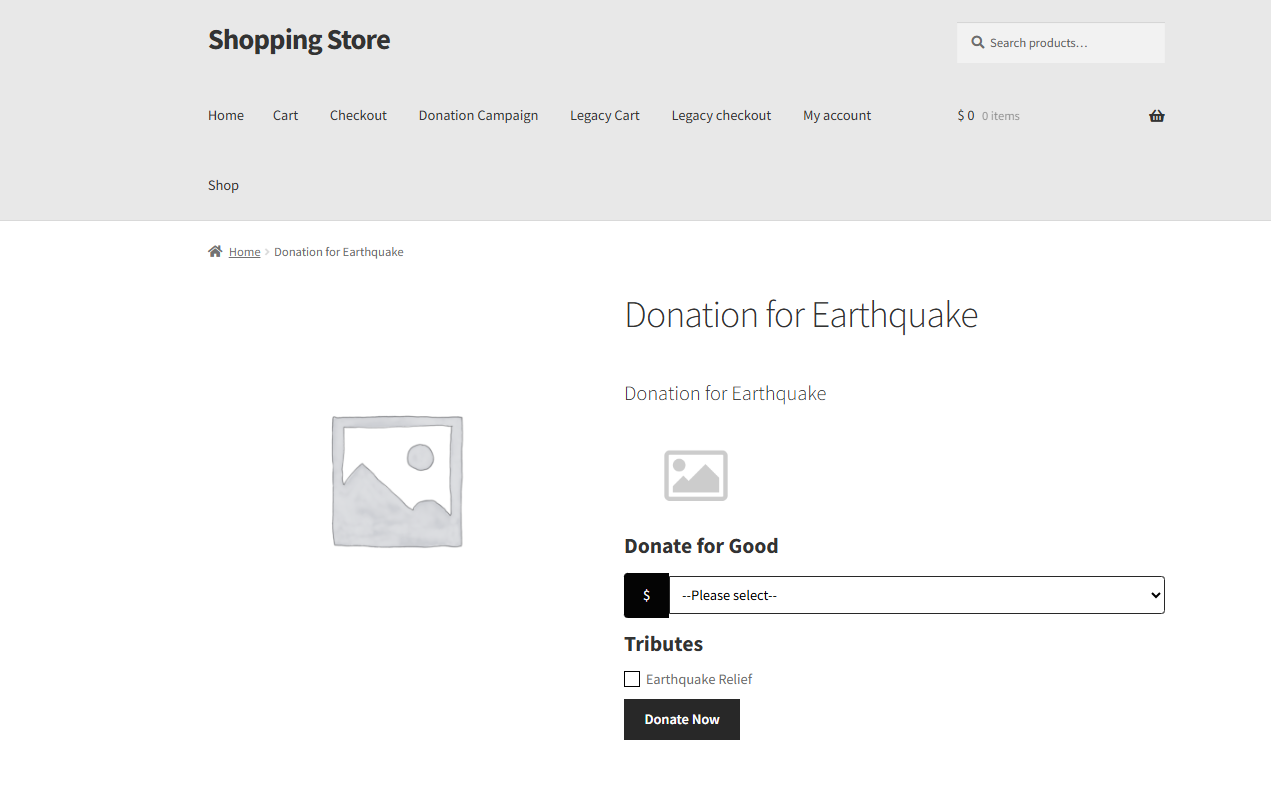
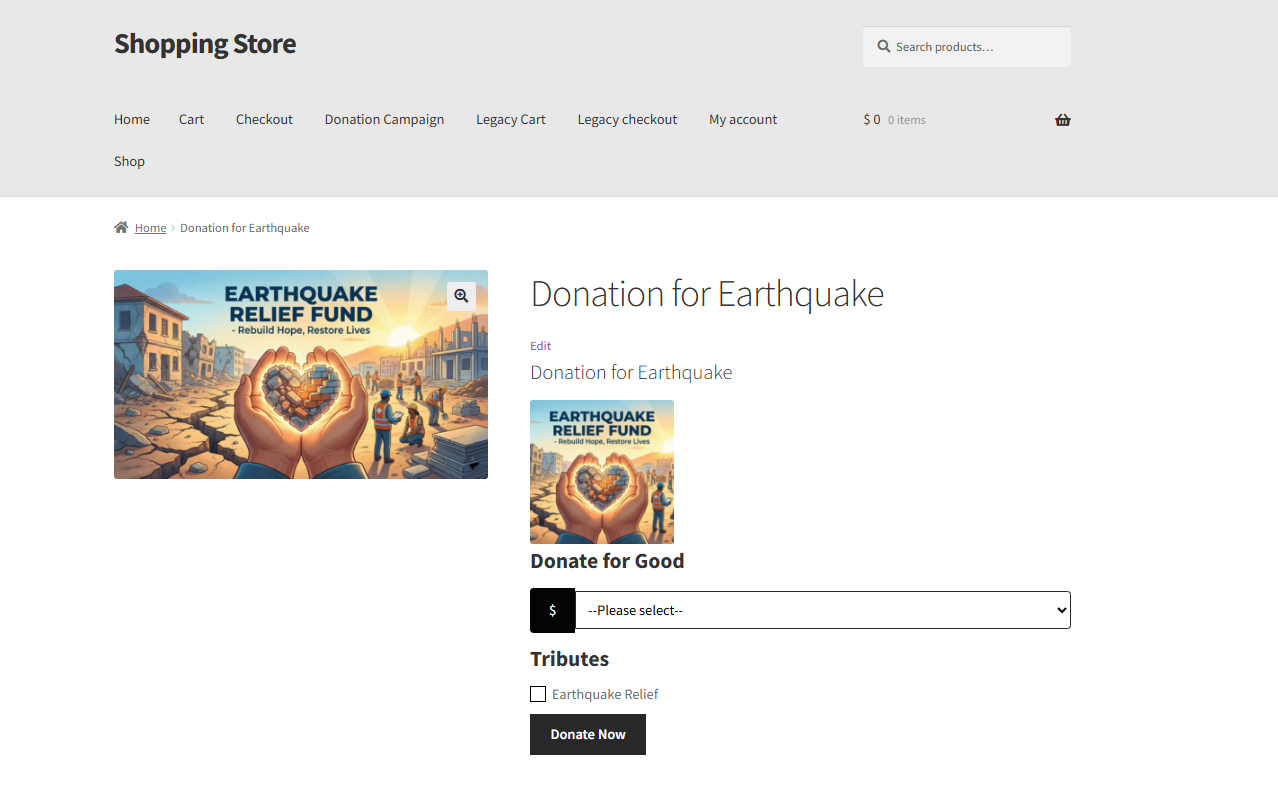
Front End
- Before
- After
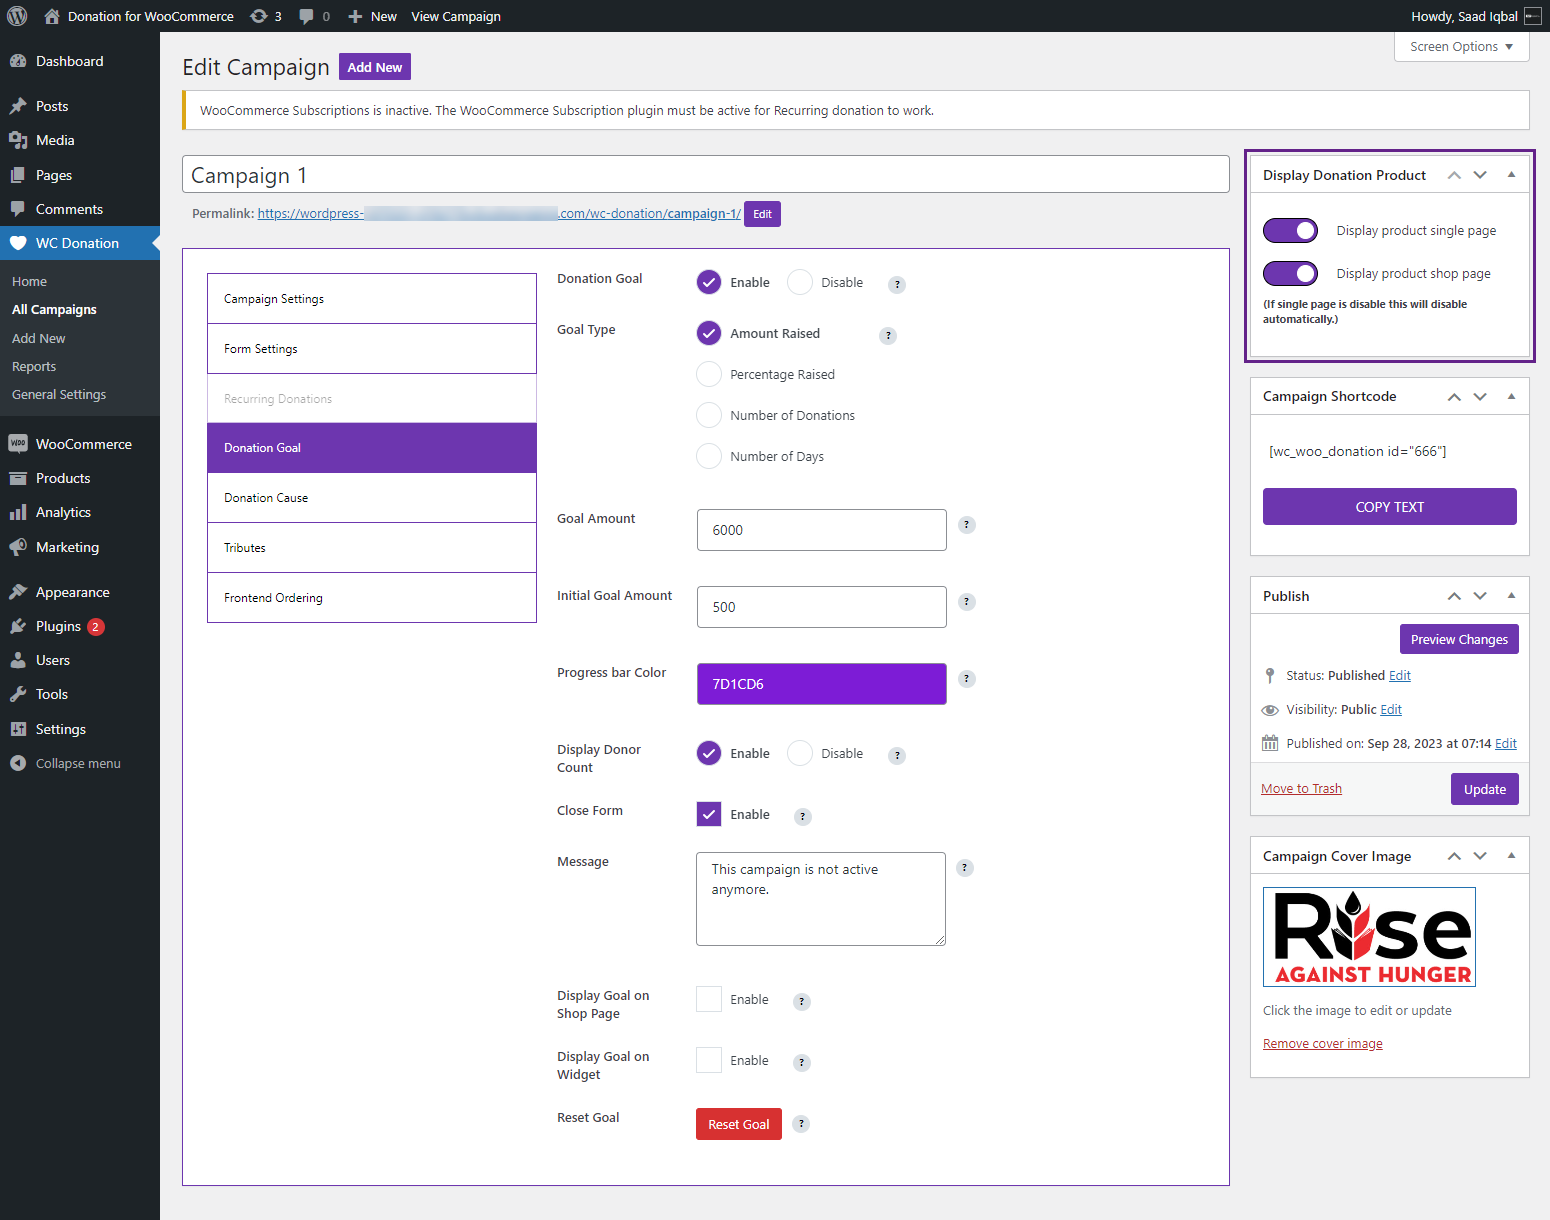
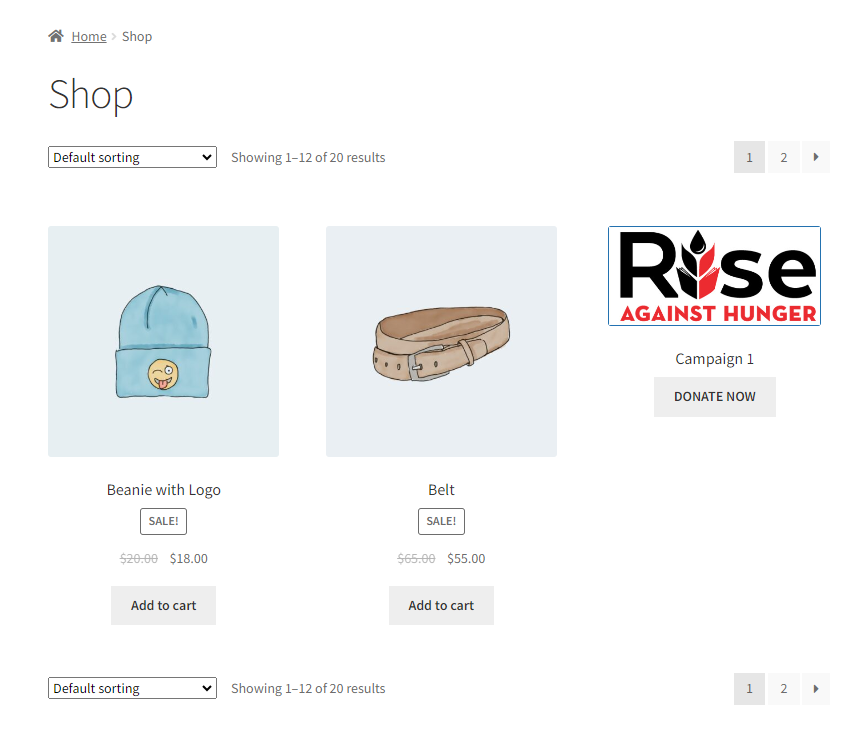
Display Donation Product
↑ Back to topThe Display Donation Product feature allows the admin to control where the donation product is shown on the frontend. Within the Display Donation Product section, the admin can enable the following options:
- Display Product on Single Page: Shows the donation product on the individual product detail page.
- Display Product on Shop Page: Displays the donation product on the shop and product listing pages
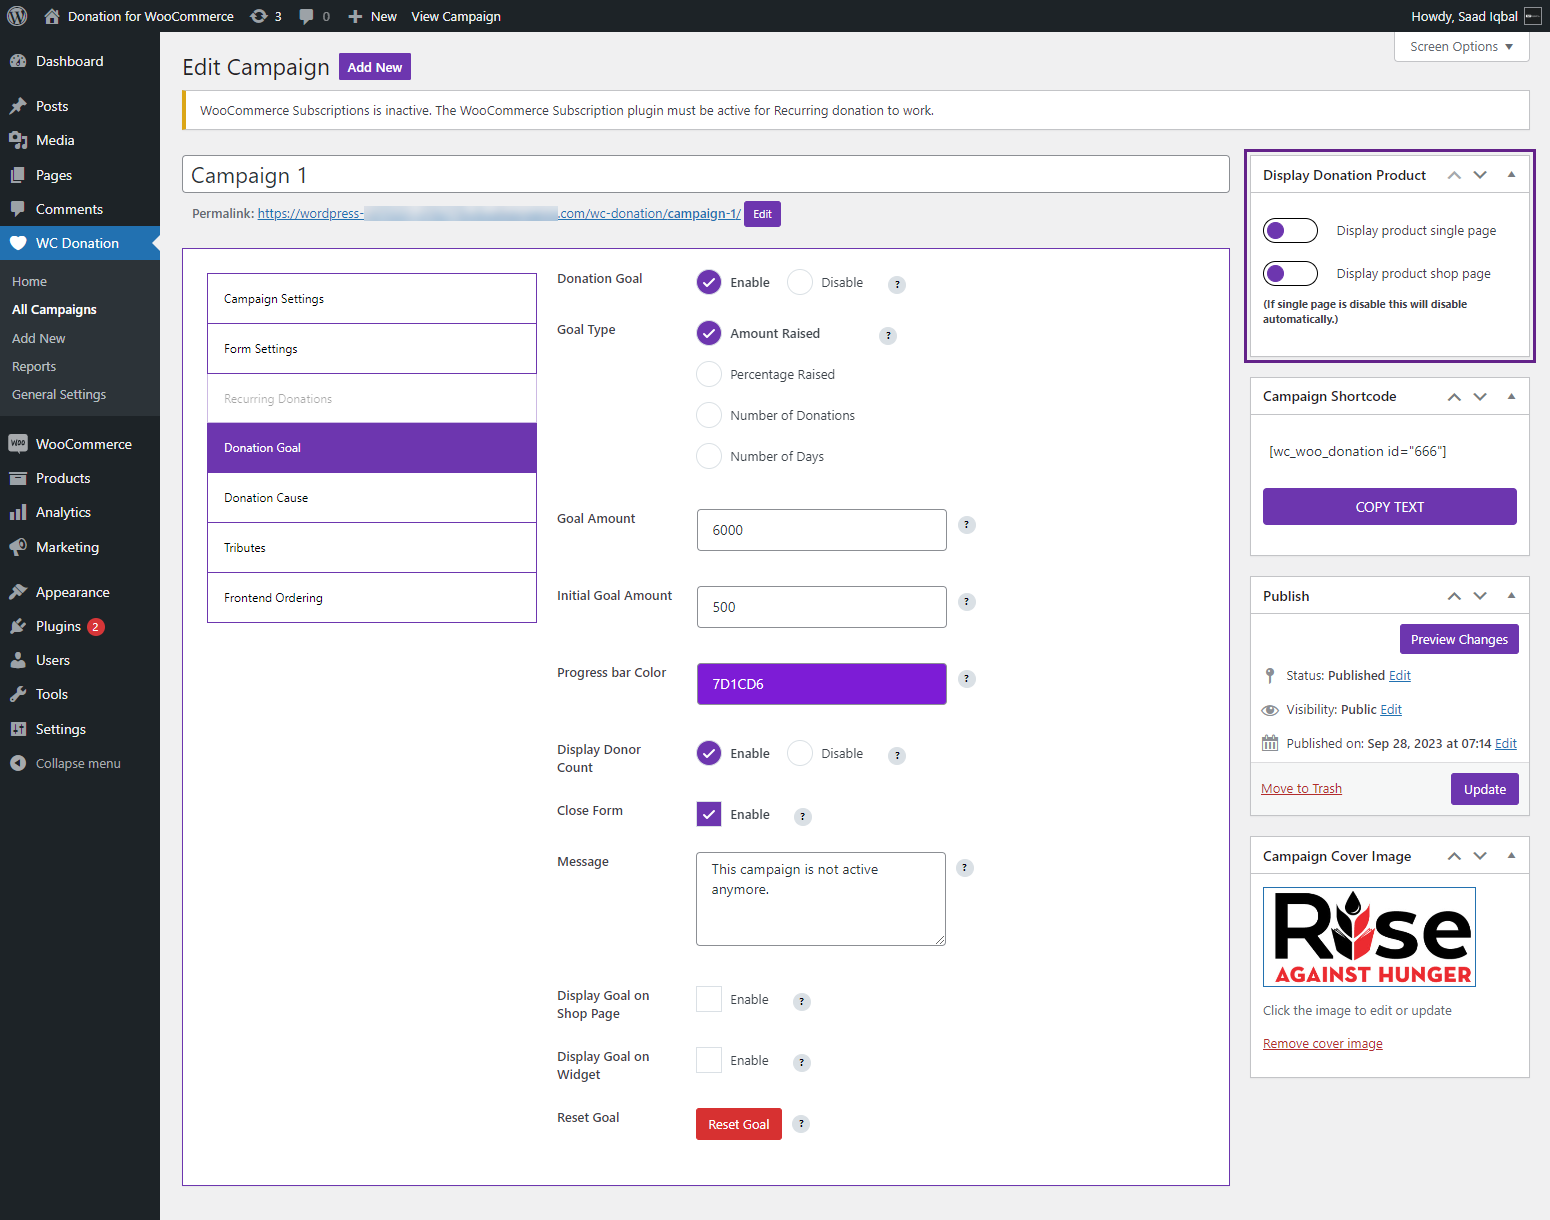
- Enable the Display product single page toggle button to display the campaign on the single product page.
- Enable the Display product shop page toggle button to display the campaign on the shop page.
- Once done, click on the Update button.
Front-End Impact
Shop Page
Single Product Page
Featured Campaign
↑ Back to top
The Featured Campaign option allows the admin to highlight specific donation campaigns for increased visibility on the frontend. Featured campaigns can be displayed using a dedicated Gutenberg block.
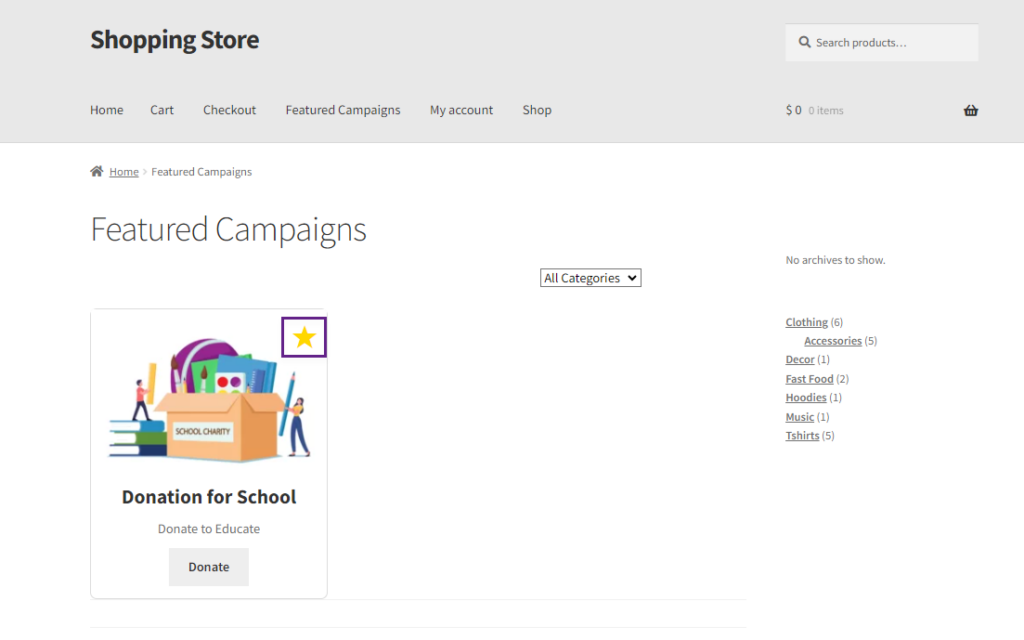
- Go to WordPress Admin Dashboard > WC Donations > All Campaigns > Edit Campaign.
- There will be a Featured Campaign box in the sidebar.
- Enable the Featured Campaign option to display the campaign as featured.

- Click on the Update button to save the changes.

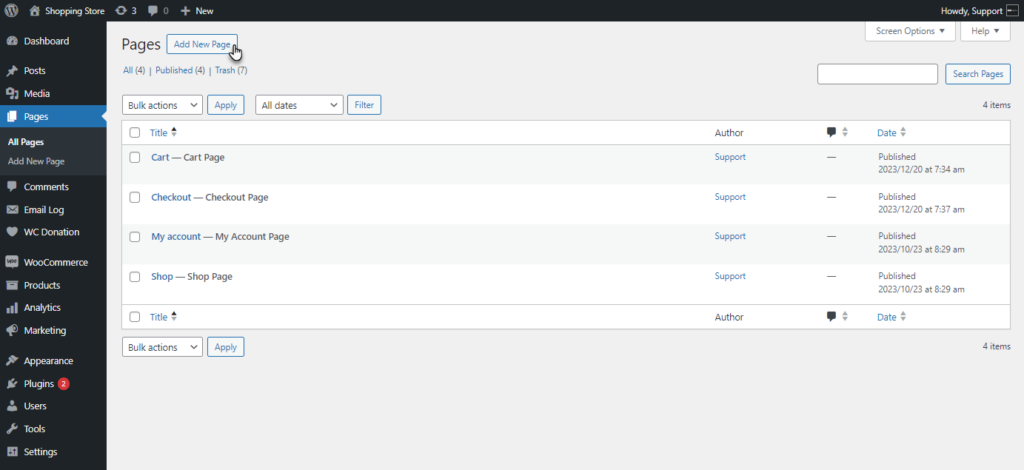
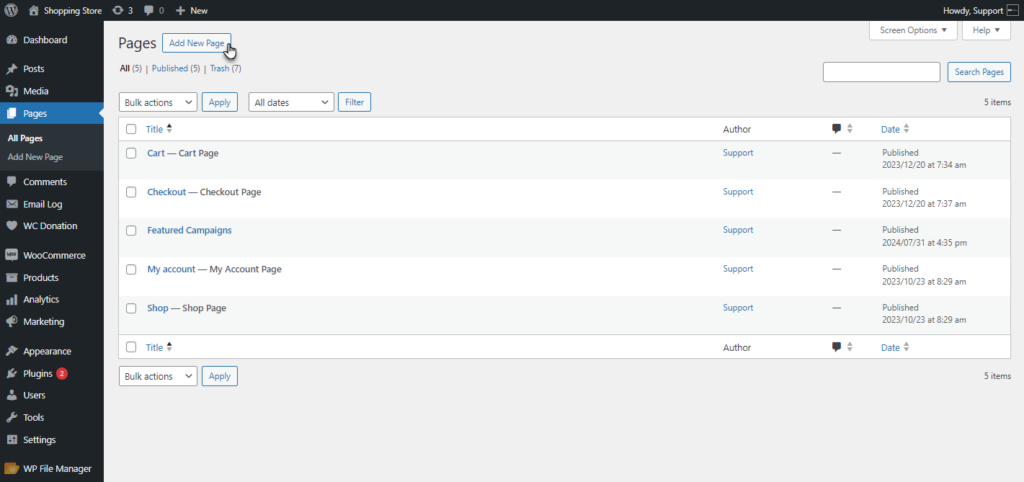
- Now Go to WordPress Admin Dashboard > Pages > Add New Page.
- Add a WC Feature Donation block element.
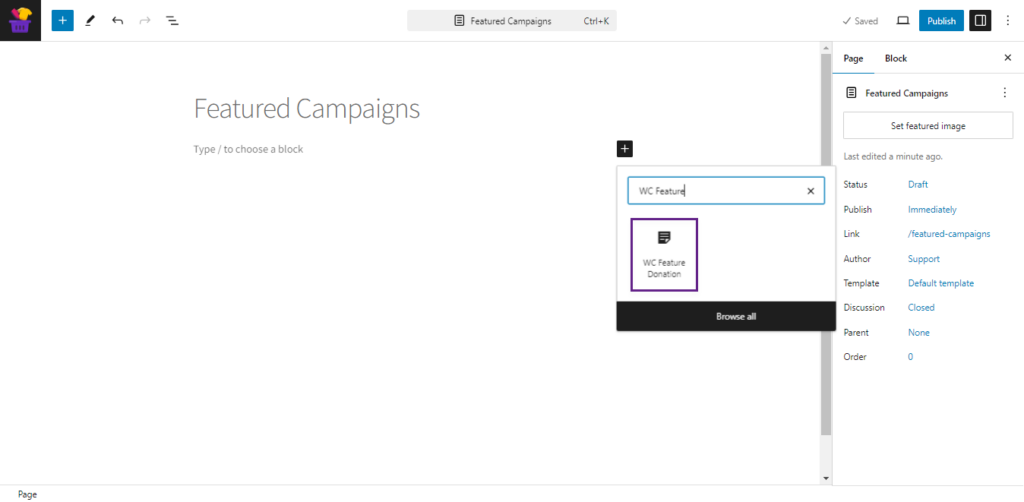
- Click the Publish button.
Front-End Impact
- Login to your WordPress account.
- Go to the Featured Campaigns page. Only featured campaigns will be listed on the page.
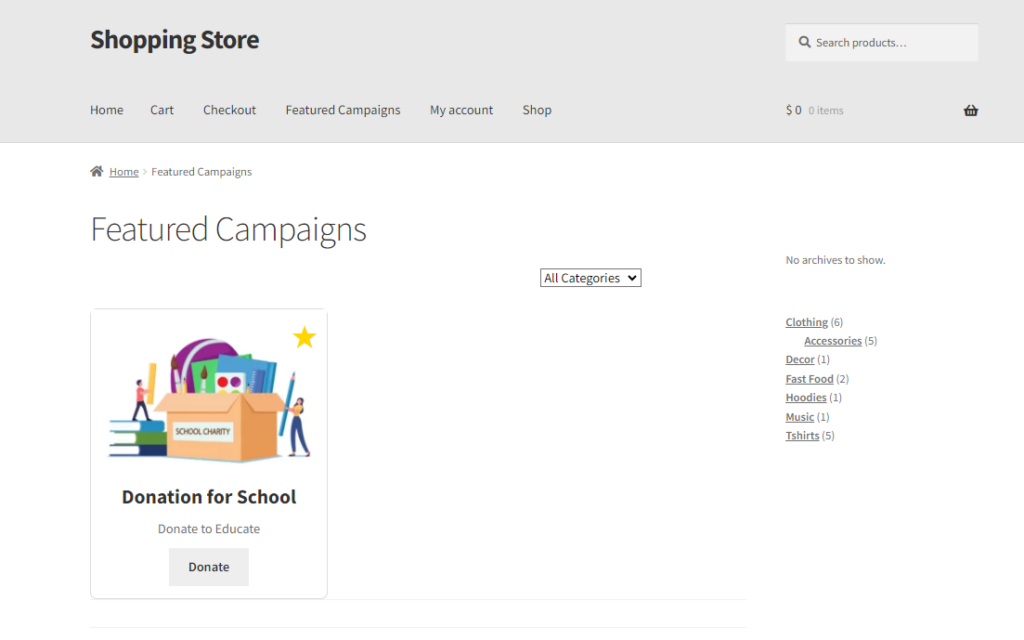
- There will be a star icon on the featured campaigns.
All Campaigns Page
↑ Back to top
The All Campaigns Page feature allows the admin to display all donation campaigns on a page using a dedicated Gutenberg block.
- Go to WordPress Admin Dashboard > Pages > Add New Page.
- Add a WC All Donation block element.
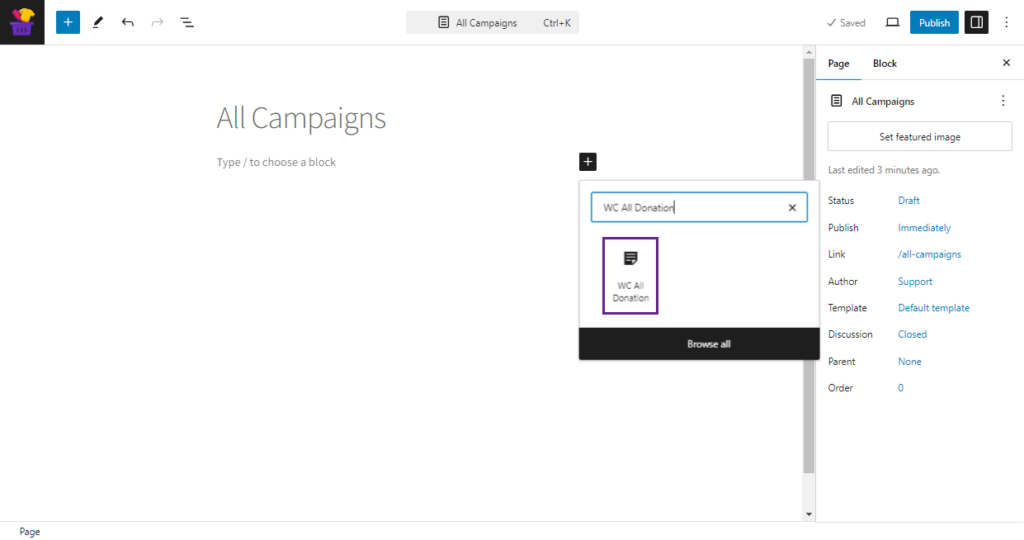
- Click the Publish button.
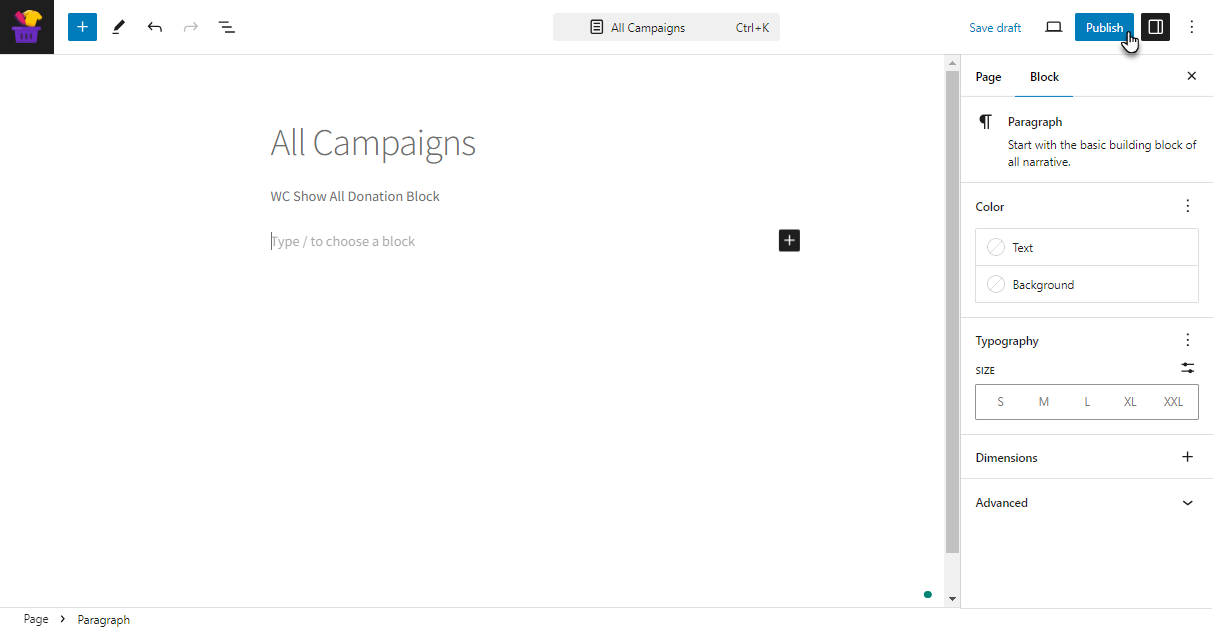
Front-End Impact
- Login to your WordPress account.
- Go to the All Campaigns page. All the Donation Campaigns will be listed on the page.

General Settings
↑ Back to top- Navigate to the WordPress Admin Dashboard > WC Donation > General Settings.

- All the options will appear in the General Settings section.
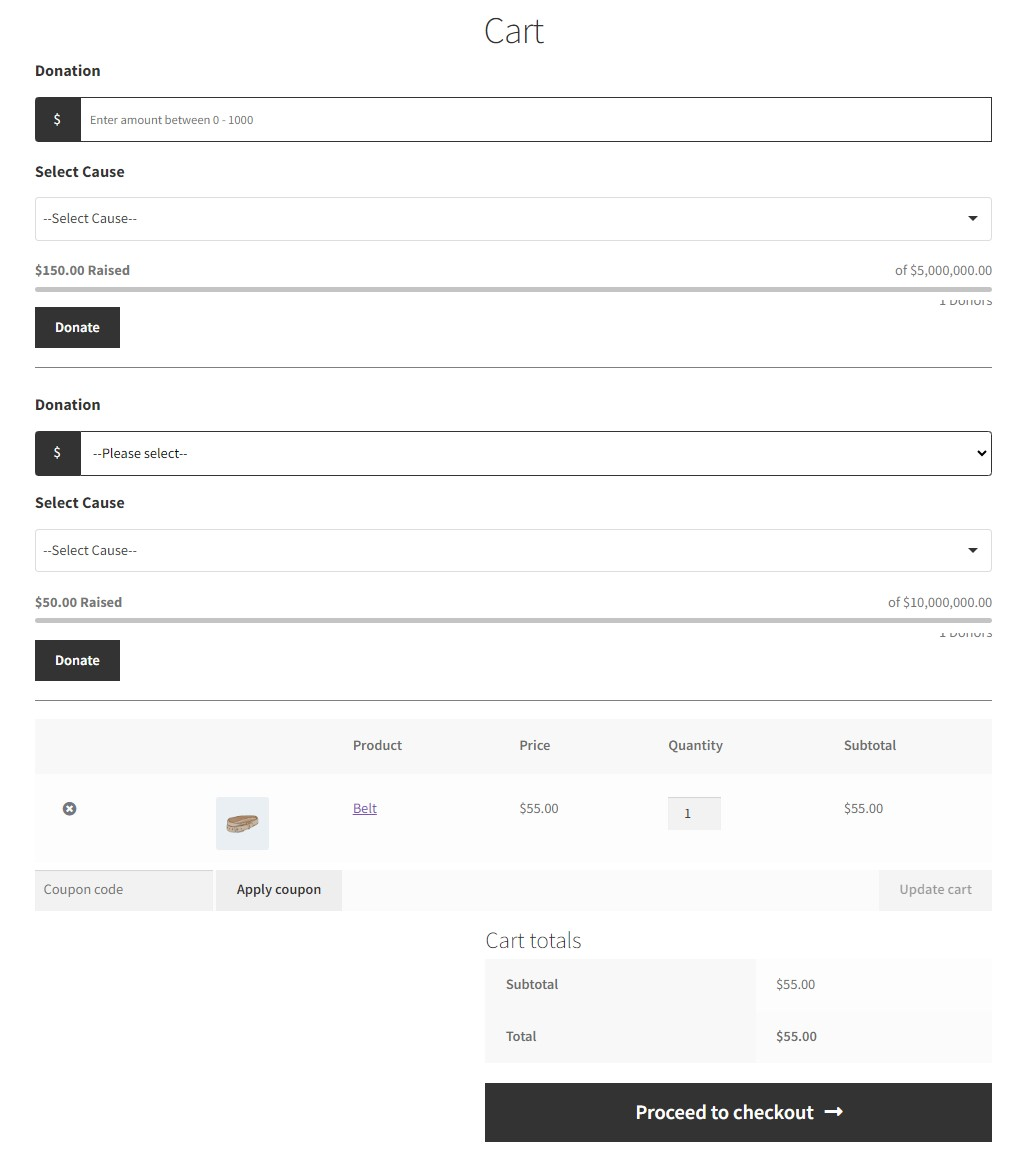
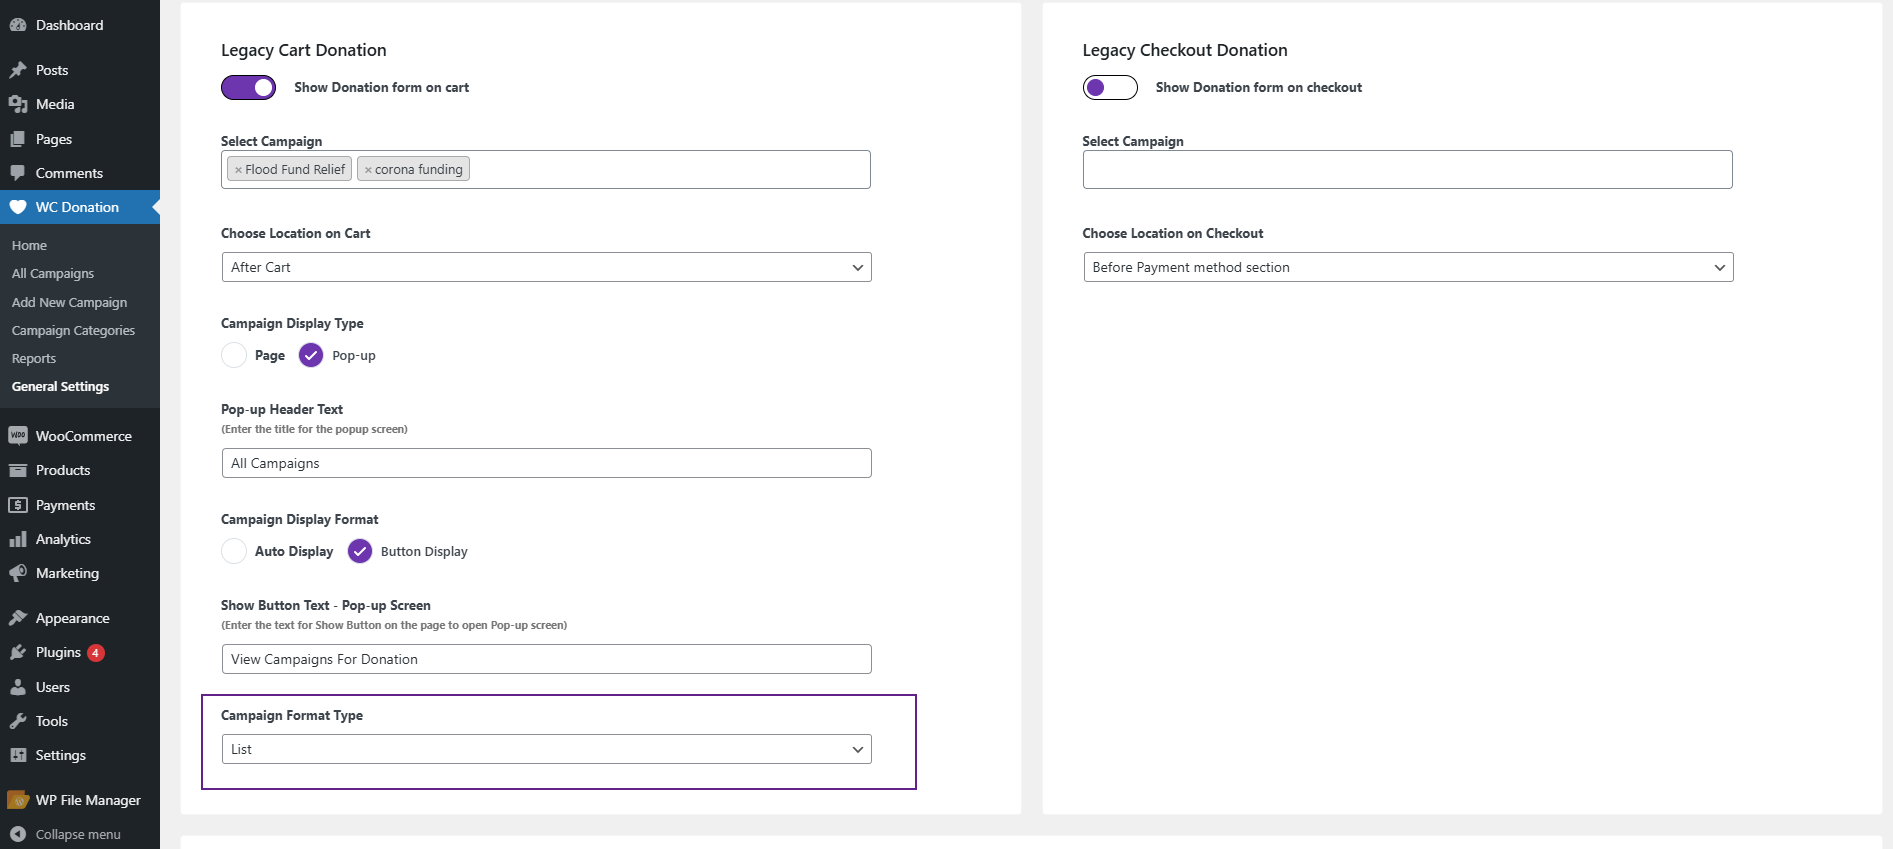
Legacy Cart Donation
↑ Back to top- Navigate to the Legacy Cart Donation in General Settings.
- Enable the Show Donation form on cart.

Select Campaign
- Navigate to Select Campaign in Legacy Cart Donation.
- Select multiple campaigns in a multi-selector textbox.

Choose Location on Cart
Before Cart Table
- Navigate to the Choose Location on Cart in Legacy Cart Donation.
- Select from the drop-down menu Before Cart Page.
- Click on Save Changes.

Front-End Impact
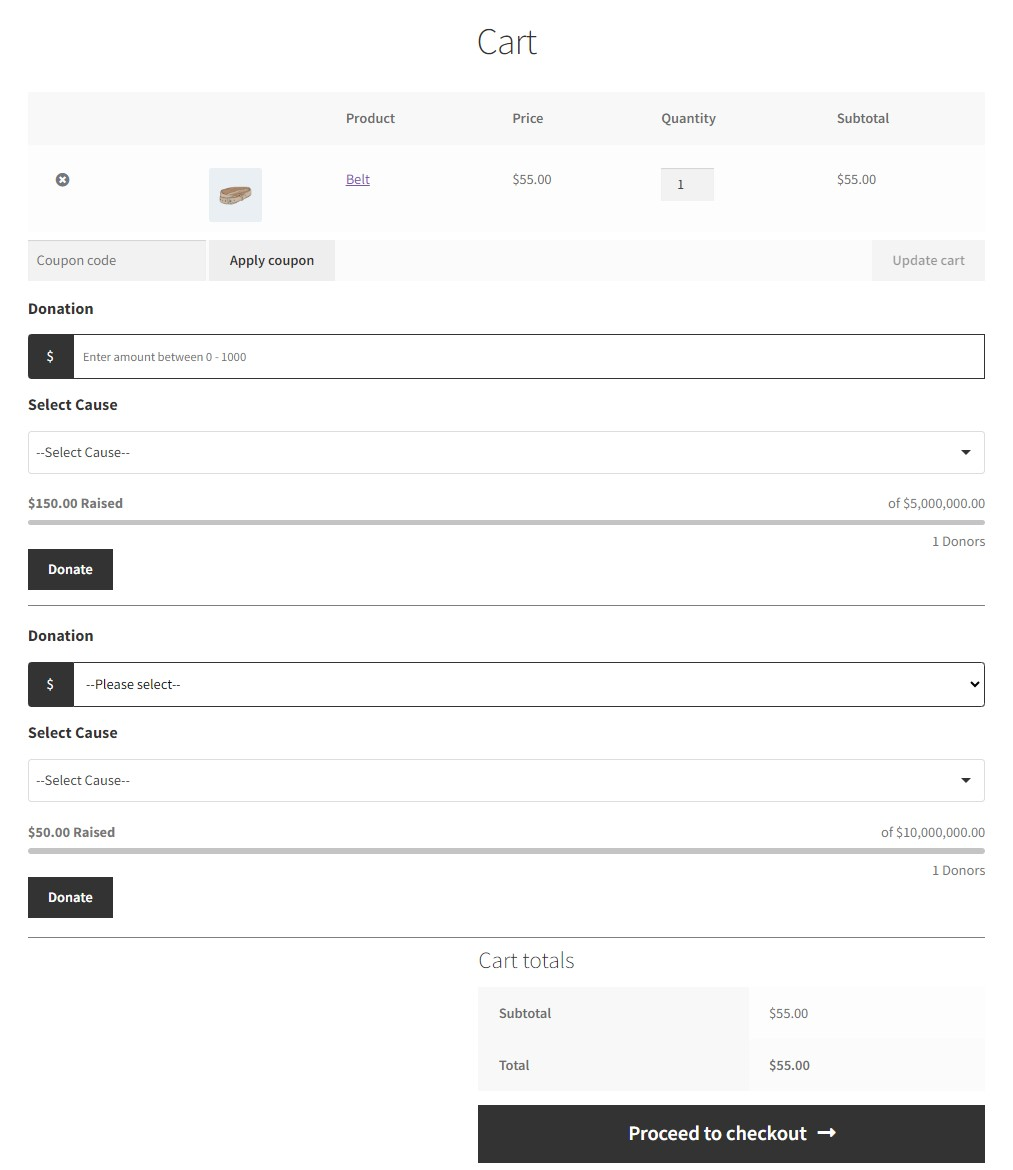
After Cart Table
- Navigate Choose Location on Cart in Legacy Cart Donation.
- Select from the drop-down menu After Cart Page.
- Click on Save Changes.

Front-End Impact
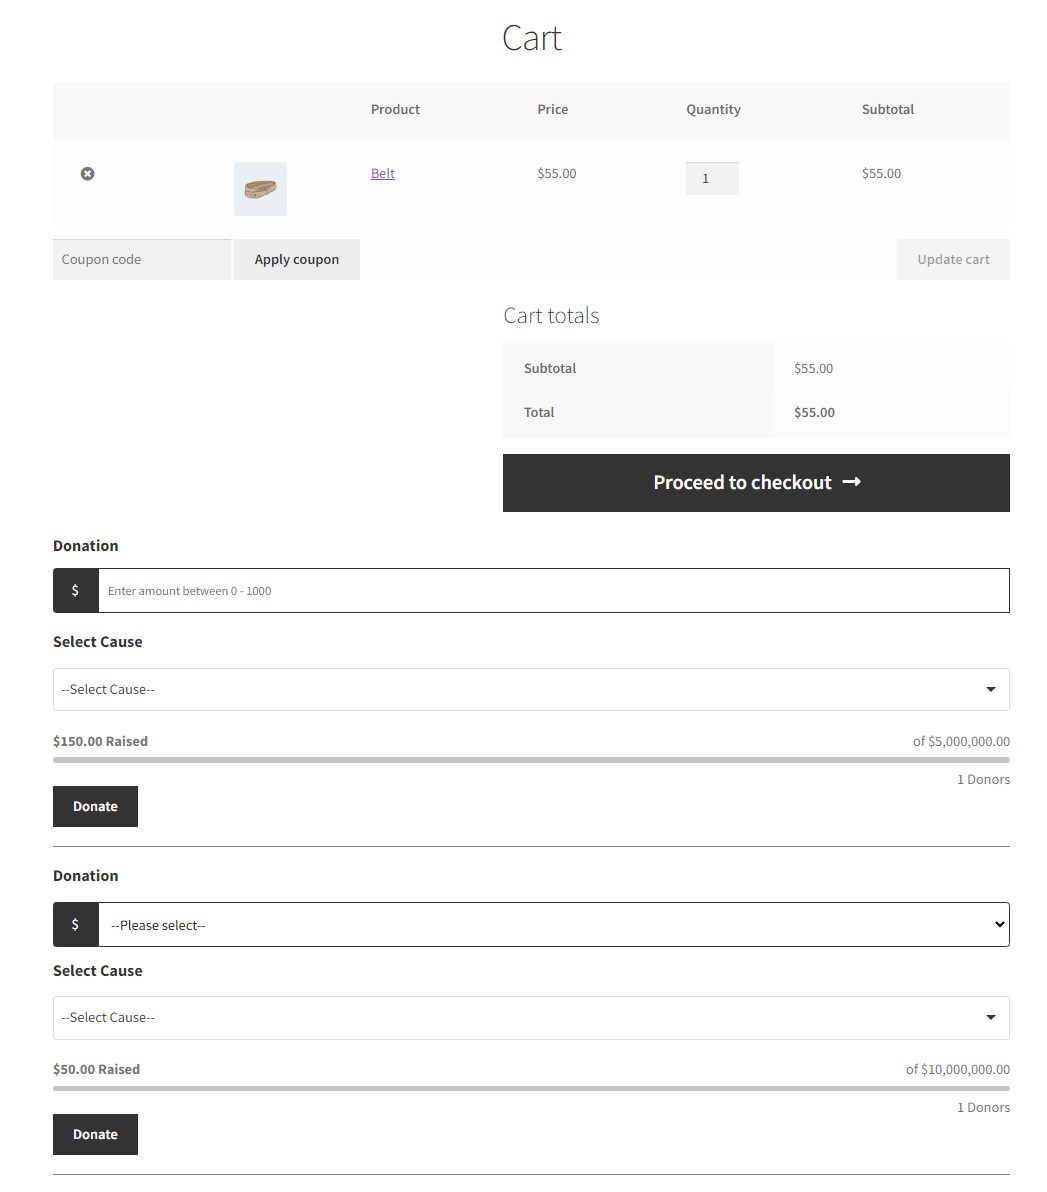
After Cart
- Navigate Choose Location on Cart in Legacy Cart Donation.
- Select from the drop-down menu After Cart.
- Click on Save Changes.

Front-End Impact
Campaign Display Type
- Admin can select Campaign Display Type and how they want to display the campaign on the cart page for customers.
- Navigate Campaign Display Type in Legacy Cart Donation.
Page
- Select Page from Campaign Display Type.
- Click on Save Changes.

Front-End Impact
Pop-up
- Select Pop-up from Campaign Display Type.
- Click on Save Changes.

Front-End Impact
NOTE: Pop-up Header Text and Campaign Display Format will be shown when Pop-up is selected only.
Pop-up Header Text
- Admin can set the Pop-up Header Text, where they will display the heading on the cart page for customers. Whenever a customer visits the cart page after adding a product to the cart.
- Navigate Choose Location on Cart in Legacy Cart Donation.
- Enter text in the textbox.
- Click on Save Changes.

Front-End Impact

Campaign Display Format
- Admin can select the Campaign Display Format, where they will display the Campaign Display Format on the cart page for customers. Whenever a customer visits the cart page after adding a product to the cart.
Auto Display
- Navigate Campaign Display Format in Legacy Cart Donation.
- Select Auto Display from Campaign Display Format.
- Click on Save Changes.

Front-End Impact
Button Display
- Navigate Campaign Display Format in Legacy Cart Donation.
- Select Button Display from Campaign Display Format.
- Click on Save Changes.

NOTE: After selecting Button Display, a feature of Show Button Text – Pop-up Screen will appear.
Front-End Impact
Show Button Text – Pop-up Screen
- Admin can set the Show Button Text – Pop-up Screen, where they will display the button on the cart page for customers. Whenever a customer visits the cart page after adding a product to the cart.
- Navigate Show Button Text – Pop-up Screen in Legacy Cart Donation.
- Enter the text in the textbox.
- Click on Save Changes.

Front-End Impact
Campaign Format Type
- Admin can set the Campaign Format Type, where they will display the Campaigns on the cart page for customers in different formats. Whenever a customer visits the cart page after adding a product to the cart.
Block
- Navigate Campaign Format Type in Legacy Cart Donation.
- Click on it, and select the Block format from the drop-down menu.
- Click on Save Changes.

Front-End Impact
List
- Navigate Campaign Format Type in Legacy Cart Donation.
- Click on it, and select the List format from the drop-down menu.
- Click on Save Changes.
Front-End Impact
Before
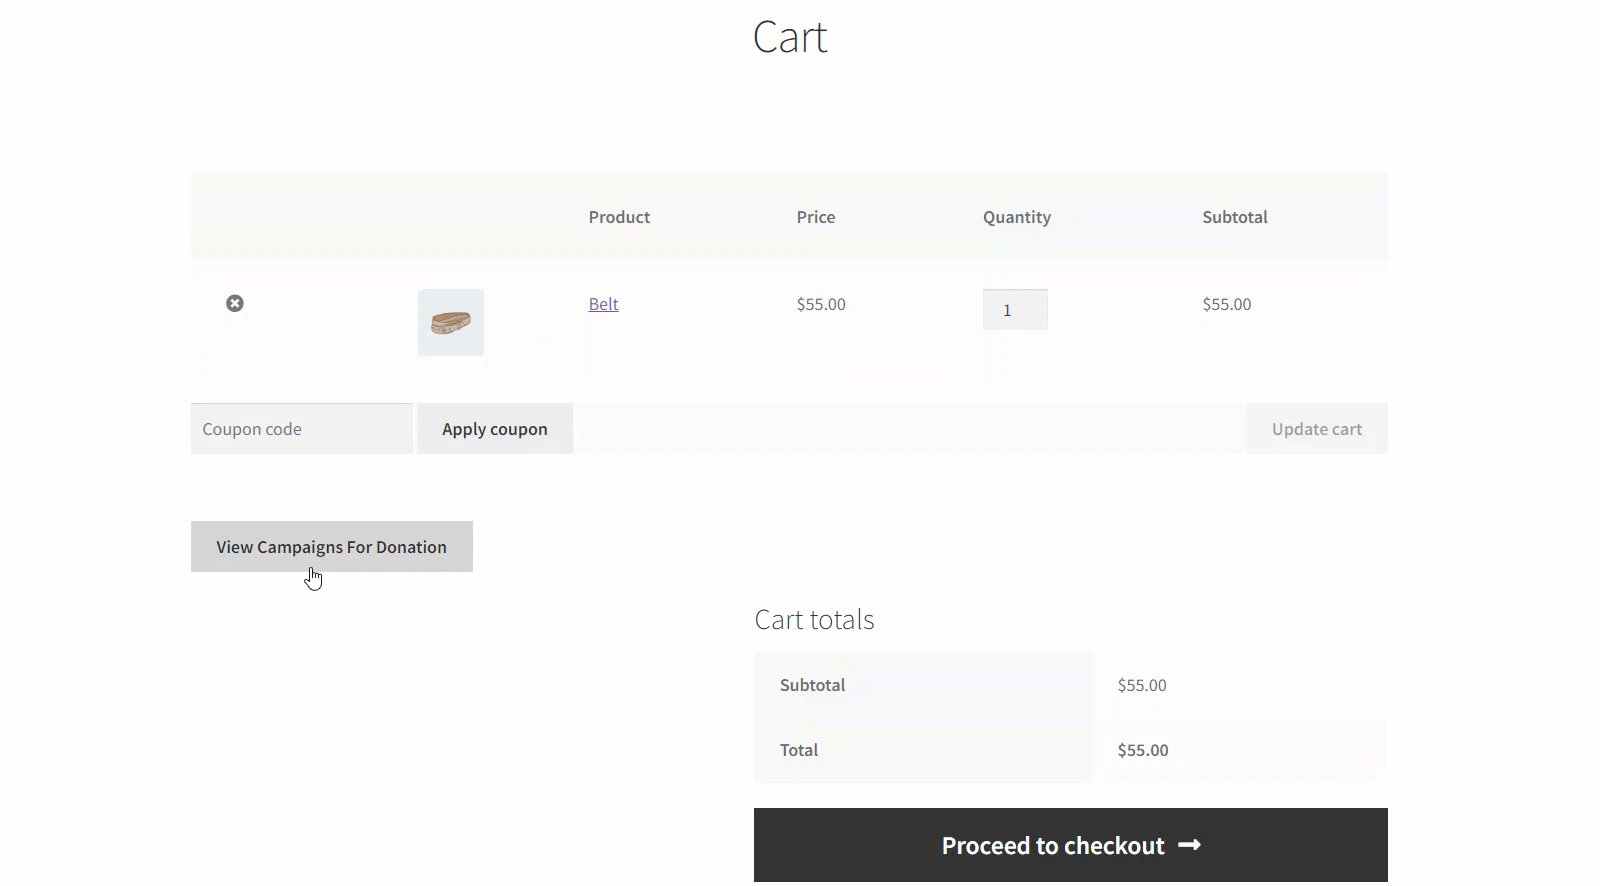
After
Grid
- Navigate Campaign Format Type in Legacy Cart Donation.
- Click on it, and select the Grid format from the drop-down menu.
- Click on Save Changes.

Front-End Impact
Before

- After
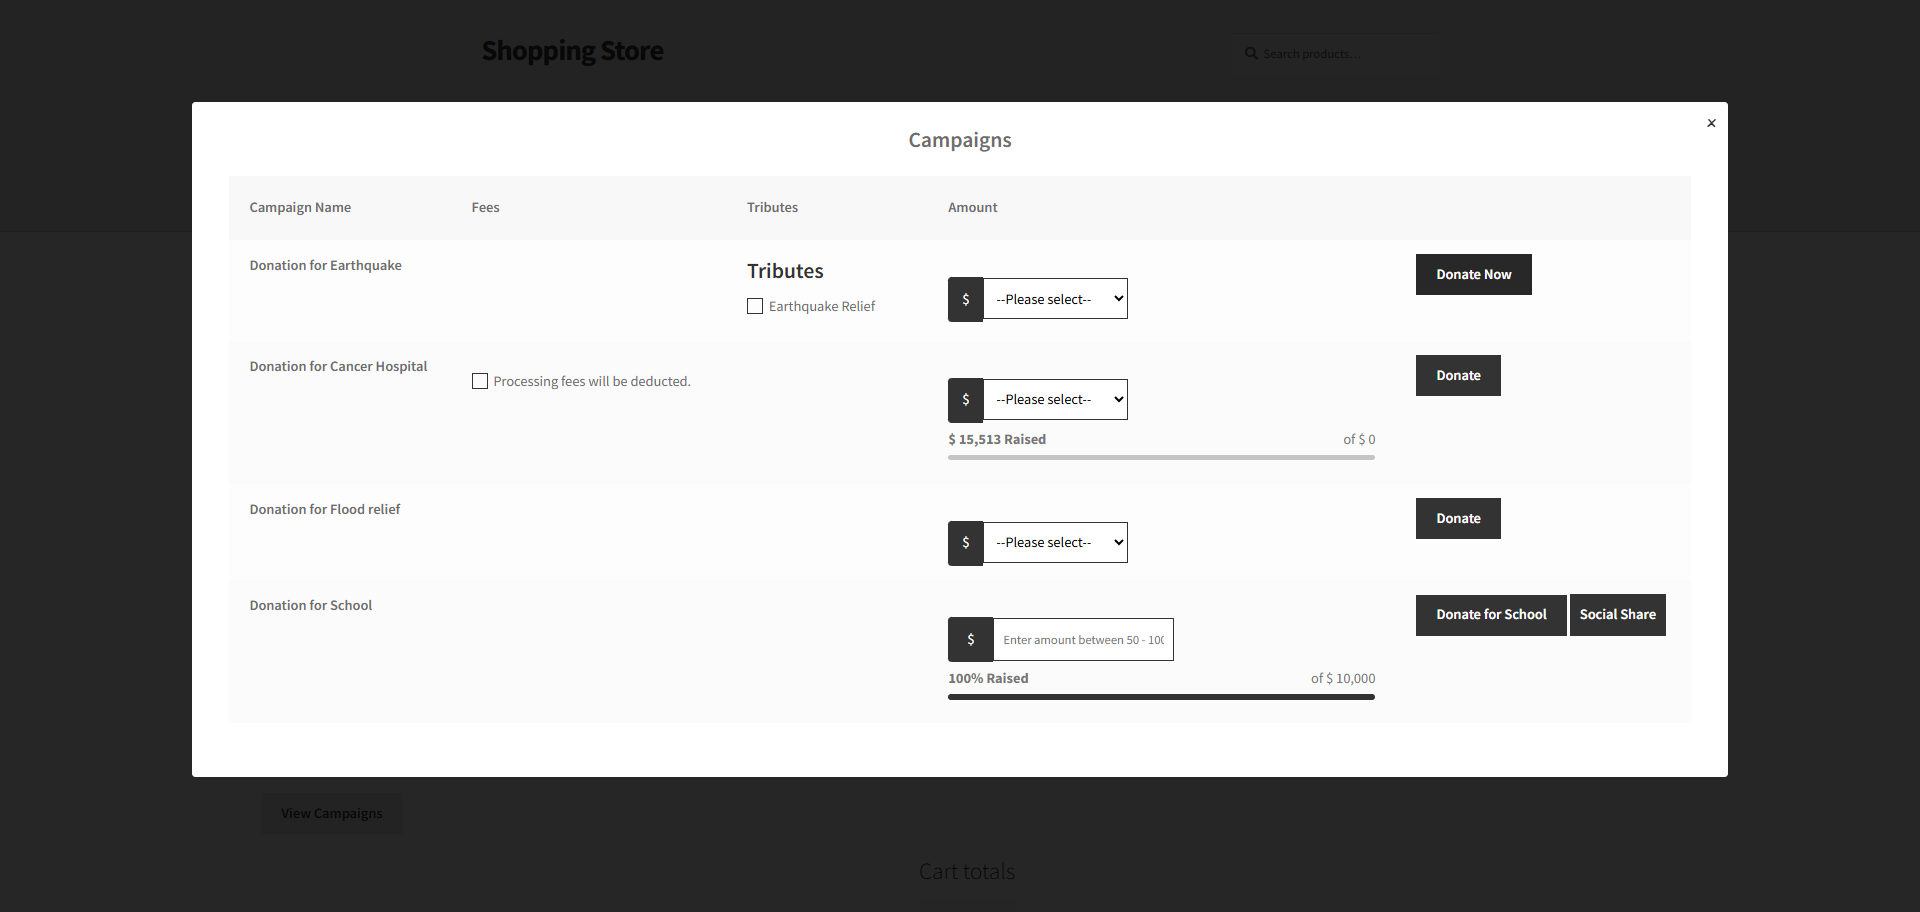
Table
- Navigate Campaign Format Type in Legacy Cart Donation.
- Click on it, and select the Table format from the drop-down menu.
- Click on Save Changes.

NOTE: When the Table format type is selected from the Campaign Format Type only then Deactivating Columns In Table Format will appear.
Front-End Impact
Deactivating Columns In Table Format
- Admin can restrict campaign thumbnail, causes, and description columns in the Table displaying on the front-end.
Deactivate Campaign Thumbnail
- Navigate Deactivate Columns In Table Format in Legacy Cart Donation.
- Enable the Deactivate Campaign Thumbnail format from the drop-down menu.
- Click on Save Changes.

Front-End Impact
Before
After

Deactivate Campaign Causes
- Navigate Deactivate Columns In Table Format in Legacy Cart Donation.
- Enable the Deactivate Campaign Causes format from the drop-down menu.
- Click on Save Changes.

Front-End Impact
Before

After
Deactivate Campaign Description
- Navigate Deactivate Columns In Table Format in Legacy Cart Donation.
- Enable the Deactivate Campaign Description format from the drop-down menu.
- Click on Save Changes.

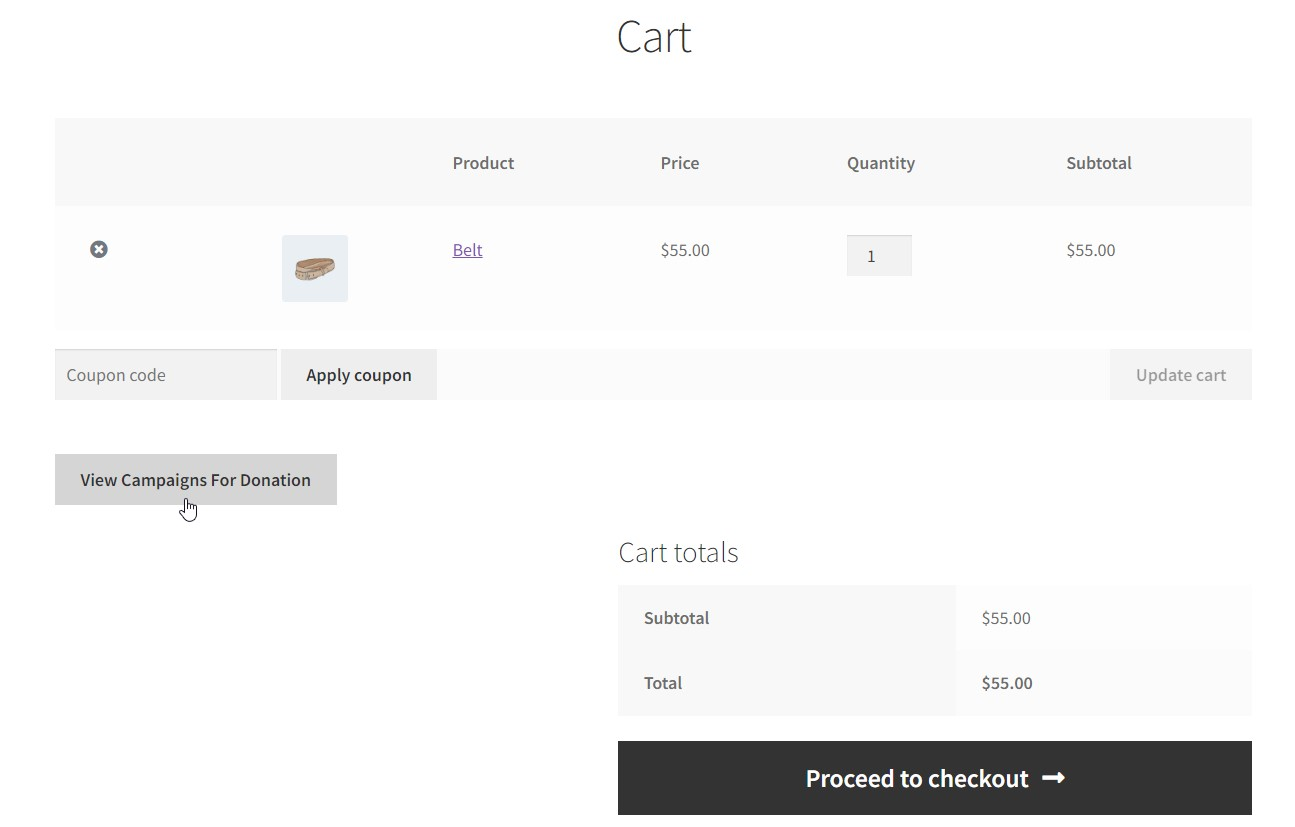
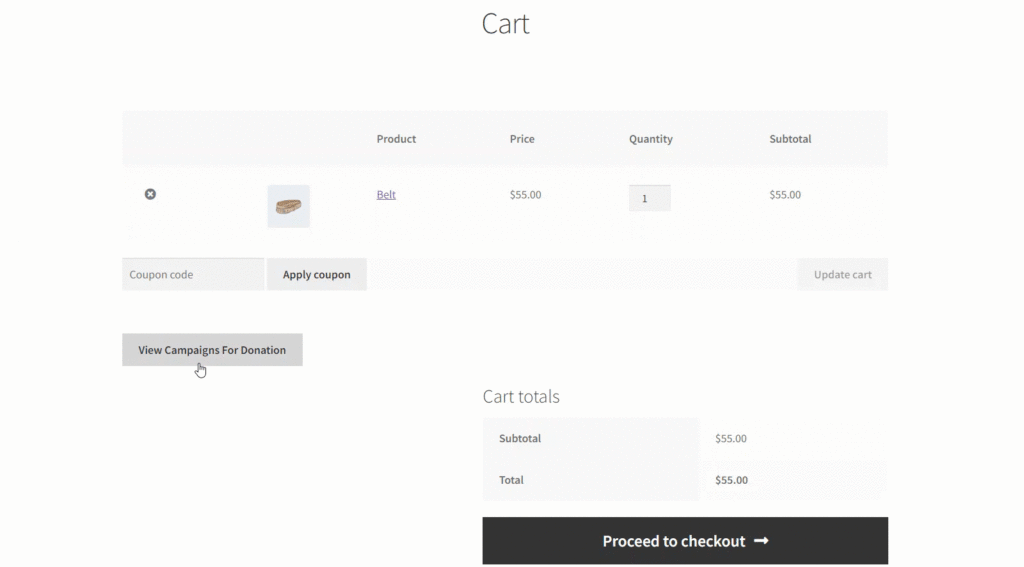
Front End
- Before
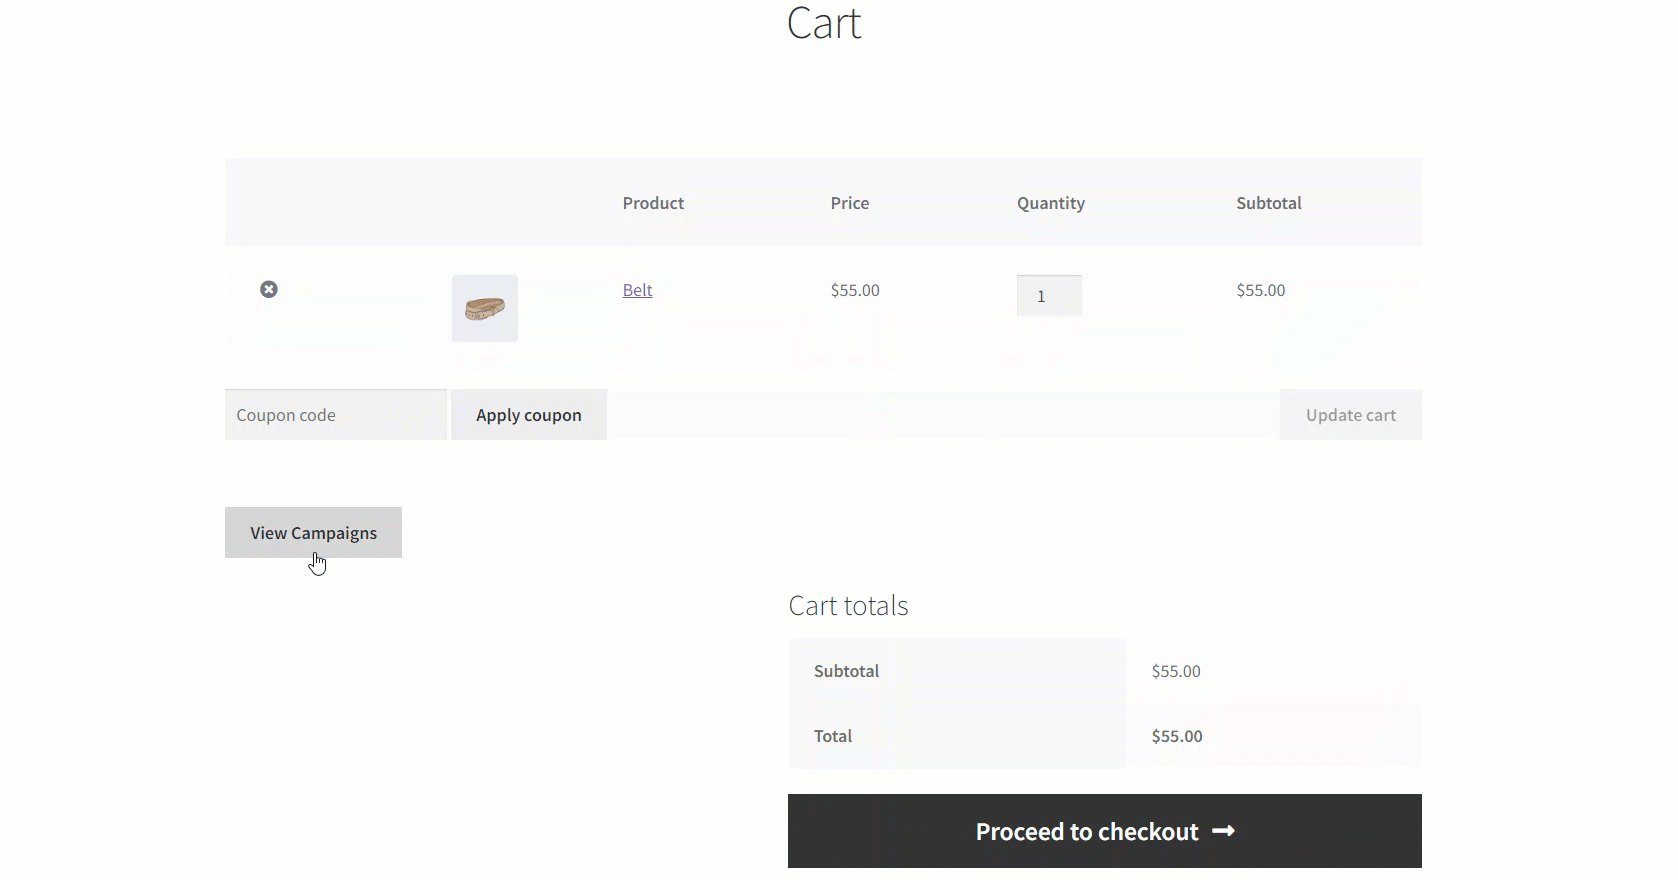
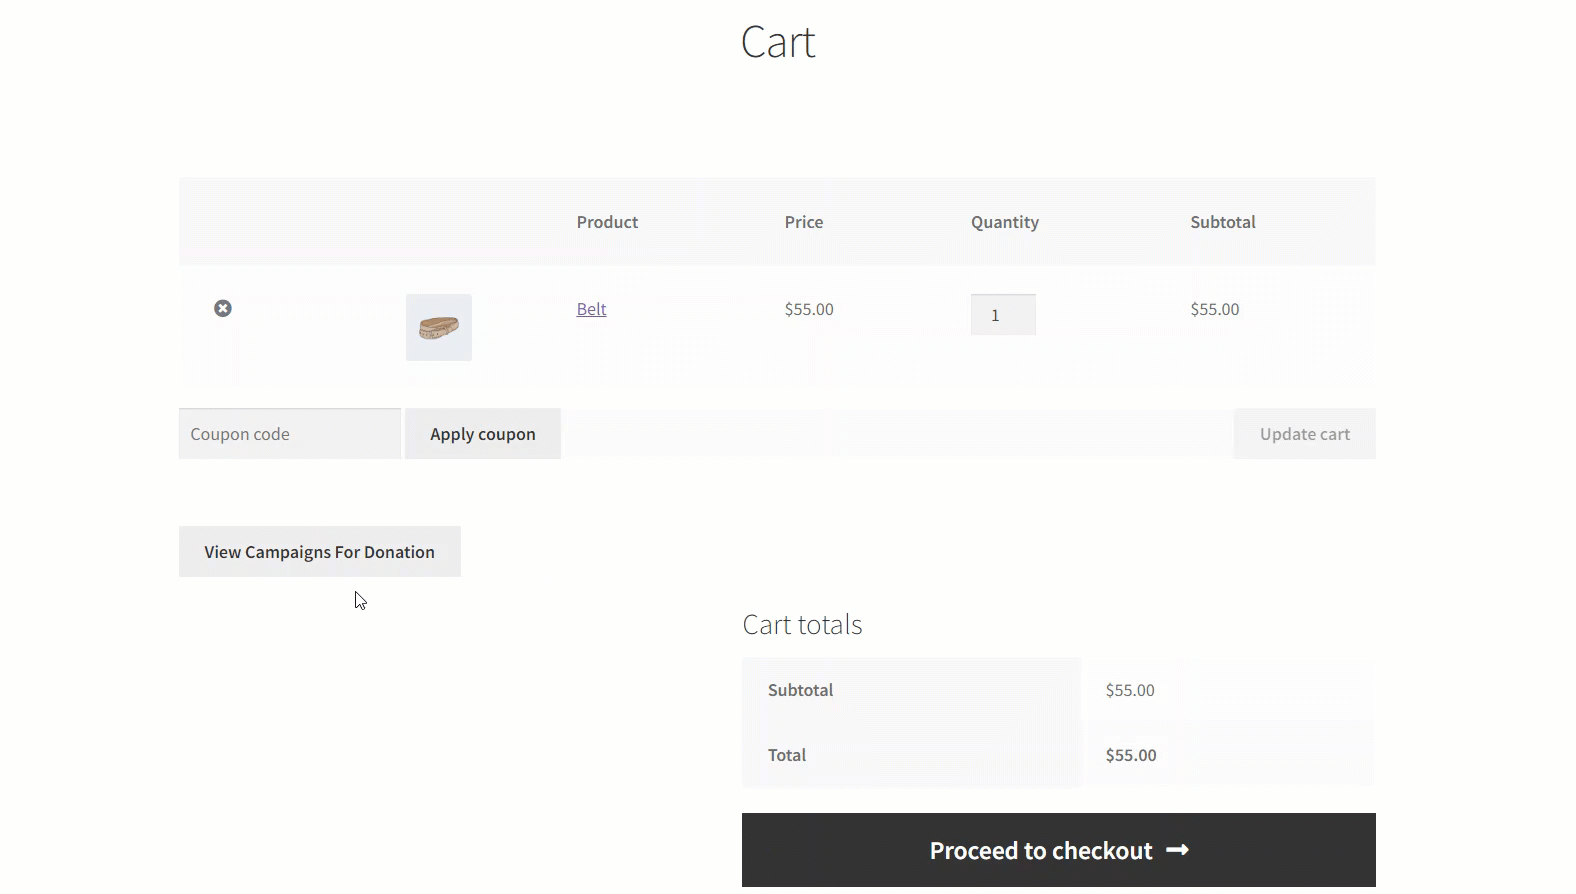
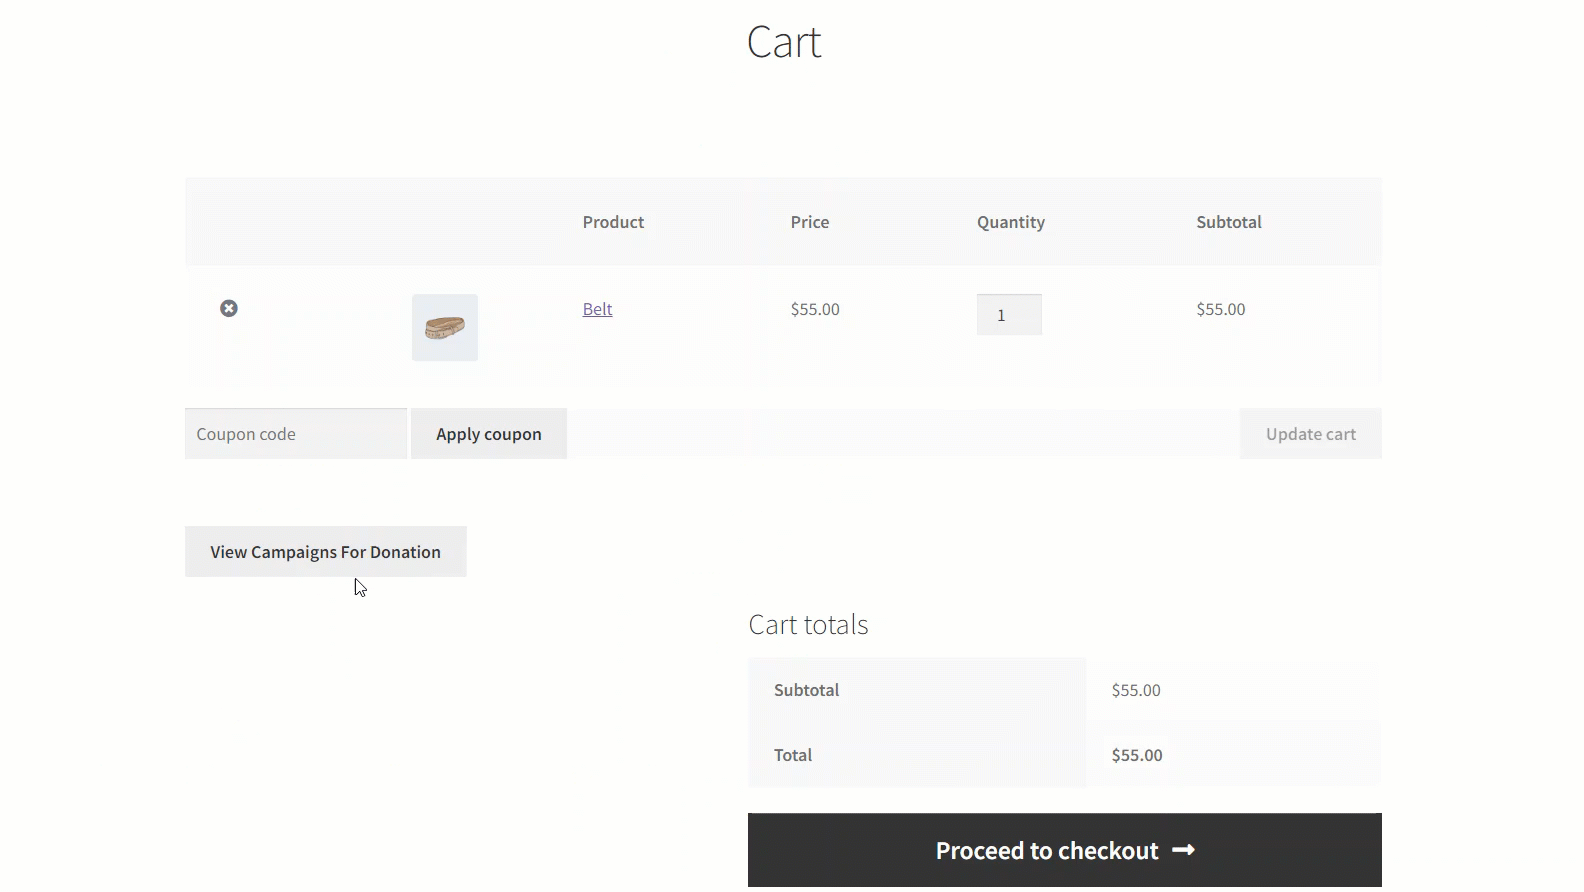
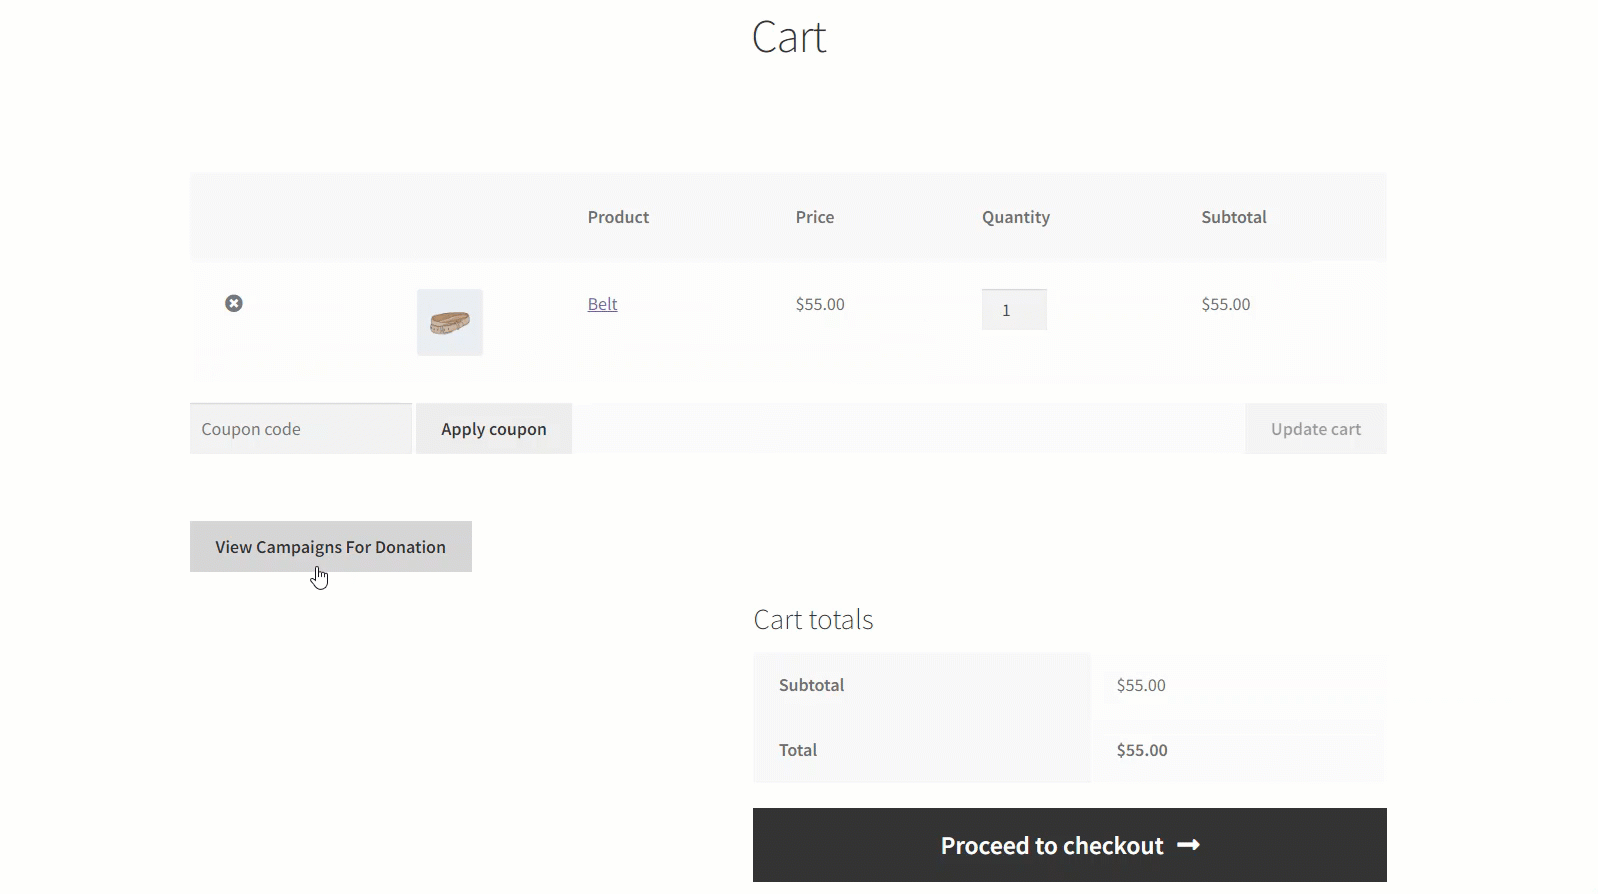
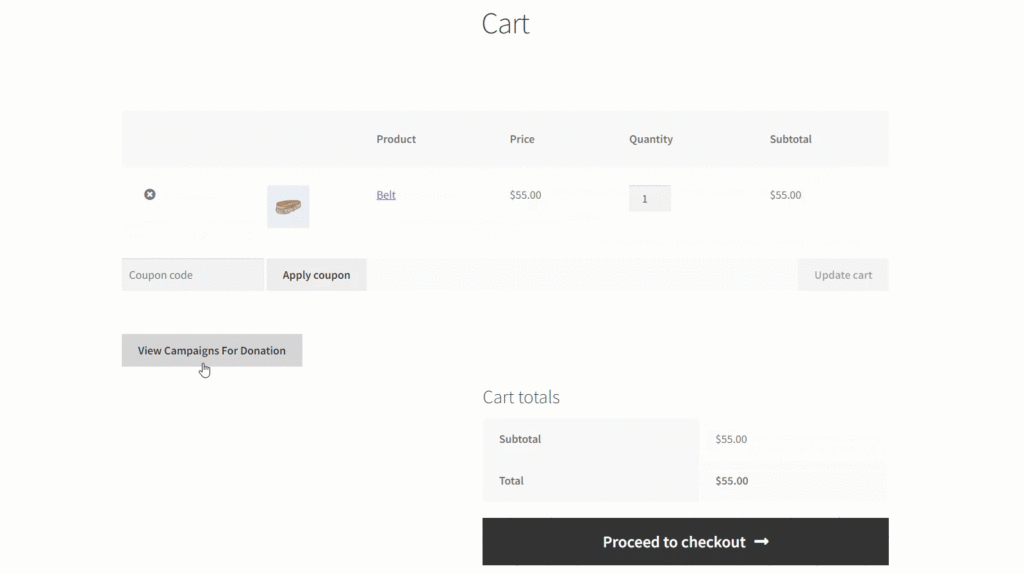
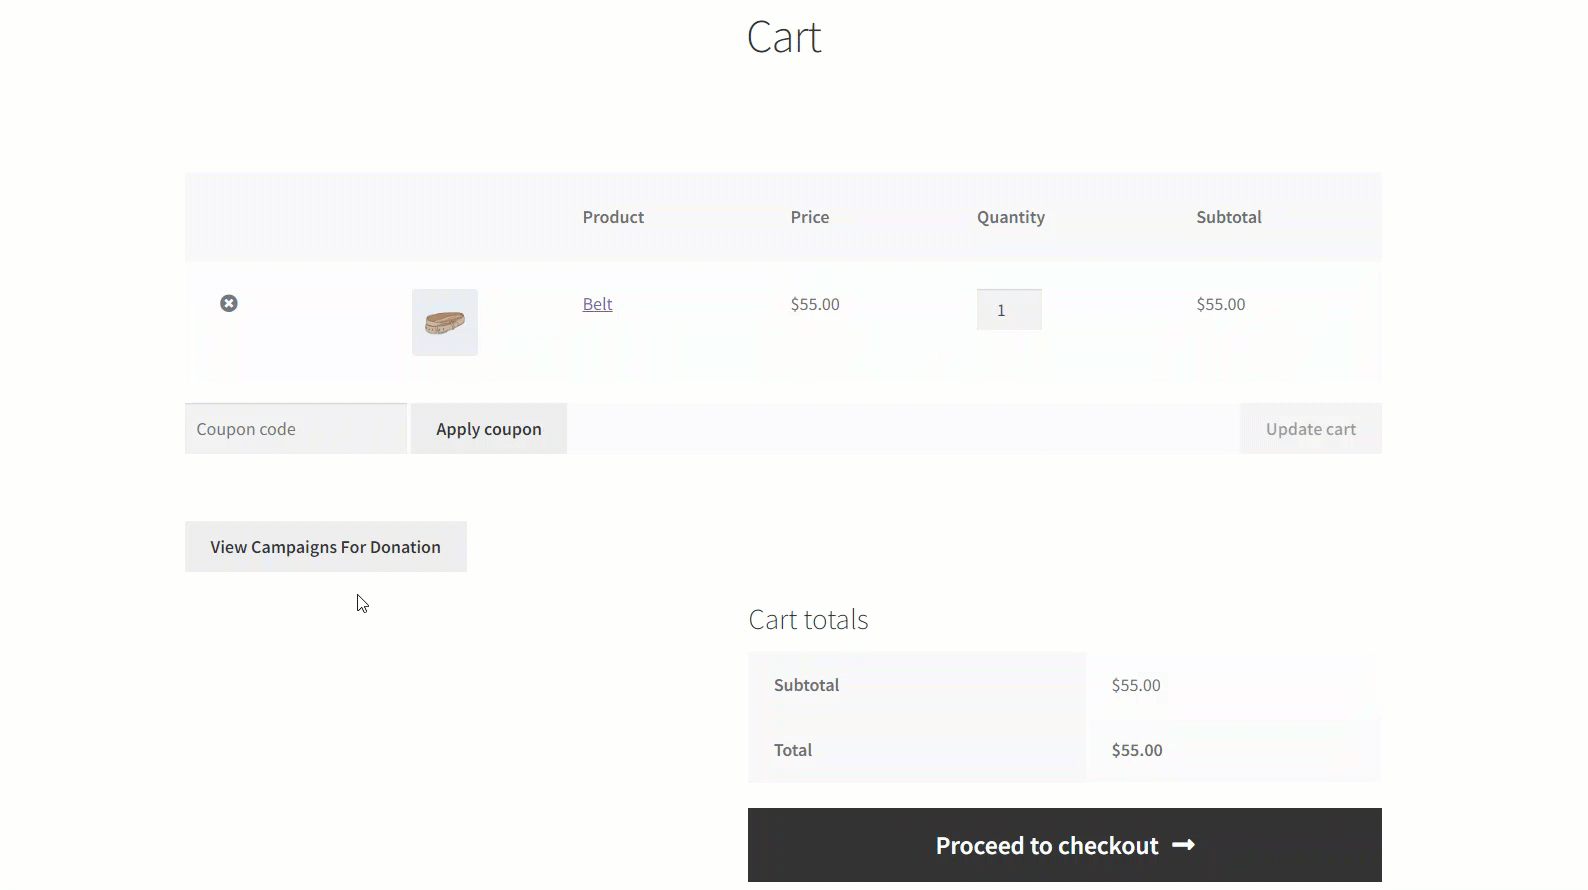
Go to the cart page and click on the View Campaigns button.
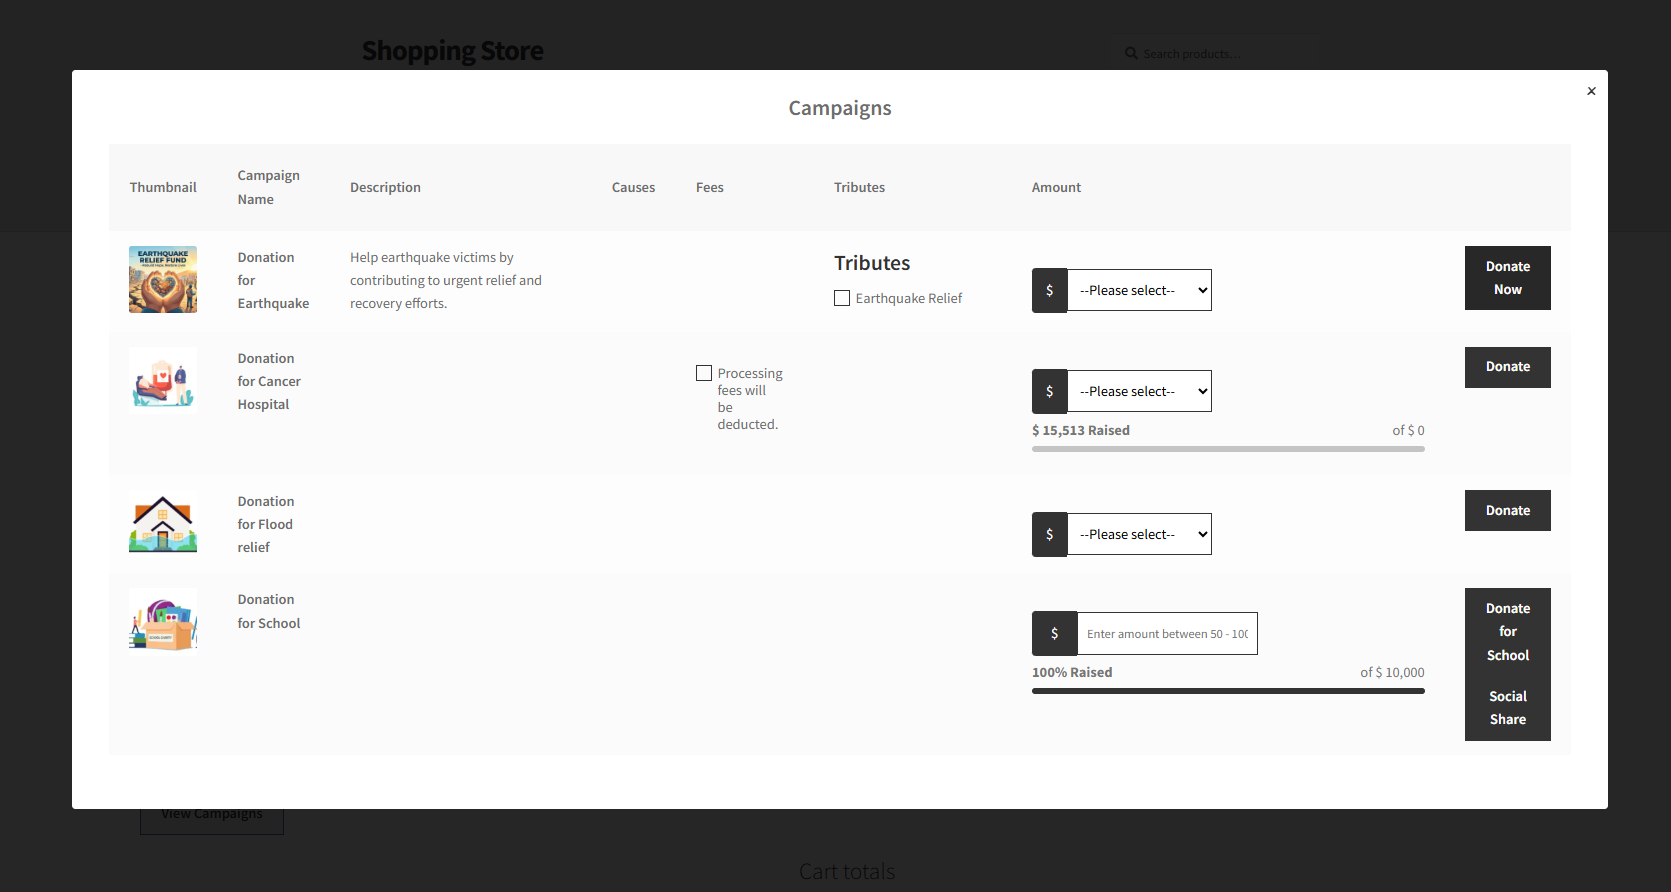
- After
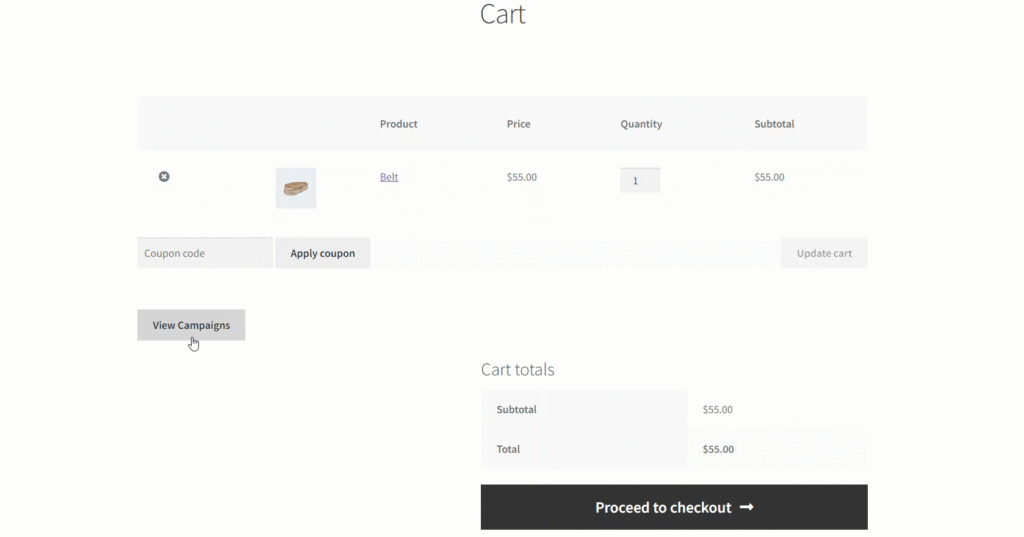
Go to the cart page and click on the View Campaigns button. Campaign Thumbnail, Campaign Causes, and Campaign Description will be deactivated.
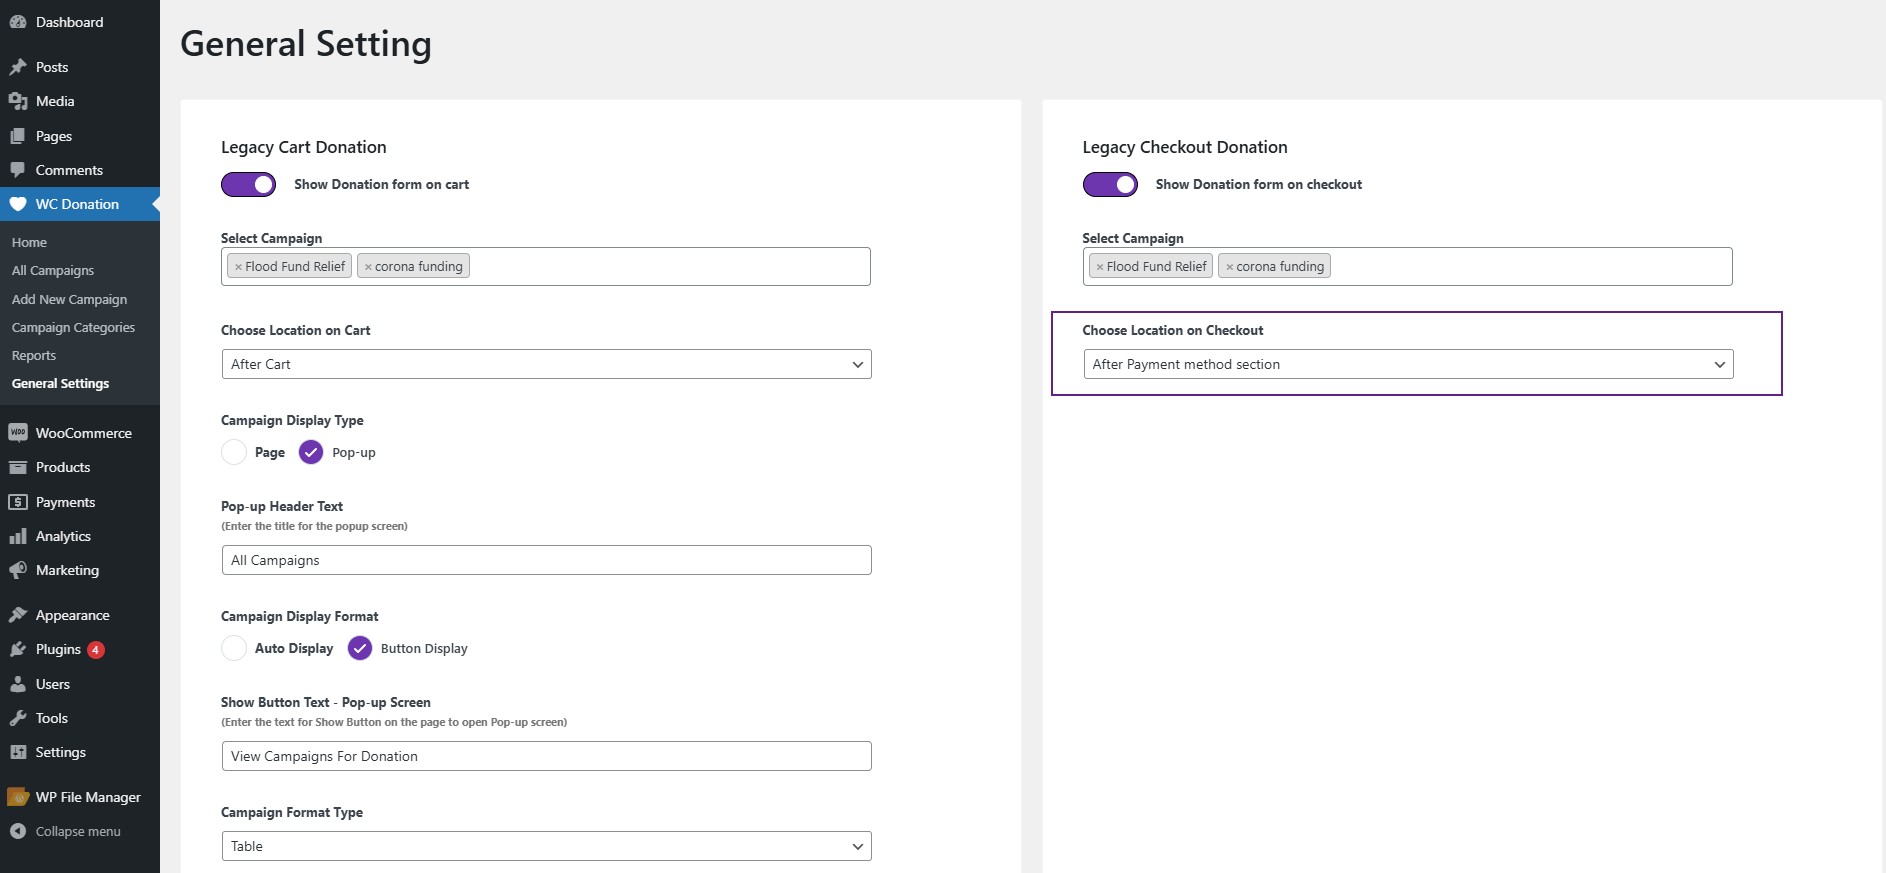
Legacy Checkout Donation
↑ Back to top- Navigate to the Legacy Checkout Donation in General Settings.
- Enable the Show Donation form on checkout.

Select Campaign
- Navigate to Select Campaign in Legacy Checkout Donation.
- Select multiple campaigns in a multi-selector textbox.

Choose Location on Checkout
Before Payment Method Section
- Navigate Choose Location on Checkout in Legacy Checkout Donation.
- Select from the drop-down menu Before Payment Method Section.
- Click on Save Changes.

Front-End Impact
After Payment Method Section
- Navigate Choose Location on Checkout in Legacy Checkout Donation.
- Select from the drop-down menu After Payment Method Section.
- Click on Save Changes.
Front-End Impact
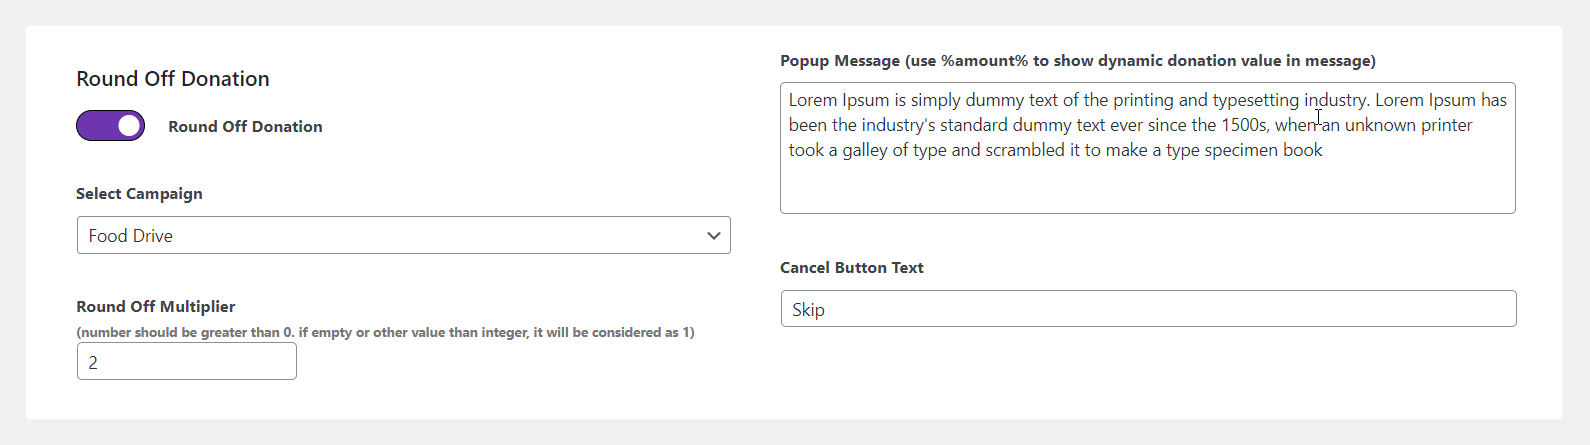
Round Off Donation
↑ Back to top- The Round-off Donation feature allows your customers to round off their final payment value to the closest round number.
- If the product’s price is in rational value, a pop-up message will appear asking the customer to donate the round-off amount to any campaign of the user’s choice. Users can skip this process if they don’t want to round off the value.
- Toggle the Round Off Donation to Enable it.
Select Campaigns
- Select the campaigns the Admin wants to set for Round Off Donation in the Select Campaigns option.
Round Off Multiplier
- Set the multiplier for the Round Off according to your requirement in the Round Off Multiplier option.
- Let’s suppose your customer is purchasing a product for $25 and donating an amount of $2.5 for any listed or specified donation product. The round-off multiplier will ask the customer to settle the final payment at $ 28.
- For Example: Suppose if you input the value $8, your cart total will be reached to the nearest number, which will be divisible by 8.
- Cart Total: $27.35
- Round off multiplier: 8
- Now, after 27, your next number, which will be divisible by 8, is 32
- So, 32 – 27.35 = 4.65
- Your donation will be $4.65.
NOTE: Round Off will work only if your cart total is in decimal. If there are whole numbers in the cart and checkout page, then the round-off functionality will ignore the whole numbers.
NOTE: The number should be greater than 0. If empty or other value than an integer, it will be considered as 1.
Popup Message (use %amount% to show dynamic donation value in message)
- Enter the text that will be displayed in the popup message in the Popup Message (use %amount% to show dynamic donation value in message) option.
Cancel Button Text
- Enter the cancel button text displayed in the popup in the Cancel Button Text option.
Front-End Impact
- Select a product with a price value in decimal and click on the Add to Cart button against it.

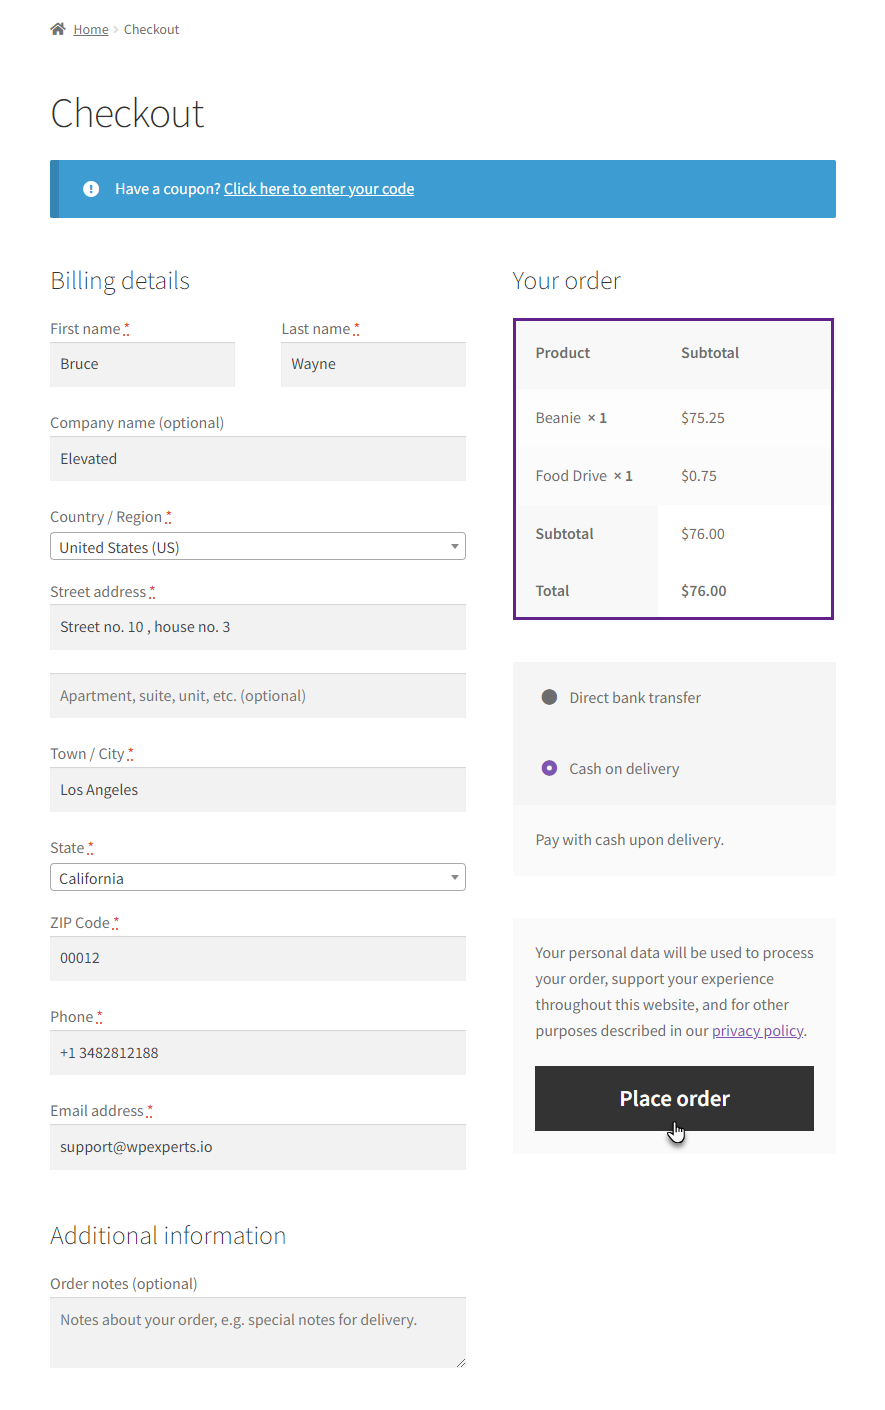
- Now navigate to the Checkout page.
- We can see that the total amount is in decimal at the moment.
- Click on the Place Order button.
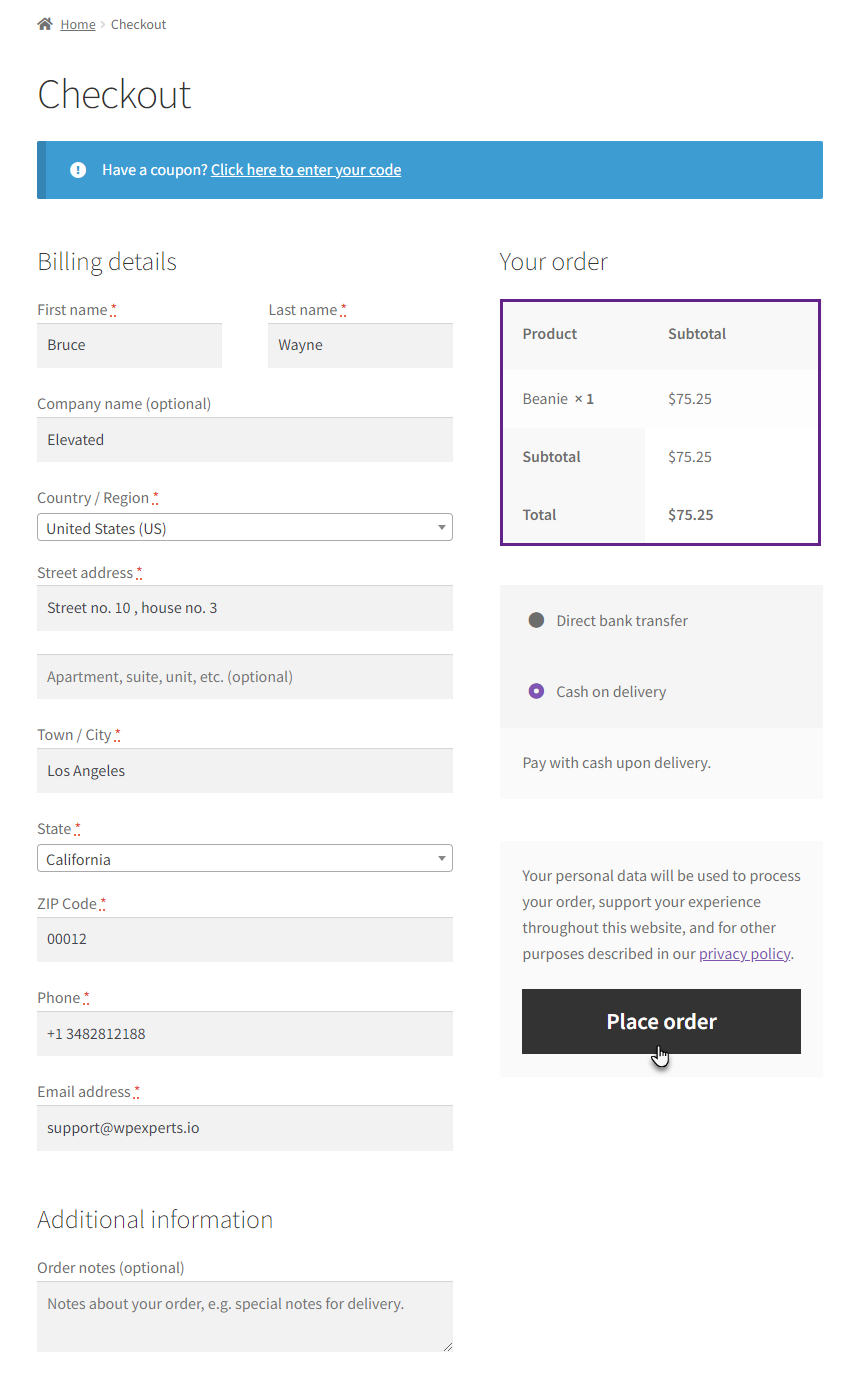
- A popup will appear. It will allow the customer to round off the amount if we click on the donate button.
- If we click on the Skip button then the order will be placed with the actual amount in the decimal form.
- If we click on the Donate button then the round off amount will be donated to the campaign selected in the Round Off Donation option.
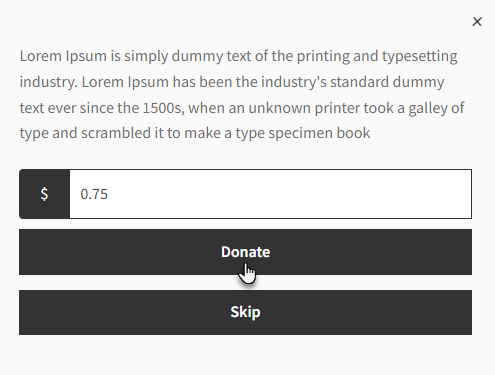
- We can see that the amount is now updated to a rounded off value and the total amount is not now a decimal value anymore.
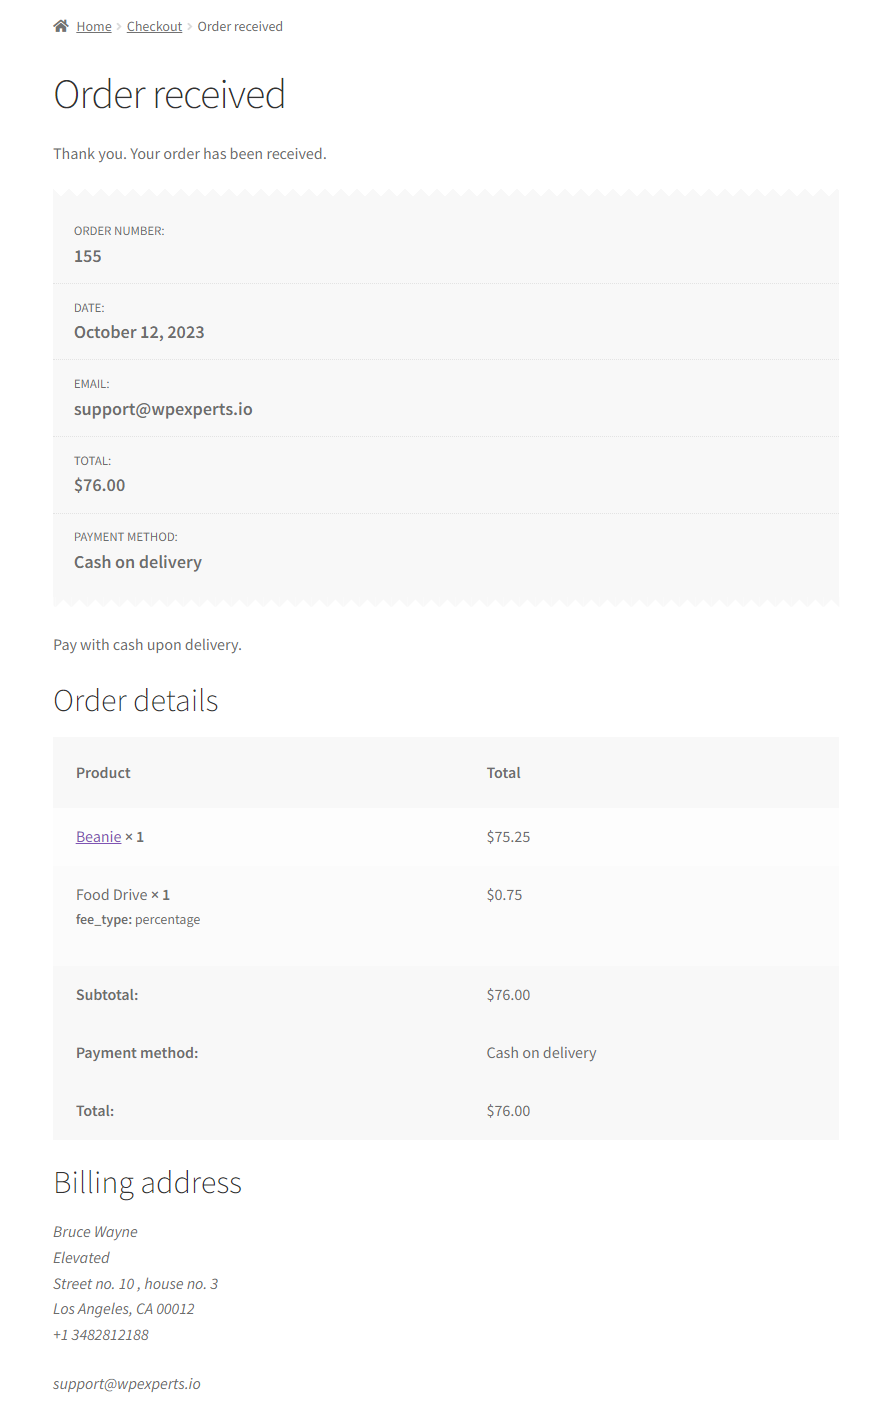
- Click on the Place Order button.
- The order is placed successfully with the updated amount.
Donation on Product
↑ Back to top
The Donation on Product feature allows the admin to attach a donation amount to a product, either as a fixed amount or a percentage. This donation value is automatically deducted from the product price and treated as a donation when the product is purchased.
- Navigate to WordPress Admin Dashboard > WC Donation > General Settings.

- Locate and enable the Donation on Products toggle button.

- Select the campaign from the Select Campaign dropdown.

- Enter the donation amount as a percentage in the Enter Donation Amount field.

Note: The value entered in the Enter Donation Amount field will be in percentage (%).
- Choose the product from which the donation amount will be deducted when purchased using the Select Products field.

- Click the Save button to apply the settings.

- The selected product will be listed in the Donation Campaign table.

- The admin can edit the product from the table.

- The admin can delete the product from the table.

- Enable the following visibility options if needed:
- Visible on Cart: Displays donation details on the Cart page.

- Visible on Checkout: Displays donation details on the Checkout page.

- Visible on Single Product: Displays donation details on the Single Product page.

- Click on the Save Changes button to update the settings.

Front End Impact
- Login to your account.
- Go to the Single Product Page – The Donation on Product message will be displayed.

- Add the Product to the Cart – The Donation on Product message will appear on the Cart page.

- Proceed to Checkout – The Donation on Product message will also be shown on the Checkout page.

- A specific amount will be deducted from the order total and allocated to the selected donation campaign.

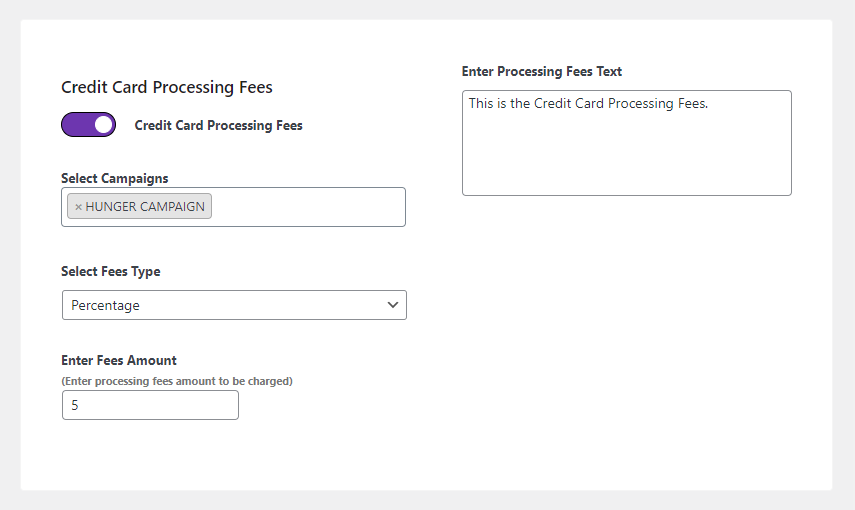
Credit Card Processing Fees
↑ Back to top- Processing fees charged on credit card payments would be paid by the user donating. This feature allows the admin to ask the end-user for the processing fees charged on credit card processing against the donation being received so that the user’s donation is sent to the admin, and the processing fee is not deducted from the donation amount.
- Credit Card Processing Fees will be at the bottom of the page.
- Toggle the Credit Card Processing Fees to Enable it.
Select Campaigns
- Select the campaigns the Admin wants to charge this fee in the Select Campaigns option.
Select Fees Type
- Select the fee type, i.e., Percentage or Fixed, according to your requirement in the Select Fees Type option.
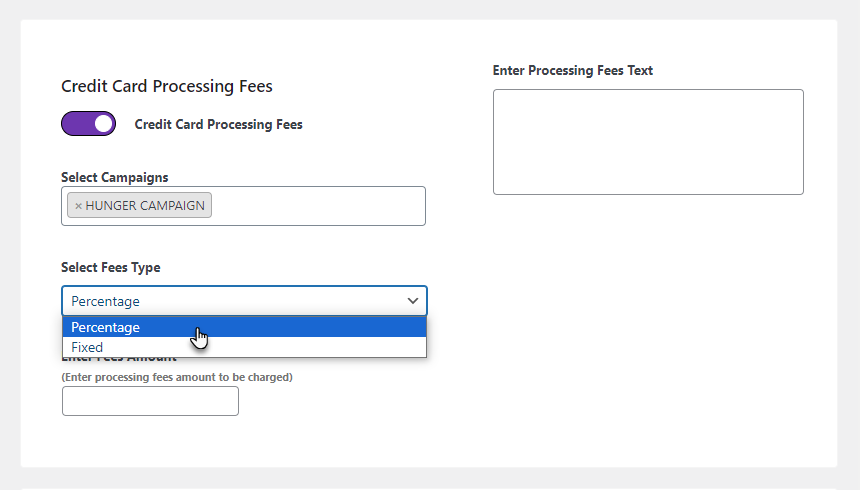
Enter Fees Amount
- Enter the processing fees that will be charged in the Enter Percentage option. This will be charged according to the Select Fees Type (Percentage or Fixed) option.

Enter Processing Fees Text
- Enter the text that will be displayed for this fee in the Enter Processing Fees Text option.
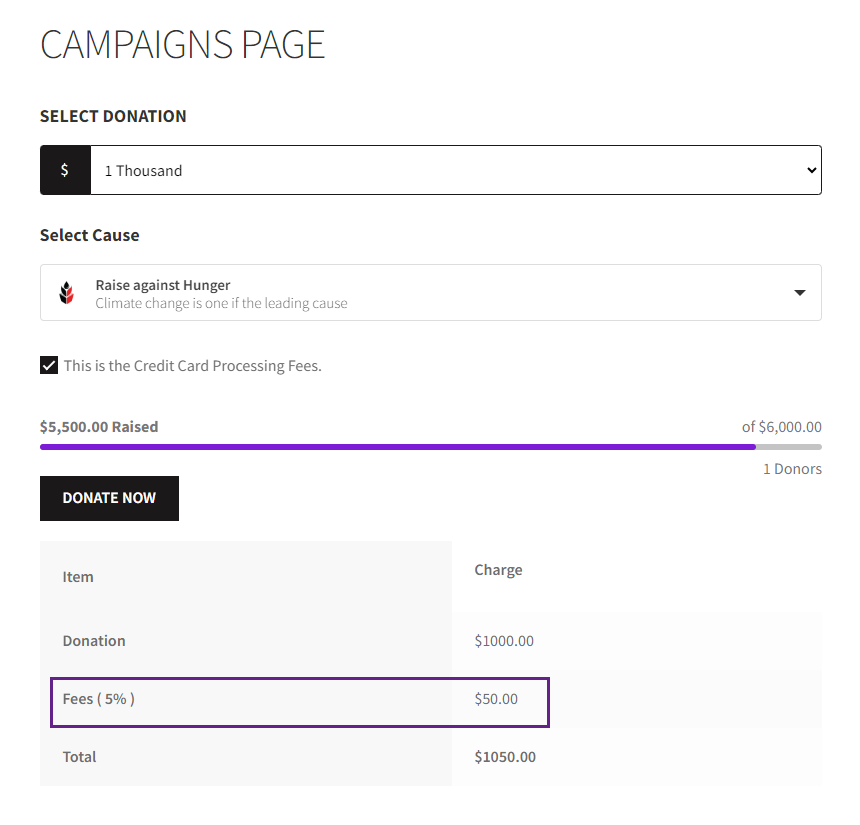
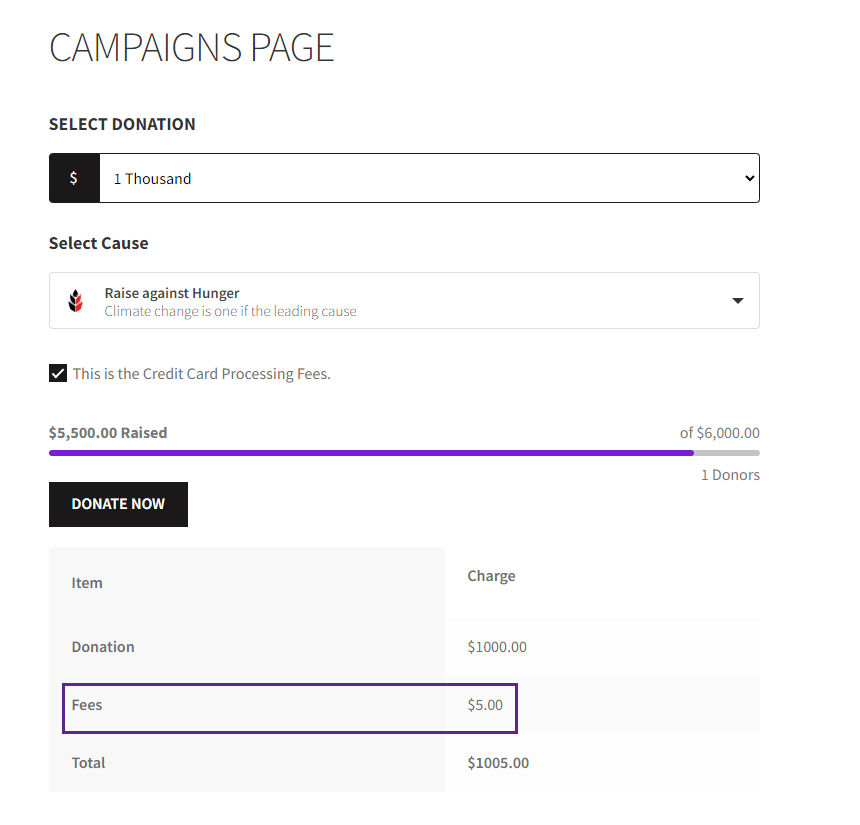
Front-End Impact
- The user will checkmark the Credit Card Processing Fees option and text set in the Enter Processing Fees Text option would appear beside the checkbox on the front-end.
- Based on the amount of donation, a certain percentage or fixed amount of them would be charged additionally which is set in the Enter Percentage option in the back-end configuration and will be added to the total amount.
Fees Type – Percentage
Fees Type – Fixed
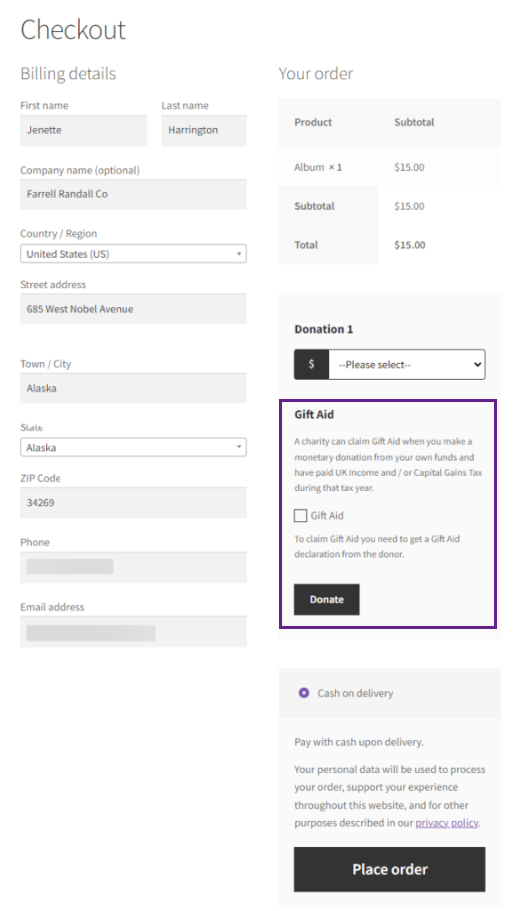
Gift Aid (UK)
↑ Back to top
Gift Aid (UK) is a donation enhancement feature that allows eligible UK taxpayers to increase the value of their donation at no extra cost. When enabled, donors can confirm their Gift Aid declaration during checkout, enabling the organization to reclaim additional tax and increasing the total donation received.

- Once you click on the General Settings, the admin can see Gift Aid UK settings.
- You can enable or disable the Gift Aid UK by using the toggle button under the General Settings.
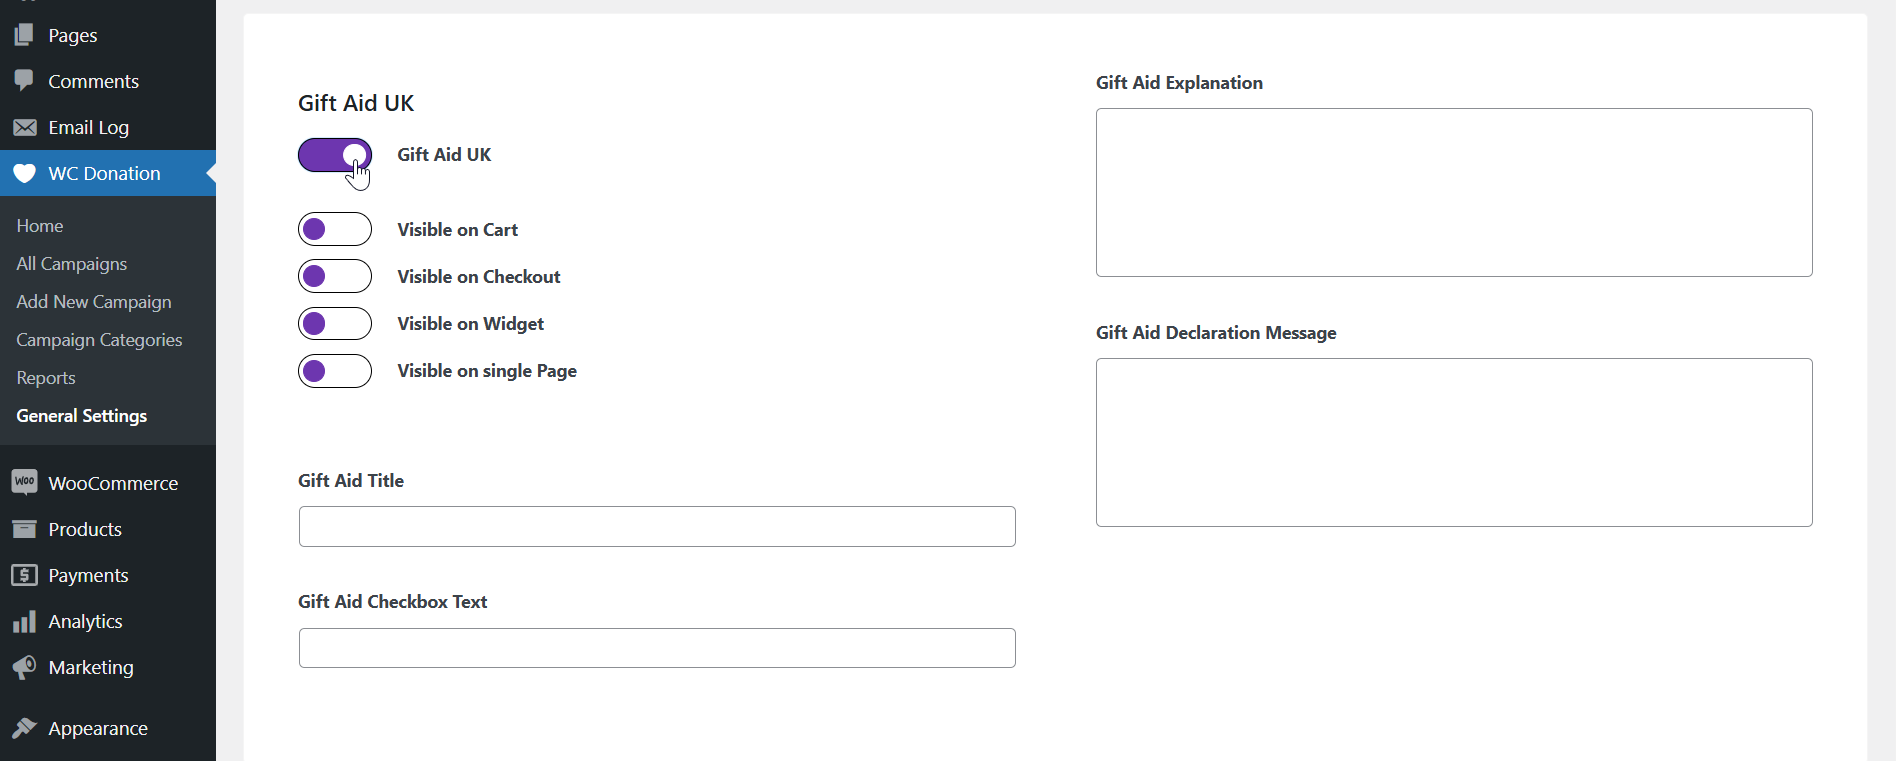
NOTE: To display Campaigns, users must define Campaign in the Legacy Cart Donation and Legacy Checkout Donation.
- Admin must add the Gift Aid Title, Gift Aid Checkbox Text ,Gift Aid Explanation and Gift Aid Declaration Message text boxes in the respective fields.
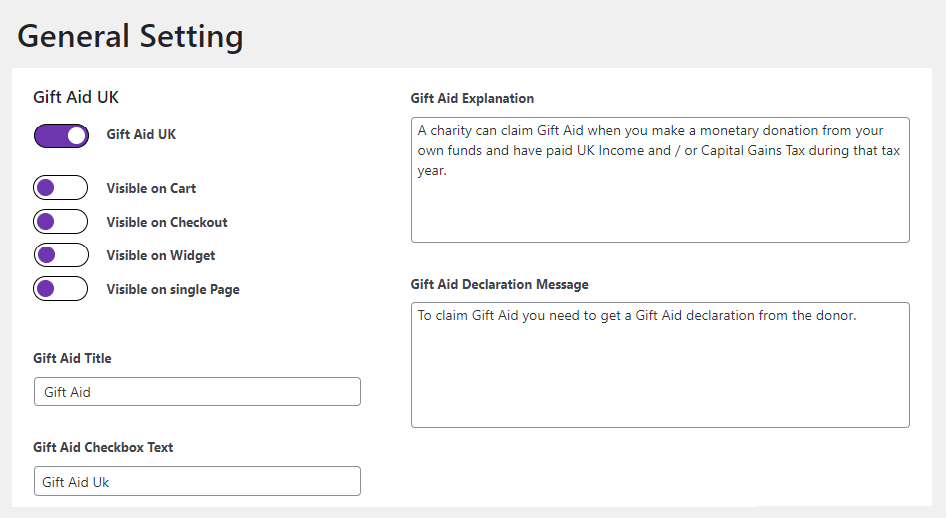
Front-End Impact

- Admin must enable the Gift Aid UK on the following checkboxes:
Visible on Cart

Front-End Impact
Visible on Checkout

Front-End Impact
Visible on Widget

- After the changes are applied and saved, the admin must set the widgets from the WordPress Admin dashboard> Appearance > Widgets.
- Select the desired Campaign and click the Save button.
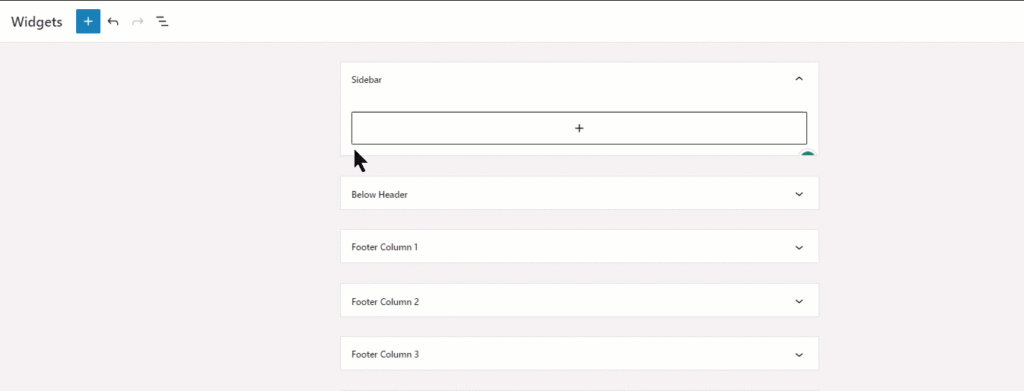
Front-End Impact

Visible on Single Page

Front-End Impact

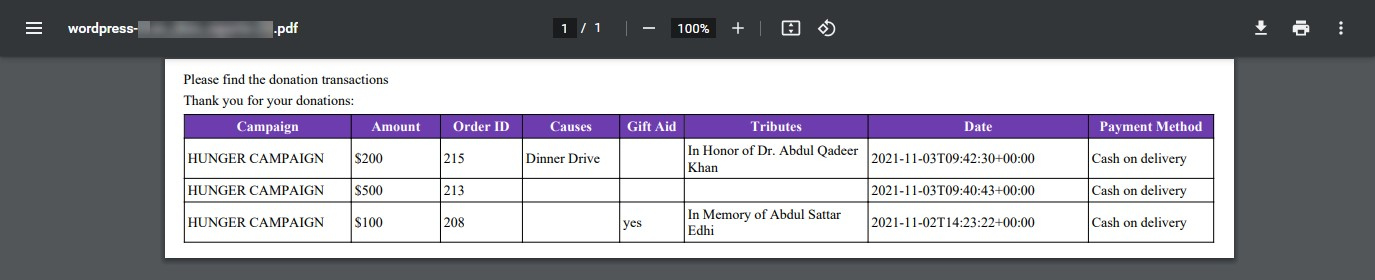
PDF Receipt
- Go to the bottom of the page and enable the PDF Receipt toggle button.

- Once done, click on the Save Changes button.
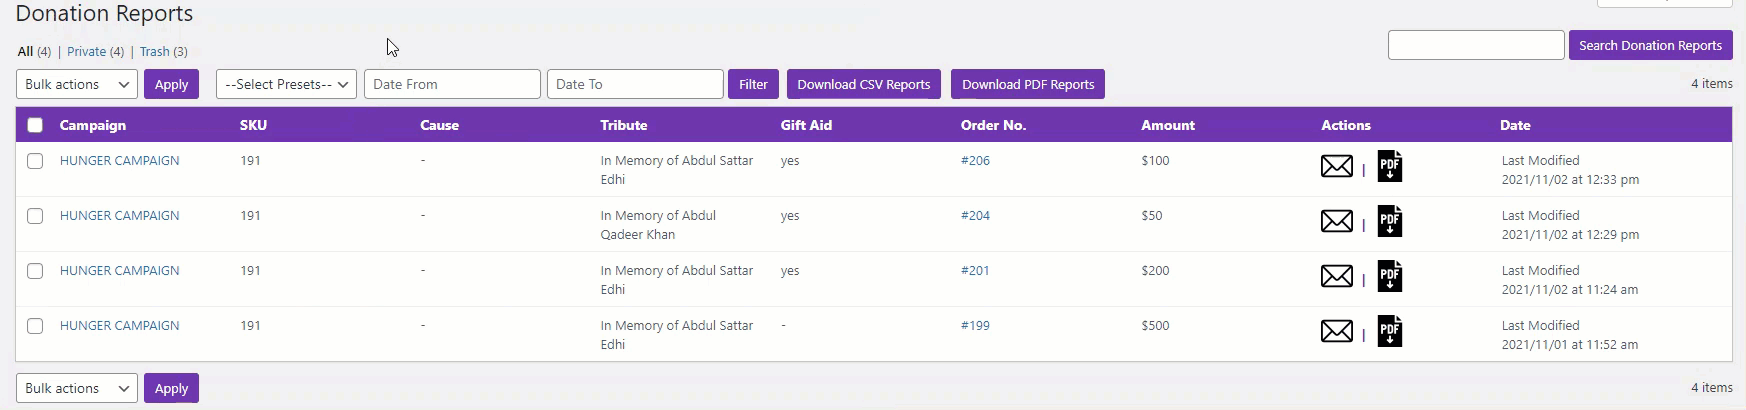
- Now navigate to the Admin Dashboard > WC Donation > Reports.

- Now you’re on the Donation Reports page.
- All the reports of each donation with all the details are present on this page.
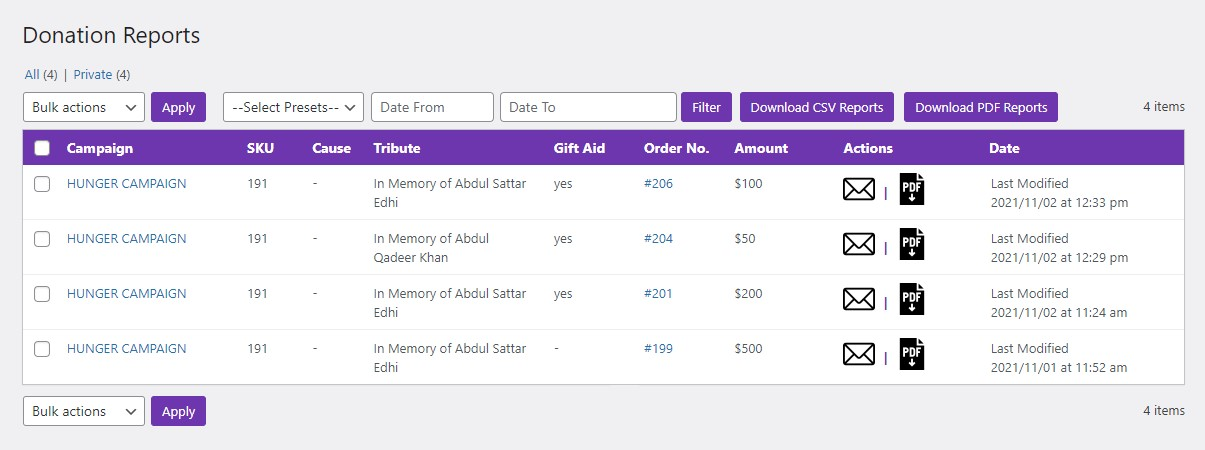
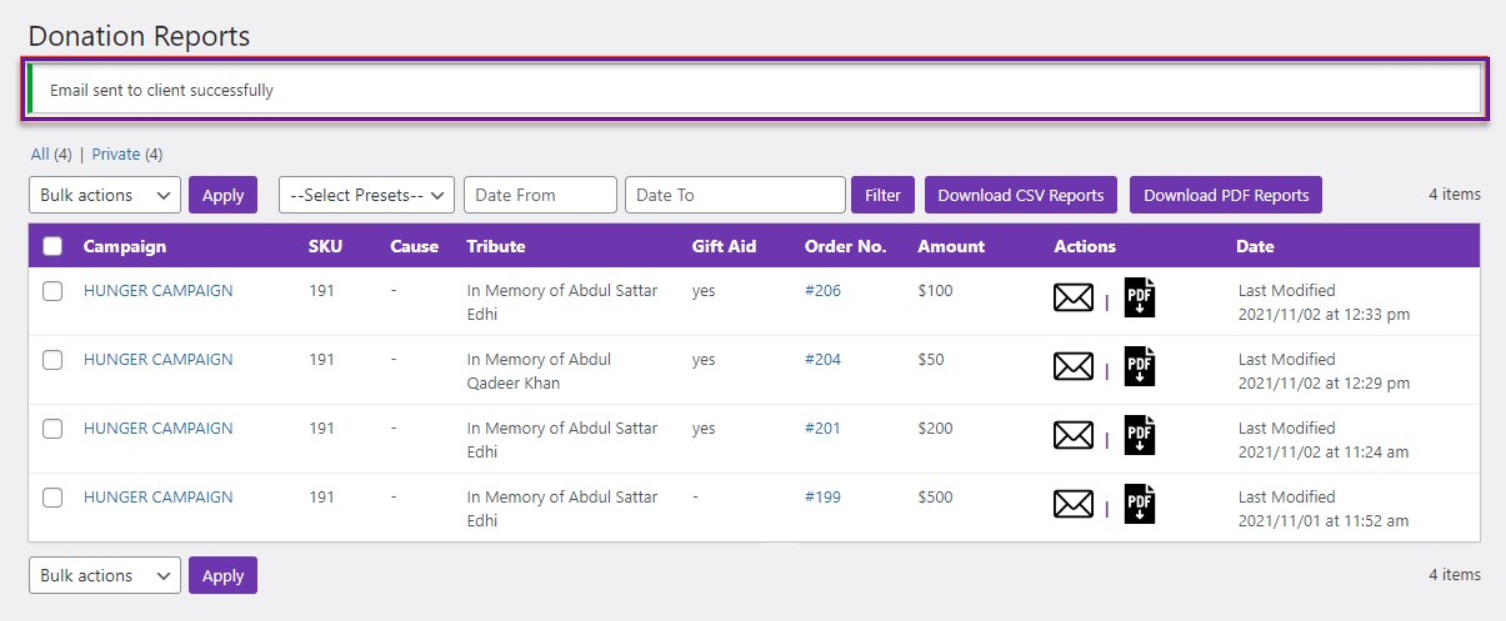
- In the Actions column, two icons are present,
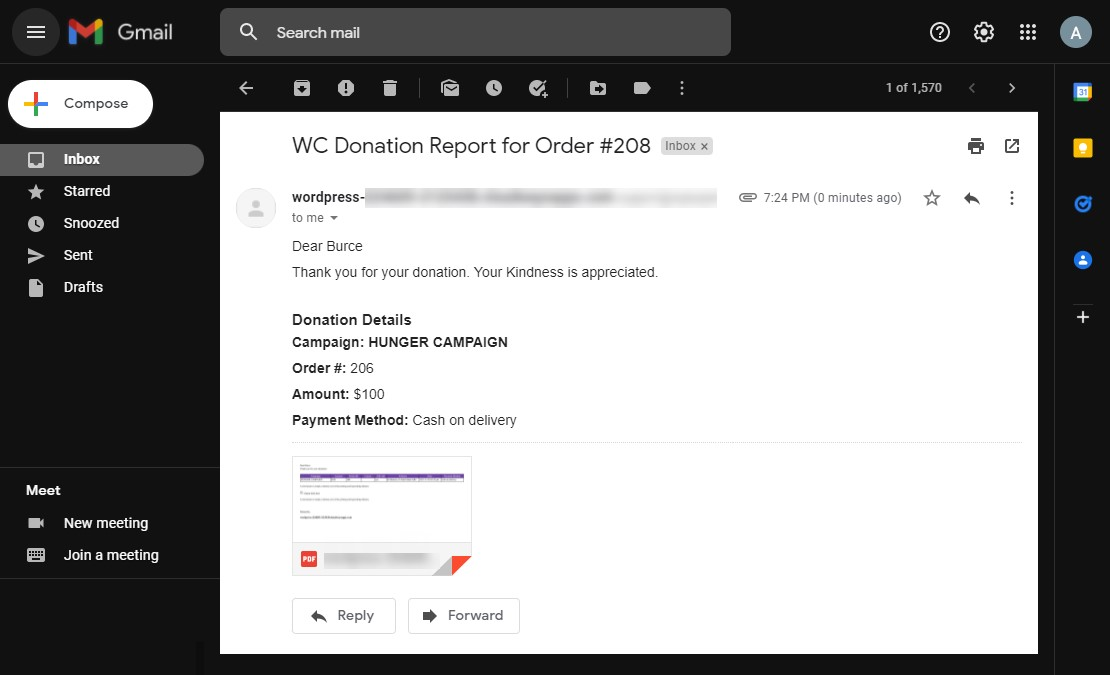
- Click the Email icon to send the report of the donation to the user.

- You’ll be notified when the email is sent successfully.
- The user will receive an email about the details of the donation and the report in PDF format.
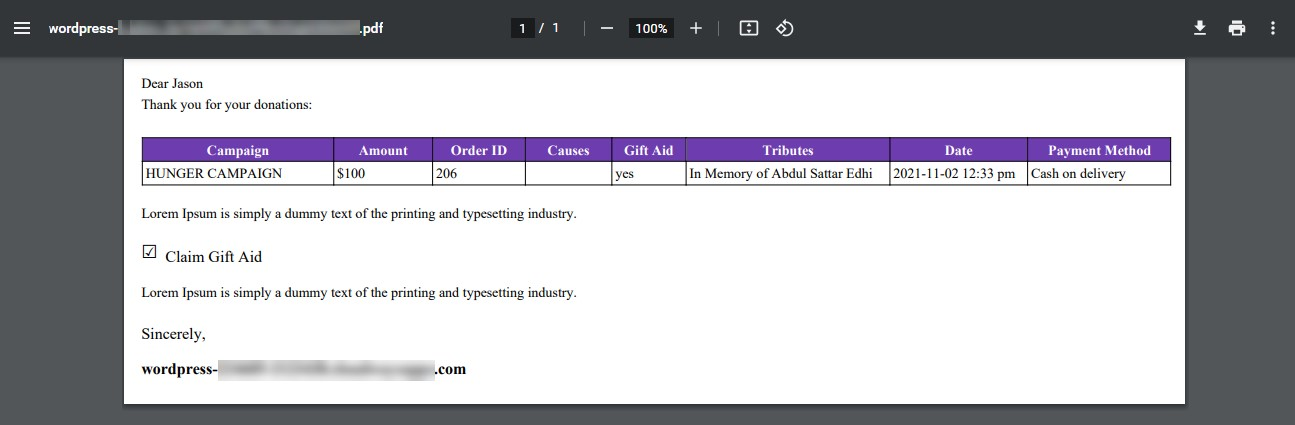
- Click the PDF icon to send the donation report to the user.

- The report will be downloaded in PDF format.
- Click on the report to open.
- The report will have all the details of that individual donation.
- You can also filter the reports according to the options given in the dropdown menu,
- Today
- Yesterday
- Last 7 days
- Last Month
- Last Year
- Select an option from the dropdown menu, and the plugin will filter the reports accordingly.
CSV Reports
- You can also download CSV Reports of your donations in bulk.
- Select the reports you want to download.
- Once done, click on the Download CSV Reports button.

- A CSV file will be downloaded.
- Click on the CSV file to open it.
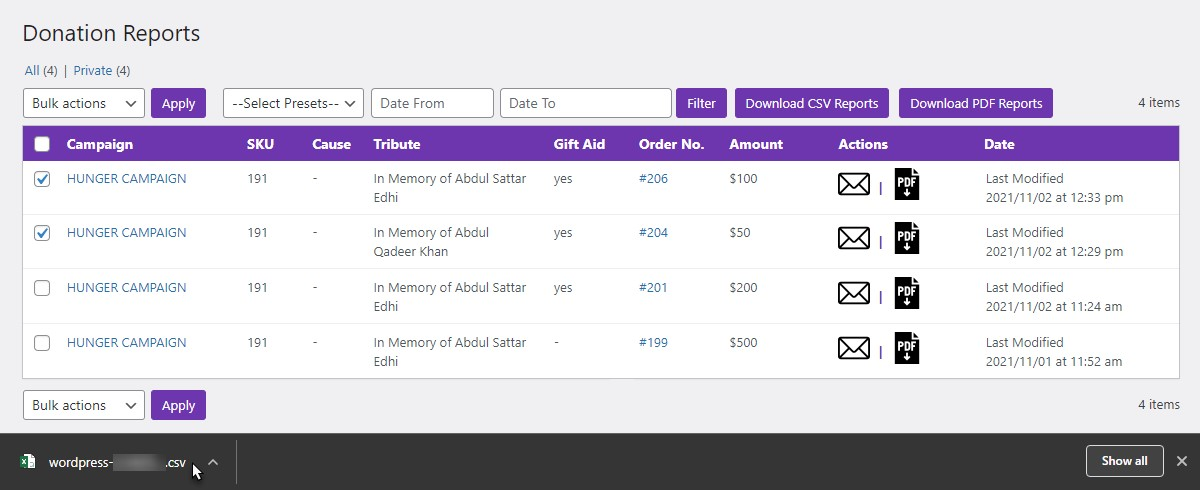
- The CSV file will have all the details of the selected reports.
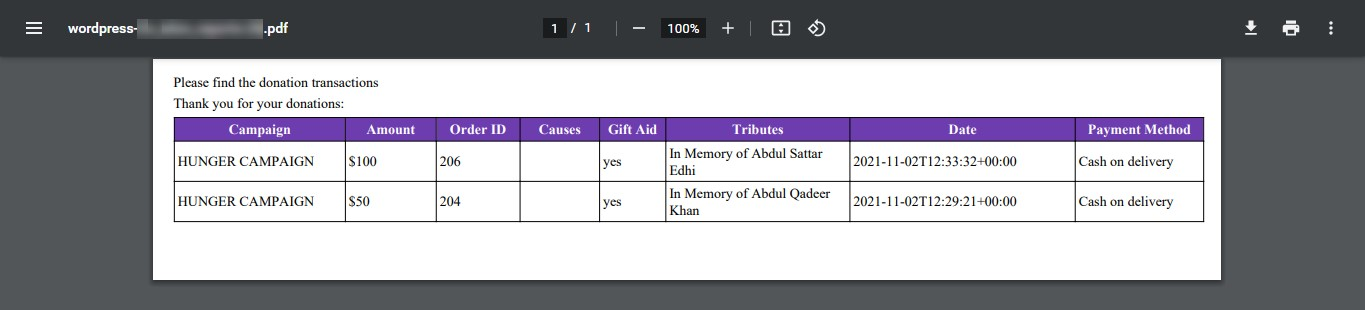
PDF Reports
- Similarly, you can download PDF Reports of your donations in bulk.
- Select the reports you want to download.
- Once done, click on the Download PDF Reports button.

- A PDF file will be downloaded.
- Click on the PDF file to open it.
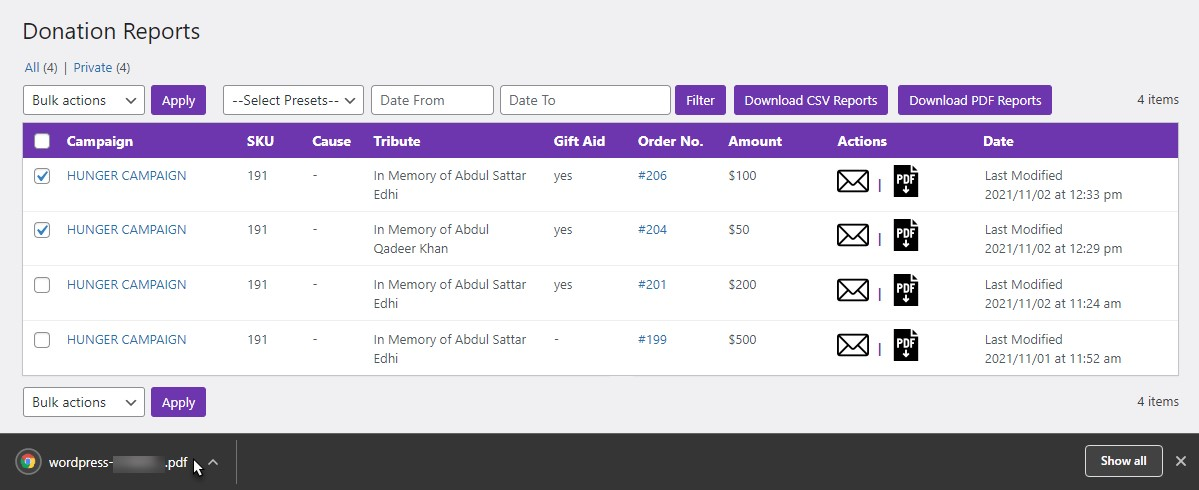
- The PDF file will have all the details of the selected reports.
Report Shortcode
- Navigate to WordPress Admin Dashboard > Pages > Add New.

- A new page would open.
- Add the Title of the page.

- Click on the sign ➕ to add blocks.
- Select the Shortcode element.
- Now paste the shortcode [donation_reports].
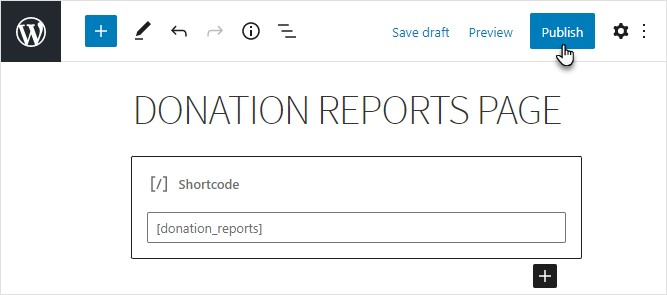
- Click on the Publish button.
- Now, when the user goes to the website and the page where the shortcode was pasted.
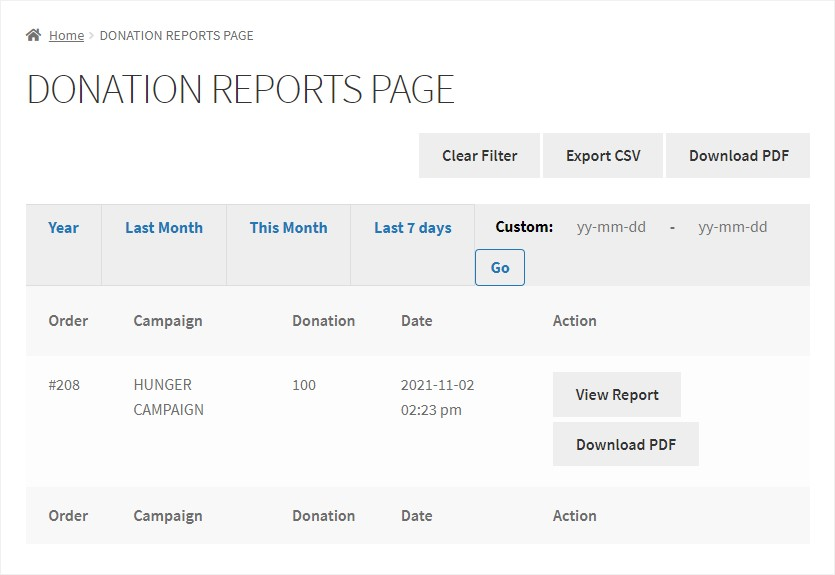
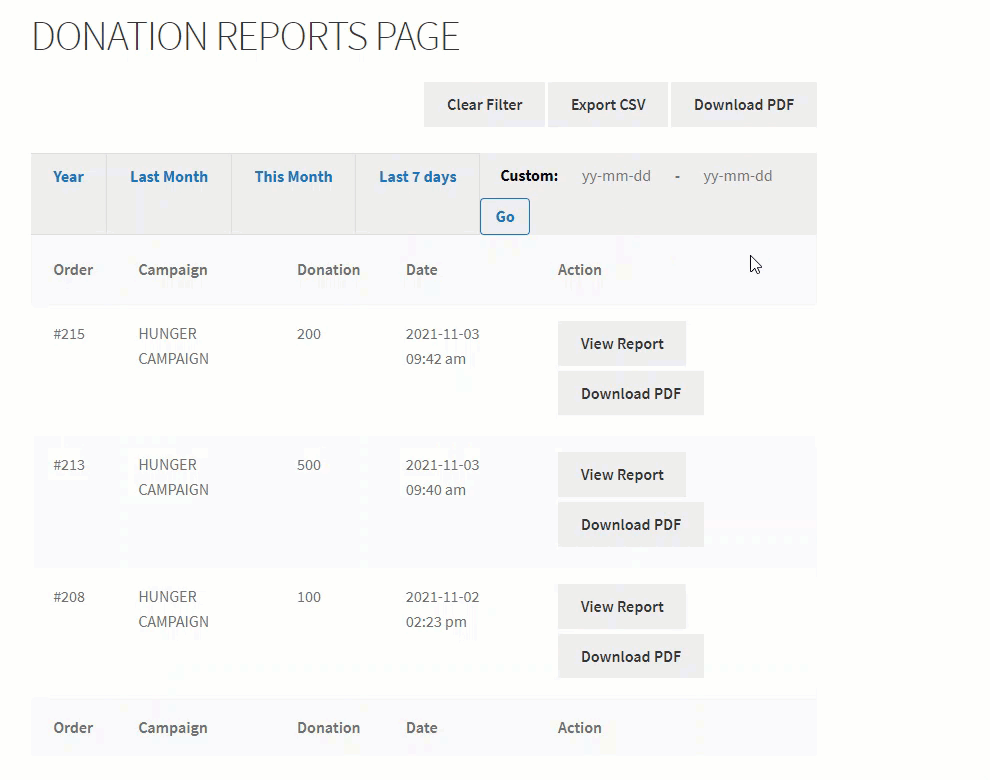
View Report
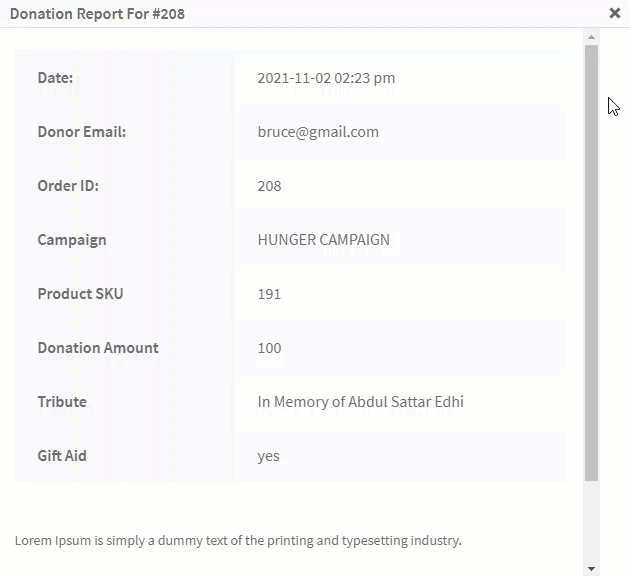
- The user can view the report’s details by clicking the View Report button in the Action column.
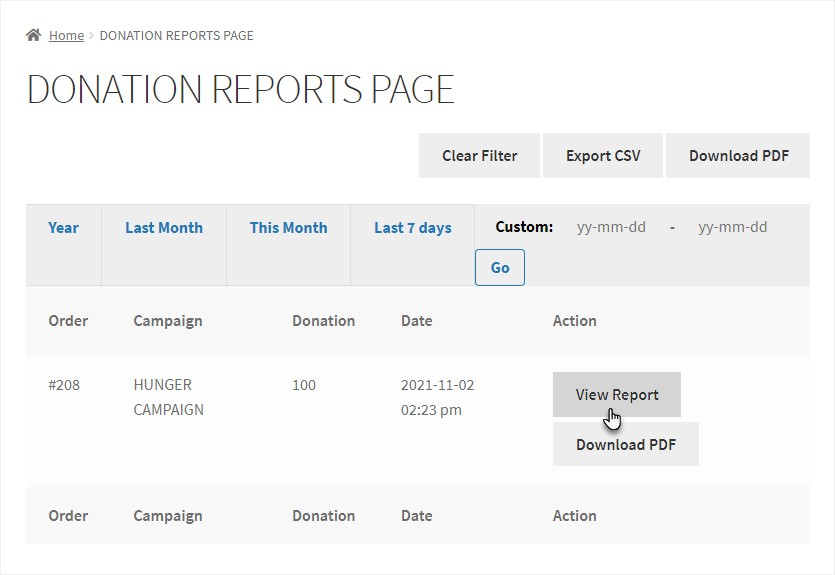
- Once done, a popup will appear with all the details of that respective report.
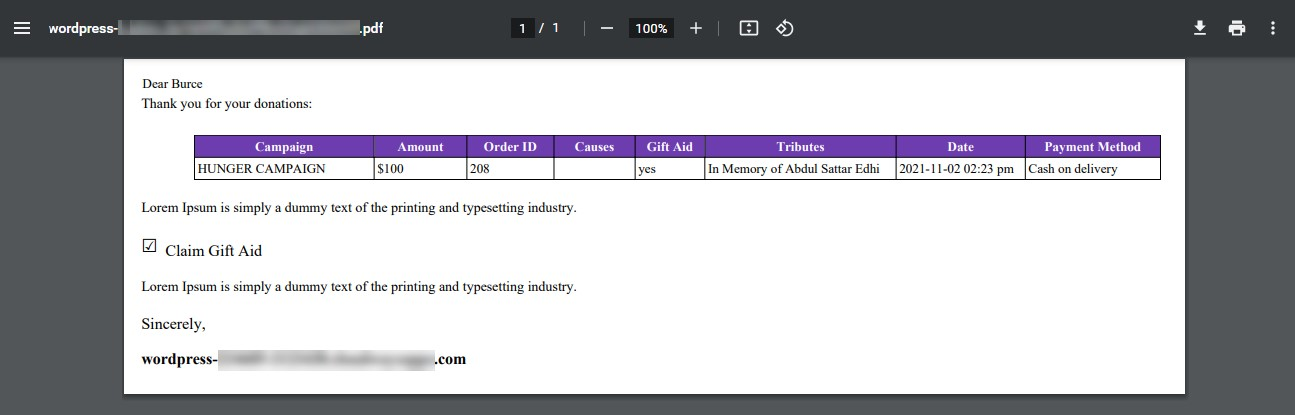
Download PDF
- The user can also download the report by clicking the Download PDF button in the Action column.
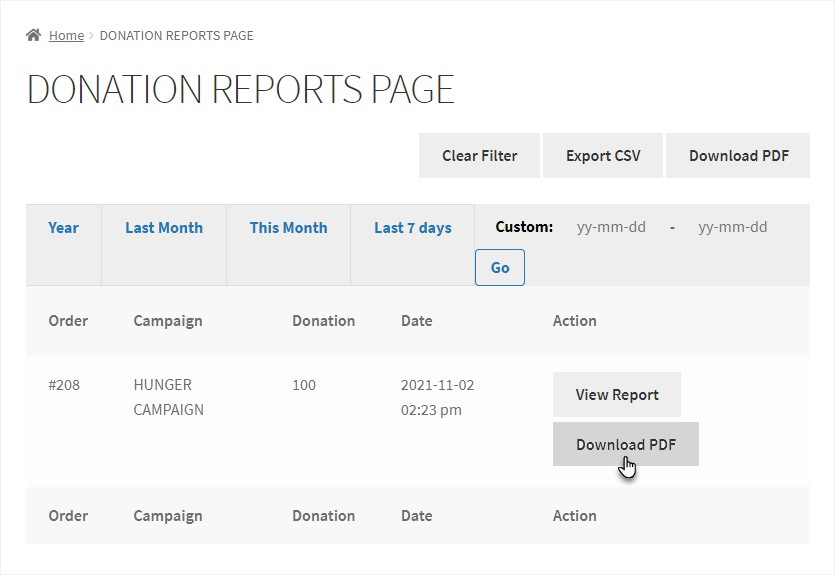
- The report will be downloaded in PDF format.
- Click on the report to open.
- The report will have all the details of that individual donation.
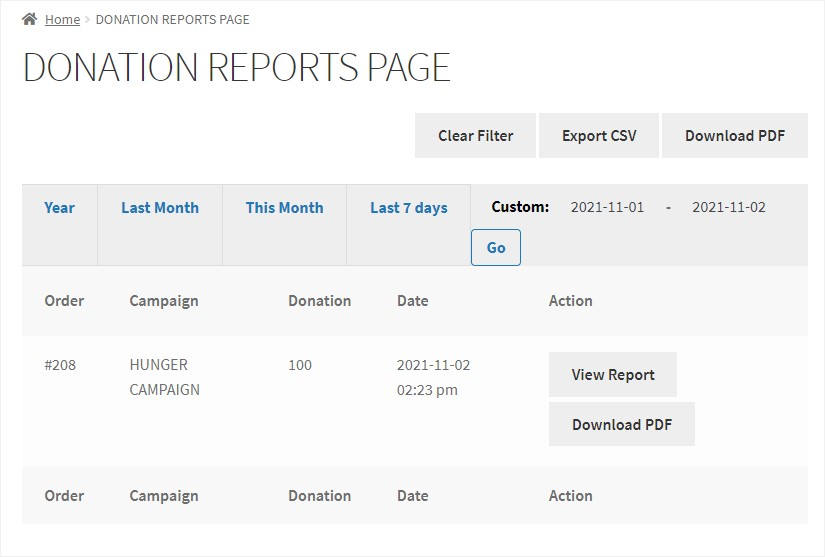
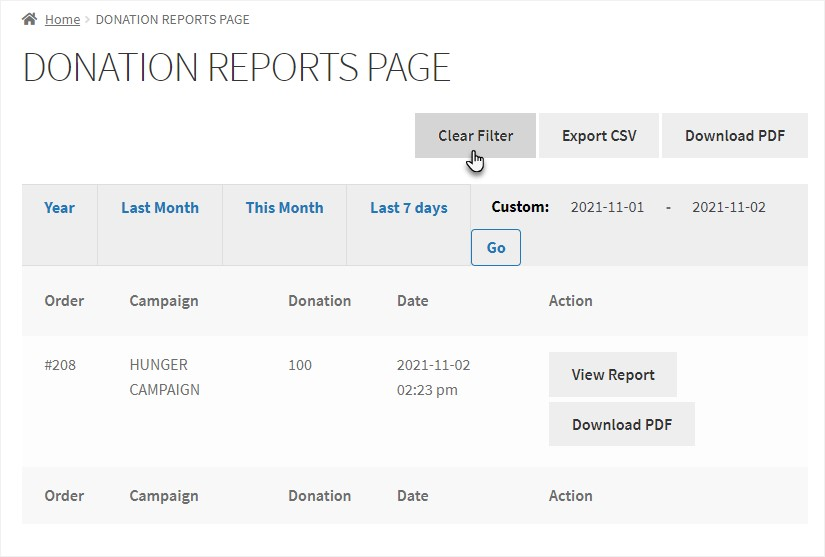
Custom Filter
- The user can also view the reports of a specific duration by setting custom dates.
- Set the dates in the Custom section.
- Click on the Go button.
- The reports generated between the dates will be filtered.
Clear Filter
- Click on the Clear Filters button to clear the filters.
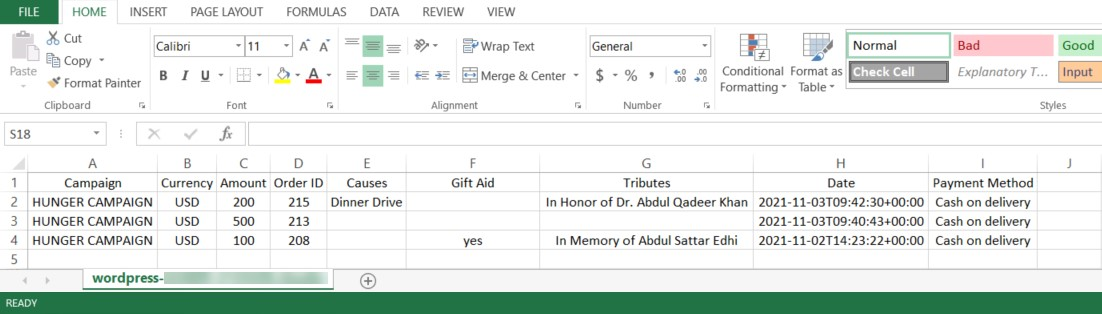
Export CSV – Bulk
- Click on the Export CSV button.
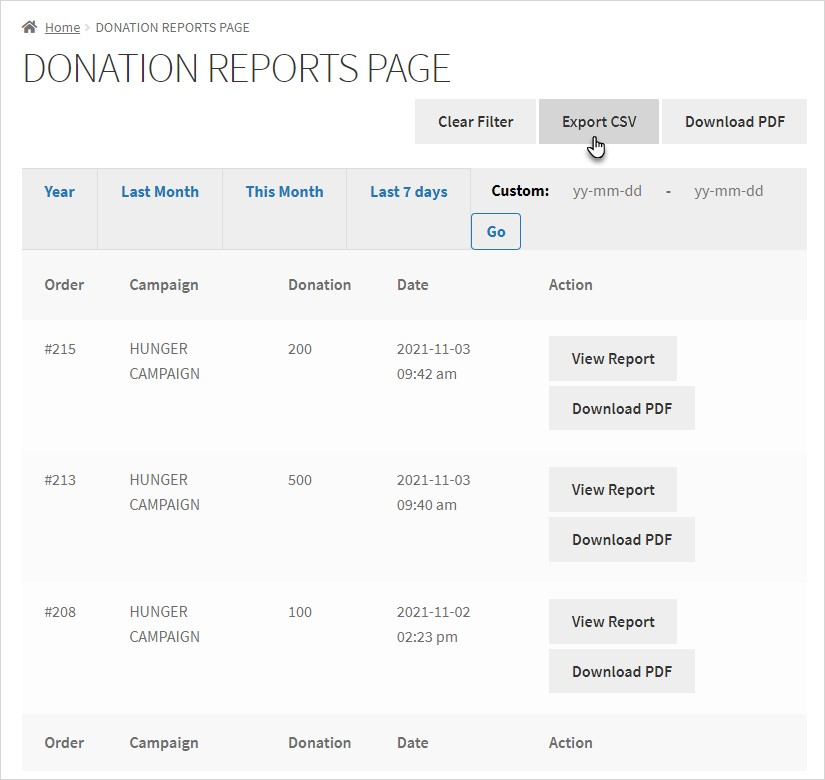
- Once done, a CSV file will be downloaded.
- Open the CSV file.
- It will contain all the details of that particular user’s donations.
Download PDF – Bulk
- Click on the Download PDF button.
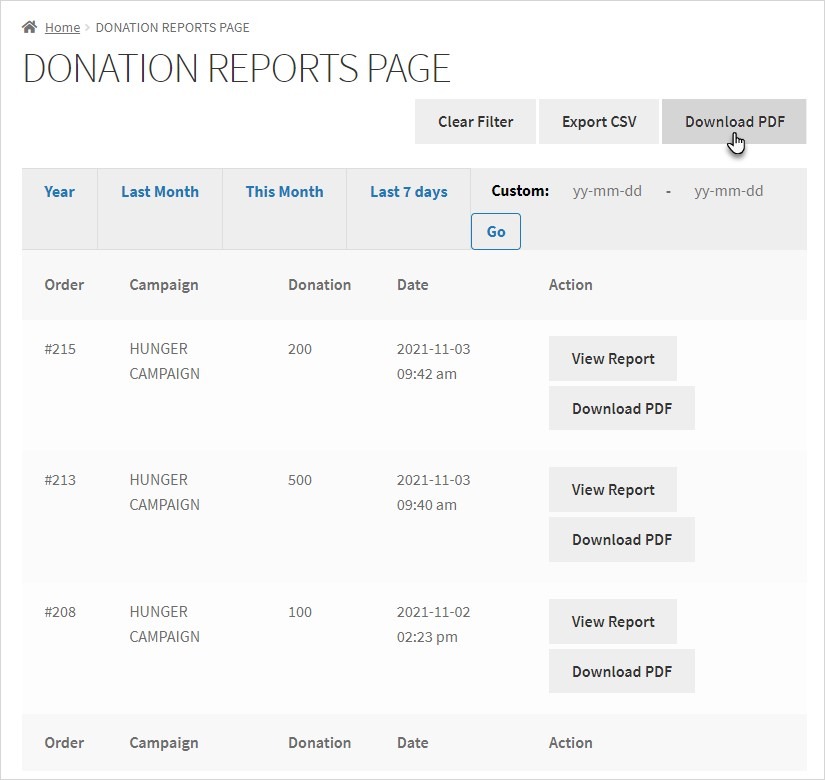
- Once done, a PDF file will be downloaded.
- Open the PDF file.
- It will contain all the details of that particular user’s donations.
Donation Emails
↑ Back to top
The Donation Email feature allows the admin to configure and send automated email notifications containing donation details to donors and recipients after a donation is completed.
- Navigate to WordPress Admin Dashboard > WC Donation > Donation Emails.

- Click on Add New Donation Email.

- Enter a Title in the Add Title field.

- Enter a Subject of email in the Subject field.

- Use the DFW Fields dropdown to insert tags into the Email Body.

- In the Campaigns meta box, select the campaigns to which this email applies.

- In the Actions meta box, choose when the email will be triggered.

- Enable the email template using the Enable Template option.

- Click Publish to save the email template.

Front End Impact
- When a user donates to a campaign and the order status is marked as Completed, as set by the admin, an email will be triggered and sent to the user.

WC Donation API
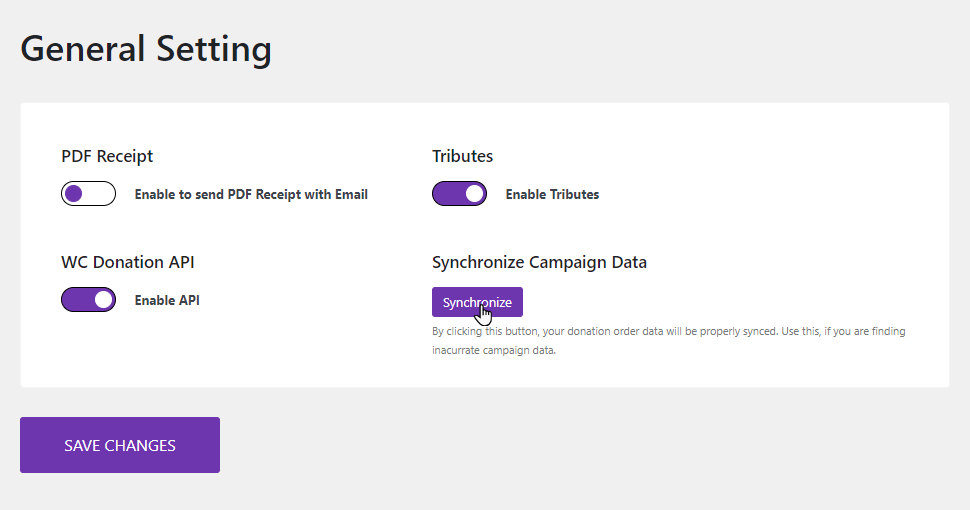
↑ Back to top- Go to the bottom of the page and enable the WC Donation API toggle button.

- Once done, click on the Save Changes button.
Synchronize Campaign Data
↑ Back to top- At the bottom of the page, a Synchronize Campaign Data option is present.
- Click on the Synchronize button.
- Clicking on this button will ensure your donation order data is synchronized correctly. Use this option if you encounter incorrect campaign data.
Tribute (Messages)
↑ Back to top- Navigate Tributes in General Settings.
- Enable the Tributes option. Once done, a Messages option will appear.
- Now enable the Messages option.
- Click on Save Changes.
- Add a new campaign or edit an existing campaign.
- Navigate Tributes, and click on it.
- Click on Add Level and enter a label that will appear on the front-end.
- Click on the Publish/Update button.

Front-End Impact
Product Page
- Go to the Product Page of the donation campaign.
- The user will enter the donation amount in the Donation text box.
- The user will select the Tribute and enter the Name and Message from whom the user is tributing.
- Once done, the user will click the Donate button.
Checkout Page
- The user will be redirected to the Checkout page.
- The user will enter the required credentials.
- Once done, the user clicks the Place Order button to complete the donation.
NOTE: Once the user is on the Checkout Page, navigate to the Cart Page. We can see that the tribute is displayed under the item.
- A Thank you message will appear with the order description after the order is placed successfully.
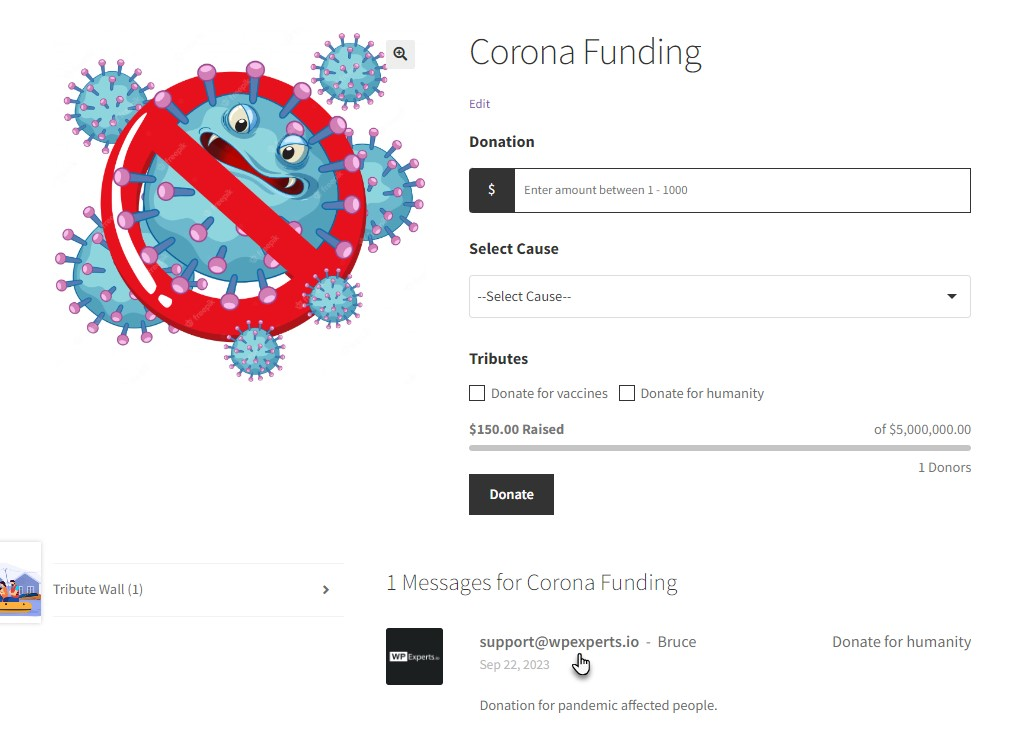
NOTE: Once the user placed the order successfully, navigate to the campaign product page. We can see that the tribute is displayed under the item.
- Navigate to the Shop Page > Product Page of the campaign.
- In the tribute wall, User details with messages will appear.
WC Donation Tabs (Multiple Donation Tabs)
↑ Back to top- Navigate to WordPress Admin Dashboard > Pages > Add New.
- A new page would open.
- Add the Title of the page.

- Click on the sign ➕ to add blocks.
- Select the WC Donation Tabs element.
- Once done, select any two campaigns in the Select First Campaign and Select Second Campaign option.
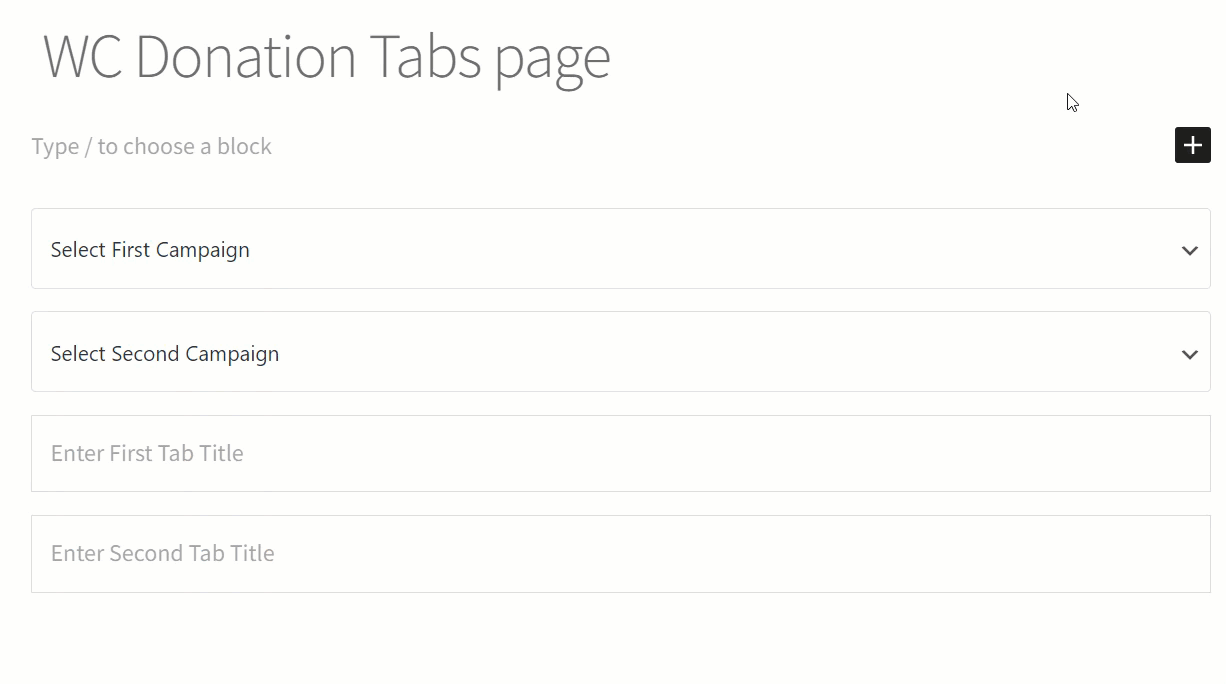
- Now enter the titles of both campaigns in the Enter First Tab title and Enter Second Tab title option.
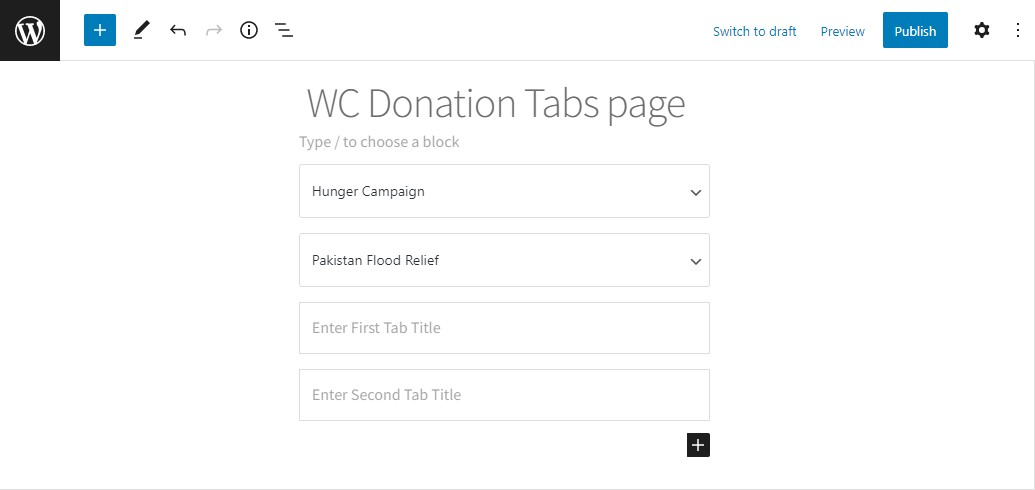
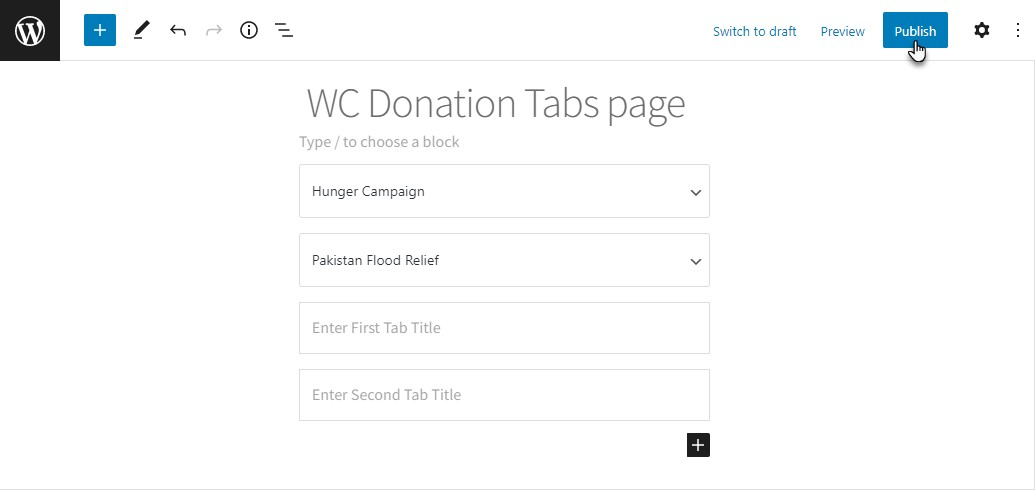
- Once done, click on the Publish button.

Front-End Impact
- Go to the website.
- Go to the WC Donation Tabs page.
- Both tabs will appear on the WC Donation Tabs page.

- Select the campaign by clicking on the tabs available.

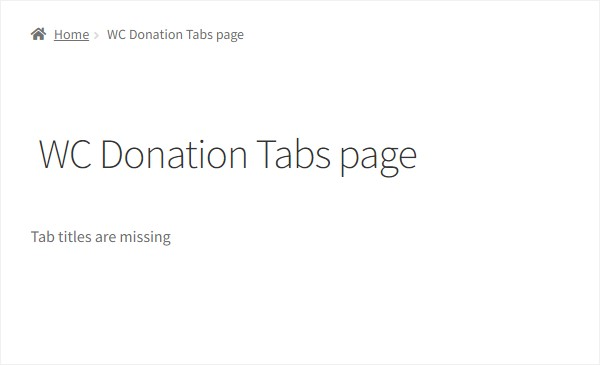
NOTE: If the Administrator does not enter the titles of both campaigns in the Enter First Tab title and Enter Second Tab title option.
The campaigns will not appear on the WC Donation Tabs page.
Donor Wall
↑ Back to top
The Donor Wall feature allows the admin to display a list of donors associated with a donation campaign on the frontend.
This tab includes two options:
- Campaign Donor List: Displays the names and donation details of donors who choose to make their donation public.
- Campaign Anonymous List: Displays donations made anonymously without revealing donor identities.
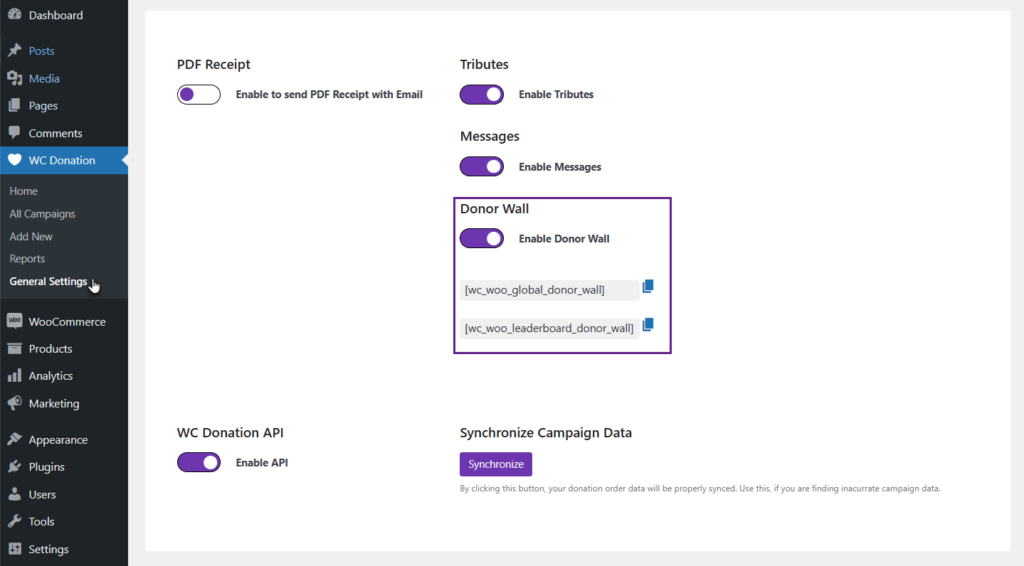
- Go to the Admin Dashboard > WC Donation > General Settings.
- Add the Donor Wall section below the Messages option.
- Two shortcodes will appear below the Donor Wall option, which will work globally.
- When enabling the Donor Wall option, a tab will appear on the Campaign Edit page.
- Navigate to the Donor Wall tab.
- We have two options in this tab:
- Campaign Donor List
- Campaign Anonymous List
- These two toggle buttons will work specifically according to the campaign.
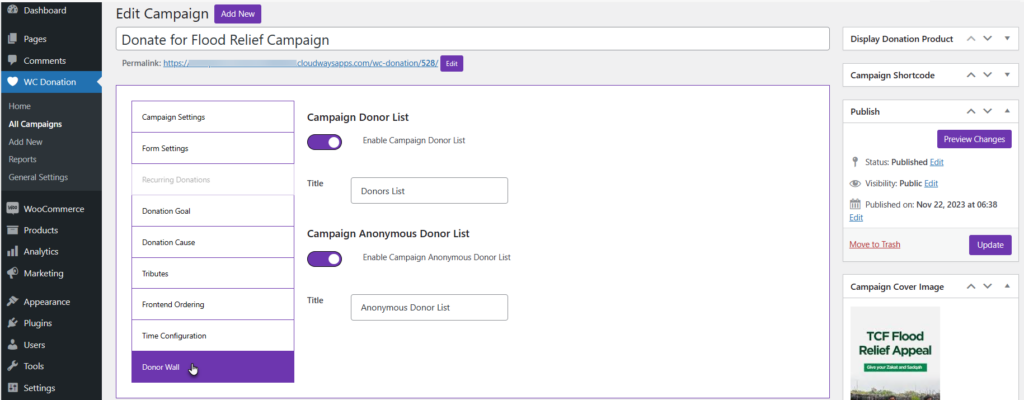
NOTE: If the Campaign Donor List and Campaign Anonymous List toggle buttons are enabled, both will appear in the Donor Wall section. The Campaign Donor List will appear first. Then, the Campaign Anonymous List will appear.
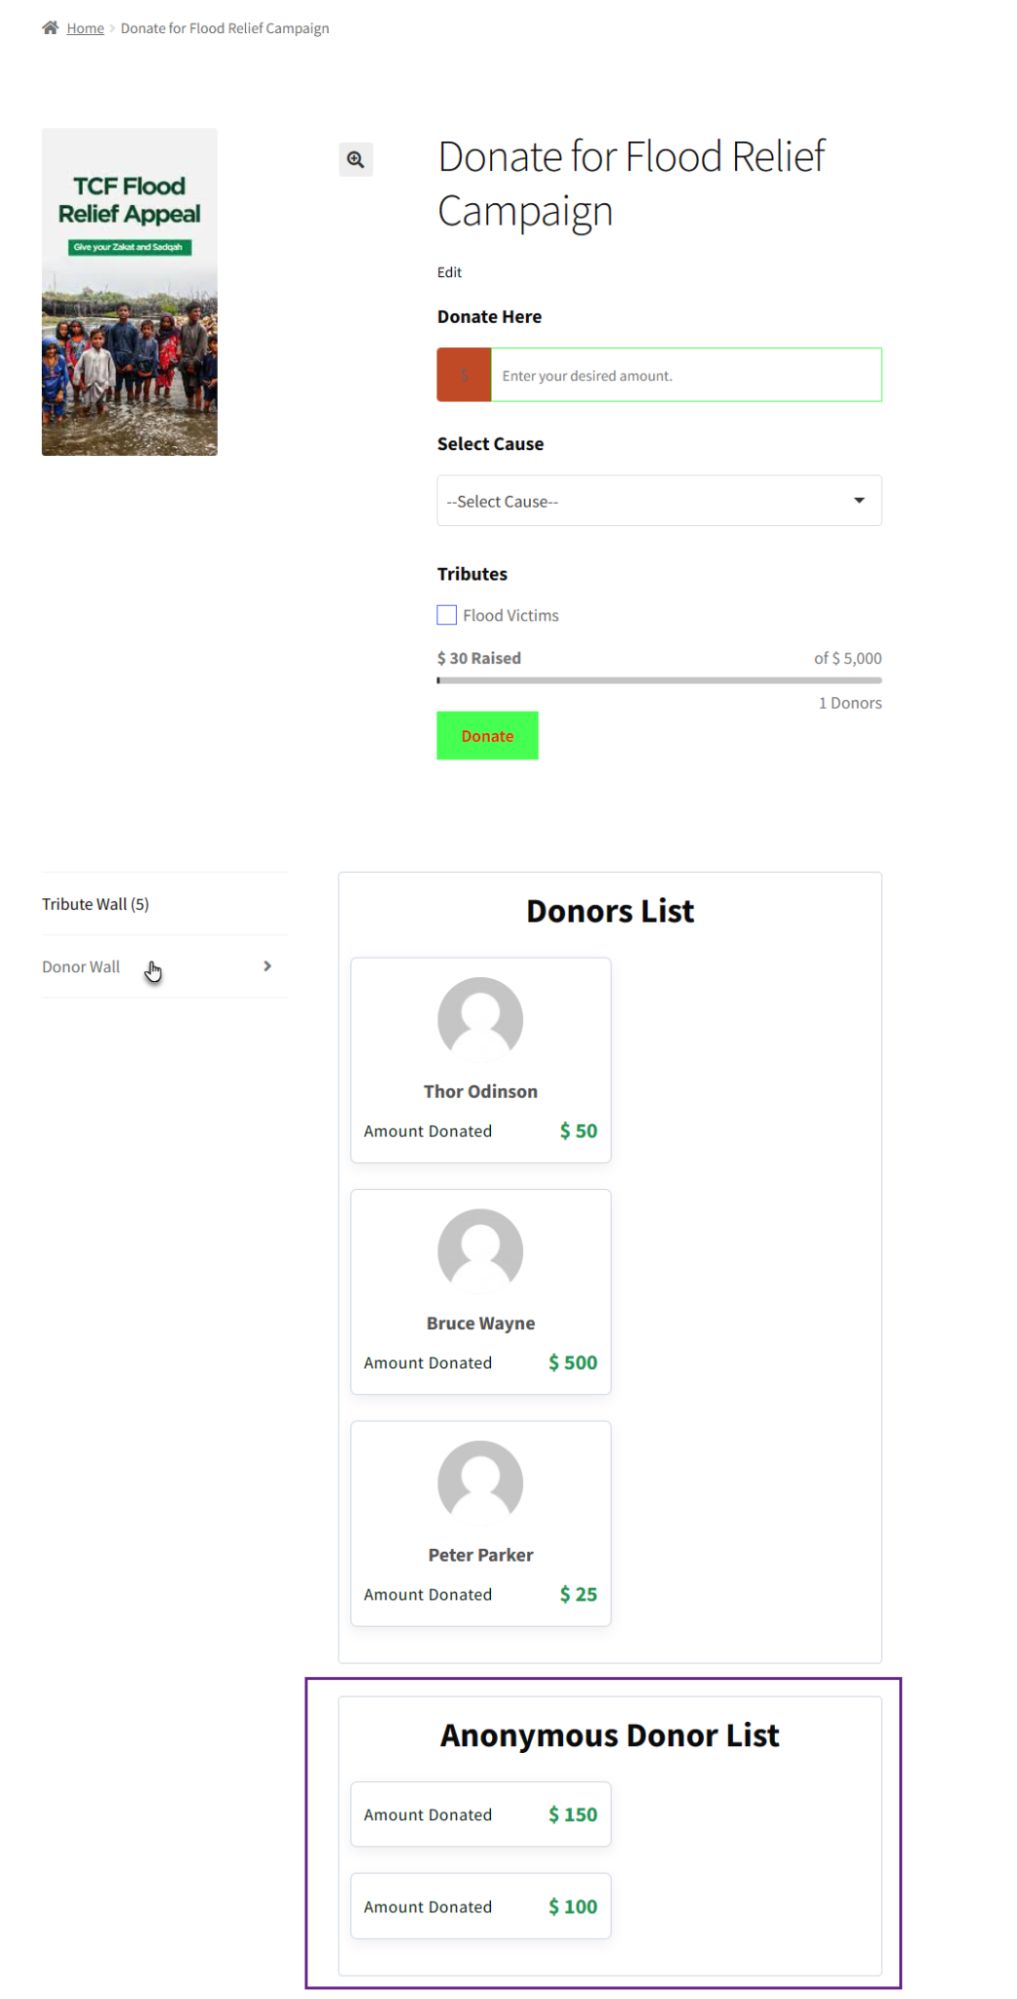
Front-End Impact
Campaign Donor List
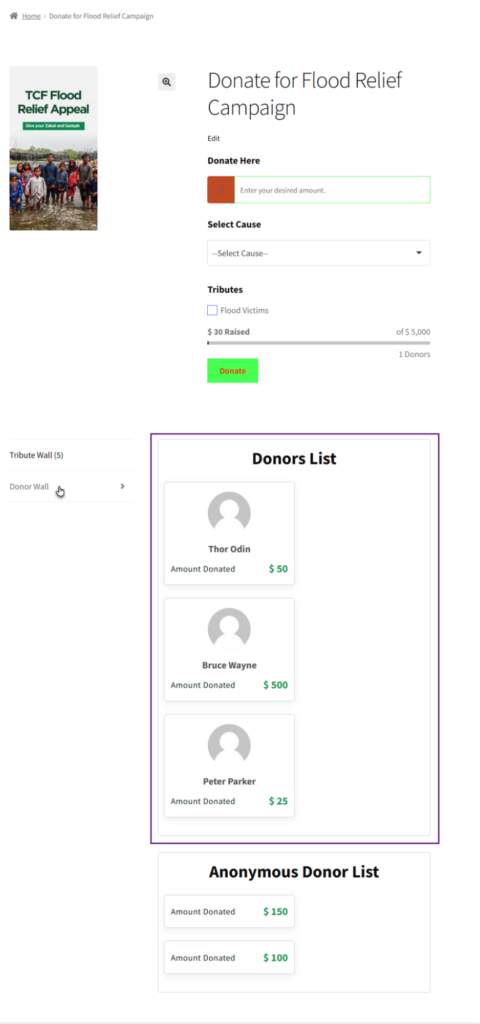
Campaign Anonymous Donor List
Global Donors Wall Shortcode
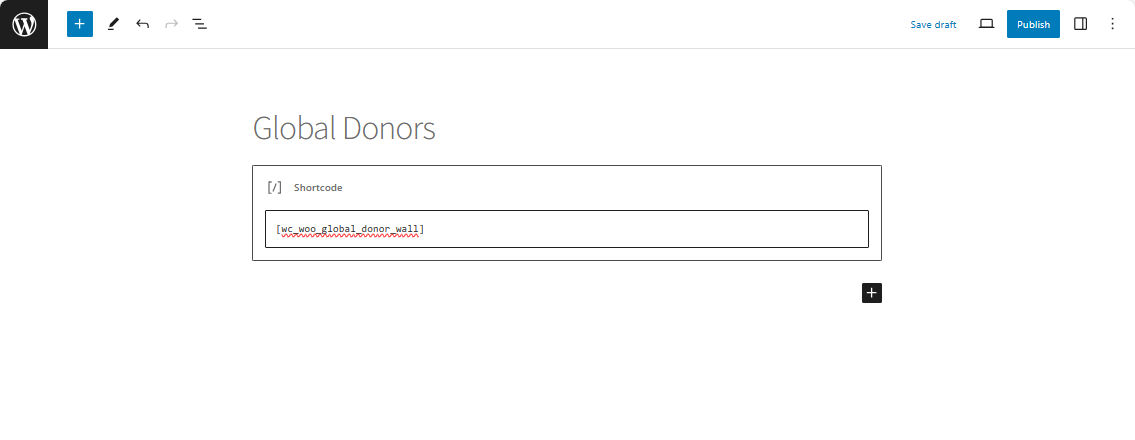
- Navigate to WordPress Admin Dashboard > Pages > Add New.
- A new page would open.
- Add the Title of the page.
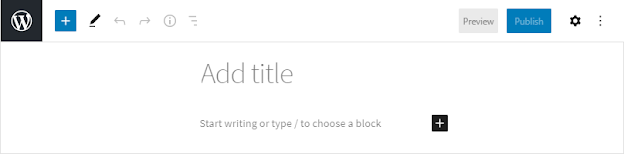
- Click on the sign ➕ to add blocks.
- Select the Shortcode element.
- Now paste the shortcode.
- Click on the Publish button.
Front-End Impact
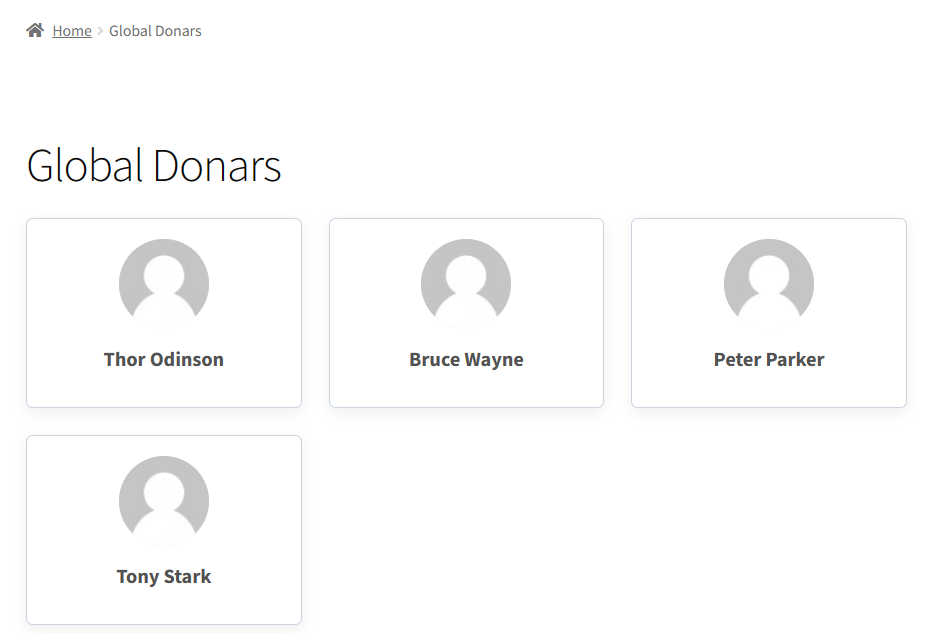
Global Donors Wall
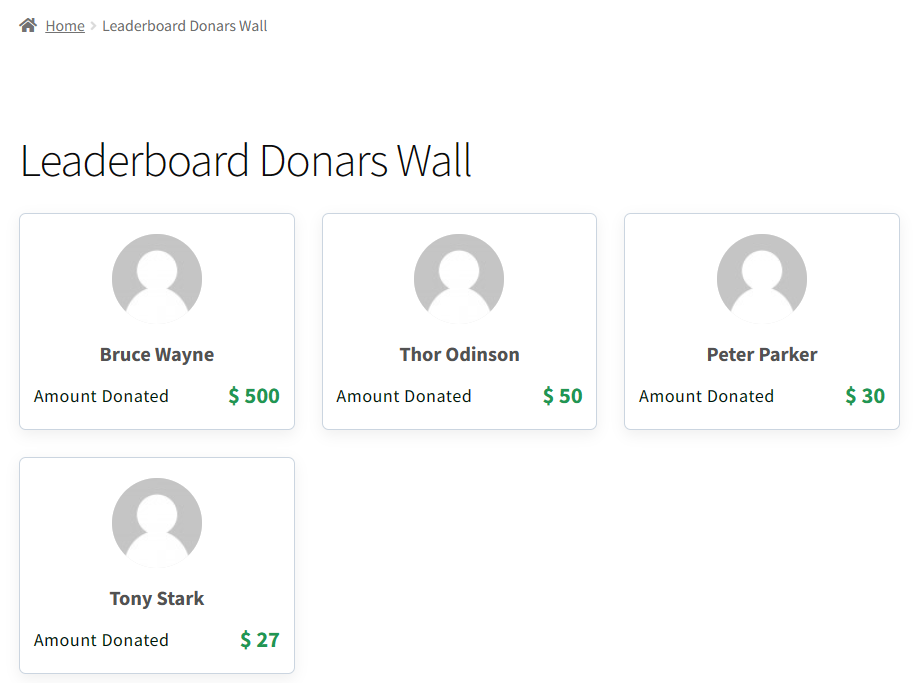
Leaderboard Donors Wall Shortcode
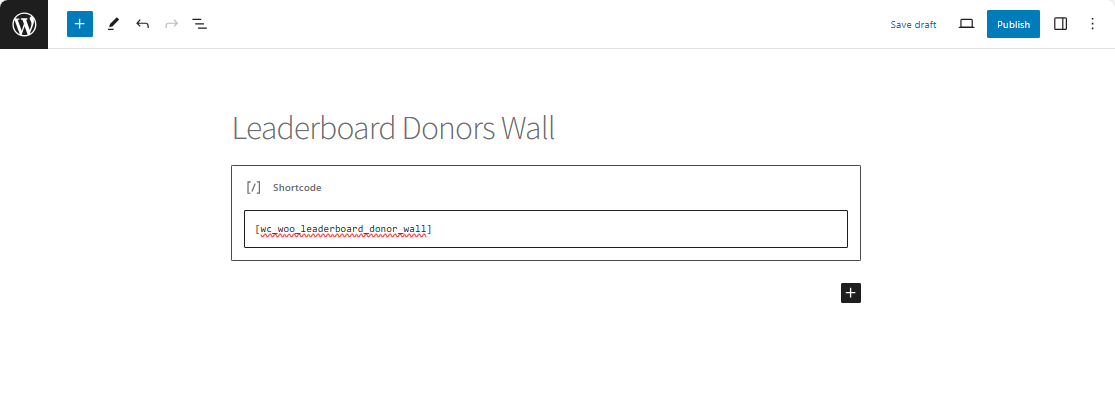
- Navigate to WordPress Admin Dashboard > Pages > Add New.
- A new page would open.
- Add the Title of the page.

- Click on the sign ➕ to add blocks.
- Select the Shortcode element.
- Now paste the shortcode.
- Click on the Publish button.
Front-End Impact
Leaderboard Donors Wall
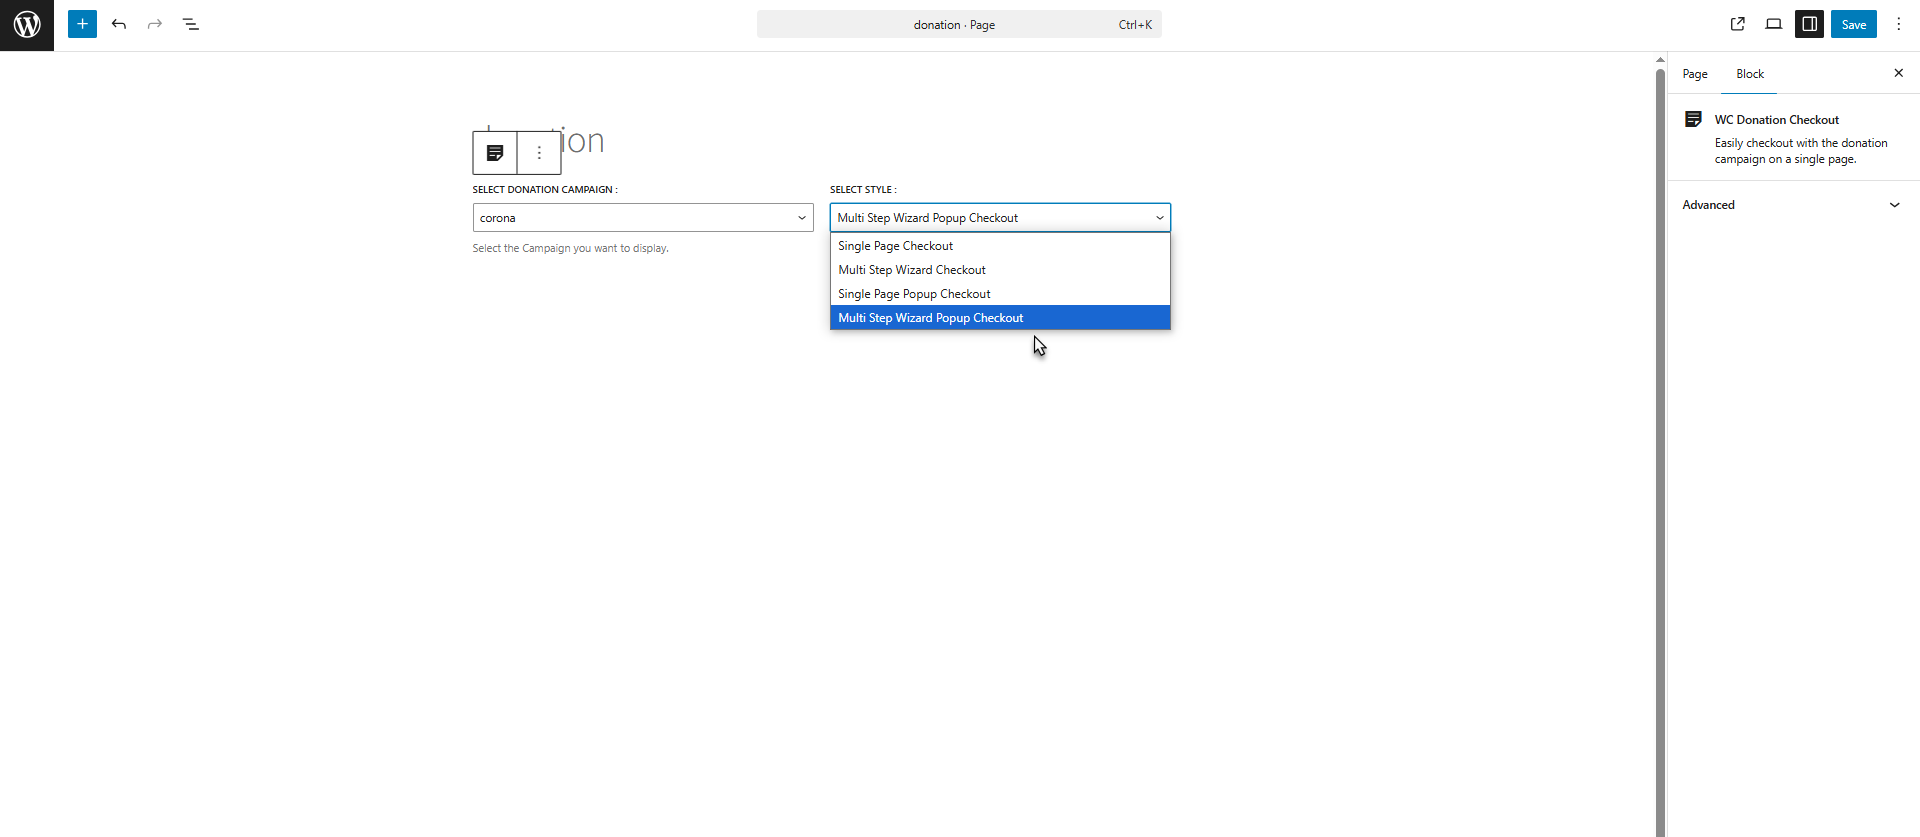
WC Donation Checkout
↑ Back to top
The WC Donation Checkout feature allows the admin to control how donors complete the donation process on the frontend by selecting a checkout style for each campaign.
Using the Select Style dropdown, the admin can choose between two checkout experiences:
- Single Page Checkout
The entire donation process—donation amount selection, donor information, and payment—is completed on a single page. This option is ideal for users who prefer a quick and straightforward checkout with minimal steps. - Multi-Step Wizard Checkout
The donation process is displayed in a step-by-step pop-up window that guides donors through multiple stages, such as selecting the donation amount, entering personal details, and choosing a payment method. All steps are completed within a single pop-up, allowing users to donate without leaving the current page. This structured flow improves clarity, reduces confusion, and enhances the overall donation experience.
- Navigate to WordPress Admin Dashboard > Pages > Add New Page.
- Enter a title for the page.

- Search for the WC Donation Checkout block.

NOTE: This feature will work only when the Legacy Checkout Donation is disabled in WordPress Admin Dashboard > WC Donation > General Settings > Legacy Checkout Donation.
- Select the donation campaign from the Select Donation dropdown.

Choose the style from the Select Style dropdown for the campaign display on the front end. There are two options available:
- Single Page Checkout: The donation checkout process will be completed on a single page.
- Multi-Step Wizard Checkout: The donation checkout process will be divided into multiple steps for a guided experience.

- Click the Publish button to save and publish the page.

Single-Page Popup Checkout
The donation process is completed within a single pop-up page, allowing users to enter their details and make the payment without leaving the current screen. This ensures a quick and smooth checkout experience.

- Click the Publish or Save button to save and publish the page.

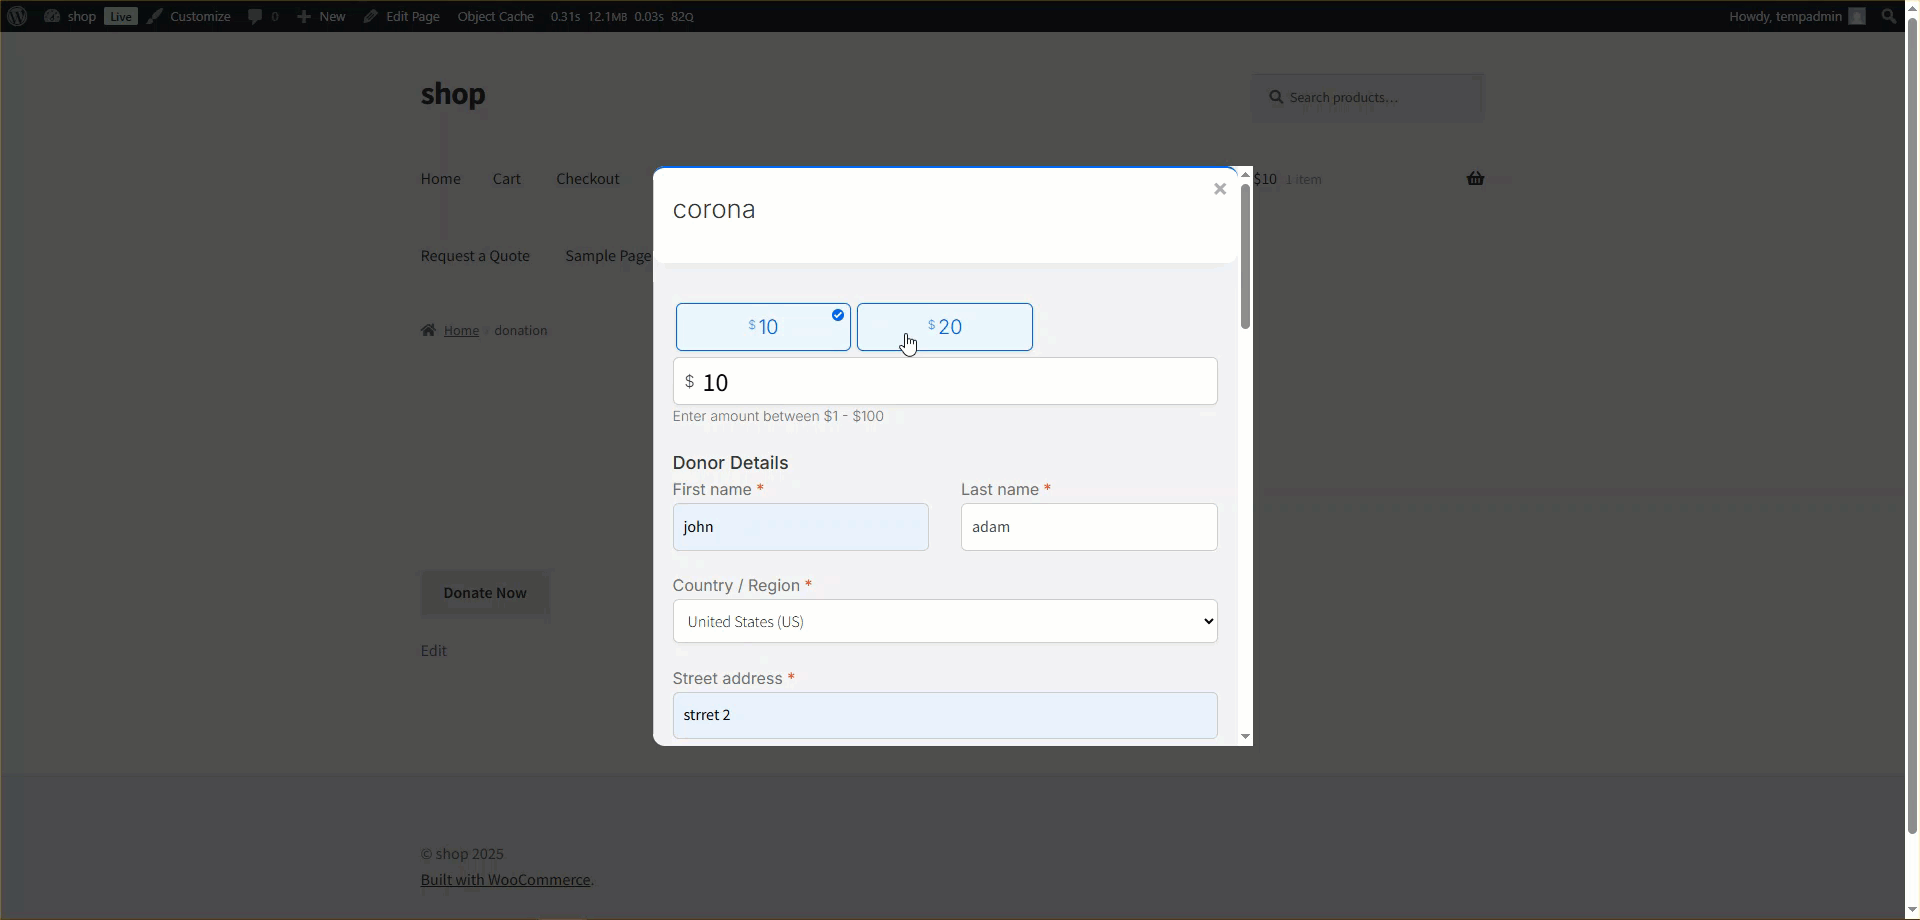
Multi-Step Wizard Popup Checkout
The donation process is completed through a step-by-step pop-up window, guiding users through multiple stages of amount selection, personal details, and payment method within the same pop-up. This structured flow helps ensure clarity, ease of use, and a smooth donation experience without navigating away from the current screen.
- Click the Publish or Save button to save and publish the page.

Front End Impact:
↑ Back to top- Single Page Checkout
- Go to the Donation Checkout page. The selected donation campaign will be displayed.

- Choose the desired amount.

- Click on the Place Order button to donate into the campaign.

- The donation will be done through Single Page Checkout.

- Multi Step Wizard Checkout
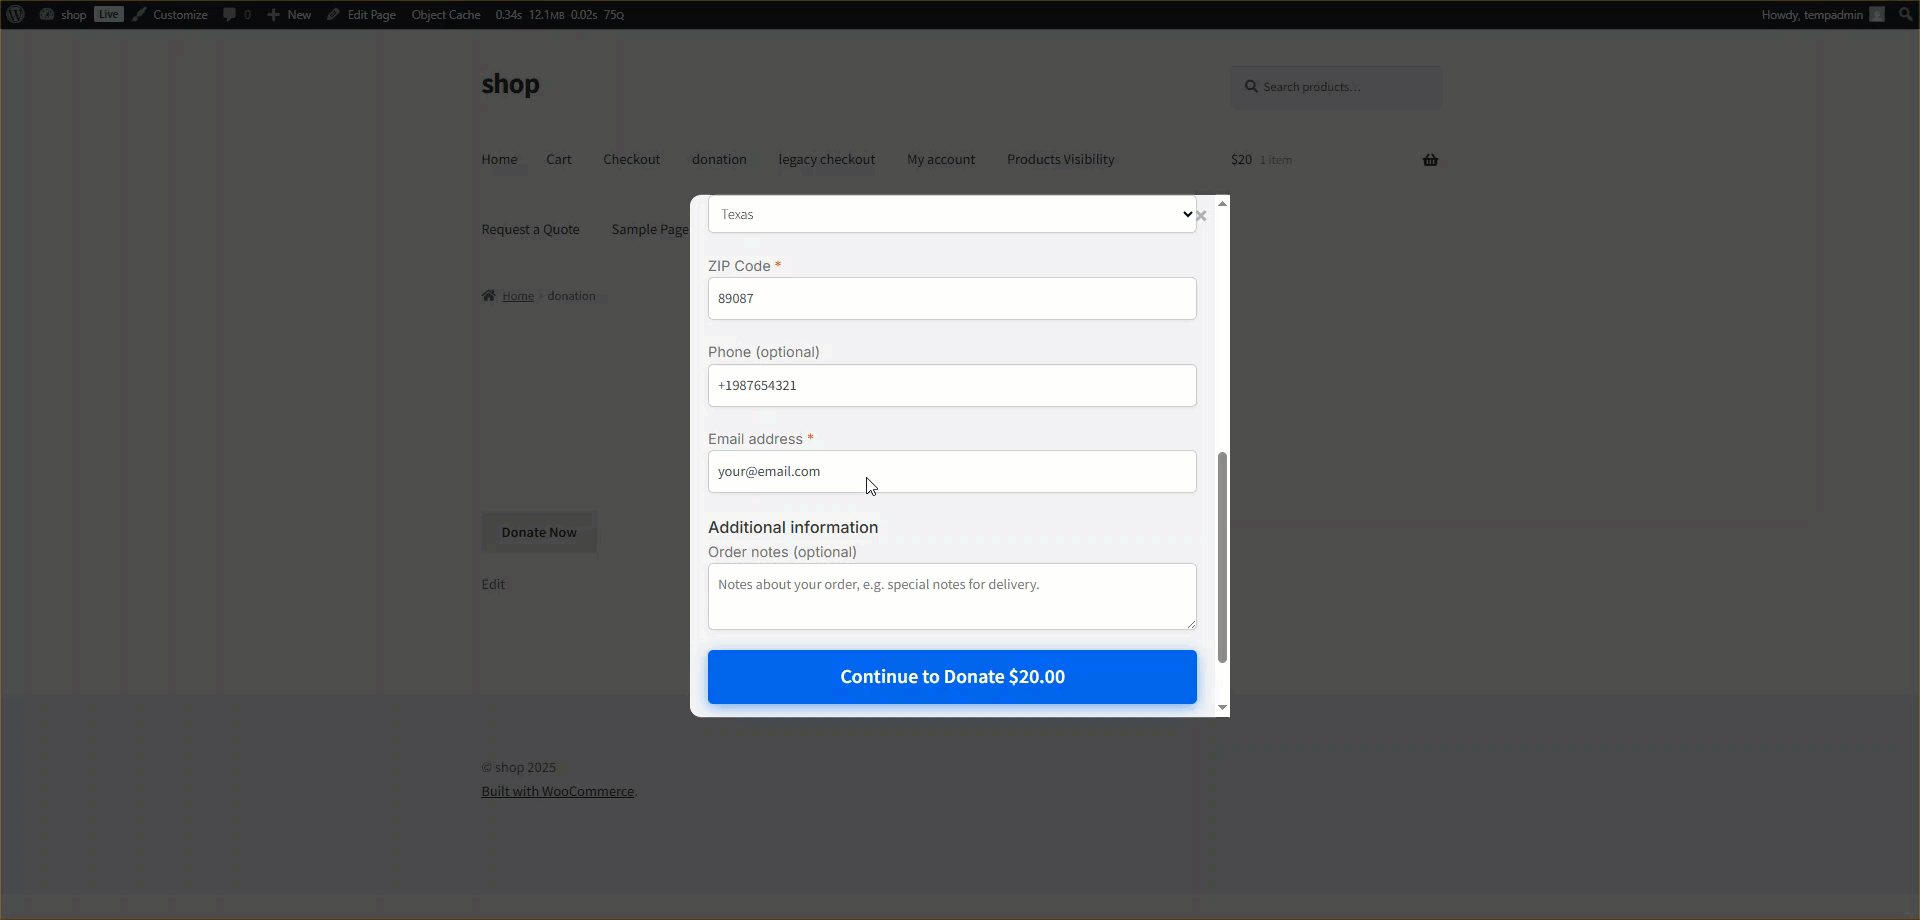
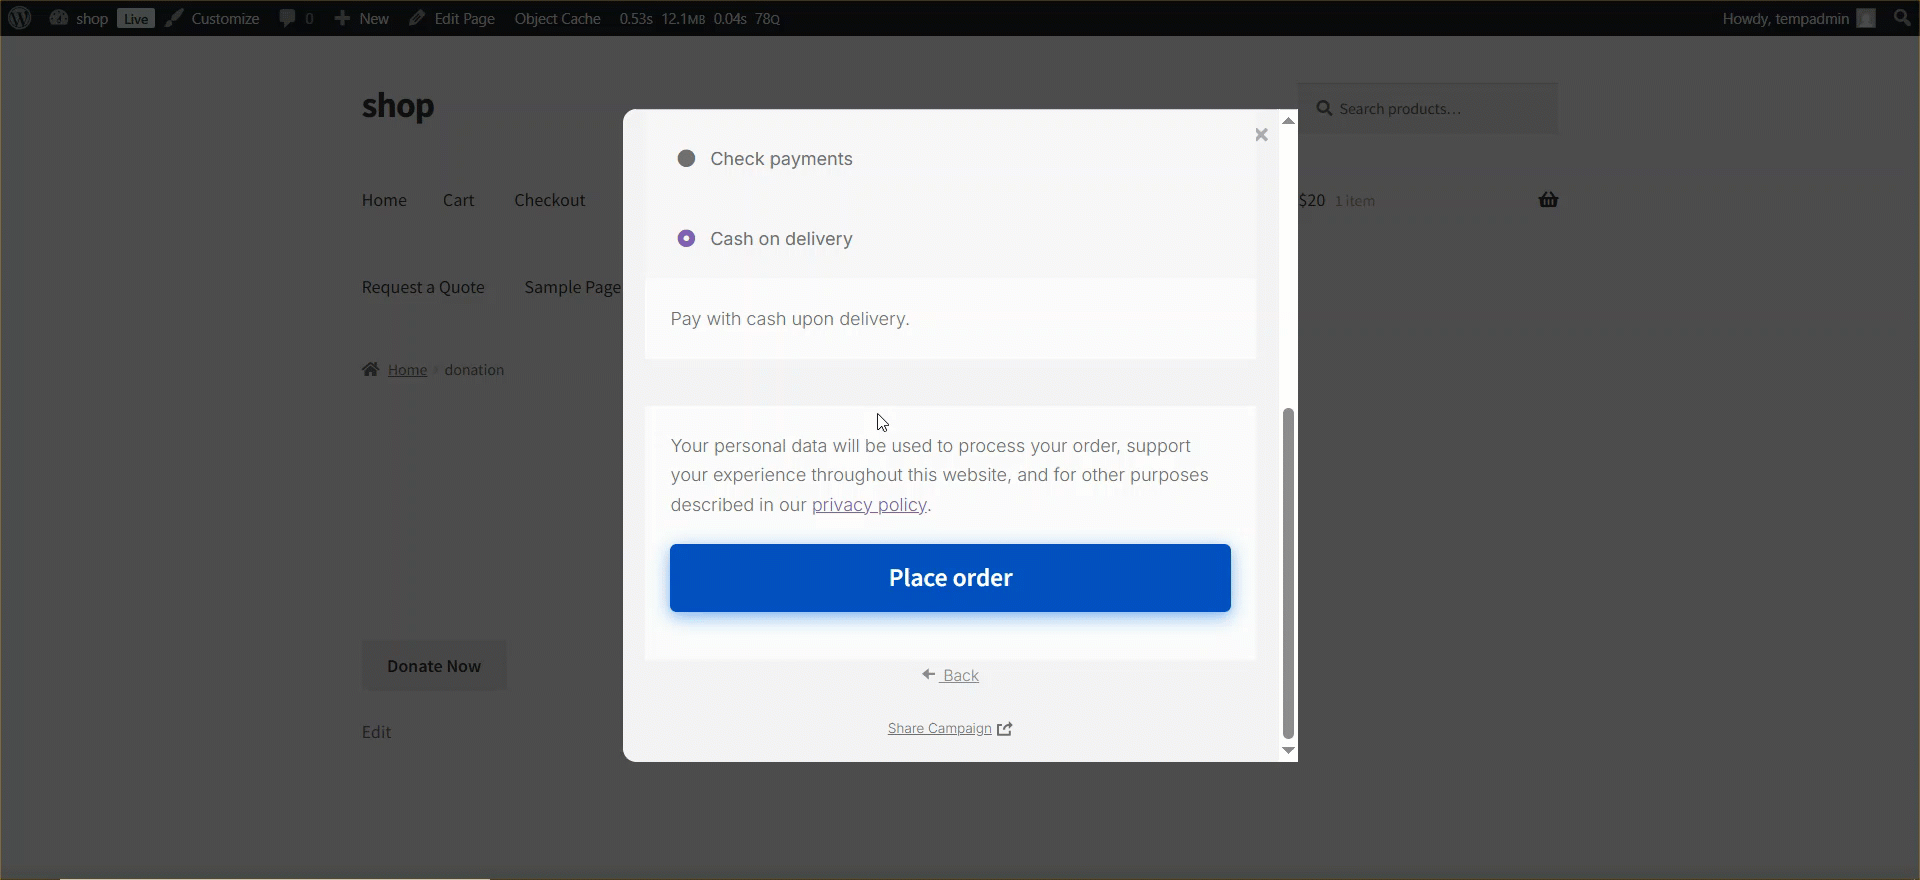
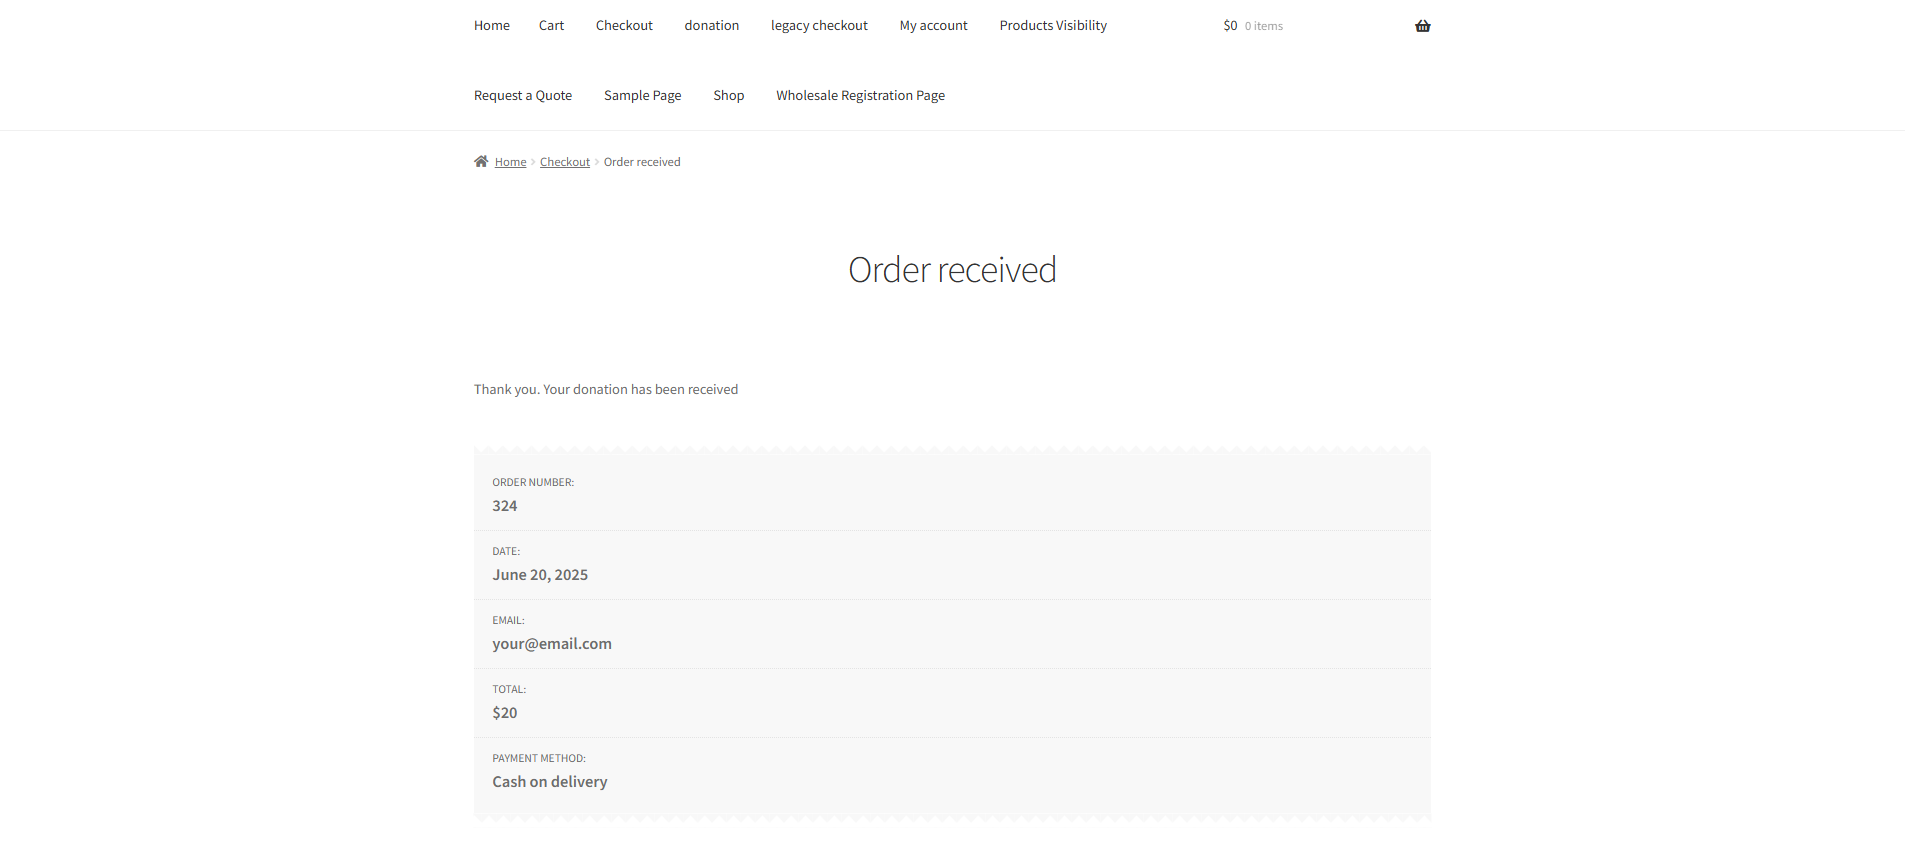
- Go to the Donation Checkout page. The selected donation campaign will be displayed.

- Select the donation amount and click on Continue to Donate.

- Fill out the necessary details. Once completed, click on Continue to Donate.

- Select the Payment Option and click on the Place Order.

- The donation is done through Multiple Step Wizard Checkout.

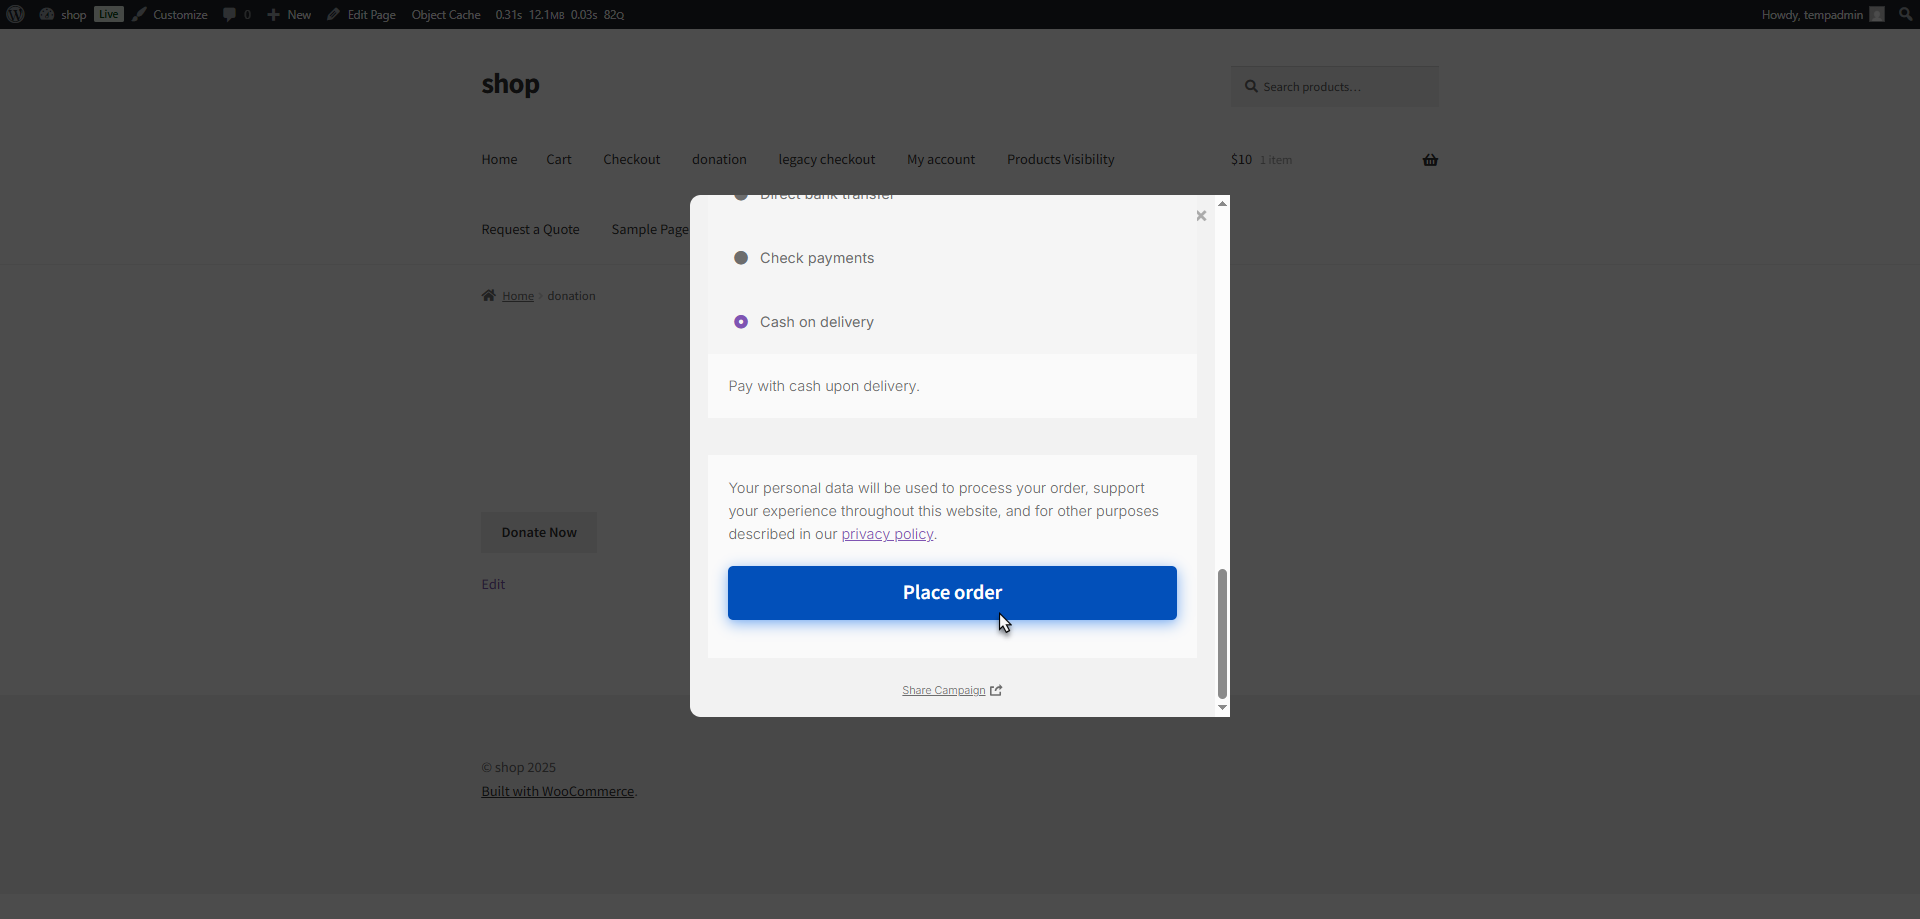
Single-Page Popup Checkout
- Go to the donation section and click the Donate Now button.
- A pop-up checkout window will appear.
- Select the desired donation amount.
- Enter your billing and payment details directly within the pop-up.
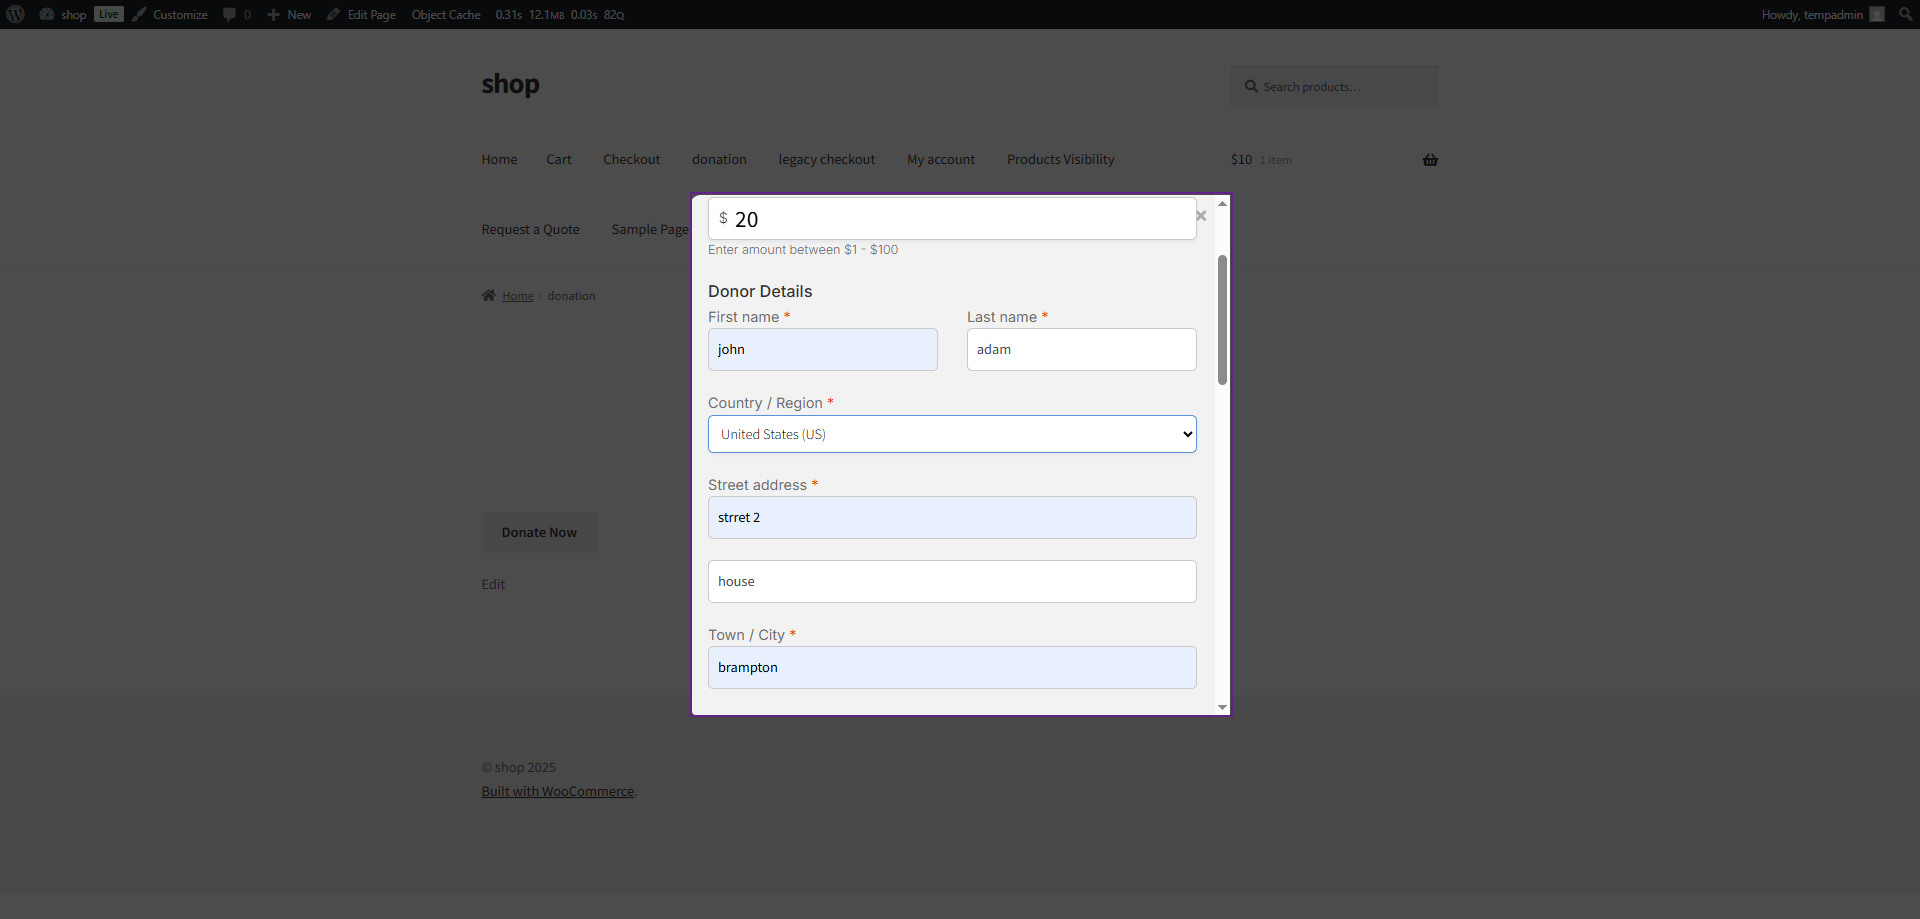
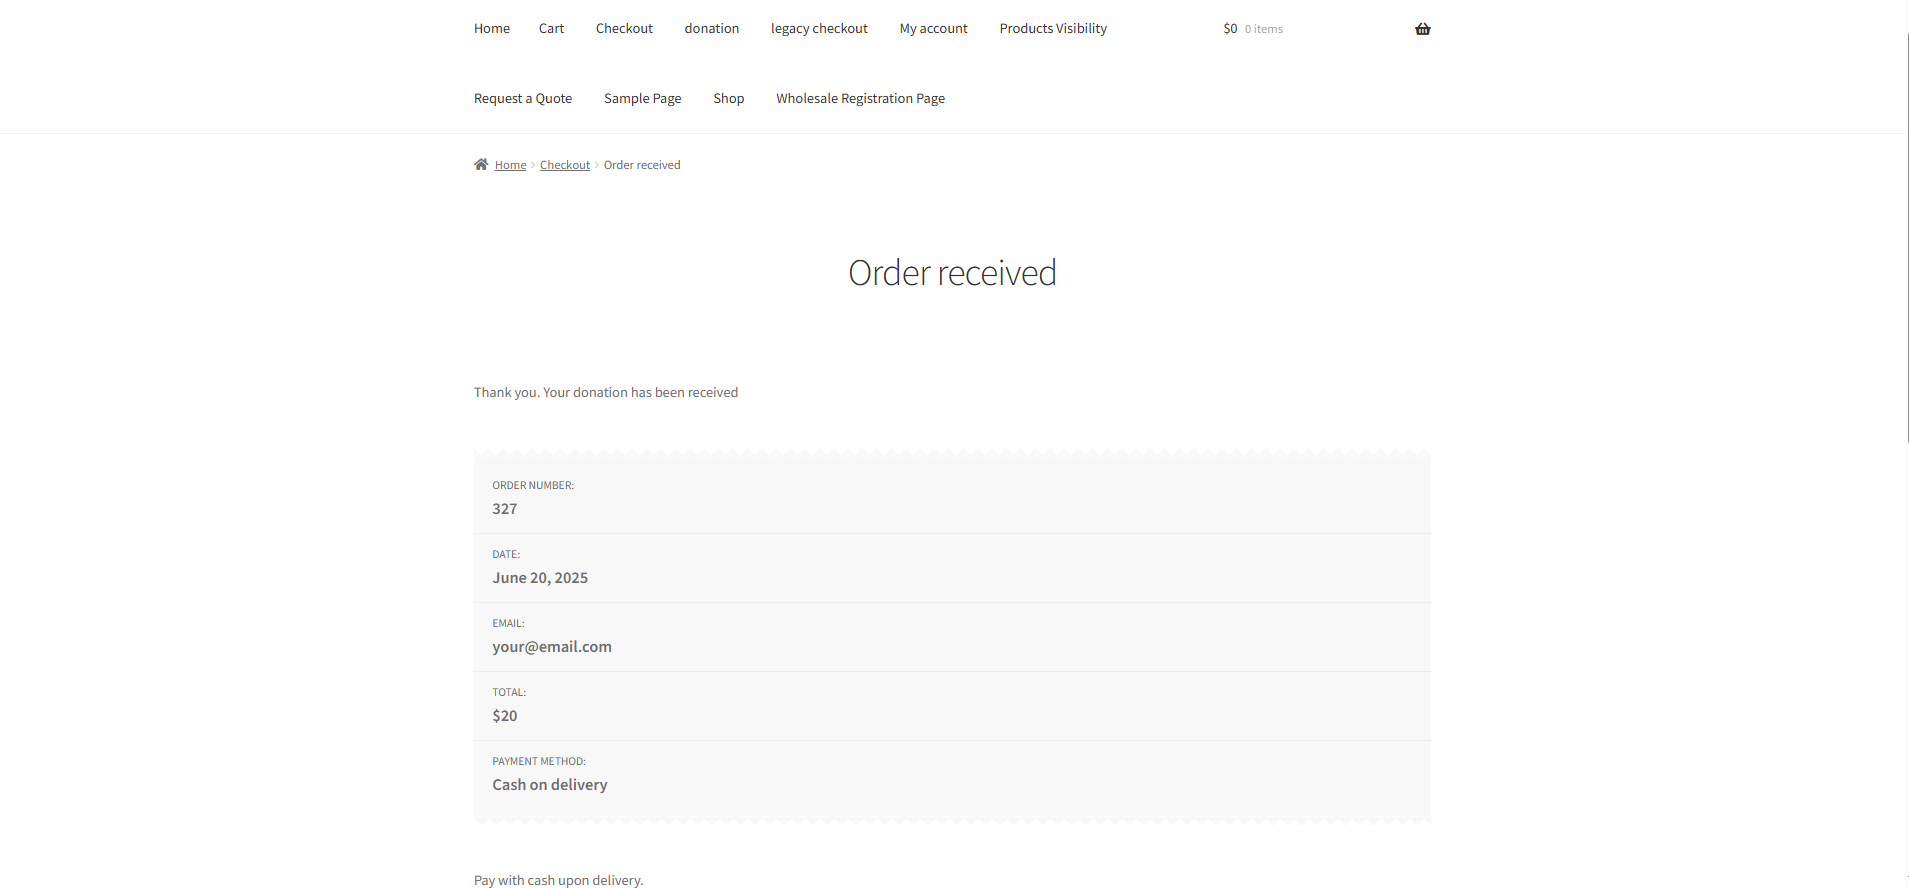
- Click the Donate or Place Order button to complete the donation.
- The donation will be completed instantly through the Single Page Popup Checkout, without leaving the current page
- The donation is done through Single-Page Popup Checkout.
Multi-Step Wizard Popup Checkout
- Go to the donation section and click the Donate Now button.
- A pop-up checkout window will appear.
- Fill out the necessary details. Once completed, click on Continue to Donate.
- Now, choose your preferred payment option and click on the Place Order button.
- The donation will be completed through a Multi-Step Wizard Popup Checkout, without redirecting to a separate page.
- The donation is done through Multi-Step Wizard Popup Checkout.
Custom Range