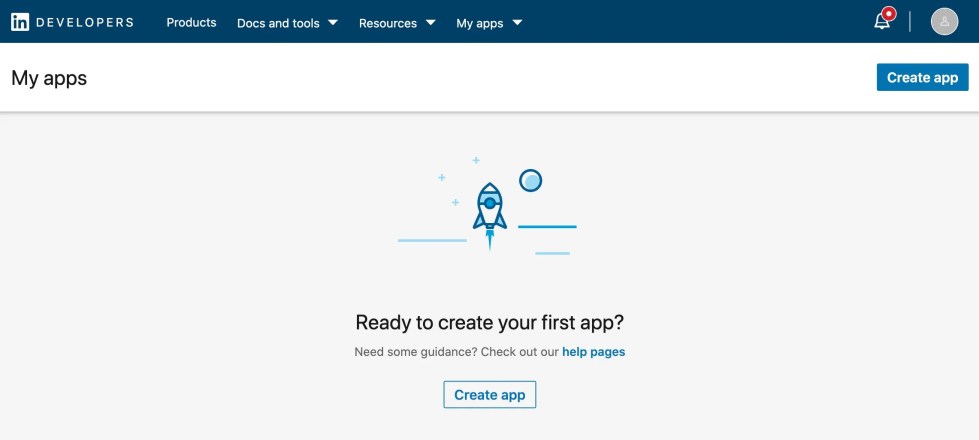
This document walks through the creation of apps for each social network that you can connect to WooCommerce Social Login. For all other information specific to the plugin, including settings, usage, and FAQs, please view the full user documentation. The plugin currently supports login with these platforms:
- WooCommerce Facebook Login
- WooCommerce X (Twitter) Login
- WooCommerce Google Login
- WooCommerce Amazon Login
- WooCommerce LinkedIn Login
- WooCommerce PayPal Login
- WooCommerce Disqus Login
Once you’ve set them up, you can enter credentials and adjust the settings for each under WooCommerce > Settings > Social Login by selecting the correct service. This guide will only walk through creating apps for each network.
If you use WP Engine for hosting or a caching plugin, you may receive authentication errors. Please follow the steps here to be sure that you do not encounter these issues.
Connecting Facebook
↑ Back to topIf your Facebook app was created after March 2018, you must enable Force SSL for all providers under WooCommerce > Settings > Social Login.
To connect your WooCommerce store to Facebook, log into your Facebook account. Go to developers.facebook.com while logged in and click on the “My Apps” option. If you haven’t created any apps before, you’ll see a “Create App” button or else, there will be a “Add a New App button”.
If you've never logged into developers.facebook.com before, you may see a "Get started" action in the top right instead. Use this to register and verify your account first.
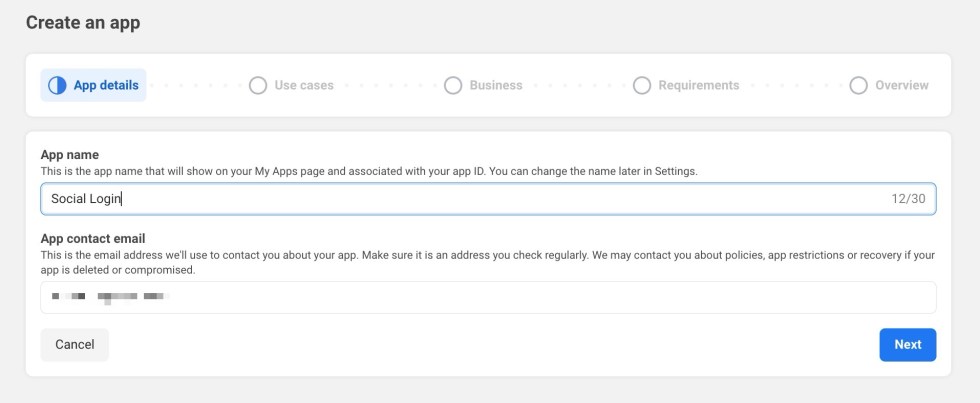
The following window will pop up. Give your App a name and make sure the email is correct:
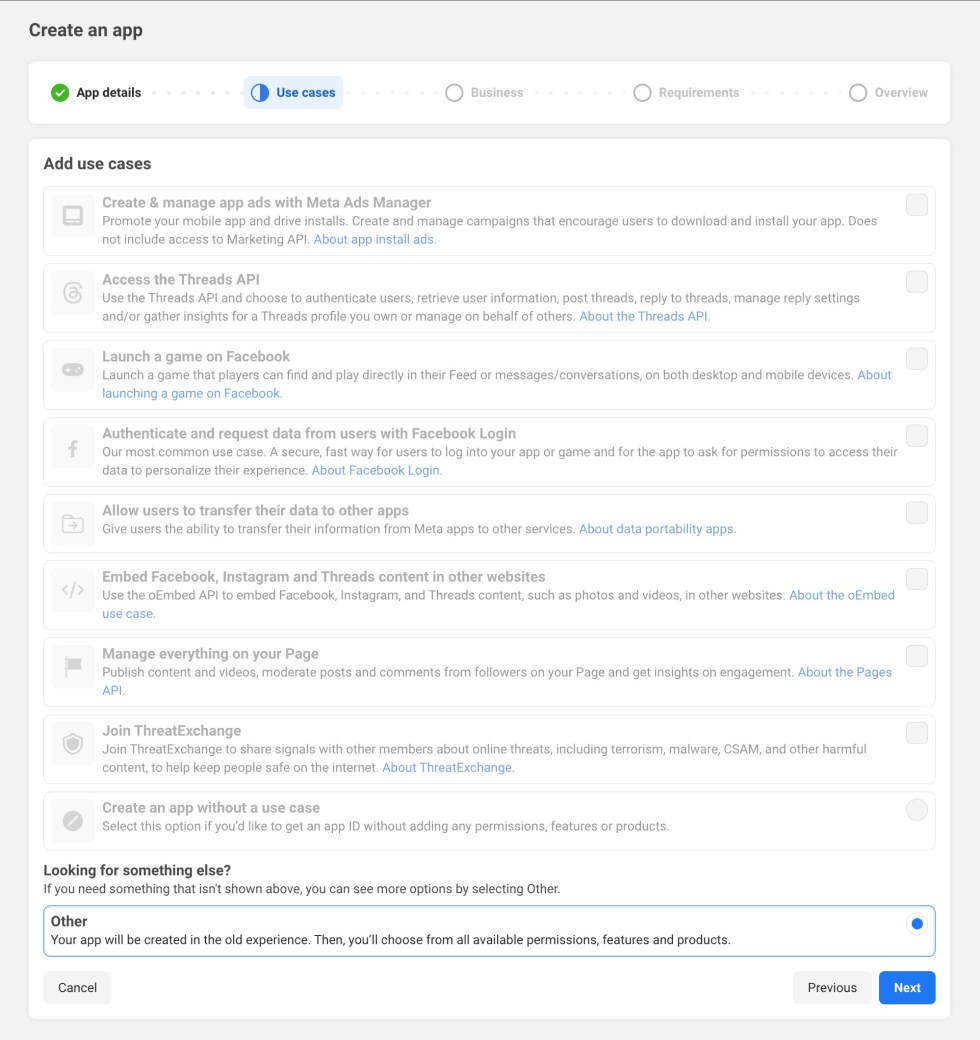
The next screen take you to “Use Cases.” You can use the “Other” option as this app will be used to integrate the Facebook Login option in your site and doesn’t necessarily fit any of the canned use cases.
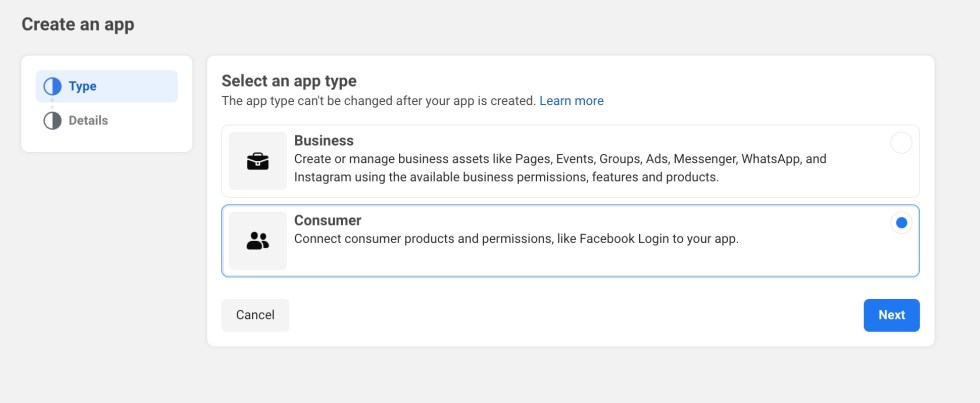
On the next screen select “Consumer“:
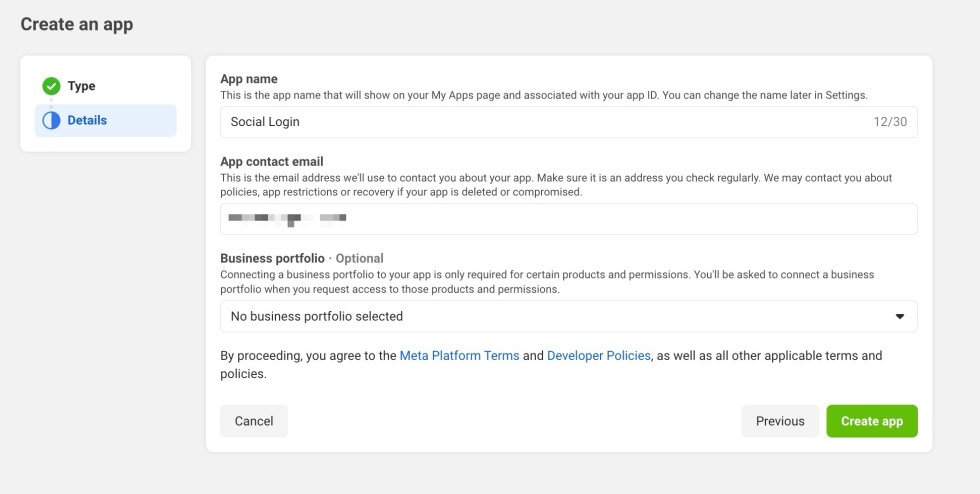
Click on Next to confirm the App Details you set up in Step 1 and add any additional information (You do not need to add a Business portfolio):
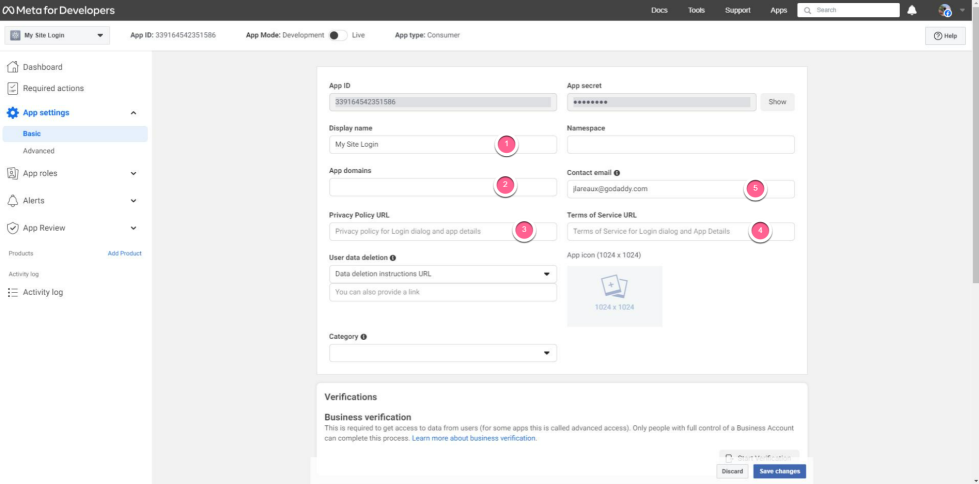
Next, go to App Settings > Basic. Enter a name for your app, the App domains, a Contact email, along with the Privacy Policy and Terms of Service URLs:
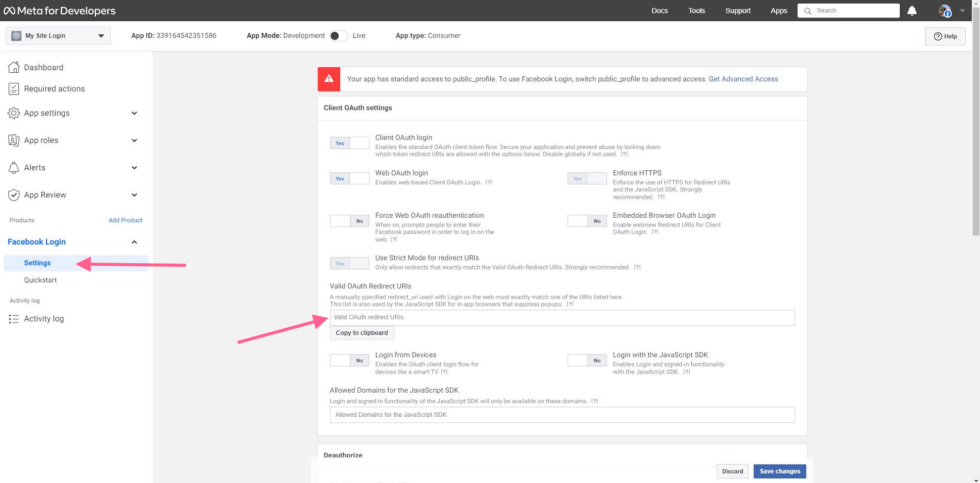
Then, go to Facebook Login > Settings and paste into the Valid OAuth redirect URIs the redirect URL. You can find this in the plugin settings (WooCommerce > Settings > Social Login > Facebook):
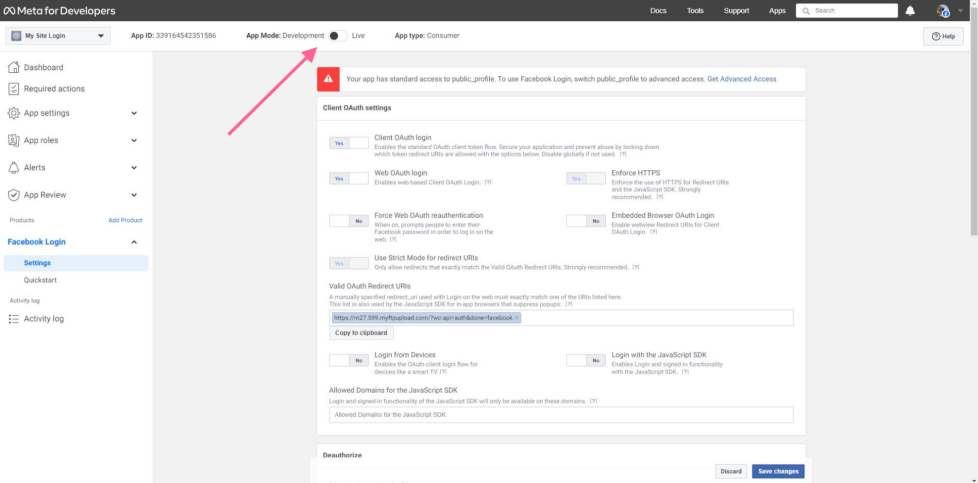
Last step! Click the switch at the top of the page to set your app live:
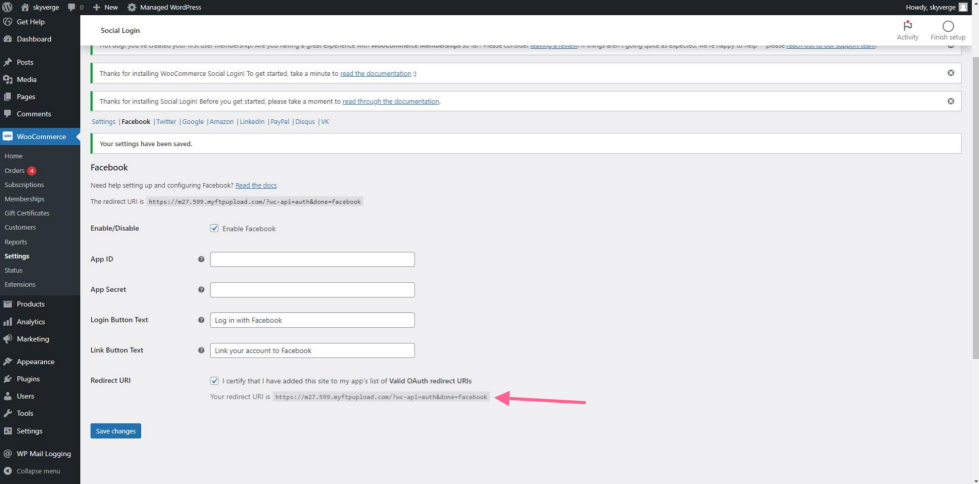
The setup is done! Now you can go back to to App Settings > Basic and grab your App ID and Secret. Enter them under WooCommerce > Settings > Social Login > Facebook. Before wrapping up, ensure that “Force SSL for all providers” is enabled under WooCommerce > Settings > Social Login as this setting is required by Facebook.
Connecting X (Twitter)
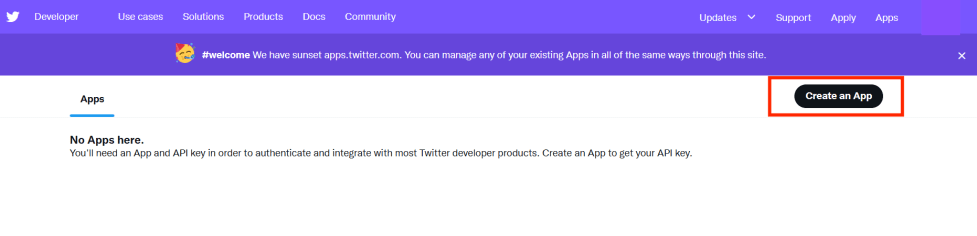
↑ Back to topTo connect your WooCommerce store to X (Twitter), you must create a free developer account and an X (Twitter) App. Log into X (Twitter), then go to developer.x.com/en/apps.
Click “Create App”:
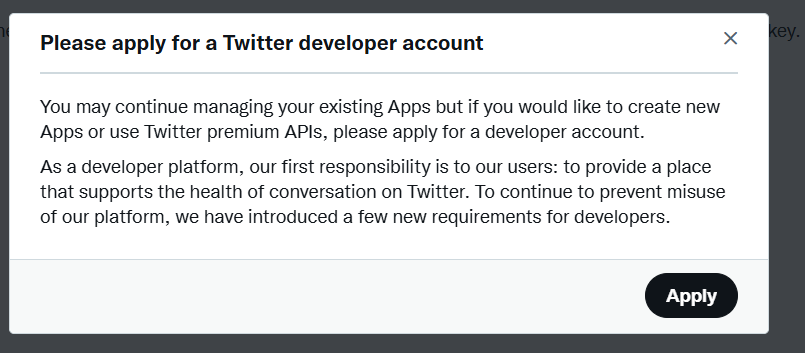
If you have not yet applied for a Developer account, you will then be prompted to create an account:
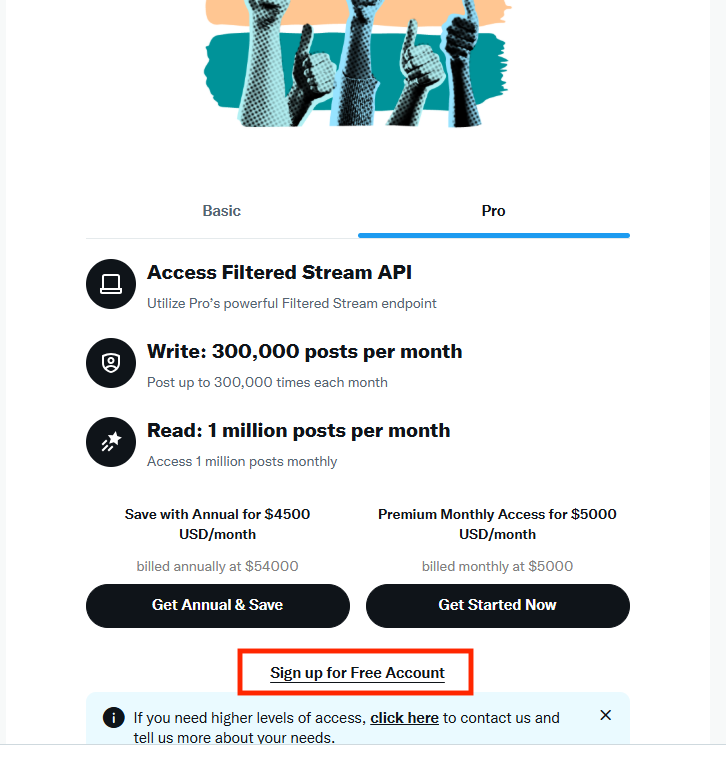
Click Apply, then on the next screen, select Sign up for a Free Account:
On the next popup, create a brief description of your use case similar to this one:

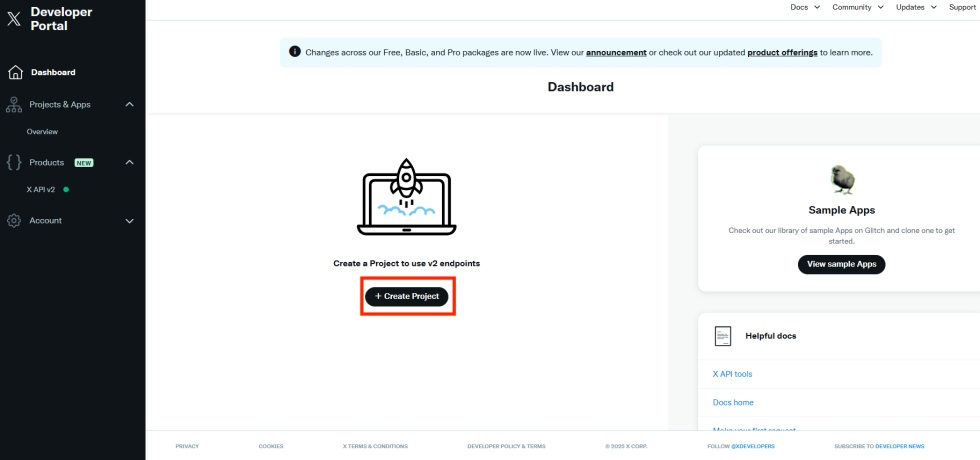
Hopefully, this will almost immediately be approved and send you to your Developer Portal, where you will click on “Create Project” to get started:
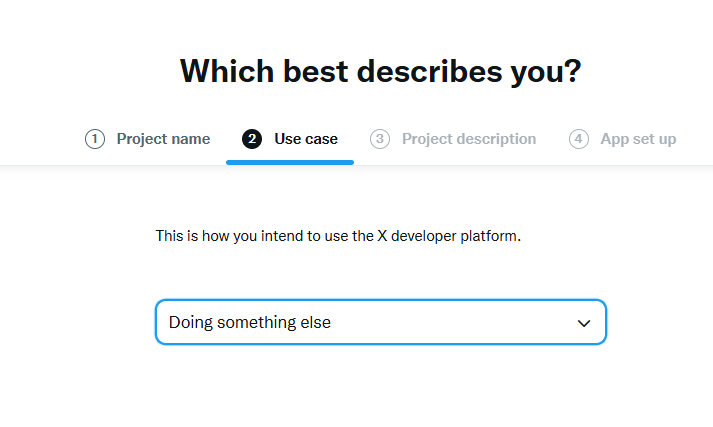
Name your project, click Next, then enter “Doing something else” for the Use case:

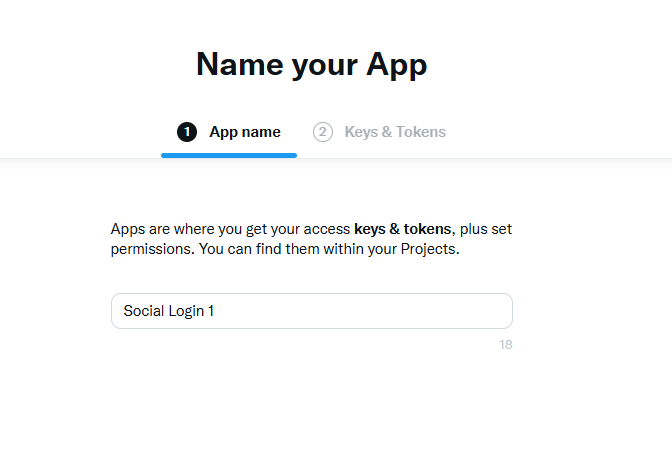
Add a project description, similar to the original developer use case but shorter, click Next, then under App Setup, name your App (cannot be same name as your project or any other apps):

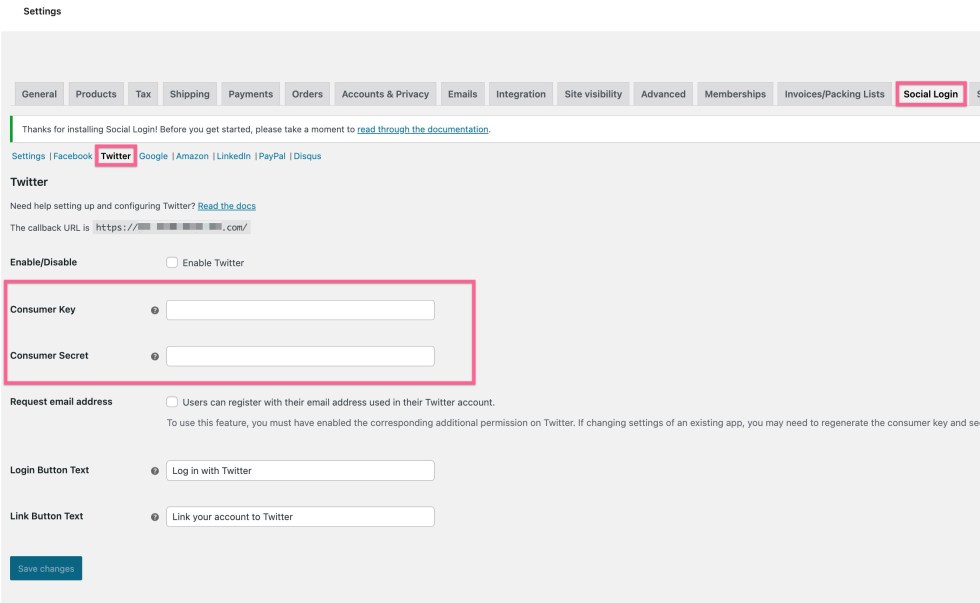
The next screen will supply you with your App Keys and Tokens that you will need to add to your website under WooCommerce > Settings > Social Login > Twitter.

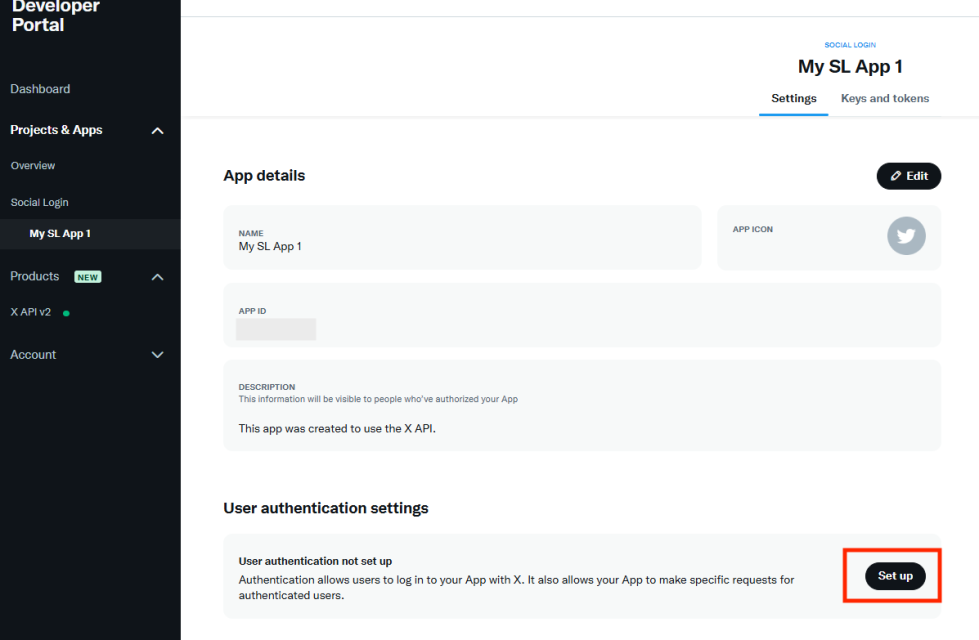
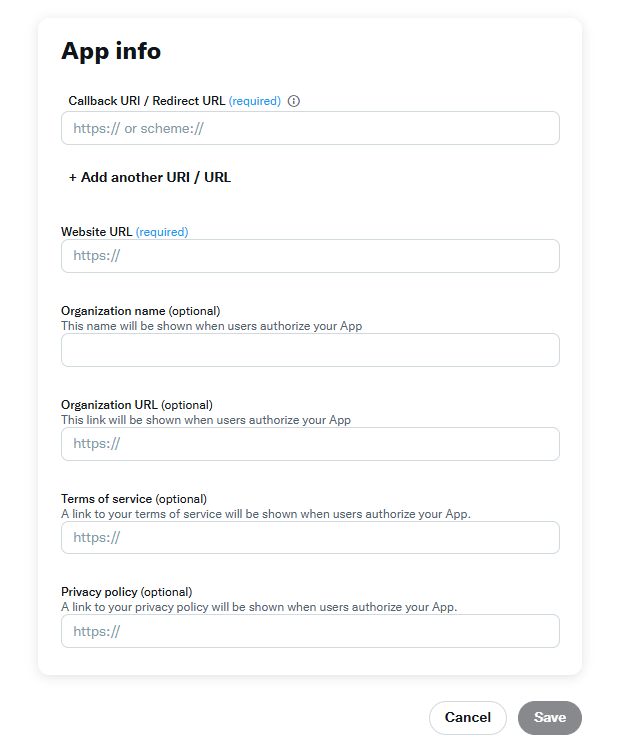
After clicking on the App Settings button, you will be viewing the App Overview screen. Click on Set Up to add the URL/URI information:
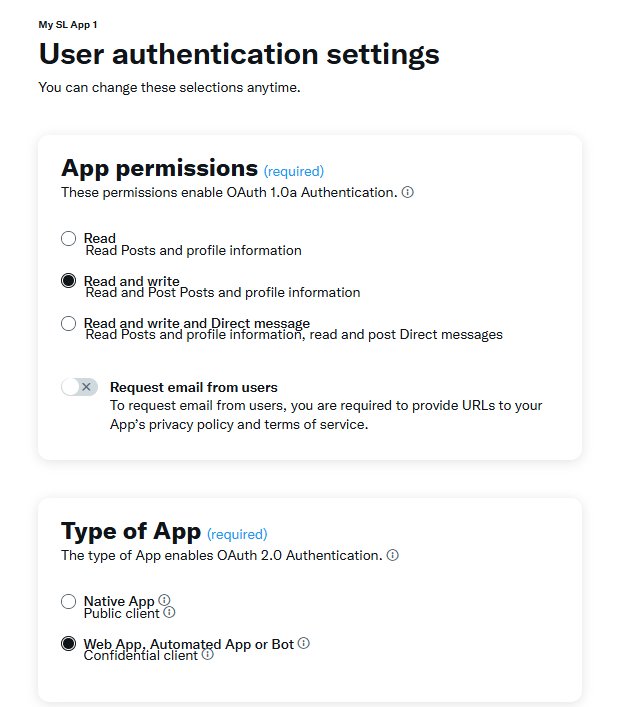
On the popup that appears, answer “Read and Write,” “Web App,” then scroll down and add your site’s URL and the Callback URI from the plugin settings:
The callback URL for Twitter is a bit of a weird one. There is an example listed under WooCommerce > Settings > Social Login > Twitter. It will probably look something like this:
https://MYSTORE.com/?wc-api=auth
BUT MAY BE DIFFERENT. Please refer to the plugin settings for this.
Finally, be sure to Enable the login in the website settings under WooCommerce > Settings > Social Login > Twitter.
Connecting Google
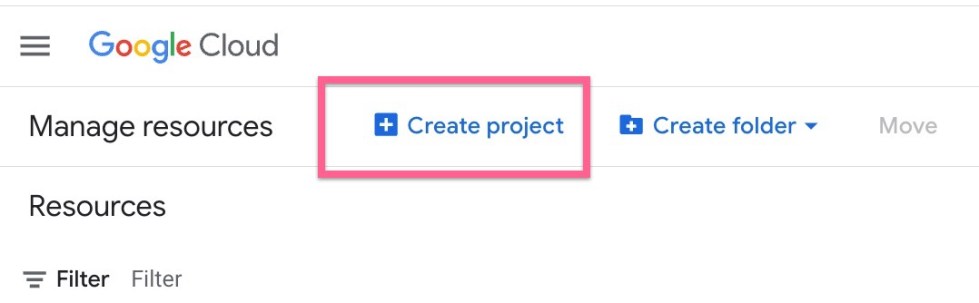
↑ Back to topTo connect your WooCommerce store to Google, log into your Google account. While logged in, navigate to https://console.cloud.google.com/cloud-resource-manager. Click “Create Project”:
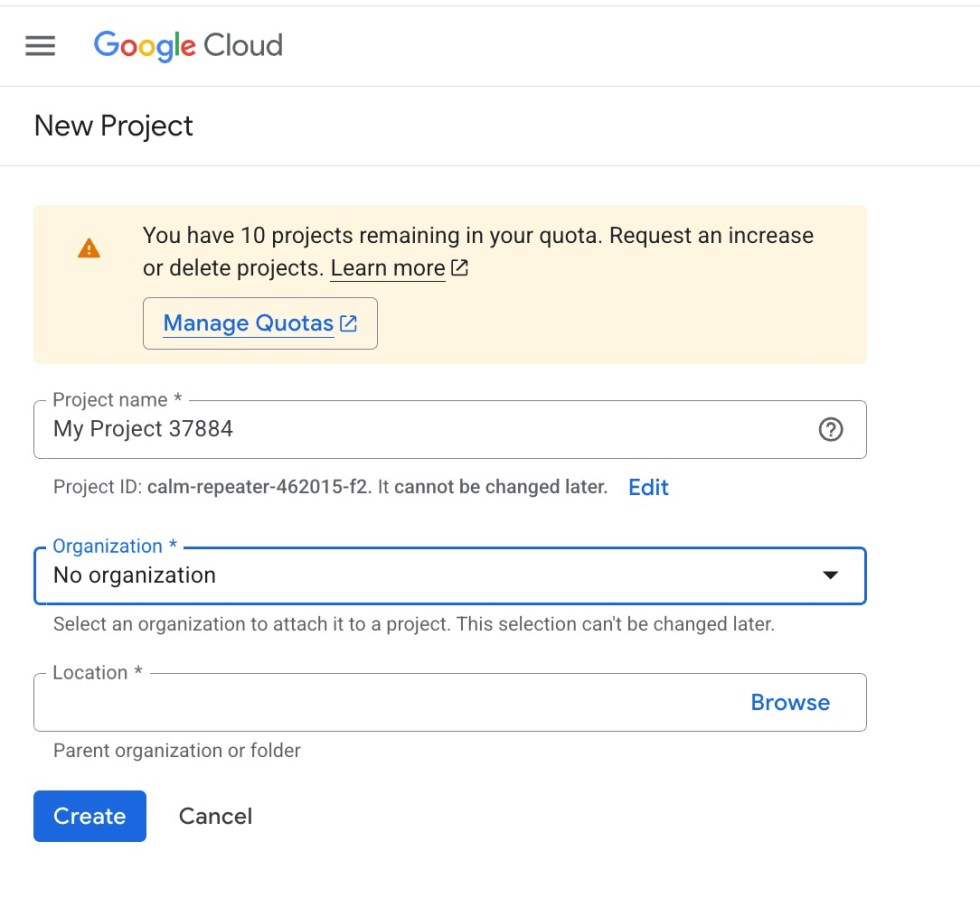
Enter your project’s name (this is shown to customers to approve the login) and click “Create”:
Wait a moment for Google to create your project, it may take a bit of time for the page to refresh. You will see a popup notification on the right side. To go to your new Project, click Select Project:

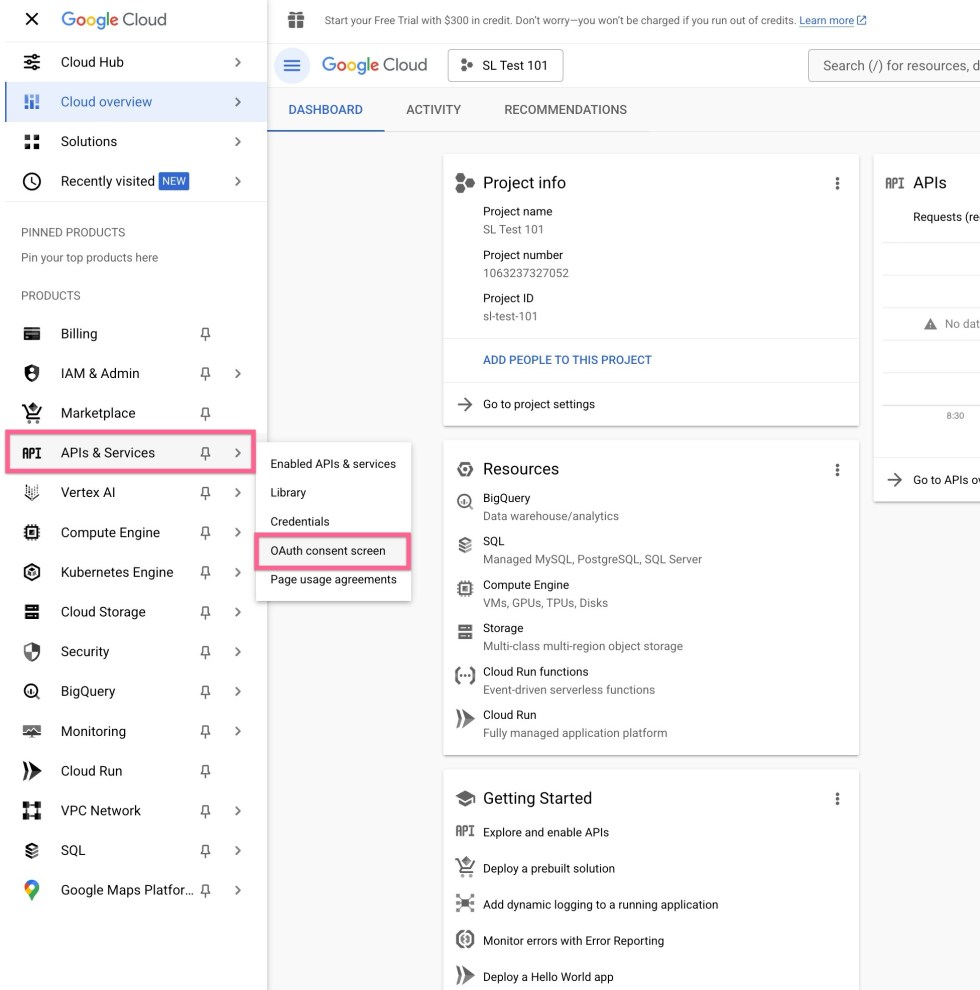
On the next screen, hover over “API & Services” on the left-hand side, then select “OAuth Consent Screen” from the pop-out menu.
On the next screen, select Get Started.

You will then walk through entering basic information in four steps:
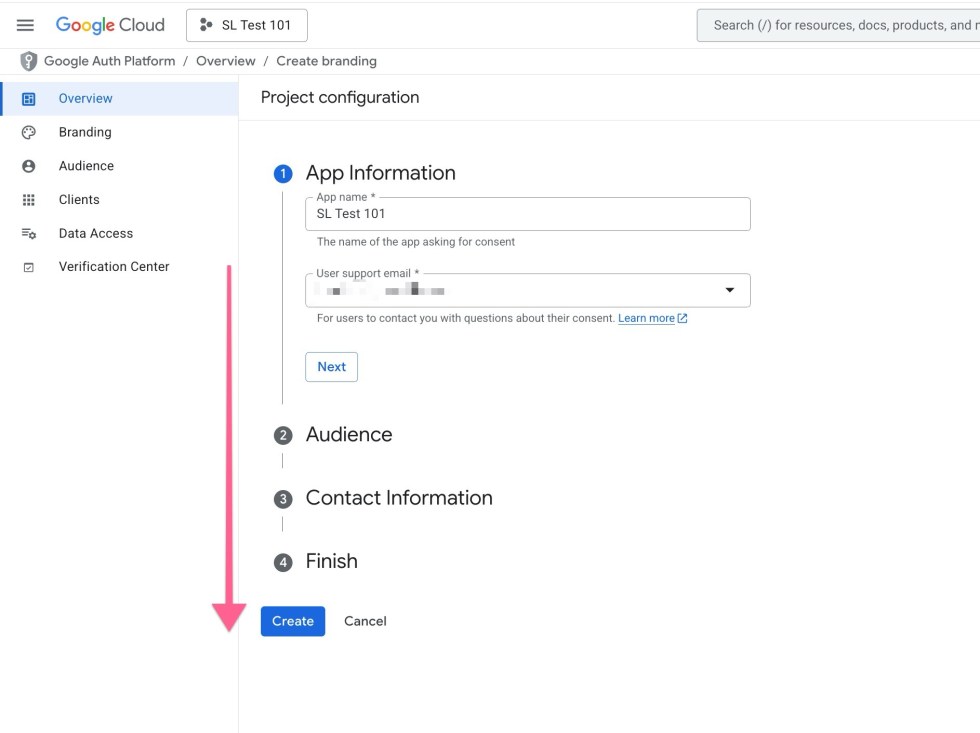
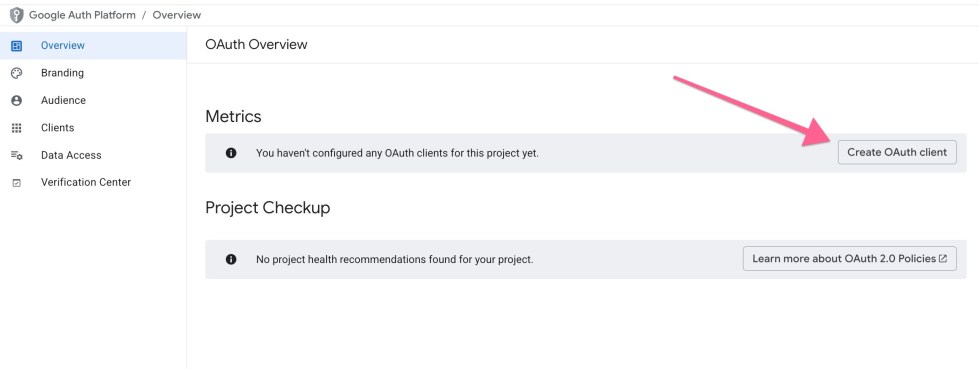
Click Create when you are done with those steps. On the next screen click on Create OAuth Client:
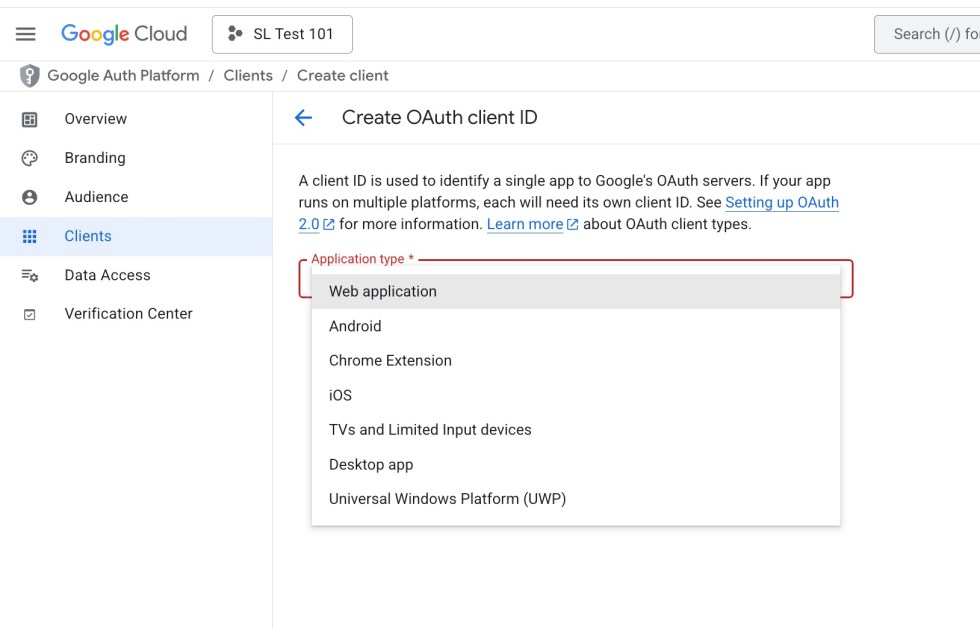
Choose “Web Application” for the Application type:
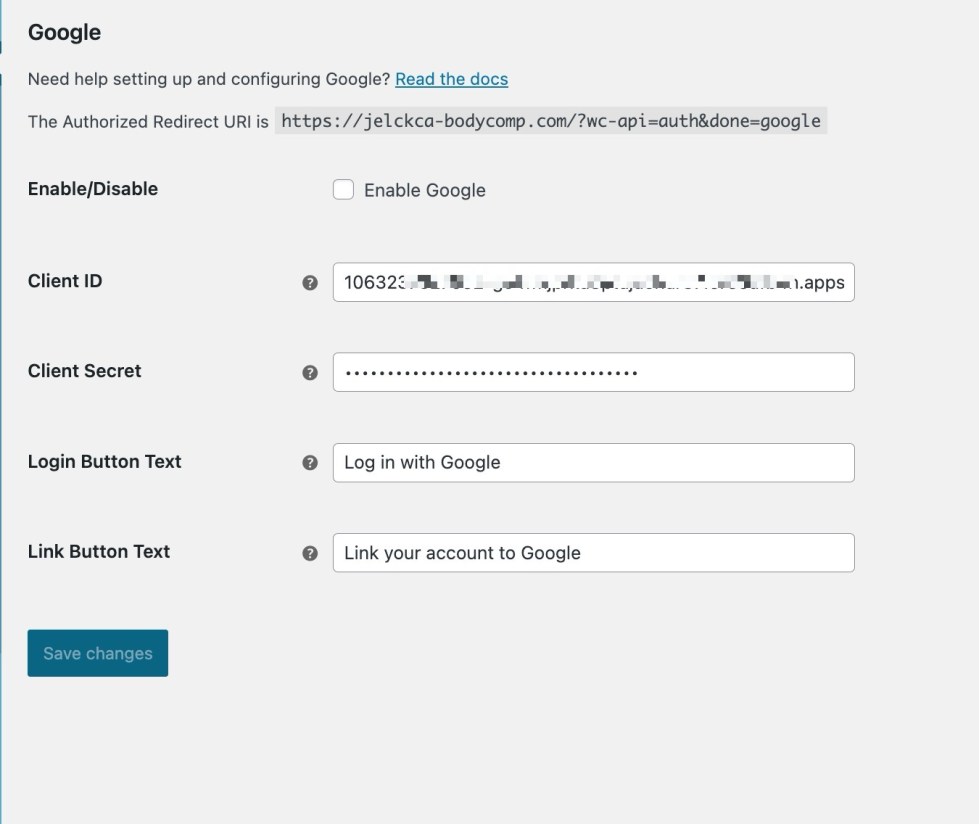
Under “Authorized Javascript Origins”, enter your site URL. The “Authorized Redirect URI” is listed under WooCommerce > Settings > Social Login > Google. It will probably look something like this:
https://MYSTORE.com/?wc-api=auth&done=google
BUT MAY BE DIFFERENT. Please refer to the plugin settings for this.
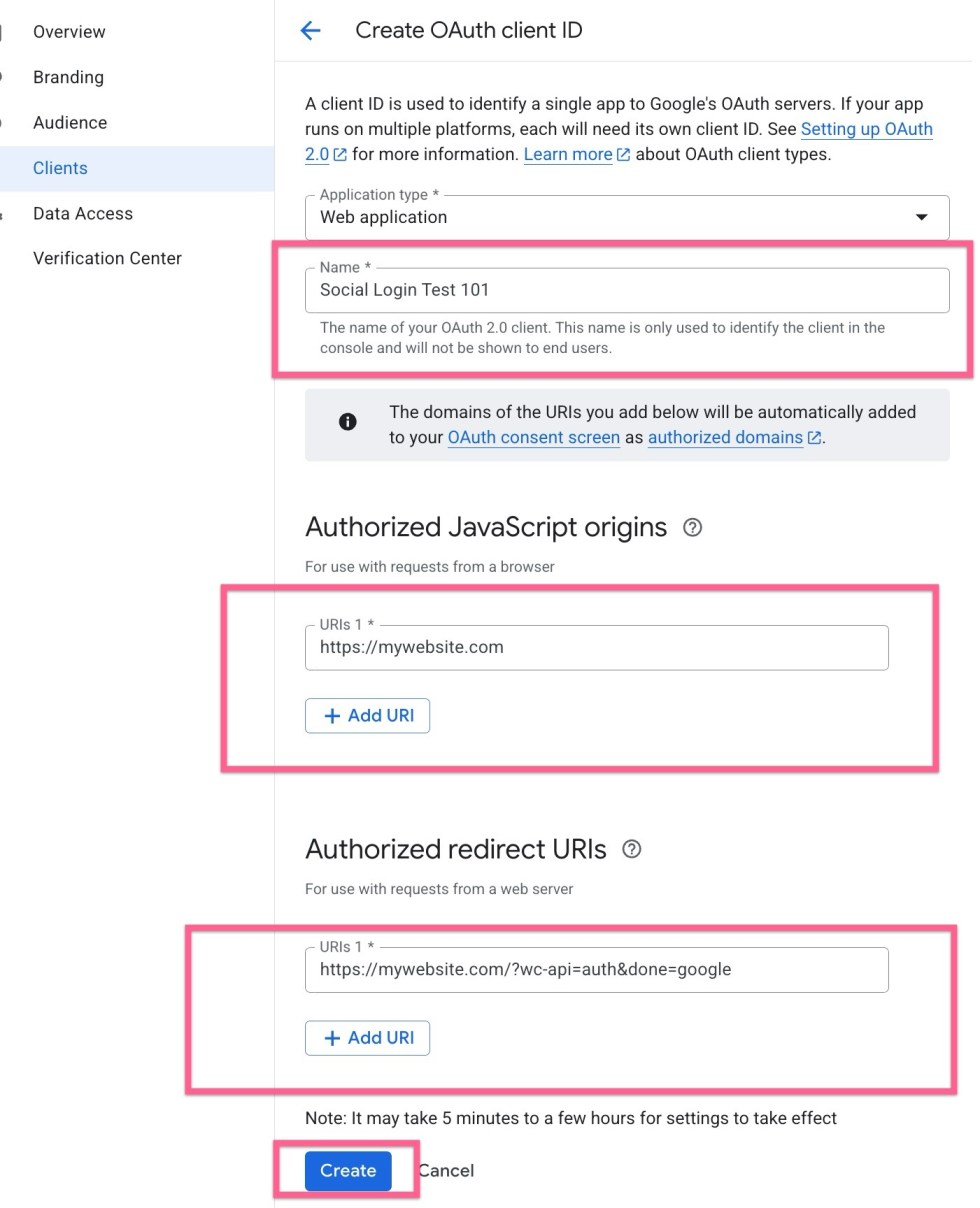
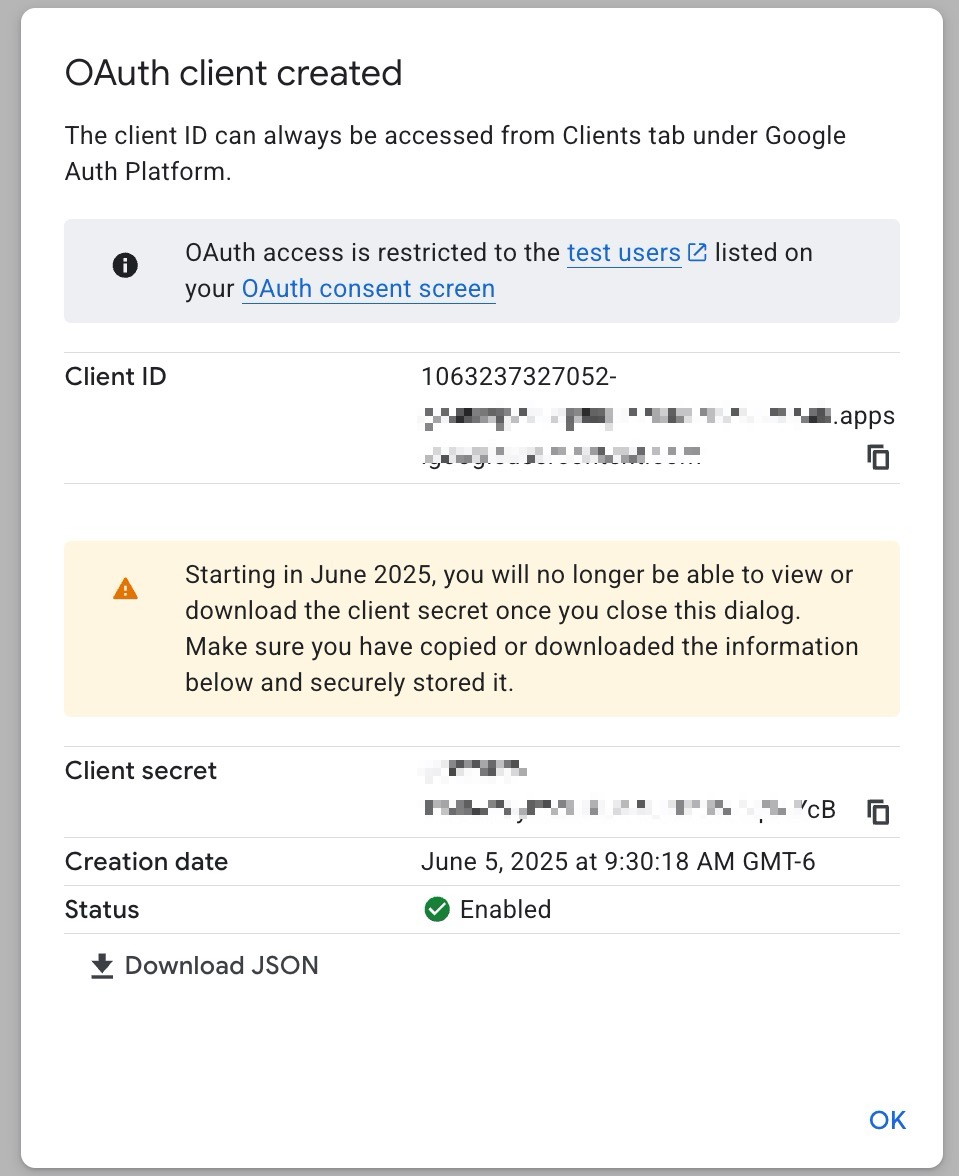
Click “Create” to save this setup and generate your credentials. You can copy these credentials and save them under WooCommerce > Settings > Social Login > Google.
Connecting Amazon
↑ Back to topPlease be sure to read these directions carefully. Amazon does not make this setup easy, unfortunately. You must Force SSL under WooCommerce > Settings > Payments.
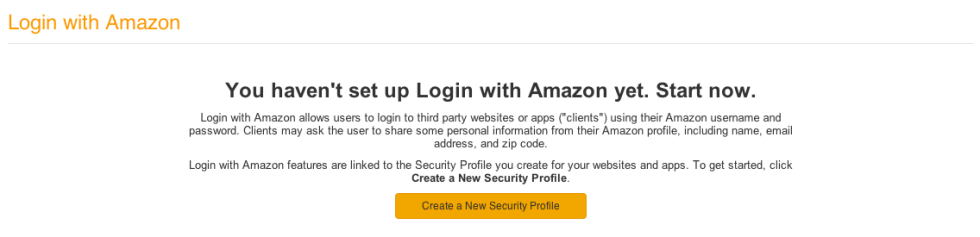
To connect your WooCommerce store to Login with Amazon, you’ll need to log into your own Amazon account. If you don’t already have a developer account set up, you’ll need to register for a Developer account using your existing Amazon account or a new one. If you’re creating a new Amazon account, go through the registration process and select that you won’t be monetizing your app. When Amazon asks you for tax information, you can click “Ask Me Later”, as you won’t be listing this as an Amazon app and only using Login functionality. Once you’re logged into or registered for your developer account, follow these steps to create a security profile for your app.
- Go to Login With Amazon (click this link, or go to “Apps & Services”, then “Login with Amazon”). Click “Create a New Security Profile”:
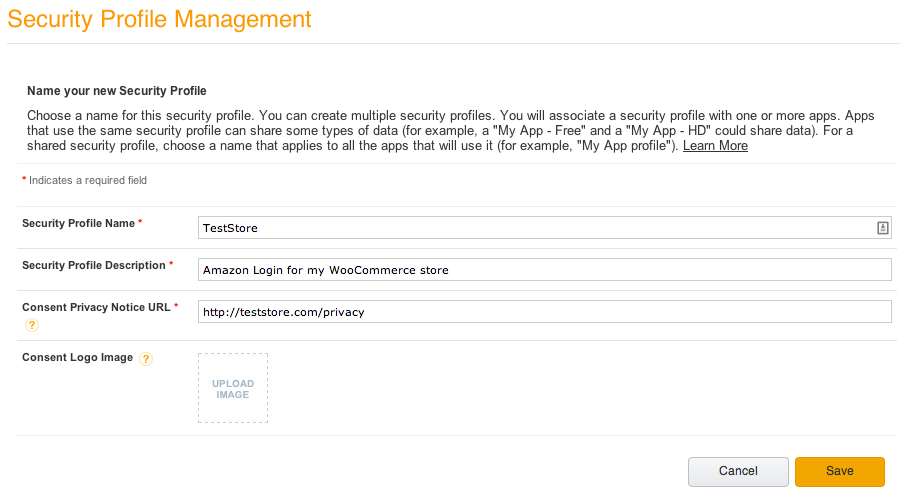
- Enter your store’s information and privacy policy URL:
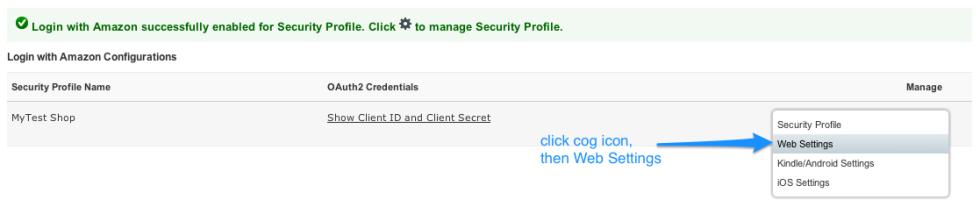
Once your profile has been created, go to Settings > Web Settings in the bottom right (the cog icon):
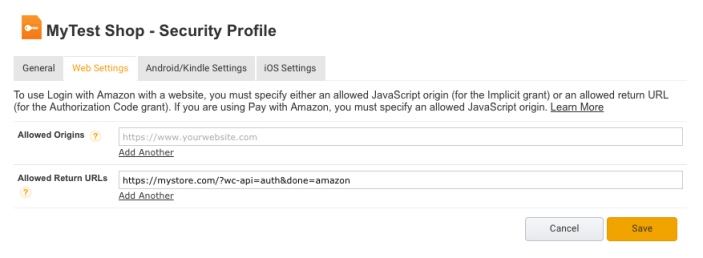
From here, click “Edit” to set the Allowed Return URL. The Allowed Return URL is listed under WooCommerce > Settings > Social Login > Amazon. It will probably look something like this:
https://MYSTORE.com/?wc-api=auth&done=amazon
BUT MAY BE DIFFERENT. Please refer to the plugin settings for this. Note that the URL MUST be https://.
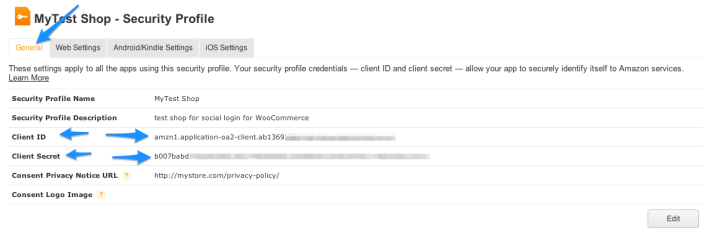
Click “Save”, and go to the “General Tab”. This page will have your Client ID and Secret credentials so you can enter them at WooCommerce > Settings > Social Login > Amazon.
Connecting LinkedIn
↑ Back to topTo connect your WooCommerce store to LinkedIn, visit the LinkedIn Developer Portal and log in with your LinkedIn credentials. You’ll be taken to the developer center where you can click Create App.
Fill out the application form with your store’s information. If you don’t have a Linkedin Page for your organization, you’ll need to create one to associate it with your app.
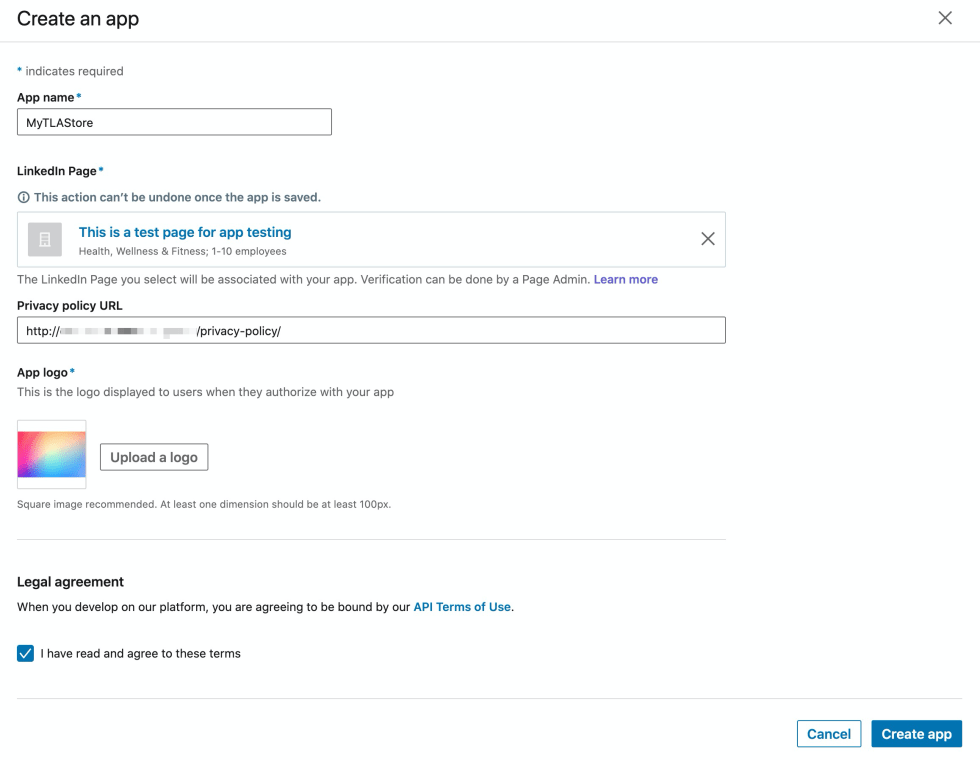
If you run into the error: "Please input a valid LinkedIn Page URL or type to search by company". Try using your Page URL with an /about/ suffix.
For example: https://www.linkedin.com/company/MYSTORE/about/
You’ll now see your application’s page and settings. Make sure your app is verified before continuing.

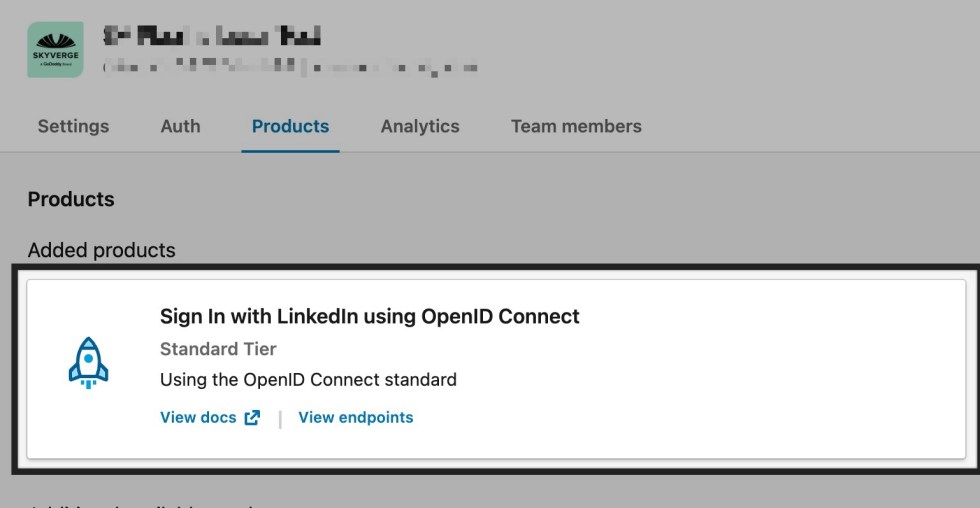
Then navigate to the Products page, find the Sign In with LinkedIn using OpenID Connect product and select Request access. This will add the necessary permissions for your app to use social login. The request to add these products should process immediately, though it may take a few minutes for changes to appear in your app as LinkedIn reviews the request.
While your request to add the products is being reviewed by LinkedIn, in your WooCommerce admin, go to WooCommerce > Settings > Social Login > LinkedIn and copy the OAuth 2.0 Redirect URL that’s listed. It will probably look something like this:
http://MYSTORE.com/?wc-api=auth&done=linkedin
BUT MAY BE DIFFERENT. Please refer to the plugin settings for this. In your LinkedIn app settings, paste the URL into Auth > Authorized redirect URL for your app.
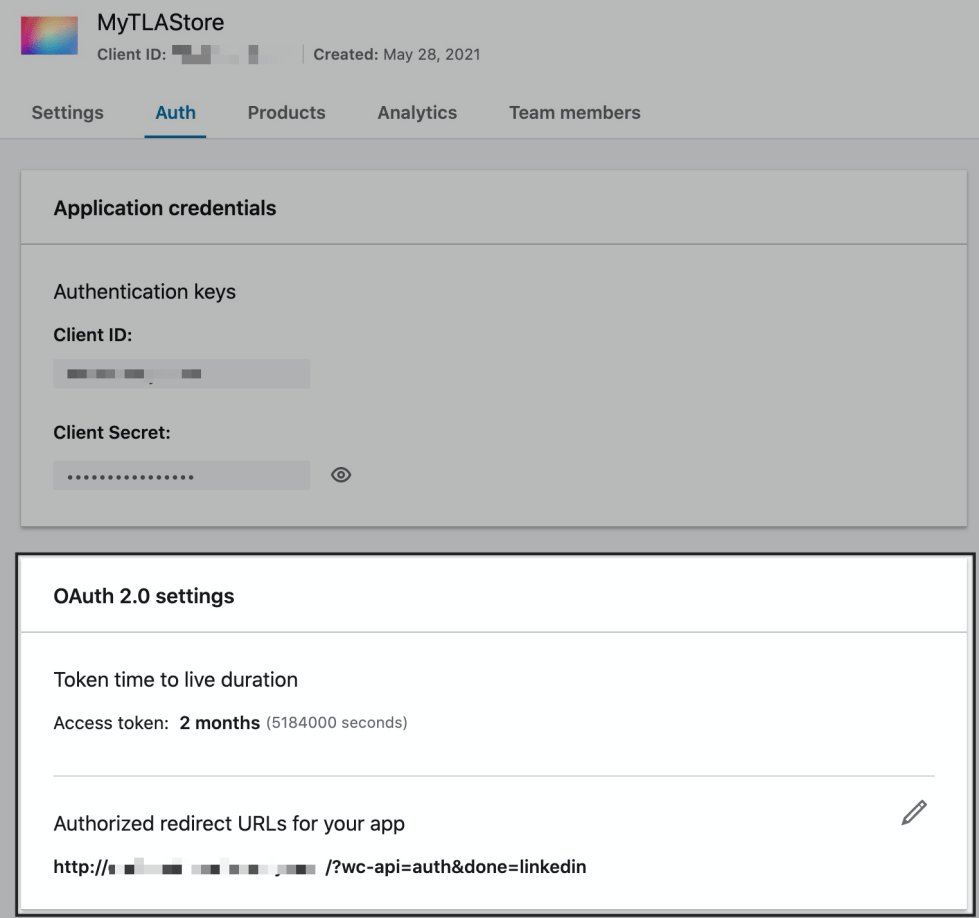
Save these changes, and copy the API credentials provided in your LinkedIn app’s page at Auth > Application credentials.

Copy the Client ID and Client Secret and paste into the plugin’s settings on WooCommerce at WooCommerce > Settings > Social Login > LinkedIn and save your changes.

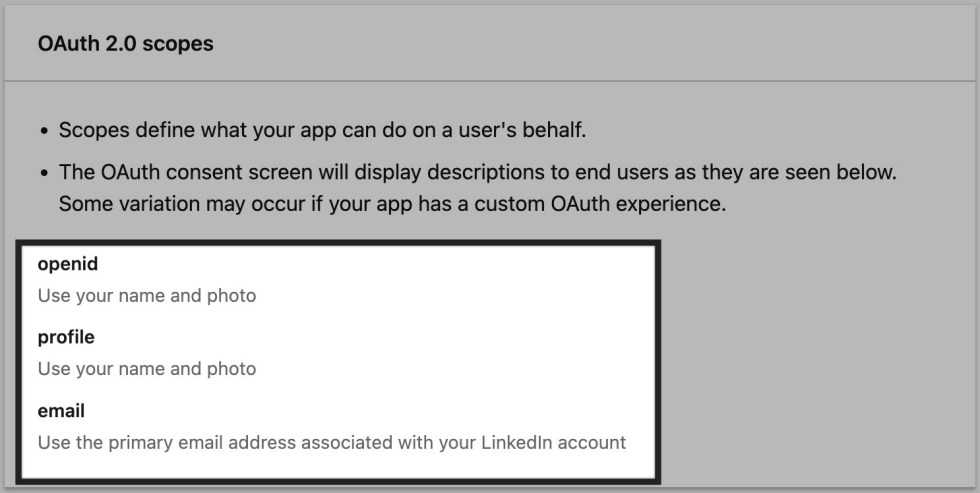
Lastly, go back to the Auth page of your LinkedIn App and scroll down to the OAuth 2.0 scopes section. Make sure that you have all three scopes listed for the LinkedIn social login to be successful: openid, profile, email.
Customers should now be able to log into your shop using Linkedin!
Connecting PayPal
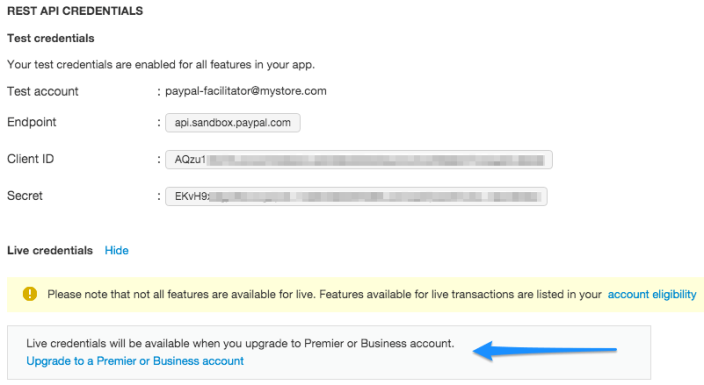
↑ Back to topPlease note that you can't have a "live" PayPal app using a personal PayPal account. To obtain live PayPal credentials, you must have a verified Premier or verified Business PayPal account (these accounts are free to signup).
If you do not have a business account, you won’t be able to access live credentials:
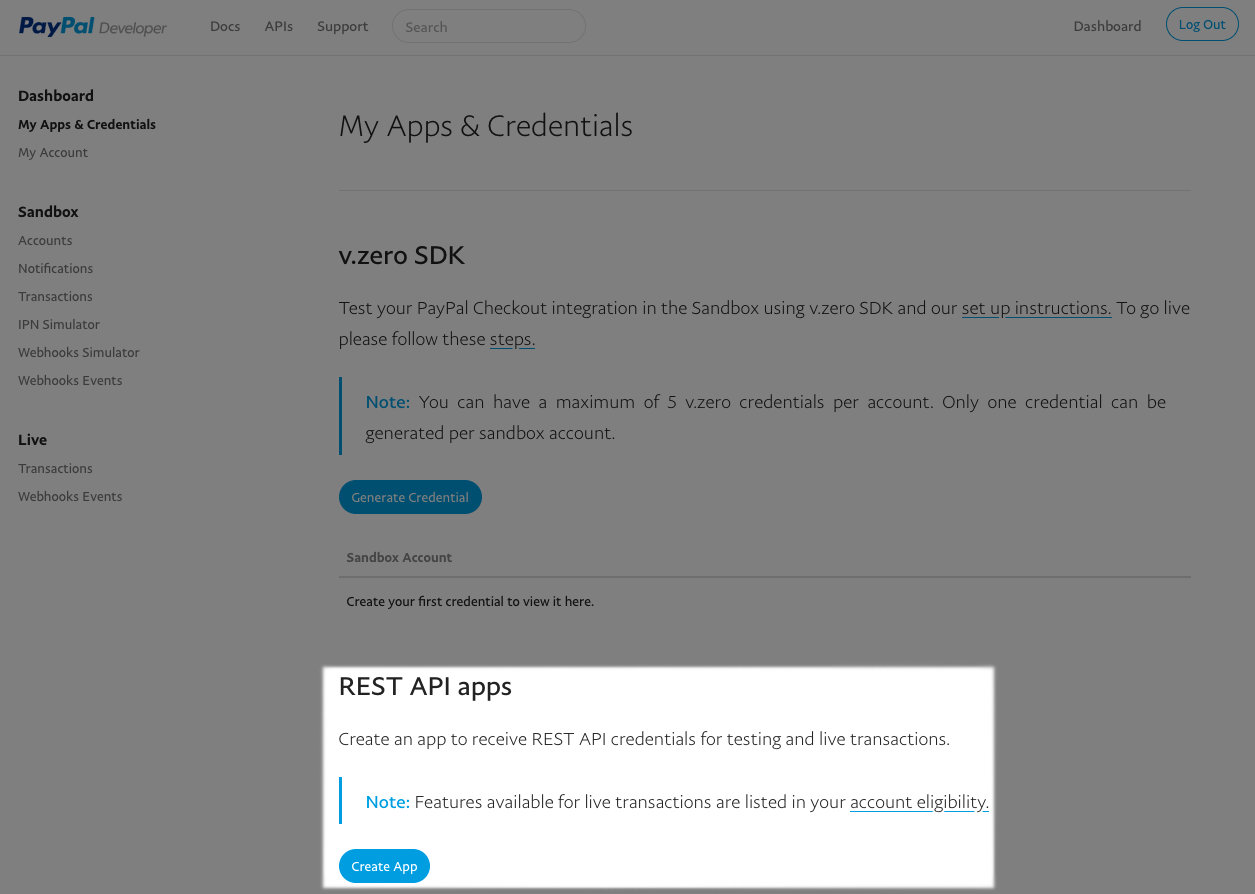
To connect your WooCommerce store to PayPal, visit the PayPal Developer Center and log in using your PayPal account credentials. If you don’t already have a developer account, this will generate one for you. Under REST API apps, click the “Create App” button.
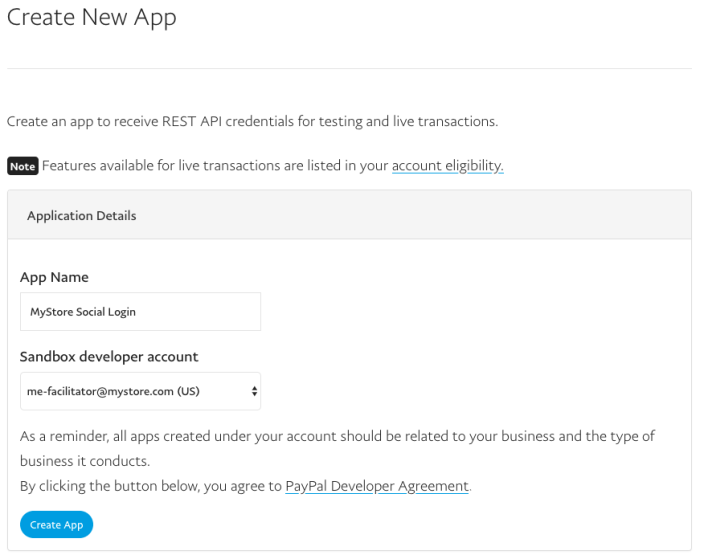
You can then enter a name for your app and click “Create App” again.
This will take you to the settings page for your new PayPal App. The first thing you should do is click “Live” in the top right to generate a live social login connection (if you want to only test this with Sandbox accounts, you can duplicate this with sandbox credentials as well). Now scroll down to the “Live App Settings” section. There are a few settings we’ll need to adjust here.
Note: PayPal recently modified their app permissions to require a special request in order to access details that Social Login requires in order to create an account on behalf of the customer. Our development team is currently investigating alternatives, but for the time being it will be necessary to reach out to PayPal at help-loginappreview@paypal.com to request special permission for your app.
- Under Return URLs, enter the App Redirect URL. The App Redirect URL is listed under WooCommerce > Settings > Social Login > PayPal. It will probably look something like this:
http://MYSTORE.com/?wc-api=auth&done=paypal
BUT MAY BE DIFFERENT. Please refer to the plugin settings for this. You can use the same redirect URL for both live and sandbox PayPal apps.
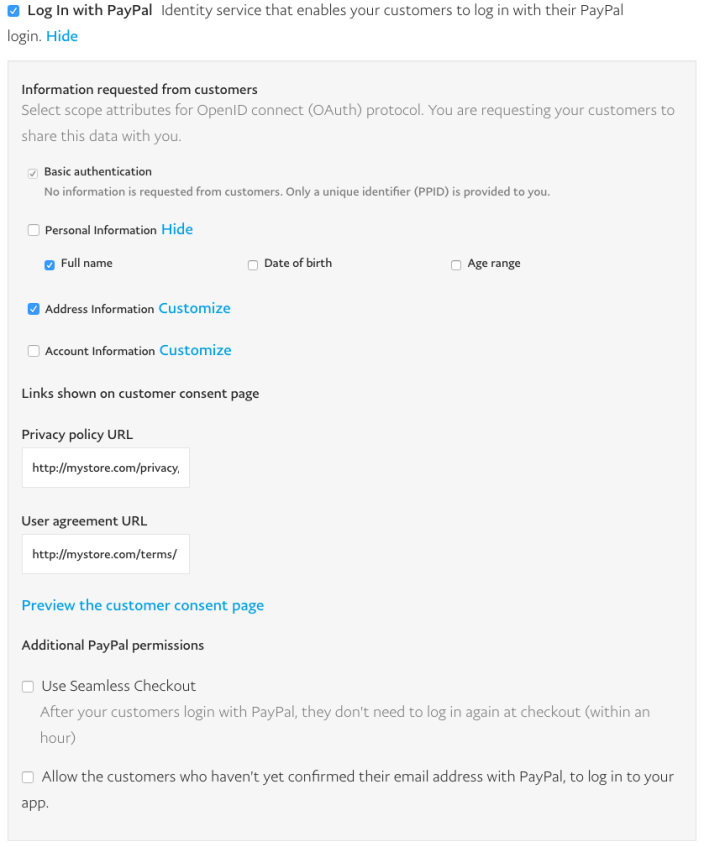
- Under App feature options, only enable “Log in with PayPal”, and disable other features.

- Under “Log In with PayPal”, we need to click “advanced options” and change a few settings:
- Click “customize” for “Personal Information” and only enable “Full Name”
- Enable “Address Information”
- Click “customize” for links shown to the customer, and enter the links to your Privacy Policy and Terms & Conditions pages
- This is highly recommended but not required: uncheck / disable “Allow the customers who haven’t yet confirmed their email address with PayPal, to log in to your app.”
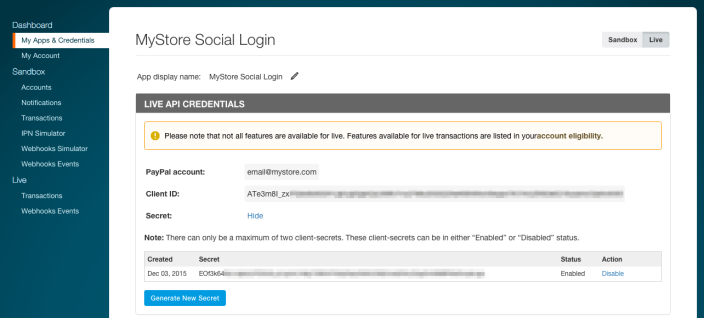
Click “Save” and confirm the changes you’ve made. Now we can copy API credentials to over to the plugin settings. At the top of the page, scroll up to “Live API Credentials”. Copy the Client ID and Secret (you may have to click “Show”), then enter them under WooCommerce > Settings > Social Login > PayPal and save your settings.
Connecting Disqus
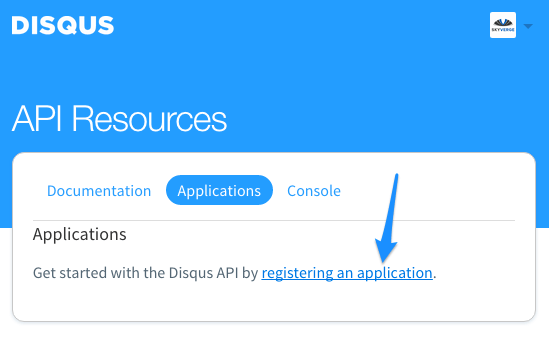
↑ Back to topTo connect your WooCommerce store to Disqus, you must register a Disqus application. Go to Disqus API Resources / Applications and sign in. Click on “register an application” under the “Applications” tab.
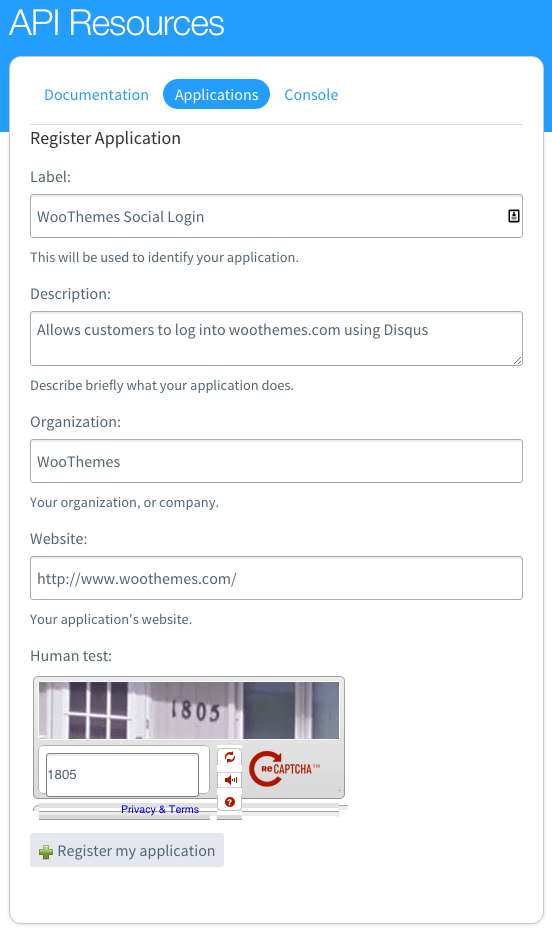
Complete the fields to register your application by entering a label for your application (for your reference), the description of what your application does, your business name, and your website. When you’ve entered these details, click “Register my application”.
While editing your application under Application > Settings, you must now change two settings:
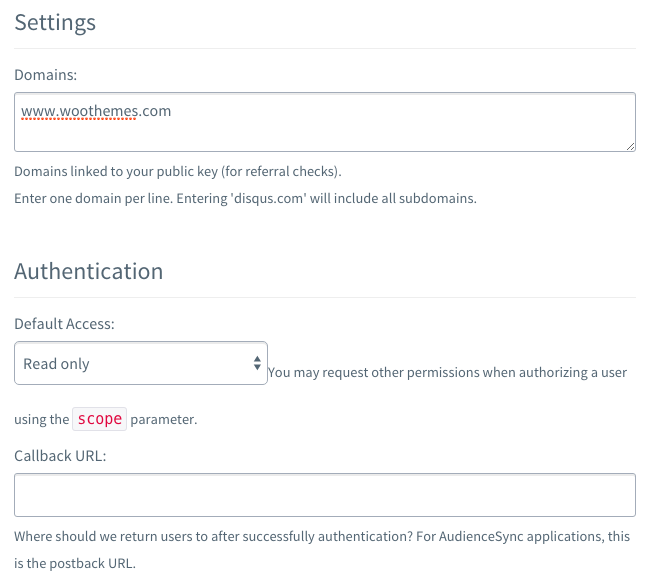
- In the “Domains” field, enter the URL of your WooCommerce site / store.
- Under “Authentication”, change “Default access” to “Read only.”
- Optional: If you want to show your logo to visitors when they authorize your site to use Disqus log in, you can set your icon here as well. Any other settings here can be completed, but are not required.
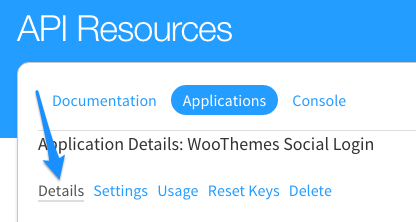
Save your settings, and go to Application > Details.
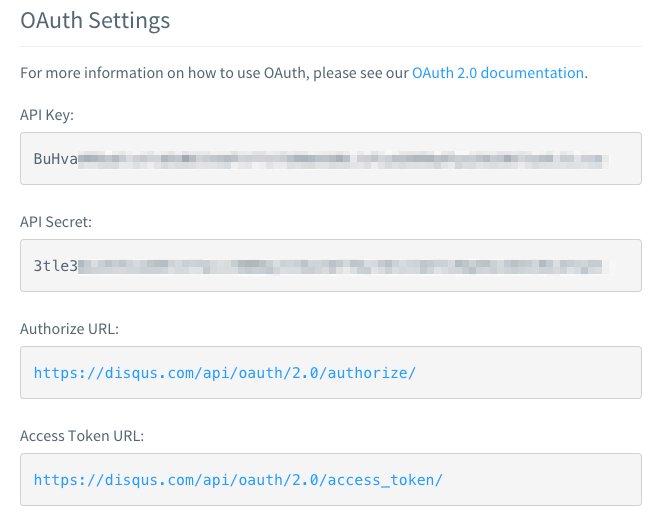
Scroll down to “OAuth” settings. Copy your API Key and API Secret, and paste these into the plugin settings.
Once you’ve saved the plugin settings, Disqus login will now be enabled.
Setup FAQ
↑ Back to topQ: Does Social Login support VKontakte?
A: As of May, 2025, Social Login no longer supports VKontakte (VK) integration. Over time, supporting VK has become increasingly difficult due to ongoing platform changes, and it was seldom used by the majority of our customers. If you’d like to continue offering this login option on your site, you may want to integrate with VK directly using their Low Code integration for Web applications. Otherwise we recommend setting up another provider to let your customers log in via social platforms.
Q: Does Social Login support Instagram?
A: No, Instagram does not support social login as of June 2020, when the Instagram API that we use to support login was fully deprecated. Unfortunately, the new API does not support login, so we won’t be able to support Instagram login going forward.
Q: Facebook is requiring other fields and I’m getting some weird errors.
A: Sometimes Facebook creates the app incorrectly. Please ensure that you’ve added a Platform under settings. If you have, delete the app and begin again, and this should resolve what you’re seeing.
Q: Why can’t I get the Amazon login to work?
A: You must have an SSL on your site, or this won’t work, as it’s required by Amazon. The Amazon setup is a bit involved, so please be sure that you’ve followed all steps for registering your security profile. Not going through this process is the most common issue we see with Amazon setup.
Q: What information is accessible for each network?
A: We have a chart that displays info received from each network. The plugin doesn’t send data from users or your store anywhere external since you’re creating and managing your own app.
Q: I get an error when trying to use PayPal login that says, “Relying Party Validation error: client_id provided in the request does not match any of the registered clients. Please check the request.”
A: This is most likely because you’re using a PayPal personal account. Please sign up for a free PayPal business account as described in the PayPal section and you’ll be able to obtain live PayPal credentials.
User Documentation
↑ Back to topNow that you’ve created your social network apps, you can visit the user documentation to finish setup.