Introducing EasySell Theme
↑ Back to topEasySell is the all-in-one solution for any category of e-commerce website you want to publish online.
Give your shop an extra boost with EasySell fast and easily! The EasySell theme is a WooCommerce block theme for all e-commerce websites, such as fashion and apparel, electronics and gadgets, home and furniture, health and beauty, food, jewelry, etc. Your website could be a simple shoe store or a big store with apparel, gadgets, food/beauty products.
Before diving in, preview the demo site created using the EasySell theme to see the full potential and what you can achieve:
See EasySell theme in Action
1. EasySell Multipurpose demo site: https://artifydemos.com/easysell
2. EasySell Fashion demo site: https://artifydemos.com/easysell-fashion/
This documentation will guide you through everything you need to understand about using the EasySell theme. We’ll cover getting started, exploring various customization options, and growing your online store.
Here, we’ll help you with the EasySell theme through a step-by-step guide, FAQs, slideshows with relevant screenshots, video tutorials, and useful resource links.
This documentation page is the definitive source of information for all EasySell-related queries.
Additionally, you can check out our YouTube Channel for Video Guides:
https://www.youtube.com/@ArtifyWeb/videos
Let’s get started!
If you haven’t already purchased the EasySell theme, that’s the first step to getting started! You can find more information about buying the theme below:
Watch Video Tutorials
↑ Back to topYouTube Playlist for EasySell Theme Video Guides
Purchase EasySell Theme
↑ Back to topReady to create your stunning online store? Click the big Buy now button at the bottom of this page to get started!
Need Help Before You Buy? Get Pre-Sales Support
Our friendly support team is happy to answer any inquiries you wish to discuss before purchasing the EasySell theme. Here’s how to reach us:
- Visit the WooCommerce Contact Support Page
- If you’re not logged in, follow the on-screen instructions to create a new WooCommerce account or log in to your existing account.
- On the support page, scroll down until you find the “Submit a request” section.
- From the “What do you need help with?” dropdown, choose Presales
- Type “easysell” in the field labeled Product to specify the theme.
- Submit the form after filling out the remaining fields.
Installation
↑ Back to topThe EasySell theme and WooCommerce plugin are prerequisites for your e-commerce website. Once you purchase the EasySell theme, follow the steps below to install the required theme and plugin on your WordPress website.
Download EasySell Theme Zip
↑ Back to top- Begin by logging in to your WooCommerce.com account
- Once logged in, navigate to the Downloads section
- Locate the EasySell theme from the products list and click the Download link. This will download a compressed file named easysell.zip to your computer
Install EasySell Theme to WordPress
↑ Back to top- Log in to your WordPress dashboard
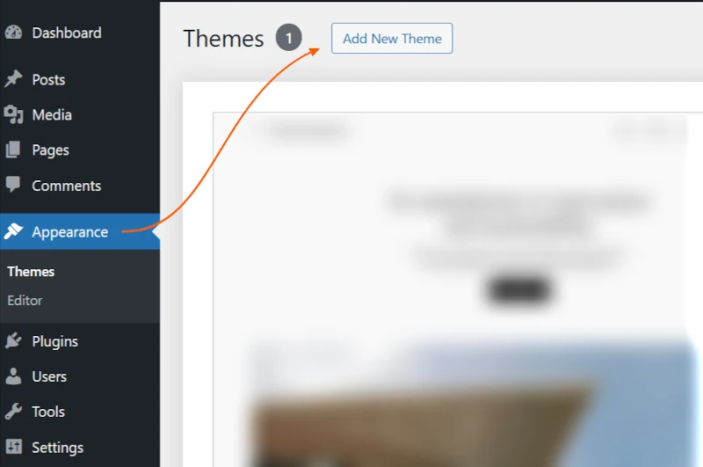
- From the left menu bar, hover over the Appearance
- Within Appearance, click on the Themes
- On the themes page, click the Add New button.
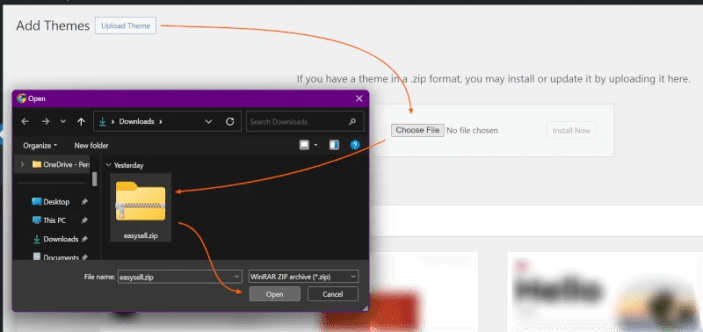
- You’ll see a theme upload option. Click on the Upload Theme button.
- In the upload window, select the easysell.zip file you downloaded earlier from your computer.
- Once selected, click the Install Now button.
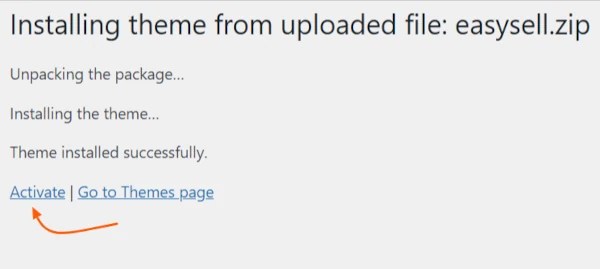
- After installation, WordPress will redirect you to a theme activation page.
- On this page, click the Activate link.
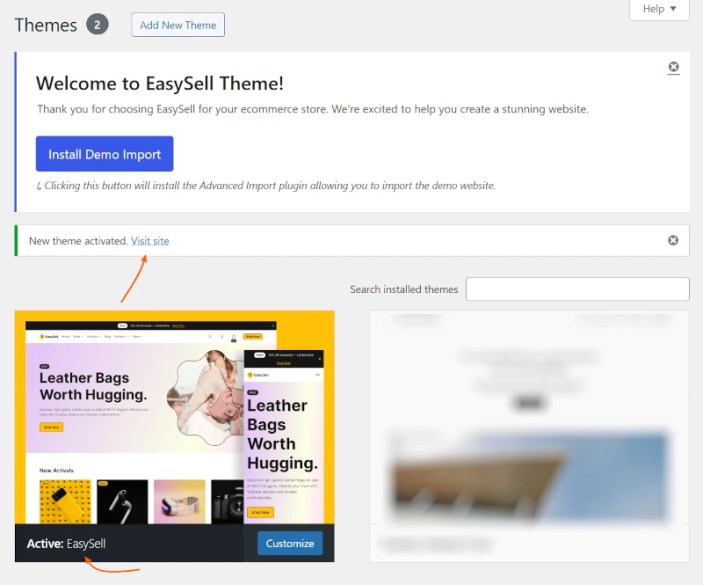
- Congratulations! The EasySell theme is installed and activated successfully. You can preview your website with the EasySell theme by clicking the Visit Site link that appears.
Slideshow on Installing EasySell Theme:
Watch step by step video guide to upload EasySell theme to your online store and activate it:
Video Tutorial on Installing EasySell Theme
Congratulations! You have successfully installed and activated the EasySell theme on your WordPress website. Since EasySell is an e-commerce theme, the next step is to install the WooCommerce plugin.
Install and Activate WooCommerce Plugin
↑ Back to topNote: Installing the WooCommerce plugin manually is optional if you intend to import the demo site as instructed in the Getting Started section below.
WooCommerce offers comprehensive documentation for installing and activating their plugin. Follow the official guide for the instructions:
Official WooCommerce Installation Documentation
Get Started
↑ Back to topAfter installing the EasySell theme on your WordPress website, you can start creating an online store in 2 ways:
- By importing a Pre-built demo website
- Manual Customization
Read the topics below for the detailed guide:
Get Started by Demo Import
↑ Back to topDue to its intuitive structure, the EasySell theme is easy to use for general WordPress users.
However, it might be a little challenging for beginners to get started. We’ve addressed this problem by providing a demo import feature.
EasySell theme comes with a pre-built demo which you can import into your website.
After importing the demo website, your website will be filled with demo content, such as the landing homepage, shop page, sample products, post articles, etc.
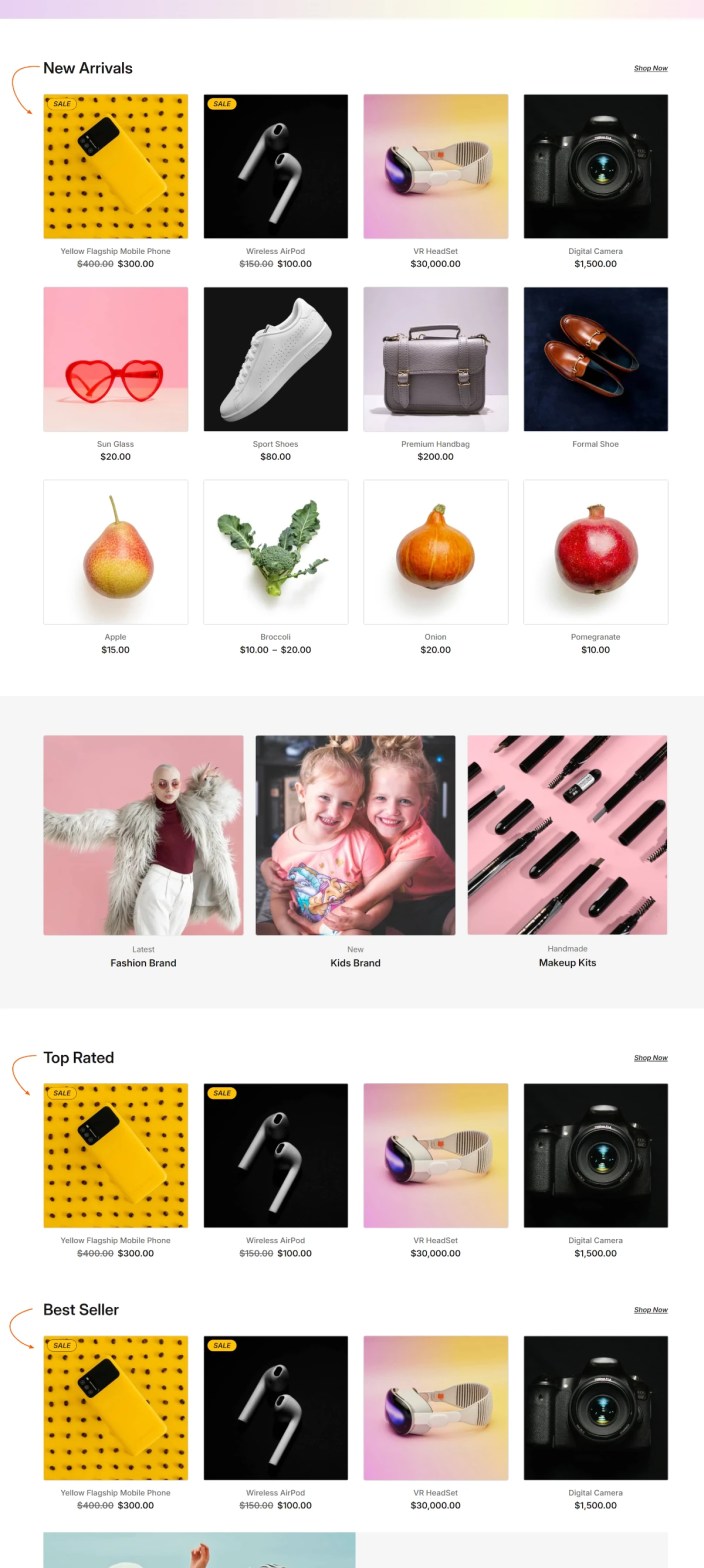
You can click the link below to see how your website will look after the demo import. Additionally, see the homepage of the EasySell demo in the screenshot below:

Now, let’s dive into the steps to import the EasySell demo into your website.
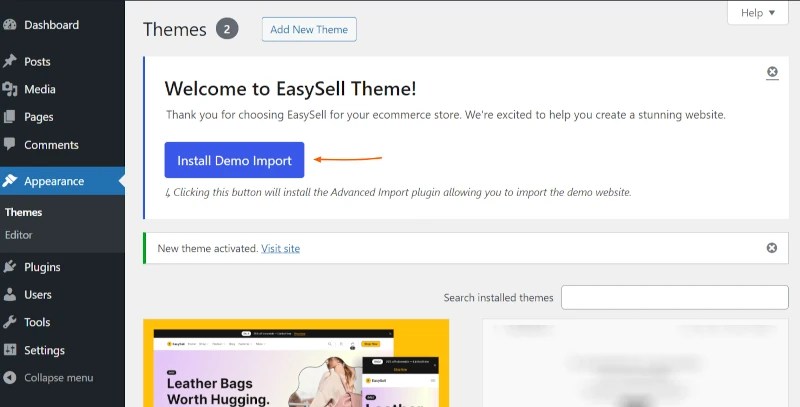
Once you install and activate the EasySell theme, a notice box will appear to help you get started with the theme.
You can utilize it to import the demo site at your convenience.
- In the notice box, click the Install Demo Import button. This will install the demo import plugin and the page will be redirected to the activation page.
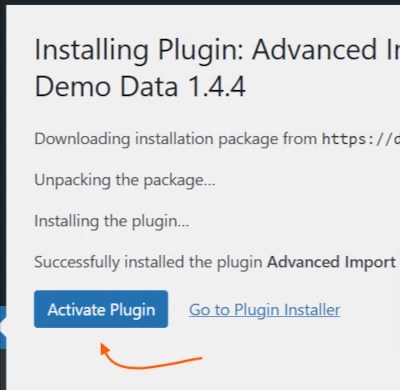
- On the next page, click the Activate Plugin button.
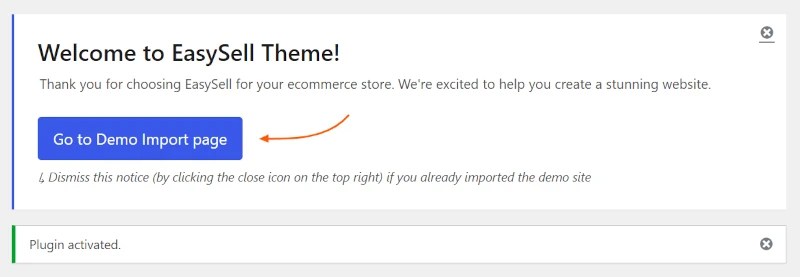
- On the notice box, click the Go to Demo Import page button. This will redirect you to the demo import page.
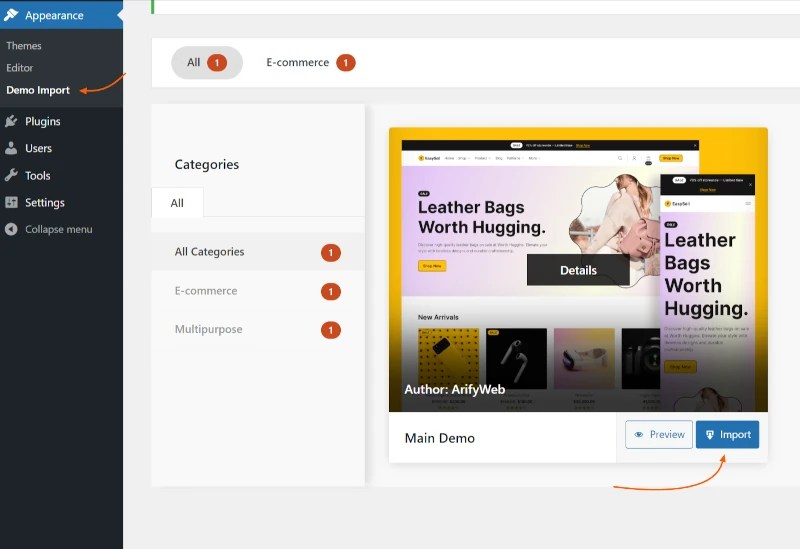
- On the demo import page, hover over the Main Demo box and click the Import button.
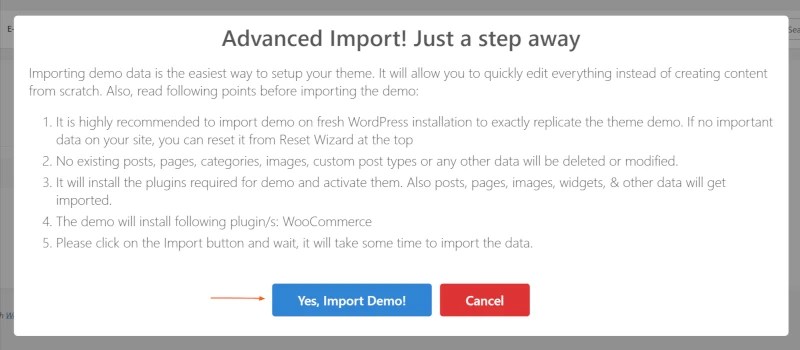
- A popup box will appear with the information that you need to read to fully understand what is going to happen next. Click the Yes, Import Demo button once you read and understand it.
- This will initiate the demo import process which includes installing the required plugin (WooCommerce) and importing the demo data (posts, pages, settings, and images).
- The progress can be seen on the bottom right of the page. Wait for a while and let the magic happen. (Note: Do not refresh the page or close the page during the progress.)
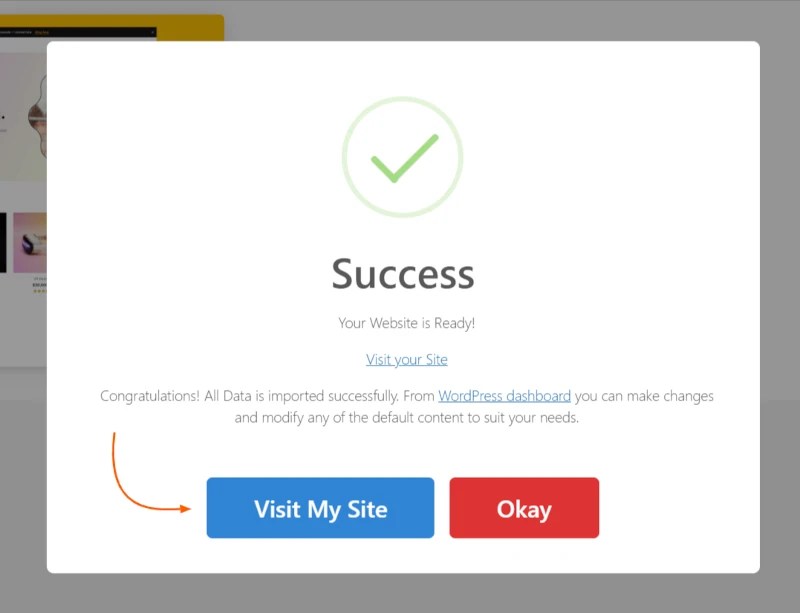
- Once the demo import is complete, a popup appears. You can click the Visit My Site to explore the newly imported site.
- Now, you can dismiss the notice box by clicking the close icon on the top right.
The next step is to replace the demo content with your own and customize the site as per your requirements.
Slideshow on Importing Demo Site:
Get Started Manually
↑ Back to topIf you’re a seasoned WordPress designer, developer, or user familiar with theme customization, you can manually tailor your website to your specific needs. The following instructions provide a solid foundation for customizing your theme.
Website Customization
↑ Back to topWhether you imported a demo or want to create the website yourself, you can customize the website using the EasySell and WordPress features.
Homepage & Blog Setup
↑ Back to topBy default, the EasySell theme displays the latest blog posts on the homepage. However, it is common practice for e-commerce websites to show the landing page with product collections, CTA banners, and other sections.
If you have imported the demo, it should already handled. So, you can avoid setting up the home and blog pages.
So, you might want to replicate the homepage from our demo website.
Follow the steps below:
Step 1: Create a Page for the Homepage
You need to set a separate home page
- Create a page for Homepage as instructed in this article: https://wordpress.org/documentation/article/create-pages/#creating-a-new-page
- For this example, let’s insert “Home” for Homepage Add title field of the page editor
- Click the Publish button to make it live.

Step 2: Set Page Template for Homepage
By default, a page displays the content added in the editor. Since the home landing page is special, we’ve provided a template that can be applied to the home page. This will magically display landing page content on the page.
The next step is to assign an appropriate template for the newly created Home Page in the above step.
Follow the steps below to switch the page template:
- From the Page Editor, click the Settings icon at the top right beside the Update/Publish button.
- In the Page Tab, click the Pages link beside the Template label.
- Then, click the Swap template option. It’ll open a panel to choose from templates.
- Look for a template called Shop Landing and click over the preview of it as shown in the slideshow below.
- Now, the chosen template is applied to the page. You can click the Save Button to save changes.
- Click the Preview Icon beside the Settings icon to preview the changes. You should see a Landing Page similar to the EasySell Demo Homepage instead of empty page content.
- However, it is just another normal separate page. So, we need to set it as the front page of the website which is explained in below.
Slideshow on Changing Page Template:
Step 3: Create Page for Blog
If you would like to have a separate blog page to post your articles, you can create a page for it just like you created the home page and name it Blog.
Step 4: Set Up Static Page as Homepage
Now, you need to tell WordPress to assign these pages to the Homepage and Blog Page so that they appear separately.
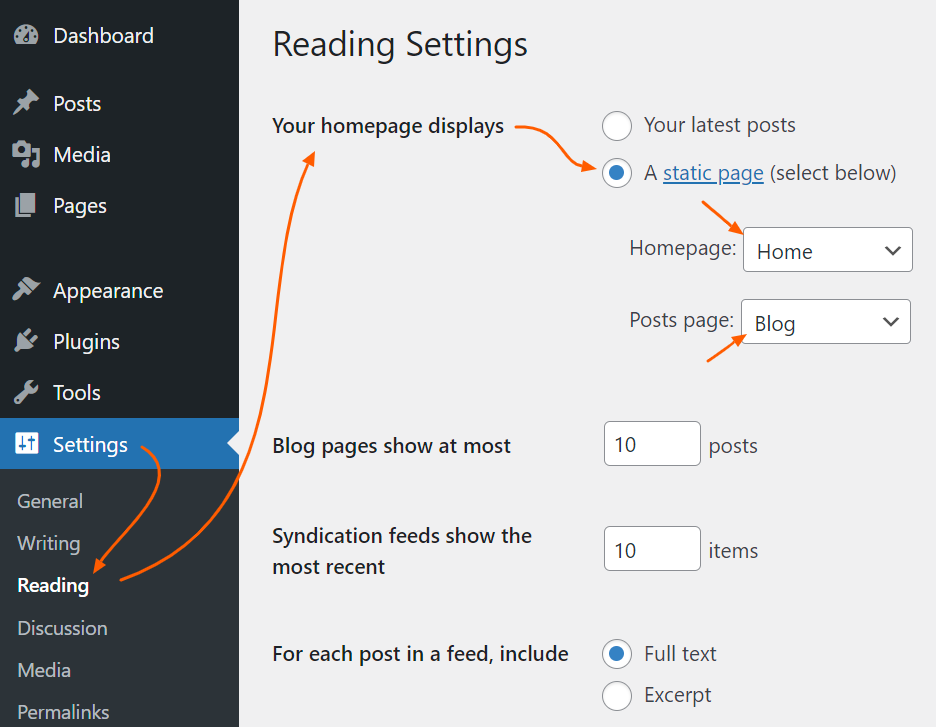
- Navigate to Settings > Reading from the WordPress dashboard.
- In Your homepage displays option, select A static page (select below). This will activate the options to set home and blog page.
- From the dropdowns, choose the respective page you created before:
- Homepage: Home
- Posts page: Blog
- Note: the Posts page here means the Blog page.
- Finally, click the Save Changes button.
Now, if you browse the homepage of your site, it should display the landing page you created. Also, you can view the blog page by navigating to the Pages menu item. Next, you can fill your website with products to sell and blog posts.
Navigation Menu
↑ Back to topOnce you activate the EasySell theme or import its demo site, you need to edit the Menus in the Header or Footer to add your pages and links.
Adding and Editing Navigation Menus
1. Learn about the customizing Navigation Menus
2. Access all menus, edit/delete them and create submenus
Display Products on Homepage and Shop Page
↑ Back to topThis guide will show you how to showcase your products on the homepage and shop page using the EasySell theme.
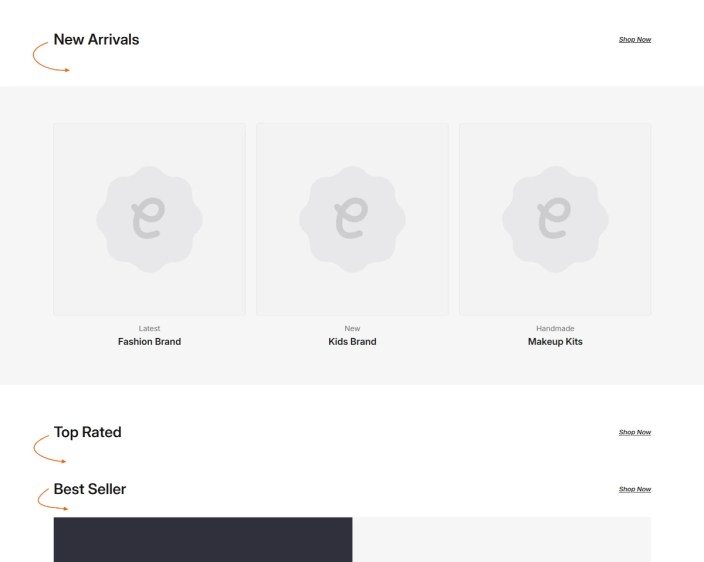
By default, sections using WooCommerce product blocks: “New Arrivals” and “Top Rated” on the homepage and shop page might appear blank as shown in the screenshot below (unless you have imported the demo site). This is perfectly normal!
These sections are designed to display your products, but if you haven’t added any products yet, they will naturally remain empty.
Slideshow on Displaying Products:
The key to seeing products populate these sections is to have products added to your WooCommerce store.
Here’s how to make them work:
Add Products to Website
↑ Back to topYou can add different types of products to your online store with EasySell just like any WooCommerce website.
So, it is better to read their documentation for a detailed guide.
Reach out if you have any problems or confusion during the process.
Note: For a more in-depth guide on adding and managing WooCommerce products, refer to the official WooCommerce documentation:
https://woocommerce.com/document/managing-products/add-product/
We’ve listed the most useful links below:
Add Different Types of Products
1. Learn about adding Simple Product
2. Learn about adding Grouped Product
3. Learn about adding External/Affiliate Product
4. Learn about adding Variable Product
5. Learn about adding Virtual and Downloadable Product
Product Editor Settings
1. Learn about all product editor settings
2. Learn about how to put products on sale or give discounts
3. Learn about managing stocks
Keep adding new products you have and they’ll appear on the homepage and shop page. To access the shop page, navigate to Shop from the header menu.
Note: If you want to get the sample products from the demo site, skip to the Import Demo Products section below and get back here.
Import Demo Products
Alternatively, if you want to see how it looks before adding your product just like in our demo site. We’ve exported a CSV file from our demo site for you to import to your site. You can import it and update it with your products.
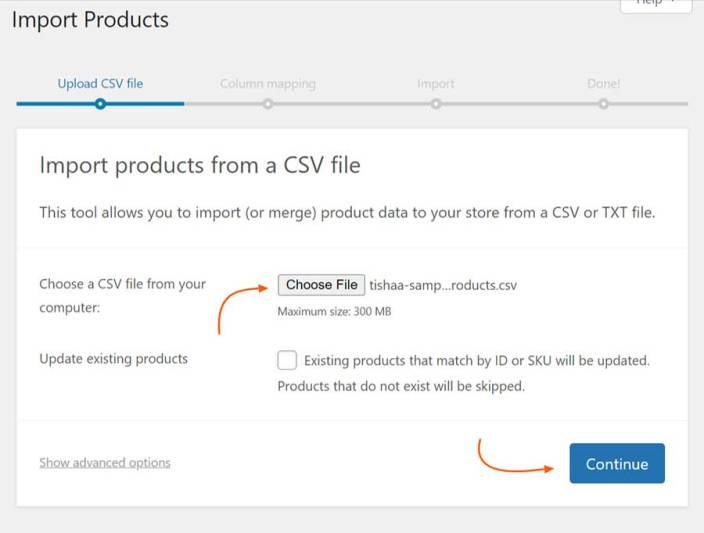
- In your WordPress dashboard, navigate to Products > All Products.
- Click the Import button.
- Download the EasySell Sample Products CSV file below and import it to your WooCommerce website.
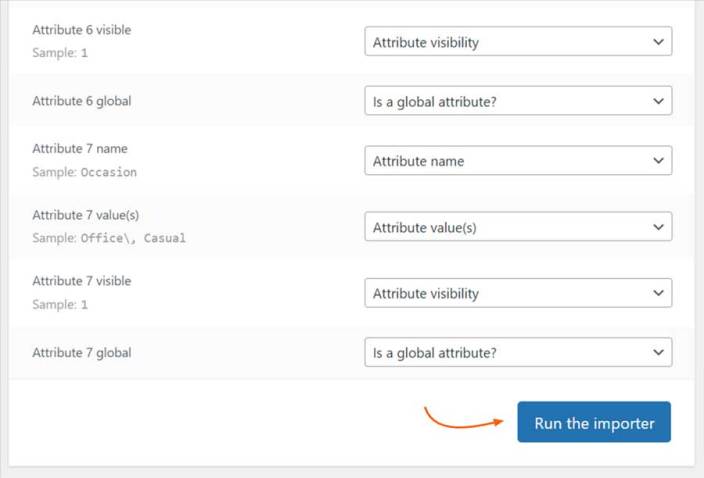
Click here to learn about importing the CSV file in detail.
In the final step, click the View products button to view the imported products in the dashboard.
Now, if you preview the homepage and shop page, you’ll see the products you have added.
Site Editor
↑ Back to topIf you’re new to WordPress or Block Theme, understanding topics such as Site Styles, Patterns, Templates & Template Parts, etc. would help you customize your website.
Customizing Website using Site Editor
1. Learn about the Site Editor
1.1 Link to Documentation,
1.2 Link to Tutorial,
1.3 Link to WooCommerce Documentation
2. Learn about the Site Style
Block Editor
↑ Back to topCustomizing Posts, Pages using Block Editor
1. Learn about the Block Editor: Link to Documentation, Link to Tutorial
2. Learn about the default WordPress blocks
3. Learn about the default WooCommerce blocks
FAQ
↑ Back to topWhy are the products not appearing in some sections/blocks/patterns such as On Sale Products?
You might see an empty area in different cases such as when you add a new block or pattern or when you import the demo site. The reason and solution are explained below:
Each block has a certain filter to display products. If you do not have products that are required by the block, it appears empty. That is why you may find a section/pattern with a title only or simply empty. So, you can try adding products that have the required features. For example: if have an On Sale Products block, make sure you have some products with a sale applied.
After the demo import, why does the navigation menu link to the EasySell demo site?
If you have imported the demo website, it’s likely menu links are redirecting you to the pages of the demo site: https://artifydemos.com/easysell
This is expected behavior. Since you will eventually need to customize those links, you can edit those navigation links as instructed in the above section (Click here to learn about editing the Navigation Menu).
Need Help? Contact Us
↑ Back to topOur friendly support team will answer any inquiries related to the EasySell theme.
Here’s how to reach us:
- Visit the WooCommerce Contact Support Page
- If you’re not logged in, follow the on-screen instructions to create a new WooCommerce account or log in to your existing account.
- On the support page, scroll down until you find the “Submit a request” section.
- From the “What do you need help with?” dropdown, choose Technical Support
- Type “easysell” in the field labeled Product to specify the theme.
- Submit the form after filling out the remaining fields.
Improve This Documentation
↑ Back to topFound an issue?
Please let us know if you encounter a typo, grammatical error, or outdated information.
Do you want to help us make this documentation better?
We appreciate your feedback and suggestions. Please let us know if:
- You have a question: If you have a specific question that isn’t answered in the FAQ section, we’d love to hear from you.
- You find something confusing: If you find any part of the documentation difficult to understand, please let us know so we can clarify it.

