Set-up and installation
↑ Back to topThe first step in setting up your WooCommerce-powered online store is to install WordPress and the WooCommerce plugin itself. Before doing so, make sure to check your hosting environment.
Requirements for WordPress:
- WordPress 6.3 installed (Note: WordPress 6.3 is the minimum version required. Tested with WordPress 6.9)
- PHP version 8.0 or greater
- MySQL version 5.67 or greater OR MariaDB version 10.4 or greater
- WordPress memory limit of 256 MB or greater
- HTTPS support (SSL certificate enabled(
Instructions to install WooCommerce: https://docs.woocommerce.com/document/installing-uninstalling-woocommerce/
Once the online store is ready, you will then need the following information from Elavon’s Helpdesk to get started – these details will be communicated via e-mail to the lead contact on the account – usually within 24-48 hours of the application being approved:
- Processor Account ID
- Merchant Alias
- Public Key
- Secret Key
There is one way to install the Elavon Payment Gateway WooCommerce Plugin:
- Visit the relevant page in the WooCommerce Extensions store for ‘Elavon Payment Gateway’
- Click ‘Add to Store’ from the Product page
- Once added, enter the URL of the store where you’d like to install the extension
- The extension will then be successfully installed within a few seconds
- Login to your WordPress backend.
- Select the Plugins tab on the sidebar underneath WooCommerce.
- Navigate down to ‘WooCommerce Elavon Payment Gateway’
- Ensure that the plugin is activated and installed

Updating the Plugin
↑ Back to topKeeping the Elavon Payment Gateway plugin up to date is now effortless. You no longer need to manually deactivate, uninstall, and reinstall a previous version.
One-click updates
Whenever a new release is available, you can upgrade to the newest version in a single click directly from your Elavon Payment Gateway plugin settings — no downloads, no FTP, no downtime.
From the same configuration screen, you can also enable auto-updates with a single click. Once enabled, future releases will install automatically as soon as they are published, so your store always runs the latest, most secure version.
How to update
1. Go to WooCommerce › Settings › Payments › Elavon Payment Gateway.
2. If a new version is available, you’ll see an “Update available” banner at the top of the settings screen.
3. Click “Update now” to install the latest release in a single click.
4. To enable auto-updates, toggle “Enable auto-updates” on the same screen — that’s it.
Upgrade from a Previous Version
↑ Back to topIf there is a previous version of the plugin already installed, you should deactivate and uninstall it before you proceed with installing a new version.
- Login to your WordPress Admin Panel.
- Click the Plugins tab.
- Scroll down to the WooCommerce Elavon Payment Gateway plugin and click Deactivate.

- After successful deactivation, click Delete.

Once the plugin has been successfully installed, follow the steps below to configure the various integration options supported.
- Login to the WooCommerce Admin Panel.
- Navigate to Settings | Payments.
- Select the Elavon Payment Gateway to see the options available for configuration.
- Configure the options below:
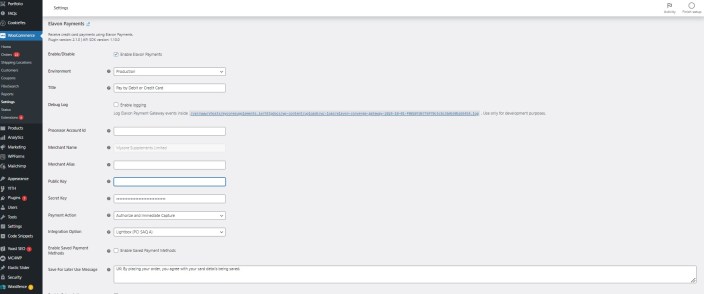
Enable/Disable – By default, this option is disabled. This needs to be checked to ensure the Elavon Payment Gateway plugin option displays on the checkout page.
Environment – This option allows you to switch between sandbox and production environments. Enable Sandbox to send transactions to your Elavon Payment Gateway “Test/UAT” Account. Enable Production to send transactions to your “Live Production” Account. Note that the credentials for each environment are different.
Title – This option allows you to enter a specific title, this will be displayed as the payment method title which the customer will see during the checkout process. By default, the title is set to Elavon Payment Gateway.
Debug Log – Debug logging can be enabled if you are having issues processing transactions correctly. All debugging messages are cleaned of sensitive information before being displayed, but as a best practice, do not enable this unless you are having issues with the plugin.
Processor Account Id – The Processor Account Id is a unique ID that is used to identify merchants when connecting to Elavon Payment Gateway. The ID will be provided by the Elavon Payment Gateway Helpdesk.
Merchant Name – Trading as, operating as, doing business as, fictitious, or assumed name, which may be different than the legal name. This value is automatically received from Elavon Payment Gateway based on the value for the Processor Account Id.
Merchant Alias – The Merchant Alias is a unique ID that acts as a username for authentication. The ID will be provided by your Elavon Payment Gateway Helpdesk.
Public key – The public key for your account, provided by your Elavon Payment Gateway Helpdesk.
Secret key – The secret key for your account, provided by your Elavon Payment Gateway Helpdesk.
Payment action – This option controls how transactions are submitted to Elavon Payment Gateway. You may select either Authorize and Immediate Capture or Authorize and Delayed Capture. If you select Authorized and Delayed Capture, you must initiate a manual capture after the transaction has been submitted. This can be completed via the WooCommerce orders screen. By default, this is set to Authorize and Immediate Capture.
Integration option
↑ Back to top- Enable Lightbox if you would like to display the Elavon Payment Gateway hosted payments page as a pop-up on the WooCommerce payment page (uses javascript to show a pop-up window which appears seamlessly, keeping customers on your site for payment).
- Enable HPP if you would like to redirect the customer directly to the hosted payment page on Elavon servers from the WooCommerce checkout page. (Cardholder information is collected securely and not stored on merchant server).
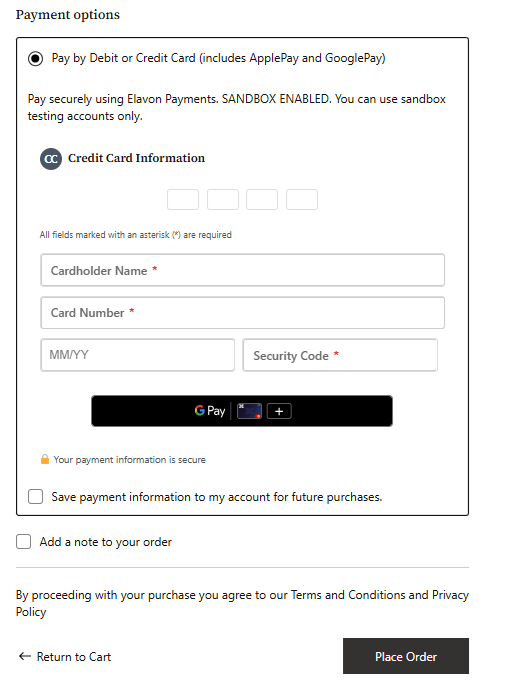
- Enable Hosted Fields if you would like to embed the Elavon Payment Gateway card form directly within your WooCommerce checkout page. The card number, expiry, and security code are rendered inside secure iframes hosted by Elavon, so sensitive cardholder data never touches your server while the checkout still feels native to your store. To turn it on, go to WooCommerce › Settings › Payments › Elavon Payment Gateway, scroll to the Integration option section, and tick the “Enable Hosted Fields” checkbox. Save changes, then place a test order in Sandbox to confirm the embedded card form renders on your checkout page. Hosted Fields is mutually exclusive with Lightbox and HPP — only one integration option should be enabled at a time.
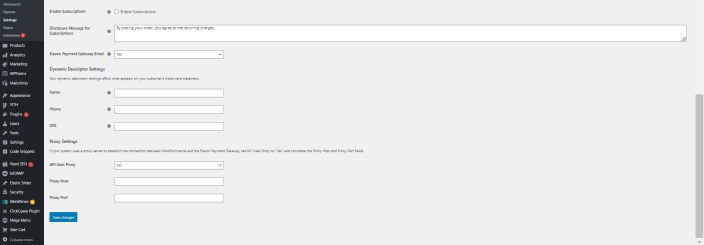
Enable Saved Payment Methods – By default, this option is disabled. This needs to be checked to ensure the saved cards and Save for later use options are displayed on the checkout page.
Save for Later Use Message – This field allows the merchant to define a message that is displayed to the user when he is trying to save a card for later use. The default value is: “By placing your order, you agree with your card details being saved.”
Elavon Payment Gateway Email – This option allows you to choose if Elavon Payment Gateway should send emails to the shopper’s email address. By default, this option is set to no (disabled).
License Code – This value for this field is provided by Elavon Payment Gateway and should be sent with each transaction. Note that his field is optional and can be left blank.
Dynamic Descriptor Settings – The options under this section affect what appears on your customer’s credit card statement.
- Name – The value in the business name field of a customer’s statement. Company name/DBA section and the product descriptor will contain an “*” between them. The name must be a max of 25 characters.
- Phone – The value in the phone number field of a customer’s statement. The phone must be a maximum of 20 characters.
- URL – The value in the URL/web address field of a customer’s statement. The URL must be 13 characters or shorter.
- Proxy Setting – If your system uses a proxy server to establish the connection between WooCommerce and Elavon Payment Gateway, set API Uses Proxy to “Yes” and complete the Proxy Host and Proxy Port fields.
Shopper View
The following is an overview of the main features in the daily usage of the WooCommerce Elavon Payment Gateway plugin.
Placing an Order
↑ Back to topTo create a new Authorization Only transaction using Elavon Payment Gateway plugin, make sure that the Payment Action is set to Authorize and Delayed Capture, along with other options:
- Enabled/Disable = Checked; Environment = Sandbox (in case of test transaction); Processor Account ID, Merchant Alias, Public Key, Secret Key = valid data provided by Elavon Payment Gateway
- Payment Action = Authorize and Delayed Capture
To create a new Sale transaction, only the Payment Action option should be changed:
- Enabled/Disable = Checked; Environment = Sandbox (in case of test transaction); Processor Account ID, Merchant Alias, Public Key, Secret Key = valid data provided by Elavon Payment Gateway
- Payment Action = Authorize and Immediate Capture
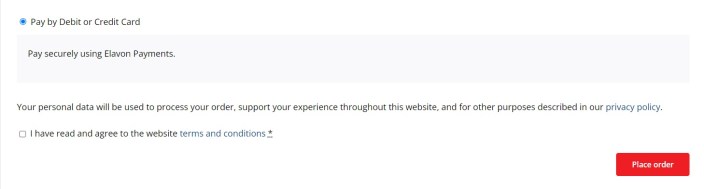
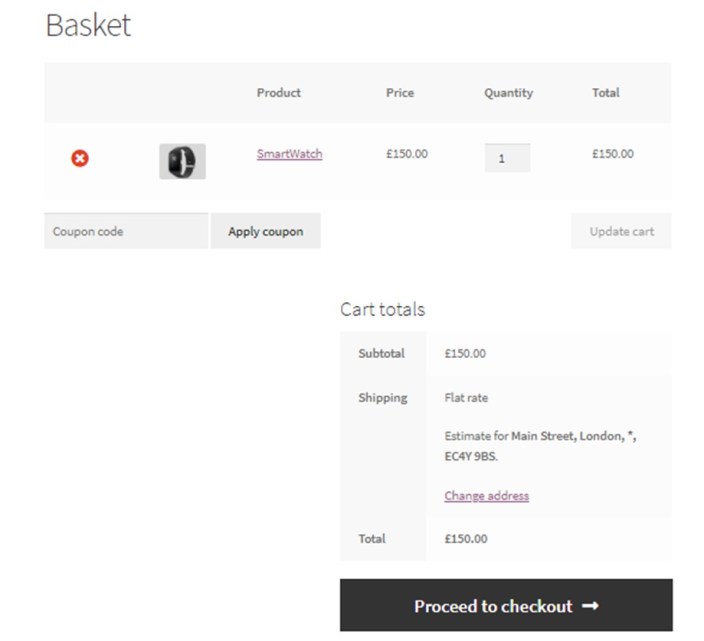
The payment procedure is similar for guests and logged in users. To initiate a payment via Elavon Payment Gateway:
- Access the Checkout page from the WooCommerce store view.
- Populate the Billing and Shipping Addresses.
- Select Elavon Payment Gateway (or your desired description) as a payment method
- Click Place Order.
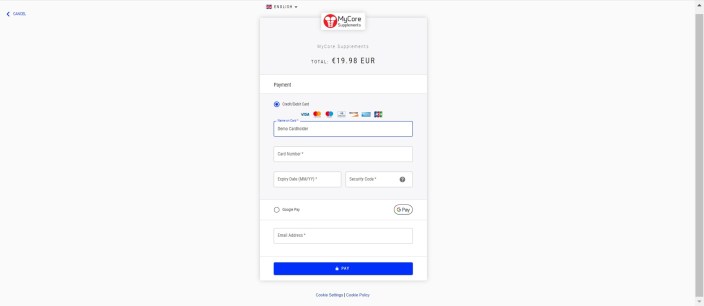
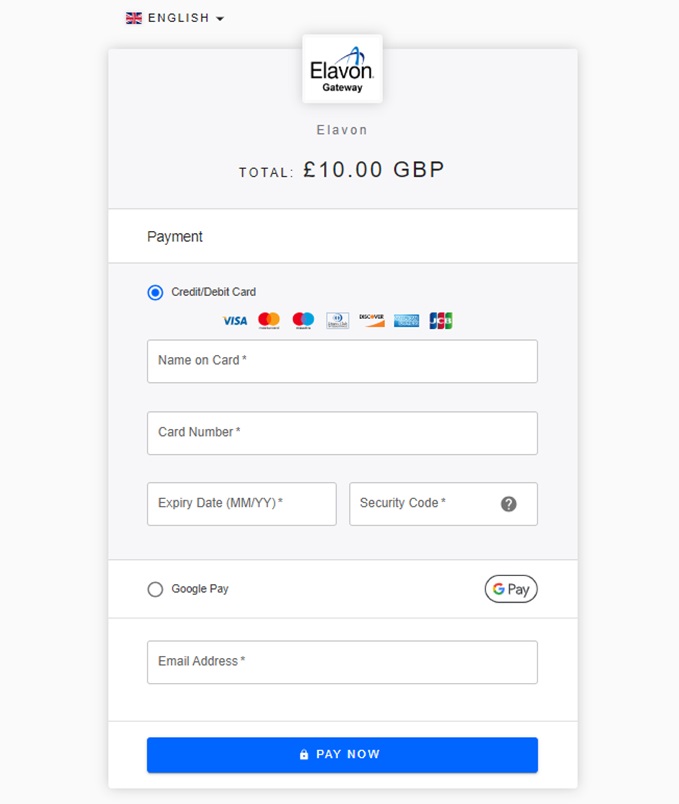
Payment via Hosted Payments Page (HPP)
↑ Back to topIf HPP is selected in the configuration page, the HPP opens once the user selects Elavon Payment Gateway and places the order.
Note
The actual HPP screen may vary depending on the options enabled in Elavon Payment Gateway. To configure the HPP, refer to the Hosted Payments section.
From this page, two options are available:
- Cancel Payment
- Pay
HPP – Cancel Payment
If the user selects Cancel, the payment and the order are cancelled, and the user is redirected to the shopping cart. If needed, the user can then initiate a new order with the same products.
HPP – Checkout
To continue with the order:
- Enter the card details (number, expiry date, and security code) plus an e-mail address to receive an instant receipt notificaton
- Click Pay Now.
Two possible outcomes can happen after you click Pay:
- Payment is Declined
- Payment is Accepted
HPP Checkout – Declined
↑ Back to topWhen your payment is declined, you will be redirected to WooCommerce from where you can try to pay for the order again.
HPP Checkout – Accepted
↑ Back to topWhen a payment is accepted, the user is redirected to WooCommerce where the details for the order are displayed.
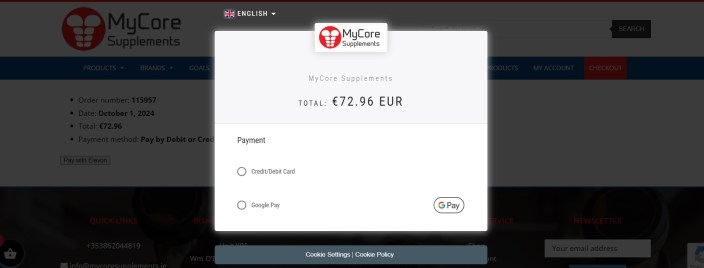
Payment via Lightbox
↑ Back to topIf Lightbox is selected in the configuration page, the checkout page will be the same as if HPP was selected. If you continue, a new page displays containing information about the order (number, date, total and payment method) and the option to “Pay with Elavon Payment Gateway”.

Selecting Pay with Elavon Payment Gateway opens the pop-up where you can enter the card details and pay.
Similar to payment with HPP, the payment can be accepted or declined, and the behaviour in each case is the same.
Payment via Hosted Fields
↑ Back to topWhen using Hosted Fields, the payment experience remains fully embedded within the WooCommerce checkout page, providing a seamless and modern user experience for the shopper. Rather than redirecting the customer to a separate payment page or overlay, individual payment input fields (such as card number, expiry date, and CVV) are securely rendered inline within the WooCommerce checkout using Elavon‑hosted components.
From the shopper’s perspective, the checkout flow feels native to the site – they remain on the same page throughout the payment journey, with no visible redirects or pop‑ups. Visually, the fields inherit the styling of the WooCommerce checkout where possible, helping maintain brand consistency while still ensuring sensitive card data is captured and processed securely by Elavon.
Once the customer submits the checkout, payment processing happens in the background and the order is completed in the same way as a standard WooCommerce transaction. Hosted Fields are typically used by merchants who want a smoother, more integrated checkout experience while still benefiting from Elavon’s secure handling of payment data and reduced PCI scope.
Stored Shopper
↑ Back to topFor the logged-in users that select the option Save for later use on the checkout page, the details are saved in Elavon Payment Gateway. If a user changes the details (name, address) and creates a new order using the Save for later use option, the profile is also updated in Elavon Payment Gateway.
Stored Card
↑ Back to topAdd Card
Logged in users have additional options to store credit cards used for payment on HPP so that it can be used for future payments without leaving the WooCommerce store. In order to do this, you need an active account created in the WooCommerce store and to be logged in before reaching the checkout page. After doing that, on the checkout page, there is an additional option to store card for later use.
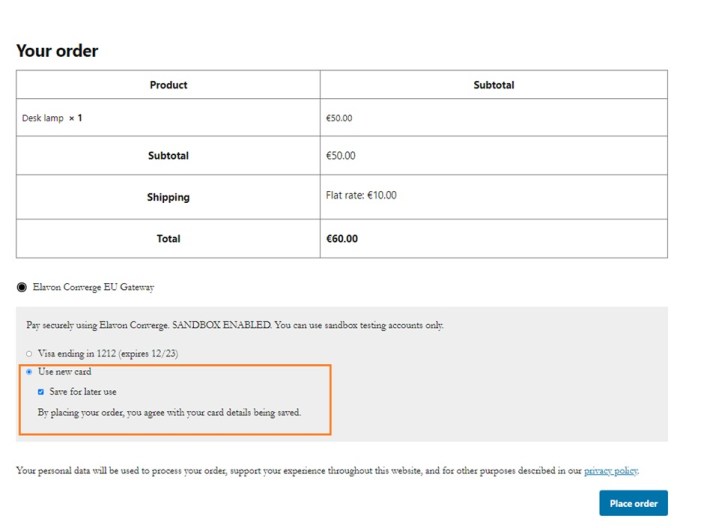
Once you make a successful payment with this option selected, the card used to process payment in both Elavon Payment Gateway and WooCommerce is saved.
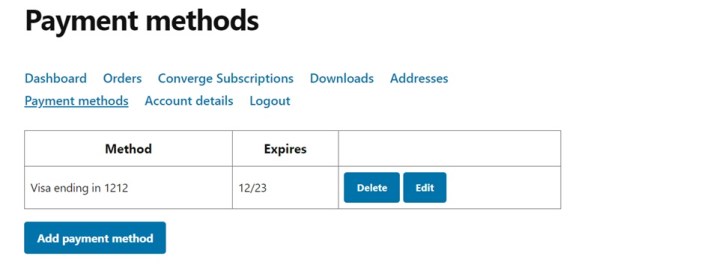
To view cards stored in WooCommerce, you should navigate to the following screen: WooCommerce Store (Logged In) -> My Account -> Payment methods.
Delete Card
↑ Back to topYou have an option to delete a stored card directly from WooCommerce. Click Delete next to the card to delete it from Elavon Payment Gateway. If the merchant deletes a card from Elavon Payment Gateway, synchronization with WooCommerce does not exist so the user is still able to see the card in WooCommerce with an option to delete it manually themselves.
Edit Card
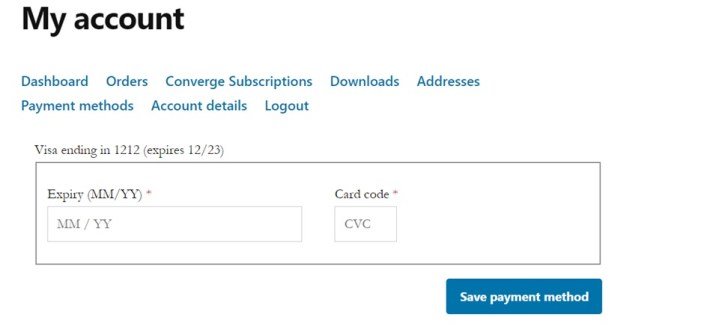
↑ Back to topYou have an option to edit the Expiry Date and the Card Code for a stored card. Click Edit next to the card.
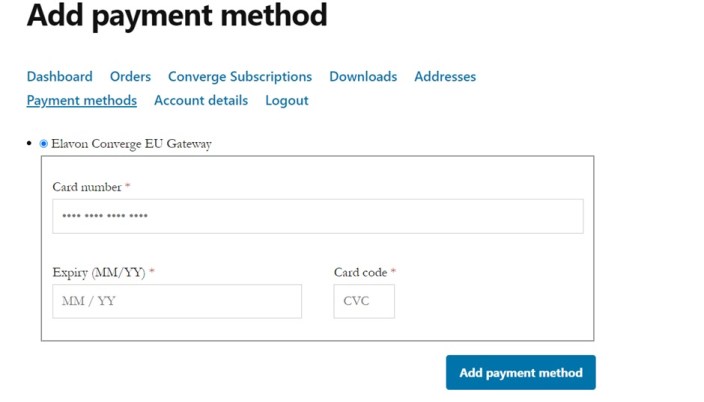
Add Payment Method
↑ Back to topYou have an option to add a stored card directly from the Payment Methods section. Click Add payment method under the list of stored cards.
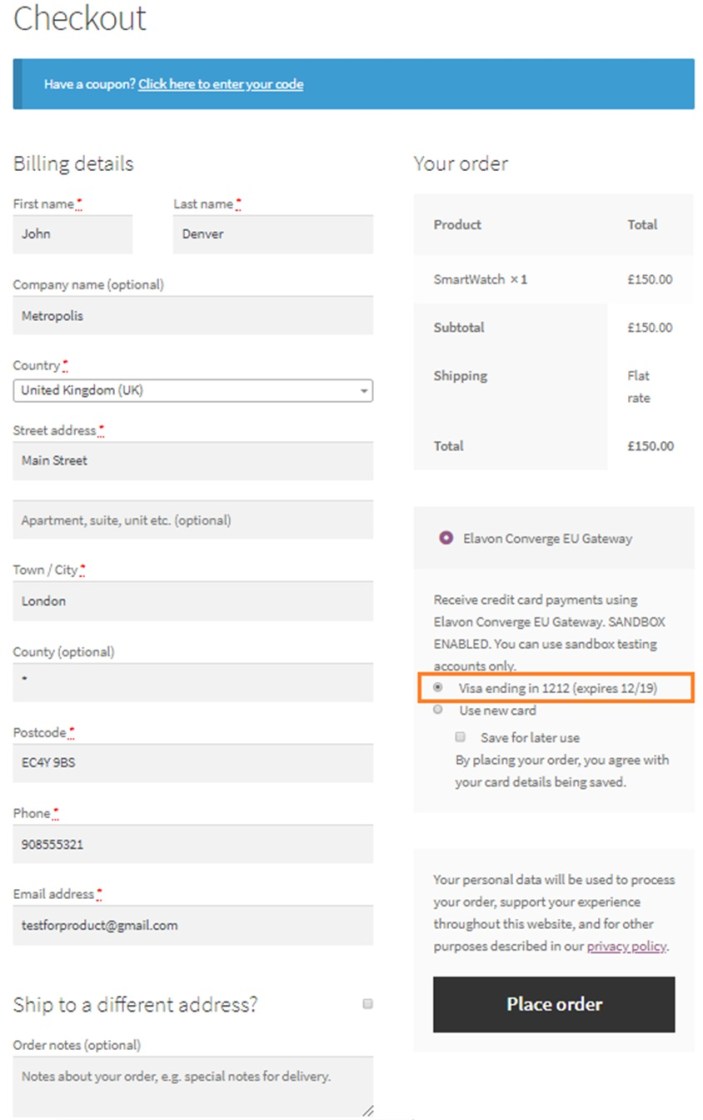
Pay with Stored Card
↑ Back to topOnce the card is stored, you can use it to initiate a payment. To do that, perform the same steps for HPP payment for the logged-in user until the checkout page. The stored cards will be visible in the Payment Method section and you can select one of them to pay for the next order.
Once you click the Place Order button, an API call to Elavon Payment Gateway will be made in the background, and depending on the response, you will get one of the following:
- Error message – in case the payment is declined by Elavon Payment Gateway.
- Newly created order number – in case the payment is accepted by Elavon Payment Gateway.
Merchant View
↑ Back to topAs a merchant, you are able to perform additional actions on transactions that have been already created directly from the WooCommerce Admin page.
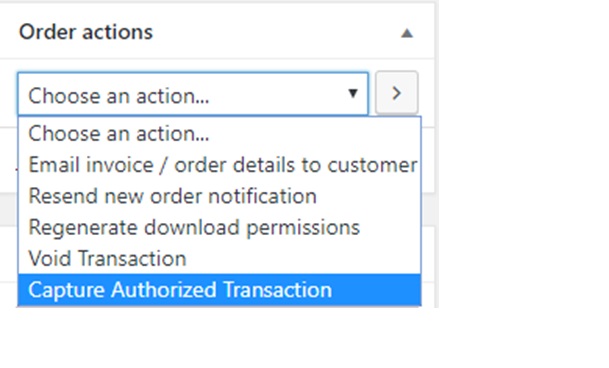
Capture
↑ Back to topMerchants who choose to authorize only at checkout (Authorize and Delayed Settlement) can capture their orders for a fixed period of time after the initial authorization.
- Navigate to WooCommerce | Orders.
- Click the order you want to capture.
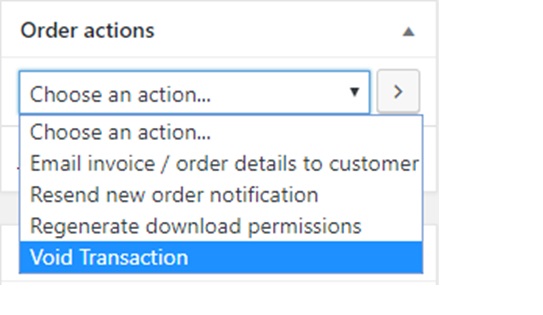
Void
↑ Back to topYou can void a sale transaction provided it is in the correct state. Refunds can be processed directly from the WooCommerce orders screen — open the order, click Refund, specify the refund amount, add notes in the “Reason for refund” field, and confirm.
- Navigate to WooCommerce | Orders.
- Select the order you want to void.
- When you click on Void button in WooCommerce, this transaction will be voided in Elavon Payment Gateway and the status of the order in WooCommerce will be Cancelled.
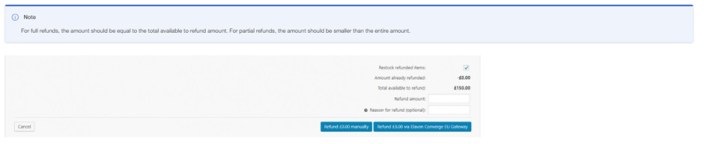
Refund – Full and Partial
↑ Back to topYou should be able to partially or fully refund a transaction if the Elavon Payment Gateway status is Captured, Settled, or Settlement Delayed.
- Navigate to WooCommerce | Orders.
- Select the order you want to refund.
- Click the grey Refund button to start.
- Specify the refund amount.
- Add refund notes in the Reason for refund field. This is optional.
- Click Refund £X via Elavon Payment Gateway, where X is the amount to be refunded (updates automatically).
Note
For full refunds, the amount should be equal to the total available to refund amount. For partial refunds, the amount should be smaller than the entire amount.
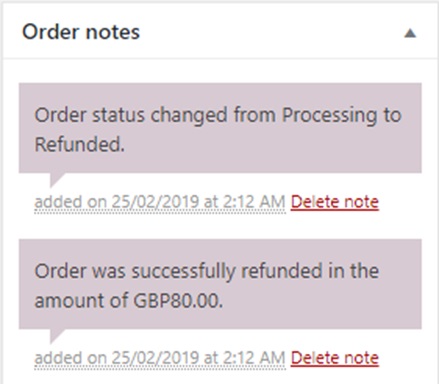
In the Order Items, there will be a note that will be added to inform you that a refund has been processed. If a refund has been completed for the entire order, the order status will be automatically changed to Refunded.
Subscriptions
↑ Back to topSubscriptions have different functionalities depending on who the viewer is. For more information, read through the guides for each view.
Subscriptions – Merchant View
As a merchant, you can define which products allow subscriptions, view and edit subscription records, and create an order with subscription products.
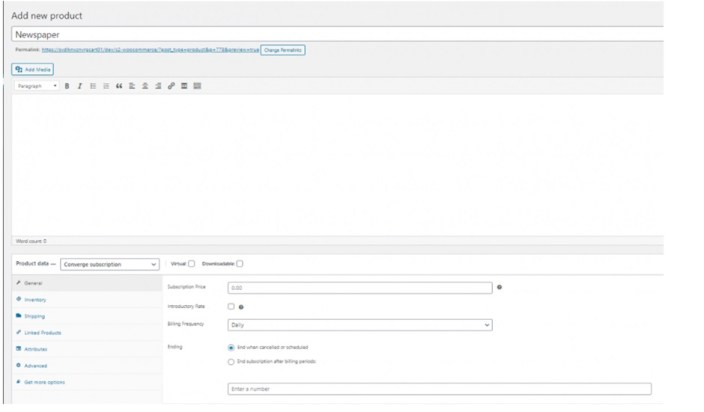
Product Configuration
If subscriptions are enabled, you can create a subscription product. Go to WooCommerce > Products and create a new product or edit the product you want to turn into a subscription. Select Elavon Payment Gateway subscription or Elavon Payment Gateway variable subscription as the product type.
Set the terms for the subscription, including the following:
- Subscription Price
- Introductory Rate (optional)
- Billing Frequency (daily, weekly, monthly, early)
- Ending
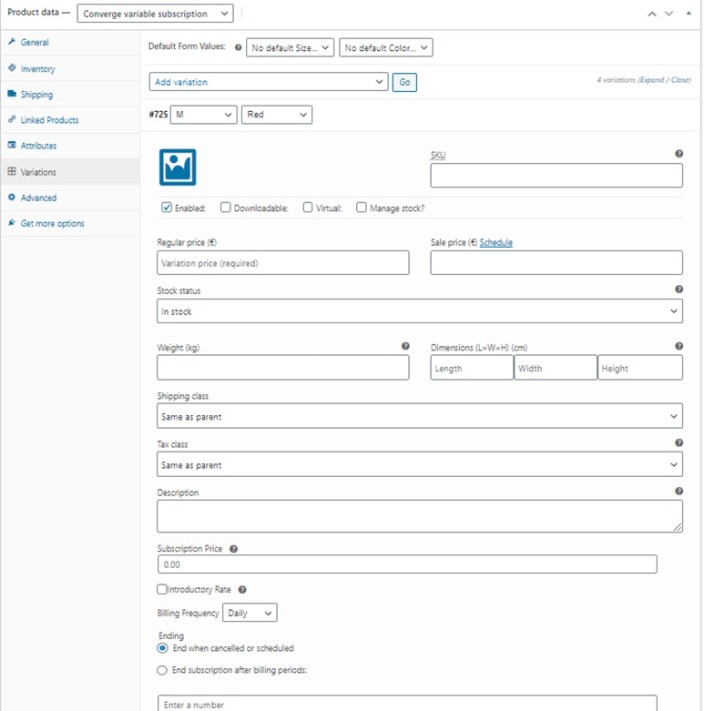
The Elavon Payment Gateway variable subscription product type is similar to Variable product. Each variation in a Elavon Payment Gateway variable subscription contains the options for subscriptions: Subscription Price, Introductory Rate, Billing Frequency, and Ending.
View and Edit Subscriptions
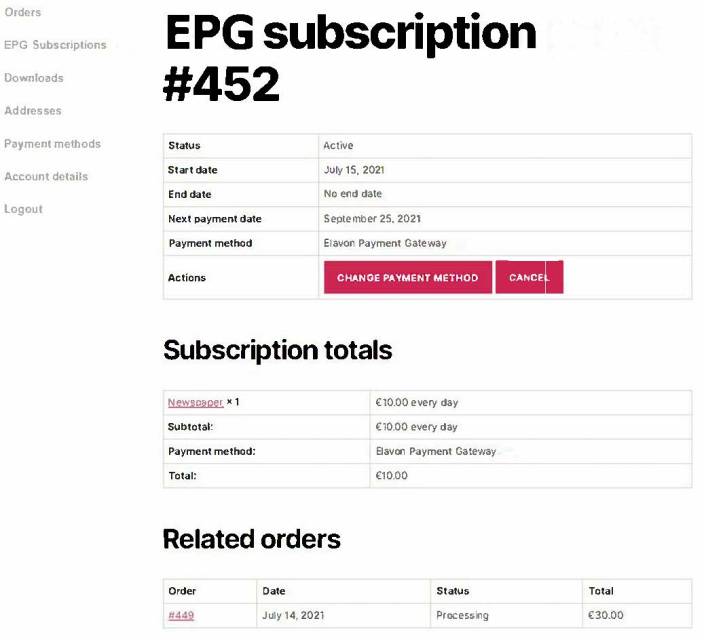
↑ Back to topAs a merchant, you can view the list of subscriptions under WooCommerce > Elavon Payment Gateway Subscriptions.
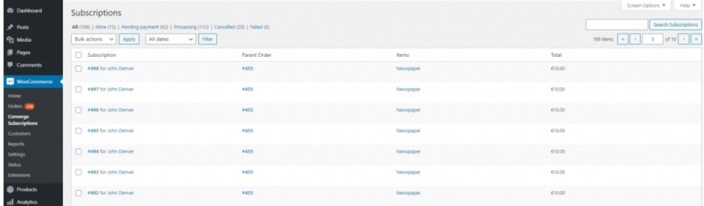
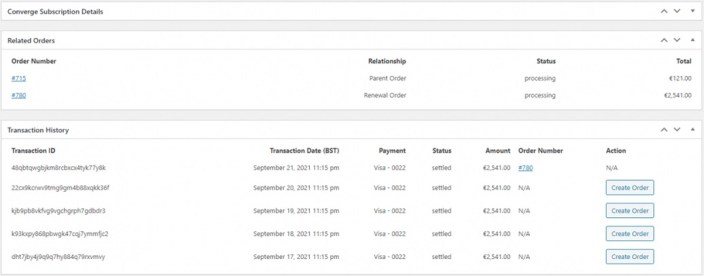
If you select one of the subscriptions, you can view more details and edit it.
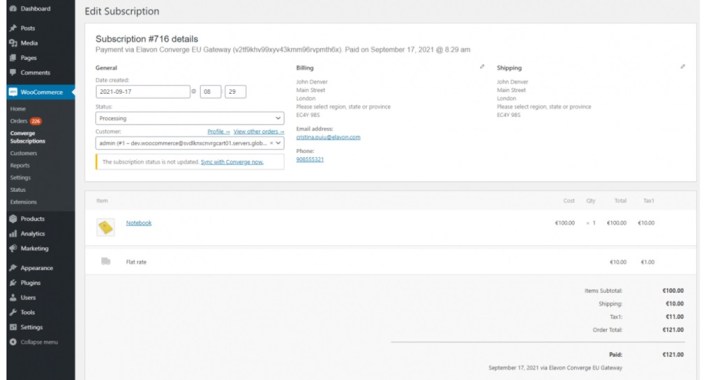
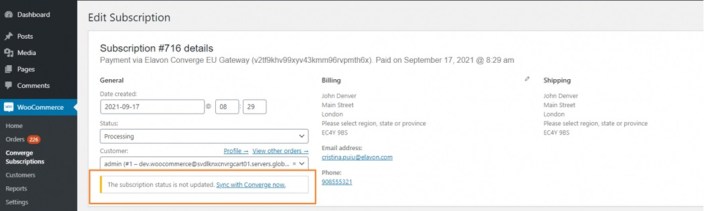
If the WooCommerce status is not synchronized with the Elavon Payment Gateway status of a subscription, you will be notified to update it.
If the status allows, you can cancel the subscription.

Renewal orders are manually created. Check the transaction history and create orders for the transactions that have this option.
Subscriptions – Customer View
As a customer, you can purchase one or more subscription products. Once your order has been created, you can view and manage your subscriptions.
Placing an Order with Subscription Products
You can select products with subscriptions from the store and add them to the cart. After choosing a subscription product, the details can be reviewed by opening the shopping cart.

The initial order will contain the list of related Elavon Payment Gateway subscriptions.
View and edit subscriptions
Customers can view their subscriptions by navigating to the following screen:
WooCommerce Store > My Account > Elavon Payment Gateway Subscriptions.
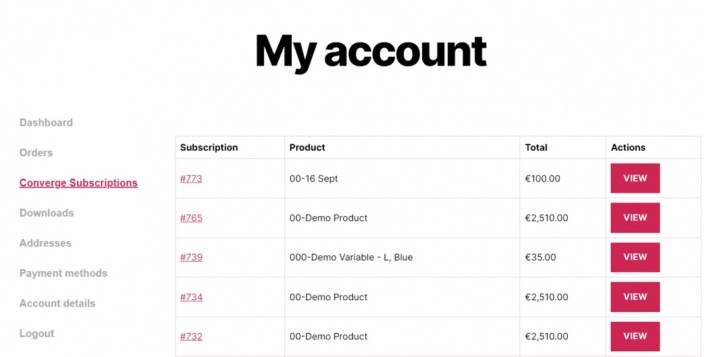
After selecting a subscription, you can view the details about the status, products, and related orders. Also, if the status allows, you can change the payment method or cancel the subscription.