Enable WooCommerce deposits and flexible payment plans with Ultimate Payment Plans for WooCommerce. Let customers pay upfront, in installments, or partial payments to increase conversions and boost sales for high-value products.
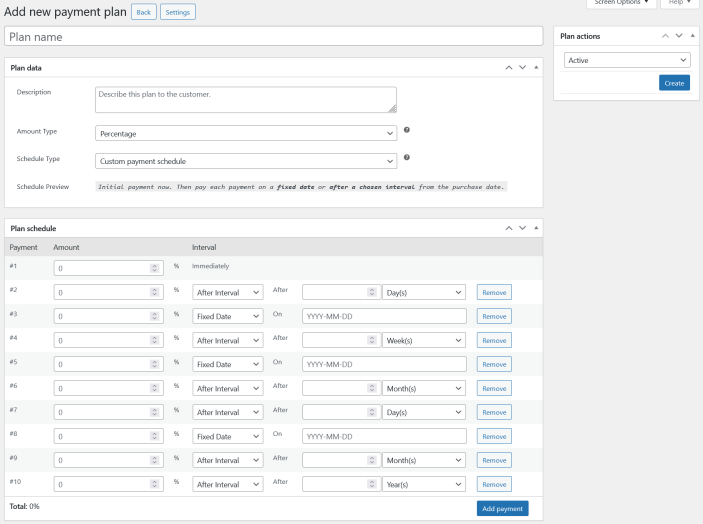
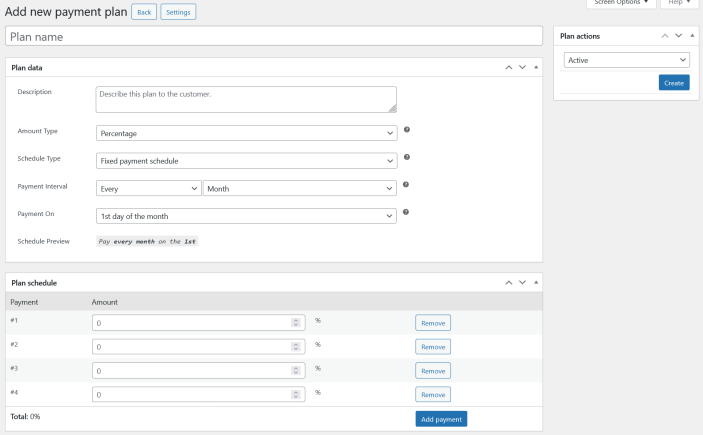
Go to WooCommerce > Settings > Payment Plans Settings > Add new payment plan.
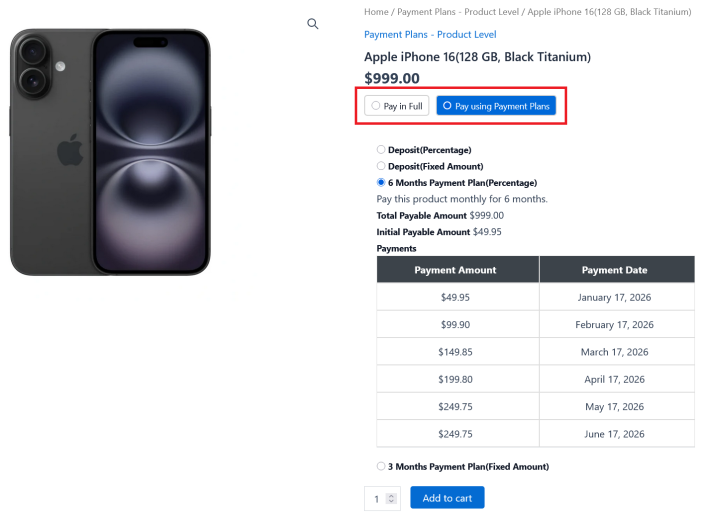
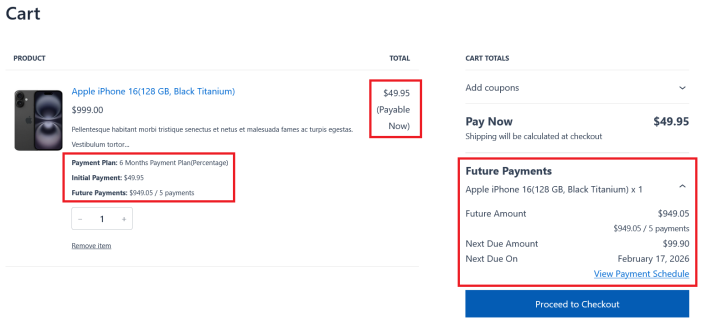
Payment Plans give customers the option to pay a down payment and the remaining payments at a later date, dividing payments into multiple parts over time. This would be similar to a layaway, partial payments, scheduled payments, installment payments, fixed payments, flexible payments or variable payments.
With our plugin, you can easily create flexible payment options using two powerful scheduling types:
Installments can be configured using either a percentage of the product price or a fixed amount, giving the site admin full control over the payment structure and timing.
By offering flexible payment plans, you can improve customer purchasing power, reduce friction at checkout, and ultimately increase conversions.
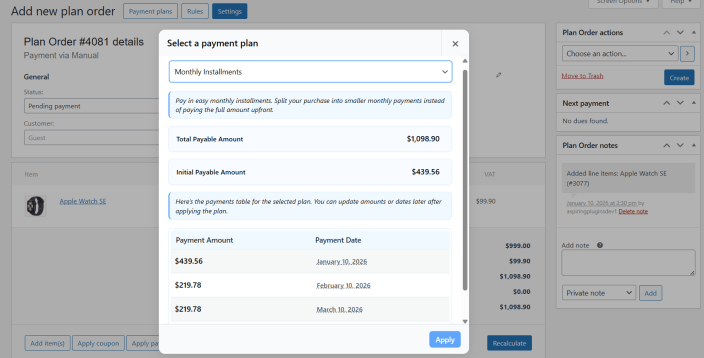
When “Custom payment schedule” type is selected, the site admin can set installment amounts and schedule each payment from the purchase date, either on a fixed date or after a selected number of days, weeks, months, or years.
When “Fixed payment schedule” type is selected, the site admin can set installment amounts and define a fixed payment timing, such as every X weeks, months, or years on a chosen dayfor predictable billing.
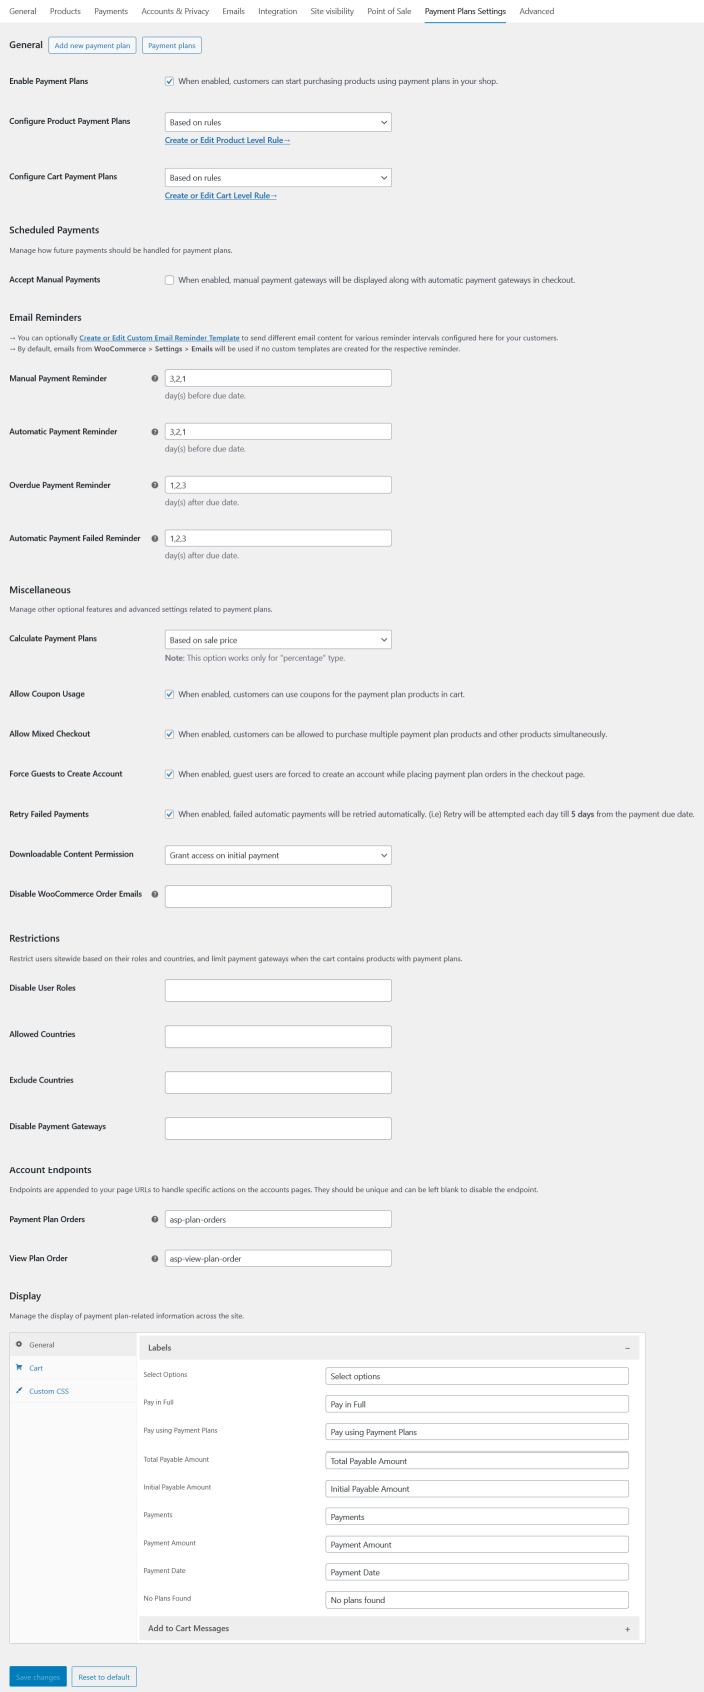
You can configure payment plans in 2 ways under: WooCommerce > Settings > Payment Plans Settings > Configure Product Payment Plans
Based on Rules (default)
Based on Storewide& Productwide
Based on Rules
Use the “Create or Edit Product Level Rule” option to create flexible rules that allow you to assign payment plans to specific products or categories for your customers.
Based on Storewide & Productwide
Use the “Product Level Payment Plans – Storewide” section to assign payment plans to all products in your store.
If you do not want to apply payment plans storewide, you can skip this section and configure payment plans individually by navigating to:
If you want your customers to choose a payment plan on the cart or checkout page based on the cart items and subtotal range, this option is right for you. It allows all items in the cart to be purchased under a single payment plan.
You can configure payment plans in 2 ways under: WooCommerce > Settings > Payment Plans Settings > Configure Cart Payment Plans
Based on Rules (default)
Based on Storewide
Based on Rules
Use the “Create or Edit Cart Level Rule” option to create flexible rules that allow you to assign payment plans based on the cart subtotal range, for specific products or categories, for your customers.
Based on Storewide
Use the “Cart Level Payment Plans – Storewide” section below to assign payment plans to any regular products added to the cart.
Site admins can manually create and assign a plan order to a customer. This workflow is similar to creating a manual order in WooCommerce.
Navigate to WooCommerce → Payment Plan Orders → Add Plan Order.
Under the General section:
Assign the customer.
Add the required billing details.
Add product(s) by clicking the Add item(s) button.
(Optional) If you want to offer a discount, apply a coupon to the line totals before taxes.
Click the Recalculate button to update the order totals.
Click Apply Payment Plan and select one of your previously created payment plans.
Once the payment plan is successfully applied, the future payment orders will be created immediately.
If you want to switch to a different payment plan, click Apply Payment Plan again and select a new plan. This will override the previously applied plan.
Set the order status to Pending payment under the General section.
In the Plan Order Actions meta box, select Send invoice details to customer.
Click Create to create the plan order.
The payment plan order will now be successfully created and assigned to the customer.
An initial payment invoice email will be sent to the customer with a Pay Link to complete the first payment.
Once the initial payment is successful, the future payment orders will be scheduled automatically according to the selected payment plan.
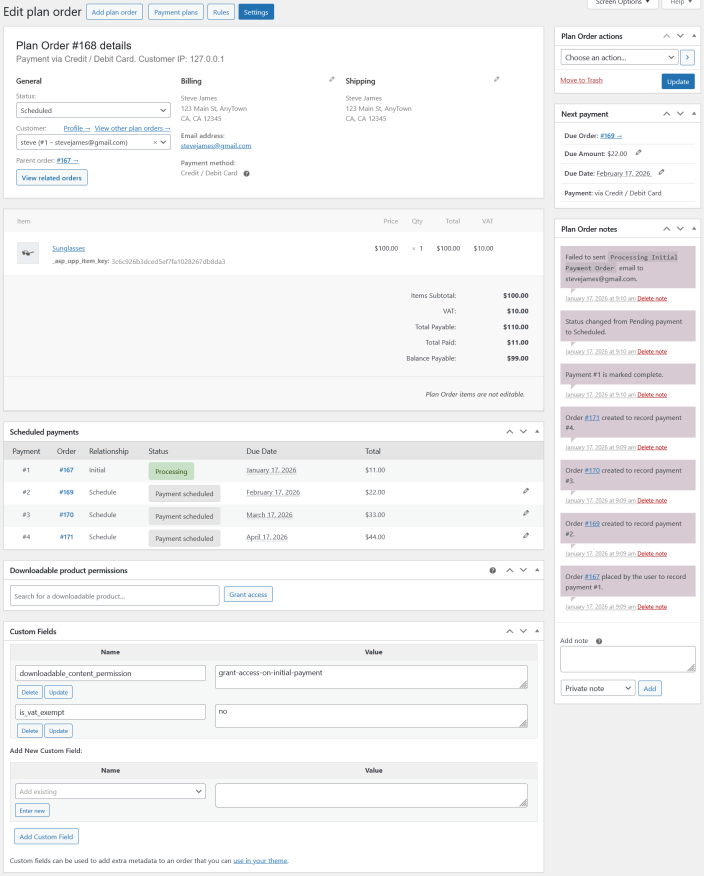
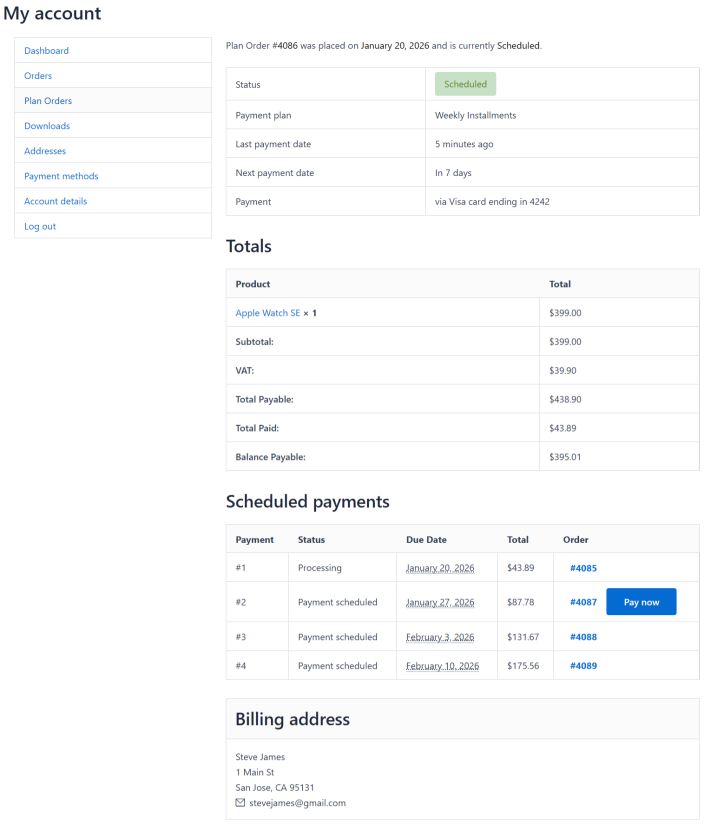
Each Plan Order status indicates the current state of the plan and how future scheduled payments are handled. Below is an explanation of each status and when it should be used
Pending Payment
The initial payment has not yet been completed
The system is awaiting payment confirmation from the customer
No scheduled payments will be processed until the initial payment is completed
Scheduled
The next payment is scheduled and no payment is currently due
Indicates that the customer is up to date with payments
Useful if you want to resume and re-schedule all future payments
On-hold
A payment has reached its due date and is awaiting completion
If you want to edit the scheduled payment amount or date, you can do so by clicking the Edit icon under each scheduled payment, as shown in the screenshot below.
If you want to send the next scheduled payment invoice to the customer immediately, select “Send invoice details to customer” under the Plan Order Actions metabox.
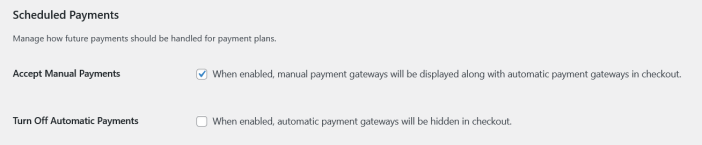
Our plugin supports both Automatic Payments and Manual Payments for Payment Plan products. You can choose how scheduled payments are collected based on your business requirements.
Automatic payments allow customers to be charged automatically on their scheduled due dates.
When a customer purchases a Payment Plan product using a supported automatic payment gateway, their future scheduled payments are charged automatically using the saved payment token created by the gateway during the initial checkout.
Key points:
Customers do not need to return to your site to make scheduled payments.
Payments are processed automatically on each due date.
Requires a supported payment gateway that supports payment tokenization.
If your customers are currently using manual payments for their scheduled payments and you want their remaining future payments to be charged automatically, follow the steps below to enable automatic payments.
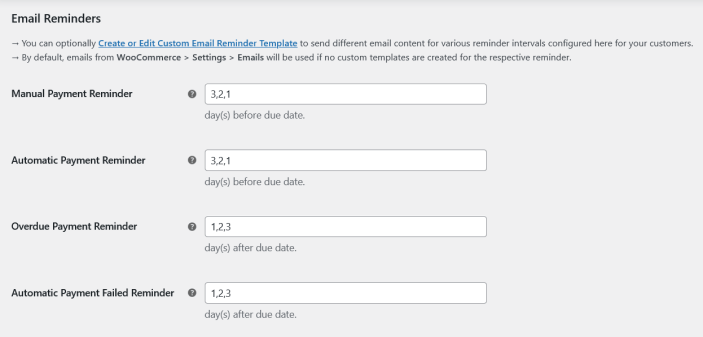
This section explains how scheduled payments are handled when payments fail or become overdue, based on whether customers are using Automatic Payments or Manual Payments.
If your customers are using Automatic Payments and a scheduled payment fails due to reasons such as insufficient funds, an invalid card, or an invalid payment token, the plugin automatically retries the payment.
How Automatic Payment Retries Work
Payment retries are attempted automatically for 5 days from the payment due date.
Both the customer and the site admin are notified immediately when a payment fails.
A retry attempt is made once per day until the payment is successful.
Future scheduled payments are paused until the missed payment is paid.
Manual Payment During Retry Period
During the retry process, the customer receives an email containing a Pay link.
The customer can complete the payment manually using this link.
Once the payment is completed:
The Plan Order status changes back to Scheduled
The next installment is scheduled automatically
If the payment remains unpaid, the Plan Order status stays On-hold
To Configure:
Go to WooCommerce → Settings → Payment Plans Settings → Miscellaneous
You can automatically add a product to the cart with a specific payment plan preselected by using a custom add-to-cart URL.
This is useful for landing pages, marketing campaigns, email links, or custom buttons where you want customers to follow a predefined payment plan without selecting it manually.
add-to-cart – The ID of the product to be added to the cart
force-payment-plan – The ID of the payment plan that should be automatically applied to the product
When a customer opens this URL, the specified product is added to the cart with the selected payment plan already applied, without requiring manual selection on the product page.
⚠️ This works only when the Payment Plan Amount type is set to “Percentage”.
This option allows you to offer a discount only to customers who choose to pay the full amount upfront, while customers who select a Payment Plan continue to pay the full price.
How This Works
By default, the plugin applies only when a customer chooses a Payment Plan. If a customer pays the full amount upfront, the purchase is treated as a regular WooCommerce order and is not managed by the plugin.
This behavior allows you to use WooCommerce’s built-in pricing to offer discounts for full upfront payments.
Practical Setup
Set the Regular Price of the product to the full price you want customers to pay when choosing a Payment Plan.
Set the Sale Price of the product to the discounted price for customers who choose Full Payment.
With this setup:
Customers who select Pay in Full receive the discounted price
Customers who select a Payment Plan are charged based on the regular price
Example
Regular Price: $1,000
Sale Price: $900
Result:
Customer chooses Full Payment → Pays $900
Customer chooses a Payment Plan → Payment plan is calculated from $1,000
To Configure
Go to WooCommerce → Settings → Payment Plans Settings → Miscellaneous
Under “Calculate Payment Plans”, select Based on regular price
We and our partners process your personal data (such as browsing data, IP Addresses, cookie information, and other unique identifiers) based on your consent and/or our legitimate interest to optimize our website, marketing activities, and your user experience.