Overview
↑ Back to topQuickBooks Integration for WooCommerce plugin by WP Swings connects your WooCommerce store with QuickBooks software. This QuickBooks WooCommerce connector allows you to sync your WooCommerce Invoices, Products, and Customers on QuickBooks.
Installation
↑ Back to top- Download the .zip file from your WooCommerce account.
- Log into your WordPress Dashboard and navigate to Plugins > Add New.
- Click on the Upload Plugin button on top and upload the zip file of the plugin.
- Install the plugin and click Activate to get started.
- Authorize the connection between QuickBooks Online and WooCommerce to start using the plugin.
Setup
↑ Back to topFollow the steps below to learn how to set up this QuickBooks Integration for Woo plugin.
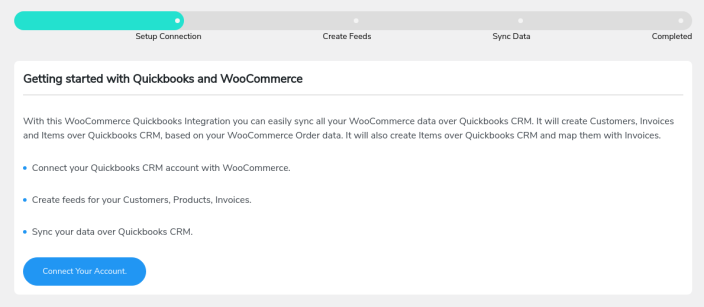
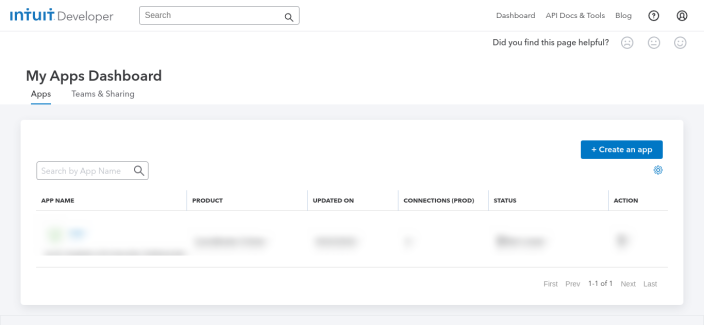
- After installing and activating the plugin, you’ll see this screen asking you to connect your QuickBooks account with the plugin. To do so, go to WP Swings→ QuickBooks Woo on your WordPress admin dashboard. Then, you’ll be able to see the following screen. Click on the button – Connect Your Account.
- There are two ways to connect WooCommerce to your QuickBooks account.
- Direct Login and Authorize
- Log in Through the Custom App
- Using Direct Login and Authorize Method
- Use Global App- To use the Global App you will need to turn on the toggle (By default it is ON)
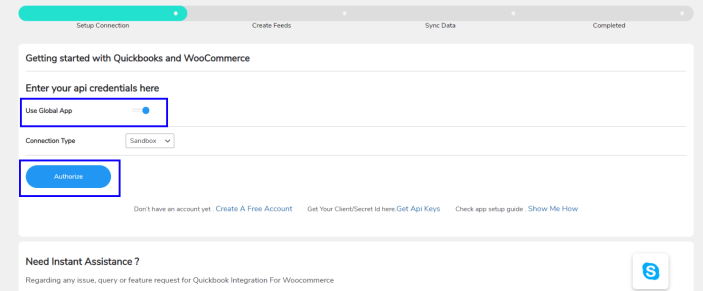
2. Connection Type- Here you will get two options- Production and Sandbox.

- The client can choose any option by their account type, either Sandbox or Production.
3. Next, you will Click on the Authorize button and you’ll be led to the QuickBooks sign-in page.
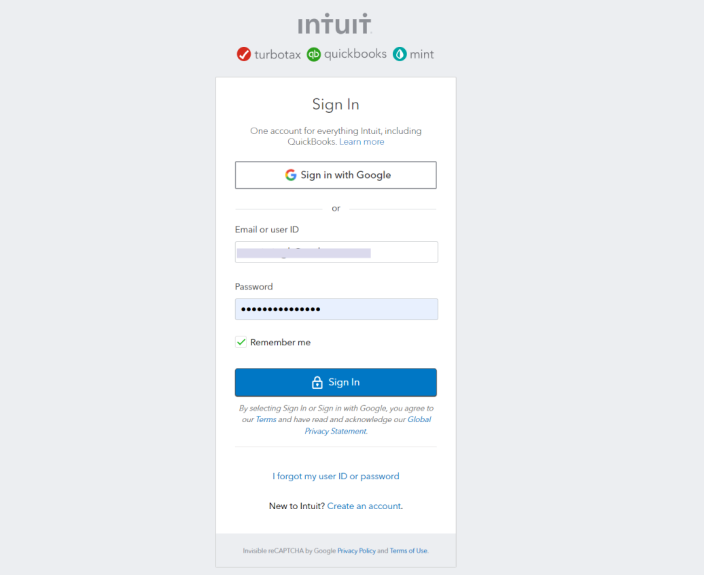
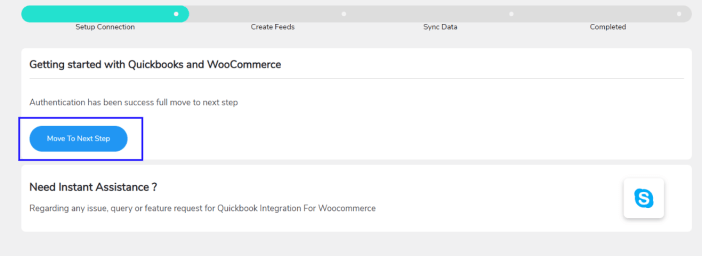
4. Sign in using your QuickBooks ID and after doing that successfully, you’ll be redirected to this page asking you to move to the next step.
- Log in Through the Custom App
- Click on the button- Connect Your Account.
2. Turn Off the Global App toggle and fill in these details:
Client ID
Secret ID
Connection Type
Redirect URI
Here are the steps to get these details.
- Click on the Get API keys link
- You’ll be asked to log in with your QuickBooks account(create a new one if you don’t have any)
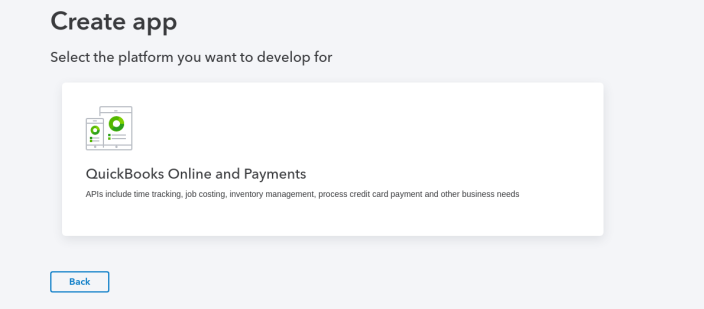
- After logging in you will be redirected to the QuickBooks console where you can create a new application.
- Click on the “QuickBooks Online and Payments” platform.
- Add the name of your app and select the scope.
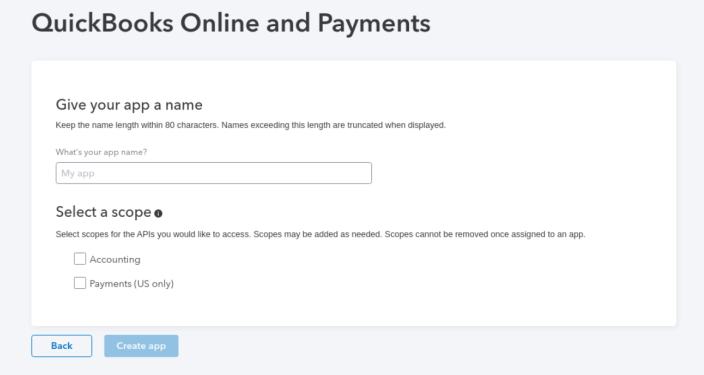
- After that, you need to click on the “Create App” button which will lead you to this dashboard.
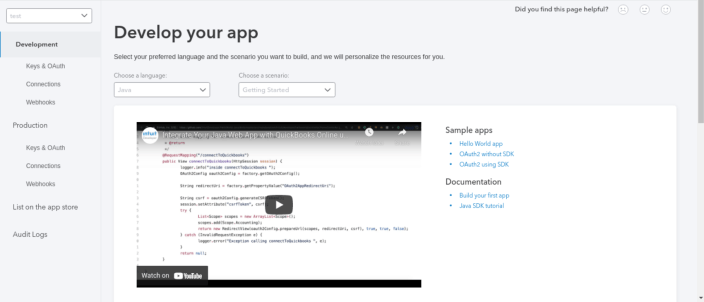
- Click on “Keys and OAuth” under the Development section in the left panel and you’ll see your Client ID and Client Secret there.
Add your website’s URL in the link field under the redirect URIs section.
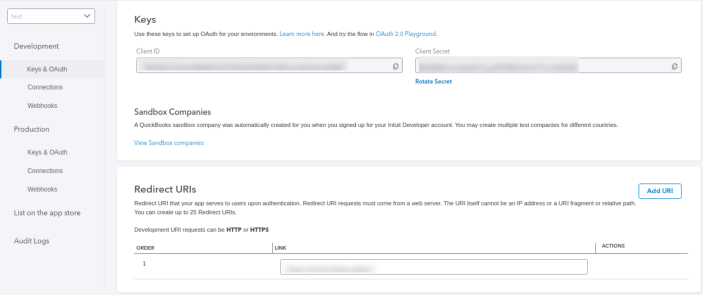
- Copy the Client ID and Secret and paste them into the form in the plugin panel and click on Authorize.
- After clicking on Authorize, you will see this window.
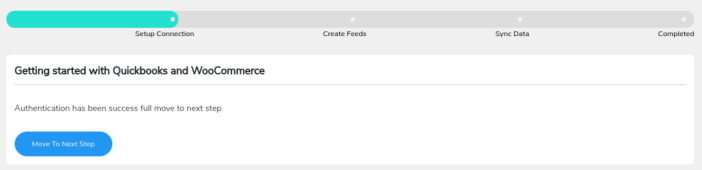
- Click on “Move to the Next Step” to proceed further.
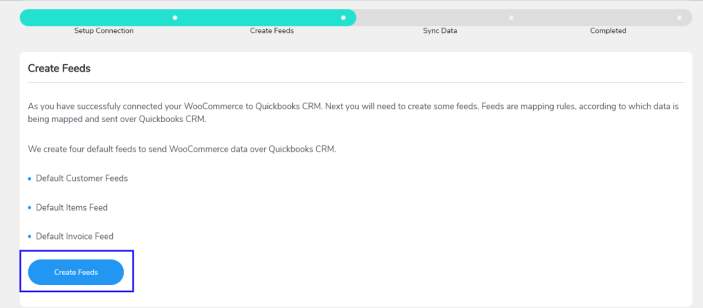
- You’ll then see a window asking you to Create Feeds. Click on the “Create Feeds” button to create them.
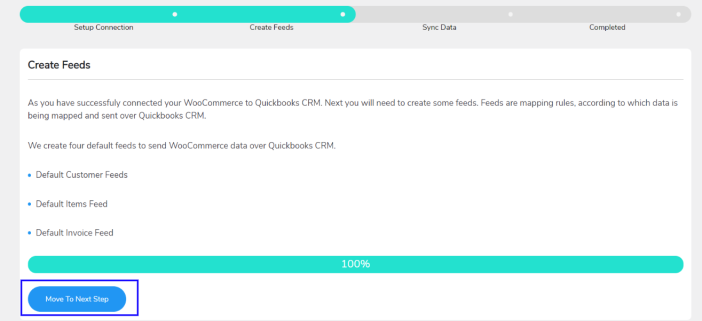
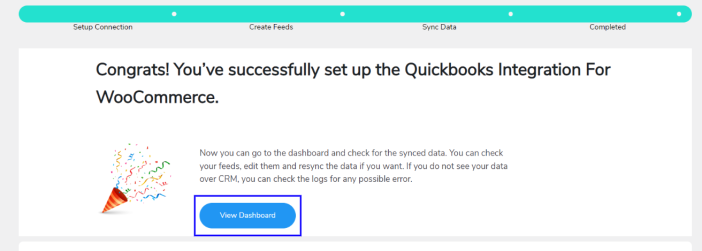
- Once you create the feeds, you’re done. You can now click “Move to Next Step” and then “Complete Onboarding” to complete the setup.

- Clicking on Complete Onboarding will lead you to a window with a button called “Visit Dashboard”. Click on it and you’ll see the dashboard.
- In case your Financial Accounts aren’t mapped with product feeds. A pop-up like this will appear.
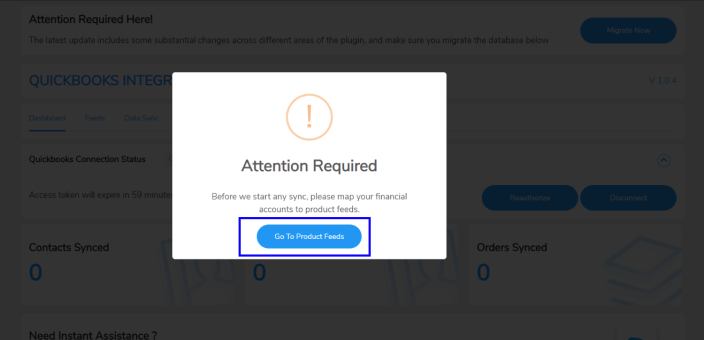
- On clicking the Go To Product Feeds, you will be directed to a page where you will find an additional option- Map QuickBooks Accounts.
- Once you click on that, you will get the following options:
- AssetAccountRef
- ExpenseAccountRef
- IncomeAccountRef
- DepositAccountRef

- You can select and choose from the dropdown menu as per your needs.
- You can map different accounts and if those are not listed you can click on “Refresh Accounts” and then all the new accounts with existing accounts will be listed in the dropdown.
- Next, you will need to click on the Update button
Dashboard
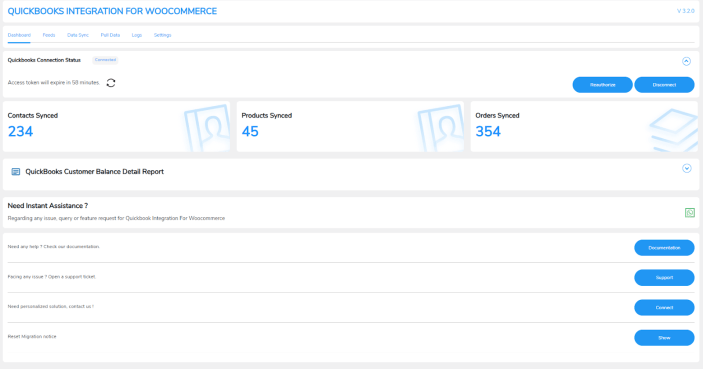
↑ Back to topThe dashboard displays the number of products, contacts, and orders that are successfully synchronized over QuickBooks.
- To disconnect the QuickBooks Woo integration, click on the “Disconnect” button on the plugin’s dashboard.
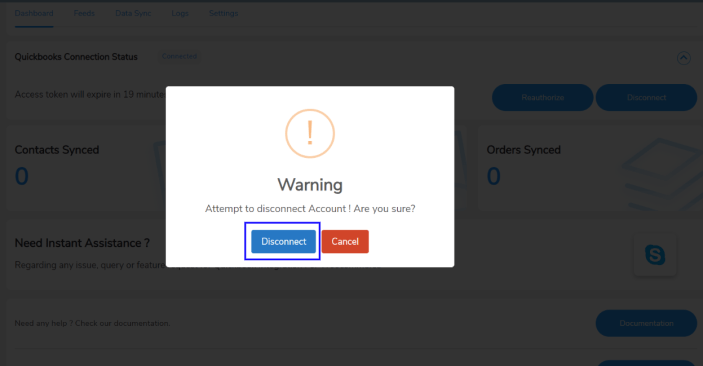
- After you click on it, you’ll get a popup asking you to confirm your decision. Click on Disconnect there. You will be successfully disconnected.
QuickBooks Customer Balance Detail Report
↑ Back to topIn this section, you can view detailed reports for all customers who have invoices created in QuickBooks or WooCommerce
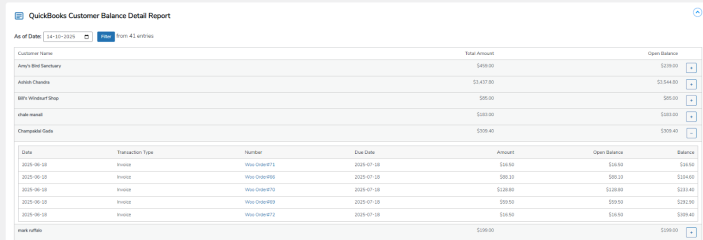
Each report shows the total invoice amount, which updates automatically whenever you add a new invoice or record a payment. You can also filter reports by date to track transactions more easily.
Feeds
↑ Back to topYou can design a set of rules for how your WooCommerce data will be synchronized over QuickBooks using feeds. The QuickBooks integration for WooCommerce plugin offers three alternative default feeds, namely,
- Customers Feed
- Invoices Feed
- Products Feed
- Refund Receipt Feed
- Customer Feed:-
1.1 Primary Email Address
1.2 Currency Label
1.3 Currency Code
1.4 Primary Phone Number
1.5 Billing Latitude
1.6 Billing Longitude
1.7 Billing City
1.8 Billing Country
1.9 Billing Line 1
1.10 Billing Zip Code
1.11 Billing State
1.12 Shipping Latitude
1.13 Shipping Longitude
1.14 Shipping City
1.15 Shipping Country
1.16 Shipping Line 1
1.17 Shipping Zip Code
1.18 Shipping State
1.19 Middle Name
1.20 Notes
1.21 Suffix
1.22 Company Name
1.23 Family Name
1.24 Print On Check Name
1.25 Display Name
1.26 Given Name
1.27 Fully Qualified Name
1.28 Title
1.29 Web Address URI
1.30 Preferred Delivery Method
1.31 Is Project
1.32 Domain
1.33 GSTIN
1.34 Active
- Invoice Feed:-
2.1 Doc Number
2.2 First Name
2.3 Last Name
2.4 Billing Address Line1
2.5 Billing Address Line2
2.6 Billing City
2.7 Billing Country
2.8 Billing State
2.9 Billing Zip Code
2.10 Shipping Address Line1
2.11 Shipping Address Line2
2.12 Shipping City
2.13 Shipping Country
2.14 Shipping State
2.15 Shipping Zip Code
2.16 Shipping From Address Line1
2.17 Shipping From Address Line2
2.18 Shipping From City
2.19 Shipping From Country
2.20 Shipping From State
2.21 Shipping From Zip Code
2.22 Customer Id
2.23 Customer Name
2.24 Currency Label
2.25 Currency Code
2.26 Billing Email Name
2.27 Print Status
2.28 EmailStatus
2.29 Customer Memo value
2.30 Transaction Date
2.31 Tracking Num
2.32 Deposited Amount
2.33 Balance Amount
2.34 Due Date
2.35 Apply Tax After Discount
2.36 Total Tax
- Product Feed:-
3.1 Name
3.2 SKU
3.3 Fully Qualified Name
3.4 Taxable
3.5 Unit Price
3.6 Item Category Type
3.7 Item Type
3.8 Purchase Cost
3.9 Track Quantity On Hand
3.10 Quantity On Hand
3.11 Inventory Start Date
3.12 Purchase Description
3.13 Description
3.14 Purchase Tax Included
You can customize your feeds with the settings that come with them. Click on the Edit icon to access those settings.
- To add a new feed using WooCommerce objects, Click Add Feeds. Add the title of the new feed
Here are the settings you get under the feeds:
Select Object: This setting lets you select the WooCommerce object you want to sync the data for.
There are six objects available for creating feeds: Customers, Invoices, Products, Refund Receipts, Sales Receipts, and Estimates.
Map Fields: This setting helps you map a field to the value it will contain. For example, you can map a Billing Address field with the address to make sure it stores the correct value.
Add New Field: This setting helps you add a new field in the feed. If you want to sync some other data, you can add that field to the respective feed.
Primary Field: This setting helps you choose a field that will work as a primary key.
Select Event: This setting lets you select the event that triggers the data synchronization.
- Click Publish/ Update in the right panel or Back to Feeds which will take you back to your dashboard in case you want to edit more.
Condition Filter in Feeds
With this new feature of filter in feed, you may sync the data over QuickBooks as per your choice, just by applying filters over feeds. The filters available for you are many; you can filter the feeds according to dates, exact matches, numbers, texts, and many more…

Invoice Status
This new feature will automatically update the status of the invoice in QuickBooks as PAID, once the order/ payment is set to complete on your WooCommerce store. Now, you may automatically create customers and invoices with updated status when purchases are made on your WooCommerce online store by using the WooCommerce to QuickBooks plugin.

Filter For Errors
As you may already know, the QuickBooks Integration plugin offers a thorough WooCommerce Quickbooks sync log report that enables you to quickly identify errors. Using the new filter for errors functionality, you can now filter out all these errors from the logs area while data syncing.

Shipping Charges Syncing
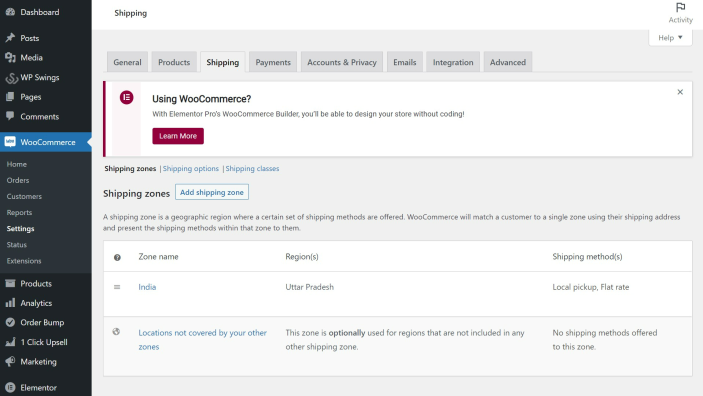
Integrate WooCommerce with QuickBooks and completely automate your accounting. No need to manually enter invoices, customers, or products again. No Synchronization Limits; the plugin supports unlimited real-time sync of orders, customers, inventory, and shipping charges as well.
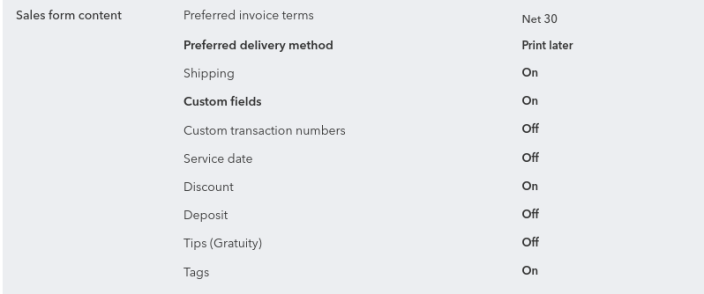
To enable shipping charges syncing; Go to Settings > Account & Settings > Sales > Sales Form Content, and ensure the checkbox for Shipping is checked.
Syncing of Tax Value and Tax Rate
↑ Back to topNow, the tax value and tax rate will also be synced to QuickBooks invoices along with the orders with the help of this latest feature of QuickBooks, i.e. QuickBooks syncing including necessary tax details.
Make sure to generate the same tax rate at the QuickBooks invoicing end as well in order to avoid any syncing errors.
Data Sync
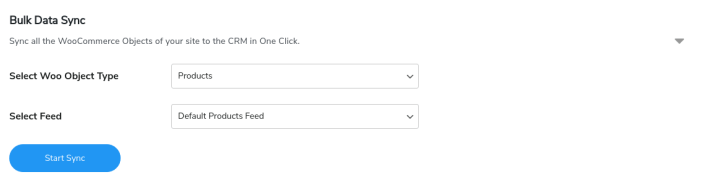
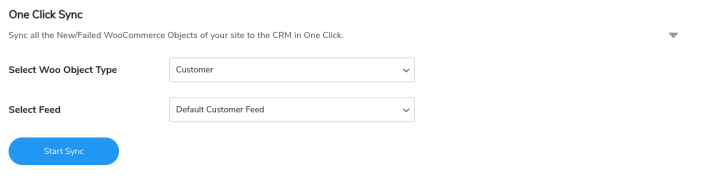
↑ Back to topThe data sync tab helps you with data synchronization. You get 2 different options here:
- Bulk Data Sync: Bulk Data sync synchronizes all the data(including historical data) of the selected object.
- One-Click Sync: One-click Sync synchronizes only the newly added data of the selected object or the one that failed to sync earlier.
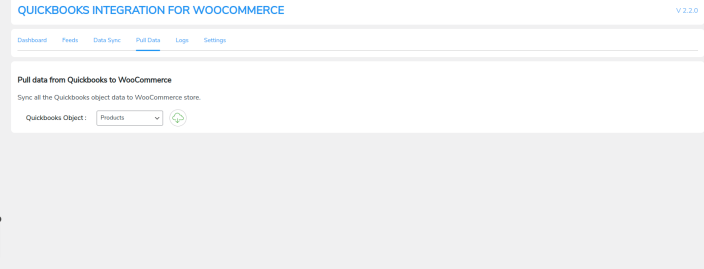
- Two-Way Sync for WooCommerce Products: With Two-way sync, you can pull the products created in QuickBooks with one click and enable the option to create the products in your WooCommerce store.
Logs
↑ Back to top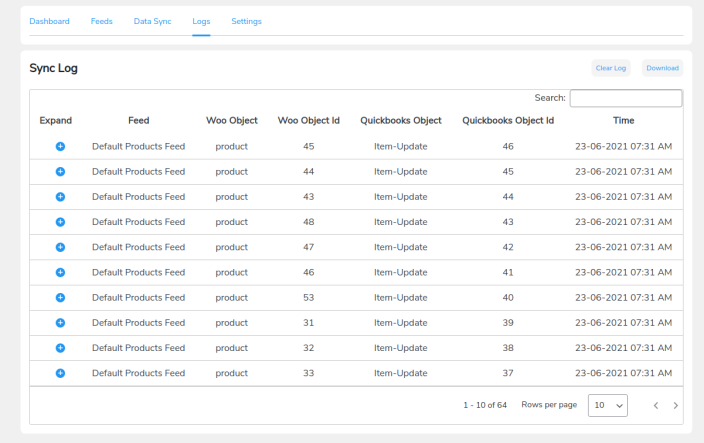
The Logs section shows any errors that occurred during the data sync process. This tab contains multiple details for each log. Here are those:
- Feed: Displays which feed the error occurred in.
- Woo Object: Displays the WooCommerce object.
- Woo Object Id: Displays the WooCommerce object ID.
- QuickBooks Object: Displays the QuickBooks object.
- QuickBooks Object Id: Displays the QuickBooks object ID.
- Time: Displays the timestamp at the error occurred.
Settings
↑ Back to top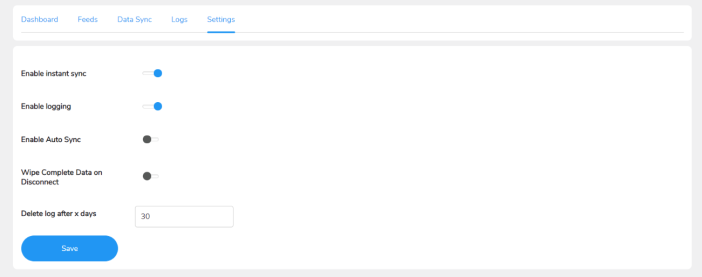
You get 3 settings here:
- Enable instant sync: When you enable this toggle, WooCommerce data is instantly synced to QuickBooks. If you turn off this option, you’ll have to manually sync the data from the Data Sync tab.
- Enable logging: Enabling this option allows you to save sync log errors. If you deactivate this option, no logs will be saved.
- Enable auto-sync: Enabling this option will sync all your data in the background.
- Wipe complete data on disconnect: If you enable this toggle, all the data you’ve synced over QuickBooks will be deleted once you disconnect the plugin.
- Delete log after x days: This option will let you select the number of days you want to store the sync logs. For example, selecting 30 days will store the logs for 30 days and be deleted after that.
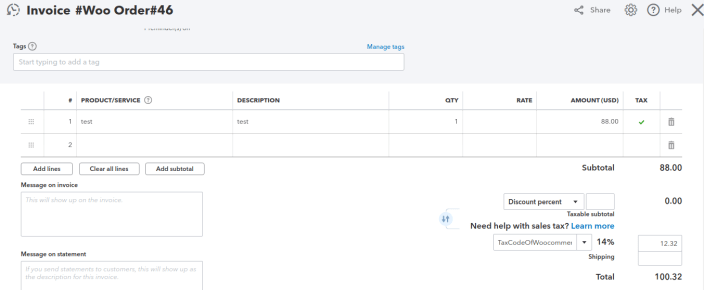
Unit Price/Rate Syncing in Invoice on QuickBooks
↑ Back to topThe product’s price will sync on QuickBooks as the unique price that will be seen in the Rate section of QuickBooks.
Product individual prices will sync on columns of invoice line items in QuickBooks.
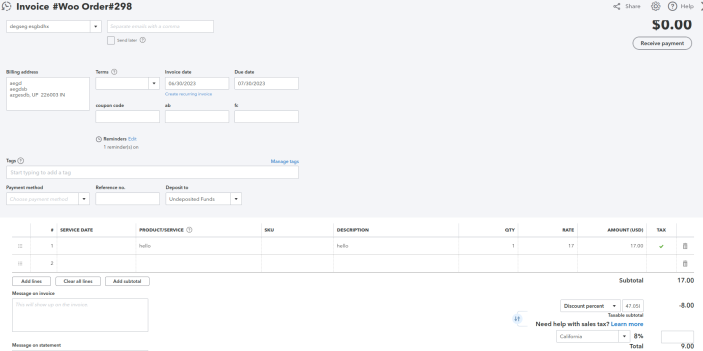
Syncing Discounts Data To Invoice Module
↑ Back to top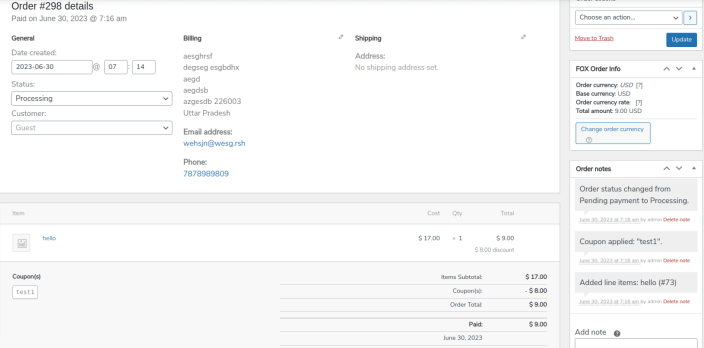
Invoice feeds can be used for synchronizing discount data applied to orders using coupons. By leveraging invoice feeds, you can ensure that the QuickBooks Invoice module accurately reflects both the absolute discount value and the discount percentage, regardless of the discount type (whether fixed or percentage).
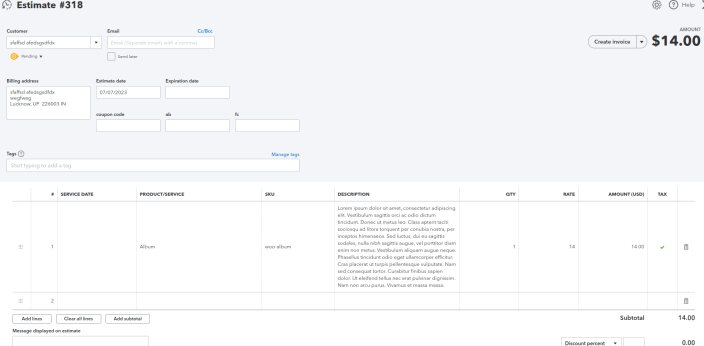
Fetch Key Data With Sale Receipt and Estimate Objects
↑ Back to top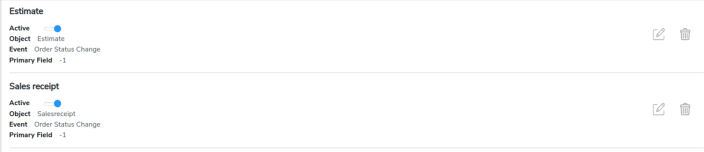
The Sales Receipt object in QuickBooks WooCommerce Integration allows you to accurately track and record customer payments. It monitors various forms of payment, including cash, checks, credit card payments, and other payment methods, ensuring accurate financial management and reporting.
The Estimate object is used to create feeds that sync data about quotes or bids sent to customers. This data includes the potential costs of products or services you intend to sell, as well as their pricing and the terms of the sale. This data is sent to the Estimate QuickBooks module.
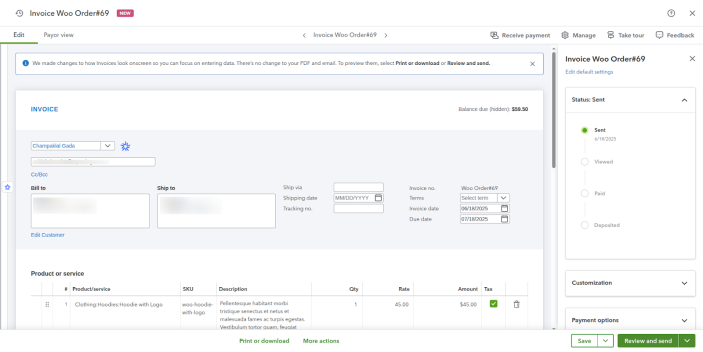
Sending Invoices on Unpaid Orders
↑ Back to topSending invoices over unpaid orders became much easier, just toggle the “Send invoice for unpaid orders” option in the settings

and your customers will automatically receive the invoice email for their unpaid order, you can also trigger the emails manually from the QuickBooks dashboard
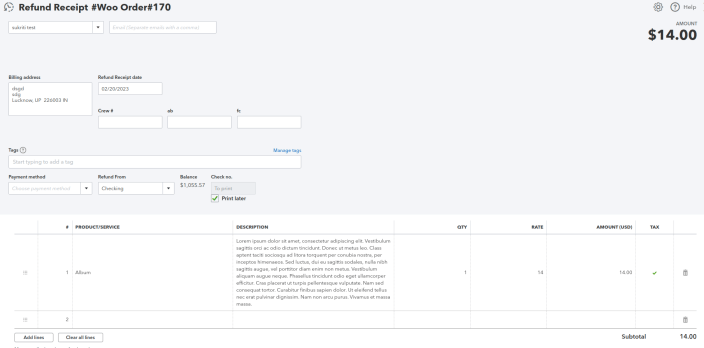
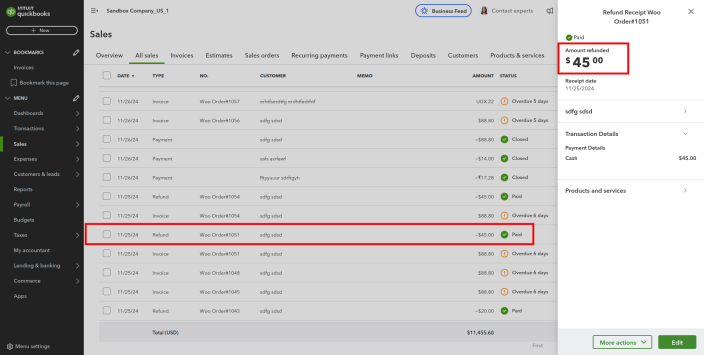
Refund Receipt Syncing While Order Refunded From WooCommerce
↑ Back to topIn case the customer’s order is refunded from WooCommerce, the object will be created on QuickBooks as a refund receipt.

The refund receipt generated is shown here:
Auto Sync Payment Details
↑ Back to top
WooCommerce QuickBooks Integration plugin automatically syncs payment details with QuickBooks. When a payment is completed in WooCommerce and an invoice is created, the payment information is instantly synced to QuickBooks.
Auto Sync Partial Refund
↑ Back to topWhen an order is marked as “refunded” in WooCommerce, the refund details—whether partial or full—are automatically updated in QuickBooks.
This ensures your financial records stay accurate and up to date, making refund management simple and hassle-free.
Sync SKU in Items and Invoices
↑ Back to topYou can sync SKUs between your products and invoices. You can enable or disable this feature directly from the plugin settings.

When a product has an assigned SKU, it will automatically sync with the corresponding items and invoices in QuickBooks.
Important: To use this feature, ensure the “SKU for Invoices” option is enabled in your QuickBooks account.
Follow these steps to activate it:
- Navigate to Settings > Account and Settings > Sales > Products and Services.
- Check the option for “Show SKU Columns”.
This ensures SKUs are properly displayed and synchronized across your invoices and items.
Sync User Browser Info and IP address
↑ Back to topYou can set up fields in the feed to capture and sync user details like IP addresses and browser information with QuickBooks.
This helps improve reports, gives better insights into user activity, and adds an extra layer of security by making it easier to spot unusual activity. To do this, go to the feed settings, add fields for IP and browser info, map them to QuickBooks, and test to make sure everything works smoothly.
Two-Way Deletion For WooCommerce Products
↑ Back to topWhen you move a product to the trash in WooCommerce, it automatically becomes inactive in QuickBooks. Similarly, if you mark a product as inactive in QuickBooks, it is moved to the trash in WooCommerce.
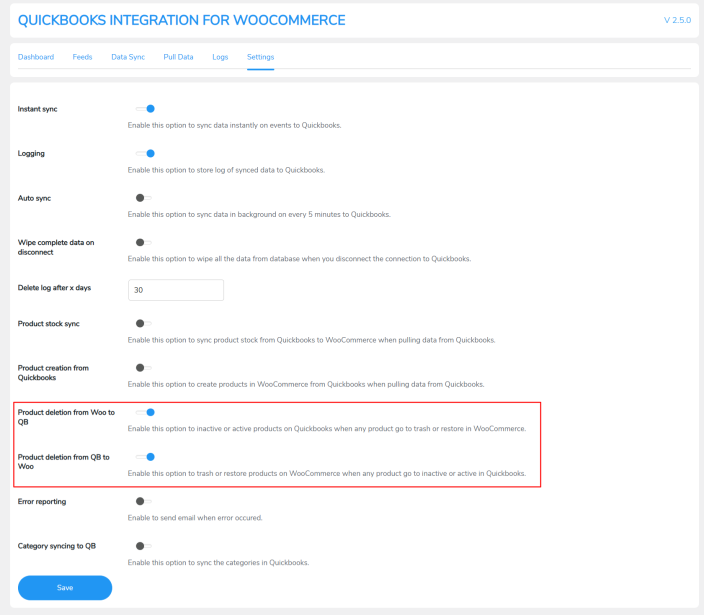
Restoring a product from the trash in WooCommerce reactivates it in QuickBooks, and the same happens if you reactivate it in QuickBooks. This process works seamlessly for both simple and variable products.
Quickbooks Invoices for Customers
↑ Back to top
QuickBooks Integration plugin adds a dedicated tab to the “My Account” page, giving customers quick access to download their QuickBooks invoices directly from their accounts.
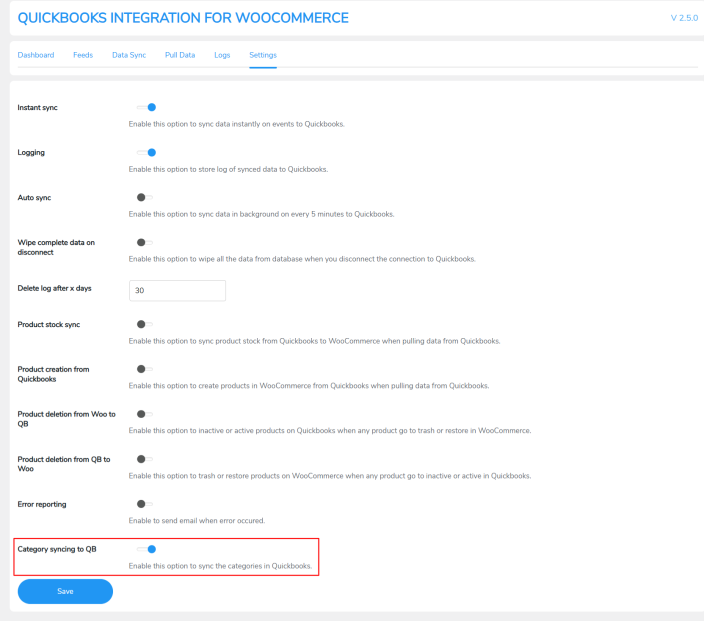
Sync Product Categories
↑ Back to topWith our QuickBooks integration plugin, you can easily sync parent and child product categories. Once synced, these categories will appear under the products in your QuickBooks dashboard, helping you manage product information more accurately and keeping it updated.
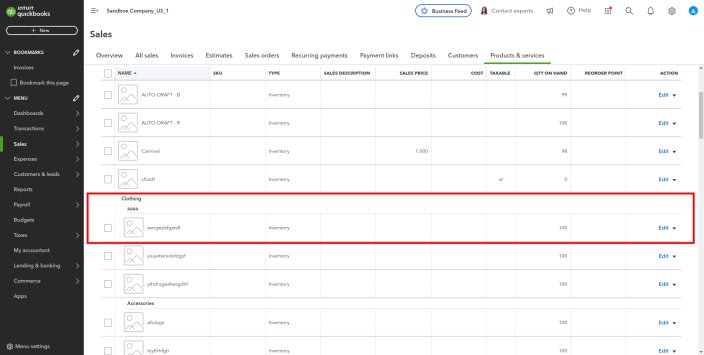
You can enable and disable this option from the settings.
Sync WooCommerce Base Currency Over QuickBooks
↑ Back to topWhen the order is placed on a WooCommerce store, the invoice currency of that particular order will be similar to its base currency. It means the base currency of the WooCommerce order will sync over the invoice of that particular order.
Suppose, the WooCommerce order is placed:
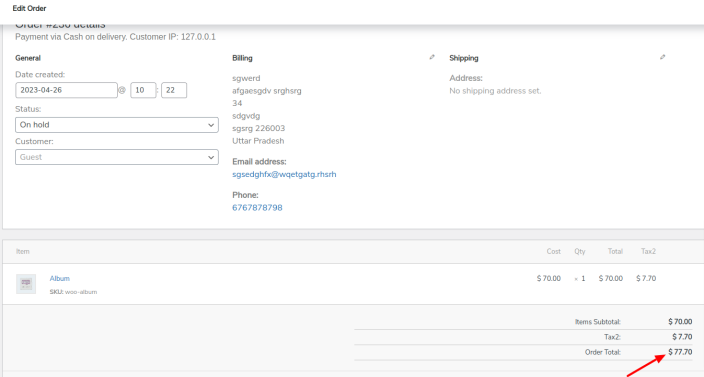
Then, the base currency and invoice currency are the same as you can see:

Compatible With Fox Currency Switcher Plugin
↑ Back to topOrder currency will sync precisely the same as it was before on QuickBooks. QuickBooks home currency will not matter in this case.
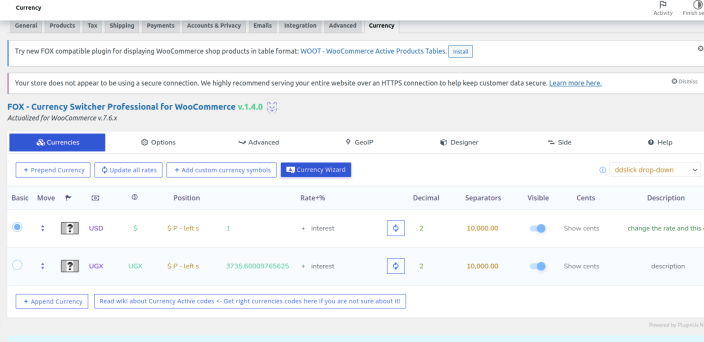
Here is the setting of the FOX Currency Switcher plugin on which the price will be calculated during the checkout:
When the WooCommerce order currency is switched through this switcher plugin, the currency and price of that particular order will sync correctly.
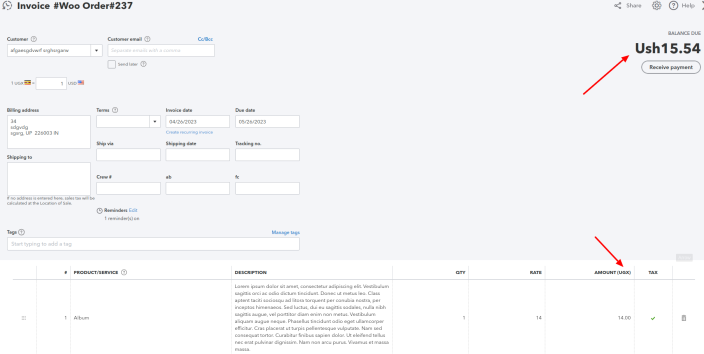
Suppose, the order is placed on the WooCommerce store and its currency is in UGX:

Then, you see that its currency is synced on QuickBooks correctly irrespective of its home currency via the switcher plugin:
Compatible With WooCommerce HPOS
↑ Back to topQuickbooks integration for WooCommerce is compatible with WooCommerce High-Performance Order Storage (HPOS) is an easy-to-understand and solid database structure that uses an alternative storage mechanism for Order Tables to ensure the smooth workflow of your WooCommerce Store.
To Enable HPOS Follow these steps:
Firstly, make sure your WooCommerce version is updated with the latest 8.0. After that navigate to WooCommerce > Settings > Advanced > Features and choose the High Performance Order Storage option for orders.

You can switch between data storages freely to sync the data between the tables.
For more information, refer to the WooCommerce HPOS Documentation
FAQs
↑ Back to topQ1. Can this plugin help in creating invoices?
This plugin will help in creating Customers, Items, and Invoices over QuickBooks.
Q2. Can we sync the data with the Quickbooks plugin?
Yes, we have given two options for this: Bulk sync and One-click Sync which you can choose according to your need.
Q3.Can we sync the tax value and tax rate as well?
Yes, if you need to sync the tax value or tax rate both things you can do with our Quickbooks plugin
Q4. What is the difference between Bulk sync and One-click Sync?
Bulk Sync: Syncs all the data of a particular object.
One-click Sync: Syncs only the newly added data or the one that failed to sync earlier.
Q5. I don’t want to sync all the data automatically, what options can we opt for?
We have given the option of Manually syncing data so that you can choose the manual option too.
Q6. Can we check sync error logs with the Quickbooks plugin?
Yes, there is an option in the backend where you can check all your logs.
Q7. Can the logs be deleted automatically after some days?
Yes, you can set the number of days you want to store the logs. They’ll be deleted after the set days.
Q8. We want to delete some data from the plugin, is this possible?
Yes, with this plugin you can delete plugin data as you want.