This Bookings use case will walk through how to use WooCommerce and WooCommerce Bookings to set up different levels of tickets for entry to a museum, with different limitations on the times entry is allowed.
The tickets also include scannable barcodes for entry. This feature is powered by the WooCommerce Order Barcodes plugin.
Scenario
↑ Back to topSusan is the director of a local museum and wants people to book online to help manage museum numbers and for visitor convenience.
Requirements include the following:
- The museum is closed on Mondays, Christmas and January 1
- For all other days and dates, visitors can buy a ticket for use on that date without a specific entry time
- Adult price is $10 per ticket, and child price is $5 per ticket
- Maximum number of people each day is 250
- On Sunday, adults pay half price and child tickets are free
- Visitors must print their booking receipt as the barcode on it will be used to verify their ticket upon entry (this optional feature requires the WooCommerce Order Barcodes plugin)

Products Used
↑ Back to topSetup and Configuration
↑ Back to topCreating a Bookable Product
↑ Back to top- In the sidebar of your WordPress Admin, click on Products.
- Click on the Add New button on the top.
- Add a title for your new product, such as “Museum Ticket.”
- Under Product data select Bookable Product.
General Settings
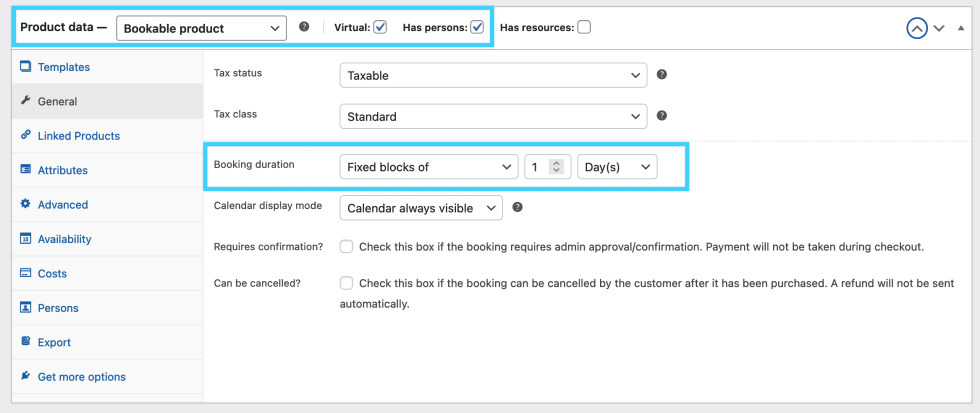
↑ Back to top- On your newly created Bookable Product, or on an existing Bookable Product you are editing, scroll down to the Product Data > General tab.
- Check the Virtual box to indicate that this product is virtual, as there is no physical item to be delivered. This will cause orders for these tickets to be automatically marked as Complete once they are paid.
- Check the Has persons box to indicate that each ticket purchase might be for more than one person at a time. This setting will also allow you to set up different levels of ticketing.
- Set the Booking Duration to be Fixed Blocks of 1 Day, as the tickets are for a specific date but not for any specific time or duration on that date.
Setting the Availability
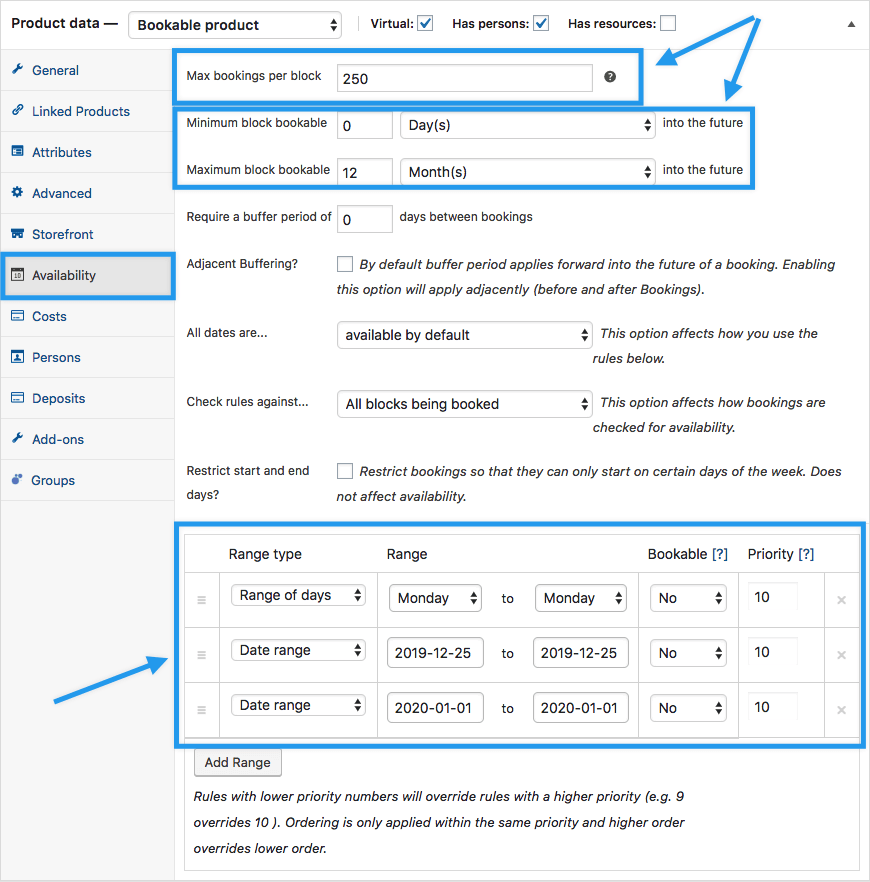
↑ Back to topIn the Product Data box, click on the Availability tab. Here, we will set the days and dates that tickets are available.
- Set Max bookings per block to 250 to limit tickets to 250 visitors per day.
- Set Minimum block bookable and Maximum block bookable for allowed days in advance tickets can be purchased. In our example here, we are using a 0 day minimum, meaning same-day ticket sales are allowed, and a 12 month maximum, meaning tickets can be purchased for dates up to a year in advance.
- Set All dates are… to “available by default” and then use the Range type and Days/Dates to prevent sales for Mondays, December 25, and January 1. Note that the specific dates are not recurring, so December 25 and January 1 of each future year will have to be added here going forward. More info on these rules can be found at: Create a Bookable Product.
Setting up Persons
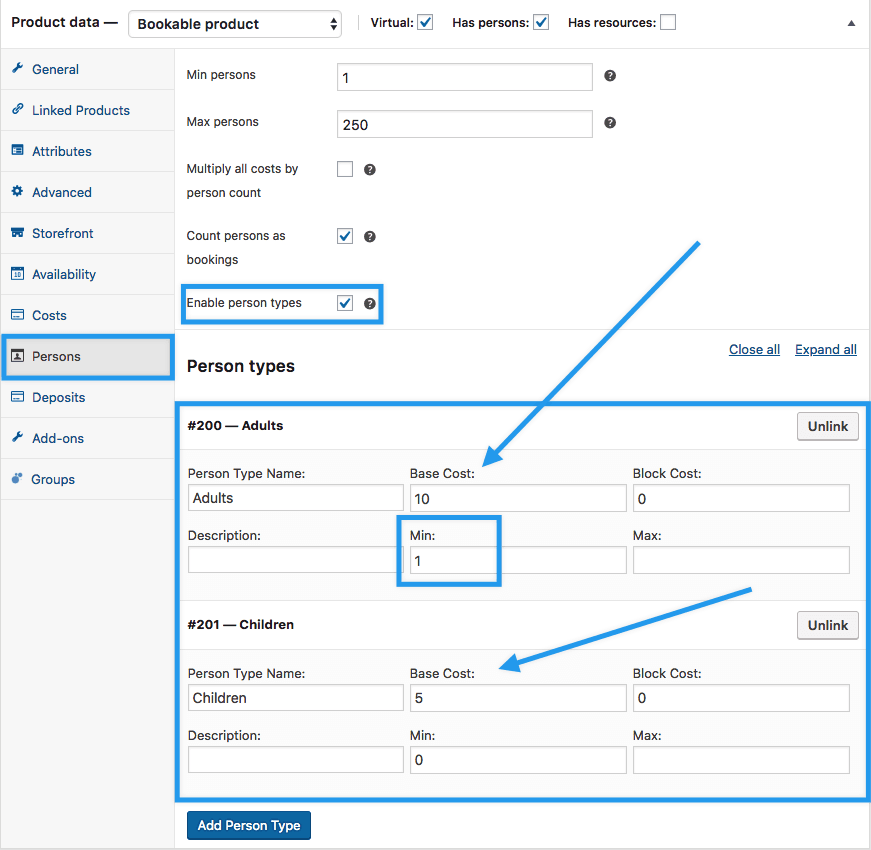
↑ Back to topIn the Product data box, click on the Persons tab. Here, we will set up the types of tickets (Adult and Child) and set prices for each.
- Set the Min persons and Max persons to the total number of tickets allowed in a single purchase. Here, we have set a minimum person count to 1, meaning at least 1 ticket must be purchased with each transaction. We have set the maximum to 250, which would allow a customer to effectively “book out” the entire museum for a day, as the overall Max Bookings Per Block is 250, i.e. maximum of 250 visitors per day.
- Check Count persons as bookings – this ensures that each ticket is counted towards the 250 per day maximum number of visitors.
- Check Enable person types – this option will allow the creation of different types of tickets, i.e. Adult and Child.
- Click the Add Person Type button to add a new person type. Give the new person type the name “Adults” with a base cost of $10. Set the Minimum to 1, which means each purchase of museum tickets must include at least one Adult ticket.
- Click the Add Person Type button again to add a second person type. Give the new person type the name “Children” with a base cost of $5 and set the minimum in this case to 0, as adding Child tickets is optional.
Setting the Discount on Sundays
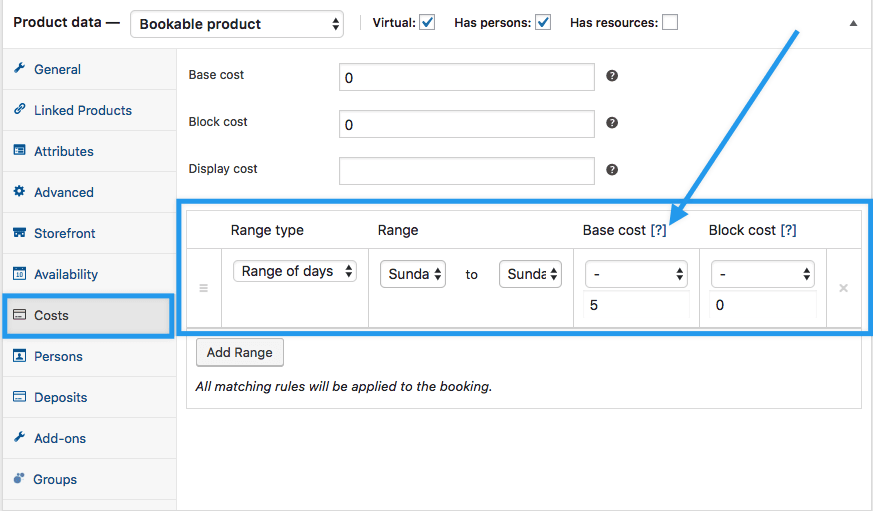
↑ Back to topIn the Product Data box, click on the Costs tab. Follow these steps to set up the discount that applies to tickets on Sundays:
- For this scenario, leave the Base, Block, and Display costs at 0, as there is no basic cost to booking a ticket; the ticket prices alone (set in the Persons tab) represent the overall cost of entry.
- Under Range type, set up a range of days that is Sunday to Sunday, with a Base cost of -5 to offer a $5 discount on all tickets on Sundays. This effectively reduces the Adult ticket from $10 to $5 (i.e. half price) and the Child ticket from $5 to $0 (i.e. free).
Publishing the Product
↑ Back to topAs with all WooCommerce Products, you can optionally add a Product Image, Product Categories, and Product Tags for the Museum Tickets product.
Then, publish the product using the blue Publish button in the top right corner.
Adding Barcodes
↑ Back to topThis feature is optional and requires the use of WooCommerce Order Barcodes.
If you have purchased and installed the WooCommerce Order Barcodes plugin, be sure to activate it and configure settings at: WooCommerce > Settings > General > Barcodes. Setting up the plugin will automatically add barcodes of your chosen configuration to all orders; when customers receive their order confirmation email, the barcode will be included in the email for printing.
More detailed instructions and information on how to set up scanning of barcodes for entry at: WooCommerce Order Barcodes Setup and Configuration.
Customer View
↑ Back to topThis is what the visitors to the website will see:

After placing a ticket order, the Thank You page will reflect booking information and also show the barcode for scanning, if using WooCommerce Order Barcodes.

Ask customers to print or download this page or their order confirmation email and bring it with them because the barcode is needed to verify validity of payment.
Questions and Feedback
↑ Back to topDo you have a question before you buy? Please fill out this pre-sales form.
Already purchased and need some assistance? Get in touch with a Happiness Engineer via the Help Desk. Please ensure you are logged into the WooCommerce.com account you made your purchase from.