Odoo Integration for WooCommerce adds powerful integration features to connect your WooCommerce Store with your Odoo business management software.
• Multi-Language Support: The plugin now accommodates multiple languages, making it more accessible for a global user base.
• Successful Connection Indicator: A visual indicator has been added to confirm a successful connection between your WooCommerce site and Odoo, ensuring seamless integration.
• Enhanced Order Processing: The plugin now supports importing orders based on their status in WooCommerce and allows for real-time updates between the two platform.
Installation:
↑ Back to top- Download the .zip file from your WooCommerce account.
- Go to: WordPress Admin > Plugins > Add New and Upload Plugin with the file you downloaded with Choose File.
- Install Now and Activate the plugin.
Installation FAQ:
↑ Back to topWhat do I need to get started?
To start with the installation and configuration of Odoo, it is important to have an Odoo account and be familiar with the specific version of Odoo being used. Additionally, the following modules are necessary to be installed and activated in the Odoo database: Sales, Invoicing, Accounting, and Inventory.
What Odoo Modules are required?
The following modules are required to be installed and activated in your Odoo database: Sales, Invoicing, Accounting, and Inventory.
1. Creating an Odoo Account:
↑ Back to top1. Getting Started with Odoo:
↑ Back to topGetting Started: Without an Odoo Account
An Odoo account is required to use the plugin. You can create one at https://www.odoo.com/
Getting Started: Existing Odoo Account
If you have an existing Odoo account, please read on to confirm your Odoo version and continue the steps to configure the Odoo for WooCommerce plugin.
What is Odoo and what are the different Odoo versions?
Odoo is an open-source suite of business applications including sales, CRM, project management, manufacturing, inventory, and accounting in a single software solution. All versions are supported.
All versions of Odoo are supported.
Does the plugin work with Odoo Online?
FAQ: Does this support Odoo Online.
Yes. All versions of Odoo are supported.
Does the plugin work with Odoo.sh?
Yes. All versions of Odoo are supported.
Using Odoo.sh requires configuring Configure custom routes and API Access. Speak to your consultant about XML-RPC and API Access.
2. Debugging the Odoo Plugin
↑ Back to top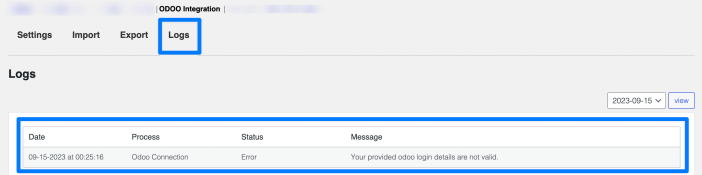
The debugging features for the Odoo Integration for WooCommerce plugin are accessible through the plugin’s settings page.
How to access the Odoo Integration for WooCommerce debug logs?
To access the Odoo Logs sub-menu, follow this path: WooCommerce > Settings > Integrations > ODOO Integration > Logs.
How to view or update the debug logs to test a feature?
Important: Ensure that debugging is enabled in the Odoo plugin before testing the feature you are interested in. Enabling debug logs after an incident will only record new information while debugging is active. The logs will not retrospectively capture issues that have occurred before this setting was enabled.
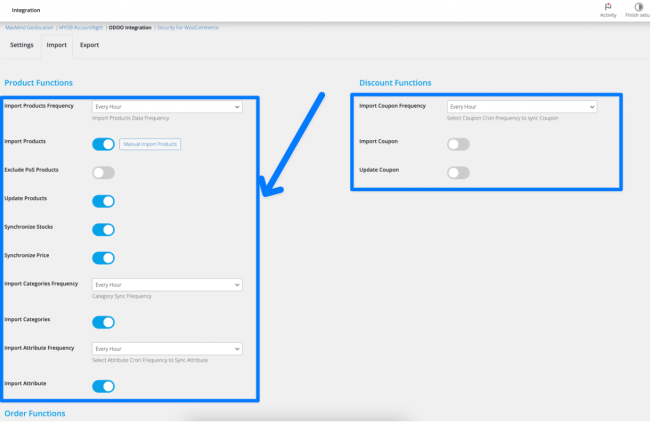
3. Accessing the Plugin Settings in WooCommerce:
↑ Back to topOnce you have installed the Odoo Integration for WooCommerce Plugin on your WooCommerce site you will need to configure the plugin to connect to your Odoo server and access your Odoo database.
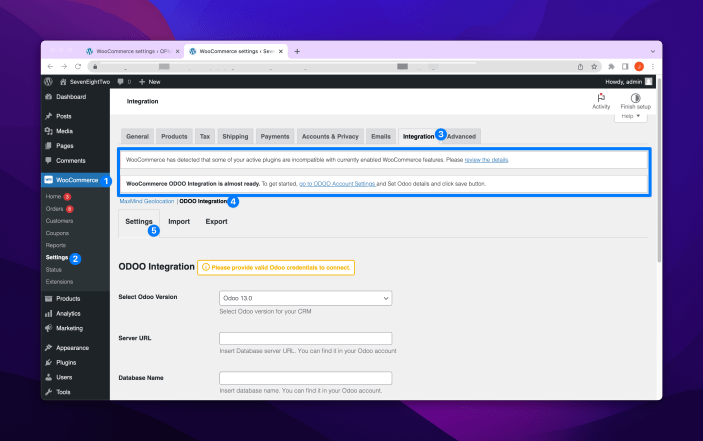
The image above outlines how to access the plugin settings:
- From your WordPress admin page, navigate to WooCommerce Settings by clicking on WooCommerce
- Next, select Settings under WooCommerce.
- Select Integration.
- On the integration page select the ODOO Integration tab.
- You are now in the Odoo Integration for WooCommerce settings section.
Within the Odoo Integration for WooCommerce settings section there are three sub-sections, Settings, Import and Export.
2. Setup and Configuration
↑ Back to topTo configure the Odoo Integration for WooCommerce plugin you will first need to connect your WooCommerce Store to your Odoo server. You will then need to allow access to your specified database.
These details will be required to be input into fields in your Odoo Integration for WooCommerce Plugin General Settings page.
1. Settings Prerequisites:
↑ Back to topOdoo Enterprise Edition – Details Required.
- Server URL: https://xyz.odoo.com
- Database: Use the database name as demonstrated.
- Username: Use the default email username for your Odoo account.
- Password: Do not use your Odoo account Password, use the API key instead.
- API Key: This is generated from your Odoo account page.
Odoo Community Edition/Odoo.sh Edition – Details Required.
- Server URL: https://yoursite.com
- Database: Use the database name as demonstrated.
- Username: Use the default email username for Odoo.
- Password: Do not use your Odoo account Password, use the API key instead.
- API Key: This is generated from your Odoo account page.
2. General Settings Configuration:
↑ Back to topYou will see the following fields in the General Settings page:
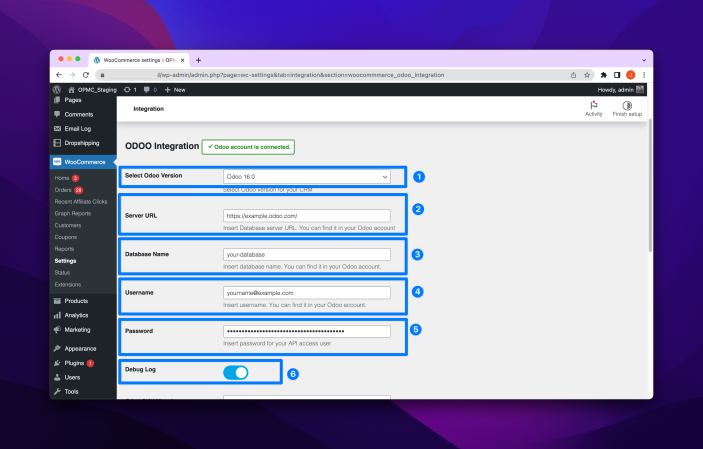
To connect your WooCommerce site to Odoo ensure the following fields are configured correctly.
1. Select Odoo Version:
Select your specific Odoo version. Odoo versions 13, 14, 15, 16 and 17 are currently supported.
2. Server URL:
Enter your server URL.
3. Database Name:
Enter your Odoo Database name.
4. Username:
Enter your Odoo account username.
5. Password:
Enter your Odoo account Password/API.
6. Debug Log:
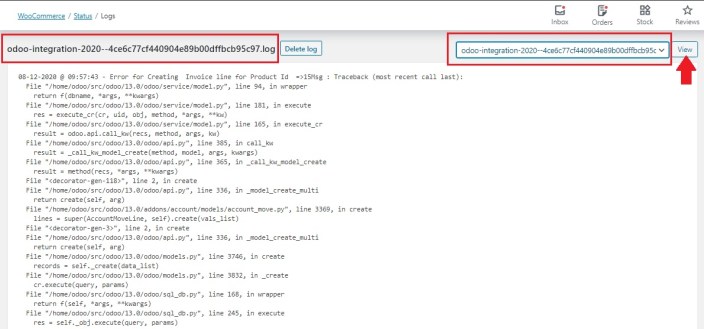
Toggle this setting to enable debugging mode. In debugging mode the plugin will record and see events and API requests and save them to your debug logs. The logged debug file can be found by navigating to WooCommerce > Status > Logs.
The status indicator at the top of the page will provide a visual and written indication of your current connection status. If your WooCommerce site is not connected to Odoo the status indicator will display the following text:
- Not connected: ‘Please provide valid Odoo credentials to connect.’ with text highlighted in yellow.
- Connected: ‘Odoo account is connected.’ with text highlighted in green.
Once you have entered the required inputs into the fields, please save and reload the page to establish the connection to your Odoo accounts. Return to the General settings page to confirm the connection status by viewing the status indicator.
Help: I cannot find the additional settings pages.
FAQ: I cannot find the Additional Settings pages.
The Import / Export Settings pages will be visible once you have connected and configured the Odoo settings. Please complete all required fields in the ‘Settings’ and ‘Configuration’ tabs.
Help: I cannot find the Import / Export Settings pages.
FAQ: I cannot find the Import / Export Settings pages.
The Import / Export Settings pages will be visible once you have connected and configured the Odoo settings. Please complete all required fields in the ‘Settings’ and ‘Configuration’ tabs.
3. Advanced General Settings:
↑ Back to topThese fields relate to the mapping of various elements between your WooCommerce site and the Odoo database.
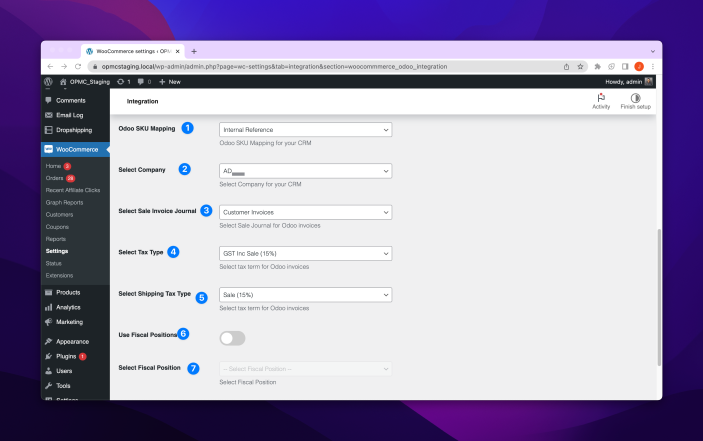
Odoo General settings – Advanced Options explained:
- Odoo SKU Mapping: Internal Reference | Barcode.
- Products are mapped between WooCommerce and Odoo using a unique ID. In WooCommerce a SKU is required for every product. This setting chooses to map this to either the Internal Reference or Barcode fields in Odoo.
- Select Company: Company/Database Name.
- Use these settings to select the correct Odoo database to connect to. If you have more than one company/database they will be listed here.
- Select Sale Invoice Journal: List of Invoice Journals from Odoo.
- Use these settings to select the correct Odoo invoice journal to map WooCommerce sales. If you have one or more invoice journals they will be listed here.
- Note: If you create an Invoice Journal after connecting the plugin, or do not see your Invoice Journal listed, please deactivate and reactivate the plugin and reconnect your store. This will reload the Odoo invoice journals and populate the list.
- Select Tax Type: List of Tax Types from Odoo.
- Select Shipping Tax Type: List of Shipping Tax Types from Odoo.
- Use Fiscal Positions: Toggle this to enable the use of Fiscal Positions.
- Select Fiscal Position: List of Fiscal Positions from Odoo, disabled using the above setting toggle.
- Fiscal positions allow the creation of rules to adapt the taxes and accounts used for a transaction automatically. This is configured in your Odoo account by your accountant.
Common Questions:
↑ Back to top- How are products matched between systems?
- Products are matched based on SKU (WC) to Internal Reference/Barcode (Odoo). This is a required field.
- Why are my products not import / exporting correctly?
- Products creation or updating failure can be caused by a number of reasons.
- Commons issues include not have a valid SKU, not enabling “Variations” support in Odoo, or not setting the matching currency.
- To determine the root issue: Enable debugging from the settings page and view the debug logs.
- Why are orders being created without any products / line items?
- The Order Sync Process occurs in sequential stages.
- When an order is placed in WooCommerce and enters into the “Processing” status, this triggers the sync process to Odoo.
- In Odoo an Quotation or Sales Order is created and populated with the Customer and Product Information.
- The customer information is matched based on the Customer Details, if no matching Customer in located in Odoo a customer can be created. .
- The Product information is matched based on the Product SKU, if no matching Product in located in Odoo the product will be created.
- An incomplete order may exist if the Customer or Product processes failed to resolve. If this occurs you can simply review the debug logs to understand the reason for failure and then re-sync the order once you have resolved the issue.
- When an order has been synced to Odoo, is it possible to have that status sync back to WooCommerce once this is updated in Odoo so the order also appears as completed there?
- How do I enable and view the debug logs?
- You can use the debug logs located via the WC Status page or on directly on your server.
- Ensure you enable debugging in the Odoo for WC plugin settings page.
- More information on how to debug with Odoo for WooCommerce here.
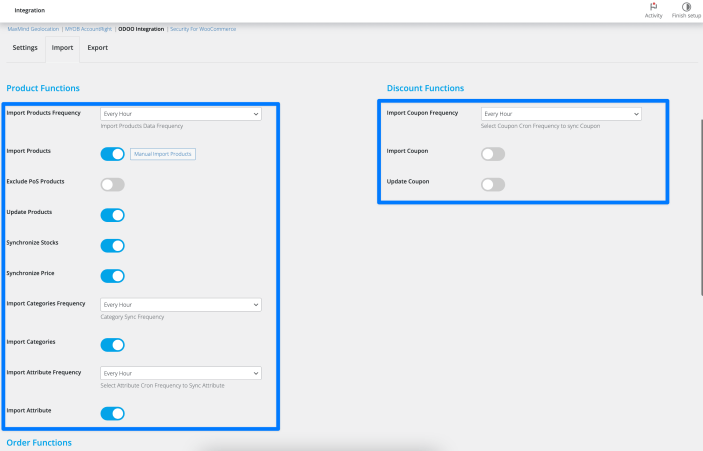
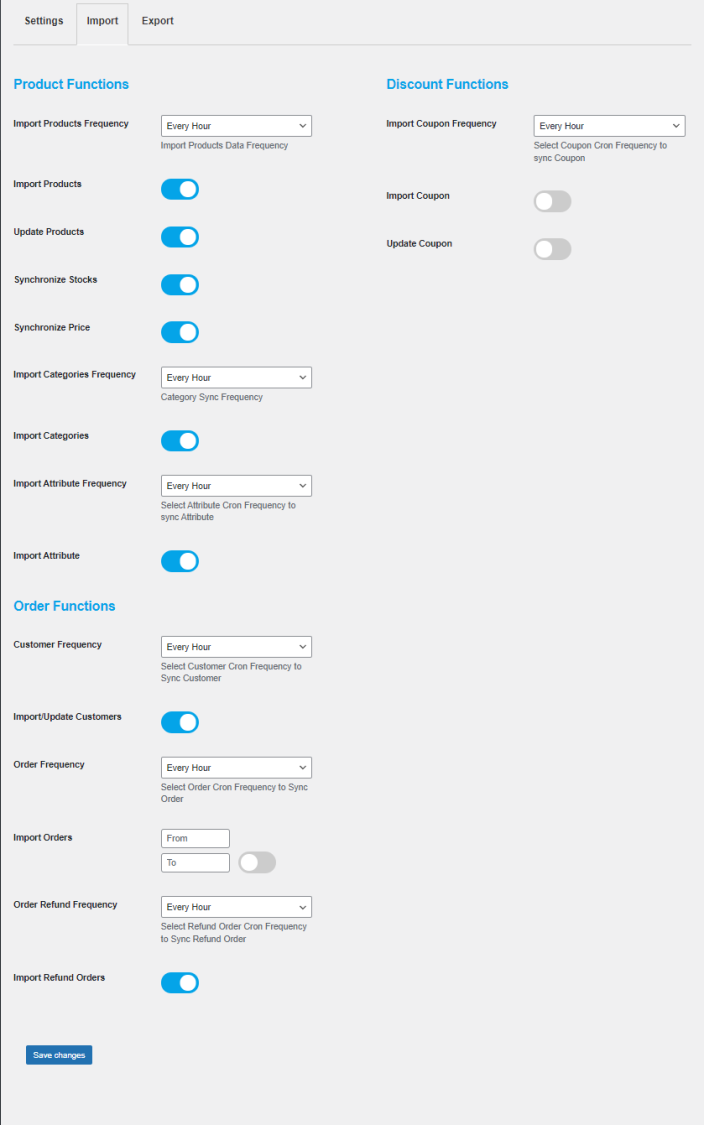
3. Import Settings Configuration:
↑ Back to topOnce you have configured the Odoo for WooCommerce plugin with your Odoo account you will be able to access the Import and Export functions. Under the Import Settings you will be able to see the following options.
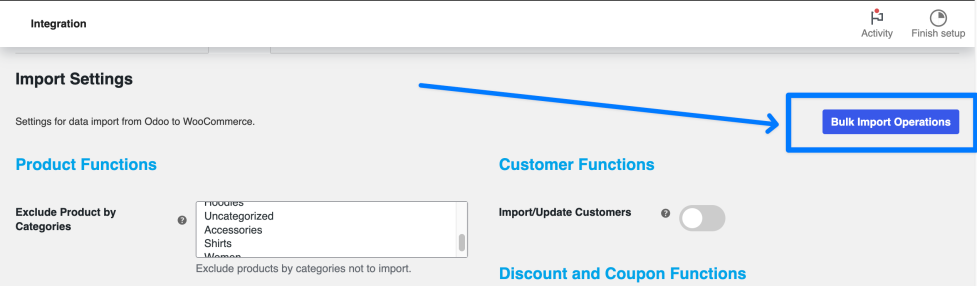
How do I manually trigger the Import Process?
On all versions lower than V3.8.0, please use the manual import products button.
Versions 3.8.0+ will need to use the Bulk Import Button Found in the top right of the Import Settings page.
1. Product Functions:
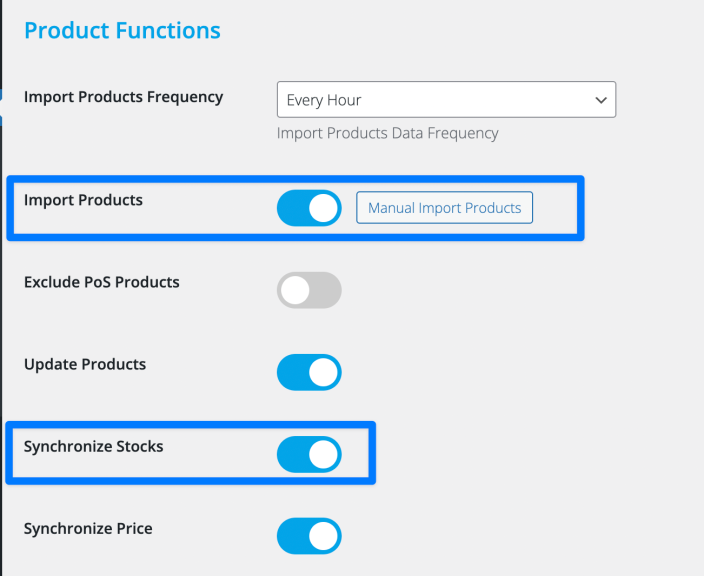
↑ Back to top1. Import Products Frequency:
Select the frequency of for importing products via Cron jobs.
- Frequency Options: Every Hour, Twice A Day, Once A Day
2. Import Products:
Toggle options to enable or disable the import product function feature.
- Toggle Options: Enabled, Disabled.
- Manual Import Products: Use this option to manually trigger import the products.
3. Exclude PoS Products:
Option to exclude or include PoS Products.
4. Update Products:
Option to exclude or include Product Updates from Odoo to Woocommerce.
5. Synchronize Stocks:
Toggle this option to include the Stock Sync as part of the product updates.
6. Synchronize Price:
Toggle this option to include the Price Sync as part of the the product updates.
7. Import Categories Frequency:
Select a minimum frequency to import categories.
8. Import Categories:
Toggle this option to include the Product Categories as part of the product updates.
9. Import Attribute:
Toggle this option to include the Product attributes as part of the product updates.
Product Functions – FAQs:
Our Odoo inventory system manages stock across various warehouse locations, is there a way to configure which stock level is imported?
No, unfortunately, this is not a feature of the plugin. The stock sync pulls data based on the internal reference / barcode and the overall stock for that item.
Does the product import function work with multi-company and multi-currency setup in Odoo?
No, unfortunately, this is not a feature of the current Odoo for WooCommerce plugin.
Support for Multi-Currency is scheduled for release in 2026.
2. Discount Functions:
↑ Back to top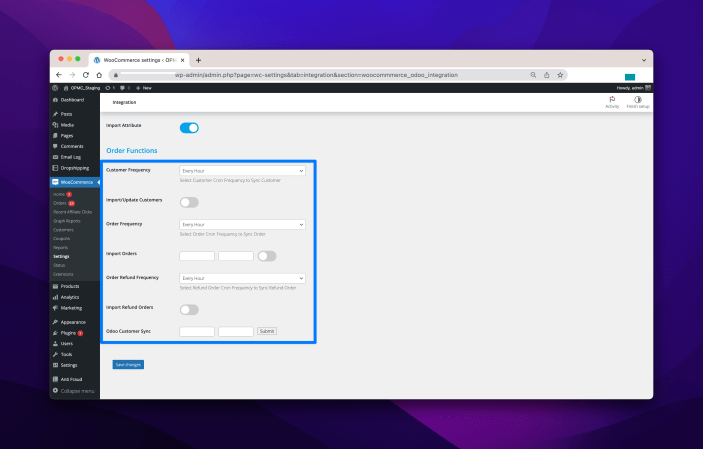
- Import Coupon Frequency: Select the frequency for importing coupons via Cron jobs.
- Frequency Options: Every Hour, Twice A Day, Once A Day
- Import Coupon: Toggle option to enable coupons.
- Update Coupon: Toggle option to enable if coupons are updated coupons.
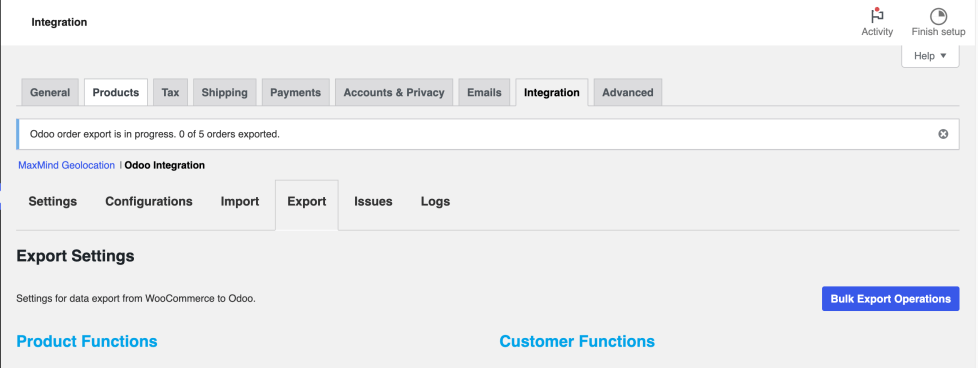
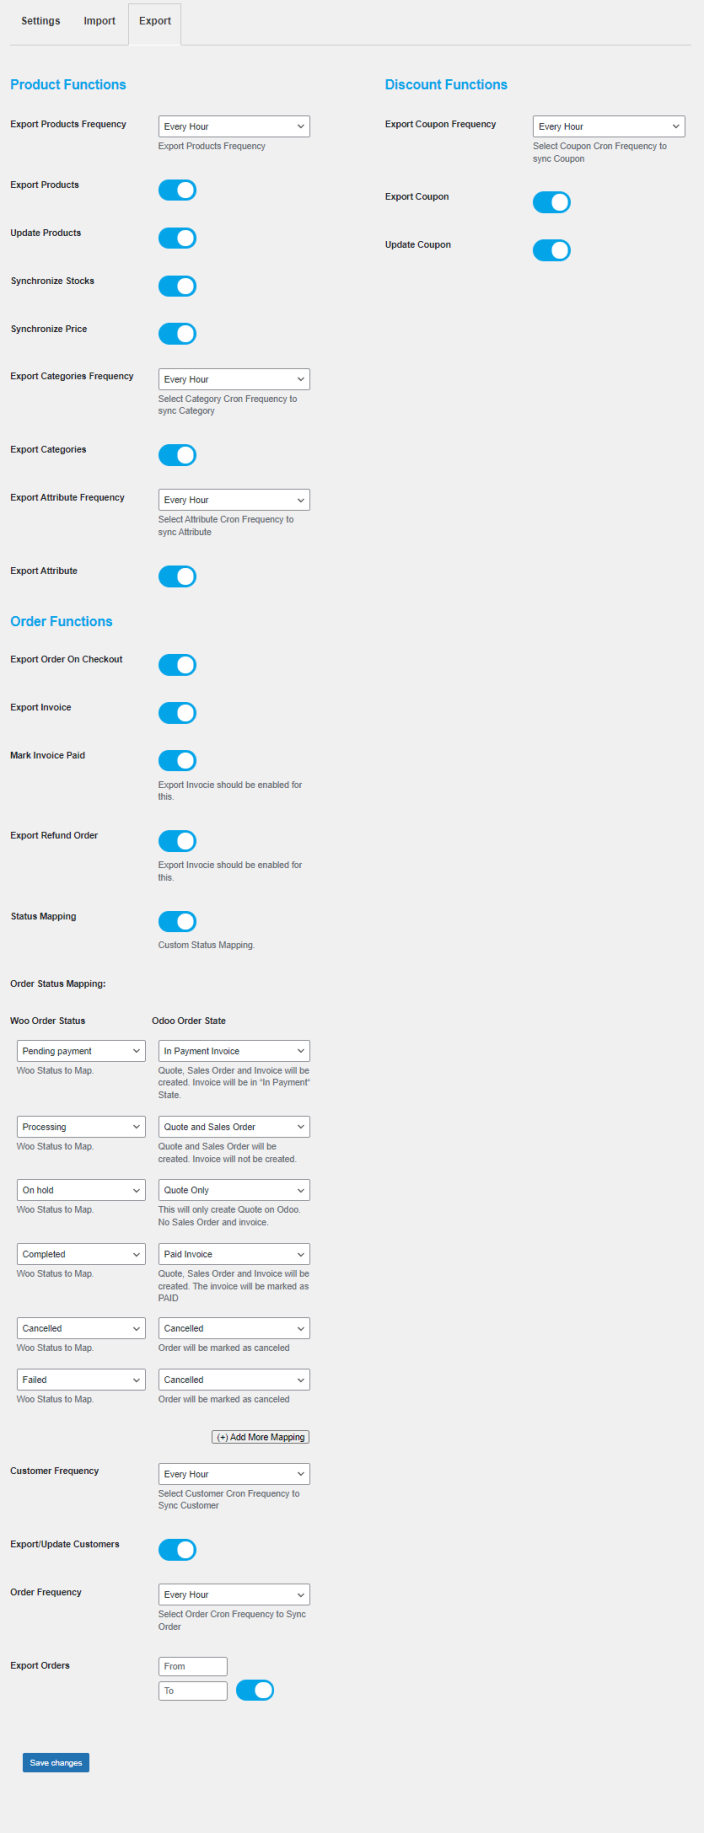
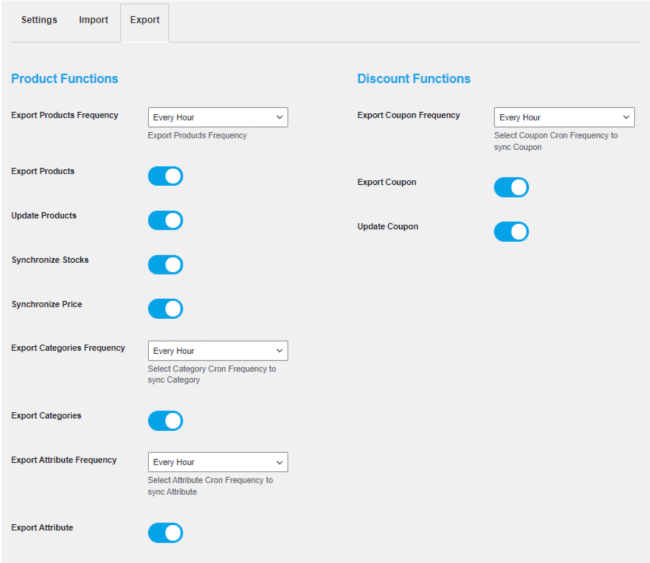
4. Export Settings Configuration:
↑ Back to top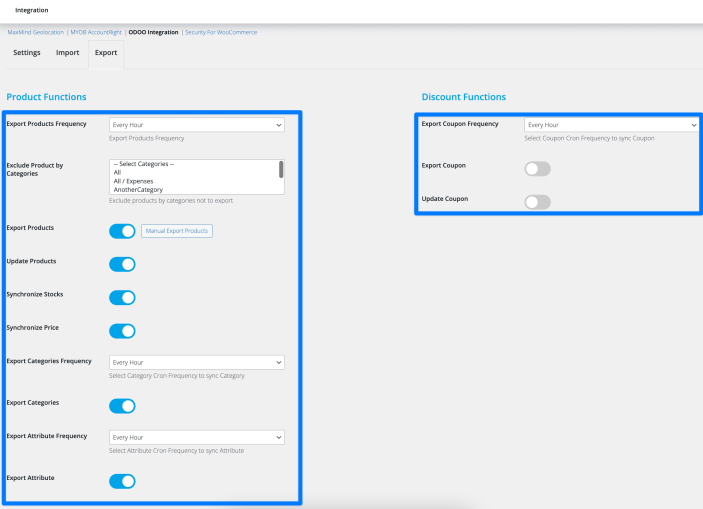
1. Product Functions:
↑ Back to topWhat settings are available on the Order Export page?
- Export Products Frequency: Select the frequency for exporting products via Cron jobs.
- Exclude Product by Categories: Select the product categories to be filtered when exporting Products by categories.
- Export Products: Toggle options to enable or disable the export product function feature.
- Toggle Options: Enabled, Disabled.
- Manual Export Products: Use this option to manually trigger the export of the products.
- Update Products: Toggle this option export the product details from WooCommerce to Odoo.
- Synchronize Stocks: Toggle this option export the product details from WooCommerce to Odoo.
- Synchronize Price: Toggle this option include the product price export details from WooCommerce to Odoo.
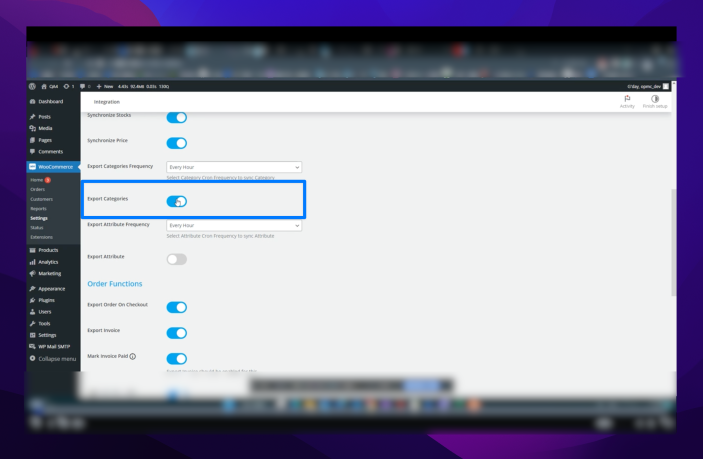
- Export Categories Frequency: Select the frequency of for importing customers via Cron jobs.
- Frequency Options: Every Hour, Twice A Day, Once A Day
- Export Categories: Toggle this option to enable the Categories export.
- Export Attribute Frequency: Select the frequency of for exporting attributes via Cron jobs.
- Frequency Options: Every Hour, Twice A Day, Once A Day
- Export Attribute: Toggle this options to enable the attribute export.
How frequently will my auto export of products trigger?
Frequency Options can be site to: Every Hour, Twice A Day, Once A Day.
Minimum is once an hour.
How to export core product details only?
To export core product details enable Export Products and Update Products.
This will export all products that have a unique and defined SKU in WooCommerce.
Product price and stock are not included in core product details.
How to export core product details only?
To export core product details enable Export Products and Update Products.
This will export all products that have a unique and defined SKU in WooCommerce.
Product price and stock are not included in core product details.
How to export a product’s stock and price details?
Product price and stock can be optionally included in core product detail exports.
These details are in addition to the core product details.
Product Functions – FAQs:
Does the product export function work with multi-company and multi-currency setup in Odoo?
No, unfortunately, this is not a feature of the current Odoo for WooCommerce plugin.
Support for Multi-Currency is scheduled for release in 2026.
2. Discount Functions:
↑ Back to topComing Soon. Please reach out to OPMC directly for documentation regarding these features.
3. Order Functions:
↑ Back to top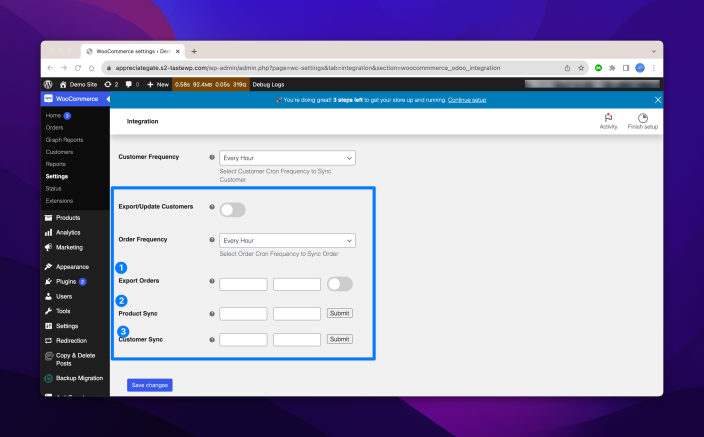
Export Order Sync:
Option to enable Exporting Products. To trigger the order export please enable the toggle option, select a date range and then save the page using the button at the bottom of the page.
- Calendar: Use the Calendar option to select the date period for the orders that you wish to export.
- Toggle: Use the toggle option to enable / disable the export orders feature.
Export Product Sync:
Option to enable Exporting Products. To trigger the products export please enable the toggle option, select a date range and then save the page using the button at the bottom of the page.
- Calendar: Use the Calendar option to select the date period for the products that you wish to export.
- Toggle: Use the toggle option to enable / disable the export products feature.
Export Customer Sync:
Option to enable Exporting Customers. To trigger the order import please enable the toggle option, select a date range and then save the page using the button at the bottom of the page.
- Calendar: Use the Calendar option to select the date period for the customers which you wish to export.
- Toggle: Use the toggle option to enable / disable the export customers feature.
How to access Odoo Export Features in Version 3.8.0?
The Export Order, Export Product, and Export Customer settings are now located in the hidden submenu. Access this using the “Bulk Export Operations” Button.
Order Status Mapping:
Where can I find the Order Status Mapping?
Order Status Mapping
This is found under WooCommerce > Settings > Integration > Odoo Integration > Export > Order Status Mapping:
5. Work with Product Categories
↑ Back to topProduct categories can be imported, exported and synced with the Odoo Integration for WooCommerce Plugin.
Importing and Exporting Product Categories.
Filtering Import / Export using Product Categories.
6. Odoo Versions: Odoo Enterprise, Odoo.sh, and Odoo Online.
↑ Back to topEnterprise Edition
↑ Back to topEnterprise Edition – Odoo Setup
- Click on the following link to go to the Official Odoo Website and to sign up and activate your free trial. You will need to update to a paid Odoo account to connect the plugin to your WooCommerce store.
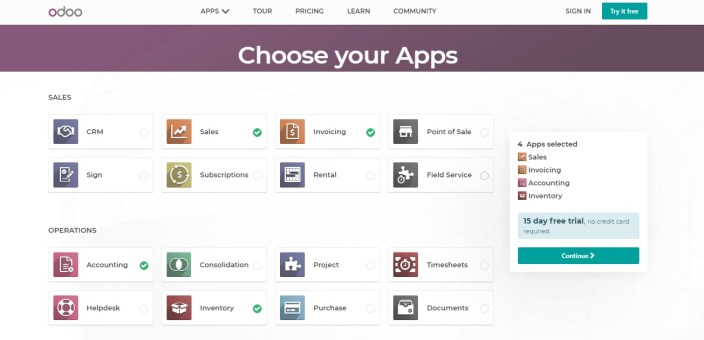
- Select the following Odoo Modules to integrate with your WooCommerce store: Sales, Invoicing, Accounting, and Inventory are essential apps required for the plugin to work. Click Continue.
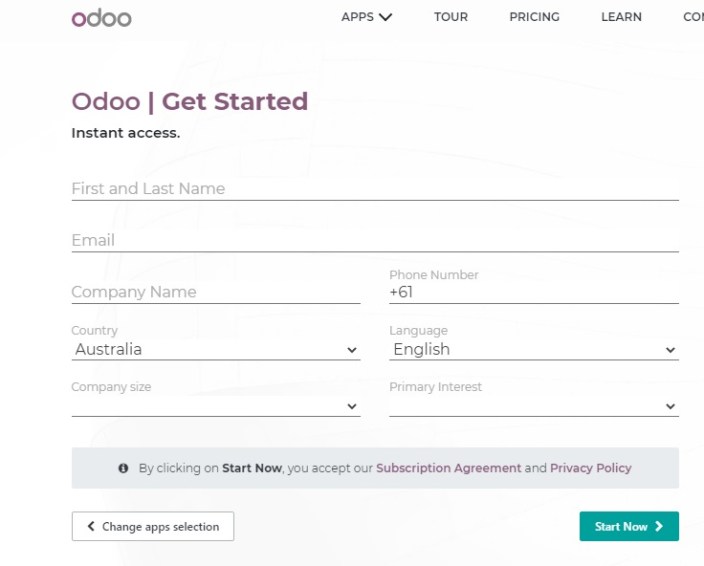
- Fill up your credentials and click Start Now.
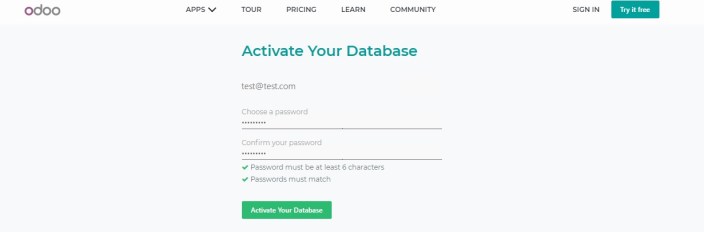
- Respond to the confirmation email, set the password and click Activate Your Database for account activation.
Community Edition
↑ Back to topCommunity Edition – Odoo Setup
This is the free, open-source version with basic features. It’s typically self-hosted, meaning you’ll need your own server infrastructure. Download the Community edition from here and for the installation process click here.
Server URL
↑ Back to topEnterprise Edition – Server URL
For Enterprise Edition
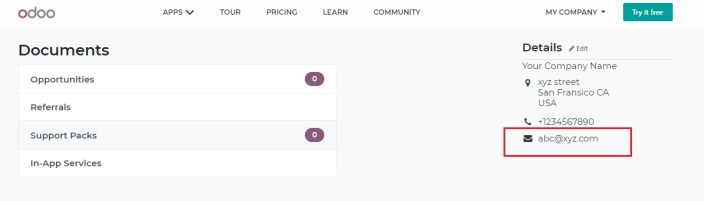
- For locating the Server URLm sign in to Odoo account, and select the name of your company displayed at the top right corner and click on My Databases.

- Select Connect in front of the Database you want to connect with your website.
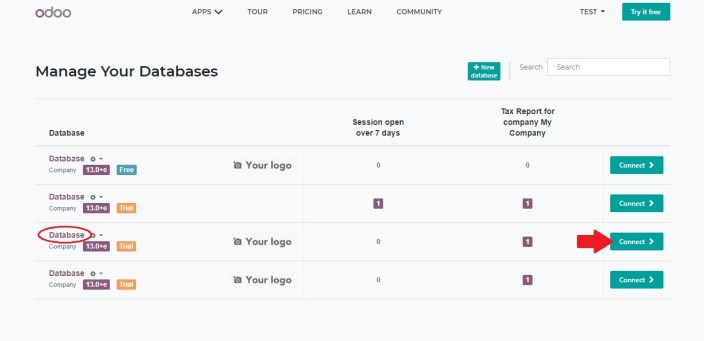
- Copy the URL of the page, for example, https://xyz. odoo.com
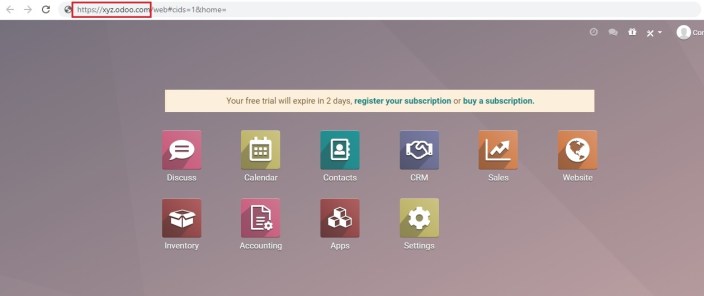
- Paste it in the Server URL tab.

Community Edition – Server URL
For Community Edition
Copy and paste your default URL for the selected database of Odoo into the Server URL.
For Example, In the below-mentioned case, it would be http:// testsite. com
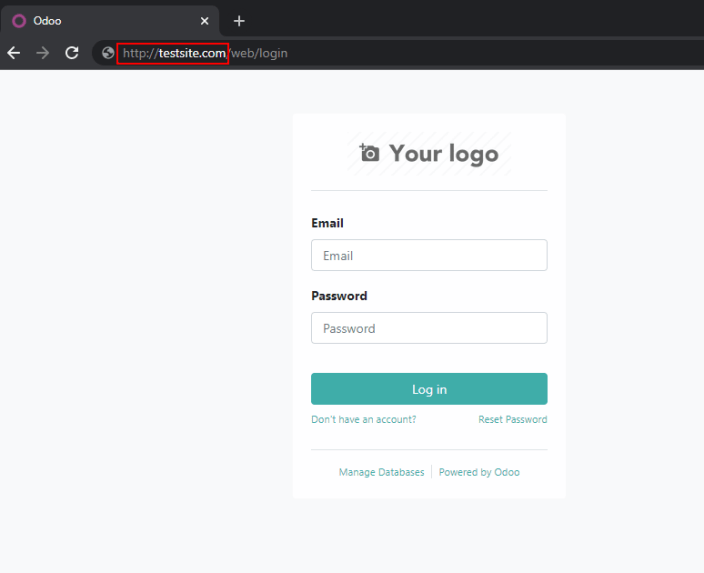
Note: Do not add a forward slash at the end of your URL “/”
Database Name
↑ Back to topEnterprise Edition – Database Name
Community Edition
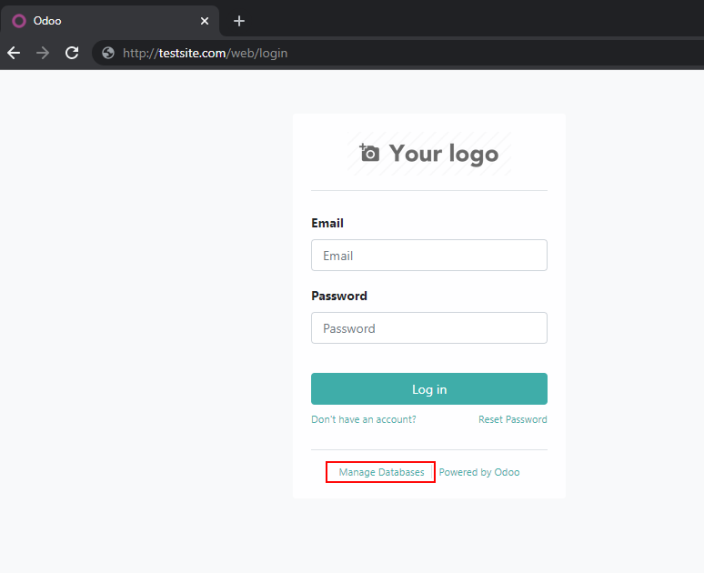
Click on Manage Databases from the main login window.
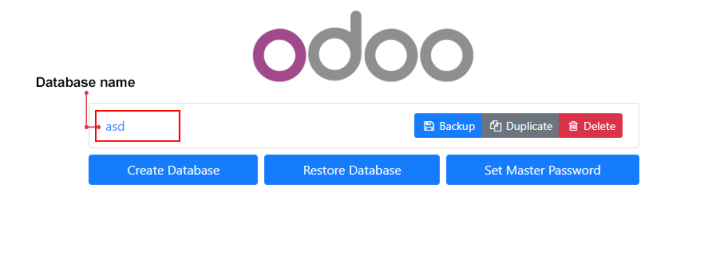
Copy database name you want to connect.
Now, insert database name in Database Name tab associated with Server URL.

Community Edition – Database Name
Enterprise Edition
Goto: Odoo website > My Databases page.

Username
↑ Back to topEnterprise Edition – Username
Community Edition – Username
Community Edition
For Community Edition, the default email will be your username.
Now, Copy and paste the username associated with your odoo account.

Password / API Key
↑ Back to topPassword
Can I connect to Odoo using my Odoo Account Password?
Connecting to Odoo via an Account password is possible, but no longer recommended by Odoo. Please ensure you are using your Odoo API Key.
API Key Access
How to locate by Odoo API?
For API Access goto Settings > General settings

Scroll at the bottom of the tab and click on Activate the developer mode.
On the top-right corner click on your Profile name and select preferences ( or My Profile in older version of Community edition ) from the dropdown menu.
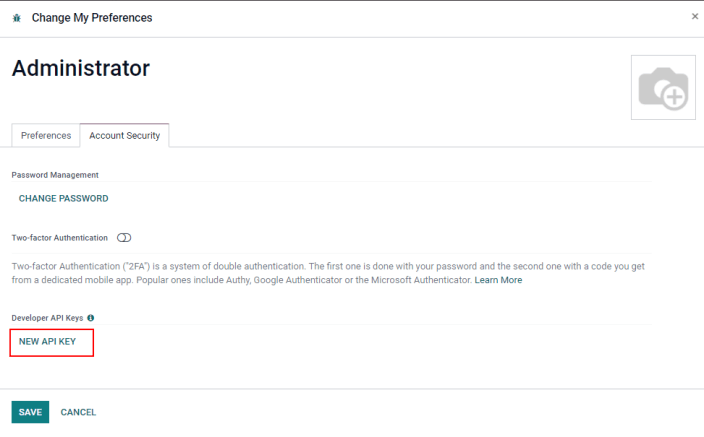
Select Account Security and click on NEW API KEY
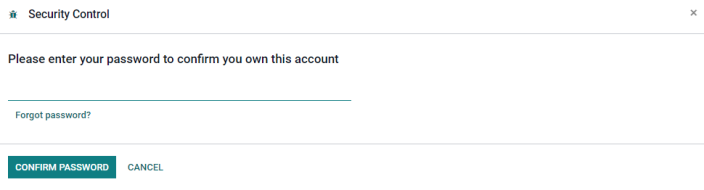
Enter your default password if asked.
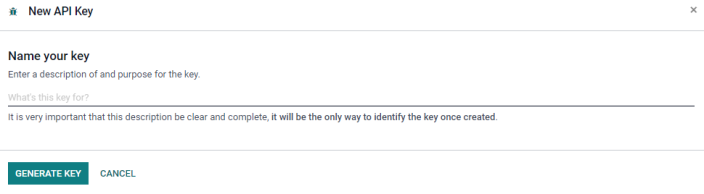
If asked enter the purpose of the API key. Could be anything and then click GENERATE KEY button.
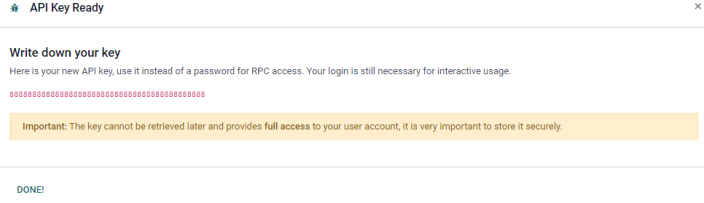
Copy API Key and save it to a secure place for future use.

Now, paste API key in Password/API key tab
Debug Log
↑ Back to topHow to enable debugging in the Odoo Plugin?

A debug log allows you to record and see events and API requests. Useful for developers while debugging any event.
Where are the Odoo Debug Logs located?
Logged file can be found at WooCommerce > Status > Log
WooCommerce SKU to Barcode Mapping (Internal Reference)
How are products mapped between the WooCommerce and Odoo Systems?
Odoo SKU Mapping tab is used to export SKU as an odoo’s internal reference or barcode, or import barcode or internal reference as an SKU. Select the one that is preferable for your odoo CRM.
Products are mapped using the key id. The key id is a unique field which synced the SKU in WooCommerce, with either the Internal Reference or Barcode in Odoo.
How do I know if I am mapping my product SKUs to the Internal Reference or Barcode?
Odoo SKU Mapping tab is used to export SKU as an Odoo’s internal reference or barcode or import the barcode or internal reference as an SKU. Select the option that is preferably used in your Odoo CRM. Products are mapped using the key ID. The key ID is a unique field that syncs the SKU in WooCommerce, with either the Internal Reference or Barcode in Odoo.
This setting is found under WooCommerce > Settings > Integrations > ODOO Integration > Configurations

Are SKUs and Internal References / Barcodes required to use the plugin?
Yes. All products, including each variation, must have a unique reference number.
Enable Inventory Sync
↑ Back to topHow do I enable Inventory Stock sync for my products?
To Enable Inventory Sync you will need to configure the settings on the Import section of the settings page. Your wooCommerce product inventory is synched into your Odoo inventory app according to the frequency set with Cron Frequency.
What is included in the Update Product Settings?
When enabled the “Update Product” setting will import and update products in your WooCommerce Store from Odoo. The imported fields will include the core Product Fields which are SKU, Product Title, Product Description and Product Image.
How to import product details including Price?
Enabled the Product Settings: Update Product + Synchronize Price
How to import product details including Stock Count?
Enabled the Product Settings: Update Product + Synchronize Stocks
How to import product details including Stock Count and Price?
Enabled the Product Settings: Update Product + Synchronize Stocks + Synchronize Price
Is it possible to update product stock count / price without updating the core Product details?
No. This is not possible, the core details are always included in import and update. Stock count and price are the only optional fields.
Note: The inventory sync is manages through the Import and Export settings page of the Odoo plugin. You can enable the Cron job which will automatically trigger the inventory import, or use the manual import products button to trigger a manual import.
7. Other Account Settings
↑ Back to topThese accounts may load based on your settings in odoo after successful integration based on your settings in odoo and country settings. Choose the default option for your wooCommerce store that best describe your accounts, debtor accounts, tax types and so on.
1. Select GST/ Tax / Shipping Tax Type
↑ Back to topThese tabs appear based on the country or state you are dealing in, taxes are imported from your odoo account and you can select the one from the dropdown menu according to your need. And click Save changes.

2. Select Account Type
↑ Back to topSelect an account type for your customers buying at your WooCommerce store according to your suitability for your odoo account.

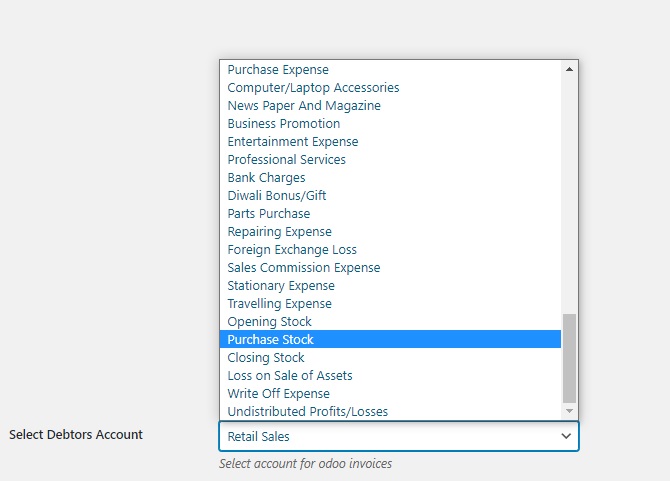
3. Select Debtors Account
↑ Back to topSelect debtors account for your odoo account based on the intent of your customers and products or services you are providing.
8. Import Settings
↑ Back to topOdoo Import Settings Page Overview:
Odoo Import Settings Page Overview:
9. Export Settings
↑ Back to topOdoo Export Settings Page Overview:
Note: To trigger the manual export of products to Odoo enable the setting ‘Export Products’ and when you click ‘Save’ the page will reload and trigger the export.
FAQ:
↑ Back to topGetting Started Questions:
↑ Back to topWhat Odoo Modules is the Plugin Compatible with?
The following Odoo Modules are supported: Sales, Invoicing, Accounting, and Inventory
Do you offer a Plugin demo?
Click the button below to access a demo Odoo for WooCommerce Plugin:
On the Demo site, you will be taken to the WooCommerce plugins page with Odoo for WooCommerce plugin already installed.
Odoo Plugin Settings Page – To access the Odoo Plugin Settings Page navigate to:
WooCommerce > Settings > Integrations > Odoo Settings.
Does the Plugin Support PHP 8?
PHP8 Support: Odoo for WooCommerce now supports PHP 8. Currently this functionality is available as a free trial and does not require any actions to be taken. Based on customer usage and feedback we will introduce new features and functionality into tiered paid service package options.
Do you have a Video Installation Guide?
You can watch Quick Start Guide here.
How do I debug the plugin if I am having issues with Products / Order Sync?
The Odoo Integration for WooCommerce debugging features are available in the Odoo Integration for WooCommerce plugin settings page, under the Logs sub-menu.
To navigate to the Odoo Logs Sub-menu navigate to the following: WooCommerce > Settings > Integrations > ODOO Integration > Logs
Important: When debugging the Odoo plugin ensure debugging is enabled prior to testing the feature you want to test. Enabling the debug logs after an incident will only log new information during the time the debugging is enabled. The logs cannot retrospectively log issues from prior to enabling this setting.
Odoo Integration Setup Questions:
↑ Back to topHow to set up an Odoo Account?
We are not as qualified as Odoo experts. You should always speak to an Odoo expert.
We do have a guide on creating an Odoo account found at the bottom of this page.
What are the different Editions of Odoo?
- Odoo Enterprise Edition: This is the full-featured, paid version. It can be self-hosted or hosted on Odoo’s own cloud platform for an additional fee. Follow Enterprise edition and use the API Key for your password.
- Odoo.sh: This is a cloud platform for Odoo, providing hosting, scaling, and maintenance for your Odoo applications. It’s fully managed, meaning Odoo handles the server infrastructure for you. Follow Community edition and use the API Key for your password. Follow Community edition and use the API Key for your password found under ‘My Profile’ in older versions of Community edition.
- Odoo Community Edition: This is the free, open-source version with basic features. It’s typically self-hosted, meaning you’ll need your own server infrastructure. Follow Community edition and use the API Key for your password found under ‘My Profile’ in older versions of Community edition.
What versions of Odoo are supported?
All versions are supported. We have tested with Odoo 13, 14, 15, 16 and 17.
What versions of Odoo are supported?
All versions are supported. We have tested with Odoo 13, 14, 15, 16 and 17.
What happens if we need to update the Odoo Server URL?
Updating the Odoo server URL can be done in the Plugin Settings. To update to a new Odoo server URL, please deactivate the Odoo plugin and reactivate the plugin to ensure new authentication data is saved and updated.
What happens if we need to update the WooCommerce URL / change from the Staging site to the Live Site?
The WooCommerce store URL is not included in the settings. As long as the Odoo Server URL is correct, and all other Odoo settings are correct the connection will be made. If there are any issues, resave the credentials page to refresh the connection to your Odoo server.
How to enable Variable Product Support in Odoo?
How to enable Variable Product Support in Odoo?
You can enable Product Variants under the Odoo Inventory Settings:
Odoo Settings > Inventory > Products > Variants

Error code 404 issues showing up or redirecting you to another page?
Error code 404 issues showing up or redirecting you to another page?
This usually occurs when another plugin is interfering with the plugin operations. To solve this, simply disable all plugins temporarily and continue by activating plugins one-by-one.
If this error is still occurring, please reach out to our support team by raising a WooCommerce ticket here- https://woocommerce.com/my-account/create-a-ticket/ and mention you have disabled other plugins, so, we can take the next steps necessary.
Plugin Features – General Questions:
↑ Back to topHow does the Odoo for WooCommerce Plugin sync orders?
How this plugin sync orders?
Orders are synced directly to the Odoo account when customers have processed them. When an order is placed in your WooCommerce store, the invoice is generated automatically in Odoo.
For cron job, make sure you have enabled Order Functions from export, and/or import tabs as per your preference and save changes. There are certain settings based on your odoo CRM settings for orders in the odoo integration settings such as Select Account Type, Select Debtors Account and Select Tax Type explained above.
Can the Odoo Plugin support Product Bundles from WooCommerce when syncing with Odoo
No – at this stage this is not a feature supported by the plugin.
How important is it to have SKU numbers for products in Odoo?
SKU numbers are essential in Odoo as they serve as unique identifiers for syncing items between different systems or modules. Without a valid SKU, products or their variants may not be exported correctly, leading to errors in processes like Order Export.
What does the following error mean and how do I solve this? Error: “Object sale.order doesn’t exist”
The error indicates that the Odoo database does not have the Sales module issue installed or configured correctly. Start by confirming if you have Odoo Sales modules enabled and have enabled variable products under the Odoo settings page.
If you need any further assistance, please reach out to support.
What should I do if I receive an error during the Order Export process in Odoo?
When you encounter an error during the Order Export process, the first step is to check the error log for details. In many cases, such as the one reported, the issue may be related to an invalid SKU (Stock Keeping Unit) for a product or its variants. Ensure that all products and their variations have valid SKU numbers, as these are critical for item syncing.
Can the Odoo Plugin Sync Variable Products from Odoo to WooCommerce?
Yes, Odoo Version 3.6.0 and above now fully supports Variable Product Sync.
Older versions of Odoo (< v3.6.0) will not sync variable products correctly. The plugin will not sync variable products from Odoo to WooCommerce. As Variable products is not enabled by default this is not supported by the plugin.
Can the Odoo Plugin Sync Variable Products from WooCommerce to Odoo?
Version 3.6+: Yes, Odoo Version 3.6.0 and above now fully supports Variable Product Sync.
Version below 3.6:
Yes – The plugin will sync variable products from WooCommerce to Odoo. Within Odoo these will be each variation of the product will be a separate product in the Odoo Database.
Where can I find the Order Status Mapping?
Order Status Mapping
This is found under WooCommerce > Settings > Integration > Odoo Integration > Export > Order Status Mapping:
Plugin Features – Import Questions:
↑ Back to topCan I import from Multiple Company Databases in Odoo?
No. You must select a company database to be synced to within the plugin settings.
Connecting to multiple companies’ databases is not supported at this time.
How do I import or update products from Odoo automatically?
WooCommerce → Settings →Integration → Odoo Integration → Import tab
Enable following:
- Import products
- Update products
- Synchronise stocks
- Synchronise price
- Import categories
- Import Attributes
Also, set the frequency to initiate the cron job.
To trigger the import manually, use the ‘Manual Import Products’ button found under the import tab.
Importing Products – Sync Process taking too long?
Sync Process taking too long?
Syncing your WooCommerce store to your Odoo Database is easily done with the plugin installed.
If you are having issues with the sync process, or experiencing long sync (import / export times) please try these steps to diagnose the root cause.
1. First, check your CRON jobs and ensure this is configured correctly. Check with your hosting provider if this is configured to use WP Cron or Server Level Cron Jobs. Server level is preferred. Have your hosting provider also provide a log of the Cron Jobs so you can accurately track these during debugging.
2. Next, check your import / export process and confirm what the issues are on the admin section of your WooCommerce store. When importing / exporting products you will be notified of the correct progress using the Odoo Progress Notification Box. This number will update with the progress in real-time, however, you can refresh your page if there are any issues viewing the updated count.
Please test a sample product set and document the time taken. Try changing your server limits/settings and confirm if this improves performance.

3. Try benchmarking this with another server. Install the Odoo Integration for WooCommerce plugin on another server and repeat the import process, if you find the import times vary greatly then this might indicate a conflict causing the sync process to slow.
You can easily use the demo link below to quickly create and test this against a new WooCommerce instance. This will come configured with the Odoo Integration for WooCommerce plugin installed already.
4. Next check the bug logs on the Odoo Plugins Settings page, under the logs section. For more information about Odoo Plugin, please view our Debugging tutorial video here. Also read the documentation on Debugging the Odoo Plugin above.
Please look for unusual errors or debug messages that may display when testing the sync process.
Finally, if the above steps do not resolve the issues, please raise a support ticket via the WooCommerce Official Support Channel. We will request that you share the outcome of the testing steps above so please include this with the ticket, specifically:
(1) Which steps have been completed? Checking CRON, Timing the Import, Benchmarking Process, and Debugging.
(2) Your Odoo Account / DB Details.
(3) Sample Product List (Names, SKUS, Images)
(4) Debug Logs.
Sync Process – Help I am having issues with Importing Products.
Sync Process – Help I am having issues with Importing Products.
Importing Products from Odoo to your WooCommerce store should be easy. Occasionally, unexpected things come up. If you are having issues with the import process, not able to import all products, or just some products and details, read this section.
First the principles around importing.
- The import is considered to be sync products from your Odoo Database to WooCommerce.
- These products will be imported including Product Name, Product Description, Product Images, Product Price, Product Stock, Attribute, and Category.
- Note, that some of these are required and others can be toggled from the Import settings menu.
- All products in Odoo should have either an Internal Reference or a Barcode. For certainty, use input values into both. Make sure to save changes by clicking on the Save Changes button at the bottom of every tab to save your settings.
Once you set the Import Products toggle to Enabled and save the settings the import will occur based on the selected frequency selected on the same page. At this stage, you can wait for the next Cron job to trigger at the frequency, or choose to manually import the products.
Testing the Import: Getting your first Import Complete
The import should now have started or be completed. If not, go back and save the page, then trigger the import using the manual import button.
Once the import has started, the Import Notification Bar will present itself at the top of the settings page and other WordPress admin pages.
Common Issues:
- Not all products are showing / Some products are missing: If you have more products than the amount showing in the notification bar this may mean some products do not have the required Internal Ref/Barcode, or you are filtering by categories.
- I have a set of products in Odoo. I only want to import a sub-set to WooCommerce: Using categories you can import one, a few, or many products from Odoo. In the categories section, a selectable box will allow you to filter the categories imported. You can use this to select and filter the categories imported.
Since Odoo allows one product to multiple categories, you can also create a new WooCommerce Online Products category and only import the products you want on your online store. - The import process is taking too long: Please see the above section about how to debug this issue.
- Variable Products not importing: Some products or product variations may not import as expected. The common cause and solution is to ensure each product and variation has a unique and valid SKU (Internal Code, Barcode) assigned in Odoo.
- Products are being duplicated: If you believe the import and/or export process is duplicating products, first check that all products have the defined SKU and matching Internal Reference / Barcode number. This should match and assign products correctly, if you still experience this issue please complete the Odoo debugging steps.
Once your product import has completed you should be able to view the products in the WooCommerce products section.
Once the first product import is complete you should be all set up to keep your products updated.
Automated Imports: Keeping your products updated
Based on the Frequency setting in the import settings page, a Cron Job will be used to trigger the import function at the appropriate time.
Debugging the Odoo Import Process: Odoo import is not working.

If the import process does not successfully run this may be due to an issue with the Cron scheduling. Please check with your hosting provider, request the Cron Job logs and confirm if this is configured and actioning the jobs as expected. Feel free to reach out to OPMC via WooCommerce Support for assistance with this.
Debugging the Odoo Import Process: Odoo import is not working.
At any point, if this Odoo Import process is not working, or you are unsure if it is working, you can use the following steps to test this:
- First, enable Debugging under the Odoo Settings page.
- Next, filter the category of products to import so you can test one category. Save the page. Use the manual import button to trigger the import.
- Finally, wait until the import is completed. If this is not completed after some time, note this and share it with the OPMC support team. Additionally, head to the Debug Logs section, and review the logs. Make sure to select the appropriate date and view the latest logs.
- Finally reviewing the logs should provide an indication of the process run and any potential issues. The most common errors and solutions are provided in the Q&A section below. If you require help reach out to OPMC Support.
Sync Process – Help I am having issues with Exporting Products.
Read this section if you are having issues with exporting products to Odoo. This includes not being able to export all products, issues with exporting some products and details, and issues with product data or fields missing or being exported wrongly.
First the principles around exporting products using the Odoo Integration for WooCommerce Plugin.
- The Export is considered to sync products from your WooCommerce Database to your Odoo Database
- These products will be Exported including Product Name, Product Description, Product Images, Product Price, Product Stock, Attribute, and Category.
- Note, some of these are required and others can be toggled from the Import settings menu.
- All products in WooCommerce are required to have a unique SKU. This includes all variations for variable products. This unique SKU will map to the Internal Reference or Barcode fields in Odoo.
- Product images will be exported. Not Odoo versions below 16.6 do not support WebP images. Therefore you will need to convert these to a supported format. For new Odoo versions, WebP images are supported.
- Variable Products and Exporting Product Variations are supported. All product variations are required to have a valid and unique SKU. Additionally, you need to enable the Variable Product support in your Odoo settings page before exporting products.
- Products are being duplicated: If you believe the import and/or export process is duplicating products, first check that all products have the defined SKU and matching Internal Reference / Barcode number. This should match and assign products correctly, if you still experience this issue please complete the Odoo debugging steps.
Where do we locate the Database and Database Password?
Odoo.sh can vary given this is the open-source and editable version of the Odoo System.
Here are some useful links for locating the Database in Odoo.sh. For specific information on your environment, we recommend speaking to your Odoo consultant.
You can find more information about Odoo.sh database here.
Plugin Features – Export Questions:
↑ Back to topTesting the Export: Getting your first Export Complete
Testing the Export: Getting your first Export Complete
Once you set the Export Products toggle to Enabled and save the settings the Export will occur based on the selected frequency selected on the same page. At this stage, you can wait for the next Cron job to trigger at the frequency, or choose to manually export the products.
The export should now have started or be completed. If not, go back and save the page, then trigger the export using the manual export button.
Once the export has started, the export notification bar will present itself at the top of the settings page and other WordPress admin pages.
Common Issues:
- Not all products are exported / some products are missing: Please ensure all products have SKUs, all variations have SKUs, and category filtering is not applied.
- Can I filter the products exported to Odoo: Using categories you can export one, a few, or many products from Odoo.
- The Export process is taking too long: Please see the above section about how to debug this issue.
- Variable Products not exporting: Some products or product variations may not export as expected. The common cause and solution is to ensure each product and variation has a unique and valid SKU (Internal Code, Barcode) assigned in Odoo.
- Some Product images are not exporting: Note Odoo versions below 16.6 do not support WebP images. Therefore you will need to convert these to a supported format. For new Odoo versions, WebP images are supported. Please check this if images are not exporting/exported correctly.
- Products are all exporting with incorrect prices / Products are all exporting with a price of $1:
The common cause of pricing mismatch or pricing not exporting correctly is due to not having both Odoo and WooCommerce set to the same currency.
Please check your currency setting and ensure both are set to the same currency.
The Currency set at the Odoo Database Level is required to match with the currency matched in WooCommerce.
Once your product export has completed you should be able to view the products in the Odoo products section. Head to your product pricelist section to review your pricelist in Odoo to view all products and variations.
Once the first product export is complete you should be all set up to keep your products updated. This will trigger based on the selected frequency.
Does the OPMC WooCommerce connector add any code to the Odoo system, or is it hosted exclusively on WooCommerce?
The OPMC WooCommerce connector is designed to operate exclusively on your WooCommerce server. It does not add any code to the Odoo system. The connector works by utilizing the provided APIs of Odoo and managing all interactions and processes from the WooCommerce side. This design ensures that all plugin-related activities and data exchanges occur within your WooCommerce environment, without the need to modify or add code to the Odoo system itself.