Smart Coupons provide a powerful, “all-in-one” solution for gift cards, store credits, discount coupons and vouchers extending the core functionality of WooCommerce coupons.
This documentation explains how to set up ‘auto-apply coupons’ using the Smart Coupons plugin, eliminating the need for users to enter or copy-paste coupon codes!
You can auto-apply or forcefully apply a coupon on numerous occasions:
- Black Friday, Cyber Monday or Christmas sales
- New year, Valentine’s Day, your store anniversary or any special occasion
- New product launches, events, stock clearance sales
- For loyal customers to encourage repeat purchases
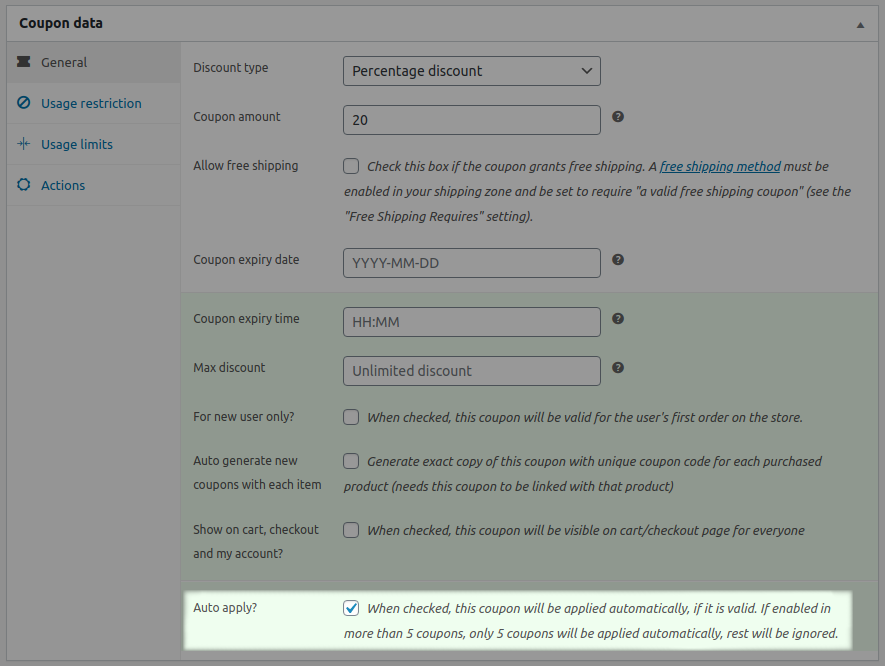
Steps to create/set auto-apply coupons
↑ Back to top- Go to your WordPress admin panel. Under Marketing > Coupons, click on Add coupon. You can also modify your existing coupon.
- Set the discount type, coupon amount, expiry date and time and other details.
- Look for the ‘Auto apply?’ option. Enable it.
- Set usage limits and other restrictions as per your requirements. You can also set advanced restrictions based on payment methods, product quantity, user roles and more for your auto-apply coupon.
- Publish/Update the coupon.
That’s it.
Important notes for auto-apply coupons
↑ Back to top- The auto-apply feature will trigger only when there’s a product in the cart.
- Smart Coupons will check the validity and all the restrictions and limits set for the coupons before auto-applying them.
For example – If you restrict a coupon to “Customer” user role and “Stripe” payment gateway, the plugin will first verify whether these restrictions are met and then apply the coupon. - Up to five coupons can be auto-applied by default even if you’ve enabled the ‘Auto apply?’ option for more coupons. If required, you can extend this limit using the following steps:
- Open your website’s database.
- Go to table ‘{prefix}options‘ (e.g. wp_options).
- Search for a record having option_name like ‘wc_sc_max_auto_apply_coupons_limit‘
- If you find it, set its corresponding option_value as the number of auto-apply coupons allowed to be applied.
- If you don’t find it, insert a record in the same table with option_name as ‘wc_sc_max_auto_apply_coupons_limit‘ and option_value as the number of auto-apply coupons allowed to be applied. That’s it.
- Your users can remove any auto-applied coupon if they wish to. But if you don’t want them to remove the auto-applied coupons, follow these steps:
- Open your website’s database.
- Go to table ‘{prefix}options‘ (e.g. wp_options).
- Search for a record having option_name like ‘wc_sc_auto_apply_coupon_removable‘
- If you find it, set its corresponding option_value as ‘no‘.
- If you don’t find it, insert a record in the same table with option_name as ‘wc_sc_auto_apply_coupon_removable‘ and option_value as ‘no‘. That’s it.
- You can bulk generate coupons with the auto-apply feature.
- Auto-apply feature works with subscription coupons as well.
- Users can’t auto-apply gift cards/store credits.
- Auto-apply will not be enabled for coupons that are linked to a product. This means that when you issue any coupon with a product purchase, that coupon will need to be manually applied by the users on their next purchase.