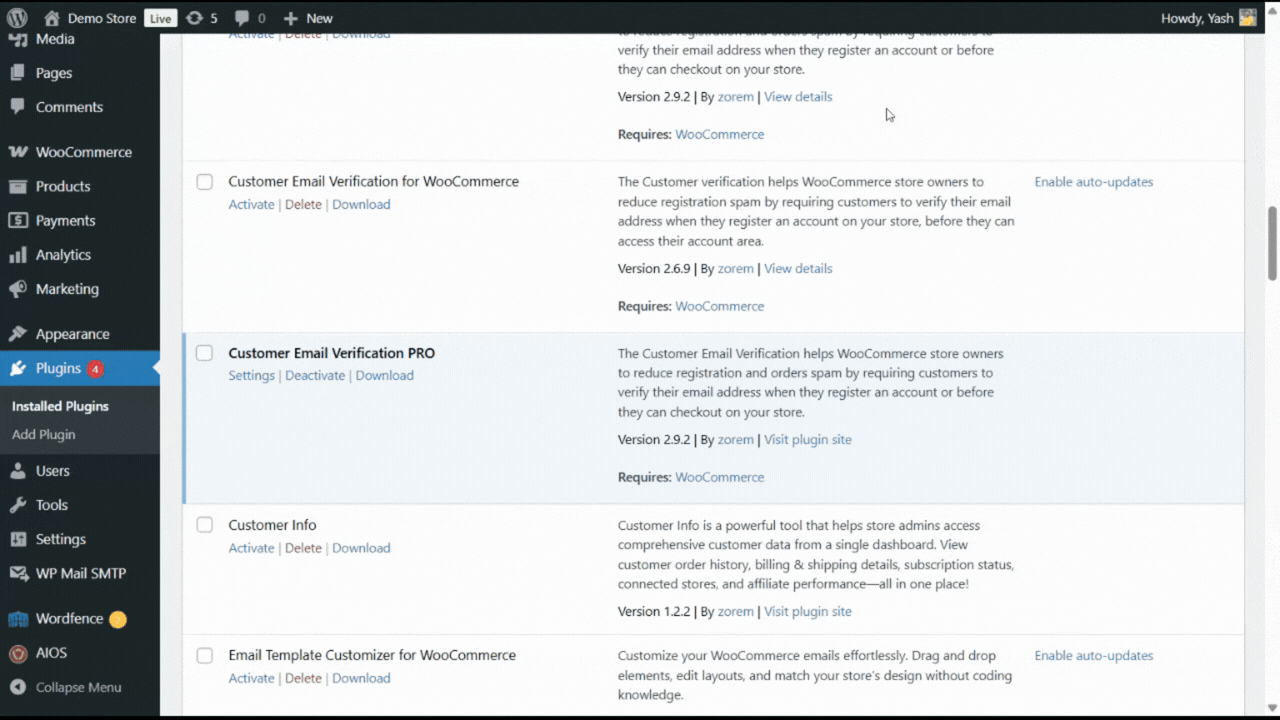
The Customer Email Verification Pro plugin adds a crucial layer of security to your WooCommerce store by integrating an email verification step into the registration and checkout process. This ensures that only valid email addresses can be used to create accounts, reducing spam registrations and increasing customer confidence.
Signup Verification
Require email verification at registration with full OTP configuration — length, expiry, and resend limits.
Checkout Verification
Verify guest & registered customers before or during checkout — choose Popup overlay or Inline OTP entry.
Login Authentication (2FA)
Require OTP for logins from new devices, new locations, or after a set number of days since last login.
OTP Length & Expiry
Choose 4-digit or 6-digit OTPs and set expiry times — 10 min, 30 min, 1 hr, 24 hrs, 72 hrs, or never.
Spam Protection
Block disposable emails, fake domains, and unwanted addresses before the OTP is sent — disposable list, MX validation, B2B allowlist, and custom blocked emails.
Auto-cleanup & Auto-delete
Keep your store clean automatically — delete stale verification log rows and abandoned user accounts on a daily cron, with safeguards that never touch users with orders or recent logins.
Re-engagement Reminders
Bring back lapsed sign-ups automatically — customizable email reminders at 1h, 24h, 3d, or 7d after sign-up with a one-click button to complete verification.
Getting started
↑ Back to topCustomer Email Verification Pro helps WooCommerce store owners reduce spam registrations and fake orders by requiring customers to verify their email address using a One-Time Password (OTP).
How to Install the Plugin?
↑ Back to top- Download the plugin ZIP file from your zorem account.
- In WordPress admin, go to Plugins → Add New → Upload Plugin.
- Select the ZIP file and click Install Now.
- After installation, click Activate Plugin.
Settings
↑ Back to topConfigure email verification options by navigating to WooCommerce → Email Verification.
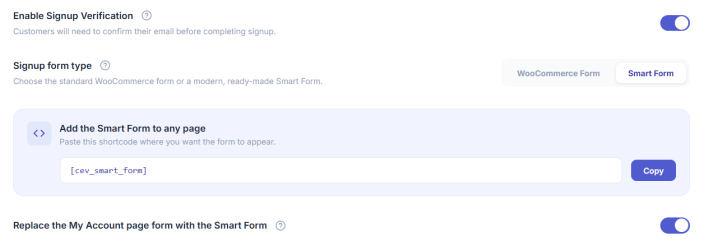
How to Enable Signup Verification?
↑ Back to topSignup verification requires customers to verify their email address before their account is created.
- Go to WooCommerce → Email Verification.
- Toggle Enable Signup Verification to ON.
- Click Save Changes.
How it works: When a customer submits the registration form, they receive an OTP via email. The account is only created after successful verification of the OTP.
How to Enable Checkout Verification?
↑ Back to topCheckout verification ensures customers verify their email before placing an order.
- Go to WooCommerce → Email Verification.
- Toggle Enable Checkout Verification to ON.
- Select the Checkout Verification Type:
- Popup: Opens a popup window for OTP entry
- Inline: Displays verification field directly on the checkout page
- Click Save Changes.
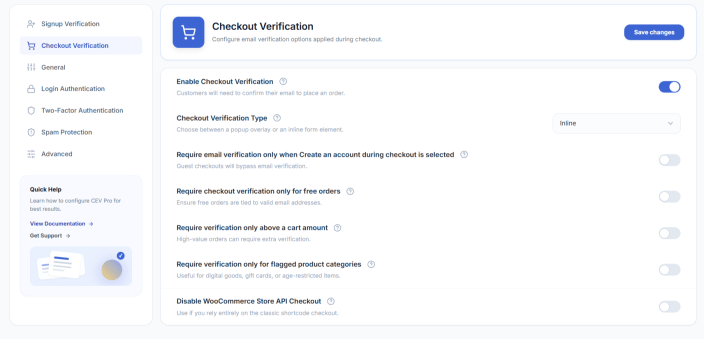
Additional Checkout Options
| Option | Description |
|---|---|
| Enable on cart page | Show verification popup on the cart page instead of checkout |
| Free orders only | Require verification only when order total is $0 |
| Create account during checkout | Only verify if customer opts to create an account (inline mode only) |
| Disable Store API Checkout | Block WooCommerce Store API to prevent bypassing verification |
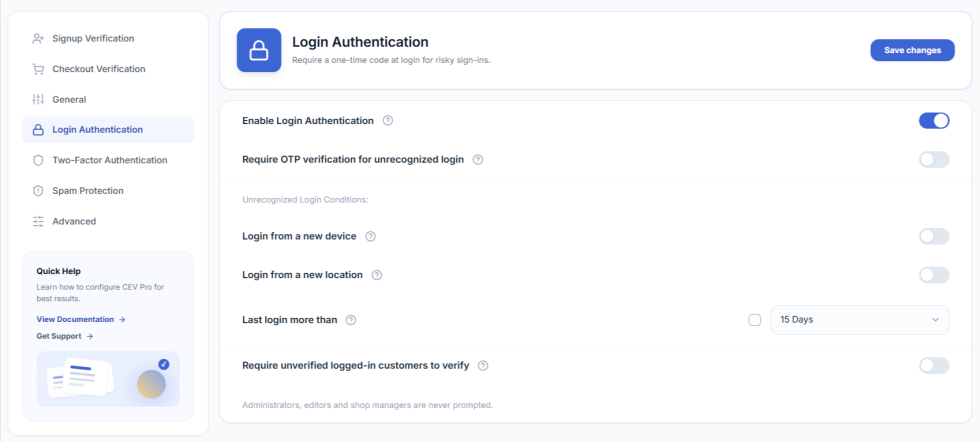
How to Enable Login Authentication?
↑ Back to topLogin authentication adds an extra security layer by requiring OTP verification for suspicious login attempts.
- Go to WooCommerce → Email Verification.
- Scroll to the Login Authentication section.
- Toggle Enable Login Authentication to ON.
- Enable Require OTP verification for unrecognized login.
- Select the conditions that trigger verification:
- Login from a new device
- Login from a new location
- Last login more than X days ago (15, 30, or 60 days)
- Click Save Changes.
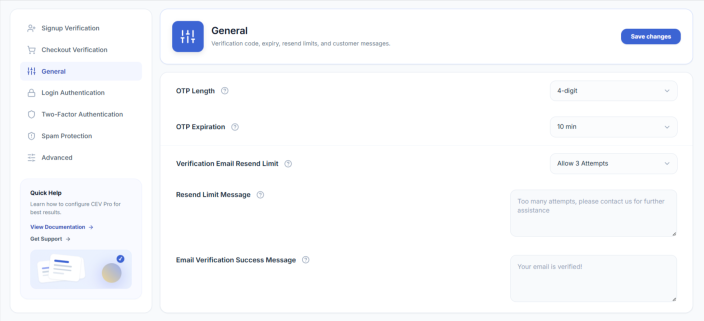
How to Configure OTP Settings?
↑ Back to topCustomize the OTP behavior for all verification types.
- Go to WooCommerce → Email Verification.
- Locate the General Settings section.
- Configure the following options:
| Setting | Options |
|---|---|
| OTP Length | 4-digit or 6-digit code |
| OTP Expiration | Never, 10 min, 15 min, 30 min, 1 hour, 24 hours, or 72 hours |
| Resend Limit | Allow 1 attempt, 3 attempts, or disable resend |
| Resend Limit Message | Custom message when resend limit is reached |
| Success Message | Message shown after successful verification |
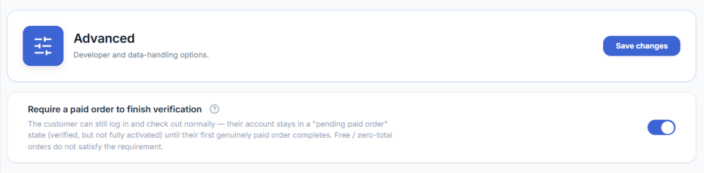
How to require a paid order to finish verification in Customer Email Verification Pro?
↑ Back to topThe Require a paid order to finish verification option (also called Paid-Order Gatekeeping) adds a third state to the standard verification flow. After a customer has confirmed their email via OTP, their account is held in a pending paid order state — counted as verified for login and checkout, but not yet fully activated — until their first genuinely paid WooCommerce order completes. CEV Pro provides this state and fires a completion hook on the paid order, so your own coupon, marketing-list, or membership integrations can decide when to release any perks they were holding back.
Requirements
Requires Customer Email Verification Pro to be installed and active, with WooCommerce also active. This feature is off by default and only takes effect once you explicitly enable it.
What it does (and what it doesn’t)
CEV Pro keeps things deliberately minimal. With this option ON, the plugin:
- Adds a third verification state – pending paid order – alongside the existing verified and unverified states.
- Writes that state at OTP success. When a new customer confirms their email, their account is marked pending paid order instead of verified.
- Flips the state to fully verified when the customer’s first genuinely paid order reaches processing, completed, or payment complete status.
- Fires the cev_paid_order_gatekeeping_completed action hook at the moment of the flip, so your own integrations can release any perks they were holding back (welcome coupons, marketing-list opt-ins, membership upgrades, etc.).
- Shows the state in the admin – the WP Users list verification column displays an orange clock badge for pending-paid-order customers (distinct from the green verified tick and the red unverified cross).
- Protects pending customers from automatic cleanup – the auto-delete unverified and re-engagement reminder crons skip them, because their email is already confirmed.
What CEV Pro does not do on its own:
- It does not hold back the WooCommerce welcome / account-created email — that is sent normally at registration.
- It does not restrict login, checkout, browsing, or any standard WooCommerce flow. A pending-paid-order customer can shop and check out exactly like any verified customer.
- It does not automatically restrict coupons, discounts, or promotional campaigns. If you want those to wait for the paid order, listen to the hook from your own code or theme.
The three verification states
- Verified – email confirmed and (when this option is on) first paid order completed. Used for the strict Verified KPI in the Analytics dashboard and the green tick in the admin user list.
- Pending paid order – email confirmed via OTP, but no paid order yet. Counted as verified for login and checkout. Shown as an orange clock in the admin and as a separate bucket in the Analytics Verification Status widget.
- Unverified – email has not been confirmed at all (same as before).
How to enable Paid-Order Gatekeeping
- Verified – email confirmed and (when this option is on) first paid order completed. Used for the strict Verified KPI in the Analytics dashboard and the green tick in the admin user list.
- Pending paid order – email confirmed via OTP, but no paid order yet. Counted as verified for login and checkout. Shown as an orange clock in the admin and as a separate bucket in the Analytics Verification Status widget.
- Unverified – email has not been confirmed at all (same as before).
The setting takes effect immediately for new signups. Existing customers keep their current verification status — they are not retroactively moved into pending paid order.
What counts as a “paid order”
- Any order with a total greater than zero that reaches the processing, completed, or payment complete status counts. This covers all standard payment paths: automatic-capture gateways (Stripe, PayPal, etc.) as well as manual gateways like Cash on Delivery, Bank Transfer (BACS), Cheque, and admin-created orders.
- Free / zero-total orders do NOT count. A $0 order (after coupons, member discounts, or free trials) does not satisfy the requirement. This prevents a spammer from unlocking perks with a $0 placeholder order.
- Cancelled, failed, refunded, or pending-payment orders do NOT count. Only successfully paid orders flip the status.
Admin override — Force activate
If you need to manually flip a pending-paid-order customer to fully verified — for example, you took payment offline, or you’re activating a VIP / staff account — you can do it from the WP Users screen.
- Go to Users → All Users.
- Select the customers you want to fully activate.
- From the Bulk actions dropdown, choose Force activate (skip paid-order requirement) and click Apply.
The selected pending customers are flipped to fully verified, and the same cev_paid_order_gatekeeping_completed hook fires, so any of your integrations that listen for it run as if the customer had completed a paid order. Customers who weren’t pending are skipped silently.
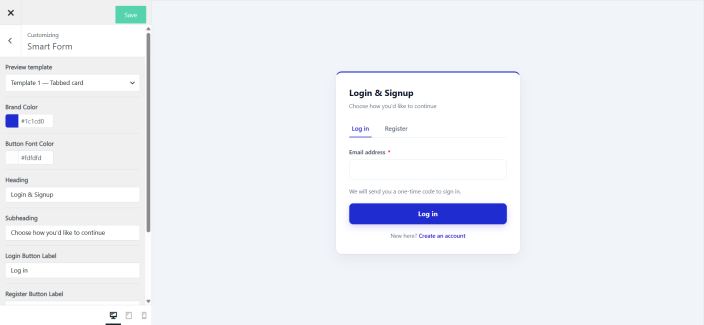
Smart Form
↑ Back to topHow to use Smart Form in Customer Email Verification Pro?
↑ Back to topThe Smart Form is an optional, fully-branded login and registration form that replaces WooCommerce’s default form on the My Account page (or any post or page) via a shortcode. It supports verification by email or phone (SMS), and gives customers a choice of password or one-time-code (OTP) login. The same anti-spam protections that power the rest of Customer Email Verification Pro are reused, so behaviour stays consistent with your existing setup.
Requirements
Requires Customer Email Verification Pro to be installed and active. WooCommerce must also be active. Phone (SMS) verification additionally requires an SMS gateway account with one of the supported providers — MSG91, Twilio, Vonage (Nexmo) or WhatsApp Business.
Smart Form vs WooCommerce Form
Smart Form is a self-contained Login + Register experience that lives alongside the existing WooCommerce form. Merchants can switch between two form types from a single setting.
- WooCommerce Form — the default WooCommerce login/registration form with email verification on top. This is the existing behaviour and is unchanged for stores that don’t opt in.
- Smart Form — a modern, branded form with four ready-made layouts, optional phone (SMS) verification, and a choice of password or OTP login.
Feature comparison
- Form design – WooCommerce Form uses your theme default; Smart Form uses one of 4 ready-made templates.
- Verification – WooCommerce Form supports email only; Smart Form supports email or phone (SMS).
- Login – WooCommerce Form uses username/email + password; Smart Form supports password, Email OTP, or Phone OTP.
- Anti-spam tools – disposable-email blocking, MX check, allow/block list and B2B mode apply to both form types.
- Best for – WooCommerce Form is right when you want the standard flow; Smart Form is right when you want a branded, flexible signup/login.
How to enable Smart Form?
↑ Back to top- Go to WooCommerce → Email Verification → Settings → Signup Verification.
- Set Form type to Smart Form.
- Choose a Template (1–4) — see the Smart Form templates section below for what each layout looks like.
- Choose a Registration verification method (Email or Phone).
- Choose a Login method (Password, Email OTP, or Phone OTP).
- Click Save changes.
Your existing Email Verification settings (OTP length, expiry, resend limit, success messages, anti-spam rules) continue to apply to Smart Form — they are reused, not duplicated.
How to place Smart Form on the frontend?
↑ Back to topYou have two ways to put Smart Form in front of your customers.
Option 1 — Shortcode (any page or post)
Add this shortcode to any page, post, or widget where you want the form to appear:
[cev_smart_form]
The form will render using the template and verification methods you chose in Settings. You can place the shortcode in your theme’s account page, a custom landing page, or anywhere else you want to direct sign-ups.
Option 2 — Replace the WooCommerce My Account form
If you want Smart Form to take over the standard /my-account/ page automatically (without adding a shortcode), enable the Replace the My Account page form with Smart Form toggle in the Signup Verification settings. WooCommerce’s default login form on /my-account/ will be replaced by your chosen Smart Form template for logged-out visitors. The logged-in dashboard is not affected.
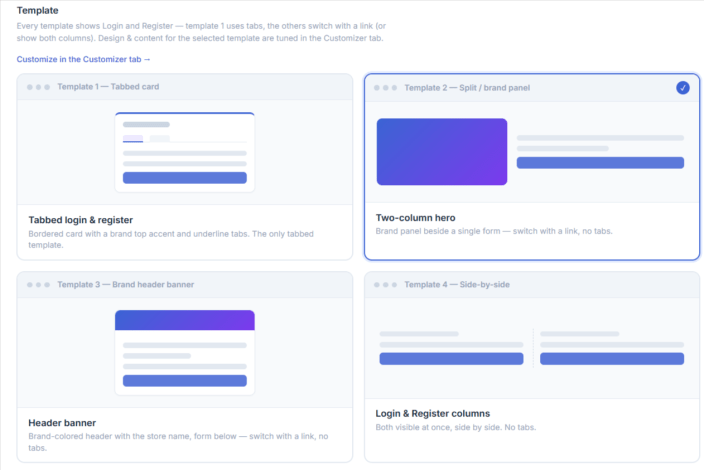
Smart Form templates
Four layouts are included. All four are fully responsive and inherit your brand colour, title, and panel image from the Customizer.
- Template 1 — Combined (tabs) – Single centered card with Login and Register tabs. Best for stores that want both forms on one screen with minimal scrolling.
- Template 2 — Split / brand panel – Two-column hero with brand image or colour on the left and the form on the right. Best for branded landing pages where you want to show the brand prominently.
- Template 3 — Minimal centered – Single column with plenty of whitespace and logo on top. Best for clean, distraction-free sign-up — perfect for ad landing pages.
- Template 4 — Side-by-side – Login and Register shown in parallel columns. Best for returning-customer-heavy stores where both flows need equal weight.
Registration methods
Smart Form supports two ways for a new customer to verify their account at sign-up. Choose one under Signup Verification → Registration verification method.
- Email verification – the customer enters their email address and receives a one-time code. They type the code into the form to complete sign-up. This uses the same OTP engine, throttling, resend limits, and email templates as the existing Email Verification feature.
- Phone (SMS) verification – the customer enters their mobile number and receives the OTP by SMS or WhatsApp. Requires an SMS gateway to be configured first (see SMS gateway configuration below).
Login methods
Returning customers can sign in to Smart Form using one of three login methods. Choose one under Signup Verification → Login method.
- Password – the classic username/email + password flow. If two-factor authentication is enabled on the account, the user is also prompted for their authenticator code.
- Email OTP – the customer enters their email address and receives a one-time code by email. No password required.
- Phone OTP – the customer enters their mobile number and receives a one-time code by SMS or WhatsApp. Requires an SMS gateway.
Phone OTP fallback. If you enable Phone OTP login and a customer’s account has no phone number on file, Smart Form will automatically offer Email OTP as a fallback so the customer is never locked out. For accounts with a prior order, the saved billing phone is used automatically.
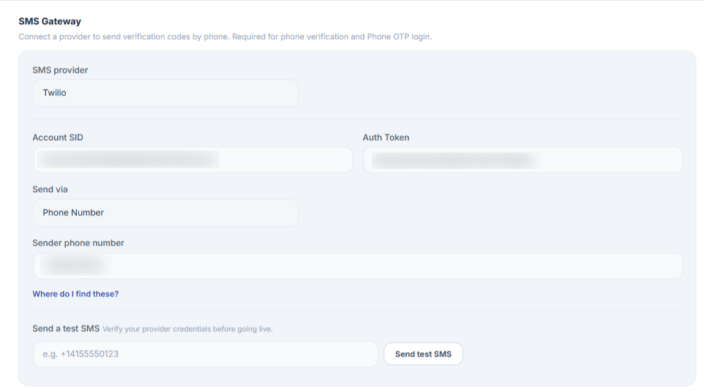
SMS gateway configuration
If you choose Phone verification for registration or Phone OTP for login, Smart Form needs an SMS gateway to deliver the codes. Four providers are supported out of the box:
- MSG91
- Twilio
- Vonage (Nexmo)
- WhatsApp Business
How to configure an SMS gateway
- Go to WooCommerce → Email Verification → Settings → Signup Verification.
- Scroll to the SMS Gateway section.
- Pick a Provider from the dropdown.
- Enter the API credentials shown by the provider — each provider asks for its own combination of API key, sender ID, account SID, etc.
- Click Send test SMS to verify the connection.
- Click Save changes.
Note
SMS credentials are stored on your server and are never exposed to the browser or to customers. Only the active SMS provider name is referenced on the frontend — never the API key.
How to customize the Smart Form design?
↑ Back to topSmart Form’s design and copy are tuned from the existing Customizer tab, under a new Smart Form panel. Go to WooCommerce → Email Verification → Customize, then open the Smart Form panel.
Design options
- Brand title
- Brand colour
- Primary & secondary colour
- Button colour & text colour
- Text colour
- Background colour
- Font size
- Spacing & padding
- Corner radius
- Form width
- Logo
Content options
- Login button text
- Register button text
- OTP button text
- Resend OTP text
- Custom success messages
- Custom error messages
- Field placeholders
Notes & limitations
- Checkout verification is unchanged. Smart Form replaces the signup/login experience only. Guest checkout continues to use the existing Checkout Verification settings — nothing on the checkout page is affected by Smart Form.
- Phone verification requires an SMS gateway. If no gateway is configured, the Phone option will be greyed out with a setup link.
- Existing settings still apply. OTP length, expiry, resend limits, disposable-email blocking, MX checks, B2B allowlist, and the email block-list all continue to apply to Smart Form sign-ups — no duplicate configuration.
- Backwards compatible. Switching back to WooCommerce Form at any time restores the original WooCommerce login/registration experience. No customer data is lost.
- Translation-ready. All Smart Form strings (labels, buttons, error messages) are translatable via WPML and Polylang’s String Translations.
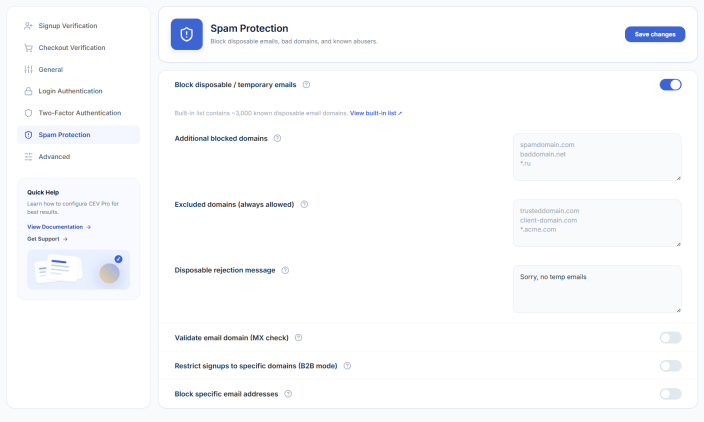
Spam Protection
↑ Back to topCustomer Email Verification Pro includes four independent layers of spam protection that run before the OTP is sent — disposable email blocking, MX record validation, a B2B allowlist, and a custom blocked-emails list. Each layer is a separate toggle, so you can enable only the ones you need.
How to Block Disposable / Temporary Emails?
↑ Back to topThe plugin ships with a built-in list of ~3,000 known disposable email providers (Mailinator, 10MinuteMail, GuerrillaMail, etc.). When this rule is on, sign-ups from any of those domains are rejected before an OTP is sent.
- Go to Settings → Spam Protection.
- Enable the toggle Block disposable / temporary emails.
- (Optional) Add extra domains to Additional blocked domains — one per line.
- (Optional) Add domains to Excluded domains to whitelist them even if they’re on the built-in list.
- Customize the rejection message shown to users.
Note
The blocklist is checked at signup, classic checkout, Blocks checkout, and edit-account email change.
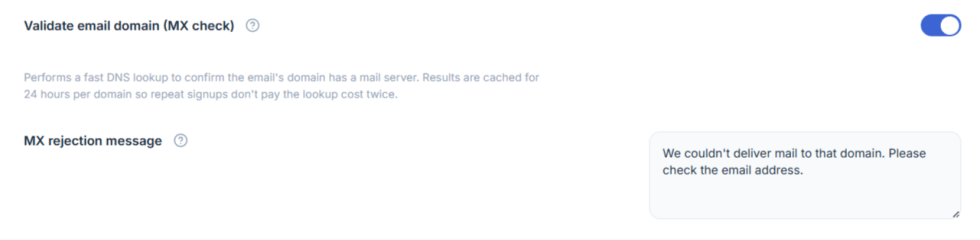
How to Validate MX Records?
↑ Back to topThe MX check confirms the email’s domain has a working mail server. This catches typos like @gmial.com, fake domains like @example.test, and dead inboxes — before sending an OTP that would never be delivered.
- Go to Settings → Spam Protection.
- Enable the toggle Validate email domain (MX check).
- Customize the MX rejection message if needed.
- Click Save.
Note
Results are cached per domain for 24 hours to avoid repeat DNS lookups for repeat sign-ups. The check fails open on DNS errors so transient issues don’t block legitimate users.
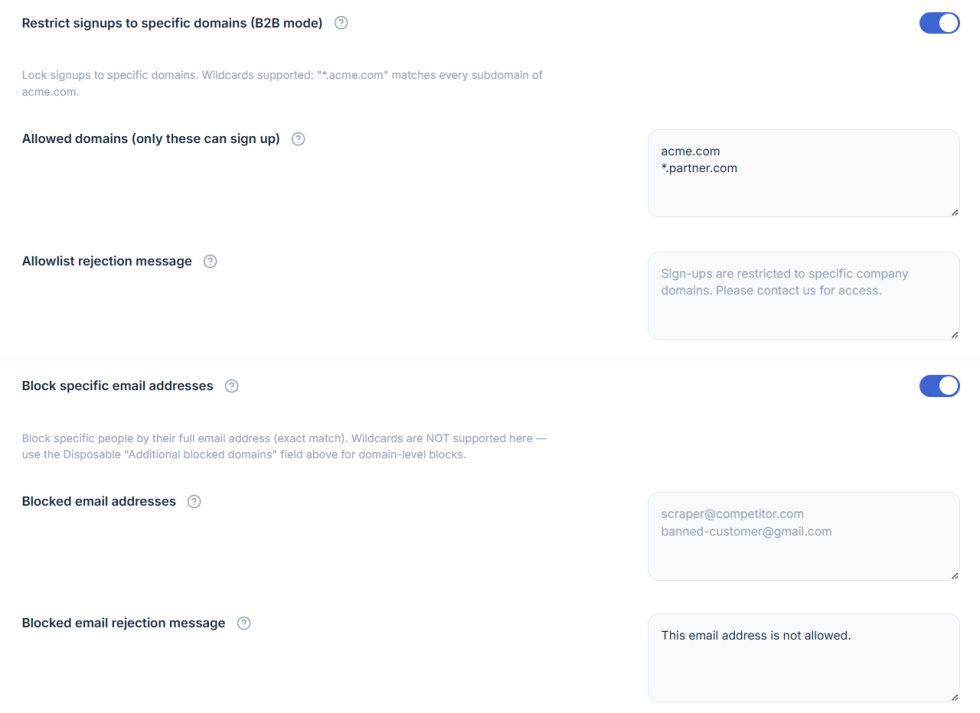
How to Restrict Sign-ups to Specific Domains (B2B Mode)?
↑ Back to topFor B2B / corporate stores that should only accept sign-ups from approved company domains.
- Go to Settings → Spam Protection.
- Enable the toggle Restrict signups to specific domains (B2B mode).
- In Allowed domains, add the domains that are permitted to register — one per line. Wildcards supported (e.g.
acme.com,*.partner.com). - Customize the Allowlist rejection message.
- Click Save.
Important
When this toggle is ON, only the listed domains can sign up. Every other domain is
How to Block Specific Email Addresses?
↑ Back to topFor blocking individual bad actors by their exact email.
- Go to Settings → Spam Protection.
- Enable the toggle Block specific email addresses.
- Add full email addresses to Blocked email addresses — one per line, exact match (no wildcards).
- Customize the Blocked email rejection message.
- Click Save.
Tip: For domain-level blocking (e.g. block all @spam.com), use the Additional blocked domains field inside the disposable section instead — it supports domain matching.
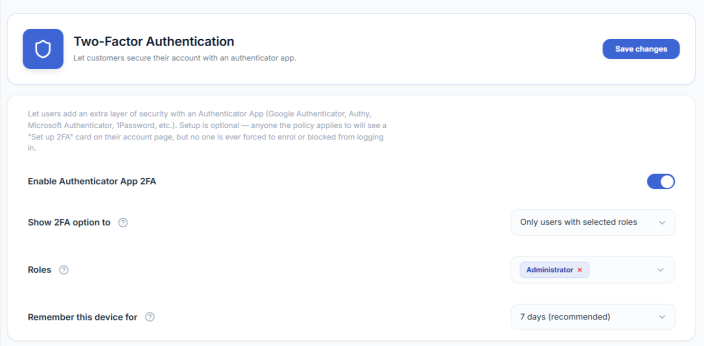
Two-Factor Authentication (Authenticator App)
↑ Back to topAdd an extra layer of security to your store with Authenticator App 2FA. Customers and staff can scan a QR code in Google Authenticator, Authy, Microsoft Authenticator, 1Password, or any TOTP-compatible app, and from then on every login asks for a 6-digit time-based code in addition to their password.
What it does ?
↑ Back to top- Authenticator-App based 2FA — no SMS, no email OTPs, no third-party service. Setup is one-time and works with any RFC-6238 TOTP app.
- Fully opt-in — no one is ever forced to enrol or blocked from logging in. The “Set up 2FA” card simply appears on the account page for users the policy applies to; they choose whether to enable it.
- Role-based visibility — show the 2FA option to All users, Only users with selected roles, or All users EXCEPT selected roles. Useful when you want to offer 2FA to staff but keep the option hidden from regular shoppers.
- “Remember this device” trust cookie — after a successful 2FA verification, the same browser/device is remembered for 1, 3, 7, 14, or 30 days (admin-configurable). The user isn’t re-prompted for a code until that period elapses or they sign in from a different browser.
- Frontend prompt for customers — the 2FA verification step renders inside your store theme on /my-account/, not on wp-login.php. Admins get the standard wp-login.php prompt.
- Backup codes — 10 one-time-use recovery codes generated at enrolment, in case the user loses their phone.
How to enable it ?
↑ Back to top- Go to WooCommerce → Email Verification → Settings → Two-Factor Authentication.
- Toggle Enable Authenticator App 2FA on.
- Choose Show 2FA option to:
- All users — the setup card is shown to everyone.
- Only users with selected roles — pick the roles below (e.g. Administrator, Shop manager) — only those users see the setup card.
- All users EXCEPT selected roles — useful to hide 2FA from “Customer” while keeping it for staff.
- Pick Remember this device for — how long a verified browser stays trusted (7 days is the recommended default).
- Click Save at the top of the section.
How a user enrols (first-time setup) ?
↑ Back to topWhen a user the policy applies to opens My Account → Two-Factor Auth (or for admin/editor users: Users → Profile), they’ll see a “Set up 2FA” card.
- Click Set up two-factor authentication.
- A QR code appears alongside a setup key.
- Open the user’s authenticator app (Google Authenticator, Authy, Microsoft Authenticator, 1Password, etc.) and either:
- Scan the QR code with the app’s camera, or
- Tap “Enter a setup key” / “Add manually” in the app, then paste the setup key shown on screen.
- The app immediately starts showing a 6-digit code that changes every 30 seconds.
- Type the current 6-digit code into the “Enter the 6-digit code” field on the setup card and click Verify & enable.
- Important step — the page now shows 10 backup codes. The user MUST save these somewhere safe (password manager, printed copy, downloaded text file) before closing the page. These are the only way back into the account if the authenticator app is lost.
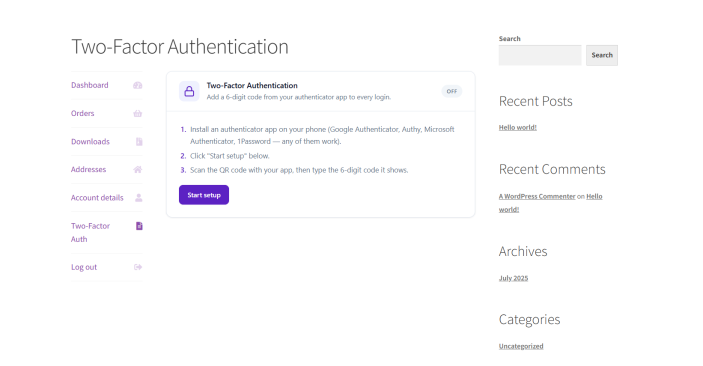
From the next login onward, the user will be asked for a 6-digit code from their authenticator app after entering their password.
How to use backup codes ?
↑ Back to topBackup codes are 10 one-time-use codes (each 10 characters long, formatted like a1b2c-3d4e5) issued at enrolment. They exist so a user isn’t locked out if they lose access to their authenticator app.
When to use a backup code ?
- Lost your phone
- Reinstalled your authenticator app and lost the entries
- Got a new device and forgot to migrate
- Authenticator app’s clock is out of sync (rare, but possible)
How to enter a backup code at login ?
- At the 2FA prompt during login, type one of your unused backup codes into the same “Enter the 6-digit code” field instead of a TOTP code.
- Click Verify.
The plugin auto-detects whether the input is a 6-digit TOTP code or a 10-character backup code and handles each correctly — there’s no separate “use backup code” link to click.
Important rules for backup codes
- Each code can be used only once. After it’s used, it’s permanently consumed and can’t be reused.
- The plugin tracks how many backup codes you have left. When you’re running low (say 2-3 codes remaining), you should regenerate.
- Backup codes are stored as hashes, not in plaintext — neither the store admin nor a database leak can read them after enrolment. That’s also why you must save them at the moment they’re issued; if you lose them, they can’t be recovered, only regenerated.
How to regenerate backup codes ?
If the user has used most of them, or thinks the printed copy is no longer safe:
- Go to My Account → Edit Account (or Users → Profile for staff).
- On the 2FA card, click Regenerate backup codes.
- The previous codes are invalidated immediately and a new set of 10 is issued.
- Save the new set somewhere safe.
What if a user loses everything (phone AND backup codes)?
The store admin can reset 2FA for that user:
- Go to Users → All Users, find the user, click Edit.
- Scroll to the 2FA section and click Reset 2FA for this user.
- Confirm in the dialog. The user’s 2FA enrolment is wiped — they can log in normally with just their password, then re-enrol if desired.
This action is admin-only and logged in the Analytics dashboard as a 2fa_disabled event.
Settings reference
↑ Back to top| Setting | What it does |
|---|---|
| Enable Authenticator App 2FA | Master toggle. When off, the entire 2FA system is dormant — no setup cards, no login prompts, even for users already enrolled. |
| Show 2FA option to | Decides which users see the “Set up 2FA” card on their account page. Setup remains optional even for users the policy applies to. |
| Roles | Used by the two role-based policy modes above. Multi-select. |
| Remember this device for | Trust-cookie lifetime after a successful 2FA verification. Don't remember makes the code prompt appear at every login. |
Verification Analytics Dashboard
↑ Back to topA new Analytics tab in WooCommerce → Email Verification that shows you exactly how the plugin is performing — how many signups you’re getting, how many complete email verification, how much spam is being blocked, and where the spam is coming from.
What it shows ?
↑ Back to topKPI cards (top of the page)
- Total Signups — registered users (rows in wp_users) created during the selected date range, excluding administrators and editors. This is the merchant-meaningful “how many people signed up this period.”
- Verified — how many of those signups completed email verification (have customer_email_verified = ‘true’).
- Spam Blocked — sum of all blocked email attempts in the period (disposable, MX-failed, blocklisted, not-in-allowlist).
- Avg. Time to Verify — median time between OTP sent and OTP verified, for users who completed verification.
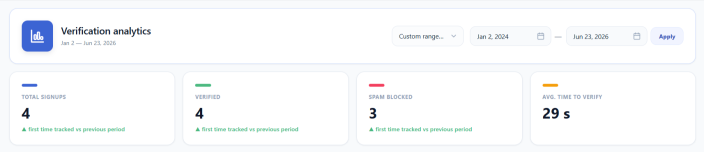
Each card shows a small trend indicator below it: “▲ +12.3% vs previous period” so you can see whether numbers are climbing.
Time-series chart
A line chart with three series — Signups (blue), Verified (green), Blocked (red) — across the selected date range.
The chart’s bucket size automatically adapts to the range:
- Last 7 days → daily buckets
- Last 30 days → daily buckets
- Last 90 days → weekly buckets
- Custom range under 1 year → monthly buckets
- Custom range 1+ year → yearly buckets
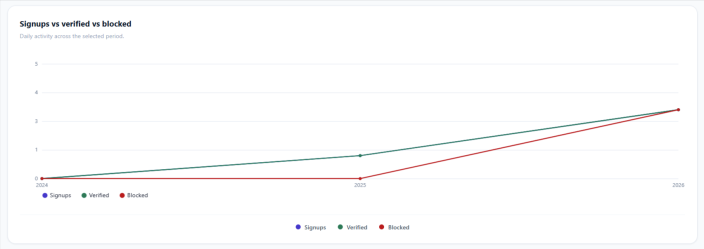
This keeps the line readable instead of flattening into a horizontal bar over a long range.
Verification funnel
A two-step funnel showing the drop-off from “Verification email sent” to “Code verified”:
- Step 1 — Verification email sent: every OTP that left your server, including incomplete signups (people who got the email but never finished registration).
- Step 2 — Code verified: how many of those people actually entered the code correctly.
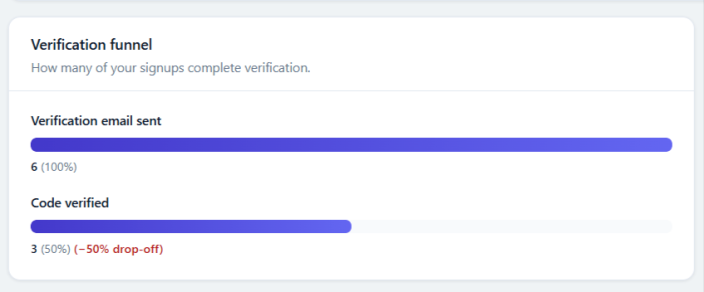
The percentage tells you the completion rate — if step 2 is much lower than step 1, you have a lot of abandoned signups and might want to revisit your OTP email design or expire time.
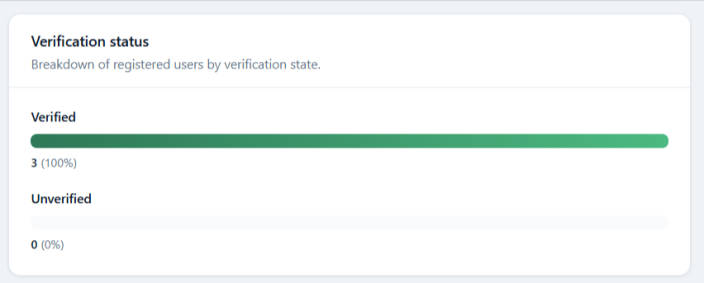
Verification status widget
A snapshot of your registered users in the period, split between Verified (green bar) and Unverified (amber bar), with counts and percentages. Gives you a quick read on what fraction of your customer accounts are sitting unverified.
Top blocked domains
A top-10 list of which email domains are being blocked most — useful for spotting which disposable-email providers are targeting your store, or whether your allowlist is too strict.

How to use the date range ?
↑ Back to topThe dropdown at the top right of the dashboard offers:
- Last 7 days
- Last 30 days (default — opens to this every time)
- Last 90 days
- Custom range — pick any two dates with the date pickers, click Apply.
The dashboard reloads instantly when you switch ranges. Custom date selections are remembered for the rest of your session — if you switch to another range and back to Custom, the dates come back pre-filled.
What feeds the data?
↑ Back to topEvery verification-related event the plugin handles is logged to a dedicated wp_cev_verification_events table:
| Event | When it’s logged |
|---|---|
otp_sent | A verification email is sent (signup, checkout, edit-account, login auth) |
otp_verified | A user enters the correct code |
otp_failed | A user enters the wrong code |
blocked_disposable | A signup with a disposable email is blocked |
blocked_mx | A signup with a non-existent mail server is blocked |
blocked_specific_email | A signup with an admin-banned email is blocked |
blocked_not_in_allowlist | A signup outside the B2B allowlist is blocked |
2fa_verified / 2fa_failed | A user enters their 2FA code (or backup code) |
2fa_enrolled | A user completes 2FA setup |
auto_deleted | A stale unverified user is cleaned up by the maintenance cron |
You don’t have to do anything — events are recorded automatically. The first time you open the Analytics tab after upgrading from a previous version, the plugin runs a one-time migration that backfills historical data from your existing user list, so the dashboard isn’t empty on day one.
Maintenance
↑ Back to topThe Maintenance tab keeps your store clean by auto-deleting stale verification records, removing abandoned user accounts, and bringing lapsed sign-ups back via re-engagement reminder emails. All three features are off by default and run on background daily crons.
You’ll find them at Settings → Unverified Users → Maintenance.
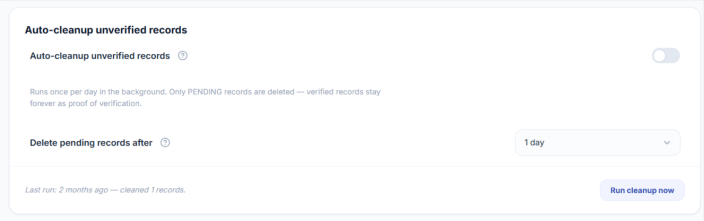
How to Auto-Cleanup Stale Verification Records?
↑ Back to topThe verification log table stores every email-verification attempt — including bot traffic and abandoned sign-ups. Auto-cleanup deletes the unverified rows after a configurable retention window so the table doesn’t grow unbounded.
- Go to Settings → Unverified Users → Maintenance.
- Enable the toggle Auto-cleanup unverified records.
- Choose how long to keep pending records under Delete pending records after — 14 days is recommended.
- Click Save.
- (Optional) Click Run cleanup now to execute immediately instead of waiting for the daily cron.
Note: Only pending records are deleted. Verified records stay forever as proof of verification.
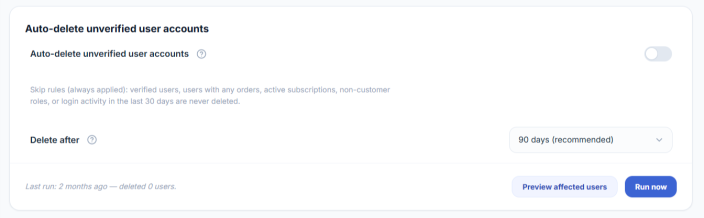
How to Auto-Delete Unverified User Accounts?
↑ Back to topThis permanently deletes WordPress user accounts that registered but never verified their email. It’s destructive — but ships with built-in safeguards so you can’t accidentally remove paying customers.
A user is never deleted if any of these are true:
- They have at least one order (any status)
- They have an active WooCommerce subscription
- They have any role other than customer or subscriber
- They’ve logged in within the last 30 days
- They actually verified their email
To enable:
- Go to Settings → Unverified Users → Maintenance.
- Enable the toggle Auto-delete unverified user accounts. A confirmation modal listing the safeguards will appear — read it and click Enable.
- Choose the retention window under Delete after — minimum 30 days, 90 days recommended.
- Click Save.
- (Strongly recommended) Click Preview affected users to see exactly which users would be deleted on the next run, without deleting anything. This lets you sanity-check the safeguards before turning the cron loose.
- Click Run now when you’re ready, or wait for the daily cron.
Important: Always click Preview affected users before the first run. The list shows email, registration date, and role for every candidate.
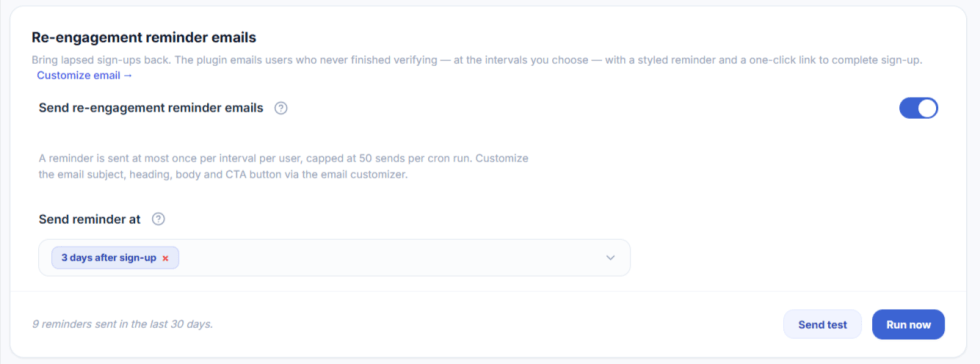
How to Send Re-engagement Reminder Emails?
↑ Back to topBring back customers who started signing up but never completed email verification. The plugin emails them at the intervals you choose — 1 hour / 24 hours / 3 days / 7 days after sign-up — with a styled reminder and a one-click button to come back and finish.
- Go to Settings → Unverified Users → Maintenance.
- Enable the toggle Send re-engagement reminder emails.
- Under Send reminder at, select one or more intervals.
- Click Save.
- Click Customize email → to edit the subject, heading, body copy, button text, button link, and footer through the email customizer (matches the same workflow as your other CEV emails).
- (Optional) Click Send test to email a sample to your admin address before going live.
- (Optional) Click Run now to fire the cron immediately.
Note: Each user gets each interval at most once, ever — no spam. Sends are capped at 50 per cron run to protect your SMTP. Reminders go to both registered users and guest checkout entries that exist in the verification log.
How to force re-verify all customers in Customer Email Verification Pro?
↑ Back to topThe Force re-verify all customers tool flips every existing verified customer back to unverified in a single action. The next time each customer logs in, they will be required to re-confirm their email address before they can continue. This is the recommended cleanup after a spam attack, after installing CEV Pro on a store that already has legacy accounts, or whenever you suspect the accounts list contains bots or stale data.
Requirements
Requires Customer Email Verification Pro to be installed and active, with WooCommerce also active. We strongly recommend you also enable the Login Authentication popup — that is the screen customers will see after their account has been re-flagged, and it is what actually re-collects the email OTP at next login.
When to use this tool
- After a spam attack – if your store was hit with mass bot signups, force re-verify is the fastest way to make every existing account prove ownership again. Real customers re-verify in one click; bots never come back.
- On a fresh install over legacy accounts – if you installed CEV Pro on a store that already had thousands of customers, those accounts were never asked to verify. Force re-verify retroactively adds the verification gate.
- After a data migration or import – if you bulk-imported customers from another platform and aren’t sure how clean the data is.
- Periodic security hygiene – some merchants run it once a year to flush abandoned accounts.
How to run the tool
- Go to WooCommerce → Email Verification → Unverified Users → Maintenance.
- Scroll to the Tools card.
- Read the description, then click the Force re-verify all customers button.
- A confirmation popup will show you how many customers will be affected. Review the count, then confirm.
- The job runs in the background. The card updates with a “Last run” timestamp and a count of how many customers were processed when it finishes.

Force re-verify selected users only
If you only want to re-verify a subset of customers (instead of everyone), you can do it from the WordPress Users screen.
- Go to Users → All Users.
- Use the checkboxes to select the customers you want to re-verify.
- From the Bulk actions dropdown, choose Force re-verify selected users and click Apply.
The selected customers are flipped to unverified using the same logic as the bulk button. Same exclusions apply (administrators, editors and shop managers are skipped silently).
Customer Management
↑ Back to topHow to View Customer Verification Status?
↑ Back to top- Go to WordPress → Users.
- The Email Verification column shows each user’s status.
- Use the filter dropdown to show only verified or unverified users.
How to Manually Verify a Customer?
↑ Back to top- Go to WordPress → Users.
- Find the customer you want to verify.
- Click the Verify action link, OR edit the user profile.
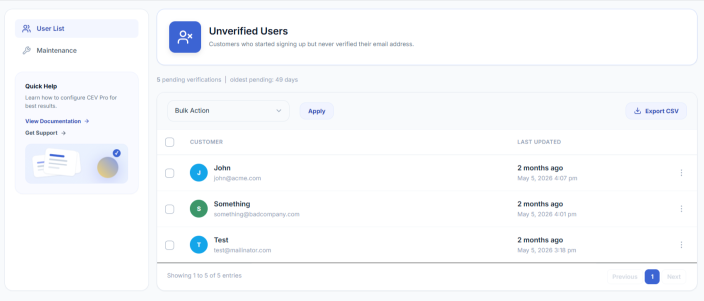
The Unverified Users tab lists every email that started verification but didn’t finish — both registered customers and guest checkout entries. From here you can resend reminders, export data, or remove rows in bulk.
You’ll find it at Settings → Unverified Users → User List.
How to View Unverified Users?
↑ Back to top- Go to Settings → Unverified Users → User List.
- The table shows pending verifications with the customer’s name, email, and the date they last attempted verification.
- The header strip displays pending count + oldest pending age at a glance.
How to Send a Reminder Email to a Specific User?
↑ Back to top- Go to Settings → Unverified Users → User List.
- Find the row for the customer.
- Click the kebab menu (⋮) at the right of the row.
- Click Send reminder. The customizer-defined re-engagement email is sent to that customer immediately.
Note
Sending a reminder this way is independent of the cron — you can send to any row, anytime, regardless of the configured intervals.
How to Send Reminders to Multiple Users at Once?
↑ Back to top- Go to Settings → Unverified Users → User List.
- Tick the checkboxes next to the users you want to email.
- From the Bulk Action dropdown, choose Send re-engagement reminder.
- Click Apply.
- Confirm the send in the modal that appears.
Tick the checkbox in the column header to select every visible row at once.
How to Delete an Unverified User Entry?
↑ Back to top- Go to Settings → Unverified Users → User List.
- Click the kebab menu (⋮) on the row.
- Click Delete and confirm.
For bulk delete: tick multiple rows, choose Delete from the Bulk Action dropdown, click Apply, and confirm.
How to Export the Unverified User List to CSV?
↑ Back to top- Go to Settings → Unverified Users → User List.
- Click Export CSV in the top-right of the records card.
- The file downloads with columns: ID, Email, Status, Last Updated.
The export includes the entire list, not just the visible page.
Customization
↑ Back to topCustomize the appearance of verification popups and emails to match your store’s branding.
How to Access the Customizer?
↑ Back to top- Go to WooCommerce → Email Verification.
- Click on Customize in the settings menu.
- The customizer opens with a live preview panel.
- Select Popup Style or Popup Content from the left panel.
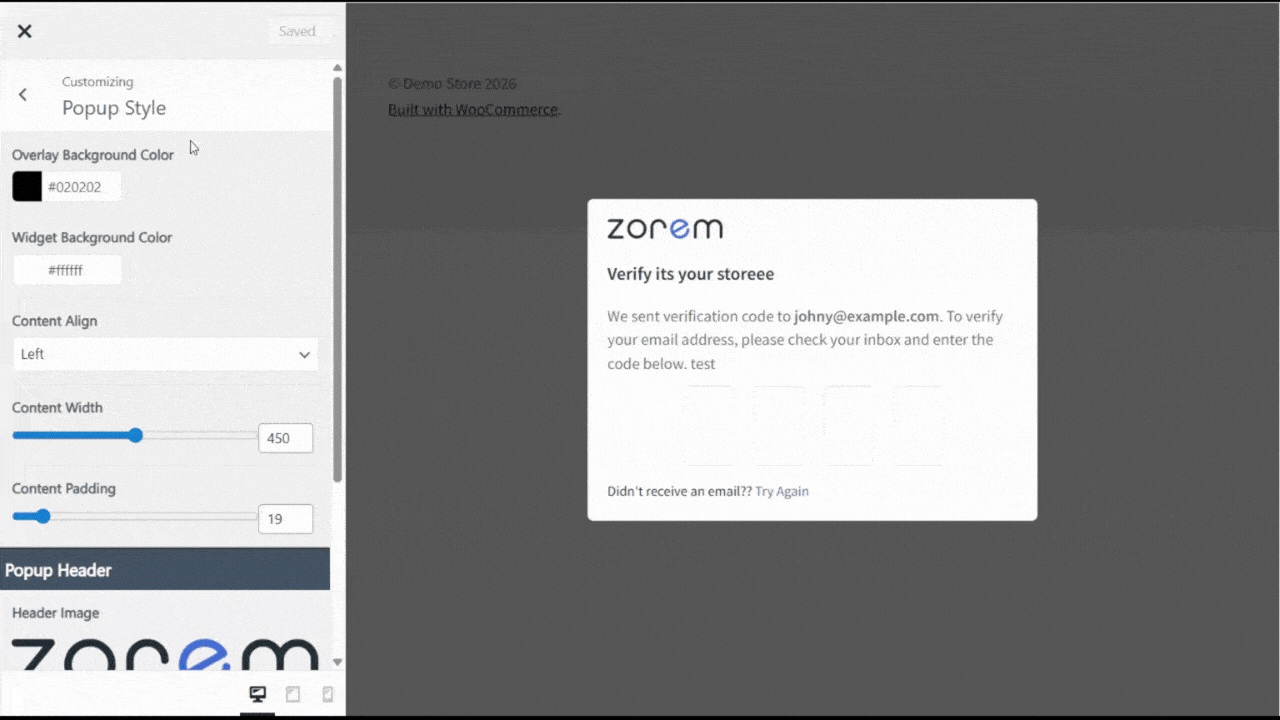
How to Customize the Popup Style?
↑ Back to top- In the customizer, click Design → Popup Style.
- Adjust the settings below.
- Click Publish to save your changes
- In the customizer, click Design → Popup Style.
- Adjust the settings below.
- Click Publish to save your changes
| Setting | Description | Default |
|---|---|---|
| Overlay Background Color | Color of lightbox overlay behind popup | #ffffff |
| Widget Background Color | Background color of popup widget | #f5f5f5 |
Popup Layout Settings
| Setting | Description | Range | Default |
|---|---|---|---|
| Content Alignment | Align popup content | Center, Left | Center |
| Content Width | Width of popup widget | 300px – 600px | 440px |
| Content Padding | Internal spacing | 10px – 100px | 30px |
Popup Header Settings
| Setting | Description | Range | Default |
|---|---|---|---|
| Header Image | Upload logo or custom image | Media upload | Email icon |
| Image Width | Width of header image | 25px – 250px | 80px |
| Header Font Size | Size of header text | 10px – 30px | 18px |
Verification Button Settings
| Setting | Description | Default |
|---|---|---|
| Button Color | Background color of verify button | #2296f3 |
| Button Font Color | Text color of verify button | #ffffff |
| Button Font Size | Size of button text | 14px |
| Button Padding | Internal padding of button | 15px |
| Expand Button | Make button full-width | Disabled |
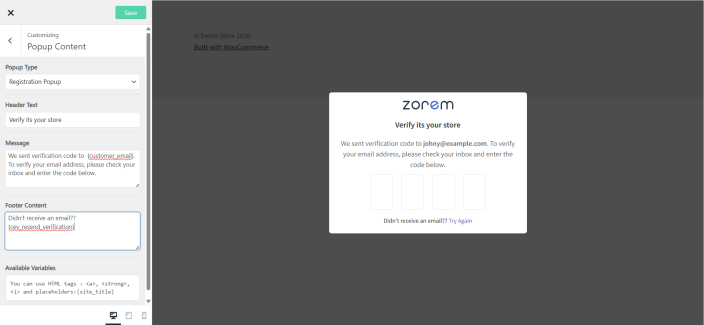
How to Customize the Popup Content?
- In the customizer, click Popup Content.
- Select the Widget Type from the dropdown.
- Edit the content fields for your selected type.
- Click Publish to save changes.
Available Widget Types
| Widget Type | Description |
|---|---|
| Registration | Popup shown during account registration |
| Checkout Email Popup | Initial email entry popup at checkout |
| Checkout OTP Popup | OTP entry popup after code is sent |
| Login Authentication | Popup for suspicious login attempts |
How to Customize the Registration Popup Content?
- In the customizer, click Popup Content.
- Select Widget Type: Registration from the dropdown.
- Edit the following fields:
| Field | Description | Default Value |
|---|---|---|
| Header Text | Title at top of popup | “Verify it’s you.” |
| Verification Message | Main message body | “We sent verification code to {customer_email}. To verify your email address, please check your inbox and enter the code below.” |
| Footer Text | Text below form | “Didn’t receive an email? {cev_resend_verification}” |
| Button Text | Verify button text | “Verify Code” |
How to Customize the Checkout Email Popup Content?
- In the customizer, click Popup Content.
- Select Widget Type: Checkout Email Popup from the dropdown.
- Edit the following fields:
| Field | Default Value |
|---|---|
| Header Text | “Verify it’s you.” |
| Verification Message | “Please verify your email address to proceed to checkout.” |
| Footer Text | “Already have an account? Login now” |
How to Customize the Checkout OTP Popup Content?
- In the customizer, click Popup Content.
- Select Widget Type: Checkout OTP Popup from the dropdown.
- Edit the following fields:
| Field | Default Value |
|---|---|
| Header Text | “Verify it’s you.” |
| Verification Message | “We sent verification code to {customer_email}. To verify your email address, please check your inbox and enter the code below.” |
| Footer Text | “Didn’t receive an email? {cev_resend_verification}” |
How to Customize the Login Authentication Popup Content?
- In the customizer, click Popup Content.
- Select Widget Type: Login Authentication from the dropdown.
- Edit the following fields:
| Field | Default Value |
|---|---|
| Header Text | “Verify it’s you.” |
| Verification Message | “We sent verification code to {customer_email}. To verify your email address, please check your inbox and enter the code below.” |
| Footer Text | “Didn’t receive an email? {cev_resend_verification}” |
| Button Text | “Verify Code” |
Popup Content Placeholders
| Placeholder | Description | Example |
|---|---|---|
| {customer_email} | Customer’s email address | john@example.com |
| {cev_resend_verification} | Clickable resend link | Resend Code |
How to Access Email Customization?
↑ Back to topEmail Types Overview
The plugin supports 5 different email types, each sent for a specific verification scenario:
| Email Type | When It’s Sent | Contains OTP |
|---|---|---|
| Registration | When customer registers a new account | ✓ Yes |
| Checkout | When customer verifies email at checkout | ✓ Yes |
| Edit Account | When customer changes their email address | ✓ Yes |
| New Login OTP | When OTP is required for suspicious login | ✓ Yes |
| New Login Auth | Alert for new login (informational only) | ✗ No |
How to Access Email Customization?
- Go to WooCommerce → Email Verification.
- Click on Customize in the settings menu.
- The customizer opens with a live preview panel.
- Click Design → Email Style to customize appearance.
- Click Email Content to customize text and messages.
How to Customize the Email Style?
Customize colors, layout, and header appearance for all verification emails.
Step-by-Step Instructions
- In the customizer, click Design → Email Style.
- The preview panel will show a sample email.
- Adjust the settings below.
- Click Publish to save your changes.
Email Layout Settings
| Setting | Description | Range/Options | Default |
|---|---|---|---|
| Content Alignment | Align email content horizontally | Center, Left | Left |
| Content Width | Width of the email content area | 400px – 1000px | 650px |
| Content Padding | Internal spacing inside the email | 10px – 100px | 30px |
Email Color Settings
| Setting | Description | Default |
|---|---|---|
| Background Color | Background color of email content area | #fafafa |
| Border Color | Color of the content border | #e0e0e0 |
| Font Color | Color of the email body text | #333333 |
Email Header Settings
| Setting | Description | Range/Options | Default |
|---|---|---|---|
| Header Image | Upload your logo for emails | Media upload | None (empty) |
| Image Width | Width of the header image | 50px – 300px | 80px |
| Header Font Size | Size of the heading text | 10px – 30px | 18px |
Email Button Settings
| Setting | Description | Default |
|---|---|---|
| Button Color | Background color of the verify button | #2296f3 |
| Button Font Color | Text color of the verify button | #ffffff |
| Button Font Size | Size of button text | 14px |
| Button Padding | Internal padding of the button | 15px |
| Expand Button | Make button full-width | Disabled |
How to Customize Email Content?
Each email type has its own customizable content including subject, heading, body message, and footer.
Step-by-Step Instructions
- In the customizer, click Email Content.
- Select the Email Type from the dropdown menu.
- Edit the content fields for your selected email type.
- The preview panel updates in real-time.
- Click Publish to save changes.
Available Email Types in Dropdown
| Email Type | Description |
|---|---|
| Registration | Email sent during account registration |
| Checkout | Email sent during checkout verification |
| Edit Account Email | Email sent when customer changes email address |
| New Login OTP | Email with OTP for suspicious login verification |
| New Login Authentication | Alert email for new login notification |
How to Customize the Registration Email?
- In the customizer, click Email Content.
- Select Email Type: Registration from the dropdown.
- Edit the fields shown below.
- Click Publish to save changes.
Registration Email Settings
| Field | Description |
|---|---|
| Email Subject | Subject line that appears in customer’s inbox |
| Email Heading | Large heading text inside the email body |
| Verification Message | Main content explaining verification with OTP code |
| Footer Content | Additional text displayed below the main content |
Registration Email Default Values
| Field | Default Value |
|---|---|
| Email Subject | Please Verify Your Email Address on {site_title} |
| Email Heading | Verify Your Email Address |
| Verification Message | Thank you for signing up for {site_title}, to activate your account, we need to verify your email address.<p>Your verification code: <strong>{cev_user_verification_pin}</strong></p> |
| Footer Content | (empty) |
Available Placeholders for Registration Email
| Placeholder | Description | Example Output |
|---|---|---|
| {site_title} | Your website/store name | My Store |
| {cev_user_verification_pin} | The OTP verification code | 123456 |
| {cev_display_name} | Customer’s display name | John |
How to Customize the Checkout Email?
- In the customizer, click Email Content.
- Select Email Type: Checkout from the dropdown.
- Edit the fields shown below.
- Click Publish to save changes.
Checkout Email Settings
| Field | Description |
|---|---|
| Email Subject | Subject line that appears in customer’s inbox |
| Email Heading | Large heading text inside the email body |
| Verification Message | Main content explaining verification with OTP code |
| Footer Content | Additional text displayed below the main content |
Checkout Email Default Values
| Field | Default Value |
|---|---|
| Email Subject | Please Verify Your Email Address on {site_title} |
| Email Heading | Verify Your Email Address |
| Verification Message | To complete your order on {site_title}, please confirm your email address. This ensures we have the right email in case we need to contact you.<p>Your verification code: {cev_user_verification_pin}</p> |
| Footer Content | (empty) |
Available Placeholders for Checkout Email
| Placeholder | Description | Example Output |
|---|---|---|
| {site_title} | Your website/store name | My Store |
| {cev_user_verification_pin} | The OTP verification code | 123456 |
| {cev_display_name} | Customer’s display name | John |
How to Customize the Edit Account Email?
- In the customizer, click Email Content.
- Select Email Type: Edit Account Email from the dropdown.
- Edit the fields shown below.
- Click Publish to save changes.
Edit Account Email Settings
| Field | Description |
|---|---|
| Email Subject | Subject line that appears in customer’s inbox |
| Email Heading | Large heading text inside the email body |
| Verification Message | Main content explaining verification with OTP code |
| Footer Content | Additional text displayed below the main content |
Edit Account Email Default Values
| Field | Default Value |
|---|---|
| Email Subject | Please Verify Your Email Address on {site_title} |
| Email Heading | You recently changed the email address {site_title} |
| Verification Message | To complete your order on {site_title}, please confirm your email address. This ensures we have the right email in case we need to contact you.<p>Your verification code: {cev_user_verification_pin}</p> |
| Footer Content | (empty) |
Available Placeholders for Edit Account Email
| Placeholder | Description | Example Output |
|---|---|---|
| {site_title} | Your website/store name | My Store |
| {cev_user_verification_pin} | The OTP verification code | 123456 |
| {cev_display_name} | Customer’s display name | John |
How to Customize the New Login OTP Email?
- In the customizer, click Email Content.
- Select Email Type: New Login OTP from the dropdown.
- Edit the fields shown below.
- Click Publish to save changes.
New Login OTP Email Settings
| Field | Description |
|---|---|
| Email Subject | Subject line that appears in customer’s inbox |
| Email Heading | Large heading text inside the email body |
| Verification Message | Main content with login details and OTP code |
| Footer Content | Additional text displayed below the main content |
New Login OTP Email Default Values
| Default Value |
|---|
| New sign-in from {login_browser} on {login_device} |
| New sign-in from {login_browser} on {login_device} |
| (empty) |
Default Verification Message Template
Hi {cev_display_name},
There was a new login to your {site_title} account from {login_browser} on {login_device}
We wanted to make sure it was you. Please verify your account using this OTP: {login_otp}
If you don’t recognize this activity, please change your password right away.
Thanks
Available Placeholders for New Login OTP Email
| Placeholder | Description | Example Output |
|---|---|---|
| {site_title} | Your website/store name | My Store |
| {cev_display_name} | Customer’s display name | John |
| {cev_user_verification_pin} | The OTP verification code | 123456 |
| {login_otp} | The OTP code (alternative) | 123456 |
| {login_browser} | Browser name used for login | Chrome |
| {login_device} | Device type used for login | Windows |
| {login_time} | Date and time of login attempt | March 30, 2026 10:30 AM |
| {login_ip} | IP address of login attempt | 192.168.1.1 |
| {change_password} | Link to change password page | (clickable link) |
How to Customize the New Login Authentication Email?
- In the customizer, click Email Content.
- Select Email Type: New Login Authentication from the dropdown.
- Edit the fields shown below.
- Click Publish to save changes.
New Login Authentication Email Settings
| Field | Description |
|---|---|
| Email Subject | Subject line that appears in customer’s inbox |
| Email Heading | Large heading text inside the email body |
| Verification Message | Main content with login details and security info |
| Footer Content | Additional text displayed below the main content |
New Login Authentication Email Default Values
| Field | Default Value |
|---|---|
| Email Subject | New sign-in from {login_browser} on {login_device} |
| Email Heading | New sign-in from {login_browser} on {login_device} |
| Footer Content | (empty) |
Default Verification Message Template
Hi {cev_display_name},
There was a new login to your {site_title} account from {login_browser} on {login_device}
We wanted to make sure it was you. Please check the details below:
Device: {login_browser}, {login_device}
Date: {login_time}
IP: {login_ip}
If you don’t recognize this activity, please change your password right away.
Thanks
Available Placeholders for New Login Authentication Email
| Placeholder | Description | Example Output |
|---|---|---|
| {site_title} | Your website/store name | My Store |
| {cev_display_name} | Customer’s display name | John |
| {login_browser} | Browser name used for login | Chrome |
| {login_device} | Device type used for login | Windows |
| {login_time} | Date and time of login attempt | March 30, 2026 10:30 AM |
| {login_ip} | IP address of login attempt | 192.168.1.1 |
| {change_password} | Link to change password page | (clickable link) |
Complete Email Placeholders Reference
All Available Placeholders by Email Type
| Placeholder | Registration | Checkout | Edit Account | Login OTP | Login Auth |
|---|---|---|---|---|---|
{site_title} | ✓ | ✓ | ✓ | ✓ | ✓ |
{cev_display_name} | ✓ | ✓ | ✓ | ✓ | ✓ |
{cev_user_verification_pin} | ✓ | ✓ | ✓ | ✓ | ✗ |
{login_otp} | ✗ | ✗ | ✗ | ✓ | ✗ |
{login_browser} | ✓ | ✓ | ✓ | ✓ | ✓ |
{login_device} | ✓ | ✓ | ✓ | ✓ | ✓ |
{login_time} | ✓ | ✓ | ✓ | ✓ | ✓ |
{login_ip} | ✓ | ✓ | ✓ | ✓ | ✓ |
{change_password} | ✗ | ✗ | ✗ | ✓ | ✓ |
Supported HTML Tags in Email Content
| Tag | Description | Example |
|---|---|---|
<a> | Create links | <a href="https://example.com">Click here</a> |
<strong> | Bold text | <strong>Important</strong> |
<i> | Italic text | <i>Note:</i> |
<p> | Paragraphs | <p>Paragraph text</p> |
<br> | Line breaks | Line 1<br>Line 2 |
How to Add Footer Content to Emails?
- In the customizer, click Email Content.
- Select your desired Email Type from the dropdown.
- Scroll down to find the Footer Content field.
- Enter your footer text (HTML supported).
- Click Publish to save changes.
💡 Tip: Each email type has its own footer content field, so you can customize different footer messages for each verification scenario.
How to Customize the Re-engagement Reminder Email?
↑ Back to topThe Re-engagement Reminder is the email sent to customers who started signing up but never finished email verification. Its subject, heading, body, CTA button, and footer are all editable through the Email Customizer — the same place you customize the verification email and other CEV emails.
Before customizing, make sure the feature is enabled at Settings → Unverified Users → Maintenance → Send re-engagement reminder emails.
How to Open the Re-engagement Email in the Customizer?
↑ Back to top- Go to Settings → Unverified Users → Maintenance.
- Inside the Re-engagement reminder emails card, click Customize email → at the top.
- The Email Customizer opens with the Re-engagement Reminder template pre-loaded in the preview pane.
Alternatively:
- Go to Customize tab in the plugin admin.
- Open the Email Content panel.
- Change the Email Type dropdown to Re-engagement Reminder.
Available merge tags for Re-engagement email:
- {site_title} — your store name
- {cev_display_name} — the customer’s display name (or empty for guest entries)
- {cev_user_email} — the recipient’s email address
- {registration_page_url} — direct link to the My Account / sign-up page
Always run a Send test after editing — some email clients render HTML differently, and seeing the email in your real inbox is the only way to confirm spacing, fonts, and the CTA button look right.
Compatibility
↑ Back to topCustomer Email Verification Pro is tested and compatible with many popular plugins and features.
How to Use with WooCommerce Checkout Blocks?
↑ Back to topThe plugin fully supports WooCommerce Checkout Blocks (Cart and Checkout blocks).
- Enable Checkout Verification in the plugin settings.
- For inline verification, the OTP field appears in the checkout block automatically.
- For popup verification, the modal displays when needed.
Note: If you experience issues with third-party themes using the Store API, enable “Disable WooCommerce Store API Checkout” in settings.
How to Use with REST API Customer Creation?
↑ Back to topWhen customers are created via the WooCommerce REST API, verification works as follows:
- Customers created via API are marked as unverified by default
- Verification email is sent to the customer
- Customer must verify email on first login
Compatible Third-Party Plugins
↑ Back to top| Plugin | Compatibility Notes |
|---|---|
| Affiliate For WooCommerce | Full support for affiliate registration verification |
| Smart Manager | Bulk edit verification status |
| Email Customizer Pro by StoreApps | Custom email templates supported |
| Cashier | One-page checkout compatible |
| YITH Customize My Account | Custom My Account layouts supported |
| Essential Addons for Elementor | Elementor login forms supported |
| CheckoutWC | Custom checkout pages supported |
| CartFlows | Funnel builder checkout compatible |
Developers
↑ Back to topHooks and filters available for developers to extend plugin functionality.
How to Check User Verification Status?
↑ Back to topUse the following code to check if a user has verified their email:
$is_verified = get_user_meta( $user_id, 'cev_email_verified', true );

if ( $is_verified === '1' ) {
    // User is verified
}
How to Change the OTP Button Label?
↑ Back to topUse this filter to customize the “Send Verification Code” button text:
add_filter( 'cev_checkout_send_otp_button_text', function( $text ) {
    return 'Get Your Code';
});
Available Filters
| Filter | Description |
|---|---|
cev_checkout_send_otp_button_text | Change the OTP button text |
cev_verification_email_content | Modify verification email content |
cev_otp_code_length | Programmatically set OTP length |
Translations
↑ Back to topCustomer Email Verification Pro (CEV PRO) is fully compatible with WPML, allowing you to translate all plugin strings into any language for your multilingual WooCommerce store.
How to Translate CEV PRO Using WPML ?
↑ Back to topCustomer Email Verification (CEV PRO) is fully compatible with WPML, allowing you to easily translate all CEV PRO-related strings into your desired languages. With the WPML update, you can now translate strings individually or in bulk, using the enhanced translation interface.
Translating CEV PRO Using WPML
WPML’s String Translation and Translation Management tools make it simple to localize CEV PRO’s strings for your multilingual store. Below are step-by-step instructions on how to translate CEV PRO strings both individually and in bulk.
Bulk Translation via WPML Translation Dashboard
To translate multiple CEV PRO strings at once:
- Log in to your WordPress dashboard.
- Navigate to WPML > Translation Dashboard.
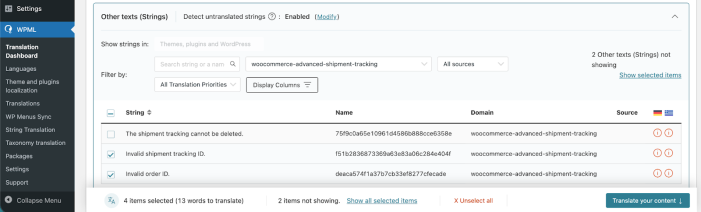
- Scroll down to the Other texts (Strings) section.
- In the Filter by field, search for CEV PRO strings using any of the following key names:
cev_verification_headercev_verification_messagecev_verification_widget_footer
- Once the relevant strings are displayed, you can translate them in bulk:
- Select the checkboxes for all the strings you want to translate and click Translate your content.
At Step 2, choose your translation method. To quickly translate multiple strings, choose Translate automatically from the dropdown. For the best results, ensure your translation engine is Private Translation Cloud (PTC), WPML’s proprietary AI. The Translation Dashboard shows you the cost of automatic translation in euros and credits. If you want to translate strings yourself, choose Translate myself.
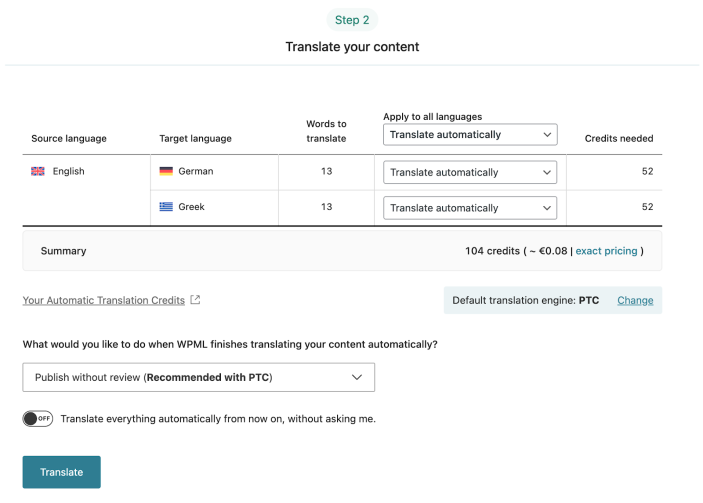
When ready, click Translate.
With automatic translation, you’re all set! PTC translates your selected content in a few minutes. If you’ve chosen to translate yourself, navigate to WPML > Translations to add your translations for each string.
Sync Your Translations
Once you’ve translated the strings, ensure they are synced across your website. If you’ve chosen to publish without review, WPML automatically applies translations. Otherwise, go to WPML > Translations to review translated content and publish.