Additional Terms Pro lets you create required or optional WooCommerce terms and conditions checkboxes for the Cart page, Checkout page, or both.
Use conditional logic to show specific agreements based on products, categories, payment gateways, customer locations, cart values, coupon codes, user roles, and other order details. You can also keep customer acceptance records, display accepted terms after checkout, include acceptance dates in WooCommerce emails and PDF receipts, and export agreement records in CSV format.
Installation
↑ Back to topTo start using a product from WooCommerce.com, you can use the “Add to store” functionality on the order confirmation page or the My subscriptions section in your account.
- Navigate to My subscriptions.
- Find the Add to store button next to the product you’re planning to install.
- Follow the instructions on the screen, and the product will be automatically added to your store.
Alternative options and more information at:
Managing WooCommerce.com subscriptions.

Terms & Conditions Checkboxes
↑ Back to topTo create “I agree” checkboxes for your store’s terms and conditions on the Cart page, Checkout page, or both.
- Go to WooCommerce > Settings > Additional Terms.
- In the current tab, find the Terms section.
- Click on the Add New button.
- Provide a user-friendly Name for your terms checkbox.
- Specify a label for the Terms Text to be displayed alongside the checkbox.
- Click on the Save changes button.
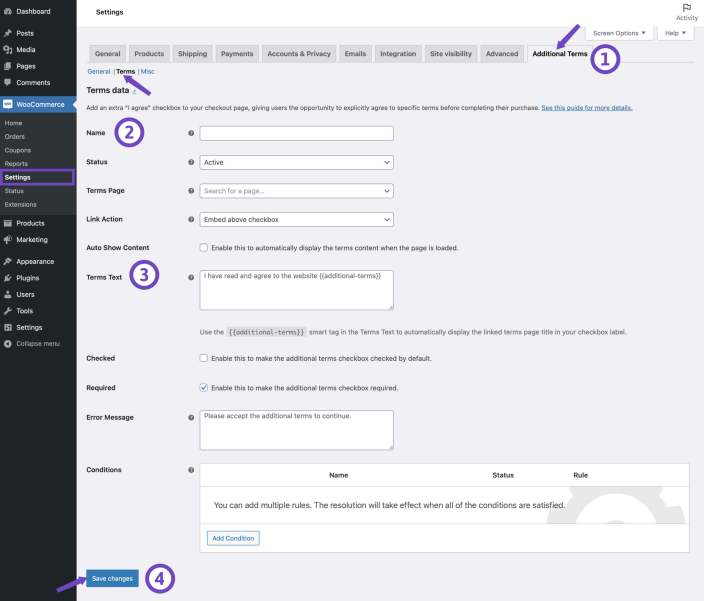
If your checkout page is created with the WooCommerce Checkout Block, you’ll need to manually insert the Additional Terms block within the Checkout block.
Ready-Made Templates
↑ Back to topAdditional Terms Pro includes ready-made templates for the Terms Text and Error Message fields. These templates provide suggested wording that you can use as a starting point and customize for your store.
To use a template:
- Go to WooCommerce > Settings > Additional Terms > Terms.
- Create a new terms item or edit an existing one.
- Locate the Terms Text or Error Message field.
- Select Templates from the editor toolbar.
- Choose the template you want to use.
- Select Use this to insert the wording into the field.
- Review and customize the text.
- Select Save changes.
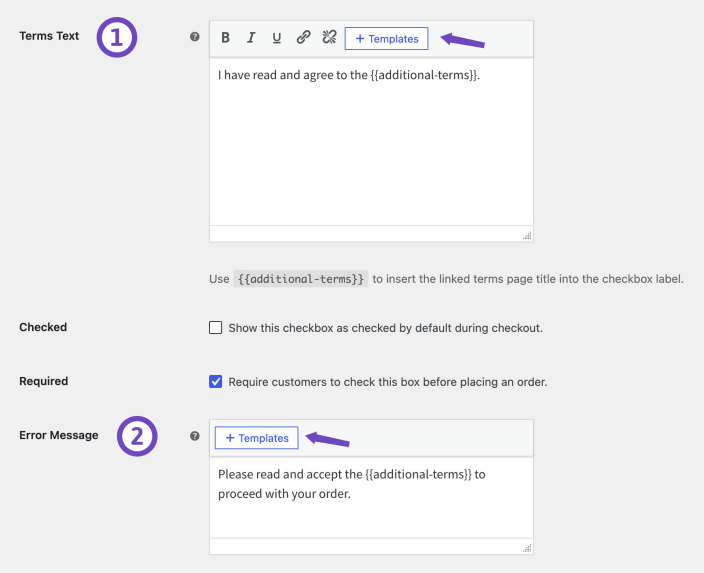
Selecting a template replaces the current content of that field. Review any existing text before applying a different template.
New terms items start with suggested Terms Text and Error Message wording. Existing saved terms are not changed automatically.
You can use the {{additional-terms}} smart tag in the Terms Text to insert the linked terms page title and link. In the Error Message field, the smart tag displays the linked terms page title as plain text.
Note:
Selecting a ready-made template replaces the current content of the Terms Text or Error Message field. Review any existing text before applying a template. The replacement is not permanently stored until you save the terms item.
Smart Tags
↑ Back to topSmart Tags insert dynamic details into the Terms Text field. They help you keep checkbox text accurate without manually updating page titles, URLs, store details, or fees.
To add a Smart Tag:
- Go to WooCommerce > Settings > Additional Terms > Terms.
- Create a new terms item or edit an existing one.
- Locate the Terms Text field.
- Place the cursor where you want to insert the dynamic detail.
- Open the Smart Tags menu in the editor toolbar.
- Select the Smart Tag you want to add.
- Click Save changes.
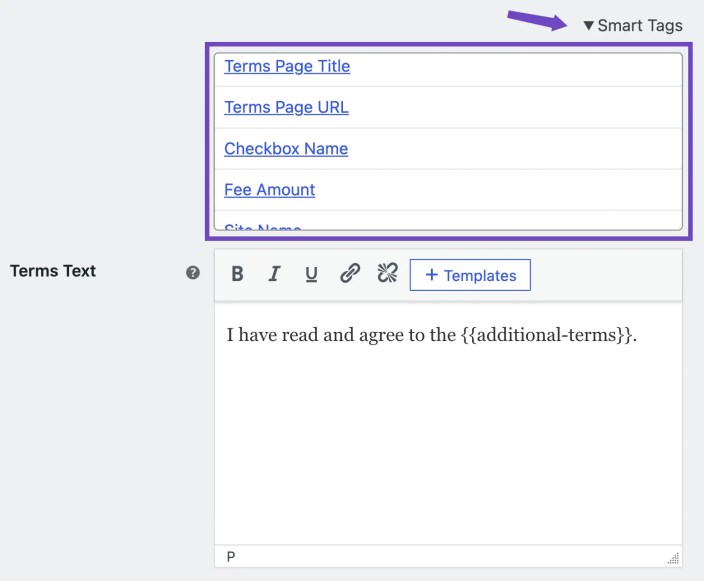
Available Smart Tags
| Smart Tag group | Available details | Recommended use |
|---|---|---|
| Terms page | Terms Page Title, Terms Page URL | Display the linked terms page title or URL in the checkbox text. |
| Checkbox and fee | Checkbox Name, Fee Amount | Identify the checkbox or show the current fee before a customer selects it. |
| Store | Site Name, Site URL, Admin Email | Insert store details without adding them manually to every checkbox. |
| Customer | Customer Name, Username | Add customer details when personalised wording is appropriate. |
The existing {{additional-terms}} Smart Tag adds the linked terms page title as a clickable link in the Terms Text field. In the Error Message field, it displays the linked page title as plain text.
Using a fee in checkbox text
Use the Fee Amount Smart Tag when a checkbox has a fee. The tag shows the current fee amount in the checkbox text.
For example:
I’d like to add eco-friendly packaging for
{{fee_amount}}.
This is particularly useful for percentage-based fees because the displayed amount updates with the order value.
Using customer details
Customer Smart Tags use the available customer information at checkout. For guest customers, a customer detail may be empty until the relevant information is entered.
Do not rely on customer Smart Tags for required legal or policy wording. Use them only where personalised wording remains clear if the customer detail is not available.
Editing terms
↑ Back to topTo edit an existing terms and conditions checkbox:
- Navigate to WooCommerce > Settings > Additional Terms.
- Locate the terms checkbox you want to edit, then hover over it and select Edit.
- Implement your desired changes.
- To save your modifications, click the Save changes button.
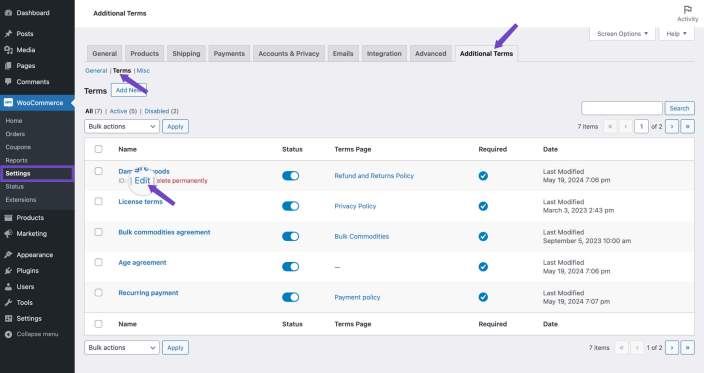
Defining the terms page
↑ Back to topThe Terms page is essential for users to access comprehensive terms and gain a thorough understanding of your store’s policies, rules, and guidelines. You can link a checkbox to a terms page when customers need access to more detailed content.
- Create a new page for your terms at Pages > Add new.
- Edit the desired term in the Additional Terms settings.
- Choose the Terms Page using the dropdown menu. Enter at least three words from the page title and select your terms page.
- Select the Link Action for displaying the full page content after clicking the linked terms page:
- Embed above checkbox: When selected, the full page content will be displayed directly above the relevant checkbox field after clicking the linked page.
- Open in modal: This option causes the full page content to appear in a convenient popup box after clicking the linked page.
- Open in new tab: By choosing this setting, the terms page will open in a new browser tab when the user clicks on it.
- Add the
{{additional-terms}}smart tag to the Terms text to display the linked page name in the checkbox label. - Click on the Save changes button.
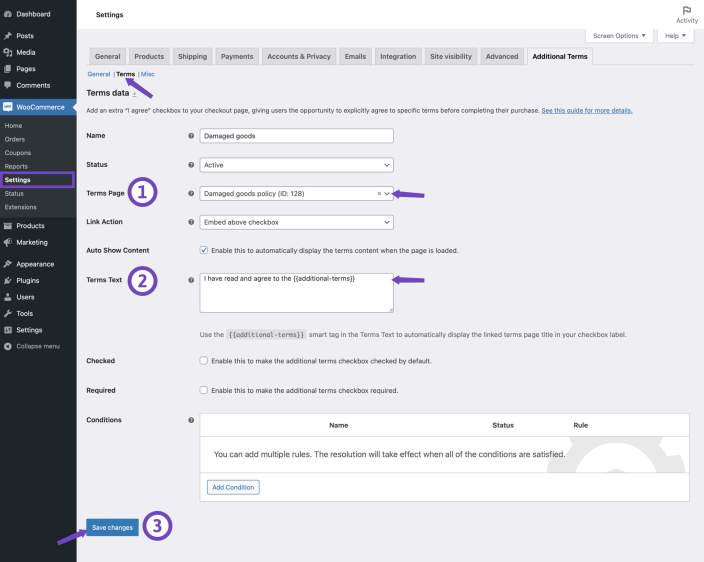
You can choose an unpublished page in the Terms Page dropdown. The content of this page will still be displayed if you’ve selected either Open in modal or Embed above checkbox as the option for the Link Action. These settings allow the page content to be shown even if the page itself hasn’t been published.
Expand terms content
↑ Back to topYou can configure the checkout page to automatically expand terms and policies content when it loads, making the terms content visible when the page loads. Here’s how to set it up:
- Use Auto Show Content to specify your preference:
- Checked: The terms content will automatically display upon page load based on your selection for Link Action, either expanded inline above the checkbox or as an opened modal.
- Unchecked: The content will not open automatically. The user must click the page link to display the terms content.
- Click the Save changes button.
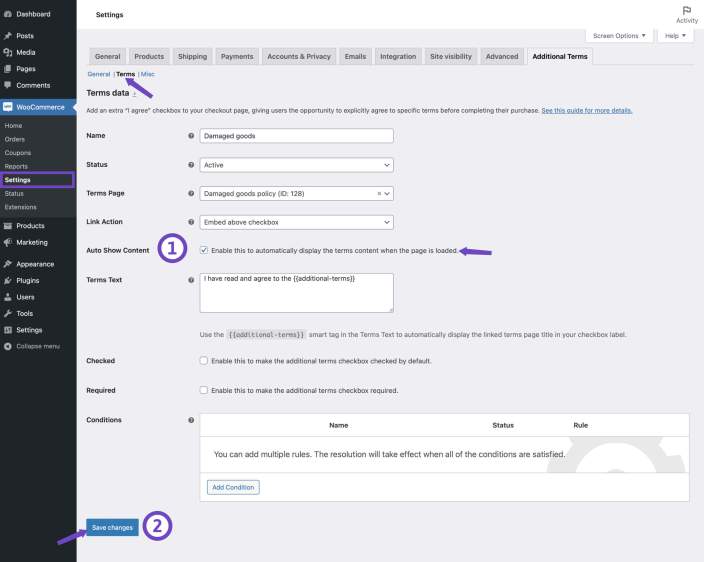
To display the content, ensure you have selected the terms page and added the {{additional-terms}} smart tag to your checkbox label.
Default checkbox state
↑ Back to topYou have the option to set a checkbox as pre-checked by default:
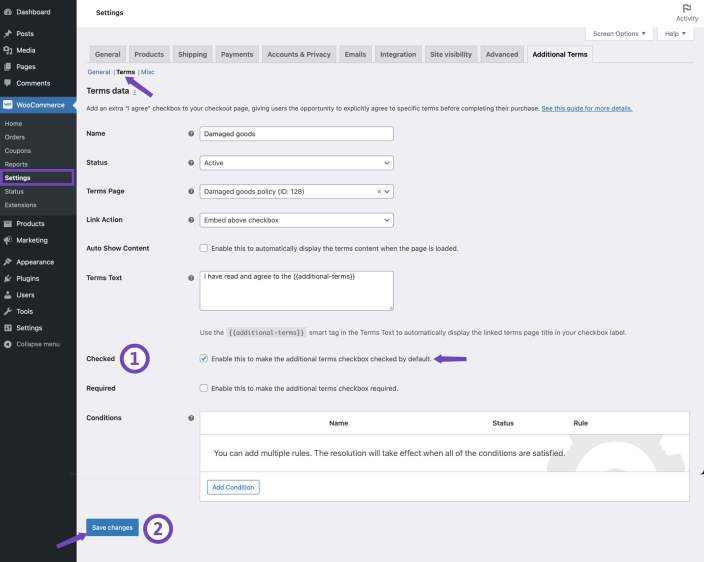
- Choose whether the checkbox should be Checked by default on the checkout page:
- Checked: The checkbox will be automatically pre-selected when the checkout page loads.
- Uncheck: The checkbox will remain unchecked, and customers can choose to check it if desired.
- Click on the Save changes button.
Terms checkbox requirement
↑ Back to topYou can make a terms checkbox mandatory or optional during its creation or editing:
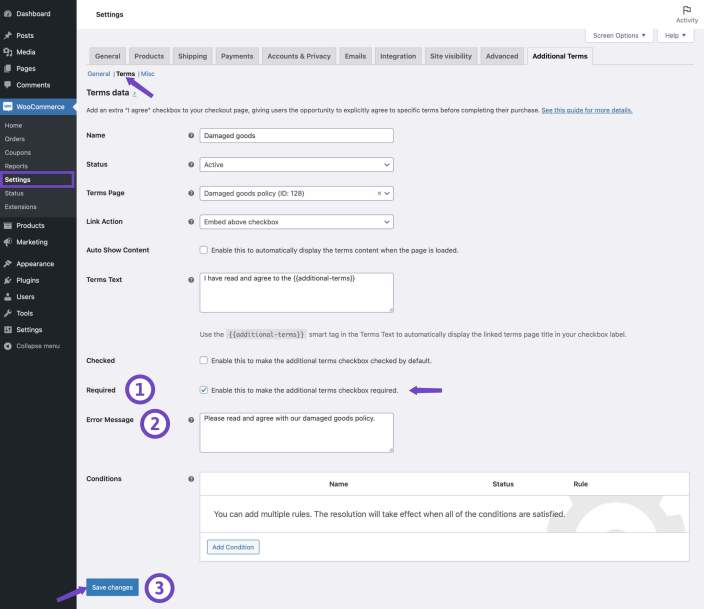
- Use the Required field to specify your preference:
- Checked: Customers must agree to the terms checkbox during the checkout process, ensuring full compliance with your terms and conditions.
- Uncheck: Customers can choose whether or not to agree with the terms, enhancing their shopping experience by giving them a choice.
- Enter an Error Message for the Required field. This message will be displayed during checkout if customers haven’t checked the terms checkbox, ensuring they cannot proceed without acknowledging the terms.
- Click on the Save changes button.
Add a fee to a terms checkbox
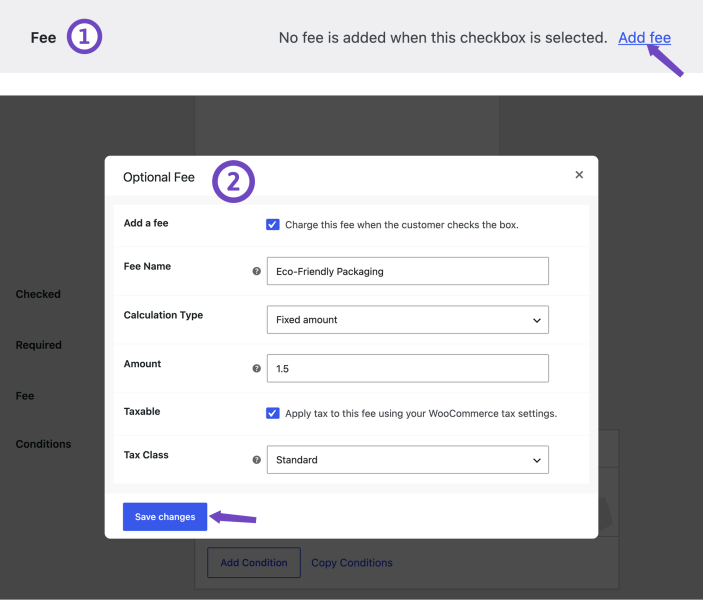
↑ Back to topAdditional Terms Pro lets you add a fixed or percentage fee when a customer accepts a terms checkbox. You can use fees for optional paid services, such as gift wrapping or eco-friendly packaging, or for charges connected to a required agreement.
A fee can be added to both optional and required terms checkboxes. For optional checkboxes, the fee is added only when the customer selects the checkbox. For required checkboxes, the customer must accept the checkbox before placing the order.
To add a fee:
- Go to WooCommerce > Settings > Additional Terms.
- Create a new terms checkbox or edit an existing one.
- Locate the Fee row.
- Click Add fee.
- In the fee modal, ensure Add a fee is checked.
- In the fee modal, enter a Fee Name. (This name appears in the cart and order totals.)
- Select a Calculation Type:
- Fixed: Adds the same amount to each applicable order.
- Percentage: Calculates the fee as a percentage at checkout.
- Enter the Amount.
- Select Taxable if the fee should use your WooCommerce tax settings.
- When Taxable is selected, choose the Tax Class to apply to the fee.
- Click Save changes in the fee settings.
- Click Save changes on the terms edit screen.
Viewing fee details
When a customer accepts a checkbox with a fee, Additional Terms Pro stores the charged amount with the acceptance record.
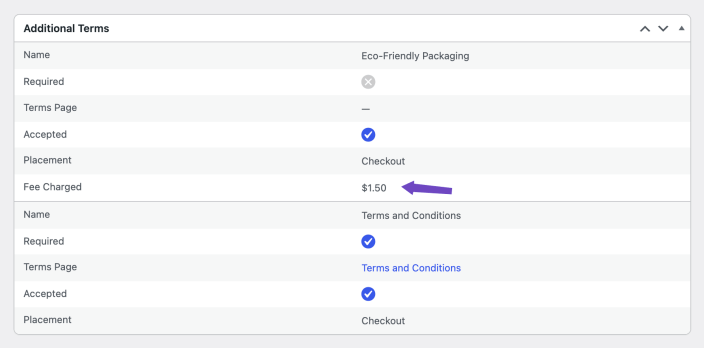
To review the fee from the WooCommerce order screen:
- Go to WooCommerce > Orders.
- Open the relevant order.
- Locate the Additional Terms panel.
- Review the Fee Charged row for the accepted checkbox.
The Additional Terms panel is available when Admin Acceptance Summary is enabled.
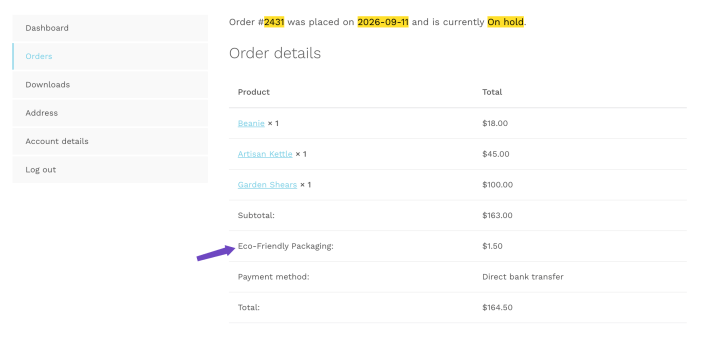
Customers can also see the fee in their order totals after checkout and from their My Account order details page.
Fee details can also appear in order notes, customer emails, PDF terms receipts, and Additional Terms acceptance record CSV exports.
Agreement checkbox placement
↑ Back to topAdditional Terms Pro lets you choose where each agreement checkbox appears in your store. You can display a terms checkbox on the Checkout page, the Cart page, or on both Cart and Checkout.
This gives you more control over when customers review and accept your store agreements. For example, you may want customers to accept a delivery notice on the Cart page before they continue to checkout, while keeping legal terms or payment-related agreements on the Checkout page.
Agreement checkbox placement works with both classic WooCommerce pages and WooCommerce Block pages.
Supported placements include:
- Classic Checkout shortcode page
- Checkout Block page
- Classic Cart shortcode page
- Cart Block page
How to set checkbox placement
To choose where a terms checkbox appears:
- Go to your terms list in the WordPress admin.
- Edit the terms item you want to update.
- Find the Placement setting.
- Use the select field to choose where the checkbox should appear:
- Cart
- Checkout
- Cart and Checkout
- Save your changes.
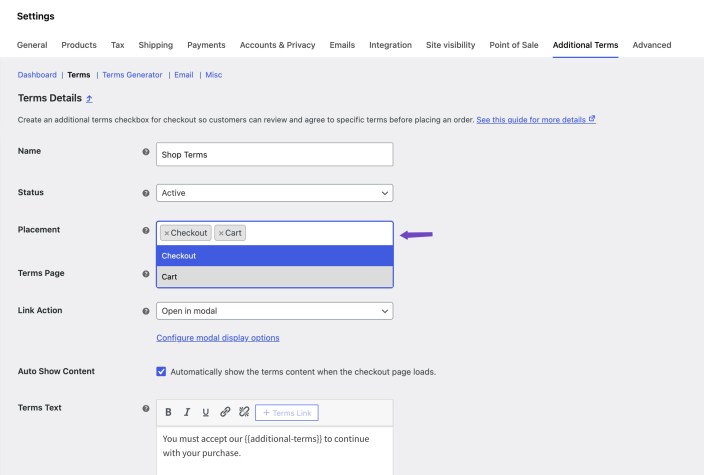
Once saved, the agreement checkbox will only appear in the selected placement area.
Cart and checkout placement
When a terms item is set to appear on the Cart page, customers can review and accept the agreement before moving to checkout.
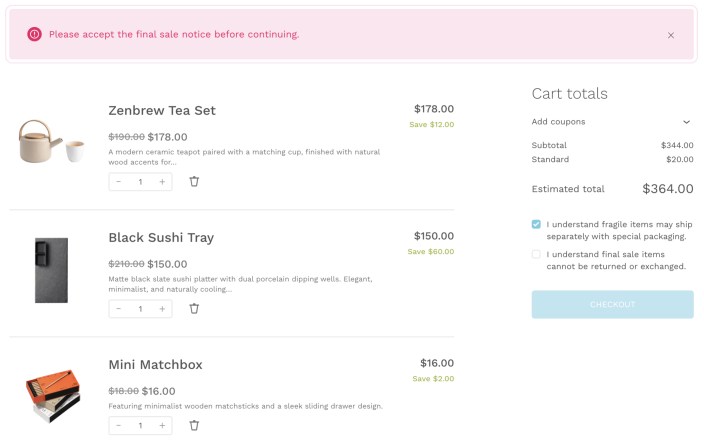
When a terms item is set to appear on both Cart and Checkout, the customer’s Cart page acceptance is carried over to the Checkout page during the same customer session. This helps avoid asking the customer to accept the same agreement twice during a normal cart-to-checkout flow.
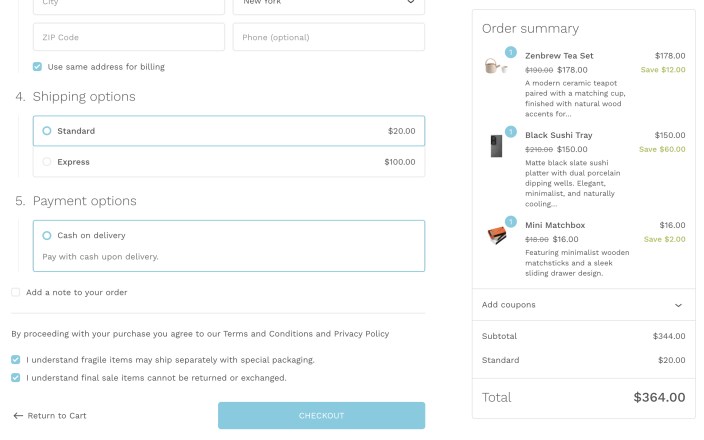
For example, if a customer accepts an agreement on the Cart page and then continues to checkout in the same session, the accepted state is preserved on Checkout.
Placement details in order acceptance summary
When a customer accepts an agreement, Additional Terms Pro records where the agreement was accepted.
The placement details are included in the order acceptance summary, making it easier to review whether a terms item was accepted on the Cart page, Checkout page, or through a Cart-to-Checkout flow.
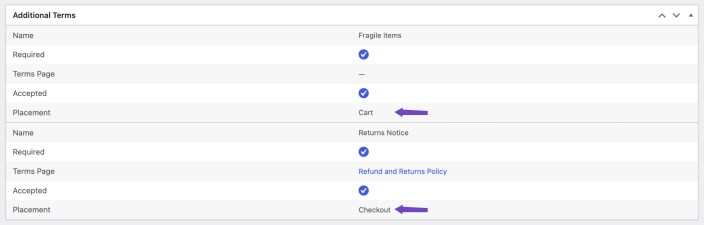
This helps store owners keep a clearer record of each accepted agreement and where it appeared during the customer’s purchase process.
Updating terms checkbox status
↑ Back to topHere’s how to manage the status of your terms checkboxes to control their display on the checkout page:
Updating status from terms table
- Visit the Terms table.
- Locate the terms checkbox you want to update.
- Click on the toggle switch in the Status column to change the checkbox’s display status.
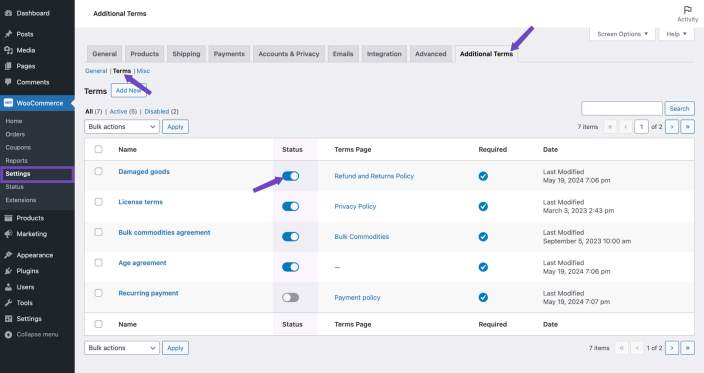
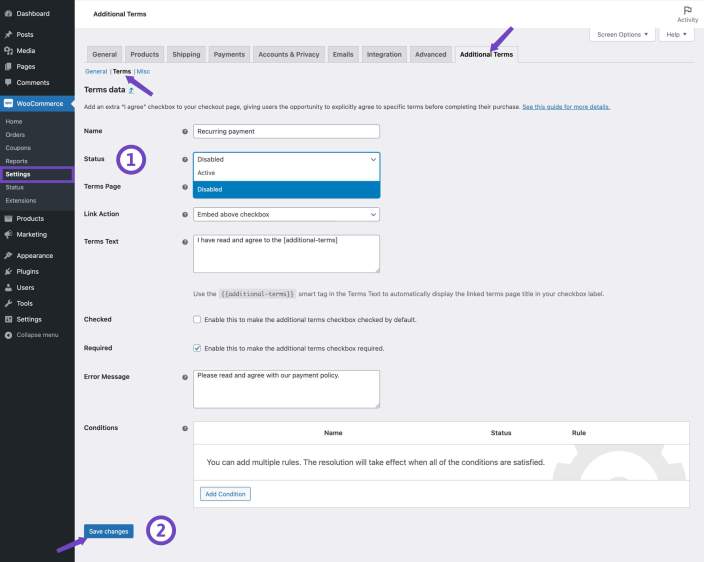
Updating status while editing or creating a term
- Edit the desired term.
- In the Status field, you have two options:
- Active: The checkbox will be operational and visible on the checkout page.
- Disabled: The checkbox will be non-operational and excluded from the checkout page.
This flexibility ensures that you have full control over when and where your terms checkboxes are displayed during the checkout process, aligning them with your store’s requirements.
Terms overview table
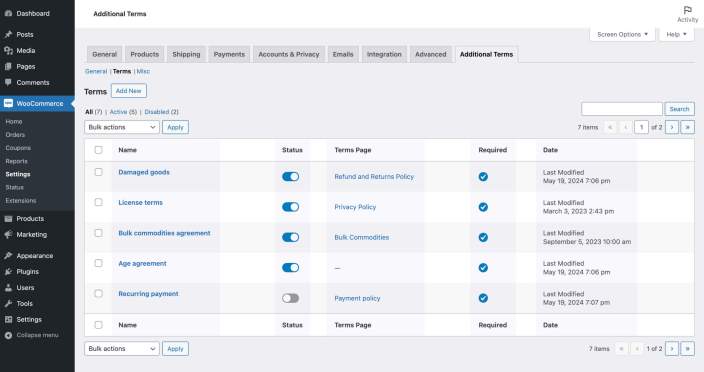
↑ Back to topYou have a table on the terms page that provides an overview of all the defined terms checkboxes. Here’s what you’ll find in this table:
- Name: Displays the name of your terms and conditions. If no custom name was entered, the entry creation timestamp serves as a placeholder.
- Status: Shows the activation status of your terms and conditions, with an option to toggle the status by clicking the switch in this column.
- Page: Displays the terms and conditions page linked to the respective terms checkbox.
- Required: Indicates whether the terms field is required during checkout. A checkmark means users must agree to the terms, while a cross icon signifies that agreeing to the terms is optional.
- Date: Displays the date of the last modification made to the terms.
Removing terms checkboxes
↑ Back to topAdditional Terms Pro allows you to remove terms checkboxes individually or in bulk. Deleted terms checkboxes are first moved to the Trash, so you can restore them later if needed or permanently delete them.
Remove an individual terms checkbox
To remove a single terms checkbox:
- Go to WooCommerce > Settings > Additional Terms > Terms.
- Find the terms checkbox you want to remove.
- Hover over the terms checkbox row.
- Click Delete.
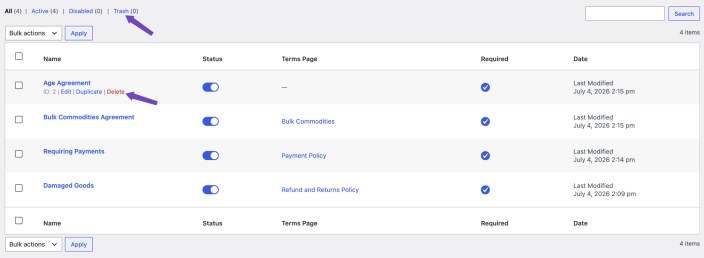
After deleting the terms checkbox, it will be moved to the Trash page. From there, you can either restore it or delete it permanently.
Restore a deleted terms checkbox
To restore a terms checkbox from the Trash:
- Go to WooCommerce > Settings > Additional Terms > Terms.
- Open the Trash view.
- Hover over the deleted terms checkbox.
- Click Restore.
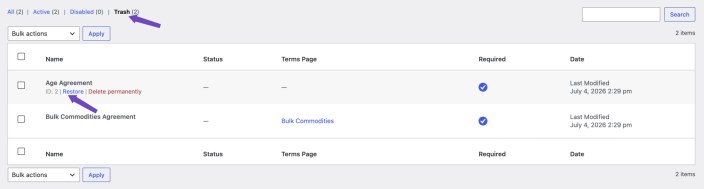
The terms checkbox will be moved back to the main Terms list.
Permanently delete a terms checkbox
To permanently remove a terms checkbox:
- Go to WooCommerce > Settings > Additional Terms > Terms.
- Open the Trash view.
- Hover over the terms checkbox you want to remove permanently.
- Click Delete Permanently.
Once a terms checkbox is permanently deleted, it cannot be restored.
Bulk remove terms checkboxes
You can also delete multiple terms checkboxes at the same time.
To bulk delete terms checkboxes:
- Go to WooCommerce > Settings > Additional Terms > Terms.
- Select the terms checkboxes you want to remove using the checkboxes on the left side of the table.
- Open the Bulk actions dropdown.
- Select Move to Trash.
- Click Apply.
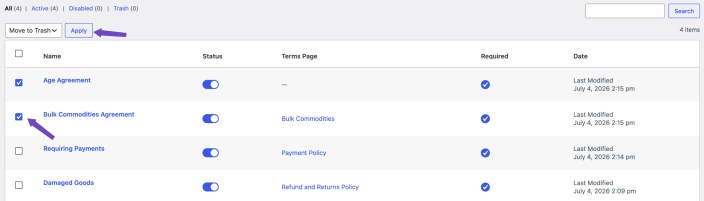
The selected terms checkboxes will be moved to the Trash.
Bulk restore or permanently delete terms checkboxes
From the Trash view, you can also restore or permanently delete multiple terms checkboxes at once.
To do this:
- Go to WooCommerce > Settings > Additional Terms > Terms.
- Open the Trash view.
- Select the deleted terms checkboxes using the checkboxes on the left side of the table.
- Open the Bulk actions dropdown.
- Choose Restore or Delete Permanently.
- Click Apply.
Locating active terms
↑ Back to topTo identify active terms checkboxes currently in use during checkout:
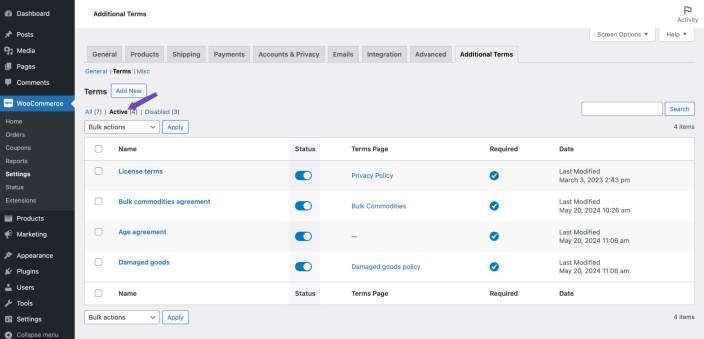
- Look for the filter link labeled Active.
- Click on this link to access a list of terms checkbox fields currently used and displayed during the purchase process.
Duplicating a terms checkbox
↑ Back to topAdditional Terms Pro lets you duplicate existing terms checkboxes. This is useful when you want to create a new agreement with similar settings, conditions, placement, or display options.
Duplicate an individual terms checkbox
To duplicate a single terms checkbox:
- Go to WooCommerce > Settings > Additional Terms > Terms.
- Find the terms checkbox you want to copy.
- Hover over the terms checkbox row.
- Click Duplicate.
A new copy of the terms checkbox will be created. You can then edit the duplicated item and adjust its title, content, conditions, placement, or other settings as needed.
Locating disabled terms
↑ Back to topTo identify inactive terms checkboxes not in use during the purchase process:
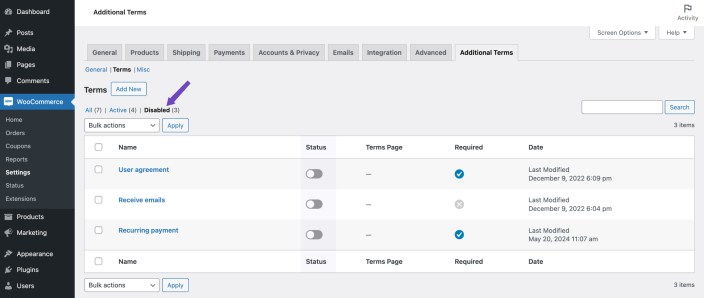
- Look for the filter link labeled Disabled.
- Click on this link to access a list of terms checkbox fields that are not displayed during the purchase process.
Customizing your terms table
↑ Back to topTo customize the view of the Terms table:
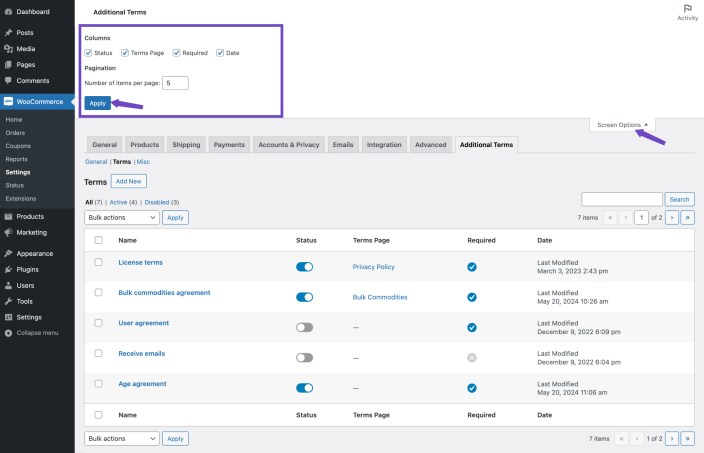
- Locate the Screen Options pull-down at the top right corner of the screen.
- Within this menu, toggle the visibility of each column displayed on the Terms table to suit your preferences and management needs.
Conditional Logic
↑ Back to topConditional logic lets you control when each terms checkbox appears based on the customer’s cart, checkout details, selected payment method, location, user role, product data, URL parameters, and more.
This helps you show only the agreements that are relevant to the customer’s order. For example, you can display a product-specific waiver only when selected products are in the cart, show a payment agreement only when a certain payment gateway is selected, or show an additional notice when the cart total, discount amount, shipping total, or cart weight matches your rules.
Setting conditions
↑ Back to topIntroducing smart logic to your terms checkboxes enhances user understanding of your store’s policies. To add conditional logic to a terms checkbox:
- Go to WooCommerce > Settings > Additional Terms > Terms.
- Edit an existing terms checkbox or create a new one.
- Locate the Conditions table.
- Click Add Condition.
- Configure the condition in the modal:
- Enter a condition name.
- Select a rule.
- Select an operator.
- Choose or enter the required values for that rule.
- Click Save changes in the condition modal.
- Click Save changes on the terms edit screen.
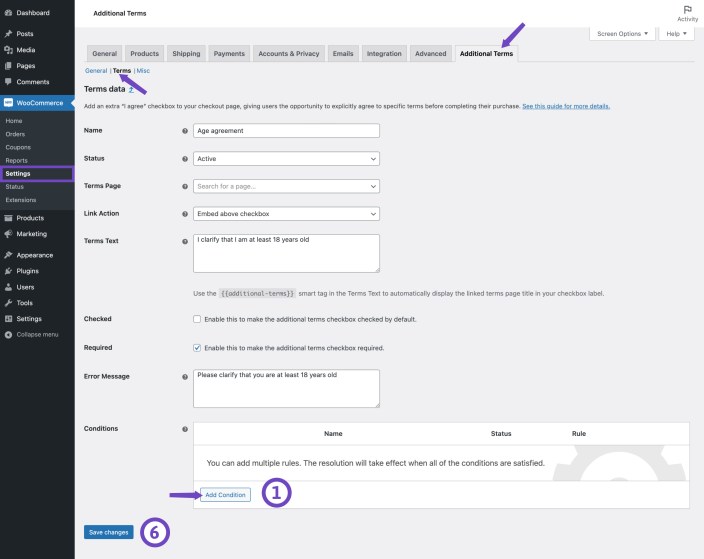
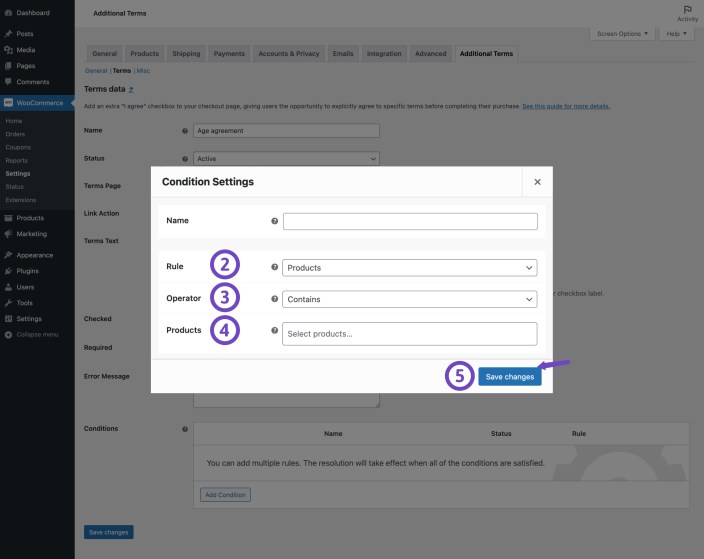
The condition will not be applied on the front end until the terms item itself is saved.
Copying conditions from another terms item
↑ Back to topYou can copy conditions from another terms checkbox instead of recreating the same rules manually.
This is useful when multiple agreements should use similar display rules. For example, you may have several agreements that should only appear for the same product category, cart amount, shipping location, or payment gateway.
To copy conditions:
- Edit the terms checkbox where you want to reuse existing conditions.
- Locate the Conditions table.
- Click the Copy Conditions action.
- Select the terms item you want to copy conditions from.
- Review the copied conditions.
- Click Save changes on the terms edit screen.
Copied conditions are not permanently saved until you click Save changes. If you leave the page without saving, the copied conditions will not be applied.
Common condition rules
↑ Back to topAdditional Terms Pro includes several condition rules for showing terms checkboxes based on the customer’s cart, checkout details, products, customer role, location, payment method, or shopping day.
These rules usually let you choose whether the condition should match or not match the selected values. For example, you can show a checkbox when the cart contains selected products, or when the cart does not contain products from selected categories.
Products
Use the Products rule to show a terms checkbox when selected products are included in the customer’s cart.
This is useful for product-specific agreements, care instructions, warranties, waivers, or notices that only apply to certain products.
Categories
Use the Categories rule to show a terms checkbox when the cart includes products from selected product categories.
For example, you can show a special warranty agreement when the customer purchases products from an appliance, electronics, or handmade goods category.
Tags
Use the Tags rule to show a terms checkbox when products in the cart are assigned to selected product tags.
For example, you can show a fragile goods notice when the cart contains products tagged as fragile.
Product brands
Use the Product Brands rule to show a terms checkbox when products in the cart are assigned to selected WooCommerce Brands.
This is useful for brand-specific license terms, warranty notices, manufacturer restrictions, or special product agreements.
Product types
Use the Product Types rule to show a terms checkbox when the cart contains selected WooCommerce product types.
For example, you can show a recurring payment agreement when the customer adds a subscription product, or a booking-related agreement when the cart contains a booking product.
Shipping classes
Use the Shipping Classes rule to show a terms checkbox when products in the cart are assigned to selected shipping classes.
This is useful for bulky items, fragile products, heavy goods, freight shipping, or special handling notices.
User roles
Use the User Roles rule to show a terms checkbox for selected customer roles.
For example, you can show different agreements for wholesale customers, members, vendors, subscribers, or other custom user roles.
Weekdays
Use the Weekdays rule to show a terms checkbox only on selected days of the week.
This is useful for weekend processing notices, limited service days, delivery schedule notices, or store-specific operating day agreements.
Store Vacation
Use the Store Vacation rule to show a checkbox when your store matches a selected Store Vacation for WooCommerce state.
This lets you display agreements, notices, or acknowledgements only when they are relevant to your store’s current operating state.
To add a Store Vacation condition:
- Go to WooCommerce > Settings > Additional Terms > Terms.
- Create a new checkbox or edit an existing one.
- Locate the Conditions table.
- Click Add Condition.
- Enter a Name for the condition.
- Select Store Vacation as the Rule.
- Select Is as the Operator.
- Choose the Store Vacation state that should display the checkbox.
- Click Save changes in the condition modal.
- Click Save changes on the checkbox edit screen.
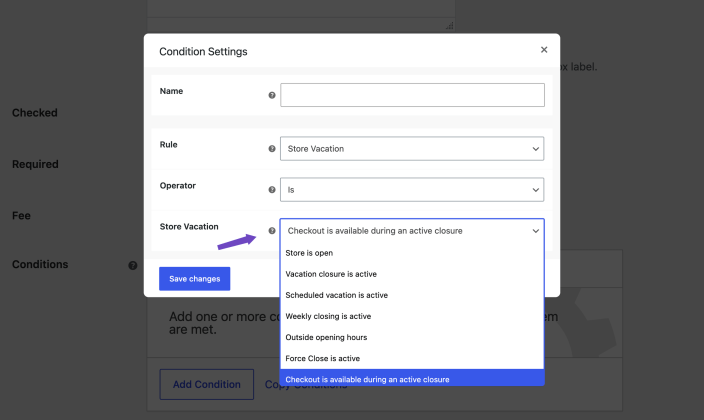
Available Store Vacation states include:
- Store is open
- Vacation closure is active
- Scheduled vacation is active
- Weekly closing is active
- Outside opening hours
- Force Close is active
- Checkout is available during an active closure
For example, select Scheduled vacation is active when the checkbox should only appear during a scheduled Store Vacation period.
The checkbox appears only while the selected Store Vacation state matches.
Billing location
Use the Billing Location rule to show a terms checkbox based on the customer’s selected billing location.
This is useful when certain legal, tax, privacy, or payment agreements depend on the customer’s billing country, state, or region.
Shipping location
Use the Shipping Location rule to show a terms checkbox based on the customer’s selected shipping location.
This is useful for regional shipping restrictions, delivery notices, privacy agreements, handling requirements, or location-specific policies.
Payment gateways
Use the Payment Gateways rule to show a terms checkbox when the customer selects specific payment methods at checkout.
For example, you can show a bank transfer notice when the customer selects direct bank transfer, or a cash-on-delivery agreement when that payment method is selected.
Applied coupons
Use the Applied Coupons rule to show a terms checkbox when one or more selected coupon codes are applied to the customer’s cart.
This is useful for coupon-specific terms, promotional restrictions, final-sale acknowledgements, partner offers, or agreements that apply only to selected promotions.
Conditions matching
↑ Back to topWhen a terms checkbox has more than one condition, you can choose how those conditions should be matched.
The Conditions Matching setting controls whether the checkbox should appear when:
- All conditions match
- Any condition matches
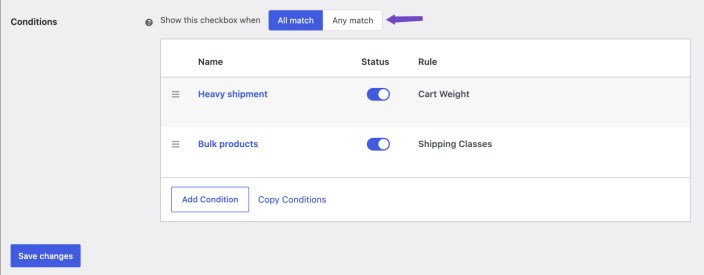
All conditions match
Use All conditions match when every condition must be true before the checkbox appears.
For example, you can show a checkbox only when:
- The cart contains a product from a selected category.
- The customer selects a specific payment gateway.
- The cart total is greater than your selected amount.
In this case, the checkbox appears only when all of those rules are true at the same time.
Existing terms default to All conditions match, so previously configured terms continue to behave as expected.
Any condition matches
Use Any condition matches when the checkbox should appear if at least one condition is true.
For example, you can show a checkbox when:
- The cart contains a selected product.
- Or the customer selects a selected payment gateway.
- Or the cart discount total is greater than your selected amount.
In this case, the checkbox appears as soon as any one of the configured conditions matches.
Cart amount conditions
↑ Back to topCart amount conditions let you show terms checkboxes based on live cart values.
Available cart amount rules include:
- Cart Subtotal
- Cart Total
- Cart Discount Total
- Cart Shipping Total
These rules are useful when an agreement should only appear for certain order values, discount amounts, or shipping totals.
For example, you can show:
- A high-value order agreement when the cart total is greater than a selected amount.
- A coupon-related notice when the cart discount total is greater than a selected amount.
- A shipping policy agreement when the cart shipping total reaches a selected amount.
Cart amount conditions support numeric operators, including:
- Greater than
- Greater than or equal to
- Less than
- Less than or equal to
- Equal to
- Not equal to
Cart amount conditions work with both Classic Checkout and Checkout Block. In Checkout Block, the checkbox can refresh when cart totals, discounts, or shipping amounts change.
Applied Coupons Condition
↑ Back to topThe Applied Coupons condition lets you show a terms checkbox when one or more selected coupon codes are active in the customer’s cart.
This is useful for promotional restrictions, final-sale acknowledgements, partner discounts, campaign-specific policies, or agreements that apply only to selected offers.
Applied Coupons and Cart Discount Total evaluate different information:
- Applied Coupons checks whether selected coupon codes are active in the cart.
- Cart Discount Total checks the monetary value of the discount applied to the cart.
To configure the condition:
- Add or edit a condition for the terms checkbox.
- Select Applied Coupons as the rule.
- Select the matching operator.
- Search for and select one or more coupon codes.
- Save the condition.
- Save the terms item.
The terms checkbox can update when a selected coupon is applied or removed from the Cart or Checkout.
Cart weight condition
↑ Back to topThe Cart Weight condition lets you show terms checkboxes based on the live total weight of the cart contents.
This is useful when certain shipping notices, handling agreements, delivery restrictions, or freight-related terms should only appear for heavier orders.
For example, you can show a special handling agreement when the cart weight is greater than a selected value.
Cart Weight uses the store’s configured WooCommerce weight unit and supports numeric operators, including:
- Greater than
- Greater than or equal to
- Less than
- Less than or equal to
- Equal to
- Not equal to
Cart Weight conditions work with both Classic Checkout and Checkout Block. The checkbox can update when the cart contents or product quantities change and the total cart weight is recalculated.
URL parameter condition
↑ Back to topThe URL Parameter condition lets you show terms checkboxes based on campaign, affiliate, or custom checkout query parameters.
This is useful when customers arrive at checkout through a specific promotion, partner link, affiliate campaign, or custom URL.
For example, you can show a campaign-specific agreement when the checkout URL contains a parameter such as:
?campaign=summer-sale
You can configure the condition by entering the URL parameter name and selecting the matching rule.
Supported URL Parameter operators include:
- Exists
- Equals
- Does not equal
- Contains
- Does not contain
URL parameter values are captured into the WooCommerce session on the front end. This helps the condition continue matching even when checkout refreshes or when Store API order validation runs.
Live updates and conditional logic
↑ Back to topAgreement checkboxes can respond to live WooCommerce updates when condition values change.
This is useful when a terms checkbox depends on cart or checkout data that may change while the customer is shopping or completing checkout.
For example, a checkbox can appear, disappear, or refresh when the customer:
- Changes cart quantity.
- Adds or removes a coupon.
- Changes the selected shipping method.
- Updates checkout details that affect shipping totals.
- Changes cart contents in a way that affects the total cart weight.
- Updates cart totals, discounts, shipping amounts, or other condition-based values.
This helps conditional agreements stay accurate as the customer’s cart or checkout details change.
For example, if a terms checkbox is configured to appear only when the cart total is greater than a selected amount, the checkbox can update automatically when the customer changes quantities, applies a coupon, or modifies checkout details that affect the order total.
Similarly, conditions based on cart discount total, shipping total, or live cart weight can update as the customer’s cart changes.
Example use cases
↑ Back to topHigh-value order agreement
Show an additional agreement when the cart total is greater than a selected amount.
Example setup:
- Rule: Cart Total
- Operator: Greater than
- Value: 500
This can be used for high-value order terms, special fraud review notices, insurance notices, or additional delivery confirmations.
Coupon discount notice
Show an agreement when the customer receives a discount above a selected amount.
Example setup:
- Rule: Cart Discount Total
- Operator: Greater than or equal to
- Value: 50
This can be used for promotional terms, coupon restrictions, or final sale notices.
Coupon-specific agreement
Show an agreement only when one or more selected coupon codes are applied to the customer’s cart.
Example setup:
- Rule: Applied Coupons
- Operator: Matches
- Value: Select the applicable coupon code or codes
This can be used for promotional terms, limited-time offers, final-sale conditions, partner discounts, or campaign-specific purchase requirements.
Heavy cart handling agreement
Show a handling or freight agreement when the cart weight is greater than a selected value.
Example setup:
- Rule: Cart Weight
- Operator: Greater than
- Value: 25
The value is checked using the store’s configured WooCommerce weight unit.
Campaign-based agreement
Show a campaign-specific agreement when the customer arrives through a URL parameter.
Example setup:
- Rule: URL Parameter
- Parameter name: campaign
- Operator: Equals
- Value: summer-sale
This can be used for campaign terms, affiliate terms, partner promotions, or custom checkout flows.
Flexible matching with any condition
Show the same agreement when one of several conditions is true.
Example setup:
- Conditions Matching: Any condition matches
- Condition 1: Product is in the cart.
- Condition 2: Cart total is greater than 500.
- Condition 3: URL parameter exists.
The checkbox appears if any one of the configured conditions matches.
Strict matching with all conditions
Show an agreement only when every configured condition is true.
Example setup:
- Conditions Matching: All conditions match
- Condition 1: Product category is in the cart.
- Condition 2: Shipping location matches a selected location.
- Condition 3: Cart shipping total is greater than 20.
The checkbox appears only when all configured conditions match at the same time.
Complex conditional logic
↑ Back to topYou have the flexibility to create complex conditional logic for displaying a terms checkbox by incorporating multiple conditional rules. Here are some examples of what you can achieve:
Single conditional rule
You can set a checkbox to display if a specific condition is met, such as when users add products from a particular product type to their cart. For instance, the terms checkbox will appear in the checkout when users add items from the “Electronics” product type.
Multiple rules
Combine various conditions by using multiple rules. For example, you can display the terms checkbox if users add products from both a specific product type and a particular category to their cart. This provides a more nuanced approach to triggering the checkbox.
Negating conditions
Employ “not” operators to negate certain conditions. For instance, you can display the terms checkbox only if users don’t add a particular product to their cart. This allows you to tailor the display of the checkbox based on exclusions.
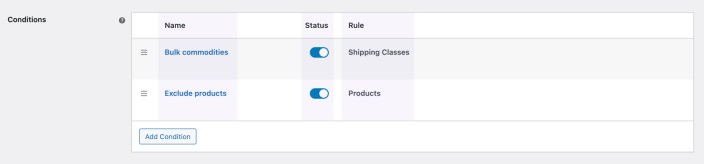
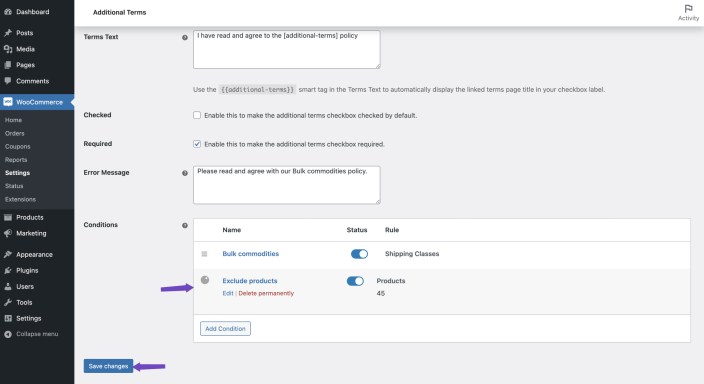
Conditions table
↑ Back to topWhen you navigate to the edit term page, you will find a table that provides an overview of the defined conditions for each terms checkbox. Here’s what you can expect to see in this table:
- Name: This column displays the name of your condition. If you haven’t entered a custom name when creating the condition, a horizontal line (—) will be shown as a placeholder.
- Status: In this column, you can view the activation status of your condition. You have the option to change the status by simply clicking on the toggle switch provided in this column.
- Rule: This column displays the condition statement or “if-then” statement that defines the condition. It specifies under which circumstances a certain action or result will occur based on the defined condition.
Editing conditions
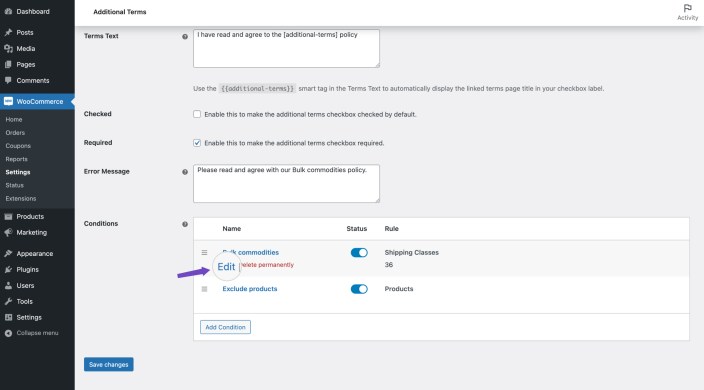
↑ Back to topOnce you’ve added a condition to a terms checkbox, you can edit its details to make any necessary adjustments. Here’s how to do it:
- Locate the Conditions table on the edit term page.
- Hover over the specific condition you wish to edit, and select Edit.
- Apply the new changes to the condition as needed.
- After making your edits, click on the Save changes button within the modal to ensure that your changes are saved and applied.
- Save your terms settings by clicking the Save changes button on the edit page.
Removing a condition
↑ Back to topIf you need to remove and delete a condition associated with a terms checkbox, follow these steps:
- Locate the Conditions table on the edit term page.
- Hover over the specific condition you wish to remove, and select Delete permanently.
- A confirmation message will appear. Click the Ok button to confirm and remove the conditional logic from the terms checkbox.
- Click on the Save changes button.
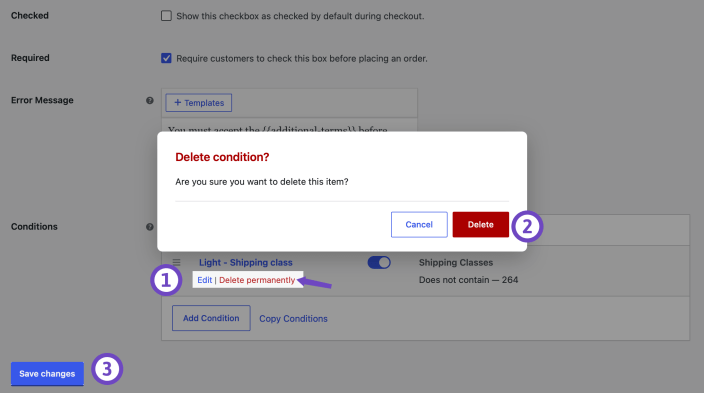
Deleting a conditional logic will result in its permanent removal, and there will be no way to restore it. Proceed cautiously and verify your decision before confirming the deletion, as it cannot be undone.
Disabling a condition
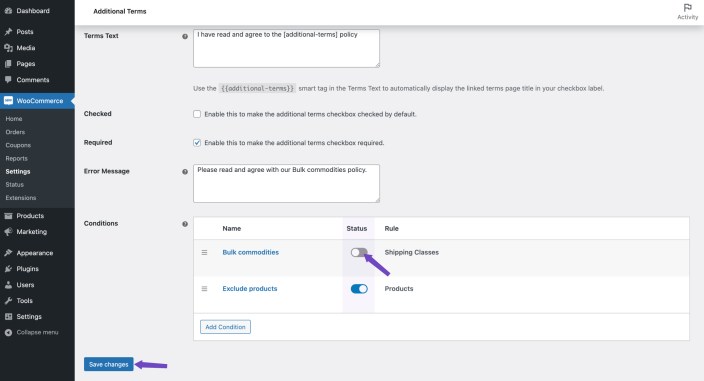
↑ Back to topYou have the option to enable or disable the conditional logic for a additional terms checkbox using toggle switch located in the Status column. To change the status of a condition, follow these steps:
- Locate the Conditions table on the edit term page.
- Click the toggle button in the Status column to switch the condition’s status between enabled and disabled.
- Click on the Save changes button.
Sorting conditions
↑ Back to topTo organize the conditions for a terms checkbox and ensure that the conditional logic is executed correctly, you can reorder them via drag-and-drop. Here’s how to do it:
- Locate the Conditions table on the edit term page.
- Use the left handle (represented by three horizontal lines) next to the condition name.
- While holding the condition, drag it up or down to change its position in the list.
- Drop the condition at its new position by releasing the mouse button.
- Click on the Save changes button.
Terms Generator
↑ Back to topThe Terms Generator in Additional Terms Pro helps WooCommerce store owners create structured Terms and Conditions content using a guided questionnaire.
Instead of starting from a blank page, store owners can answer questions about their business, products, services, platform, payment methods, customer interactions, and policies. Additional Terms Pro then uses those answers to generate a Terms and Conditions draft that can be reviewed, edited, and published.
The generated content is designed to save time and provide a strong starting point for creating legal and policy pages for WooCommerce stores.
Accessing the terms generator
↑ Back to topTo open the Terms Generator:
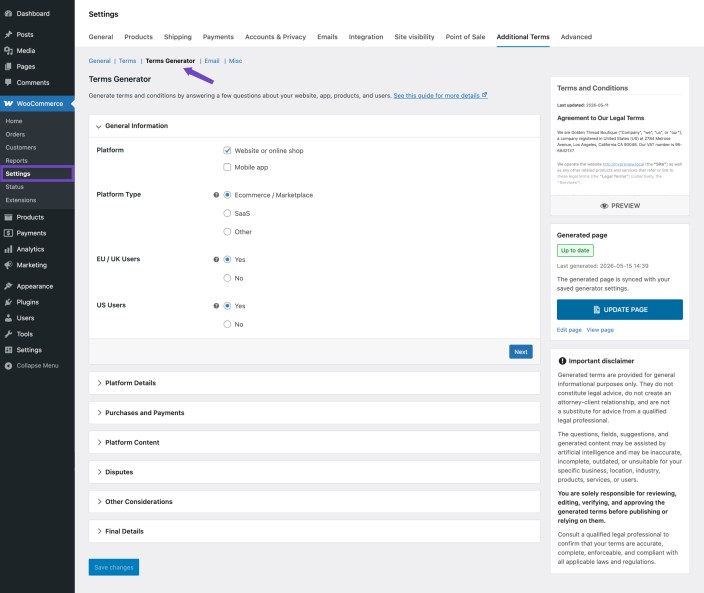
- Go to WooCommerce > Settings > Additional Terms.
- Open the Terms Generator tab.
- Complete the guided questionnaire.
- Review the generated terms preview.
- Edit and publish the generated page when ready.
Generator sections
↑ Back to topThe Terms Generator is divided into several sections to make the setup process easier and more organized.
General information
This section collects basic information about your website, platform, users, and general business model.
It may include details such as:
- Website type
- Target audience
- Whether users can create accounts
- Whether customers interact with the platform
- General usage rules
Platform details
This section gathers information about how your platform operates.
It may include details such as:
- Products or services offered
- Hosting and platform usage
- Store functionality
- User access
- Digital or physical product availability
Purchases and payments
This section controls payment-related clauses and purchase information.
It may include details such as:
- Accepted payment methods
- Order processing rules
- Pricing information
- Billing terms
- Refund or cancellation references
- Subscription or recurring payment details, if applicable
Platform content
This section configures content-related terms and user behavior rules.
It may include details such as:
- User-submitted content
- Account responsibilities
- Prohibited activities
- Intellectual property considerations
- Content ownership and usage rights
Disputes
This section controls clauses related to disputes, liability, and conflict resolution.
It may include details such as:
- Limitation of liability
- Dispute handling
- Governing law
- Customer responsibility
- Platform availability and service limitations
Other considerations
This section includes additional settings that may apply to specific stores or business models.
It may include details such as:
- Compliance requirements
- Third-party services
- External links
- Additional policy references
- Special business rules
Final details
This section collects the final business and legal details needed to complete the generated terms page.
It may include details such as:
- Business name
- Business address
- Contact information
- Legal entity details
- Effective date
- Policy ownership information
Previewing generated terms
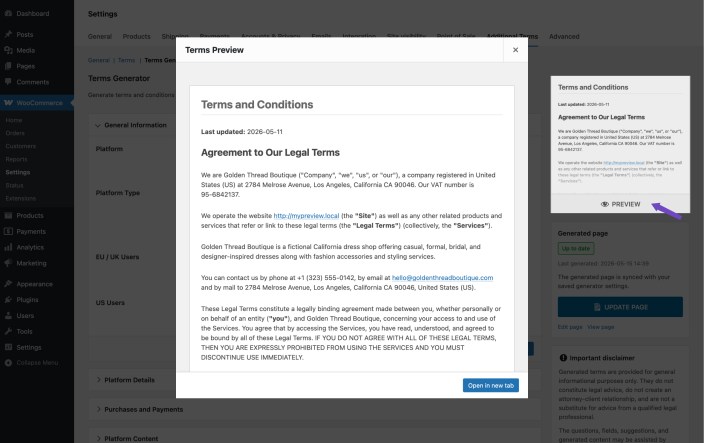
↑ Back to topAfter the questionnaire is completed, Additional Terms Pro generates a preview of the Terms and Conditions content.
The preview allows you to review the generated content before publishing it.
Creating a terms page
↑ Back to topOnce the generated content has been reviewed and approved, it can be saved or published as a WordPress page.
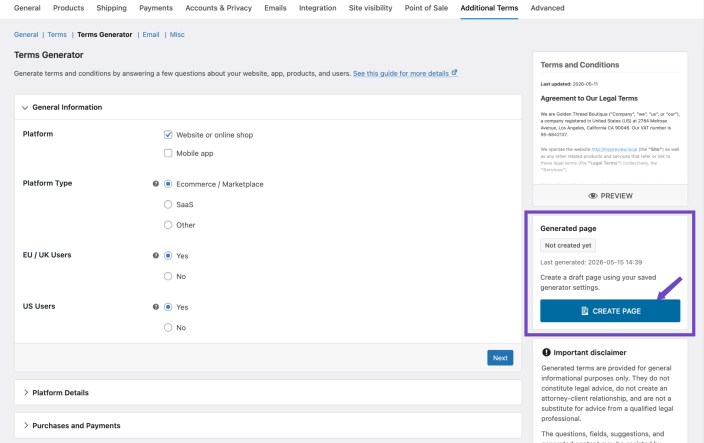
To create the terms page:
- Complete the Terms Generator questionnaire.
- Review the generated preview.
- Locate Generate Page card.
- Click the Create Page button.
- Save or publish the generated page.
Important Disclaimer
The Terms Generator creates general informational content to help you get started with your Terms and Conditions page. Generated content, including any AI-assisted suggestions, should be reviewed and approved before publishing. For legal accuracy, compliance, and enforceability, consult a qualified legal professional.
Misc Settings
↑ Back to topTerms source post type
↑ Back to topBy default, Additional Terms Pro allows store owners to link additional terms checkboxes to standard WordPress pages. This is useful for common legal pages such as Terms and Conditions, Privacy Policy, Refund Policy, or Shipping Policy.
Some WooCommerce stores may prefer to manage legal content using a custom post type instead of regular WordPress pages. For example, a store may have a dedicated post type for legal documents, policies, agreements, or compliance pages.
The Terms Source Post Type setting allows you to choose which post type should be used when selecting linked terms content for additional terms checkboxes.
How to change the terms source post type
↑ Back to topTo configure the source post type:
- Go to WooCommerce > Settings > Additional Terms.
- Open the Misc settings tab.
- Find the Terms Source Post Type setting.
- Select the post type that should be used for linked terms content.
- Click Save Changes.
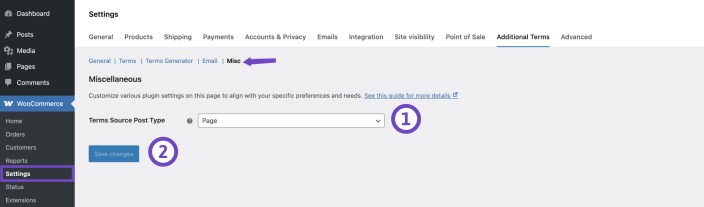
After saving the setting, Additional Terms Pro will use the selected post type when displaying available terms content inside checkbox settings.
Using custom post types with terms checkboxes
↑ Back to topOnce a custom post type has been selected, entries from that post type become available when creating or editing additional terms checkboxes.
To select linked content from the configured post type:
- Go to the Terms section.
- Create a new terms checkbox or edit an existing one.
- Select the Terms Page.
- Save your changes.
The content selector will display entries from the selected post type instead of standard WordPress pages.
This is helpful for stores that keep legal content separate from regular site pages or use a custom document management workflow.
Customer acceptance details
↑ Back to topThe Customer Acceptance Details option lets you show customers the Additional Terms that applied to their order.
When enabled, customers can view the terms they accepted, as well as any optional terms they declined, after checkout and from their account order details page.
Acceptance details can be shown in:
- The order details section displayed after checkout.
- The customer’s My Account > Orders > View order page.
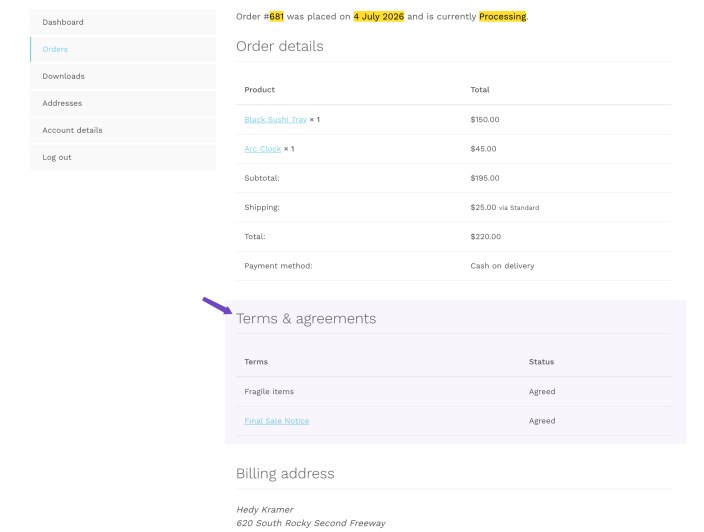
This helps customers review the agreements connected to their order without contacting the store owner.
Customer-facing terms open in a modal on the order details page. This keeps customers on the order screen while allowing them to review the related terms content.
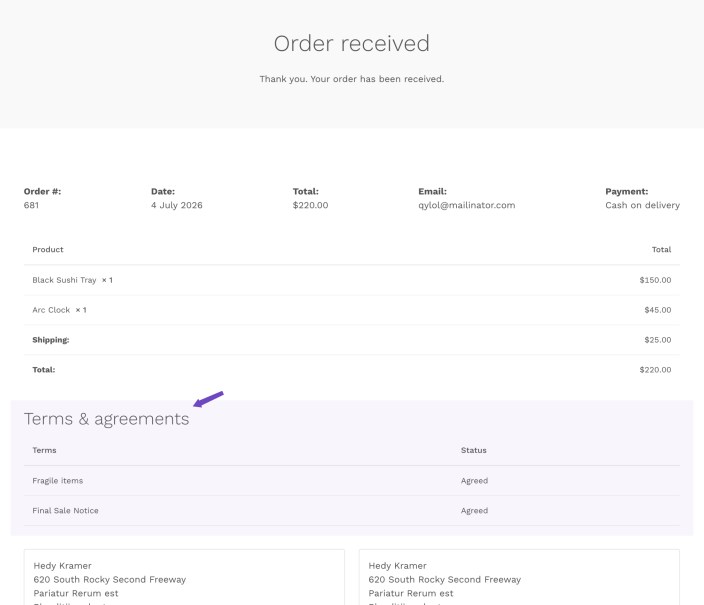
The modal also allows customers to view the recorded terms content even when the linked terms page is saved as a draft or private page, without sending them to a separate page URL.
To enable Customer Acceptance Details:
- Navigate to WooCommerce > Settings > Additional Terms.
- Go to the Misc section.
- Enable Customer Acceptance Details.
- Click Save Changes.
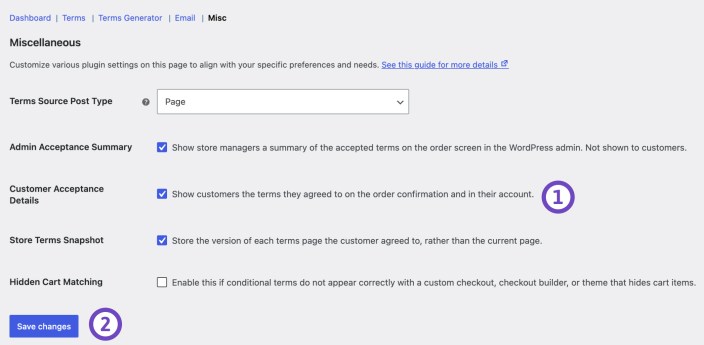
Once enabled, customers will be able to review their Additional Terms acceptance details for each order, including accepted terms and declined optional terms when available.
Store terms snapshot
↑ Back to topThe Store Terms Snapshot option stores the version of each terms page that the customer agreed to at the time of purchase.
When this option is enabled, Additional Terms Pro saves a snapshot of the accepted terms content with the order. This allows customers to review the exact version of the terms they agreed to later, even if the original terms page is updated after the order is placed.
This is useful because terms pages may change over time. For example, you may update your refund policy, shipping policy, warranty terms, waiver text, or other agreement content. With Store Terms Snapshot enabled, customers can still view the version that applied to their own order, instead of seeing the latest updated version of the page.
The saved snapshot can be shown to customers when Customer Acceptance Details is enabled. Customers can review their accepted terms from the order confirmation page after checkout and from their account order details page.
To enable Store Terms Snapshot:
- Go to WooCommerce > Settings > Additional Terms.
- Open the Misc section.
- Enable Store Terms Snapshot.
- Click Save changes.
Once enabled, the plugin stores the terms page version accepted with each order, rather than relying only on the current content of the linked terms page.
This helps keep customer-facing agreement records accurate when your terms pages are edited after an order is completed.
Admin Acceptance Summary
↑ Back to topThe Acceptance Summary option displays recorded Additional Terms acceptance details for store admins on the WooCommerce order details page.
When a user agrees to your terms and conditions, they are giving their informed approval to your policies, procedures, and guidelines outlined on the terms page. The additional terms plugin records this agreement on the single order page, protecting both the shop owner and the user and promoting transparency and accountability in your store.
Tracking which users have agreed to the terms and conditions can serve as a reference point for any legal disputes or challenges to your terms. This demonstrates that your website is upfront and honest about its policies, ensuring users know their rights and responsibilities.
Maintaining a record of accepted terms and conditions can also help improve customer service. For instance, if a user has a question or concern about your policies, you can quickly look up the order and verify when they agreed to the terms and conditions, which is also useful for auditing purposes.
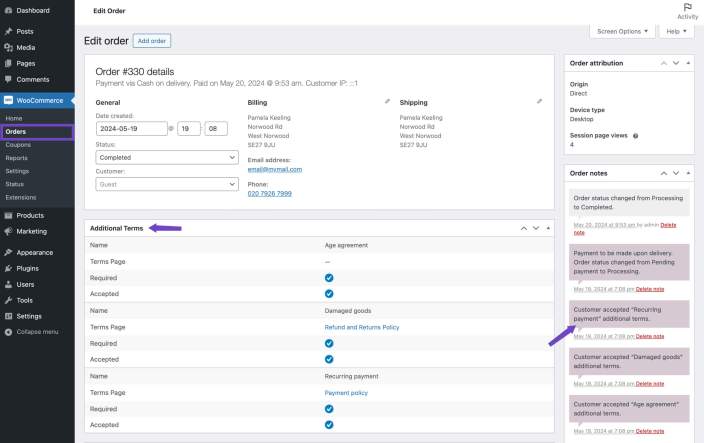
The summary can include:
- The terms name.
- The linked terms page.
- Whether the term was required or optional.
- Whether the customer accepted or declined it.
- The placement where the choice was recorded, such as Cart or Checkout.
After receiving an order, the acceptance of user agreements is attached to the order as a note. To review the order notes, go to WooCommerce > Orders and click on the Order number.
To enable the Admin Acceptance Summary:
- Go to WooCommerce > Settings > Additional Terms.
- Open the Misc section.
- Enable Admin Acceptance Summary.
- Select Save changes.
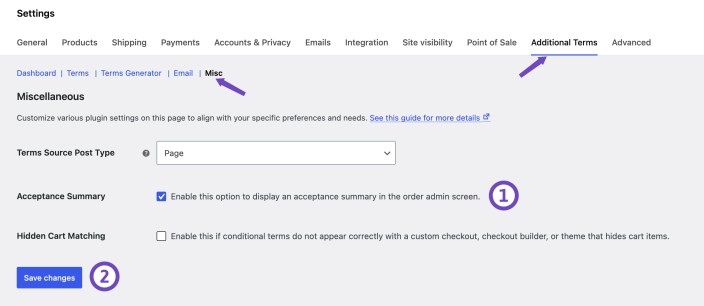
Once you select the Acceptance Summary, you can find the acceptance of the terms and conditions checkboxes on the single order page.
To review the recorded choices for an order:
- Go to WooCommerce > Orders.
- Open the order you want to review.
- Find the Additional Terms panel on the order screen.
Consent IP & Device Log
↑ Back to topThe optional Consent IP & Device Log records additional technical information when a customer accepts Additional Terms.
When enabled, the consent evidence can include:
- IP address.
- Device type.
- Browser.
- Operating system.
- User agent.
The customer’s IP address and user agent are stored with the WooCommerce order. The device, browser, and operating-system details are identified from the recorded user agent and displayed in a separate Consent Evidence panel on the admin order screen.
Consent IP & Device Log is disabled by default. The setting is available when Admin Acceptance Summary is enabled.
To enable consent evidence logging:
- Go to WooCommerce > Settings > Additional Terms.
- Open the Misc section.
- Enable Admin Acceptance Summary.
- Enable Consent IP & Device Log.
- Select Save changes.
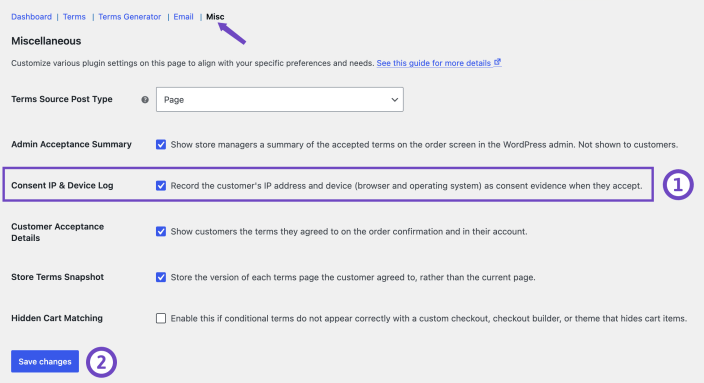
Consent evidence is recorded when a new Additional Terms acceptance is saved. Enabling the feature does not add evidence retrospectively to orders completed before consent logging was enabled.
When Consent IP & Device Log is enabled, Additional Terms acceptance CSV exports can also include the IP address, device, browser, operating system, and user agent.
Only enable this feature when it is appropriate for your store’s privacy policy, data-retention practices, and applicable legal requirements.
Hidden Cart Matching
↑ Back to topIn some cases, your theme or a third-party plugin may customize the WooCommerce checkout page. This can happen when a theme overrides the checkout page template, or when a checkout builder or other plugin changes how cart items are displayed.
These customizations may conflict with the Additional Terms Pro conditional logic. As a result, some terms may not appear correctly on the checkout page based on the conditions you configured on the term edit screen.
To help resolve this, enable the Hidden Cart Matching option from the Misc settings page.
When enabled, this option allows Additional Terms Pro to better detect cart items when they are hidden or modified by a custom checkout layout, checkout builder, or theme customization.
After enabling this option, click Save changes.
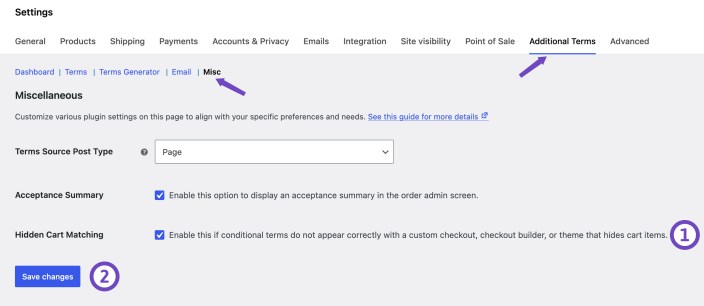
Note:
You do not need to enable this option if you are using the WooCommerce Checkout Block, or if your checkout page has not been customized by your theme or third-party plugins. In these cases, keep this option disabled.
If conditional terms still do not appear correctly after enabling this option, please contact our support team for assistance.
Email Settings
↑ Back to topAdditional Terms Pro includes email-related settings that allow accepted additional terms to be displayed in WooCommerce order emails.
This helps customers clearly see which agreements, policies, or terms they accepted during checkout. It can also help store owners maintain better records of customer consent and reduce future disputes.
To configure email options:
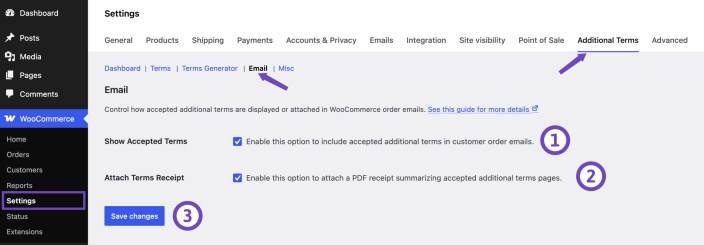
- Go to WooCommerce > Settings > Additional Terms.
- Open the Email settings tab.
- Enable or disable the available email options.
- Click Save Changes.
Show accepted terms in emails
↑ Back to topThe Show Accepted Terms setting allows accepted checkout terms to appear directly inside WooCommerce order emails.
When enabled, WooCommerce emails can include a record of the additional terms accepted by the customer during checkout.
To enable this option:
- Open the Email settings tab.
- Check the Show Accepted Terms option.
- Click Save Changes.
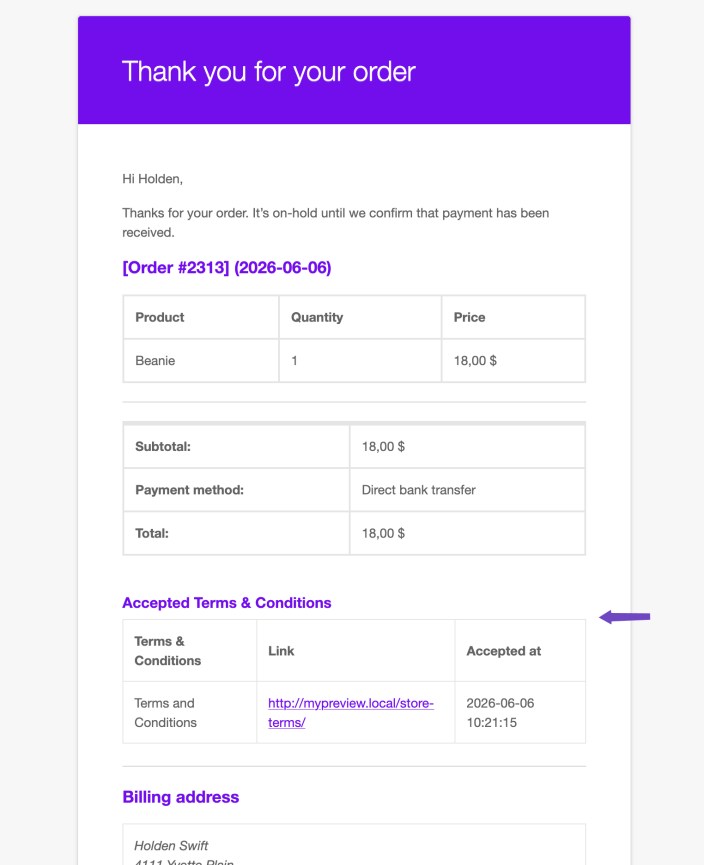
Once enabled, accepted terms information will be included in supported WooCommerce order emails.
Attach terms receipt PDF
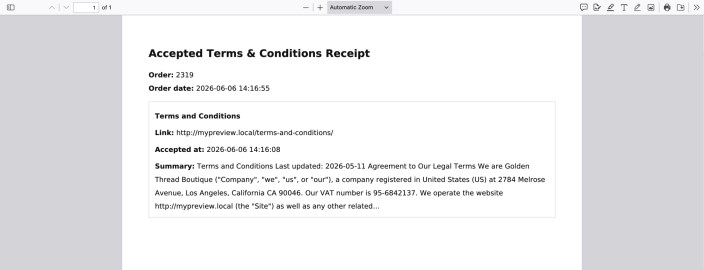
↑ Back to topThe Attach Terms Receipt setting allows Additional Terms Pro to attach a PDF receipt containing accepted terms information to WooCommerce emails.
This PDF can provide a structured record of the customer’s accepted agreements.
To enable this option:
- Open the Email settings tab.
- Check the Attach Terms Receipt option.
- Click Save Changes.
Benefits of including accepted terms in emails
Displaying accepted terms in WooCommerce emails can help:
- Improve transparency for customers
- Provide a clearer record of accepted agreements
- Reduce disputes related to policies or checkout conditions
- Support compliance and documentation workflows
- Improve customer trust by confirming what was accepted at checkout
Add Terms Checkbox to Checkout
↑ Back to topCheckout shortcode
↑ Back to topOnce you have successfully created an additional terms checkbox, it will automatically appear alongside the WooCommerce terms and conditions on the checkout page. This is accomplished by using the checkout shortcode [woocommerce_checkout].
Checkout block
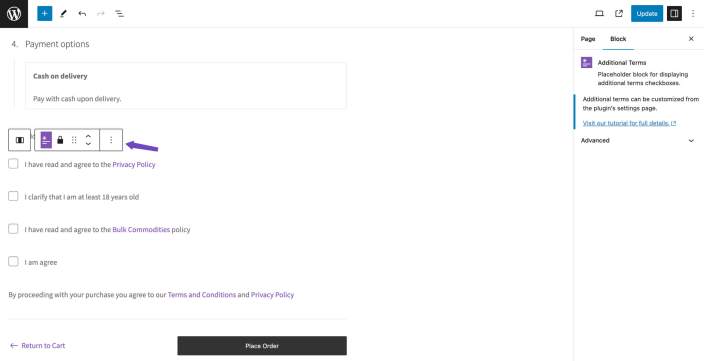
↑ Back to topIf your checkout page uses the WooCommerce Checkout block, there’s an additional step required to display your custom terms. Unlike the traditional checkout shortcode, the block editor works differently, so you’ll need to manually add the Additional Terms block to ensure everything functions properly.
Steps to Add the Additional Terms Block:
- Navigate to Pages in your WordPress dashboard.
- Edit the Checkout page.
- Within the block editor, locate the Checkout block and add the Additional Terms block within it.
- Update your checkout page by clicking the Save button.
Once added, you can reposition the Additional Terms checkboxes within the Checkout block to match your desired layout and preferences. This ensures that the terms are presented exactly where you want them during the checkout process.
Translating Additional Terms Pro
↑ Back to topUsing the WPML Plugin
↑ Back to topTo translate the Additional Terms Pro plugin using the WPML Multilingual plugin, follow these steps:
- Navigate to String Translation: Go to WPML > String Translation in your WordPress dashboard.
- Search for the Relevant Strings: In the search bar, look for
admin_text__watpro_settings. This will help you locate the store vacation notices or other relevant strings you want to translate. - Select the Notice to Translate: Find the specific notice you wish to translate from the list of strings.
- Translate into Your Desired Language: Click the Edit icon beneath the flag representing the language you want to translate the notice into, and enter your translation.
For more detailed instructions, refer to the WPML documentation on translating strings.
Using the Polylang Plugin
↑ Back to topTo translate strings with the Polylang plugin, follow these steps:
- Access Translation Settings: Go to Languages > Translation in your WordPress dashboard.
- Filter by Plugin: Use the dropdown menu to filter and select plugins/additional-terms. This will display the relevant strings for the Additional Terms Pro plugin.
- Translate the Strings: In the Translations column, input your translated strings for each language.
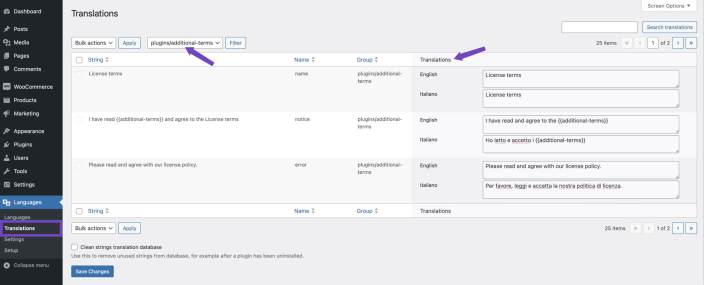
For more detailed instructions, refer to the Polylang documentation.
Import and Export
↑ Back to topThe import and export options allow you to migrate plugin settings to a new website. Your site’s content will be downloaded into a JSON file, which can then be imported into another WooCommerce store.
Export plugin settings
↑ Back to topBefore exporting your plugin settings, ensure your store is publicly accessible and not under maintenance or password-protected. It is also recommended to remove any unwanted terms before exporting, so the export file only includes the settings and content you want to migrate.
To export the existing plugin customization and content into a JSON file:
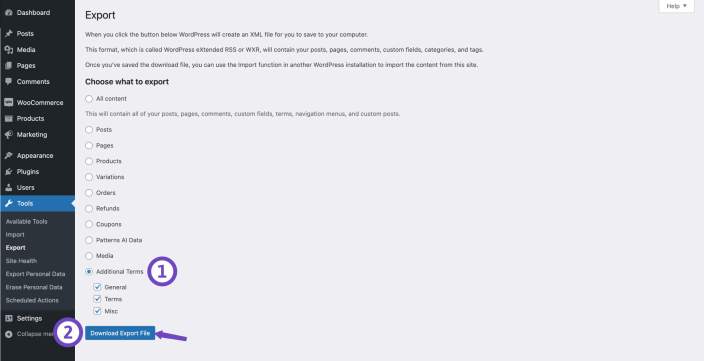
- Navigate to Tools > Export.
- Choose Additional Terms.
- Select which settings to export using the checkboxes.
- Click on the Download Export File button.
- Wait for the export process to complete. WordPress will create a JSON file for you to save to your computer.
Export Additional Terms acceptance records
↑ Back to topAdditional Terms Pro allows you to export recorded agreement acceptances for orders where customers accepted Additional Terms checkboxes.
This export is useful when you need a CSV record of accepted agreements for auditing, compliance review, customer support, or internal reporting.
Acceptance records are exported separately from the plugin settings export. The plugin settings export creates a JSON file for moving settings between stores, while the acceptance records export creates a CSV file containing accepted agreement data from customer orders.
To export Additional Terms acceptance records:
- Go to Tools > Export in your WordPress admin.
- Choose Additional Terms acceptance records.
- Select the start month and end month for the export.
- Click Download Export File.
- WordPress will generate a CSV file containing the matching acceptance records.
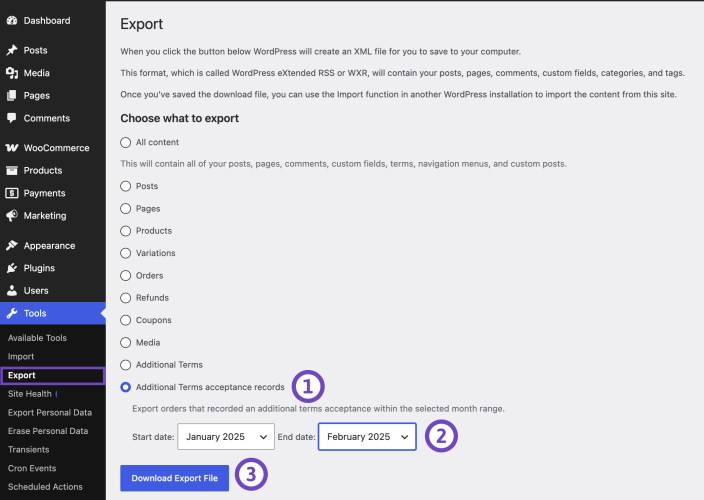
The export includes acceptance records for orders that have accepted Additional Terms within the selected date range.
The CSV can include:
- Order number and order ID.
- Order date, total, and currency.
- Customer name and email address.
- Terms name and acceptance status.
- Acceptance placement.
- Linked terms page and URL.
- Stored terms summary.
- Linked terms page modification date.
When Consent IP & Device Log is enabled, the export can also include:
- IP address.
- Device.
- Browser.
- Operating system.
- User agent.
Orders completed before consent logging was enabled may have empty consent-evidence fields.
The acceptance-record export supports WooCommerce High-Performance Order Storage and legacy WooCommerce order records.
Import
↑ Back to topBefore importing, ensure the exported file isn’t too large for your server to handle, as this might cause memory issues. If this happens, you might see an error like ☒ Fatal error: Allowed memory size of 8388608 bytes exhausted. To resolve this, if you have server permissions, increase the available memory by editing the php.ini file. Alternatively, split the settings into several smaller files and import each separately. You can also ask your hosting provider for assistance.
To import the plugin information from a JSON file to a new site:
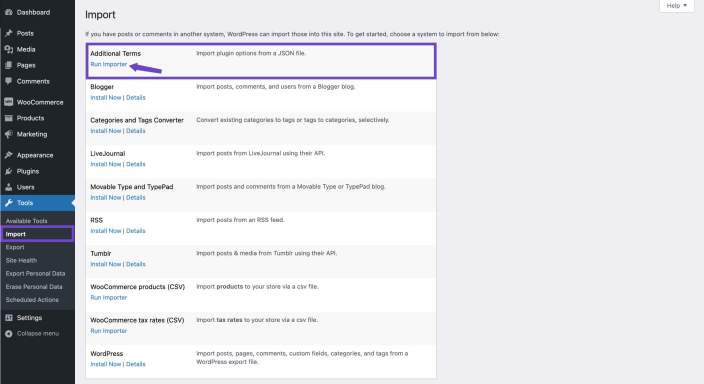
- Navigate to Tools > Import.
- Go to Additional Terms and select Run Importer.
- Click on the Choose File button and select the JSON file.
- Click on the Upload file and import button.
- Once the import process is complete, a success message will appear.
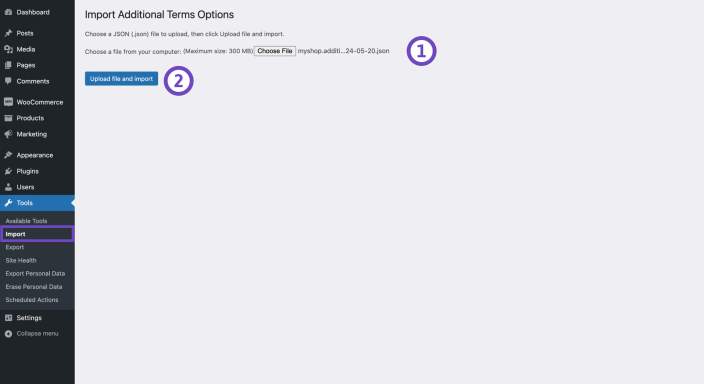
If your import process fails, it may still create some content. To avoid duplicate data, review the plugin’s settings page after a failed import and remove any unnecessary records before trying again.
Using Export as a Backup
↑ Back to topUse the plugin settings export before migrating your store or making extensive changes to your Additional Terms configuration.
Terms checkboxes moved to Trash can be restored until they are permanently deleted. Once an item is permanently deleted, it cannot be restored from Trash. Keeping a recent settings export provides an additional backup of your plugin configuration.
Troubleshooting Common Issues
↑ Back to topWhile using the Additional Terms Pro plugin, you might encounter some issues. Below are common problems along with potential solutions:
Checkbox not displaying on the checkout page:
- Confirm the checkbox label: Double-check that you’ve entered the correct text in the ‘Terms Text’ field, which is responsible for the checkbox label. This text is essential for the checkbox to appear on the checkout page.
- Verify status: Ensure that the Status field is set to Active. If this isn’t selected, the checkbox won’t be displayed.
- Add the block: If your checkout page is created using the WooCommerce checkout shortcode, the Additional Terms checkbox will be automatically added. However, if you’ve built your checkout page using the WooCommerce Checkout block, you must manually add the Additional Terms block within the checkout block. Without this step, the checkbox won’t appear on the checkout page.
Page link not displaying within the checkbox label:
- Check the smart tag: Confirm that you’ve inserted the correct smart tag
{{additional-terms}}within the ‘Terms Text’ field. This tag is crucial as it dynamically inserts the linked terms and conditions page title into the checkbox label. - Select the correct terms page: Ensure you’ve selected a page from the Terms Page dropdown menu. If no page is selected, the link will not display properly.
- Ensure the page is published: If you’ve opted for the Open in new tab option in the Link Action field, double-check that the selected Terms page is published. An unpublished page will not display in the checkbox label.
Unable to Find Terms for Translation Using WPML:
- Locate strings in WPML: To translate your additional terms, navigate to WPML > String Translation. Search for
admin_text_watproto find the strings associated with your additional terms. This is where you can manage translations for different languages.
Consent Evidence Is Not Being Recorded
If consent evidence does not appear on the WooCommerce order screen, check the following:
- Admin Acceptance Summary is enabled.
- Consent IP & Device Log is enabled.
- The customer accepted at least one Additional Terms checkbox.
- The order was placed after Consent IP & Device Log was enabled.
- The order contains a recorded Additional Terms acceptance.
Consent evidence is recorded only when a new acceptance is saved. Enabling the feature does not add IP address or device information to earlier orders.
Applied Coupons Condition Is Not Displaying the Checkbox
If a terms checkbox does not appear when a coupon is applied, check the following:
- The terms item is saved and its status is set to Active.
- Applied Coupons is selected as the condition rule.
- The correct coupon code is selected in the condition.
- The selected coupon is currently applied to the cart.
- The terms checkbox includes the current Cart or Checkout placement.
- The Additional Terms block is added when using the Cart or Checkout Block.
- The selected conditions and Conditions Matching setting allow the checkbox to appear.
Applied Coupons and Cart Discount Total are different rules. Applied Coupons matches selected coupon codes, while Cart Discount Total matches the monetary value of the discount.
If these troubleshooting steps don’t resolve your issue, please don’t hesitate to reach out to our support team for further assistance.