NOTE
This product is no longer available on WooCommerce.com. This document has been left available for existing users, but will no longer be updated.
The AntsRoute module simplifies issues regarding local delivery for online sales sites. Online sellers can automatically delegate their deliveries to a carrier or organize them by their own resources.
Requirements
↑ Back to top- Minimum PHP version: 5.2.
- Having subscribed to AntsRoute.
- Available in Africa, Europe, North-America and South-America.
Installation
↑ Back to top- Download the .zip file from your woocommerce.com account.
- Go to WordPress Admin > Plugins > Add New to upload the file you downloaded using Choose File.
- Activate the extension.
Note: After having activated the AntsRoute plugin, it is then displayed in the “Settings” tab of the WooCommerce plugin.
Set up your AntsRoute account
↑ Back to topCreate the ‘Number’ and ‘Weight’ capacities on AntsRoute
↑ Back to topThe capacities allow you to manage the quantities (number of packages and weight) that can be transported by each vehicle during a route.
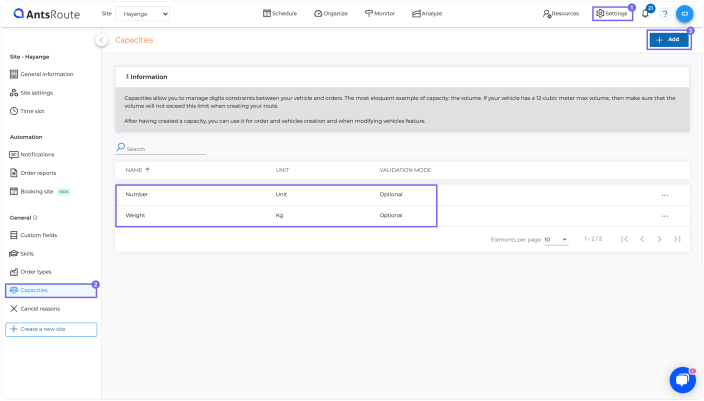
- Go to ‘Settings‘ > ‘Capacities‘ > ‘Add‘ and fill in the first capacity:
- Name: Number ;
- Unit: Unit ;
- Validation mode: Optional.
- Click on ‘Add‘ and fill in the second capacity:
- Name: Weight ;
- Unit: Kg ;
- Validation mode: Optional.
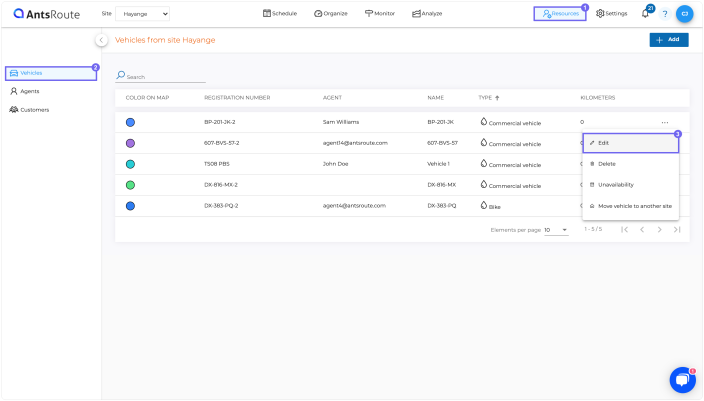
- Go to ‘Resources‘ > ‘Vehicles‘ and click on ‘…‘ > ‘Edit‘ for the first vehicle.
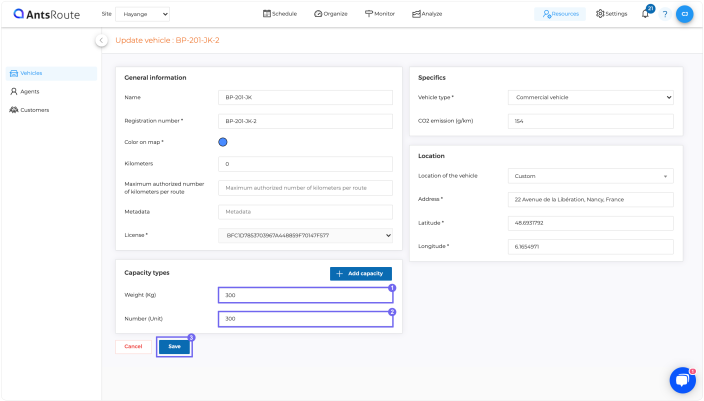
- In the ‘Capacity types‘ box, determine the ‘Number’ and ‘Weight’ capacities for this vehicle before clicking on ‘Save’.
- Repeat these actions for each vehicle available.
Create the ‘Description’, ‘Price’ and ‘Reference’ custom fields on AntsRoute
↑ Back to topThese custom fields are necessary to send the WooCommerce data in AntsRoute.

- Go to ‘Settings‘ > ‘Custom fields‘ > ‘Add‘ and click on ‘Create a category’ (e.g. ‘WooCommerce Fields’).
- Click on ‘Create a field‘ and fill in the first custom field:
- Name: Description ;
- Input: when scheduling orders ;
- Field type: Text type.
- Click on ‘Create a field‘ and fill in the second custom field:
- Name: Price ;
- Input: when scheduling orders ;
- Field type: Text type.
- Click on ‘Create a field‘ and fill in the third field:
- Name: Reference ;
- Input: when scheduling orders ;
- Field type: Text type.
Get an AntsRoute API key
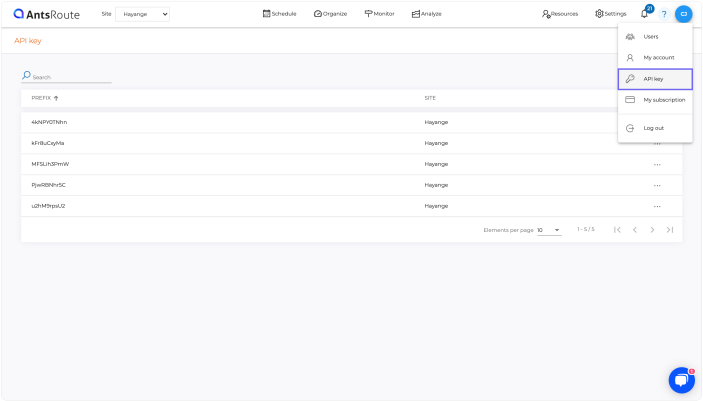
↑ Back to top- Go to ‘Profile‘ > ‘API key‘ > ‘Add‘ and select the site for which you need the API key.
- Click on ‘Create‘ > ‘Copy‘ the key generated and paste it in a secure document as it will be asked later when setting up the plugin in WordPress.
- Click on ‘Continue‘ ta save the key.

Set up the AntsRoute module on WordPress
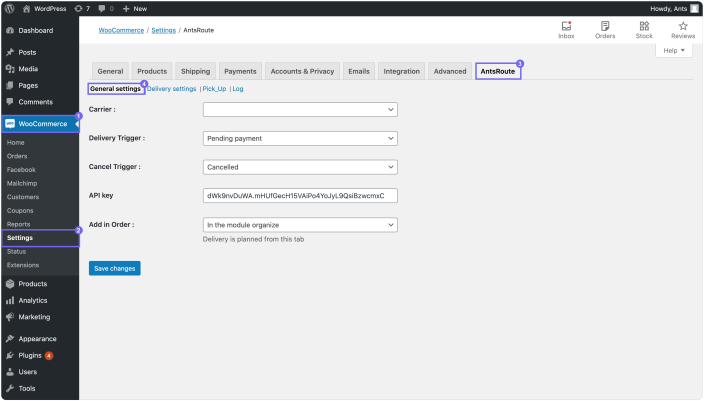
↑ Back to top- Go to ‘WooCommerce‘ > ‘Settings‘ and click on the AntsRoute tab.
- Click on ‘General settings‘ to define ‘Carrier’, ‘Delivery trigger’, i.e. the WooCommerce action that triggers a delivery, ‘Cancel trigger’.
- Paste the API key created on AntsRoute during the previous step and determine the tab from which the deliveries are scheduled: ‘Intervention basket’ or ‘Organize module’.
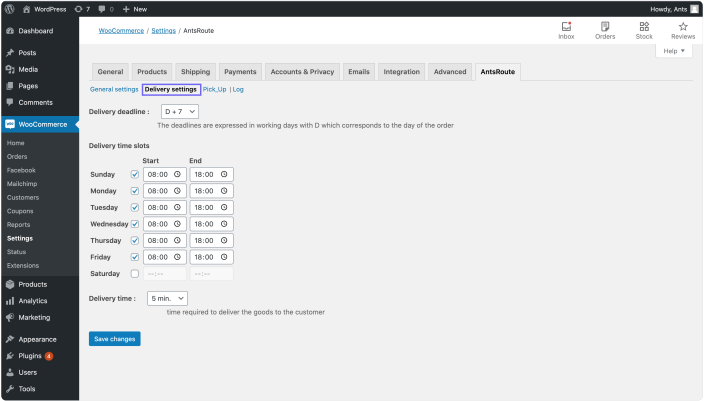
- Click on ‘Delivery settings‘ to define the ‘Delivery deadline’, i.e. the number of working days between the order date and delivery date, ‘Delivery time slots’, ‘Delivery time’ i.e. the time required to sign for parcels on delivery.
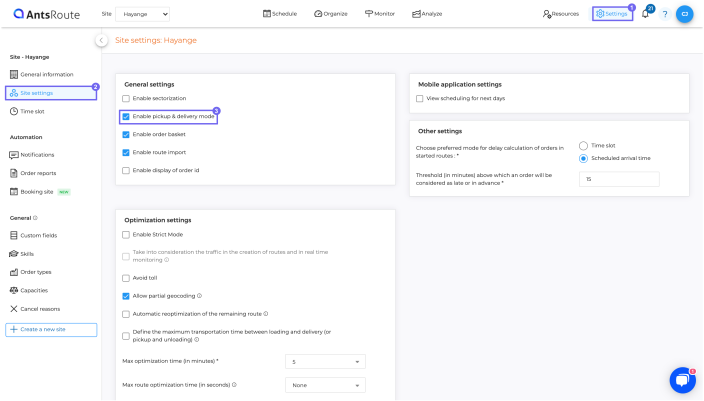
Note: For companies whose deliverymen carry out several returns to the depot during their routes to reload the vehicle, they can activate the ‘Pick-up & Delivery’ features.
- From the ‘AntsRoute account‘ > ‘Settings‘ > ‘Site settings‘, check the ‘Enable pickup & delivery mode’ box.
- From ‘WooCommerce’ > ‘Settings’ > ‘AntsRoute’ > ‘Pick-up & Delivery’, activate ‘Enable pick-up & delivery’ by selecting ‘Yes’.
- Determine the ‘Warehouse name’, ‘Warehouse address’, ‘Loading time’ and ‘Loading slot’.