
Automatically print order invoices and packing slips the moment an order is placed, using PrintTrigger or PrintNode.
Overview
↑ Back to topAutomatic Order Printing for WooCommerce prints invoices, packing slips and other order documents on your own printers the moment an order is placed. You don’t need to open each order in the dashboard or print by hand.
The plugin sends print jobs through a cloud print service. Two services are supported: PrintTrigger and PrintNode. You need an account with one of them.
Supported print services
↑ Back to top| Service | What you need | Plans |
| PrintTrigger | A PrintTrigger account and its desktop agent (Windows or macOS) on the computer connected to your printer | printtrigger.com/pricing |
| PrintNode | A PrintNode account and the PrintNode client on the computer connected to your printer | printnode.com |
Select the service you use under Print Service in the plugin settings.
Features
↑ Back to top- Print new orders automatically, without logging in to the dashboard.
- Print delivery instructions with each order.
- Start fulfillment sooner after an order comes in.
- Send orders to several printers at once.
- Create custom templates for invoices, packing slips and other documents.
- Print or download any order manually from the order details page.
- Choose your print service: PrintTrigger or PrintNode.
Requirements
↑ Back to top- WooCommerce installed and active.
- An account with PrintTrigger or PrintNode.
- A computer that stays on near your printer, running the print service’s desktop software. For PrintTrigger:
- Windows 10 or later, 64-bit
- macOS 11 Big Sur or later, Intel or Apple Silicon
- A printer connected to that computer, by USB or over the network.
Installation
↑ Back to top- Download the extension from your WooCommerce dashboard.
- Go to Plugins > Add New > Upload and select the ZIP file you just downloaded.
- Click Install Now, and then Activate.
After activation, set up your print service and then configure the plugin as described below.
Setup and Usage
↑ Back to topStep 1 – Set up PrintTrigger
↑ Back to topFollow these steps if you use PrintTrigger. If you use PrintNode, see Using PrintNode below.
- Create a free account. Sign up at printtrigger.com/register. No credit card is required.
- Install the desktop agent. On the computer connected to your printer, download the agent from printtrigger.com/download. Choose the .exe for Windows or the .dmg for macOS. Open the file and follow the on-screen steps.
- Copy your API key. In your PrintTrigger dashboard, go to Account and copy your API key. It starts with
ak_live_. - Connect the agent. When the agent’s setup window opens, paste your API key. The agent moves to the system tray (Windows) or menu bar (macOS), and your printers appear in the PrintTrigger dashboard automatically.
First-launch warnings. Windows may show “Windows protected your PC”: click More info, then Run anyway. On macOS, if the app is reported as damaged, move Print Trigger Agent to Applications, run xattr -dr com.apple.quarantine "/Applications/Print Trigger Agent.app" in Terminal, then open the app again.
Step 2 – Configure the plugin
↑ Back to top- In WordPress, go to WooCommerce > Auto Print Settings and open the General tab.
- Enable: tick Enable automatic printing.
- Print Service: choose Print Trigger. It is selected by default.
- Print Trigger API Key: paste the key you copied in Step 1 (it starts with
ak_live_). Don’t have one yet? Use the here link under the field to get a key. - Click Test Connection to confirm the plugin can reach your PrintTrigger account.
- Fill in Store Address, logo and footer text. These appear on your invoices and packing slips.
- Click Save changes.
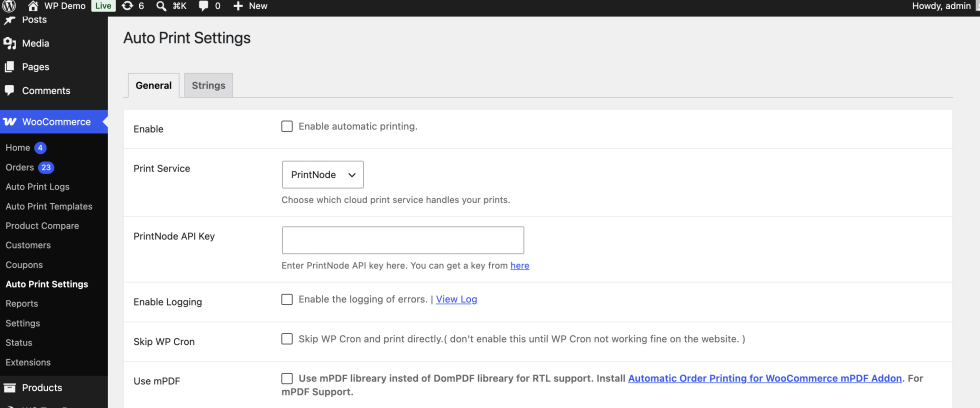
Other settings on this page
↑ Back to top| Setting | What it does |
|---|---|
| Enable Logging | Records errors to a log. Use View Log to open it. Turn this on when troubleshooting. |
| Skip WP Cron | Prints directly instead of through WP Cron. Only enable this if WP Cron is not working on your site. |
| Use mPDF | Uses the mPDF library instead of DomPDF for right-to-left (RTL) languages. Requires the Automatic Order Printing for WooCommerce mPDF Addon. |
Step 3 – Set up print templates
↑ Back to topTemplates decide what gets printed, on which printer, and how many copies.
- Go to WooCommerce > Auto Print Templates and click Add New.
- Enable auto printing for the template.
- Set the document name, PDF size, printer and number of copies. Your PrintTrigger printers appear in the printer list automatically. Use Preview to check the layout.
- Turn the template’s sections on or off: store, billing, shipping, order, product, footer and print conditions.
- Click Publish.
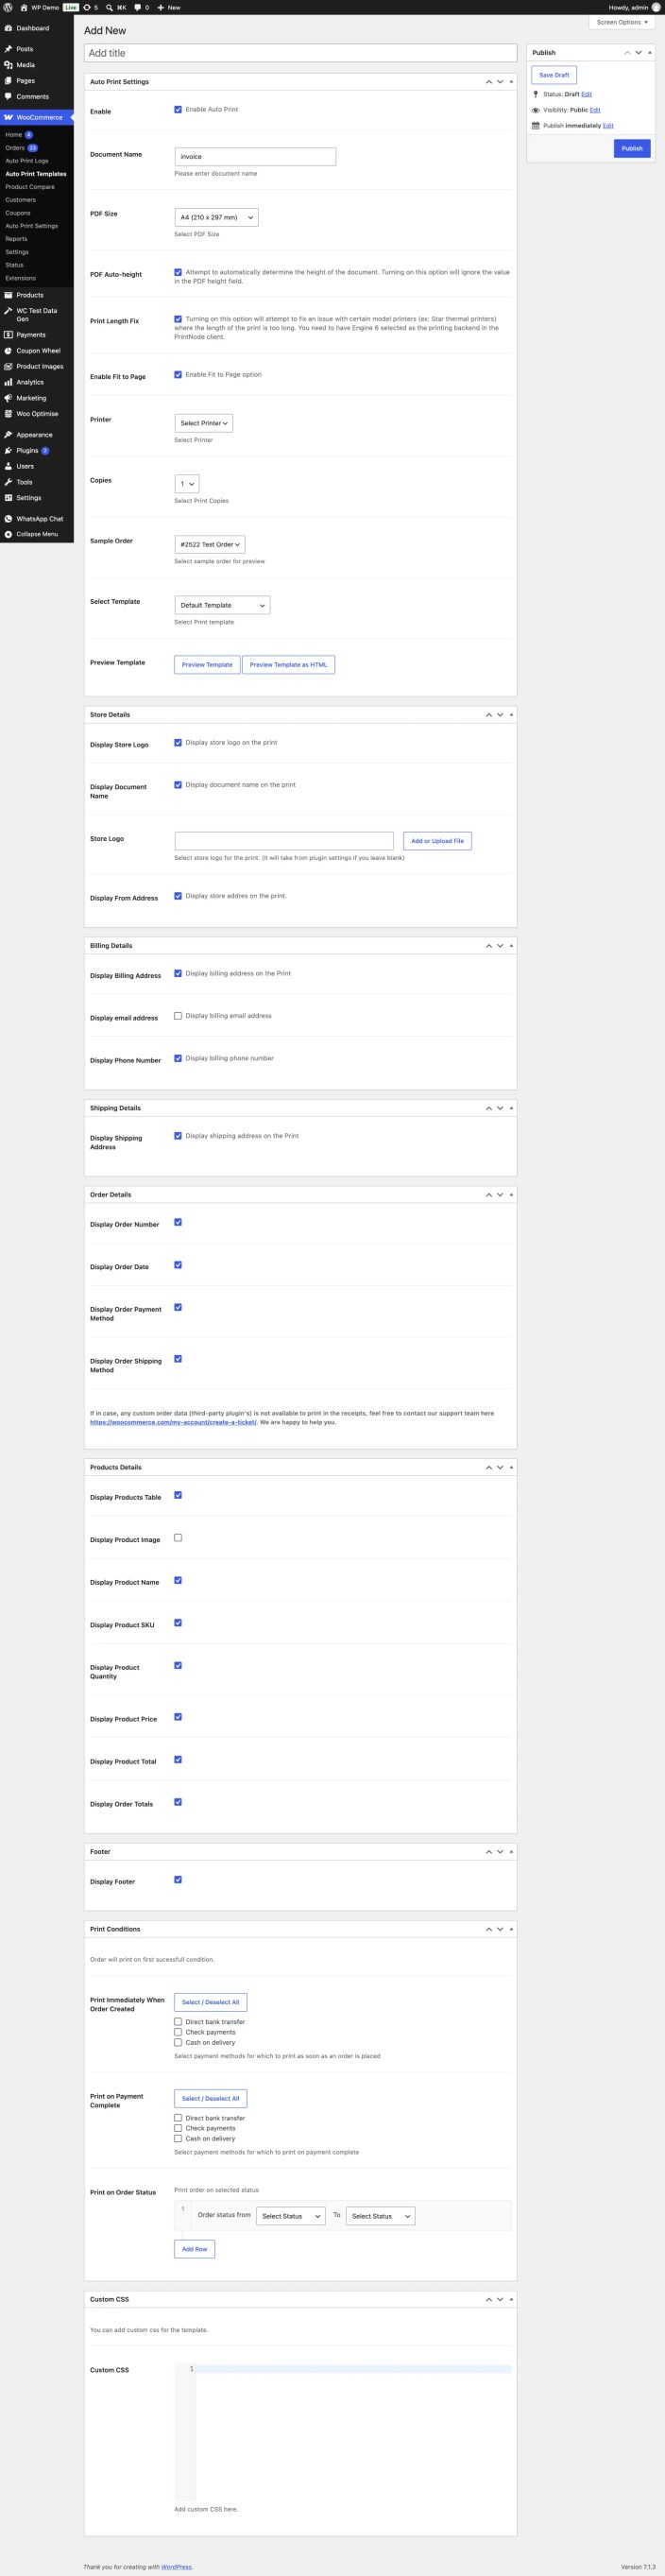
You can create several templates, for example, an invoice for the office printer and a packing slip for the warehouse printer.
Using PrintNode instead
↑ Back to topFollow these steps if you use PrintNode instead of PrintTrigger.
- Go to WooCommerce > Auto Print Settings.
- Under Print Service, choose PrintNode.
- Enter your PrintNode API key. To get one, sign in to PrintNode and create a key in its API Keys section.
- Click Save changes. Your templates keep working as before.
You can switch between services at any time by changing Print Service, entering that service’s API key, and re-selecting the printer in each template.
Troubleshooting
↑ Back to top- Test Connection fails: check that the API key was copied in full and starts with
ak_live_. - Printer missing from the template’s printer list: make sure the PrintTrigger agent is running on the printer’s computer and the printer shows in your PrintTrigger dashboard.
- Orders not printing: turn on Enable Logging under WooCommerce > Auto Print Settings, place a test order, then check View Log. Also check the job’s status in your PrintTrigger dashboard’s print history.
- “Monthly limit reached” error: your PrintTrigger plan’s job quota is used up. Upgrade from Dashboard > Billing in PrintTrigger, or wait for the quota to reset on the 1st of the month.
If it doesn’t help you to fix issues? We’re happy to help out! Please submit a request to the help desk and include a description of what’s going wrong along with your system report (found under WooCommerce > System Status).
Frequently Asked Questions
↑ Back to topWhich print services are supported?
↑ Back to topPrintTrigger and PrintNode. Choose one under Print Service in WooCommerce > Auto Print Settings.
Which print services are supported?
↑ Back to topPrintTrigger and PrintNode. Choose one under Print Service in WooCommerce > Auto Print Settings.
Is a print service subscription included with the plugin?
↑ Back to topNo. PrintTrigger and PrintNode are separate services with their own plans. See PrintTrigger pricing or the PrintNode website.
What happens if my computer is off when an order comes in?
↑ Back to topPrintTrigger, the job is queued in the cloud and prints as soon as the computer and agent are back online.
How do I get a PrintTrigger API key?
↑ Back to topSign up at printtrigger.com, then copy the key from Account in your PrintTrigger dashboard.
Can i send the invoice/packing slip prints to PrintNode manually?
↑ Back to topYes of course. You can print them manually from Order Details page. You can also download them.
Questions and Feedback
↑ Back to topHave a question before you buy? Please fill out this pre-sales form.
Already purchased and need some assistance? Get in touch with a Happiness Engineer via the Help Desk.

