NOTE
This product is no longer available on WooCommerce.com. This document has been left available for existing users, but will no longer be updated.
Bonanza Integration for WooCommerce helps you connect your WooCommerce store to the Bonanza marketplace and showcase your products to a broader audience by listing your products without any hassle. The automated features of the plugin include category mapping, inventory management, auto profiling, and much more!
Sell effortlessly and effectively by connecting your WooCommerce store to the Bonanza marketplace with Bonanza integration for WooCommerce. The app auto acknowledges all your orders, thereby facilitating centralized order management, and also helps in staying updated with real-time synchronization of your products.
Key Features
↑ Back to top- Upload, update and manage your products and price in no time with easy product management.
- Ease the process of product upload by mapping WooCommerce categories to Bonanza categories.
- Automate the process of upload by assigning all the products based on their profiles.
- Manage all your orders from a centralized location and stay updated with auto-acknowledgement of orders.
- Avoid overselling by getting your inventory synchronized regularly and in real-time.
- Keep your stock updated on both stores with real-time stock updation features.
How to get started?
↑ Back to topBonanza WooCommerce Configuration
↑ Back to topTo get started with the plugin, go to CedCommerce and select Bonanza, as shown in the screenshot below.

Then click on the Configuration tab.

Enter the Bonanza developer ID and Bonapitit Certificate ID.
When you click on update, the developer ID and certificate ID will be saved.
And when you click on validate, the page will get redirected to Bonanza.com. You will then have to fill in the seller login details.


After you get the access, you can make the changes regarding product upload and update.
Then click on the global settings.
Global Settings
↑ Back to topIn this section, you will map your WooCommerce store attributes to the Bonanza attributes. For mapping the attributes or metakeys, you need to select the Metakeys and Attributes List.

In the search bar, enter the required product name to get the attributes of the search query.

Note- A list will appear once you enter the initials of the product. Select the required one from the given list.
1. In the Meta Key column, select the checkboxes related with the required meta keys.
2. Click the Save button, as shown in the screenshot below.

Click on the product button; the attributes are based on three categories-
- Product-specific- In this section, you need to fill the details or map with WooCommerce attributes or metakeys.

- Price specific- You can map the price of the products and then fill in the markup type and markup value.

- Shipping specific- In this section, choose a calculated shipping rate based on size, weight, height, depth, and width. Also, fill the shipping and internal shipping services. Make sure to fill in all the required fields and save the settings.

Then click on the order tab. You can restrict the emails being sent to customers for Bonanza orders. You can use the enable or disable button to do so. Save the settings.

Under the cron section, you can enable or disable the auto-fetch bonanza orders and auto-update price and stock on Bonanza from WooCommerce.

Category Mapping
↑ Back to topWith this feature, you can map WooCommerce categories to Bonanza categories. The products existing in WooCommerce categories will get listed under the mapped Bonanza categories.

You can select the product, then from the dropdown, select the parent category. If there are any subcategories, you can select that as well.
Profiles
↑ Back to topBased on the mapped categories, different profiles are created for each product. You can simply assign the products based on these categories.

Select the profile name, edit the category-specific attributes based on colour, size, or any other attribute.
Products
↑ Back to topUnder this section, you can select the products and filter them based on Bonanza status, category, and product type. You can also choose the number of products to be uploaded per page. You can perform bulk operations and reduce the tedious tasks of manual upload.

Orders
↑ Back to topAll the Bonanza orders will be fetched in WooCommerce and get listed here. If the SKU matches with any products in WooCommerce, only then the orders will get listed. Once the SKU matches, the orders are created in WooCommerce.

FAQs
↑ Back to topInstallation error
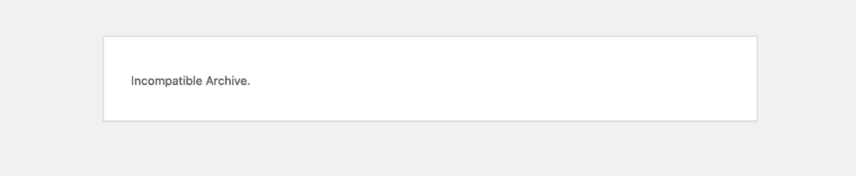
Q- I am unable to install the plugin due to an Incompatible Archive error. How to solve this issue?
Ans. This is a temporary error where you might not be able to install the plugin on your WordPress dashboard.
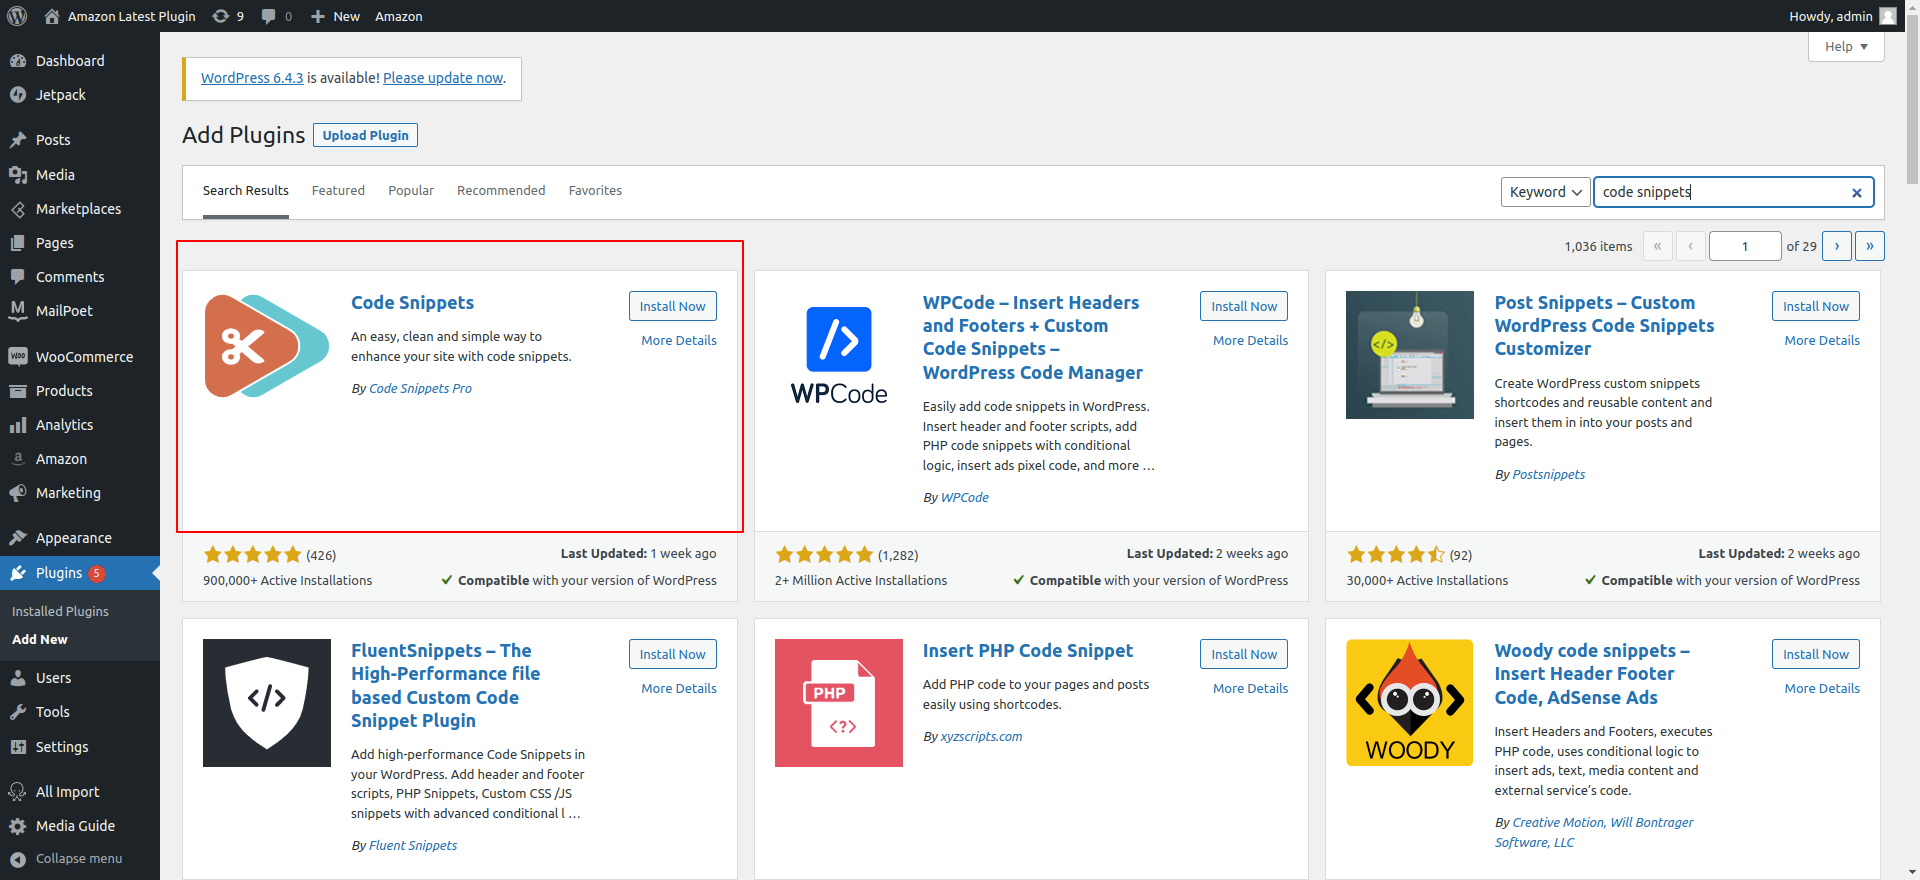
To solve the issue you need to Install and Activate a plugin named Code Snippets as shown in the image below-
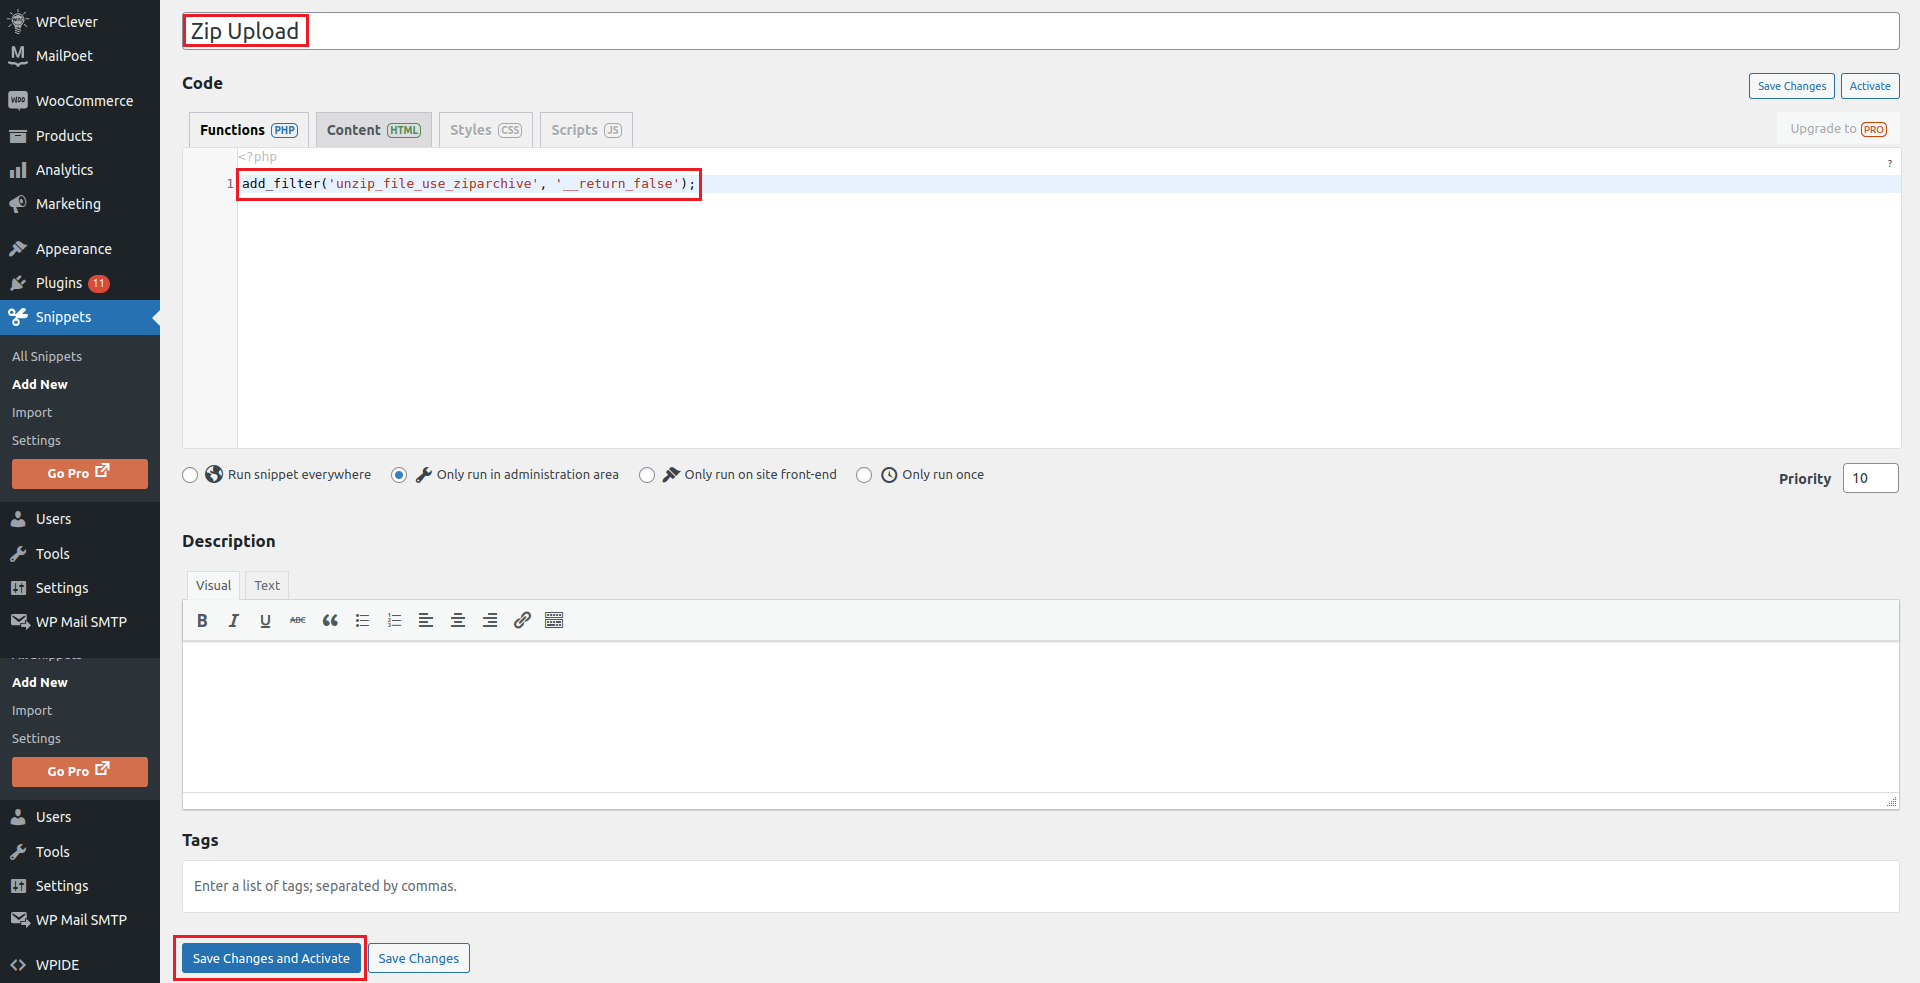
Once activated click on Add New under the Snippets section and create a new snippet.

In the next step enter a name for your snippet with the following code in the code section- add_filter(‘unzip_file_use_ziparchive’, ‘__return_false’);
Choose an option “only run in administration area” in the next field.
Once done click Save Changes and Activate.
Your new snippet is activated and will hopefully resolve the Incompatible Archive error issue.
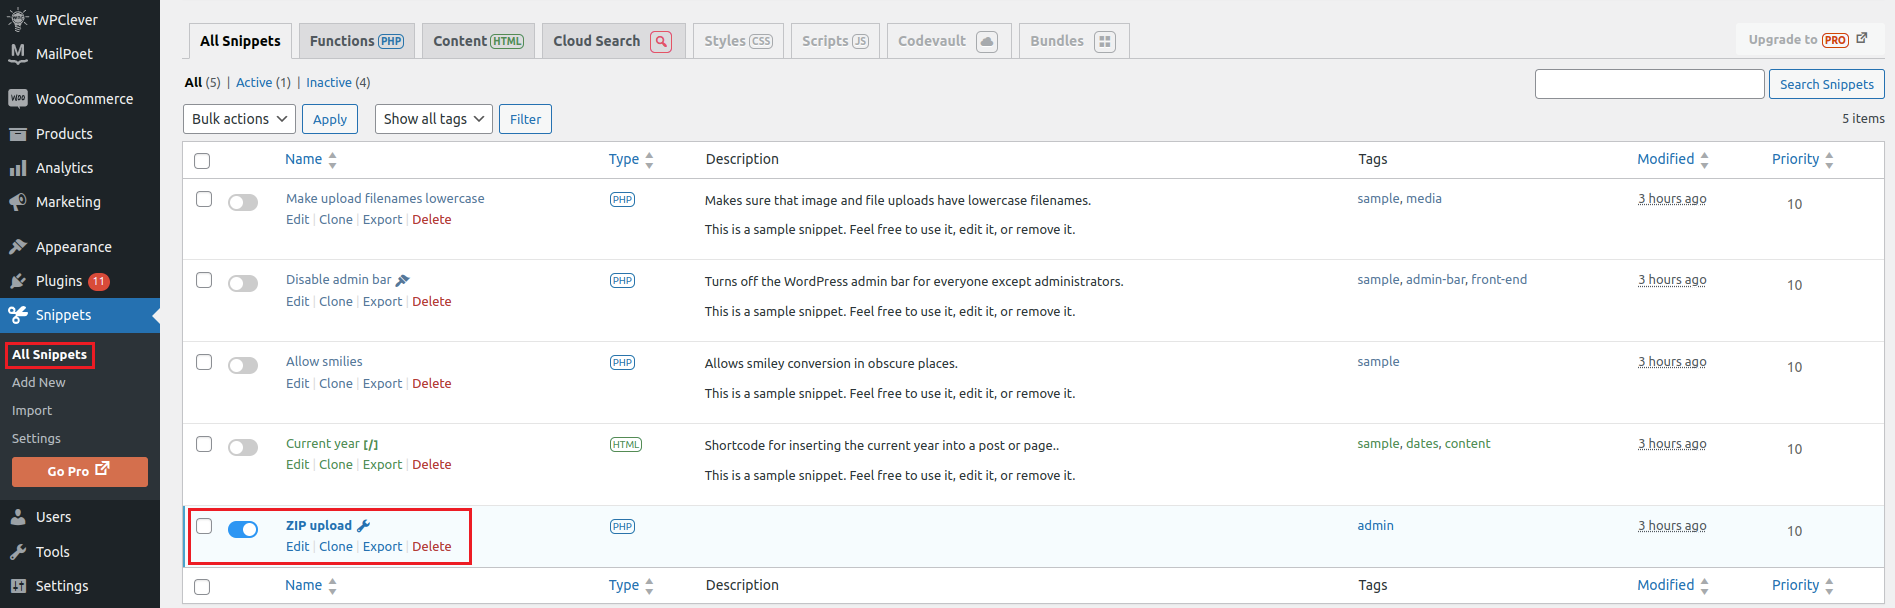
Now you can move ahead and retry to install the plugin on your WordPress dashboard.
If not yet resolved contact the support team by raising a ticket and our support team will be in touch shortly.
Q2) How do I upload products on Bonanza?
Ans. To upload products on Bonanza, follow these steps:
- Click on the Products section in the menu bar.
- Select the products you wish to upload.
- Choose the Upload Products tab from bulk action and click on Submit.
Q3) What products are prohibited on Bonanza?
Ans. The list of prohibited items on Bonanza:-
- Bureau of Alcohol, Tobacco, and Firearms
- Bureau of Industry and Security Denied person List
- California Department of Food and Agriculture Plant Health and Pest Prevention Services Division
- Copyright Office
- National Plant Board
- National Stolen Art File
- Office of Foreign Assets Control
- Patent and Trademark Office
- Drug Enforcement Administration
- Federal Laws and Regulations
- Food and Drug Administration
- Fish and Wildlife Service
- California Health and Safety Code
- California Penal Code
- Consumer Product Safety Commission Recalled Item List
Q4) What do these products’ status in Bonanza mean– Items for Sale, Items Ready to Post, Product Submitted, Profile Not Set, Not Uploaded Products?
Ans. All of these terms are explained below-
Items For Sale: These items are for sale.
Items Ready to Post: These items are not for sale but ready to be posted on Bonanza (You have to “Update Booth”).
Product Submitted: Products are uploaded but are “Under Review” by Bonanza.
Profile Not Set: You have to update or add a new profile to the products according to your Bonanza Store.
Not Uploaded Products: Products that are not uploaded on Bonanza.
Q5) How do I create a profile on a Bonanza?
Ans. You can create different profiles for each product based on mapped categories. Select the profile name, and edit the category-specific attributes based on size, colour, or any other attribute. You can simply assign the products based on these categories.
Do you still have questions and need assistance?
Get in touch with our dedicated account managers, who will assist you throughout the onboarding process. Our team will be available 24*7 for your support.