NOTE
This product is no longer available on WooCommerce.com. This document has been left available for existing users, but will no longer be updated.
Installation
↑ Back to top- Download the .zip file from your WooCommerce account.
- Go to: WordPress Admin > Plugins > Add New and Upload Plugin with the file you downloaded with Choose File.
- Install Now and Activate the extension.
More information at: Install and Activate Plugins/Extensions.
configuration
Setup and Configuration
↑ Back to topFor a simple subscription product
↑ Back to top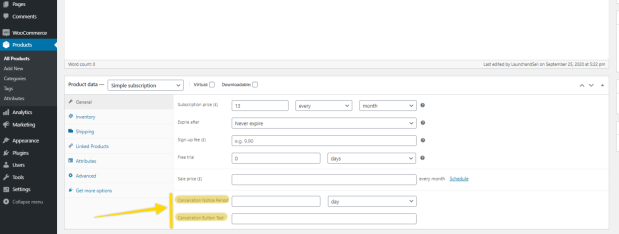
Step 1 – In your dashboard sidebar click on Product > All Products
Step 2 – Click on the subscription product you want to add the notice period to.
Step 3 – In the Product data > General two more fields have been added:
- Cancellation Notice Period: Enter a number and choose if it’s days, weeks, months or years with the drop down options.
- Cancellation Notice Text: This is the text that will replace the cancel button in your customer dashboard so you can change it to inform your customer that they are giving their notice. If left empty then the Cancel button will be left unchanged and display Cancel
For a variable subscription product
↑ Back to top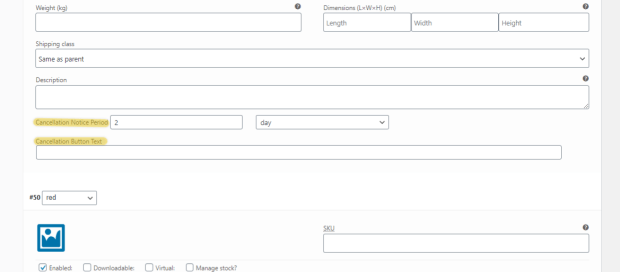
Each variation will have their own notice period.
Step 1 – In your dashboard sidebar click on Product > All Products
Step 2 – Click on the subscription product you want to add the notice period to.
Step 3 – In Product Data > Variations, click on the variation you want to add the notice period to. Two more fields have been added:
- Cancellation Notice Period: Enter a number and choose if it’s days, weeks, months or years with the drop down options
- Cancellation Notice Text: This is the text that will replace the cancel button in your customer dashboard so you can change it to inform your customer that they are giving their notice. If left empty then the Cancel button will be left unchanged and display Cancel
Usage
↑ Back to topHow does it look on the customer panel
↑ Back to topWhen your subscriber wants to cancel their subscription in the dashboard they’ll see the cancel button with the text you’ve set up for this particular subscription product.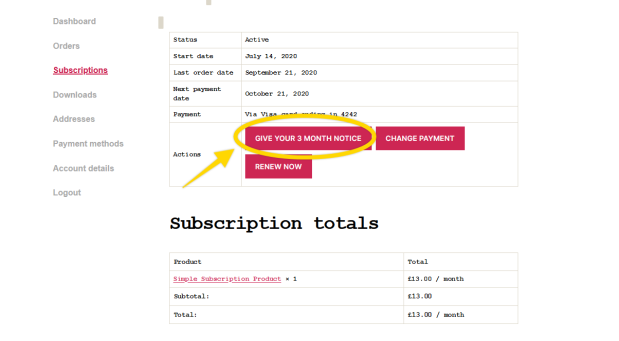 If they click on the cancel/notice button then they’ll see a confirmation message that their subscription has been cancelled and will be able to see when is their next payment and the date their subscription will run out (after the notice period).
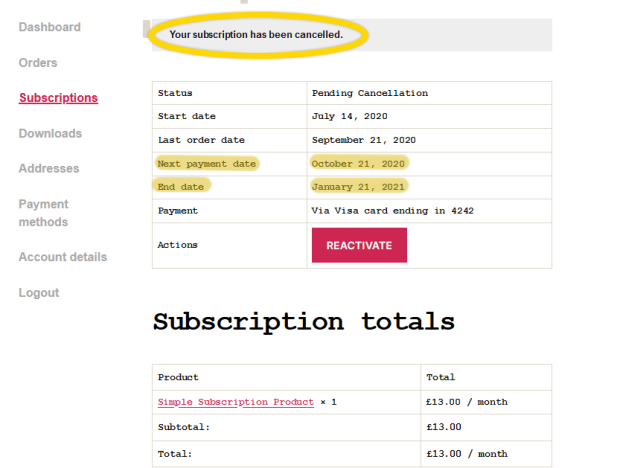
How is the end date of the subscription calculated
↑ Back to topThe plugin will take the date your customer cancels and add the notice period you set up. Then the subscription will be active until the next renewal date after the notice period ends.
Example: if you have a monthly subscription renewing every first of the month with a 2 month notice period, if your customer cancels the 15 January the subscription will run till the 31st of march. You’ll still bill your customer the 1st of February and the 1st of March.