Overview
↑ Torna in cimaThe CRM Integration for Zoho plugin has several handy transaction data processing capabilities, such as the ability to create feeds, map WooCommerce fields to Zoho modules, and synchronize historical data with One-Click and Bulk Sync.
Note– Our plugin is focused solely on CRM functions, which means we do not handle any features related to Zoho Books or Inventory.
This Woo Zoho CRM plugin offers feeds, which are a sequence of rules that define how your store data is passed across Zoho CRM and WooCommerce.
The highlighting features of the plugin are –
- Effective historical and newly created data synchronization.
- Smooth reconnection utilizing the Re-Authorize option.
- Easy Bulk Data Sync, One-Click Sync, and Manual Sync are available.
- Can let you download detailed transactional log data in a TXT file.
- Easily record the real-time data at each transaction.
Setup and Configuration
↑ Torna in cimaConnecting your WooCommerce store to Zoho CRM involves installing our Integration with Zoho CRM Plugin.
Step 1 – Install the Plugin
↑ Torna in cima- Download the .zip file from your WooCommerce account.
- Log into your WordPress Dashboard and navigate to Plugins > Add New.
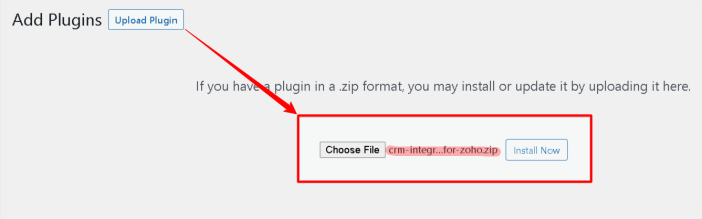
- Click on the Upload Plugin button on top and upload the .zip file of the plugin.
- Install the plugin and click Activate to get started.
Step 2 – Connect to Zoho
↑ Torna in cimaUsing the plugin functionality, you can easily connect your Zoho CRM accounts to your WooCommerce store. To connect, simply input your Zoho CRM login details i.e. API Key and API URL in the fields provided.
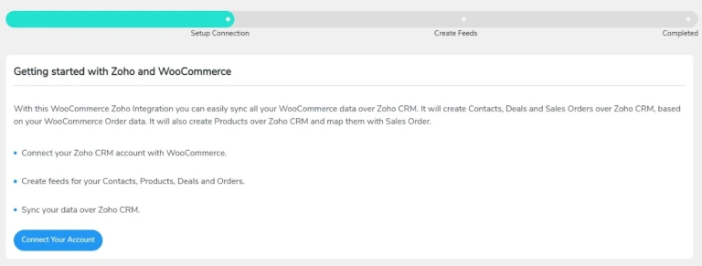
If you don’t already have a Zoho account, use the links below and then register and integrate one (Integrate WooCommerce with Zoho CRM). For further information, review the links given in the footer section of this page.

Now you can also connect your Zoho CRM account with a Canada domain.
If you’re on this page, it’s safe to assume that your WooCommerce store and Zoho CRM are linked.
Proceed to the next step in the plugin’s integration procedure.
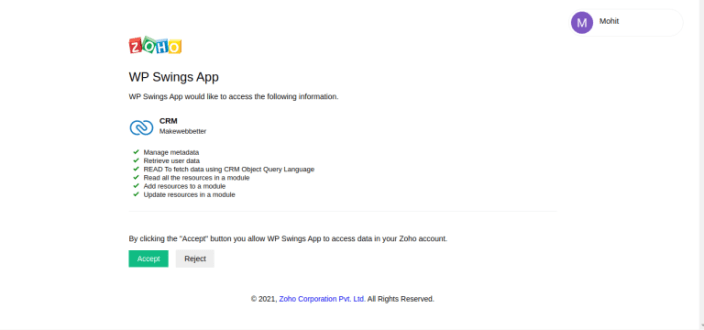
Click on Accept button in the above step to enable WP Swings access over your Zoho account data and help with the integration process.
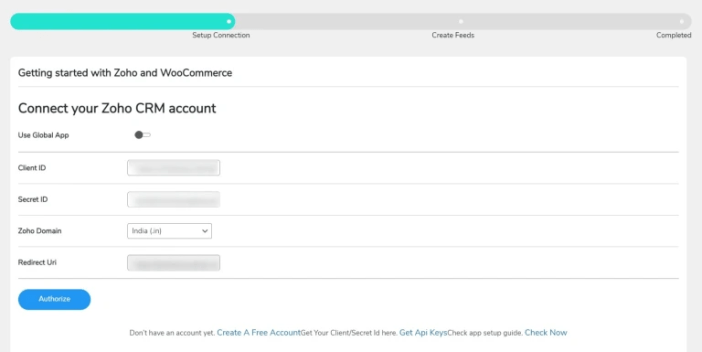
The very next step involves the actual integration process with the help of credentials offered. The required details that need to be filled here involve Client ID, Secret ID, Zoho Domain & Redirect URL. Enter all the details in the respective fields and proceed by clicking the Authorize button.
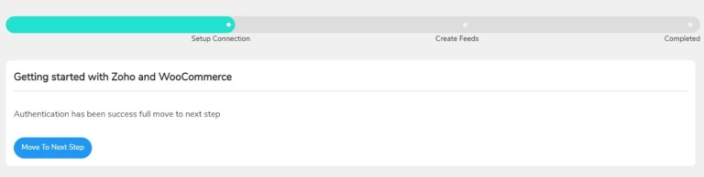
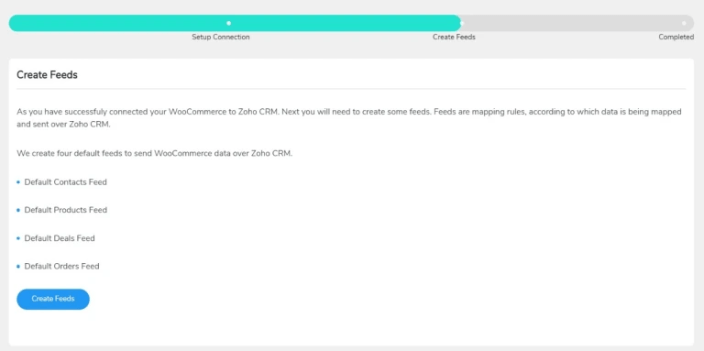
The very next step involves creating feeds. If you want to initiate the integration process with all the default feeds listed then hit on the Create Feeds button and proceed with the flow.
After you create the feeds you’ll be prompted to create Abandoned Cart feeds and its object.
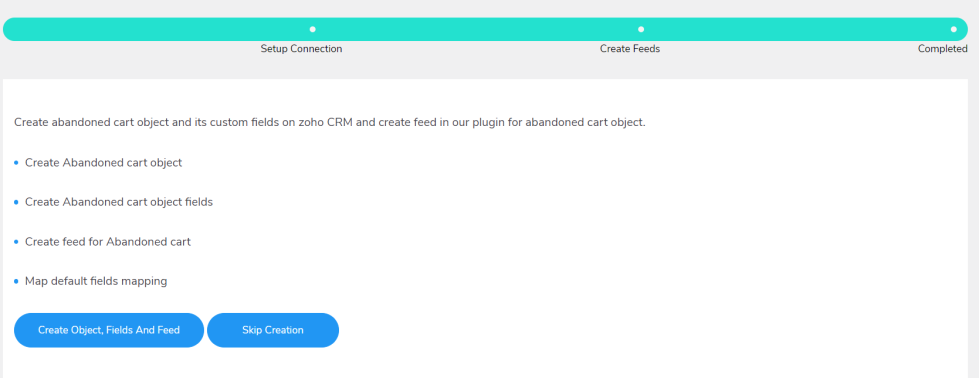
You can create Abandoned cart objects, fields, and feed from here or you can create them manually later.
After the creation of the abandoned cart object, fields and feed you can move to the next step.

In this step, you’ll be asked to sync all your products from the Zoho CRM or you can skip this part and sync later.
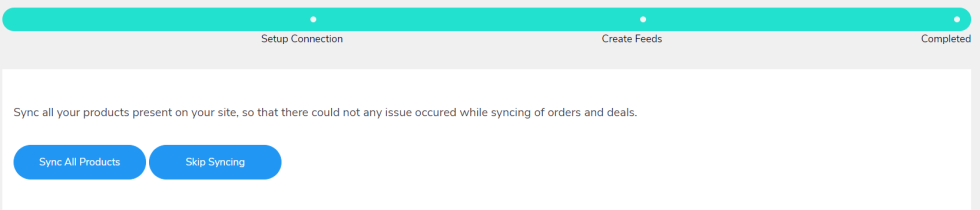
After clicking on the sync all product option, you’ll be prompted with 2 options, instant sync and bulk sync.

You can choose any of the options to sync your product, we’ll talk about these features later in the documentation.
This is the end of your integration initial settings. After the feed creation, you’ll be automatically redirected to the next page.

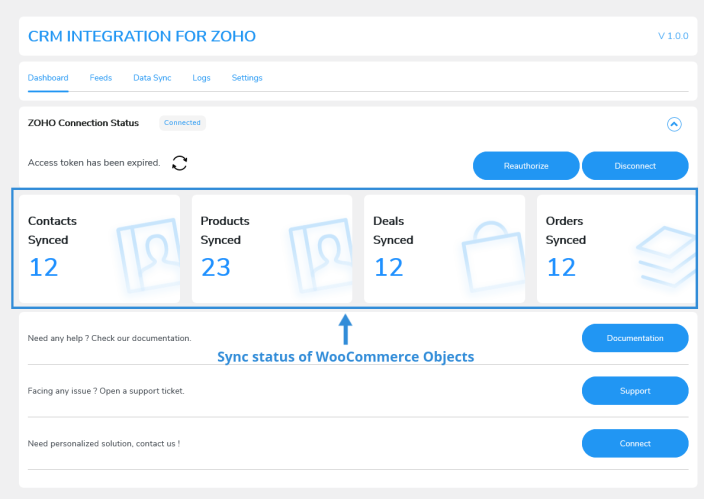
Lastly, after completing all the required processes you’ll be redirected to the Plugin’s actual dashboard, which looks like the page below.

Step 3 – Perform Default Settings
↑ Torna in cimaFeeds
This is the very next tab in the plugin backend section, this involves you creating feeds that control the overall data synchronization process for your WooCommerce objects.
The 4 default feeds respectively, Sales Order, Deals, Contact, and Products are provided here.
These feeds enable your WooCommerce store to synchronize data from your transactions over Zoho CRM. Two other options are also available here, described below-
- Add Field- From this, you can also create customized feeds in CRM to send data from those other objects.
- Reset Default- This would thereby turn all feed creation processes to auto-suggested mode.
Data Sync
This is the next tab in the plugin backend that serves the data synchronization purpose for your WooCommerce store over Zoho This tab offers two data synchronization methods, namely-
Bulk Data Sync- This type of synchronization process involves historical data sync. You can easily make use of this feature available in the plugin if you supposedly contain a large amount of historical data.
As the name suggests, the feature offers easy bulk data synchronization. You just need to provide The specific Object and the respective Feed associated with that in order to get started with the process.

Furthermore you can also set the Date Range to sync the bulk data.
One-Click Sync- This type of synchronization process lets you easily sync all your missed or failed data and assists you successfully completing your data recording process.
Due to network or other constraints, procedures might miss or fail to record(newly added data) a few data chunks while recording data from your WooCommerce store utilizing Zoho CRM.
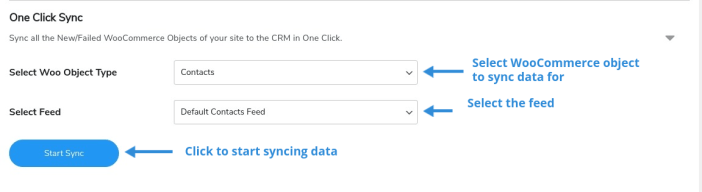
Simply navigate to the Data Sync tab in the plugin’s backend and select your specified Object and associated Feed to get started synchronizing your existing or newly added data over Zoho using these two alternatives.
Logs
This is the very next tab available in the plugin backend, which offers a detailed log table of all your data transactions performed.
This detailed report of your sync logs contains descriptive data about the errors that were generated based on various defined criteria like Objects, Object ID, Feed, and so on.
Log data consists of an error filter, along with that there are other specifical controls available here in this section i.e. Reload for sync data refresh without reloading the page, Clear Log for deleting the synced log data, and Download for easy downloading the synced data for further use.
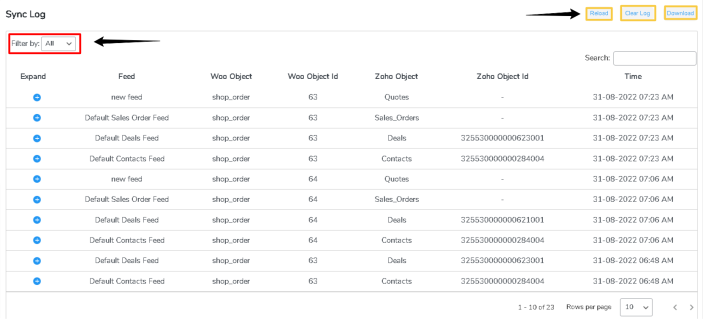
This can be a useful tool for assisting you in having a clear knowledge and analysis of all your recorded transactions, as well as telling you a lot about what went wrong so you can quickly find out the problems and troubleshoot.
Settings
This is the last tab in the plugin backend section, that offers effective setup options for the plugin features and functionality. It includes setting options like-
Enable Instant Sync- This is the toggle-based feature that offers easy enabling/ disabling of the Instant Sync feature of the plugin.
Enable Background Sync- This is also a toggle-based feature that offers easy enabling/disabling of the Background Sync feature of the plugin.
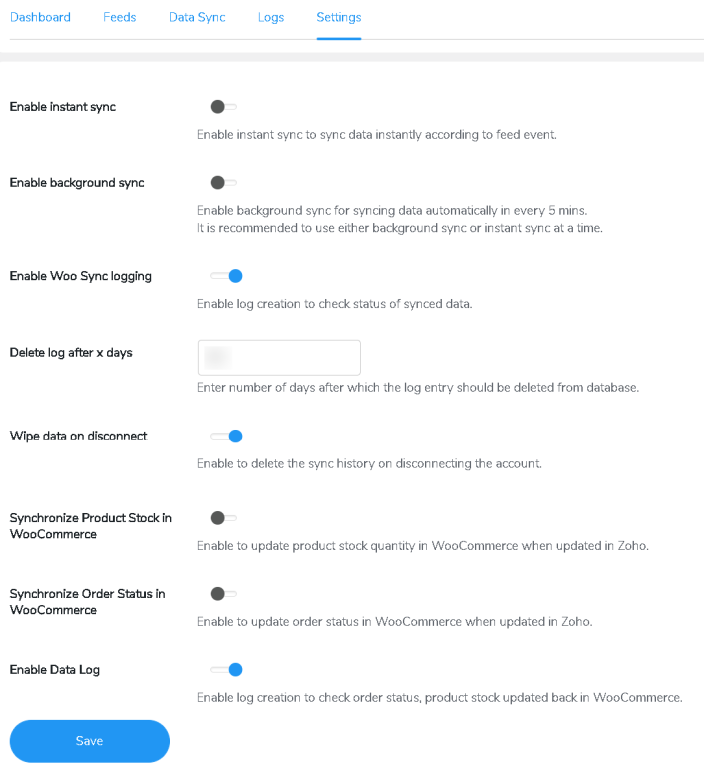
Enable WooSync Logging- This is a toggle-based functionality that allows you to easily enable/disable the WooSync Log table data in the plugin’s Logs tab just below the synced data log.
Delete Log after X Days- This setting option allows you to input the specified number of days after which you want your Logs data to be cleared automatically.
Wipe Complete data on Disconnect- This is a toggle-based feature that lets you simply enable or disable the thorough deletion of plugin-related data while disconnecting.
Two-Way Sync for Products and Orders- Enabling these toggles would allow you to sync the respective status from the Woo Zoho Integration plugin which is requested in the setting. Let’s understand in detail-
Synchronize Product Stock in WooCommerce- If you enable this toggle button to ON, definitely it would allow you to sync your Product Stock related data from Zoho CRM to WooCommerce with ease or swiftly utilizing the Woo Zoho CRM Plugin only.
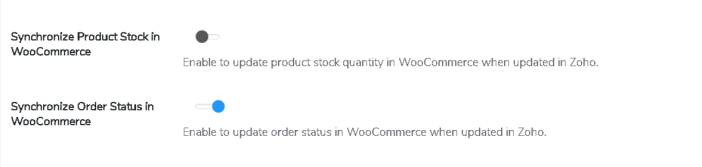
Synchronize Order Status in WooCommerce
If you enable this toggle button to ON, it will allow you to sync your Product Stock-related data from Zoho CRM to WooCommerce with ease or swiftly utilizing the WooCommerce Zoho CRM Plugin only.
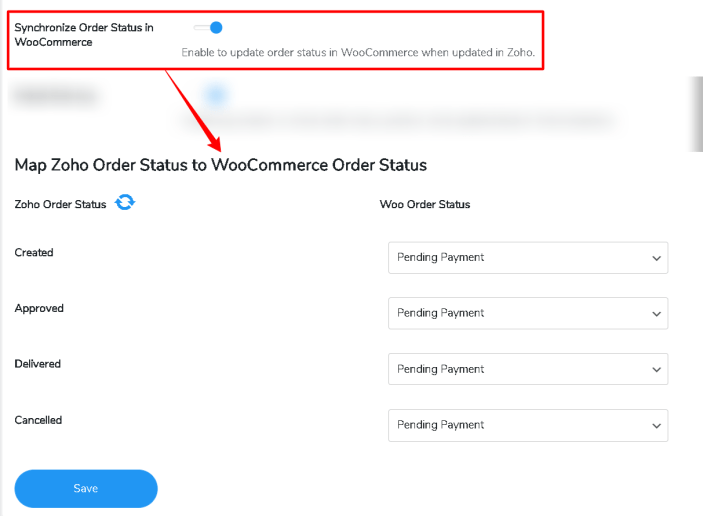
This extra field involves the input of the Zoho Order Statuses with respect to the Woo Order Statuses at each stage likewise the Created, Approved, Delivered & Canceled. Just fill out the respective order statuses given and hit the Save button to continue further.
Enable Data Log- This is a toggle-based functionality that allows you to easily enable/disable the Log table data in the plugin’s Logs.
Step 4 – Map WC Data Fields to Zoho Modules
↑ Torna in cimaIn order to perform the actual process out of the integration, you need to create feeds first and map them with Zoho CRM modules.
Although 6 default feeds i.e. Contacts, Organization, Opportunity, Lead, Assignments, and Projects are already created while installing the plugin automatically.
Even though you require it, you can easily create custom feeds utilizing the Create Feeds button in the Feeds tab. Let me guide you through the feed creation process in detail here-
Initially, provide a specific name for your feed, that sounds relevant in the Add Title text field given-
These feeds have different options, so you can simply regulate data synchronization using your feed settings.
The following are some of the feed customization options available-
Select Object
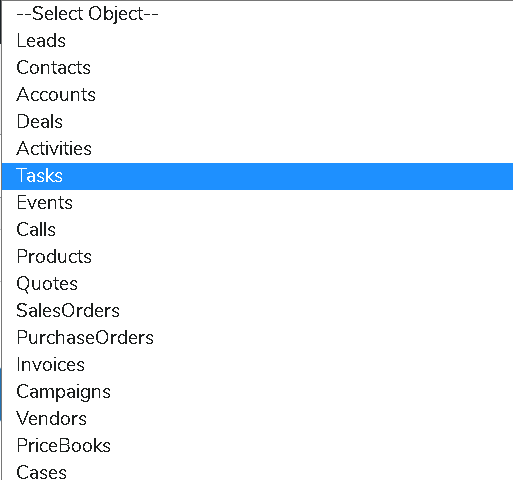
This option allows us to easily select the WooCommerce Object whose meta fields you want to transfer to Zoho object fields.

This is the list of default objects available in the dropdown given for the Select-Object field, do refer to the screenshot below-
Map Fields
This setup option comprises a thorough feed mapping process that proceeds with the selecting of the object type, i.e. the Zoho modules you would like to associate with your Feed.
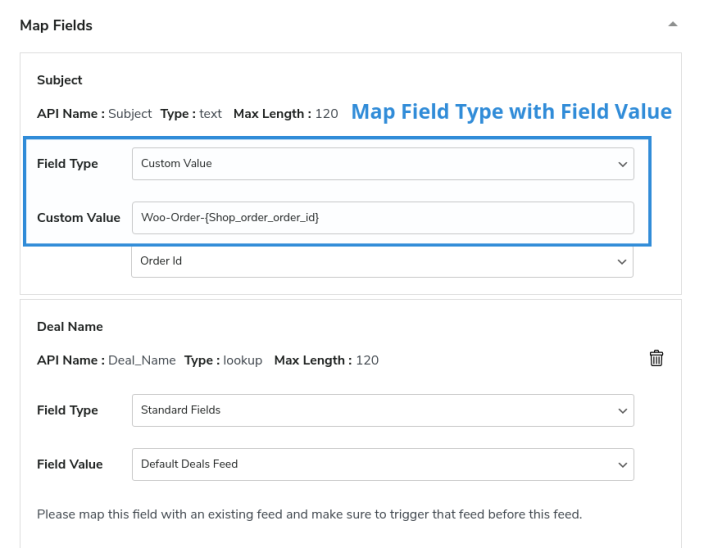
The default WooCommerce meta, as well as the relevant object field, will be recommended instantly. Aside from that, you can Add/Delete/Modify the appropriate fields. Retrieve and add accounts in the case of products.
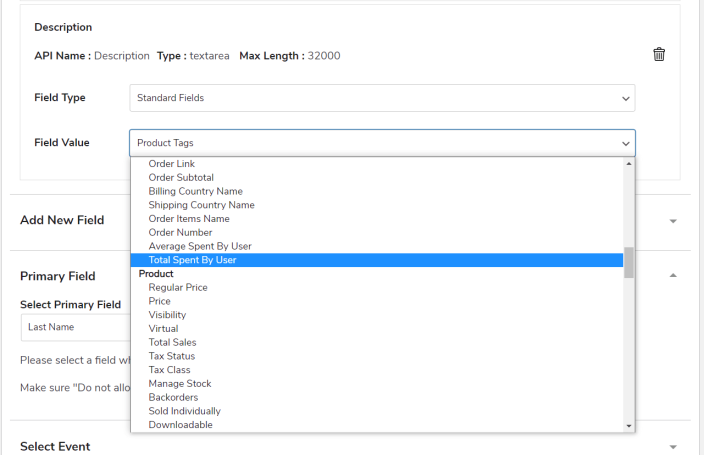
Send Product Tags to Zoho Products
Using the Zoho CRM Integration for Woo, you add fields to sync product tag data upon any order placed in the product module of Zoho CRM.
- Go to any product feed
- Click on add new or modify an existing field
- Click on the Field Value drop-down
- Select Product tags.

Save the changes to your feed. Afterward, all product tags will be sent to Zoho CRM after order placement.
Total Amount Spent By the User
You can map fields to collect the total amount paid on complete orders and sync it to the Orders and Contacts objects in the Zoho CRM. It allows you to keep track of the total value of completed orders of any users.
While mapping the fields, select the Total Spent By User as the field value to sync the total order value data.
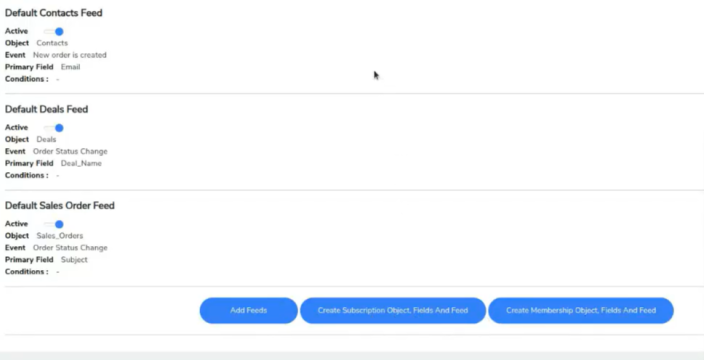
Sequential Events For Feeds
With the Zoho CRM Integration plugin, you can set up sequential events to sync data in a specific order. This means one type of data will sync only after another sync is completed.
How Sequential Sync Works
- You can create feeds that sync different types of data, like Contacts, Deals, and Sales Orders.
- Some feeds can be set to run after another feed has finished syncing.
- This helps keep your data organized and linked properly in Zoho CRM
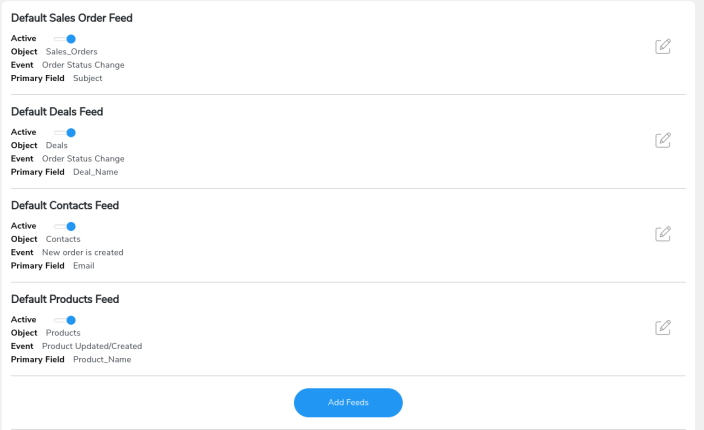
Example: Setting Up a Sequential Event
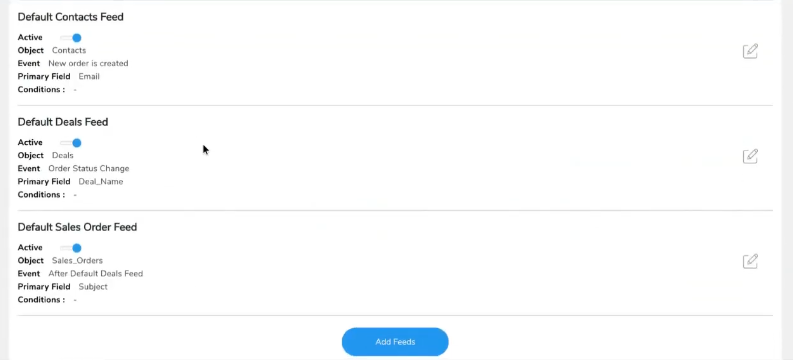
Consider the following setup:
- Default Contacts Feed
- Object: Contacts
- Event: Triggered when a new order is created
- Primary Field: Email
- Default Deals Feed
- Object: Deals
- Event: Triggered on order status change
- Primary Field: Deal_Name
- Default Sales Order Feed(Configured as a sequential event)
- Object: Sales Orders
- Event: After Default Deals Feed (i.e., triggers after the Deals Feed sync is completed)
- Primary Field: Subject
In this case, the Default Sales Order Feed will only sync after the Default Deals Feed is executed. This ensures that sales orders are linked to the correct deals and contacts, maintaining data consistency in Zoho CRM.
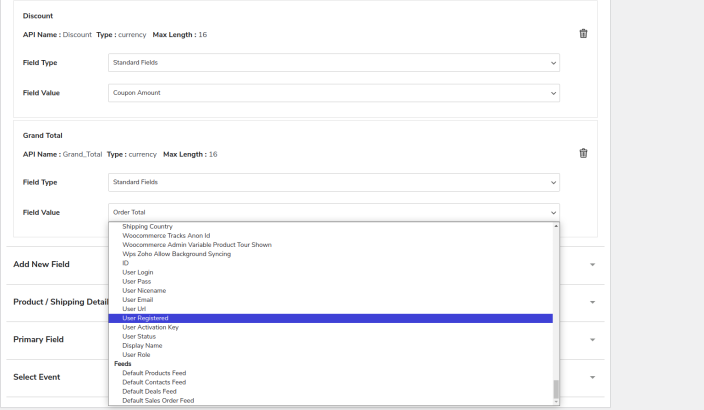
Send User Role Data to Zoho CRM (Customers)
To transmit User Role Data to Zoho CRM through the Integration with Zoho CRM, follow these instructions:
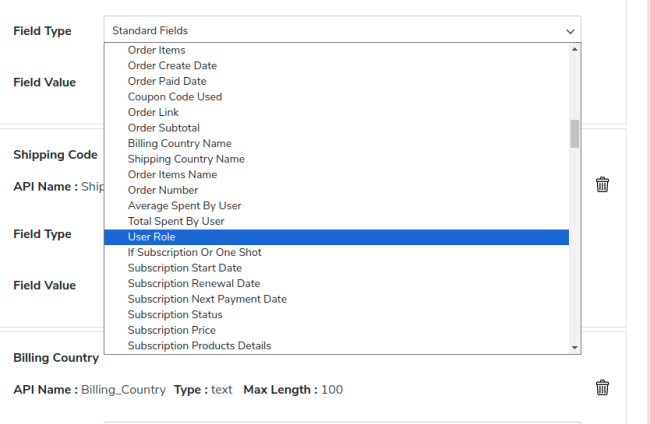
- Opt to create a new field or modify an existing one within Zoho CRM.
- Click on the “Field Value” dropdown menu.
- Choose the User Role value.
- Save the modifications made to your field configuration.
By executing these steps, Zoho CRM will seamlessly receive User Role Data upon order placement, enhancing the synchronization of crucial user information for effective management and access control.
Sync WP User Roles To Zoho
↑ Torna in cimaAs the store administrator, you can assign roles to your users to fulfill specific operational needs. You can sync these WP user roles to Zoho modules using our Woo Zoho Integration.

Sync User Details
↑ Torna in cimaAs an Admin, you can easily sync extra user details such as login info, passwords, usernames, URLs, activation keys, and more.
This makes managing users in one place and keeping track of their information a breeze.
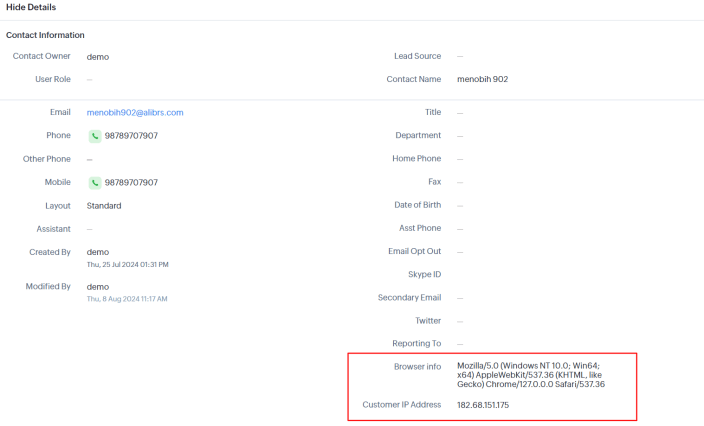
Sync User Browser info and IP address
↑ Torna in cimaYou can create fields in the contact feed and map them to Zoho CRM to sync the user’s IP address and browser information.
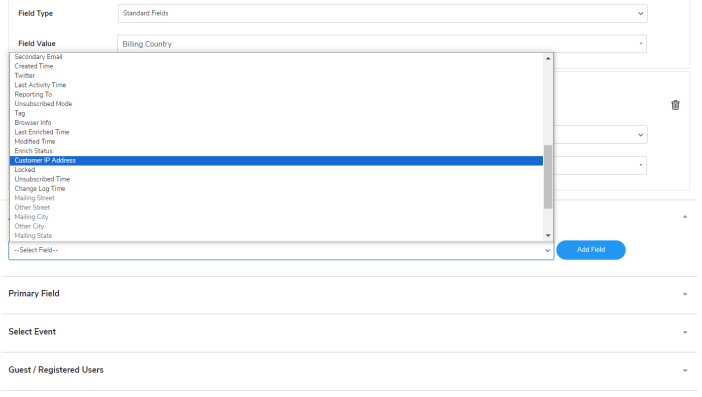
These fields will be efficiently synced to Zoho CRM as shown in the below screenshot.
Sync Coupon Details
↑ Torna in cimaWith Zoho CRM integration, you can synchronize multiple coupon details such as the coupon amount, type, and code.
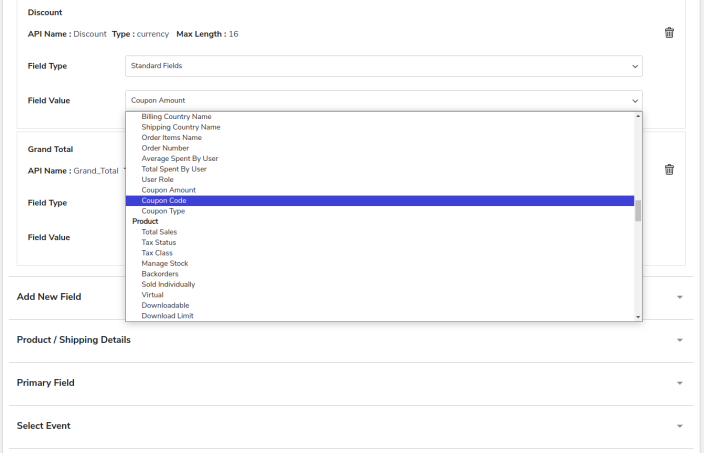
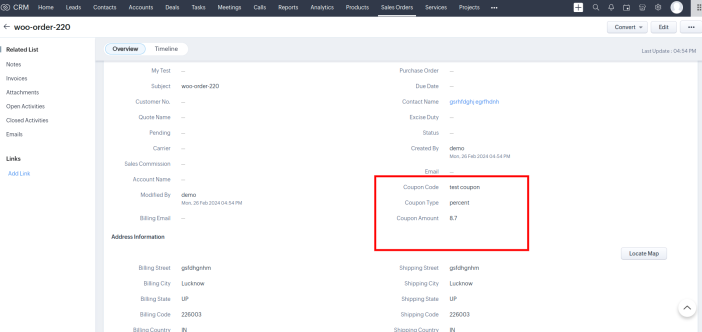
Just select the respective fields and you are good to go.
Sync Coupon Discounts in Line Items
↑ Torna in cimaTo sync coupon discounts in line items enable the “Sync coupon discount in line items” from the Settings tab. After enabling the Discount line item settings you can show the coupon amount details parallel to each line item.
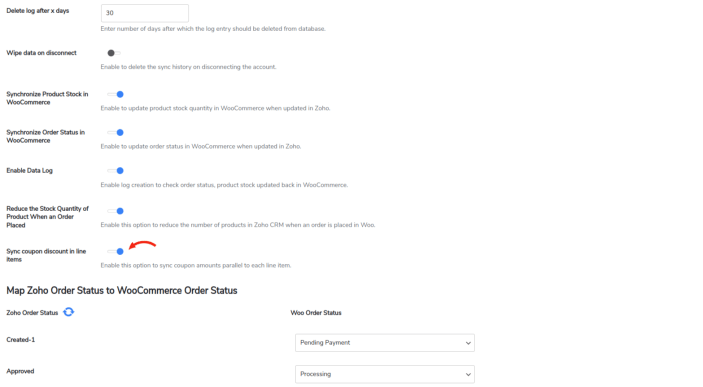
Note: If not enabled the discount will sync in parallel to the total and subtotal fields
This helps in clearer breakdowns of discounts applied, and improved order comprehension.
Update Product Stock When The Order is Synced.
↑ Torna in cimaIf you want to update the product stock when the order is synced, you can do this by enabling the “Reduce the stock quantity of a product when order is placed” from the Setting Tab.
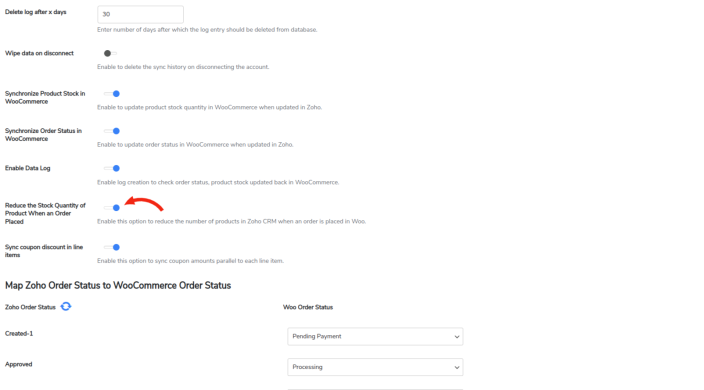
After that Zoho CRM integration will automatically update the product stock when the order is synced.
Sync Tax Details
↑ Torna in cimaSync Tax Details feature provides users with flexible options to control how tax values are captured and reflected in the Sales order object, either alongside individual order items or in parallel with the subtotal.
This applied tax is not directly linked to any specific product but is calculated on the order total during checkout.
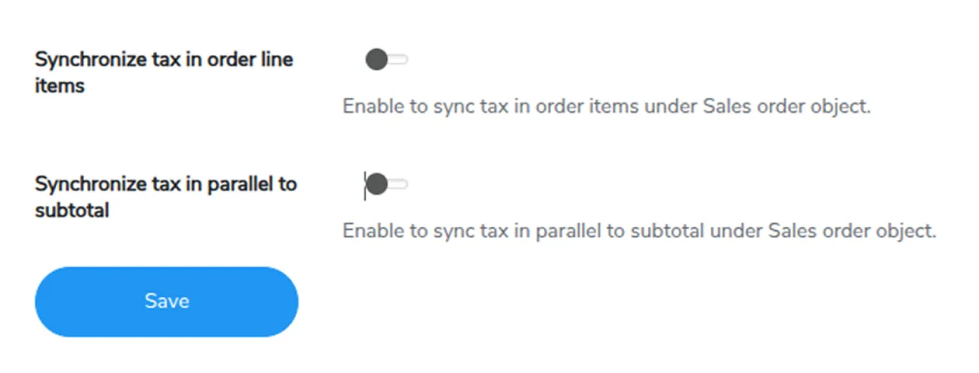
Steps to Configure Sync Tax Details
↑ Torna in cimaFollow these steps to configure the tax synchronization settings:
Access Sync Tax Settings:
- Go to your plugins Settings section.
- Locate the Sync Tax Details .
Enable/Disable Tax Sync Options:
- Synchronize tax in order line items:
Toggle this ON to sync tax details in order inline items. - Synchronize tax in parallel to subtotal:
Toggle this ON to sync the total tax amount alongside the subtotal instead of at the line-item level.
And finally, Save Changes.
Synchronize SKU in Sales Order
↑ Torna in cimaStock Keeping Units (SKUs) are essential identifiers that help manage product inventory, sales tracking, and order fulfillment. The Synchronize SKU in Sales Order feature ensures that the SKU of each product included in a customer’s order is accurately synced and recorded in the corresponding Sales order line items.

Navigate to the settings section and toggle this option on if you want to sync SKU details in order items under the Sales Order Object.
Two-Way Deletion for Products
↑ Torna in cimaYou can toggle these two options from the settings to enable Two way deletion of product between WooCommerce and Zoho CRM.
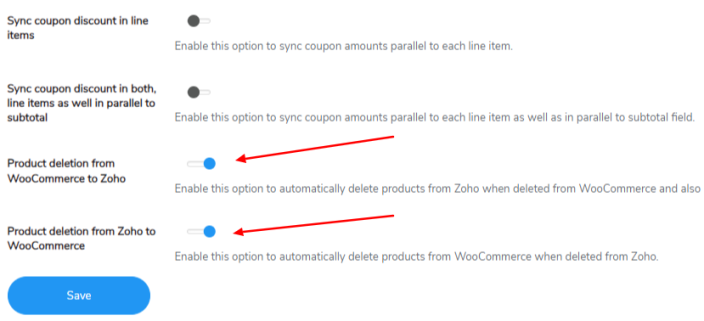
After enabling the first option, When you move a product to the trash in your WooCommerce store, it automatically becomes inactive in Zoho CRM.
Similarly, after enabling the second option, if a product is marked as inactive in Zoho CRM, it will be moved to the trash in WooCommerce.
The same synchronization applies to restoration: if you restore a product from the trash in WooCommerce, it will become active again in Zoho CRM, and vice versa.
Please note: if you delete a product entirely from either Zoho CRM or WooCommerce, it will be permanently deleted from both platforms.
Assign Leads To Campaign
↑ Torna in cimaIf you’ve created campaigns in your Zoho CRM, they will appear in the ‘Associate Campaign’ section under a feed. You can link a contact or lead to one or more campaigns and easily sync your leads and contacts to those campaigns.
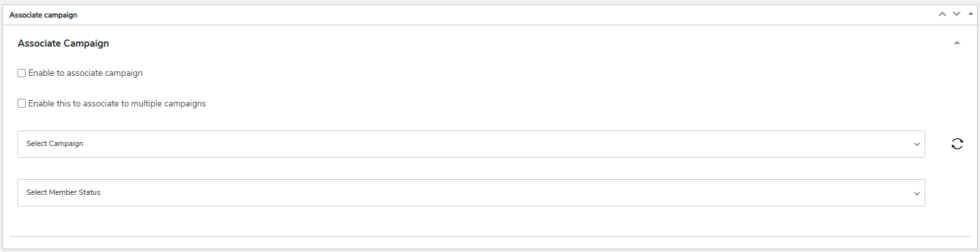
In the Associate Campaign section, you have two options: either click on ‘Associate Campaign’ or select the second option to ‘Enable Associating Multiple Campaigns’
As it sounds like it, after enabling the associate campaigns, you can select a single campaign only to sync the leads.
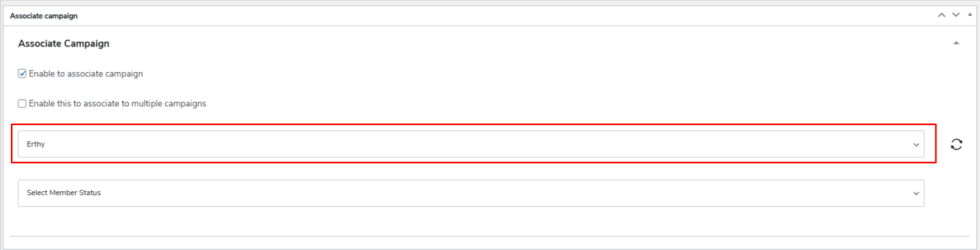
If you select the second option, you can select multiple campaigns
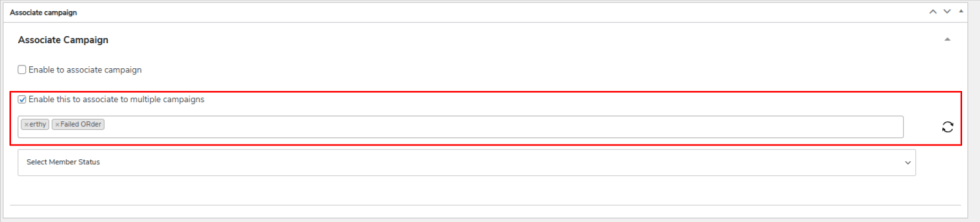
Next, you have the option to define the member’s status, which you can choose accordingly
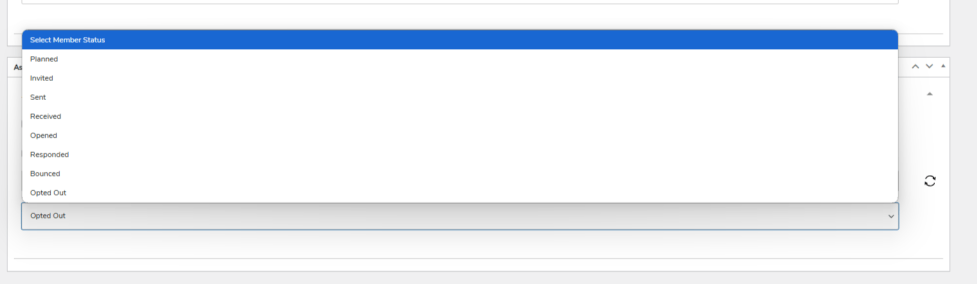
And that’s it, now your leads will sync in the defined campaign, with defined member status.
Assign Owner To Module
↑ Torna in cimaWe have added an option to associate an owner to a module, in your desired feed, scroll down to see the Add Owner section, click on the “enable to add owner button”
All the owners created in Zoho will be shown. Select the desired owner, and you’re good to go.
Associate Contacts To Abandoned Cart
↑ Torna in cima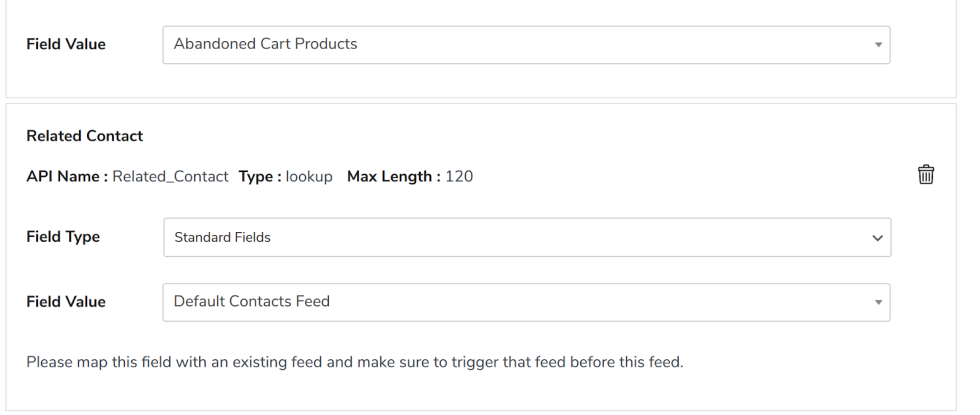
Our Zoho CRM Integration for WooCommerce plugin has the feature to automatically associate contacts with abandoned carts. This feature ensures that whenever a logged-in customer abandons their shopping cart, the related customer information is synced with Zoho CRM, along with the cart details.

Example Use Case:
- Suppose a registered customer adds products worth $150 to their cart but exits the store without completing checkout.
- With this feature: The cart is marked as abandoned. The customer’s profile (e.g., John Doe, johndoe@email.com) is automatically linked to this cart.
- In Zoho CRM, your sales or marketing team will now see an abandoned cart record tied to John Doe, making it easier to send him a reminder email or offer a discount to recover the sale
Two-Way Product Syncing
↑ Torna in cimaProduct Sync From Zoho to WooCommerce: Enable this option to automatically sync products from Zoho to WooCommerce whenever changes are made to synced products in Zoho.
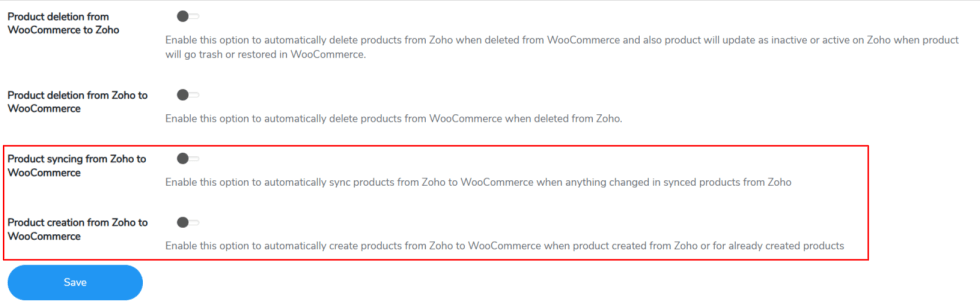
Product creation from Zoho to WooCommerce: Enable this option to automatically create products in WooCommerce when new products are added to Zoho.
These two features complete the functionality of 2-way synchronization between Zoho CRM and WooCommerce.
Add New Field
↑ Torna in cimaThis option in the feeds mapping involves adding up a new within your feed in order to map further.
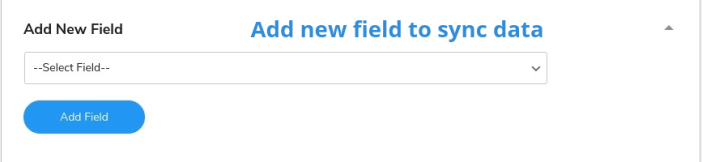
These are the respective field Add New Field options available in the dropdown given, check out the screenshot for more details-
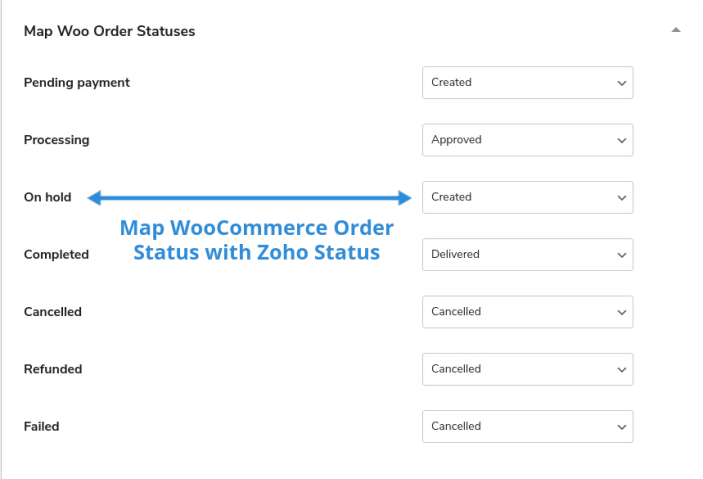
Map Woo Order Statuses
↑ Torna in cimaThis setting helps you map the order statuses of WooCommerce with Zoho order statuses. This makes sure the order status changes in Zoho CRM if it changes in WooCommerce.
Product Details
↑ Torna in cimaThis setting lets you send the purchased product data to Zoho CRM with the respective object’s data. For Example, if you enable this setting in the Orders feed, the products purchased in the orders will also sync over Zoho with the orders data.

Note: This setting appears on those fields where products can be associated.
Primary Field
↑ Torna in cimaThis option is essential for avoiding repetition and redundancy during receiving data from your WooCommerce store to Zoho CRM.
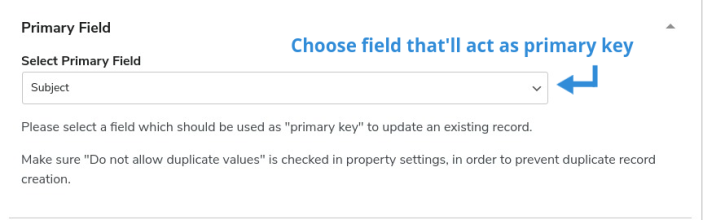
For your data submissions, you only need to choose a Primary Field. Any unique identifier, such as an email address or a phone number, can be appended to the Primary Field.
This data field supports your CRM in identifying updates to your store’s records.
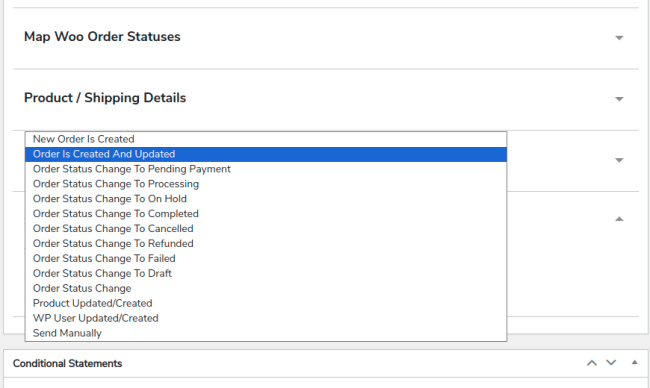
Select Event
↑ Torna in cimaIn this section of the select event settings, you must choose one event that can easily initiate your data synchronization procedure.

Essentially, Event settings should be used to record real-time data at each transaction.
This is all about the field mapping settings in the custom feeds section.
Note: You can easily minimize these processes, just click on Reset Default and that would thereby turn all feeds creation to auto-suggested mode.
Tax Setup
↑ Torna in cimaThis setting lets you set up the tax to make the products taxable.
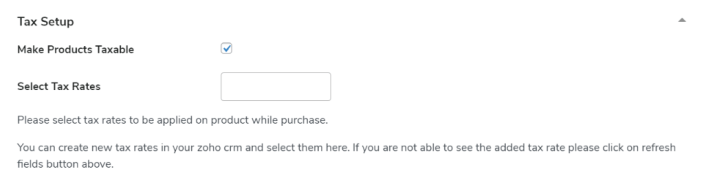
To map your Zoho tax rates with WooCommerce products, follow these steps:
- Go to WooCommerce Settings >> Tax section.
- Create your tax rates for standard, reduced, and zero rates.
- Map these WooCommerce tax rates to Zoho CRM.
If a tax rate is not showing in the Zoho tax rate section, create it in Zoho CRM first and then map it with the corresponding WooCommerce tax rate. This ensures easy mapping and synchronization of taxes.
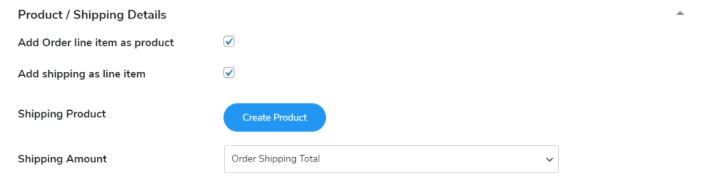
Product/Shipping Details
↑ Torna in cimaThis option of the plugin offers easy Product/ Shipping related details to update. You can effectively set up your product’s shipping/order as a line item as well as create one shipping product defining the amount with respect to that utilizing the settings here.
Abandoned Cart Tab
↑ Torna in cimaA new feature has been added to sync your guests’ and logged-in users’ abandoned cart data with Zoho CRM. You can easily enable or disable this feature, set the cart abandonment time, delete abandoned cart data from your store after a specified period, and store the data in an HTML-encoded format.
When you set up the plugin, an abandoned cart feed is created automatically, including all the respective fields.
However, you’ll also be able to skip the automatic creation and can create feeds manually.
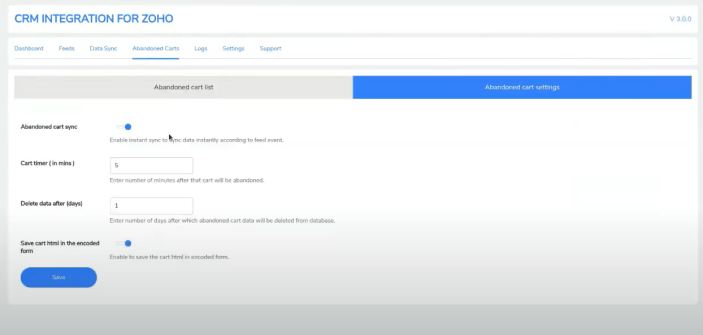
Abandoned Cart Sync: Toggle this option to enable the abandoned cart syncing feature.
Cart Timer: Set the minimum waiting time before moving the cart to abandoned state.
Delete Data after (days): Specify the number of days after which the abandoned cart data will be deleted from your WooCommerce store. However, you can still access this data in your Zoho CRM.
Save Cart in HTML encoded format: Toggle this option to save the data in HTML encoded format
For more details about your abandoned carts, navigate to the Abandoned Cart lists section.

Here, you can view information such as the user’s email, user type (whether guest or logged-in), cart total amount, last updated time, cart status (active or abandoned), and sync status (whether the abandoned cart has been synced with Zoho CRM or not).
Support Tab
↑ Torna in cima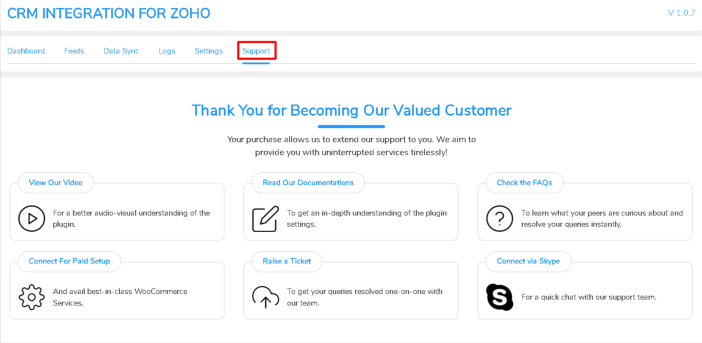
When utilizing the Zoho Woo Integration plugin, there is a support tab that is there to assist you if you run into issues despite having tried all of the suggested practical solutions. These alternatives include our video, document, and FAQ support as well as the possibilities for simple payment setup, Skype connect, and ticket management.
These practical resources allow you to easily communicate with our experts and the knowledgeable resources at your disposal.
Integration
Zoho WooCommerce plugin Integration With Contact Form 7
↑ Torna in cimaYou can add CF7 forms to your store and sync the collected submission data to Zoho CRM.
To establish the integration, you only need to install and activate the Contact From 7 plugin. If done successfully, a new sub-tab named CRM Zoho CF7 will be created in the WP Swings tab.
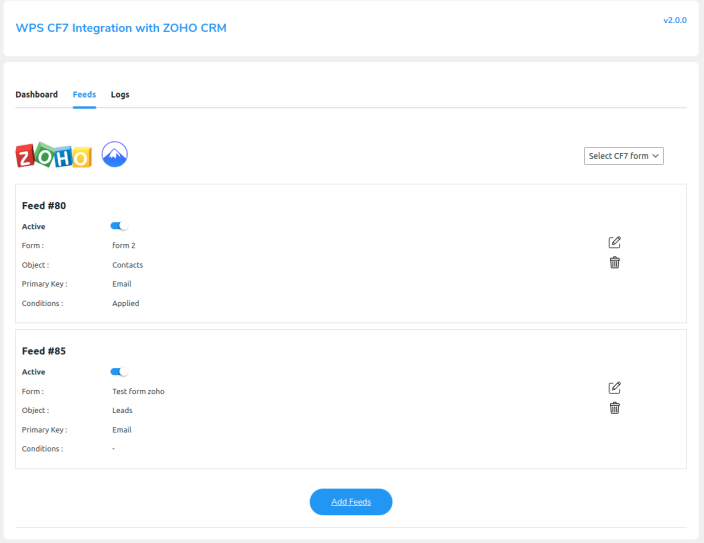
Follow these steps to sync contact forms:
- Go to CRM Zoho – CF7 >> Feeds and click on Add Feeds to add a new feed.
- From the feed details section, click on the Select CF7 Form dropdown.
- Choose the CF7 form you wish to sync.
- Select the Zoho Object to map your CF7 Form Fields.
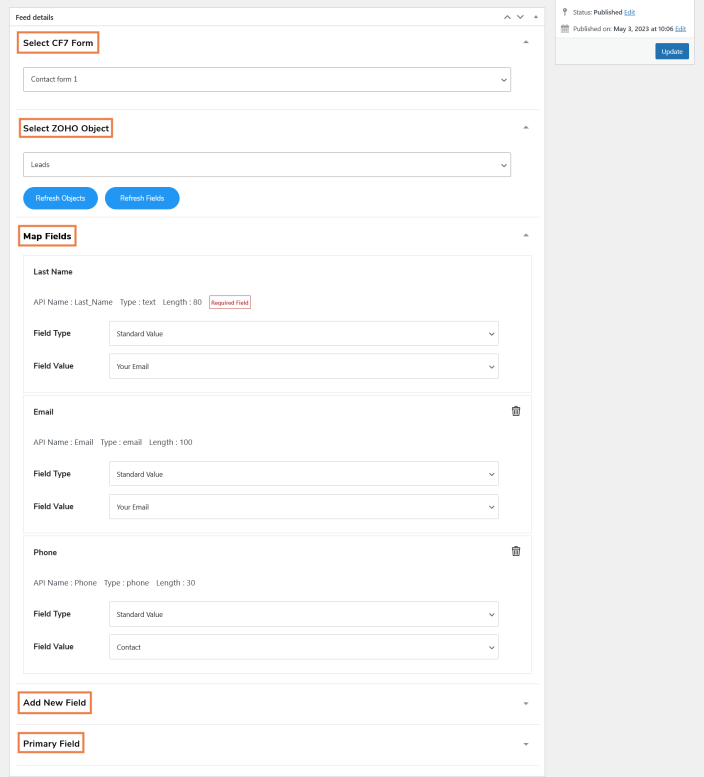
5. Now, select the Field Type as standard or custom.
6. Enter the field value from the select CF7 form field.
7. From the Primary key option, you can make any field primary.
8. Lastly, click on publish to synchronize your CF7 form with Zoho CRM.
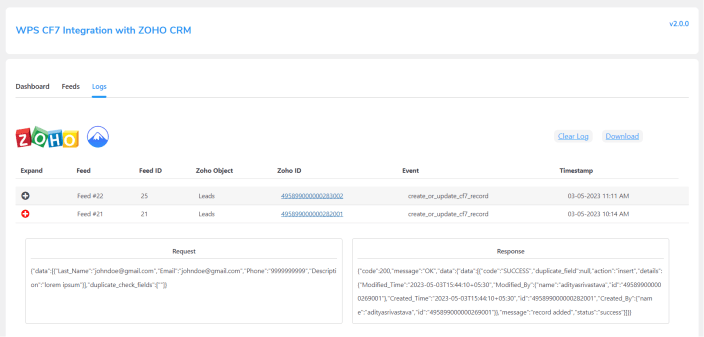
Logs: The log tab contains a detailed list of all successful form submissions. You can open any log entry to see the full user response. You can click on the Zoho ID to view the form submission details in your Zoho account.
Feeds: The Feeds tab shows the status of synced CF7 forms. You can edit these forms or delete them as per your need. Plus, you can deactivate the synchronization.
Compatibility With WooCommerce Subscriptions
↑ Torna in cimaOur integration solution for WooCommerce and Zoho CRM seamlessly works with WooCommerce Subscriptions.
This compatibility ensures the smooth transfer of subscription order specifics from your WooCommerce store to Zoho CRM. Whenever a customer initiates a subscription order through your WooCommerce store, the subscription details are logged within Zoho CRM.
This integration effectively captures the following subscription details:
- If Subscription OR One Shot
- Subscription Start Date
- Subscription Renewal Date
- Subscription Next Payment Date
- Subscription Price
- Subscription Status
- Subscriptions Products Details
Mapping Fields to Capture Subscription Order Data:

- Choose to either create a new field for syncing subscription data or modify an existing one within your Zoho CRM setup.
- From the Map Field option, click on the “Field Value” dropdown.
- Select the value you want to capture.
- Save the changes.
Upon setting up these field mappings, the integration will automatically extract subscription order data upon order placement.
Now you also get an option to create the subscription objects, feeds, and fields manually in one click if you missed their creation during the setup

Compatibility With WooCommerce Memberships
↑ Torna in cimaOur Zoho CRM for WooCommerce plugin is compatible with WooCommerce Memberships.
It allows you to organize your membership orders by combining the power of Zoho CRM with WooCommerce Memberships. This compatibility assures that your data is accurate, up-to-date, and easily accessible, whether you’re tracking membership statuses or monitoring renewal dates.
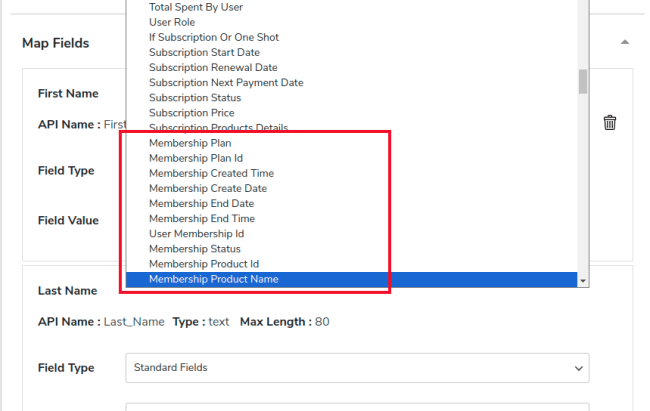
The following membership information is sent over to Zoho CRM:
- Membership End Date
- Membership End Time
- User Membership ID
- Membership Status
- Membership Product ID
- Membership Product Name
- And Many More New Options Are Added.
Collect Membership Order Data By Mapping Fields:
1. Create a new field or modify an existing one in Zoho CRM to collect membership order details.
2. Click on the “Field Value” dropdown to select the membership field value.
3. Save the changes.
Now you also get an option to create the membership Objects, feeds, and fields manually in one click if you missed their creation during the setup
Compatibility With WooCommerce HPOS
↑ Torna in cimaCRM Integration for ZOHO is fully compatible with WooCommerce High-Performance Order Storage (HPOS) is an easy-to-understand solid database structure that uses WooCommerce Crud Design to Store order data in Custom Order Tables, allowing you to run your WooCommerce store smoothly during festive seasons when order volume is high.
Plugin Usage
↑ Torna in cimaUnderstanding the Automatic Sync
↑ Torna in cimaThe WooCommerce and Zoho integration plugin’s main purpose lies in its ability to synchronize your store’s data over Zoho CRM.
True, our plugin provides automated data synchronization, but in order to initiate the automation, there is a toggle-based setting under the backend Settings tab namely Enable Instant Sync, which provides simple and automated data synchronization actually.
If you want to perform the automated data sync for your store’s data then just enable the toggle ON and let your store data sync over Zoho CRM automatically.
Your WooCommerce store-based transactional data will not sync automatically if you supposedly turn OFF the toggle, consequently, you’ll have to manually sync the data and then utilize the Data Sync tab options.
Maintain Flawless Data Synchronization Across Both Platforms
↑ Torna in cimaMany times there is a circumstance when we change or delete specific data from Zoho but forget to sync that on WooCommerce.
At that time, you may encounter an error, such as “Invalid Field to Update,” when you attempt to sync this modified data with WooCommerce in the future. In that case, the data won’t sync.
For such crucial times, we have come up with an easy and outstanding metabox setup option i.e. Reset Zoho Feed Ids.
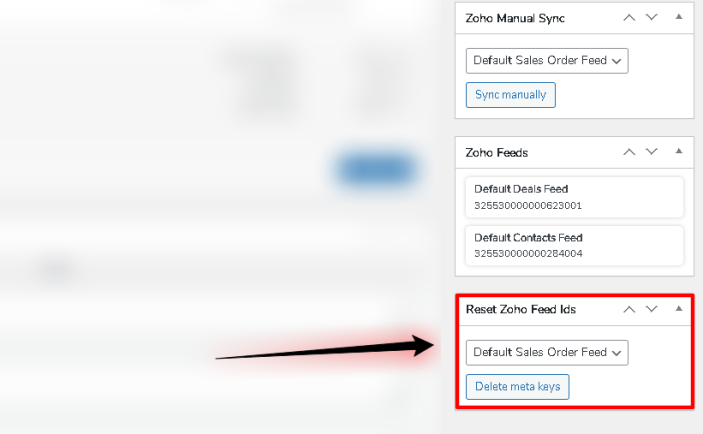
Let’s say, if we select Sales Order Feed then the Zoho Feed corresponding to that would automatically be updated with the current Zoho data without any extra effort.
Effectively Map your Product Name in Field Values
↑ Torna in cimaIf you need to include your product name with your mapped data, don’t worry—you can now simply use our Zoho CRM Integration for Woo plugin’s feature to synchronize the product names in the ZOHO CRM order field and successfully map that.
For a more effective understanding, you can refer to the screencast of the feature—
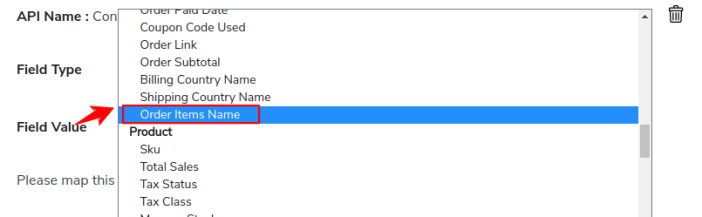
WooCommerce Zoho CRM Integration plugin makes it simple to sync the product names in the order field of Zoho CRM. When you need to map the data for your orders within CRM, this functionality is extremely helpful.
Map Order Number & Average spent by User as Order Values
↑ Torna in cimaNow, you can effectively map your Order Number & Average spent by User data in your feed with ease. For that, you just need to select the custom value for mapping from the list and get the data.
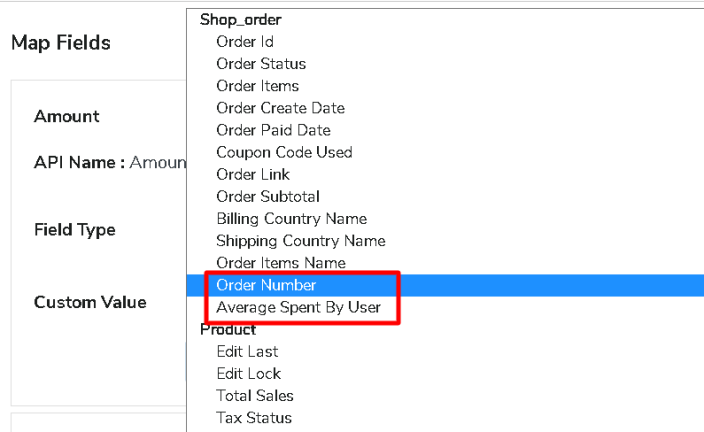
If you think what are these two values then let me give you an idea about them, The Order Number is the value that is displayed on the order listing page with a prefix # and that denotes your order identity.
The Average spent by the User is the value that is listed on the customer page and is calculated for both guest & registered users. Other than that we also fetch AOV i.e. Average Order value for the completed orders of customers.
So, if you require to map these values in your Order related feeds then now you can easily do that with the help of these feeds’ order values available.
Manually Connect/Disconnect the Integration
↑ Torna in cimaThe re-authorize option in the ZOHO CRM Integration for Woo plugin interface helps you with the Zoho CRM connection authorization request. Because the authorization for your WooCommerce store with Zoho expires after 24 hours, you can proficiently stay connected by using the Re-Authorize button.
If you have more than one Zoho account, you can conveniently disconnect one and re-authorize with the other while using the Disconnect button.
FAQs
↑ Torna in cimaQ 1. How to Set up the Connection With Zoho CRM?
To set up the connection, you’ll need to log in to your Zoho account and go to the Zoho API console and create a new app. You will get a client ID and a client secret ID to set up the connection.
Q 2. What Feeds Do We Get With This Integration to Sync Data?
The plugin comes with the following four default feeds which sync the respective data over Zoho WooCommerce Integration CRM-
- Products Feed
- Contacts Feed
- Deals Feed
- Orders Feed
Q 3. Does this plugin Let You Map the Names of the Shipping and Billing Countries From WooCommerce to Zoho CRM?
Yes, both the shipping and billing countries’ names and country codes easily to Zoho CRM utilizing the plugin’s mapping options available
Q 4. Does this Plugin Allow for the Mapping of Product Attributes and Categories From Integration with Zoho CRM?
Yes, utilizing this plugin enables you to easily map product attributes and categories to ZOHO CRM.
Q 5. How WooCommerce Data Synced Over Zoho CRM?
By default, the integration extracts your product data from WooCommerce and syncs them over Zoho as products. For Contacts, Deals, and Orders, it retrieves data from WooCommerce orders and syncs it over Zoho CRM.
Q 6. Can we Create Custom Feeds to Sync Data?
Yes, You can create your custom feeds to sync data to any Zoho CRM object.
For this, you need to go to the feed section and click on the “Add new feed” button. It will redirect you to a new feed from where you can customize it to start syncing.
Q 7. What is Instant Sync?
The instant sync feature, if enabled, synchronizes your WooCommerce data to Zoho CRM instantly according to the event selected in your respective feed.
Q 8. Can we Sync the Data Manually?
Yes, you can sync data manually. There are 2 options available to sync data manually-
- Bulk Data Sync
Sync all the WooCommerce Objects of your site to the CRM in One Click. - One-Click Sync
Sync all the New/Failed WooCommerce Objects of your site to the CRM in One Click.
Along with the above options, you can also sync individual Orders data from the Order edit page.
Q 9. Can Stored Log Data Be Deleted Automatically?
You can set the duration you want to store the logs in the “Settings” tab. The logs will automatically be deleted after the set duration.
Q 10. Does the CRM Integration for ZOHO plugin assist us in syncing the Product Names in the Order Field Value?
Yes, you can easily utilize the plugin feature to sync the product names in the ZOHO CRM’s order field.
Q 11. Does this plugin sync the user’s average spending in the customer feeds?
Yes, using the CRM Integration for ZOHO, you can sync the average spend by the user in the customer feeds.
Q 12. Is it possible to sync the order number in the order values?
Yes, it is possible to sync order numbers in the order values using the CRM integration for ZOHO.
Q 13. Whenever I make any changes to the WooCommerce order. Will it get reflected in the Zoho CRM as well?
Yes, For this you need to select the event “Order Creation/Updation” under Feeds > Sales Order Feed > Select Event.
Q 14. Can I sync the user role to Zoho CRM?
Yes, You can add this field under Contact feeds and it will sync to Zoho CRM.
Q 15. Is this plugin compatible with “WooCommerce Memberships”?
Yes, this Zoho WooCommerce integration plugin is compatible with WooCommerce Memberships. You can sync membership-related fields to Zoho CRM.