Note: This product has been retired and is not for sale. Documentation is no longer being updated.
General information
↑ Revenir en hautInstallation
↑ Revenir en haut- Purchase and download the plugin zip file from WooCommerce.com
- Login to your WordPress Admin. Click on Plugins | Add New from the left hand menu
- Click on the “Upload” option, then click “Browse” to select the zip file from your computer. Once selected, press “OK” and press the “Install Now” button.
- Activate the plugin.
Configure the gateway
↑ Revenir en haut- Go to –> WooCommerce –> Settings –> Checkout –>.
- You should see “Dibs” displayed across the top of the page as a link. Click on this to configure the plugin, and you will see a list of options:
-
- Enable/Disable checkbox for this gateway.
- The Title option allows you to determine what your customers will see this payment option described as on the checkout page.
- The Description box controls the message that appears under the payment fields on the checkout page.
- DIBS Merchant ID – Requested from DIBS.
- MD5 k1 – needed when using Flexwin as the payment method and when using the DIBS transaction capture setting On order completion. Can be found in your DIBS account, under –> Integration –> MD5 keys.
- MD5 k2 – needed when using Flexwin as the payment method and when using the DIBS transaction capture setting On order completion. Can be found in your DIBS account, under –> Integration –> MD5 keys.
- HMAC Key (k) – only needed when using Payment Window as the payment method. Can be found in your DIBS account, under –> Integration –> HMAC keys.
- Payment Method – Choose Flexwin or Payment Window as the payment method to use. More information about the different payment methods can be found here.
- Language – Set the language in which the page will be opened when the customer is redirected to DIBS.
- Alternative payment icon – Specify the URL to an alternative payment icon that the user sees during checkout. Leave blank to use the default image. Alternative payment method logos can be found here.
- Icon width – The width of the Alternative payment icon.
- DIBS transaction capture – Select if you want to capture the card payment from WooCommerce or not. When a purchase is completed the amount is first reserved on the customers card. In the next step you as a merchant need to capture the payment. Select On order completion if you want he capture to be triggered from WooCommerce when changing the orderstatus from Processing to Completed. Select On purchase if you want the capture to be done directly when the customer finalizes the purchase in DIBS payment screen.
- Decorator – Specifies which of the pre-built decorators to use (when using Flexwin as the payment method). This will override the customer specific decorator, if one has been uploaded. Select Responsive to get a mobile optimized payment window experience.
- Test Mode – Check this box if your DIBS account is set to test mode. Read more about the DIBS test process here.
- Debug – If this option is checked then details of communication with DIBS are stored in a debug log at location wp-content/uploads/wc-logs
- Press Save changes to save your changes.
DIBS backoffice setup
↑ Revenir en haut- Log in to your account at http://www.dibspayment.com/
- If you are using FlexWin as the payment method; check the box Perform verification of md5key under ->Integration ->md5 keys.
- If you are using Payment Window as the payment method; check the box Perform verification of HMAC-key under ->Integration ->HMAC keys.
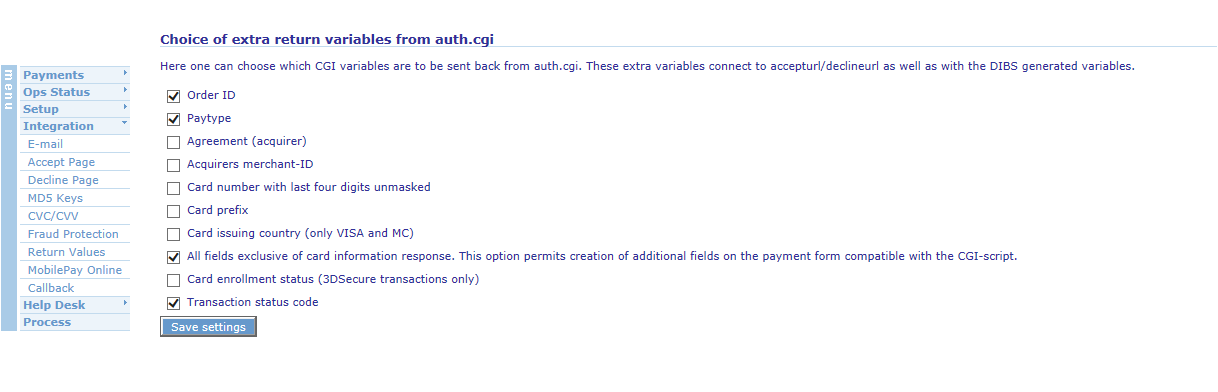
- Go to –> Integration –> Return Values and make sure that the following boxes are checked:
– Orderid
– Paytype
– All fields exclusive of card information response
– Transaction status code

- Check the box Skip step 3 – Payment approved under ->Integration ->FlexWin.
DIBS API Credentials
↑ Revenir en haut- Log into your account at DIBS.
- Go to → Setup → User Setup.
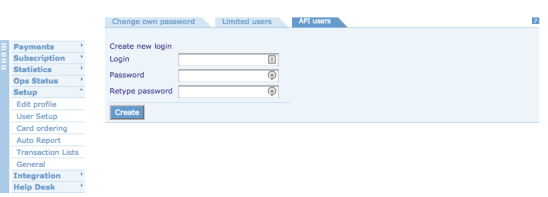
- Click on the tab API Users.
- Click the button Create new login.
- Enter a username (Login) and password and click the button Create.
- Enter the same credentials in API Username & API Password in the payment gateway settings.
- Save the payment gateway settings and you should now be able to process refunds from WooCommerce.
DIBS transaction ID in order emails
↑ Revenir en haut
This file contains hidden or bidirectional Unicode text that may be interpreted or compiled differently than what appears below. To review, open the file in an editor that reveals hidden Unicode characters.
Learn more about bidirectional Unicode characters
| /** | |
| * Add the DIBS Transaction ID to order emails | |
| **/ | |
| add_filter('woocommerce_email_order_meta_keys', 'dibs_woocommerce_email_order_meta_keys'); | |
| function dibs_woocommerce_email_order_meta_keys( $keys ) { | |
| $keys['DIBS Transaction ID'] = 'dibs_transaction_no'; | |
| return $keys; | |
| } |
Change the payment gateway icon in checkout
↑ Revenir en haut
This file contains hidden or bidirectional Unicode text that may be interpreted or compiled differently than what appears below. To review, open the file in an editor that reveals hidden Unicode characters.
Learn more about bidirectional Unicode characters
| /** | |
| * WooCommerce – DIBS payment gateway | |
| * Filter the payment gateway icon used in checkout | |
| * | |
| **/ | |
| // Credit card payment method | |
| add_filter('wc_dibs_icon_html', 'my_wc_dibs_icon_html'); | |
| function my_wc_dibs_icon_html( ) { | |
| return '<img src="http://url-to-your-image.png" alt="DIBS – Payments made easy" />'; | |
| } | |
| // Invoice payment method | |
| add_filter('wc_dibs_invoice_icon_html', 'my_wc_dibs_invoice_icon_html'); | |
| function my_wc_dibs_invoice_icon_html( ) { | |
| return '<img src="http://url-to-your-image.png" alt="DIBS – Payments made easy" />'; | |
| } |
WooCommerce Subscriptions support
↑ Revenir en haut- Use Payment Window as the selected payment method in your DIBS settings.
- Set up an agreement with DIBS about taking subscription payments.
- Purchase and configure the WooCommerce Subscriptions extension.
WPML Compatibility
↑ Revenir en haut- Guide for installing & activating WPML is available on the WPML getting started guide.
- Guide for installing and activating WooCommerce Multilingual is available here.