
The e-Path extension allows you to integrate your WooCommerce store with the e-Path payment gateway.
The e-Path service collects your customer’s credit card details with an approval to charge. You are notified by email so you can log in to securely view the credit card details and process the order offline using your manual merchant account.
It is not necessary to use an online merchant account with e-Path, only a basic MOTO merchant account is used. While individual circumstances may vary, the merchant service fee for a MOTO merchant account may be lower than the rate for an online merchant account. e-Path charge a one off setup and an annual fee for their service, but do not charge per transaction.
All credit card handling is performed on the PCI compliant e-Path website.
Usage
↑ Back to top- During checkout, your customer is transferred to the e-Path website, and their credit card details are entered and stored in your e-Path account.
- You log into your e-Path account (via the e-Path website) to retrieve the customer’s credit card details.
- You manually process the credit card payment, update the order’s status, and ship the order.
Requirements
↑ Back to top- An e-Path account and a credit card merchant account
- WooCommerce version 9.4 or newer.
- WordPress 6.6 or newer
- PHP 7.4 or newer
Cart & Checkout Blocks Compatibility
↑ Back to topThe WooCommerce e-Path extension is compatible with both the shortcode cart/checkout and the new block based cart/checkout.
In order to use WooCommerce e-Path with WooCommerce’s new Cart/Checkout Blocks, the following must be met:
- WooCommerce e-Path version 2.1.0 or newer
- WooCommerce version 7.6 or newer
Setup and Configuration
↑ Back to tope-Path Account Configuration
↑ Back to topThis step is important.
You must contact e-Path support and inform them that your e-Path payment gateway is going to be used with WooCommerce. e-Path will then modify your gateway to ensure that it works with WooCommerce.
e-Path will make sure your customers are sent back to your store after they enter their card details. This is how WooCommerce knows the order is ready for you to process.
Your WooCommerce store will not work correctly with your e-Path account until e-Path have manually configured your gateway correctly in their system.
Store Configuration
↑ Back to top- Download the extension from your WooCommerce.com account.
- In your WordPress dashboard, go to Plugins > Add New Plugin > Upload Plugin, choose the downloaded zip file and click Install Now.
- Click Activate Plugin.
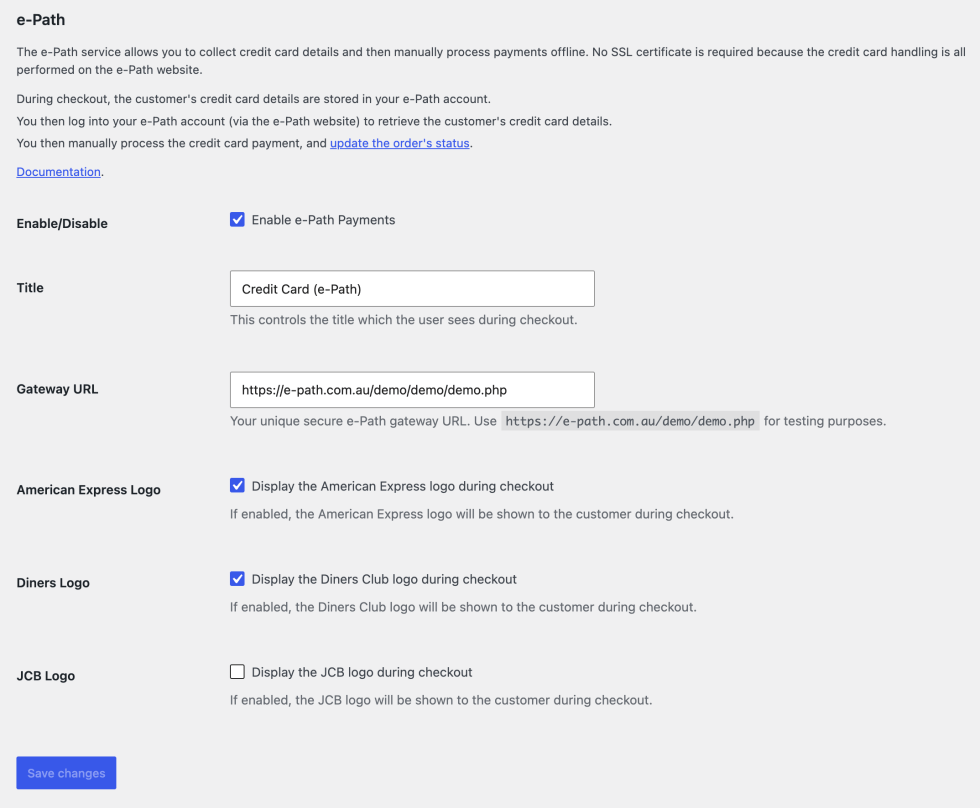
- Go to WooCommerce > Settings > Payments and open e-Path.
- Tick the “Enable e-Path Payments” checkbox so e-Path is shown to your customers during checkout.
- Enter your unique Gateway URL (your e-Path welcome email will contain this information). If you aren’t sure what your Gateway URL is, you will need to contact e-Path.
- If your existing merchant account accepts American Express cards, tick the American Express checkbox.
- If your existing merchant account accepts Diners Club cards, tick the Diners Club checkbox.
- If your existing merchant account accepts JCB cards, tick the JCB checkbox.
- The above 3 card settings control which logos are displayed to your customers. They do not control which card types e-Path accepts.
- Click the Save button to save the configuration settings.
- Confirm that e-Path have manually configured your account as per the e-Path Account Configuration instructions above.
- Ensure that your website satisfies e-Path’s acceptance graphic guidelines.
- Your WooCommerce store is now ready to accept e-Path transactions!
How Does It Work?
↑ Back to topOnce configured and enabled, this extension adds the e-Path payment method to your store’s checkout.
The screenshot below shows a store with multiple payment methods configured. The e-Path payment method is highlighted in red. In this example, the merchant account accepts Visa, Mastercard, American Express, Diners Club and JCB).

Once the customer clicks the Place Order button, they are transferred to the e-Path payment screen (which is hosted on the e-Path website). This screen is populated with the details from the online order, including:
- The unique order number
- The customer’s name
- The order amount
The design/layout of this e-Path payment screen is determined by your e-Path account settings. If you wish to change it, you will need to contact e-Path directly.
The customer enters their credit card information, and clicks the Make Payment Now button. Their credit card details are encrypted and stored in your e-Path account. The customer is then shown e-Path’s thank you page (see screenshot below).

After several seconds, they are automatically transferred back to your WooCommerce store’s order received page (see screenshot below).

You (the WooCommerce store owner), will then receive two notification emails:
- A New Customer Order email, which is sent by WooCommerce. This email contains all the details of the customer’s order.
- An email from e-Path, which contains instructions on how to log into your e-Path account and retrieve the customer’s credit card details.
At this point the order has a status of on hold, which means the customer’s card details are stored in e-Path and the order is ready for you to process. You can view the order by going to your WordPress Dashboard, WooCommerce, Orders.
WooCommerce then also sends a confirmation email to the customer informing them that their order is on-hold until you confirm payment has been received. This email can be customised by going to Dashboard, WooCommerce, Settings, Emails, order on-hold.
Once you have retrieved the customer’s credit card details from your e-Path account, you process the payment using your existing merchant account.
Once payment has been successful, you would usually:
- Use the WordPress dashboard to update the order’s status (typically you would change the status to Processing to indicate that the order has been paid for)
- Ship the order (if applicable)
- Update the order’s status to Completed
See WooCommerce’s Managing Orders documentation for more details.
Testing Details
↑ Back to topTo test your online store, use the following:
Gateway URL: https://e-path.com.au/demo/demo.php
Credit Card Number: [Any 16 digit number]
Credit Card Expiry Date: [Any month/year after the current date]
Although this is only a demonstration gateway URL, it gives you access to a working simulated gateway. You will be experiencing exactly how your own unique secure e-Path payment system will perform, but of course you will not be receiving any e-Path payment alert notifications with this demonstration.
More Information on e-Path’s Testing Procedure
Troubleshooting
↑ Back to topOrders stuck at Pending payment
↑ Back to topAn order moves to on hold when your customer comes back to your store after entering their card details. If an order stays at Pending payment:
- Make sure you are using the latest version of the e-Path extension.
- Check your e-Path account for the customer’s card details.
- If they are there, change the order to on hold to send the usual order emails.
Questions & Support
↑ Back to topHave a question before you buy? Please fill out this pre-sales form.
Already purchased and need some assistance? Get in touch the developer via the Help Desk

