Installation Guide
↑ Back to top- Log in to your WordPress Admin Panel.
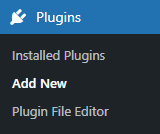
- Navigate to the WordPress Admin Dashboard → Plugins → Add New.
- Click the Upload Plugin button on the top left corner of your screen.
- Next, click the Choose File button in the box that appears below.
- Select the zip file that you have downloaded and upload it.
Getting Started
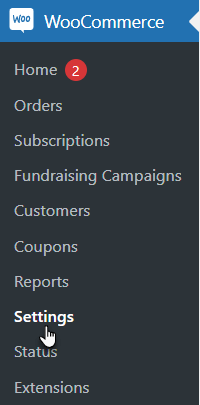
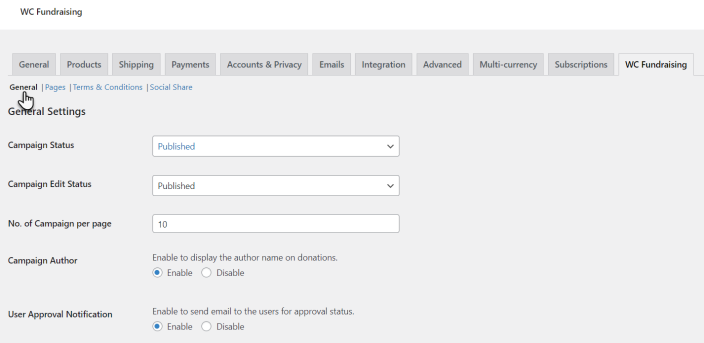
↑ Back to top- Navigate to Admin Dashboard → WooCommerce → Settings.
- Once done, navigate to the WC Fundraising tab.
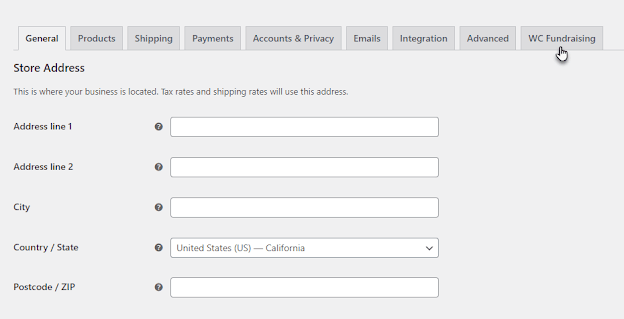
- In the WC Fundraising tab, there are three sub-tabs.
- General
- Pages
- Terms & Conditions

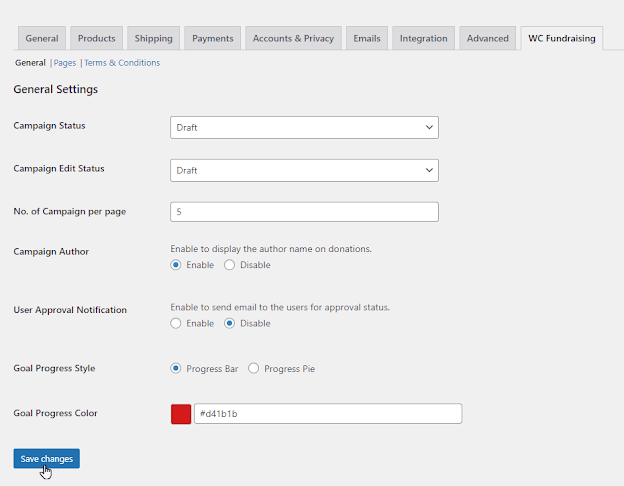
General
↑ Back to top- Navigate to the General sub-tab (by default, the user accesses the General sub-tab page).

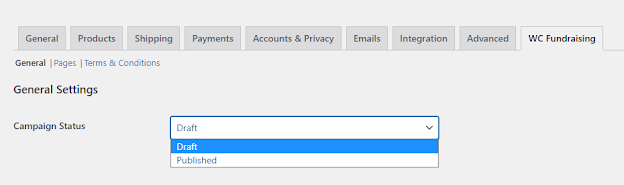
Campaign Status
↑ Back to top- In the Campaign Status option, the Administrator can set the status of the campaigns submitted by a Fundraiser user.
- There are two options in the dropdown menu, Draft and Published.
- When the Administrator selects the Draft option from the drop-down menu, the status will appear as Draft upon creating a new campaign by the Fundraiser on the Front-End. Additionally, the campaign will not be visible on the campaign listing page, meaning customers cannot donate to those specific campaigns.
- When the Administrator selects the Published option from the drop-down menu, the status will appear as Published upon creating a new campaign by the Fundraiser on the Front-End. Additionally, the campaign will be visible on the campaign listing page, meaning customers can donate to those specific campaigns.
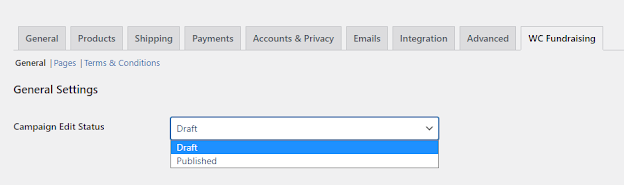
Campaign Edit Status
↑ Back to top- In the Campaign Edit Status option, the Administrator can set the status of the updated campaigns submitted by a Fundraiser user.
- There are two options in the dropdown menu, Draft and Published.
- When the Administrator selects the Draft option from the drop-down menu, the status will appear as Draft upon updating an existing campaign by the Fundraiser on the Front-End. Additionally, the campaign will not be visible on the campaign listing page, meaning customers cannot donate to those specific campaigns.
- When the Administrator selects the Published option from the drop-down menu, the status will appear as Published upon updating an existing campaign by the Fundraiser on the Front-End. Additionally, the campaign will be visible on the campaign listing page, meaning customers can donate to those specific campaigns.
No. of Campaign per page
↑ Back to top- In the No. of Campaign per page option, enter the number of campaigns to be displayed on the Campaign Listing page.
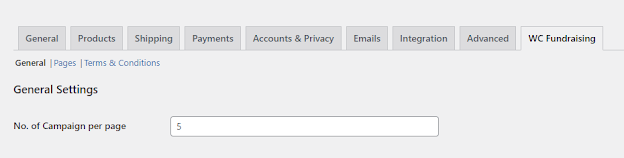
NOTE: The No. of Campaign per page will be 5 by default. Do not enter any Decimal Numbers, Alphabets, or Special Characters in the text field.
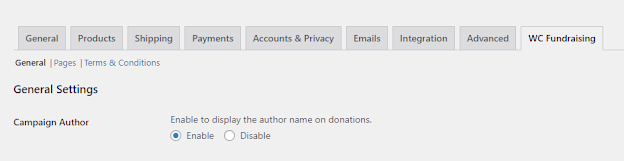
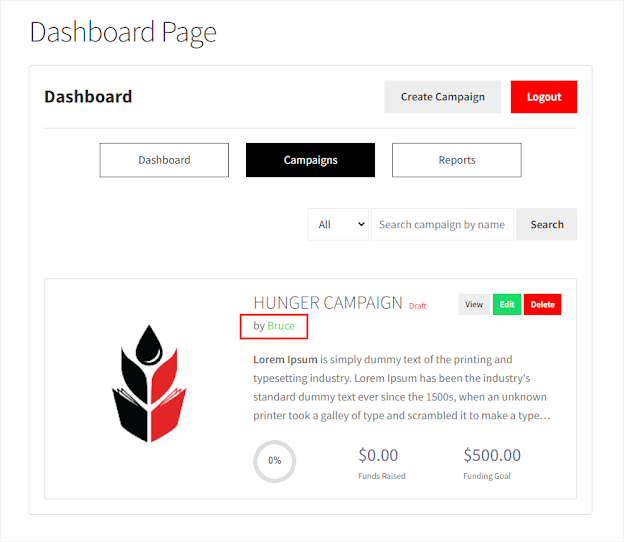
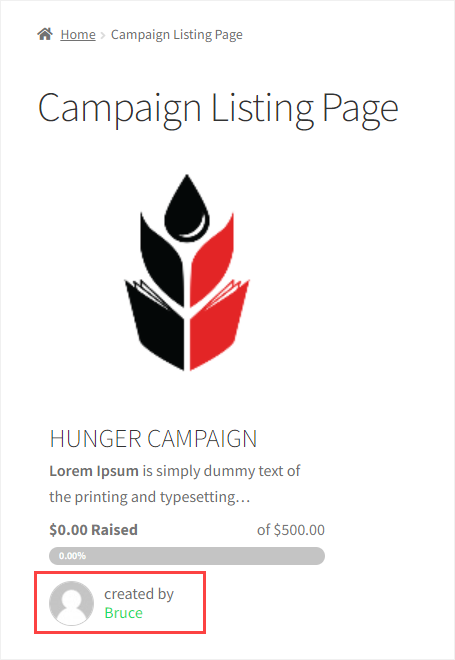
Campaign Author
↑ Back to top- In the Campaign Author option, click on Enable radio button to display the author against the campaign on the Campaign Listing page.
Front-End Impact
- Dashboard Page
- Campaign Listing Page
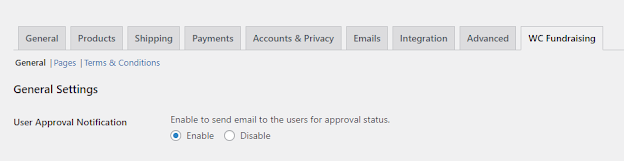
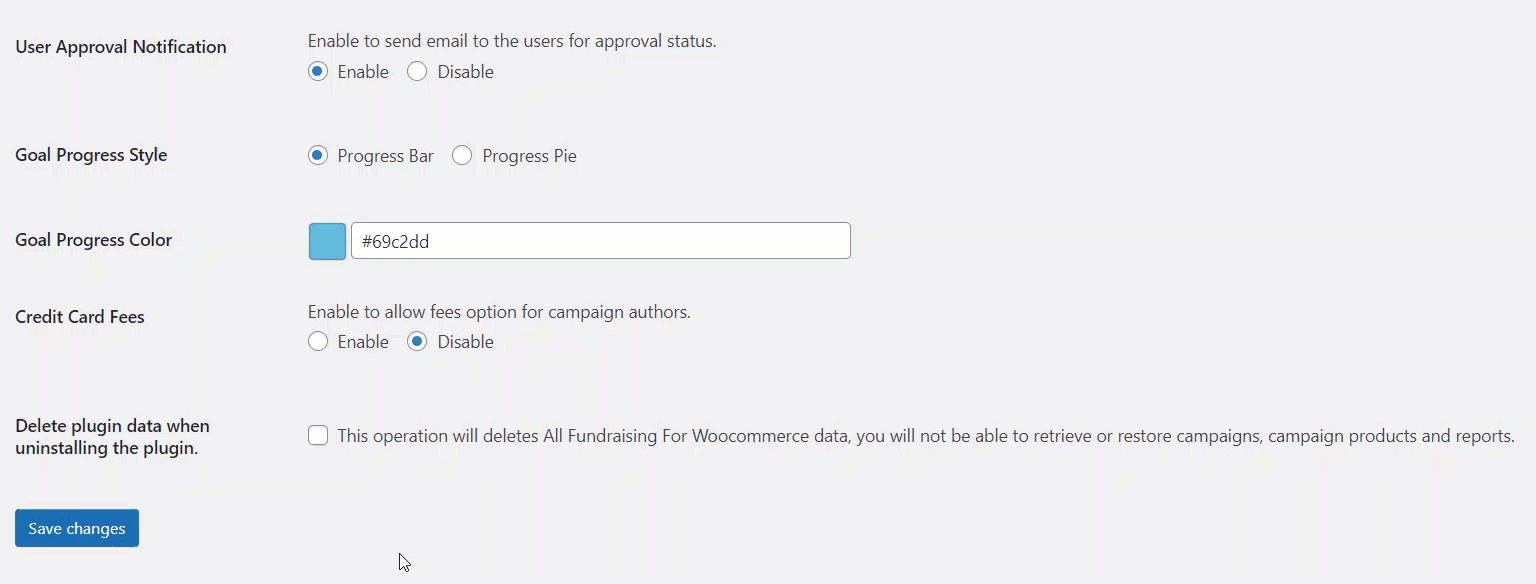
User Approval Notification
↑ Back to top- In the User Approval Notification option, click on the Enable radio button so that when the Administrator approves the user to become a Fundraiser, an approval email will be sent to the user.
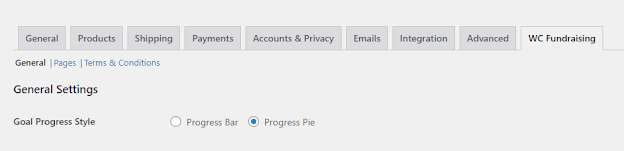
Goal Progress Style
↑ Back to top- There are two types of styles available in the Goal Progress Style option
- If we select the Progress Bar radio button, a bar will appear which will highlight the progress of the campaign
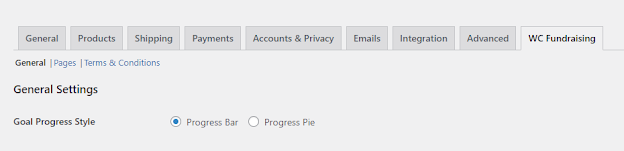
- If we select the Progress Pie radio button, a pie chart will highlight the campaign’s progress.
Front-End Impact
- Progress Bar
- ProgressPie

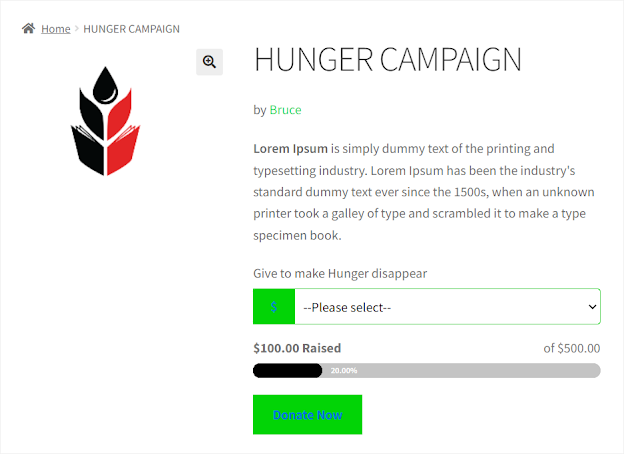
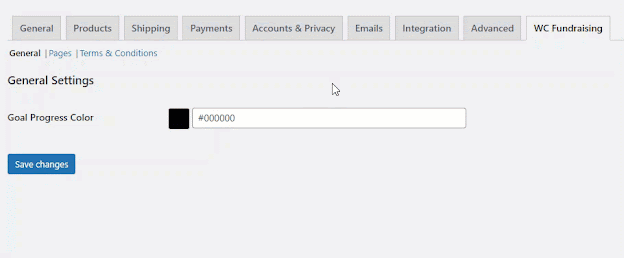
Goal Progress Color
↑ Back to top- In the Goal Progress Color option, select the goal color that will appear in the Progress Bar/Progress Pie.
Front-End Impact
Progress Bar
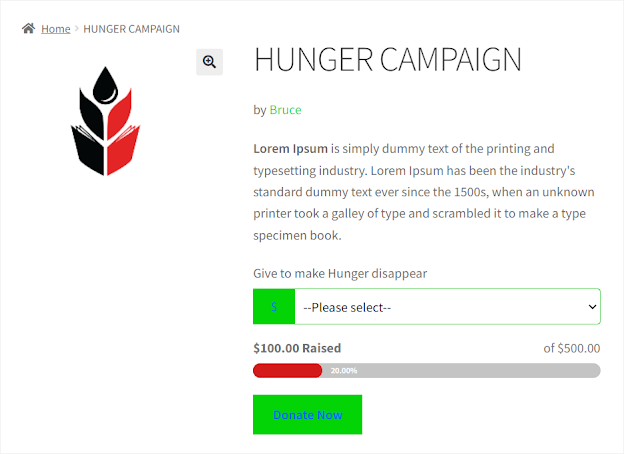
Progress Pie
- Click on the Save change button to apply your settings.
Fundraiser
↑ Back to topSearch Field
↑ Back to top- Login to your WordPress Website using a fundraiser user role account.
- Navigate to the Fundraising Dashboard on the front-end and click the Create Campaign button. The Create campaign popup window will open.
- Within the create campaign popup, users will find fields of location and Product category.
- After entering all the data in the fields and selecting the Location and Product category, users will click the Submit button to add the new campaign.
- When the users add a campaign, it will be displayed on the campaign dashboard where users can view, edit & delete.
- Users can edit an already existing campaign.
- Navigate to the fundraising dashboard → Campaigns → Campaign → Edit.
- Users can edit various fields that are associated with the campaign, including Location and Product Category.
- After editing, the user will click on the Submit Button.

Product Category
- Open the Create Campaign popup to go to the Product Category dropdown.
- Users can select a product category from the Product Category dropdown menu.
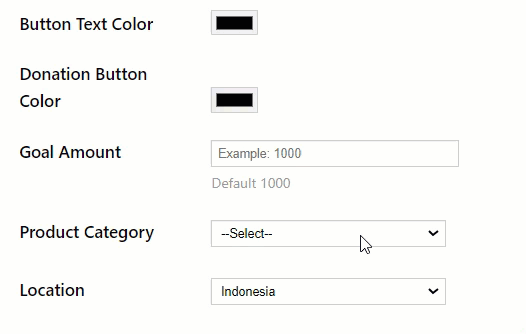
Location
- Open the Create Campaign popup to go to the Location dropdown.
- Users can select a country from the Location dropdown menu.
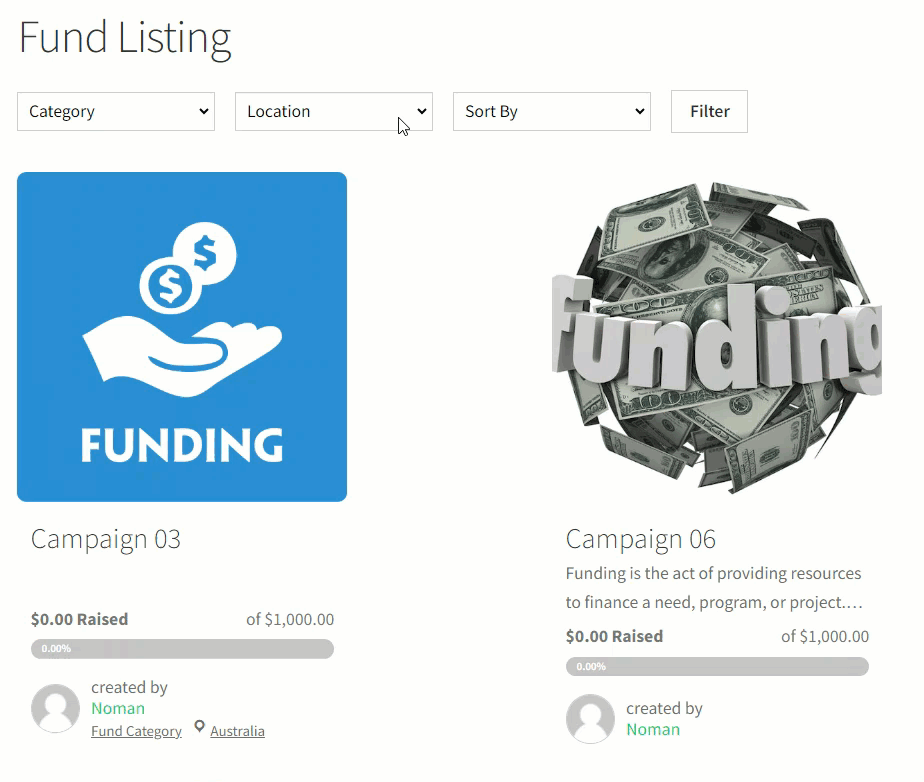
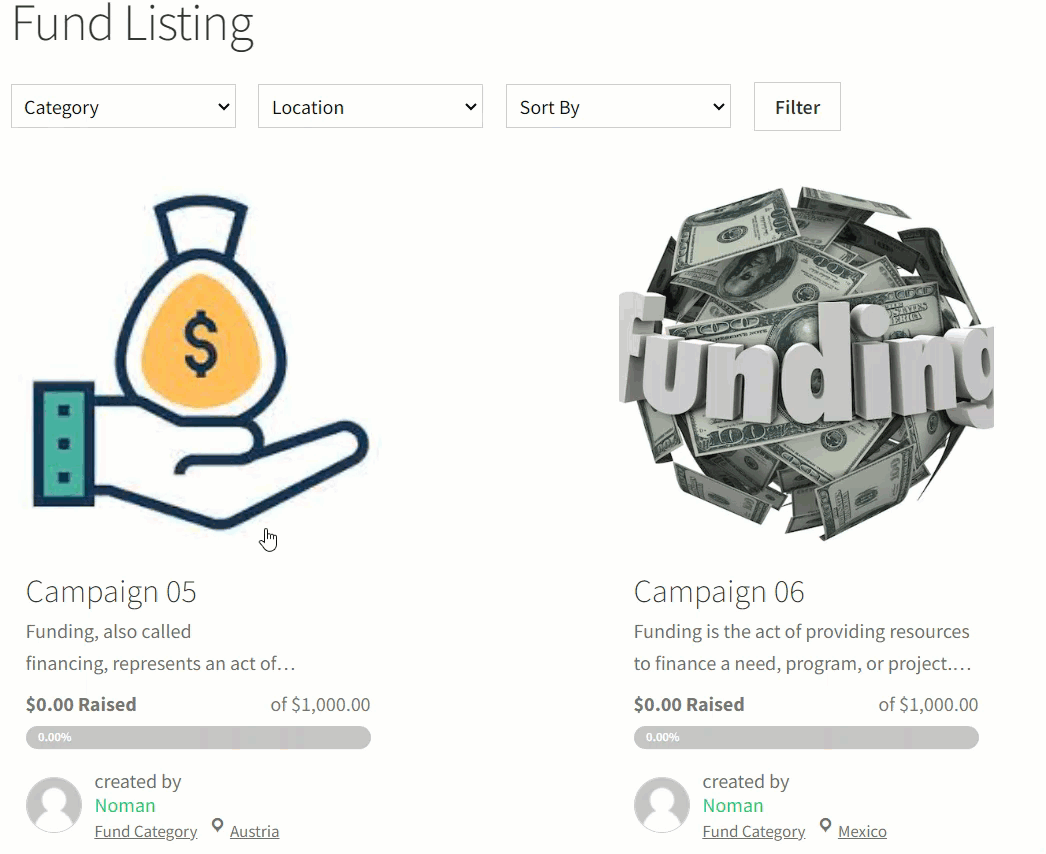
Front-End Impact
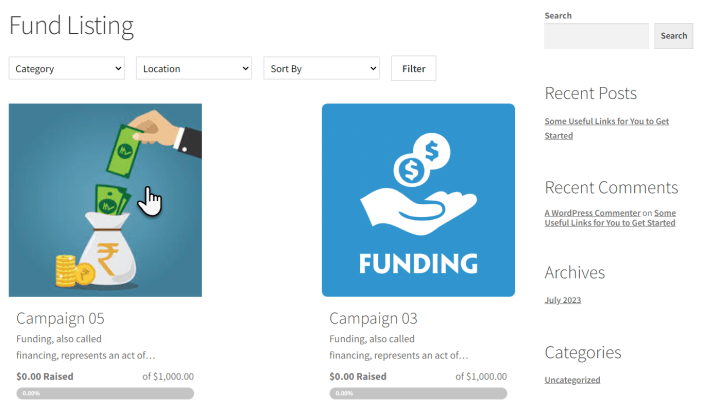
– Category Filter
- Go to the campaign listing page on the front-end.
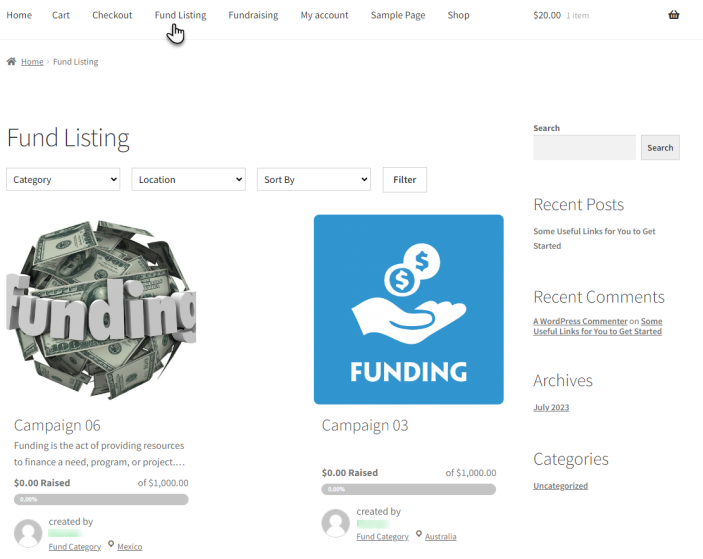
- Users can filter campaigns by category.
- Select the category from the Category filter dropdown.
- Click on the Filter button.
- The system will display all the campaigns that belong to the selected category.
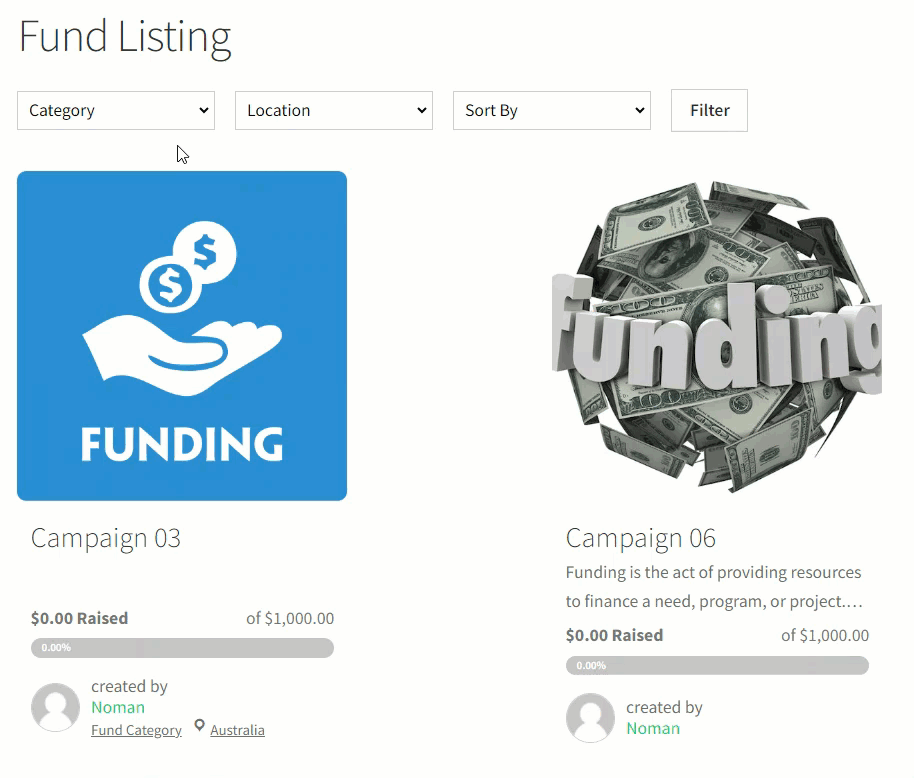
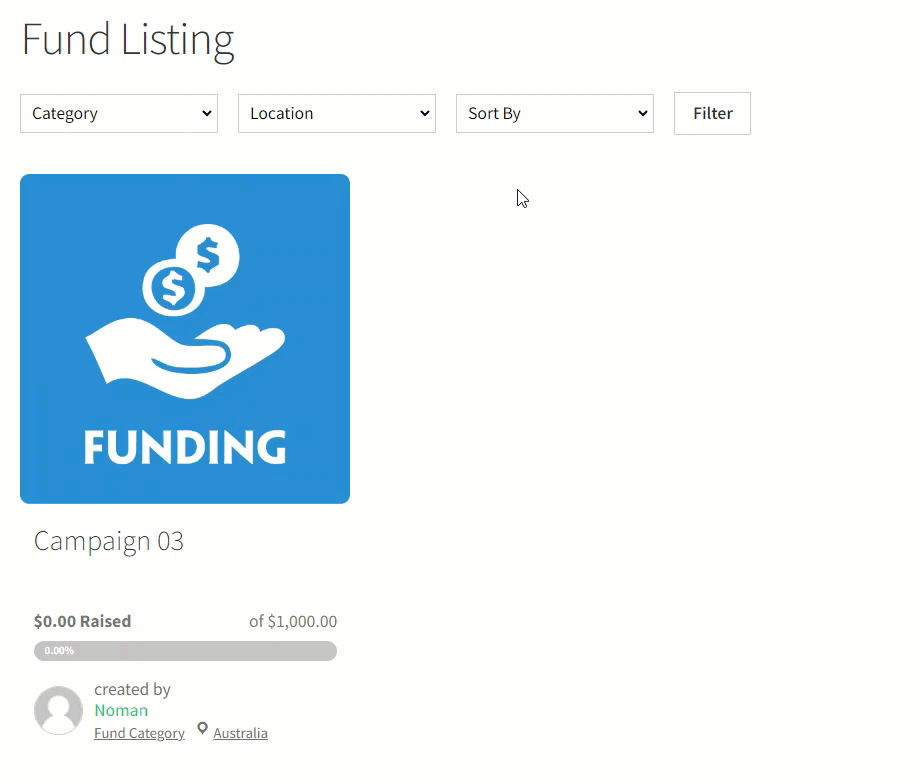
Location Filter
- Users can filter campaigns by Location.
- Select the Country from the Location filter dropdown.
- Click on the Filter Button.
- The system will display all the campaigns that belong to the selected Country.
Sort by Filter
- Select the sorting options from the Sort By filter dropdown to sort campaigns.
The available sorting options are:
- Newest: This option displays the most recently created campaigns first, based on the creation date.
- Most Funded: This option displays campaigns based on their funding goals achieved, with the campaigns having achieved 75% or more goals shown first.
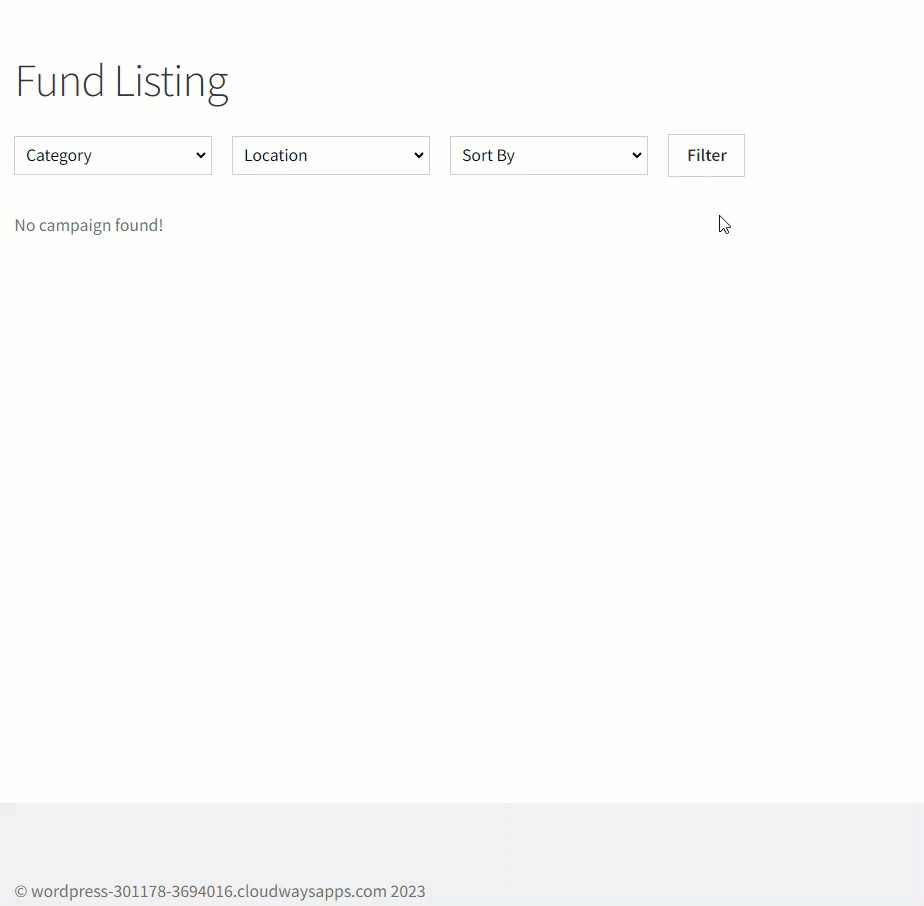
Note: If a user selects multiple filters. The result will reflect the selected Category, Country, and Sorting preferences. The system provides the results as per the user’s choices.
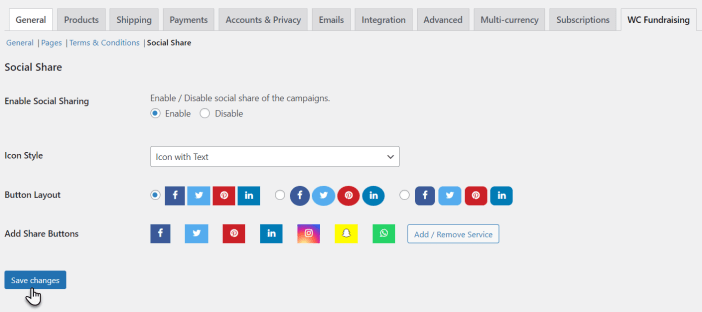
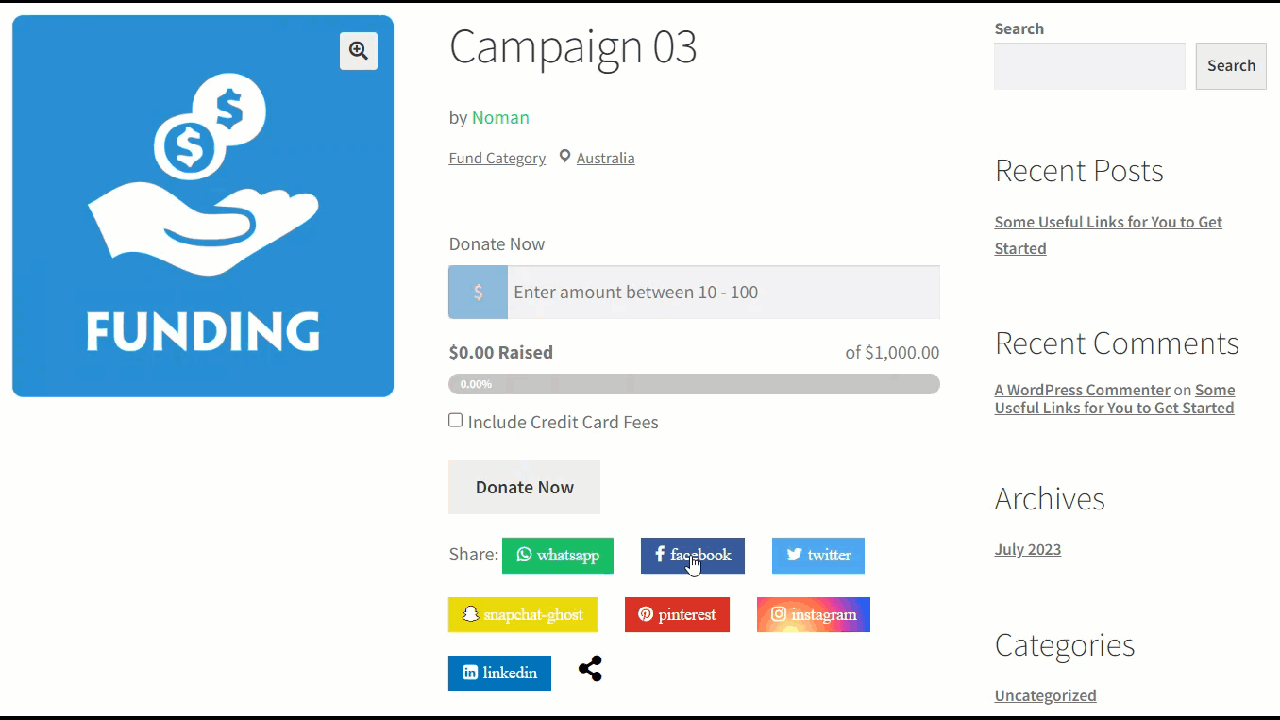
Social Share
↑ Back to top- Navigate to Admin Dashboard → Woocommerce → Settings → WC fundraising → Social Share
- Select the WC Fundraising tab within the settings.
- Go to the Social Share within the WC Fundraising tab.
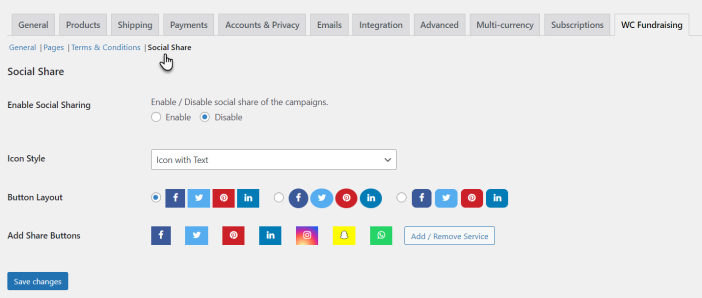
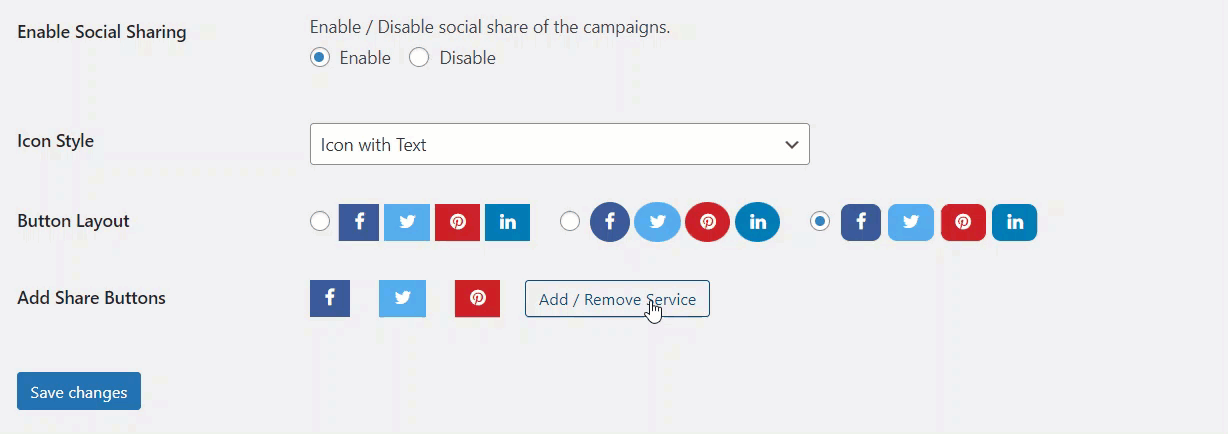
Enabling/Disabling Social Share
- In the social share tab, users will find an option to enable or disable social share.
- When social sharing is enabled, front-end users will see a social share icons button for campaigns that allows them to share content with social media platforms.
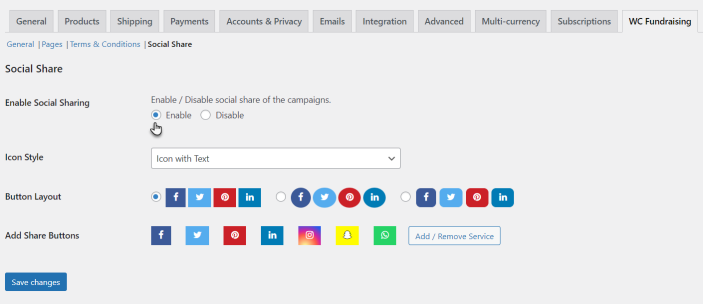
- When a social share is disabled, the social share icons button for campaigns will not be visible to the users.

- When the user enables or disables the social sharing radio button, the user needs to click on the save changes button to apply the changes on the front-end.
Icon Style Configuration
- This section will allow the users to choose the style of social icons displayed on the front-end.
- Select the options from the dropdown.
- Icon only: Displays social icons without accompanying text.
- After selecting, Click on the Save changes button.
- When the user selects icons with text from the dropdown, it will display icons with text.
- Icon with text: Displays social icons with accompanying text.
- After selecting, Click on the save changes button.
Front-End Impact
- Icon Only: Front-end users will see the social icons without text.
- Icon with Text: Front-end users will see thesocial icons with text.
Button Layout Configuration
- In the button layout section, users can choose from available layouts to display social buttons on the front-end.
- Select the layout options from the available choices.
- After selecting, Click on the save changes button.
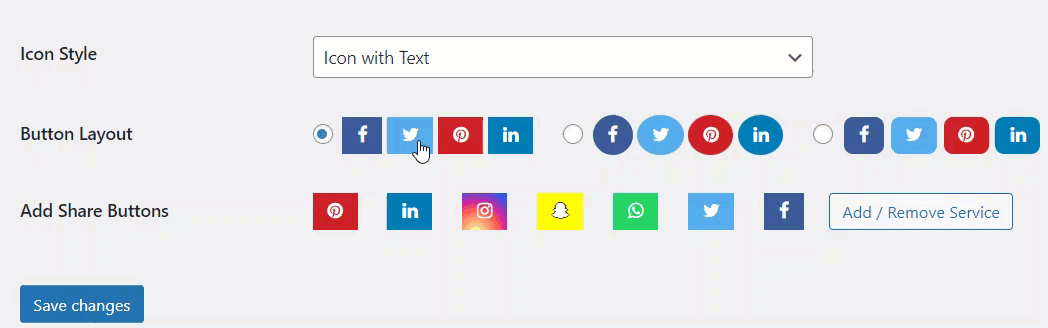
Adding Share Button
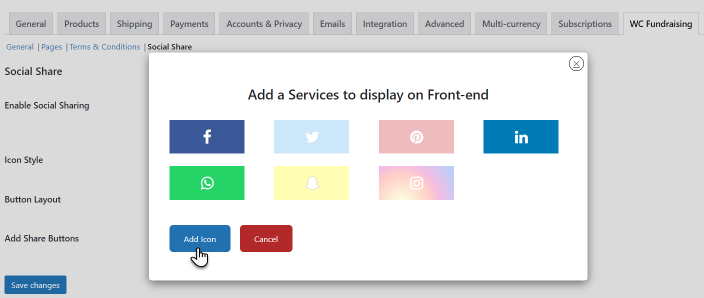
- Users can add and remove social services displayed on the website.
- Users click on the Add/Remove service button, and a popup window will open that displays the available social services.
- Then click on the Add Icon button to add social services.
- The selected service will be displayed on the front-end for users to share campaigns.
- Click on the save changes button to reflect on the front-end for users.
Front-End Impact
- Users will go to the Website and log in.
- Once logged in, the users will navigate to the Campaign Listing page.
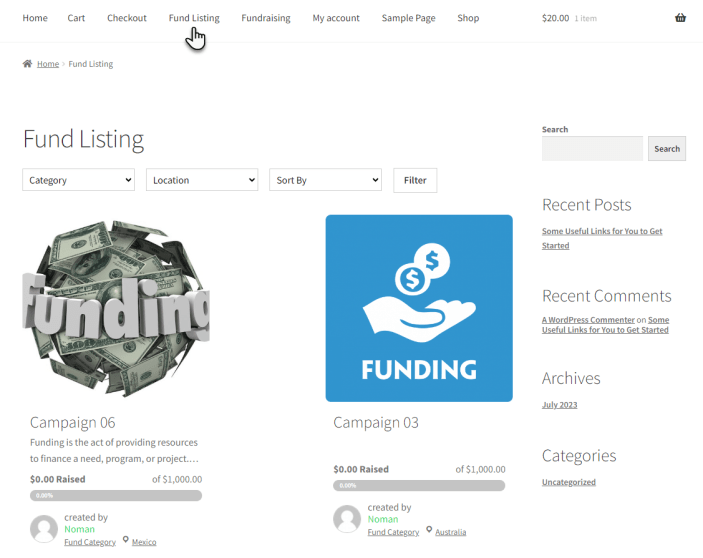
- On the Campaign Listing page, all the campaigns will appear.
- Click on the campaign that you want to share, and the campaign page will open.
- Below the campaign, the user will see the share buttons.
- All the share buttons will be visible on the campaign page, allowing users to share the campaign on social media.
- These buttons represent various social media platforms like Facebook, WhatsApp, Linkedin, Instagram, Twitter, etc.
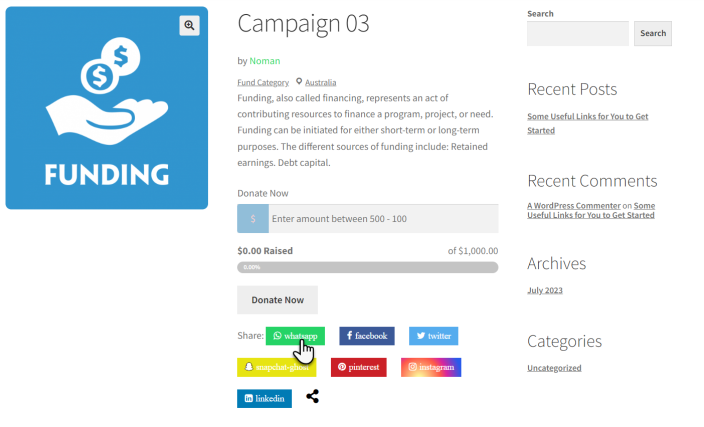
- Clicking the social media icon will trigger a sharing action.
- When the share button is clicked, a popup browser will appear that will redirect the user to the social service page.
- Users will log in to the social service and share social campaigns.
- Users can also copy and share Campaign share links that allow easy access to the campaign page.
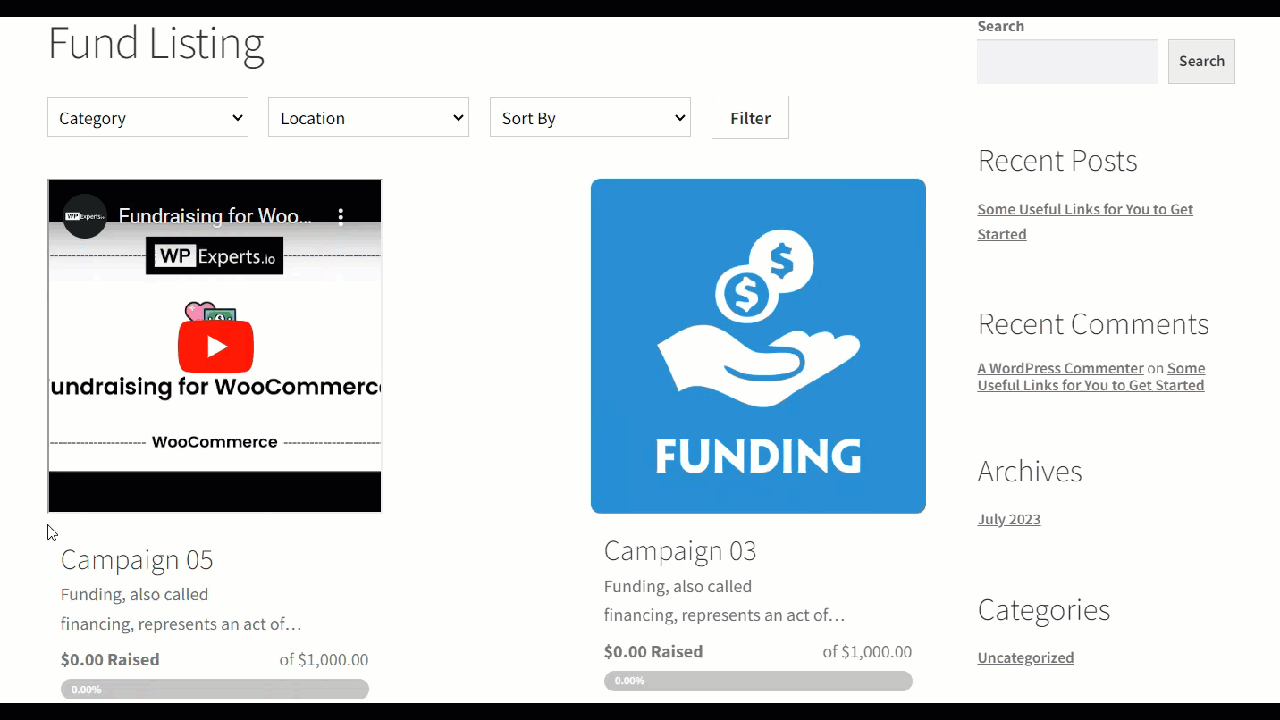
Video Support
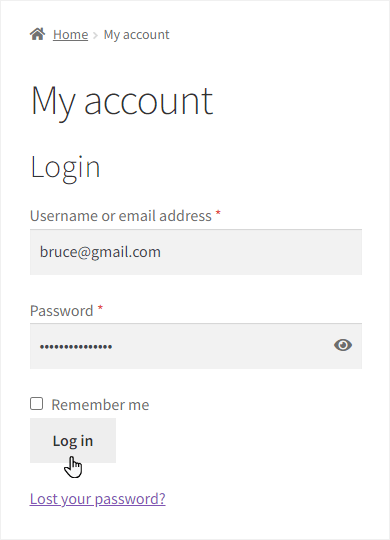
↑ Back to top- Log in to your WordPress Website using a fundraiser user role account.
- Once logged in, the users will navigate to the Funding Dashboard.
- Click on the Create Campaign button to add a new campaign.
- Once the user clicks on the Create Campaign button, the Create Campaign popup will appear.
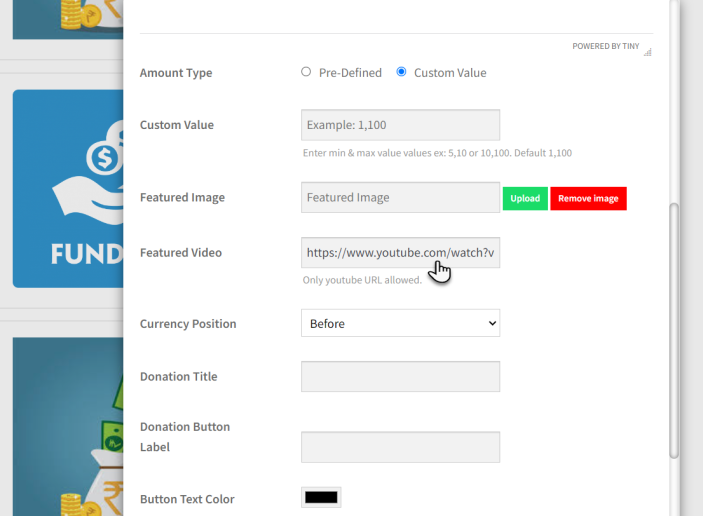
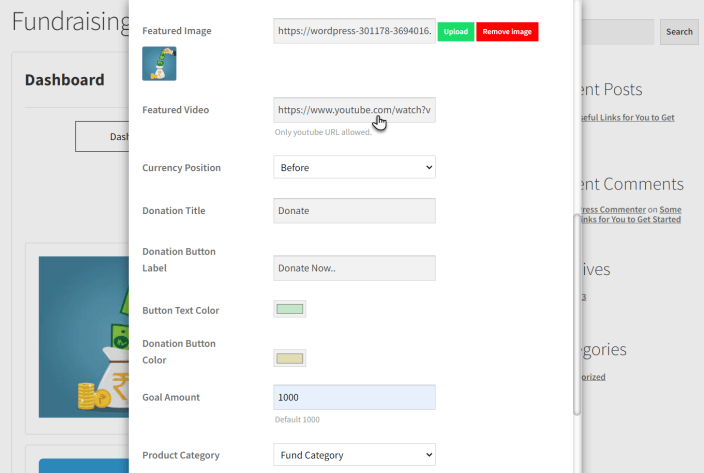
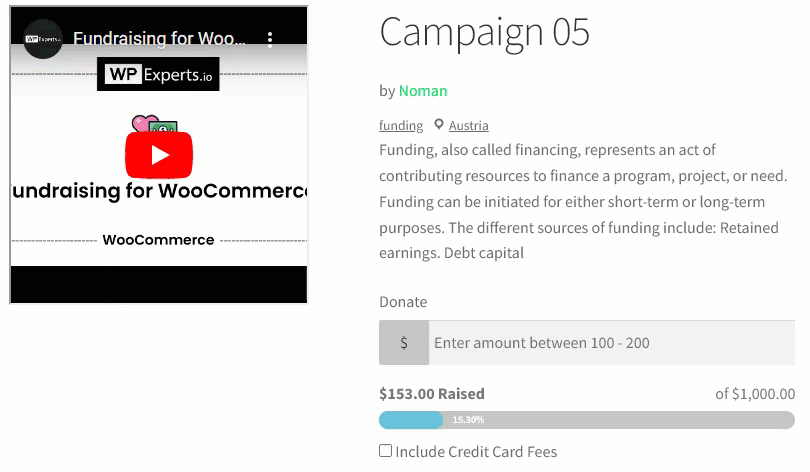
- On the create campaign popup, users can enter the video link (only Youtube URL allowed) in the Featured Video field.
- Once the user adds the video link and fills in all the campaign details, the user will click on the Submit button to save the campaign.

- Users can edit the campaign and add video links in the Featured Video field.
- First, go to the campaign page on the Fundraising dashboard.
- Choose a campaign that users want to edit.
- Click on the Edit button, and a popup will appear where users can paste a YouTube URL video link in the Featured Video input field.
- Click on the submit button to save the video in the campaign.
Featured Video Availability
- Users will go to the Website and log in.
- Once logged in, the users will navigate to the Campaign Listing page.
- Click on the campaign.
- Once a user clicks on a campaign, the user will enter the campaign page, and the page will display the video.
Featured image and video availability
- If both the featured Image and video are saved for the campaign:
- The image will be displayed on the campaign listing page.
- The video will be displayed on the campaign page.
Displaying a video without a featured image
- If the featured image is not available for the campaign, only the video is available on the campaign.
- The video will be displayed on both the campaign listing and single campaign pages.
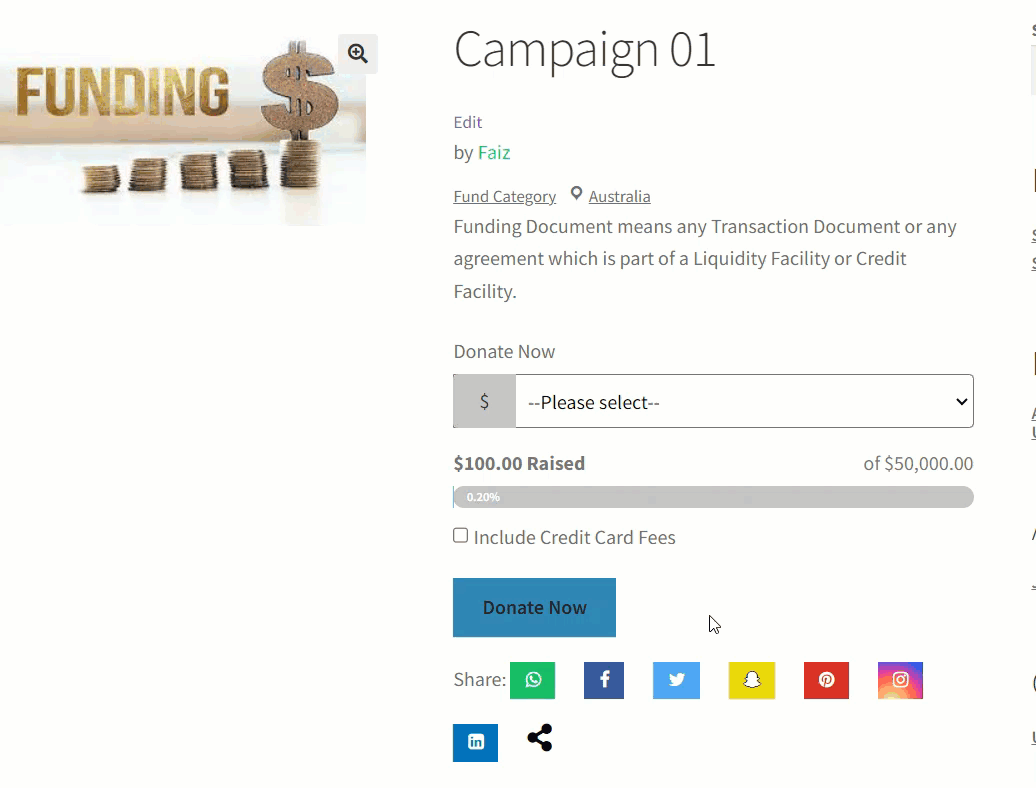
Credit Card Fees
↑ Back to top- Navigate to Admin Dashboard → Woocommerce → Settings → WC fundraising → General
- Select the WC Fundraising option within the settings menu.
- Access the General settings within the WC Fundraising tab.
- By default, the credit card fees option will be disabled.
- When the user enables the radio button, the credit card fees option will appear in the create campaign popup.
- Click on the save changes button to reflect on the front-end user.
Front-End Impact
- Go to the campaign fundraising dashboard and click on the Create campaign button. Users will have the option to enable or disable the credit card fees.
- When enabled, additional options for credit card fee configuration will be available on the Create campaign popup.
- These options are for specifying the credit card fee type, either fixed or percentage, to be charged from the donor.

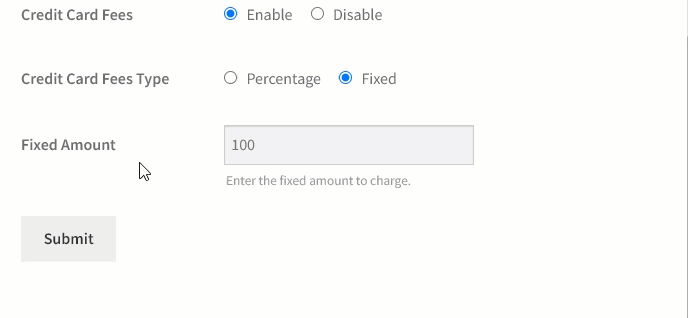
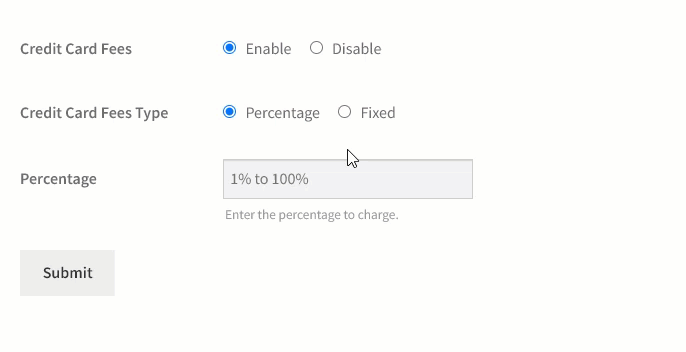
Credit Card Fees Type
- Users can choose the credit card fee type.
- There are two types: fixed & percentage.
Percentage Configuration
- Click on the Percentage radio button from the Credit Card Fees Type.
- If the user selects Percentage amount, the user can enter the specific Percentage amount to be charged as credit card fees.
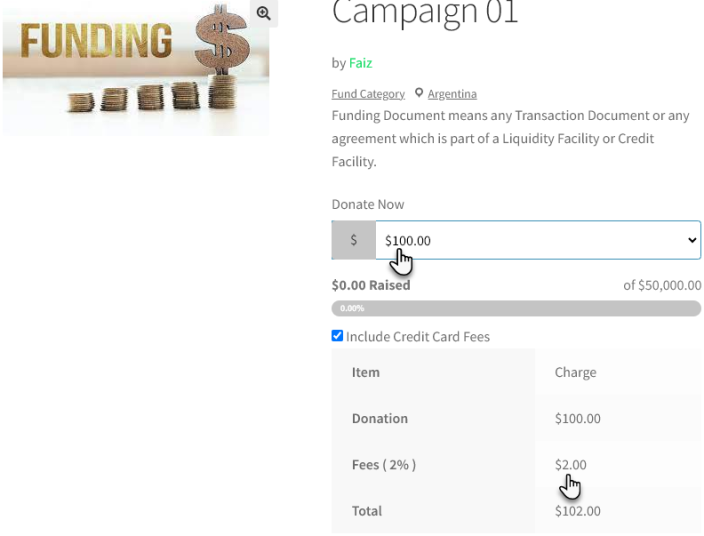
- For example, we have taken 2% as the Percentage Amount, such as if the donation amount is $100, so the 2% of $100 would be our Credit Card Fee.
- Click on the Submit button.
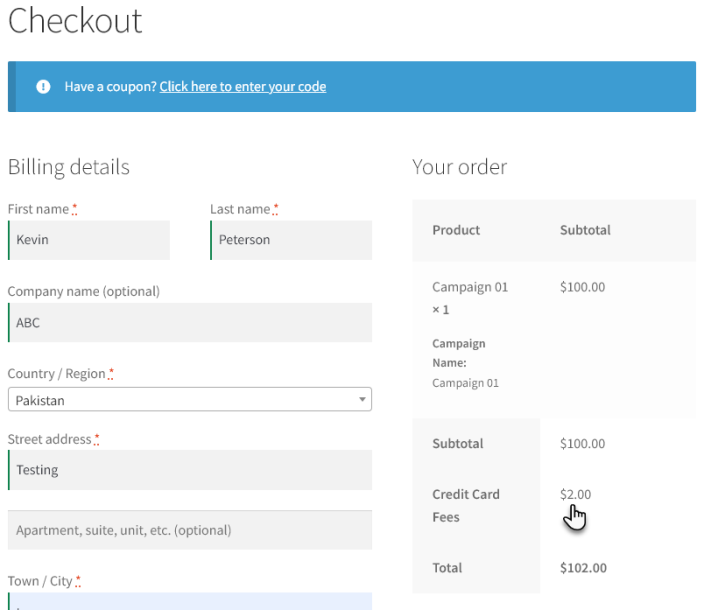
Displaying Fees Calculation
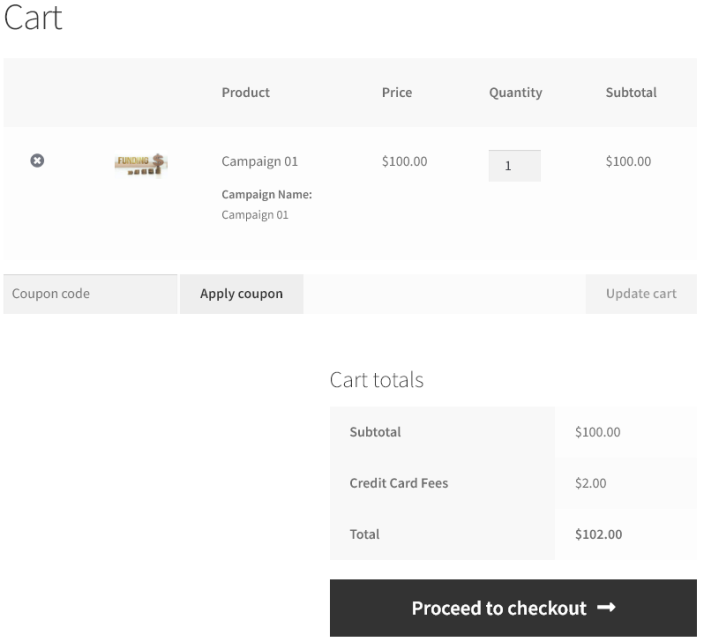
The fee calculation will be displayed separately on the single campaign page, cart, and checkout page.
Campaign page
- Checkout page
- Cart
- Fixed Configuration
- If the user selects a Fixed amount, the user can enter the specific fixed amount to be charged as credit card fees.
- For example, entering the fixed amounts as 10 would add credit card fees.
- Click on the Submit button.
- Displaying Fees Calculation
- The fee calculation will be displayed separately on the single campaign page, cart, and checkout page.
- Campaign page
- Go to the campaign listing page and select a campaign.
- The campaign page will open.
- Here, the credit card fee is displayed as Fees.

- Click on the Donate Now button and proceed to the Checkout page.
- Checkout Page
- Cart

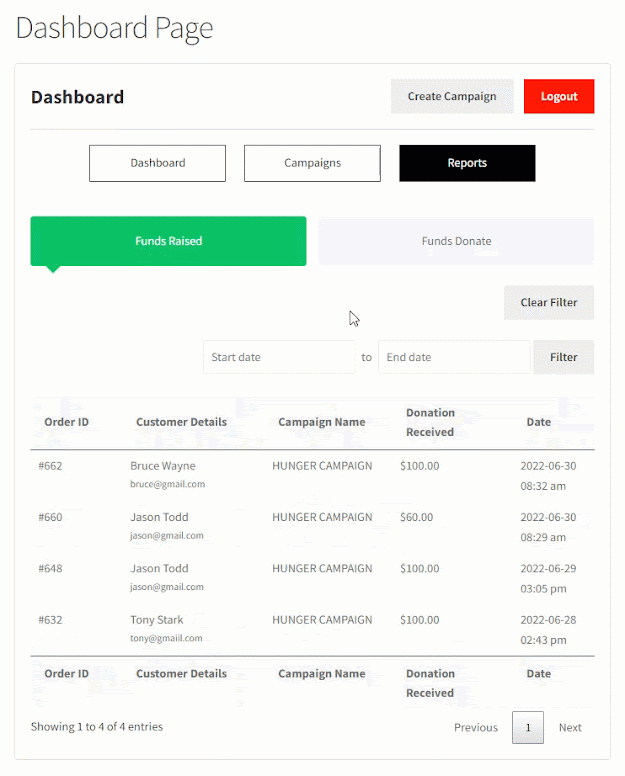
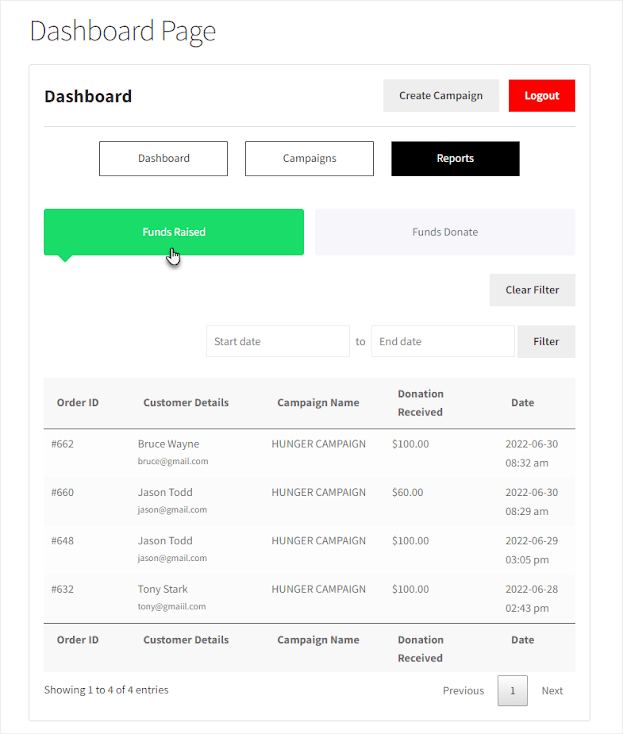
Reports Download
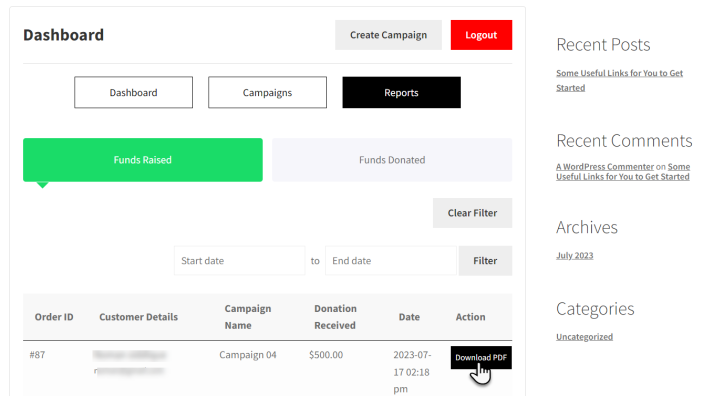
- Navigate to the Campaign Dashboard.
- Go to the Report section.
- The Reports section will open, and two tabs will be presented: Fund Raised and Fund Donated.
- Fund Raised Report
- Click on the Funds Raised tab, and all the reports and information will appear below.
- Within the section, there is an action column with a Download PDF button available to initiate the download process.
- Click on the Download PDF button.
- This action will trigger the download process.
- Once the download is complete, navigate to the chosen location on your computer or device where the report was saved.
- Open the report.
- Clear Filter
- When the user clicks the clear filter button, it triggers an action that removes the applied data range.
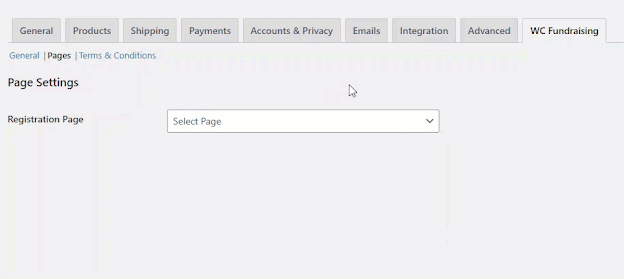
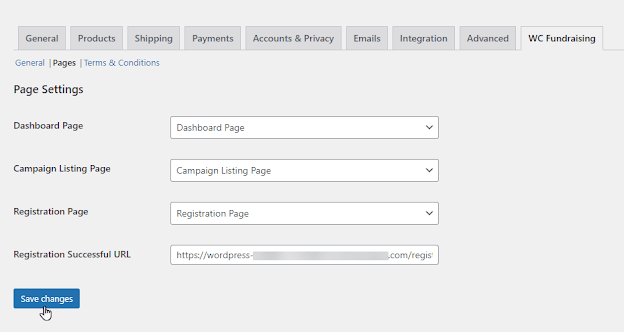
Pages
↑ Back to top- Navigate to the Pages sub-tab.

Dashboard Page
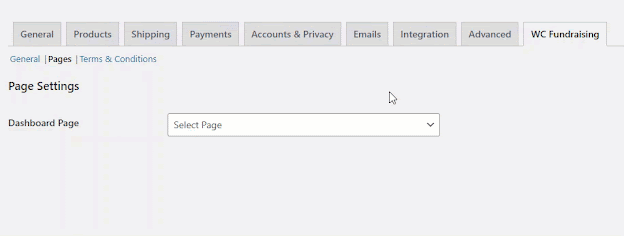
↑ Back to top- In the Dashboard Page option, click on the dropdown menu and select the page for the Fundraising dashboard.
Front-End Impact

Campaign Listing Page
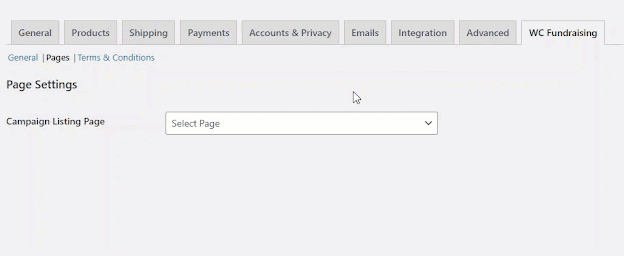
↑ Back to top- In the Campaign Listing Page option, click on the drop-down menu and select the page where all campaigns will appear.
NOTE – In the shop page you already have products so please select other than the shop page to display the campaigns.
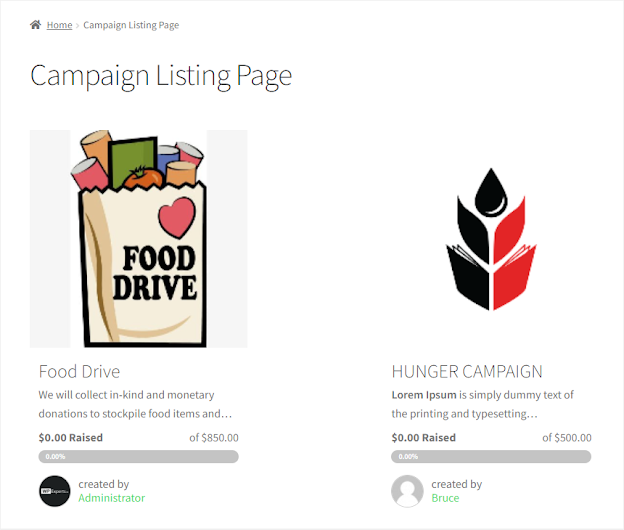
Front-End Impact
Registration Page
↑ Back to top- In the Registration Page option, click on the dropdown menu and select the page on which the users will register to become Fundraisers.
Front-End Impact
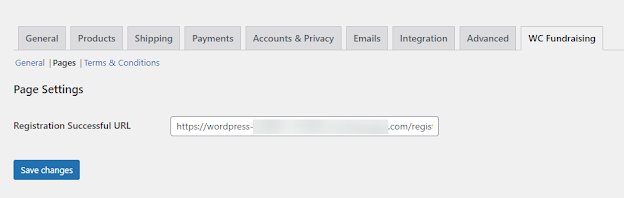
Registration Successful URL
↑ Back to top- In the Registration Successful URL option, enter the URL of the page, which will redirect the user once the registration is successful.
Front-End Impact
- According to the above configuration, we can see that we entered the URL of a titled Registration Successful, so when a user clicks on the registration button, the plugin will redirect the user to the Registration Successful page.

- Click on the Save change button to apply your settings.
Terms & Conditions
↑ Back to top- Navigate to the Pages sub-tab.

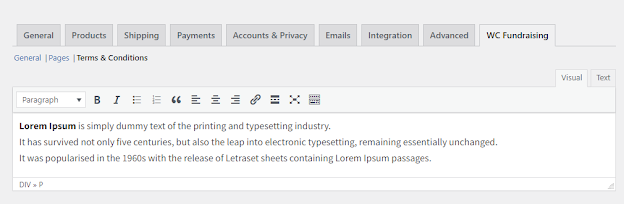
Terms & Conditions textbox
↑ Back to top- Write the Terms & Conditions in the given textbox.
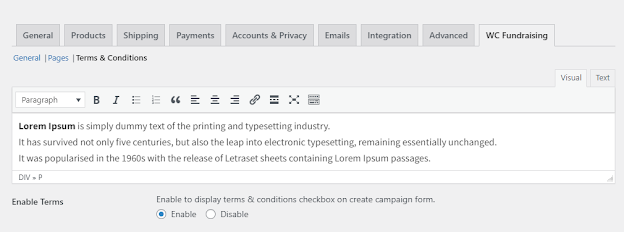
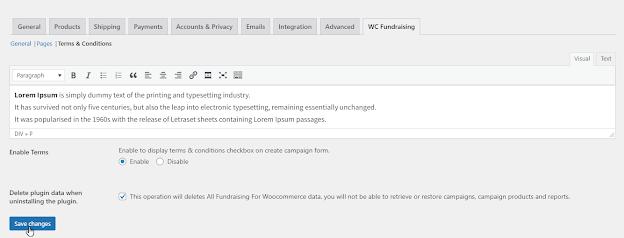
Enable Terms
↑ Back to top- In the Enable Terms option, click the Enable radio button to display terms and
- conditions when creating a campaign from the Front-End.
Front-End Impact

Delete plugin data when uninstalling the plugin
↑ Back to top- In the Campaign Status option, checkmark the checkbox so that when the plugin data is deleted during plugin uninstallation.

- Click on the Save change button to apply your settings.
Workflow Overview
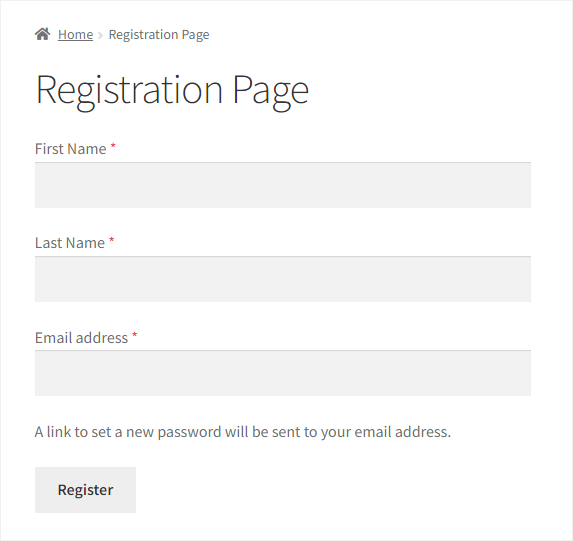
↑ Back to topRegistration
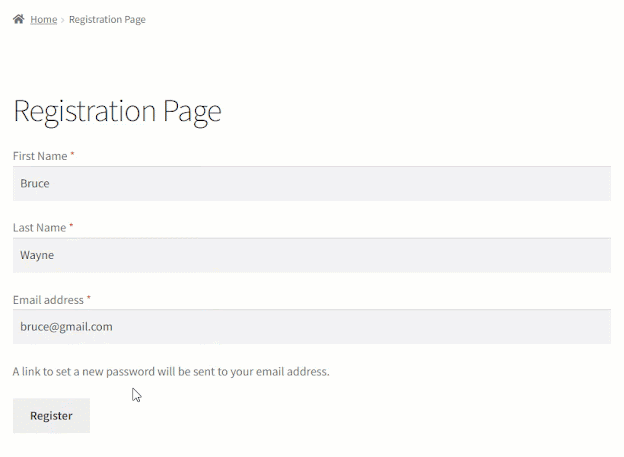
↑ Back to top- The user will go to the website and navigate to the Registration page.
- The user is required to fill in the text fields and then click on the Register button.
- If the registration is successful, the user will be redirected to a new page configured in the Registration Successful URL option on the Page Settings page.
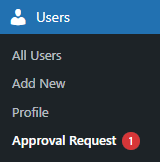
- The Administrator will now navigate to the WordPress Admin Dashboard → Users → Approval Request.
- On this page, all the registrations will appear.
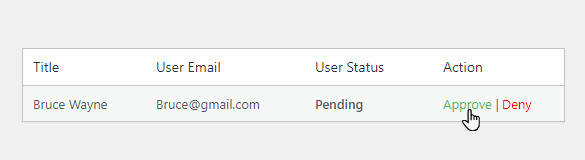
- The Administrator can either Approve or Deny the user in the Actions column.
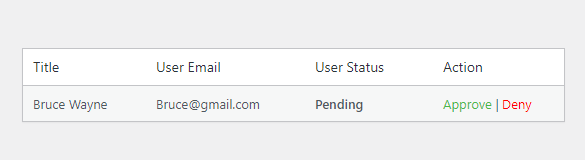
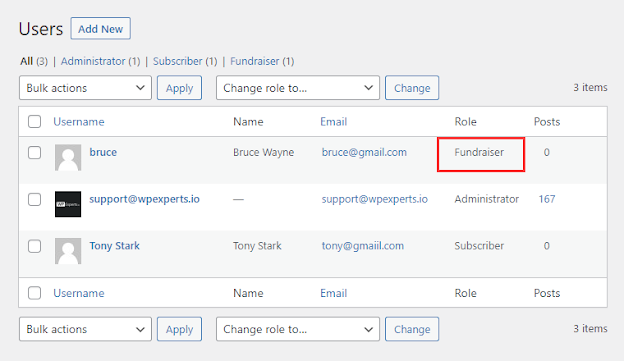
- If the Administrator clicks on the Approve button, the user will now get the Fundraiser user role.
- Navigate to the WordPress Admin Dashboard → Users → All Users.
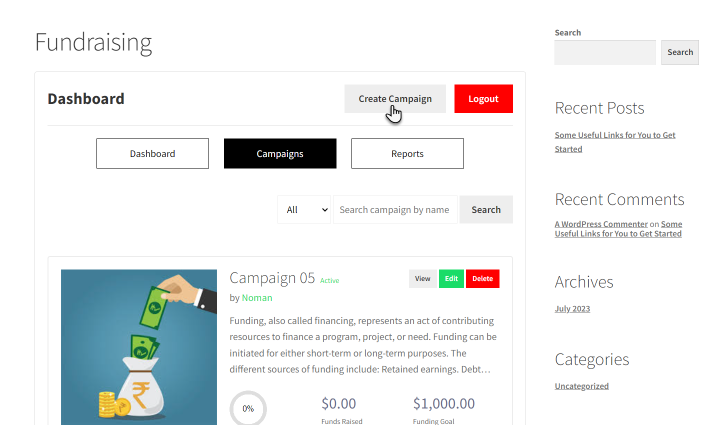
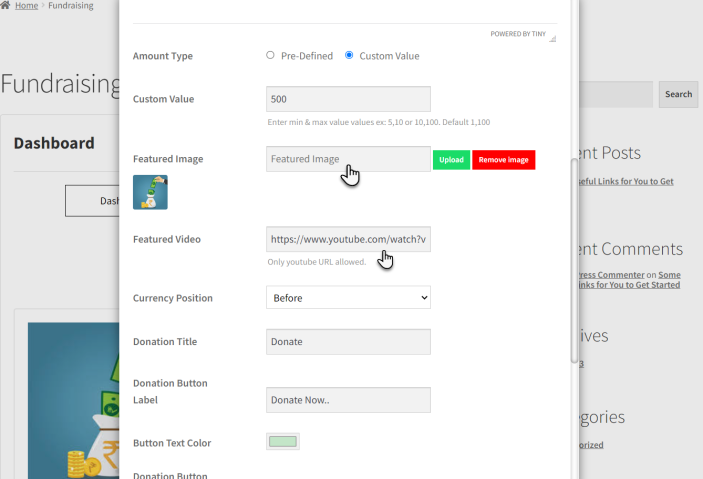
Create Campaign
↑ Back to topCreate Campaign – Fundraiser User
- The user having the user role Fundraiser will go to the website and log in with his credentials.
- Once logged in, the user will navigate to the Dashboard page.

- Once logged in, the user will navigate to the Dashboard page.
- On the Dashboard page, click on the Create Campaign button.
- A popup will appear regarding the Campaign configuration details.
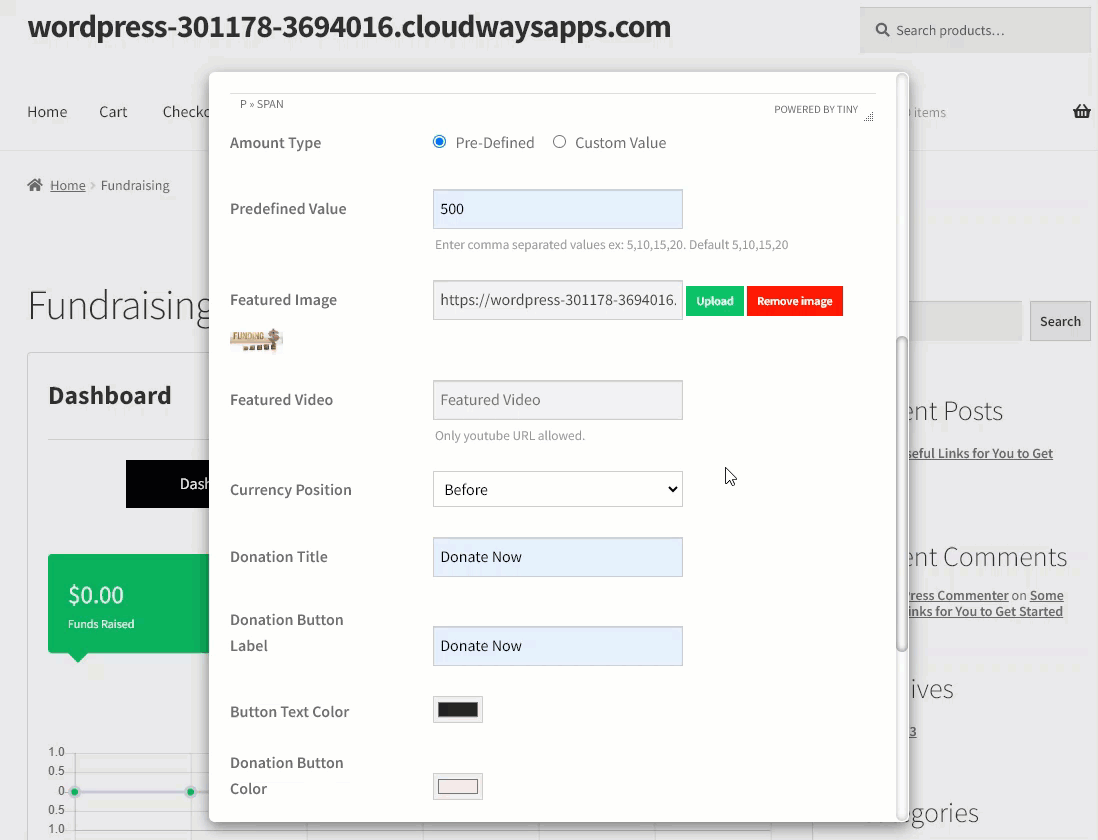
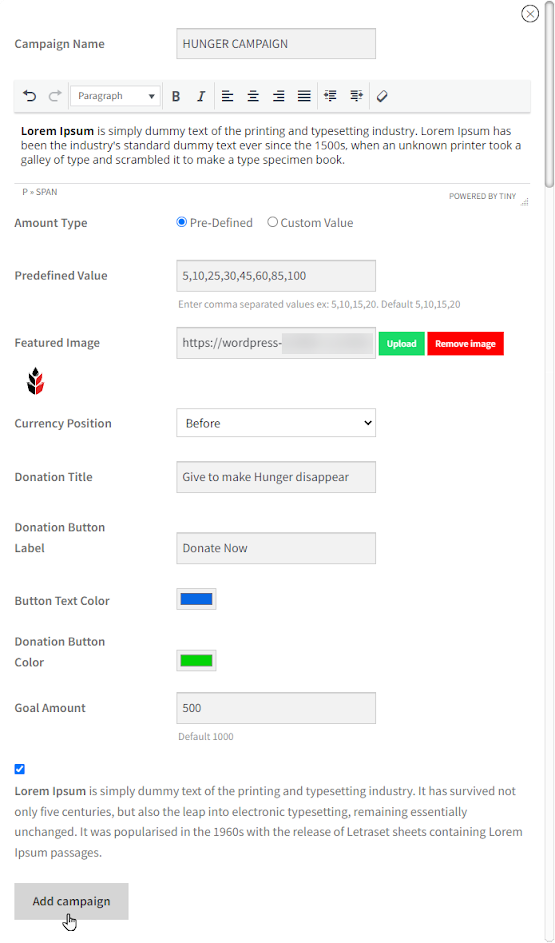
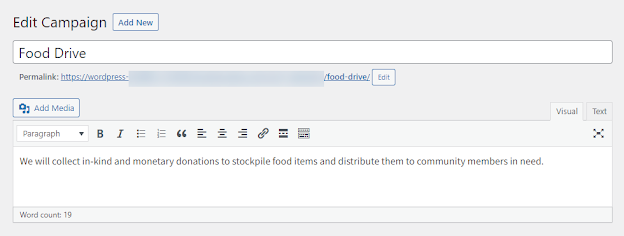
- Enter the Campaign Name.
- Enter the Campaign Details in the textbox.

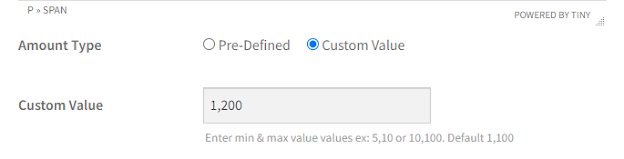
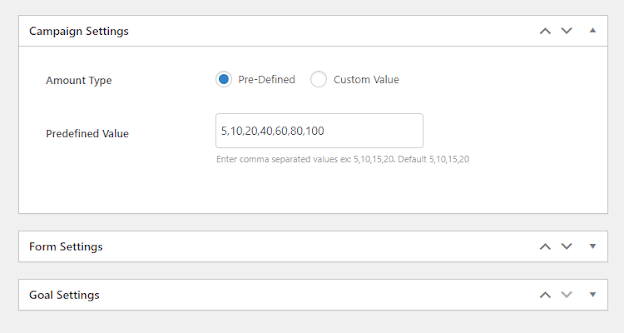
- Select the Amount Type from the available options, i.e. Pre-Defined or Custom Value.
- If the user selects Pre-Defined, it will show the fixed value for donation. Also, a Predefined Value option will be available below the Amount Type option. Enter the values for donation in this option.
- If the Fundraiser does not enter any values in the Predefined Value option, the values will be 5,10,15,20 by default.

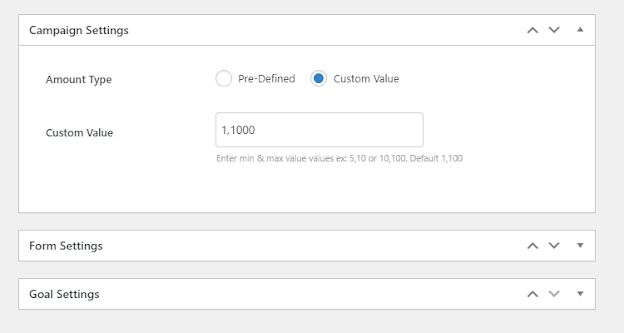
- If the user selects Custom Value, it will allow your customer to enter the amount according to his desire. Also, a Custom Value option will be available below the Amount Type option. Enter the minimum and maximum value for donation in this option. The user will only be able to donate between the minimum and maximum value.
- If the Fundraiser does not enter minimum and maximum values in the Custom Value option, the minimum and maximum values will be 1,1000 by default.
- Upload an image for your campaign by clicking on the Upload button in the Featured Image option.

- The user can remove the selected image by clicking the Remove image button.

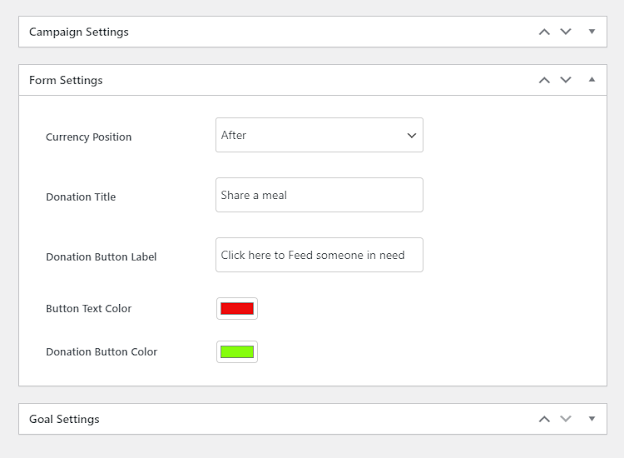
- Select Before or After from the dropdown menu in the Currency Position option.

- Enter the Donation Title in the textbox. This title will appear above the Amount Type field on the Front-End.

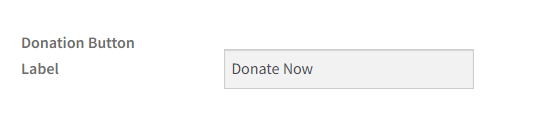
- Enter the Donation Button Label in the textbox. This label will appear on the donation button on the Front-End.
- In the Button Text Color option, select the text color that will appear on the button.
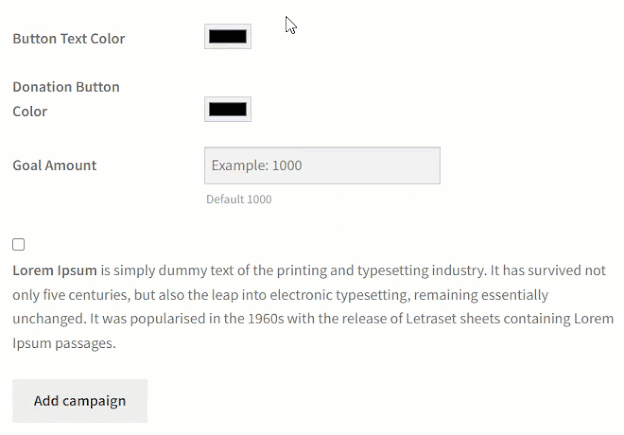
- In the Donation Button Color option, select the color of the donation button.
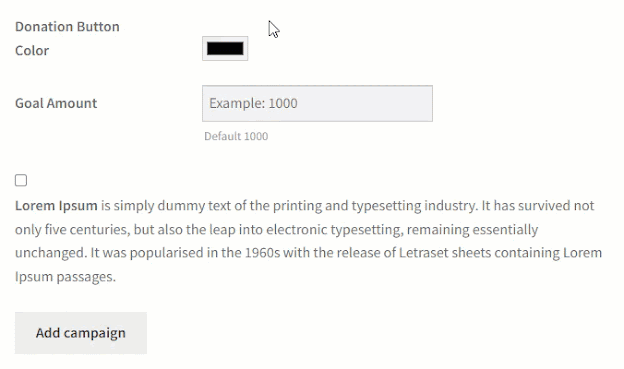
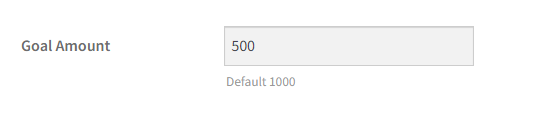
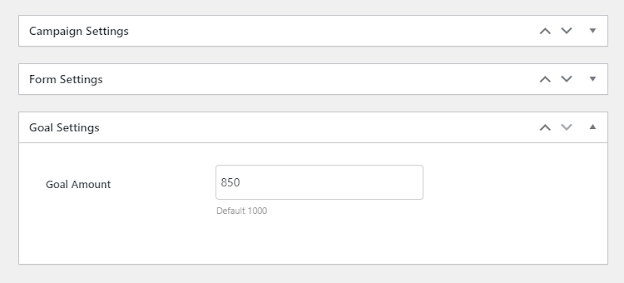
- Enter the goal amount of the Campaign in the Goal Amount option.
- If the Fundraiser does not enter any amount, the goal amount will be 1000 by default.
- A Terms & Conditions checkbox will appear at the bottom of the page that has been configured in the Terms & Conditions sub-tab.
- The Terms & Conditions will only appear when the Enable Terms option is enabled and only appear when the campaign is created from the Front-End.
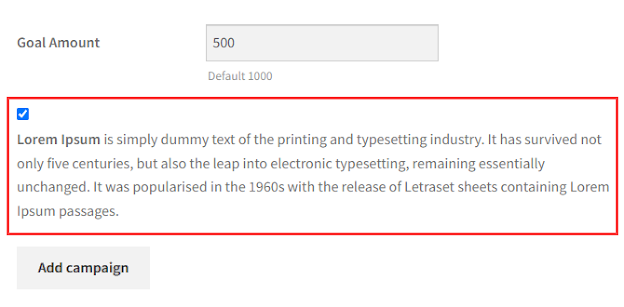
- Once done, click on the Add campaign button.
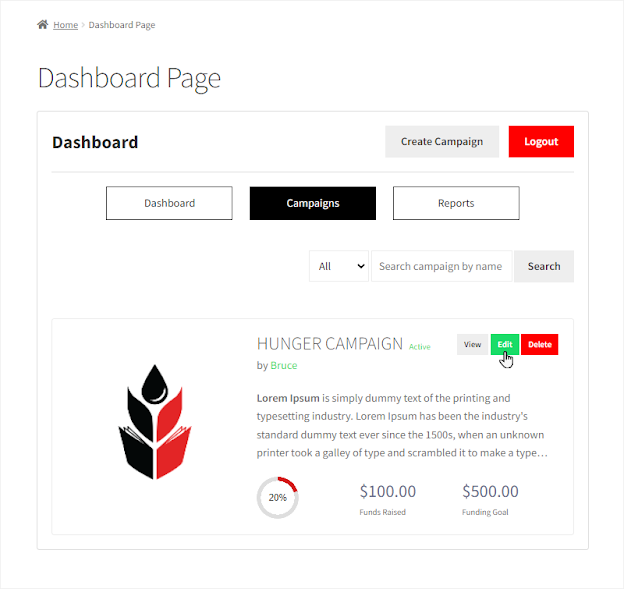
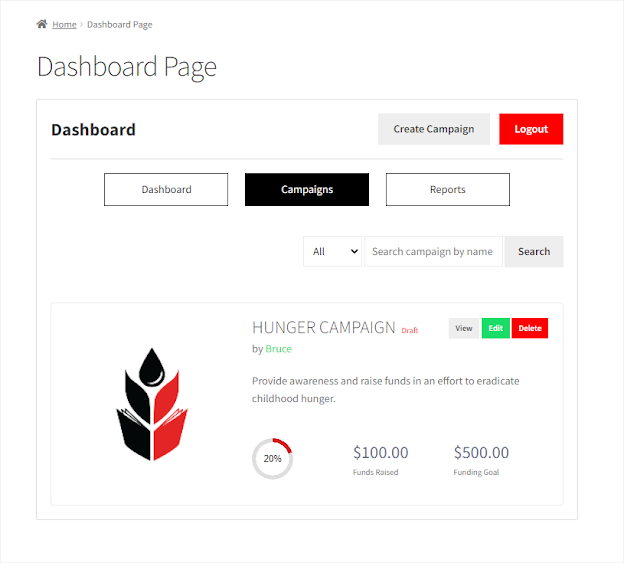
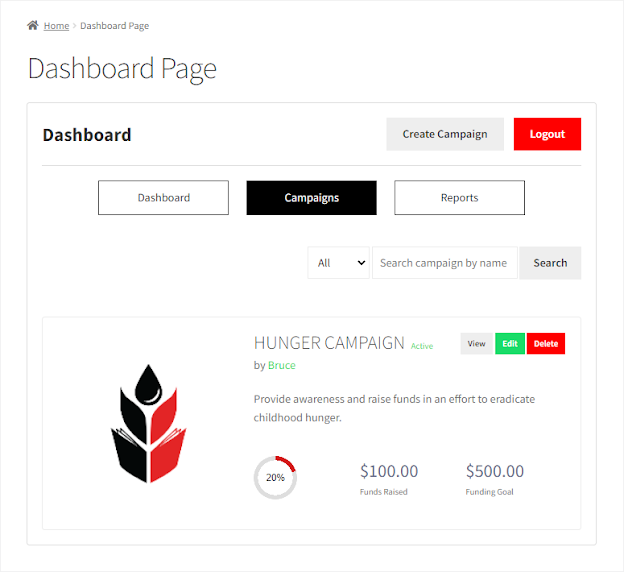
- The campaign is successfully created and mentioned in the Campaigns tab on the Dashboard page.
- The campaign’s status is Draft because the Campaign Status is set to Draft in the General sub-tab.
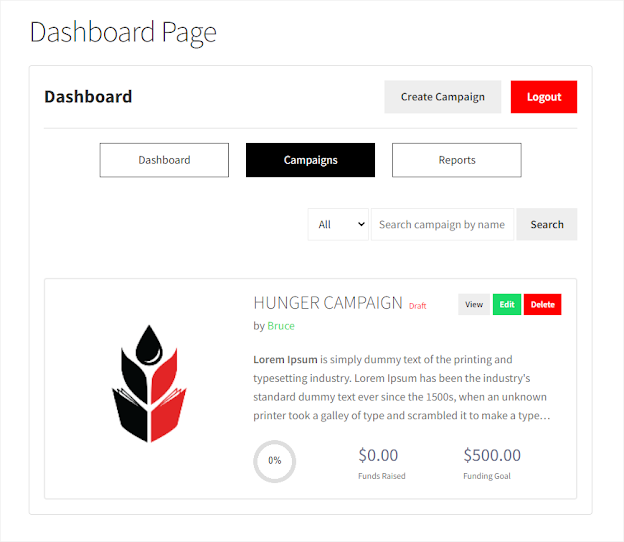
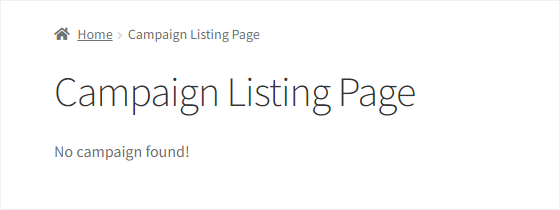
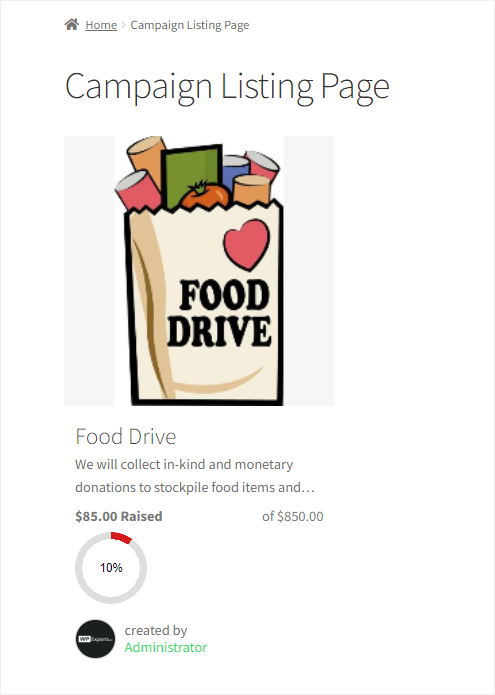
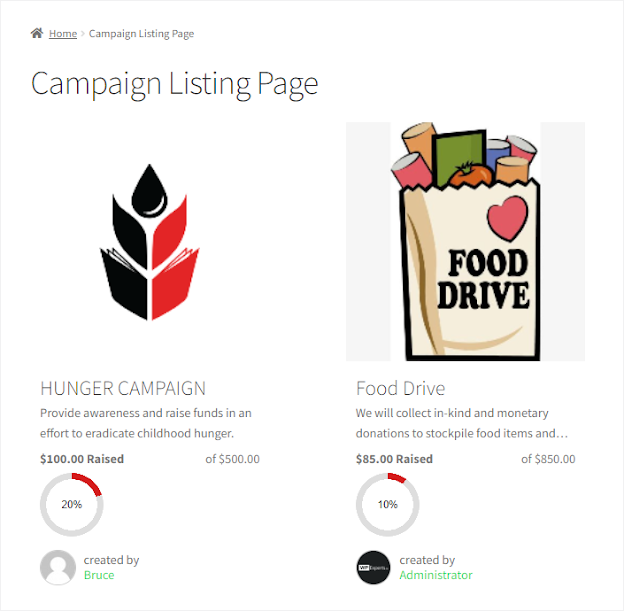
- Since the campaign’s status is Draft, it will not be visible on the Campaign Listing page.
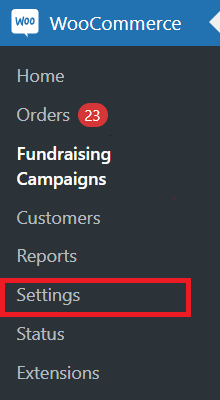
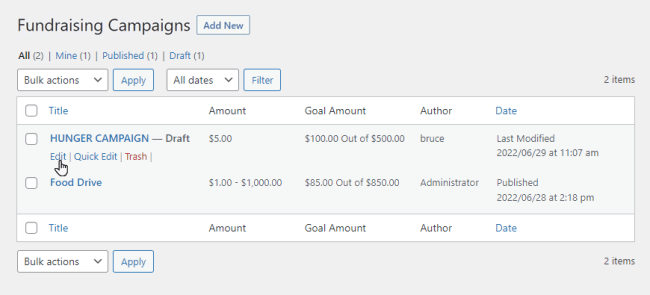
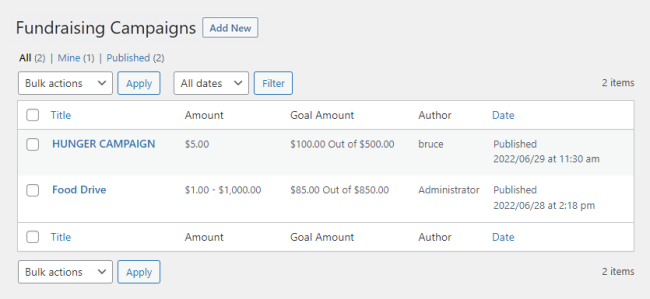
- The Administrator will now navigate to the WordPress Admin Dashboard → WooCommerce → Fundraising Campaigns.
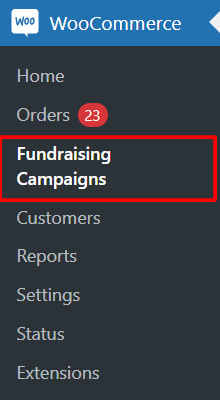
- Now the Administrator is on the Fundraising Campaigns page.
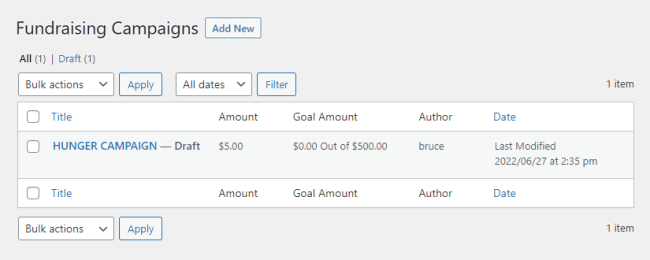
- Hover over the Campaign to view the further sub-options
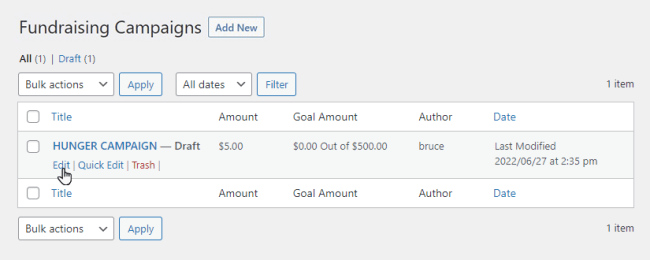
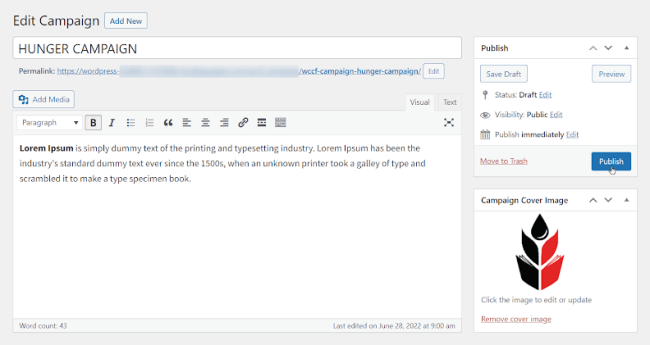
- Now you’re on the Edit Campaign page.
- Click on the Publish button.

- Once the campaign is Published, it will appear on the Campaign Listing page.

Create Campaign – Administrator
- The Administrator will navigate to WordPress Admin Dashboard → WooCommerce → Fundraising Campaigns.

- Now the Administrator is on the Fundraising Campaigns page.
- Click on the Add New button.
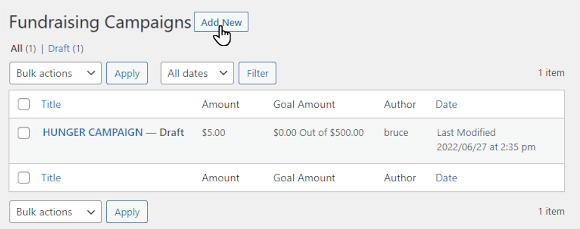
- Now you’re on the Add New Campaign page.
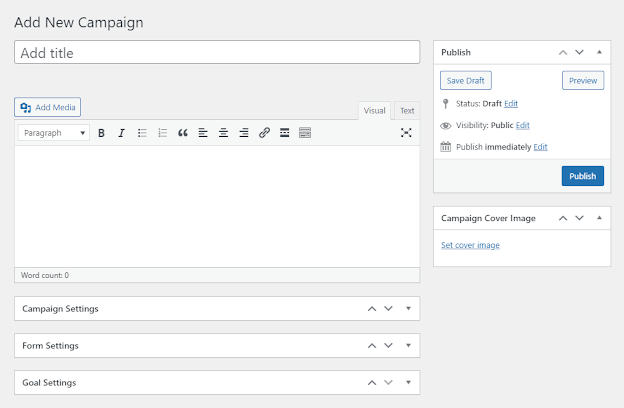
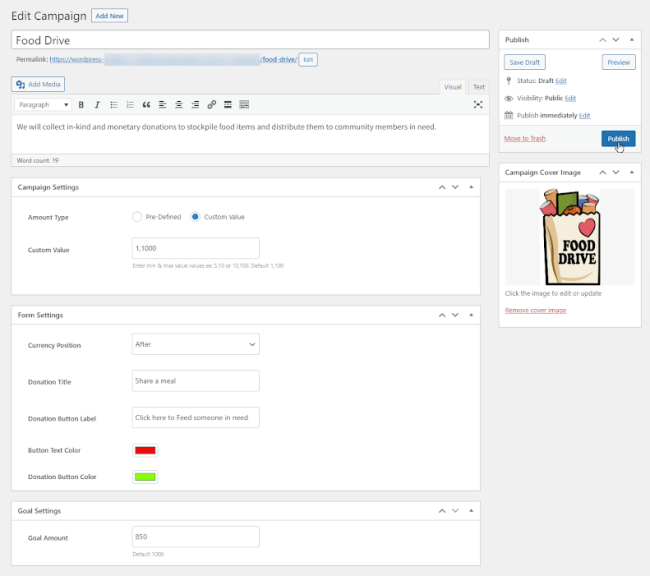
- Enter the Campaign Name.
- Enter the Campaign Details in the textbox.
- Go to the Campaigns Settings section.
- Select the Amount Type from the available options, i.e. Pre-Defined or Custom Value.
- If the user selects Pre-Defined, it will show the fixed value for donation. Also, a Predefined Value option will be available below the Amount Type option. Enter the values for donation in this option.
- If the Administrator does not enter any values in the Predefined Value option, the values will be 5,10,15,20 by default.
- If the user selects Custom Value, it will allow your customer to enter the amount according to his desire. Also, a Custom Value option will be available below the Amount Type option. Enter the minimum and maximum value for donation in this option. The user will only be able to donate between the minimum and maximum value.
- If the Administrator does not enter minimum and maximum values in the Custom Value option, the minimum and maximum values will be 1,1000 by default.
- Go to the Form Settings section.
- Select Before or After from the dropdown menu in the Currency Position option.
- Enter the Donation Title in the textbox. This title will appear above the Amount Type field on the Front-End.
- Enter the Donation Button Label in the textbox. This label will appear on the donation button on the Front-End.
- In the Button Text Color option, select the text color that will appear on the button.
- In the Donation Button Color option, select the color of the donation button.
- Go to the Form Settings section.
- Enter the goal amount of the Campaign in the Goal Amount option.
- If the Administrator does not enter any amount, then the goal amount will be 1000 by default.
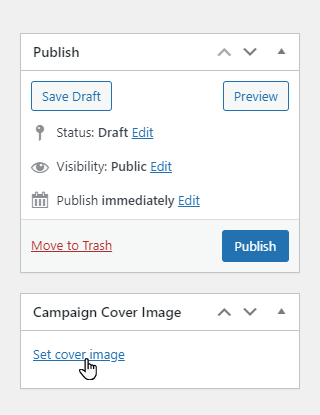
- Go to the Campaigns Cover Image section.
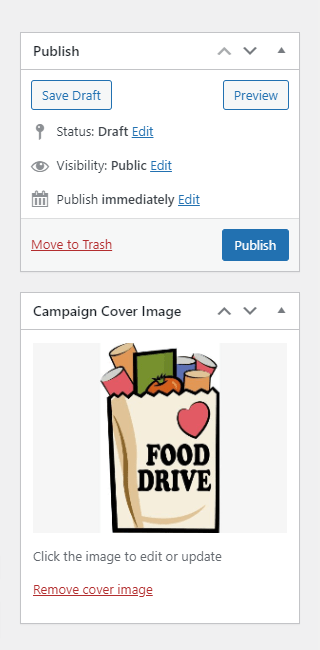
- Upload an image for your campaign by clicking on the Set cover image button.
- The user can remove the selected image by clicking the Remove cover image button.
- Once done, click on the Publish button.
- Once the campaign is Published, it will appear on the Campaign Listing page.

NOTE: There is no Dashboard page for the Administrator on the Front-End, so the campaigns created by the Administrator will only appear on the Campaign Listing page.
Update Campaign
↑ Back to topUpdate Campaign – Fundraiser User
- Navigate to the Dashboard page.
- Go to the Campaign tab.
- Click on the Edit button on the campaign.
- A popup will appear regarding the Campaign configuration details.
- Update any field according to your requirement and then checkmark the Terms & Conditions checkbox.
- Once done, click on the Add campaign button.
- The campaign is updated successfully and mentioned in the Campaigns tab on the Dashboard page.
- The campaign’s status is Draft because the Campaign Edit Status option is Draft in the General sub-tab.
- Since the campaign’s status is Draft, it will not be visible on the Campaign Listing page.
- The Administrator will now navigate to the WordPress Admin Dashboard → WooCommerce → Fundraising Campaigns.

- Now the Administrator is on the Fundraising Campaigns page.

- Hover over the Campaign to view the further sub-options.
- Now you’re on the Edit Campaign page.
- Click on the Publish button.
- Once the campaign is Published, it will appear on the Campaign Listing page.
- Also, the campaign’s status will be Active on the Dashboard page.
Update Campaign – Administrator
- The Administrator will navigate to WordPress Admin Dashboard → WooCommerce → Fundraising Campaigns.

- Now the Administrator is on the Fundraising Campaigns page.
- Hover over the Campaign to view the further sub-options.
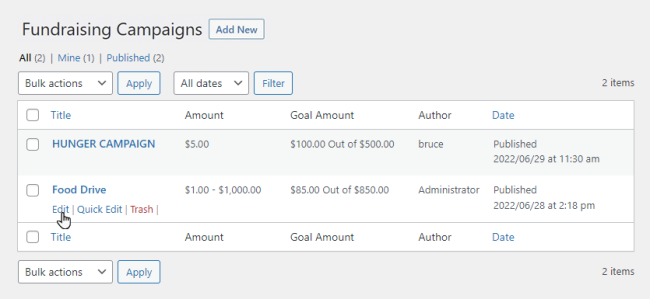
- Now you’re on the Edit Campaign page.
- Update any field according to your requirement. For example, we updated the Goal Amount in this campaign.
- Once done, click on the Update button.
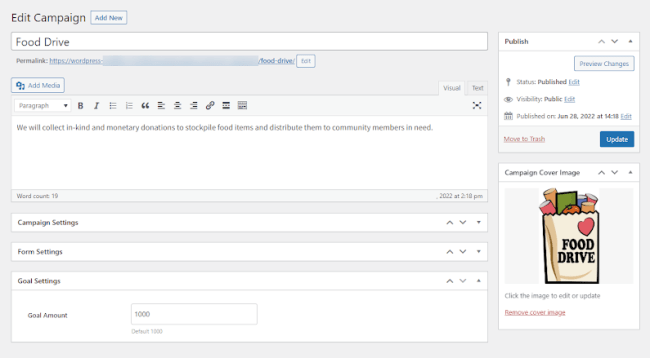
- The campaign is updated successfully, and the goal amount is changed.
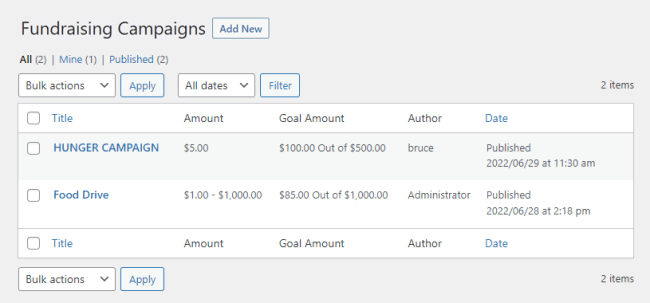
Before Update
↑ Back to top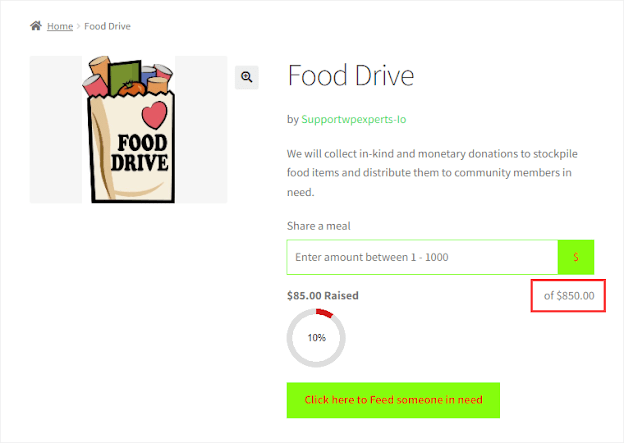
After Update
↑ Back to top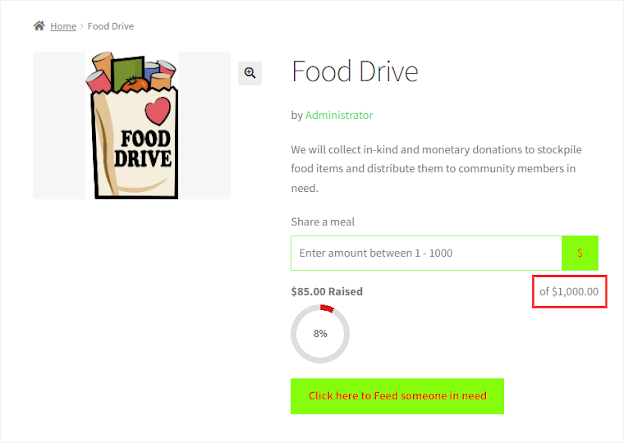
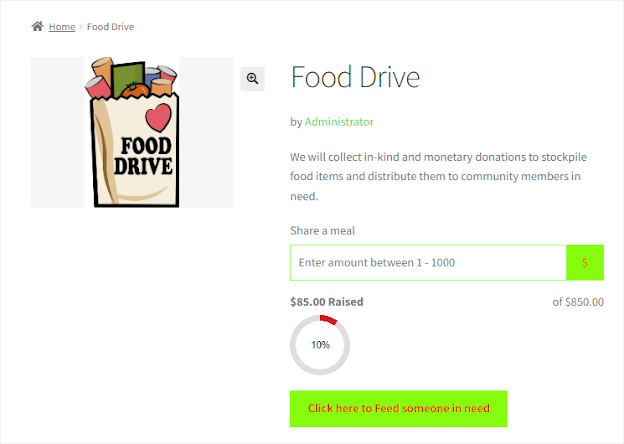
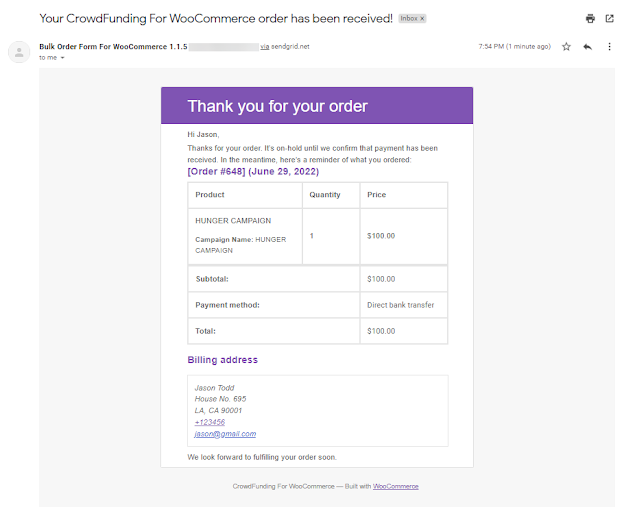
How users can Donate
↑ Back to top- The user will log into the website.
- The user will visit the Campaign Listing page.
- Select any campaign according to his desire.

- The user will select the amount of donation.
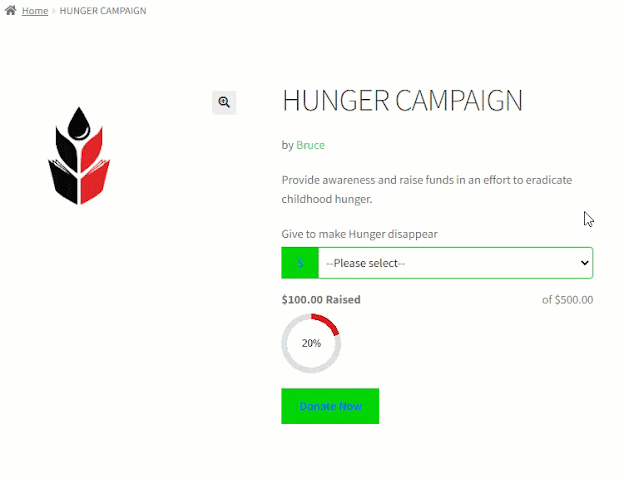
- Fill in the required fields and click on the Place Order button.
NOTE: Cash on delivery method is not supported and is unavailable when paying for donations.
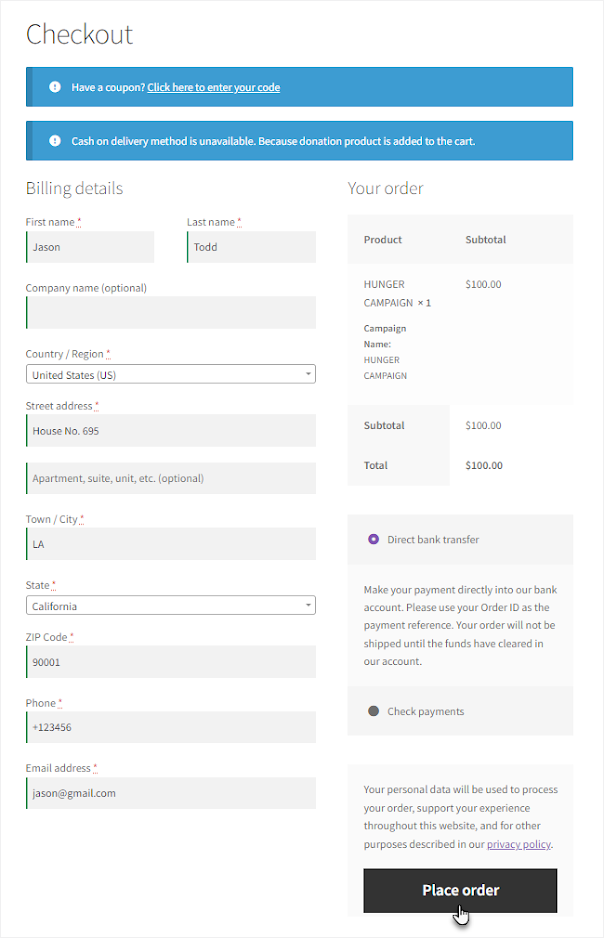
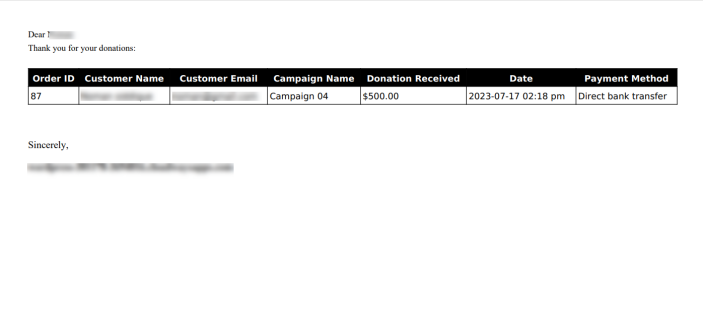
- Your donation is successful.

- The user will receive an email regarding the donation.
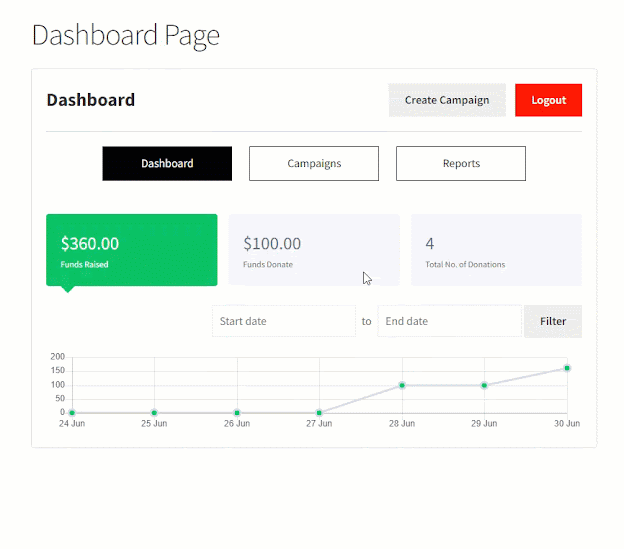
Dashboard Page
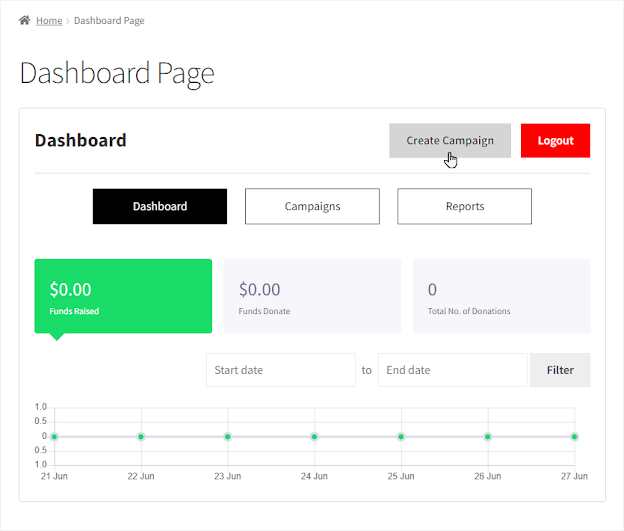
↑ Back to top- The Fundraiser will navigate to the Dashboard page.
- On the Dashboard page, there are three tabs.
- Dashboard
- Campaigns
- Reports
Dashboard Page – Dashboard
↑ Back to top- Three status boxes will appear in the Dashboard tab representing Funds Raised, Funds Donate, and Total No. of Donations.
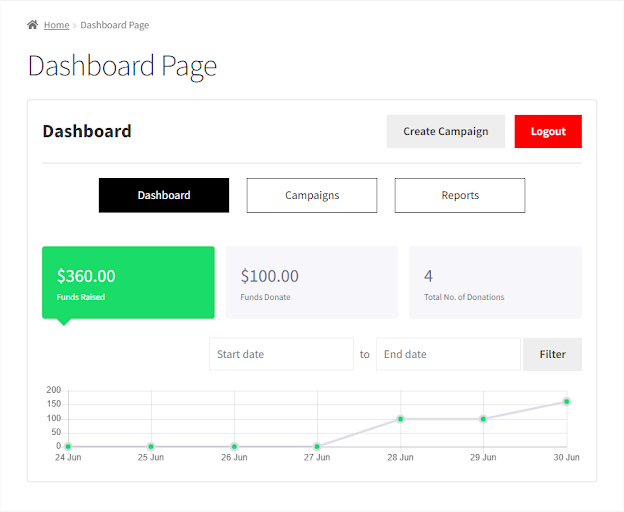
- The Dashboard tab also presents a graphical representation of the funds raised. The Fundraiser can also apply the date filter to view the graphical representation of funds raised between those specific dates.
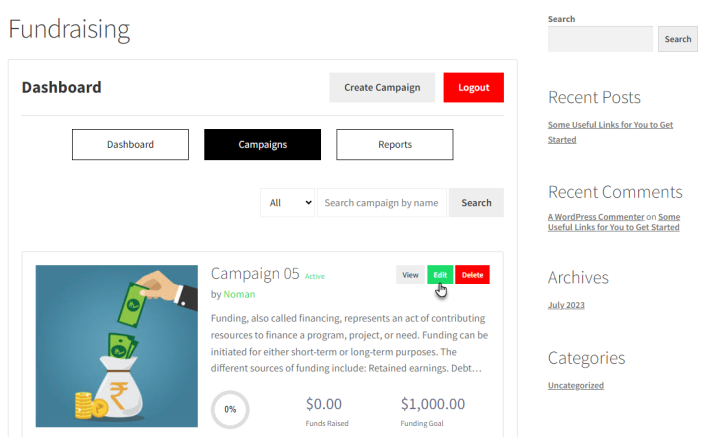
Dashboard Page – Campaigns
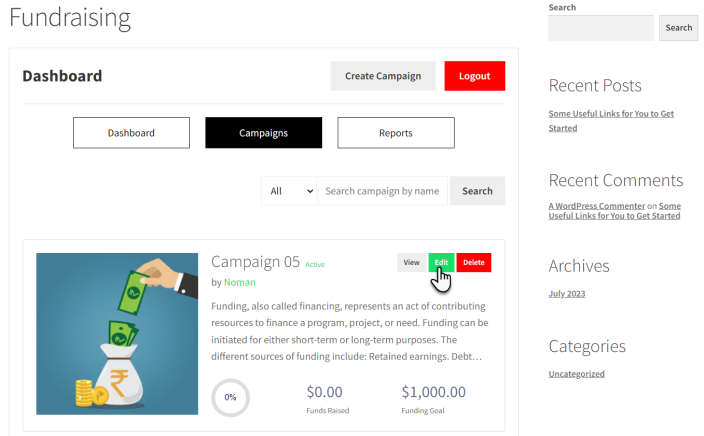
↑ Back to top- All the campaigns created by the Fundraiser will appear in the Campaigns tab.
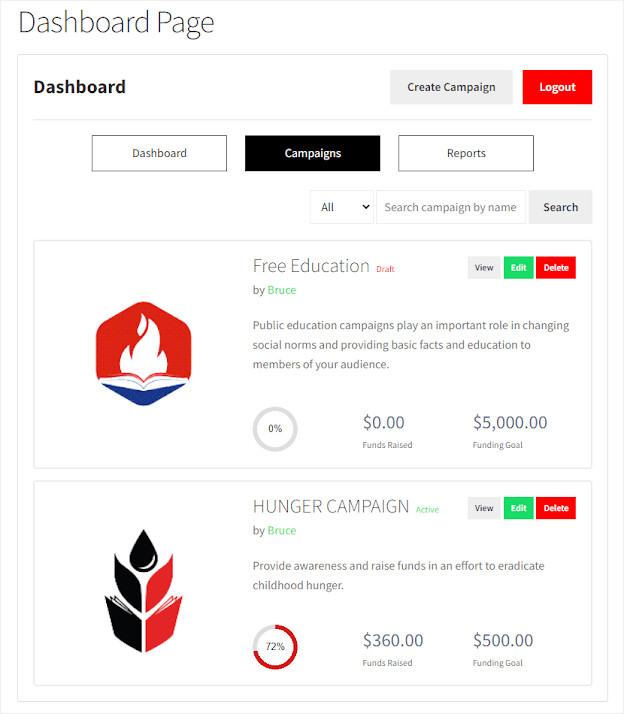
- The Fundraiser can also apply the Status filter to view All, Active, and Draft campaigns.
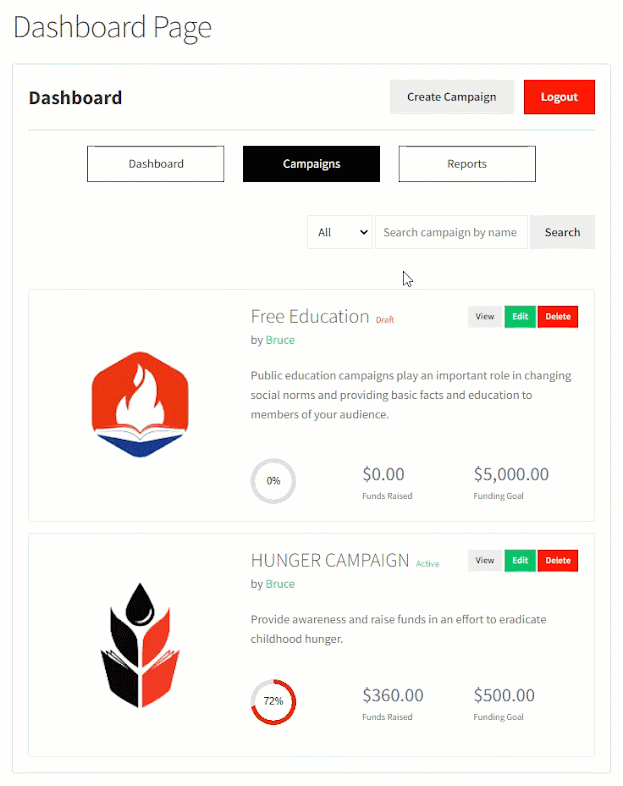
- The Fundraiser can also apply the Search filter to view any specific campaigns.

Dashboard Page – Reports
↑ Back to top- In the Reports tab, two sub-tabs will appear.
- In the Funds Raised sub-tab, all the donations will appear, which were made by the users to the campaigns created by the Fundraiser.
- In the Funds Donate sub-tab, all the donations will appear that were made by the Fundraiser to any campaign.

- The Fundraiser can also apply the date filter to funds raised and its details between those specific dates.