Gift Cards Pro for WooCommerce allows users to purchase and send virtual gift cards, physical gift cards, product gift cards and more.
Installation
↑ Back to top- Download the .zip file from your WooCommerce account.
- Go to: WordPress Admin > Plugins > Add New and Upload Plugin with the file you downloaded with Choose File.
- Install Now and Activate the extension.
Setup and Configuration
↑ Back to topSettings
↑ Back to topGeneral
General Settings

- When the plugin is installed and activated, the user will be allowed to purchase and redeem Gift Cards by default. If you want to disable Gift Cards Purchase and Redeeming, disable the “Allow Users to Purchase Gift Cards and Use Them” checkbox.
- By default, Gift Cards will be generated when the user’s order reaches Processing or Completed status. If you wish to generate gift card on a different status, you can do so by customizing the “Generate Gift Card when the Order status reaches” option.
- By default, your users will only be allowed to purchase a single quantity of the physical gift card in a single transaction. If you wish to allow multiple quantities for the physical gift card purchase, you can do so by enabling the “Allow Multiple Quantities for Physical Gift Card Purchase” option.
- By default when a user is allowed to purchase multiple quantities of Physical Gift Cards in a single transaction, a separate gift card will be generated for each quantity. If you wish to generate single gift card, you can do so by customizing the “Gift Cards Generated By” option.
- By default, designs will not be displayed to the user on physical products. If you wish to display designs for physical products, you can do so setting the value to Yes in the Allow Designs for Physical Gift Cards option.
- By default, Gift Cards will be generated in a predefined pattern that can be customized. In addition, the gift cards can also be generated as a fixed length of Alphanumeric and Numeric characters. The Gift Card pattern can be chosen from the “Gift Card Pattern Type” option. You can customize the following,
- Gift Card Length
- Prefix
- Suffix
- By default, all the Gift Cards issued by the plugin will expire in 365 days if left unused. If you want to customize the expiration date duration, you can do so by customizing the “Expiry Date in Days from the Date of Purchase” option.
- Your users can use any payment gateway enabled on your site for purchasing Gift Cards. If you want to exclude certain payment gateways for Gift Card purchase, you can do so by selecting the gateways which have to be excluded in the “Excluded Payment Methods for Gift Card Purchase” option.
- A separate section will be added to the user’s account for displaying the Gift Card related details. If you want to hide this section, you can do so by customizing the “My Account Gift Card Menu” option.
- By default, the Gift Card menu will be displayed in the my account page after the Dashboard section. If you wish to customize this position, you can do so by customizing the “Display Gift Card menu in the My Account Page After” option.
- By Default, the sender name will not be fetched and pre-filled in the Gift Card purchase form. Optionally can fetch and display either the First Name or both the First Name and Last Name by customizing the “Fetch Sender Name from User Info” option.
- By default, users will be allowed to use coupons during Gift Card purchase. If you wish to prevent users from using coupons for gift card purchases, you can do so by enabling the “Restrict WooCommerce Coupon Discount for the Gift Card Product(s)” option.
- If you wish your sender to resend the Gift Card email to their recipient, you can do so by enabling the “Allow Sender to Notify about Purchased Gift Card” option.
Virtual Gift Cards

- If you want to allow your users to choose the delivery date of Gift Cards, enable the “Allow Users to Choose the Delivery Date” option.
- By default, your users will only be able to purchase a gift card for a single recipient in a transaction. If you wish to allow your users to purchase gift cards for multiple recipients, you can do so by enabling the “Multiple Recipients Support” option.
- You can customize the number of characters in the message section in the “Character Count” option.
Gift a Product Settings
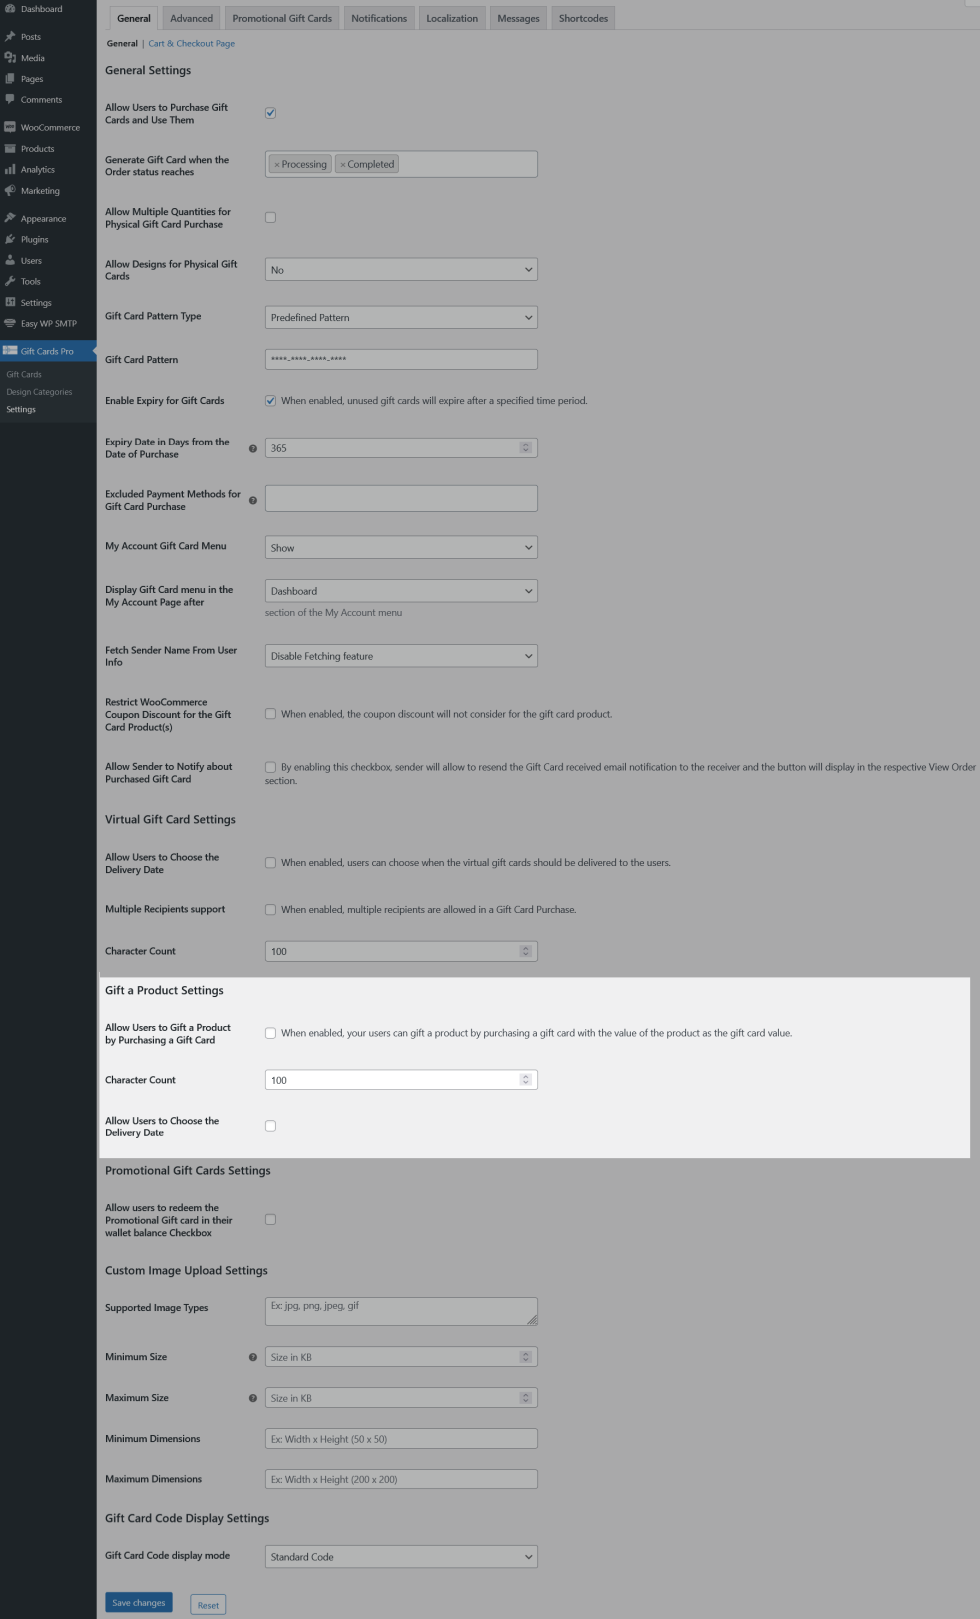
- If you want to allow yours users to Gift Products to other users in the form of Gift Cards, enable the “Allow Users to Gift a Product by Purchasing a Gift Card” checkbox.
- You can customize the number of characters in the message section in the “Character Count” option.
- If you want to allow your users to choose the delivery date of Gift Cards, enable the “Allow Users to Choose the Delivery Date” option.
Promotional Gift Cards
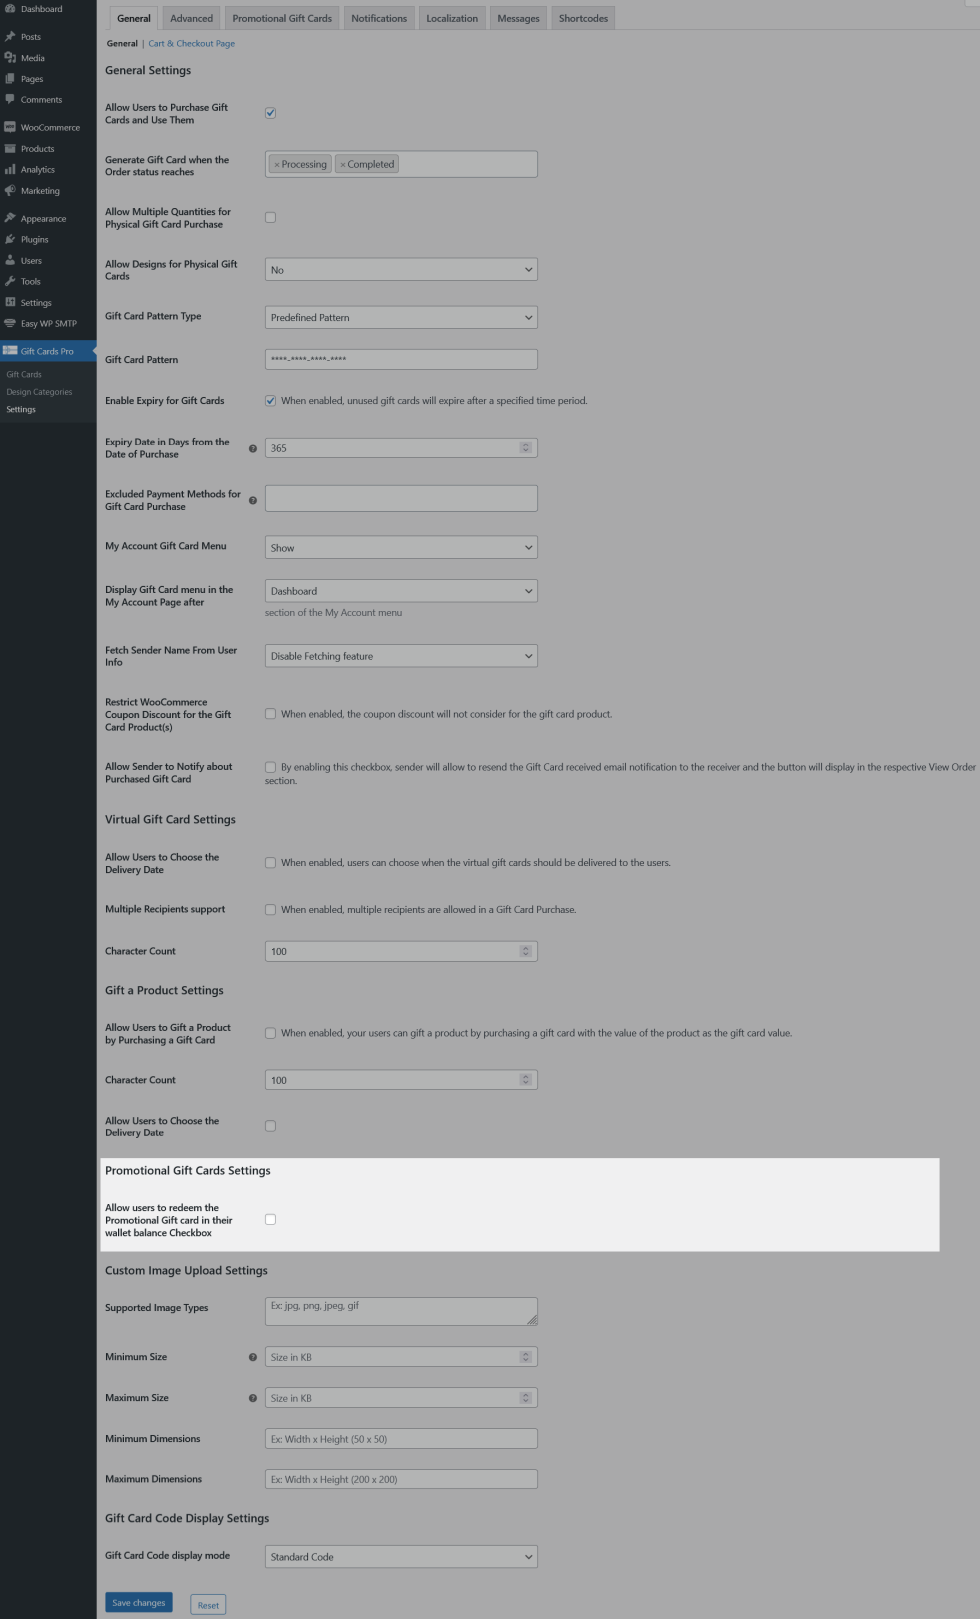
By default users will not be allowed to add promotional gift cards to their account. You can optionally allow your users to add promotional gift cards to their account by enabling the “Allow users to redeem the Promotional Gift card in their wallet balance Checkbox” option.
Custom Image Upload Settings

In this section, you can customize the attributes of the images uploaded by your users to use in the Gift Cards.
- By default, all image types are supported. If you wish to restrict image upload to specific file types, you can do so by setting the file type in the Supported Image Types option.
- You can customize the file size of the image uploaded in the Minimum Size and Maximum Size options.
- You can customize the dimensions of the image uploaded in the Minimum Dimensions and Maximum Dimensions options.
Gift Card Code Display Settings
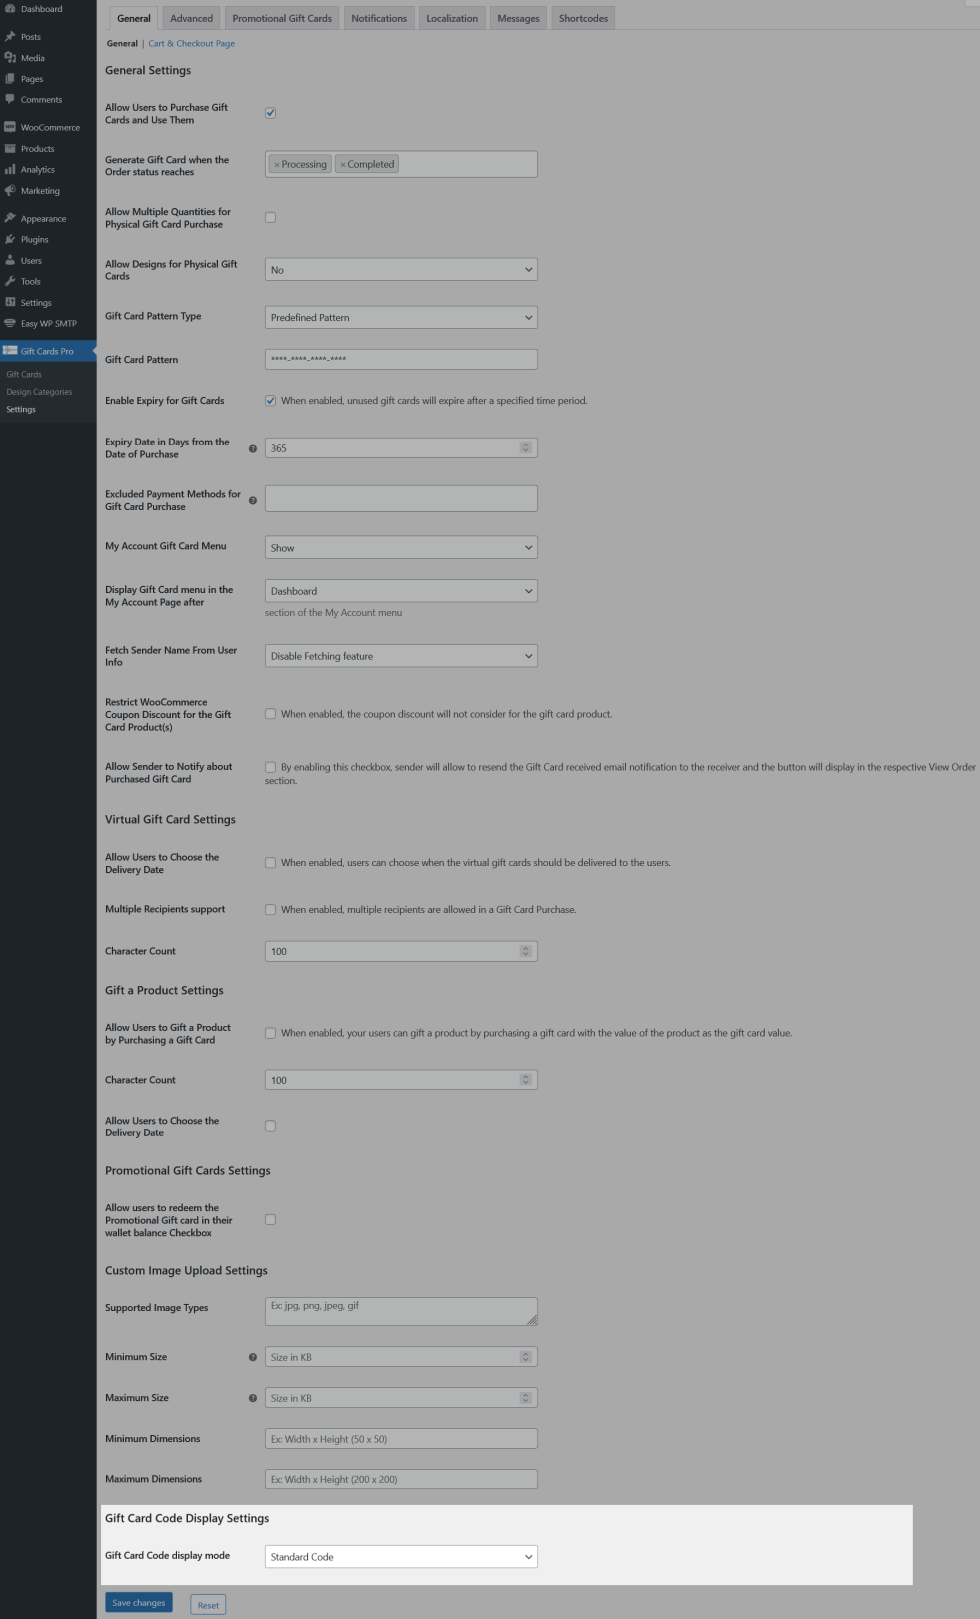
By default, only the Gift Card code will be displayed in the email and the PDF sent to the user. You can optionally send a QR code or a Barcode for identifying the gift card by customizing the “Gift Card Code display mode” option.
Cart and Checkout Page Settings
Display Settings
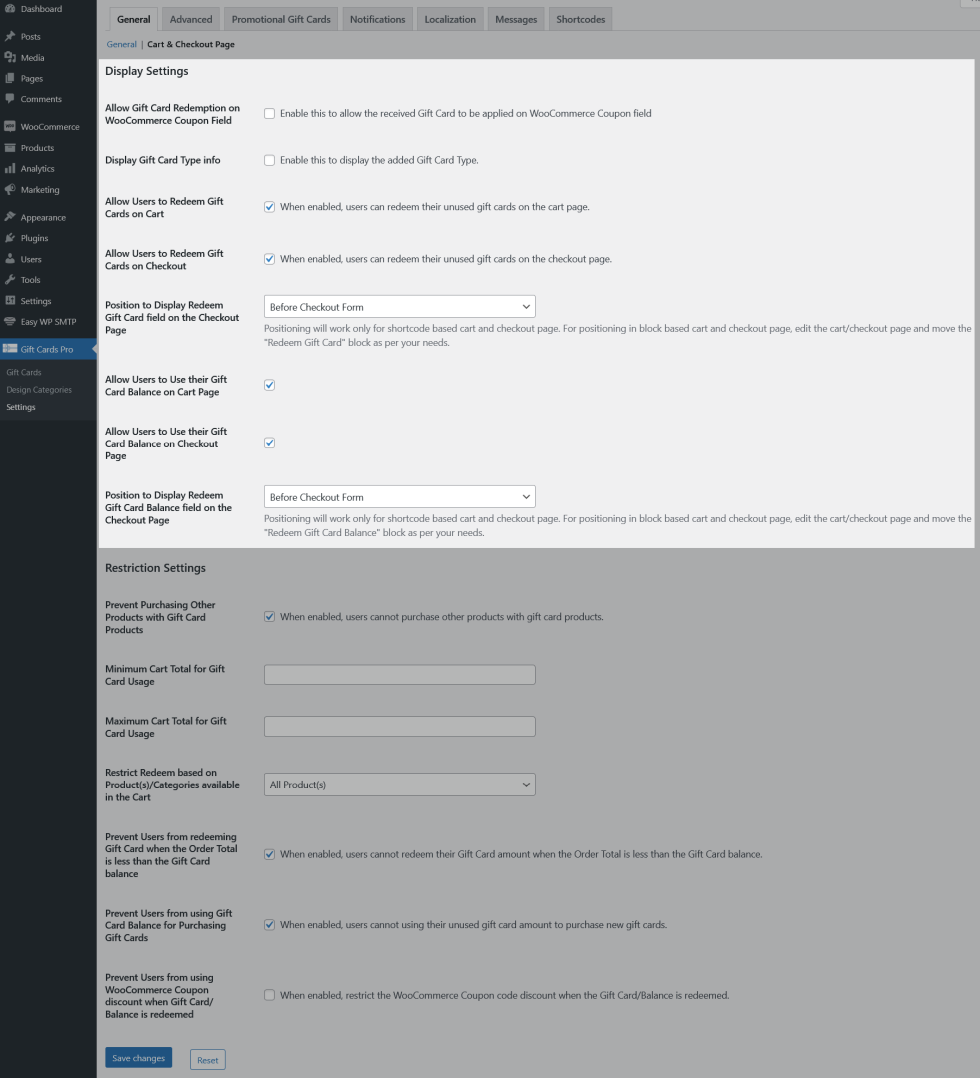
- If you wish to allow your users to redeem their gift card directly on the coupon field, you can do so by customizing the “Allow Gift Card Redemption on WooCommerce Coupon Field” option.
- If you wish to display the Gift Card Type info on the Cart & Checkout page, you can do so by enabling the “Display Gift Card Type Info” option.
- By default, the users will be allowed to redeem their gift cards directly on the cart page. If you want to prevent your users from redeeming at the cart page, disable the “Allow Users to Redeem Gift Cards on Cart” checkbox.
- By default, the users will be allowed to redeem their gift cards directly on the checkout page. If you want to prevent your users from redeeming at the checkout page, disable the “Allow Users to Redeem Gift Cards on Checkout Page” checkbox.
- By default, the Gift Card Redeeming field is visible to the user before the checkout form on the checkout page. If you wish to customize the position, you can do so by customizing the “Position to Display Redeem Gift Card field on the Checkout Page” option.
- For positioning in block based cart and checkout page, edit the cart/checkout page and move the “Redeem Gift Card” block as per your needs.
- By default, the users will be allowed to use their Gift Card balance from their account on the cart page. If you want to prevent your users from using their Gift Card balance on the cart page, disable the “Allow Users to Use their Gift Card Balance on their Cart Page” checkbox.
- By default, the users will be allowed to use their Gift Card balance from their account on the checkout page. If you want to prevent your users from using their Gift Card balance on the checkout page, disable the “Allow Users to Use their Gift Card Balance on their checkout Page” checkbox.
- By default, Redeem Gift Card field will be displayed to the user Before Checkout Form on the checkout page. If you wish to display display the Redeem Gift Card field on a different position, you can do so by customizing the “Position to Display Redeem Gift Card Balance field on the Checkout Page” option.
- For positioning in block based cart and checkout page, edit the cart/checkout page and move the “Redeem Gift Card Balance” block as per your needs.
Restriction Settings
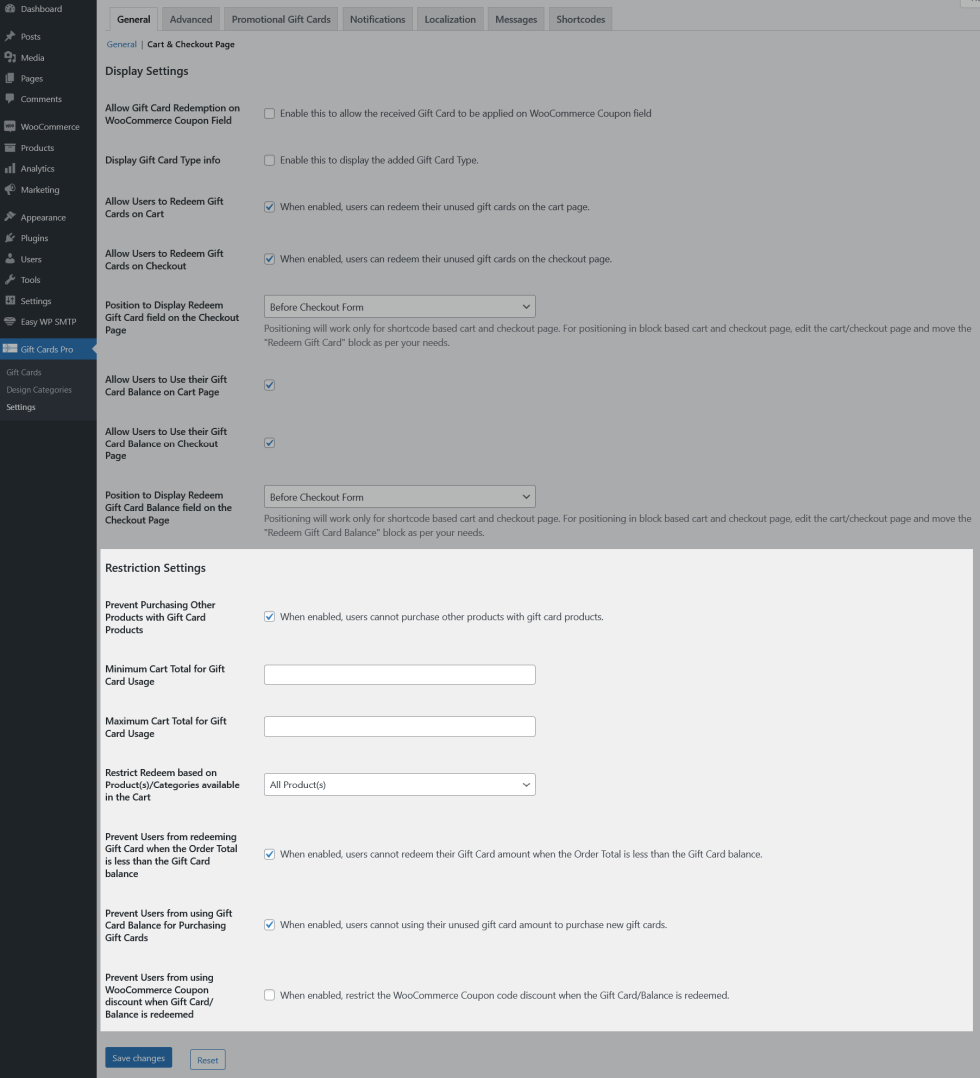
- By default, your users will not be allowed to purchase normal products with Gift Card products. If you wish to allow normal product purchase with gift card products, you can do so by customizing the “Prevent Purchasing Other Products with Gift Cards Products” option.
- By default, there is no restriction on the minimum and maximum cart total which the user should have to use the Gift Cards. If you want to set a restriction, you can do so by setting a value on the “Minimum Cart Total for Gift Card Usage” and the “Maximum Cart Total for Gift Card Usage” options.
- By default, gift cards can be used on all the products on the site. If you wish to restrict gift card product usage to specific product(s)/categories, you can do so by customizing the “Restrict Redeem based on Product(s)/Categories available in the Cart ” option.
- By default, users will not be allowed to redeem their Gift Cards directly during their purchase if their Gift Card balance is less than their order total. If you wish to allow your users to redeem their gift cards, you can do so by customizing the “Prevent Users from redeeming Gift Card when the Order Total is less than the Gift Card balance” option.
- By default, users will be prevented from using Gift Cards to purchase Gift Cards. If you want to allow your users to use Gift Cards for purchasing Gift Cards, disable the “Prevent Users from using Gift Card Balance for Purchasing Gift Cards” checkbox.
- By default, users will be allowed to use WooCommerce Coupons on the orders where gift card is used. If you wish to restrict the coupon usage, you can do so by customizing the “Prevent Users from using WooCommerce Coupon discount when Gift Card/Balance is redeemed” option.
Advanced
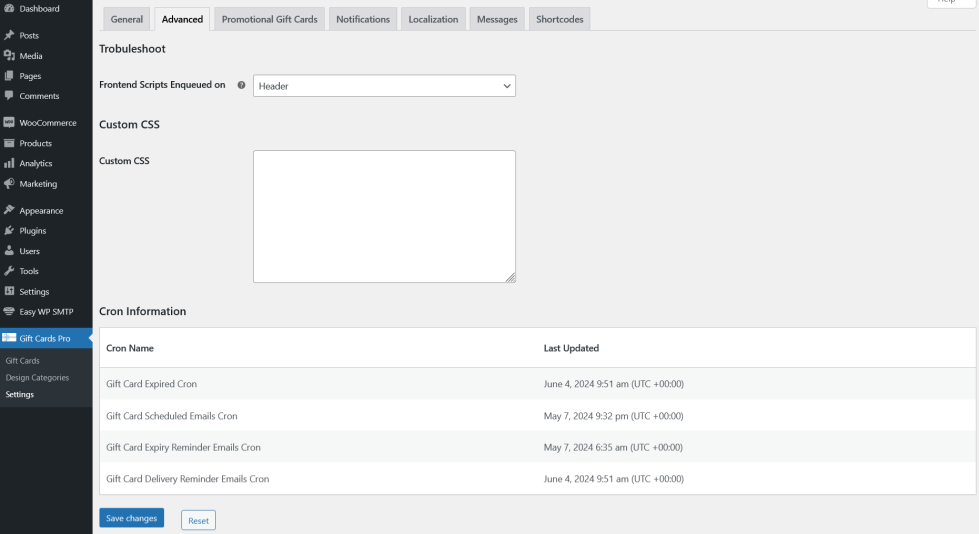
Troubleshoot
By default, the plugin scripts will be loaded on the site’s header. If you face any conflict with any other plugin or theme, you can load the plugin’s scripts on the site’s footer from the “Frontend Scripts Enqueued on” option.
Custom CSS
You can customize the look and feel of the Gift Card related fields using the Custom CSS option.
Cron Information
The Cron used by the plugins will be listed in this section along with the last updated duration.
Promotional Gift Cards
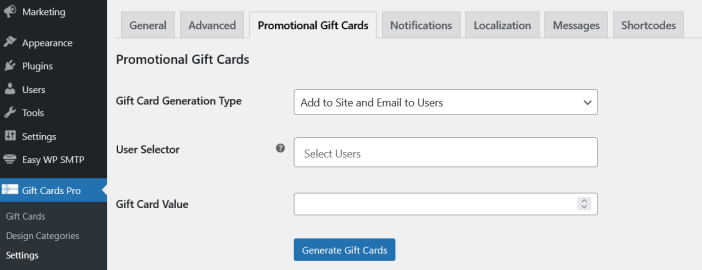
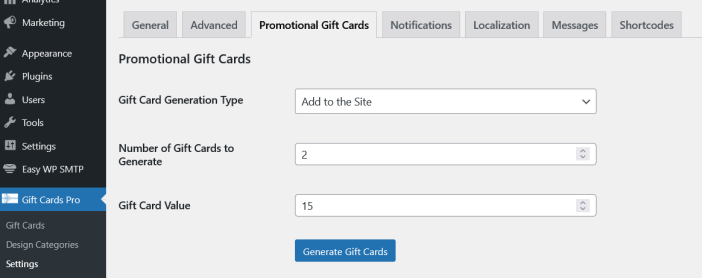
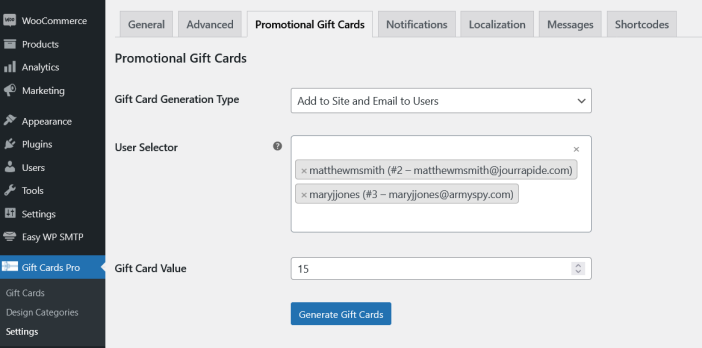
As a Site Admin you can generate promotional gift cards in bulk. The promotional gift cards can be generated in 2 ways. The type of gift card can be selected in the Gift Card Generation Type option,
Add to Site and Email to Users
- In this method, the promotional gift card will be generated and will be emailed to the users.
- In the User Selector option, select the users for whom the Promotional Gift Cards should be sent.
- In the Gift Cards Value option, input the value of the Gift Card to be generated.
Add to the Site
- In this method, the promotional gift card will be generated and will be added to the site.
- In the Number of Gift Cards to Generate option, enter the number of gift cards has to be generated.
- In the Gift Cards Value option, input the value of the Gift Card to be generated.
Notification
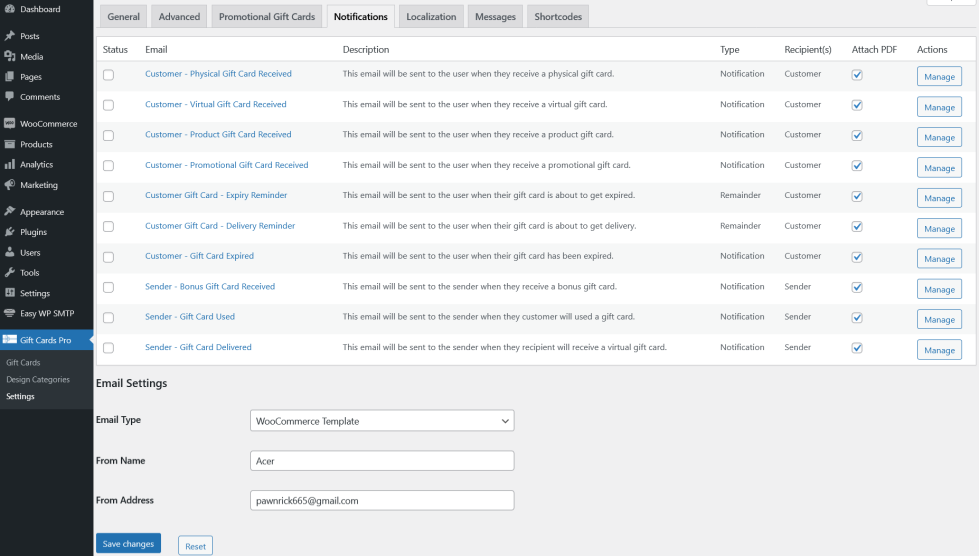
You can customize the notifications sent for your users in this section.
Localization
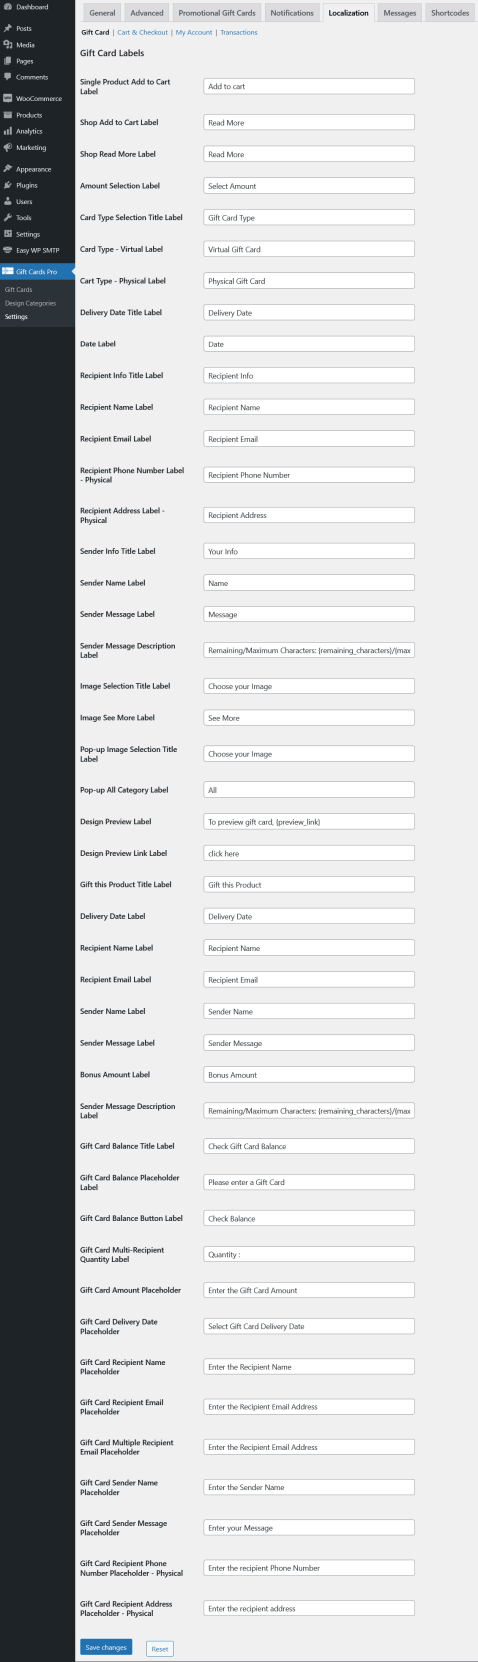
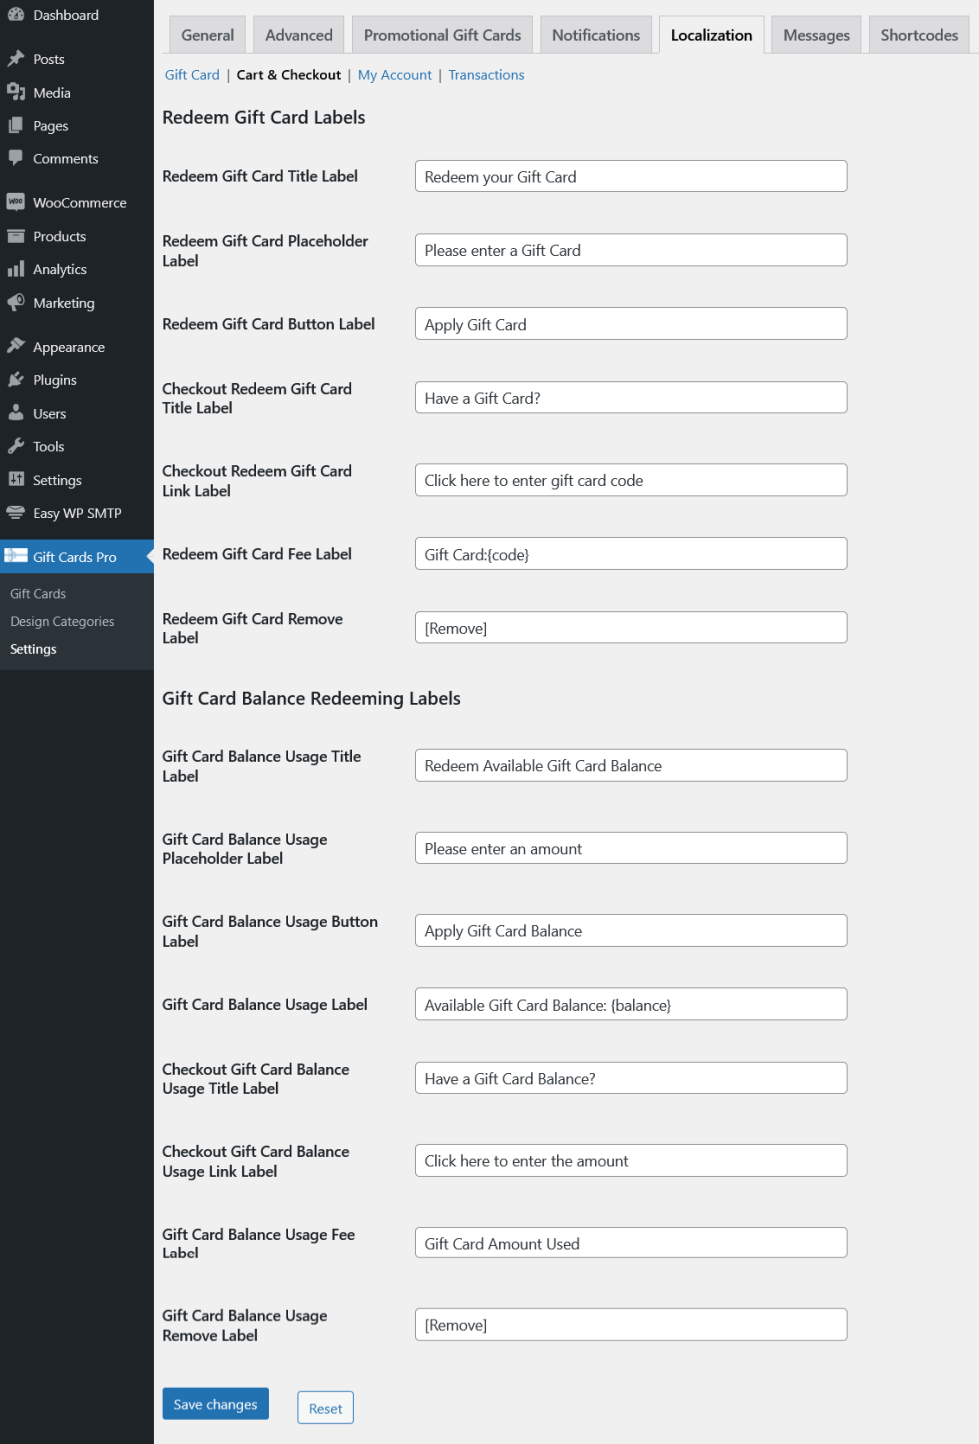

You can customize the labels displayed to your users in this section.
Messages
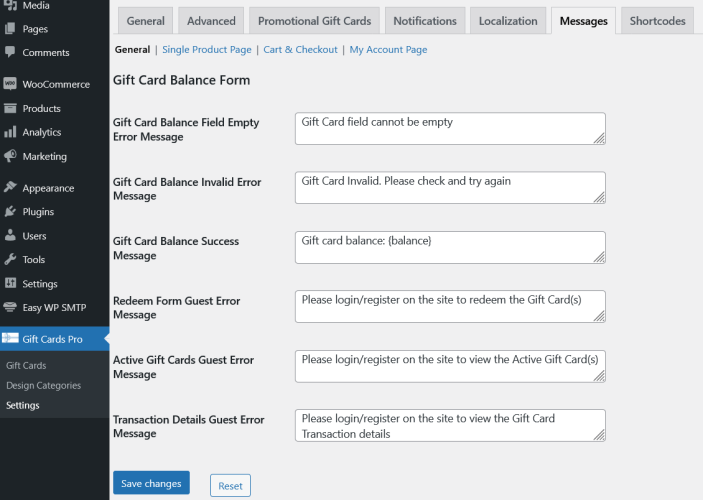
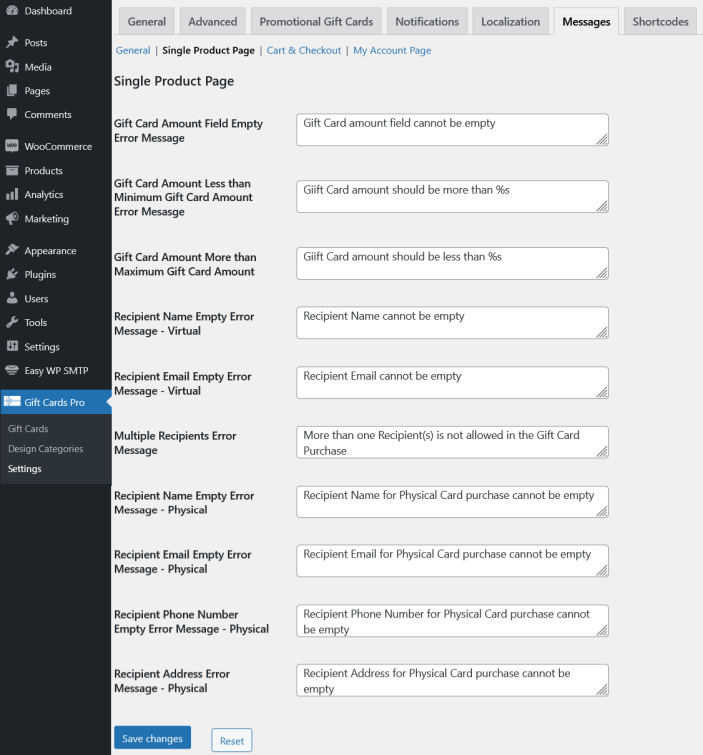
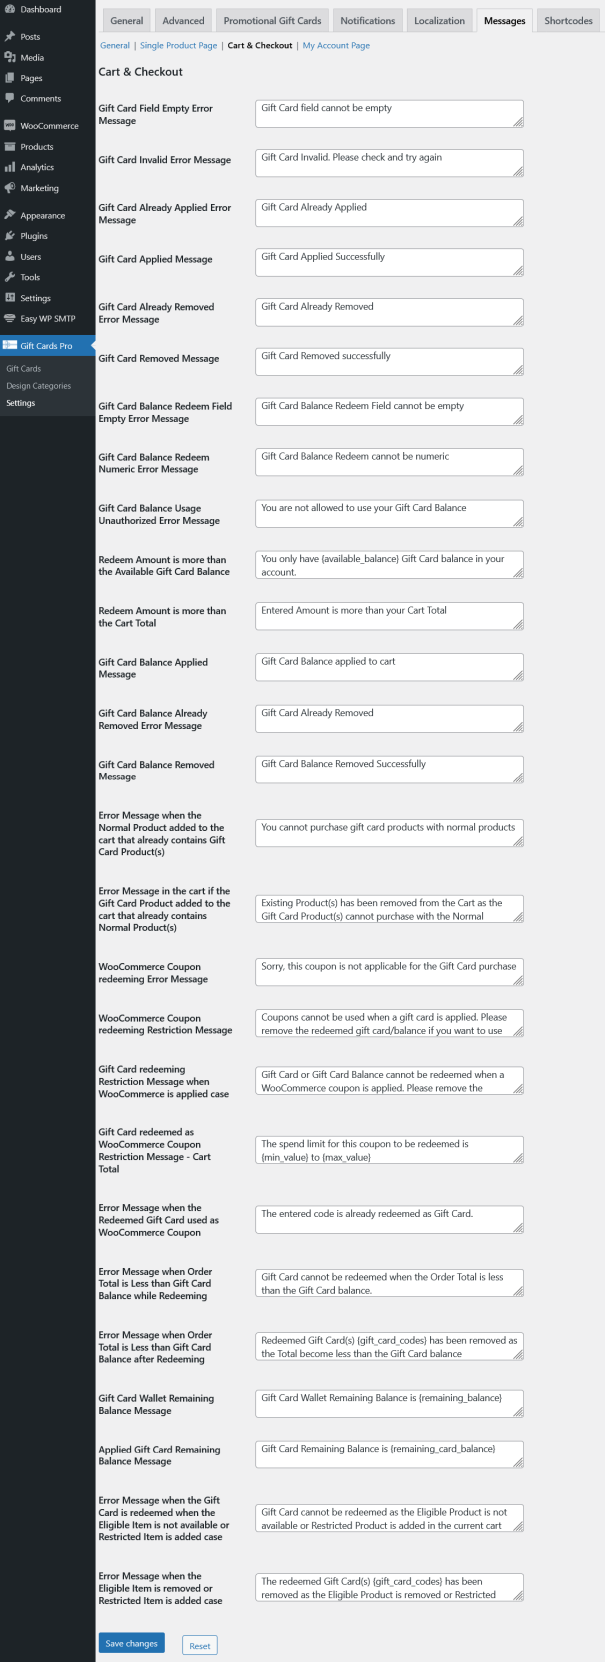
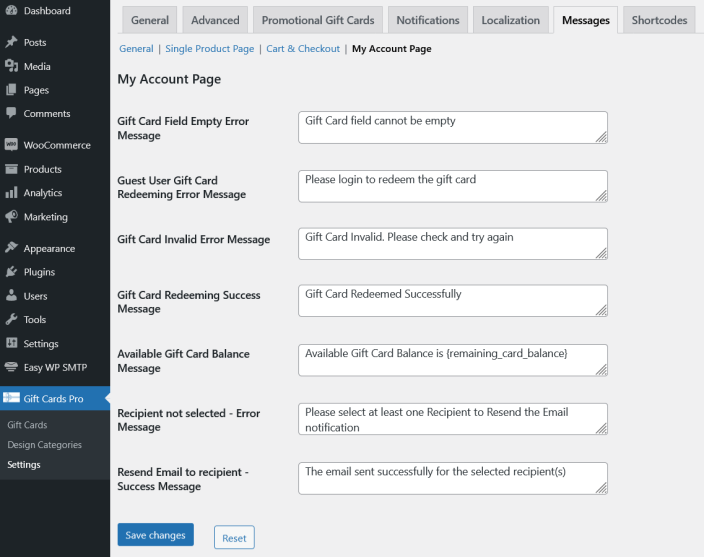
You can customize the messages displayed to your users in this section.
Shortcodes
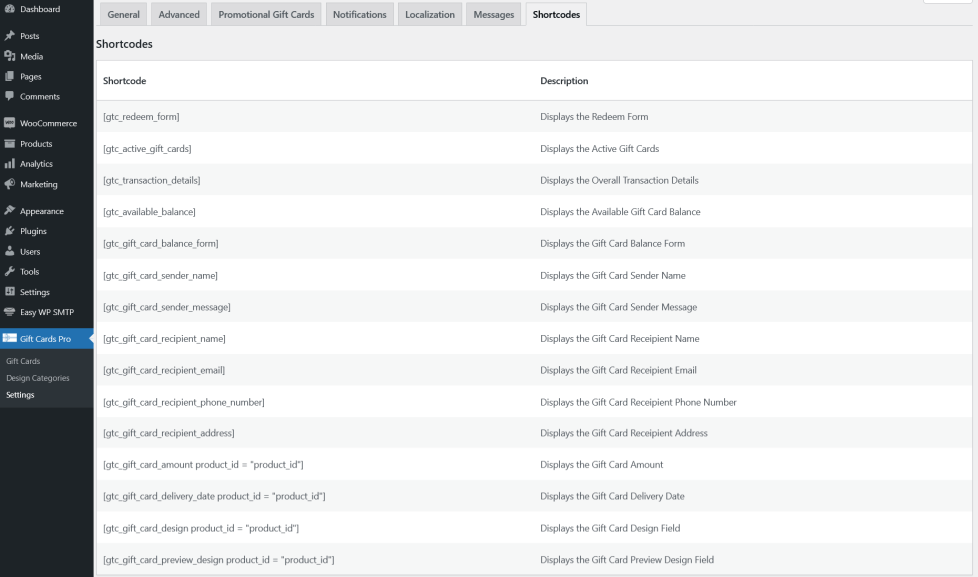
You can view the list of shortcodes available to the user in this section.
Design Categories
↑ Back to top


You can create any number of design categories and upload any number of images into each category. These images can be chosen by the user to match the Occasion/Reason for purchasing gift cards. The images will be displayed to the user category-wise on the single product page.
- To create a new category go to Design Categories > Add New.
- Fill in the title for the category.
- In the “Designs” section, upload/select the images which should be added to that category.
- Save the changes.
Virtual Gift Cards – Configuration
↑ Back to top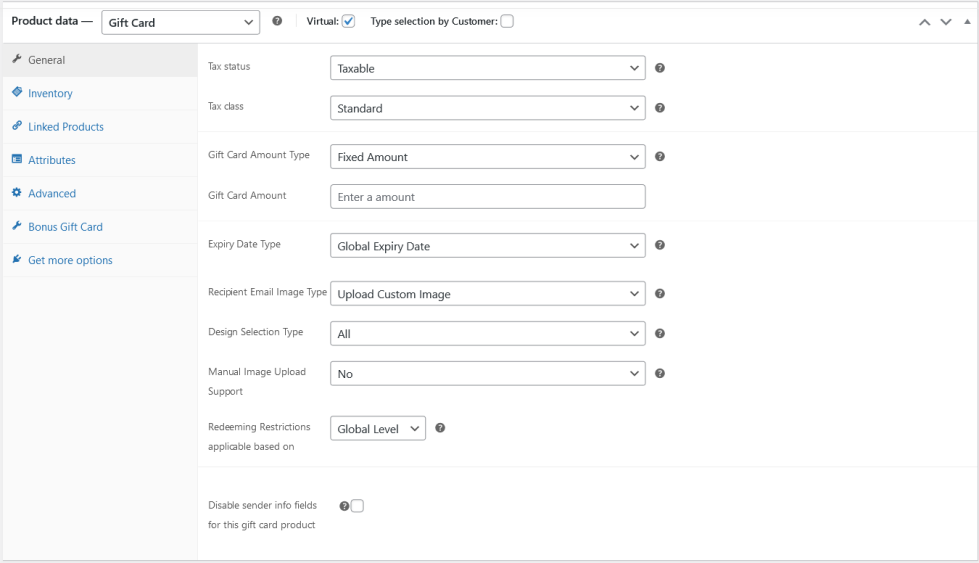
- Create a new product.
- In the Product Type, select “Gift Card.”
- Enable the Virtual checkbox.
- If you want to charge tax for the Gift Card, in the Tax Status option, set the value as “Taxable”. Set the Tax Class as per your preference.
- In the Gift Card amount type, choose any one option from the available options:
- Fixed Amount: The user will have to pay the specified amount and they will receive the Gift Card. If this option is chosen, the admin will have to input the Gift Card value in the “Gift Card Amount” option.
- Predefined Amount: The user can choose any one amount from the list of available options. If this option is chosen, the admin will have to input the predefined amounts in the Gift Card Amount field.
- Custom Amount: The user can decide the value of the Gift Card by entering an amount of their choice. The admin can decide the minimum Gift Card Amount and the Maximum Gift Card Amount for purchase.
- Predefined Amount with Custom Amount: The user can choose any one amount from the list of available options. In addition, they can also decide the value of the Gift Card by entering an amount of their choice. If this option is chosen, the admin will have to input the predefined amounts in the Gift Card Amount field, Minimum Gift Card Amount and the Maximum Gift Card Amount fields for purchase.
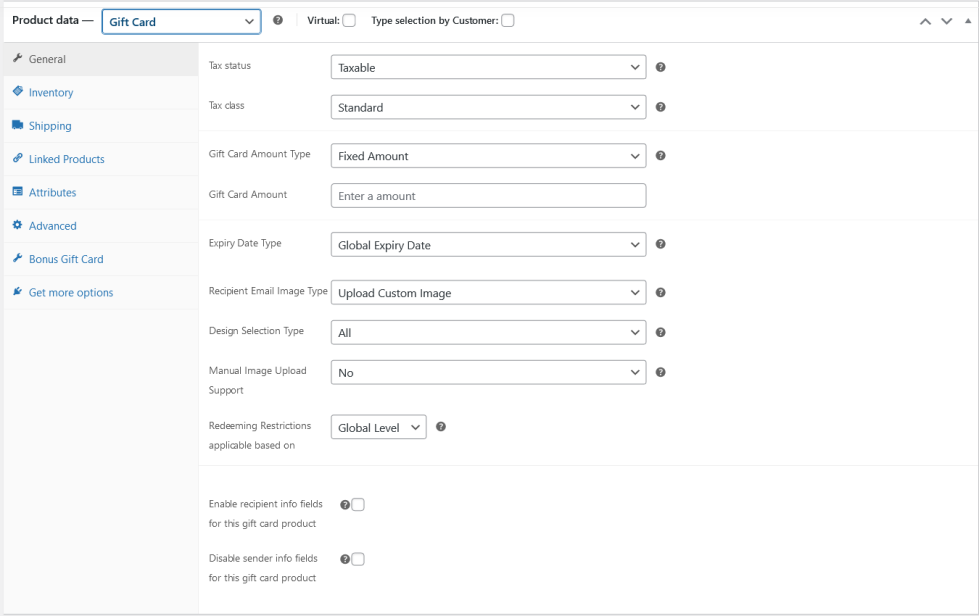
- By default, the gift card will have a global expiry date. If you wish to set a different expiry date, you can do so by customizing the Expiry Date Type option.
- Product Level Expiry Date: A separate expiry date can be set for the current product.
- Fixed Expiry Date: A Fixed expiry date can be set for the product.
- By default, users can upload the design image for the Gift card display in the recipient email. If you wish to set the Product’s Feature image or Hide the design selection for the recipient email, you can do so by customizing the Recipient Email Image Type option.
- By default, all the designs for the Gift Card will be visible to the user for selection. If you wish to display only selected Designs, you can do so by customizing the “Design Selection Type” option.
- By default, all the design categories will be displayed for a Virtual Gift Card product. If you want to restrict few design categories, you can do so by selecting specific designs in the “Select a Designs” option.
- If you wish to allow your user to upload the image, you can do so by customizing the “Manual Image Upload Support” option.
- By default, Redeeming Restrictions will be applicable based on Global Level settings. If you wish to configure Redeeming Restrictions for the product, you can do so by customizing the Redeeming Restrictions applicable based on option.
- If you wish to hide the sender info field, you can do so by customizing the “Disable sender info fields for this gift card product” option.
- Publish the product.
Physical Gift Cards – Configuration
↑ Back to top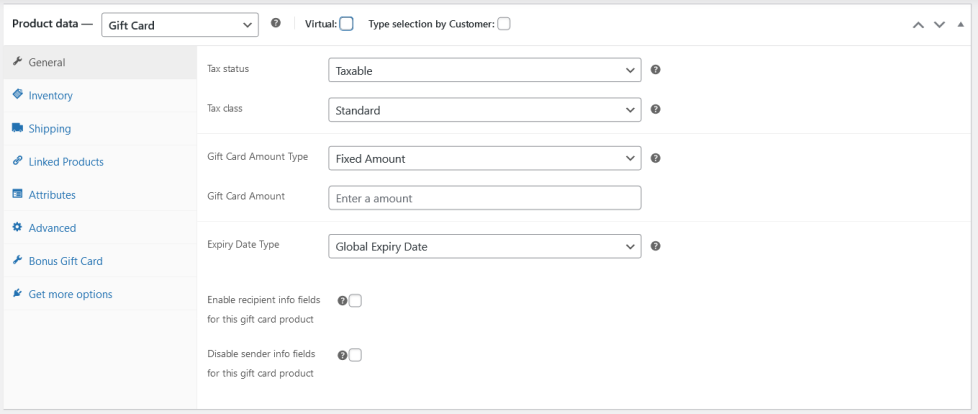
- Create a new product.
- In the Product Type, select “Gift Card.”
- If you want to charge tax for the Gift Card, in the Tax Status option, set the value as “Taxable”. Set the Tax Class as per your preference.
- In the Gift Card amount type, choose any one option from the available options:
- Fixed Amount: The user will have to pay the specified amount and they will receive the Gift Card. If this option is chosen, the admin will have to input the Gift Card value in the “Gift Card Amount” option.
- Predefined Amount: The user can choose any one amount from the list of available options. If this option is chosen, the admin will have to input the predefined amounts in the Gift Card Amount field.
- Custom Amount: The user can decide the value of the Gift Card by entering an amount of their choice. The admin can decide the minimum Gift Card amount, and the Maximum Gift Card amount for purchase.
- Predefined Amount with Custom Amount: The user can choose any one amount from the list of available options. In addition they can also decide the value of the Gift Card by entering an amount of their choice. If this option is chosen, the admin will have to input the predefined amounts in the Gift Card Amount field, Minimum Gift Card Amount and the Maximum Gift Card Amount fields for purchase.
- By default, the gift card will have a global expiry date. If you wish to set a different expiry date, you can do so by customizing the Expiry Date Type option.
- Product Level Expiry Date: A separate expiry date can be set for the current product.
Fixed Expiry Date: A fixed expiry date can be set for the product.
- If you wish to allow your user enter the recipient info on the product page, you can do so by customizing the “Enable recipient info fields for this gift card product” option.
- If you wish to hide the sender info field, you can do so by customizing the “Disable sender info fields for this gift card product” option.
- Publish the Product.
Type Selection – Configuration
↑ Back to top
By default, when a gift card product is configured for purchase, it will either be a Virtual Gift Card or Physical Gift Card. If you wish to allow your users select the type of Gift Card, you can do in this method of configuration.
- Create a new product.
- In the Product Type, select “Gift Card”.
- Enable the “Type selection by Customer” option.
- If you want to charge tax for the Gift Card, in the Tax Status option, set the value as “Taxable”. Set the Tax Class as per your preference.
- In the Gift Card amount type, choose any one option from the available options:
- Fixed Amount: The user will have to pay the specified amount and they will receive the Gift Card. If this option is chosen, the admin will have to input the Gift Card value in the “Gift Card Amount” option.
- Predefined Amount: The user can choose any one amount from the list of available options. If this option is chosen, the admin will have to input the predefined amounts in the Gift Card Amount field.
- Custom Amount: The user can decide the value of the Gift Card by entering an amount of their choice. The admin can decide the minimum Gift Card Amount, and the Maximum Gift Card Amount for purchase.
- Predefined Amount with Custom Amount: The user can choose any one amount from the list of available options. In addition they can also decide the value of the Gift Card by entering an amount of their choice. If this option is chosen, the admin will have to input the predefined amounts in the Gift Card Amount field, Minimum Gift Card Amount and the Maximum Gift Card Amount fields for purchase.
- By default, the gift card will have a global expiry date. If you wish to set a different expiry date, you can do so by customizing the Expiry Date Type option.
- Product Level Expiry Date: A separate expiry date can be set for the current product.
- Fixed Expiry Date: A Fixed expiry date can be set for the product.
- By default, users can upload their custom upload the design image for the Gift card display in the recipient email. If you wish to set the Product’s Feature image in the recipient email/or Hide the product Image design selection for the recipient email, you can do so by customizing the Recipient Email Image Type option.
- By default, all the designs for the Gift Card will be visible to the user for selection. If you wish to display only selected designs, you can do so by customizing the “Design Selection Type” option.
- If you wish to allow your user to upload the image, you can do so by customizing the “Manual Image Upload Support” option.
- By default, Redeeming Restrictions will be applicable based on Global Level settings. If you wish to configure Redeeming Restrictions for the product, you can do so by customizing the Redeeming Restrictions applicable based on option.
- If you wish to allow your user enter the recipient info on the product page when the Physical Gift Card type is selected, you can do so by customizing the “Enable recipient info fields for this gift card product” option.
- If you wish to hide the sender info field, you can do so by customizing the “Disable sender info fields for this gift card product” option.
- Publish the product.
Gift this Product – Virtual – Configuration
↑ Back to top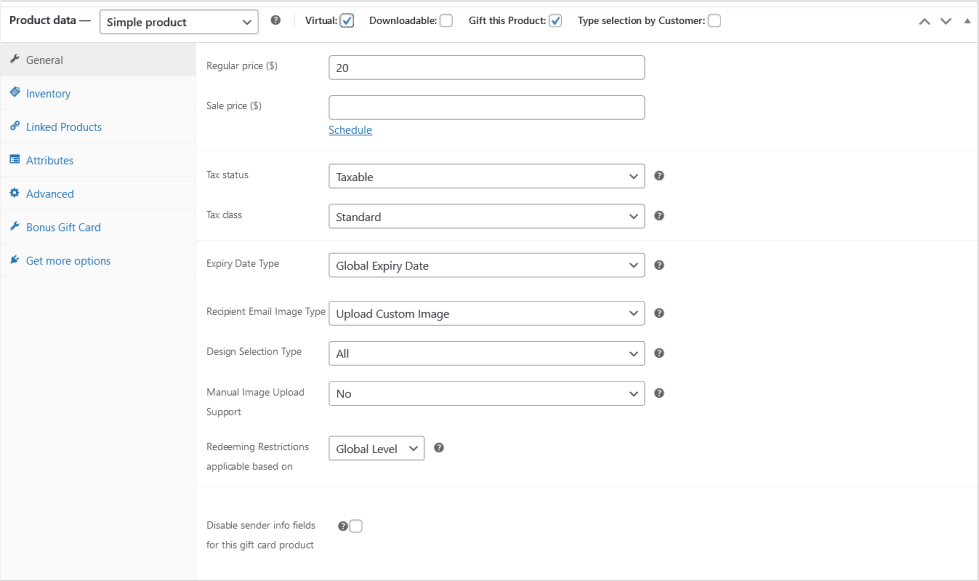
- Enable Allow Users to Gift a Product by Purchasing a Gift Card underGift Cards Pro -> Settings -> General -> General -> Gift a Product Settings.
- Create a New Product or Edit the existing product.
- Enable the Gift this Product checkbox.
- Enable the Virtual checkbox.
- If you want to charge tax for the Gift Card, in the Tax Status option, set the value as “Taxable”. Set the Tax Class as per your preference.
- By default, the gift card will have a global expiry date. If you wish to set a different expiry date, you can do so by customizing the Expiry Date Type option.
- Product Level Expiry Date: A separate expiry date can be set for the current product.
- Fixed Expiry Date: A Fixed expiry date can be set for the product.
- By default, users can upload the design image for the Gift card display in the recipient email. If you wish to set the Product’s Feature image or Hide the product Image design selection for the recipient email, you can do so by customizing the Recipient Email Image Type option.
- By default, all the designs for the Gift Card will be visible to the user for selection. If you wish to display only selected designs, you can do so by customizing the “Design Selection Type” option.
- If you wish to allow your user to upload the image, you can do so by customizing the “Manual Image Upload Support” option.
- By default, Redeeming Restrictions will be applicable based on Global Level settings. If you wish to configure Redeeming Restrictions for the product, you can do so by customizing the “Redeeming Restrictions applicable based on” option.
- If you wish to hide the sender info field, you can do so by customizing the “Disable sender info fields for this gift card product” option.
- Publish the product.
Gift this Product – Physical – Configuration
↑ Back to top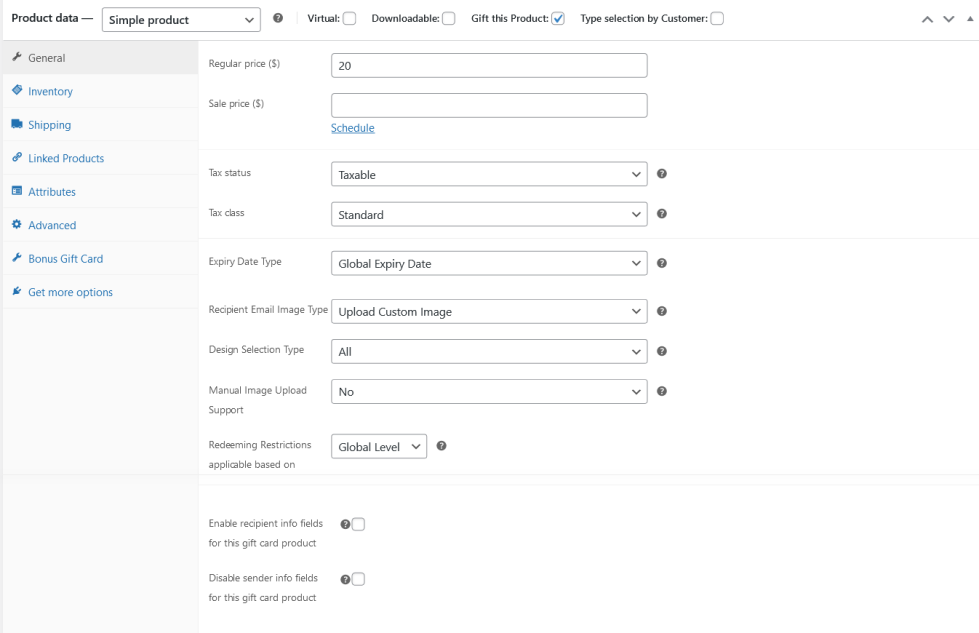
- Firstly Enable Allow Users to Gift a Product by Purchasing a Gift Card underGift Cards Pro -> Settings -> General -> General -> Gift a Product Settings.
- Create a New Product or Edit the existing product.
- Enable the Gift this Product checkbox.
- If you want to charge tax for the Gift Card, in the Tax Status option, set the value as “Taxable”. Set the Tax Class as per your preference.
- By default, the gift card will have a global expiry date. If you wish to set a different expiry date, you can do so by customizing the Expiry Date Type option.
- Product Level Expiry Date: A separate expiry date can be set for the current product.
- Fixed Expiry Date: A Fixed expiry date can be set for the product.
- By default, users can upload the design image for the Gift card display in the recipient email. If you wish to set the Product’s Feature image or Hide the design selection for the recipient email, you can do so by customizing the Recipient Email Image Type option.
- By default, all the designs for the Gift Card will be visible to the user for selection. If you wish to display only selected designs, you can do so by customizing the “Design Selection Type” option.
- If you wish to allow your user to upload the image, you can do so by customizing the “Manual Image Upload Support” option.
- By default, Redeeming Restrictions will be applicable based on Global Level settings. If you wish to configure Redeeming Restrictions for the product, you can do so by customizing the “Redeeming Restrictions applicable based on” option.
- If you wish to allow your user enter the recipient info on the product page, you can do so by customizing the “Enable recipient info fields for this gift card product” option.
- If you wish to hide the sender info field, you can do so by customizing the “Disable sender info fields for this gift card product” option.
- Publish the product.
Gift this Product – Type Selection – Configuration
↑ Back to top
- Enable Allow Users to Gift a Product by Purchasing a Gift Card under Gift Cards Pro -> Settings -> General -> General -> Gift a Product Settings.
- Create a New Product or Edit the existing product.
- Enable the Gift this Product checkbox.
- Enable the Type selection by Customer checkbox.
- If you want to charge tax for the Gift Card, in the Tax Status option, set the value as “Taxable”. Set the Tax Class as per your preference.
- By default, the gift card will have a global expiry date. If you wish to set a different expiry date, you can do so by customizing the Expiry Date Type option.
- Product Level Expiry Date: A separate expiry date can be set for the current product.
- Fixed Expiry Date: A Fixed expiry date can be set for the product.
- By default, users can upload the design image for the Gift card display in the recipient email. If you wish to set the Product’s Feature image or Hide the design selection for the recipient email, you can do so by customizing the Recipient Email Image Type option.
- By default, all the designs for the Gift Card will be visible to the user for selection. If you wish to display only selected designs, you can do so by customizing the “Design Selection Type” option.
- If you wish to allow your user to upload the image, you can do so by customizing the “Manual Image Upload Support” option.
- By default, Redeeming Restrictions will be applicable based on Global Level settings. If you wish to configure Redeeming Restrictions for the product, you can do so by customizing the “Redeeming Restrictions applicable based on” option.
- If you wish to allow your user enter the recipient info on the product page, you can do so by customizing the “Enable recipient info fields for this gift card product” option.
- If you wish to hide the sender info field, you can do so by customizing the “Disable sender info fields for this gift card product” option.
- Publish the product.
Promotional Gift Cards – Configuration
↑ Back to topPromotional Gift Cards can be created in 2 ways. The options are the following:
- Add to the Site: Gift Cards will be added to the site.
- Add to Site and Email to Users: Gift Cards will be added to the site and they will be emailed to the selected users.
Bonus Gift Card
↑ Back to top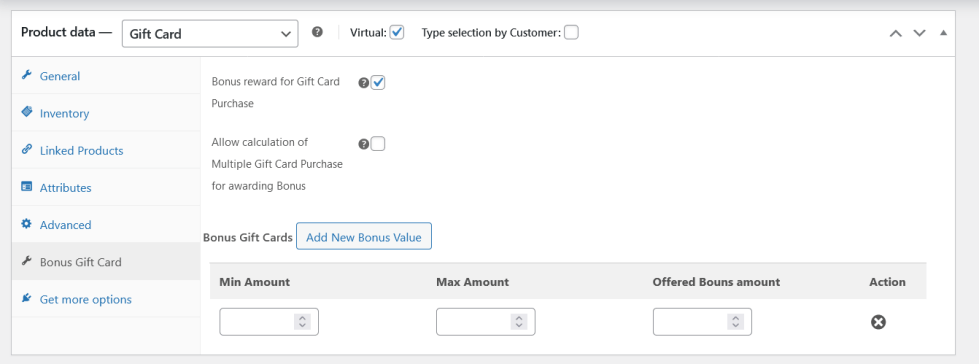
If you wish to offer Bonus Gift Cart to your users for purchasing Gift Cards, you can do so by configuring Bonus Gift Cards.
The settings for the Bonus Gift Card is available on the product configuration page.
- To configure the Bonus Gift Card, navigate to Bonus Gift Card section.
- Enable the “Bonus reward for Gift Card Purchase” option.
- If you wish to calculate the Bonus Gift Card based on the Final payable amount of Gift Card(Users purchasing multiple gift cards in a single transaction), you can do so by enabling the “Allow calculation of Multiple Gift Card Purchase for awarding Bonus” option.
- Click on Add New Bonus Value button and In the Min Amount and Max Amount option, you can set the Min and Max Gift Card Range to be eligible to receive a Gift Card Bonus.
- In the Offered Bonus option, enter the amount which the user will be receiving as a Bonus Gift card.
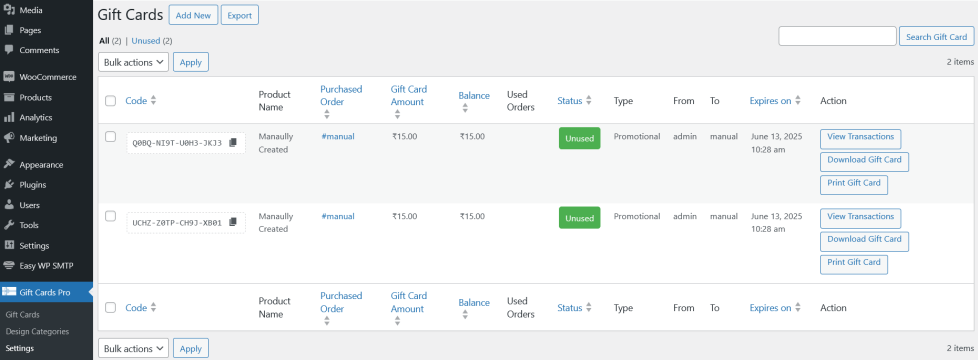
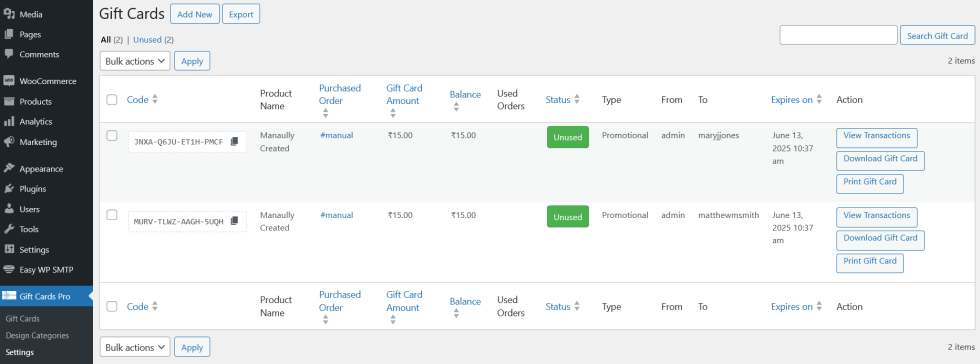
Gift Cards Dashboard
↑ Back to topAll the generated Gift Cards will be listed in the Gift Cards Dashboard and it will be accessed under Dashboard -> Gift Cards Pro -> Gift Cards.
To Add a New Gift Card Manually
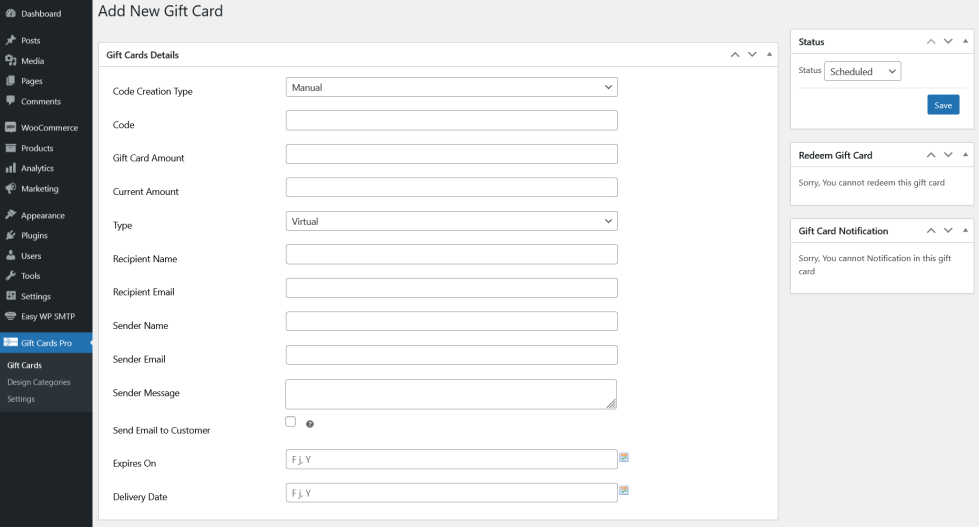
- Go Dashboard -> Gift Cards Pro -> Gift Cards.
- Click the Add New button.
- If you already have your own gift card code, then select Manual in the Code Creation Type drop-down field and enter the code in the respective field.
- If you wish to generate the gift card code randomly by the plugin, then select Global in the Code Creation Type drop-down field.
- Enter the actual gift card amount in the Gift Card Amount and available gift card amount in the Current Amount field.
- Select the type of the Gift Card in the Type drop-down field.
- Enter the recipient and sender details in the following fields,
- Recipient Name[not applicable for Physical Gift Cards]
- Recipient Email[not applicable for Physical Gift Cards]
- Sender Name
- Sender Email[not applicable for Physical Gift Cards]
- Sender Message
- If you wish to Send this Gift Card details to recipient through Email Notification[not applicable for Physical Gift Cards], you can do so by enabling the Send to Email to Customer checkbox.
- If you wish to set the status of the Gift Card based on its current status, you can do so by using the Status drop-down. The following status are available,
- Scheduled
- Unused
- Used
- Partially Used
- Expired
- Cancelled
- If all the necessary values are configured, then save the Manually created Gift Card by clicking the Save button.
To Redeem the available Gift Card manually into a user’s Gift Card Balance
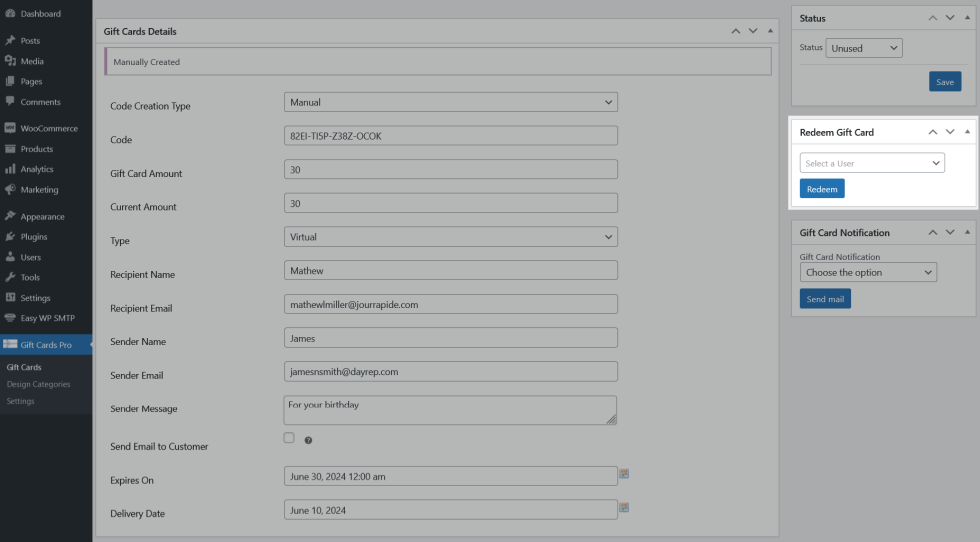
- This action is applicable only when the Gift Card is in the following status
- Unused
- Partially Used
- Go Dashboard -> Gift Cards Pro -> Gift Cards.
- Edit the Respective Gift Card.
- Navigate to Redeem Gift Card section.
- Search and select the user in the Select a User drop-down field.
- Click the Redeem button.
- The gift card will be successfully redeemed into the selected user’s Gift Card balance.
To Send the Gift Card notification manually
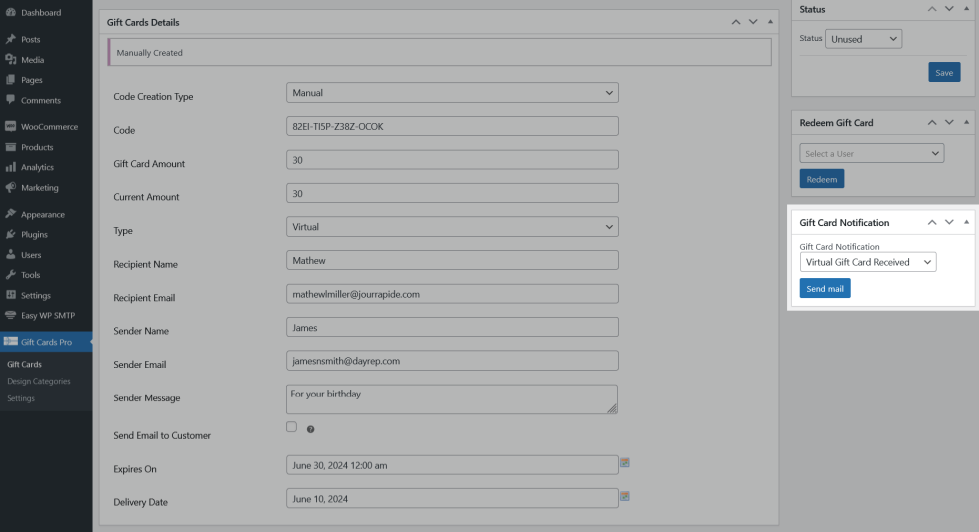
- Go Dashboard -> Gift Cards Pro -> Gift Cards.
- Edit the Respective Gift Card.
- Navigate to Gift Card Notification section.
- Select the respective email from List Emails in the Gift Card Notification drop-down field.
- Click the Send mail button.
- The respective email notification will be sent for the gift card.
To modify the existing Gift Card manually

- Go Dashboard -> Gift Cards Pro -> Gift Cards.
- Edit the Respective Gift Card.
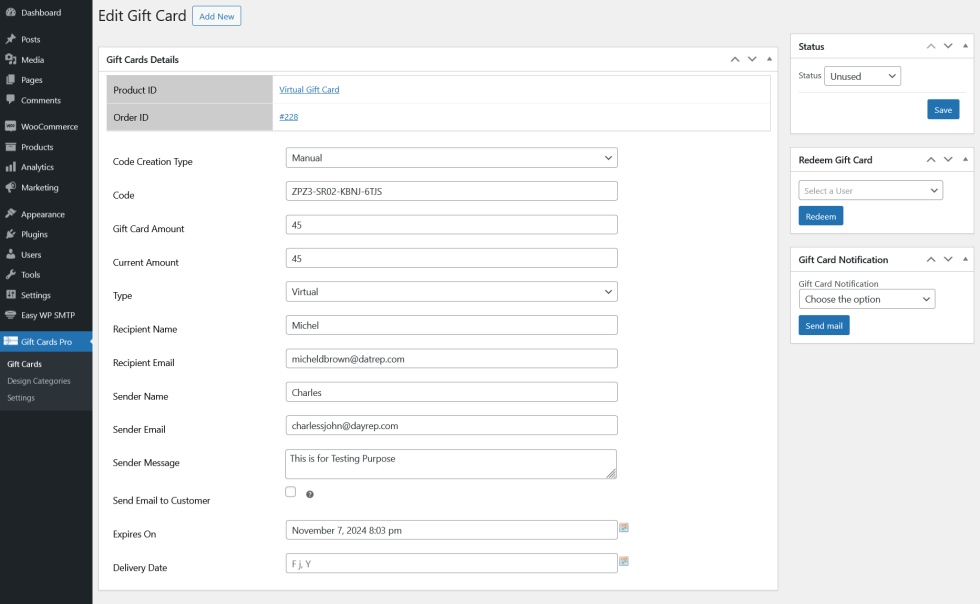
- Make the necessary changes as per your need using the available fields and actions.
- Click the Save button once the modification successfully completed.
To view the Transaction of the Gift Card
- Go Dashboard -> Gift Cards Pro -> Gift Cards
- Click the View Transaction button which is available in the respective Gift Card.
- The transaction history of the Gift Card will be listed under the Transactions dashboard.
To Download the Gift Card
- Go Dashboard -> Gift Cards Pro -> Gift Cards
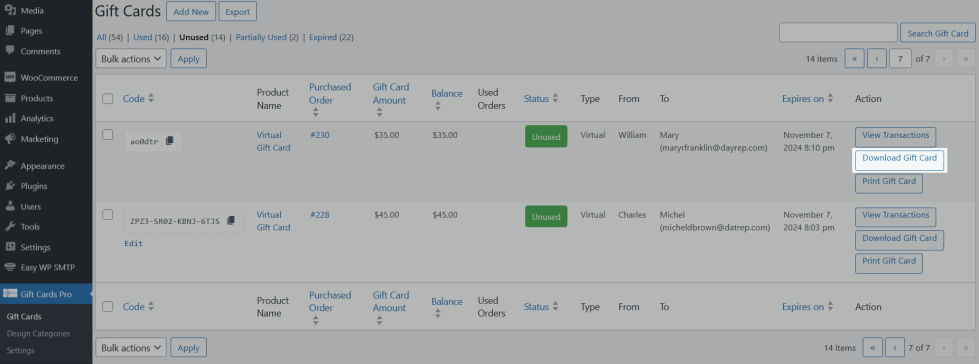
- Click the Download Gift Card button which is available in the respective Gift Card.
- The Gift Card will be downloaded successfully.
To Print the Gift Card
- Go Dashboard -> Gift Cards Pro -> Gift Cards
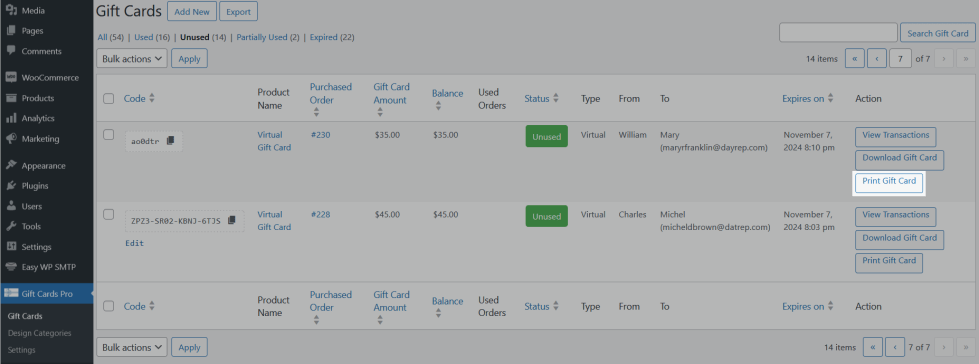
- Click the Print Gift Card button which is available in the respective Gift Card.
- It will redirect to the Printing Dashboard using which you can print the Gift Card.
To Export the Gift Cards
- Go Dashboard -> Gift Cards Pro -> Gift Cards
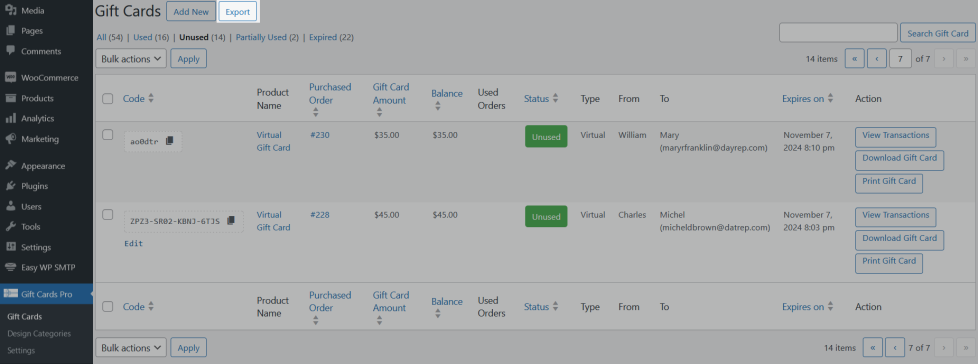
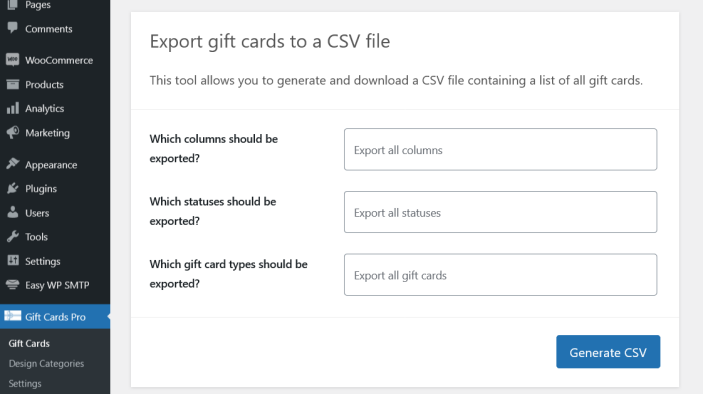
- Click the Export button which is available in the Dashboard.
- It will redirect to the Export Dashboard using which you can export the Gift Cards.
Usage
↑ Back to topVirtual Gift Cards Purchase
↑ Back to top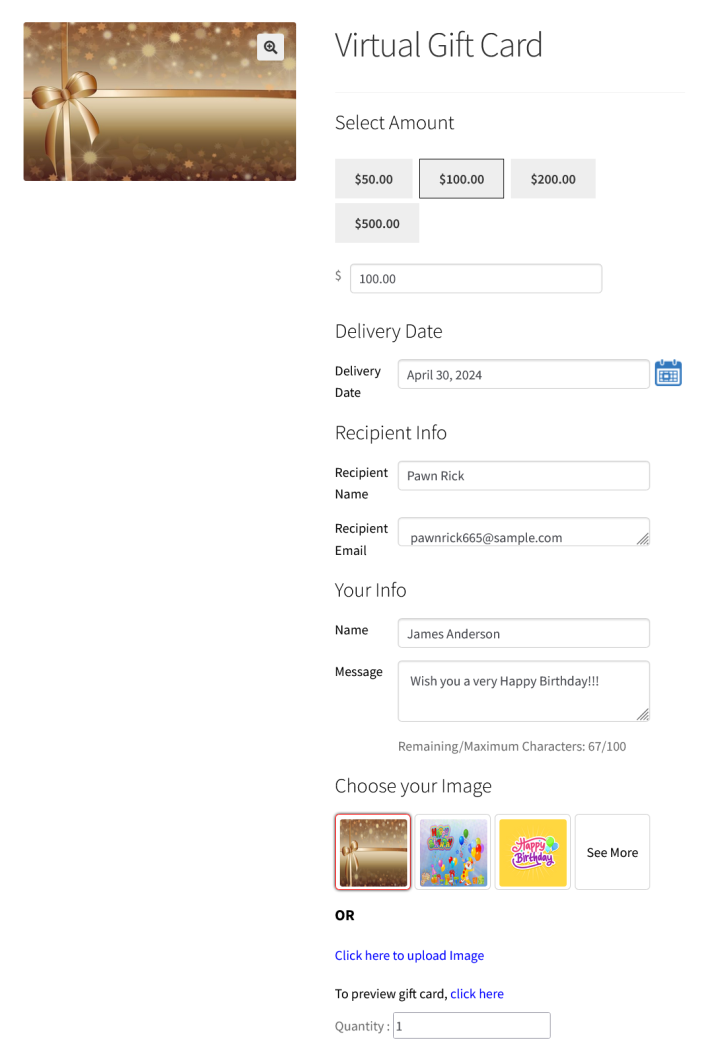
- Based on the product configuration, the Gift Card amount will be predefined, or you will have to select the Gift Card amount.
- In the Recipient Info section, fill in the Recipient Name and Recipient Email.
- In the Your Info section, fill in your name and the message which you want to display to your recipient.
- In the Choose your Image Section, choose an image. You can also get a preview of the Gift Card which the user will be receiving by clicking the preview link.
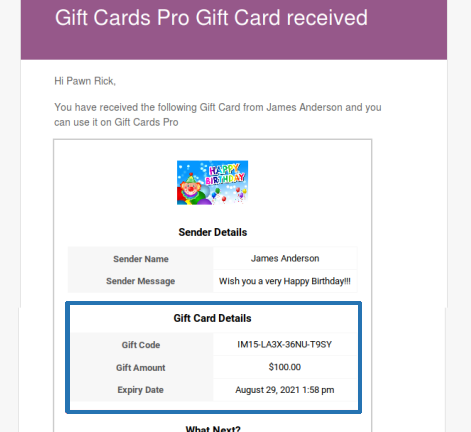
- Once the required details have been filled in, add the product to the cart and proceed to the checkout and complete the purchase.
- Once the purchase is completed and the order reaches the respective status, the recipient will receive the Gift Card via email.
Physical Gift Cards – Purchase
↑ Back to top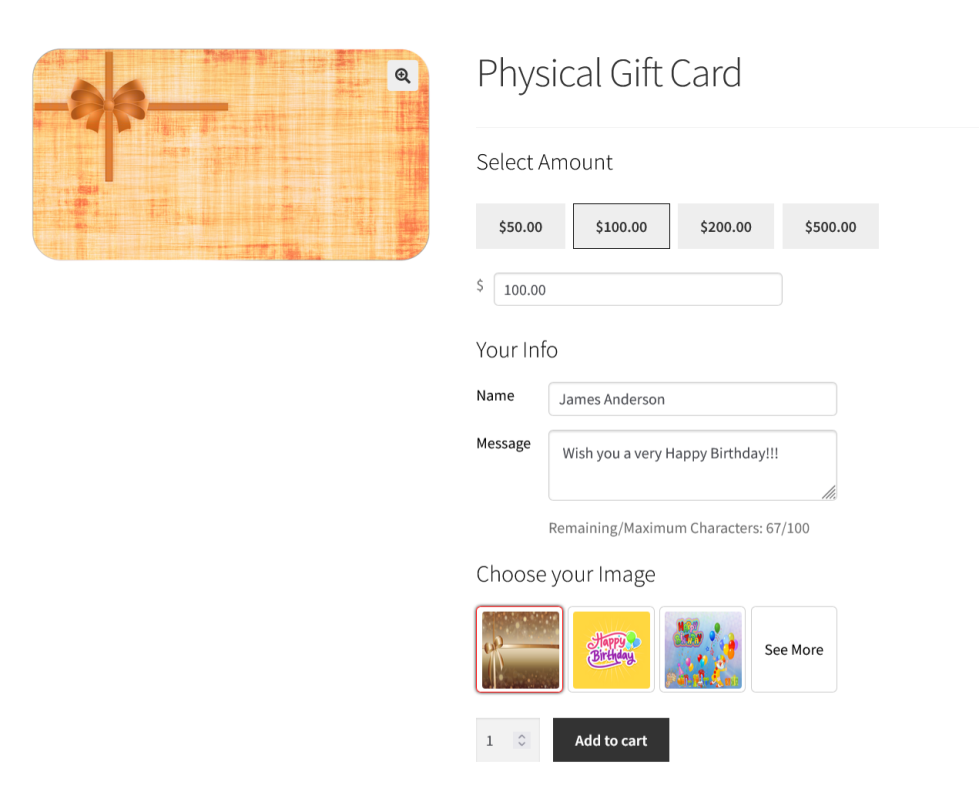
- Based on the product configuration, the Gift Card amount will be predefined, or you will have to select the Gift Card amount.
- In the Your Info section, fill in your name and the message which you want to display to your recipient.
- Once the required details have been filled in, add the product to the cart and proceed to the checkout and complete the purchase.
- Once the purchase is completed, the recipient will receive the Gift Card physically.
Type Selection Gift Card Purchase
↑ Back to top
- Based on the configuration, the Gift Card type selection will be displayed in the product page and you will have to select the type based on your need.
- Based on the product configuration, the Gift Card amount will be predefined, or you will have to select the Gift Card amount.
Virtual Type selected case
- In the Recipient Info section, fill in the Recipient Name and Recipient Email.
- In the Your Info section, fill in your name and the message which you want to display to your recipient.
- In the Choose your Image Section, choose an image. You can also get a preview of the email which the user will be receiving by clicking the preview link.
- Once the required details have been filled in, add the product to the cart and proceed to the checkout and complete the purchase.
- Once the purchase is completed and the order reaches the respective status, the recipient will receive the Gift Card via email.
Physical Type selected case
- In the Your Info section, fill in your name and the message which you want to display to your recipient.
- Once the required details have been filled in, add the product to the cart and proceed to the checkout and complete the purchase.
- Once the purchase is completed, the recipient will receive the Gift Card physically.
Gift a Product – Virtual – Purchase
↑ Back to top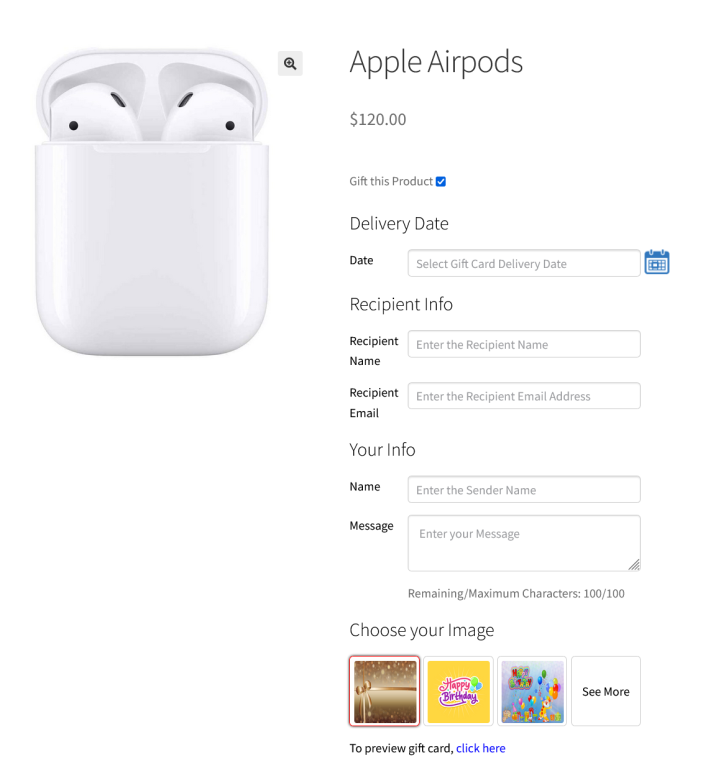
- On the single product page, the “Gift this Product” checkbox will be visible.
- When the checkbox is enabled, the following sections will be visible:
Recipient Info
Your Info - In the Recipient Info section, fill in the Recipient Name and Recipient Email.
- In the Your Info section, fill in your name and the message which you want to display to your recipient.
- Once the required details have been filled in, add the product to the cart. The price of the product will be considered as the Gift Card Value. Proceed to the checkout and complete the purchase.
- Once the purchase is completed and the order reaches the respective status[selected for Gift Card generation], the recipient will receive the Gift Card via email.
- The email will contain the Gift Card and the recommended product for purchasing. The recipient can use the gift card to purchase the recommended product or any other product from the shop.
Gift a Product – Physical – Purchase
↑ Back to top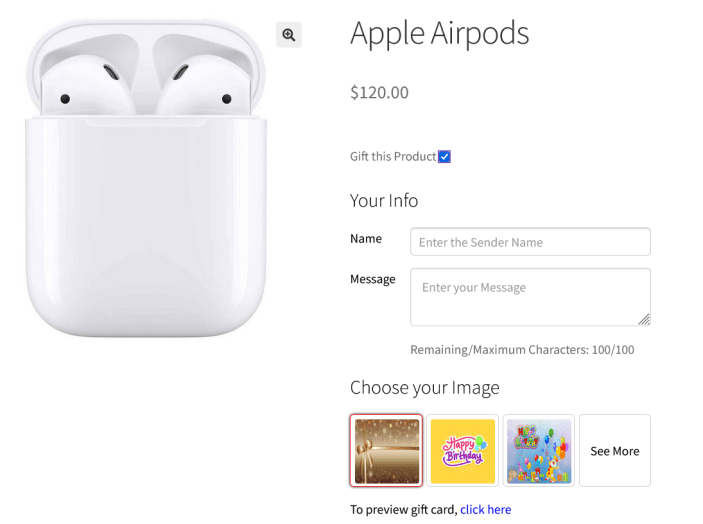
- On the single product page, the “Gift this Product” checkbox will be visible.
- When the checkbox is enabled, the following sections will be visible: Your Info
- In the Your Info section, fill in your name and the message which you want to display to your recipient.
- Once the required details have been filled in, add the product to the cart. The price of the product will be considered as the Gift Card Value. Proceed to the checkout and complete the purchase.
- Once the purchase is completed and the order reaches processing the respective status[selected for Gift Card generation], the recipient will receive the Gift Card physically.
Gift a Product – Type Selection – Purchase
↑ Back to top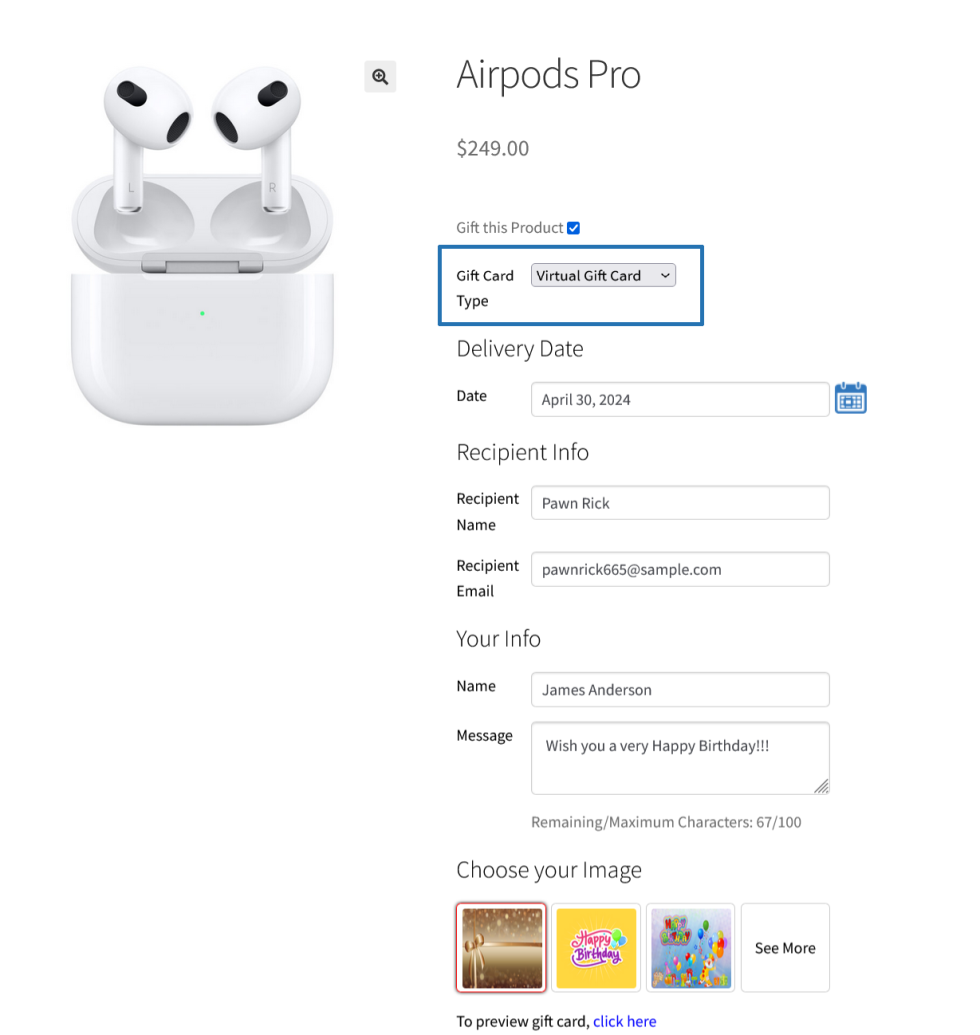
- On the single product page, the “Gift this Product” checkbox will be visible.
- When the checkbox is enabled, you will have to select the type based on your need in the Type Selection section.
Virtual Type is selected
- In the Recipient Info section, fill in the Recipient Name and Recipient Email.
- In the Your Info section, fill in your name and the message which you want to display to your recipient.
- Once the required details have been filled in, add the product to the cart. The price of the product will be considered as the Gift Card Value. Proceed to the checkout and complete the purchase.
- Once the purchase is completed and the order reaches processing the respective status[selected for Gift Card generation], the recipient will receive the Gift Card via email.
- The email will contain the Gift Card and the recommended product for purchasing. The recipient can use the gift card to purchase the recommended product or any other product from the shop.
Physical Type is selected
- In the Your Info section, fill in your name and the message which you want to display to your recipient.
- Once the required details have been filled in, add the product to the cart. The price of the product will be considered as the Gift Card Value. Proceed to the checkout and complete the purchase.
- Once the purchase is completed and the order reaches the respective status[selected for Gift Card generation], the recipient will receive the Gift Card physically.
Gift Cards – Usage – Recipient
↑ Back to topGift Cards can be used in two ways:
Added to the Site for a Later Use
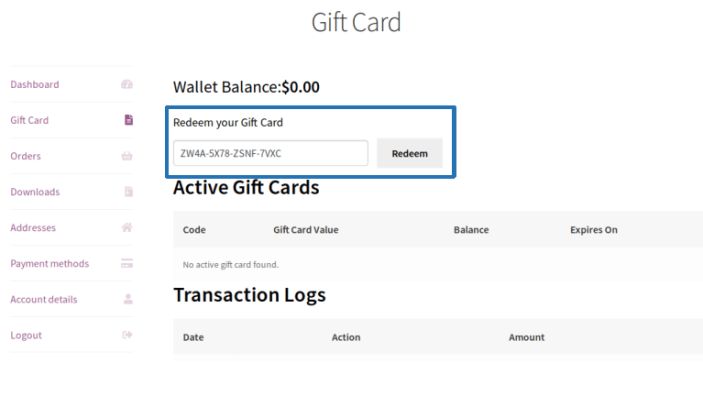
- To add a Gift Card to the site go to My Account > Gift Card.
- Enter the Gift Card code in the “Redeem your Gift Card” field and press the Redeem button.
- You can check the Gift Card balance before redeeming it into your account using the Balance check field.
- Once Redeemed, the Gift Card balance will be added to the user’s account.
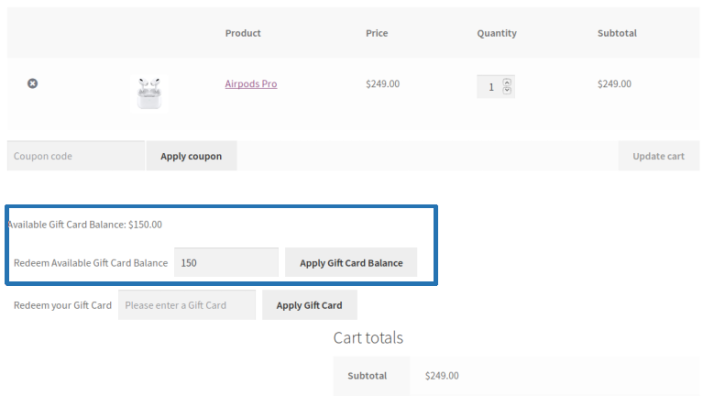
- If the user wants to use the Gift Card balance from the account, then they will have to enter the amount they wish to redeem on the “Redeem Available Gift Card Balance” field. This field will be available in the cart and checkout page.
- Once the Gift Card balance is applied on the cart, the user will have to only pay the difference amount and complete the purchase.
- By default, Promotional Gift Cards cannot be added to User’s Gift Card balance. If you wish you can optionally allow your users to add promotional gift cards to their account.
Directly Used on Cart and Checkout
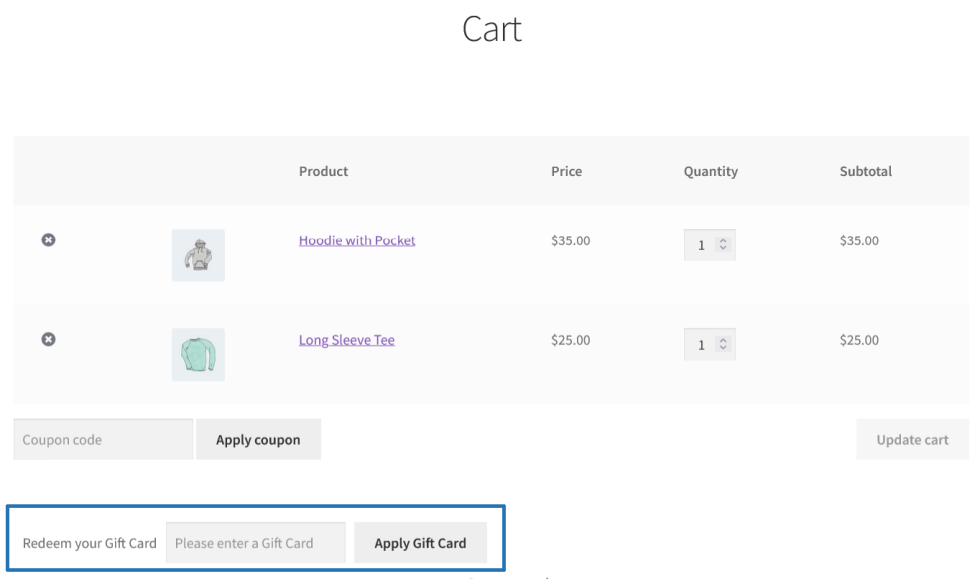
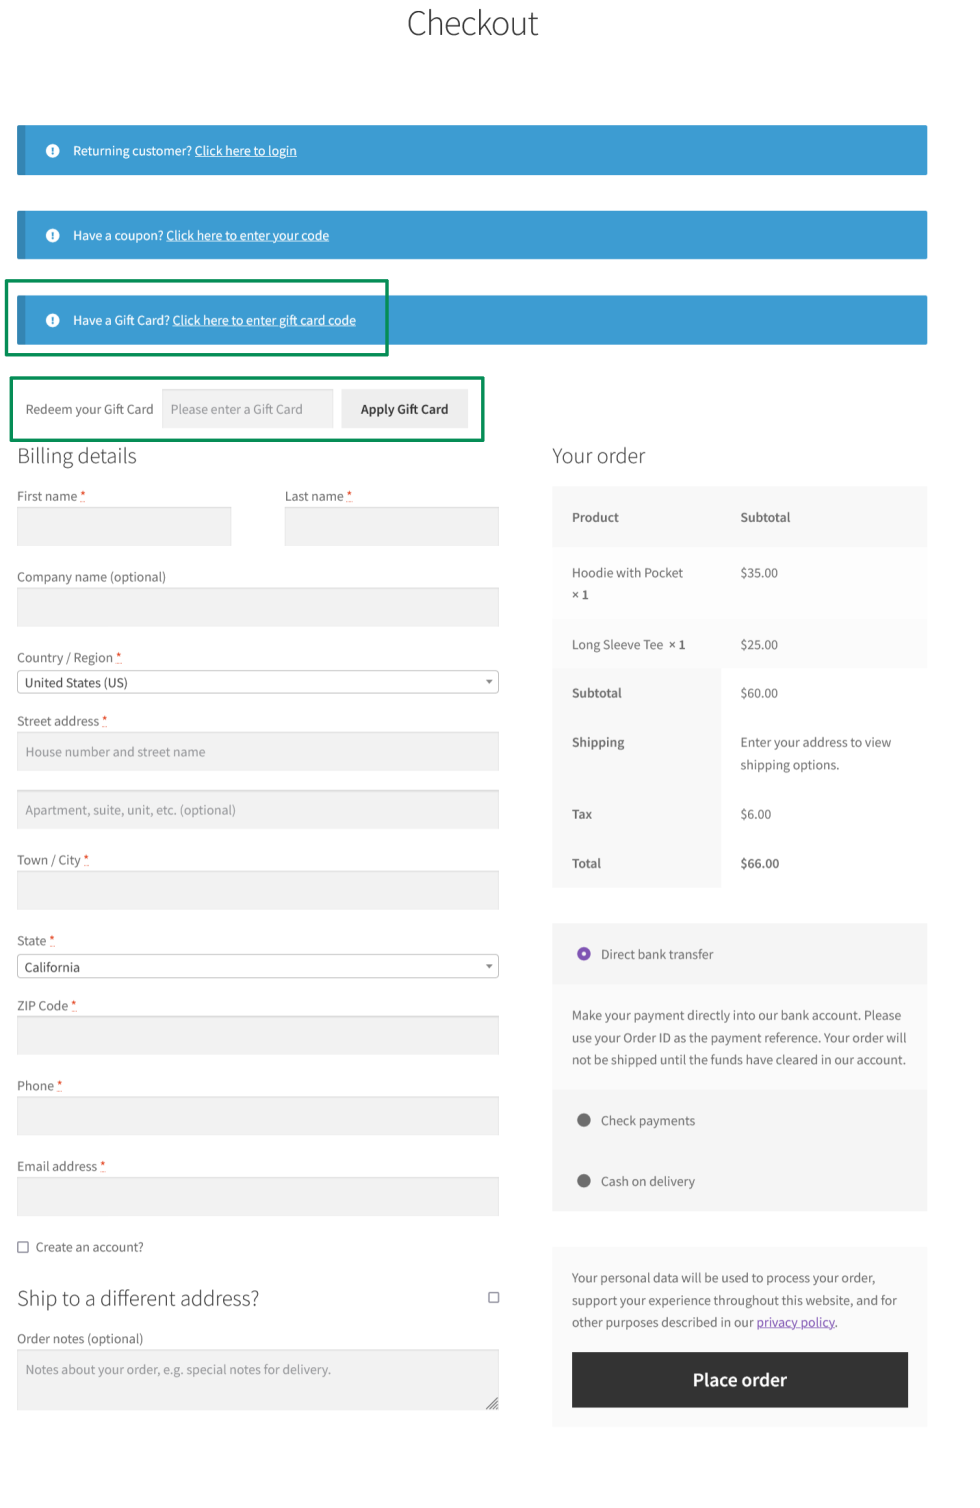
- To redeem a Gift Card directly on the cart and checkout page, the user will have to enter the gift card in the “Redeem your Gift Card” field and click the “Apply Gift Card” button.
- Once the Gift Card is applied on the cart, the user will have to only pay the difference amount and complete the purchase.
Gift Cards – Manual Usage by admin
↑ Back to top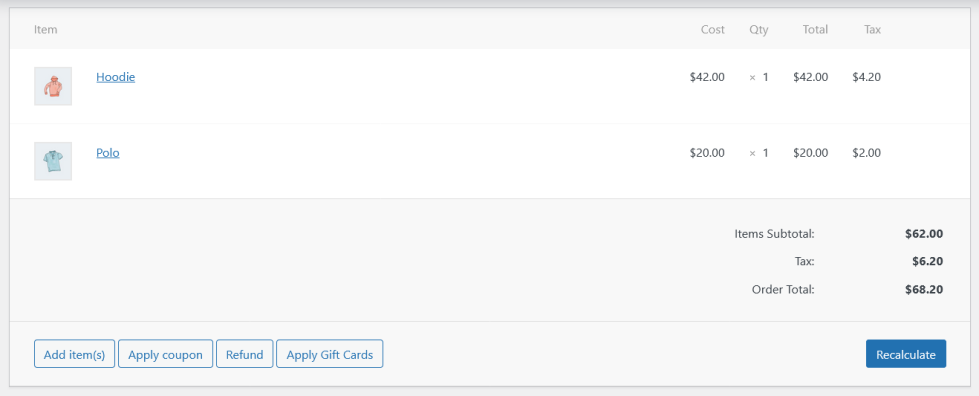
- To redeem a Gift Card in a Manually created Order or in already placed order, the site admin will have to enter the gift card in the “Apply Gift Cards” field by clicking the “Apply Gift Cards” button in the respective order page.
- Once the Gift Card is applied in the order, the site admin will have update the respective Order.
Translation
↑ Back to topGift Cards Pro for WooCommerce Plugin is translation ready meaning you can edit the po files by which you can translate the text to any language.
The steps to do the translation are as follows. For example, let us consider translating to French.
- Download and install Poedit
- Open the file gift-cards-pro-for-woocommerce > languages > gift-cards-pro-for-woocommerce.pot using Poedit.
- Create a new translation file by clicking Create new translation button.
- Choose the Source text and set its corresponding French text in Translation Text Area.
- Save the changes.
- Save the file name as gift-cards-pro-for-woocommerce-fr_FR.po.
- If you are using WordPress Version 3.9.13 or below, then in wp-config.php define the WPLANG as French. Syntax is define(‘WPLANG’, ‘fr_FR’);
- If you are using WordPress Version 4.0 or above, then go to WordPress dashboard > Settings > General and select the Site Language as French.