Gizmo Installation
↑ Back to topTo create a site with Gizmo, you must install the Gizmo theme and WooCommerce plugin.
Gizmo Download and Installation
↑ Back to top- Log in to your WooCommerce.com account and navigate to the Downloads page.
- Click the Download Icon to get a compressed gizmo.zip theme file on your computer
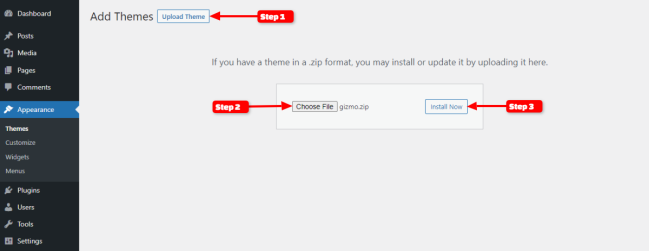
- From the dashboard of your site, navigate to Appearance > Themes and click on the Add New button
- Click the Upload Theme button to upload the gizmo.zip file you downloaded
- Click the Install Now button
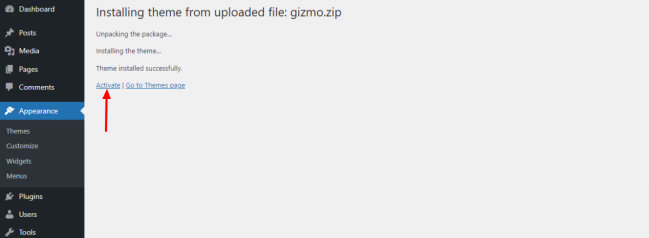
- You’ll be redirected to the activation page. Click the Activate button
Install WooCommerce
↑ Back to topIf you haven’t installed WooCommerce already, follow the steps below:
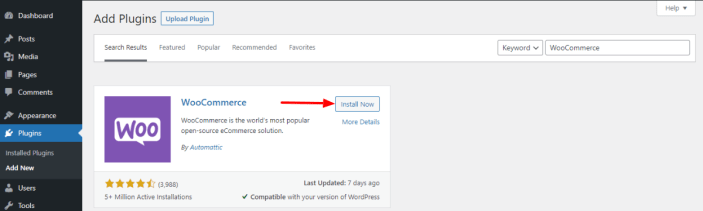
- Go to Plugins > Add New
- Search for “WooCommerce”
- Hit the Install Now button on the box containing the WooCommerce title
- Finally, press the Activate Now button
Import Demo Site
Gizmo comes with a pre-built demo site that you can import into your site and start editing content. To import the demo, you need to install the ThemeGrill Demo Importer plugin and follow these few steps:
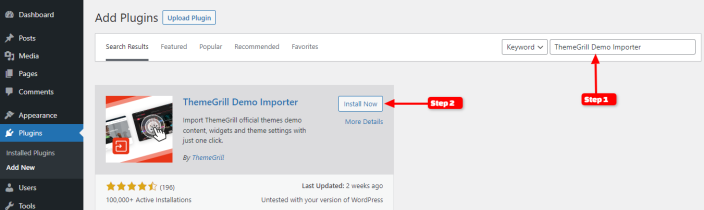
- Go to Plugins > Add New
- Search for the “ThemeGrill Demo Importer” plugin
- Once the plugin appears on the search result, click on the Install Now button
- Click on the Activate Now button
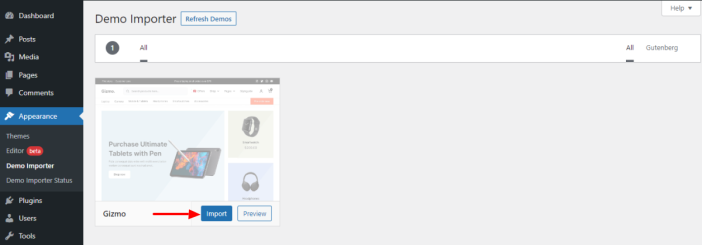
- Go to Appearance > Demo Importer
- Hover over the Gizmo box and click the Import button
- On the confirmation box, read the heads-up message carefully and click the Confirm button if all points look good to you
- Wait till the Importing… text on the button changes to Live Preview
- Click the Live Preview button
- Your site should now look like the Gizmo demo site
Now, it’s time to edit the content of your site like posts, pages, products, images, etc. Go through the documentation below for detailed information:
Editing Gizmo Demo Content
↑ Back to topWell, coming up here, you might have successfully imported the Gizmo demo to your WordPress website. You might wonder how to edit or replace the demo content, images, header, footer, templates, and more with your own.
Being a Full-Site Editing theme, all the customization options can be achieved from the front end. Navigate to WordPress Dashboard > Appearance > Editor and choose the elements you want to customize or edit.
It lets you choose the specific elements of the template parts like color, typography, content, etc.
Let us provide you with an example by showing the steps of how you can edit the header area of the Gizmo theme after the demo is imported.
The header area of the Gizmo theme consists of Logo, Product Search Bar, Menus, Cart Icon, Pre-Order Now Button, etc. These elements are added via the available blocks. For example, the Logo is added via the Site Logo Block, the Product Search Bar is added via the Product Search Block, and so on.
Edit Site Logo
↑ Back to topTo edit the Site Logo, follow the steps below:
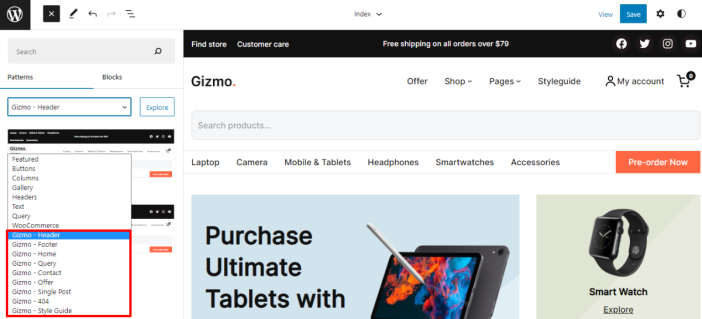
- Click on the WordPress Icon from the top left corner of the site editor.
- Choose the Templates Parts > Header.
- Click on the Logo that displays a toolbar with various settings options.
- Choose the settings options you want to change, such as Replace Logo, Crop, Apply Duotone Filter, etc.
Moreover, for other settings and customization, navigate to the right sidebar, where you will find different settings like Styles, Image Width, Dimensions, etc.
By following the steps above, you can customize all other elements available within the Gizmo demo and add your own.
Blocks and Patterns
↑ Back to topUsing Blocks
↑ Back to topBlocks are the components used in the theme for adding content to the posts/pages. The Gizmo theme support all WordPress and WooCommerce blocks that you can use to add text, media assets, and layout components, allowing you more freedom to create content.
To get access to the Block, you can follow the step below:
- Go to Pages and choose your desired page
- Now, you can click the plus (+) icon at the top left inside the toolbar to insert blocks
It will display a list of blocks available. You can use the appropriate block that suits your site requirements. For example, You can use the Site Title Block to add the site title on the header area.

Using Patterns
↑ Back to topGizmo themes come with nine pre-built patterns. Choose the one that fits your site and customize it accordingly. Once activated, you will see a set-up pattern on your front end. You can either edit or remove it by replacing the other available patterns.
Before listing the available patterns in the Gizmo theme, let’s point out several reasons for using the patterns in the theme:
- It saves time as you don’t need to create the same layout. You can reuse the same patterns on multiple areas of your site.
- It helps you add professional designs to your site without needing degree designers.
Available Patterns in Gizmo Theme:
- Header – The pattern is created for the header area of the theme. For now, it has two styles, i.e., Default and Style 1. The Style 1 pattern is added at the time of importing the demo.
The difference between these patterns is that Default searches the articles on the search bar, whereas Style 1 searches the products on the search bar.
- Footer – The pattern is created for the footer area of the theme. It comes with two styles, i.e., Default and Style 1. The Style 1 pattern is used in the demo.
Style 1 consists of many elements inside it, such as the services section, menus, copyright, social icons, and payments, whereas the Default only consists of the copyright, social icons, and payment section.
- Home – The Home pattern is for the homepage’s content area. For now, the home pattern consists of only a single design which gets added after importing the demo.
- Query – The Query pattern is used for displaying the posts on your site and comes with two designs, i.e., Default and Style 1.
The difference between these two patterns is the layouts (designs) of how the post gets displayed on your end. You can choose the pattern styles according to the site requirements.
- Contact – The Contact pattern is generally used for displaying the contact information on your end.
- Offer – The Offer pattern displays the list of products along with the banners with the best price deal. Moreover, you can highlight the Bumper Deals using the offer pattern.
- Single Post – The Single Post pattern defines the layout of how your post gets displayed while allowing it to open on a single page.
- 404 – The 404 pattern is useful for displaying the 404 errors on your end.
- Style Guide – The Style Guide patterns provide a basic visual baseline of the theme series of block patterns in the order they are being added.
Adding Patterns in the Gizmo theme
↑ Back to topYou can follow the steps below to add the new pattern to your Gizmo FSE Theme.
- Click on the plus (+) sign from the top left of your page editor.
- Select the Pattern option from the tab.
- Scroll down the available patterns and click on the one that fits on the site.
- Upon clicking, it will automatically add the selected patterns on the page.
- Once done, the patterns become individual blocks that you can move, change and customize according to your site requirement.
Template and Template Parts
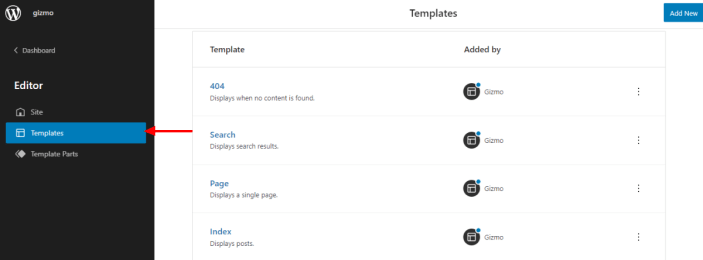
↑ Back to topThe Gizmo FSE theme offers 15 Templates for your use. You can customize these templates if you feel like changing anything on a specific template and wish to see those changes across your site.
Basically, a template defines the structure of the content area of the site, such as a 404 page, search result, single post, etc.
Below is the list of available templates within the Gizmo theme:
- 404: The template is displayed when no content is found on the requested page.
- Search: The templates display search results.
- Styleguide: It provides a basic visual baseline of the theme series of block patterns in the order they are being added.
- Contact: It displays the contact information section of the site.
- Blog: Design blog page post listing.
- Offer: It displays the list of products and the product banner with the best price deal.
- Page: It displays a single page.
- Index: It is used for displaying posts.
- Archive: The template is displayed for post categories, tags, and other archives.
- Single: The template is used for displaying any single post or attachment.
- Single Product: It displays the single product of your site.
- Product Catalog: It displays the products.
- Product Search Result: It displays the search result of your store.
- Products by Category: It displays the products which are filtered by category.
- Product by Tag: It displays the products which are filtered by tag.
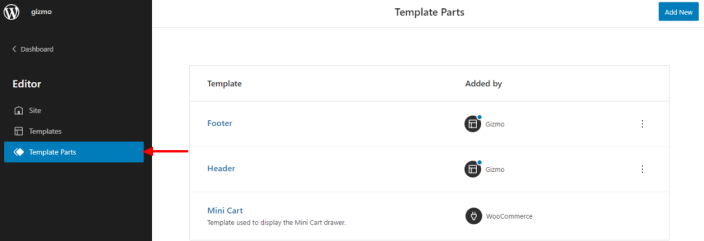
The Templates Parts is basically a block for managing the different areas of your site. It helps you set the structure for the reusable items like the Header and Footer. The primary use of the Templates Parts is used for setting up the site structure. You can either create new Templates Parts or use the one provided by the theme.
Below is the list of the Templates Parts available in the Gizmo theme:
- Footer
- Header
- Mini-Cart
Theme built-in CSS classes
↑ Back to topThe gizmo theme comes with several built-in CSS classes. CSS classes can be used to create spacings, hide/show elements, etc. CSS classes are used on the desired elements.
In order to add the CSS classes within the Gizmo theme, you can follow the steps below:
- Go to WordPress Dashboard > Pages and choose the desired page.
- Select the specific elements you want to add to the CSS.
- Click on the settings from the top-right section of the page editor.
- Under Advanced, add the CSS code inside the Additional CSS box. (Multiple classes can be added by separating them with spaces).
Theme classes that can be used:
- gizmo-avatar: It adds an avatar for my account and hides the text. Should add inside navigation page classes.
- gizmo-container-spacing-15: It adds space on the left and right container area with 15px.
- gizmo-padding-top-bottom-8: It adds padding spacing at the top and bottom by 8px.
- gizmo-hide-mobile: Display none on mobile.
- gizmo-top-bottom-border: It adds 1px solid border at the top and bottom used in the category menu.
- gizmo-menu-item-style-1: It is used to add an offer icon in navigation items.
- gizmo-post-navigation: It changes the previous and next navigation styles.
- gizmo-top-bar: It is used in the top bar as the parent class.
- gizmo-margin-block-start-20: It is used to add margin-top 20px.
- gizmo-primary-menu: It is used in menu hover. (Need to use in the primary menu pattern class)
- gizmo-mini-cart: It removes space in the cart and checkout page. (Need to be added in min cart parent row)
- gizmo-text-decoration-underline: It adds the text decoration underline in “a” tag. (Need to be added in parent div)
- gizmo-footer-menu: It adds spaces between the top and bottom 10px in mobile.