Overview
↑ Back to topAn Australian portfolio of retail and services businesses, Kogan.com came into existence in 2006. In such a brief period, it became one of the popular online shopping destinations in Australia. The platform is known for price leadership with digital efficiency. Listing products on Kogan ensures instant attention and demand in the market. Additionally, sellers can take part in rich marketing and targeted promotional activities to earn additional significant exposure to their products.
Kogan Integration for WooCommerce
↑ Back to topThe integration solution from CedCommerce connects the Kogan store with WooCommerce and facilitates easy management of the business through the two platforms. Quickly import products from Kogan marketplace to WooCommerce and manage order updates centrally.

How to get started with a Kogan Seller Account?
↑ Back to topGet started with a Kogan Seller Account today! All you have to do is fill the form here and submit it.

WooCommerce Kogan Configuration
↑ Back to topOnce you are through with the registration process on the Kogan marketplace, you can connect your Kogan account with WooCommerce Store. Simply use Kogan Integration for WooCommerce and enjoy seamless synchronization between the two channels. Follow these simple steps for the WooCommerce Kogan Configuration.
Connect your Store with WooCommerce
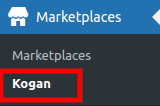
↑ Back to top- On the left side of the WooCommerce panel, hover to Marketplaces and click on Kogan.
- Under the Configuration tab, enter the Seller ID and Token. You will need to contact your Kogan account manager to get these details.

- Select the environment as Sandbox or Live. Save the settings and move ahead to Global Setting.
Note – Initially, you will need to select the Environment as Sandbox as in the starting, you will be getting the Seller ID and Token for Sandbox environment. Once the Integration is tested in the Sandbox environment, the Kogan account manager will provide the credentials for the Live environment.
Global Setting
↑ Back to topUnder the global settings, you will need to map the Kogan marketplace attributes with the WooCommerce attributes or meta keys.
MetaKeys and Attribute List
↑ Back to topThe Meta keys and Attributes List section will help you choose the required meta key or attribute on which the product information is stored.
These meta keys or attributes will further be used in attribute mapping.
In, this you can search the product by its title. For selecting the required meta key or attribute, expand the Meta keys and Attributes List section, enter the product name/keywords, and the list will be displayed under that. Select the metakey or attribute as per requirement and save settings as specified in the screenshot:

Attribute Mapping
↑ Back to topIn this section, you need to fill in the related information regarding the product either in the field provided or map the attribute or metakey from the dropdown on the right.
How it works: If you want to send the default information of the particular Kogan attribute for all the products, you may fill that information in the text field or select from the dropdown on the left.
If you want the information to be unique and picked from each product, map the corresponding attribute or metakey from the list of available options in the dropdown on the right.
You can also leave some fields blank for which you want the information to be picked from WooCommerce itself since all this information is available by default. The attributes are
SKU, Title, Description, Main image URL, Stock, Price.

- SKU – It is mandatory information to list a product on Kogan. You can map the attribute or metakey where the SKU information is stored. If left blank, WooCommerce SKU will be used automatically.
- Title – Title of the product to be uploaded on Kogan. If left blank, it will use the WooCommerce title.
- Subtitle – You can specify the subtitle of the product in this section.
- eBay Category ID – Kogan supports the eBay categories as well, so you can specify the eBay category ID if you want to use it instead of the Kogan category.
- Description – Description of the product to be uploaded on Kogan. If not mentioned, it will pick up WooCommerce data by default.
- Inbox – All the packaging details are to be added under this section.
- Length, Width, Height, Weight – Enter the product’s length, width, height, and weight. If left blank, it will use WooCommerce data if available.
- Gtin – Product barcode information required to list branded products.
- SKU Prefix – Prefix needs to be added to each product SKU for the seller identification.
- Location – Add the location of your warehouse and use the upper-case two-letter country code AU, UK, US, etc.
- Brand – Brand of the product to be uploaded on Kogan.
- Main Image URL – Map this field if you want to send a custom image on Kogan else, leave blank, as it will automatically pick the WooCommerce product image data.
- Stock – Stock of the product to be uploaded on Kogan.If left blank, WooCommerce stock will be used.
- Enabled – Specify the status of the product as enabled or disabled.
- Price – Price of the product to be uploaded on Kogan.If left blank WooCommerce price will be used.
- Kogan First Price – Set exclusive price for Kogan First Customers.
- Tax-Exempt – If the product has a special tax exemption, you mark the status as yes or no.
- Shipping – Enter the shipping charges for the products. Leave it blank for free shipping.
- Handling Days – Enter the number of days you will take to ship the orders that you receive on Kogan.
- Rrp – It is the regular price for Kogan. It is shown as Seller List Price to indicate a saving.
- Markup Type – The markup feature is used to increase a certain amount in the actual price of WooCommerce while listing on Kogan. There are two types of markup type-
1. Fixed Increased – You can add the fixed amount that needs to be added to the original price of the products.
2. Percentage Increased – You can specify the percentage increase that you want to be included in the product’s original price.
- Markup Value – Enter the markup value to be added to the price. E.g.,10.
Save the settings and move to Category Mapping.
NOTE: All this information can be overwritten if you fill the information in the fields provided at the product level. For this, you need to go to the product edit section of WooCommerce and look for the sections as shown in screenshots.
For simple products :

For variable products: Expand the Variations tabs to view.

Category Mapping
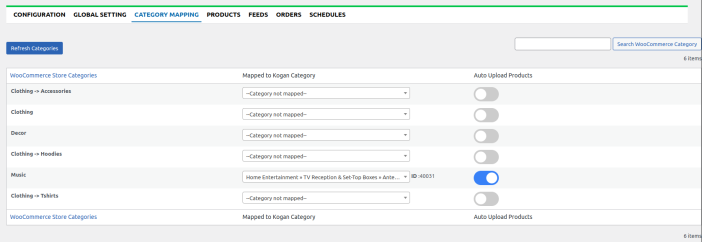
↑ Back to topIn this section, you will need to map the WooCommerce store categories to the Kogan categories.
You need to select the Kogan category using the dropdown corresponding to each WooCommerce category.
You can search the WooCommerce category by using the search box.
For new Kogan categories please click the ‘Refresh Categories’ button.
Auto Upload Products
↑ Back to topYou can also select those categories for which you want the products in that category to be automatically uploaded from the WooCommerce store to the Kogan marketplace.
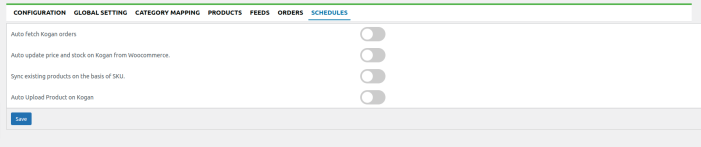
Please make sure to enable the Auto Upload Product on Kogan feature in the SCHEDULES tab.

Product Management
↑ Back to topThis section lets you perform multiple operations such as Upload/Update products from WooCommerce to Kogan. To. perform any operation from the Bulk Actions dropdown, you need to select the product using the checkbox on the left side in the product list column and hit Apply button. You will get a notification for each performed operation.
Here the admins can perform the following task:
- Upload Products
- Update Products
- Update Inventory
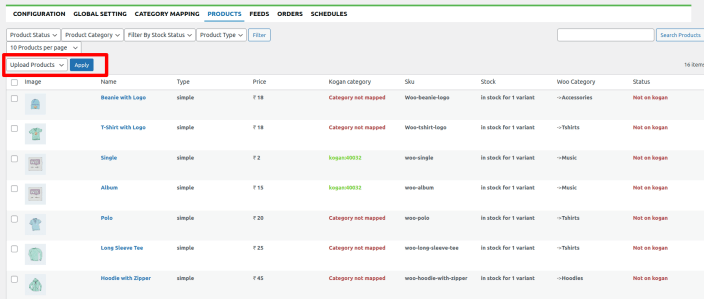
Upload Products
↑ Back to topSelect the checkboxes associated with the products you need to upload.
Click the dropdown box next to the Bulk Actions field, select the Upload Products, and then click on the Apply button as specified in the screenshot:
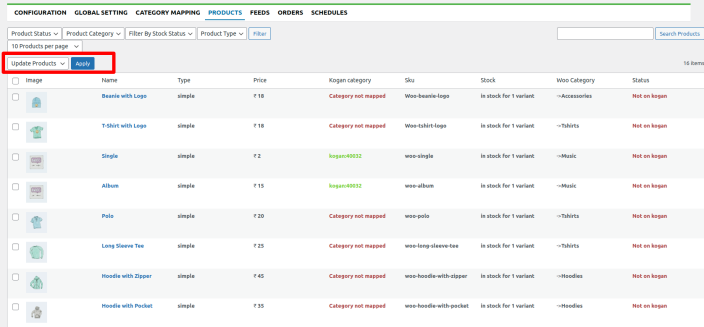
Update Products
↑ Back to topSelect the checkboxes associated with the products you need to update.
Click the dropdown box next to the Bulk Actions field, select the Update Products, and then click on the Apply button as specified in the screenshot:
Update Inventory
↑ Back to topSelect the checkboxes associated with the products you need to update inventory.
Click the dropdown box next to the Bulk Actions field, select the Update Inventory, and then click on the Apply button as specified in the screenshot:
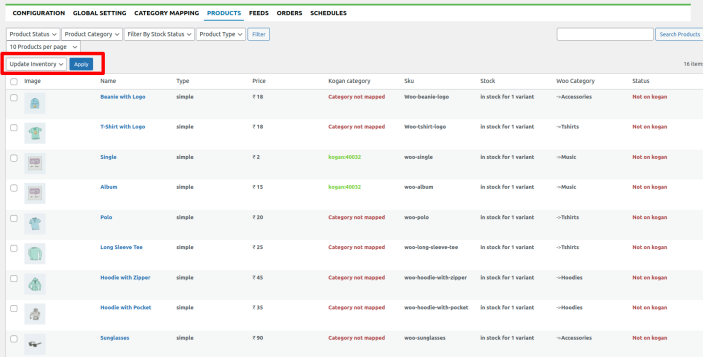
You can also filter out the products on a different basis.
- Product Status – You can filter whether the product is uploaded or not uploaded on Kogan.
- Product Category – You can filter out the WooCommerce category that you want to sync to Kogan.
- Filter by Stock Status – You can filter out the products on the basis of their stock status.
- Product Type – You can filter out the products on the basis of their type.
Feed Management
↑ Back to topReview the status of your uploaded products, whether they are published or have any errors. With the integration, you can easily view and resolve the errors and reupload them.
To view the complete report of the feed click on the View Details option under the Kogan feed ID.

Order Management
↑ Back to topYour fetched Kogan orders will be displayed here. You can fetch the Kogan orders manually by clicking the fetch order button or also you can enable the auto-fetch order feature in Schedulers.

You can also submit the tracking details from WooCommerce to Kogan. You need to go into the order edit section using the edit option in the order table below. Once you go into the order edit section you will find the section at the bottom where you can enter tracking info and update them on Kogan.

Schedules
↑ Back to topEnable the automatic synchronization of products, orders, and prices by setting up schedulers that will keep everything regularly updated.
FAQs
↑ Back to top1. How can I get Seller Id and token?
Ans. Fill the Marketplace Application form to be invited as a seller on the Kogan marketplace. Once the Kogan team accepts the form, they will provide you with the Seller Id/Token.
2. Can I set different prices just for Kogan while syncing products from WooCommerce?
Ans. Yes, you can set different prices just for Kogan while syncing products from WooCommerce. If you want to set an additional price for Kogan, you can select Fixed Increased or Fixed percentage and fill the value. It will add your default price + markup price.

3. Do the stock levels get synchronised when the order is placed on WooCommerce or Kogan?
Ans. Yes, the stock is reduced on Kogan once the order is placed on WooCommerce and vice-versa.
4. How many orders and products can be synced via the plugin?
Ans. Unlimited orders and products can be synced between both platforms at a specific time interval.
5. How to manage products that are already available on both platforms?
Ans. If the products are already available on both the Kogan and WooCommerce platforms, then the products having the same SKU will be linked automatically.
6. Do I need to upload products manually, or is there any feature for bulk uploading the products on Kogan from WooCommerce?
Ans. Yes, you can upload products manually or by opting for the “Auto upload products ” feature.

7. Can I choose and update products on Kogan?
Ans. Yes, sellers can select the products that they wish to list or update on Kogan. Under Product Management, you can perform multiple operations such as product upload and update and update inventory and image.
8. Does the plugin support variable products?
Ans. Yes, variable products can be synced using the plugin. The variations are automatically uploaded on Kogan.
9. Can I auto-upload the tracking details from WooCommerce to Kogan?
Ans. Yes, you can upload the tracking information using the plugin. You need to fill the tracking
information in the section provided in WooCommerce order edit page and hit the submit
Button.

Need further assistance?
Get in touch with our dedicated account managers, who will assist you throughout the onboarding process. Our team will be available 24*7 for your support.