Multichannel by CedCommerce simplifies eCommerce for businesses by integrating WooCommerce stores with global platforms such as Amazon, eBay, Etsy, and Walmart. This ready to launch solution facilitates effortless cross-platform selling, saving time and providing a unified dashboard for efficient management. With a focus on scalability and seamless integration, businesses can rapidly expand their reach and enhance the overall customer experience.
Key Features
↑ Back to top- Seamless Integration: Easily connect the WooCommerce store with global eCommerce platforms for centralized product, order, and inventory management.
- Global Expansion: Extend reach to a wider audience by linking the WooCommerce store to major platforms like Amazon, eBay, Etsy, and Walmart, unlocking new sales opportunities worldwide.
- Unified Management Dashboard: Simplify operations with a centralized dashboard that manages all selling activities across multiple marketplaces, reducing the need for multiple integration solutions and saving time and effort.
- Scalability: Accommodate larger product catalogs and increased order volumes, making the plugin suitable for eCommerce operations of all sizes.
- Advanced Features: Benefit from features such as fulfillment integration support, efficient order-pulling systems, multi-account management, and real-time product updates to save time and minimize manual errors.
Getting Started
↑ Back to topConnect your WooCommerce store with the marketplaces you wish to sell on by following these steps:
- Visit your WooCommerce admin page
- Locate and click on CedCommerce under the WooCommerce tab
Choose your subscription plan
↑ Back to topGo to the Pricing tab to choose a subscription plan that best fits your business needs, whether it’s monthly or yearly.
Note: Switch to the yearly plans to save more.
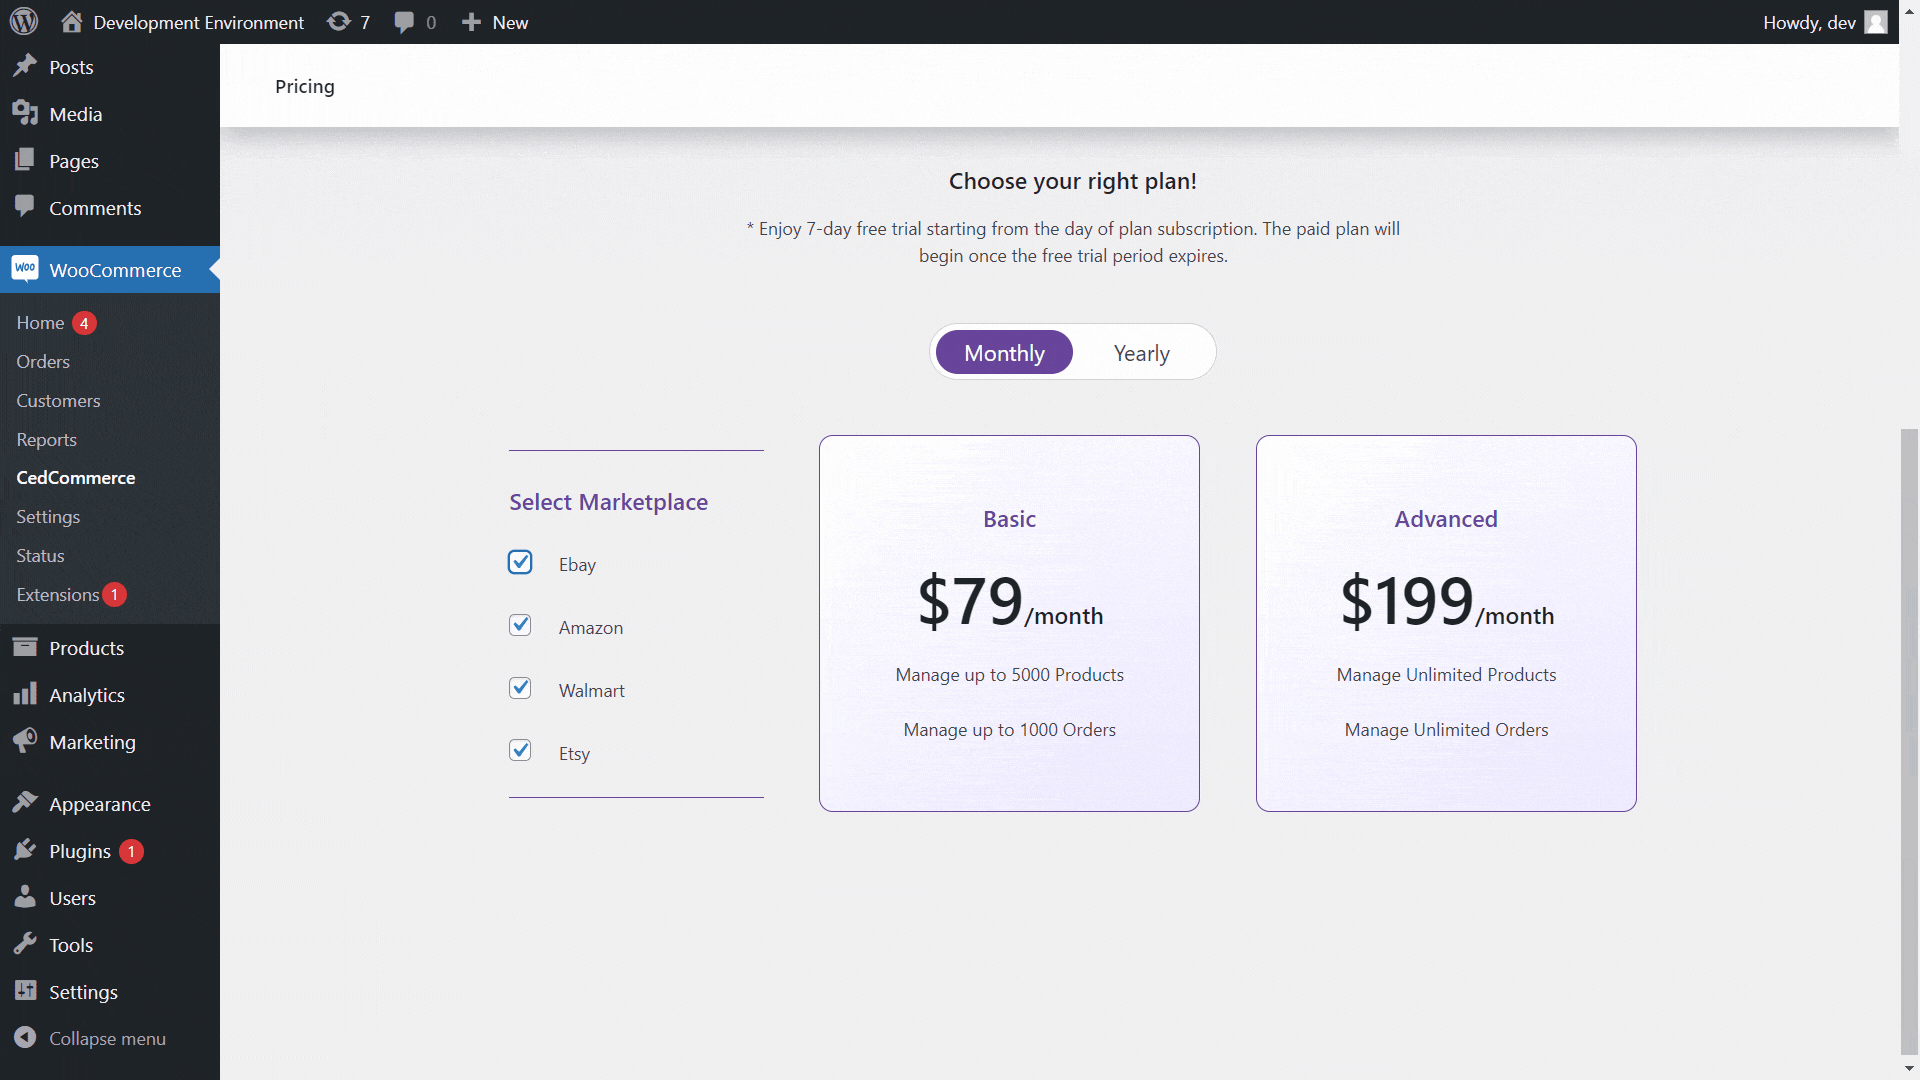
Once you have decided which plan is suitable for you, select the plan and click Buy Now to complete the checkout process.
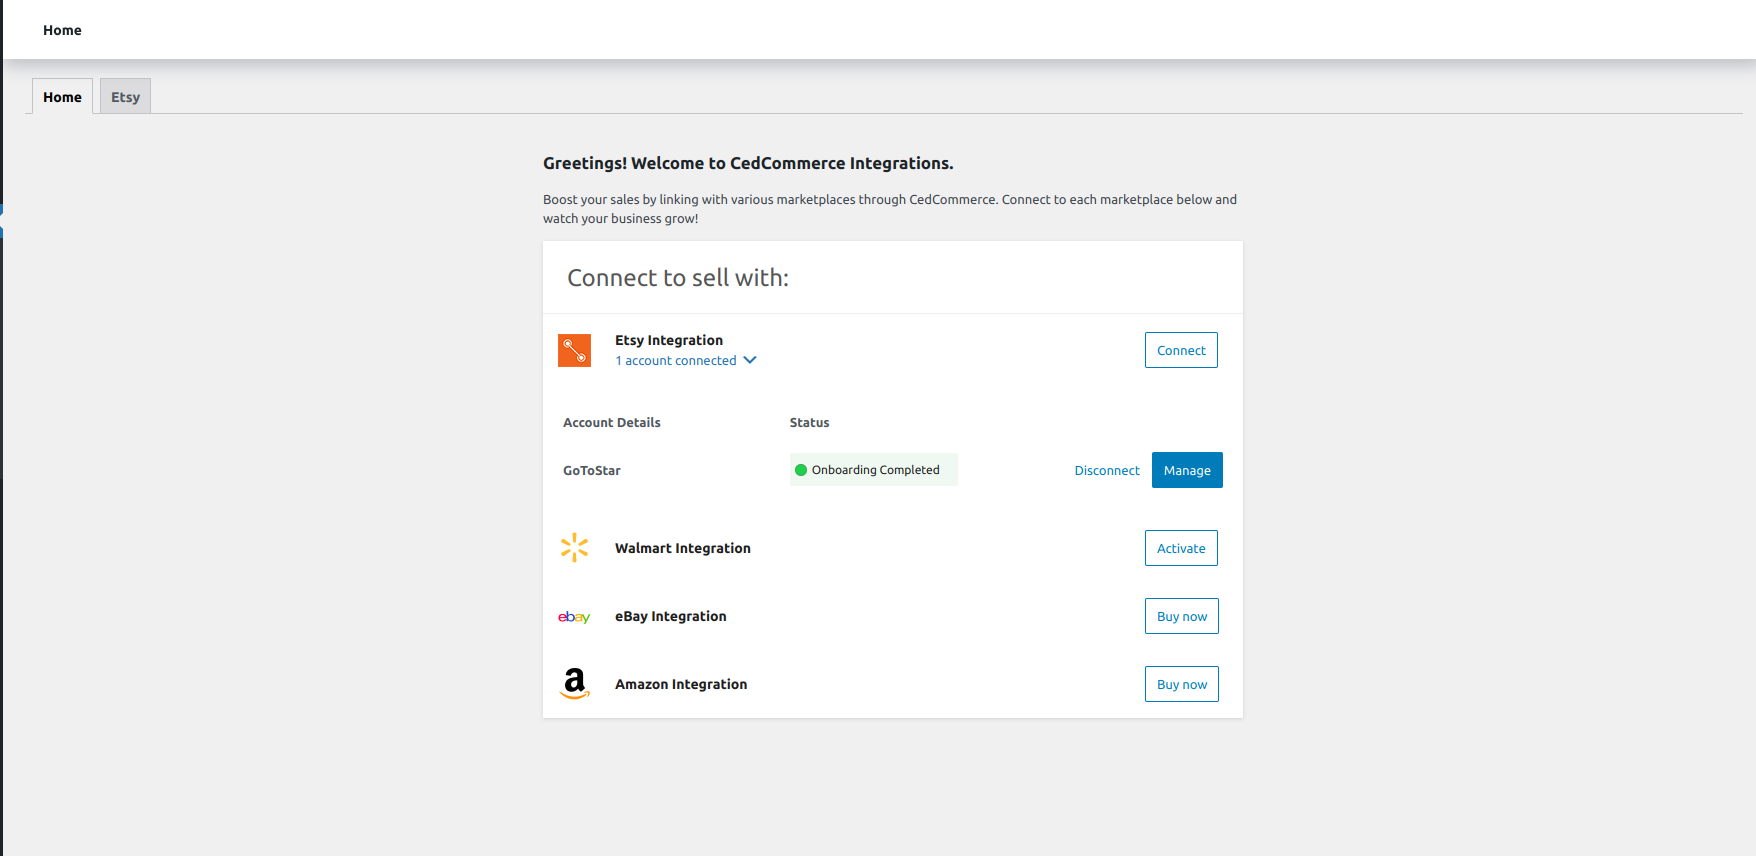
After a successful checkout, you will be redirected to the home page of the plugin. You will now see the Connect tab in front of each marketplace.
Connect and start selling on marketplaces
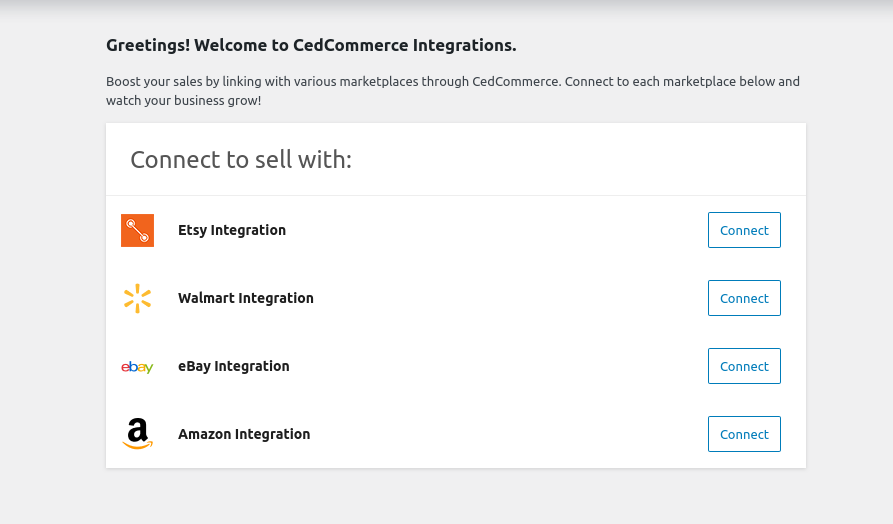
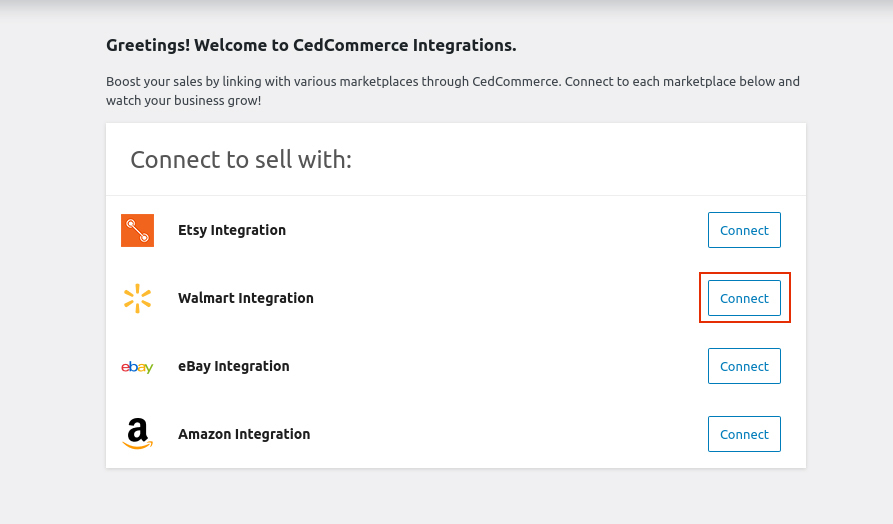
↑ Back to topConnect and start selling on marketplaces to expand your reach and tap into a larger customer base. Our platform simplifies the process, allowing you to seamlessly integrate and manage your sales across multiple marketplaces.
Connect with Etsy Integration
↑ Back to topSelect Etsy under the ‘Connect to sell with’ option.
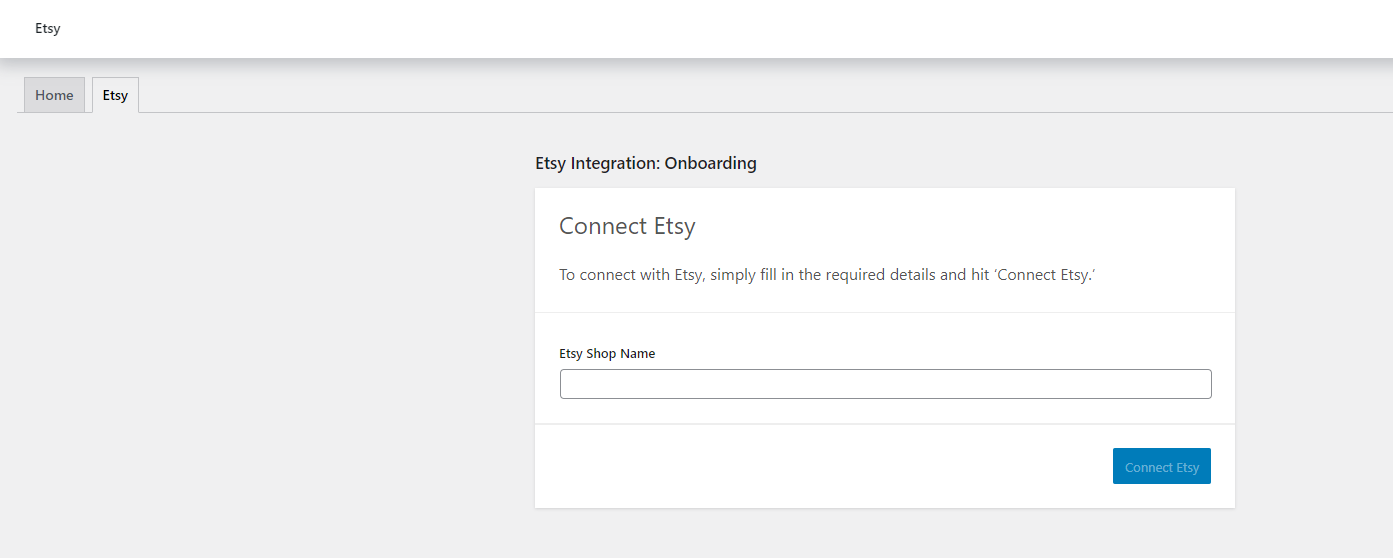
Enter your Etsy shop name on the welcome page and click ‘Connect Etsy’ to initiate setup.
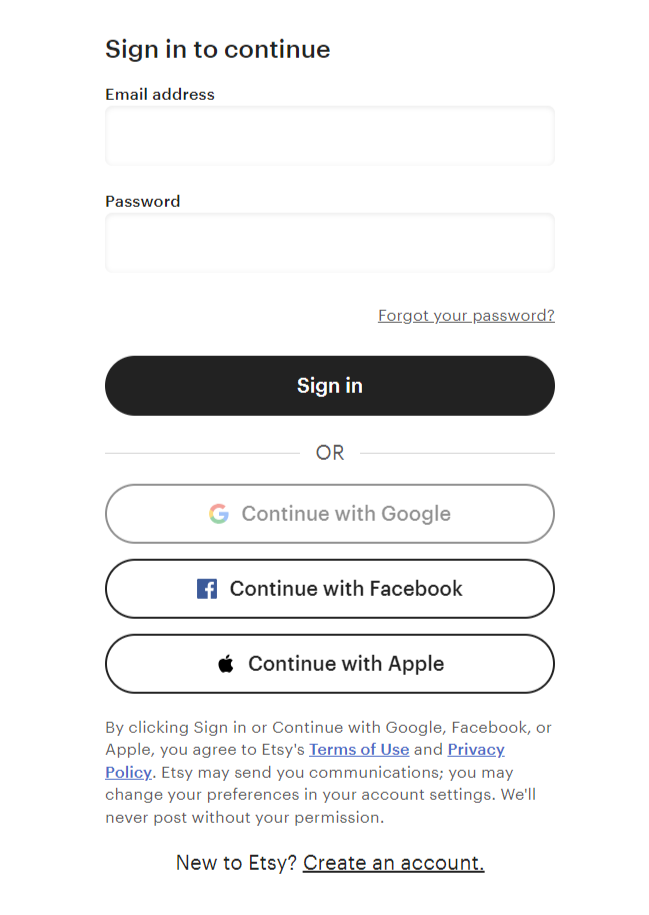
Next, you will be redirected to the Etsy login page. Go ahead and enter the required details and click ‘Sign In.’
When your Etsy store connects, you will be redirected to the application with a successful message.
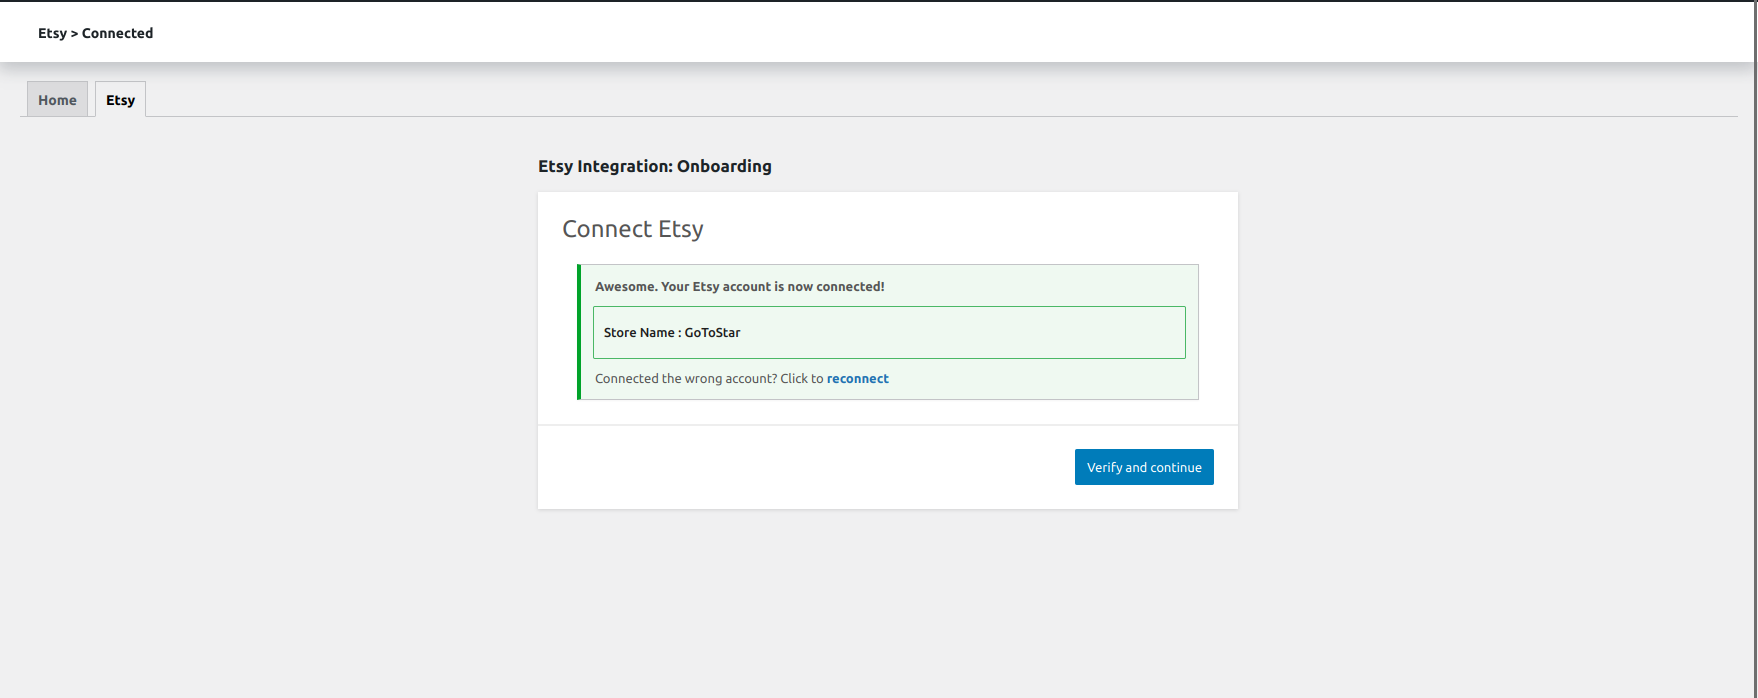
Click on ‘Verify and continue’ to configure the app.
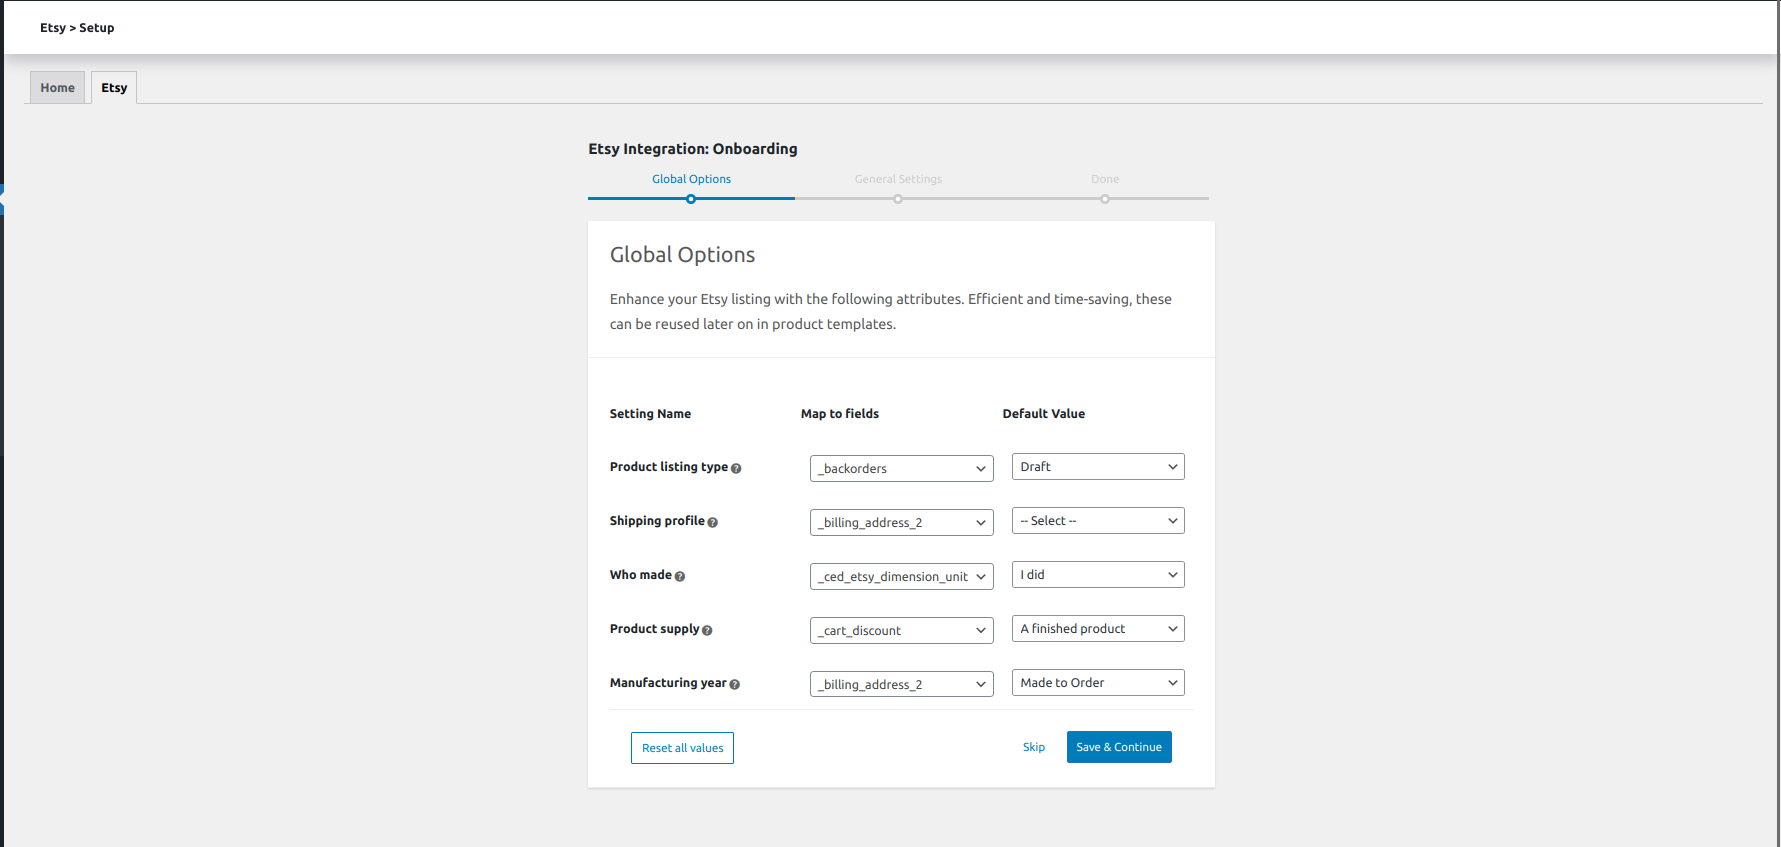
Global Options
Our solution provides some essential attributes to help you improve your Etsy product listings. These save your time and make the product templates more efficient. You can use them again for future listings, making your work even easier.
The section lets you map fields and default values for Product listing type, shipping profile, manufacturer, product supply, and the year of manufacturing for your product. The selected information for your listings will be saved in the profile and can be edited later as well.
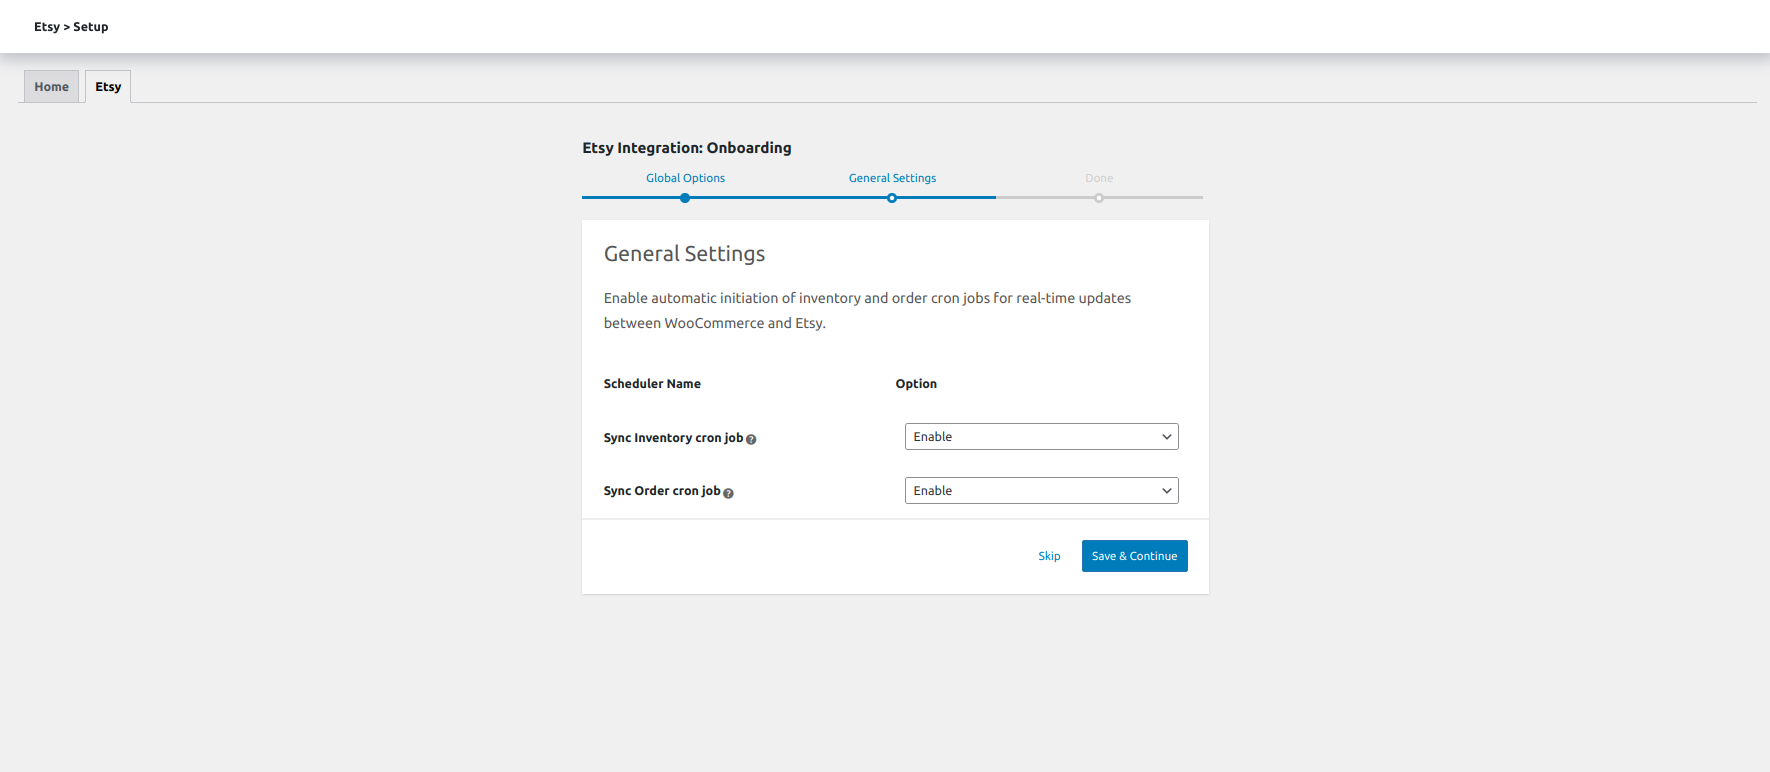
General Settings
Under the general settings section, you can activate an automatic feature that initiates inventory and order updates between your WooCommerce and Etsy stores. This is done through crons, which play a crucial role in keeping your stores synchronized by ensuring that your inventory and orders are always up-to-date.
The solution has schedulers for inventory and order. All you need to do is click on the drop-down menu, ‘Enable’ the scheduler, and hit ‘Save & continue.’
Once you have updated the plugin’s global and general setting section, your onboarding process is completed, and a success message will be displayed.
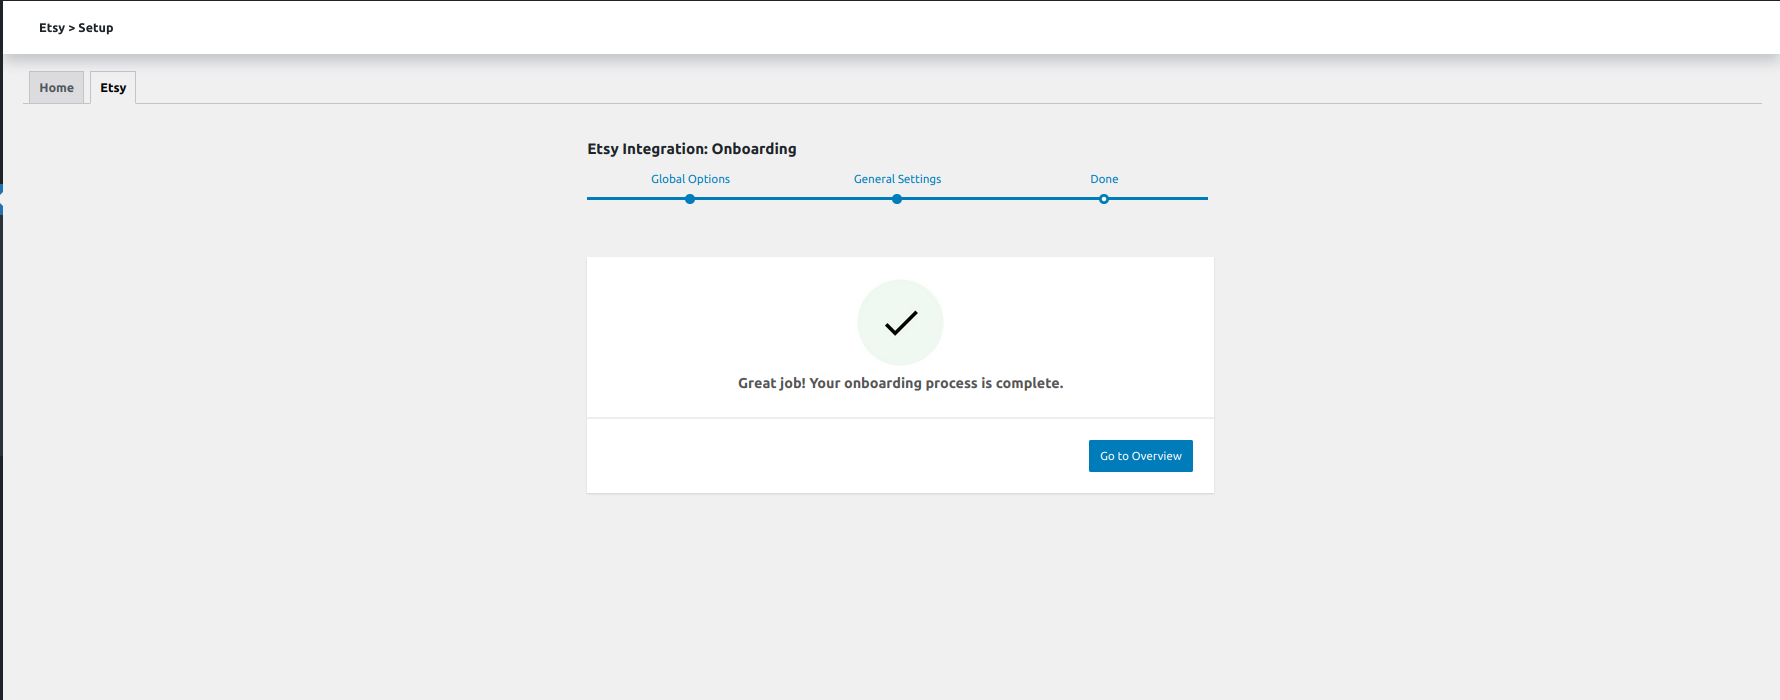
Hit the ‘Go to overview’ button to proceed with the plugin.
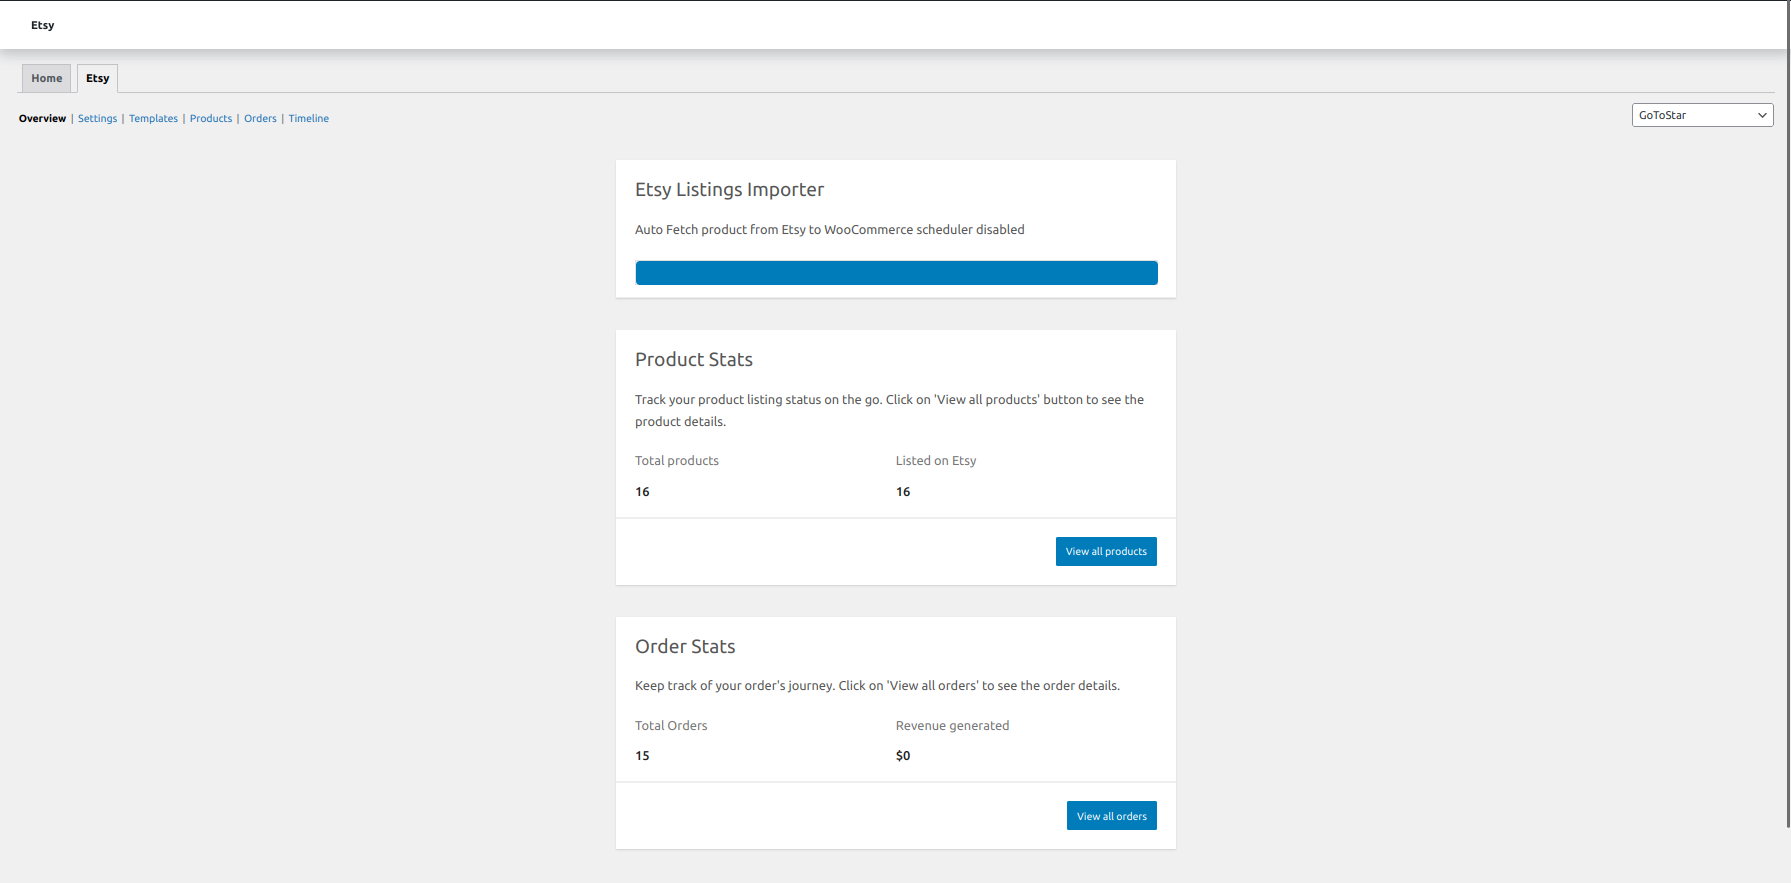
Overview
↑ Back to topThe overview section of the solution serves as a dashboard that is purpose-built to offer key insights into product statistics, encompassing details about the products listed and uploaded.
To check the status, click ‘View all products’ or ‘View all orders’ under the ‘Product Stats’ and ‘Order Stats’ tabs. The Etsy importer progress bar reflects the progress that you have made with importing products automatically from Etsy onto your WooCommerce store.
Settings
↑ Back to topFine-tuning your integration process, the settings section lets you set the values for different attributes. These include:
Product Export Settings
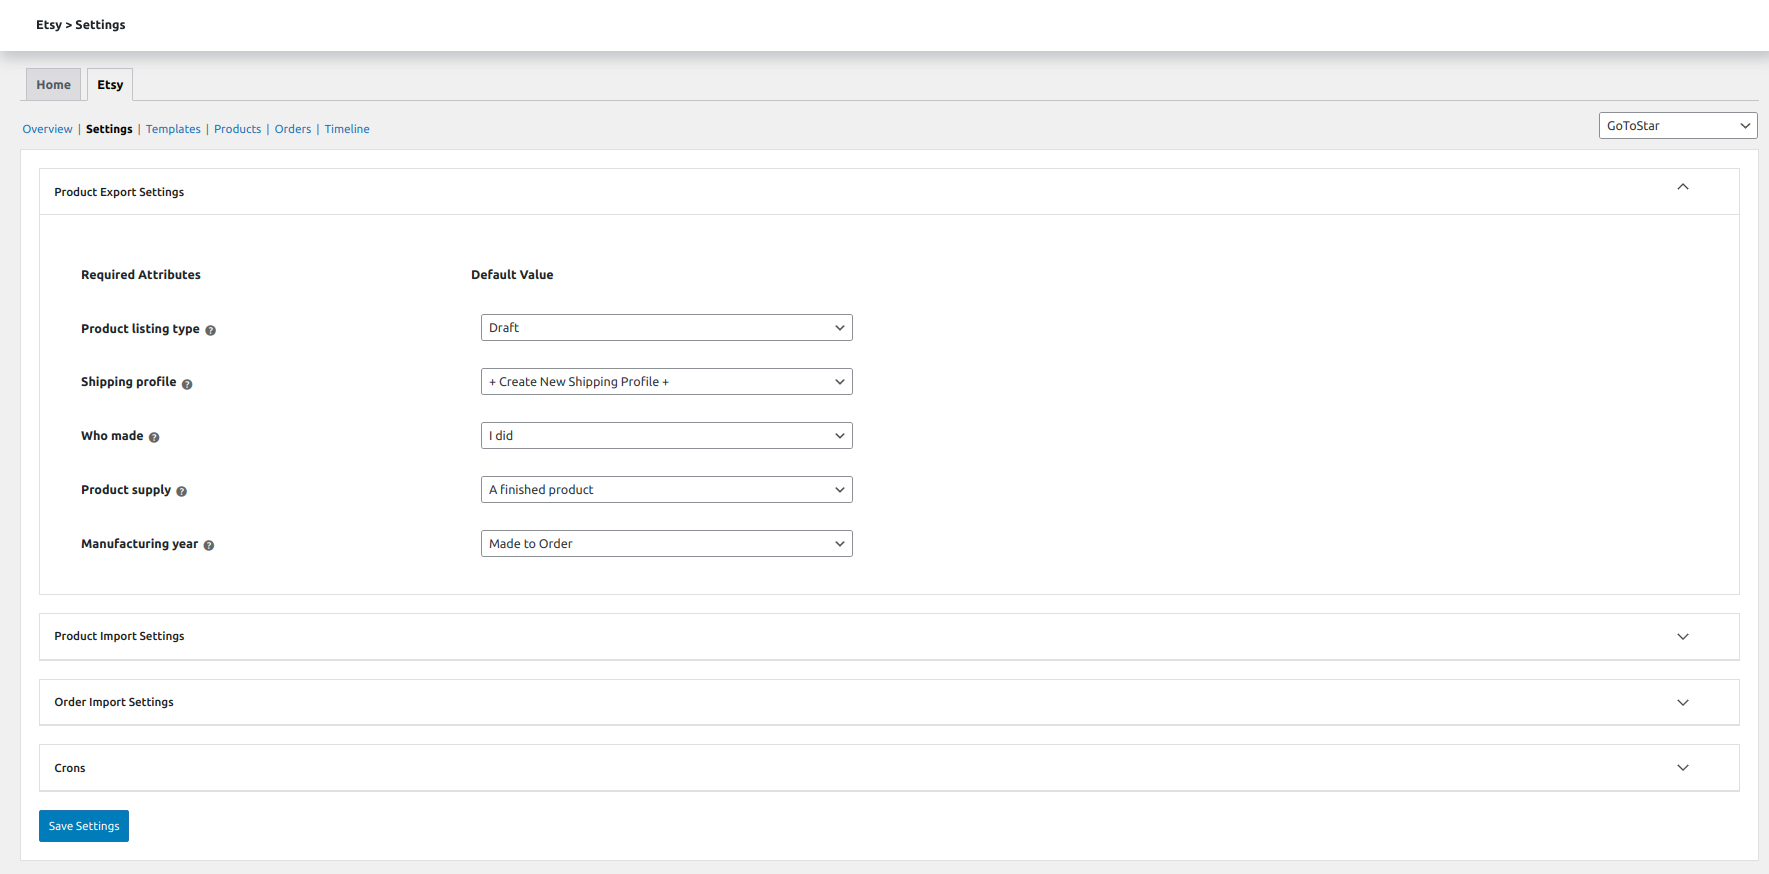
To ensure fine-grained control over how your WooCommerce products are exported and presented on your Etsy store, product export settings ensure that your listings are accurate and well-optimized for Etsy’s marketplace. The ‘Required Attribute’ section provides some essentials for your listings. This includes choosing default values for:
- Product Listing Types: Click on the drop-down and select from:
Draft: If you wish to keep the listings in the draft.
Active: If you wish to push the listings under the active or published status. - Shipping Profile: Shipping profiles help you streamline the process of listing products on Etsy and ensure that your customers are provided with accurate shipping information during the checkout process.
Click on the drop-down menu and choose the suitable option. Also, you can create a ‘New Shipping Profile’.
- Who made: Provide the information about the manufacturer of the product. You can select from:
– I did.
– A member of my shop.
– Another company or person. - Product Supply: The option lets you differentiate the tools from a finished product. Click on the drop-down menu and choose ‘A supply to tool to make things’ or ‘A finished product.’
- Manufacturing Year: To promote transparency, provide the manufacturing year. Choose’ Made to order if you provide products designed on request.’
Product Import Settings
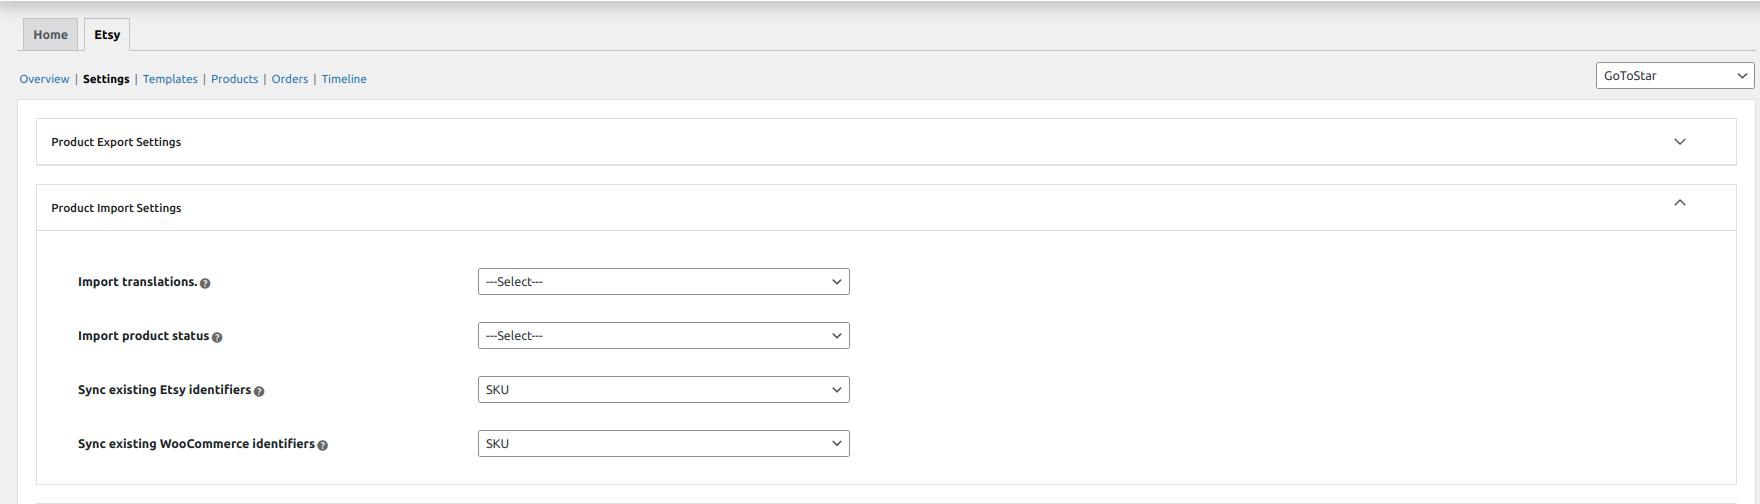
Product import settings streamline product import action from Etsy onto your WooCommerce store. The following setting allows synchronization of your stores:
- Import Translation: Using the dropdown menu, you can choose the languages you’d like to import your products from Etsy to WooCommerce.
- Import product status: You can import products from Etsy with a specific status. You can select products with statuses such as draft, pending review, private, and published for import.
- Sync existing Etsy Identifiers: You can synchronize Etsy products with your WooCommerce store using either Etsy SKUs or listing IDs as identifiers.
- Sync existing WooCommerce Identifiers: you can import and synchronize Etsy products using either WooCommerce SKUs or listing IDs as identifiers.
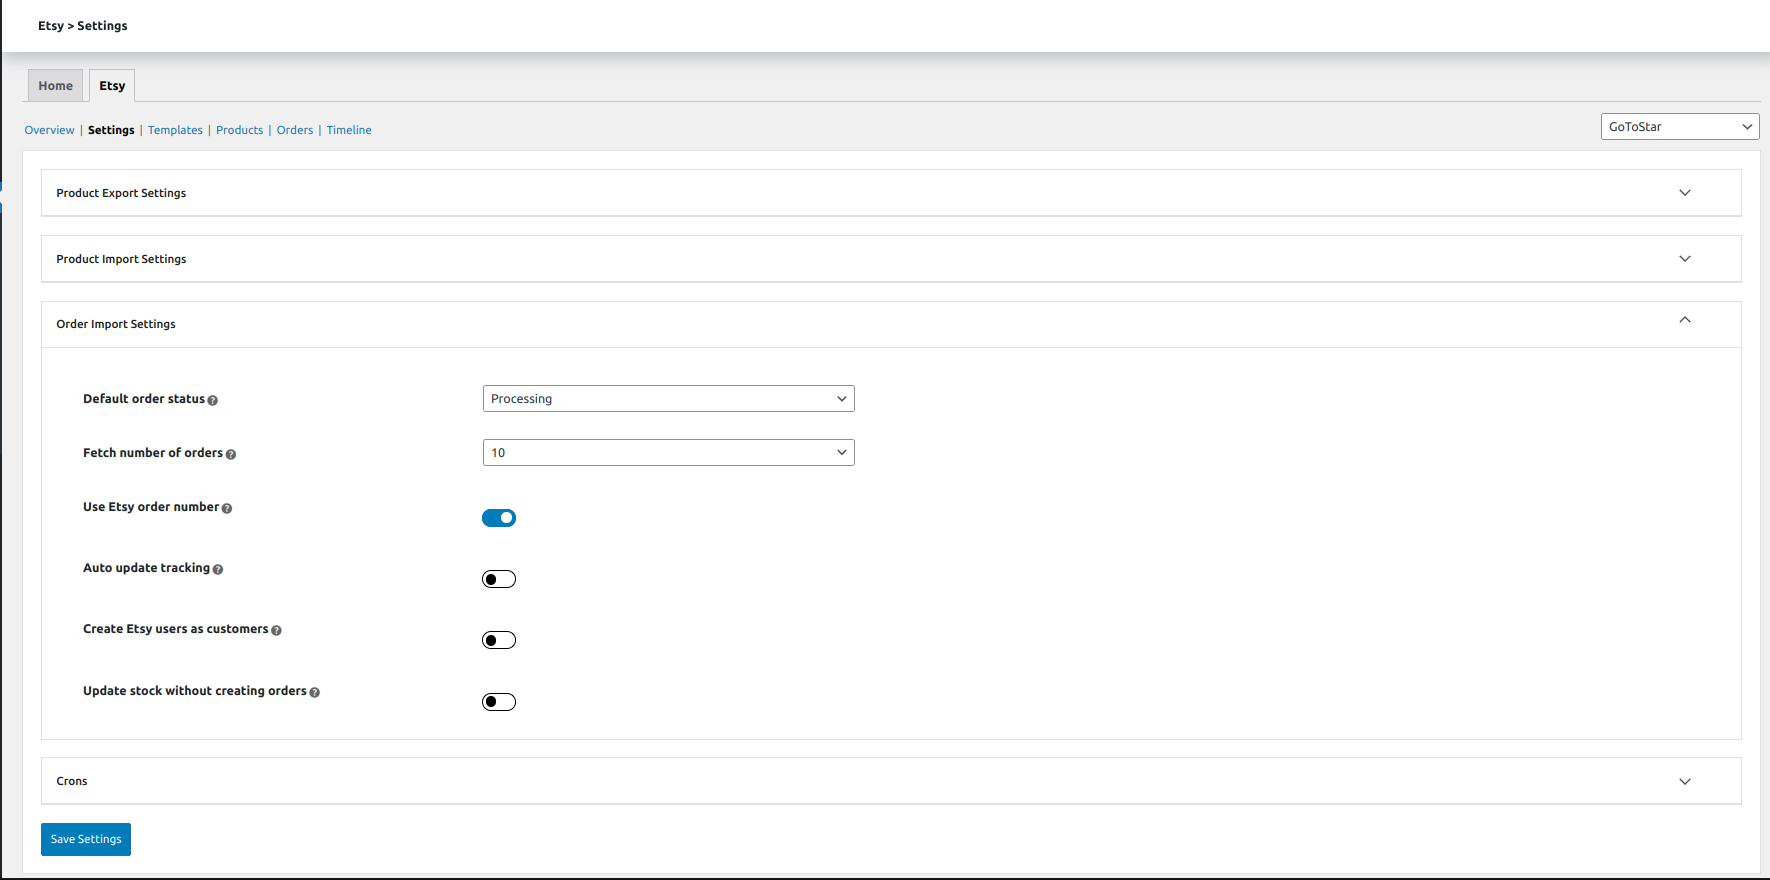
Order Import Settings
The order import settings allow you to effortlessly bring Etsy orders into your WooCommerce store and keep them synchronized. This feature streamlines managing your orders and ensures that your Etsy orders are seamlessly integrated with your WooCommerce store’s operations.
- Default order status: By default, you can import orders from Etsy with the following statuses:
- Pending payments.
- Processing.
- On hold.
- Complete.
- Canceled.
- Refund
- Failed.
- Draft.
- Fetch number of orders: Fetch Etsy orders to your WooCommerce store in batches of 10, 15, 20, 25, or 50.
Enable the schedulers for the following for automated order synchronization:
- Use Etsy order number: Once enabled, the orders will be fetched using the Etsy order number.
- Auto update tracking: Enabling the auto-update tracking scheduler will include tracking the Etsy orders, which will be imported on WooCommerce.
- Create Etsy users as customers: You can easily create your Etsy users as WooCommerce customers by enabling this particular scheduler.
- Update stock without creating orders: If you want to update the stock between Etsy and WooCommerce without creating orders, simply enable the option.
Crons
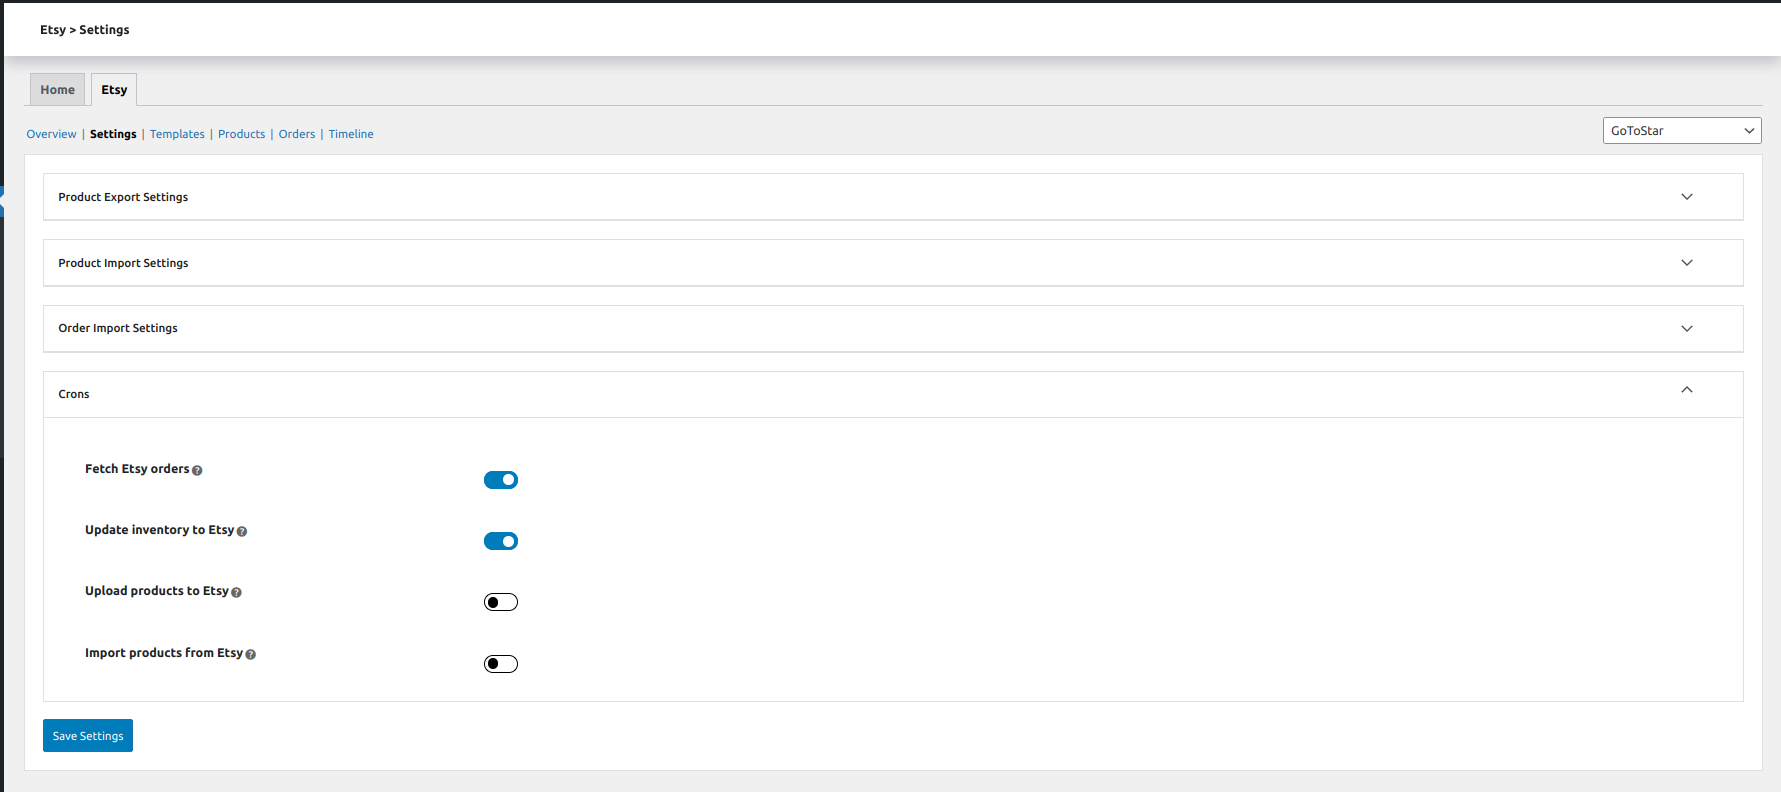
Crons are scheduled tasks that automatically run at predefined intervals, allowing you to synchronize your stores better. With CedCommerce’s Etsy Integration crons, you can:
- Fetch Etsy orders: Enable the cron to automate the order fetching process.
- Update inventory on Etsy: Keep your inventory in line by enabling the cron. This will reflect the inventory changes done on WooCommerce on the Etsy store.
- Update products on Etsy: Any product updates done on WooCommerce will also be reflected on the Etsy store once the cron is enabled.
- Import products from Etsy: The solution also imports products from Etsy to your WooCommerce store. Simply enable the import cron to begin the process.
Once done with all the settings, hit the ‘Save Setting’ button.
Templates
↑ Back to topUnder the templates section, you can map your WooCommerce product categories with the Etsy categories. Multiple templates can be generated for various WooCommerce categories to ensure clarity and organization.
Create New Template
To initiate the creation of a product template, begin by clicking on “Create new template.” You will be redirected to a new page with the following options to fill in:
Category Mapping
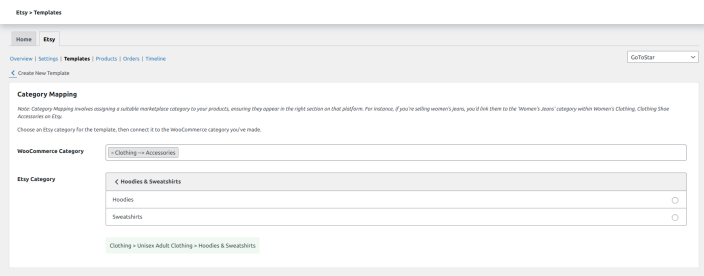
Category Mapping is the process of assigning the appropriate marketplace category with your products, ensuring they are displayed in the relevant section on the platform.
For example, if you sell women’s jeans, you would link them to the ‘Women’s Jeans’ category within ‘Women’s Clothing’ under ‘Clothing Shoe Accessories’ on Etsy.
Select an Etsy category for your template and connect it to the WooCommerce category you have created.
Products
↑ Back to topThe product management section is like a control center for all your products. It contains detailed information about each item you have in one place, making it easy to keep track of everything.
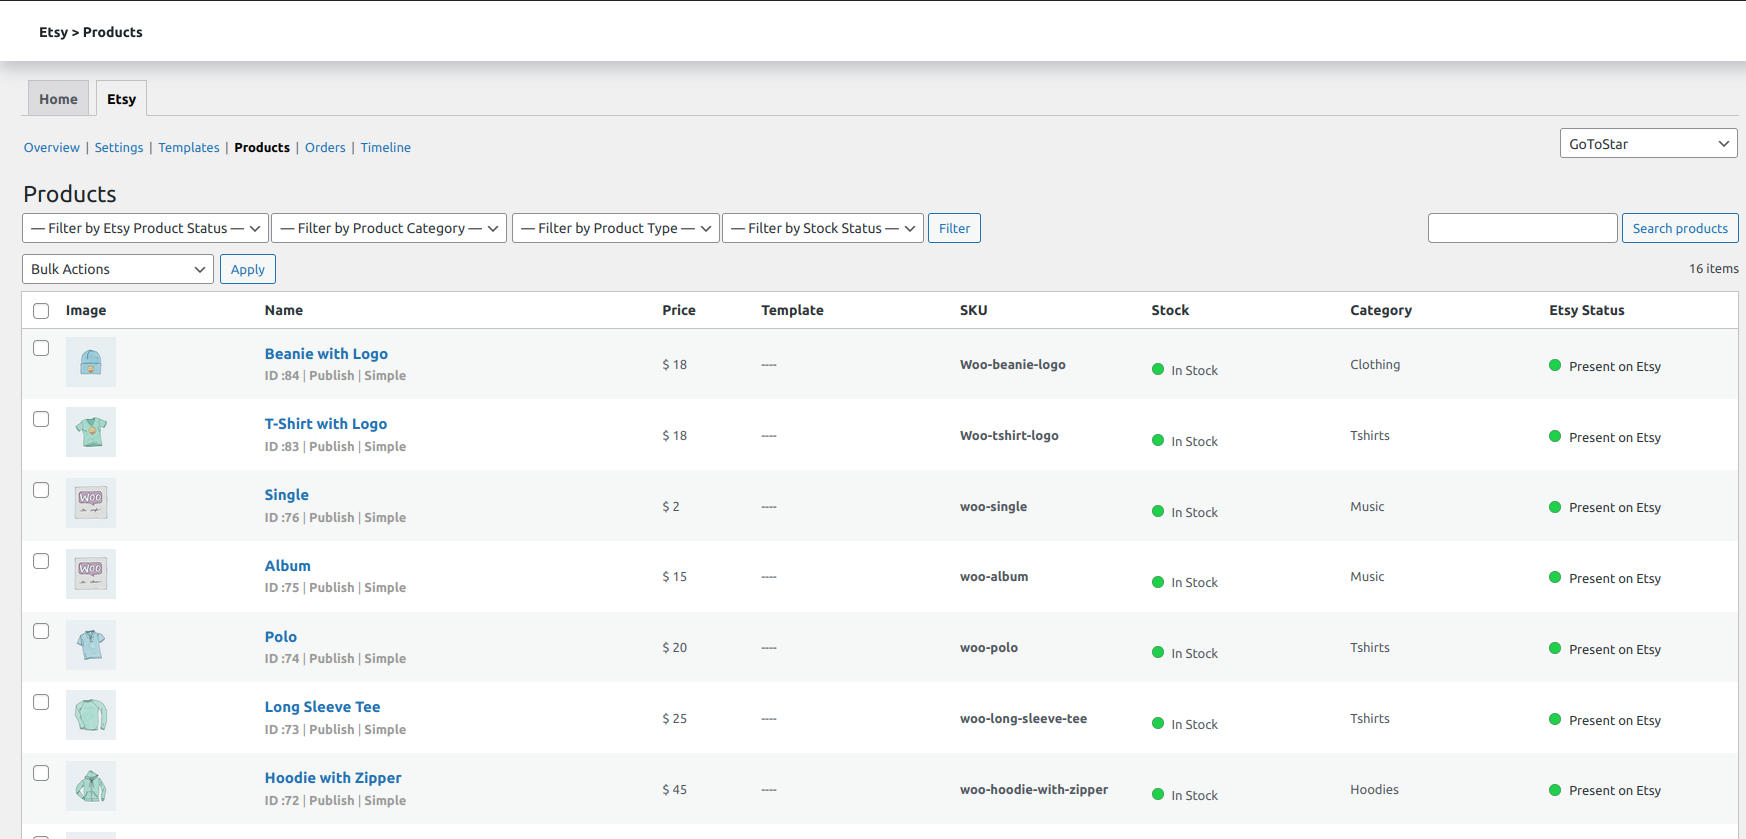
In the product management section, you can:
Filter
Filter out your products based on the following:
- Status on Etsy marketplace.
- Product categories.
- Simple or variable products (product type).
- In-stock or out-of-stock products (stock status)
Bulk Action
Under bulk action, you get to:
- Upload: Save valuable time by bulk uploading WooCommerce products to Etsy. Our efficient system eliminates manual data entry, making it a breeze to transfer multiple product listings from your WooCommerce store to Etsy’s marketplace.
- Update: With this feature, you can efficiently update selected products in bulk from WooCommerce to Etsy. Whether it’s modifying product details, pricing, or inventory, this option simplifies keeping your Etsy listings current with your WooCommerce store.
- Upload Inventory: Seamlessly manage your inventory in bulk across platforms with our user-friendly interface and straightforward steps. Keep your product availability up to date effortlessly.
- Update Images: Easily refresh the images for selected products on Etsy in bulk. You can choose the items you want to update and swiftly upload new images to replace the existing ones smoothly.
- Remove: Effortlessly remove products in bulk from your Etsy listings. Streamline your inventory management by selecting the items you no longer wish to offer on Etsy and removing them in a few simple clicks.
- Unlink: Disconnect selected products in bulk from WooCommerce and Etsy. Suppose you need to discontinue the association between specific items on both platforms. This feature allows you to do so efficiently, ensuring your product management remains flexible and tailored to your needs.
Orders
↑ Back to topExplore the enhanced capabilities of our latest plugin with HOPS compatibility. Seamlessly integrate with the HOPS framework for optimized workflow and improved performance.
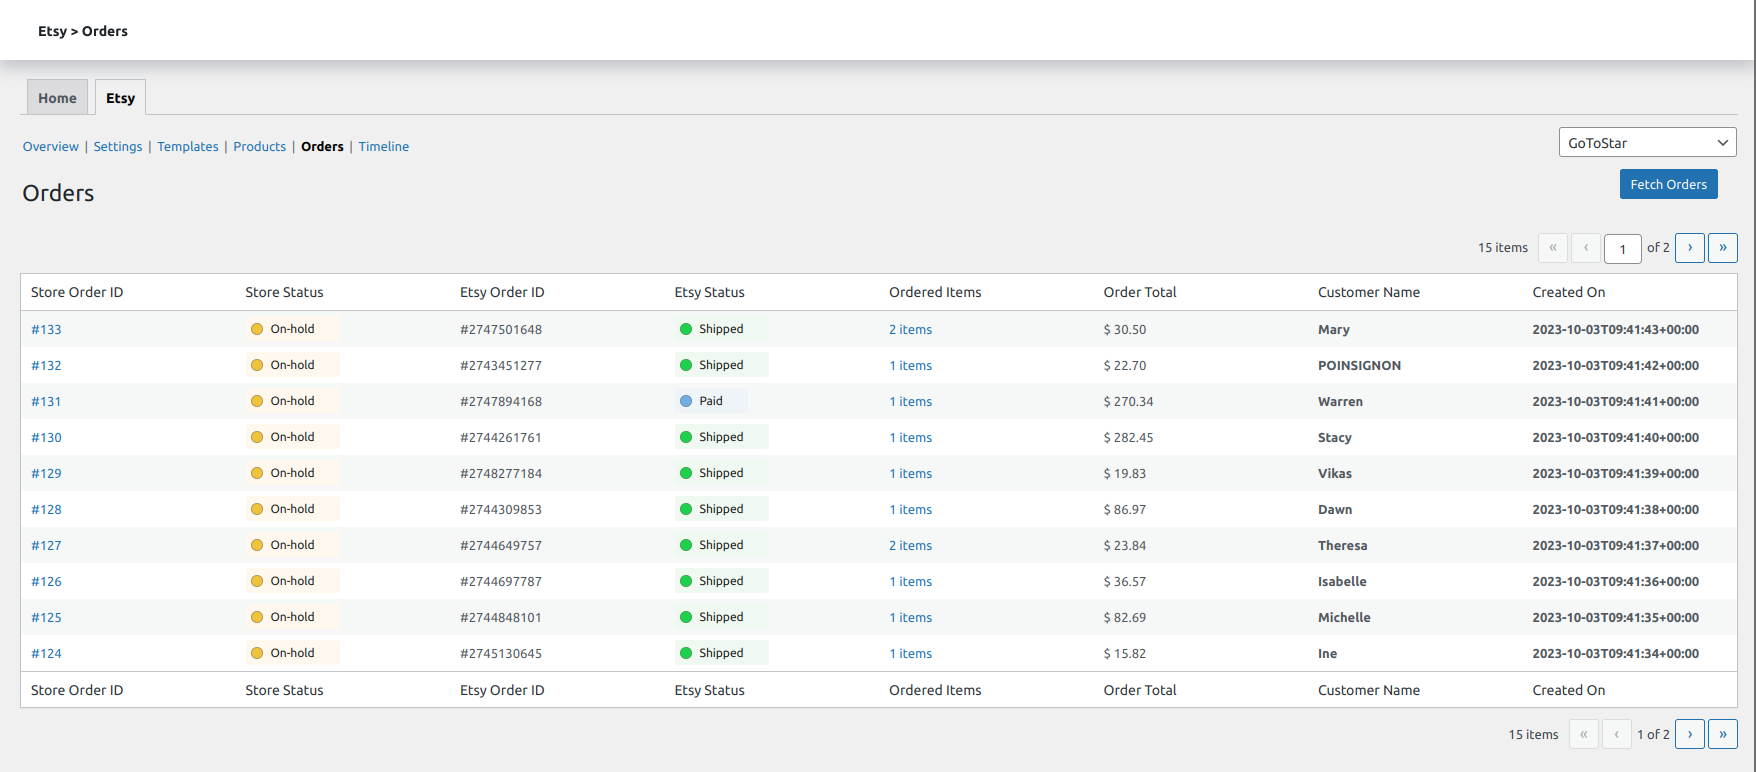
All your order-related information is reflected in the order management section. Getting your Etsy orders is easy, and you have two ways to do it:
- Manual Fetch: You can click a button to get your orders whenever possible. It’s like getting your orders on demand.
- Auto Fetch (Scheduled): You can set it up so the system automatically gets your orders at certain times. This way, you don’t have to do anything – it happens independently.
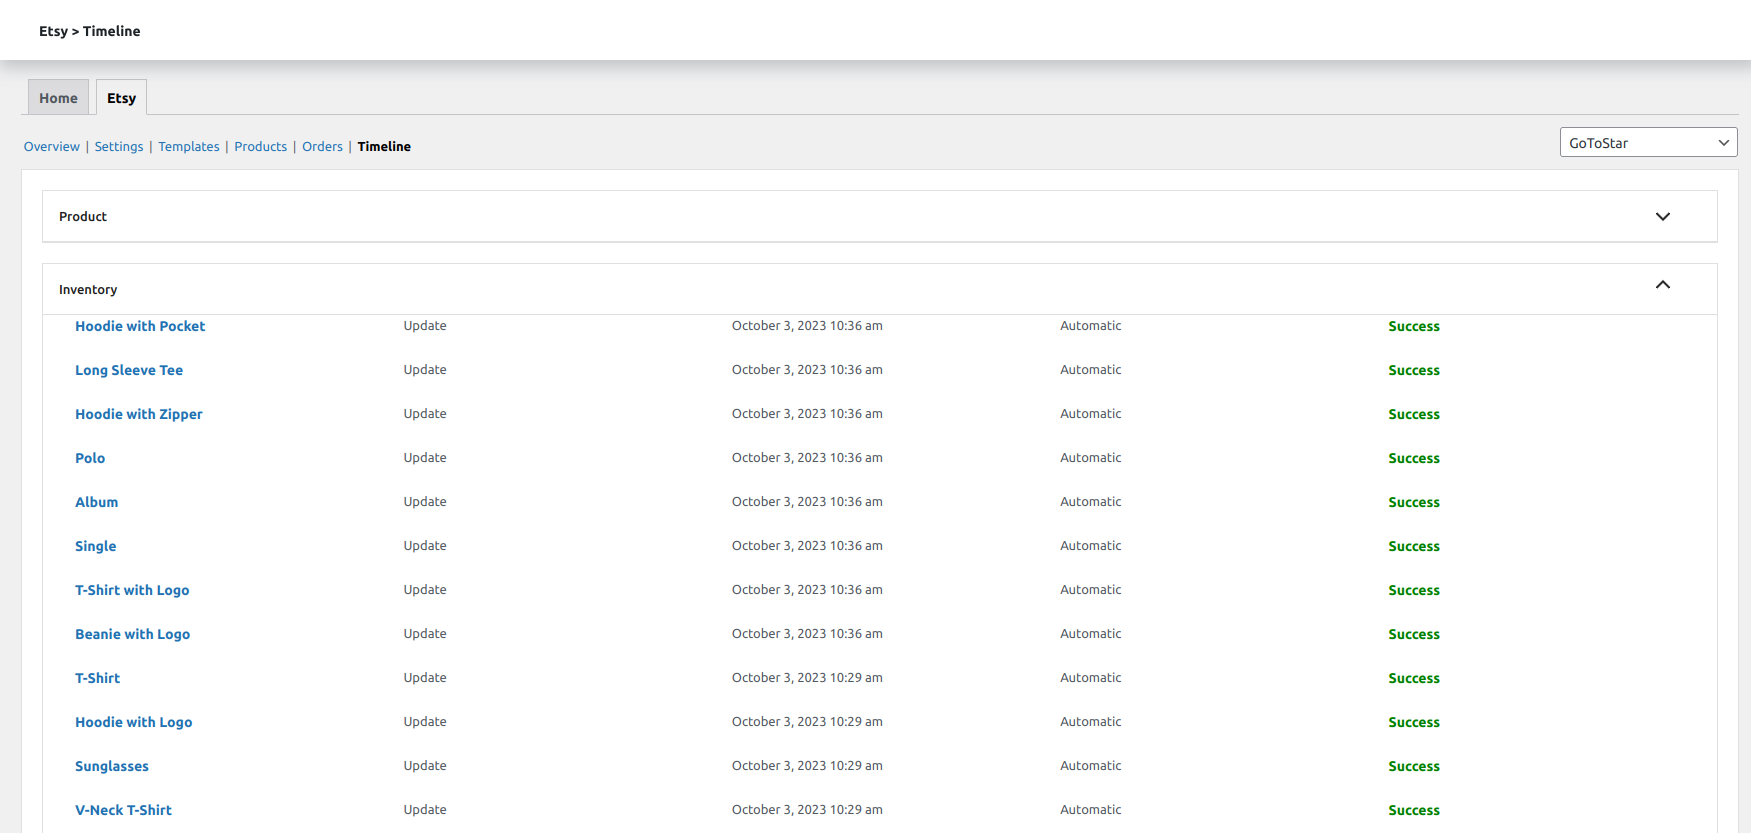
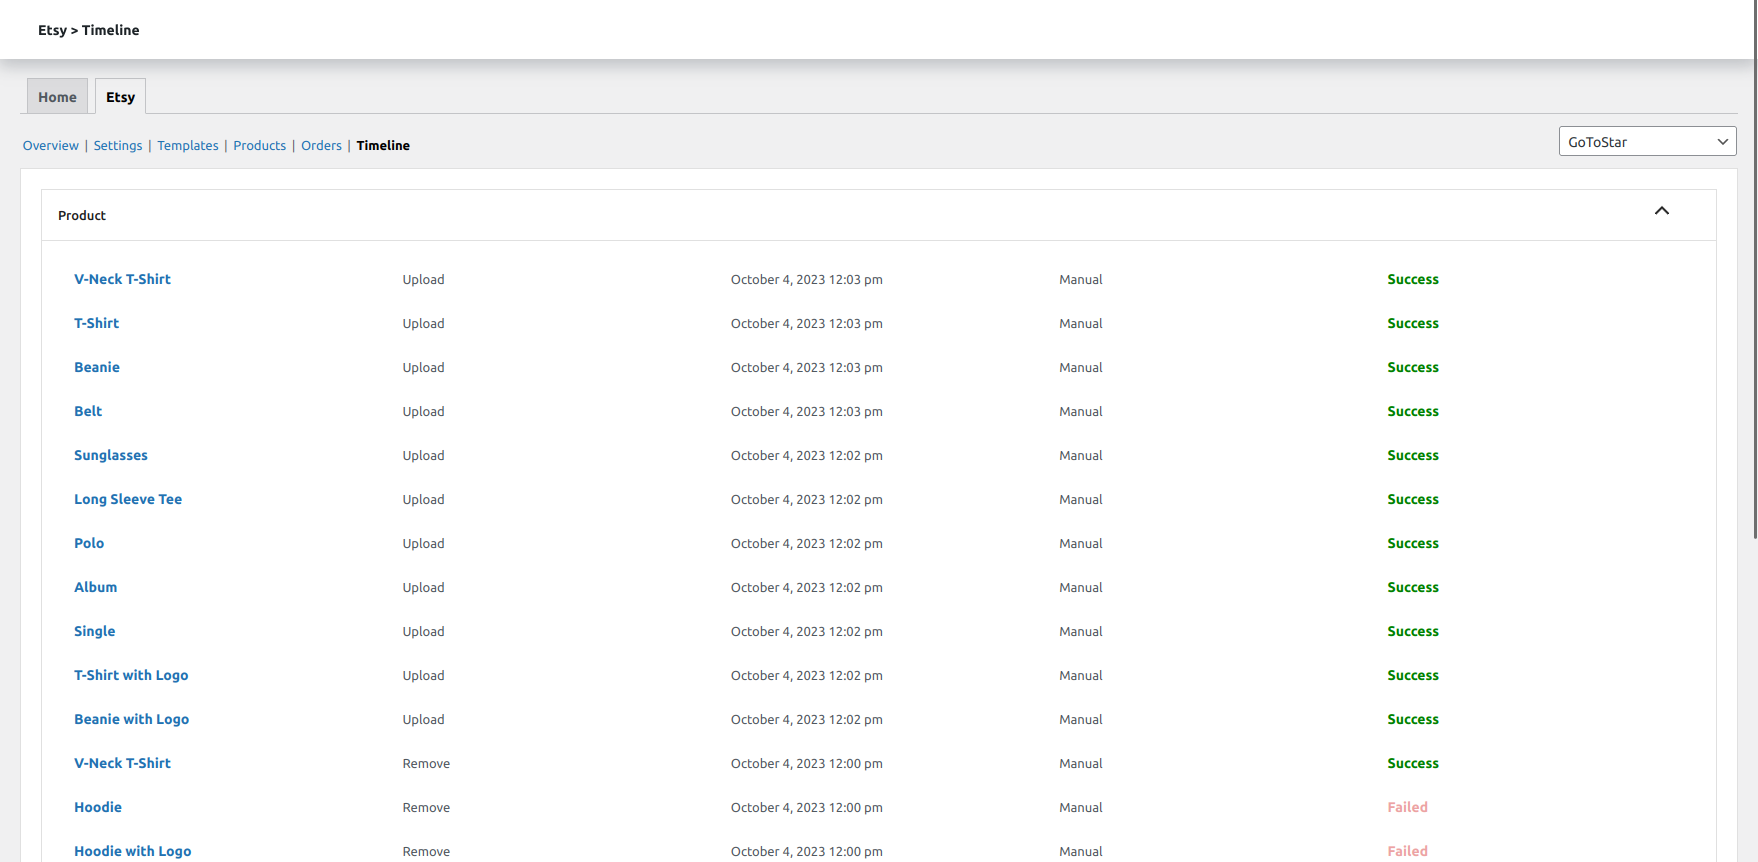
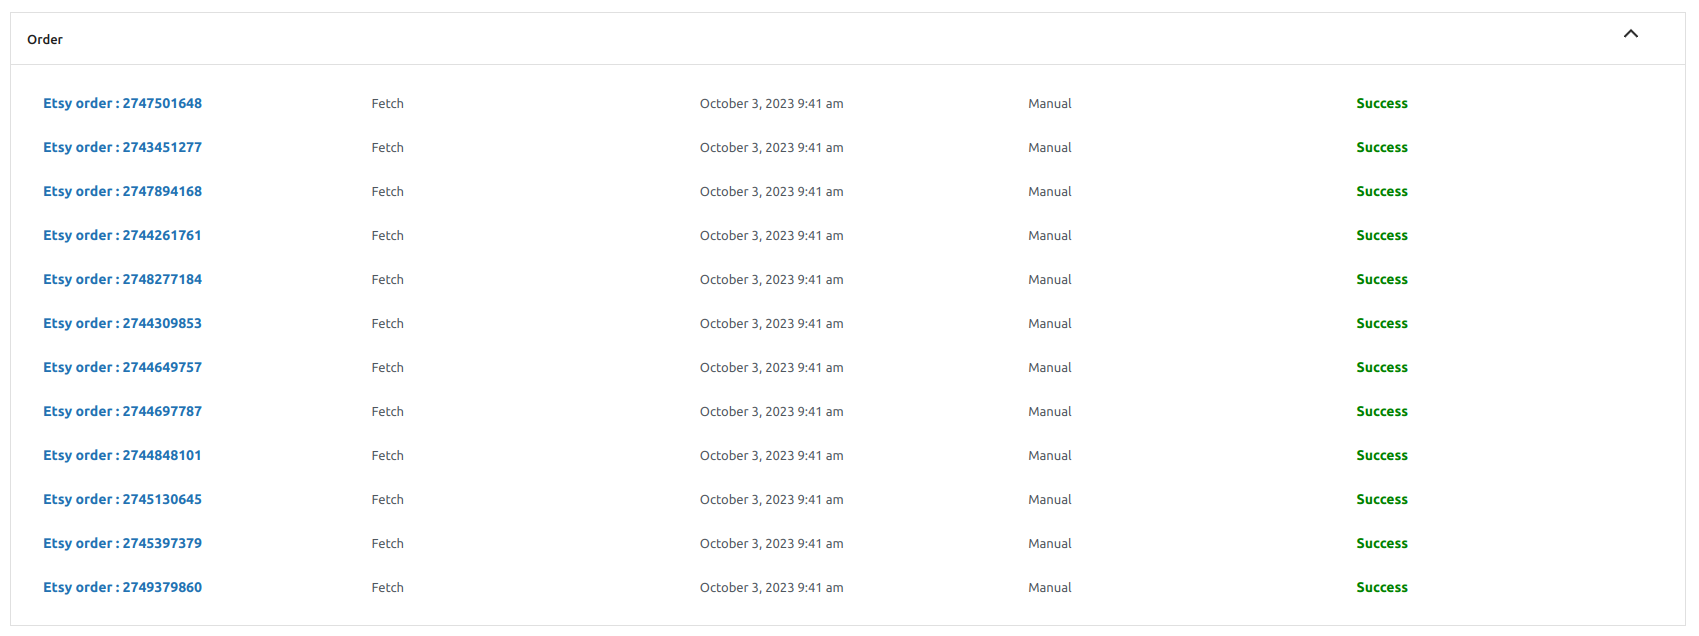
Timeline
↑ Back to topThe Timeline log keeps track of various activities, including:
- Inventory Activity: This section records details about inventory updates, such as the product name, the type of update (e.g., adding or removing stock), the date and time it occurred, whether it was done manually or automatically, and the final outcome (success or failure).
- Product Activity: Here, you’ll find information related to your products, including their names, actions taken (like uploading, updating, or removing), the date and time of the product sync, and whether it was successful or not.
- Order Activity: This part tracks Etsy orders by their order numbers, how they were fetched, the date and time of the fetch, and the response (result) of the order retrieval.
- WP-Cron Executions: This section displays information about WordPress Cron jobs, including the last time they ran and when they’re scheduled to run next. These cron jobs include automatically updating inventory, fetching orders, syncing existing products, and uploading new products.

Connect with Walmart Integration
↑ Back to topTo connect with Walmart, simply click on Connect and proceed ahead.
On the next page you will be prompted to enter your Walmart Client Id and Client Secret key.
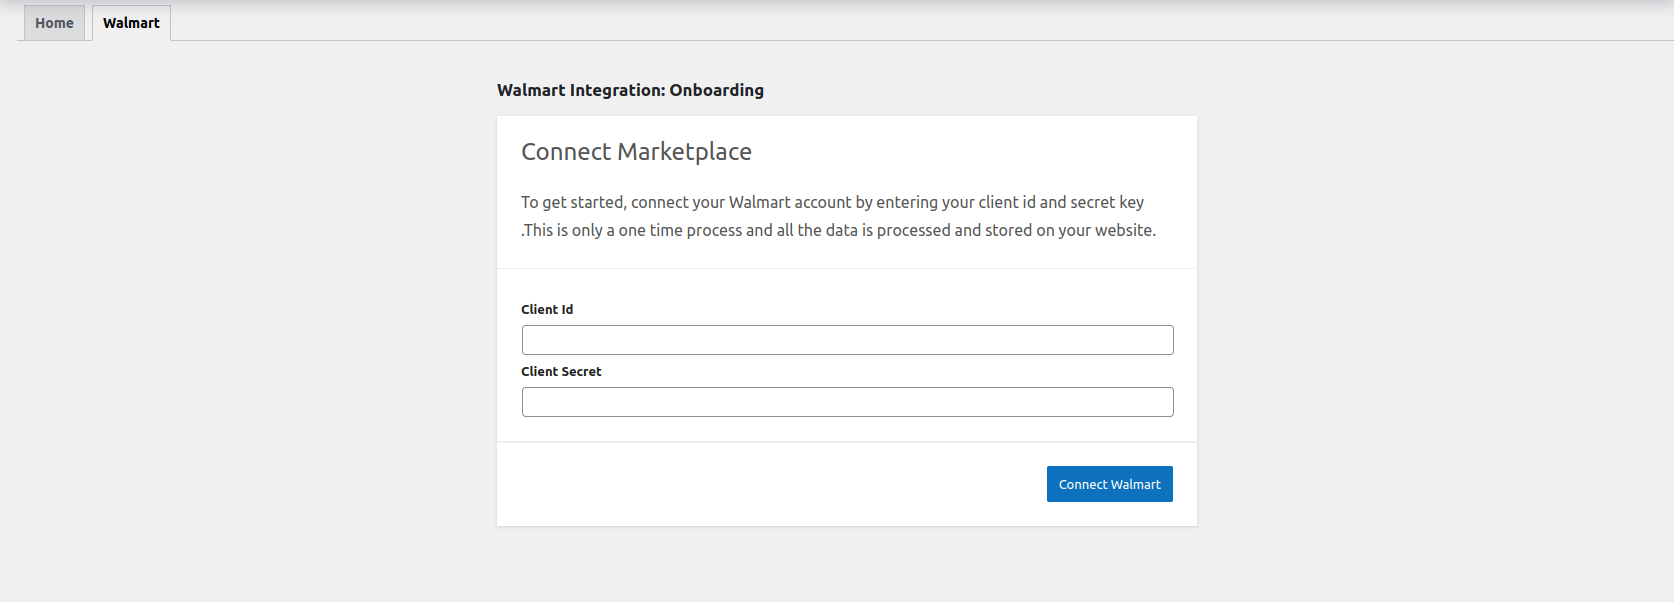
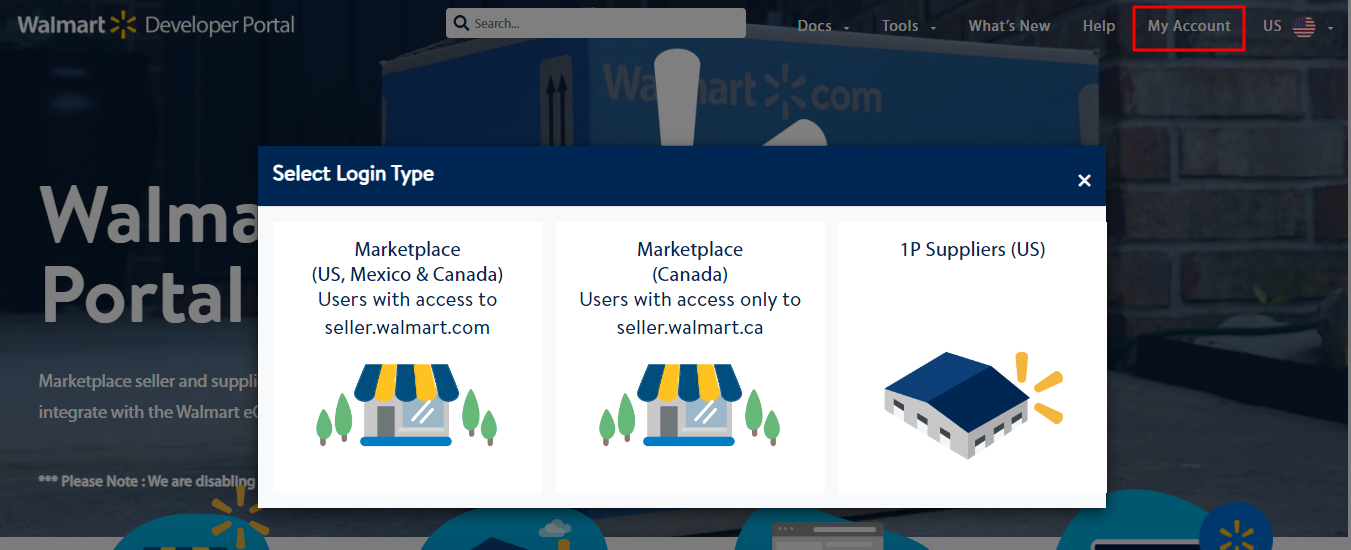
To fetch your Client Id and Client Secret key from Walmart you can start here.
You need to select your login type and then click My Account as highlighted in the image below.
This will take you to the next step wherein you need to login with your Walmart seller login credentials.
Enter your Email address and Password to successfully login

Next, you need to find the Settings section on the homepage of the portal and then look for API Key Management option as highlighted in the below. Click on API Key Management option and move to the next page.
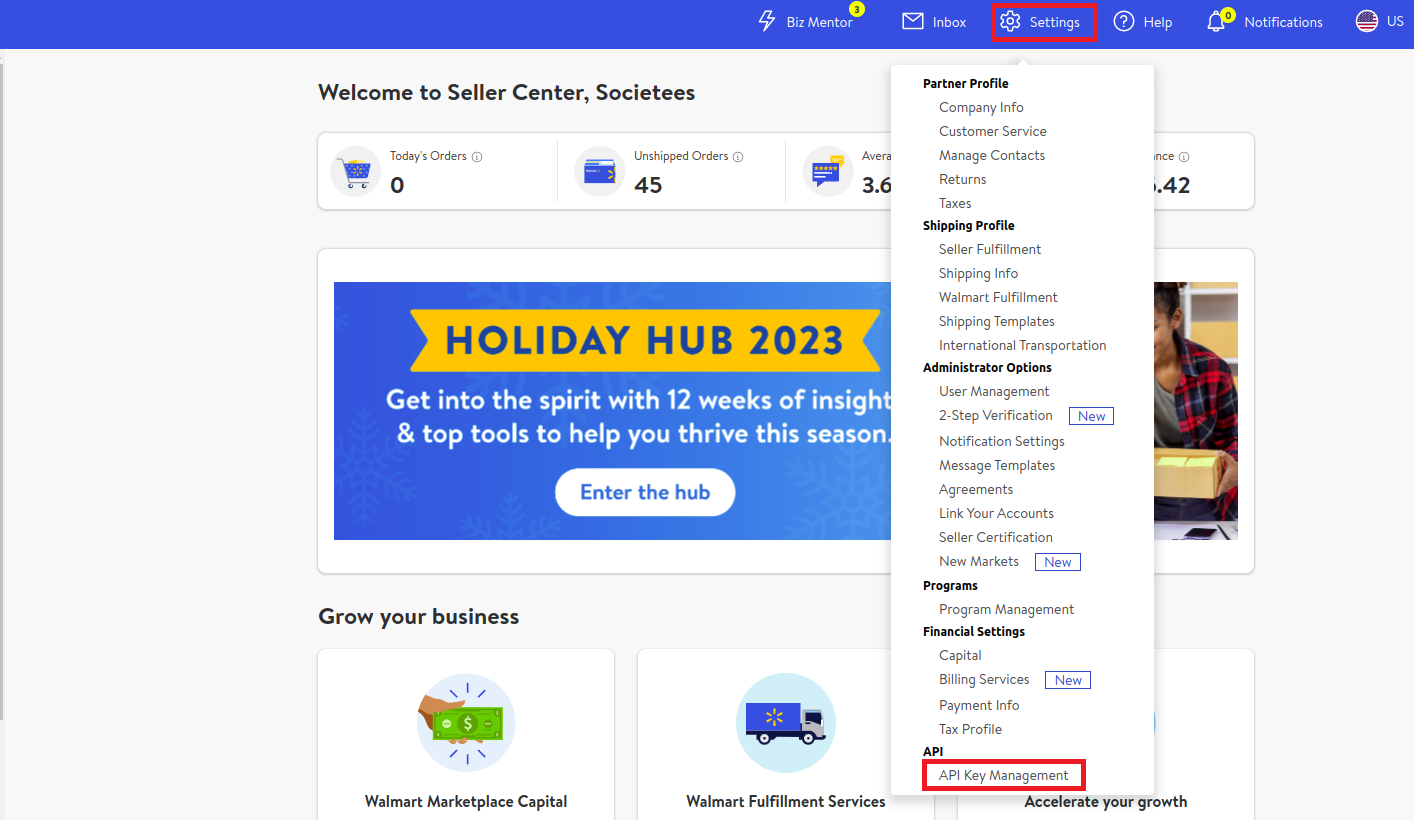
On the next page you need to select your solution provider as CedCommerce to generate the Client ID and Client Secret. Also, grant all the permissions for an uninterrupted performance of the integration.

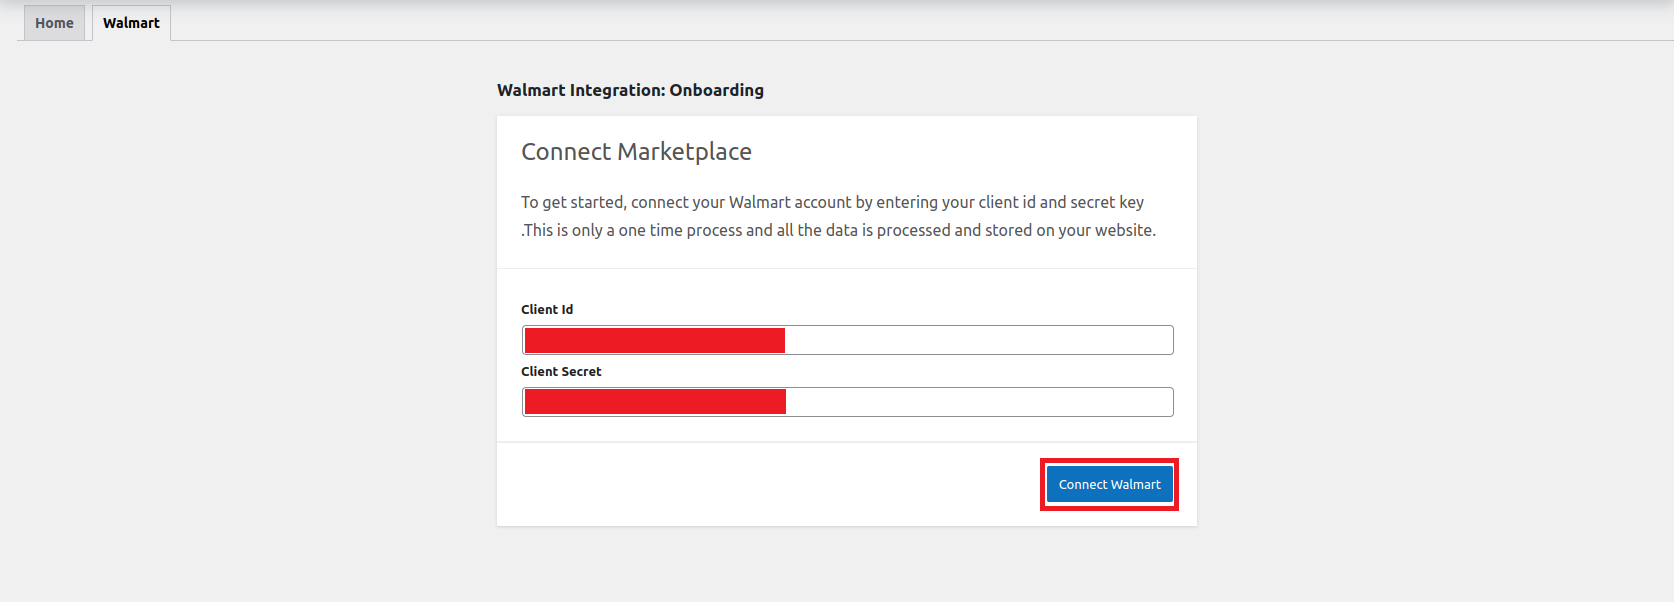
Once you have the Client ID and Client Secret go back to the integration page and enter both the credentials and hit Connect Walmart
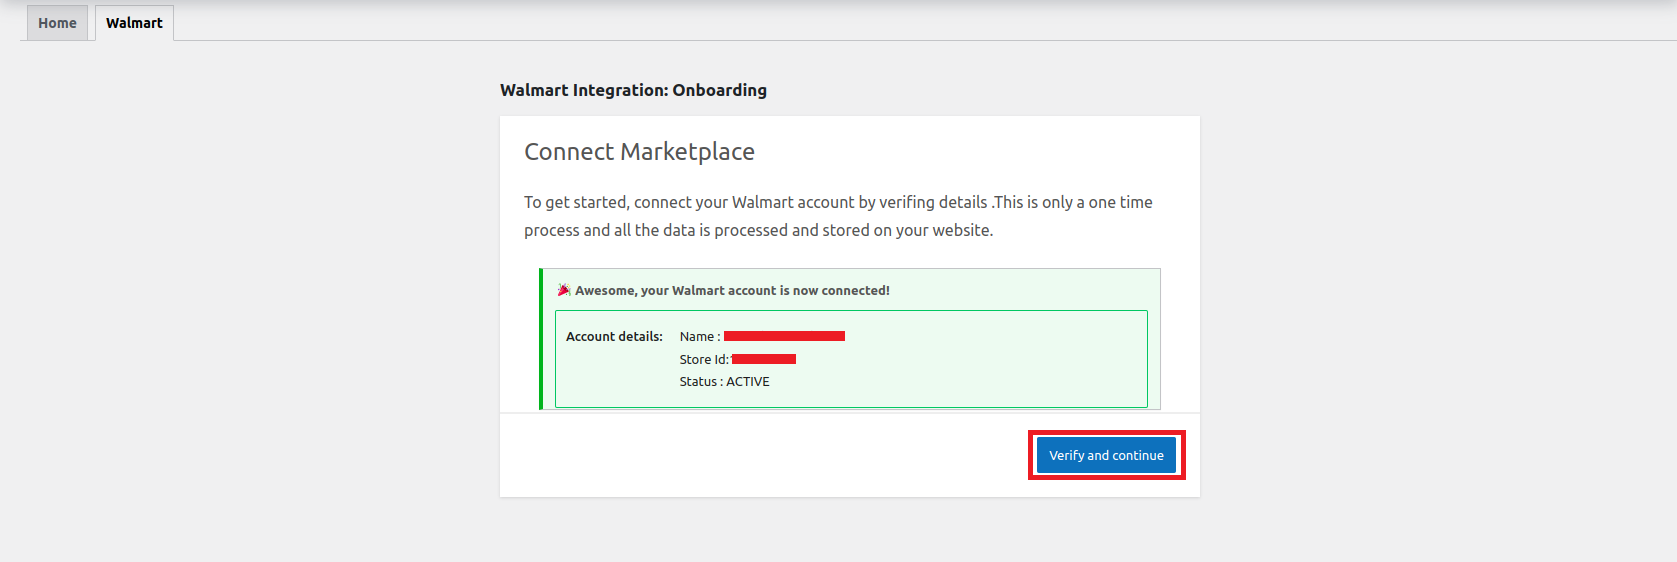
On the successful integration, you will be displayed a message as- Awesome! Your Walmart account is now connected.
Now, proceed to click on Verify and Continue to complete the few remaining steps of the onboarding process.
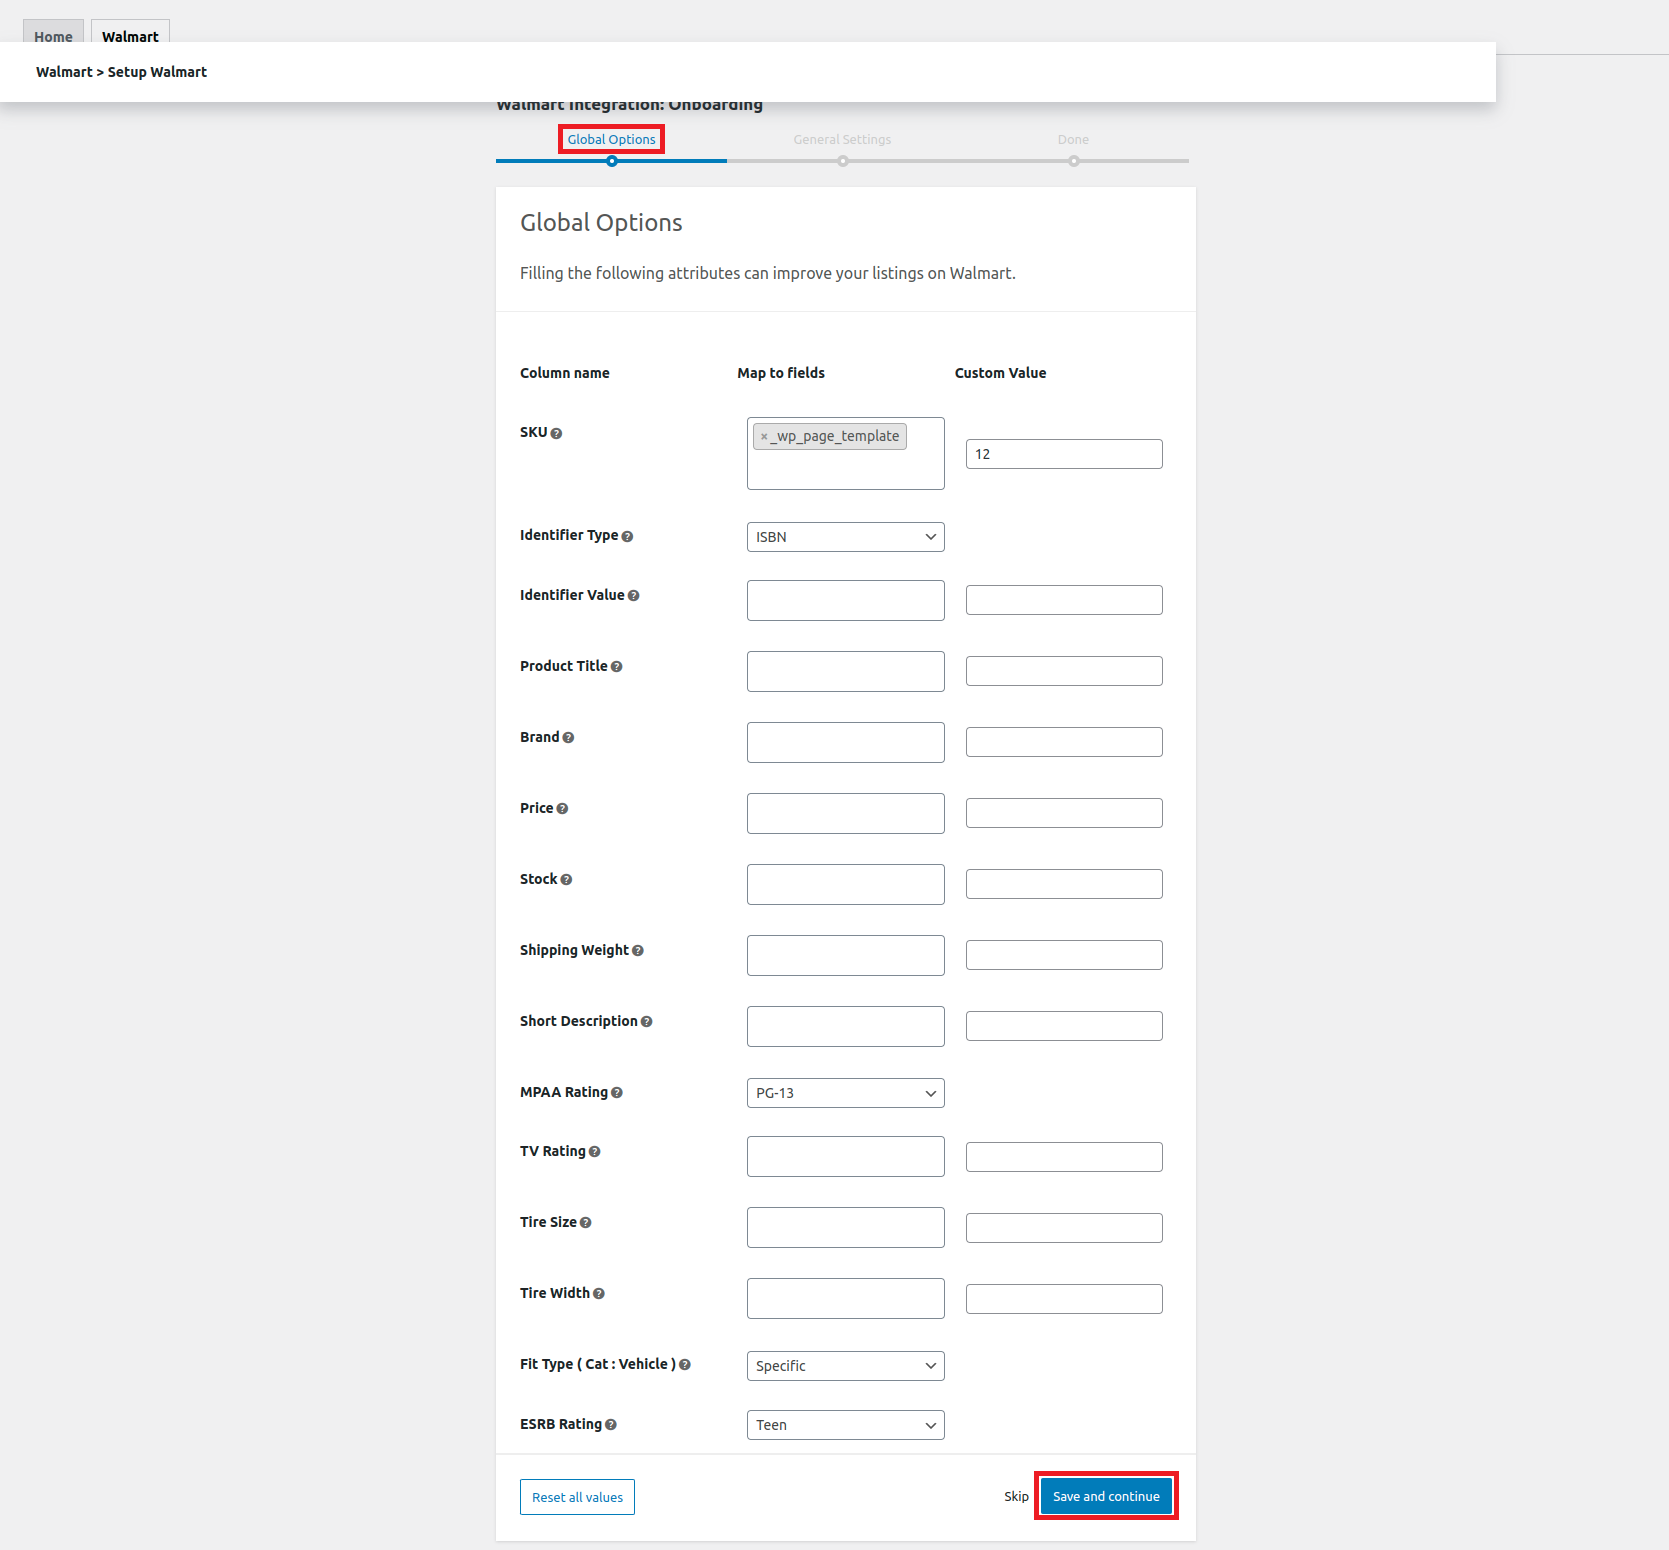
Next up is the Global Options where you can set up and map your different attributes like- SKU, Product Title, Brand, Price, Stock, and more. Once done mapping up and filling out the custom fields wherever required you can click Save and Continue to move on to the next step.
However, you can skip this section if you want to do it later on.
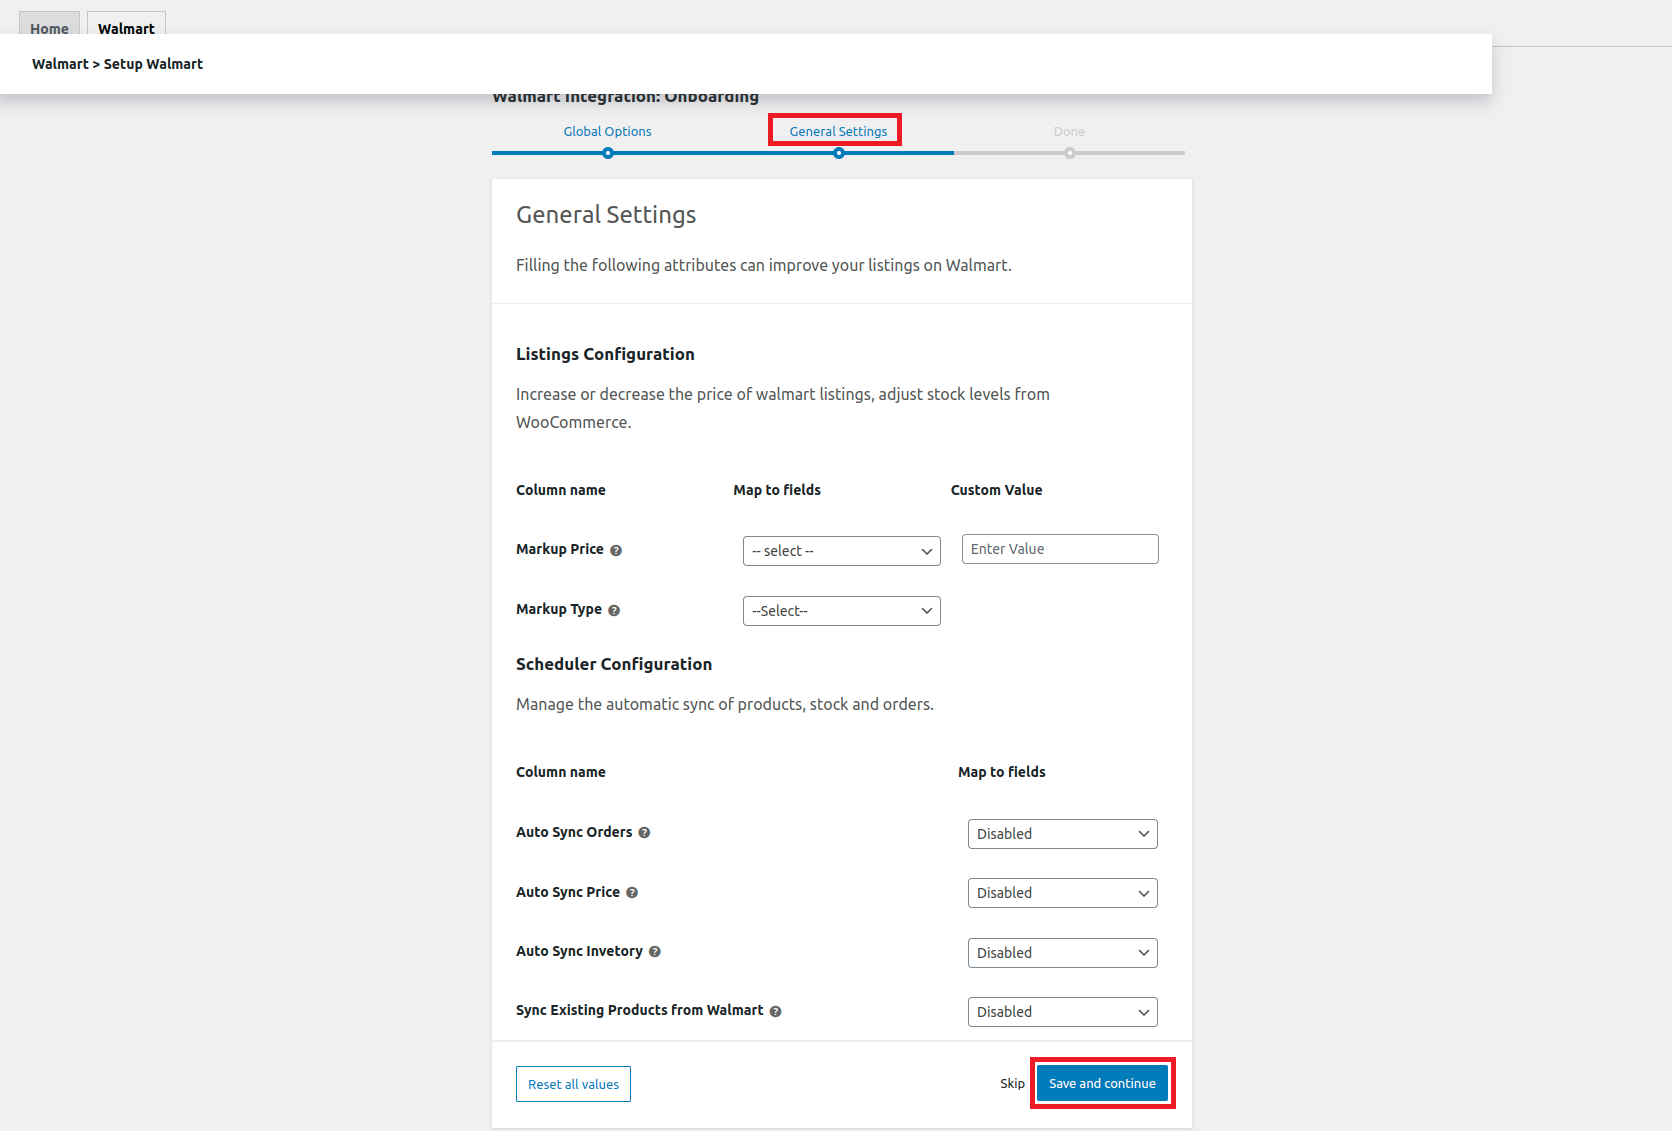
After the Global Options , you get to setup the General Settings of the integration.The General Settings is further subdivided into 2 sections-
- Listings Configuration
- Scheduler Configuration
Listings Configuration
- Markup price
Under the markup section you get to choose from 4 different variations of price markups which includes-
- Fixed Increase
- Percentage Increase
- Markup Type
Here you can select the markup type as Fixed or Percentage.
Scheduler Configuration
- Auto sync orders
Enable automatic syncing of orders across both platforms using this feature. This will assist in creating Walmart orders on your WooCommerce dashboard for centralized and faster fulfillment.
- Auto sync price
Enable automatic price syncing of your WooCommerce products with Walmart listings based on SKUs and other identifiers.
- Auto sync inventory
Enable automatic inventory syncing to get rid of overselling and underselling. You need to manually decrease the inventory after an order is received on either of the platforms if this functionality is enabled.
- Sync existing products from Walmart
Enable this feature to automatically identify your existing Walmart listings and then sync them with your WooCommerce products.
Once done with all the changes, click Save and Continue to successfully complete the General Settings section.
Also, you can skip this section as well as reset all the entered values.
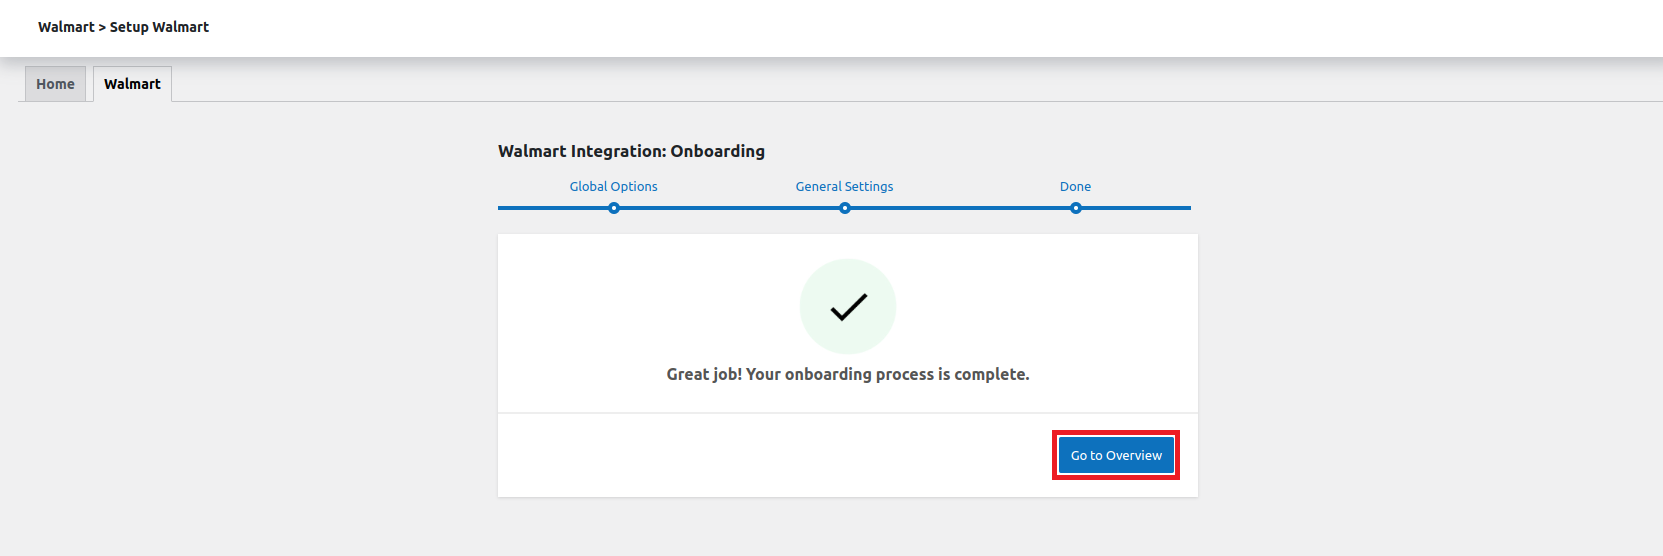
All the steps of your onboarding process are now successfully completed. Now you can move ahead to the Overview Section of the Walmart for WooCommerce plugin by clicking on the Go to Overview.
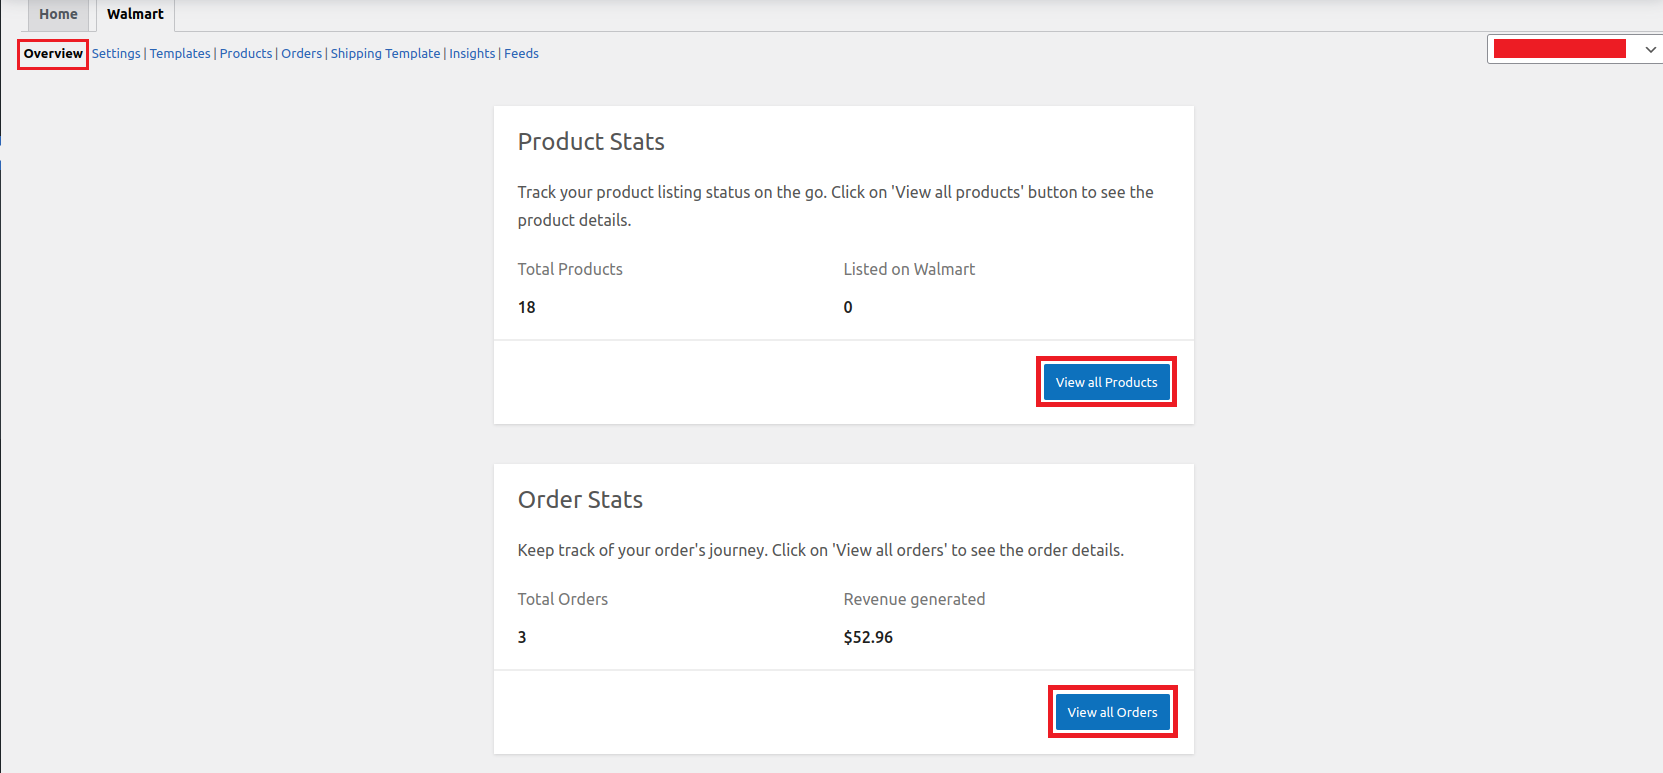
Overview
↑ Back to topThe overview section displays you the overall Product and Order related statistics.
Under the product stats, you get to view the total number of products available along with the total number of products listed on Walmart. Also, you can directly access all your products by clicking on the View all Products button.
Under the order stats, you get to view the total number of orders generated across both platforms and the overall revenue generated. Also, you can directly access all your order related data by clicking on the View all Orders button.
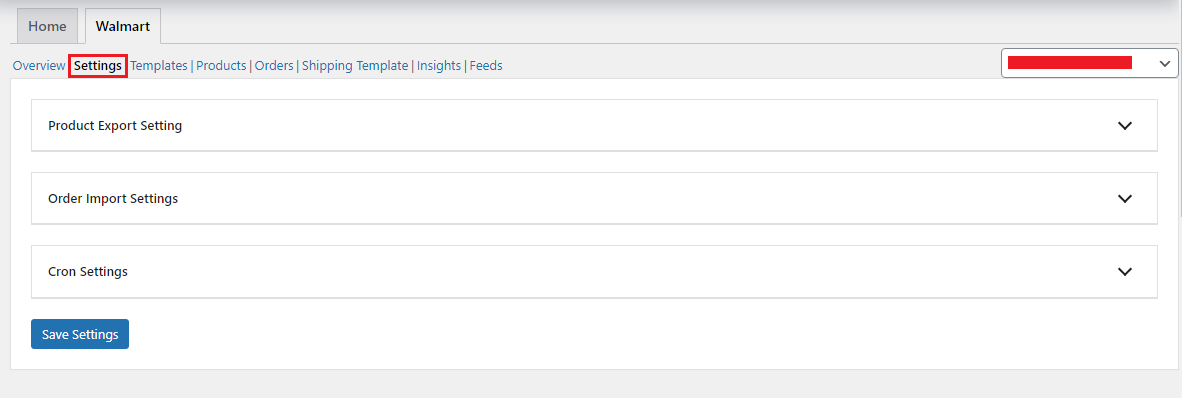
Settings
↑ Back to topThe settings section is subdivided into 3 sections namely-
- Product Export Settings
- Order Import Settings
- Cron Settings
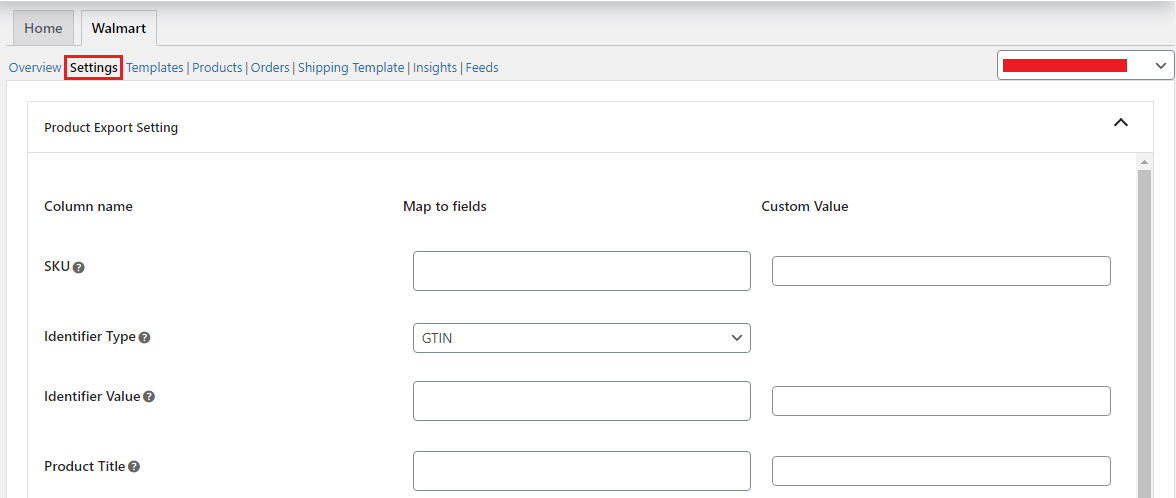
Product Export Settings
These settings are the same as those in the Global Options which we saw during the onboarding process. It has several attributes that you can map and enter custom values wherever required to finish product export settings at a global level for your store.
If you have already completed these settings in the Global Options then you can skip this here but if not done earlier you need to mandatorily complete these product export settings.
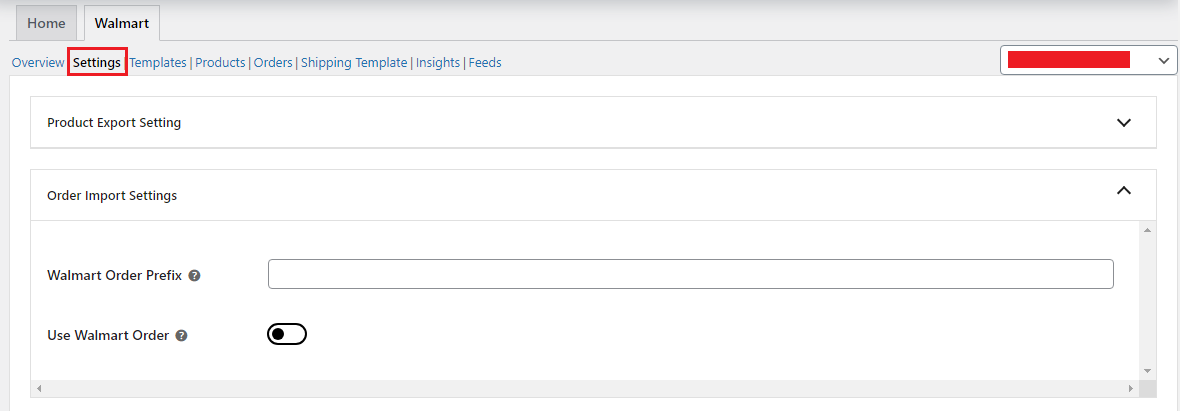
Order Import Settings
It consists of-
- Walmart order
Here you can assign a name, code etc. to all the orders which are being imported from Walmart to your WooCommerce order. This helps in identifying/ classifying Walmart orders from your WooCommerce orders. - Use Walmart order
If you enable this setting, the Walmart orders will be imported to your WooCommerce store without any special name, code etc.
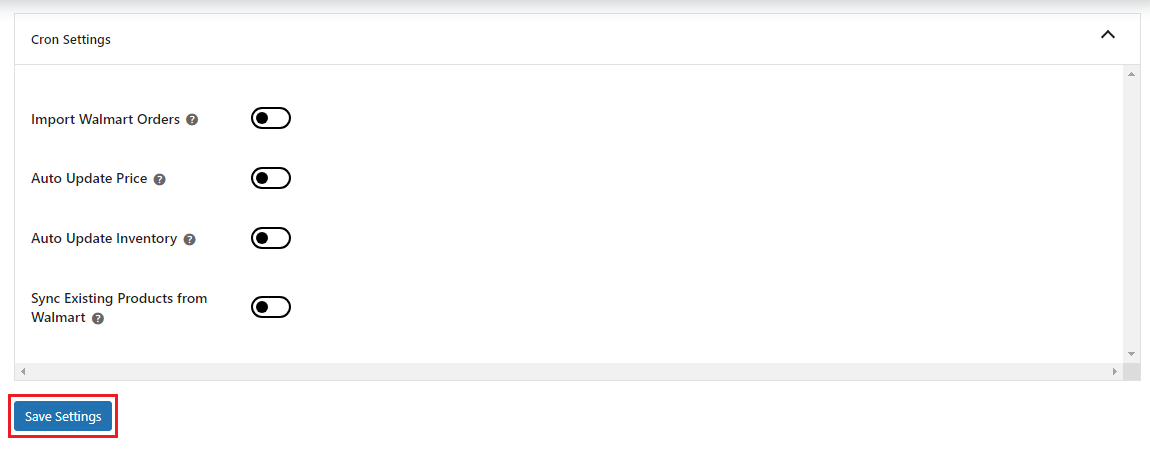
Cron Settings
Cron settings are similar to Scheduler Configuration under the General Settings section, which we saw during the onboarding process. It is further subdivided into 4 subsections which are-
- Import Walmart orders
Enable automatic importing of orders across both platforms using this feature. This will assist in creating Walmart orders on your WooCommerce dashboard for centralized and faster fulfillment. - Auto Update price
Enable automatic price updates of your WooCommerce products with Walmart listings based on SKUs and other identifiers. - Auto update inventory
Enable automatic inventory syncing to get rid of overselling and underselling. You need to manually decrease the inventory after an order is received on either of the platforms if this functionality is enabled. - Sync existing products from Walmart
Enable this feature to automatically identify your existing Walmart listings and then sync them with your WooCommerce products.
Once done with all the settings click Save Settings to complete the Settings section.
Templates
↑ Back to topUnder this section you can create templates by mapping your WooCommerce product categories with the Walmart categories. Multiple templates can be created for your several WooCommerce categories. Moreover, the bulk action provides you the option to delete your selected templates with just a click.
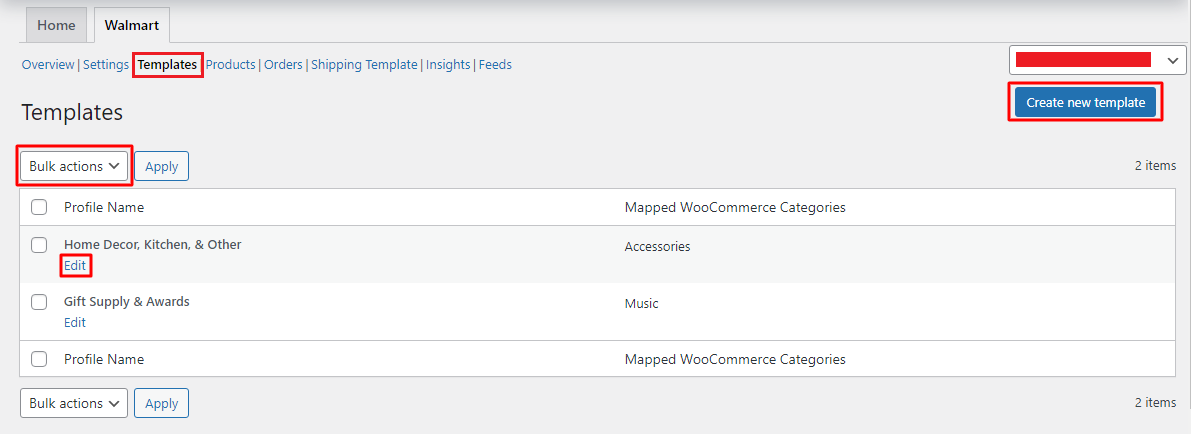
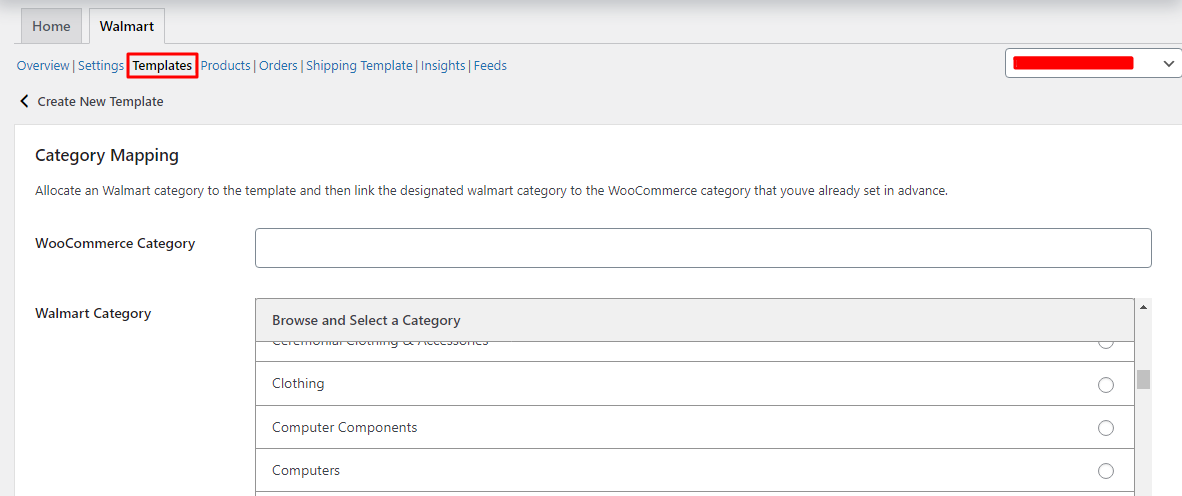
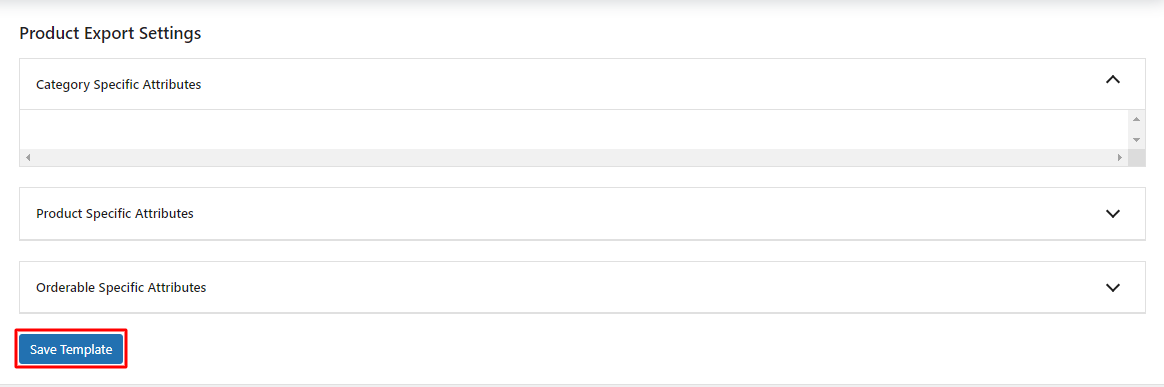
To create a new template click Create New Template and proceed to the next page where you get the following options-
- Category Mapping
- Product Export Settings
- Product Specific Attributes
- Orderable Specific Attributes
Once you complete filling out all the required fields click Save Template to finally create the template.
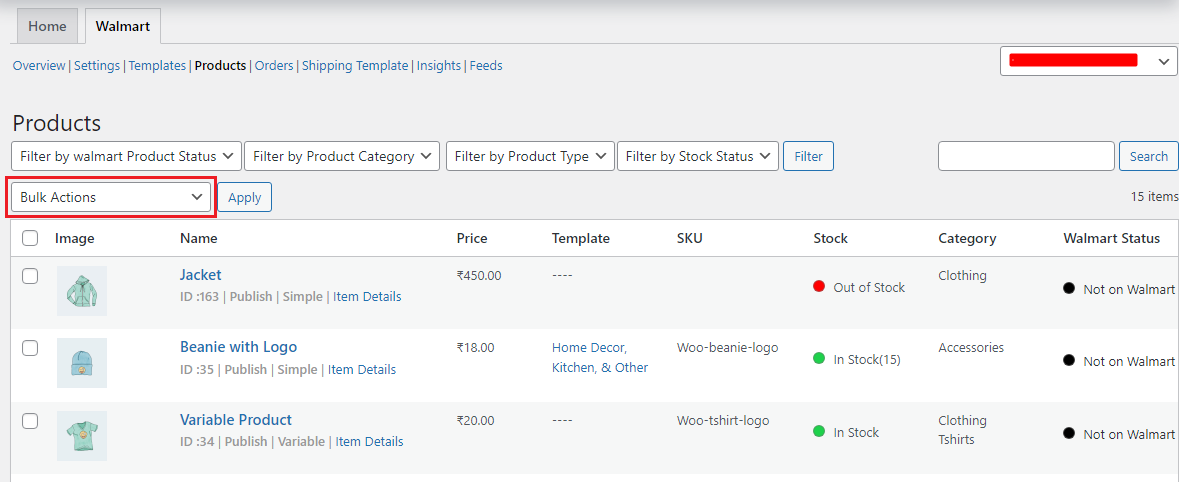
Products
↑ Back to topThe product management section helps you centrally manage all your products. It has all the granular information regarding your products.
It allows you to filter out products based on-
- Walmart Product Status
- Product Type
- Product Category
- Stock Status
- Product name
Also you get to view the product image, name, price, template assigned, SKU, stock, Woo category, Walmart status.
Apart from these, you can perform several bulk actions which are listed below-
- Upload/ Update
- Update Price
- Update Stock
- Update Shipping Template
- Remove Shipping Template
- Retire Items
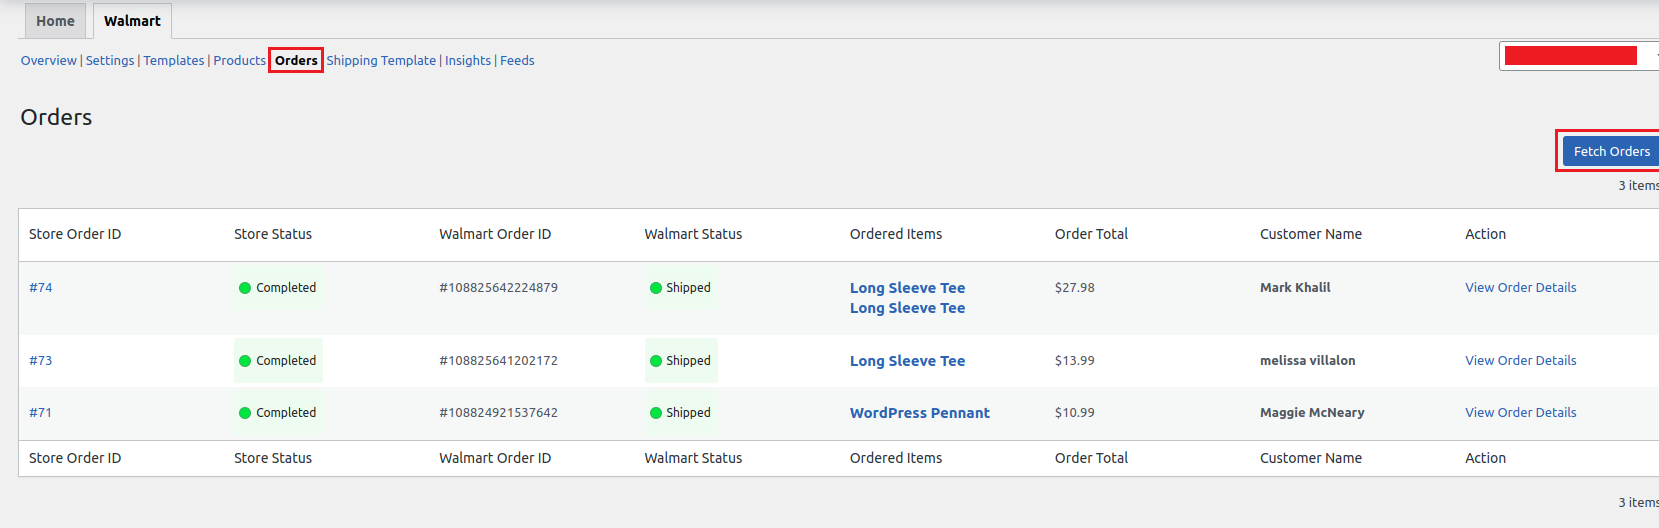
Orders
↑ Back to topOrders generated on Walmart can be fetched to your WooCommerce dashboard with the help of Fetch Order button. Also you can schedule the automatic syncing of orders using CRON schedulers as shown earlier.
The fetched orders will have all the data, that includes-
- Store Order ID
- Store Status
- Walmart Order ID
- Walmart Status
- Ordered Items
- Order Total
- Customer Name
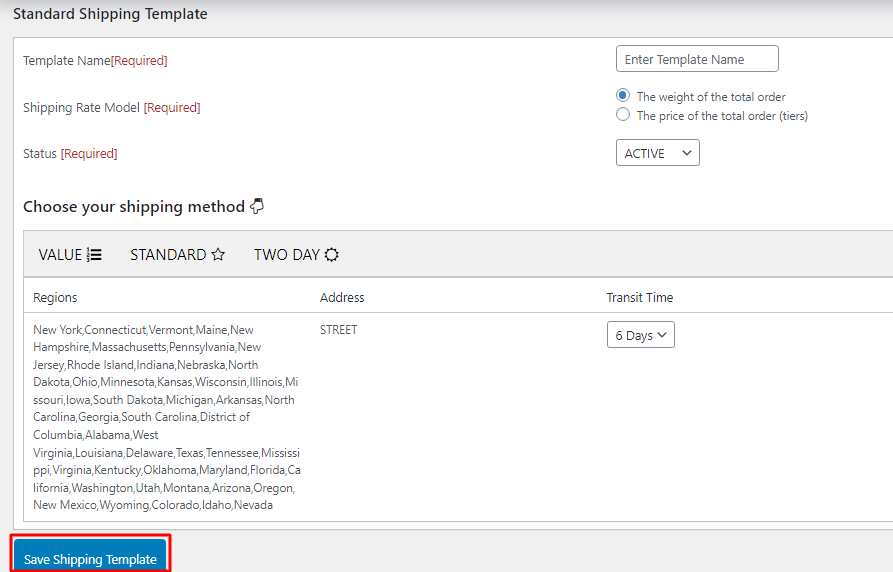
Shipping Template
↑ Back to topThis section assists you with the creation of shipping templates as per your preferences. All you need to do is click on the Create New Shipping Template and choose between Standard Template or Paid Standard Template.

Once the template type selection is done you will be redirected to the next page to fill out some basic details. Once done click Save Shipping Template to create a new template.
Insights
↑ Back to topGet all the insights of your progress as a seller on Walmart with just a few clicks under this section. You can collect the following insights here-
- Track your progress and get data enriched with actionable steps to help you become a pro seller on Walmart.
- View all the improvements required to enhance your product listing quality on Walmart.
- Unpublished items status provides you the statistics related to issues, items affected, and the accurate unpublished value for your listings.

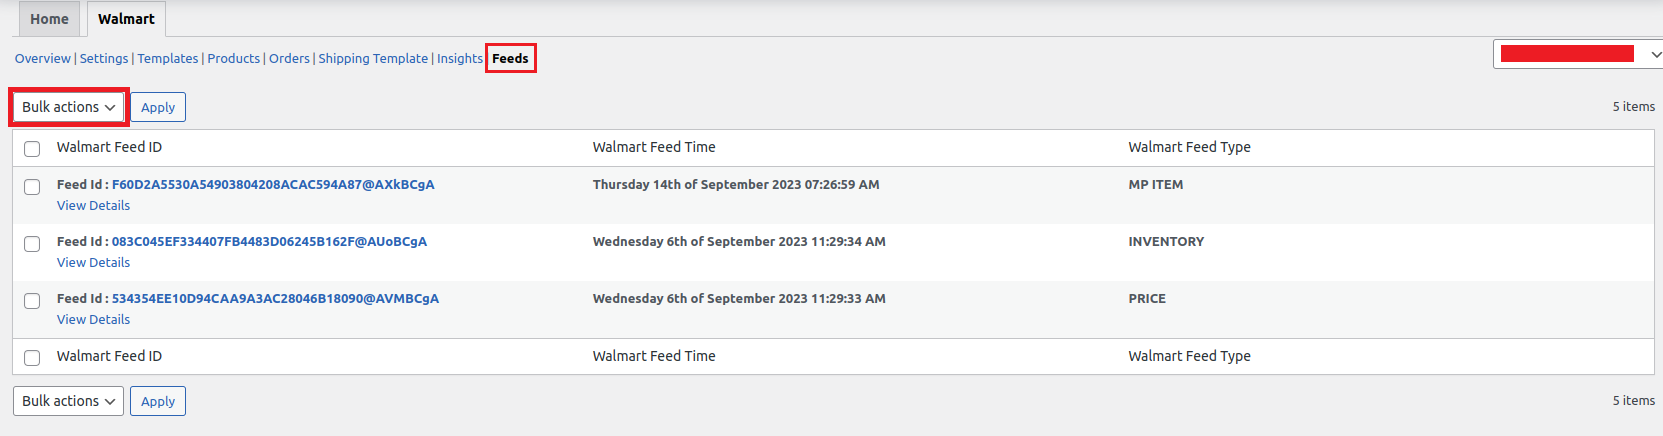
Feeds
↑ Back to topThe Feed section provides you with all the updates regarding product uploads. Every time you perform a product upload / update action a feed is generated. You can view the feed in detail by clicking on the View Details button.
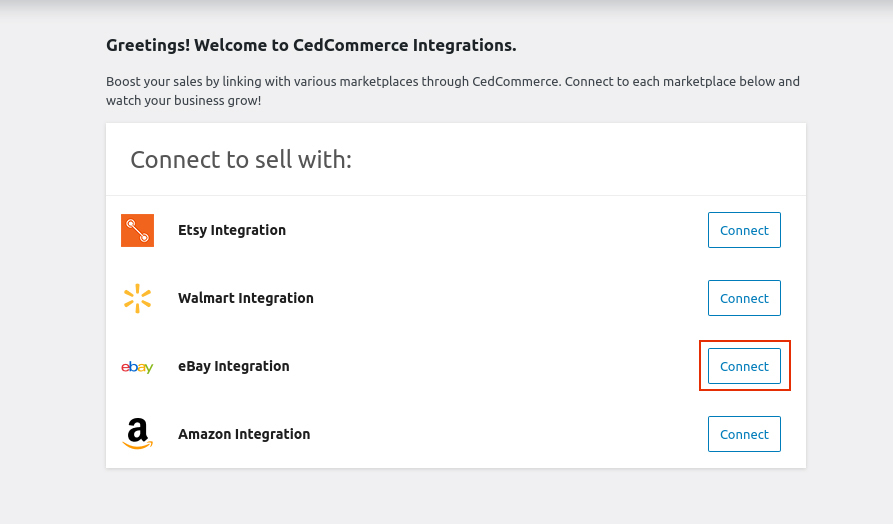
Connect with eBay Integration
↑ Back to topClick on the Connect option as highlighted in the image below and proceed to further steps.
On the next step, you will be prompted to enter your email address registered with eBay and the store location.
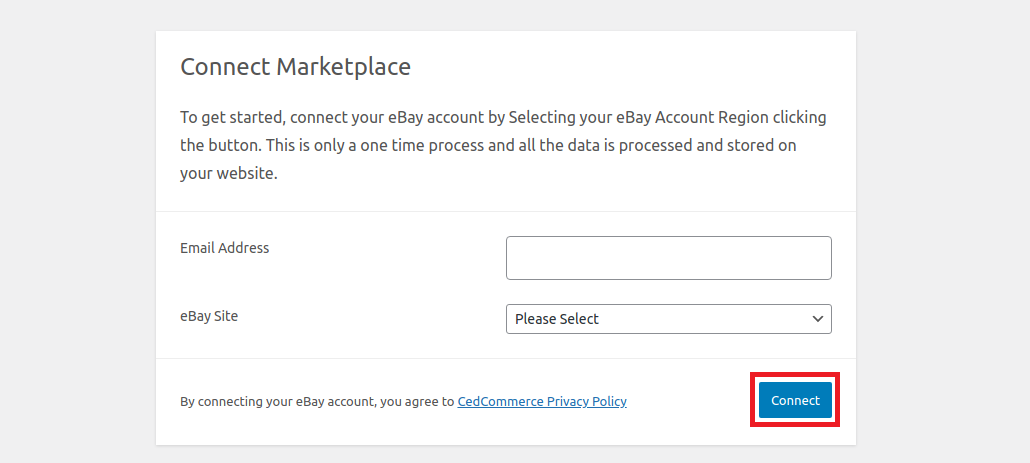
Now you need to enter the login password of your eBay seller account and then click Sign In

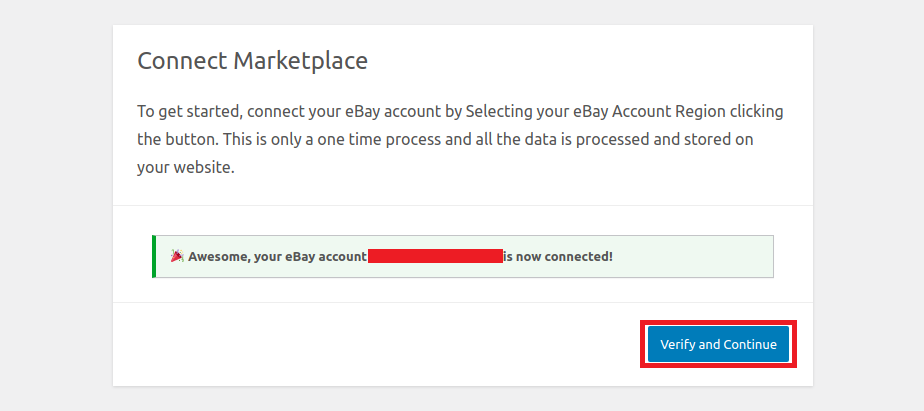
Upon successful sign in, you can clearly see the message that your eBay account is now connected. Now simply click on Verify and Continue to move to the next steps.
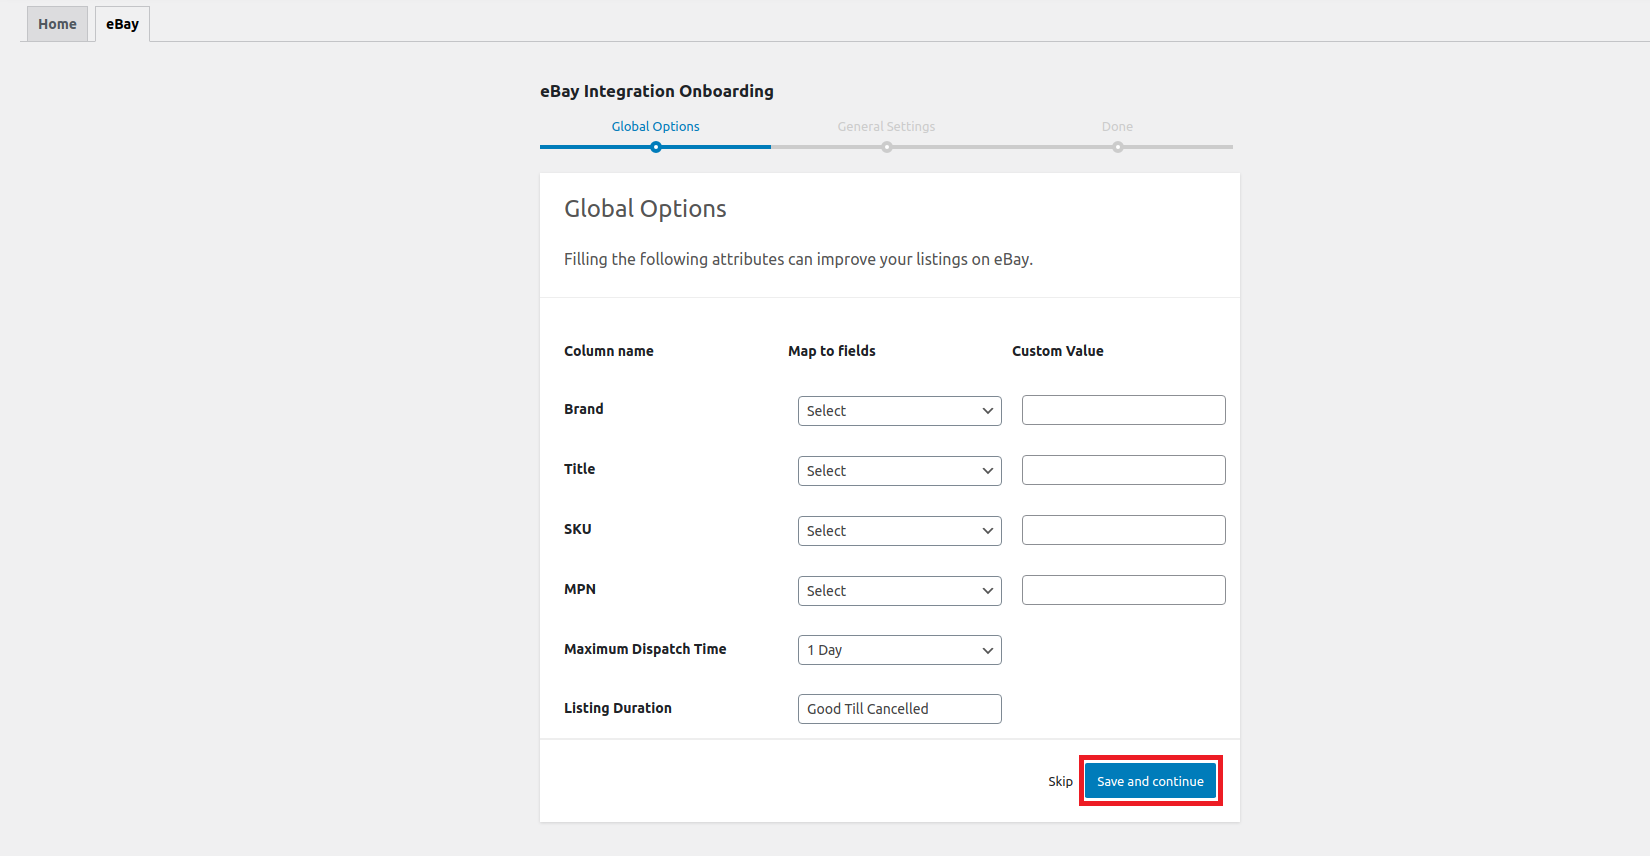
You will be redirected to the Global Options page of the plugin wherein you need to fill out the following details-
- Brand
- Title
- SKU
- MPN
- Maximum Dispatch Time
- Listing Duration
Once done filling out the details in the Global Options section click Save and Continue.
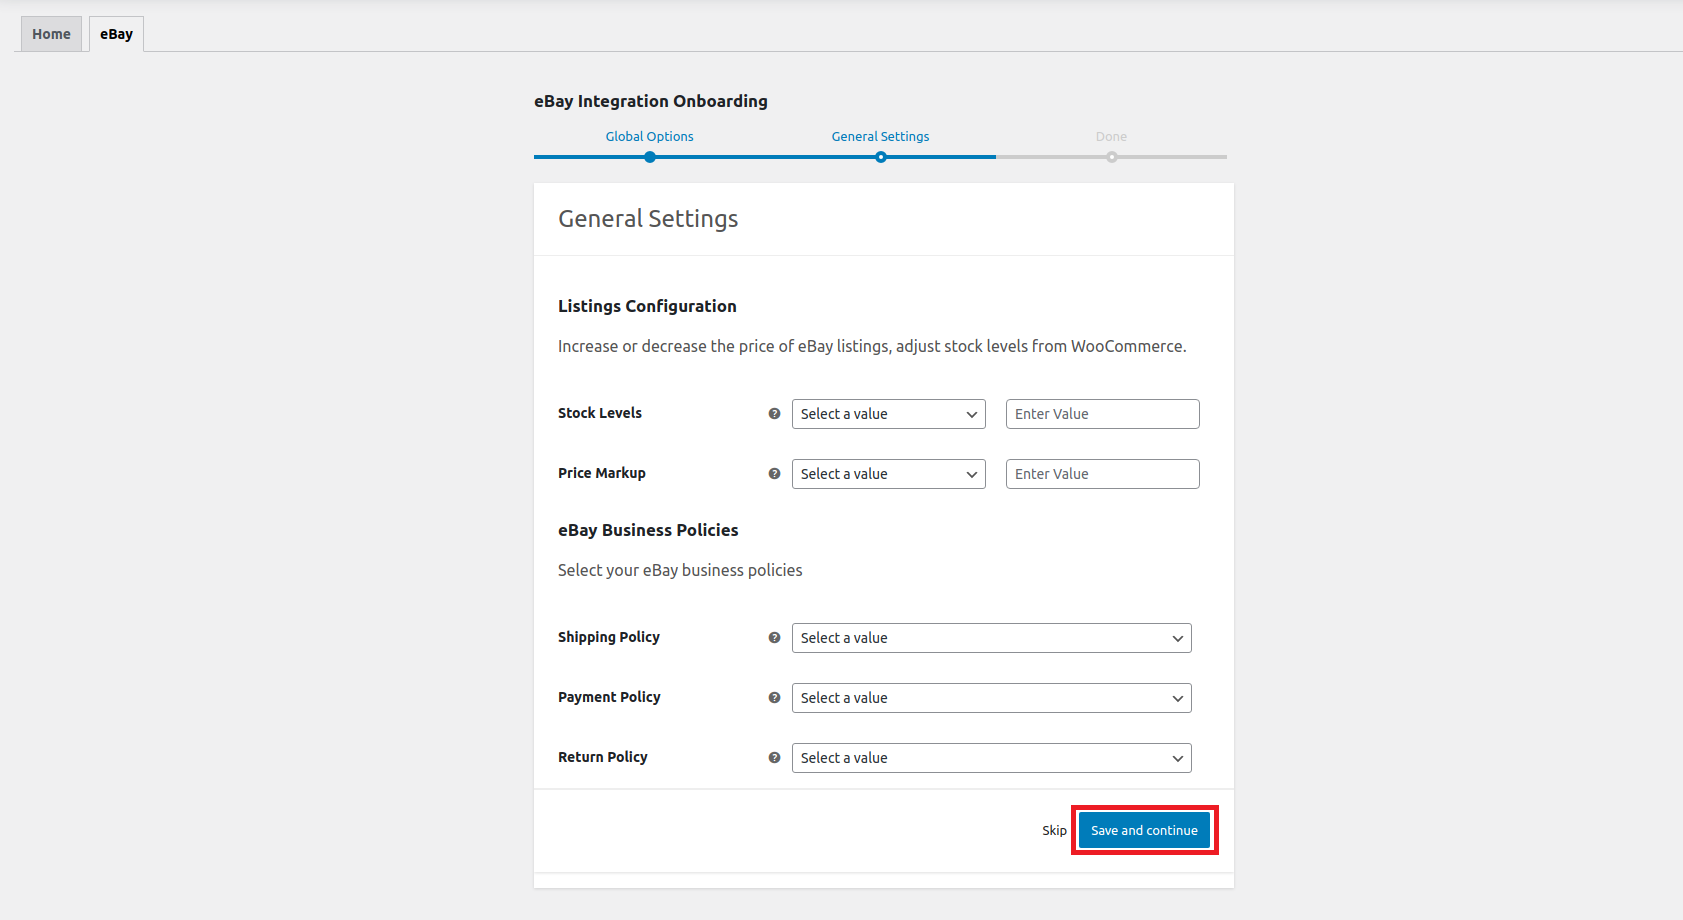
The next section is the General Settings section.
This section has 2 subsections-
- Listings Configuration
- eBay Business Policies
Listings Configuration
- Stock Levels
Select the maximum quantity that you want to display on eBay for your WooCommerce products.
- Price markup
Under the markup section you get to choose from 4 different variations of price markups which includes-
- Fixed increment
- Fixed decrement
- Percentage Increment
- Percentage decrement
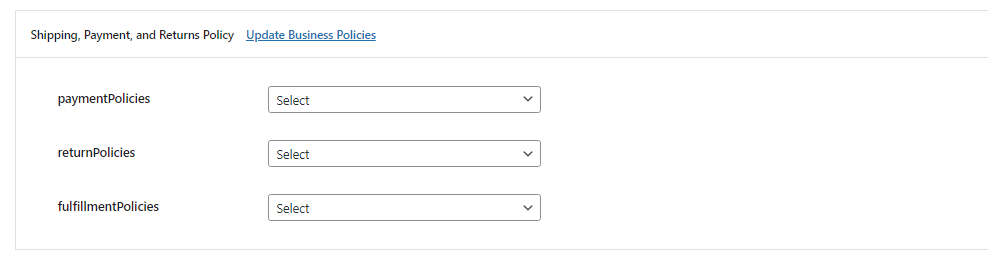
eBay Business Policies
Under this section there are various eBay policy templates under each of the Shipping, Payment, and Return policies. You need to select the appropriate templates for each one of them that best fits your business needs.
Once done, click Save and Continue.
This completes the onboarding process of eBay for WooCommerce. Now, if you wish to have an overview of your store click on Go to Overview.
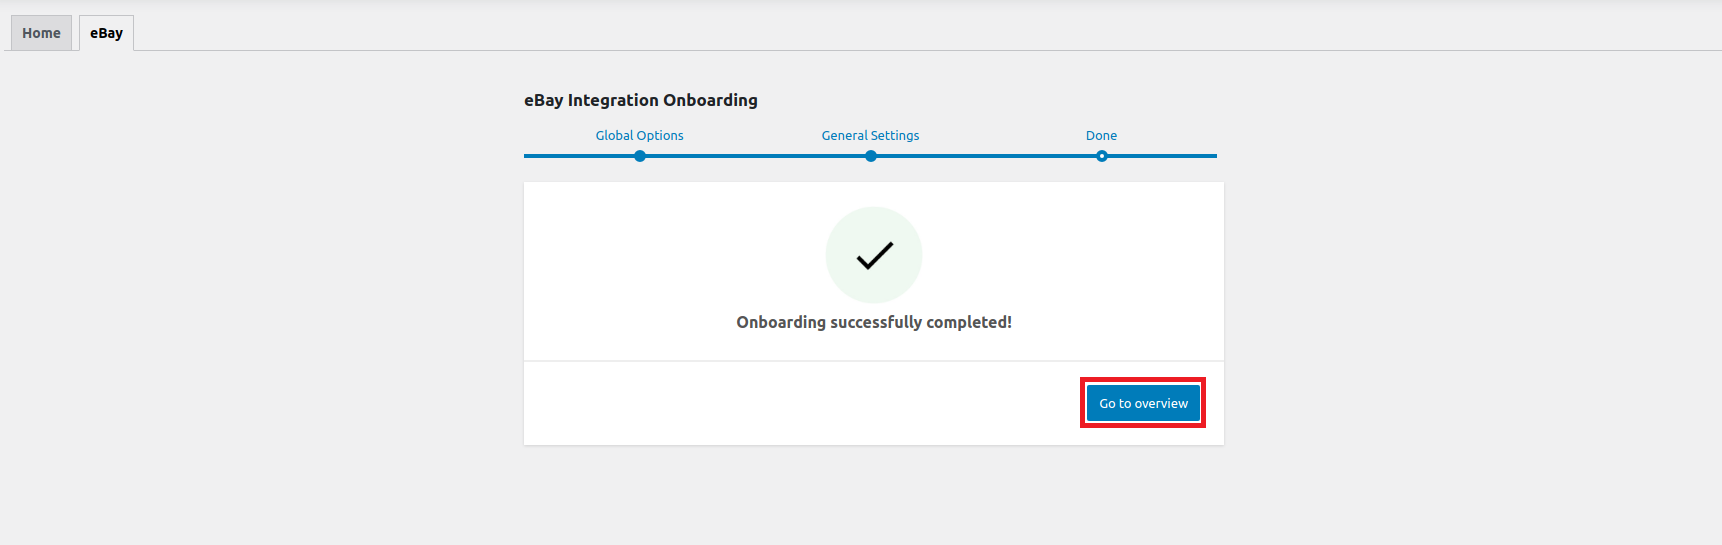
From the Home section of the plugin you also get to manage your linked eBay account. You can easily link more accounts as well as disconnect the accounts that are no more in use.

Overview
↑ Back to topIn the overview section, you can have a clear summary of what’s happening at your store. There are basically 3 subsections which are-
- eBay Listings Importer
Under this subsection you get to know the total imported listings from eBay and the active listings on eBay alongwith the last imported product. You can also start and reset the import process using Start and Reset buttons
- Product Stats
This subsection is to help you with all your product related stats. You can have the details on the total number of products available, number of products listed on eBay, and products imported from eBay. For more information click on View all products Button.
- Order Stats
Stay informed about the total orders and total sales generated on your store with this section. Also, you can have a detailed view of the orders by clicking on View all Orders button.

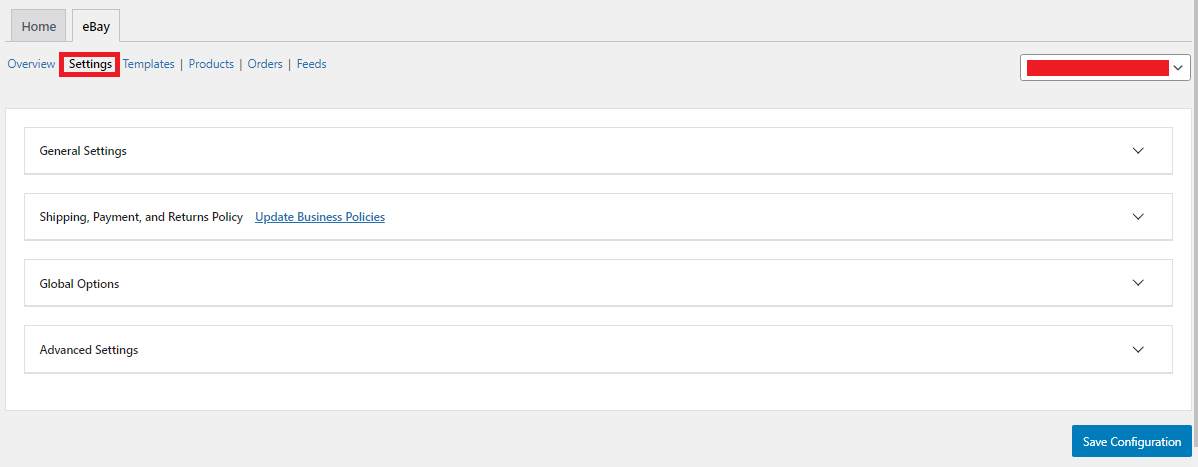
Settings
↑ Back to topSettings section is further subdivided into 4 subsections which are-
- General Settings
- Shipping, Payment, and Returns Policy
- Global Options
- Advanced Settings
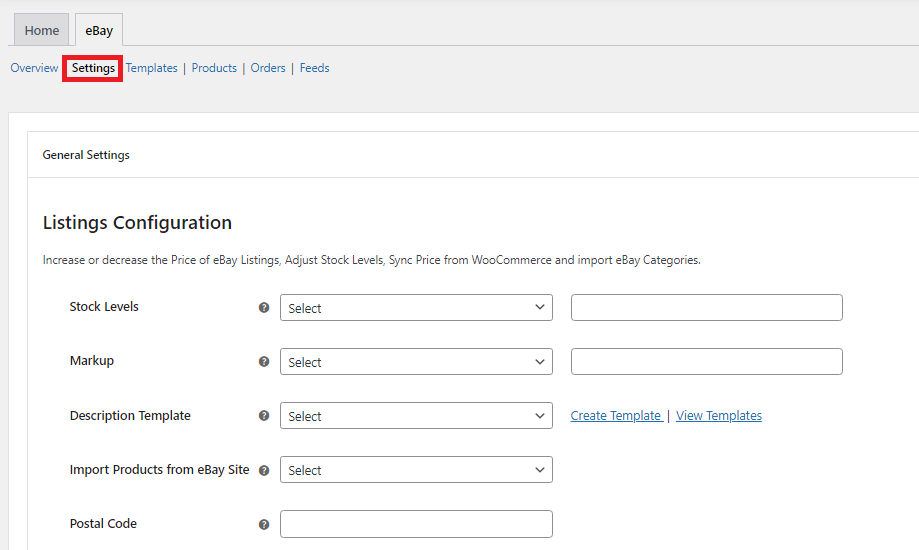
General Settings
Under the General Settings you get to configure your listings by increasing or decreasing the price of eBay Listings, adjust stock levels, sync price from WooCommerce, import eBay categories, and much more. Here is a list of settings available under this section-
- Stock Levels
This field controls the amount of stock you can list on eBay. You can select Maximum Stock from the dropdown and enter a number in the adjacent field. By doing this, you can set a cap on the amount of stock to be listed on eBay for all your WooCommerce products.
For example, if you set a Maximum Stock of 5 and you’re trying to upload a product/variation with more than 5, then the product will be listed with a stock of 5. If the stock you are trying to list is less than 5, then the product will be listed with the default stock and not the maximum stock. Use this option if you are starting to sell on eBay since your eBay account will have lower stock limits, and you will be able to list a lot more WooCommerce products by using a Maximum Stock value of 1, for example.
- Markup
Control the price of your listings on eBay by selecting the Markup type and specifying a corresponding markup value in the adjacent field. There are two supported markup types – fixed and percentage. The price of your WooCommerce products will remain unchanged.
- Description Template
You can choose the description templates created in the Account Settings section of the plugin with this setting. The selected description template will be used for all your WooCommerce products listed on eBay. Make sure that you have created at least one description template to be able to choose it in this setting.
- Import Products from eBay site
You can choose which eBay site you would like to import products from using this setting. This setting works in conjunction with our eBay to WooCommerce product importer process.
- Postal Code
You can specify the postal code of where your products are located when listing on eBay. If postal code is specified, you can skip specifiying Item Location and vice-versa.
- Item Location
Specify the item location when listing your product on eBay. If you don’t set this up, our plugin will use the postcode field in the shipping template to set the item location once an item is listed on eBay.
- Import and Assign eBay categories
This setting can be used to assign the imported products, from eBay to WooCommerce, to their eBay store categories or eBay site categories in WooCommerce. If the eBay categories don’t exist, they will be created in WooCommerce in the same hierarchy as on eBay. Turn the toggle ON and from the dropdown, which appears, select whether you want to import eBay site categories or eBay store categories.
- Skip sending SKU for simple products
If your simple products on WooCommerce don’t have SKUs while the eBay listings have them, then turning this toggle to On will make sure that the WooCommerce to eBay inventory syncing process doesn’t error out and fails.
- Sync price to eBay
Turning this toggle On will also sync any changes in your WooCommerce product prices to their counterpart on eBay. This setting works in conjunction with Sync Stock Levels from WooCommerce to eBay settings therefore, it should be enabled for the Sync price setting to work. Beware when using this option since it will overwrite your eBay listing prices.
Shipping, Payment and Returns Policy
These policies are the same as detailed in the Onboarding Process (eBay Business Policies). Also, if you have already opted for the right policy templates earlier you don’t need to do anything in this section.
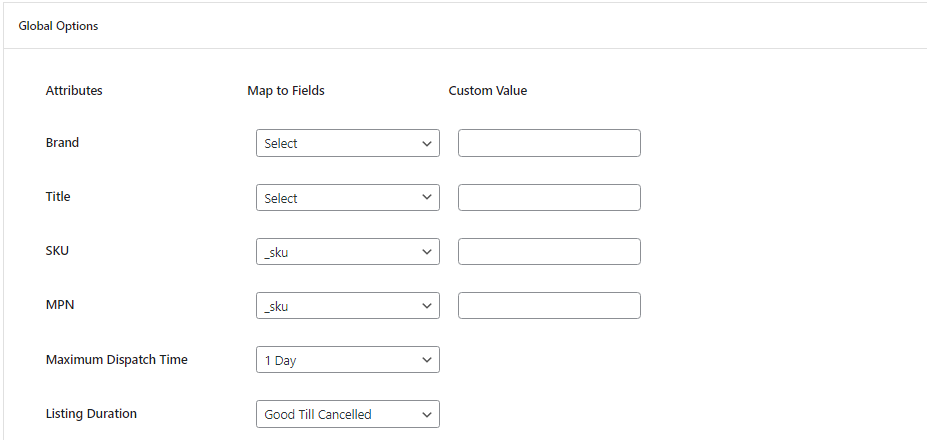
Global Options
Next up is the Global Options Settings. Under this section, you need to fill up the Attributes like-
- Brand
- Title
- SKU
- MPN
- Maximum Dispatch Time
- Listing Duration
Any attributes you will setup in this section will automatically be mapped to template fields when creating a new template.
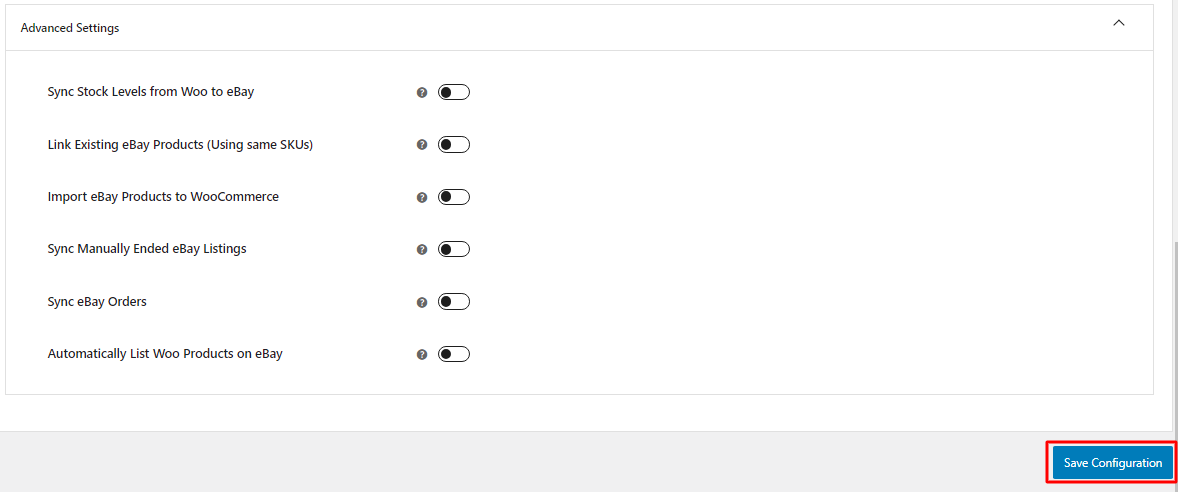
Advanced Settings
With Advanced Settings you can enable automation for the following actions-
- Sync stock Levels from Woo to eBay
- Link existing eBay products using the same SKUs
- Import eBay products to WooCommerce
- Sync manually ended eBay listings
- Sync eBay orders
- Automatically list Woo products on eBay
Once done with all the settings click Save Configuration and proceed ahead to the next setting of the plugin.
Templates
↑ Back to topTemplates encompass a compilation of stored preferences and options tailored for product listings on various sales channels like eBay. You can simply create a template by mapping up the WooCommerce categories with the respective eBay categories. The template fields are applicable to all the products belonging to WooCommerce categories mapped in the templates.
Template section allows you to-
- Create a new template – Only required if you want to list new WooCommerce products on eBay or update the existing eBay listings.
- Delete all templates – Removes all the templates you have created.
- Reset item specifics – Fetches updated Item Aspects from eBay corresponding to each template.
Also, you get to Edit, Filter Products, and perform Bulk Actions with just a few clicks.
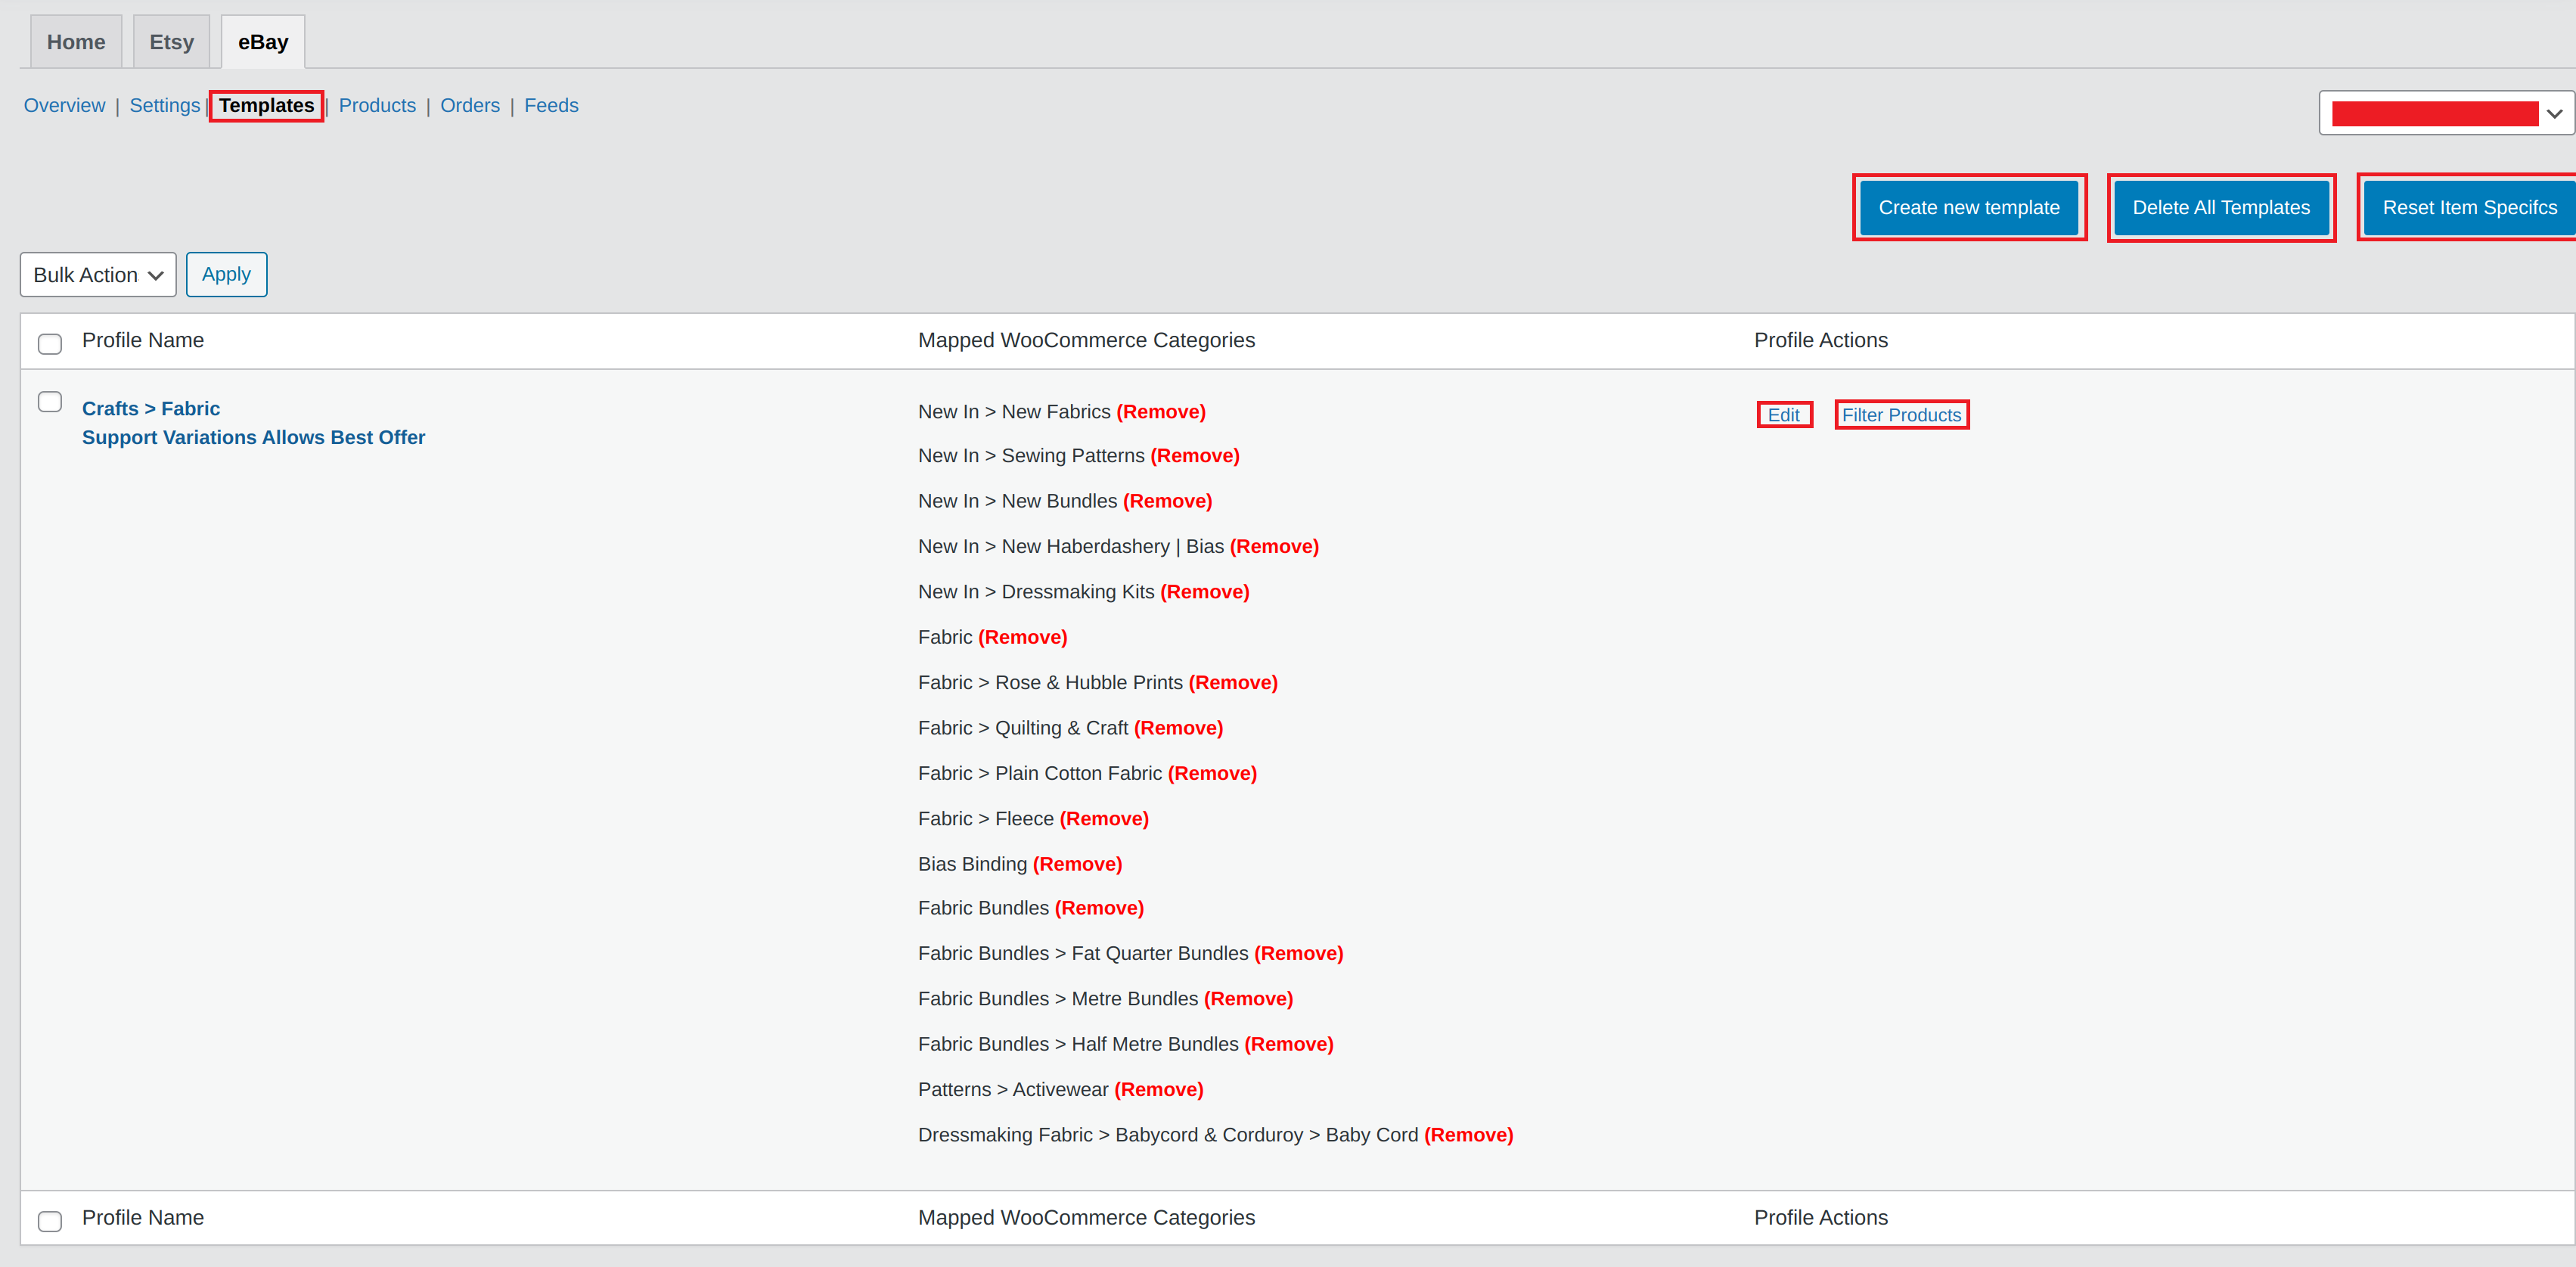
To create a new template click the Create New Template button as highlighted in the image above. A new page will open up wherein you can Allocate an eBay category to the template and then link the designated ebay category to the WooCommerce category that you have already set in advance.
Also, you can fetch eBay categories by clicking on the Fetch eBay Categories button.
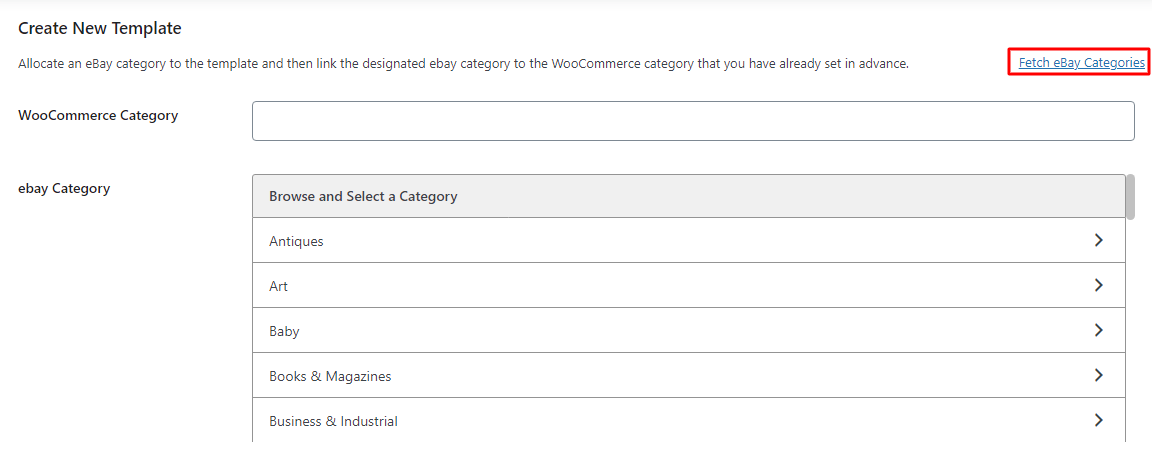
After selecting the relevant eBay category, the template fields will load which features 3 sections –
- General Details
- Item Aspects
- Framework Specific
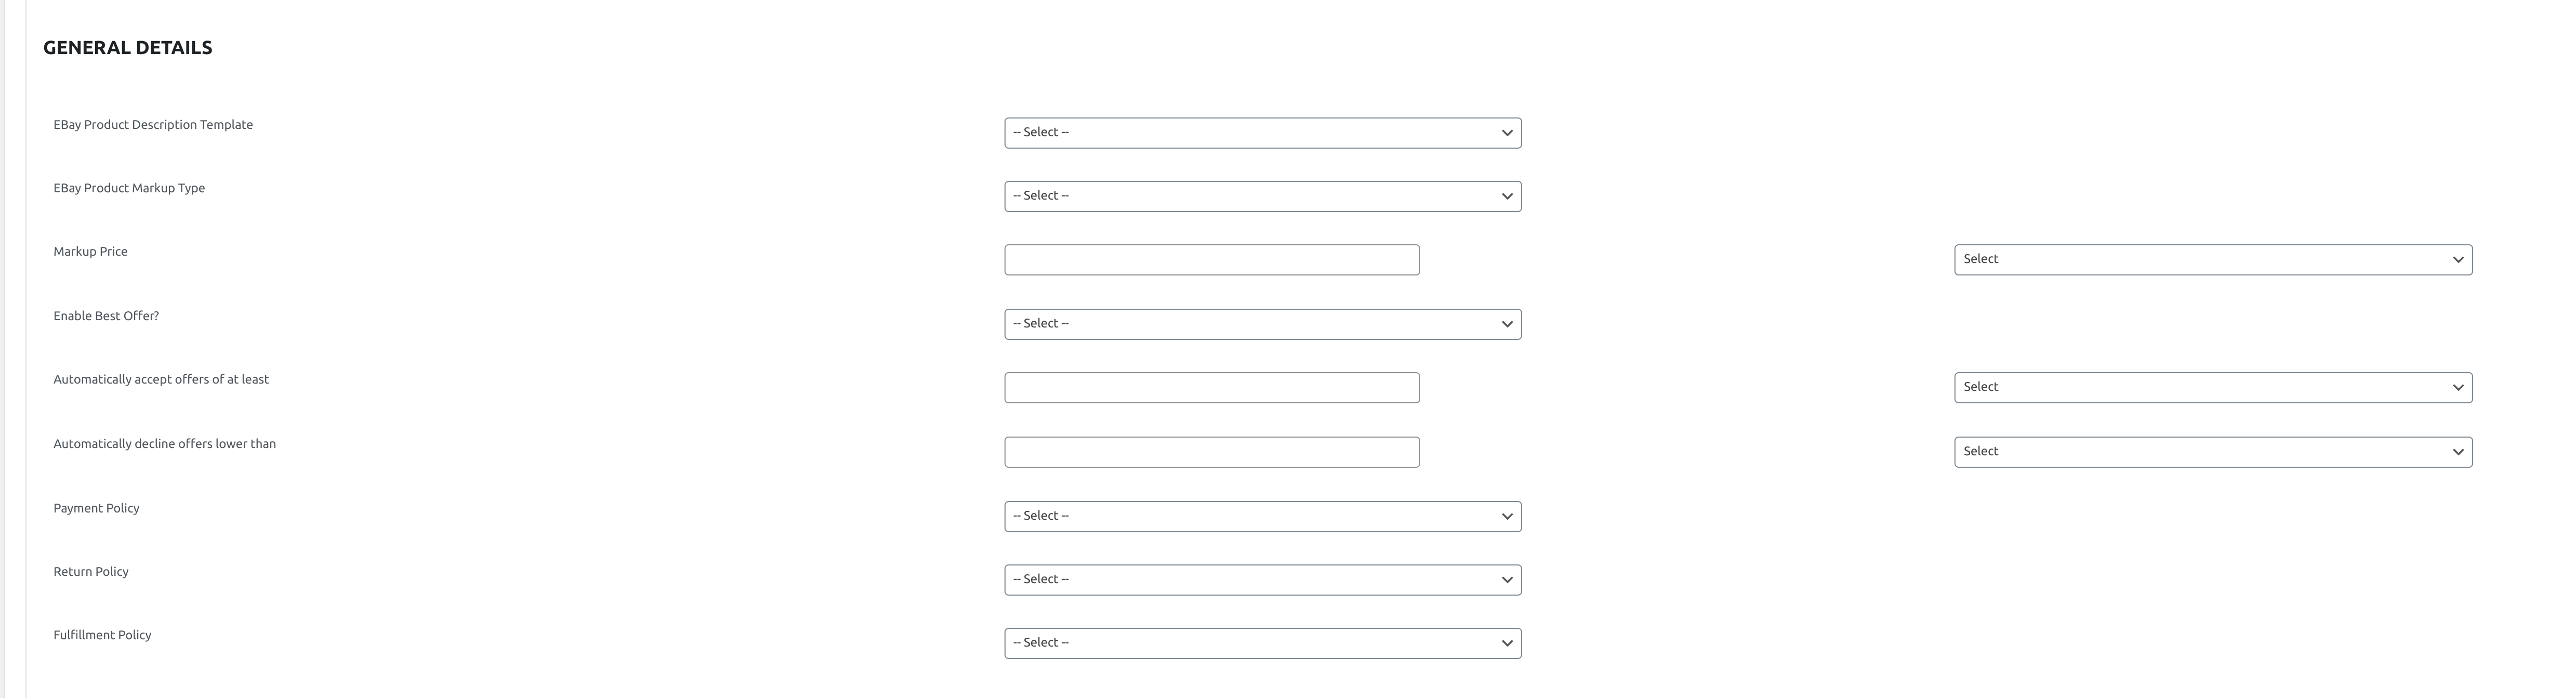
Add New Template > General Details
In this section, you are able to apply markup per WooCommerce category, offer different shipping options, and other important features.
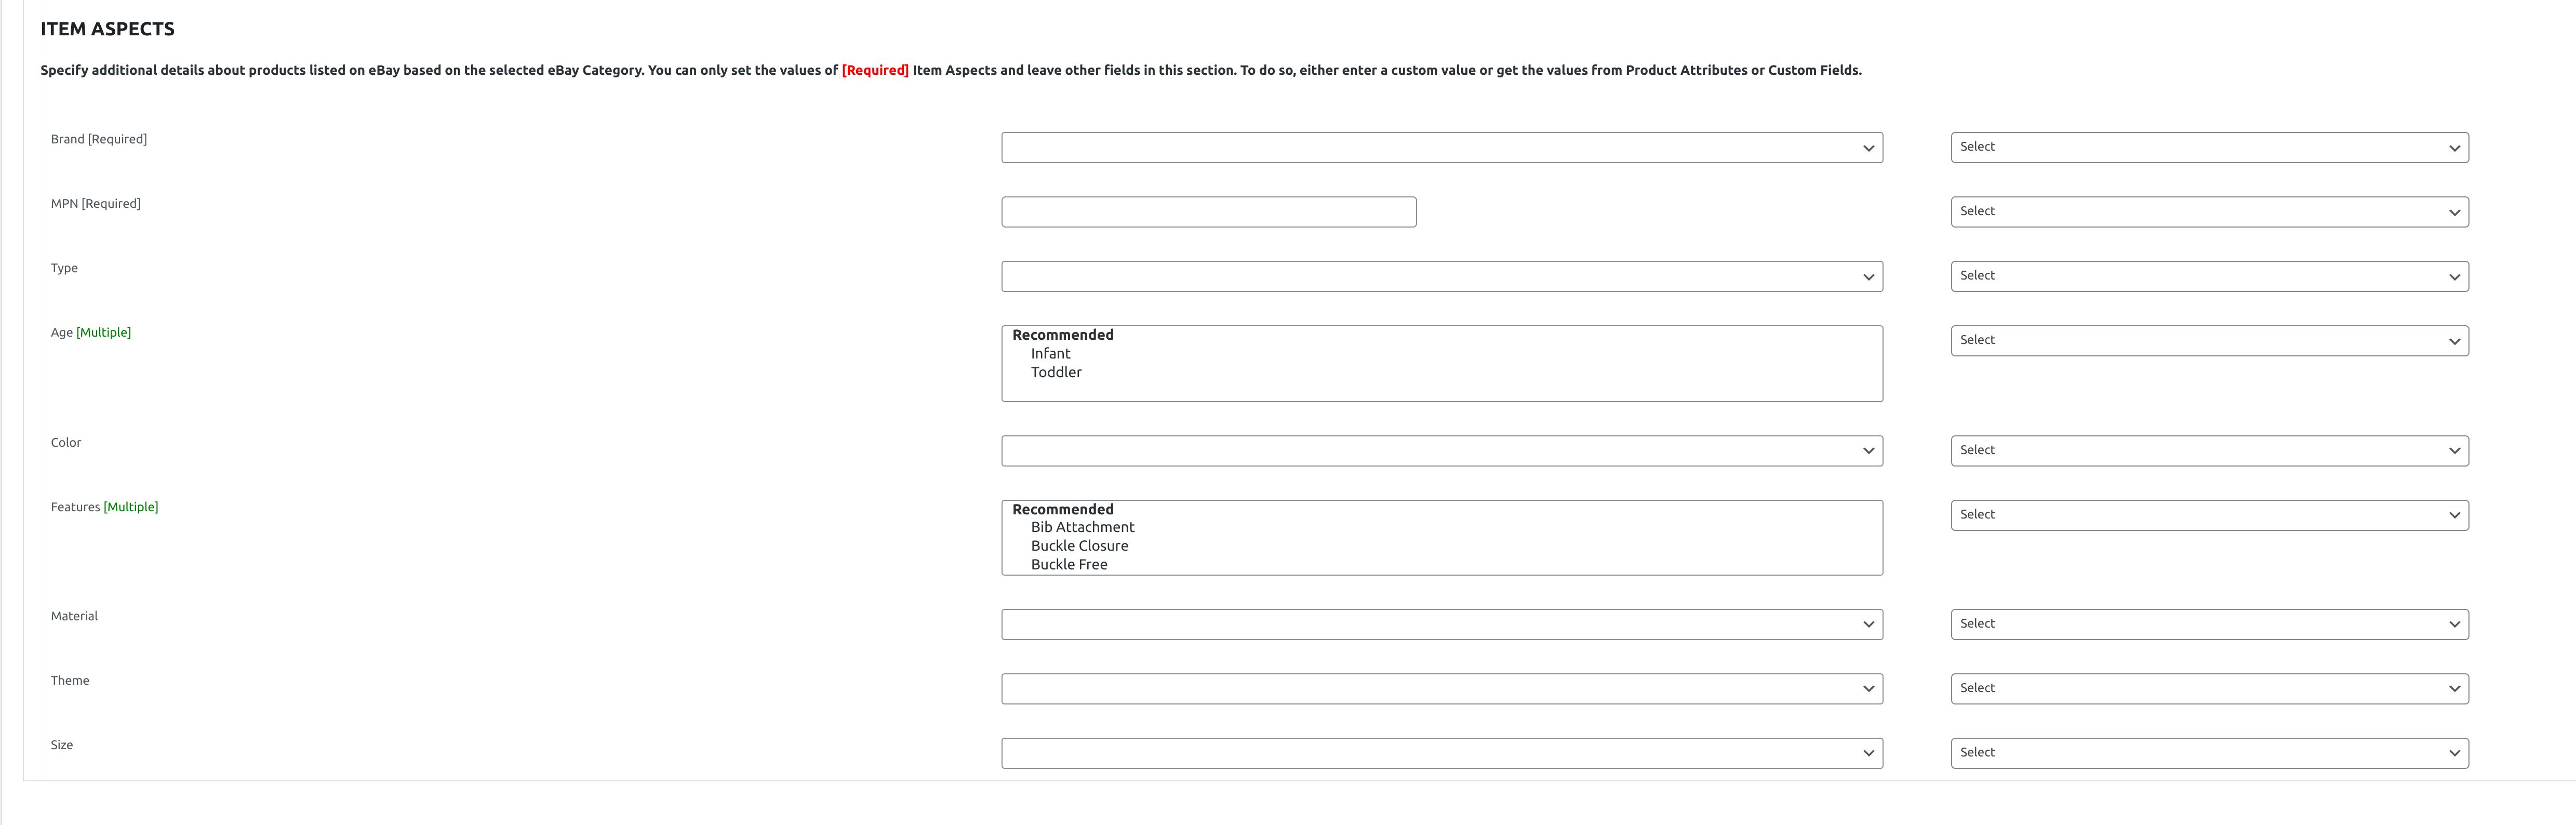
Add New Template > Item Aspects
Item aspects are used to specify additional details about products listed on eBay based on the selected eBay Category. The Item Aspects you see in the template vary on the basis of the eBay category.
In order to assign values to Item Aspects, you can click on the dropdown as shown in the below image. In the dropdown, you’ll see some Recommended values for that particular Item Aspect which you can choose by clicking on them or you can click on the Enter a custom value] option and the dropdown will be converted into an Input field where you can enter any custom value you prefer for that particular Item Aspect.
Another way to setup values for Item Aspects is by mapping them to your Product categories, Attributes, or Custom Fields. You can select the relevant field to pick the value from the dropdown shown in the above image. Only a single selection is allowed at the moment. By selecting the relevant field for mapping, each product will have a different value for the Item Aspect.
The same approach can be used for all the other fields in the Profile – either enter a custom value or map them to your product attributes, categories or custom fields.
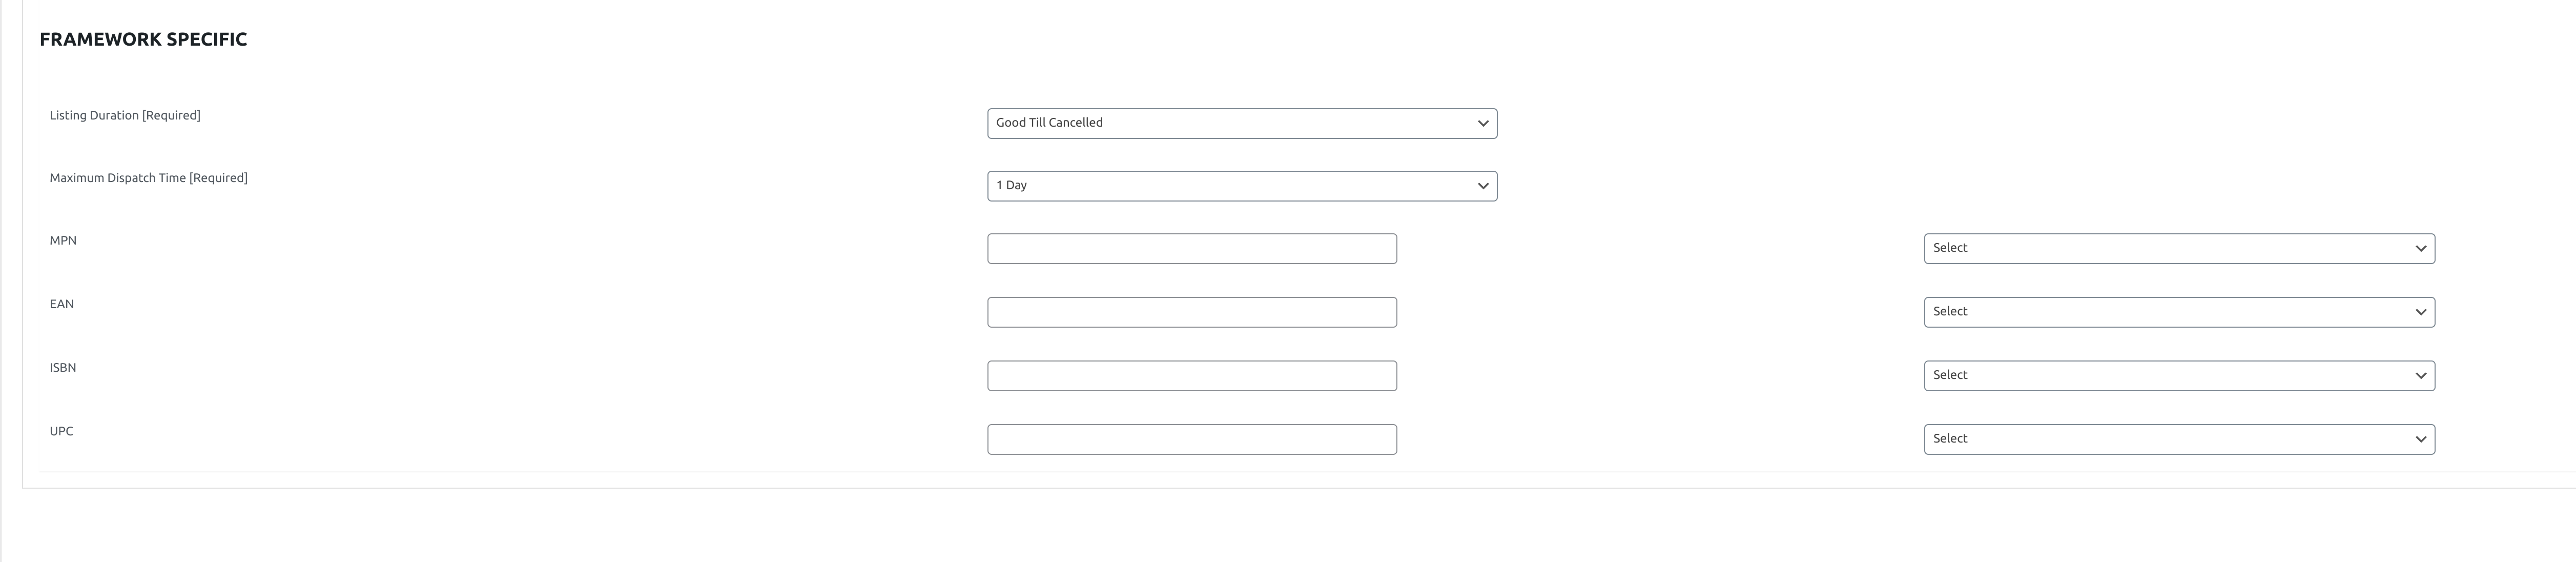
Add New Template > Framework Specific
In this section, you can setup the Listing Duration for your proudcts on eBay along with setting a dispatch time to show buyers how much time it would take you to dispatch the product once an order is placed.
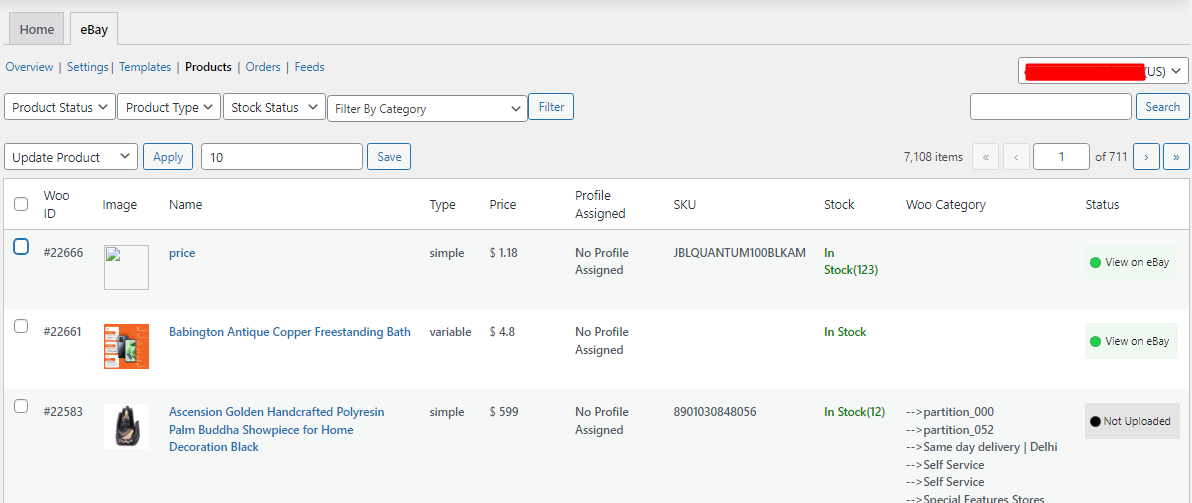
Products
↑ Back to topThe product management section helps you centrally manage all your products. It has all the granular information regarding your products.
It allows you to filter out products based on-
- Product Status
- Product Type
- Product Category
- Stock Status
Also you get to view the product image, name, type, price, template assigned, SKU, stock, Woo category, and status.
Apart from these, you can perform several bulk actions which are listed below-
- Upload: Save time by uploading WooCommerce products in bulk to eBay. Our robust system eliminates the need for manual input, allowing you to effortlessly transfer multiple product listings from your WooCommerce store to eBay marketplace.
- Relist: Choose and relist products on eBay from WooCommerce. The integration streamlines the process by relisting products by automatically transferring all product details, including images, descriptions, pricing, and inventory levels.
- Update Inventory: Effortlessly update your inventory in bulk by selecting and updating across platforms with the help of a super straightforward interface and easy-to-follow steps.
- Update Product: Update your WooCommerce product data and get it reflected on the same eBay listing in just a few seconds after you click update product.
- Link with eBay: Sync your selected products in bulk with the eBay marketplace using this feature. This feature eliminates the need for manual linking, saving you valuable time and reducing the possibility of errors.
- End/Reset Product: By using this feature sellers can End or Reset selected eBay listings. This functionality assists you with flexible actions with listings that may or may not align with your business goals.
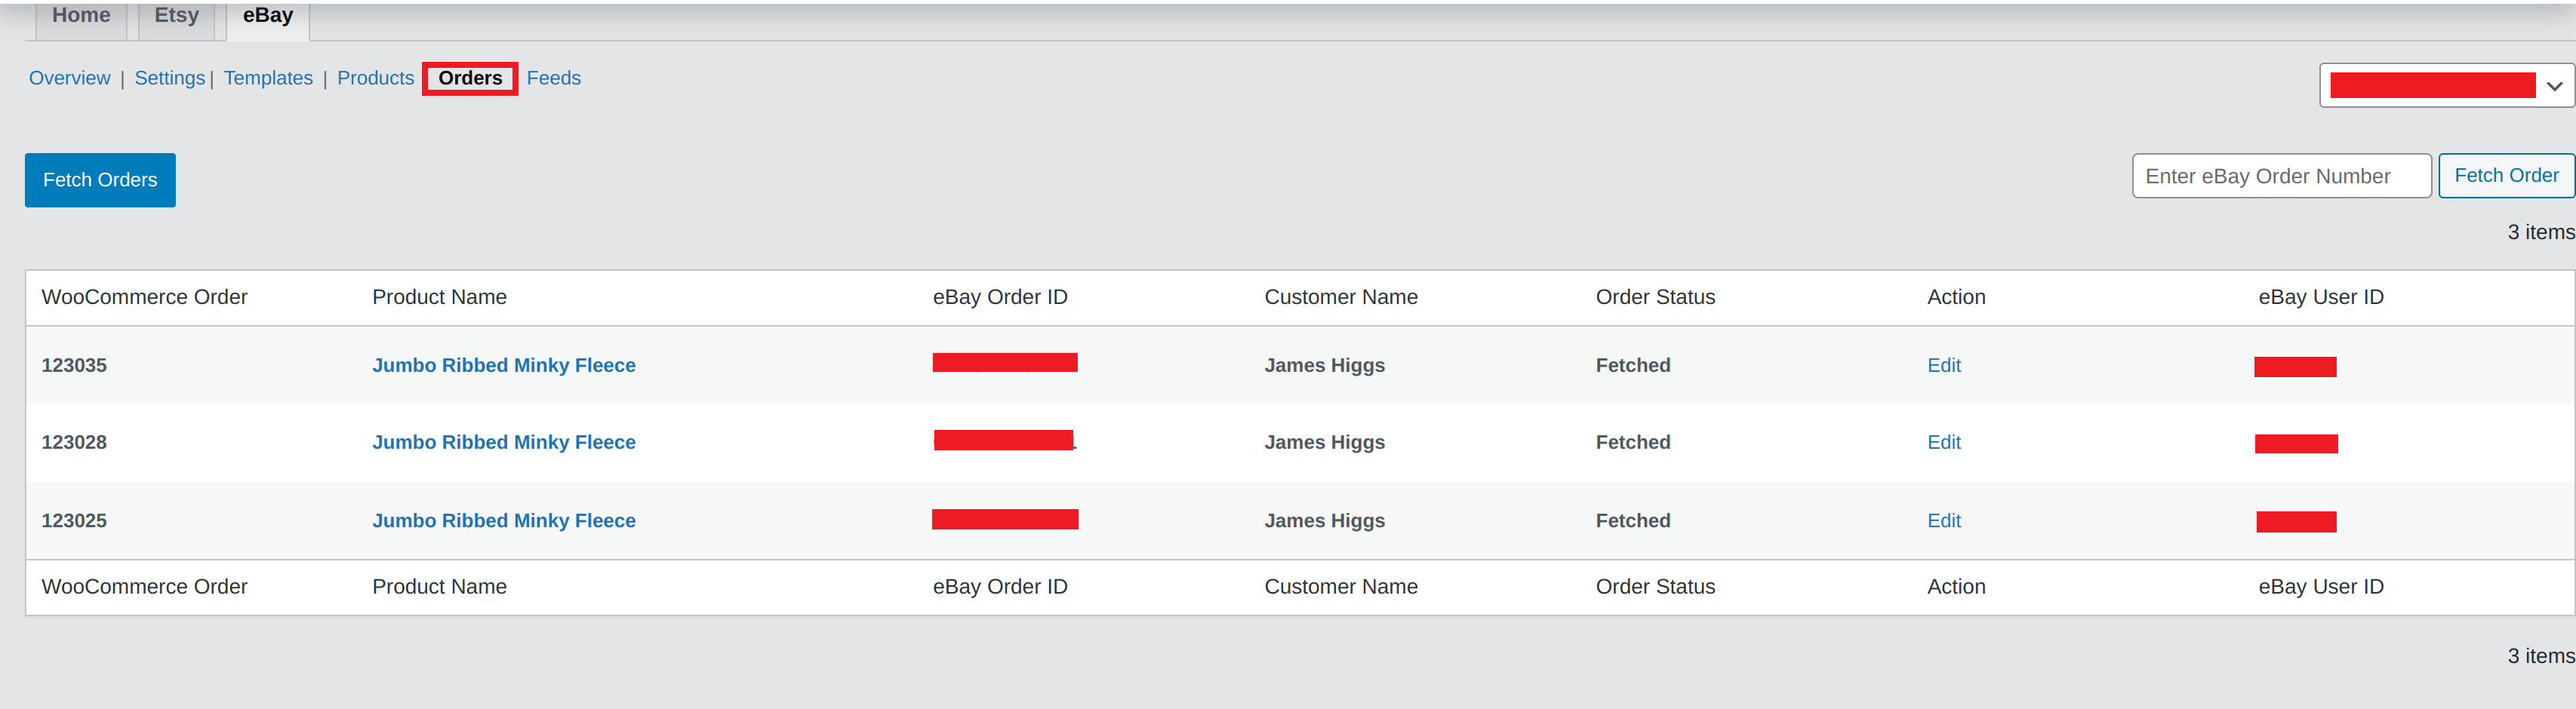
Orders
↑ Back to topUnder the orders section you can fetch your eBay orders to WooCommerce for a centralized management and speedy fulfillment. Simply click the Fetch Orders button to start the syncing of orders from eBay to WooCommerce. However, if you have opted for automatic syncing of eBay orders under the Settings section you need not to manually fetch orders under this section.The orders fetched on WooCommerce will consist of the following details-
- WooCommerce Order ID
- Product Name
- eBay Order ID
- Customer Name
- Order Status
- Action
- eBay User ID
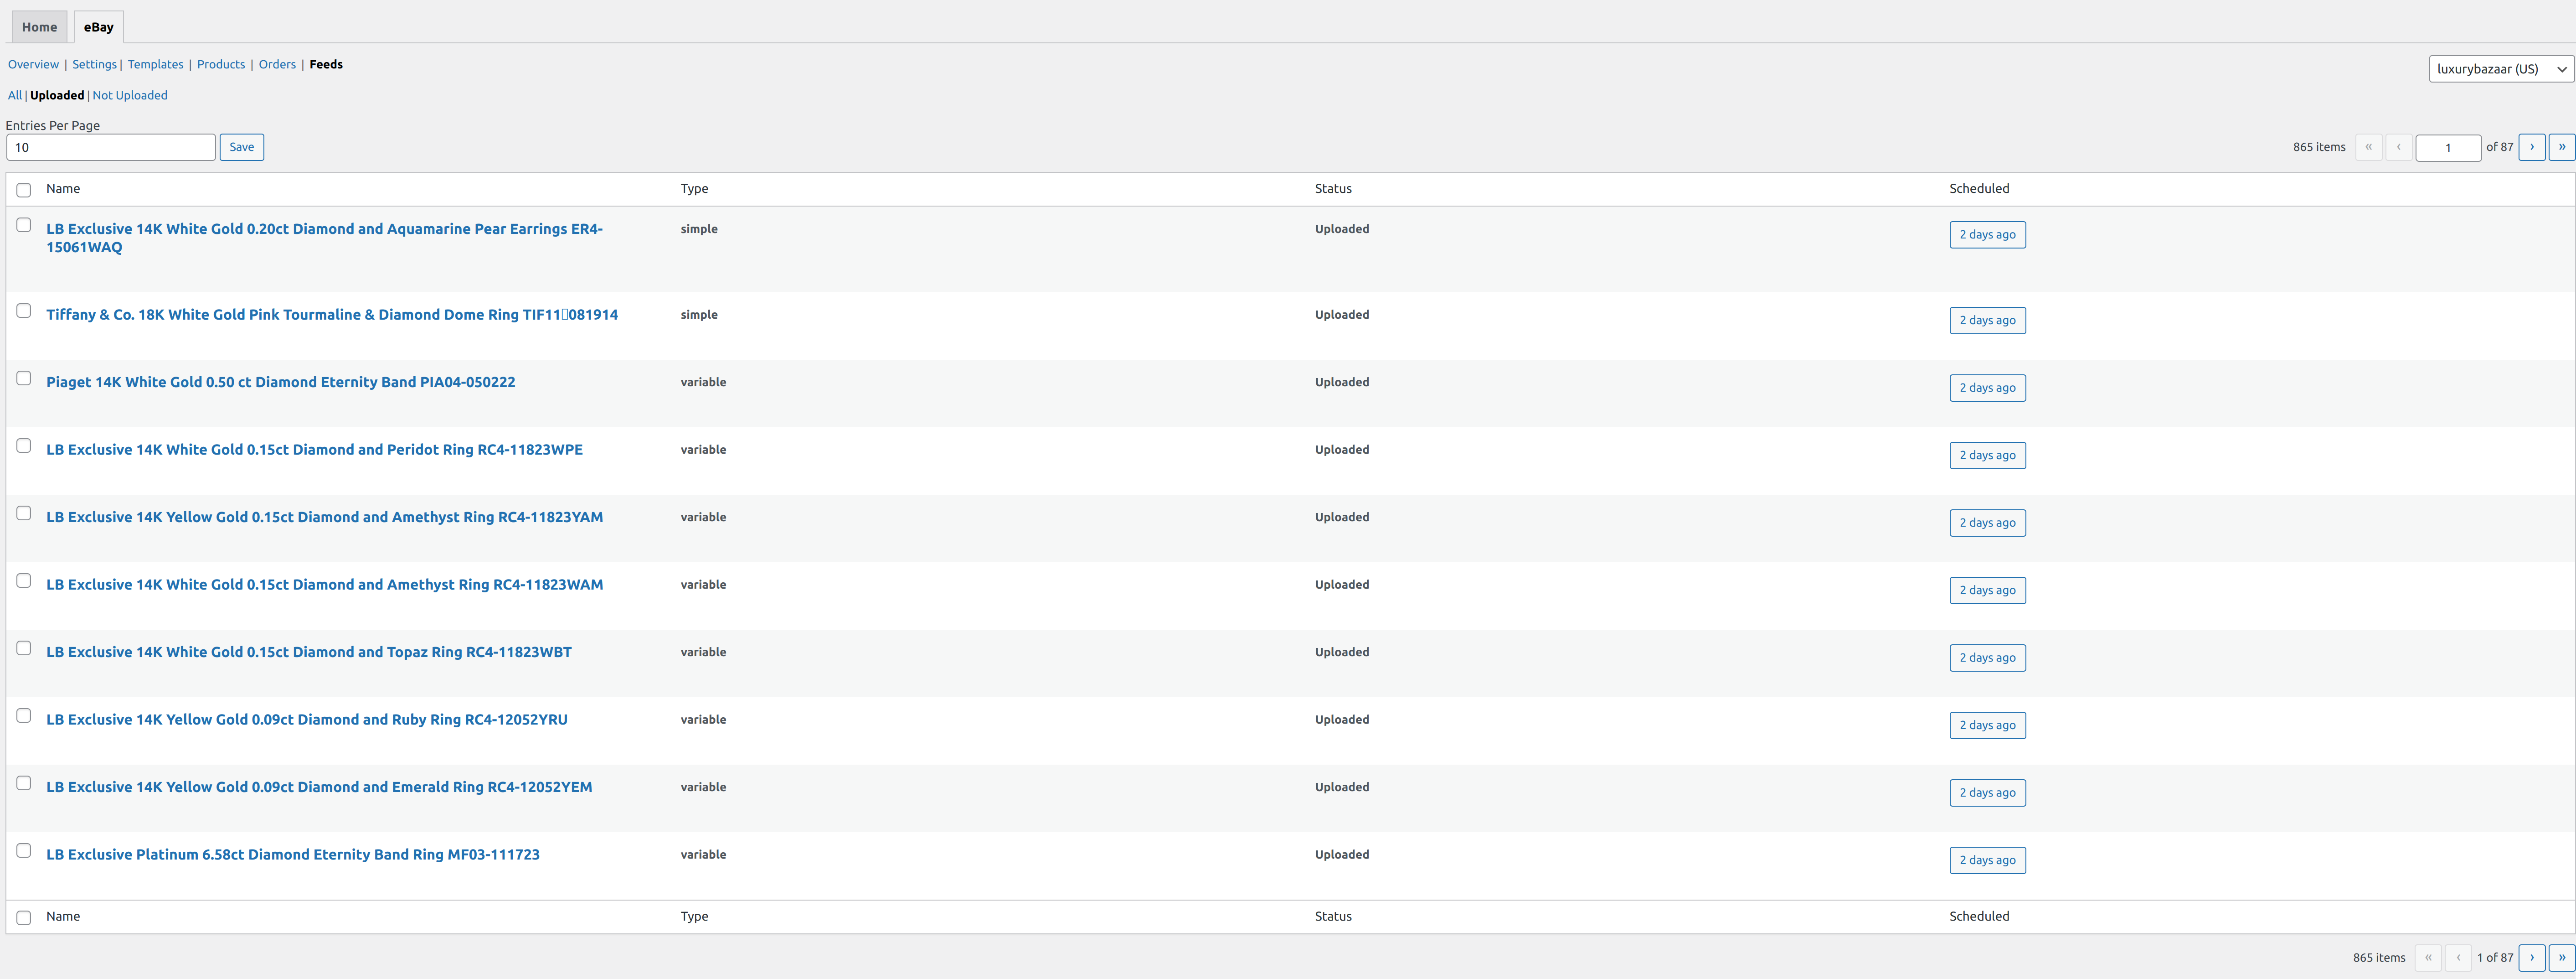
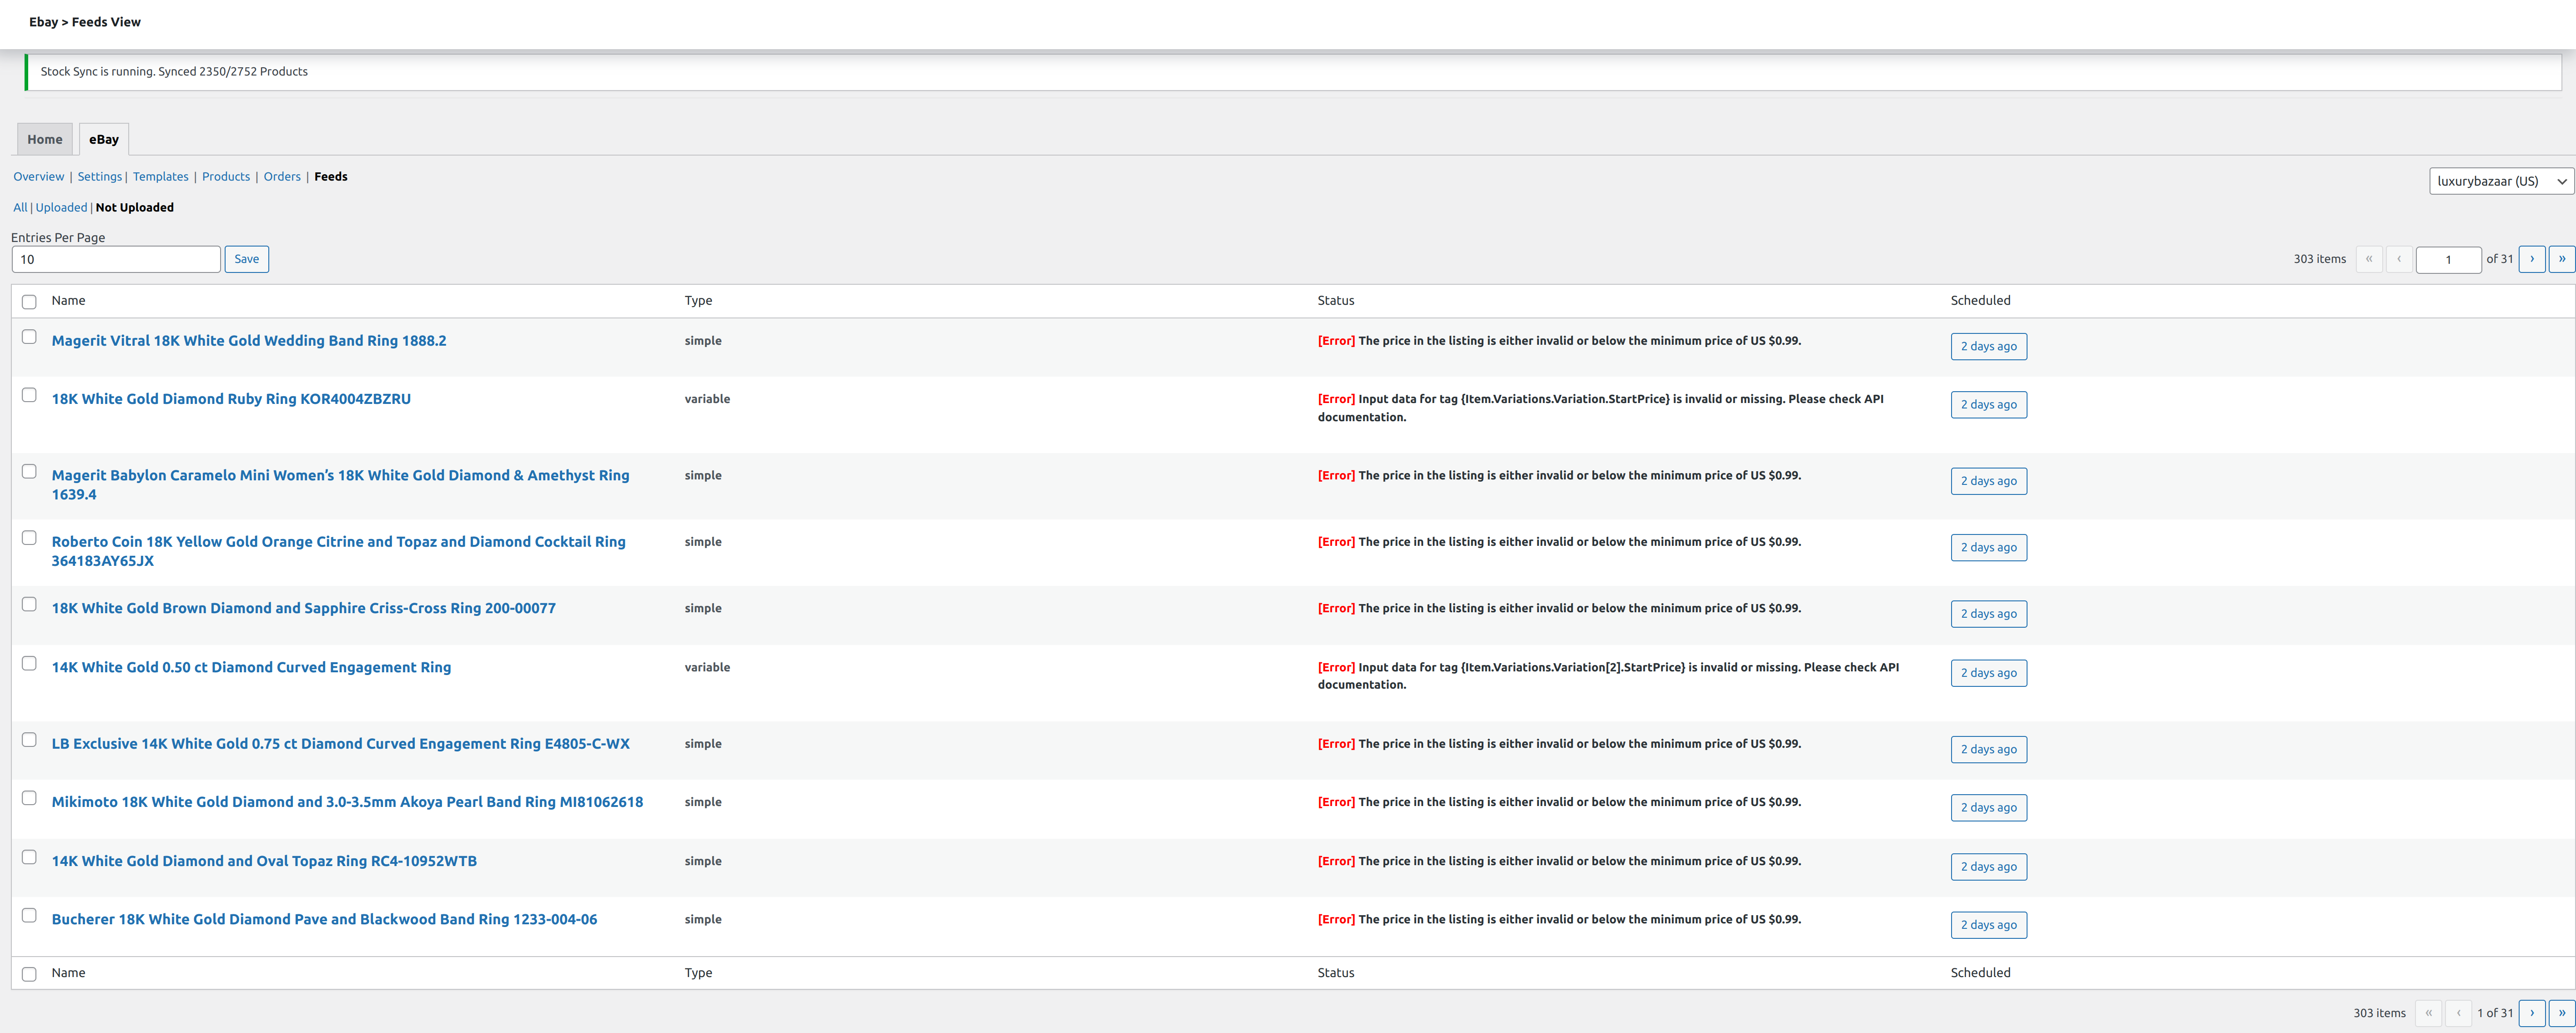
Feeds
↑ Back to topThis section shows the progress of automatically listing your WooCommerce products to eBay. If you turn ON the Automatically List Woo Products on eBay toggle in the Settings section you will see the progress in this section. You are also able to filter products which were successfully uploaded and which weren’t. You will see errors which prevented the WooCommerce products successfully listing on eBay as shown in the second image below.
Connect with Amazon Integration
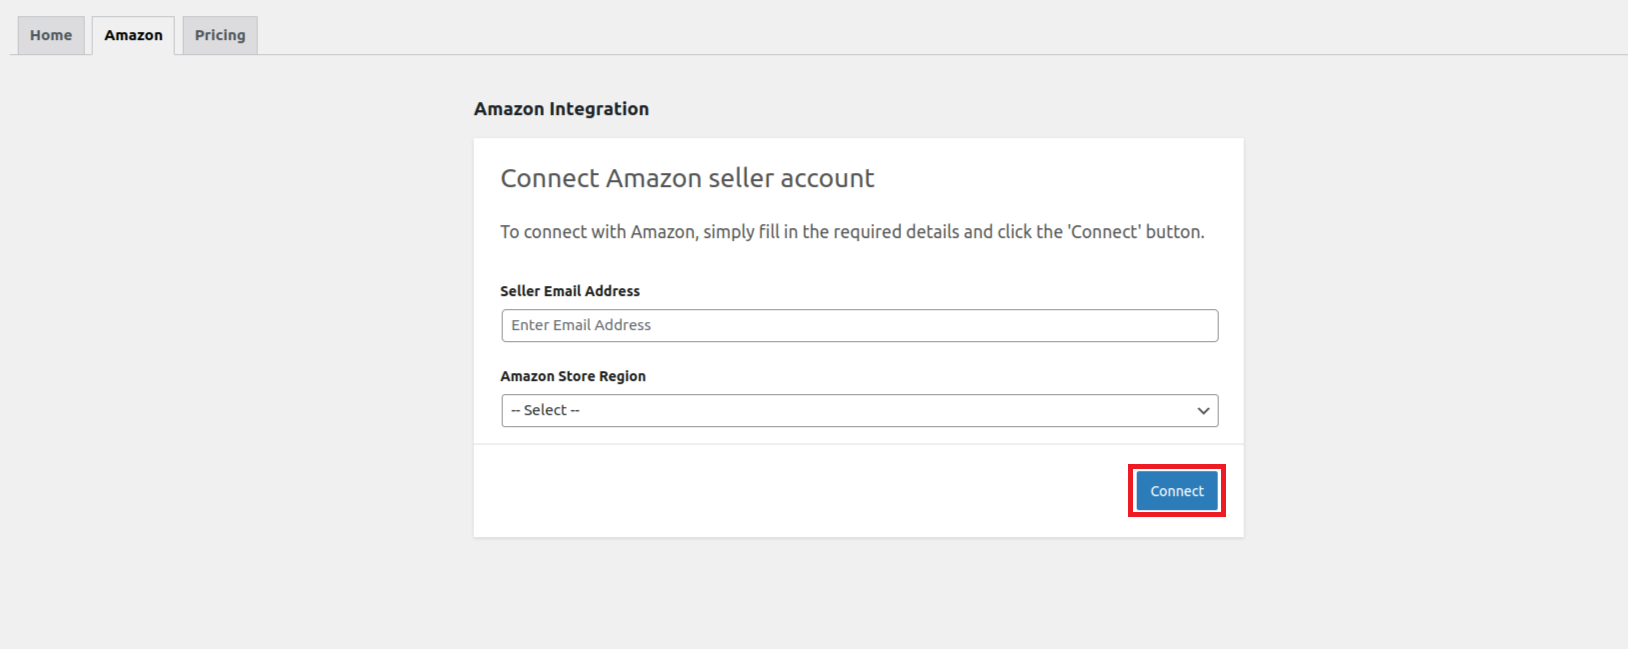
↑ Back to topNow, click on the Connect option as highlighted in the image below

On the next page, you need to enter the Seller Email Address and Amazon Store Region.
Simply fill in the details and click Connect.
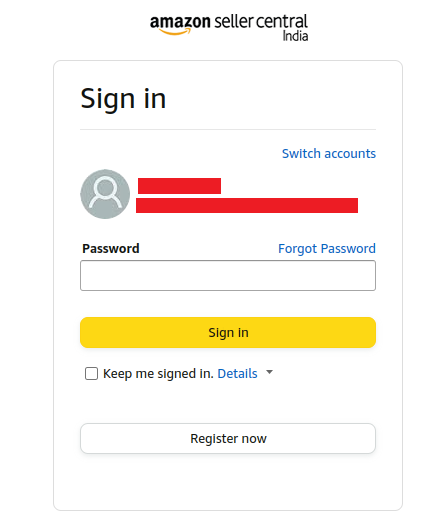
In the next step, you will have to enter the Amazon Seller Central email address and password and click Sign In to proceed.
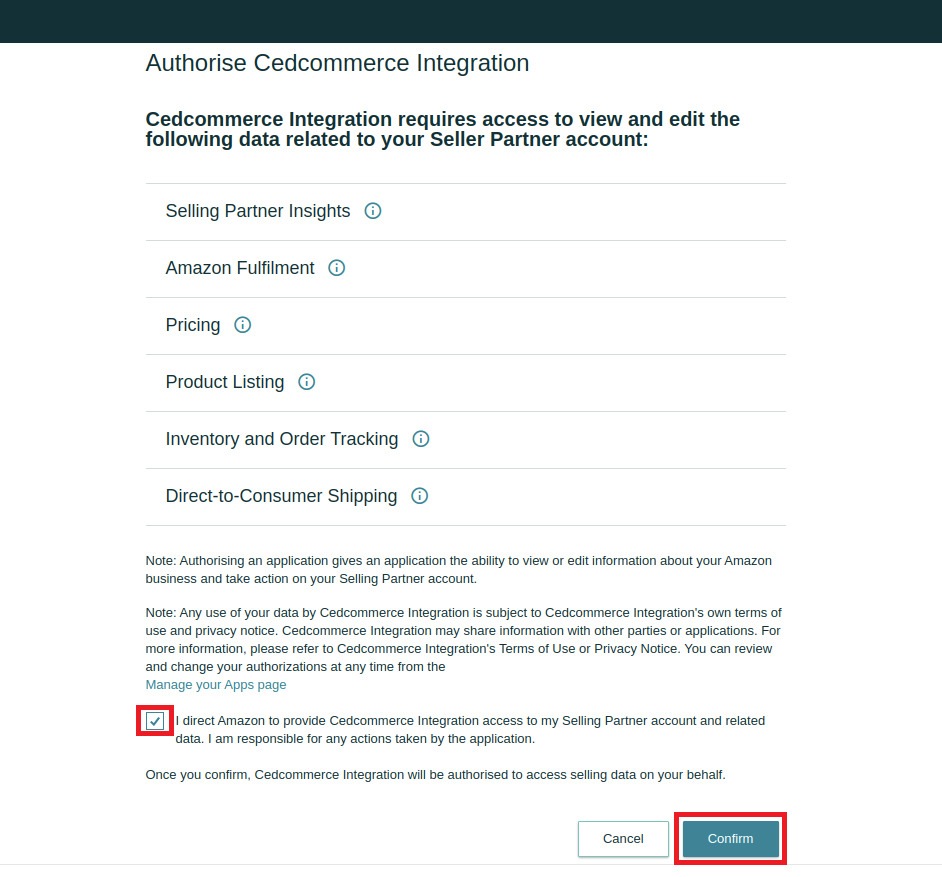
Moving ahead, you need to authorize the CedCommerce integration to view and edit data related to your Seller Partner Account.
Tick the box and click Confirm as highlighted in the image below.
After the confirmation, you will be redirected to the page that clearly displays that your Amazon account is now connected. All you need to do is click on Verify and continue.
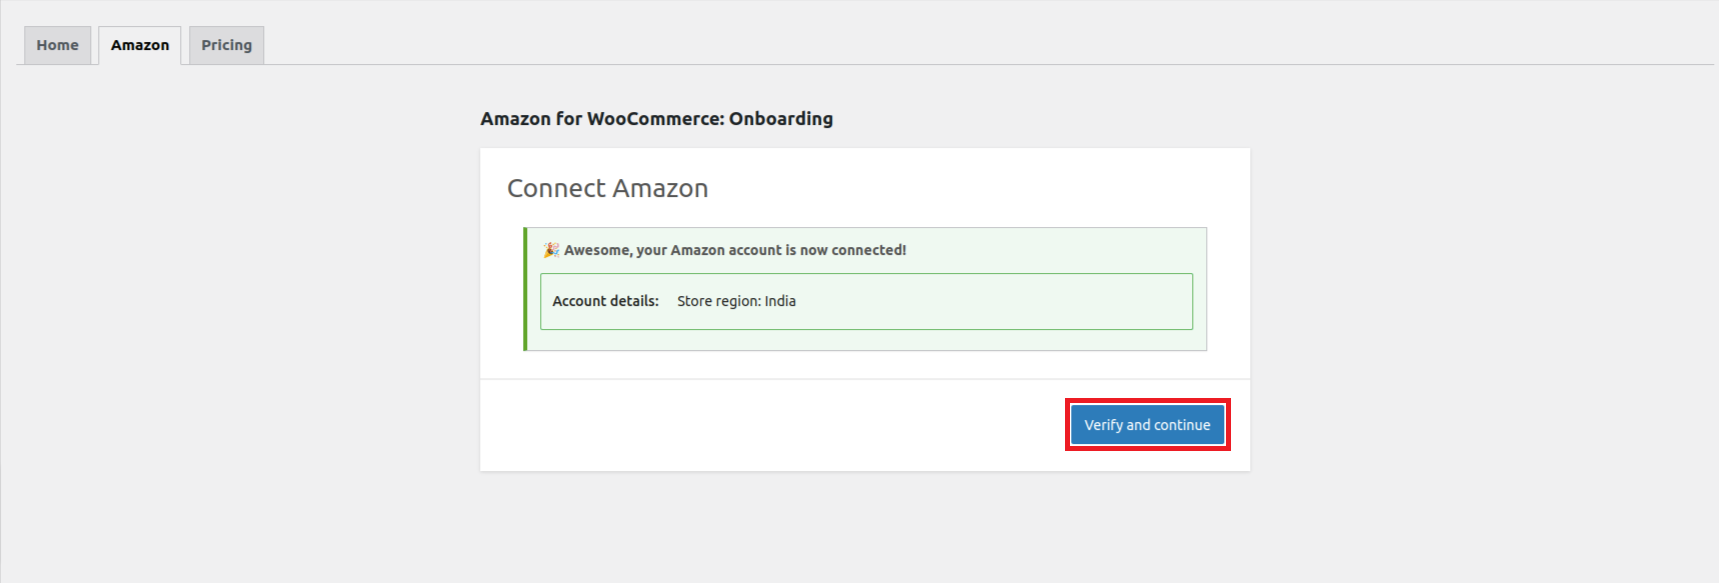
Click on Verify and Continue to start the validation of your Amazon account details. In case, if the onboarding fails a message will be displayed as Unable to verify you. Please try again. There might be a few reasons for this failure which can be –
- We can’t confirm the seller’s permission to operate in the selected region.
- The seller’s account is suspended.
- A valid credit card is not attached to the account.
- The seller is not the account owner and has insufficient permission to add the account.
- If none of the above, it might be possible that there is an issue with authentication on our end or an issue with Amazon APIs.
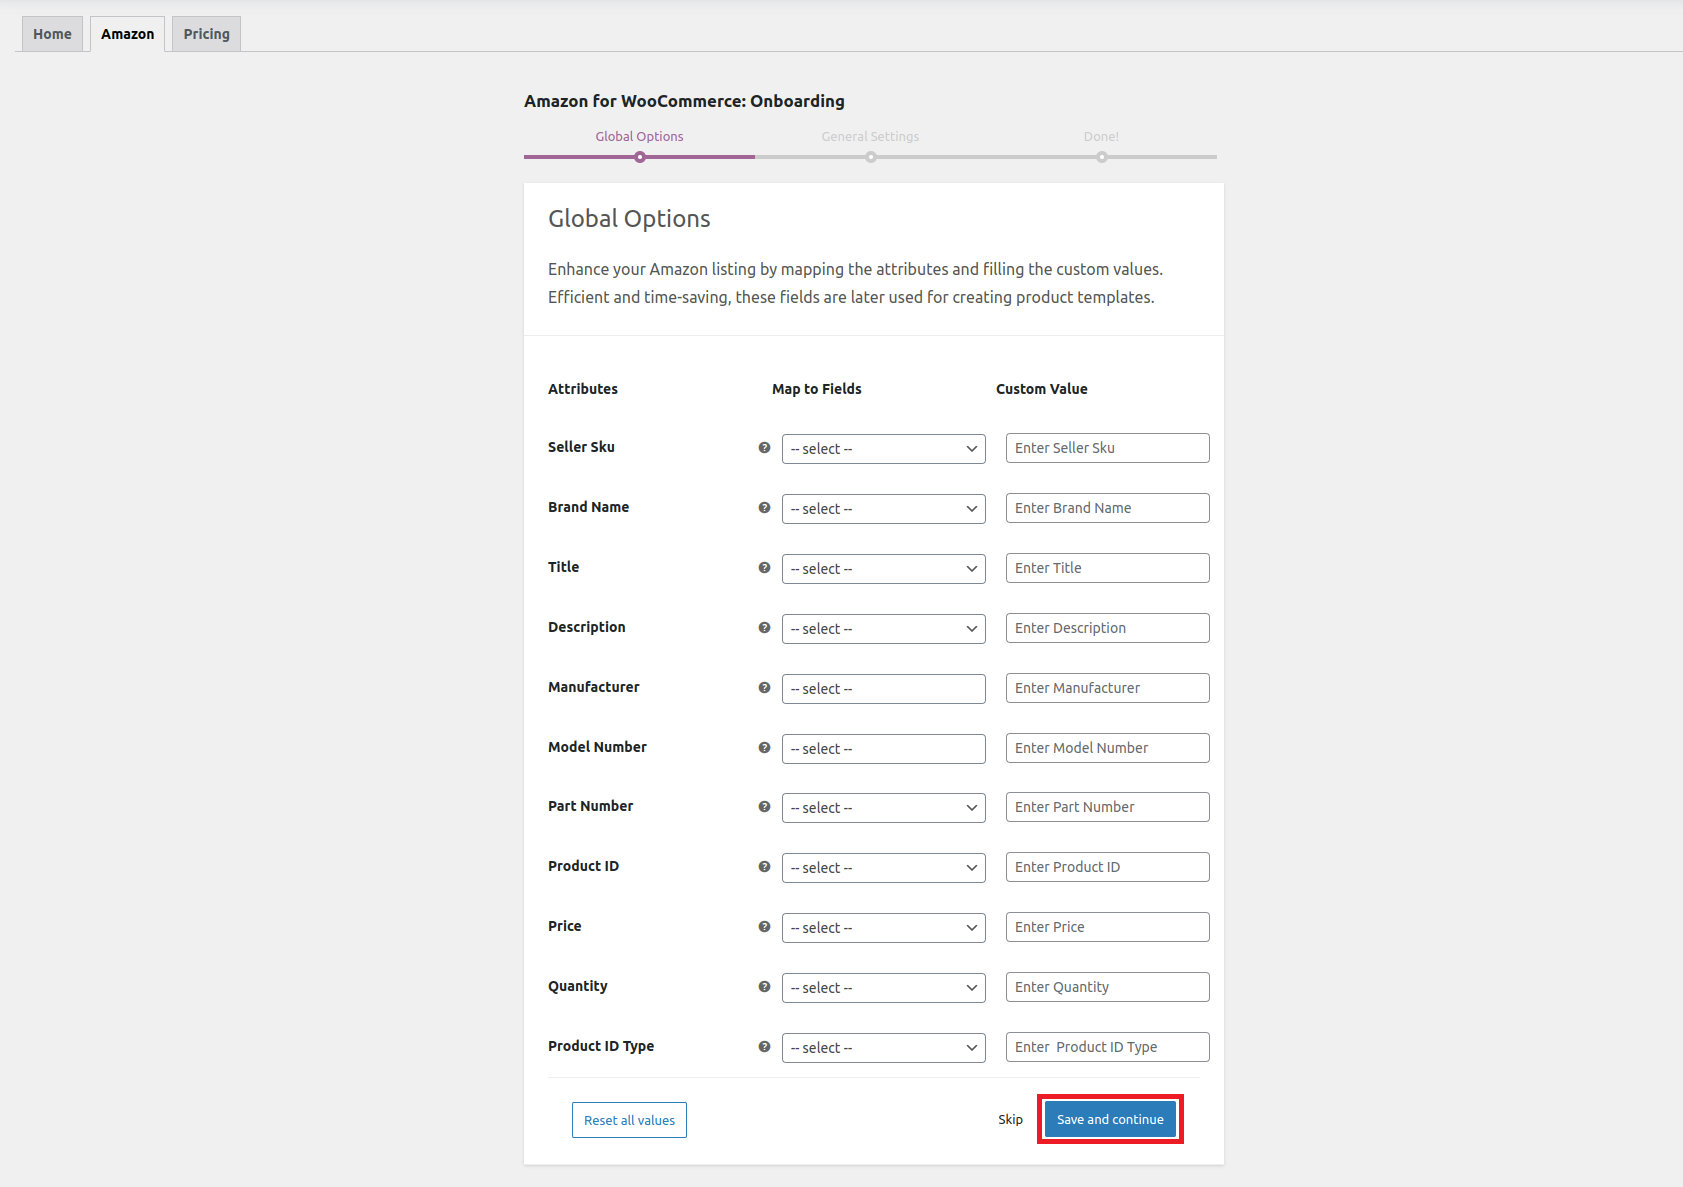
But if the onboarding is successful it will take you to the Global Options to set up Attributes, Field Mapping, and Custom values if required. The Global Options will help you save loads of time and effort while creating product templates at any later point of time.
Assign fields and enter custom values wherever required to complete the attribute mapping and proceed to click on Save and continue to finish the Global Options Settings.
Also, you can skip the section or reset all the entered values as per your preference.
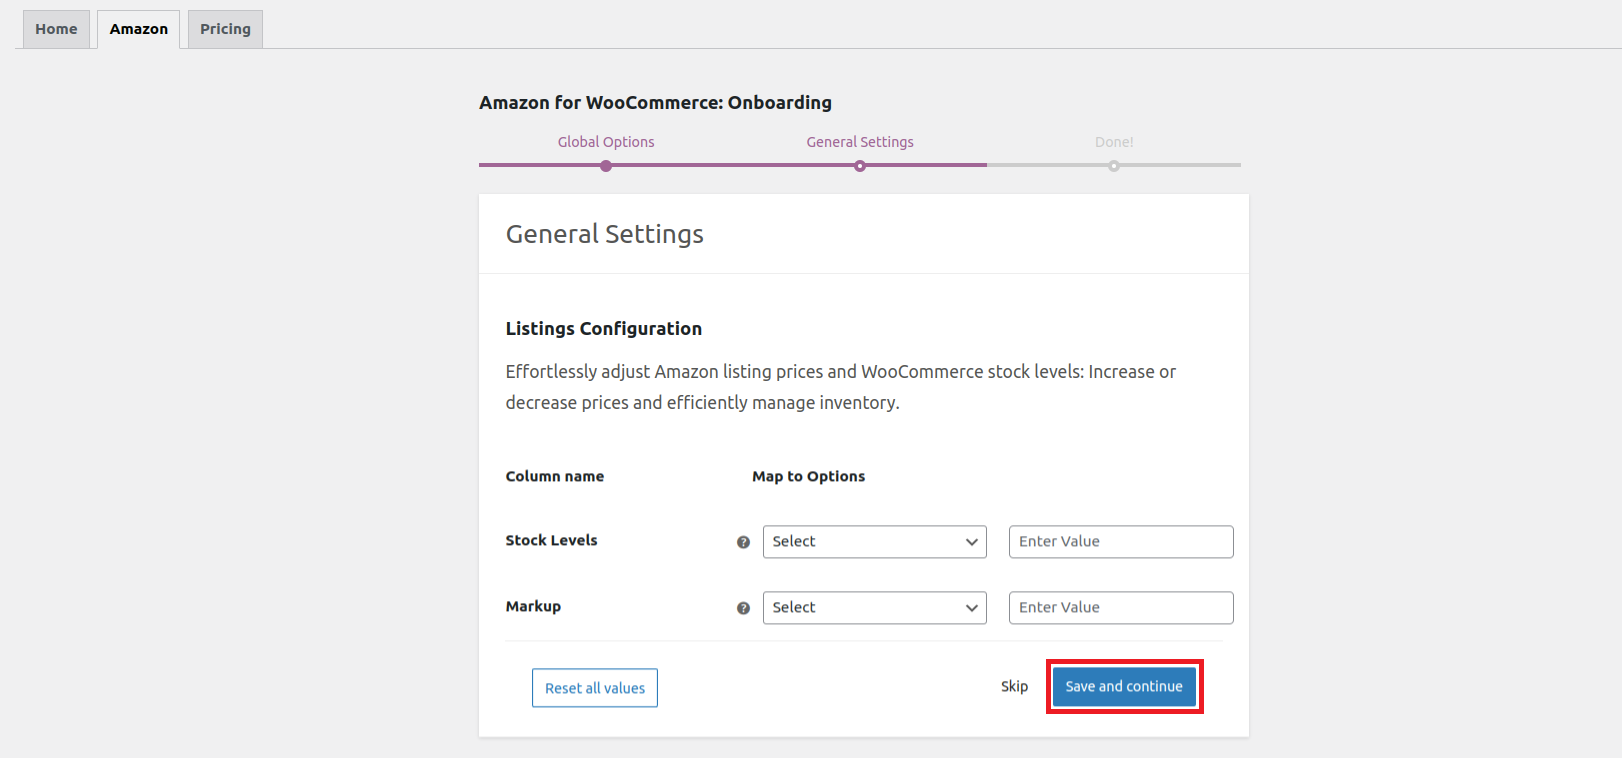
Once done with the Global Options, the next step is to complete the General Settings for Listing Configuration.
Here you need to adjust inventory stock levels and the markup prices of your listings before they get displayed on the Amazon marketplace.
Under the stock levels, you can assign the maximum stock quantity while under the markup section, you get to choose from 4 different variations of price markups which include-
- Fixed increment
- Fixed decrement
- Percentage Increment
- Percentage decrement
Once done with the selection click Save and continue to complete the onboarding process. Also, you can skip the section or reset all the entered values as per your preference.
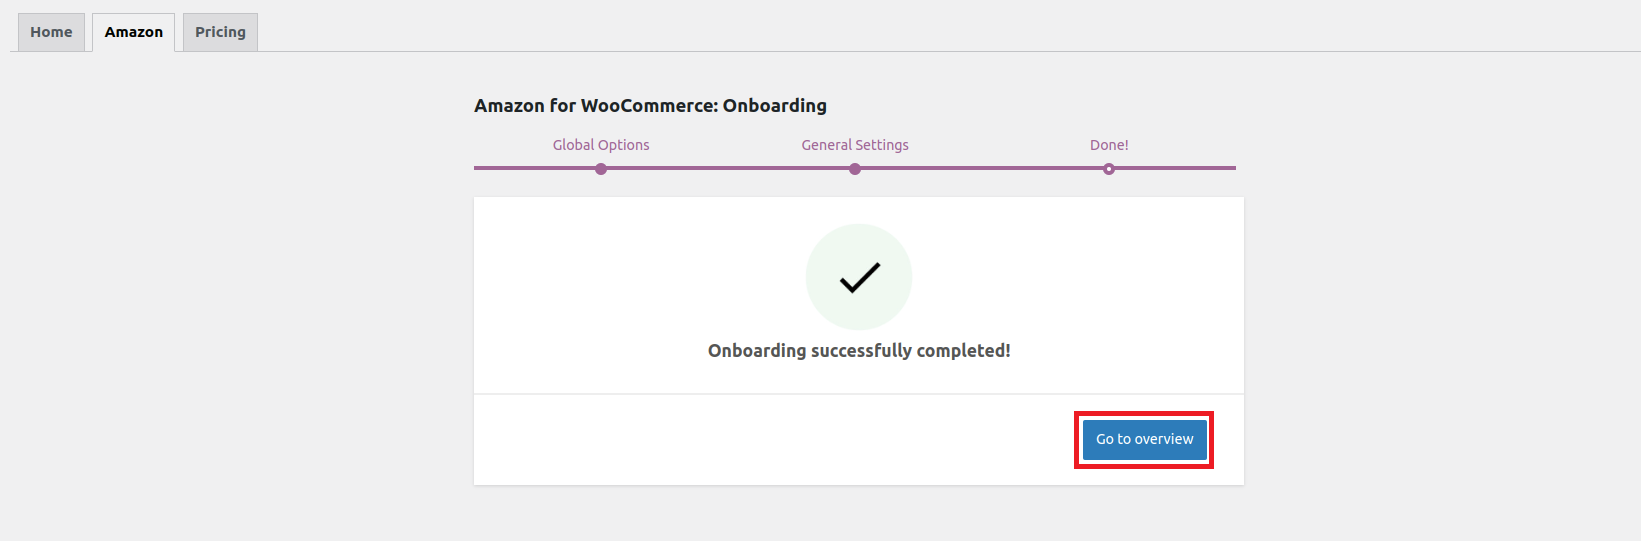
The successful completion of the onboarding process will be displayed as highlighted in the image below. You can now proceed to other settings of the plugin by clicking on the Go to overview button.
Once the onboarding is done, you now get access to all settings of the plugin. Amazon for WooCommerce has 6 subsections namely –
1)- Overview
2)- Settings
3)- Templates
4)- Products
5)- Orders
6)- Feeds
Overview
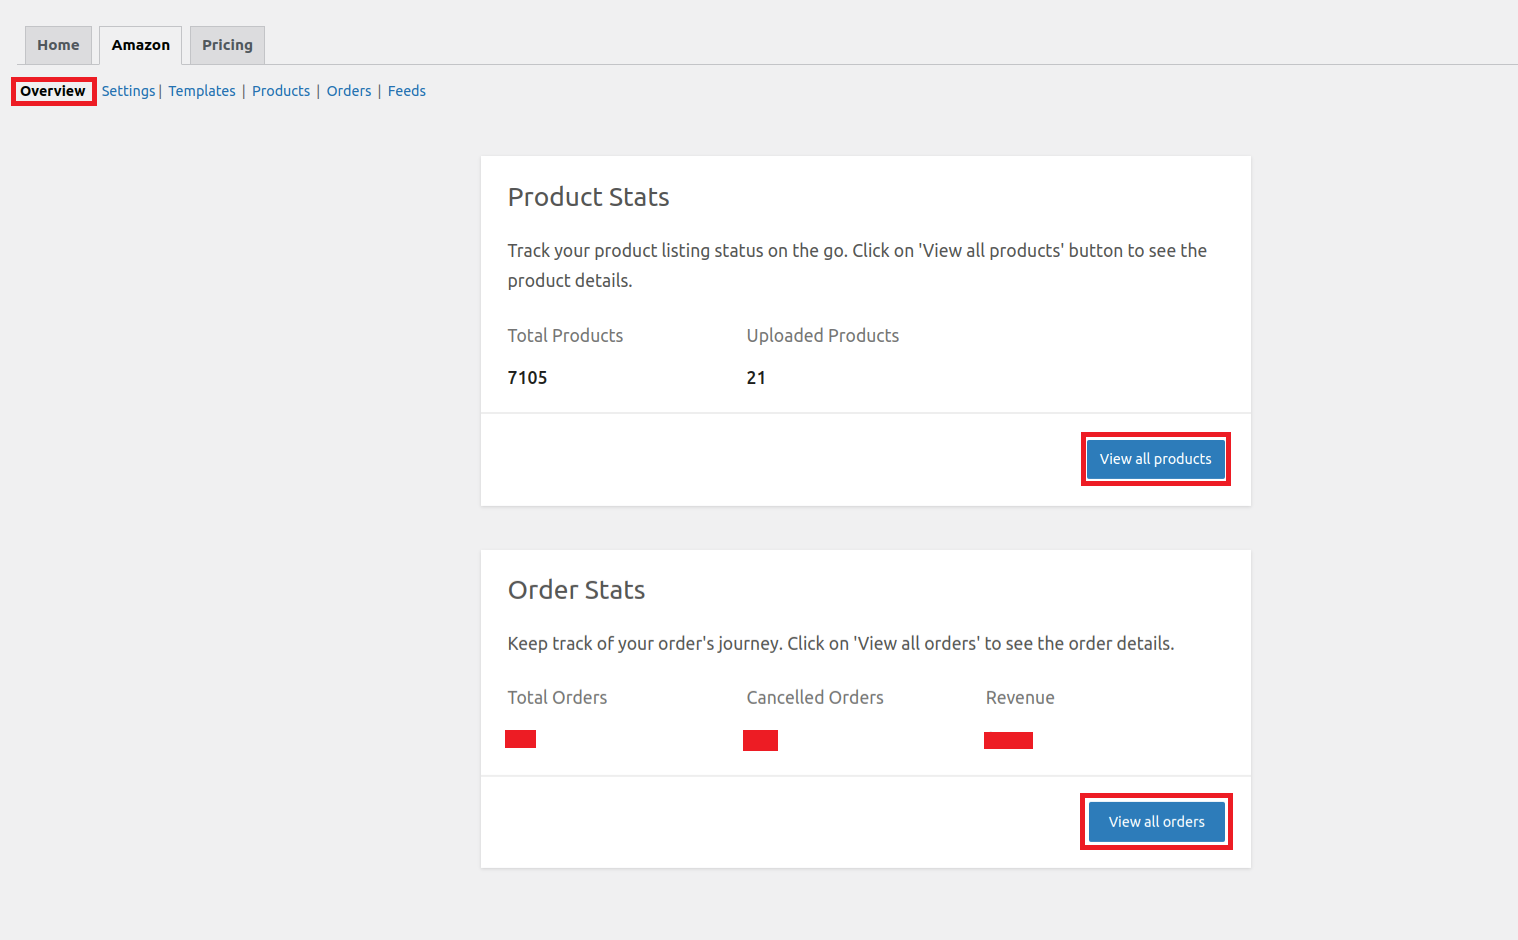
↑ Back to topThe overview section provides you with accurate data on Products and Orders.
- Product Stats
This will assist you in tracking your product listings on the go. Under the product stats, you can see the total number of products along with the uploaded products. You can also view all your products in detail by clicking on the View all products button.
- Order Stats
Under the order section, you can have an overview of total orders placed, canceled orders, and the revenue generated. For more crisp information related to orders, you can click View all orders.
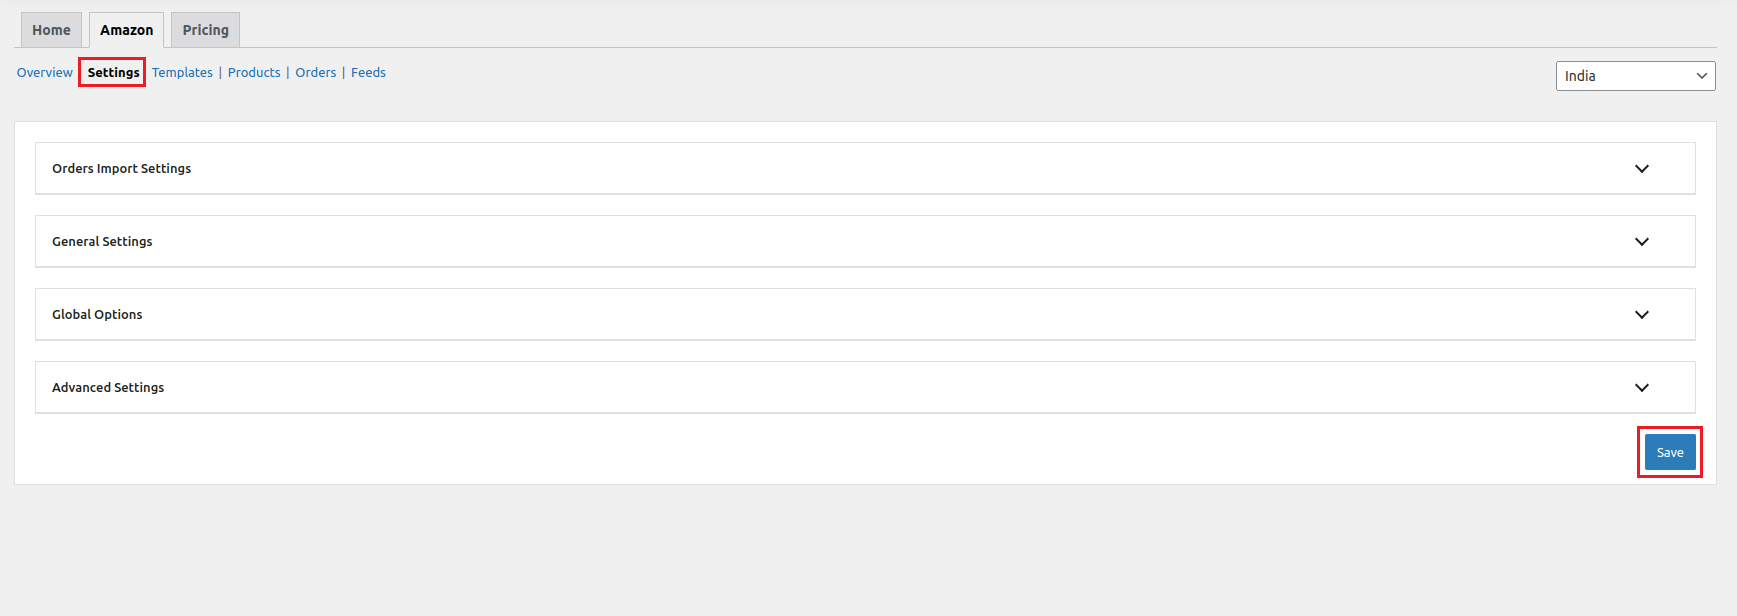
Settings
↑ Back to topThe settings section is divided into 4 subsections namely-
- Orders Import Settings
- General Settings
- Global Options
- Advanced Settings
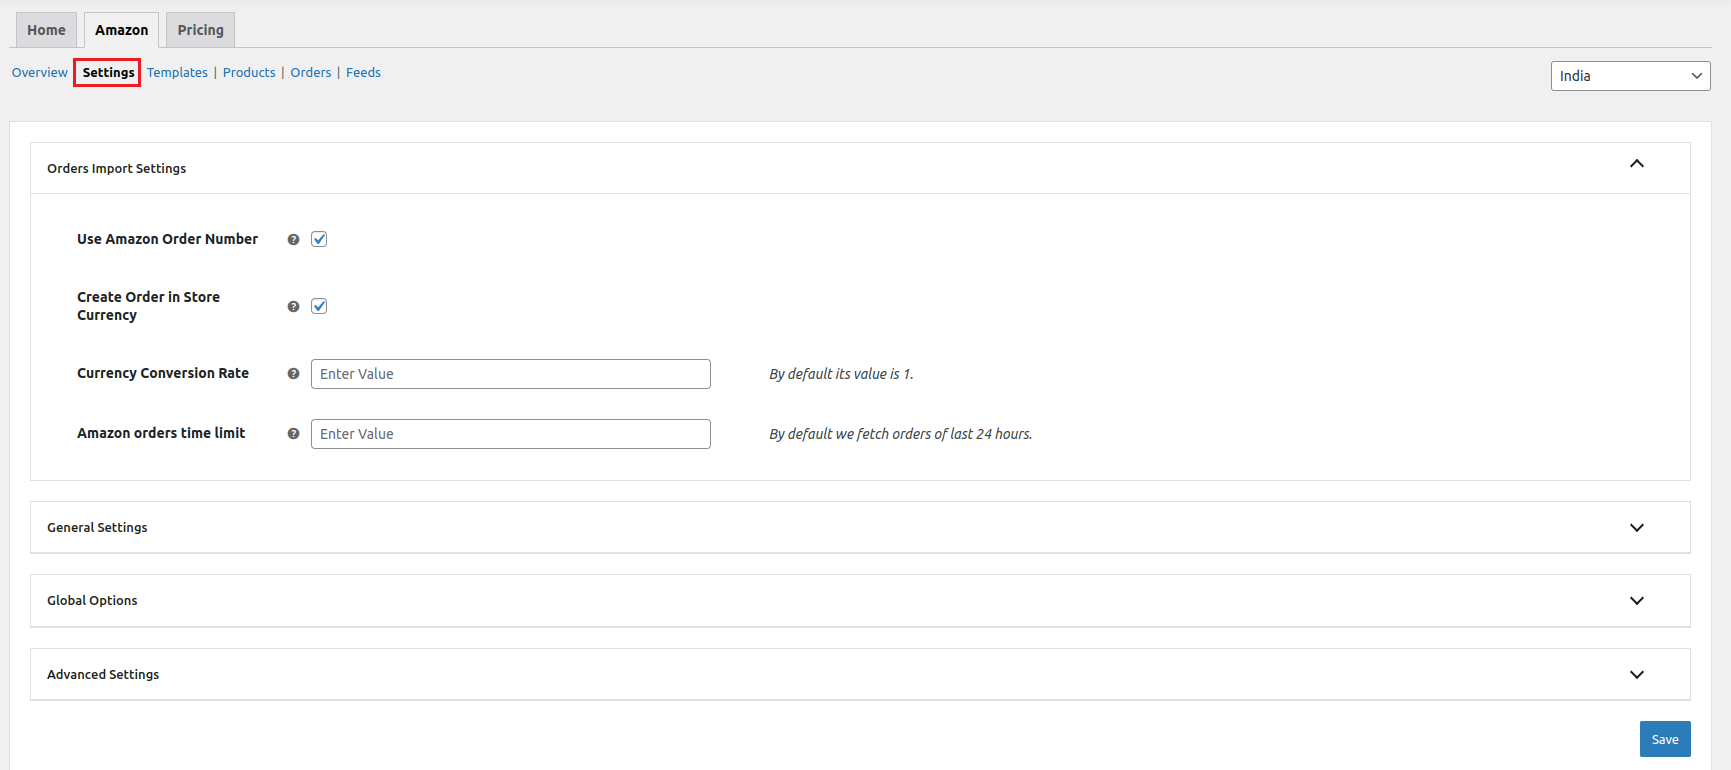
Orders Import Settings
This subsection has-
- Use Amazon Order Number: Enabling this option will display Amazon order numbers inside your WooCommerce orders section once you fetch all the orders generated on Amazon to WooCommerce.
- Create Order in Store Currency: Enable this feature if you wish to create orders on your WooCommerce dashboard in a currency based on your store’s region. Clicking on this will open up the currency conversion rate option. You need to enter a conversion value here to effectively convert order values into your regional currency.
- Amazon Orders Time Limit: Fetch Amazon orders to your WooCommerce dashboard of a certain time period as entered by you.
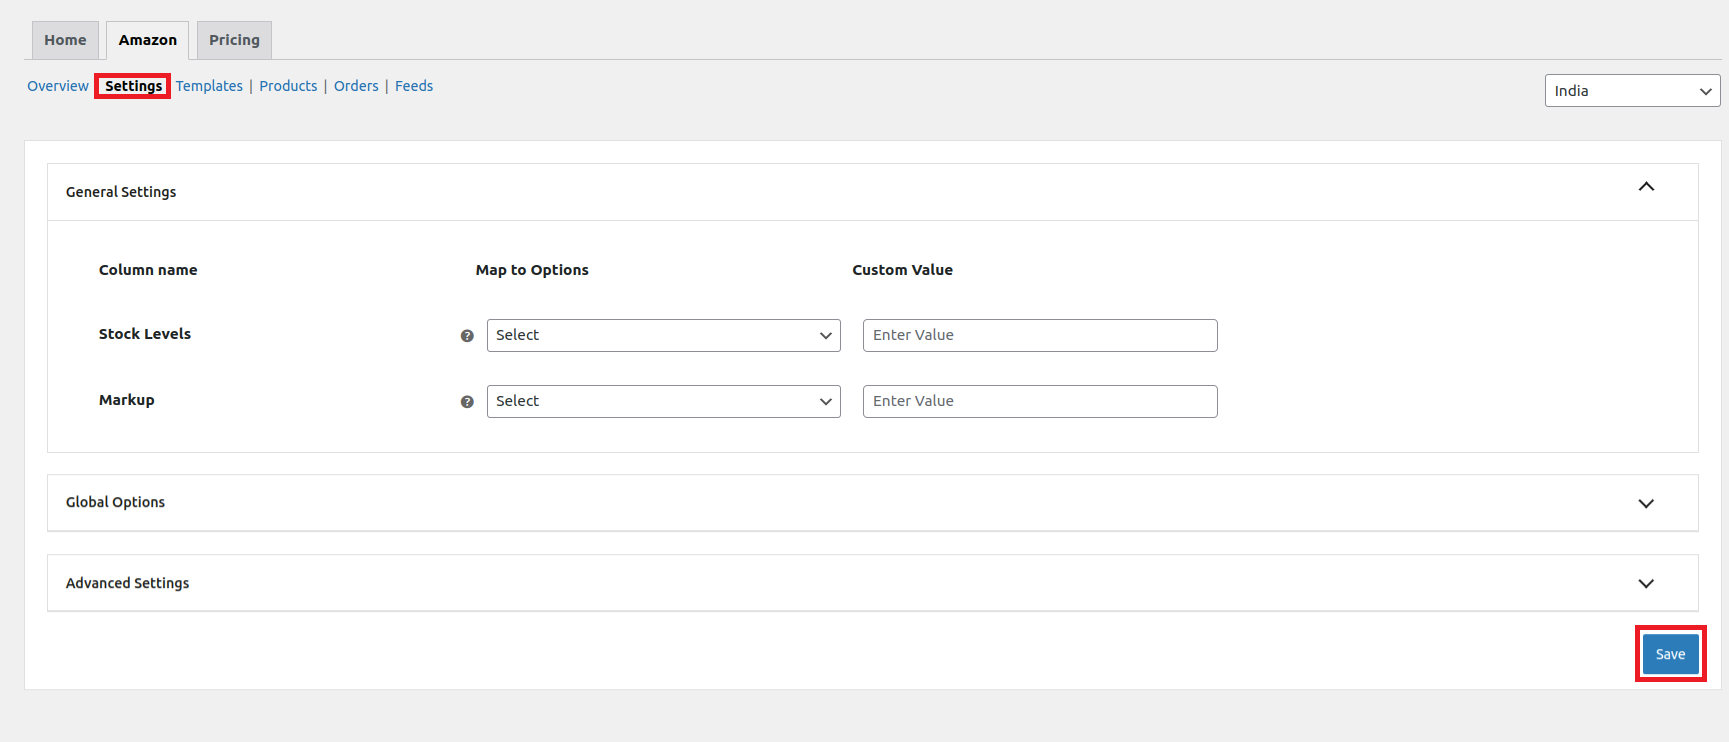
General settings
The general settings cover all the essential options you need to make your product listings shine when uploading products from WooCommerce to Amazon.
- Stock Levels: For sellers with a large inventory in WooCommerce, you can now choose to list only a portion of your products on Amazon. Set a cap on the quantity to ensure that you maintain control over your stock levels.
- Markup: Price adjustments are made easily with our price markup tool. You can assign fixed values or percentage markups to increase or decrease the prices of your Amazon listings without altering the WooCommerce product prices.
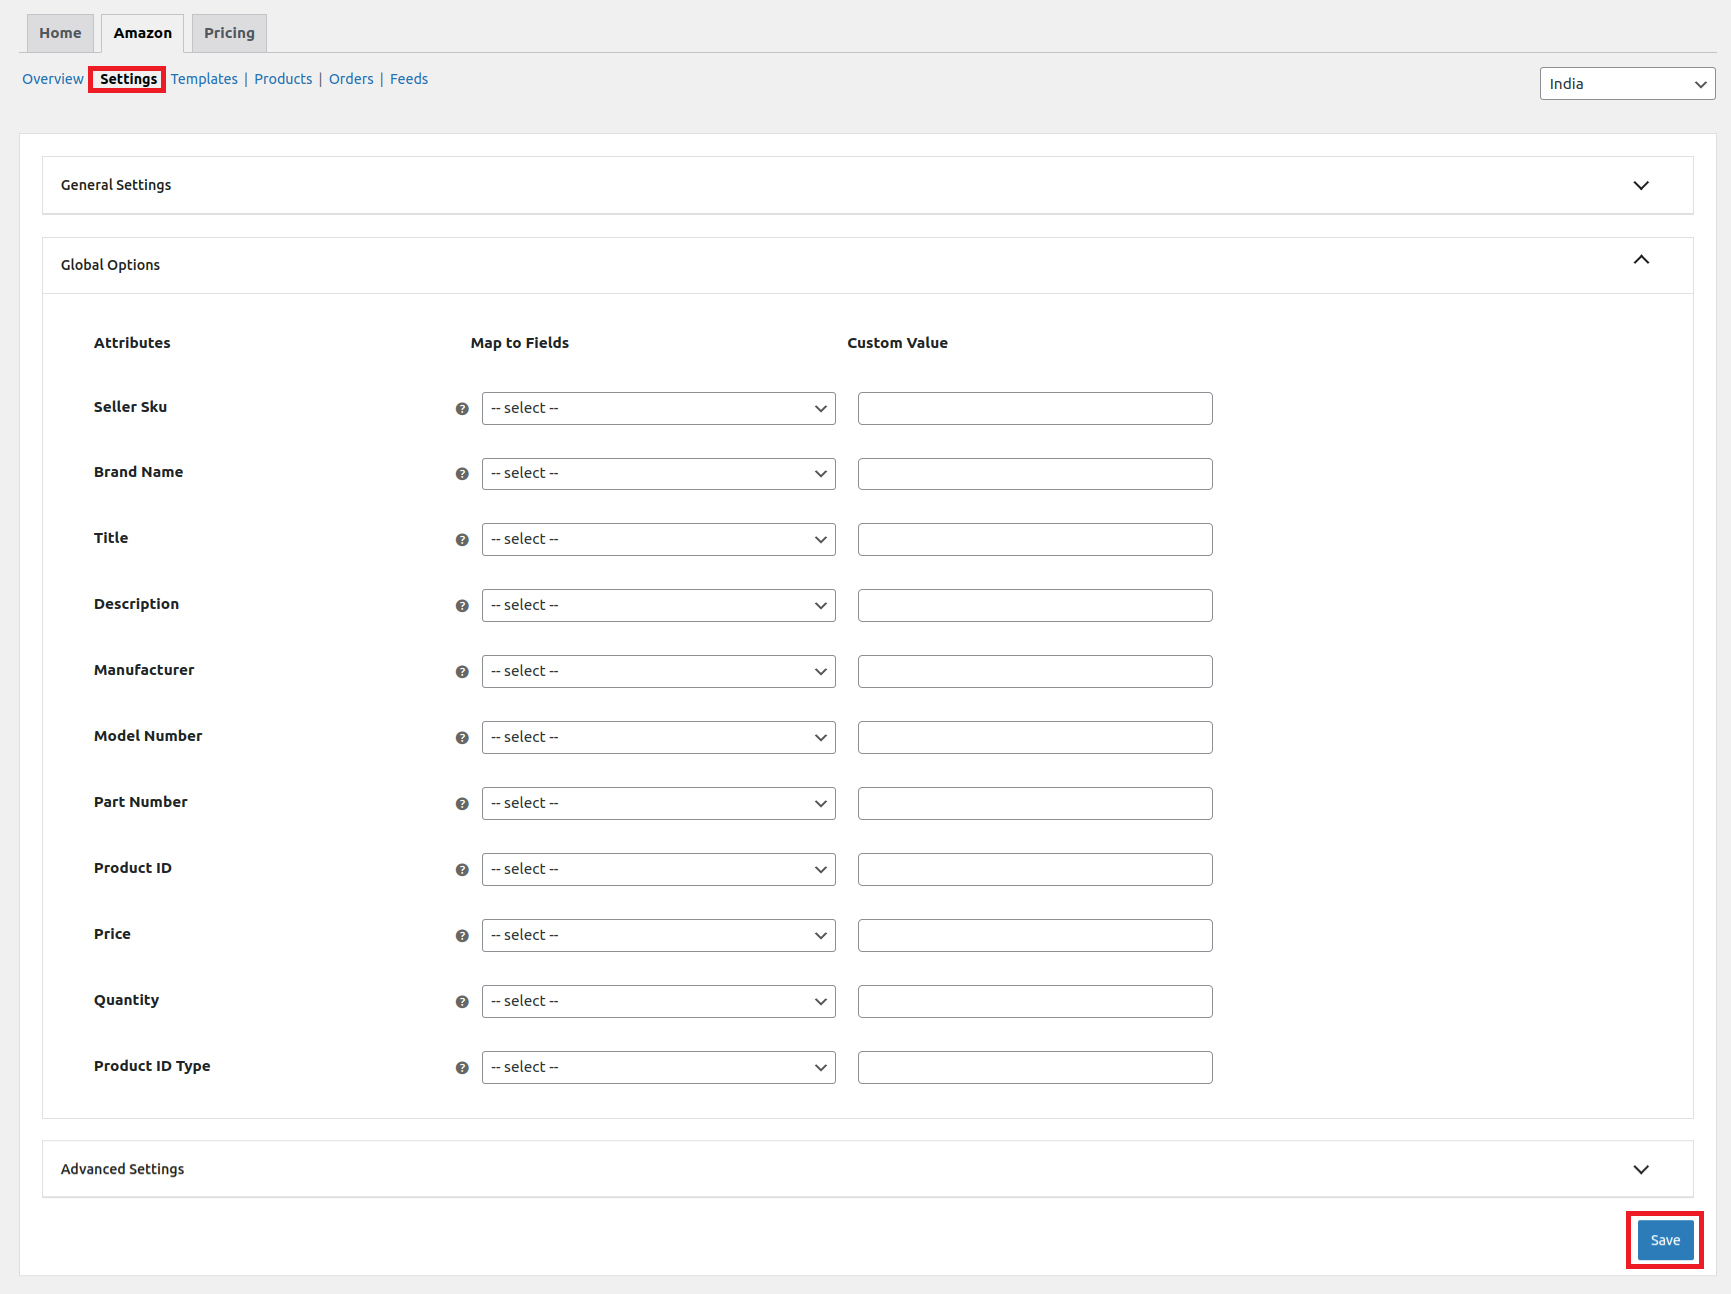
Global Options
Fields under the Global Options are not mandatory yet we encourage you to fill this voluntarily.
There are attributes like- Seller SKU, Brand Name, Title, Description, Manufacturer, Price, Quantity, etc. These attributes function as template fields, effectively eliminating the need for repetitive input. The fields within the global options are automatically populated in all the product templates created by a seller, thereby eliminating the requirement for repetitive administration or data entry across multiple templates.
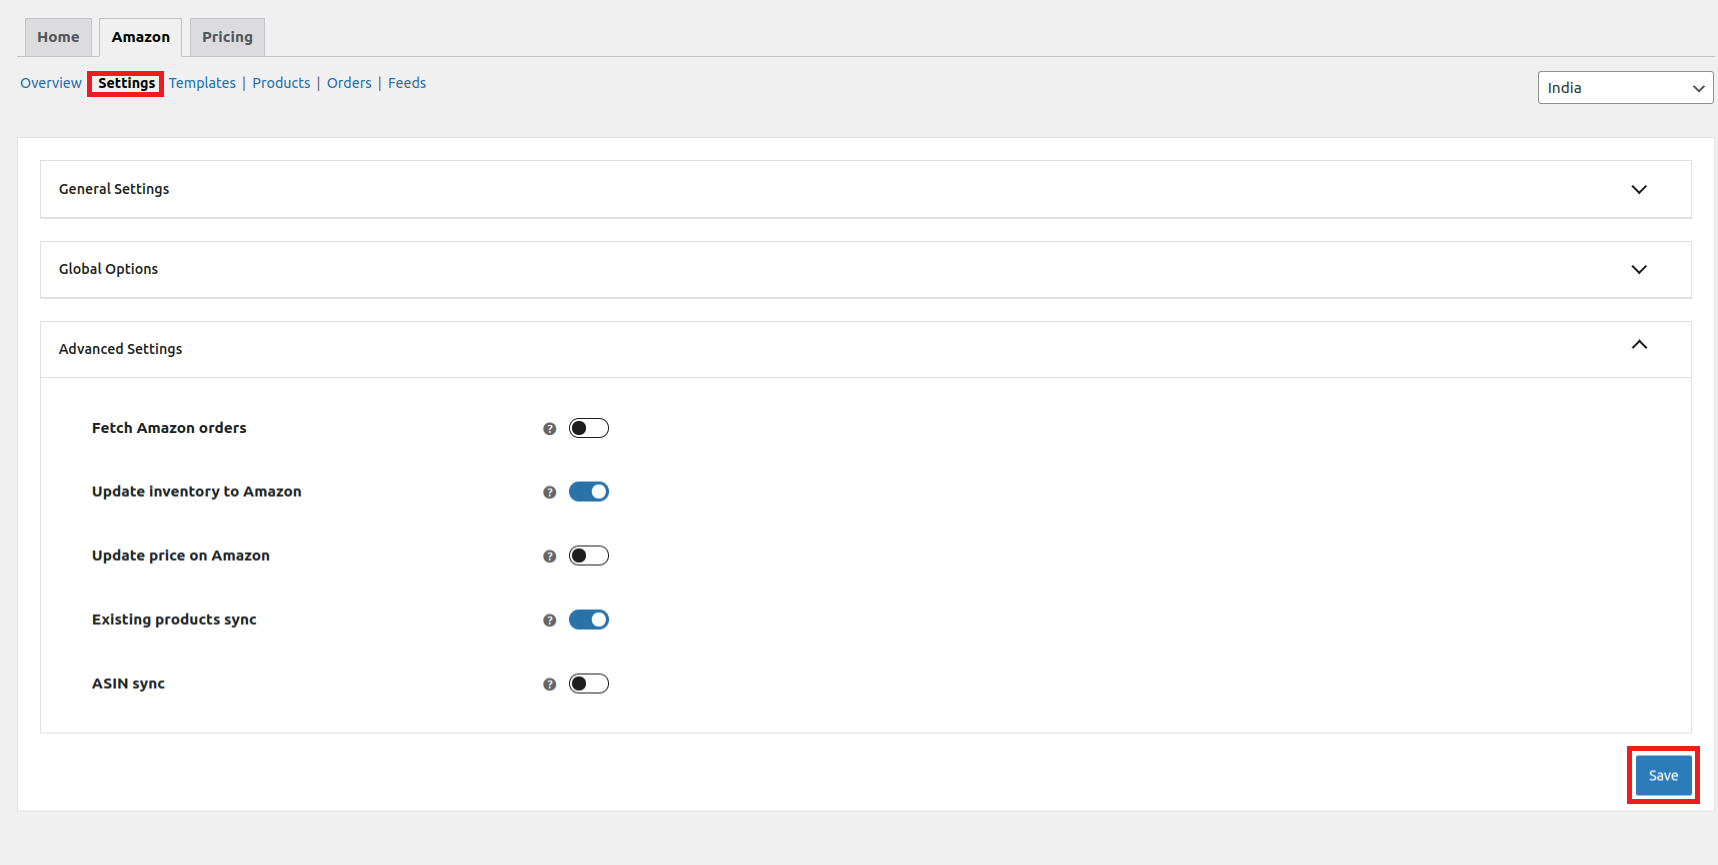
Advanced Settings
With the Advance Settings feature, you can make sure that your WooCommerce and Amazon store are perfectly in sync, without any errors getting in the way. These settings help you to-
- Fetch Amazon Orders
To make sure your WooCommerce store and Amazon are perfectly synced, it’s super important for the products in your store and the ones ordered on Amazon to have the same SKUs. When these SKUs match up, everything will flow smoothly between both platforms.
- Update inventory on Amazon
With matching SKUs, the stock in WooCommerce seamlessly syncs with the corresponding Amazon listing. You can easily track the status of these stock updates in the feeds section, ensuring your inventory remains up-to-date and in sync across both platforms.
- Update Price on Amazon
It is of utmost importance to regularly update the pricing of your products on Amazon in order to maintain accuracy and ensure that they are up-to-date. By doing so, you can effectively reflect any alterations in cost, promotions, or market conditions. This practice not only helps to keep your product listings competitive but also enhances the overall shopping experience for potential customers.
- Existing Product Sync
The Existing Product Sync feature is designed to seamlessly sync the ASIN of your Amazon listings to the corresponding WooCommerce listings by relying on the SKUs (Stock Keeping Units). This synchronization process functions smoothly when the SKUs of your WooCommerce listings match up with those on Amazon.
- ASIN sync
With the ASIN sync, you can sync the ASIN of Amazon catalog products to the corresponding WooCommerce products on the basis of UPC/ EAN or other product identifiers to connect your WooCommerce items with your Amazon listings. Just enable the scheduler and choose the right identifier from the dropdown menu to start the synchronization process.
Once done with all the subsections of the Settings tab click the Save given at the bottom right corner. This will complete and save all the changes that you have made under the Settings section.
Templates
↑ Back to topUnder this section, you can create templates by mapping your WooCommerce product categories with the Amazon categories. Multiple templates can be created for your several WooCommerce categories or you can even clone any existing template.
To create a product template, start by clicking on the Create new template.
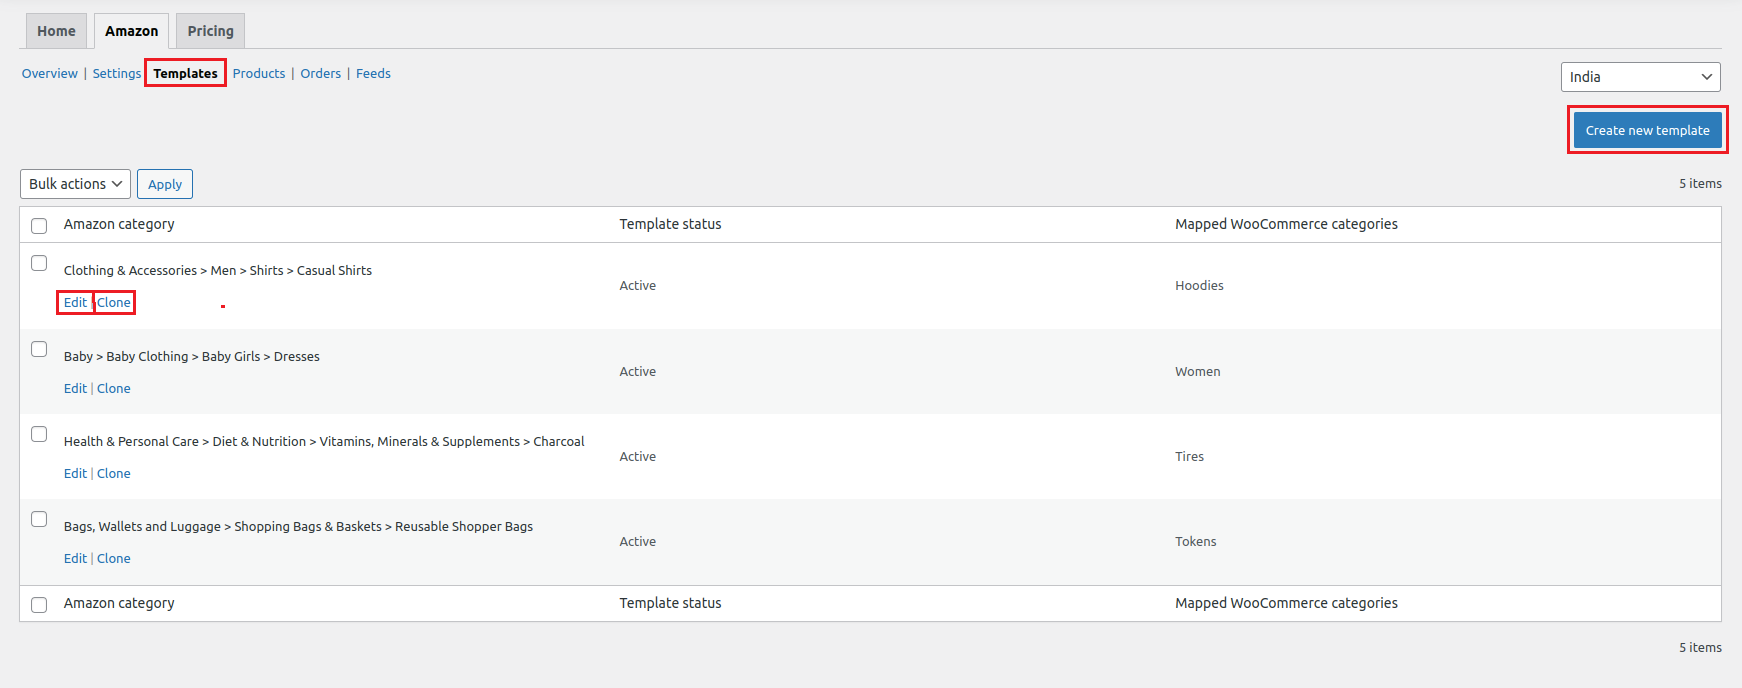
You will be redirected to a new page wherein you can map your WooCommerce category with the respective Amazon category.
Once done with filling all the details, hit Save Template. The created template will now reflect under the Templates section. Moreover, the Refresh template button is used to fetch the latest or updated Amazon template attributes or fields.

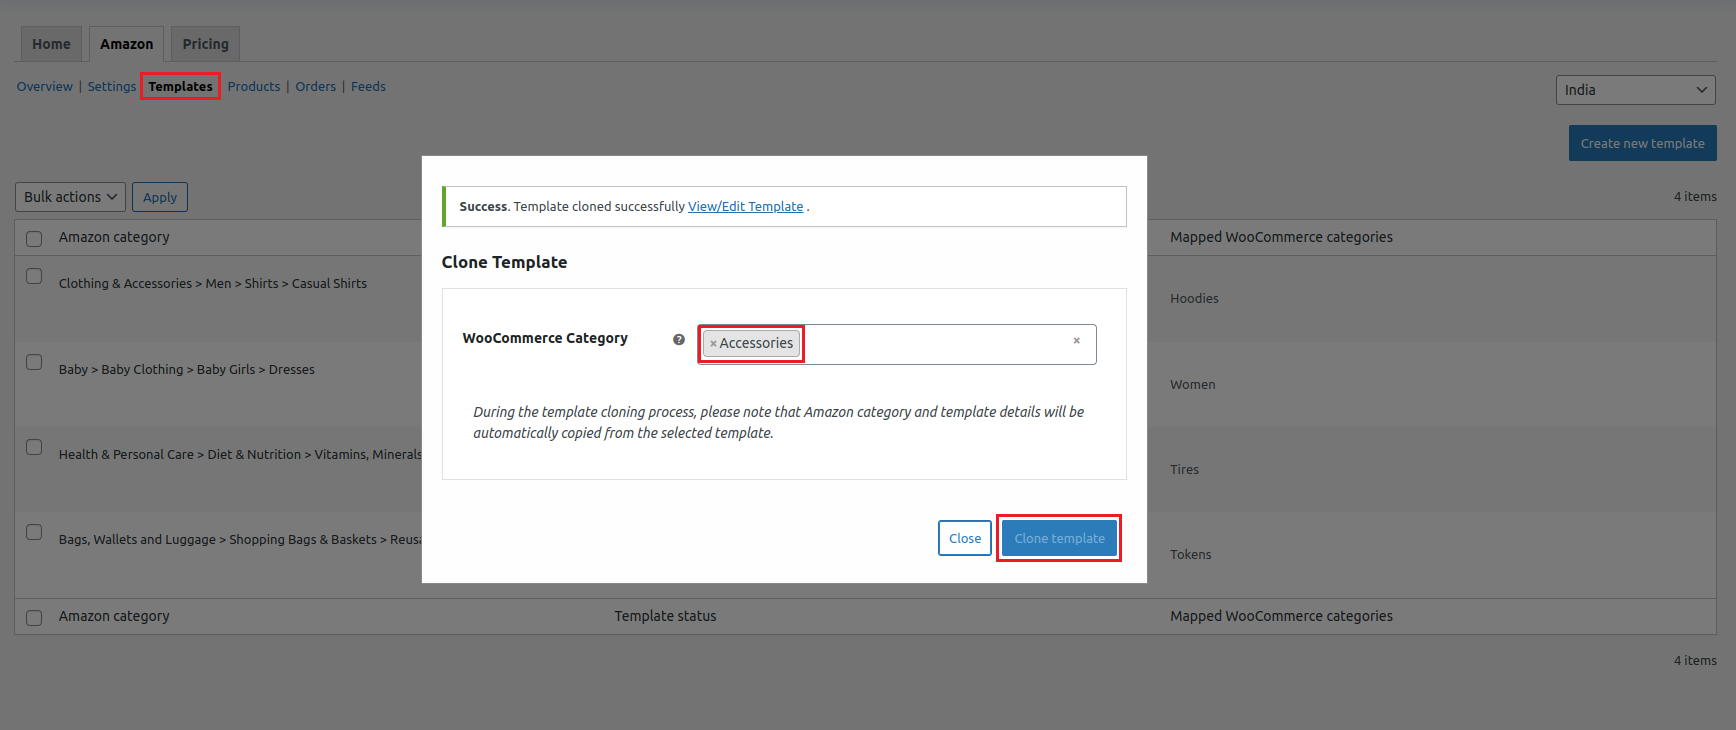
To clone an existing template click on Clone which is next to the Edit button. A popup page will open up wherein you have to select a WooCommerce category while the rest will remain the same.
Here we are trying to clone the first template for your reference which is-
Clothing & Accessories > Men > Shirts > Casual Shirts – Hoodies (WooCommerce category)
Into
Clothing & Accessories > Men > Shirts > Casual Shirts- Accessories (New WooCommerce category)
Once the WooCommerce category is done (eg- Accessories) click Clone template and a success message is displayed. Click Close and it will automatically refresh the page.
Now, you can clearly see that your template has been cloned with a new WooCommerce category in the templates section as shown in the image below.

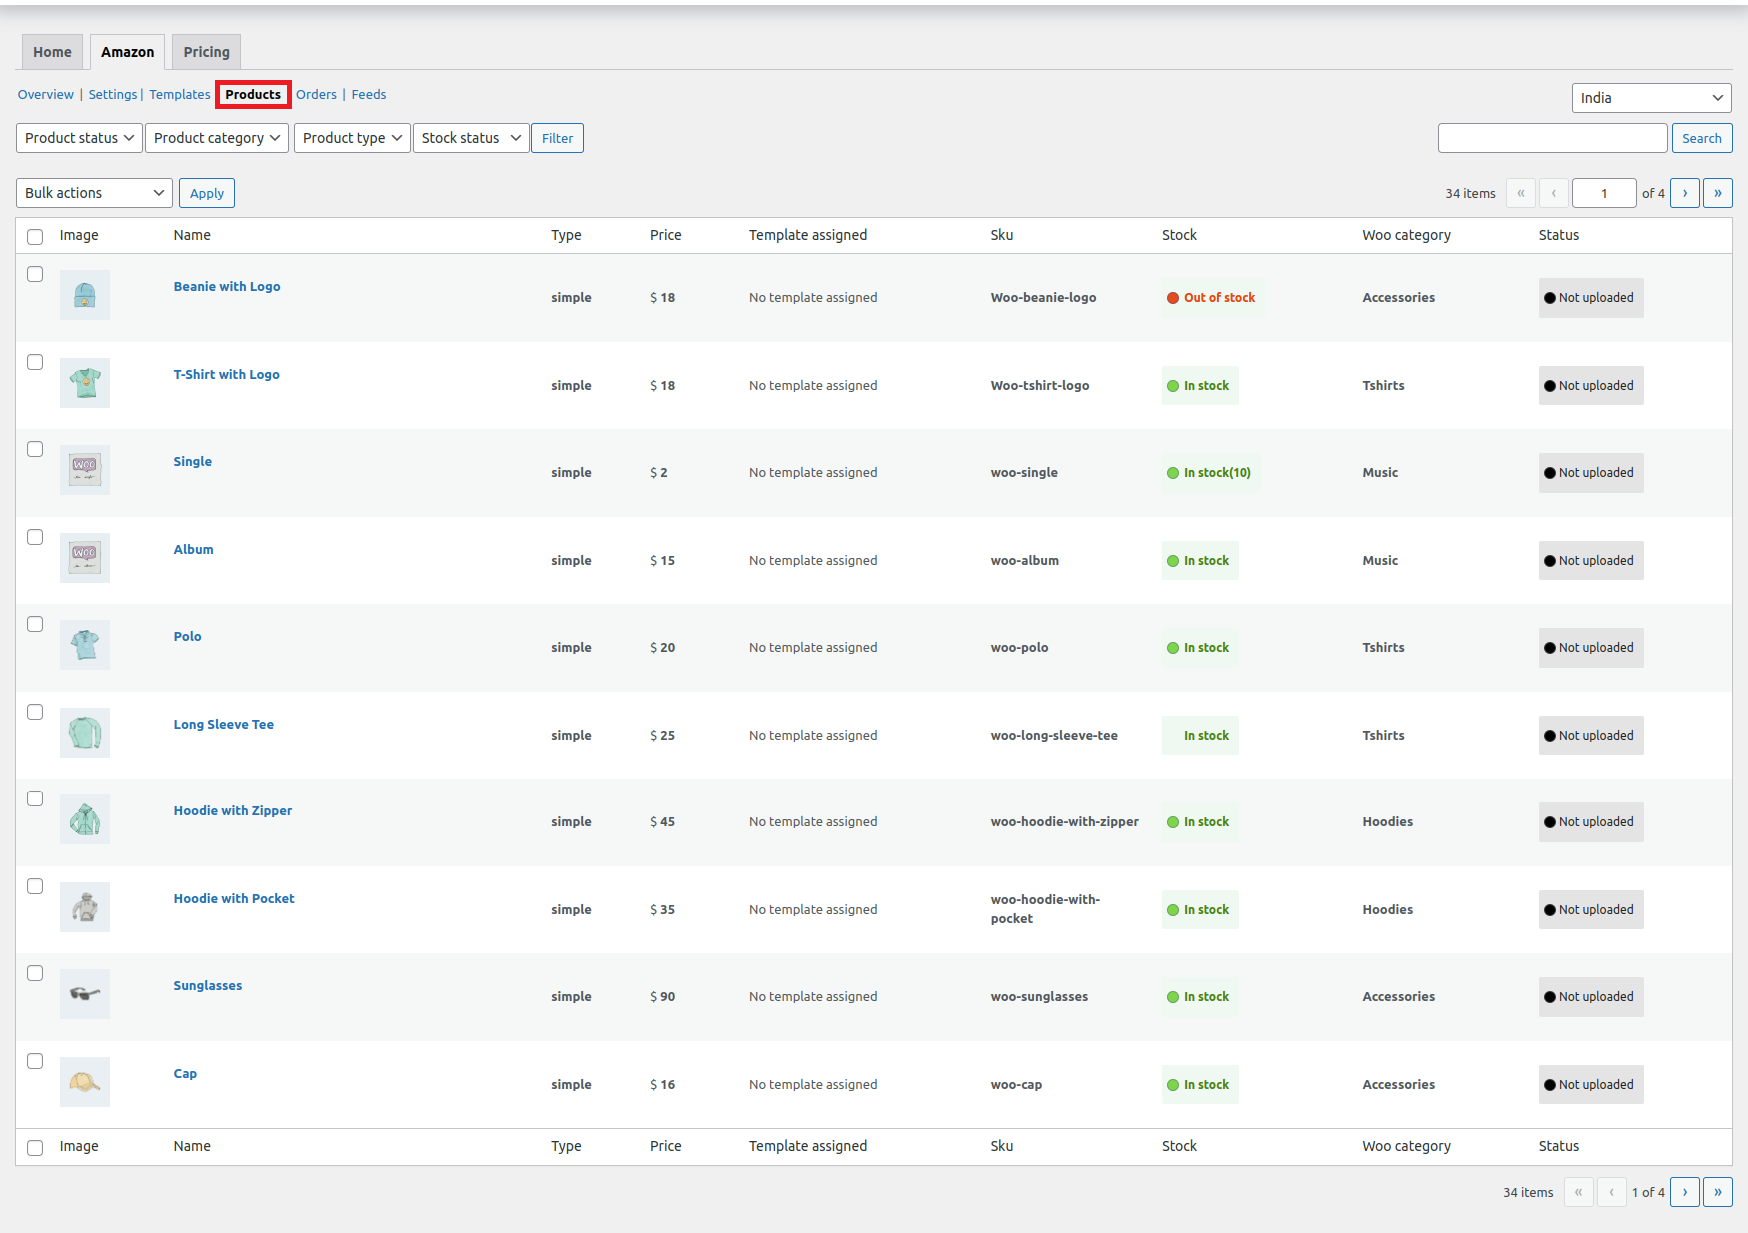
Products
↑ Back to topThe product management section helps you centrally manage all your products. It has all the granular information regarding your products.
It allows you to filter out products based on-
- Product Status
- Product Type
- Product Category
- Stock Status
- Product name
Also, you get to view the product image, name, type, price, template assigned, SKU, stock, Woo category, and status.
Apart from these, you can perform several bulk actions which are listed below-
- Upload: Save time by uploading WooCommerce products in bulk to Amazon. Our robust system eliminates the need for manual input, allowing you to effortlessly transfer multiple product listings from your WooCommerce store to Amazon’s marketplace.
- Relist Product: Choose and relist products on Amazon from WooCommerce. The integration streamlines the process by relisting products by automatically transferring all product details, including images, descriptions, pricing, and inventory levels.
- Update Inventory: Effortlessly update your inventory in bulk by selecting and updating across platforms with the help of a super straightforward interface and easy-to-follow steps.
- Update Price: Simplify the process of updating the price of selected products with bulk updates. This feature not only saves valuable time, but also ensures greater accuracy and consistency
- Update Images: Easily update images in bulk for the selected products using this feature. Users can select the desired products to modify, and then upload new images to replace the existing ones in one swift action.
- Delete Listing: Select and remove listings from Amazon with ease using Amazon for WooCommerce integration.
- Look up on Amazon: Synchronize your ASIN with your WooCommerce products using SKUs by selecting the products and clicking look up on Amazon.
Every action performed under the products section will generate a feed. Feeds help you know the progress of the task being performed. You can view the generated feeds under the Feeds section.
Orders
↑ Back to topOrders generated on Amazon can be fetched to your WooCommerce dashboard with the help of Fetch orders button. Also, you can schedule the syncing of orders using CRON schedulers.
The best part is that the plugin supports HPOS (High-Performance Order Storage). For more detailed information on HPOS, kindly refer to this article- https://developer.woocommerce.com/2022/09/14/high-performance-order-storage-progress-report/
The fetched orders will have all the data, that includes-
- WooCommerce order ID
- WooCommerce status
- Amazon Order ID
- Amazon status
- Ordered Items
- Total
- Fulfillment channel
- Created on
This is how your orders dashboard will look like, once the orders from Amazon are fetched to your WooCommerce dashboard.

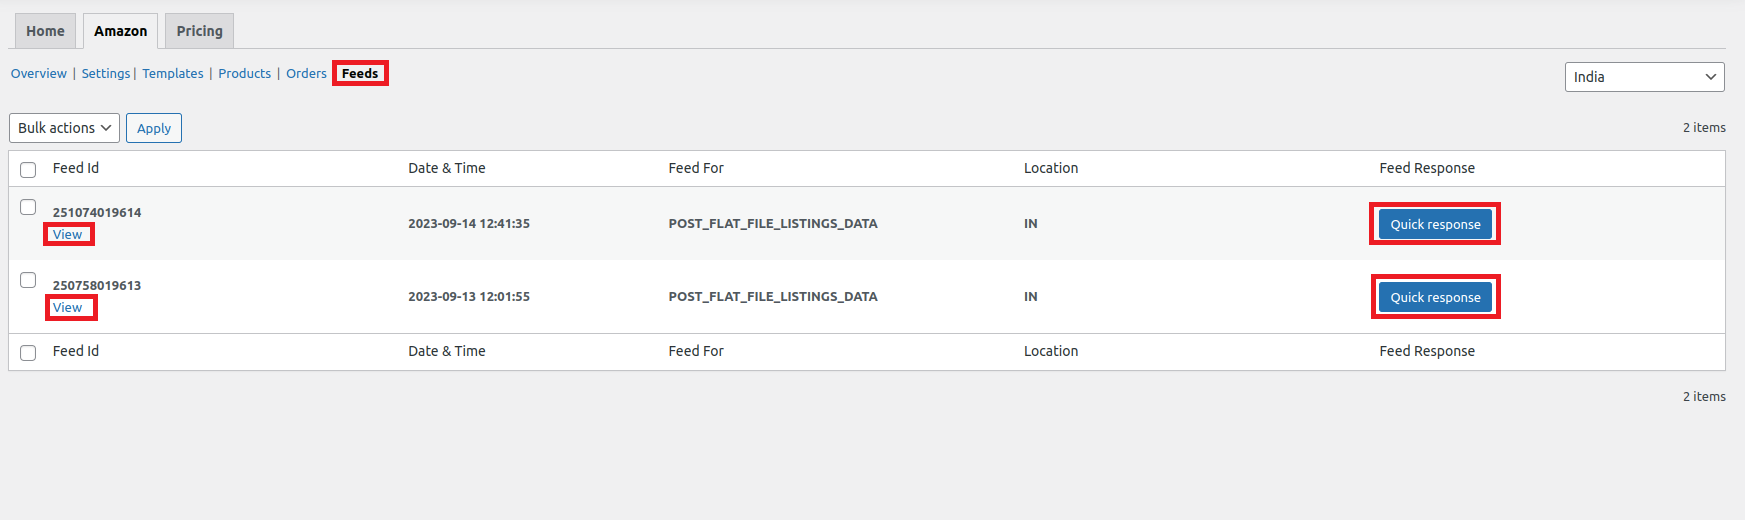
Feeds
↑ Back to topThe Amazon for WooCommerce feeds feature is super helpful for sellers who want to stay on top of their store’s activities like product upload, pricing update, and inventory sync.
You can have a quick look at the feed details either by clicking on the Quick response button or the View option under the feed ID as highlighted in the image below-