NetSuite Integration for WooCommerce creates a secure, two-way connection between your WooCommerce store and your Oracle NetSuite account. It syncs orders, inventory, prices, and customers, supports advanced conditional mapping (currencies, subsidiaries, shipping/payment methods, sales reps, classes, custom fields), and can import products and customers from NetSuite into WooCommerce — eliminating manual data entry.
Every sync runs in the background on a schedule you control and can also be triggered with one click. A complete log records every operation.
Compatible with: WooCommerce 2.2–8.8, WordPress 4.6+, PHP 8.0+ (SOAP extension required) · WooCommerce HPOS: Supported
Overview
↑ Back to topWooCommerce → NetSuite
- Orders → Sales Orders, Cash Sales, Invoices, or Customer Deposits
- Customers → NetSuite customer records (individual or company)
- Refunds → Return Authorizations
NetSuite → WooCommerce
- Inventory / stock and prices (multi-location, multi-currency aware)
- Products / items (titles, descriptions, dimensions, images, custom fields)
- Customers → WordPress user accounts
- Refunds / Return Authorizations
- Shipment tracking (number, carrier, ship date) + automatic customer email
Key Features
↑ Back to top- Order sync as Sales Order, Cash Sale, Invoice, or Customer Deposit — with coupon, tax, shipping, location, and price-level mapping.
- Inventory & price sync on a schedule (hourly / twice-daily / daily) or on demand, across all, default, or selected NetSuite locations.
- Product import from NetSuite, including images, galleries, dimensions, and custom fields, with per-field create/update control.
- Customer sync to NetSuite as individuals or companies (B2B), with duplicate-safe email and company-name matching.
- Customer import from NetSuite into WooCommerce user accounts.
- Two-way refunds between WooCommerce refunds and NetSuite Return Authorizations.
- Shipment tracking sync with automatic tracking emails and optional order auto-complete.
- Conditional field mapping — fixed value, WooCommerce field, condition-based, plus shipping- and payment-method mapping. No code required.
- Encrypted credentials, detailed API logs, settings import/export, and WooCommerce HPOS compatibility.
Requirements
↑ Back to top- WooCommerce 2.2+ (tested to 8.8) and PHP 8.0+ with the SOAP extension enabled
- An active NetSuite account with SuiteTalk (SOAP) + REST web services and Token-Based Authentication enabled, plus admin access to create credentials
- No extra setup for imports: Product Import and Customer Import use your existing NetSuite REST Web Services connection — no RESTlet/SuiteScript deployment required
Getting Started
↑ Back to top1. Install and activate
↑ Back to topUpload and activate the plugin, then open NetSuite Integration in the WordPress admin. If you see a notice that the PHP SOAP extension isn’t enabled, ask your host to enable it before continuing.
2. Connect to NetSuite (General Settings)
↑ Back to topThe integration uses Token-Based Authentication (TBA). You’ll enter six values: Host URL, Account ID, Consumer Key, Consumer Secret, Token ID, Token Secret.
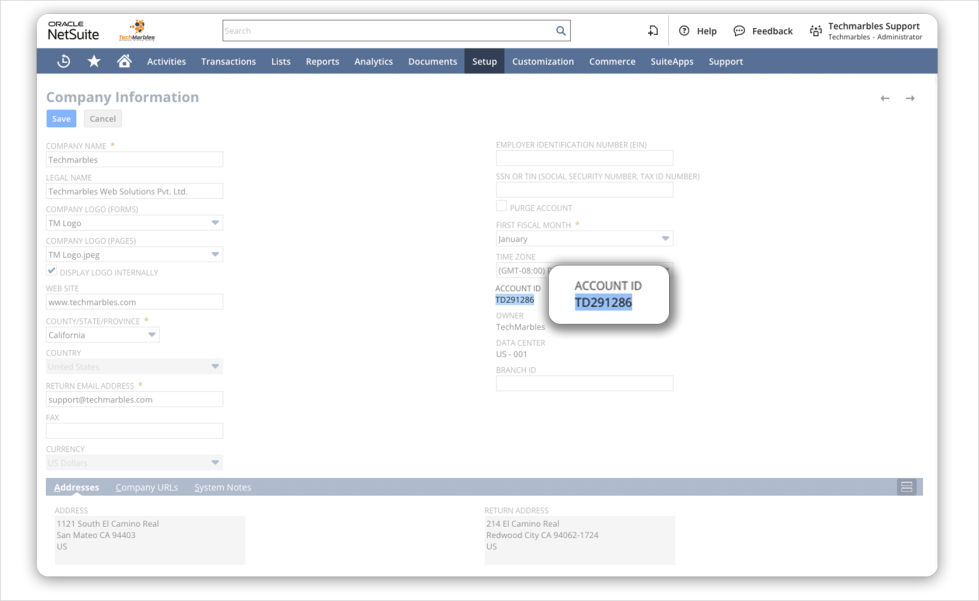
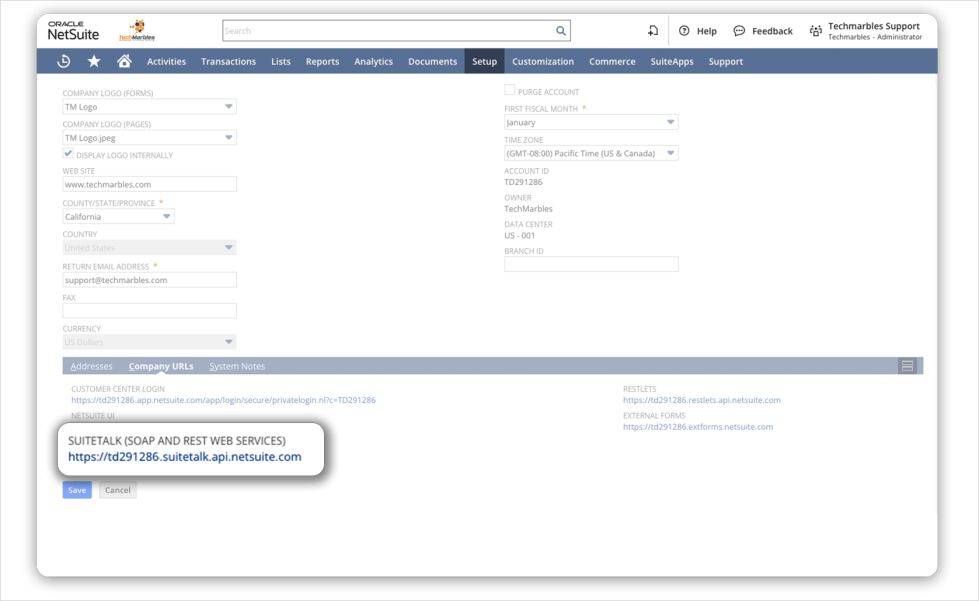
1. Host URL & Account ID — In NetSuite: Setup → Company → Company Information. Copy the Account ID; under Company URLs, copy the SuiteTalk (SOAP and REST Web Services) URL.
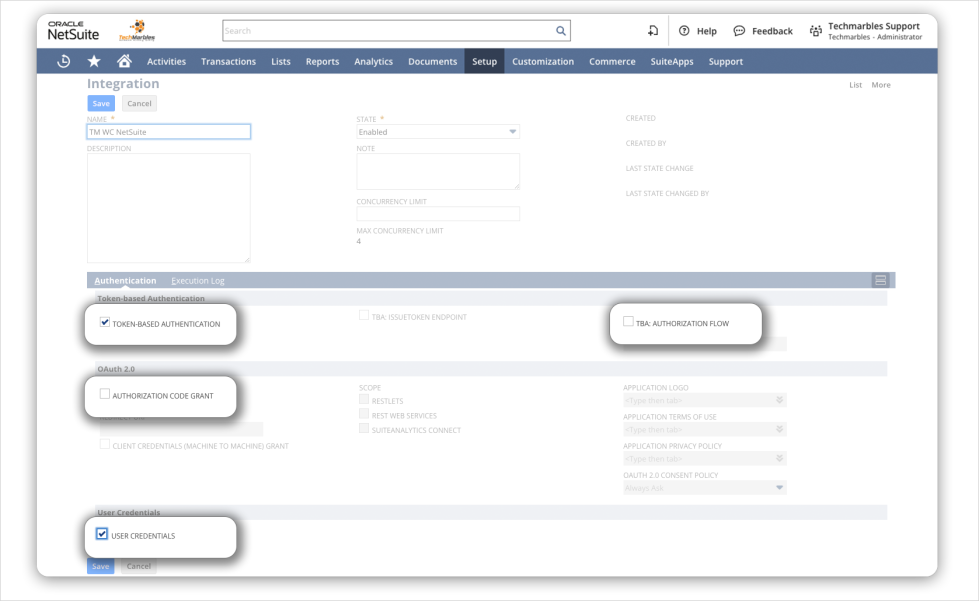
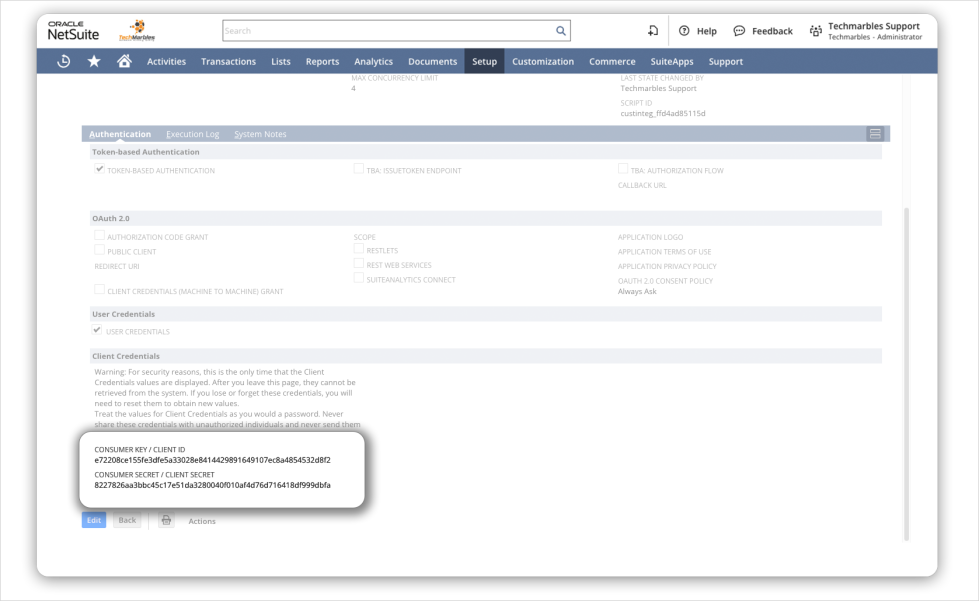
2. Consumer Key & Secret — Setup → Integration → Manage Integrations → New. Name it (e.g. TM WC NetSuite). Uncheck TBA: Authorization Flow and Authorization Code Grant; check Token-Based Authentication and User Credentials. Save and copy the Consumer Key and Consumer Secret (shown once).
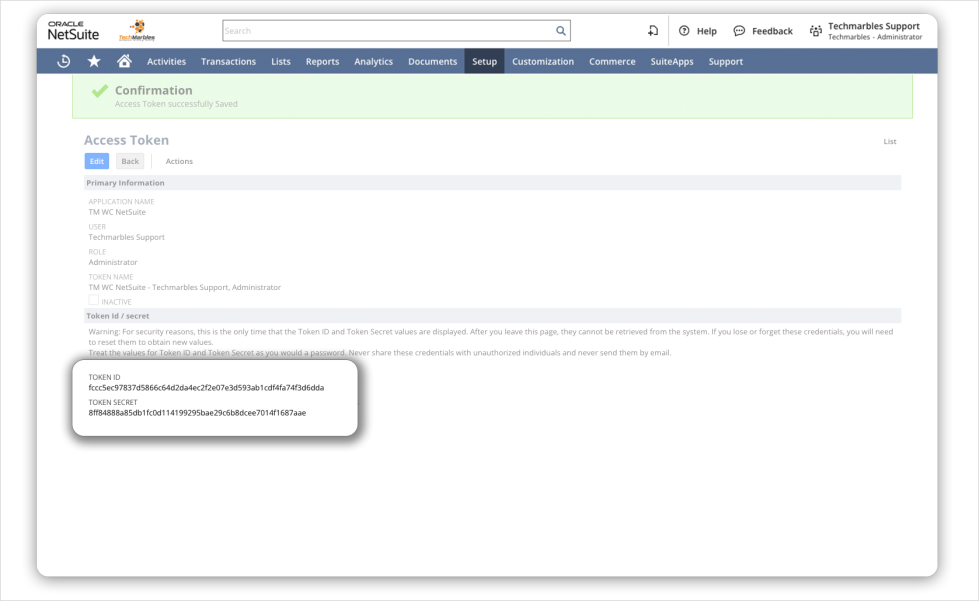
3. Token ID & Secret — Home → Manage Access Tokens → New My Access Token. Select your integration, save, and copy the Token ID and Token Secret (shown once).
4. Click Test API Credentials — success shows “Congrats. API connection is successful.”
Your Consumer and Token secrets are encrypted in the database — never stored in plain text.
Required NetSuite role permissions
In NetSuite, Setup → User Roles → Manage Roles, give the role used for the connection:
| NetSuite tab | Permission | Level |
|---|---|---|
| Transactions | Sales Order | Full |
| Transactions | Item Fulfillment | Full |
| Transactions | Fulfill Sales Order | Full |
| Transactions | Cash Sales | Full |
| Transactions | Find Transaction | Full |
| Reports | SuiteAnalytics Workbook | Full |
| Lists | Items | View |
| Lists | Location | View |
| Lists | Currency | View |
| Lists | Promotions | Full |
| Lists | Shipping Items | View |
| Lists | Customer | Full |
| Lists | Units | Full |
| Setup | REST Web Services | Full |
| Setup | User Access Tokens | Full |
| Setup | Integration Application | Full |
| Setup | SOAP Web Services | Full |
| Setup | Accounting Lists | Full |
Inventory & Price Sync
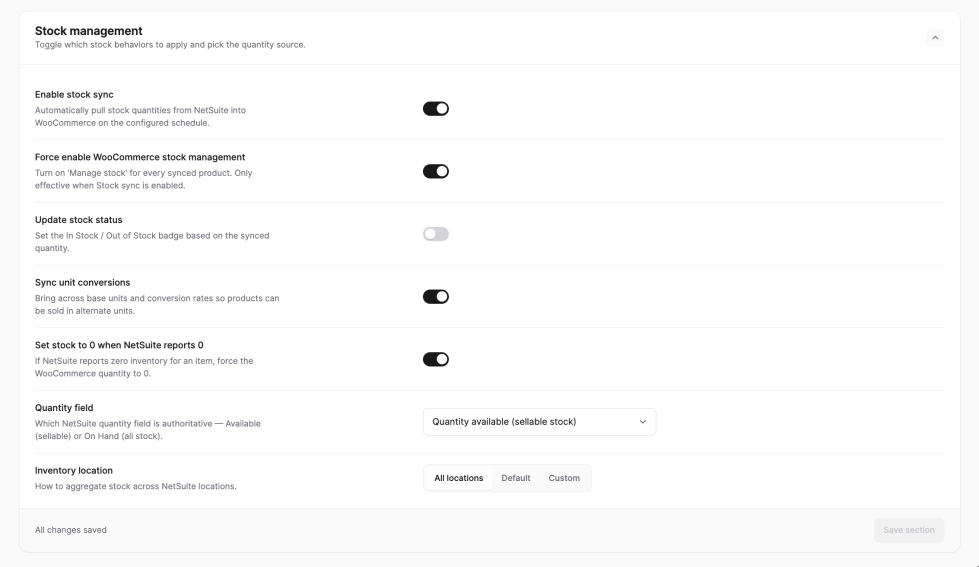
↑ Back to topUnder Inventory Settings:
- Enable Stock Sync and set the frequency (Hourly, Twice Daily, Daily).
- Inventory Location: All Location, Default Location, or Selected Location (quantities merged).
- Inventory Quantity Field: Quantity on Hand or Quantity Available.
- Override Manage Stock and Update Stock Status to control how quantities and stock status are applied.
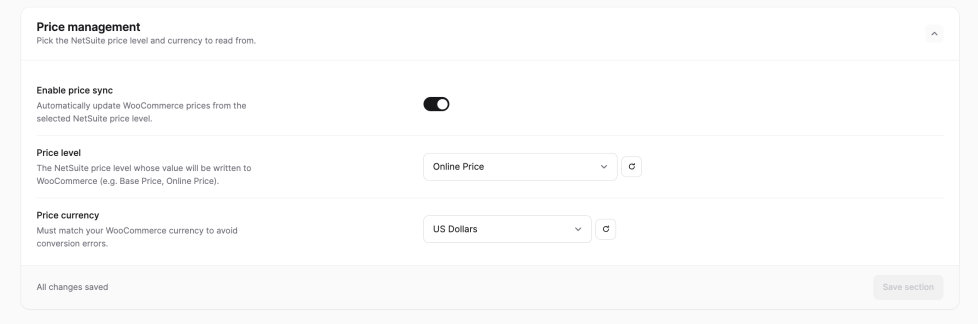
- Enable Price Sync and pick the Price Level Name.
- Map Product SKU by Item ID, UPC code, Display Name/Code, Vendor Name/Code, or a Custom Field (enter the NetSuite custom field ID).
Use Manual update inventory and(or) price for an immediate run.
Use Remove NetSuite IDs to delete the previously saved internal IDs of the NetSuite items from the WooCommerce database.

Customer Sync (incl. Company Accounts)
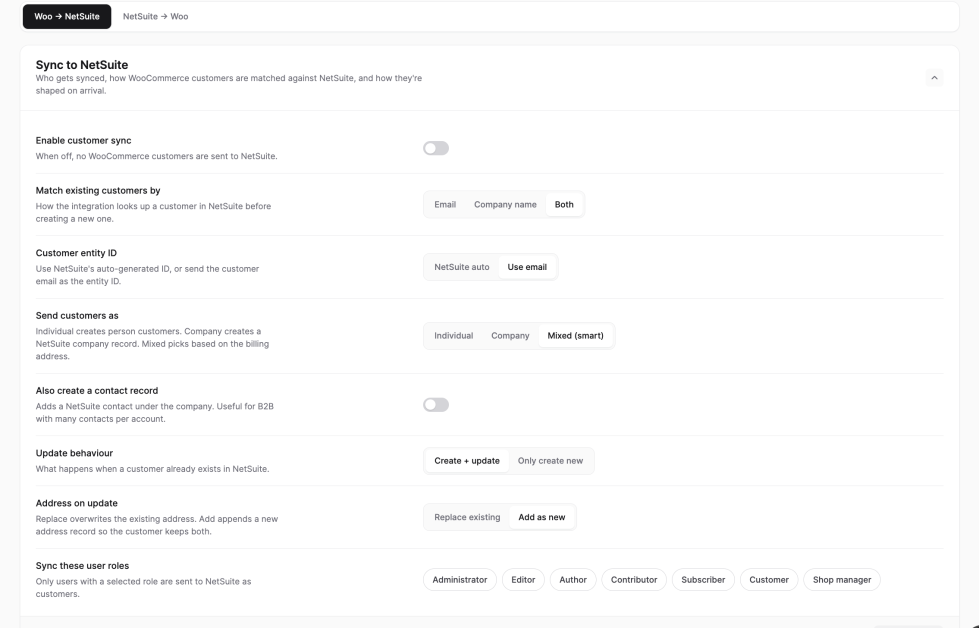
↑ Back to topUnder Customer Settings:
- Enable Customer Sync (on register, profile update, or order) and select eligible user roles.
- Send Customers as Company — send shoppers as company entities; choose all customers or only when the billing address has a company name (company name falls back to first + last name).
- Is NetSuite Customer Entity ID auto generated? — when on, NetSuite assigns the Entity ID; when off, the customer’s email is used.
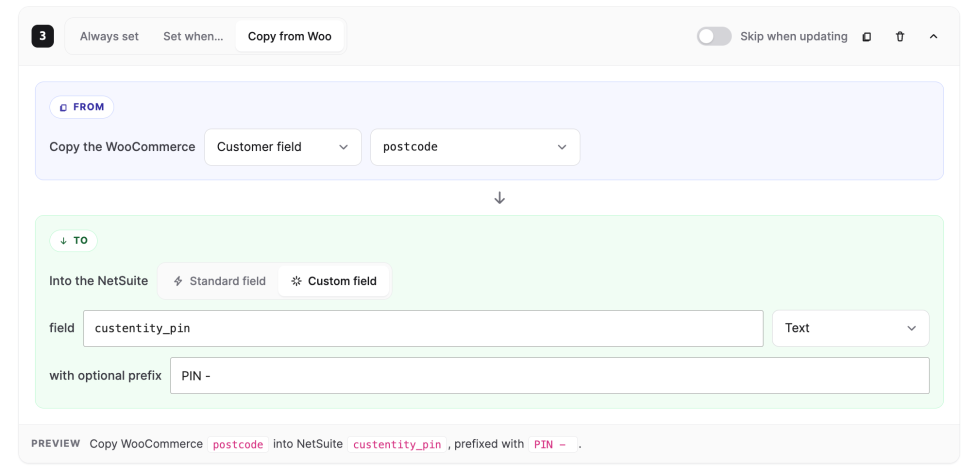
Conditional mapping (customers)
↑ Back to topSame three operations:
a. fixed value based on a WC condition (Where: IS / IS NOT / CONTAINS / DOES NOT CONTAIN):
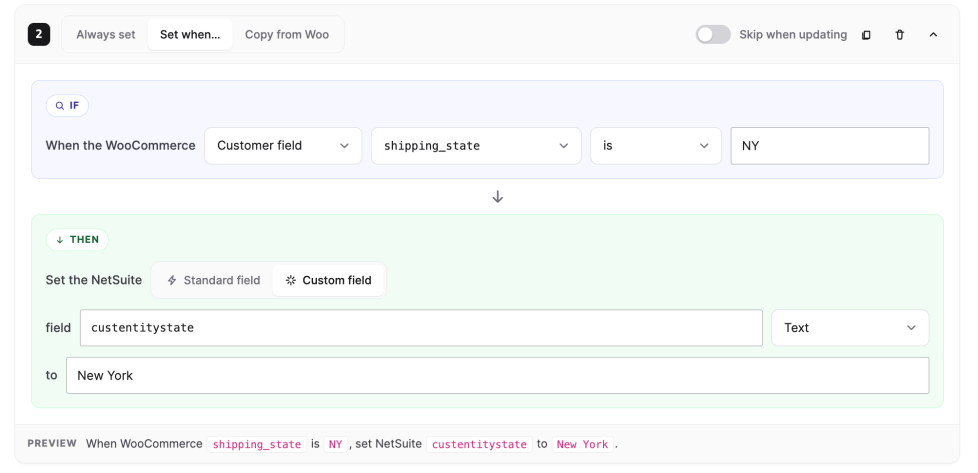
b. fixed value (e.g. subsidiary (RecordRef))

c. WC field (with optional prefix).
This syncs the customer as a company-type record; creating Contact records beneath a company is not part of the current release.
Customer Import (NetSuite → WooCommerce)
↑ Back to topImport existing NetSuite customers as WordPress users over your existing NetSuite REST Web Services connection (no RESTlet/SuiteScript deployment required):
- Choose individuals, companies, or both; optionally filter by a NetSuite custom field.
- Import only modified records after the first run.
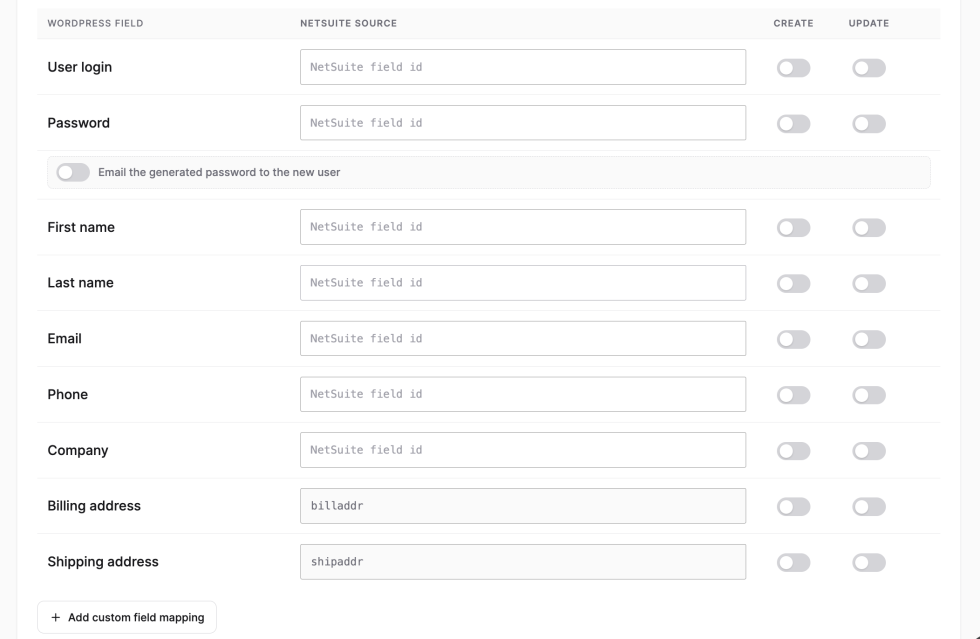
- Generate or map passwords, with an optional welcome email.
- Run on a schedule or click Import Now.
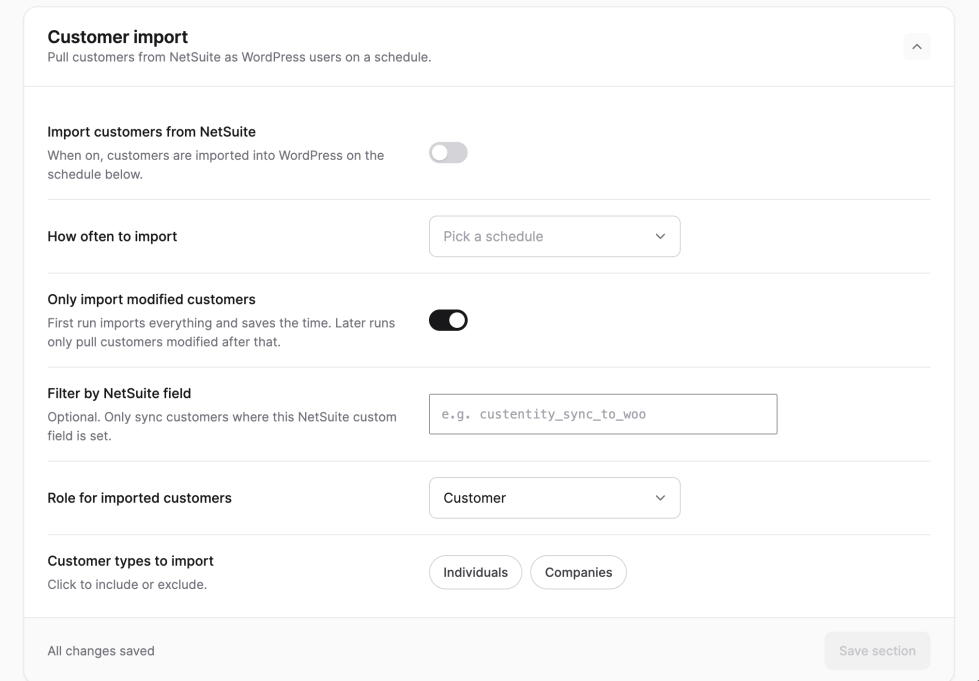
Imports email, username, name, phone, company, full billing/shipping addresses, and mapped custom fields
Order Sync
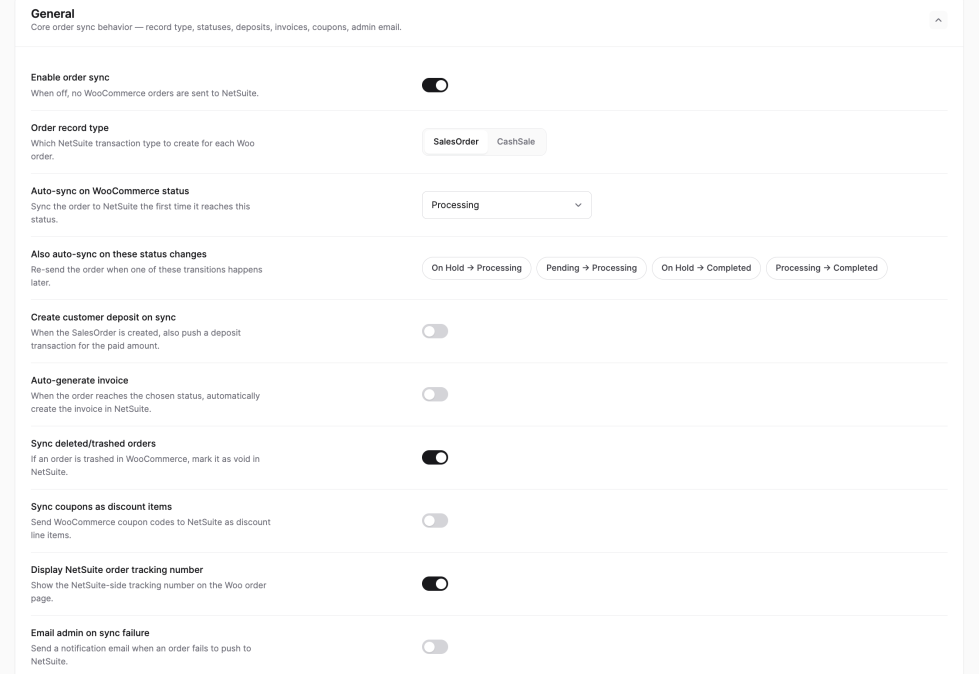
↑ Back to topUnder Order Settings → General:
- Enable Order Sync; choose Sync Order As (Sales Order or Cash Sale).
- Set Sync Orders Status (defaults to Processing).
- Optionally enable Create Woo Orders Deposit, Auto Create Invoice (at a chosen status), Order Delete on NetSuite on WC Delete, and Coupon Sync (requires NS Promo Custom Form ID and Discount ID).
- Display Tracking Number on the customer dashboard.
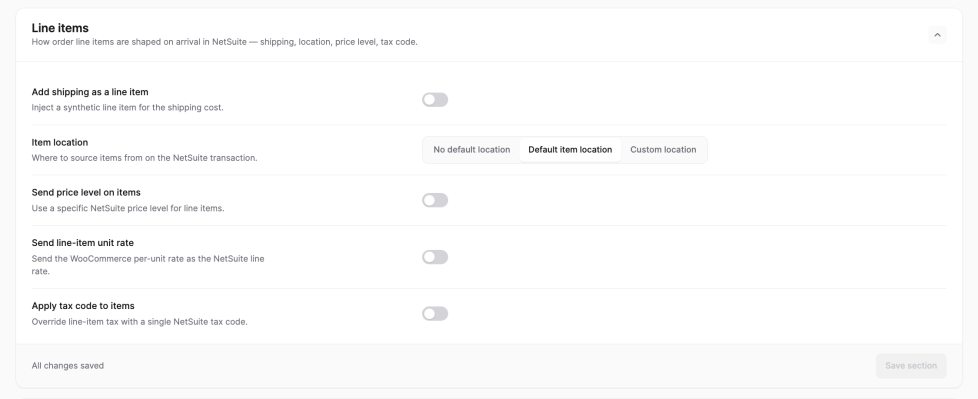
Under Order Settings → Line Items: map the Shipping Line Item Internal ID, line-item location, price level, and tax code.
Conditional mapping (orders)
↑ Back to topSimilar to the customer field mappings, push extra values onto the NetSuite order without code, using three operations — fixed value based on a WC condition, fixed value, and WC field — plus dedicated shipping-method and payment-method mapping. Values that reference NetSuite records use that record’s internal ID.
Each order is tagged with its NetSuite ID, so it’s never duplicated.
Refund Sync (Two-Way)
↑ Back to topUnder Order Settings → Refunds, enable NetSuite to Woo and/or Woo to NetSuite:
- Woo → NetSuite: a WooCommerce refund creates a NetSuite Return Authorization.
- NetSuite → Woo: Return Authorizations (after Fulfill → Authorize Return → Receive → Refund in NetSuite) create matching WooCommerce refunds.

Order Tracking & Fulfillment
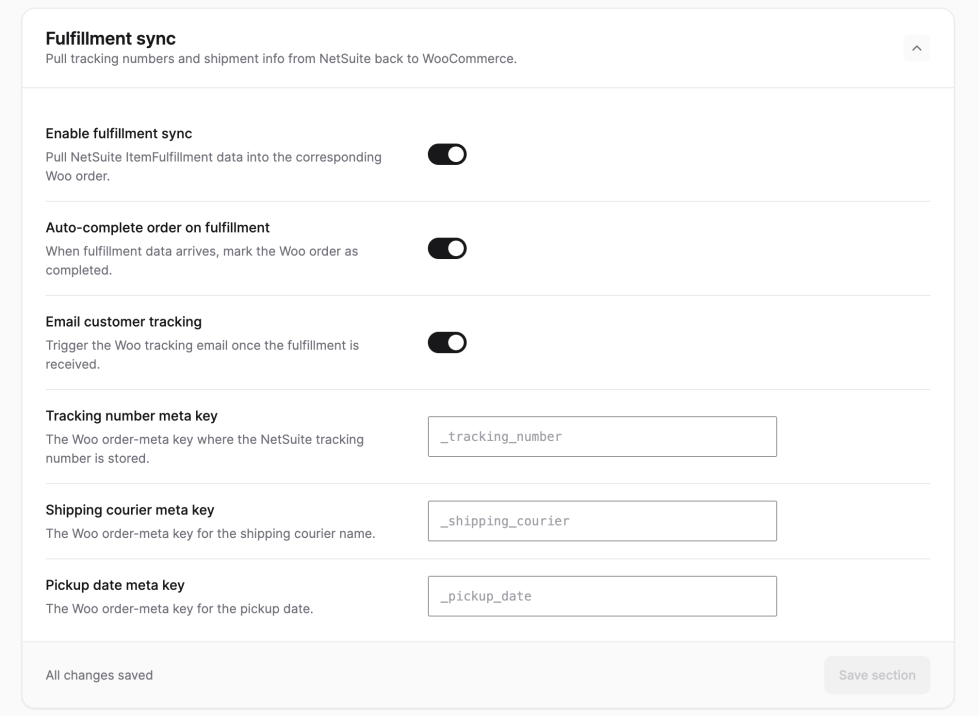
↑ Back to topUnder Order Settings → Fulfilment:
- Fulfilment Sync brings fulfilled NetSuite orders back to WooCommerce.
- Mark Order as Completed when NetSuite reports it billed/fulfilled.
- Send Order Tracking Email to Customer (once per order).
- Store tracking number, shipping courier, and ship/pickup date in chosen order meta keys.
Product Import (NetSuite → WooCommerce)
↑ Back to topCreate and update WooCommerce products directly from NetSuite items. Product import works over your existing NetSuite REST Web Services connection (set up in General Settings) — no SuiteScript or RESTlet deployment is required. Configure it under Product Import.
General settings:
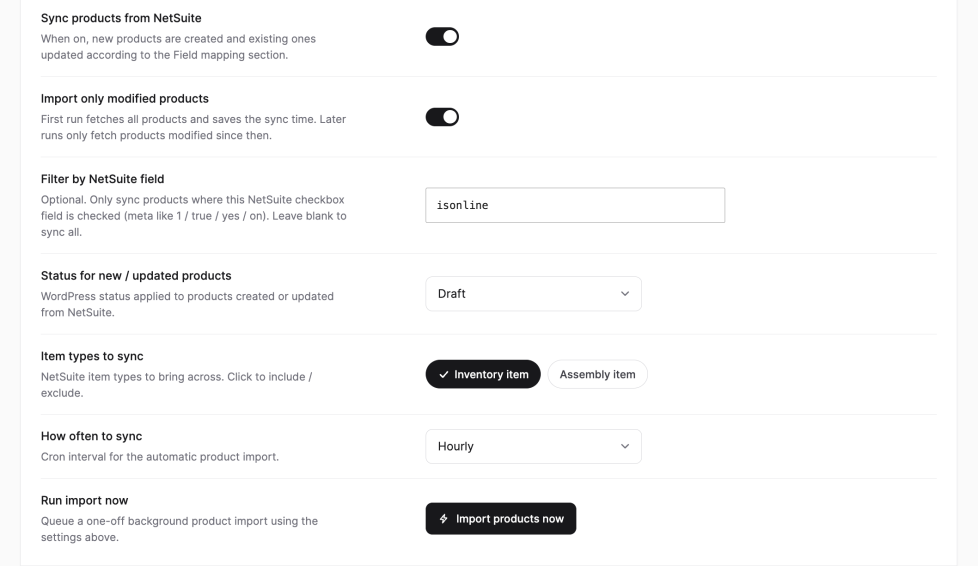
- Sync products from NetSuite — master on/off; creates new products and updates existing ones per the field mapping.
- Import only modified products — the first run fetches all products; later runs only fetch products modified since then.
- Filter by NetSuite field (optional) — only sync products where a NetSuite checkbox field is checked (e.g.
isonline; accepts 1 / true / yes / on). Leave blank to sync all. - Status for new / updated products — Draft or Published.
- Item types to sync — Inventory item and/or Assembly item.
- How often to sync — schedule for the automatic import (e.g. Hourly).
- Import products now — queue a one-off background import on demand.
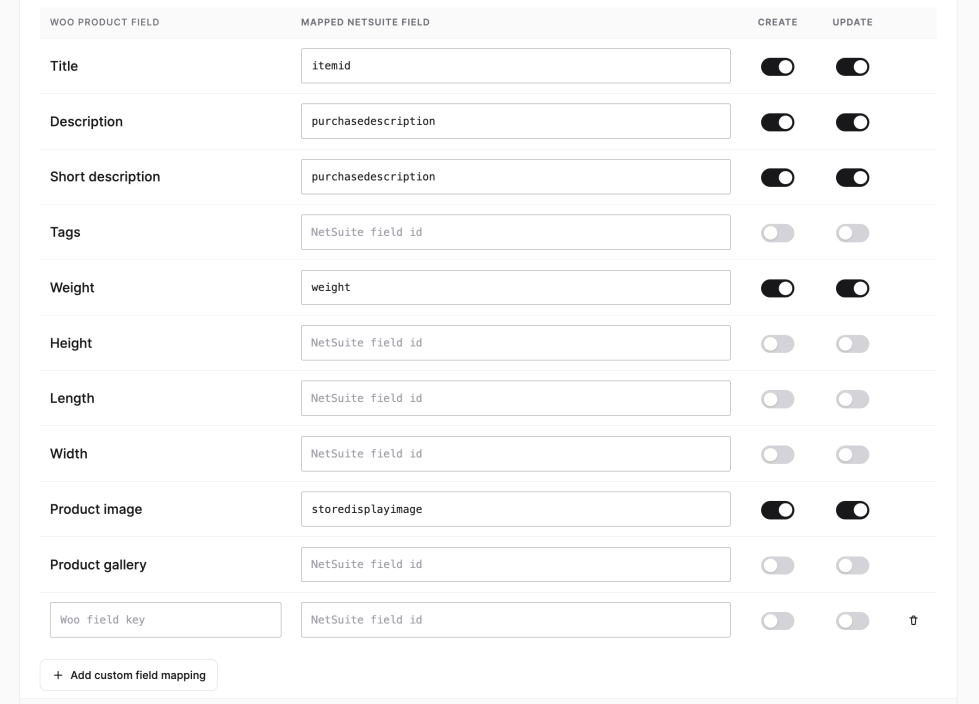
Field mapping: map each WooCommerce field to a NetSuite field ID and toggle Create / Update per field — e.g. Title → itemid, Description → purchasedescription, Weight → weight, Product image → storedisplayimage. Use Add custom field mapping for any additional field. Images are downloaded and attached; the plugin re-downloads only when the source image changes.
Logs & Settings Import/Export
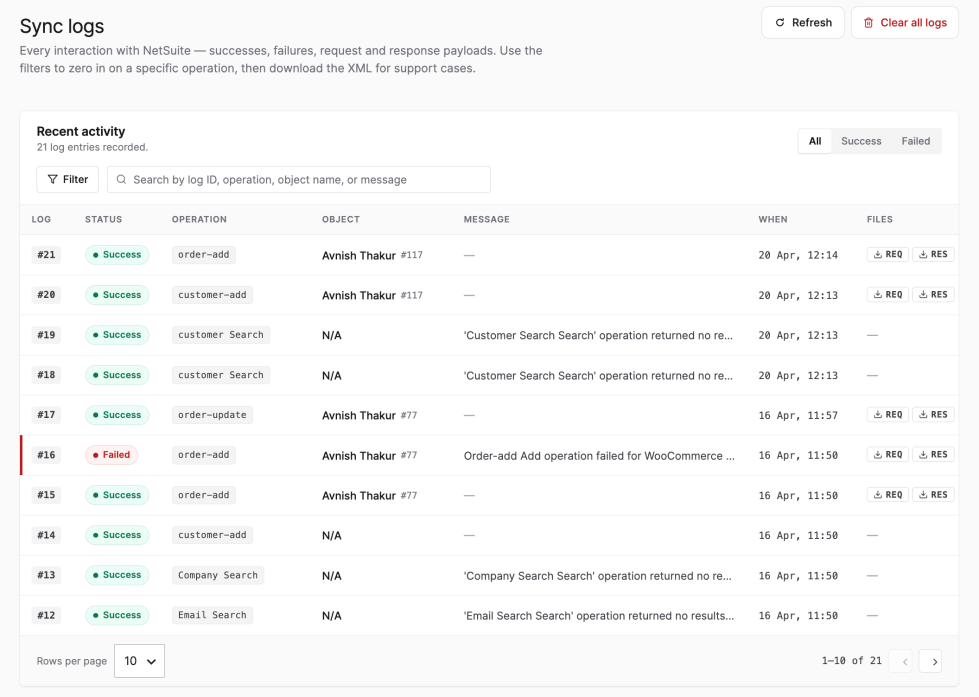
↑ Back to topNetSuite API Logs: review every sync (orders, customers, products, inventory, prices, refunds, tracking) with timestamps and the exact NetSuite response.
Import/Export: back up your configuration or move it between staging and production; imports merge with existing settings.
Frequently Asked Questions
↑ Back to topDoes it sync in both directions?
Yes. Orders, customers, and refunds go to NetSuite; inventory, prices, products, customers, tracking, and refunds come back to WooCommerce.
Can I import products and customers from NetSuite?
Yes — both run over your existing NetSuite REST Web Services connection, with field mapping and scheduling.
Can I sync customers as companies for B2B?
Yes — all customers, or only those with a company name in the billing address.
Will it create duplicates?
No. Records are tagged with their NetSuite ID and matched (by email/company) before creation.
How often does inventory update?
Hourly, twice a day, or daily — plus instant manual sync.
Is it compatible with HPOS? Yes.
Is the connection secure?
Yes — NetSuite Token-Based Authentication, with secrets encrypted in the database.
What if SOAP isn’t enabled on my server?
The plugin warns you and pauses NetSuite features until your host enables it; your site keeps running.
Common Errors & Resolutions
↑ Back to top| Error | Resolution |
|---|---|
| “You must enter at least one line item” | Fix SKU mapping in Inventory Settings to match NetSuite item identifiers. |
| “Does not have the required permissions to access [list]” | Add the missing permissions to the connecting NetSuite role. |
| “Do not have permissions to set a value for element entityid” | Enable Is NetSuite Customer Entity ID auto generated? in Customer Settings. |
| “Invalid item reference key … for subsidiary …” | Put the customer and items in the same NetSuite subsidiary. |
| “Please enter value(s) for: …” | Populate the required field via Conditional Mapping. |
| “Cannot create transactions with Stackable Promotions when SuitePromotions disabled” | Enable SuitePromotions in NetSuite. |
| “Promotion Codes feature not enabled” | Enable Promotion Codes in NetSuite. |
| Product/customer import not working | Confirm REST Web Services is enabled in NetSuite and the connecting role has REST Web Services (Full); re-test the connection. |