Save and Share Cart For WooCommerce with unique functionality for customers helps to create multiple carts. Users can save or share carts through social media and retrieve it later.
After downloading the plugin from WooCommerce follow the below instructions to install & activate the plugin.
- Login to your WordPress website dashboard.
- Navigate to Plugins > Add New.
- Click the Upload Plugin button at the top of the screen.
- Upload the save-share-cart.zip file you’ve downloaded from WooCommerce.com dashboard.
- Install and Activate the plugin.
After installing & activating the save and share cart for WooCommerce extension, please find the Share Cart menu in the admin menu.
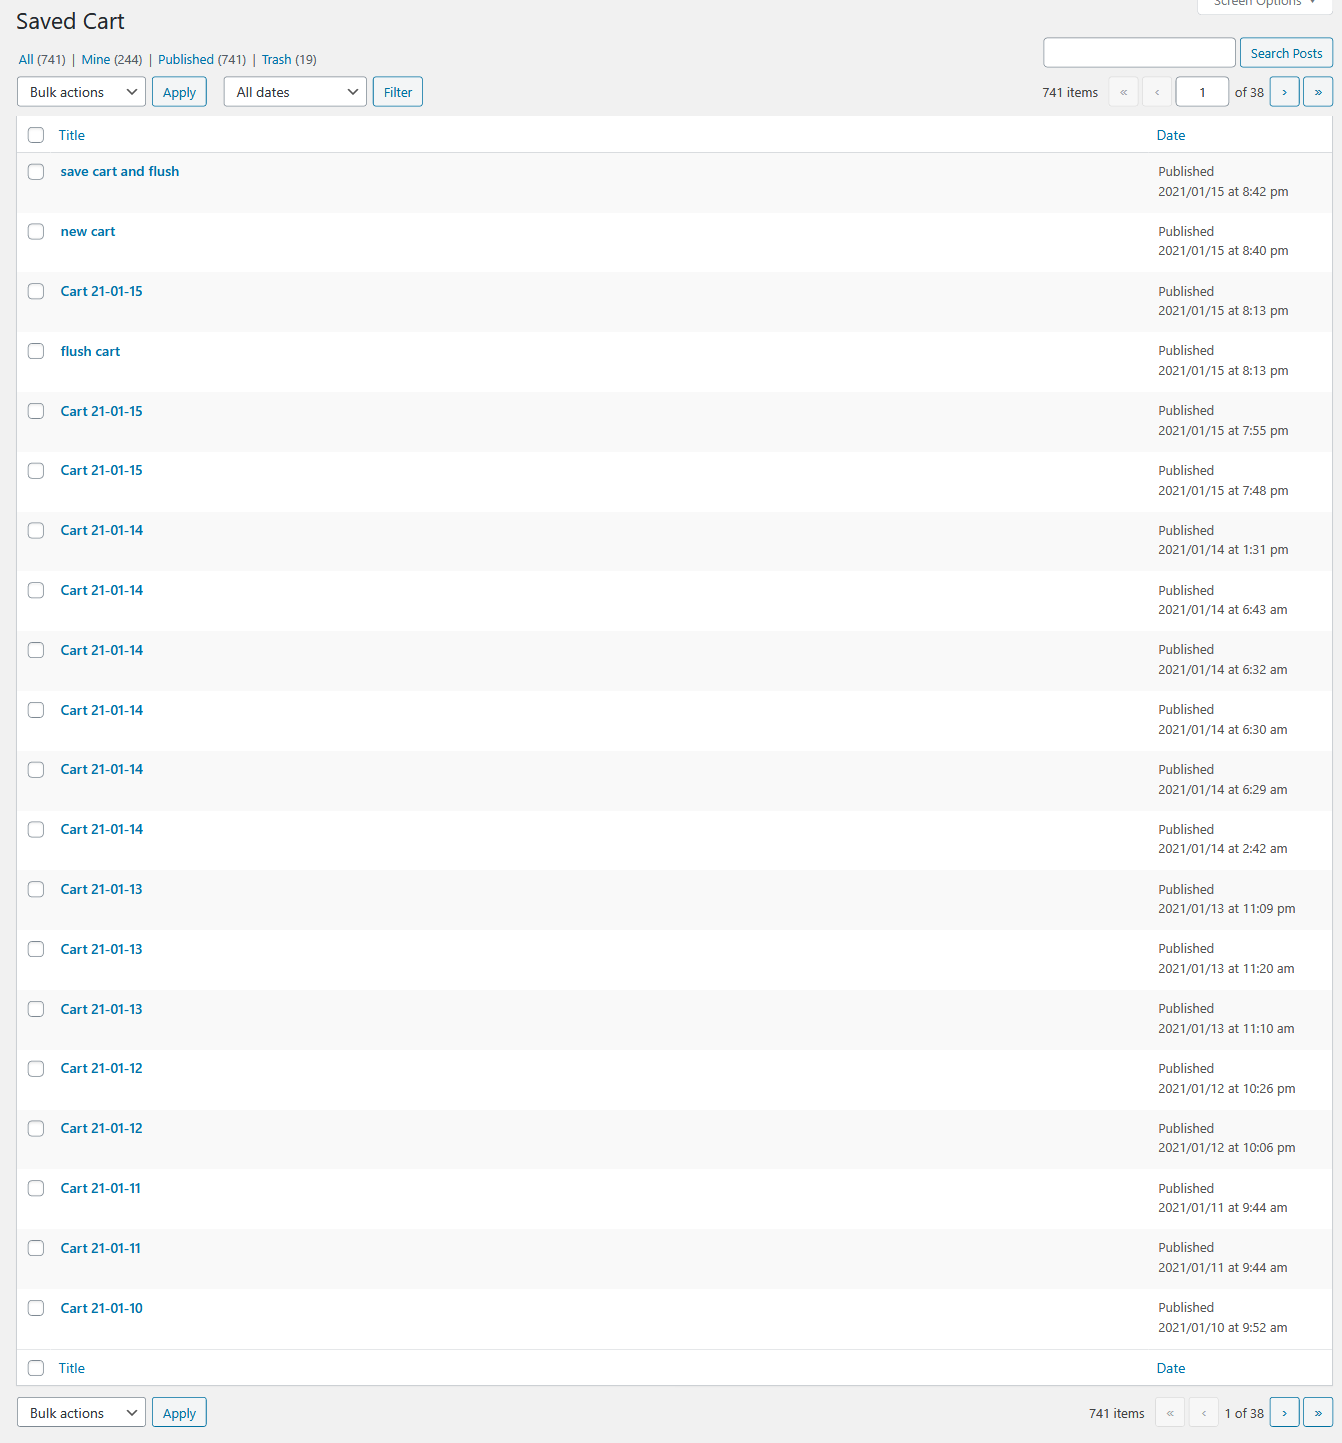
This option enables you to check the history of your saved carts.
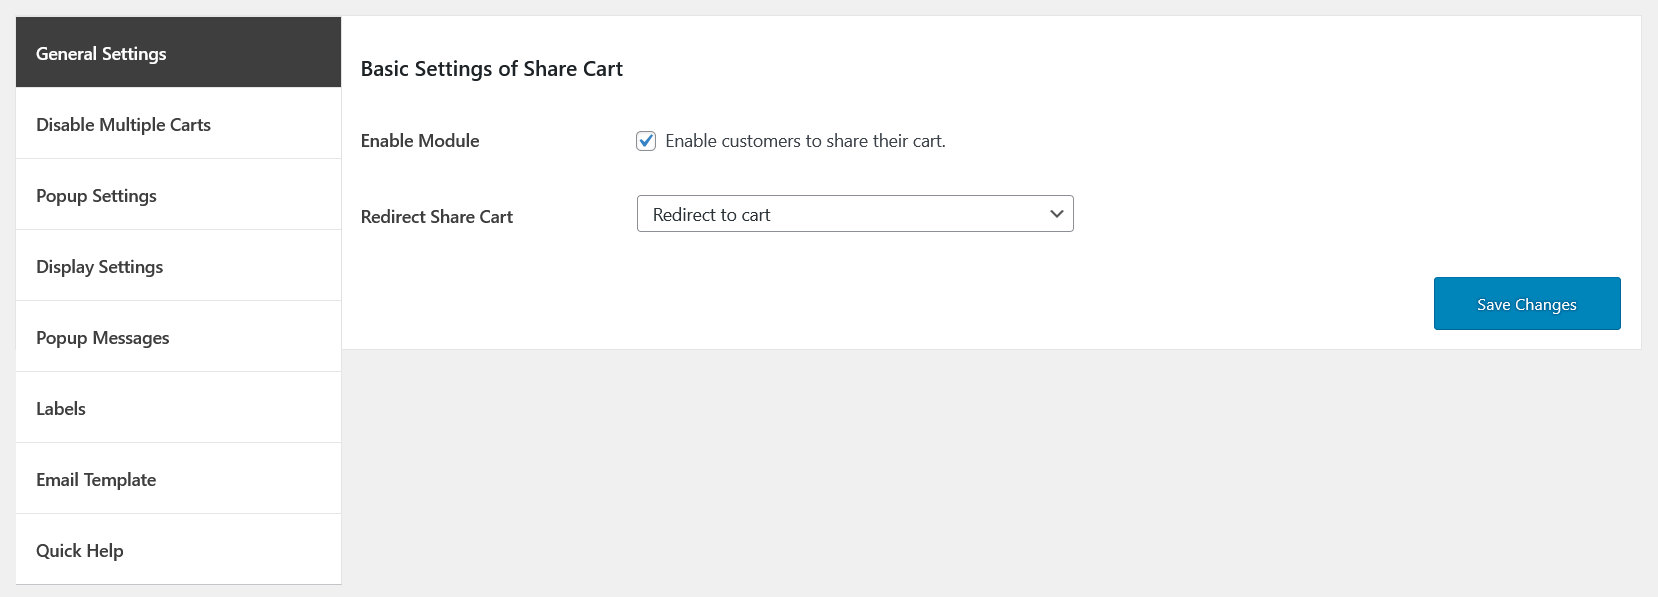
In the general settings of the Save and Share cart, you can see the following options.
Enable Module
By enabling this option will allow the customers to Share their cart.
Redirect Share Cart
Choose one of the options for redirect the Share cart either:
- Redirect to cart or
- Redirect to checkout
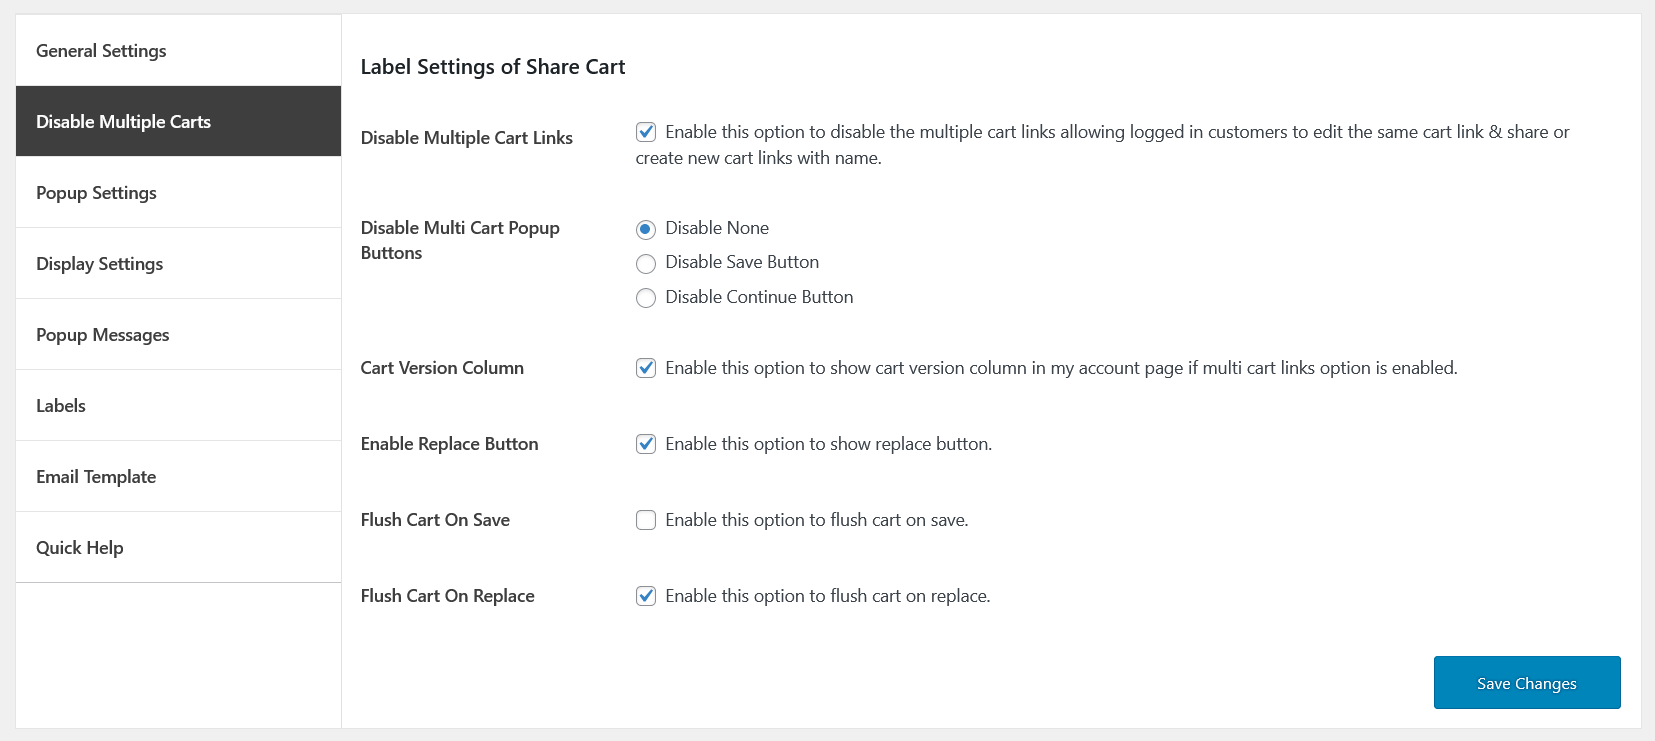
You can see the following options in the Disable multiple carts.
Disable Multiple Cart Links
When you enable this option to disable the multiple cart links and allow the logged in users to edit the same cart link & share or create new cart links with the name.
Disable Multi-Cart Popup Buttons
There are three options for disabling multi cart popup buttons.
- Disable None
- Disable Save Button
- Disable Continue Button
Cart Version Column
Enable this option to show the cart version column on my account page if multi cart links option is enabled.
Enable Replace Button
Enable this option to show the replace button.
Flush Cart On Save
Enable this option to flush the cart when saving the cart.
Flush Cart On Replace
Enable this option to flush the cart on replace.
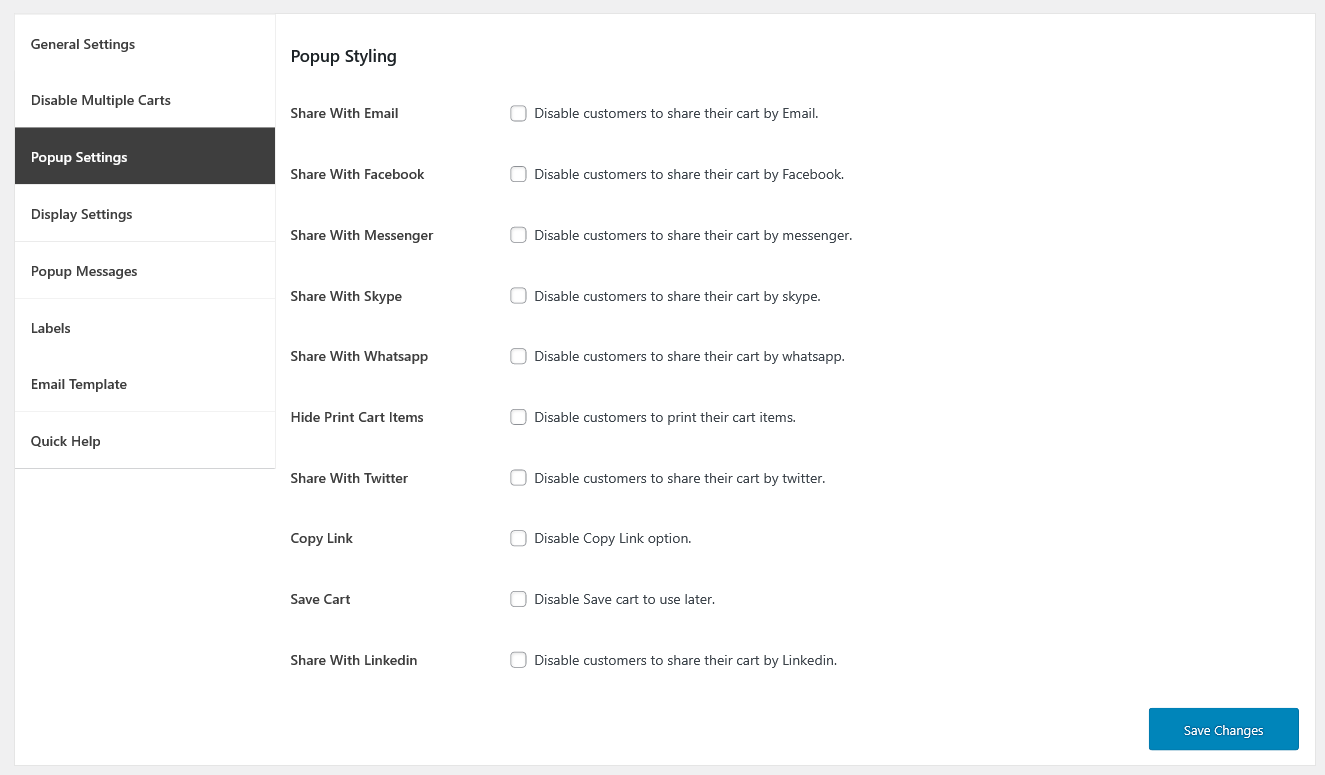
In the popup settings of Share cart following options are available.
Share With Email
When unchecking the Email option user will be enabled to share the cart by adding email, subject, and message.
Share With Facebook
Check the option to disable customers to share their cart by Facebook.
Share With Messenger
Check the option to disable customers to share their cart by messenger.
Share With Skype
Check the option to disable customers to share their cart by skype.
Share With Whatsapp
Check the option to disable customers to share their cart by WhatsApp.
Hide Print Cart Items
Check the option to disable customers to print their cart items.
Share With Twitter
Check the option to disable customers to share their cart by Twitter.
Copy Link
You can disable the option for Copy Link.
Save Cart
When you select the option the Save cart will be disabled for later use.
Share With Linkedin
Select the option to disable customers to share their cart by Linkedin label.
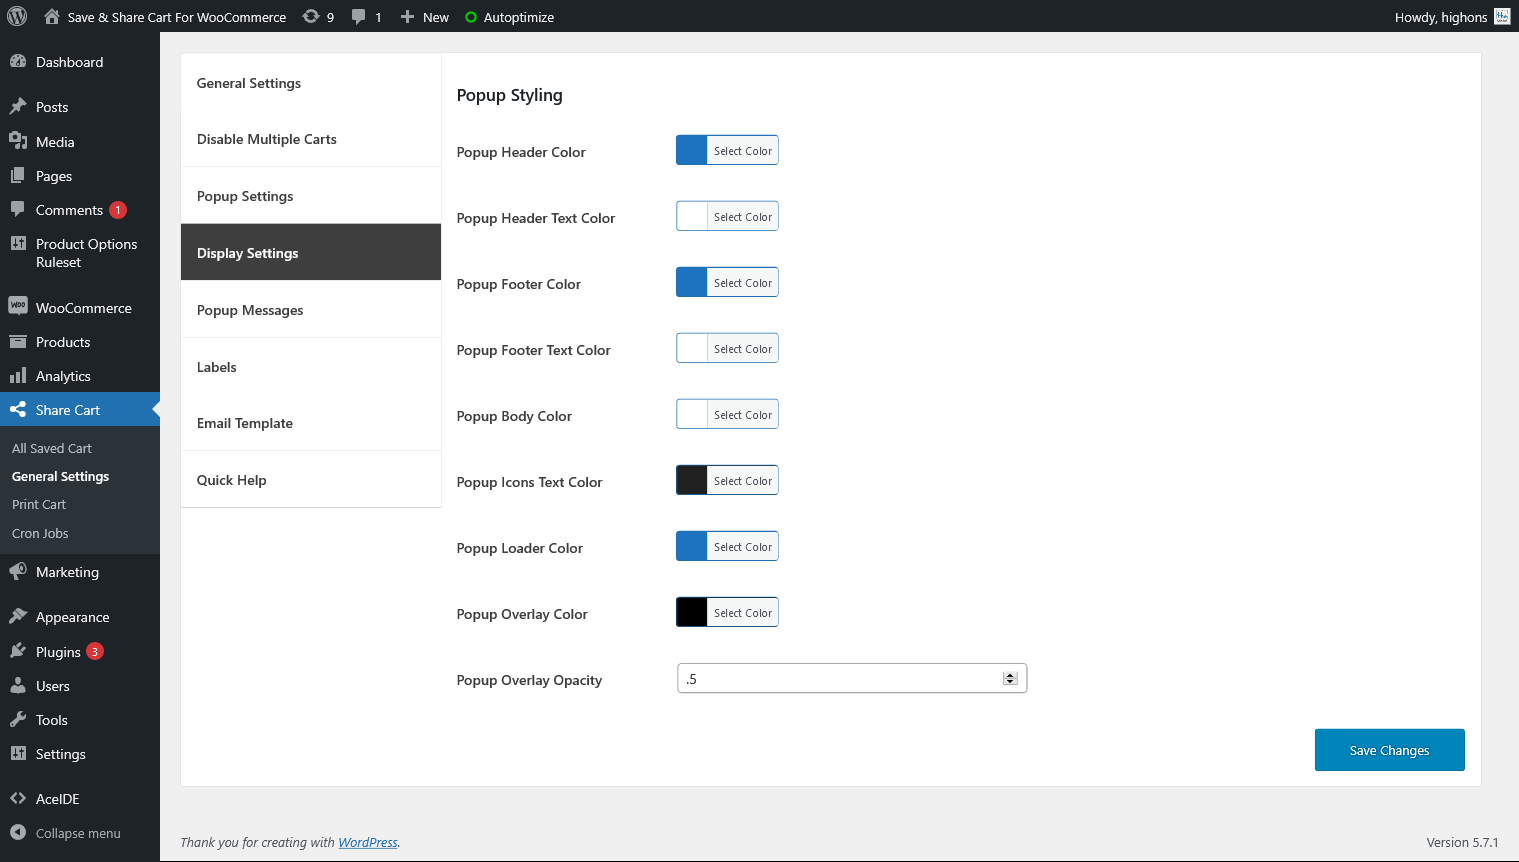
In the display settings of Share cart following options are displays to users.
Popup Header Color
Choose color for header popup
Popup Header Text Color
Choose color for popup header
Popup Footer Color
Choose color for popup footer
Popup Footer Text Color
Choose text color for popup footer
Popup Body Color
Choose popup body color
Popup Icons Text Color
Choose text color for popup icon
Popup Loader Color
Choose color for popup loader
Popup Overlay Color
Choose color for popup overlay
Popup Overlay Opacity
Add value for popup overlay opacity
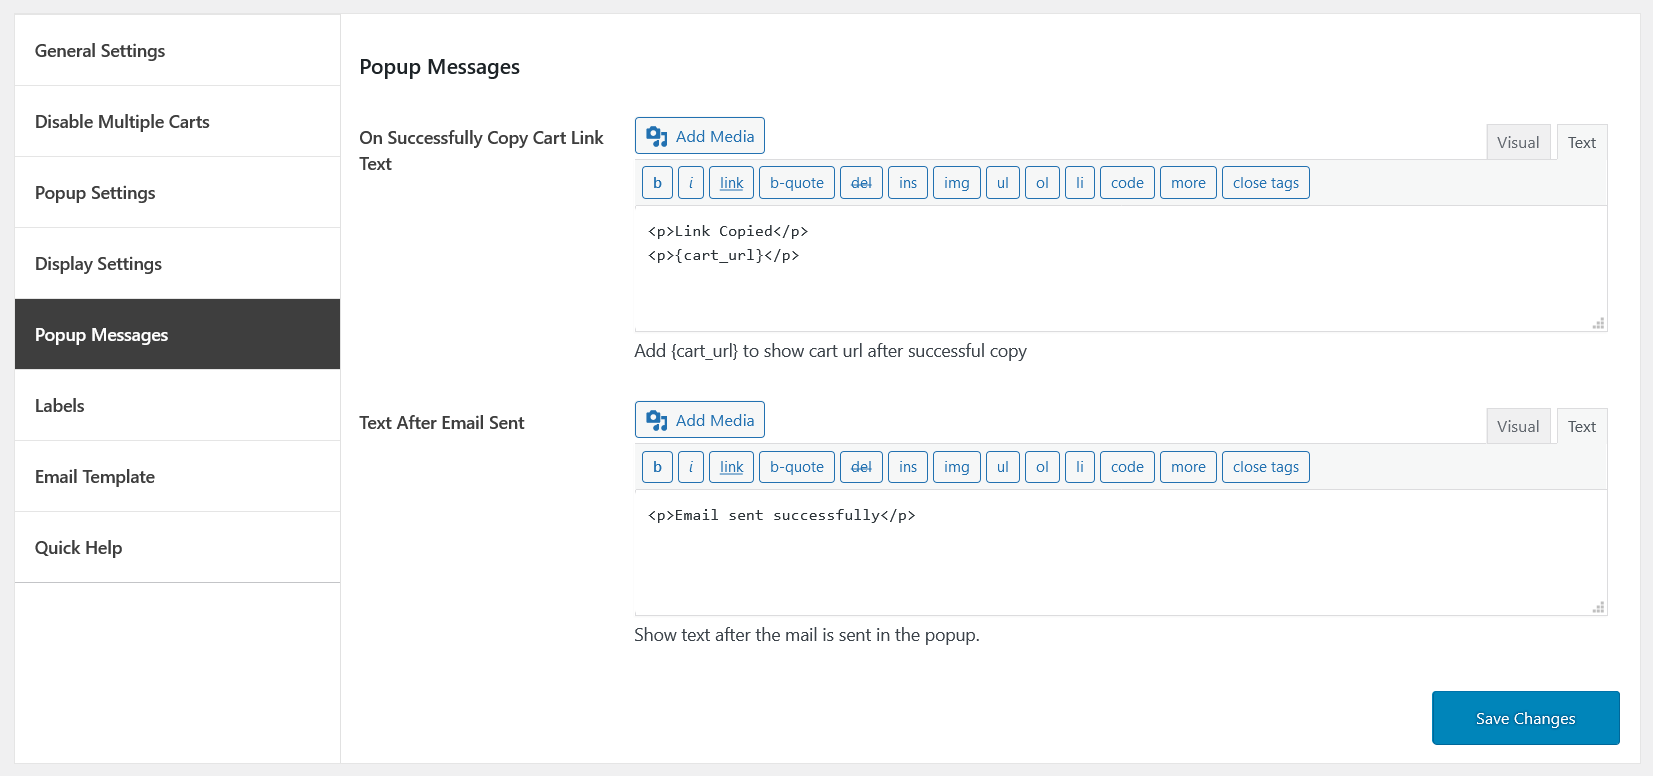
In the popup messages settings of Share cart you can see the following options.
On Successfully Copy Cart Link Text
Add text for successfully copy cart link which displays in the popup screen of Share cart.
Text After Email Sent
Add text after email is sent in the popup, for example, Email sent successfully.
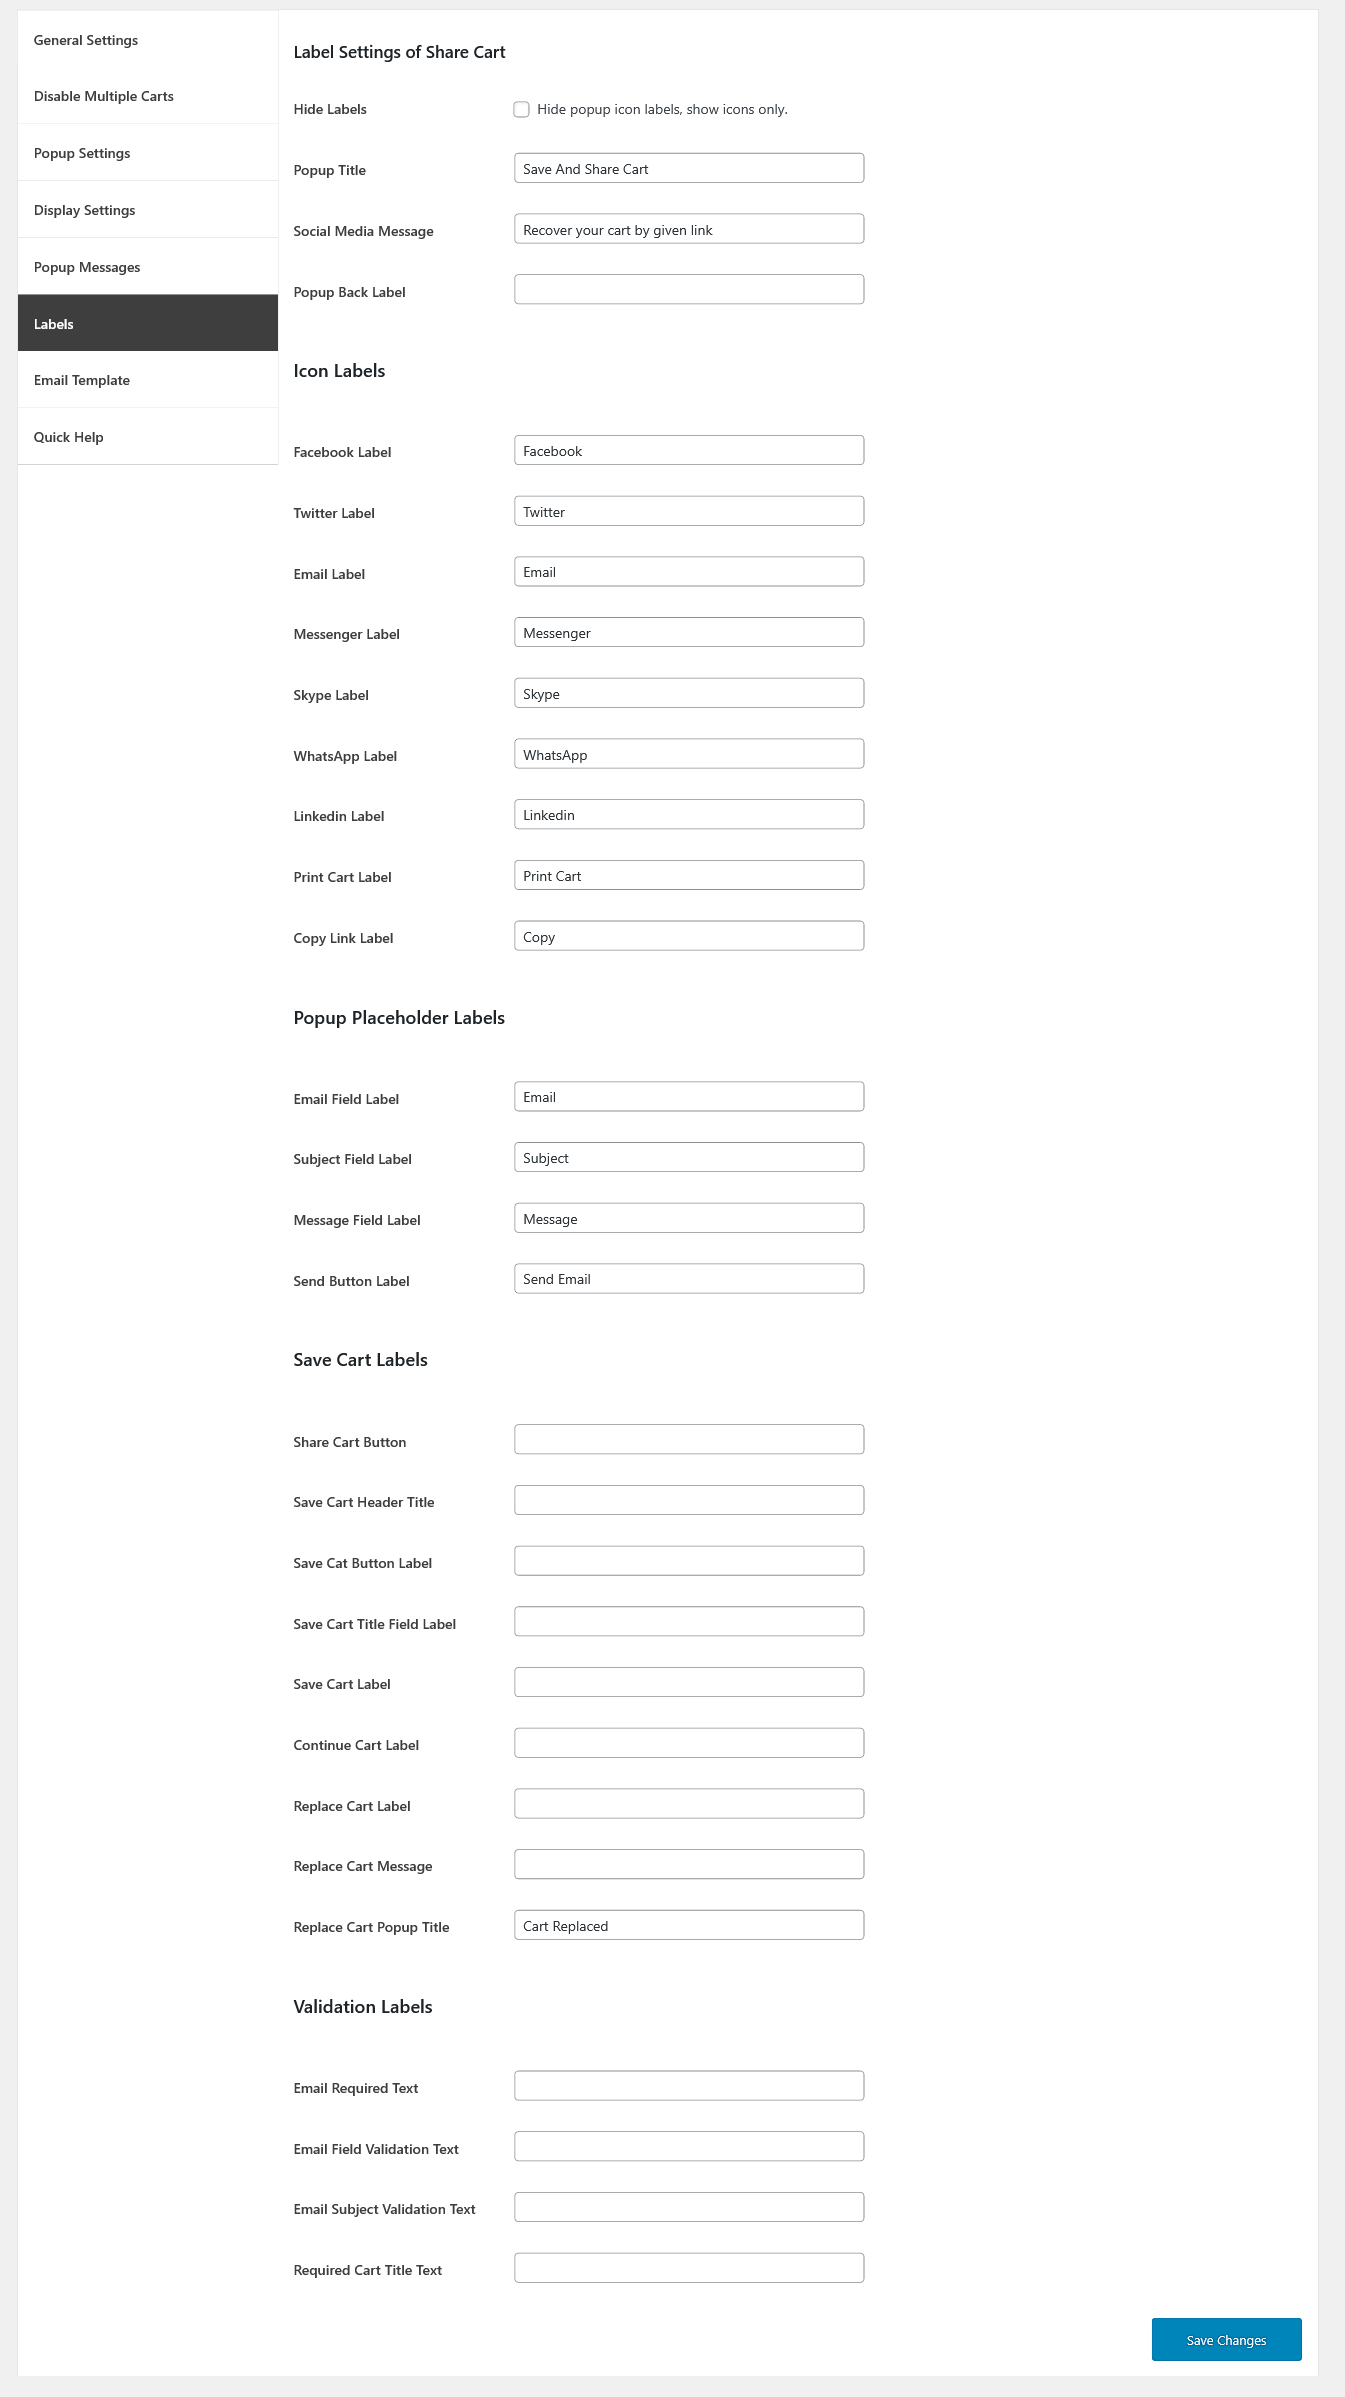
In the general settings of labels you can see the following options.
Label Settings
Hide Lebels
The options allows to enble or disable the labels
Popup Title
Add a custom title for the Share cart popup screen For example: Save And Share Cart
Social Media Message
Add text message for social media For example: Recover your cart by given link
Popup Back Label
Add text for popup back label.
Icon Labels
Facebook Label
Add label text for Facebook such as Facebook.
Twitter Label
Add label text for Twitter such as Twitter.
Email Label
Add label text for Email such as Email
Messenger Label
Add label text for Messanger such as Messanger
Skype Label
Add label text for Skype such as Skype
WhatsApp Label
Add label text for WhatsApp such as WhatsApp
Linkedin Label
Add label text for Linkedin such as Linkedin
Print Cart Label
Add label text for Print cart such as Print cart
Copy Link Label
Add label text for Copy link label such as Copy link label
Popup Placeholder Labels
Email Field Label
Add Email field label, For example, Email
Subject Field Label
Add subject field label, For example, Subject
Message Field Label
Add message field label, For example, Message
Send Button Label
Add text for the send button label, For example, Send Email
Save Cart Labels
Share Cart Button
You can add custom text for the Share cart button
Save Cart Header Title
You can add custom text for the Save cart header title
Save Cat Button Label
You can add custom text for the Save cart button label
Save Cart Title Field Label
You can add custom text for the Save cart title field label
Save Cart Label
You can add custom text for the Save cart label
Continue Cart Label
You can add custom text for the Continue cart label
Replace Cart Label
You can add custom text to replace the cart label
Replace Cart Message
You can add custom text for replacing cart messages
Replace Cart Popup Title
You can add custom text to replace cart popup title such as Cart replaced
Validation Labels
Email Required Text
Add text in the email required column
Email Field Validation Text
Add text in the email field validation
Email Subject Validation Text
Add text for email subject validation
Required Cart Title Text
Add text for required cart title
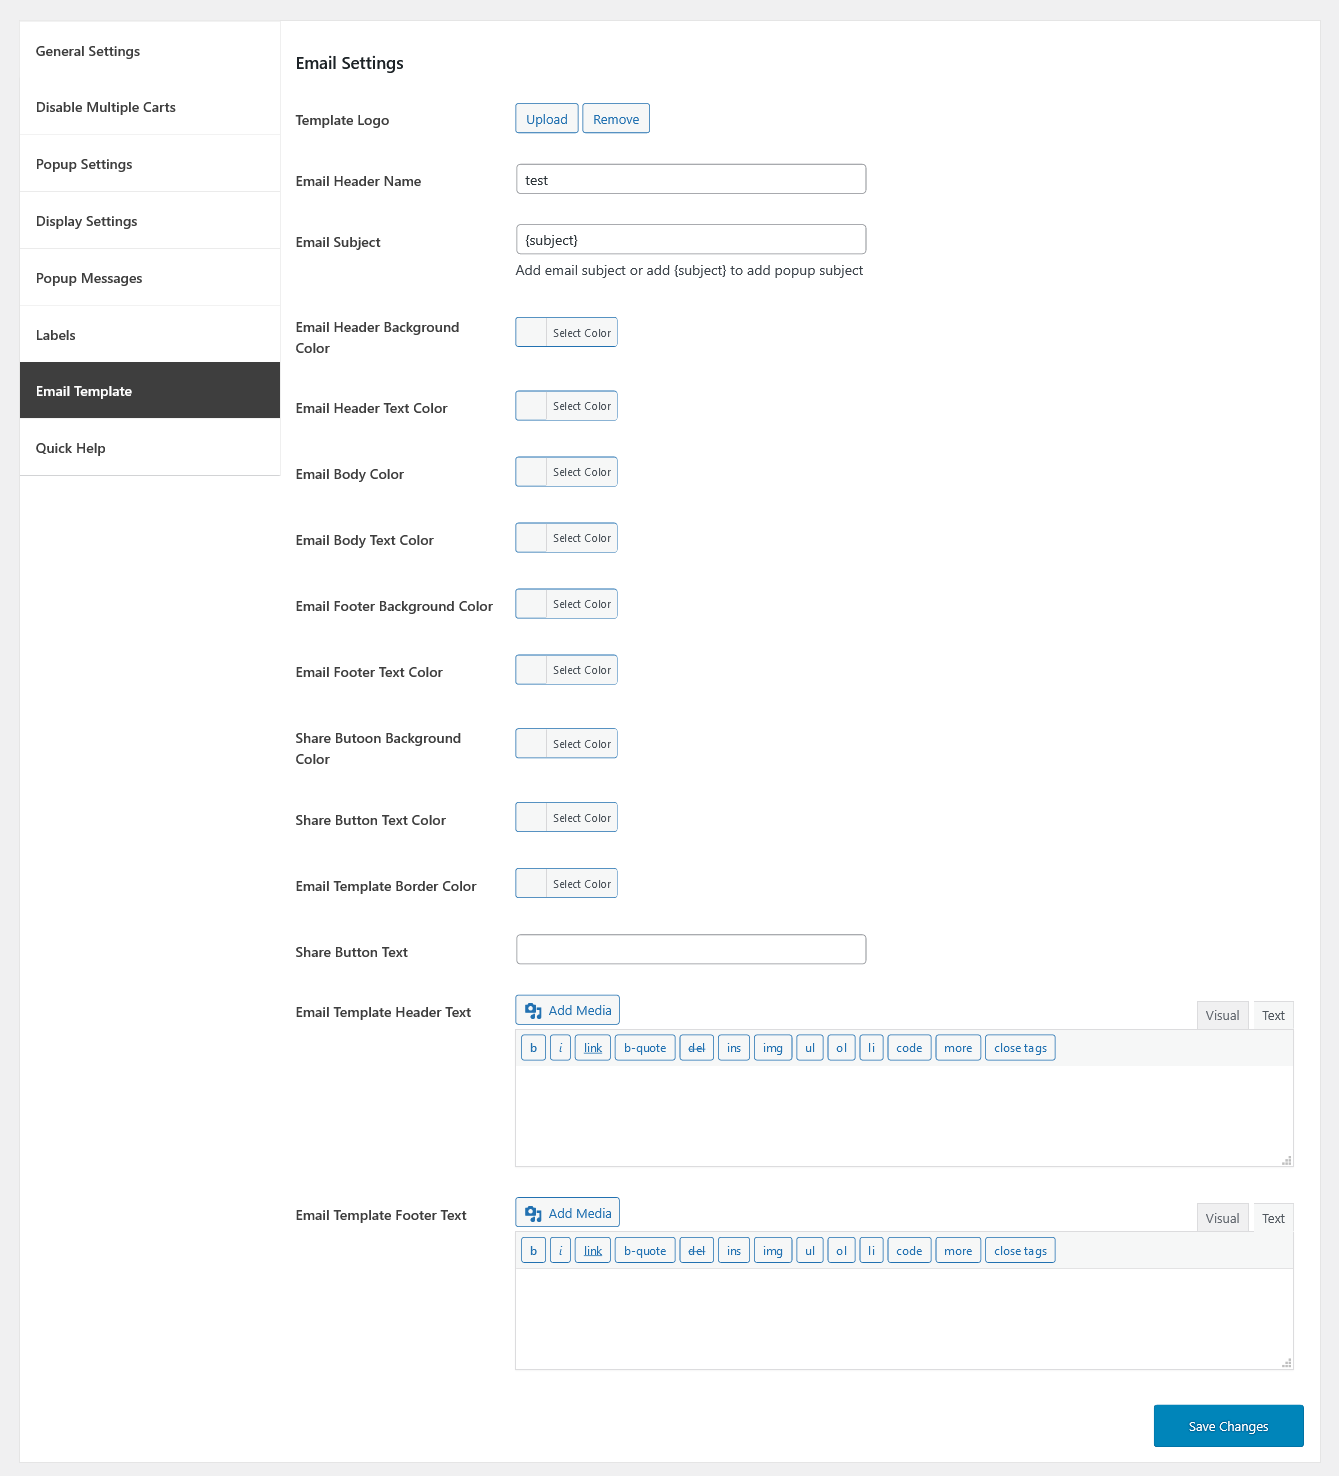
In the general settings of Email Template you can see the following options.
Email Settings
Template Logo
You can upload a new logo or remove the existing logo at which display in the received email.
Email Header Name
In the email settings of the Share cart, you can also add a header for your email.
Email Subject
In the email settings of the Share cart, you can also add a subject for your email.
Email Header Background Color
Choose the background color for email header
Email Header Text Color
Add text color for email header
Email Body Color
Choose the color for email body
Email Footer Background Color
Choose the background color for the email footer
Email Footer Text Color
Choose the text color for email footer
Share Button Background Color
Choose the background color for the Share button
Share Button Text Color
Choose the text color for the share button
Email Template Border Color
Choose border color for the email template
Share Button Text
Add text for the Share button by your choice
Email Template Header Text
You can add text for the email header template
Email Template Footer Text
You can add text for the email footer template
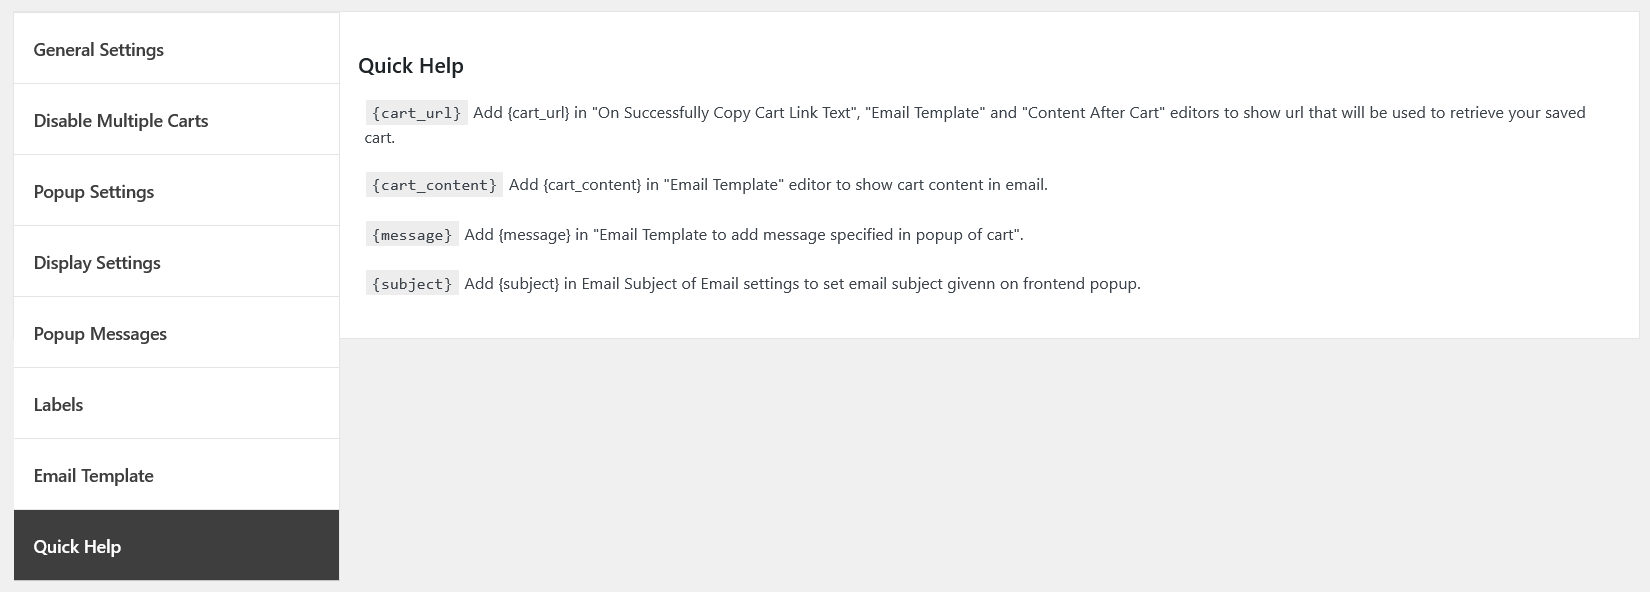
In the general settings of Email Template you can see the following options.
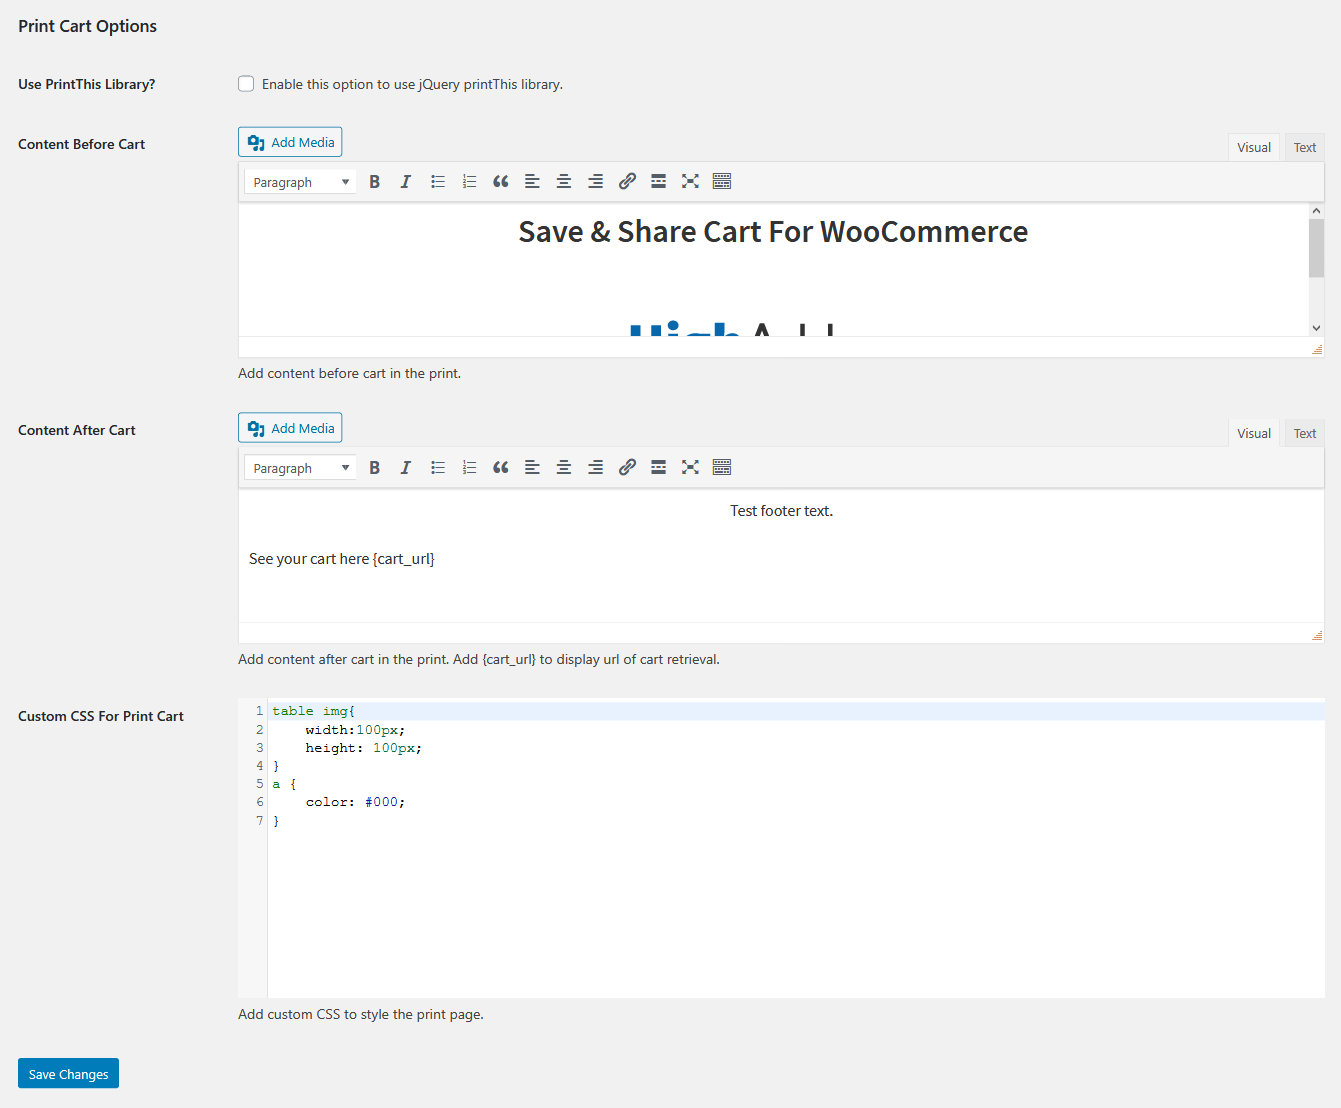
In the Save and Share cart print cart following options are visible.
Use Print This Library?
However, you can enable this option to use jQuery printThis library.
Content Before Cart
It allows you to add content before the cart in the print form.
Content After Cart
It allows you to add content after cart in the print form.
Custom CSS For Print Cart
Furthermore, you can add custom CSS to style the print page.
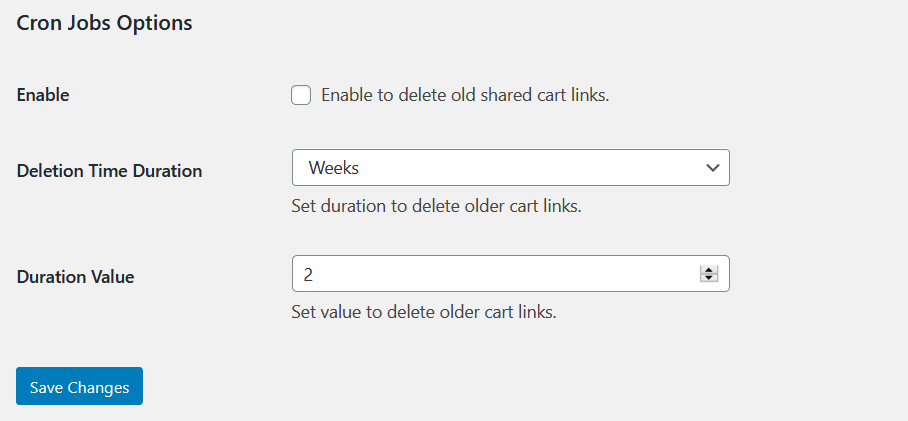
In the job corn options you can see the followin settings.
Enable
However, you can enable the option to delete old shared cart links.
Deletion Time Duration
Choose the option to delete the older cart link such as,
- Delete order cart links in days.
- Delete older cart links in weeks
- Delete older cart links in months.
Duration Value
Set the value to delete older cart links.
Social media popup styling options contain multiple options for admin. Where they can set custom popup header color, and text color. Popup footer color and text color. Merchants can also select the popup body color and popup icon text color. Furthermore, you can also select popup loader color, popup overlay color, and popup overlay opacity.
Users can see Saved carts history at the My Account page in the Saved Carts tab. When you click on the cart icon it will proceed you to the cart page or checkout page you have selected the option in the general settings. However, you can delete the saved carts as well.
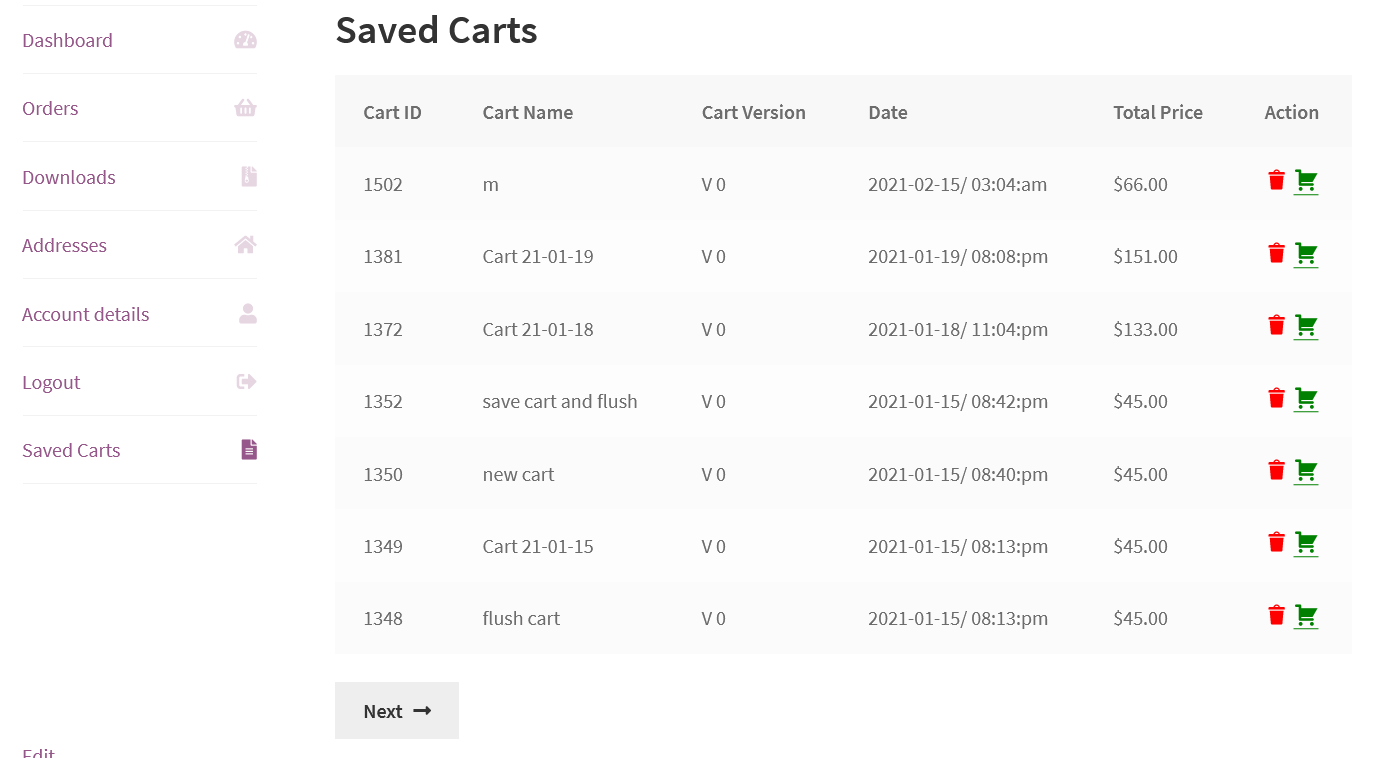
 This option enables you to check the history of your saved carts.
 In the general settings of the Save and Share cart, you can see the following options.
Enable Module
By enabling this option will allow the customers to Share their cart.
Redirect Share Cart
Choose one of the options for redirect the Share cart either:
 You can see the following options in the Disable multiple carts.
Disable Multiple Cart Links
When you enable this option to disable the multiple cart links and allow the logged in users to edit the same cart link & share or create new cart links with the name.
Disable Multi-Cart Popup Buttons
There are three options for disabling multi cart popup buttons.
 In the popup settings of Share cart following options are available.
Share With Email
When unchecking the Email option user will be enabled to share the cart by adding email, subject, and message.
Share With Facebook
Check the option to disable customers to share their cart by Facebook.
Share With Messenger
Check the option to disable customers to share their cart by messenger.
Share With Skype
Check the option to disable customers to share their cart by skype.
Share With Whatsapp
Check the option to disable customers to share their cart by WhatsApp.
Hide Print Cart Items
Check the option to disable customers to print their cart items.
Share With Twitter
Check the option to disable customers to share their cart by Twitter.
Copy Link
You can disable the option for Copy Link.
Save Cart
When you select the option the Save cart will be disabled for later use.
Share With Linkedin
Select the option to disable customers to share their cart by Linkedin label.
 In the display settings of Share cart following options are displays to users.
Popup Header Color
Choose color for header popup
Popup Header Text Color
Choose color for popup header
Popup Footer Color
Choose color for popup footer
Popup Footer Text Color
Choose text color for popup footer
Popup Body Color
Choose popup body color
Popup Icons Text Color
Choose text color for popup icon
Popup Loader Color
Choose color for popup loader
Popup Overlay Color
Choose color for popup overlay
Popup Overlay Opacity
Add value for popup overlay opacity
 In the popup messages settings of Share cart you can see the following options.
On Successfully Copy Cart Link Text
Add text for successfully copy cart link which displays in the popup screen of Share cart.
Text After Email Sent
Add text after email is sent in the popup, for example, Email sent successfully.
 In the general settings of labels you can see the following options.
Label Settings
Hide Lebels
The options allows to enble or disable the labels
Popup Title
Add a custom title for the Share cart popup screen For example: Save And Share Cart
Social Media Message
Add text message for social media For example: Recover your cart by given link
Popup Back Label
Add text for popup back label.
Icon Labels
Facebook Label
Add label text for Facebook such as Facebook.
Twitter Label
Add label text for Twitter such as Twitter.
Email Label
Add label text for Email such as Email
Messenger Label
Add label text for Messanger such as Messanger
Skype Label
Add label text for Skype such as Skype
WhatsApp Label
Add label text for WhatsApp such as WhatsApp
Linkedin Label
Add label text for Linkedin such as Linkedin
Print Cart Label
Add label text for Print cart such as Print cart
Copy Link Label
Add label text for Copy link label such as Copy link label
Popup Placeholder Labels
Email Field Label
Add Email field label, For example, Email
Subject Field Label
Add subject field label, For example, Subject
Message Field Label
Add message field label, For example, Message
Send Button Label
Add text for the send button label, For example, Send Email
Save Cart Labels
Share Cart Button
You can add custom text for the Share cart button
Save Cart Header Title
You can add custom text for the Save cart header title
Save Cat Button Label
You can add custom text for the Save cart button label
Save Cart Title Field Label
You can add custom text for the Save cart title field label
Save Cart Label
You can add custom text for the Save cart label
Continue Cart Label
You can add custom text for the Continue cart label
Replace Cart Label
You can add custom text to replace the cart label
Replace Cart Message
You can add custom text for replacing cart messages
Replace Cart Popup Title
You can add custom text to replace cart popup title such as Cart replaced
Validation Labels
Email Required Text
Add text in the email required column
Email Field Validation Text
Add text in the email field validation
Email Subject Validation Text
Add text for email subject validation
Required Cart Title Text
Add text for required cart title
 In the general settings of Email Template you can see the following options.
Email Settings
Template Logo
You can upload a new logo or remove the existing logo at which display in the received email.
Email Header Name
In the email settings of the Share cart, you can also add a header for your email.
Email Subject
In the email settings of the Share cart, you can also add a subject for your email.
Email Header Background Color
Choose the background color for email header
Email Header Text Color
Add text color for email header
Email Body Color
Choose the color for email body
Email Footer Background Color
Choose the background color for the email footer
Email Footer Text Color
Choose the text color for email footer
Share Button Background Color
Choose the background color for the Share button
Share Button Text Color
Choose the text color for the share button
Email Template Border Color
Choose border color for the email template
Share Button Text
Add text for the Share button by your choice
Email Template Header Text
You can add text for the email header template
Email Template Footer Text
You can add text for the email footer template
 In the general settings of Email Template you can see the following options.
 In the Save and Share cart print cart following options are visible.
Use Print This Library?
However, you can enable this option to use jQuery printThis library.
Content Before Cart
It allows you to add content before the cart in the print form.
Content After Cart
It allows you to add content after cart in the print form.
Custom CSS For Print Cart
Furthermore, you can add custom CSS to style the print page.
 In the job corn options you can see the followin settings.
Enable
However, you can enable the option to delete old shared cart links.
Deletion Time Duration
Choose the option to delete the older cart link such as,
