NOTE
This product is no longer available on WooCommerce.com. This document has been left available for existing users, but will no longer be updated.
Overview
↑ Back to topWooCommerce SecureNet allows you to integrate your store with SecureNet’s payment processing services. An SSL certificate is required to process payments on your site with this integration plugin.
Installation
↑ Back to top- Download the extension from your WooCommerce dashboard
- Go to Plugins > Add New > Upload and select the ZIP file you just downloaded
- Click Install Now, and then Activate
- Click the Configure link and read the next section to learn how to setup and configure the plugin.
Setup and Configuration
↑ Back to topYou need to have an active gateway account with SecureNet. To get your credentials, please:
- Log into your SecureNet Virtual Terminal
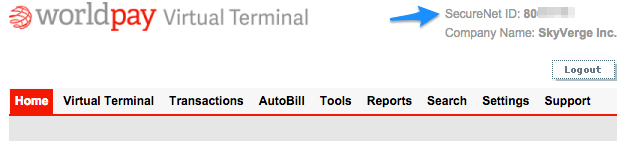
- In the top right of your account dashboard will be your “SecureNet ID”. Copy this to enter in the plugin settings.

- Click on Settings, then click “Obtain Secure Key”.
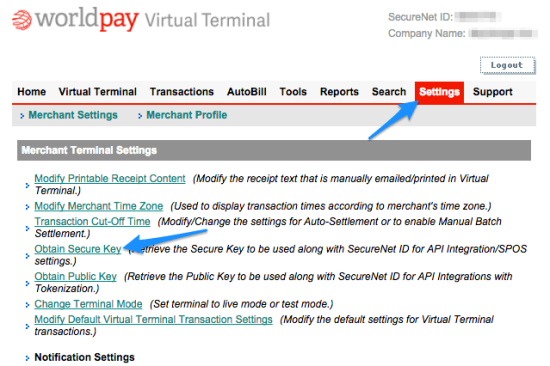
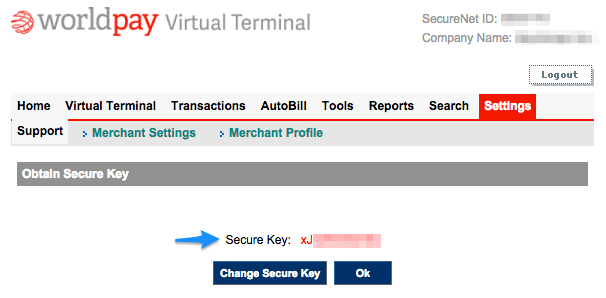
- Enter your password, press Submit, and you will see the SecureNet Key.

Extension Settings
↑ Back to topTo configure the plugin, click on WooCommerce > Settings > Checkout > SecureNet.
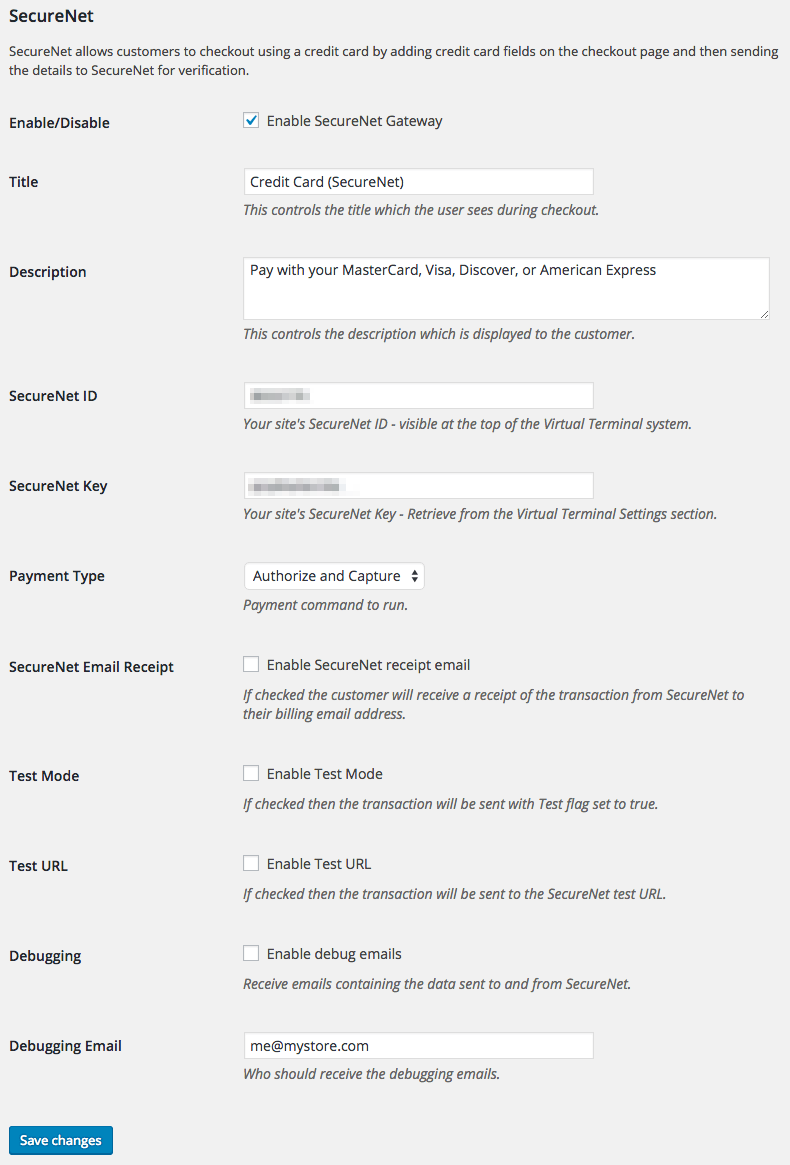
- Enable / Disable – Enable this to activate SecureNet at checkout.
- Title – This is the text shown for the payment during checkout and on the Order Received page.
- Description – This is the text shown under the title during checkout. Limited HTML is allowed.
- SecureNet ID – This is the SecureNet ID for your SecureNet account. Follow the steps above to get this.
- SecureNet Key – This is the SecureNet Key for your SecureNet account. Follow the steps above to get this.
- Payment Type – This determines whether to “Authorize” or “Authorize and Capture” the transaction. “Authorize” will authorize charges to be manually captured at a later time within your SecureNet admin panel. “Authorize and Capture” will authorize and capture funds immediately.
- SecureNet Email Receipt – Enable this to send the SecureNet receipt to the billing email in addition to WooCommerce emails.
- Test Mode – If enabled, transactions will be sent with the Test flag set to “true”. These transactions will show up in your virtual terminal under Transactions > Test Transactions
- Test URL – If enabled, transactions will be sent to the Test URL:
- PRODUCTION URL:
https://gateway.securenet.com/api/data/transaction.svc - TEST URL:
https://certify.securenet.com/api/data/transaction.svc
- PRODUCTION URL:
- Debugging – Enable this to receive emails containing the data sent to and from SecureNet. All debugging messages are cleaned of sensitive information before display, but as a best practice, please do not enable this unless you are having issues with the plugin.
- Debugging Email – Enter recipient email for debugging emails.
Troubleshooting
↑ Back to topHaving trouble? Follow these steps to make sure everything is setup correctly before posting a support request:
- Check that your SecureNet ID and SecureNet Key are entered correctly
- Double-check that your SecureNet ID and SecureNet Key are entered correctly 😉
- Enable debugging emails to get a copy of the debug information
- Submit a help request and include the debug information for further troubleshooting.
Frequently Asked Questions
↑ Back to topQ: Why is the “Address 2” field not sent to SecureNet?
A: SecureNet does not collect the fields “Billing Address 2” or “Shipping Address 2”, so the second line of the address will be omitted.
Q: Can I turn off the CVV field?
A: CVV is a required field for the SecureNet integration, so there is not an option to turn off this field.