
WooCommerce Share Cart URL is an extension that allows customers to share the content of their carts through a URL link and save carts even when they are logged in. Store managers can create pre-built carts, manage shared URLs and saved carts, customize the share window, and track the activity within the cart and order source.
Requirements And Installation
↑ Back to topA WordPress website must be configured for WooCommerce along with functional Cart, Checkout and My Account pages.
You should have administrative privileges for installing the extension. The plugin requires WordPress 4.6 and PHP 7.0 as minimum prerequisites, but your existing version of WooCommerce may require higher versions.
1. Download extension ZIP file from your account on WooCommerce.com.
2. Login to the WordPress admin panel of your store.
3. Navigate to Plugins > Add New Plugin > Upload Plugin (the Add New option’s label might vary depending on the WordPress version). Select the ZIP file you downloaded in step 1, and click Install Now
4. Then, click Activate Plugin.
5. If the Setup Wizard screen appears, follow the instructions to configure the extension. Alternatively, you can navigate to Share Cart > Settings to access the settings directly.
Onboarding and initial setup
↑ Back to topThe onboarding wizard guides you through nine screens to set up the extension. You can open the wizard after installing the plugin or at any time by clicking Re-run Setup Wizard in the Dashboard or Settings area. Click Start setup to begin, Next to proceed to the next screen, and Back to return to the previous one. On the review screen, you can click through the cards to return to the respective setup steps. You can also click Skip Setup to abandon the guided setup and configure the plugin manually.
Step 1 Welcome
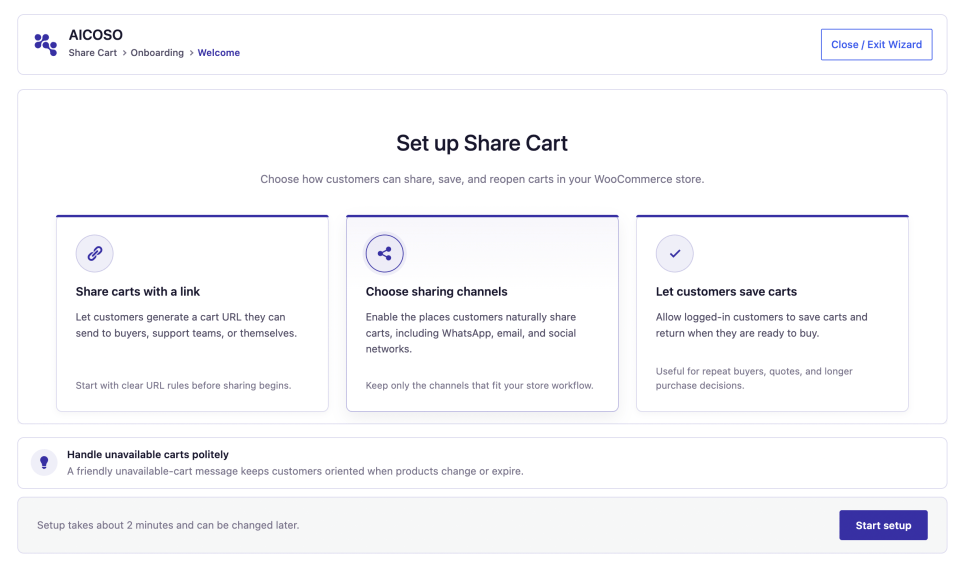
↑ Back to topThe welcome screen informs you about the extension’s capabilities and sharing options. Click Start Setup to begin the configuration process.
Step 2 Enable Features
↑ Back to top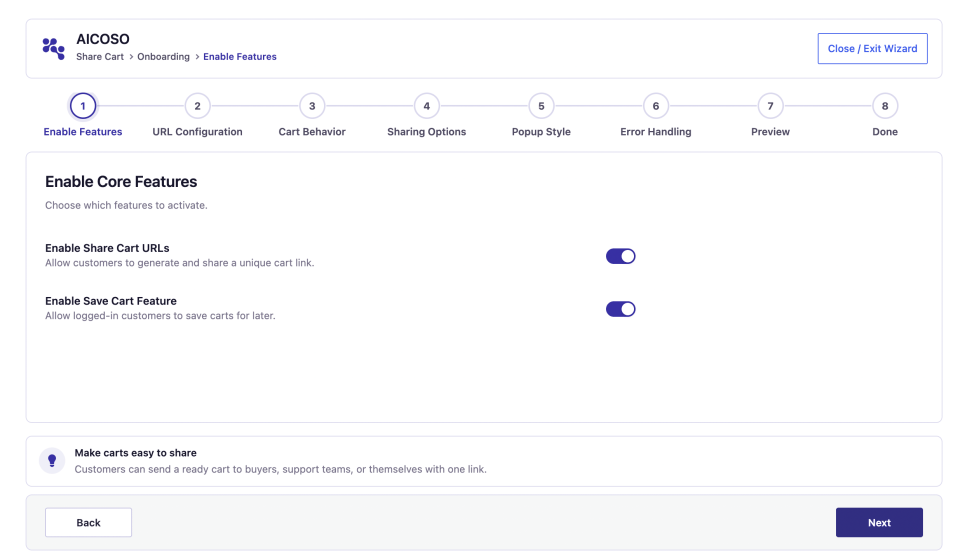
Enable the required features:
• Enable Share Cart URLs: allows your customers to share cart links.
• Enable Save Cart Feature: allows your logged-in customers to save carts to their accounts.
Enable both options if you want your shoppers to be able to share their carts publicly while also having the ability to return to them later. Click Next to proceed.
Step 3 URL Configuration
↑ Back to top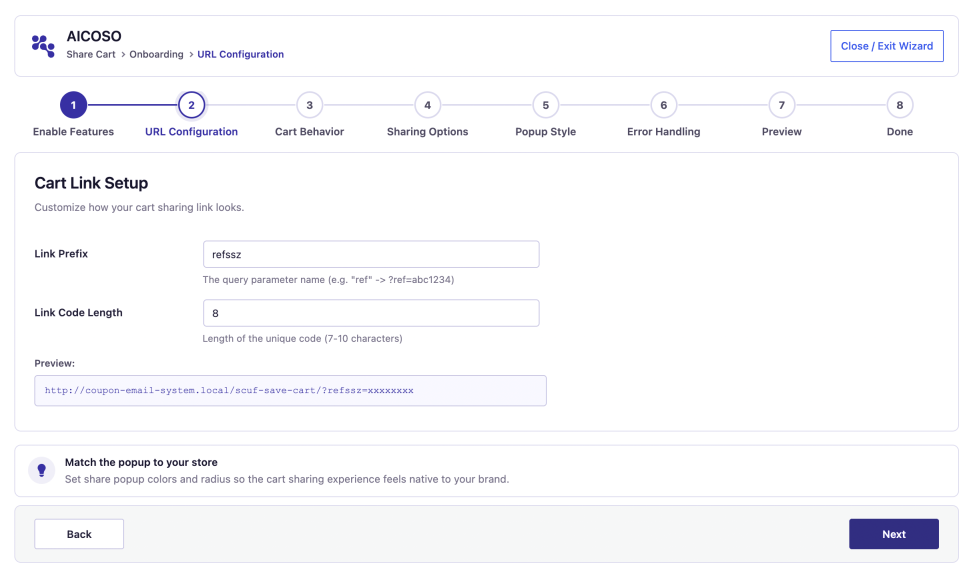
Set the Link Prefix and Link Code Length. The default Link Prefix is ref, and the Link Code Length contains between 7 and 10 randomly selected symbols. Review the preview and click Next.
When you share a cart, always use the actual shared cart link provided in the sharing UI. The preview is an example: the actual shared cart link will be formed from the current domain and the permalink structure.
Step 4 Cart Behaviour
↑ Back to top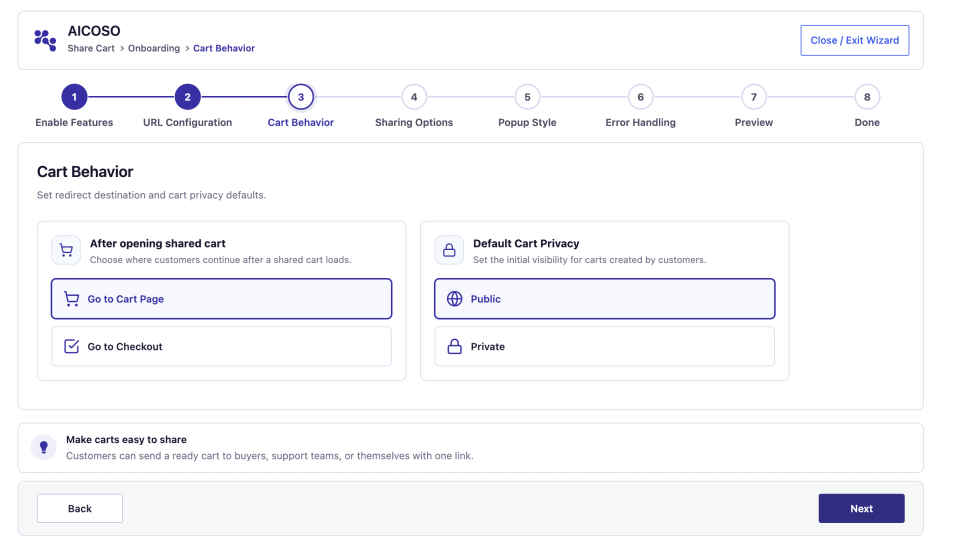
Select the default behavior when a shared cart is opened.
• Go to Cart Page allows the link opener to review the shared cart’s items before proceeding to checkout.
• Go to Checkout directs the link opener to the checkout page after the shared cart is restored.
Set the default cart privacy to Public or Private. Public shared links can be opened by anyone who knows the link, while Private links require the person to be logged in. This setting does not restrict the original cart owner: anyone can open a shared link to their private cart if they know it.
Step 5 Sharing Options
↑ Back to top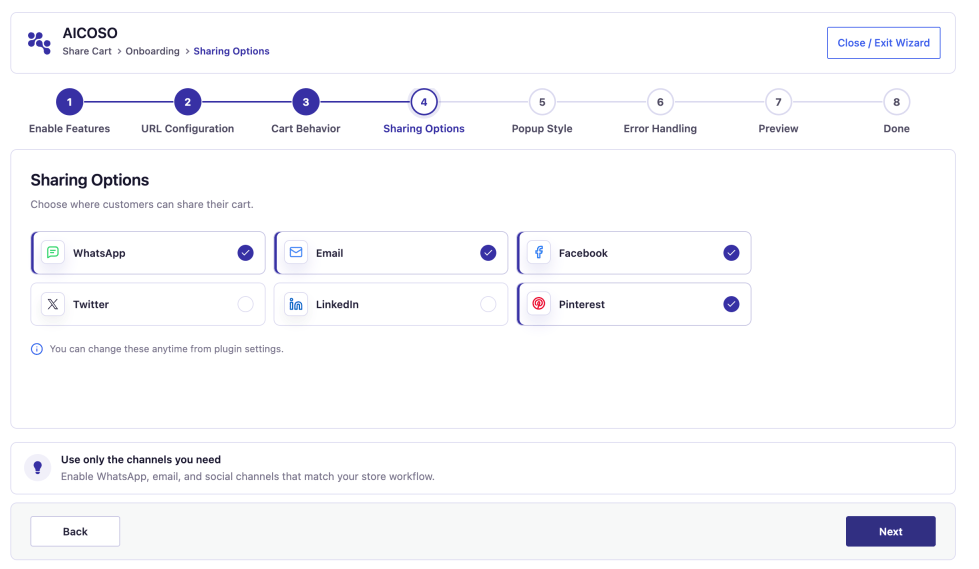
Select the social media channels your customers can use to share carts. You can also change the options at any time in the Settings > Sharing tab.
Step 6 Popup Style
↑ Back to top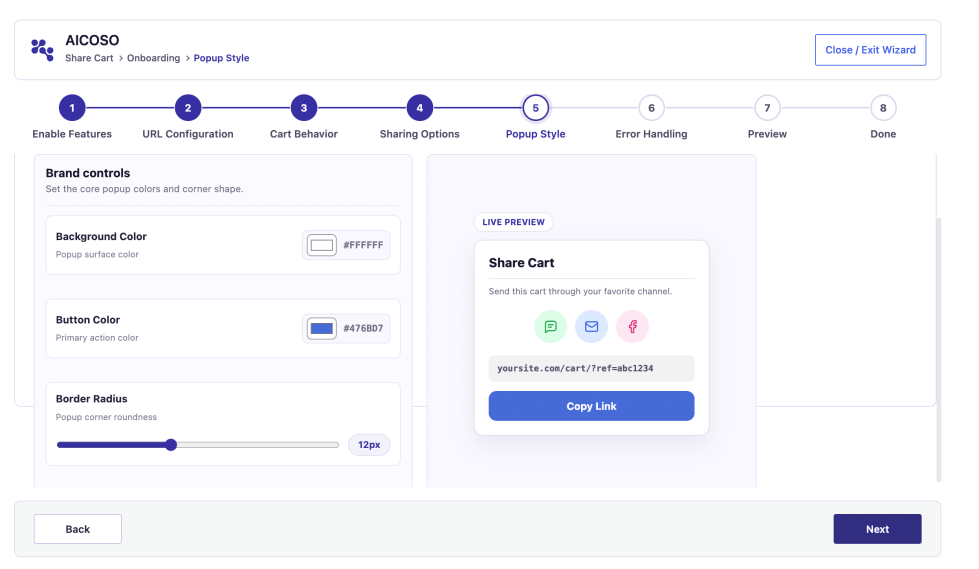
Select the Background Color, Button Color, and Border Radius for the sharing popup. Use the Preview section to review the changes. Several other options are available in the Settings > Popup Style > Advanced section.
Step 7 Error Handling
↑ Back to top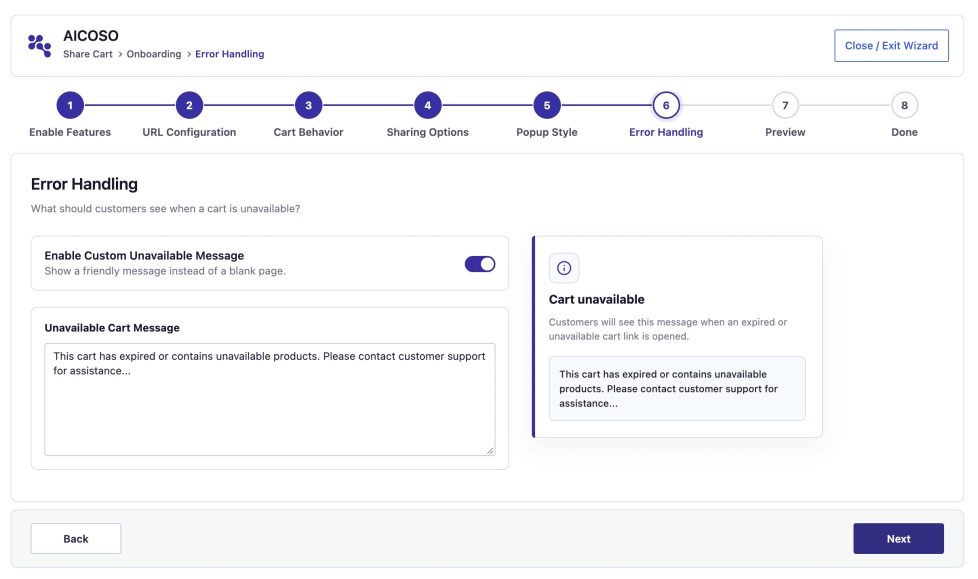
Enable the unavailable-cart custom message setting if you want your customers to see the message when their requested cart cannot be restored because none of the products in it are available. Type in the message text explaining the situation and what the customer can do next, for example, return to the shop or contact the support.
Step 8 Preview
↑ Back to top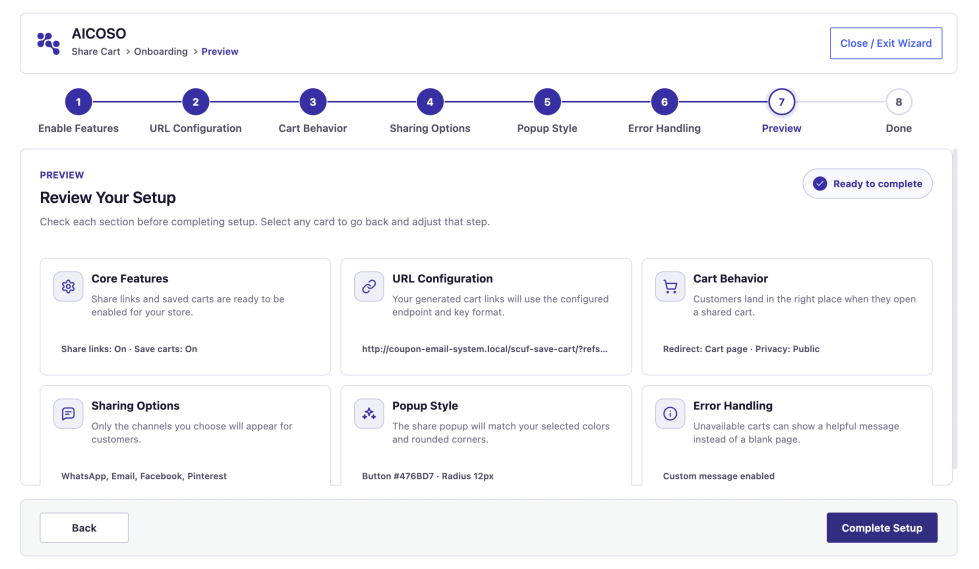
The Preview screen provides a summary of the most essential settings: features, URL configuration, cart behavior, sharing options, popup style, and error handling.
You can click through the cards to review individual settings or change them if necessary. When you are done, click Complete Setup.
Step 9 Done
↑ Back to topThe Done screen shows the links to the plugin settings and shared cart manager. It also asks for a review if you wish to share your opinion about the plugin. Once you are done, click through the test tasks to ensure the storefront sharing and saving flows work correctly.
Change settings after onboarding
↑ Back to topYou can change the settings by navigating to Share Cart > Settings and making the necessary changes.
The onboarding wizard only configures the most important options.
The Display settings, advanced popup style options, and MCP settings are available in the Settings tab.
Note that re-running the wizard will overwrite the settings managed by the onboarding screens. Always review the values covered by the wizard before re-applying it.
Backend settings
↑ Back to topOpen Share Cart > Settings, make the necessary changes, and click Save Settings.
The success message will appear at the top of the screen when the changes are successfully applied.
Only click Save Settings again after you have made the necessary changes, or the changes in the popup preview will not be saved.
General Settings
↑ Back to topLocation: Share Cart > Settings > General
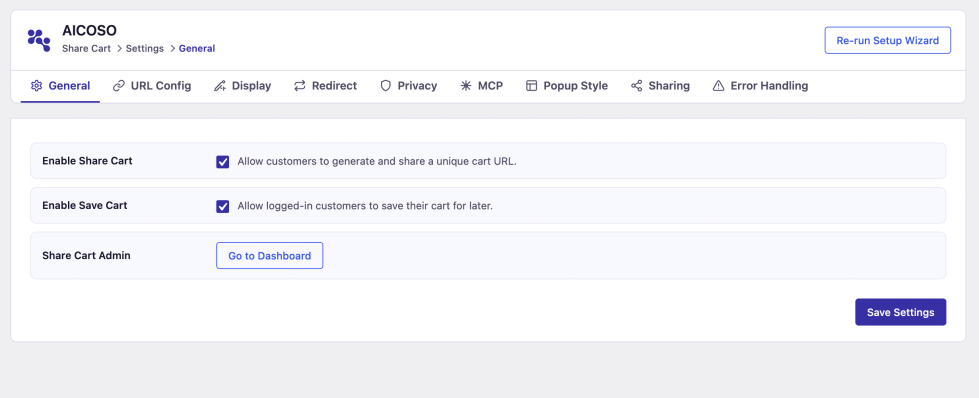
Setting Description
- Enable Share Cart Lets your customers generate and share cart links
- Enable Save Cart Lets your logged-in customers save carts to their accounts
- Go to Dashboard Lets you open the Dashboard screen By default, the features are enabled if no value is saved.
The customer flow is as follows.
- Open General.
- Enable Share Cart.
- Enable Save Cart if you want your customers to be able to save carts to their accounts.
- Click Save Settings.
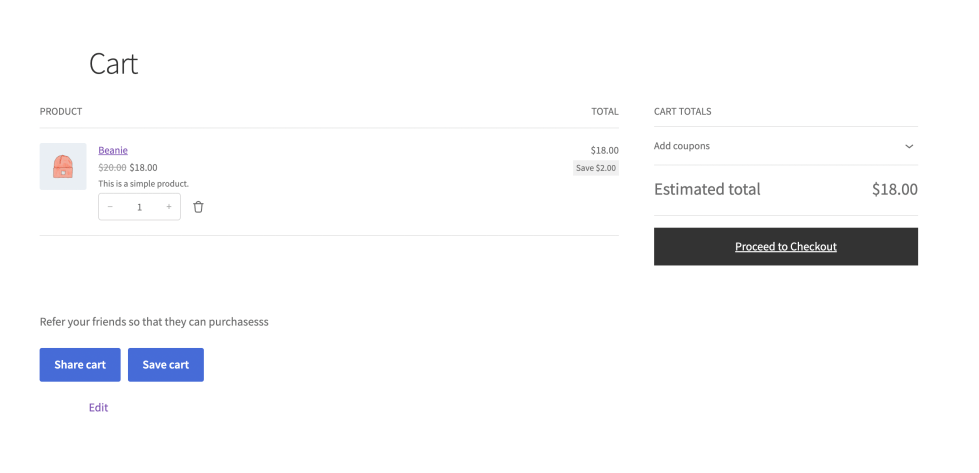
- Open the storefront Cart page with products in the cart.
- Ensure that the Share cart button is available. Log in to a customer account to ensure that the Save cart button is displayed.
URL Config
↑ Back to topLocation: Share Cart > Settings > URL Config
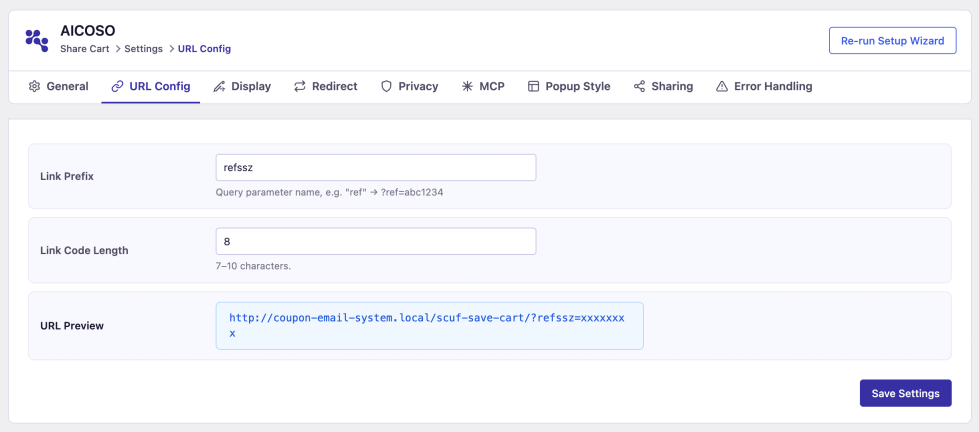
Setting Description:
- Link Prefix Lets you set the value used to generate cart links; the default value is ref
- Link Code Length Lets you set the length of the code part of the shared cart URL; the code length can be set between 7 and 10
- URL Preview Shows the example of a shared cart URL When you share a cart, the shared cart URLs are generated from your permalink routing.
The URL Preview only shows an example.
Customer flow
- Open URL Config Setting screen.
- Set the desired Link Prefix value.
- Set the desired Link Code Length between 7 and 10.
- Click Save Settings.
- Open a new cart in the storefront or Create New Cart.
- Copy the shared cart link and ensure that the routing works as expected.
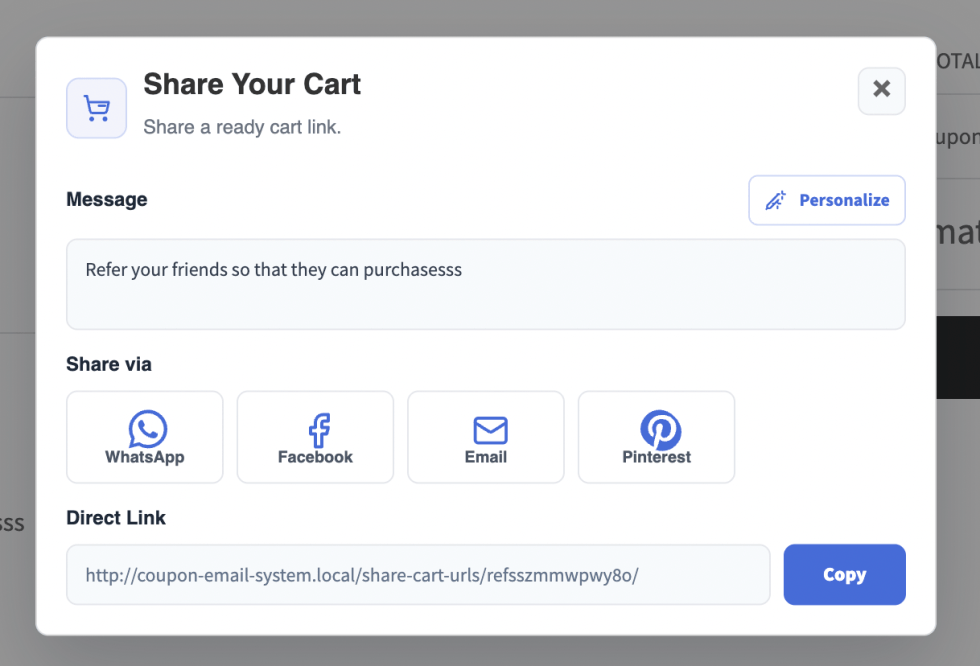
Note When you change these settings, the previously distributed shared cart links are not updated automatically. Always test the shared cart links distributed before changing your permalink routing separately.
Display Settings
↑ Back to topLocation: Share Cart > Settings > Display
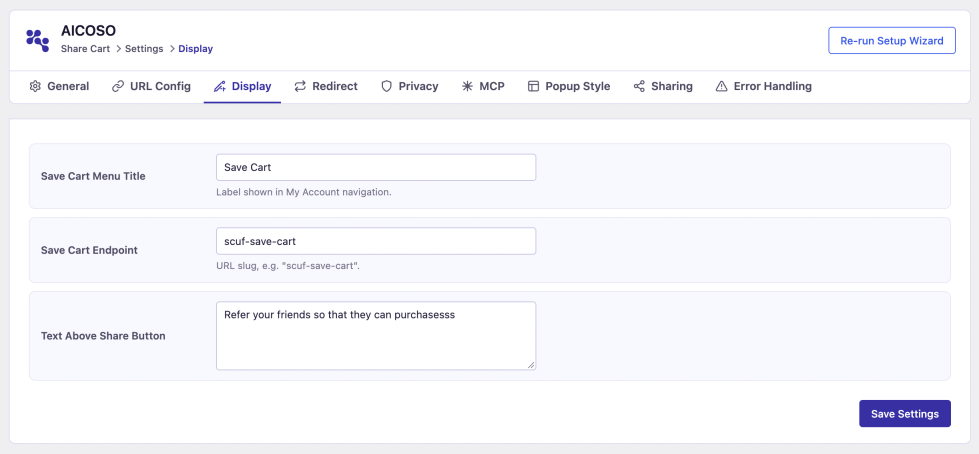
Setting Description:
- Save Cart Menu Title Lets you set the label used in the My Account navigation to identify saved carts.
- Save Cart Endpoint Lets you set the URL slug used to access saved carts; the default value is scuf-save-cart
- Text Above Share Button Lets you set the text displayed above the Share cart button in the storefront
The values of these fields are independent, the Save Cart Menu Title sets the label shown to the customer, while the Save Cart Endpoint defines the URL slug used to access the saved carts page.
Customer flow
- Open Display.
- Set the desired value for Save Cart Menu Title.
- Set the desired value for Save Cart Endpoint ensuring that it is unique across the My Account endpoints.
- Set the desired value for Text Above Share Button.
- Click Save Settings.
- Log in to a customer account and open My Account to ensure that the Menu Title is displayed as set and the navigation destination works.
- Open the Cart page and ensure that the Text Above Share Button is displayed as set.
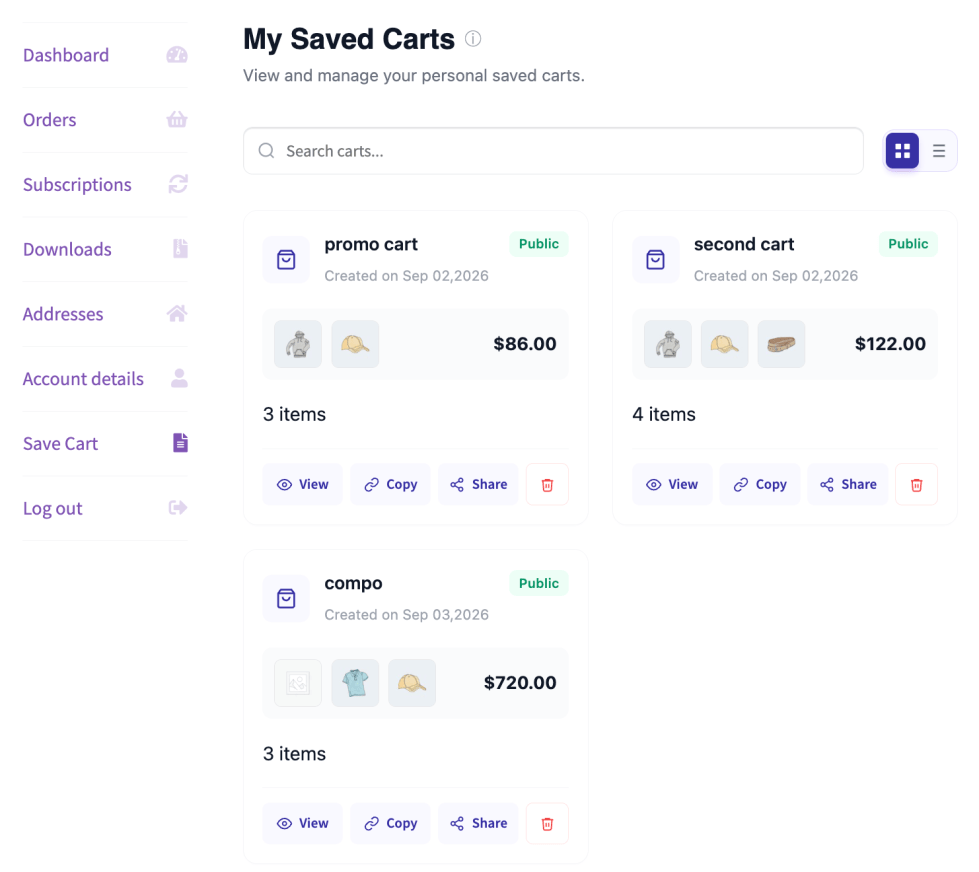
The plugin schedules a rewrite refresh to update the permalinks when the Save Cart Endpoint is changed.
If the new URL slug still shows a 404 error, open Permalinks in the WordPress settings and click Save Changes to refresh the permalinks. The bookmarked URLs using the old slug will need to be updated.
Redirect
↑ Back to topLocation: Share Cart > Settings > Redirect
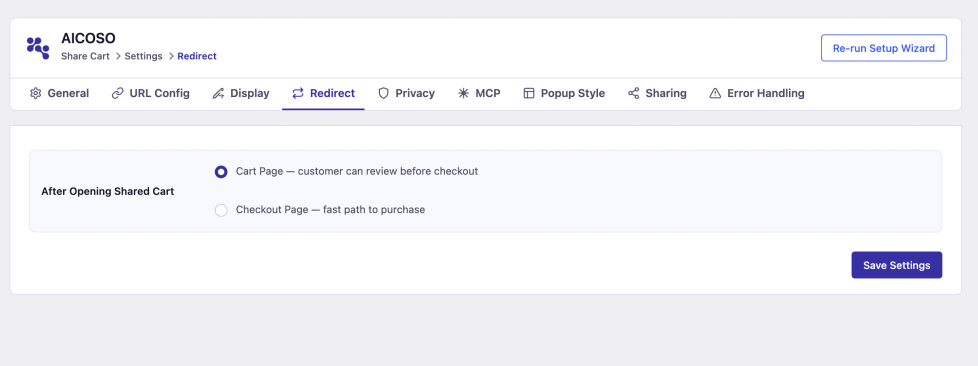
When you Open Shared Cart, you can choose between the following two behaviors:
• Cart Page: the shared cart items are displayed on the Cart page
• Checkout Page: the shared cart items are displayed on the Checkout page By default, the shared carts are displayed on the Cart page.
This setting only affects the default behavior when a shared cart is opened; it does not change the general behavior of the Checkout process.
Customer flow:
- Open Redirect.
- Set the desired behavior to Cart Page or Checkout Page.
- Click Save Settings.
- Open a valid shared cart in a separate session.
- Ensure that the shared cart items are displayed on the Cart or Checkout page, depending on the setting.
Privacy
↑ Back to topLocation: Share Cart > Settings > Privacy
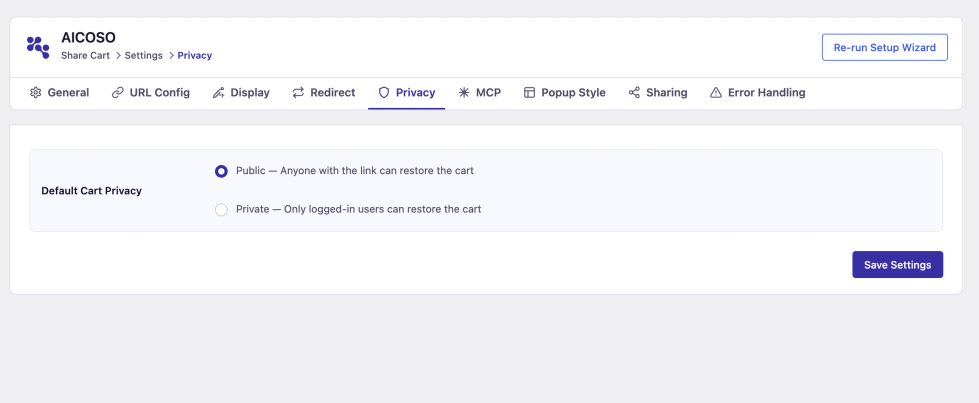
Privacy Setting Description:
Public: Anyone with the shared cart link can view the cart
Private: Only the customer who is logged in can view the cart A private cart is only visible to the customer who is logged in when the link is opened.
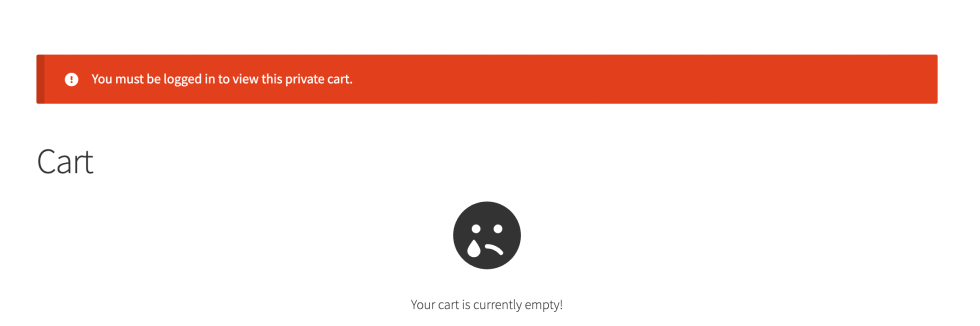
The private cart does not have additional security measures such as password protection, restricted sharing, or an owner-only viewing. The customer’s saved carts are always available to them through their My Account area, which is a separate privacy mechanism.
Customer flow:
- Open Privacy.
- Set the desired default cart privacy.
- Click Save Settings.
- Create a new shared cart link and review its privacy badge or edit form if available.
Open a shared cart link while logged out and ensure that the default privacy behavior is respected. Administrators can set the privacy value explicitly when creating or editing the shared cart link.
Sharing Settings
↑ Back to topLocation: Share Cart > Settings > Sharing
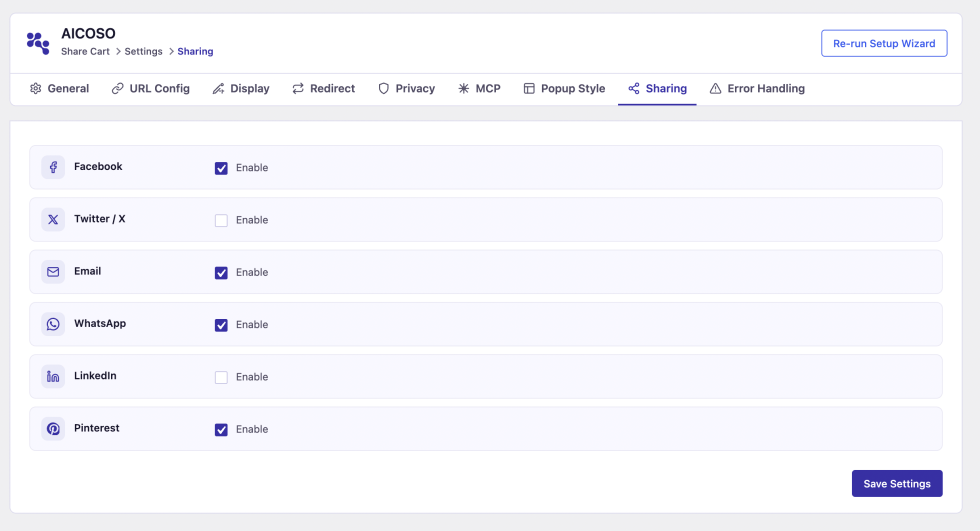
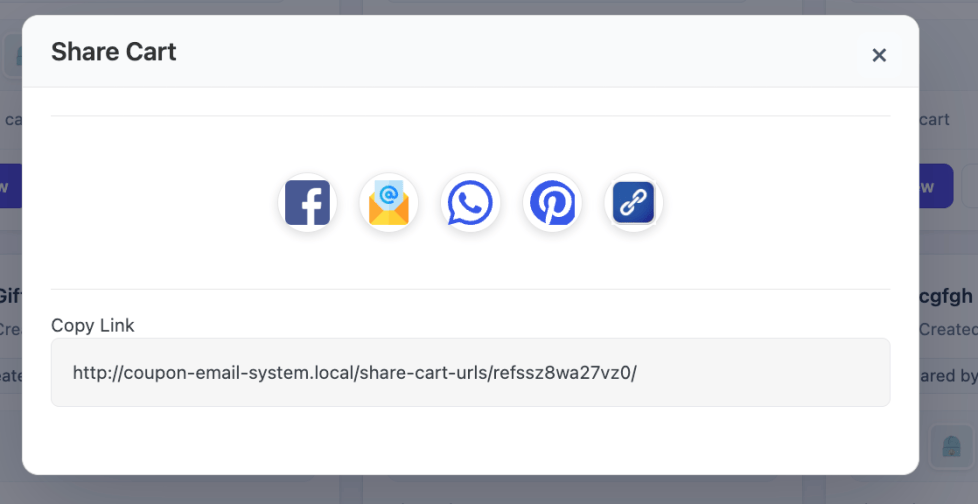
Enable or disable the Facebook, Twitter/X, Email, WhatsApp, LinkedIn, and Pinterest sharing buttons. Direct link copying is always available in the sharing popup.
Customer flow:
- Open Sharing.
- Enable the sharing channels available in your store and disable the ones you do not want your customers to see.
- Click Save Settings.
- Open the sharing popup in the storefront.
- Review the sharing buttons and ensure that the desired channels are available.
- Click through the enabled channels and ensure that the sharing destination works as expected.
- Choosing a sharing channel only prepares the share request; the customer still needs to complete the action in the selected social media channel.
The Email channel will open the email client; it does not send an email notification from your store directly.
The social media channels only act as a medium for sharing the link.
The Analytics screen will show channel attributes for the channels not covered by the six available sharing buttons. A channel name displayed in the reports does not necessarily correspond to an available sharing button. If you see a channel in the reports that you do not see as a button in the sharing popup, it means that some of your customers are using direct URL copying or an unofficial method to share carts.
Popup Style
↑ Back to topLocation: Share Cart > Settings > Popup Style
Select between the Basic and Advanced mode.
The Live Preview section shows how the preview area would look like on Desktop and Mobile.
In the Basic mode, you can set the following three values:
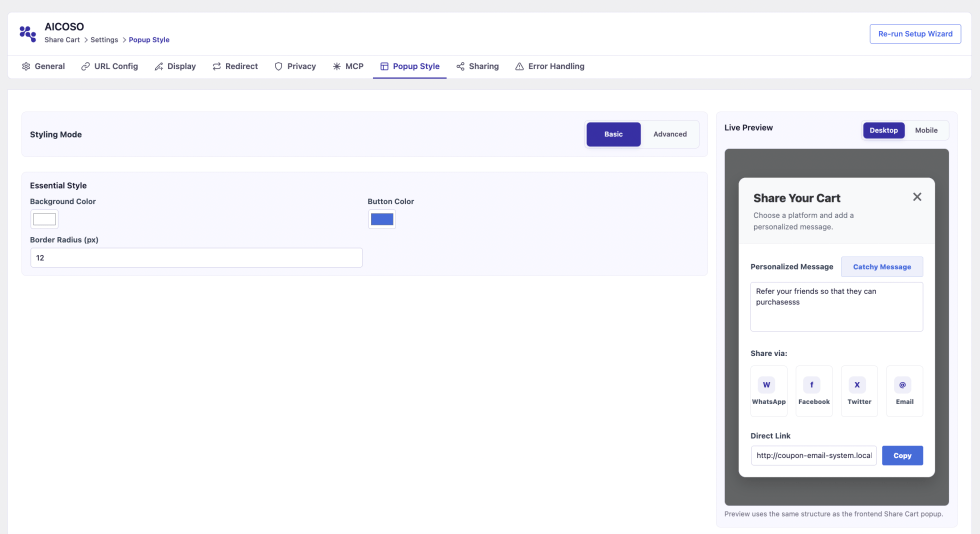
- Background Color Sets the background color of the sharing popup
- Button Color Sets the background color of the primary buttons
- Border Radius Sets the border radius of the popup corners
In the Advanced mode, you can also set the following controls:
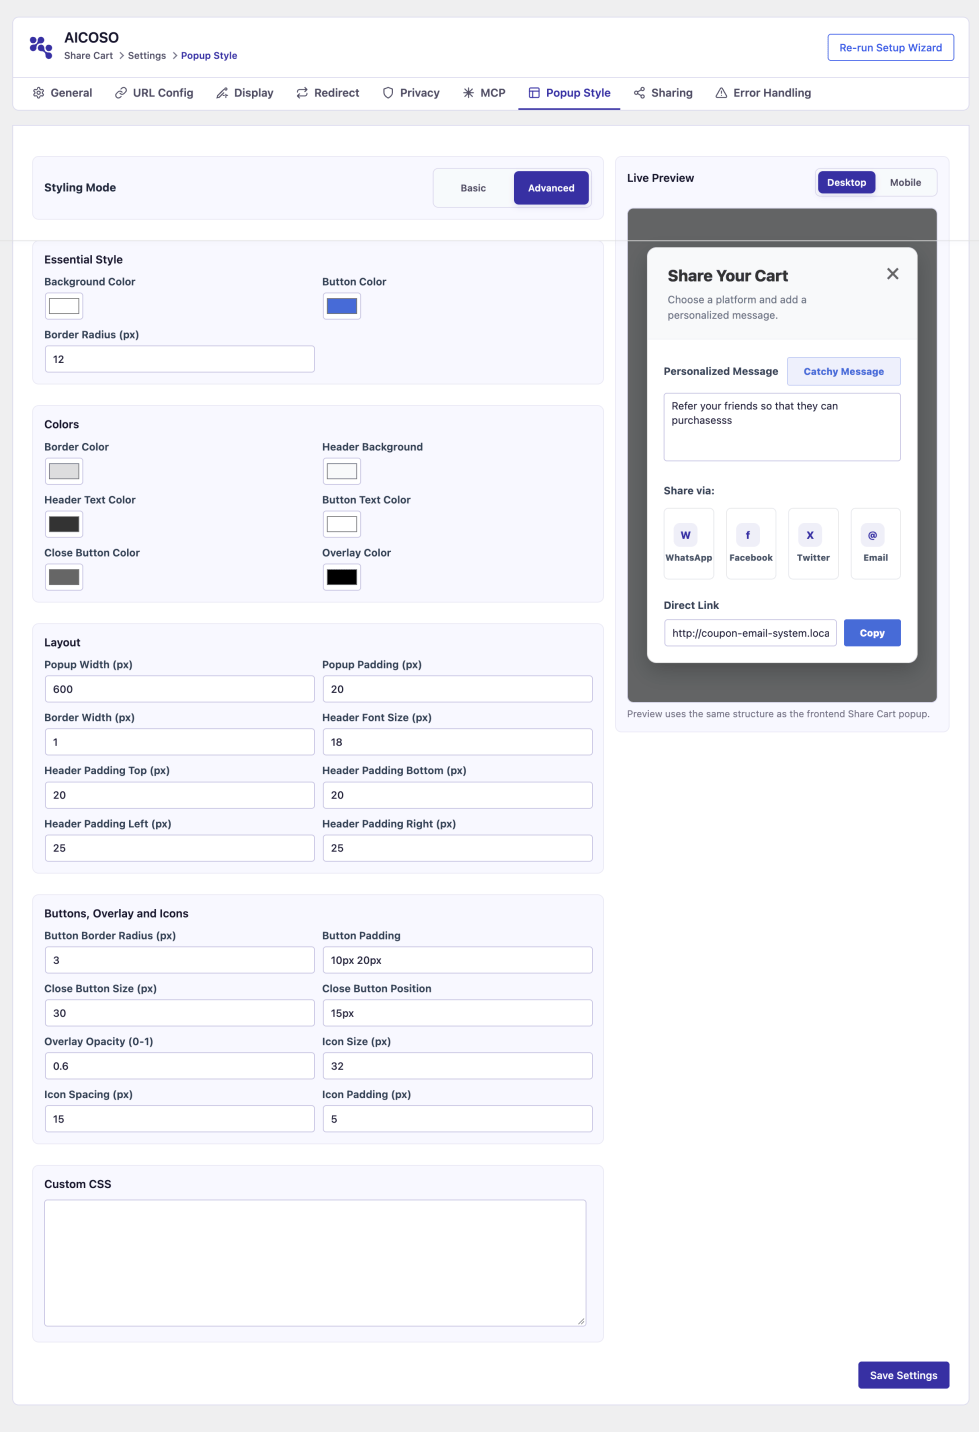
Colors :
Set the border color, header background and text color, button text color, close button color, and overlay color Layout Set the popup width, padding, border width, header font size, and header padding top/bottom/left/right Buttons Set the button border radius, padding, close button size, and position Overlay Set the overlay opacity from 0 (fully transparent) to 1 (fully opaque) Icons Set the icon size, spacing, and padding Custom CSS Set the additional CSS rules for advanced styling Most controls use pixels as units of measurement.
Error Handling
↑ Back to topLocation: Share Cart > Settings > Error Handling
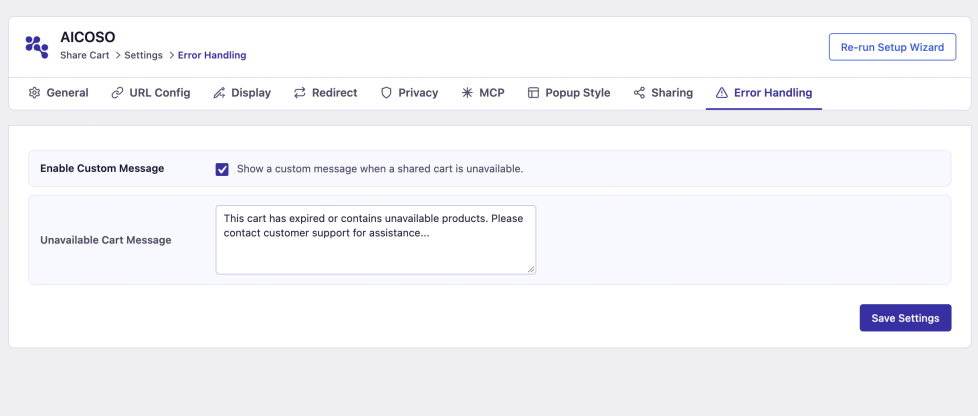
Setting Description:
Enable Custom Message Lets you enable the unavailable-cart custom message Unavailable Cart Message Lets you set the unavailable-cart message shown to the customers
Customer flow:
- Open Error Handling.
- Enable the Enable Custom Message option.
- Set the Unavailable Cart Message to your desired value.
- Click Save Settings.
- In a test store, create a shared cart with products and ensure that the unavailable-cart message displays when the link is opened in a different session after all the products in the shared cart are marked as unavailable.
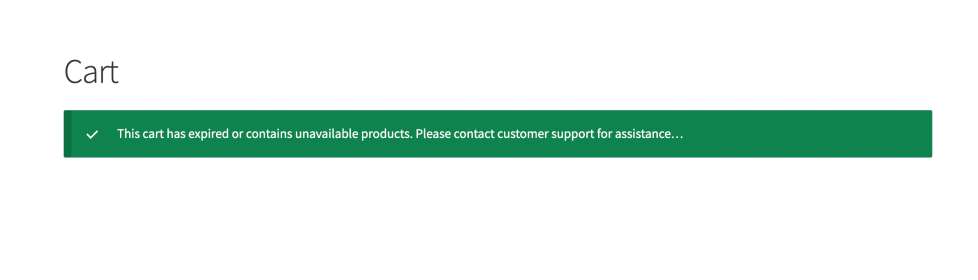
When the unavailable-cart message is enabled, it will be displayed when all the items in the shared cart are unavailable or when the restored empty cart has no available items.
Note This setting only overrides the default WordPress behavior for unavailable products and empty carts. It does not affect the other WordPress, WooCommerce, or plugin-specific error messages such as 404, unauthorized access notices, and other product availability issues.
MCP Integration
↑ Back to topLocation: Share Cart > Settings > MCP
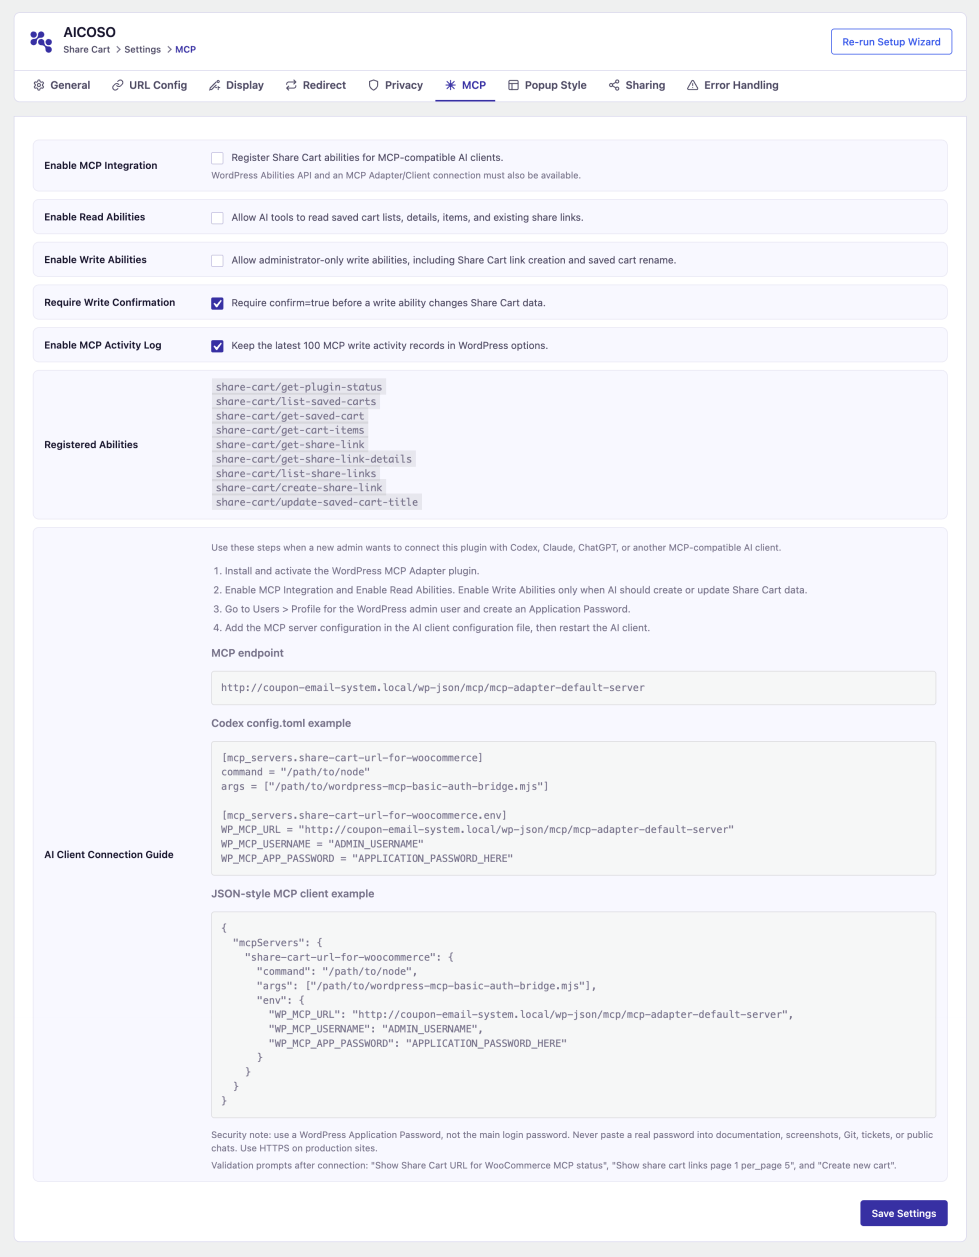
MCP (Model Context Protocol) integration allows compatible AI clients to work with Share Cart URL for WooCommerce. Once connected, you can use natural-language requests to inspect saved carts, retrieve existing shared links, create share links, and rename saved carts.
The integration uses the WordPress Abilities API and requires an MCP Adapter and a compatible AI client. Enabling the setting registers the plugin’s abilities; you must also configure the connection in your AI client.
Dashboard
↑ Back to topLocation: Share Cart > Dashboard
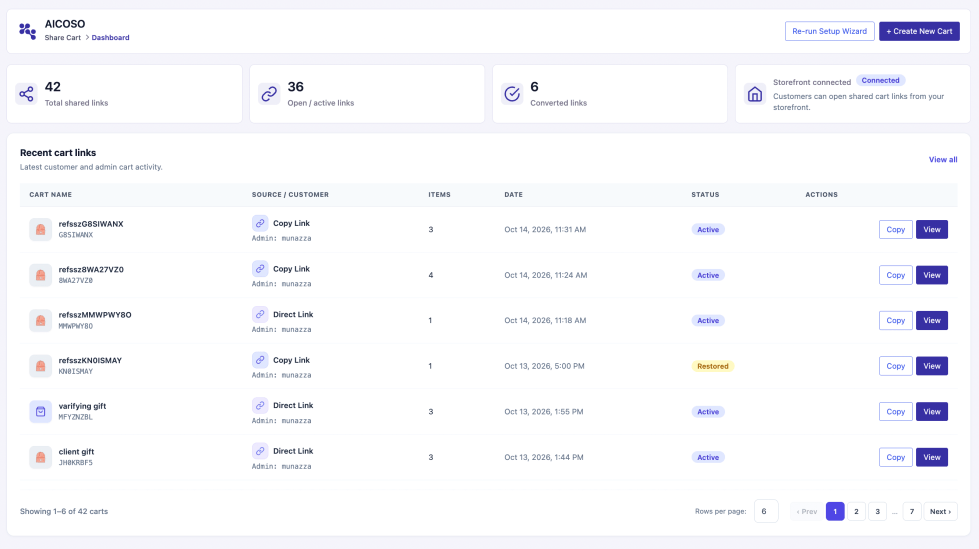
The Dashboard screen provides an overview of shared cart activity. It displays the links to essential areas such as your shared links list and saved carts, event tracking and statistics, and some helpful shortcuts. It also lets you quickly configure the most essential aspects of the shared cart experience.
1. MCP settings
↑ Back to topEnable MCP Integration: Registers Share Cart abilities for use through an MCP-compatible connection. The WordPress Abilities API and an MCP Adapter/client connection must also be available.
Enable Read Abilities: Allows AI tools to read saved cart lists, cart details, cart items, and existing share links
Enable Write Abilities: Allows administrator-only actions, including creating Share Cart links and renaming saved carts.
Require Write Confirmation: Requires a write request to include confirm=true before it changes Share Cart data.
Enable MCP Activity Log: Stores the latest 100 MCP write activity records in WordPress options.
For an initial connection, enable MCP Integration and Read Abilities. Enable Write Abilities when you want the AI client to create links or rename saved carts.
Keep Require Write Confirmation enabled if you want write requests to require an explicit confirmation value. Click Save Settings after making changes.
2. Before connecting an AI client
↑ Back to top- Share Cart URL for WooCommerce and WooCommerce are installed and active.
- The WordPress Abilities API is available on your site.
- The WordPress MCP Adapter plugin is installed and active.
- You have an MCP-compatible AI client.
- You have a WordPress administrator account and an Application Password for that account.
- Any bridge software required by your chosen client connection method is available.
The examples displayed on the MCP settings page use Node.js and a bridge file named wordpress-mcp-basic-auth-bridge.mjs. You will need the actual bridge file and its location on your computer to use those examples.
3. Connect your AI client
↑ Back to top- Open Share Cart > Settings > MCP.
- Enable MCP Integration and Read Abilities.
- Enable Write Abilities if required.
- Click Save Settings.
- Open Users > Profile for the WordPress administrator account you will use for the connection.
- Create an Application Password and store it securely.
- Return to the MCP settings page and locate AI Client Connection Guide.
- Copy the MCP endpoint and use the configuration example appropriate for your AI client.
- Replace the example values with your Node.js executable path, bridge file path, WordPress username, and Application Password.
- Save the client configuration and restart the AI client.
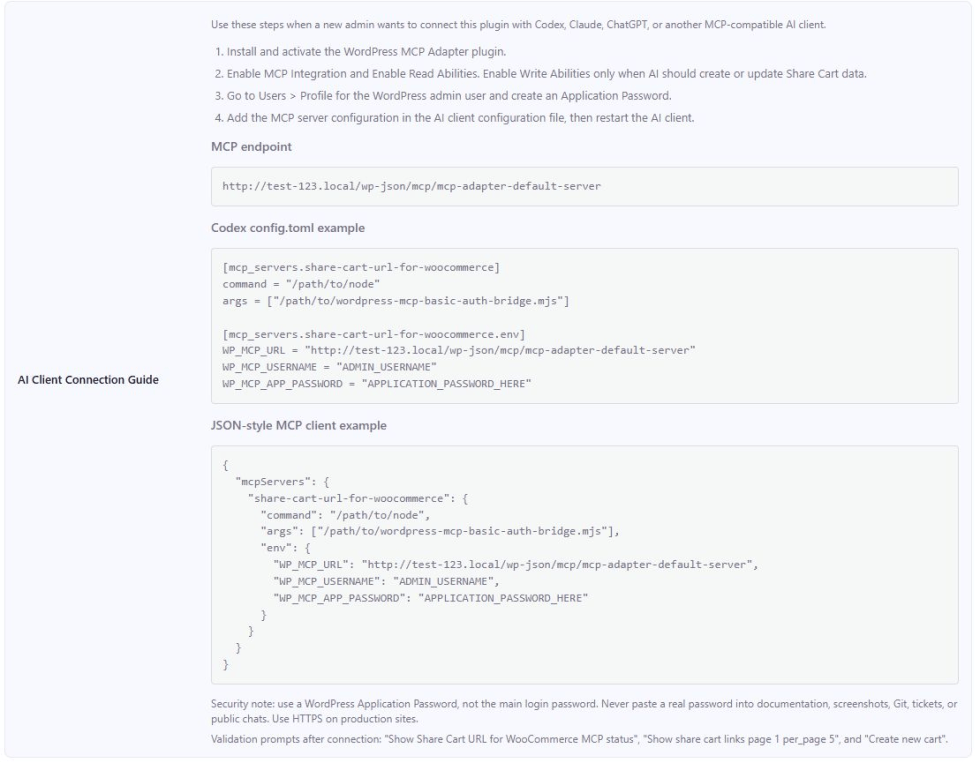
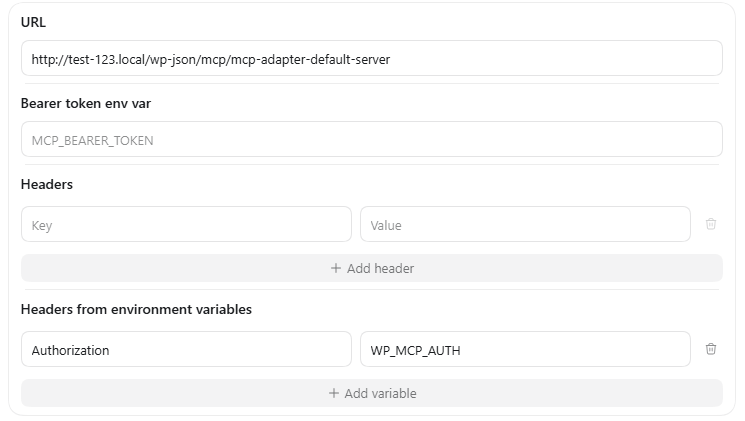
Important: Use the MCP endpoint, rather than the WordPress administration page URL.
The endpoint displayed on the settings page follows this structure:
https://your-store.com/wp-json/mcp/mcp-adapter-default-server| Configuration value | What to enter |
| command | The path to the Node.js executable. |
| args | The path to the required bridge file. |
| WP_MCP_URL | The MCP endpoint shown in your store’s MCP settings. |
| WP_MCP_USERNAME | The WordPress administrator username used for the connection. |
| WP_MCP_APP_PASSWORD | An Application Password created for that user. |
Security note: Use a WordPress Application Password instead of your main login password. Use HTTPS on production sites. Replace credentials with placeholders in screenshots, documentation, and shared configuration examples.
4. Check the connection
↑ Back to topStart with a request that reads information:
- “Show Share Cart URL for WooCommerce MCP status.”
- “Show share cart links page 1 per_page 5.”
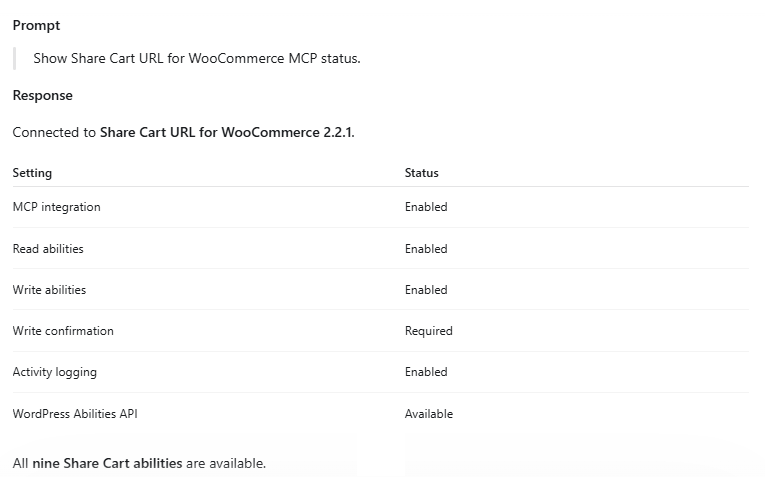
Check that the client returns information from the intended store. If you plan to use write abilities, test those separately with a sample cart after verifying read access.
5. Available MCP abilities
↑ Back to topThe MCP settings page lists the following abilities. Their availability depends on the enabled settings and the connected user’s permissions.
| Ability | Purpose |
| share-cart/get-plugin-status | Checks the plugin’s MCP status. |
| share-cart/list-saved-carts | Lists saved carts. |
| share-cart/get-saved-cart | Retrieves details for a saved cart. |
| share-cart/get-cart-items | Retrieves a cart’s items. |
| share-cart/get-share-link | Retrieves an existing share link. |
| share-cart/get-share-link-details | Retrieves details about a share link. |
| share-cart/list-share-links | Lists share links. |
| share-cart/create-share-link | Creates a share link. Requires write access and administrator permissions. |
| share-cart/update-saved-cart-title | Renames a saved cart. Requires write access and administrator permissions. |
6. Inspect carts and links
↑ Back to topUse the connected AI client to find a cart, inspect its contents, or retrieve an existing link. Example requests:
- “List my saved carts.”
- “Show the details and items for saved cart [cart identifier].”
- “List the existing Share Cart links.”
- “Show the details for share link [link identifier].”
- “Retrieve the existing share link for this cart.”
Replace bracketed text with an identifier returned by the client. If several carts match your request, identify the correct cart before continuing.
7. Create a share link
↑ Back to top- Enable Write Abilities and save the settings.
- Ask the AI client to identify the cart you want to share.
- Review the selected cart.
- Ask the client to create a share link.
- If Require Write Confirmation is enabled, the write request must include confirm=true.
- Copy the returned link and test it in a separate browser session.
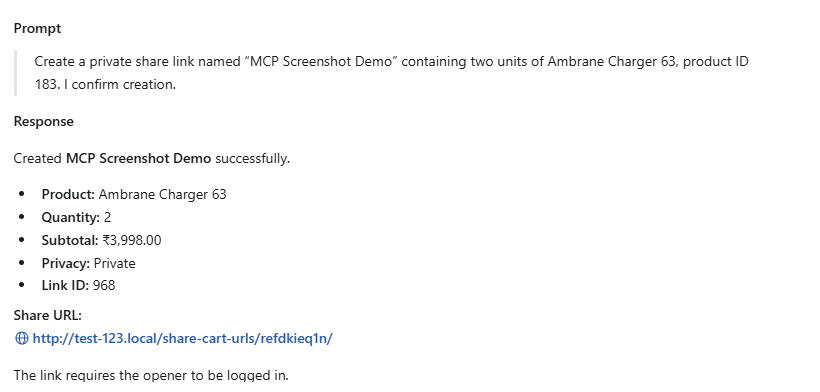
Example request: “Create a share link for this cart. Show me the cart you will use before creating the link.”
Natural-language approval and the ability’s confirmation parameter are separate: when confirmation is required, the client must submit confirm=true in the write request.
8. Rename a saved cart
↑ Back to top- Ask the AI client to locate the saved cart.
- Check the cart identifier and current title.
- Provide the new title.
- Confirm the write request if required.
- Open Share Cart > Saved Carts and verify the updated title.
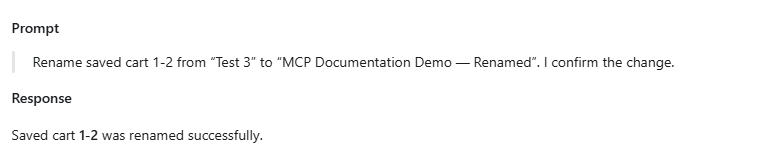
Example request: “Rename saved cart [cart identifier] to ‘Monthly Office Supplies’.”
This action updates the saved cart’s title.
9. Troubleshooting
↑ Back to top| Issue | What to check |
| The AI client cannot connect | Verify the endpoint, MCP Adapter activation, credentials, and client configuration. If using the displayed bridge examples, check Node.js and the bridge file path. |
| Share Cart abilities are unavailable | Check that MCP Integration is enabled and that the WordPress Abilities API and MCP Adapter are available. Restart the client after changing its configuration. |
| Cart or link information cannot be retrieved | Check Read Abilities, the connected user’s permissions, and the requested cart or link identifier. |
| Creating a link or renaming a cart fails | Check Write Abilities and ensure that the connection uses an administrator account. |
| A write request requires confirmation | When Require Write Confirmation is enabled, the request must include confirm=true. |
| A local store cannot be reached | Confirm that the client or bridge can access the local store address. A .local address may be accessible only from your development computer. |
Shared Links and administrator-created carts
↑ Back to topLocation: Share Cart > Shared Links
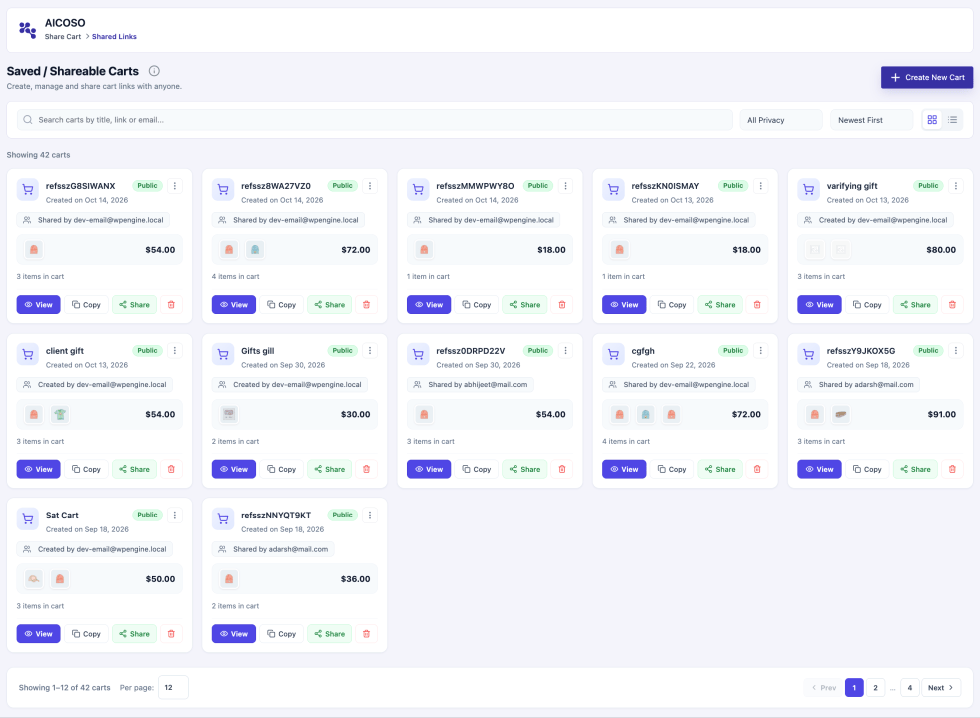
The Shared Links screen lets you create and manage the shared cart links created by administrators.
You can mass delete expired, canceled, or otherwise invalid links by using the checkboxes on the left and clicking Delete Expired or Delete Selected. The links created by the site administrator appear at the top of this screen.
Manage Cart
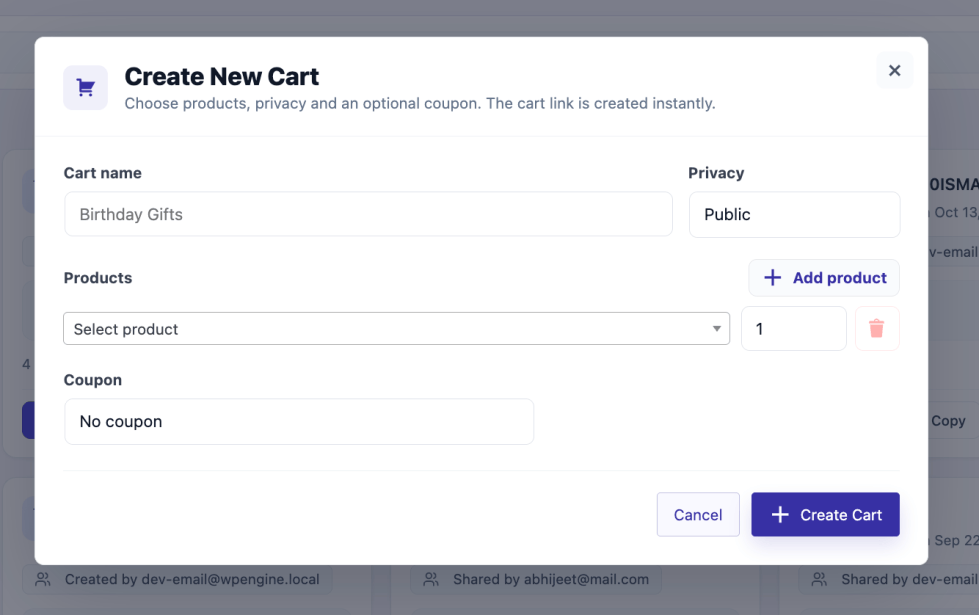
↑ Back to top- Create New Cart: Click the “+ Create New Cart” button on top right to open the popup of cart creation.
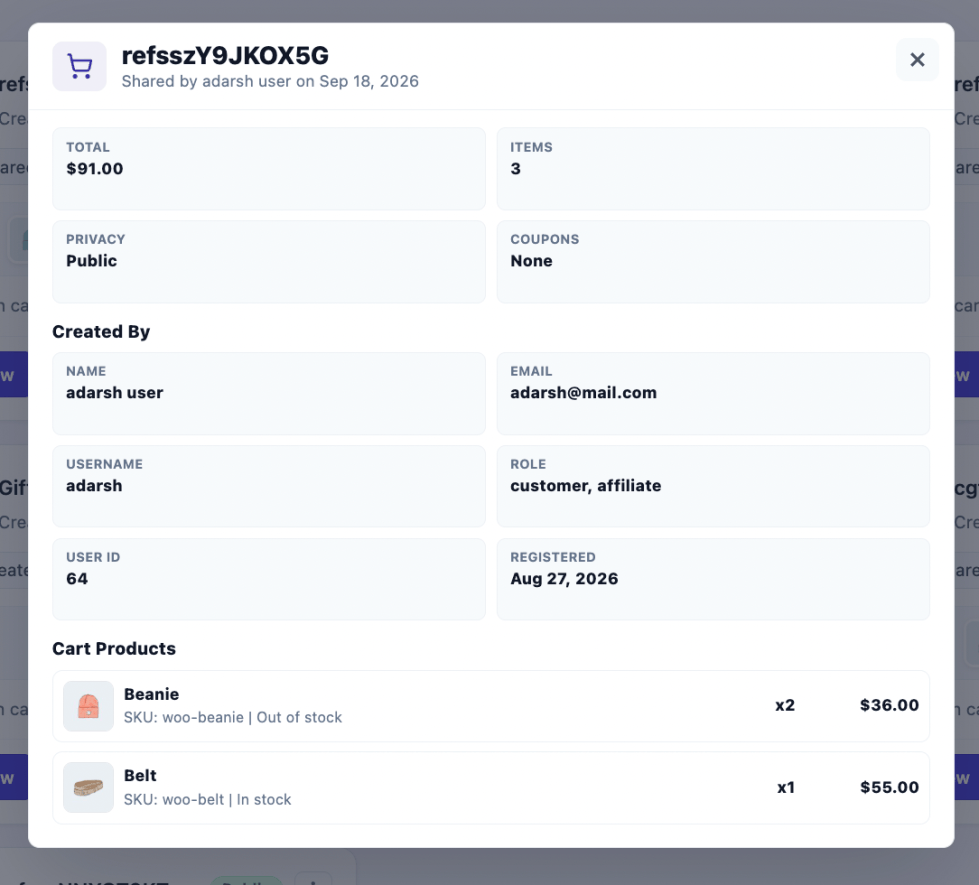
- View Cart: You can Click the “View Cart”button of every cart to see the details
- Share Cart: This Button opens the popup which displays all the sharing channels.
Saved Carts in the administration area
↑ Back to topLocation: Share Cart > Saved Carts
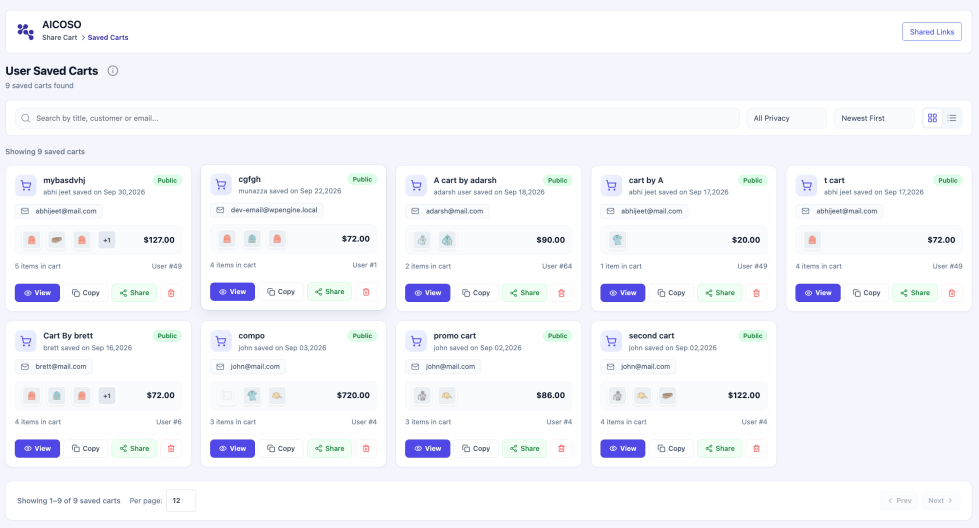
The Saved Carts screen lets you view the carts saved by your website’s customers.
You can also filter the displayed carts based on the cart owner, expiration date, privacy, and other criteria. To change the default expiration date, click Edit at the top right corner.
Find a customer saved cart
- Open Saved Carts.
- Search by title, customer, or email.
- Filter by privacy and sort by date or name.
- Choose Grid or List view.
- Adjust Per page and browse with Prev/Next.
Cards show the saved-cart title, privacy, product information, customer information, and saved date where recorded.
Inspect and share a saved cart
↑ Back to top- Click View to inspect products, quantities, total, coupons, privacy, and saved-by details.
- Close the modal.
- Click Copy to obtain a shareable link or Share to prepare a sharing action.
- Test the generated URL in another session.
- Send it through the desired channel.
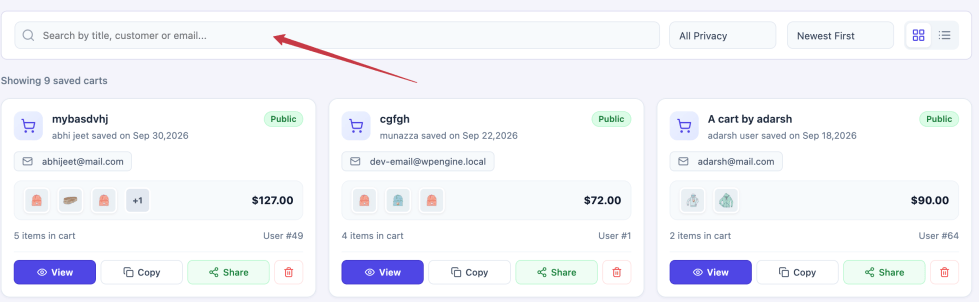
A saved cart belongs to a customer account. Preparing its shareable URL creates or refreshes a separate shared-link record, which can then appear under Shared Links.
Delete a customer saved cart
↑ Back to top- Locate the correct customer and cart.
- Click the delete action.
- Confirm Delete this saved cart?
- Check that it no longer appears in the administration list or the customer’s saved-cart list.
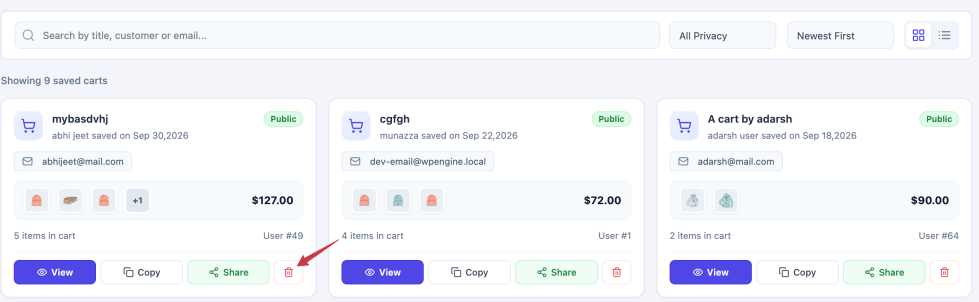
Analytics
Location: Share Cart > Analytics
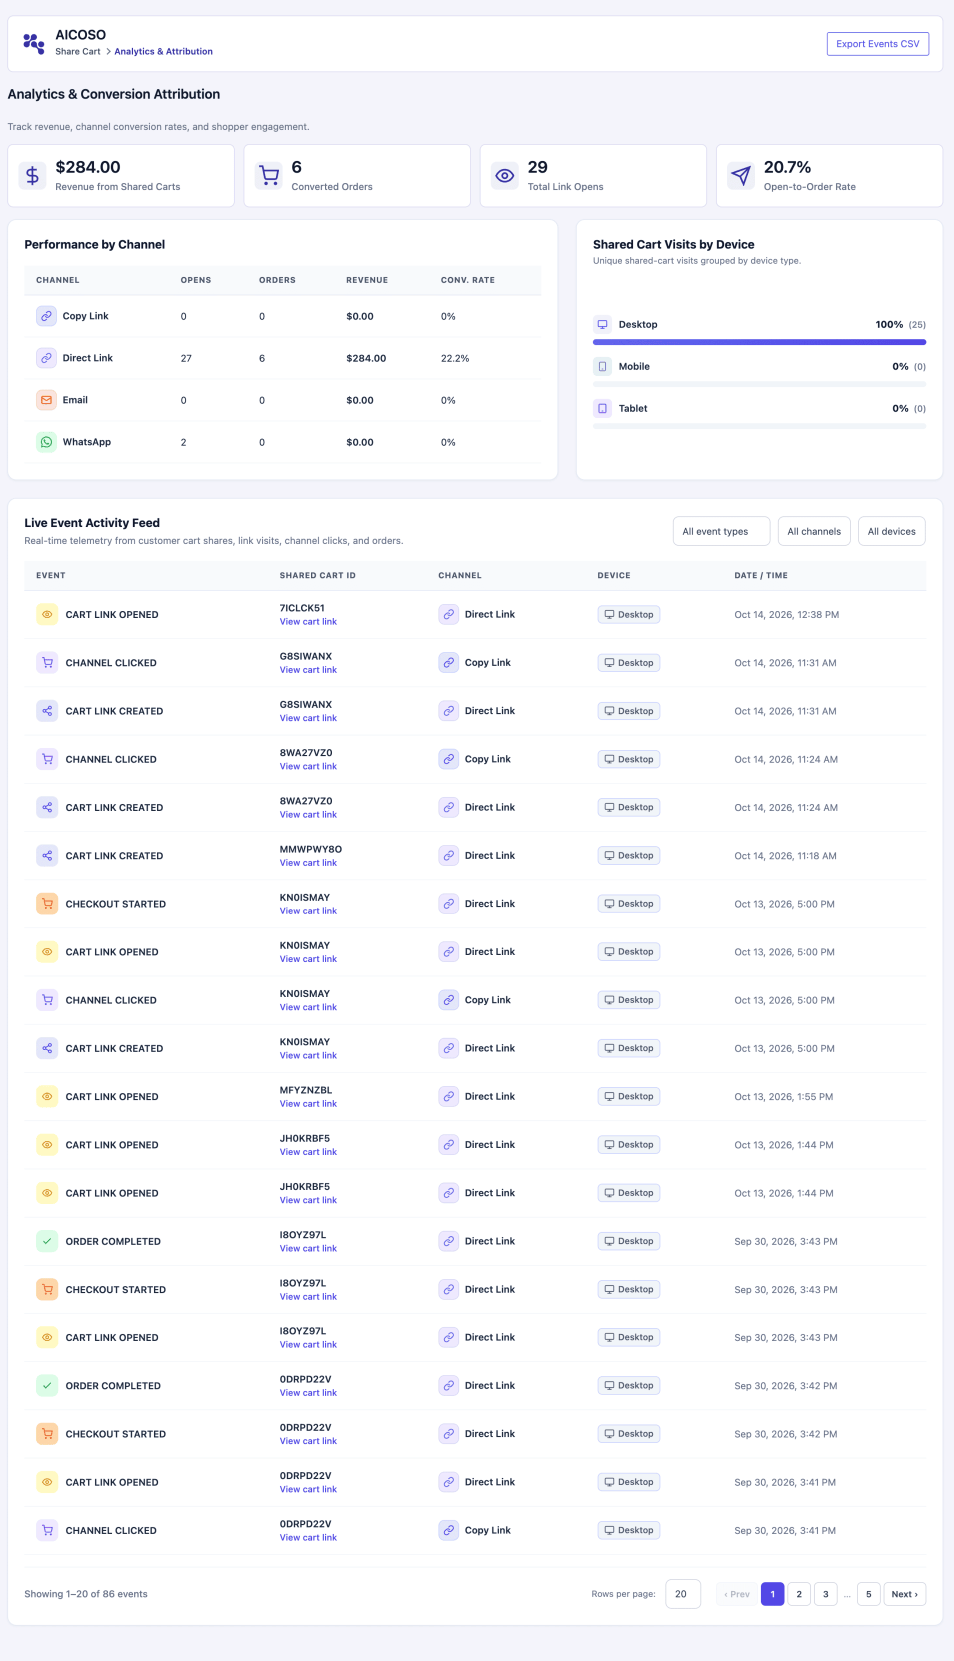
Analytics shows recorded interactions with shared carts, attributed orders and revenue, channel performance, device distribution, and an event feed.
Summary metrics
↑ Back to topRevenue from Shared Carts: Accumulated order totals recorded against shared carts
Converted Orders: Attributed order events recorded during checkout order creation
Total Links Open: Recorded shared-cart open count
Open-to-Order Rate: Attributed orders divided by recorded opens, multiplied by 100
An order is recorded through checkout processing. Converted Orders and the Order Completed event label do not mean the WooCommerce order has reached Completed status or that payment has settled.
Performance by Channel
↑ Back to topThe channel table shows Channel, Opens, Orders, Revenue, and Conv. Rate. Use it to compare recorded activity for channels such as WhatsApp, X, Email, Copy Link, and Direct Link.
Shared Cart Visits by Device
↑ Back to topLive Event Activity Feed
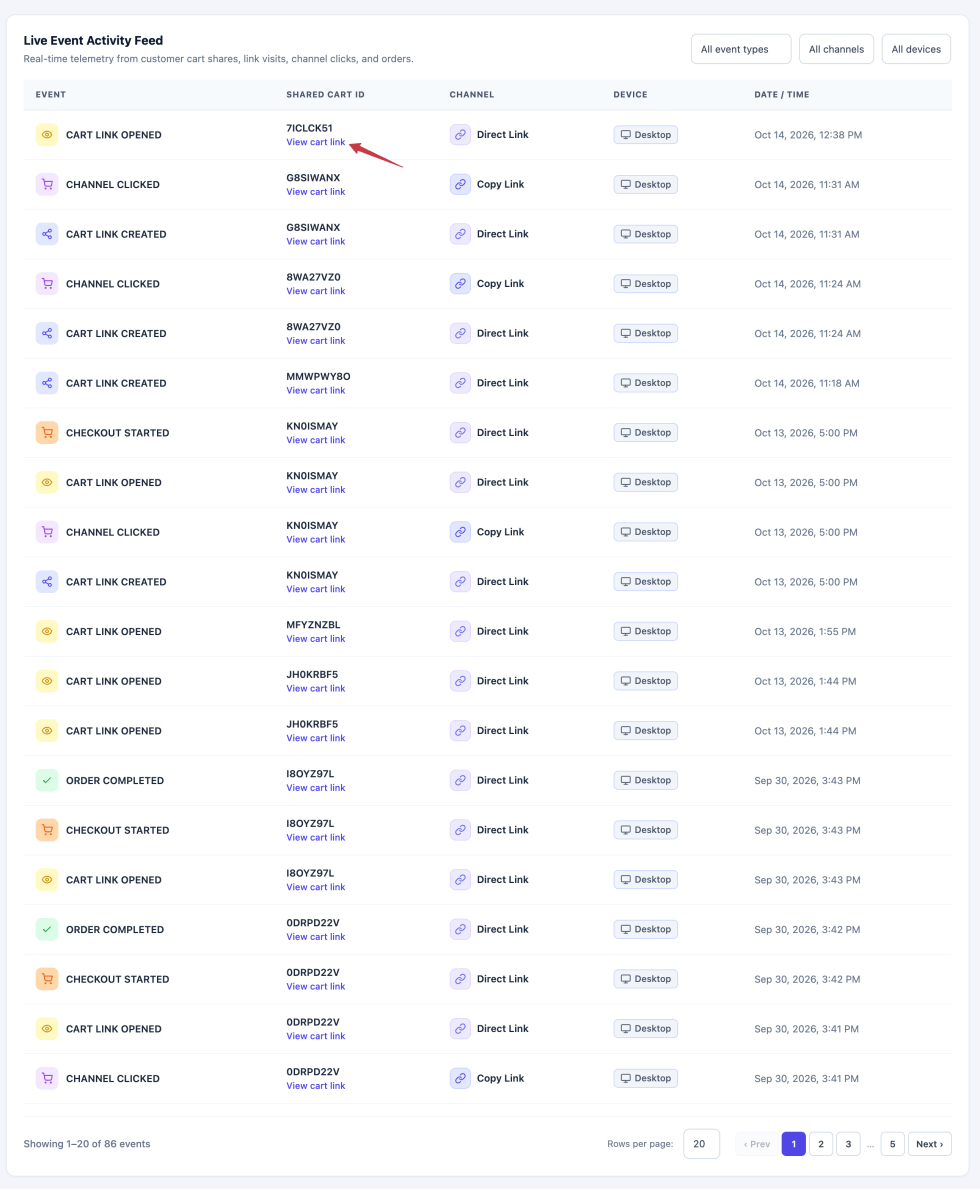
↑ Back to topThe feed shows event, shared cart ID, channel, device, and date/time. Available event filters include Cart Link Created, Cart Link Opened, Channel Clicked, Checkout Started, and Order Completed.
User flow for checking the full journey
↑ Back to top- Generate a public link on a test store.
- Open it in a separate browser session with a normal browser user agent.
- Review the restored cart and visit Checkout.
- Place a test order using your test payment workflow.
- Return to Analytics and refresh.
- Look for the open, checkout-start, and attributed order events.
- Open the cart detail and compare the event’s order number with WooCommerce.
Export Events CSV
↑ Back to top- Open Analytics.
- Click Export Events CSV.
- Save and open the downloaded file in a spreadsheet application.
The export includes event ID, cart ID, display code, event type, channel, device, IP address, order ID, order total, and timestamp.
Individual cart details
↑ Back to topLocation: Share Cart > Analytics > event > View cart link
The cart detail page combines the shared cart’s contents and recorded journey. It shows the name, creation date, item count, status, and a Copy action for the link.
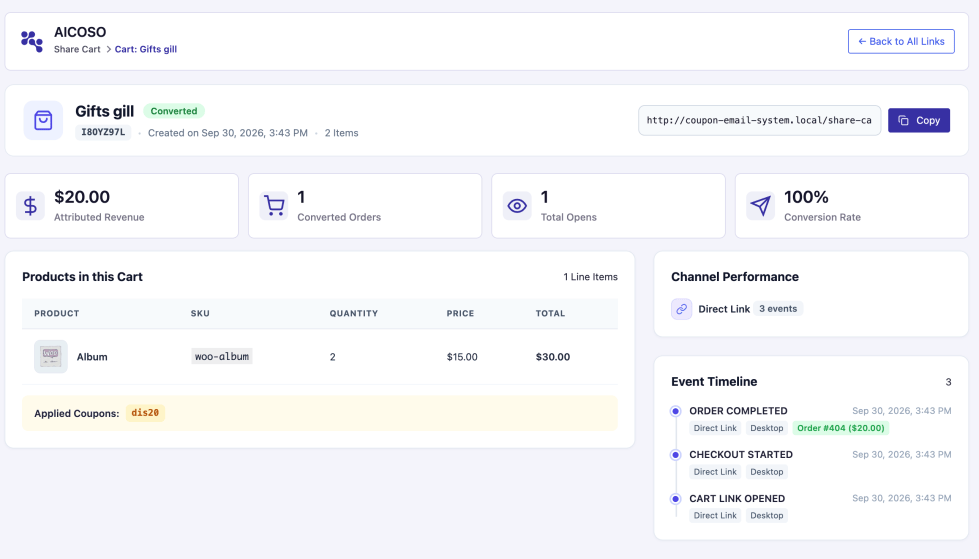
The information contained on this screen.
↑ Back to topSelected cart’s metrics: Attributed Revenue, Converted Orders, Total Opens, Conversion Rate.
Items listed in this Cart: product name, SKU, count, price and line total.
Applied Coupons: saved coupon codes (if any).
Channel Performance: measured the activity that took place on the channel for the cart.
Event Timeline: Events in the story, with order references if available.
User flow
↑ Back to top- Use Analytics feed to find the desired cart activity by filtering.
- Click View cart link.
- Check the metrics to see if they are in status or summary.
- Check products and installed coatings.
- Follow the timeline of the event to understand the event as it was recorded.
- If available, check the order reference to view the linked order on WooCommerce.
- To return to Shared Links, click on Back to All Links.
Frontend Share Cart Flows
↑ Back to topPersonally share a cart as a guest.
↑ Back to topYou must enable Share Cart, have products available in the cart, and allow for public-link restoration in the store configuration you make in the “Store” section.
- Go to the shop and put items in the shopping cart.
- Make any necessary varial or product choice prior to adding.
- Go to the Cart page and view quantities and any coupons that may have been applied.
- Click Share cart.
- If you wish to include a note, use the message/personalization controls in Share Your Cart.
- Choose a sharing platform, or click Direct Link > Copy.
- Fill out the message or post in the chosen platform.
There’s an option to create shared links while guests are staying. They can’t save a cart to their own saved-cart list, without being logged in to My Account.
Share a cart as a logged-in customer
↑ Back to top- Access via My Account.
- Create the cart and load the page of the Cart.
- Click Share cart.
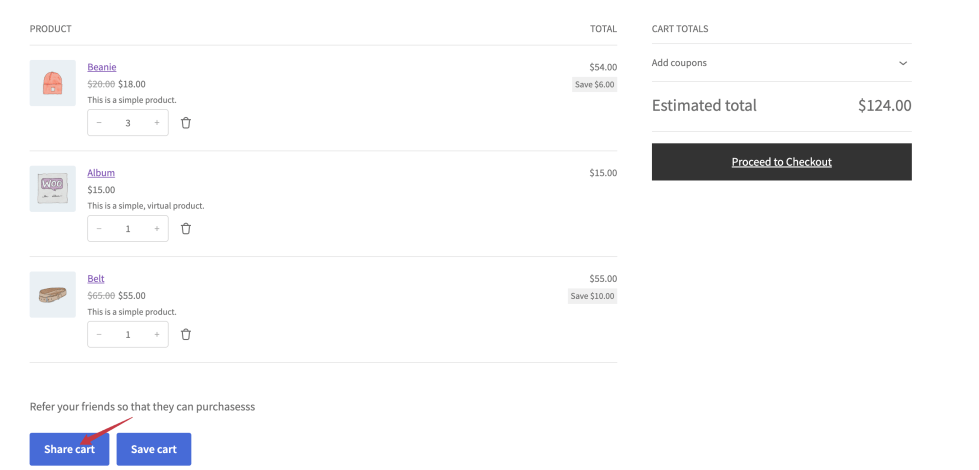
- Personalize the message if desired.
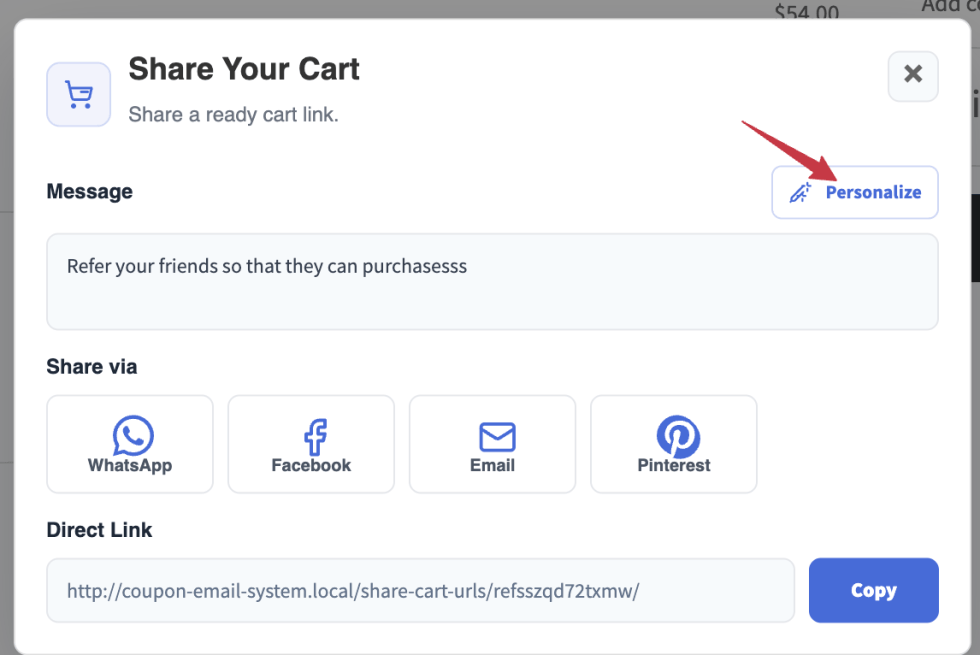
- Copy the link or select a sharing platform that is enabled.
- Send the cart link.
Personalization is not applicable to an order note or to ordering a message, it is only applied to a sharing message. There is no need to have an account on OpenAI or Gemini to use the local personalization helper.
Open a public shared cart
↑ Back to top- Follow the link that you got.
- The store loads available products, quantities, and eligible coupons.
- The recipient’s cart is replaced with the restored cart.
- Depending on the store’s Redirect setting, the recipient is directed to Cart or Checkout.
- Go through the products, the prices, the shipping and the tax as well as the eligibility of using coupons.
- Proceed through regular WooCommerce checkout process.
Open a private shared cart
↑ Back to topPrivate shared links require a logged-in store account.
Save the current shopping cart
↑ Back to topPrecondition: Customer is logged in and the Storefront Share Cart and Save Cart controls are enabled.
Add products to shopping cart.
- Open the Cart page.
- Click Save cart.
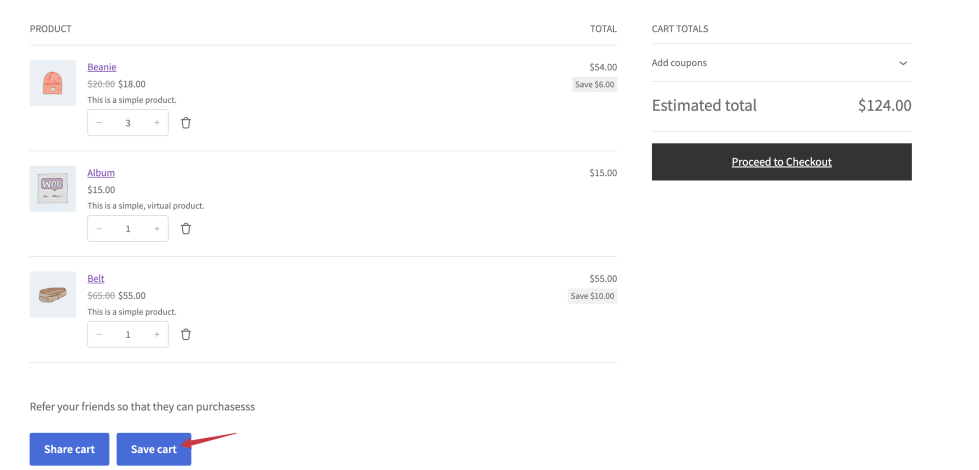
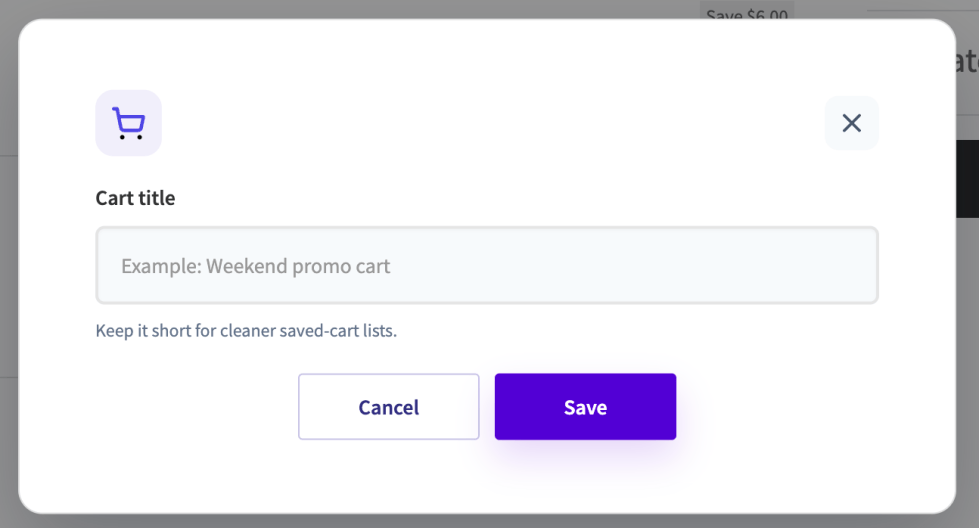
- Type a Cart title, like “Monthly office supplies.”
- Click Save..
- Be sure to wait for the success message.
- Click on its saved-cart link, or use the store’s menu label to navigate to My Account > Saved Carts.
Access saved carts
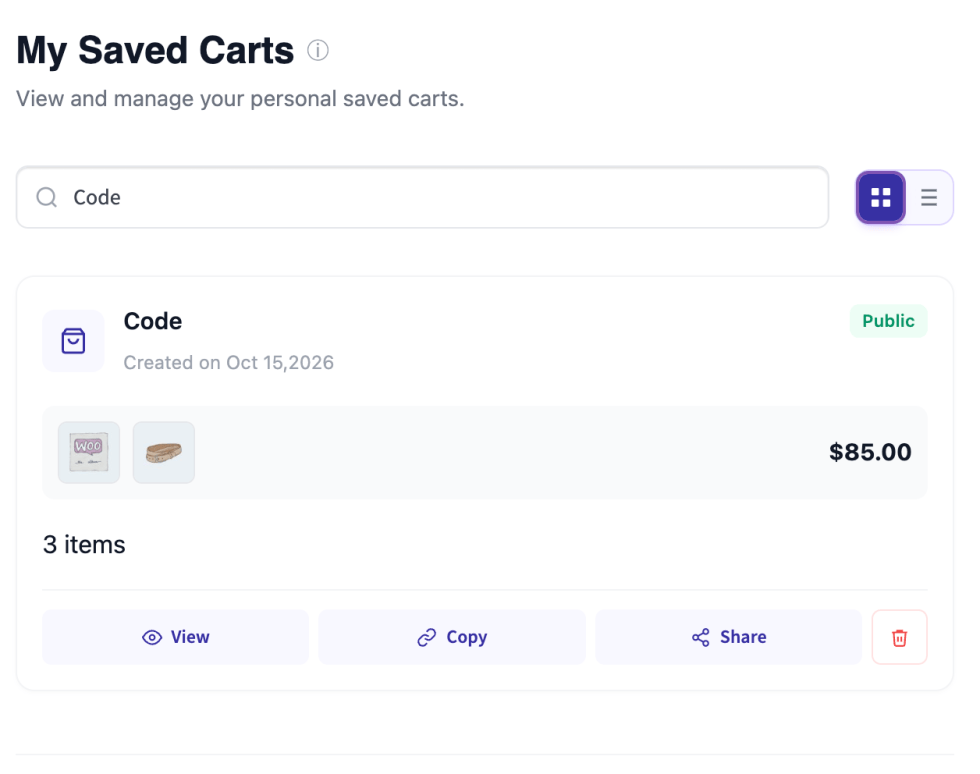
↑ Back to top- Click on saved-cart. It is Customizable under Settings > Display > Save Cart Menu Title.
- Utilize Search carts to find a cart.
- Use the page numbers or arrows to navigate other carts – switch between Grid and List view. In this version, 6 carts per page are displayed on the frontend.
Cards display the title, privacy, creation details, product preview and View, Copy, Share and Delete options. If no cart, then the page will have Start Shopping.
Update the information about a cart that has already been saved.
↑ Back to topOpen a saved cart using View.
- Change its products or quantities on the Cart page.
- Apply the cart-page changes so the current cart reflects your intended contents.
- Click the plugin’s Update cart action when it appears for the loaded saved cart.
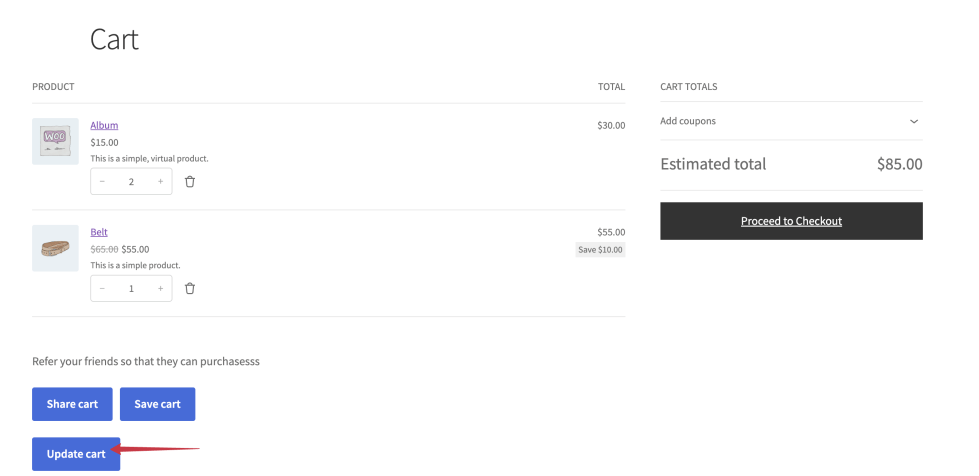
- Confirm prompt: “The current saved cart will be replaced.
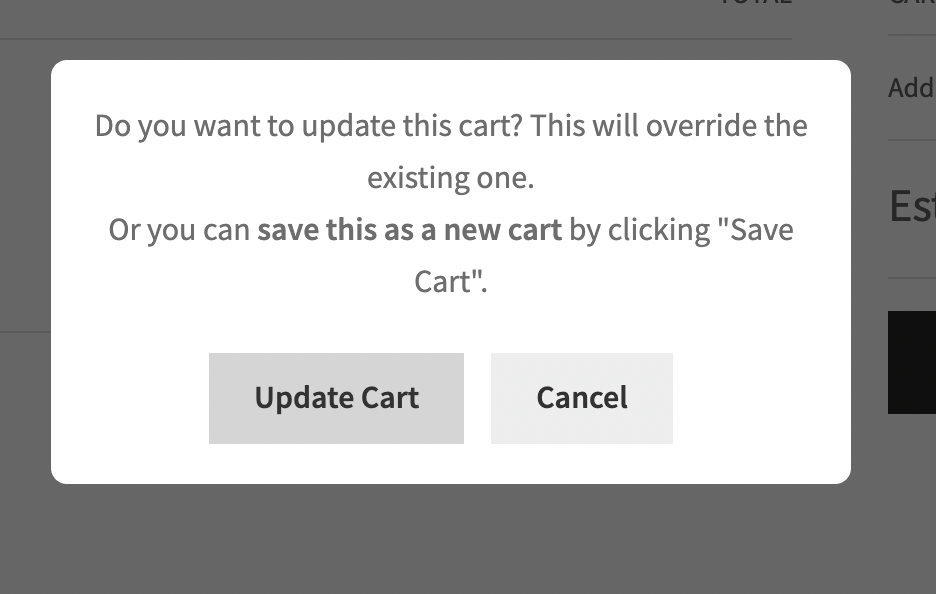
- Wait for the “success” message..
- Go back to the saved-cart screen and reopen the shopping cart to ensure that it contains the correct contents.
Note: The plugin’s Update cart action will save the contents back to the loaded saved-cart record. Save cart with new title, to create a new saved record.
Troubleshoot
↑ Back to topI created first shared cart link, after I put it in the browser address and open, why it shows nothing on our site cart page?
↑ Back to topPlease follow these initial troubleshooting steps:
1. Go to WordPress → Settings → Permalinks.
2. Ensure that “Post name” is selected (reference screenshot: https://prnt.sc/h7OL9LRIFVv0).
3. Click “Save Changes”, even if “Post name” is already selected.
4. Clear your website cache, including any server-side or CDN cache.
5. Try opening the shared cart link again:
Frequently asked questions
↑ Back to topAre there any opportunities for guests to share carts?
↑ Back to topYes. Guest can create and share a cart link. Personal saved carts must be logged in.
Where are saved carts located?
↑ Back to topIn My Account, under Display, in the navigation item for saved-cart. Customer saved carts are viewed by administrators in Share Cart > Saved Carts.
What is the difference between shared cart and saved cart?
↑ Back to topA generated URL is provided for a shared cart that can be opened by the recipient. A saved cart is saved to a user’s account which can be reused at a later date. When you copy or share an already saved cart, it creates a new shared-link record.
Is the private property only for the original customer?
↑ Back to topNo. Private shared links are password protected. They do not exclude restoration for the original owner.
If I click on a shared link, will it add the products to my Shopping Cart?
↑ Back to topThe restoration flow will exchange the existing cart with the saved content. If you want to save your current cart, save it first.
Does the common cart retain the original prices?
↑ Back to topWooCommerce updates the cart with the latest product prices and applies the rules. Check the cart & checkout amount.
A shared link does not order automatically?
↑ Back to topNo. Recipient checks out and pays as usual.
It is possible to place the share button using a shortcode?
↑ Back to topThe version provided doesn’t include a Share Cart button shortcode. Connect it to your standard Cart page or get your developer to support a custom placement for your store.
Order Completed in Analytics is a paid, completed WooCommerce order?
↑ Back to topNo. It’s the feed’s label for the order event it has been attributed to, while processing the checkout. Check payment and fulfillment in WooCommerce orders.

