Store Vacation helps you manage temporary changes to your WooCommerce store without taking the entire website offline. You can schedule a one-time vacation, close the store on selected weekdays, define regular opening hours, or immediately pause purchases when an unexpected situation occurs.
While vacation mode is active, your products and storefront can remain visible so customers can continue browsing and stay informed about when normal service will resume. You can decide whether checkout should be completely unavailable, whether customers can continue building and saving their carts, or whether selected products and shipping options should remain available.
Store Vacation also provides flexible notices, customer-facing countdowns, vacation activity reports, and additional checkout safeguards. This documentation explains how to configure each area of the plugin, how the settings work together, and what customers will experience while your store is operating under vacation mode.
Installation
↑ Back to topTo start using a product from WooCommerce.com, you can use the “Add to store” functionality on the order confirmation page or the My subscriptions section in your account.
- Navigate to My subscriptions.
- Find the Add to store button next to the product you’re planning to install.
- Follow the instructions on the screen, and the product will be automatically added to your store.
Alternative options and more information at:
Managing WooCommerce.com subscriptions.

Dashboard
↑ Back to topThe Dashboard provides an overview of your WooCommerce store’s current availability and quick access to commonly used Store Vacation settings.
To open it, go to:
WooCommerce > Settings > Store Vacation > Dashboard
From the Dashboard, you can:
- See whether the store is currently open, closed, or automatically closed by Checkout Protection.
- Identify the active vacation or closure source when available.
- Open the storefront using Visit Store.
- Quickly access Schedule, Behavior, and Conditions settings.
- Immediately close or reopen the store using Force Close Store.
- Access Store Vacation documentation and customer support.
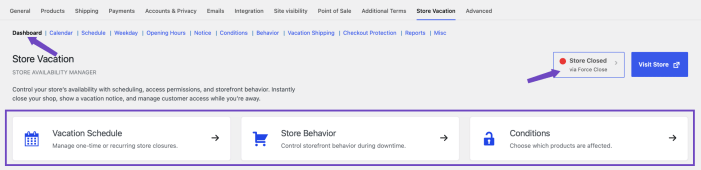
Current Store Status
↑ Back to topThe status displayed at the top of the Dashboard reflects whether customers can currently purchase from your store.
Depending on your Store Vacation configuration, the Dashboard may show:
- Store Open — customers can purchase normally.
- Store Closed — purchasing is currently restricted by Store Vacation.
- Auto-Closed — Checkout Protection has automatically closed the store after detecting suspicious checkout activity.
When a vacation or closure is active, the Dashboard may also identify its source, such as:
- A one-time Schedule.
- A recurring Weekday closure.
- Opening Hours.
- Manual Force Close.
- Checkout Protection.
An active vacation period does not always mean the store is unavailable for purchases. For example, when Bypass Restrictions is enabled with Keep shop pages open, the vacation remains active and its notice can still be displayed while customers continue browsing and checking out normally. In this situation, the Dashboard reports the store as open while still identifying the active vacation source.
Force Close Store
↑ Back to topForce Close Store lets you close your WooCommerce store immediately without creating a Schedule or specifying a reopening time.
Use Force Close for unexpected closures, emergencies, fulfillment interruptions, technical problems, or any situation where purchases must be paused immediately.
When Force Close is enabled:
- The store enters vacation mode immediately.
- Force Close takes priority over Schedule, Weekday, and Opening Hours settings.
- The selected vacation notice is shown to customers.
- The store remains closed until Force Close is manually disabled.
- No automatic reopening date or time is applied.
Enable Force Close
- Go to WooCommerce > Settings > Store Vacation > Dashboard.
- Find Emergency Close.
- Enable Force Close Store.
- Select the Notice you want to display while the store is closed. See how to create and manage vacation notices.
- Click Save changes.
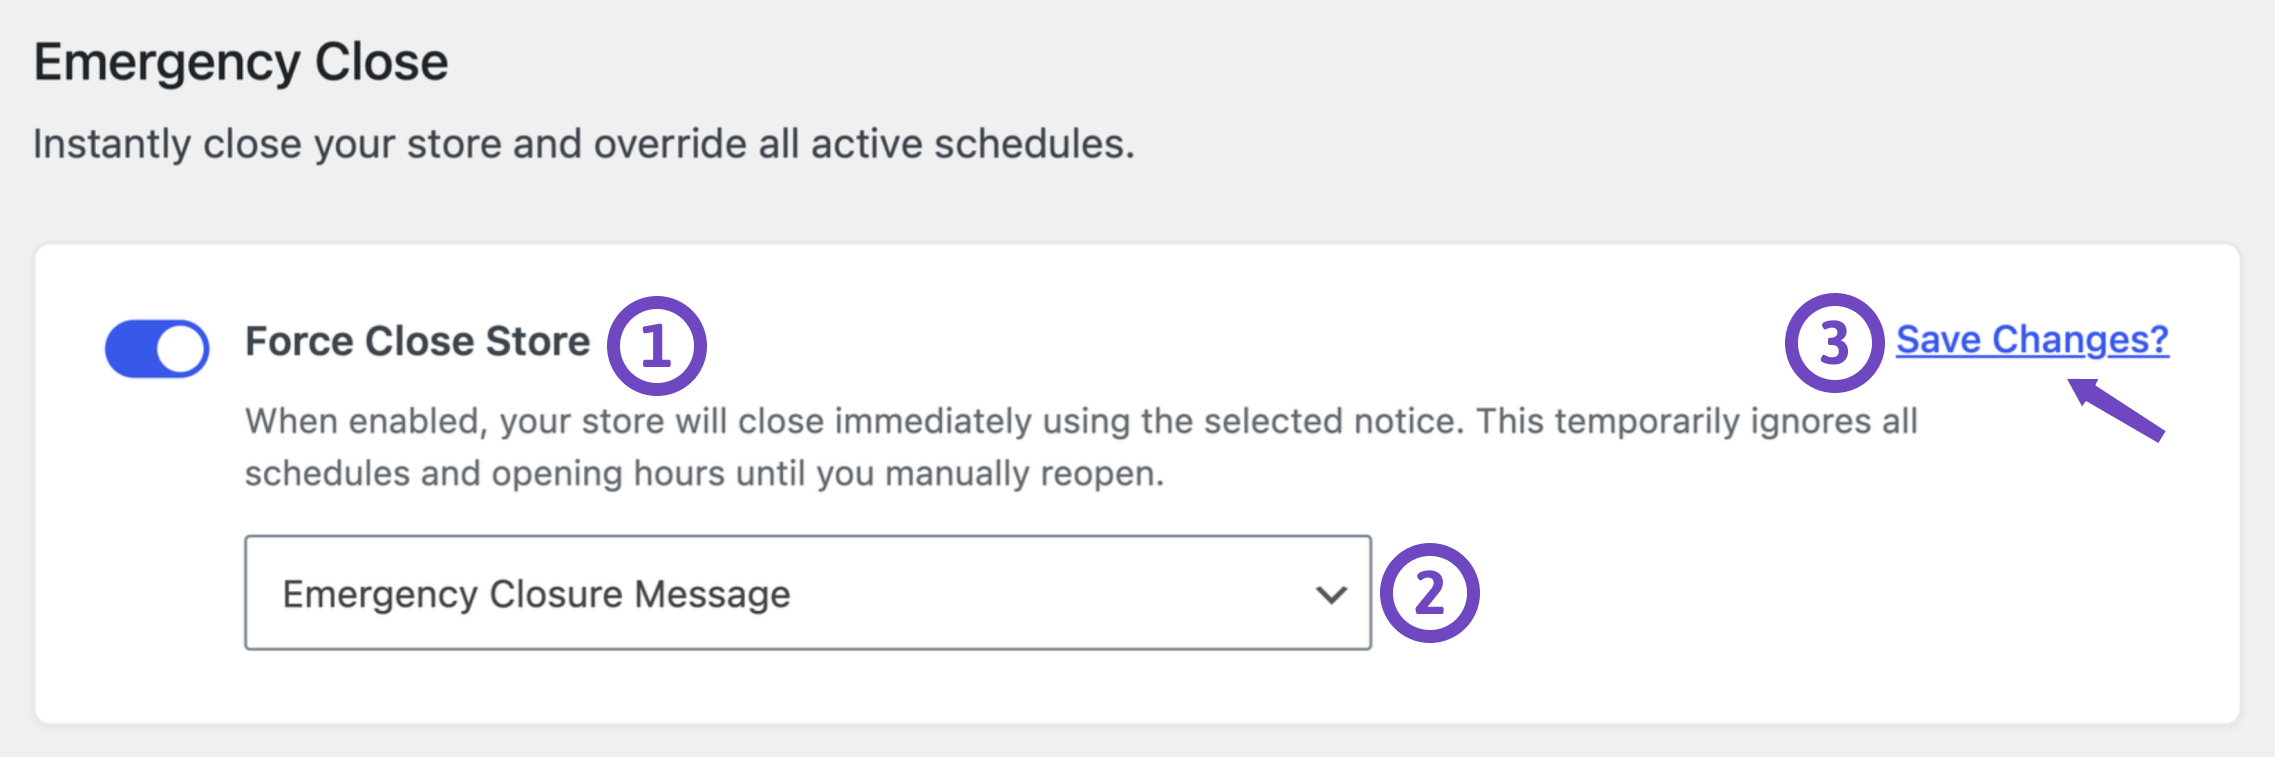
After saving, the Dashboard updates to show that the store is closed.
Important
A manually enabled Force Close does not have an end date. Remember to disable it when your store is ready to accept purchases again.
Reopen the store after a manual Force Close
- Go to WooCommerce > Settings > Store Vacation > Dashboard.
- Disable Force Close Store.
- Click Save changes.
Removing Force Close does not necessarily make the store immediately available. A Schedule, Weekday closure, Opening Hours rule, or Checkout Protection incident may still keep purchasing unavailable.
When Force Close is locked
↑ Back to topCheckout Protection can automatically activate Force Close when suspicious checkout activity is detected.
Checkout Protection can detect activity such as rapid orders, repeated orders from the same IP address, or an unusual number of payment failures. When a configured threshold is reached, Store Vacation automatically closes the store to protect checkout.
While a Checkout Protection incident is active:
- The Dashboard status shows Auto-Closed.
- Force Close remains active.
- The Force Close control is locked and cannot be manually disabled.
- Product-level exceptions cannot bypass the closure.
- Cart Building and Behavior bypass options cannot restore checkout.
- Customers remain unable to purchase until the Checkout Protection incident is cleared.
Checkout Protection takes precedence over purchasing exceptions and Behavior settings so that a security-triggered closure cannot be unintentionally bypassed.
To regain manual control, you can:
- Clear the active incident from the administrator notice.
- Clear the incident from the Checkout Protection settings.
- Wait for the configured automatic clear period, if enabled.
- Disable Checkout Protection.
After the incident is cleared, Checkout Protection releases the Force Close state it created. The store becomes available for purchases only when no other active Store Vacation rule is restricting checkout.
See Checkout Protection: Automatically Close Suspicious WooCommerce Checkout Activity for complete configuration, detection, notification, and incident-management instructions.
Schedule vacations
↑ Back to topYou can create unlimited one-time vacation schedules with precise start and end dates and times. Your WooCommerce store automatically applies an enabled schedule whenever its configured period matches your WordPress site’s date, time, and timezone settings.
- Go to WooCommerce > Settings > Store Vacation.
- Open the Schedule section.
- Click Add new.
- Enter a descriptive Name to help you identify the schedule.
- In the From field, select the date and time when the vacation should begin.
- In the To field, select the date and time when the vacation should end. The schedule stops applying after this time, although another active vacation rule may still affect the store.
- The Notice field uses No notice to display by default. To show an announcement while the schedule is active, select one of your saved vacation notices. Learn more about Vacation Notices.
- Optionally add Conditions to exclude selected products, categories, tags, or other matches from the vacation. Excluded products can remain purchasable depending on your Behavior settings and other active restrictions.
- Optionally use Hide Shipping Methods to make selected delivery methods unavailable while this schedule is active. See Hide Shipping Methods for complete instructions.
- Click Save changes.
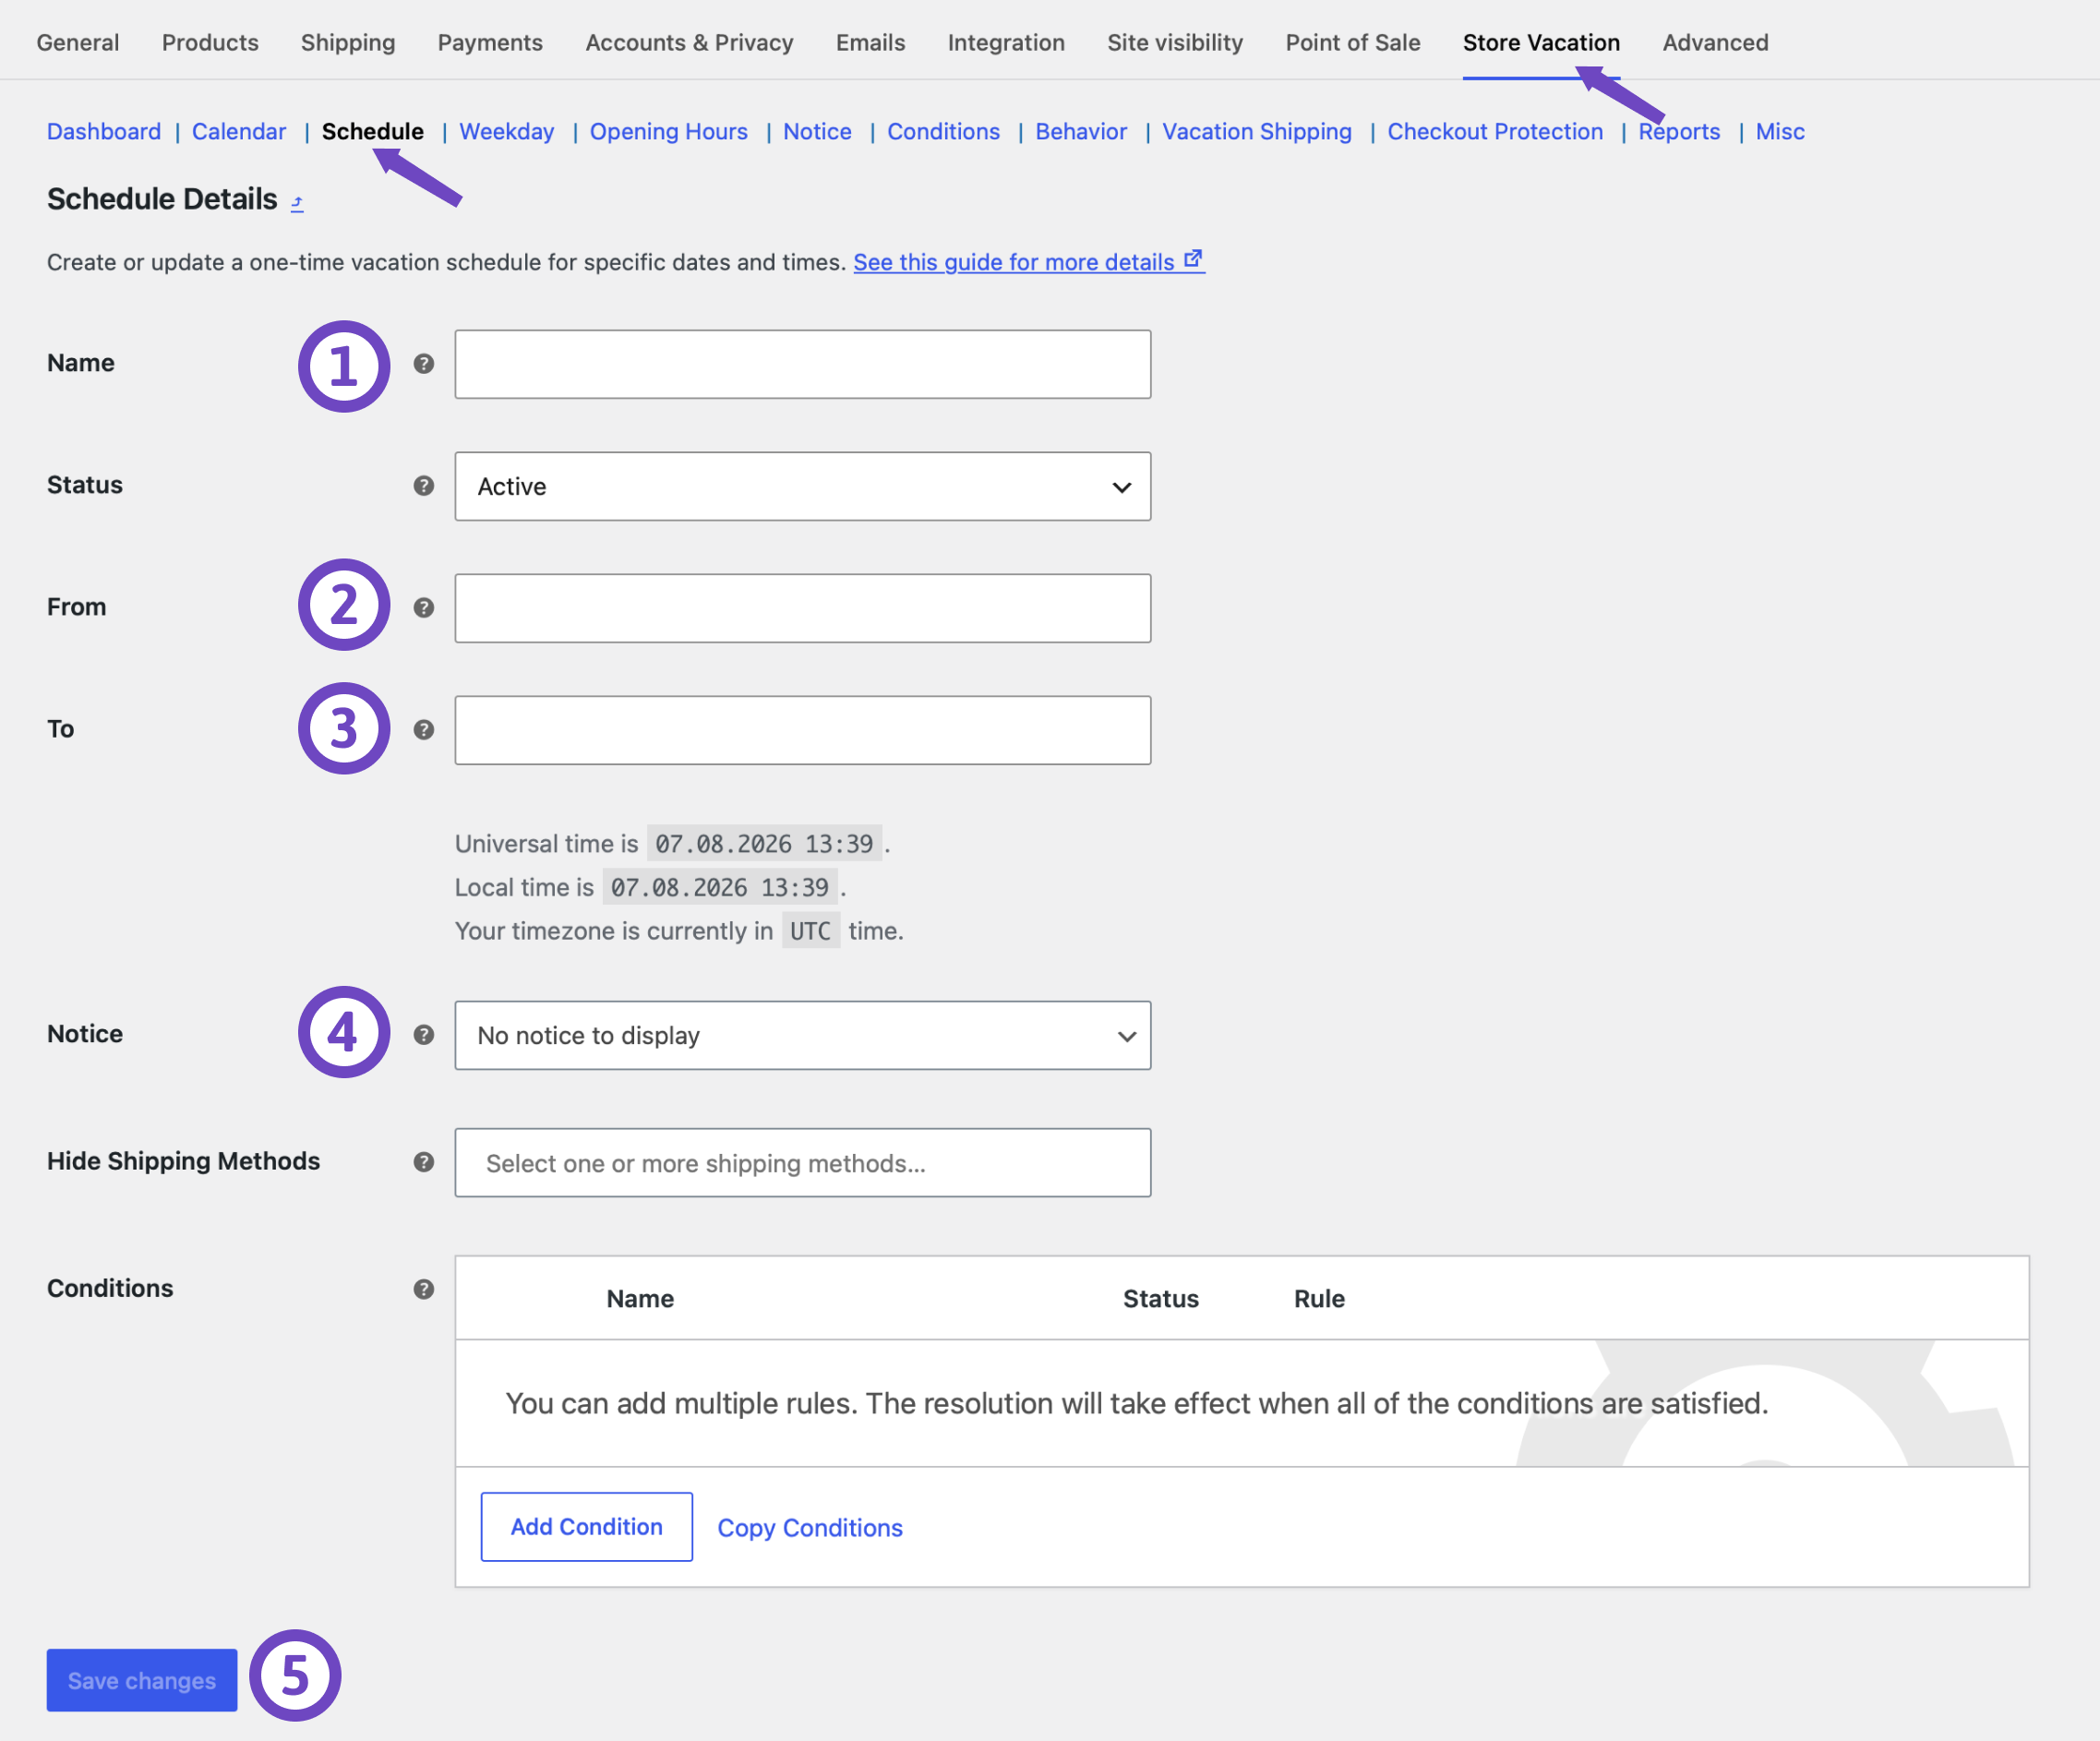
The schedule becomes active automatically at the selected start date and time while its status is enabled.
Store Vacation will use your current timezone setting for scheduling. If needed, you can adjust your timezone in your WordPress settings.
Note
An active schedule does not always mean the store is unavailable for purchases. Your Behavior settings determine how the storefront, products, cart, and checkout behave during the vacation period.
Schedule table
↑ Back to topOnce you’ve added a new schedule, your schedule table will populate with valuable information. On the schedule page, you can review the list of your planned vacations through this table. Here’s what you can find in the schedule table:
- Name: This column displays the name of your schedule. If you didn’t specify a name when creating the schedule, the creation date uses as the schedule name.
- Status: This column conveniently shows the status of your vacation schedule. Activating or disabling the schedule is easy—simply click the toggle switch to make your desired adjustments.
- From: This column shows the start date and time of your vacation. Your shop will close at the time indicated here.
- To: In this column, you’ll see your vacation’s end date and time. Your shop will reopen at the time specified here.
- Notice: This column informs whether you’ve assigned a notice to announce your vacation to your visitors. A checkmark icon indicates that you’ve selected a notice to display during the vacation, while a cross icon signifies that you’ve not chosen any notice to display.
- Date: This column displays the last date the schedule was modified.
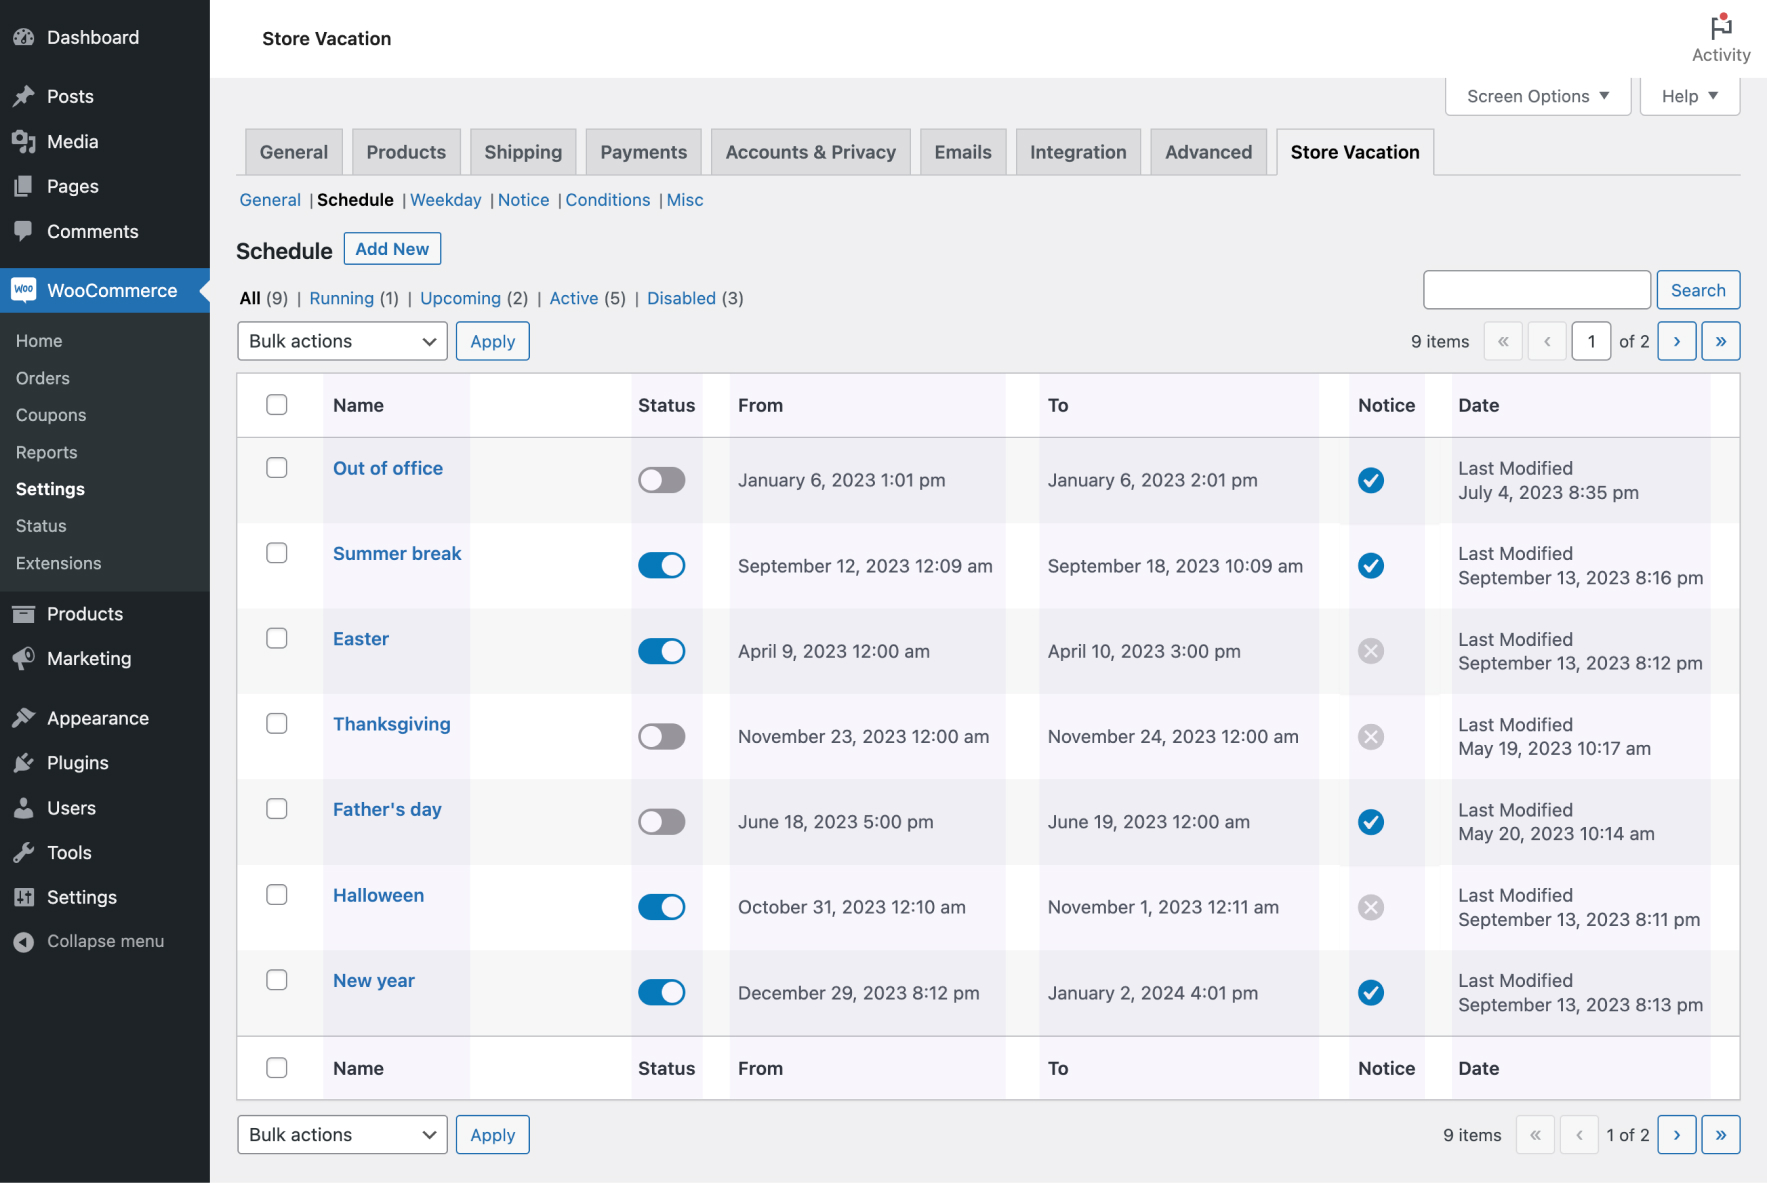
Vacation Calendar
↑ Back to topThe Vacation Calendar provides a visual overview of your store vacation schedule inside the Store Vacation settings area. It allows you to review scheduled vacations and recurring weekday closings in a monthly calendar layout, making it easier to understand when checkout will be unavailable in your store.
Instead of reviewing each schedule only from the Schedule or Weekday settings, the calendar gives you a clearer overview of how your vacation rules are applied across the month. This is especially useful when you have multiple vacation periods, recurring weekly closings, holiday closures, or maintenance days configured at the same time.
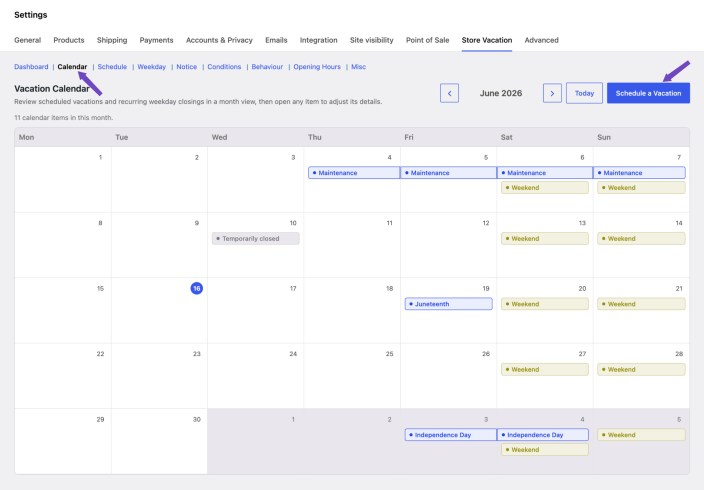
The Schedule a Vacation button available at the top right side of the Vacation Calendar allows you to add a new vacation period directly from the calendar screen without navigating back to the Schedule settings manually.
You can also interact with existing calendar items. Hovering over a scheduled item displays its scheduled hours, helping you quickly confirm when the closure starts and ends. This is useful when a vacation schedule only applies during specific times of the day rather than the full day.
Clicking an existing schedule on the calendar opens the related edit page. From there, you can review the schedule details, update the vacation period, adjust the opening or closing hours, change the schedule title, or apply any other required changes.
Weekday schedule
↑ Back to topWeekday schedules let you create recurring weekly closures for non-business hours, weekends, or other regular periods when Store Vacation should apply.
To create a weekday schedule:
- Go to WooCommerce > Settings > Store Vacation.
- Open the Weekday section.
- Click Add new.
- Enter a descriptive Name to help you identify the weekday schedule.
- Select the Day on which the recurring period should begin.
- In the From field, select the time when the weekday vacation should begin.
- In the To field, select the time when the weekday vacation should end.
- The Notice field uses No notice to display by default. To show an announcement during the recurring period, select one of your saved vacation notices. Learn more about Vacation Notices.
- Optionally add Conditions to exclude selected products, categories, tags, or other matches from the weekday vacation. Excluded products can remain purchasable depending on your Behavior settings and other active restrictions.
- Optionally use Hide Shipping Methods to make selected delivery methods unavailable while this weekday schedule is active. See Hide Shipping Methods for complete instructions.
- Click Save changes.
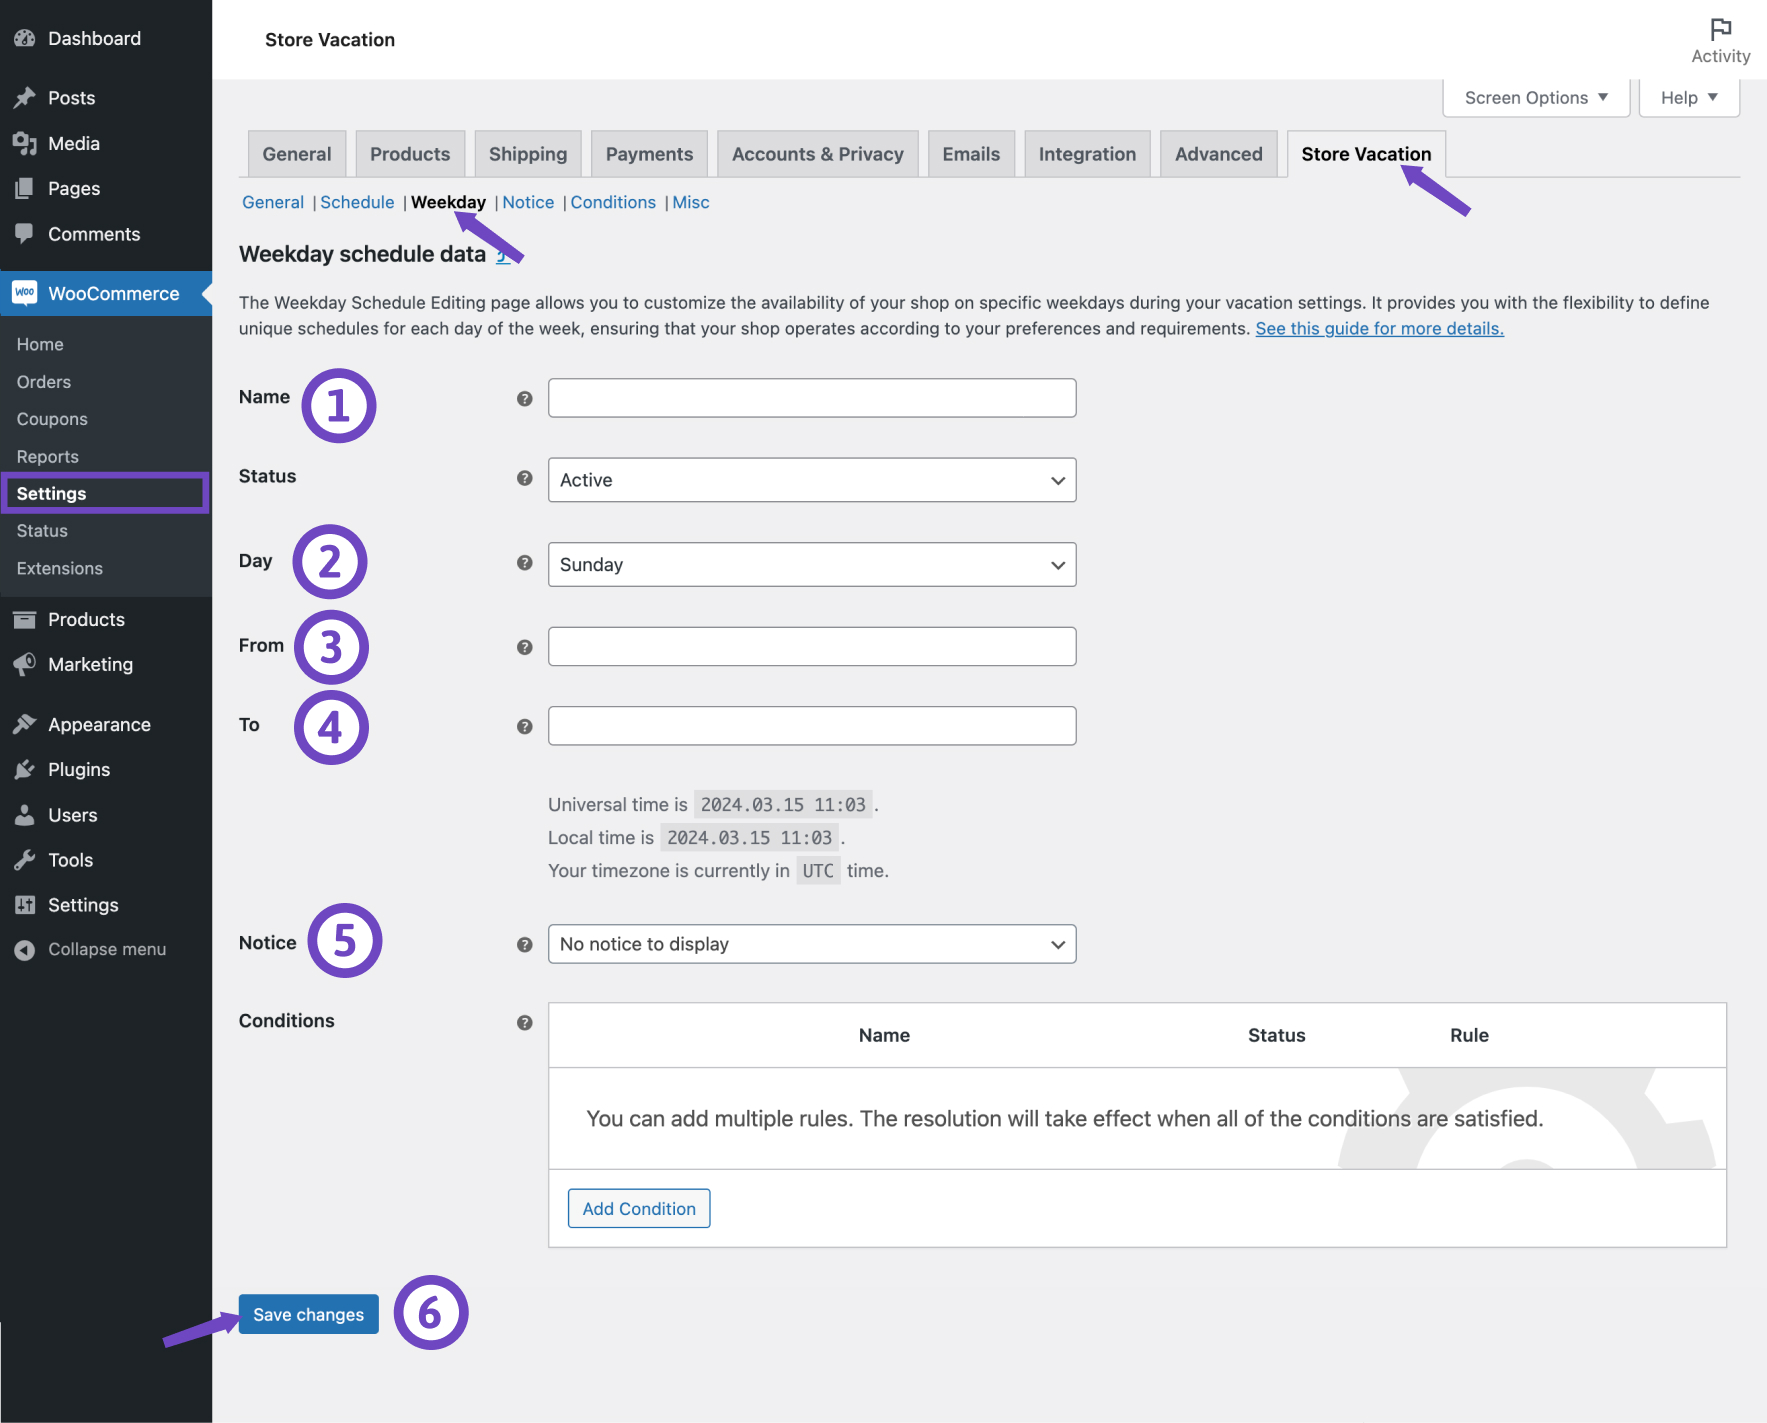
The weekday schedule repeats automatically every week while its status remains enabled.
Note
As with one-time schedules, an active Weekday period does not necessarily mean that all purchasing is disabled. The customer experience depends on your configured Behavior settings.
Weekday table
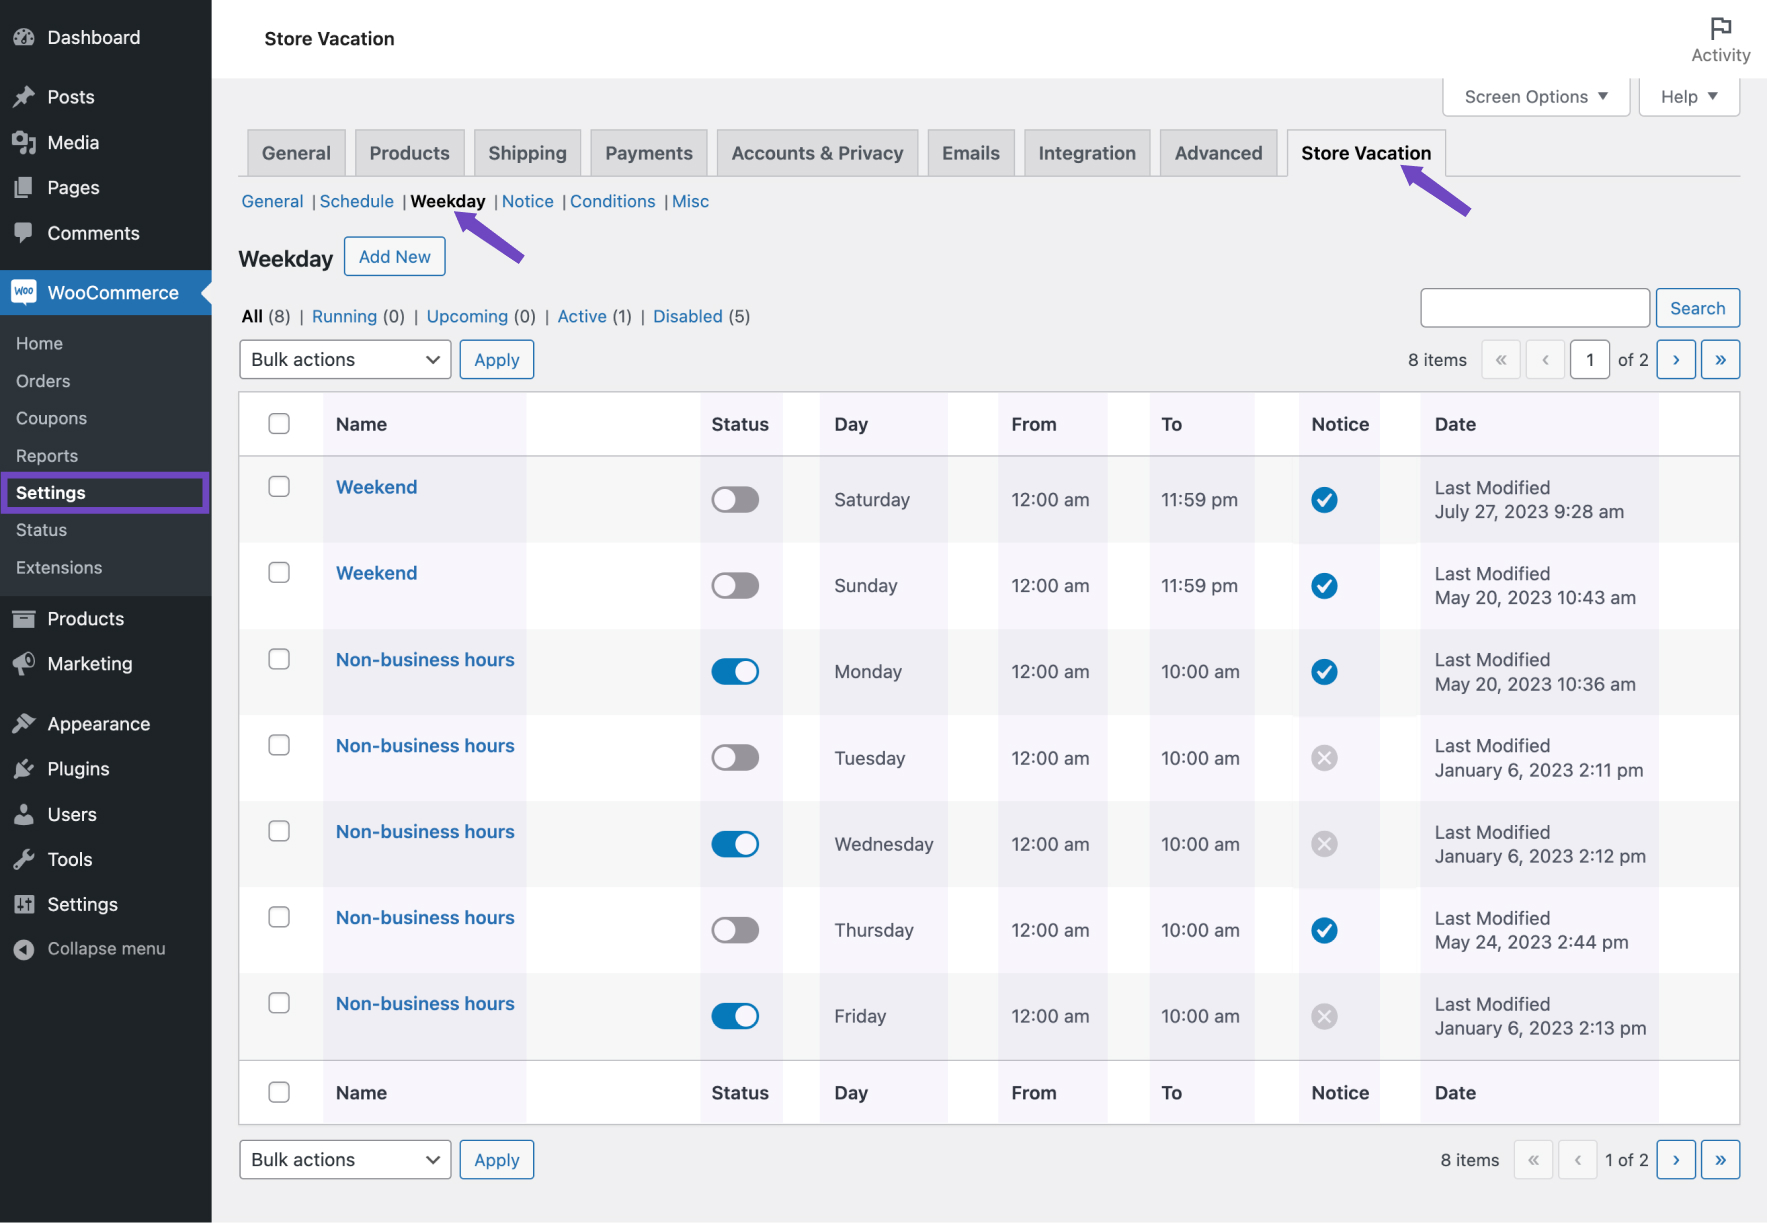
↑ Back to topAfter you add a new weekday, your weekday table will fill up. You can overview the list of your defined weekly closing times in a table on the weekday page.
The weekday table displays some information about your shop closing times based on the schedules defined.
- Name: Displays the name of your weekday schedule. If you haven’t entered a custom name when creating the schedule, the timestamp when you created the entry will be used as a placeholder for naming.
- Day: Displays the day you configured your non-working hours.
- From: Displays the start time of shop closing.
- To: Displays the end time of shop closing. Your shop reopens to accept orders at this time.
- Notice: This column lets you know whether you have assigned a notice to announce your closing time to your visitors. A checkmark icon indicates that you’ve selected a notice to display during the vacation, while a cross icon signifies that you’ve not chosen any notice to display during the vacation.
- Date: Displays the last date that the weekday is modified.
Hide Shipping Methods
↑ Back to topHide Shipping Methods lets you remove selected WooCommerce shipping methods while an individual Schedule or Weekday closure is active. Shipping methods that are not selected remain available when they otherwise meet WooCommerce’s normal shipping requirements.
This is useful when a vacation affects only certain delivery services. For example, you can disable Express Shipping during a holiday while continuing to accept orders using Standard Shipping.
Hide Shipping Methods for a Schedule or Weekday
↑ Back to top- Open WooCommerce > Settings > Store Vacation.
- Open either the Schedule or Weekday section.
- Add a new closure or edit an existing one.
- Find Hide Shipping Methods.
- Select one or more shipping methods that should be unavailable while the closure is active.
- Click Save changes.
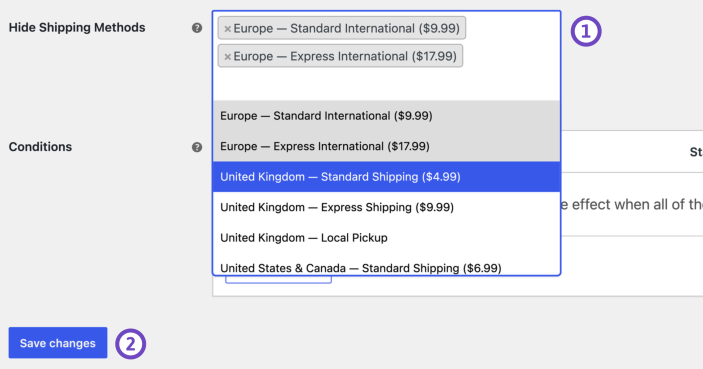
You can select multiple shipping methods in the same closure without creating separate rules for each one.
Available choices can include:
- WooCommerce shipping methods configured in your shipping zones.
- Individual shipping method instances.
- Local Pickup methods.
- Configured Vacation Shipping Options.
Example: Hide express shipping during a holiday
↑ Back to topSuppose your store continues accepting orders during a one-week holiday, but you cannot fulfill Express Shipping orders until you return.
Edit the vacation Schedule and select Express Shipping under Hide Shipping Methods.
While the Schedule is active:
- Express Shipping is removed when it would otherwise be available to the customer.
- Standard Shipping can remain available.
- Local Pickup can remain available.
- Any configured Vacation Shipping Options can also remain available unless you choose to hide them.
When the Schedule ends, Express Shipping becomes available again automatically according to its normal WooCommerce configuration.
Using vacation shipping options
↑ Back to topVacation Shipping Options can be used alongside your regular WooCommerce shipping methods.
For example, you could hide Express Shipping and Standard Shipping during a vacation while providing a dedicated Vacation Shipping option that tells customers their order will be dispatched after you return.
Vacation Shipping Options can also be selected under Hide Shipping Methods, allowing an individual Schedule or Weekday closure to suppress a vacation-specific option when necessary.
Temporarily unavailable shipping methods
↑ Back to topA previously selected shipping method may sometimes become unavailable because it was disabled, removed from a shipping zone, or otherwise changed in WooCommerce.
Store Vacation preserves these saved selections instead of silently removing them from the closure. Temporarily unavailable methods remain identifiable in the selector so that editing an unrelated Schedule or Weekday setting does not remove your existing configuration.
If the shipping method becomes available again, the saved Hide Shipping Methods configuration can take effect again automatically.
Important Notes
↑ Back to top- Hide Shipping Methods is available for individual Schedule and Weekday closures.
- It does not provide individual hide selections for Opening Hours or manual Force Close periods.
- You can hide multiple shipping methods from a single closure.
- Shipping methods that are not selected continue to follow their normal WooCommerce availability rules.
- WooCommerce shipping zones and methods should be configured before you select them.
- Individual shipping method instances are treated separately, so the same shipping method type can be hidden in one zone without necessarily affecting another instance.
- Vacation Shipping Options can also be selected and hidden for individual Schedule or Weekday closures.
- A shipping method is removed only while the corresponding enabled Schedule or Weekday closure is active.
- Ending or disabling the closure restores the normal WooCommerce shipping configuration.
Setting a pre-notice
↑ Back to topWhen creating or editing a schedule or weekday plan for your store vacation, you can set a pre-notice to inform customers in advance before vacation mode begins.
This feature lets you choose when the advance notice will start appearing on your shop pages, or anywhere you’ve placed the Store Vacation shortcode or block. This helps your customers plan their purchases before you close or wait until you return.
Follow these steps to set up a pre-notice:
- Navigate to WooCommerce > Settings >Schedule or Weekday.
- Locate the schedule you want to edit, then hover over it and select Edit.
- Below the Notice dropdown menu, click the link that says Set Pre-Notice.
- A modal window titled Notification Lead Time will appear. Here, you’ll configure the pre-notice settings.
- Select the Reminder Time for when you want the pre-notice to start displaying. This ensures customers receive a heads-up before your store goes on vacation.
- Choose the Notice you want to display from the dropdown menu. (For information on how to create a custom notice, refer to Creating a notice).
- Click the Save Changes button in the modal to save your advance notice configurations.
- After setting the pre-notice, click the Save Changes button to update your schedule or weekday plan.
By following these steps, your customers will be notified ahead of your scheduled store closure, ensuring they can plan their purchases accordingly.

Vacation notices
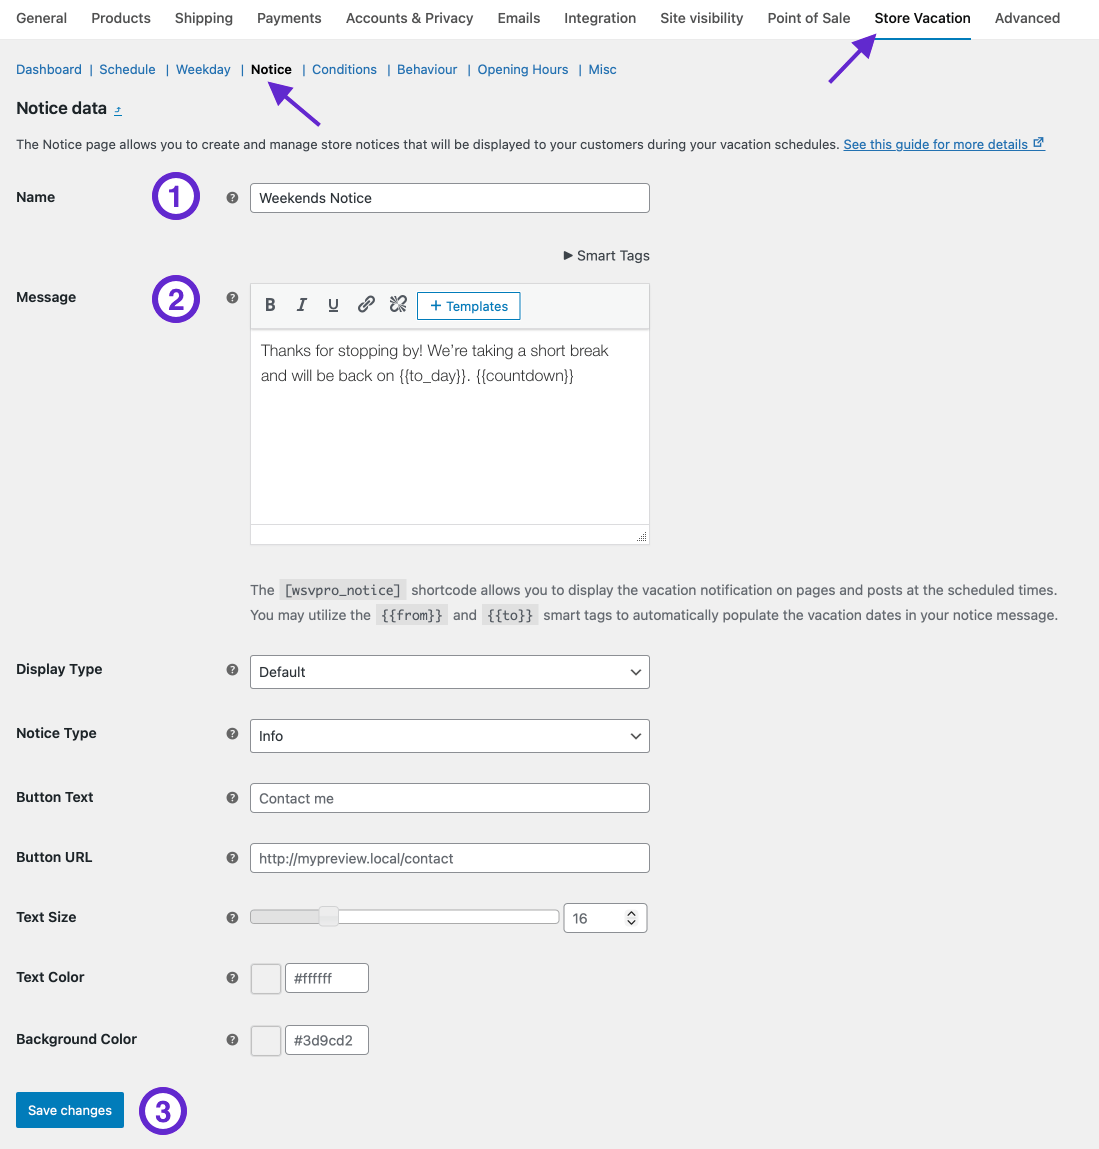
↑ Back to topYou have the flexibility to create customized notices, each with a unique announcement that can be assigned to specific vacation schedules or weekday closings. Here’s how to do it:
- Navigate to WooCommerce > Settings > Store Vacation.
- Go to the Notice section in the current tab.
- Click the Add New button to create a new notice.
- Enter a Name for your notice.
- This helps you identify the notice later when assigning it to schedules or weekdays.
- Enter your Message in the text editor.
- This message will be displayed to customers during the vacation period or specified closing days.
- Click the Save Changes button.
Your notice is now saved and ready to be assigned to vacation schedules or weekday closings.
Using Templates
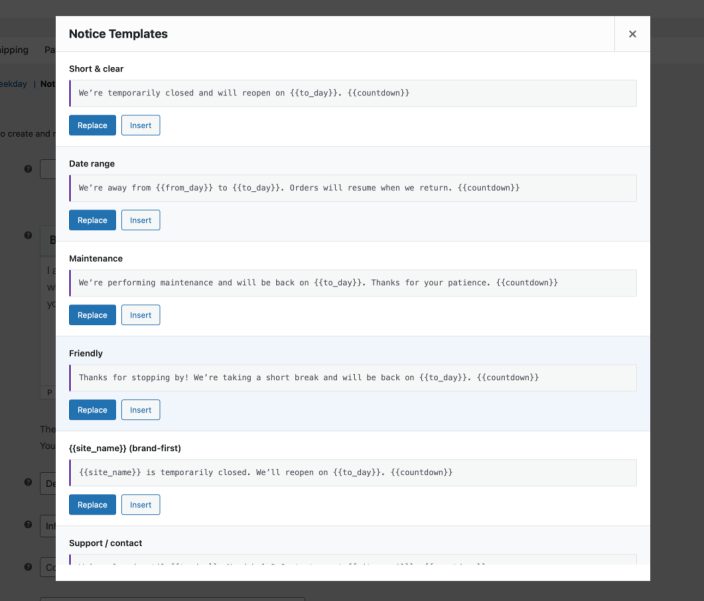
↑ Back to topThe text editor includes a Templates button that allows you to insert ready-made notices:
- Click the Templates button in the editor.
- A modal window will appear displaying available notice templates.
- Select a template and choose either:
- Insert – to add the template content to your current message.
- Replace – to replace your current message with the selected template.
Templates make it faster to create professional-looking vacation announcements while maintaining consistency.
Notice table
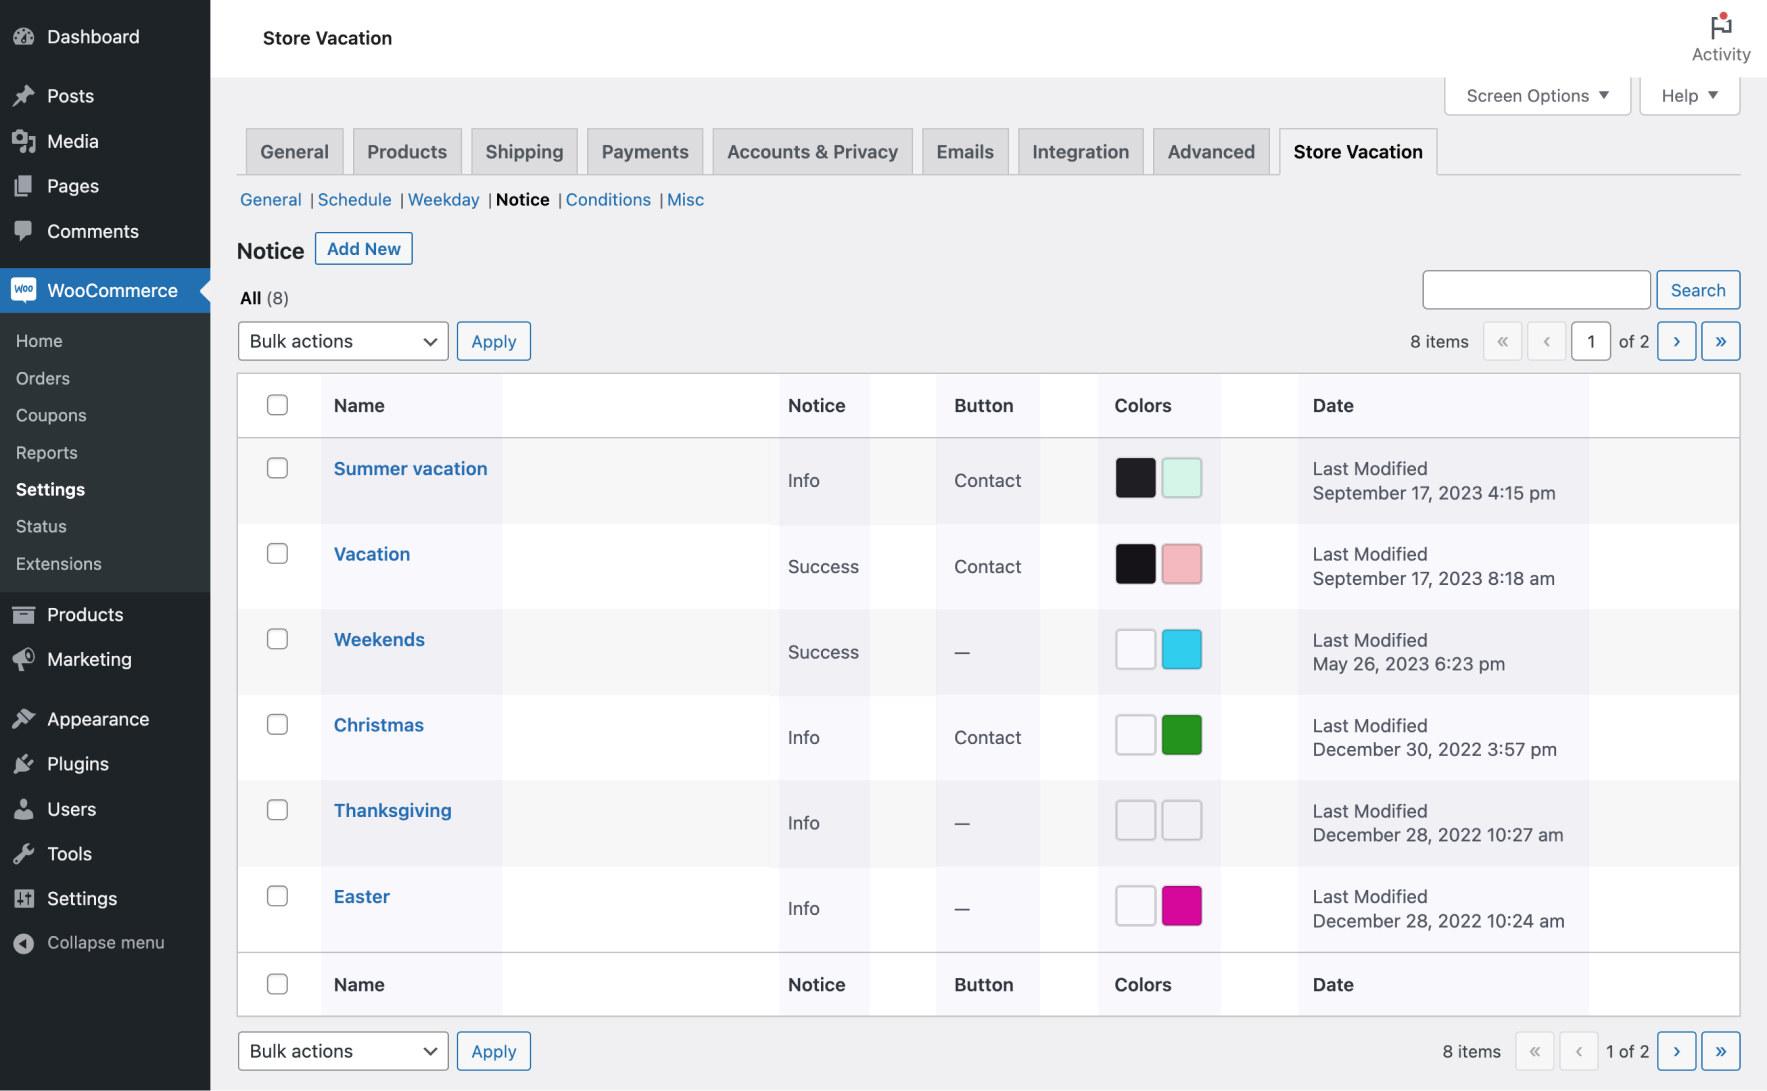
↑ Back to topThe notice table allows you to review some essential information quickly. Here’s what details you can find in the notice table:
- Name: This column displays the name of your notice. If you didn’t specify a name when creating the notice, the creation date will be used as the notice name.
- Notice: In this column, you can see the type of notice assigned to each vacation notice.
- Button: This column shows the Button Text. A horizontal line (—) will be shown as a placeholder if you didn’t enter any button text.
- Colors: In this column, you’ll find the Text and Background colors you have selected for each notice, helping you identify their visual styling.
- Date: This column displays the last date the notice was modified, allowing you to track when changes were made to your notices.
Smart tags
↑ Back to topSmart tags are placeholders that automatically insert information from your Store Vacation, WordPress, and customer settings into a notice.
For example, you can show the scheduled reopening time, display a live countdown, personalize a notice for logged-in customers, or identify a shipping method hidden by a Shipping Rule.
Add Smart Tags to a Vacation Notice
- Create or edit a vacation notice.
- Place the cursor in the Message field where you want to add the information.
- Click Smart Tags above the Message field.
- Select the smart tag you want to use.
- Move the inserted tag to the required position when necessary.
- Click Save changes.
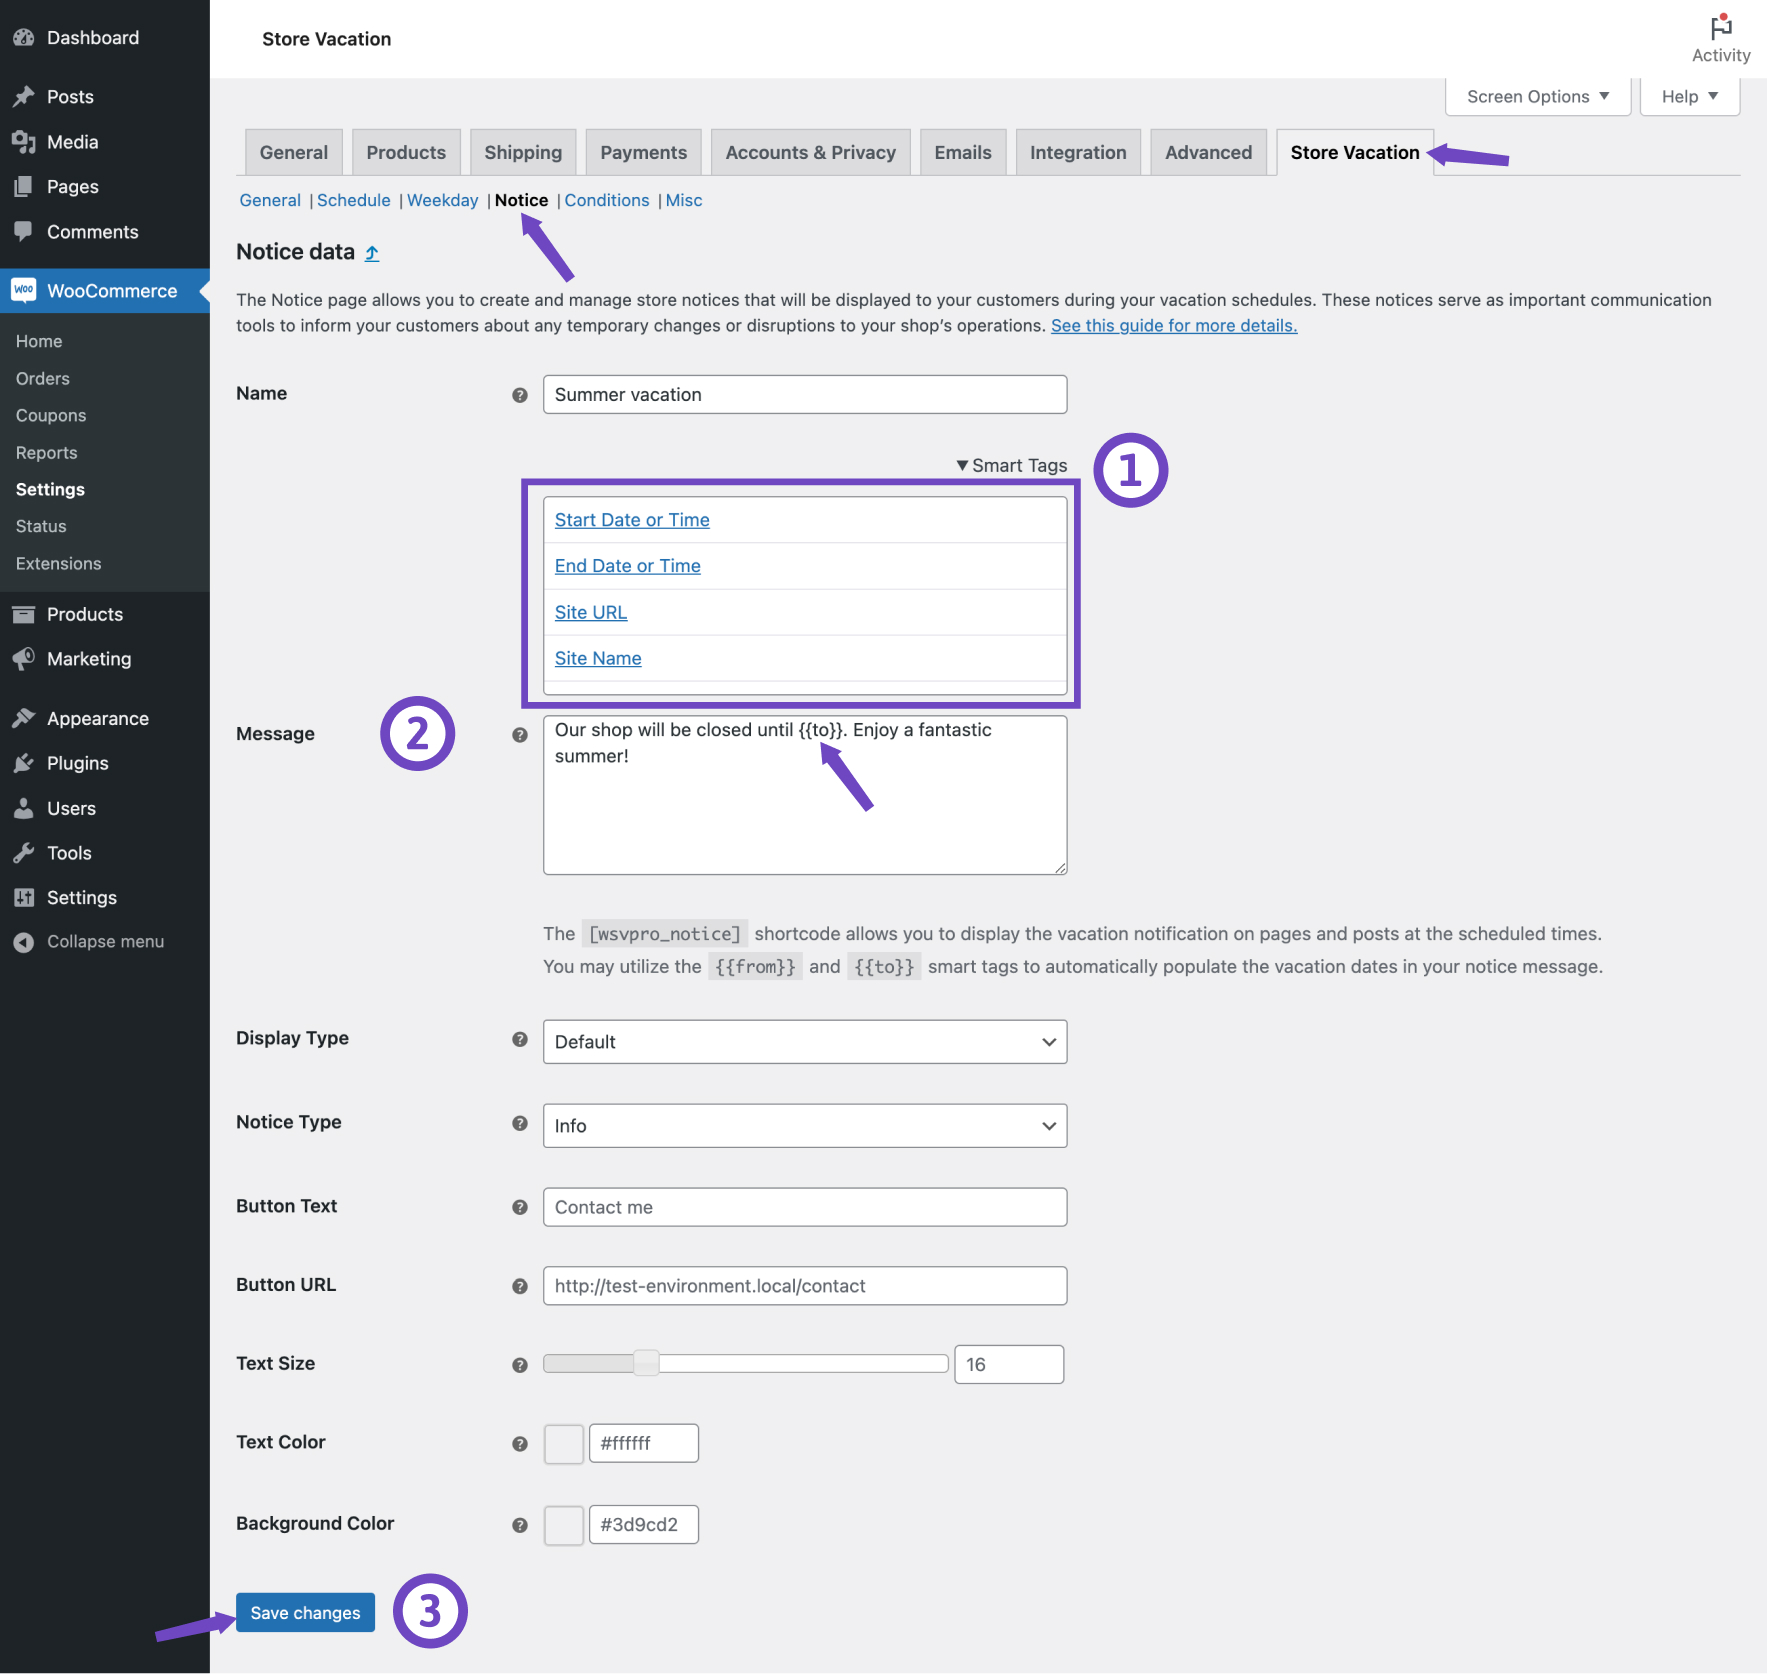
Smart tags remain visible as placeholders in the notice editor, such as {{to}}. Store Vacation replaces them with the relevant information when the notice is shown to customers.
Store schedule smart tags
↑ Back to top- Start Date or Time
{{from}}
Displays when the active Schedule or Weekday closure begins.
Example: Our store will close on {{from}}. - End Date or Time
{{to}}
Displays when the active Schedule or Weekday closure ends.
Example:Online ordering will become available again on {{to}}. - Start Day
{{from_day}}
Displays the day of the week on which the closure begins, such as Monday. - End Date or Time
{{to_day}}
Displays the day of the week on which the closure ends, such as Friday.
Site Information Smart Tags
- Site URL
{{site_url}}
Displays a clickable link to your website. - Site Name
{{site_name}}
Displays the site title configured under WordPress Settings. - Admin Email
{{site_email}}
Displays the site administrator’s email address as a clickable email link.
Customer Smart Tags
- Customer Name
{{customer_name}}
Displays the WordPress display name of the currently logged-in customer. - Username
{{username}}
Displays the WordPress username of the currently logged-in customer.
Customer smart tags return an empty value when the visitor is not logged in. Use them only when the notice will be shown to logged-in customers, or write the surrounding message so it remains understandable without the customer information.
Example:
Hi {{customer_name}}, online ordering will be available again on {{to}}.
Countdown Smart tag
- Countdown
{{countdown}}
Displays a live countdown based on the current vacation period:- In an advance notice, it counts down until the store closes. (when using pre-notice)
- In an active vacation notice, it counts down until the store reopens.

Tip: drive engagement with the countdown timer
Use the {{countdown}} tag in your notice banners to create urgency and clarity. When customers see time ticking down, they’re more likely to take action. Such as placing an order before closing or planning a return visit when you reopen.
Recommended use cases:
- Pre-Notice: “
Hurry! We’ll close in {{countdown}}. Place your order now!” - Reopening Teaser: “
We’ll be back in {{countdown}}. Get ready!”
Pro tip: Combine {{countdown}} with {{customer_name}} for highly engaging, personalized messages like:
Hi {{customer_name}}, our store will reopen in {{countdown}}. See you soon!Adding a button to your notice
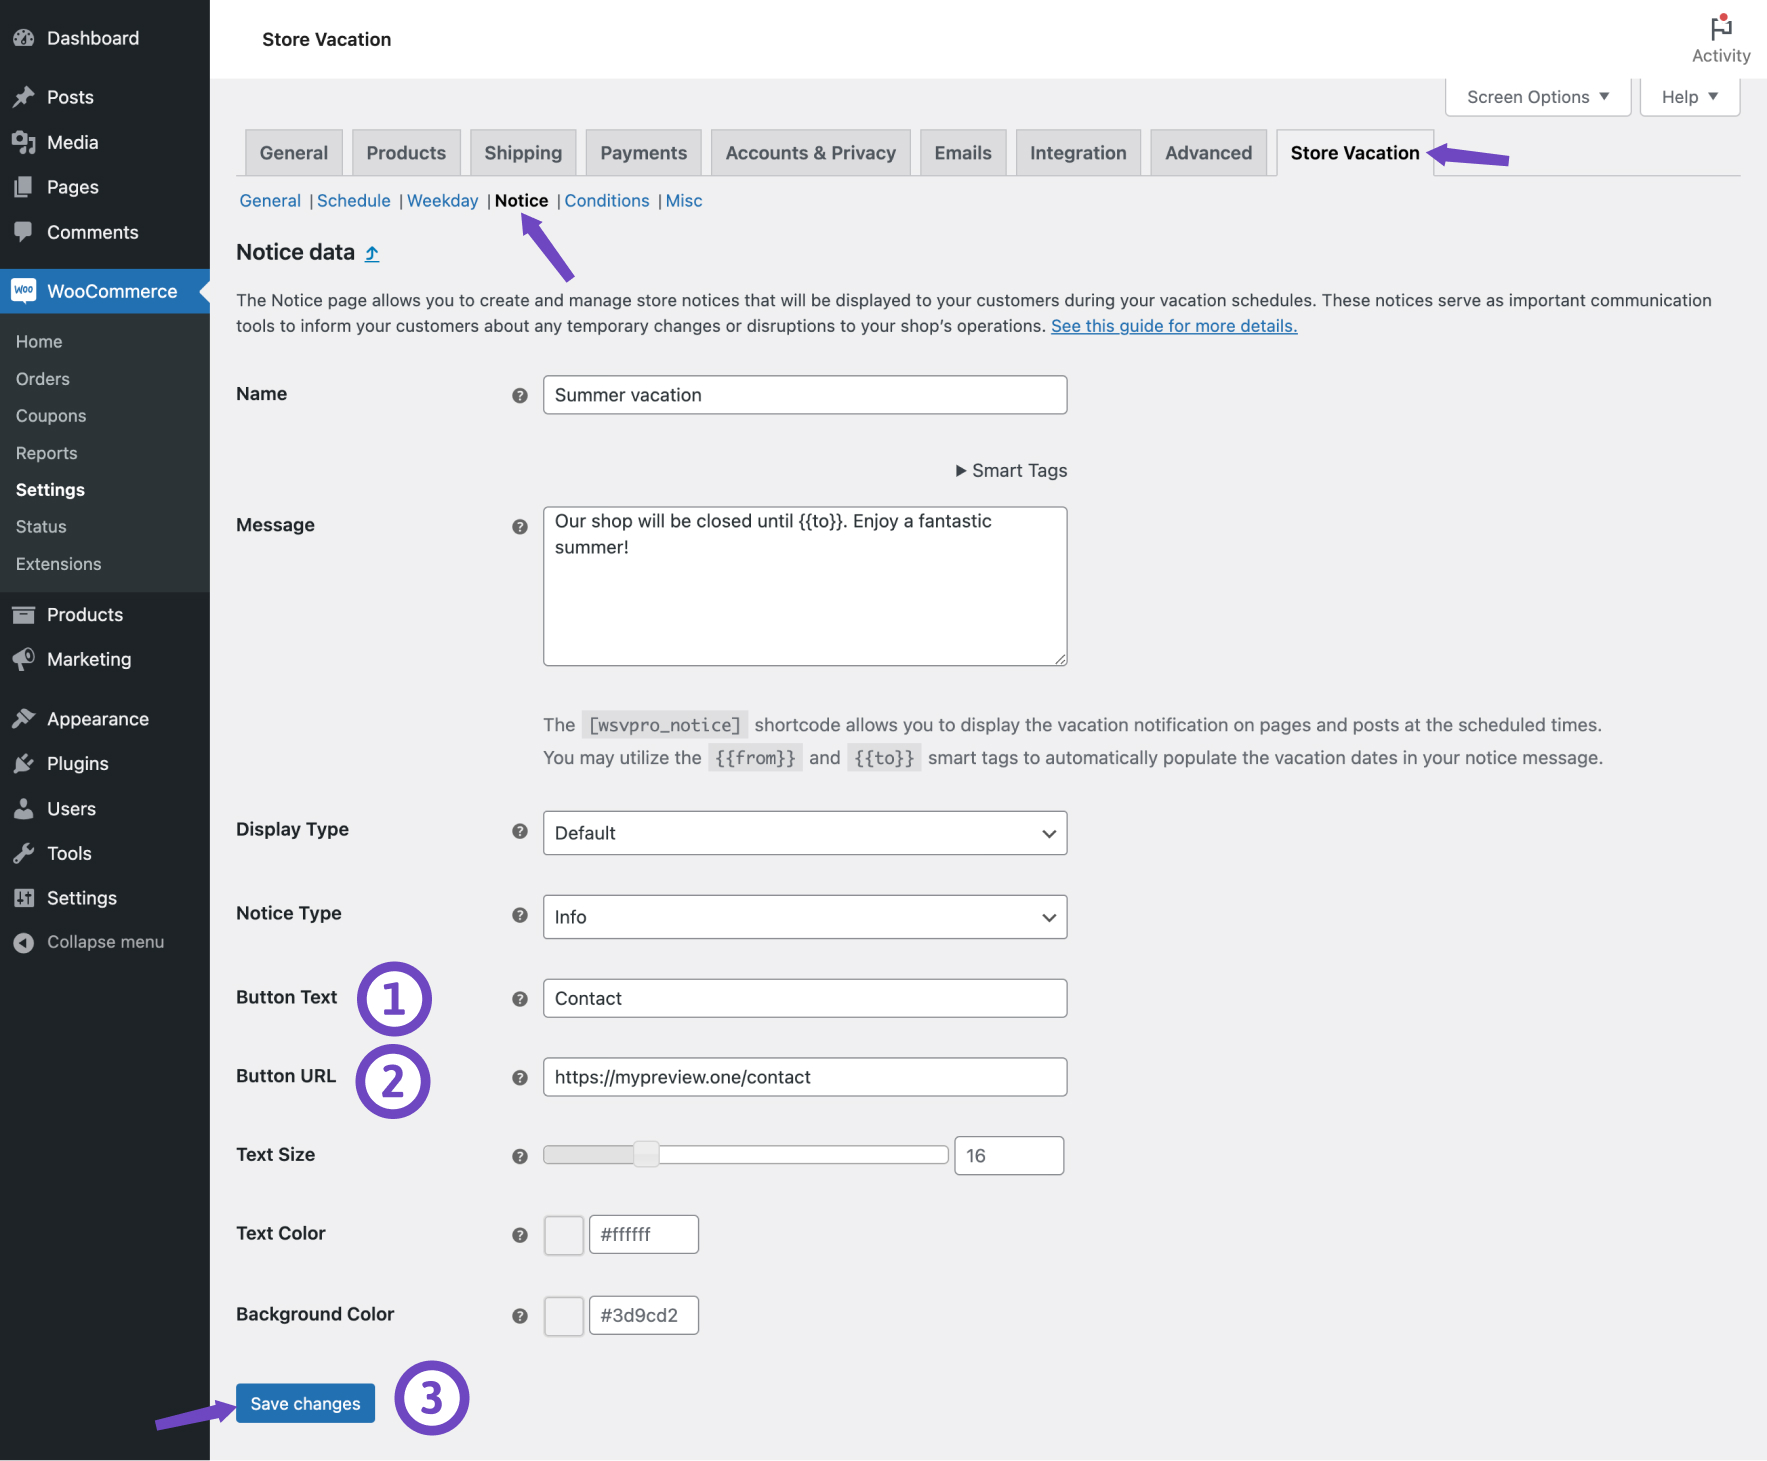
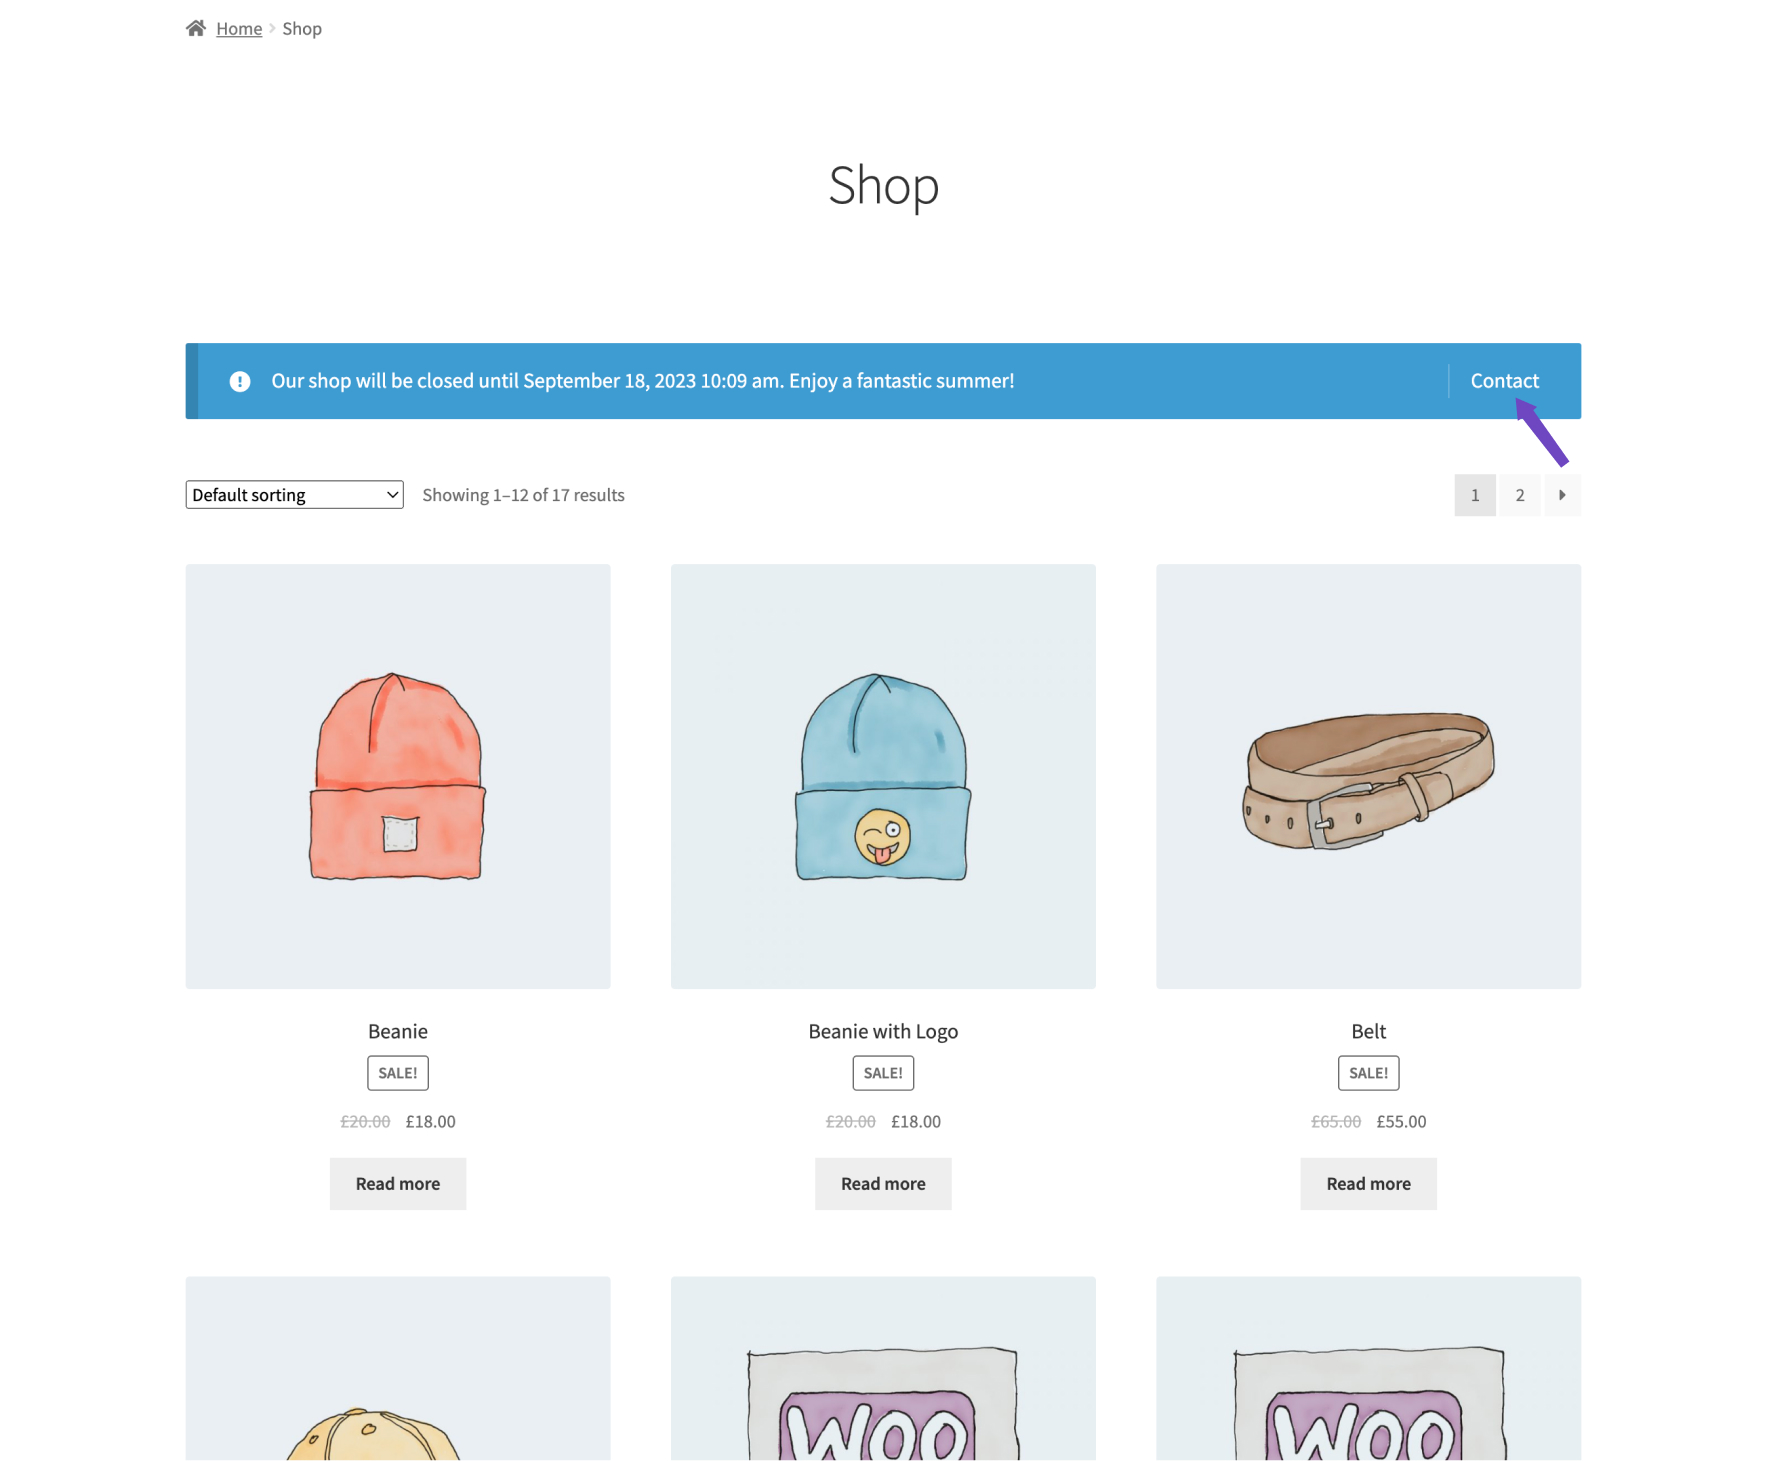
↑ Back to topEnhance your vacation notice with a clear call to action button, guiding your customers to take specific actions, such as visiting your contact page. Here’s how to do it:
- Enter the text you want to display on the button in the Button text field.
- Specify the URL to which the button should direct your customers in the Button URL field.
- Click on the Save changes button.
Customize notice
↑ Back to topIn most cases, themes will apply their own unique styles to WooCommerce notice variations to ensure they align with their visual design. Here, we’ll explore the customization options available within the extension to tailor your vacation notices to your liking.
Display type
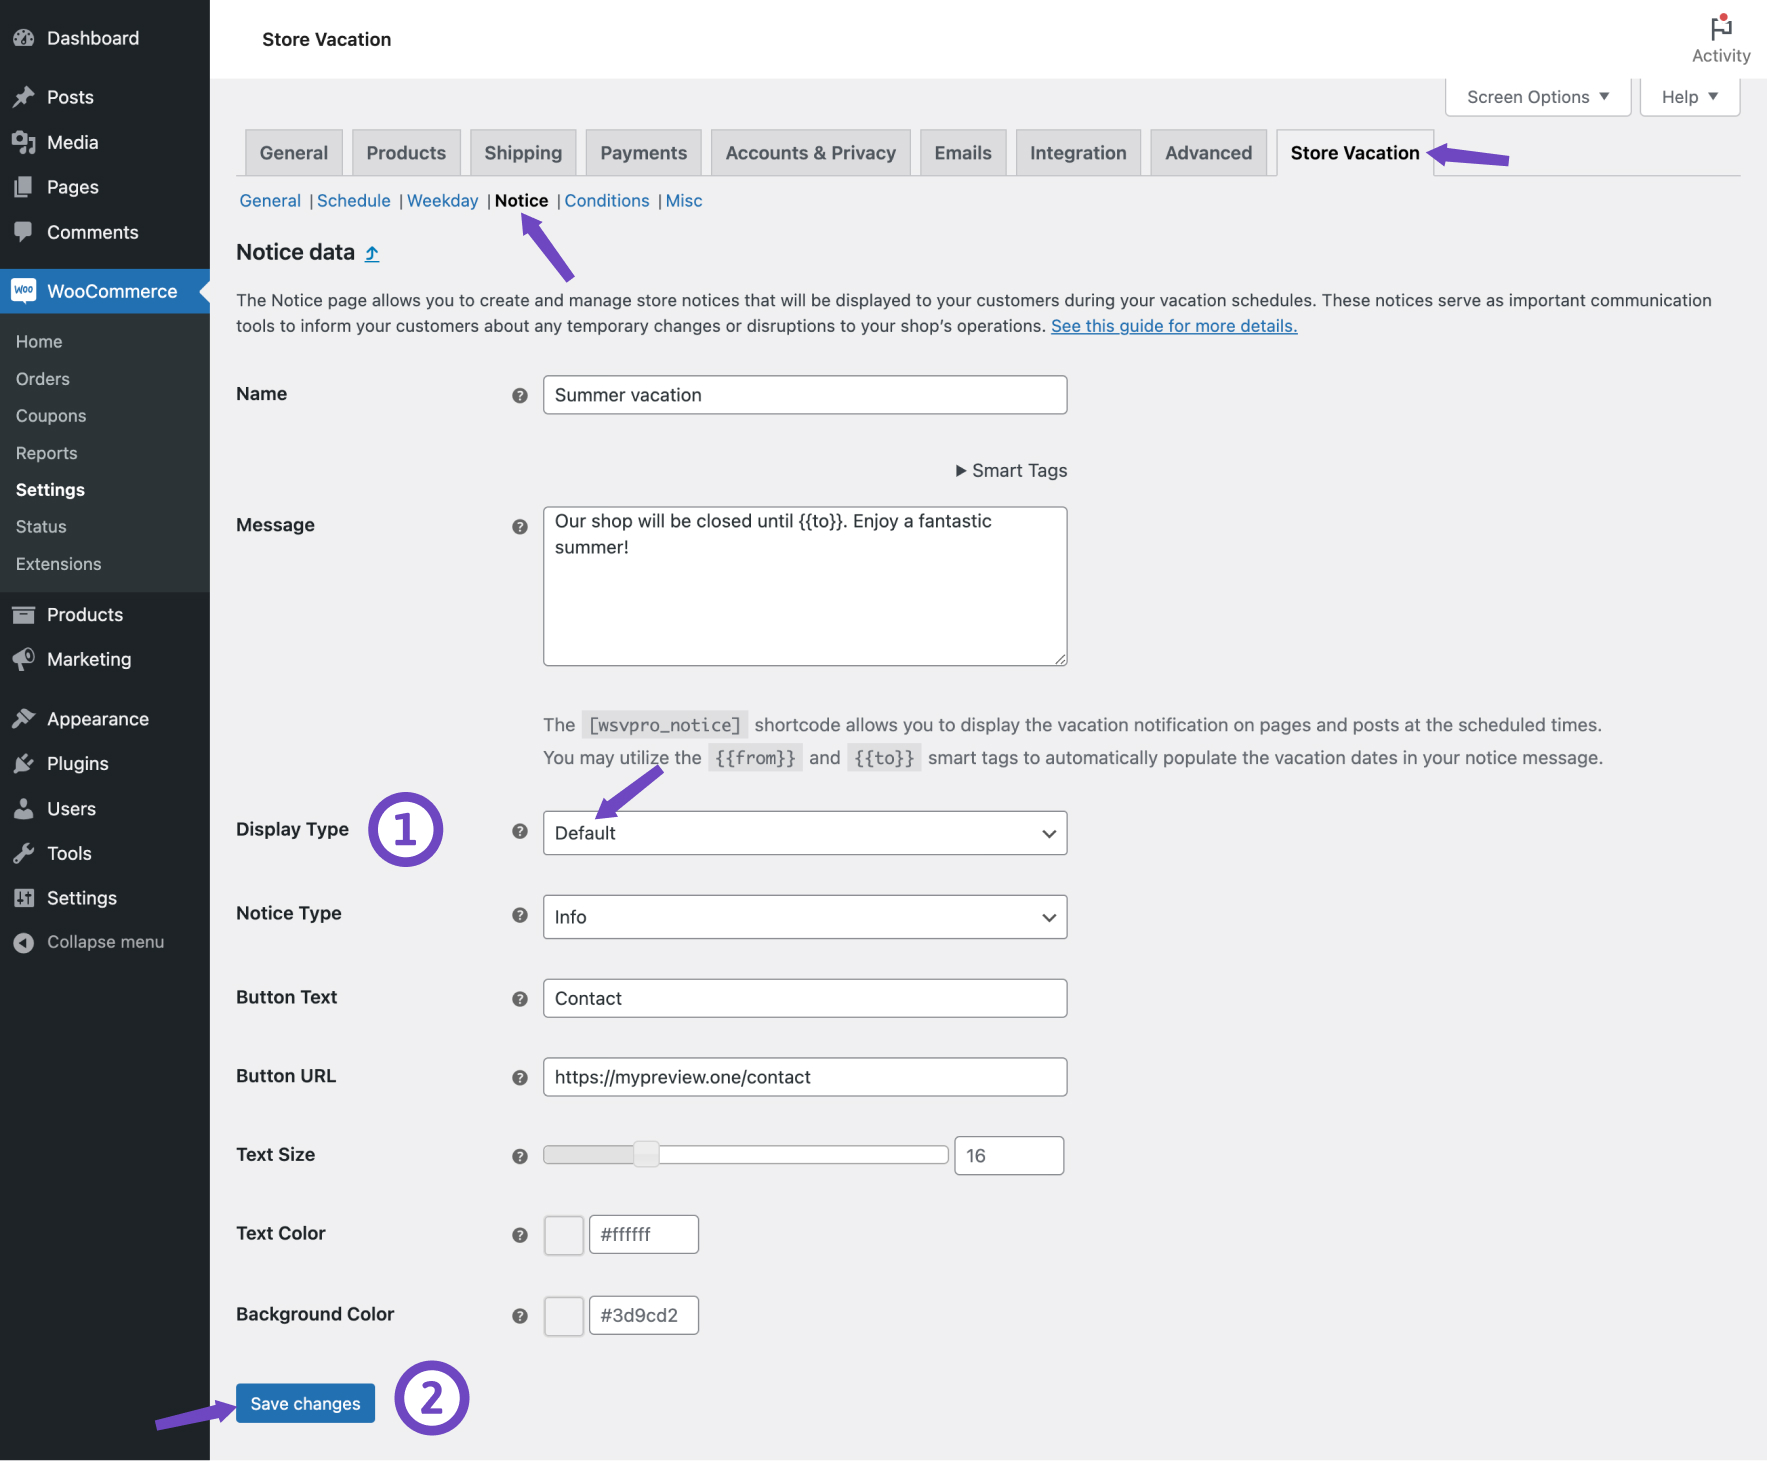
↑ Back to topYou can change the appearance of your vacation notice by adjusting the Display Type option. Here’s how:
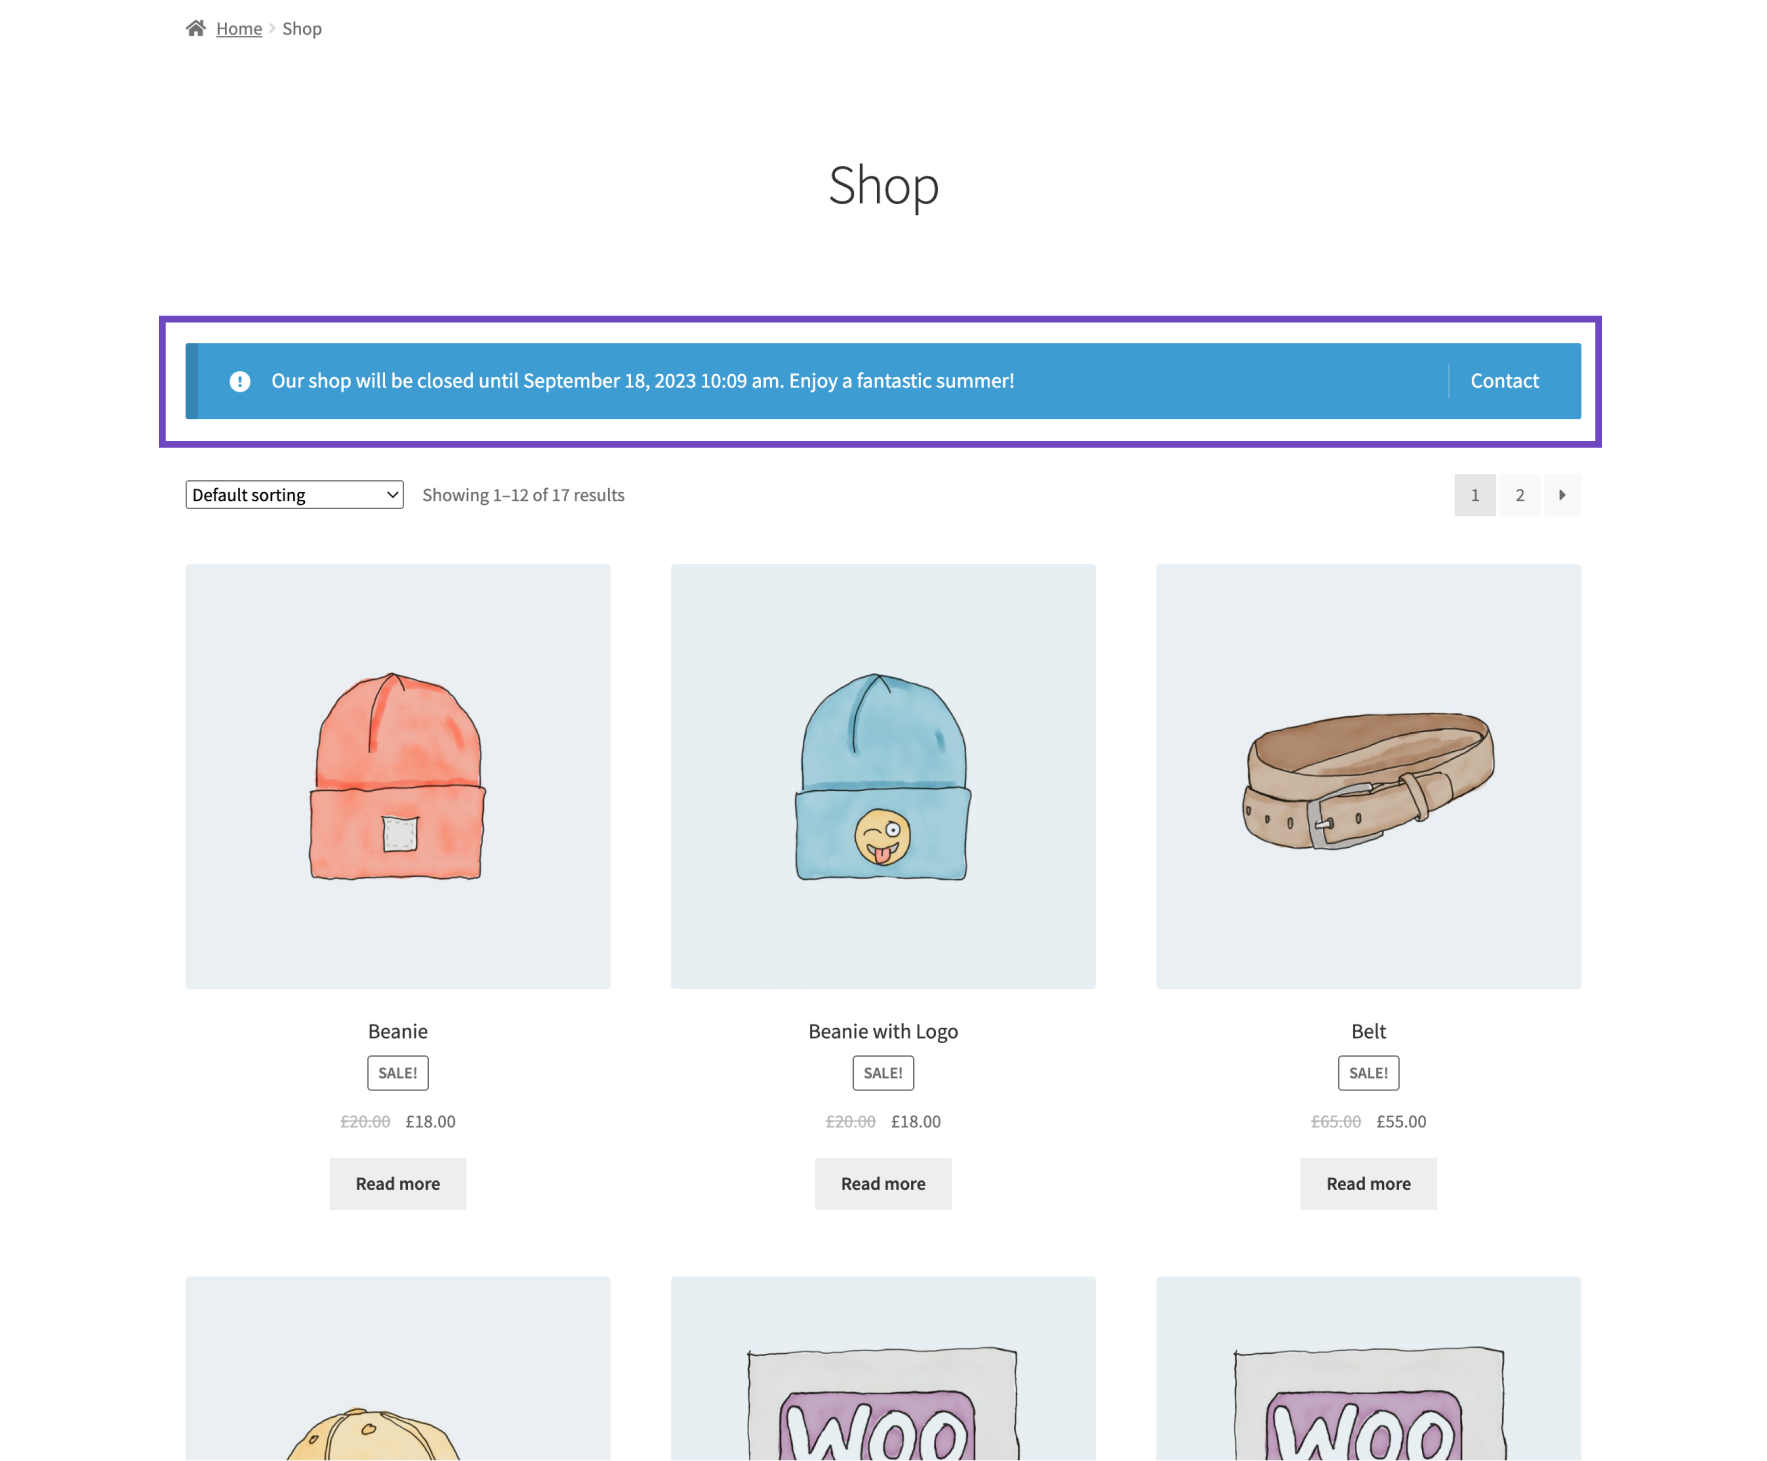
1. Default display
This is the default option, already selected for the Display Type field. It inherits the notice’s appearance from the WooCommerce notice, presenting it in a boxed view block.
2. Announcement bar
Alternatively, you have the option to showcase your vacation notice in an Announcement bar. To use the announcement bar:
- Choose the Announcement bar option for Display Type.
- Click on the Save changes button.
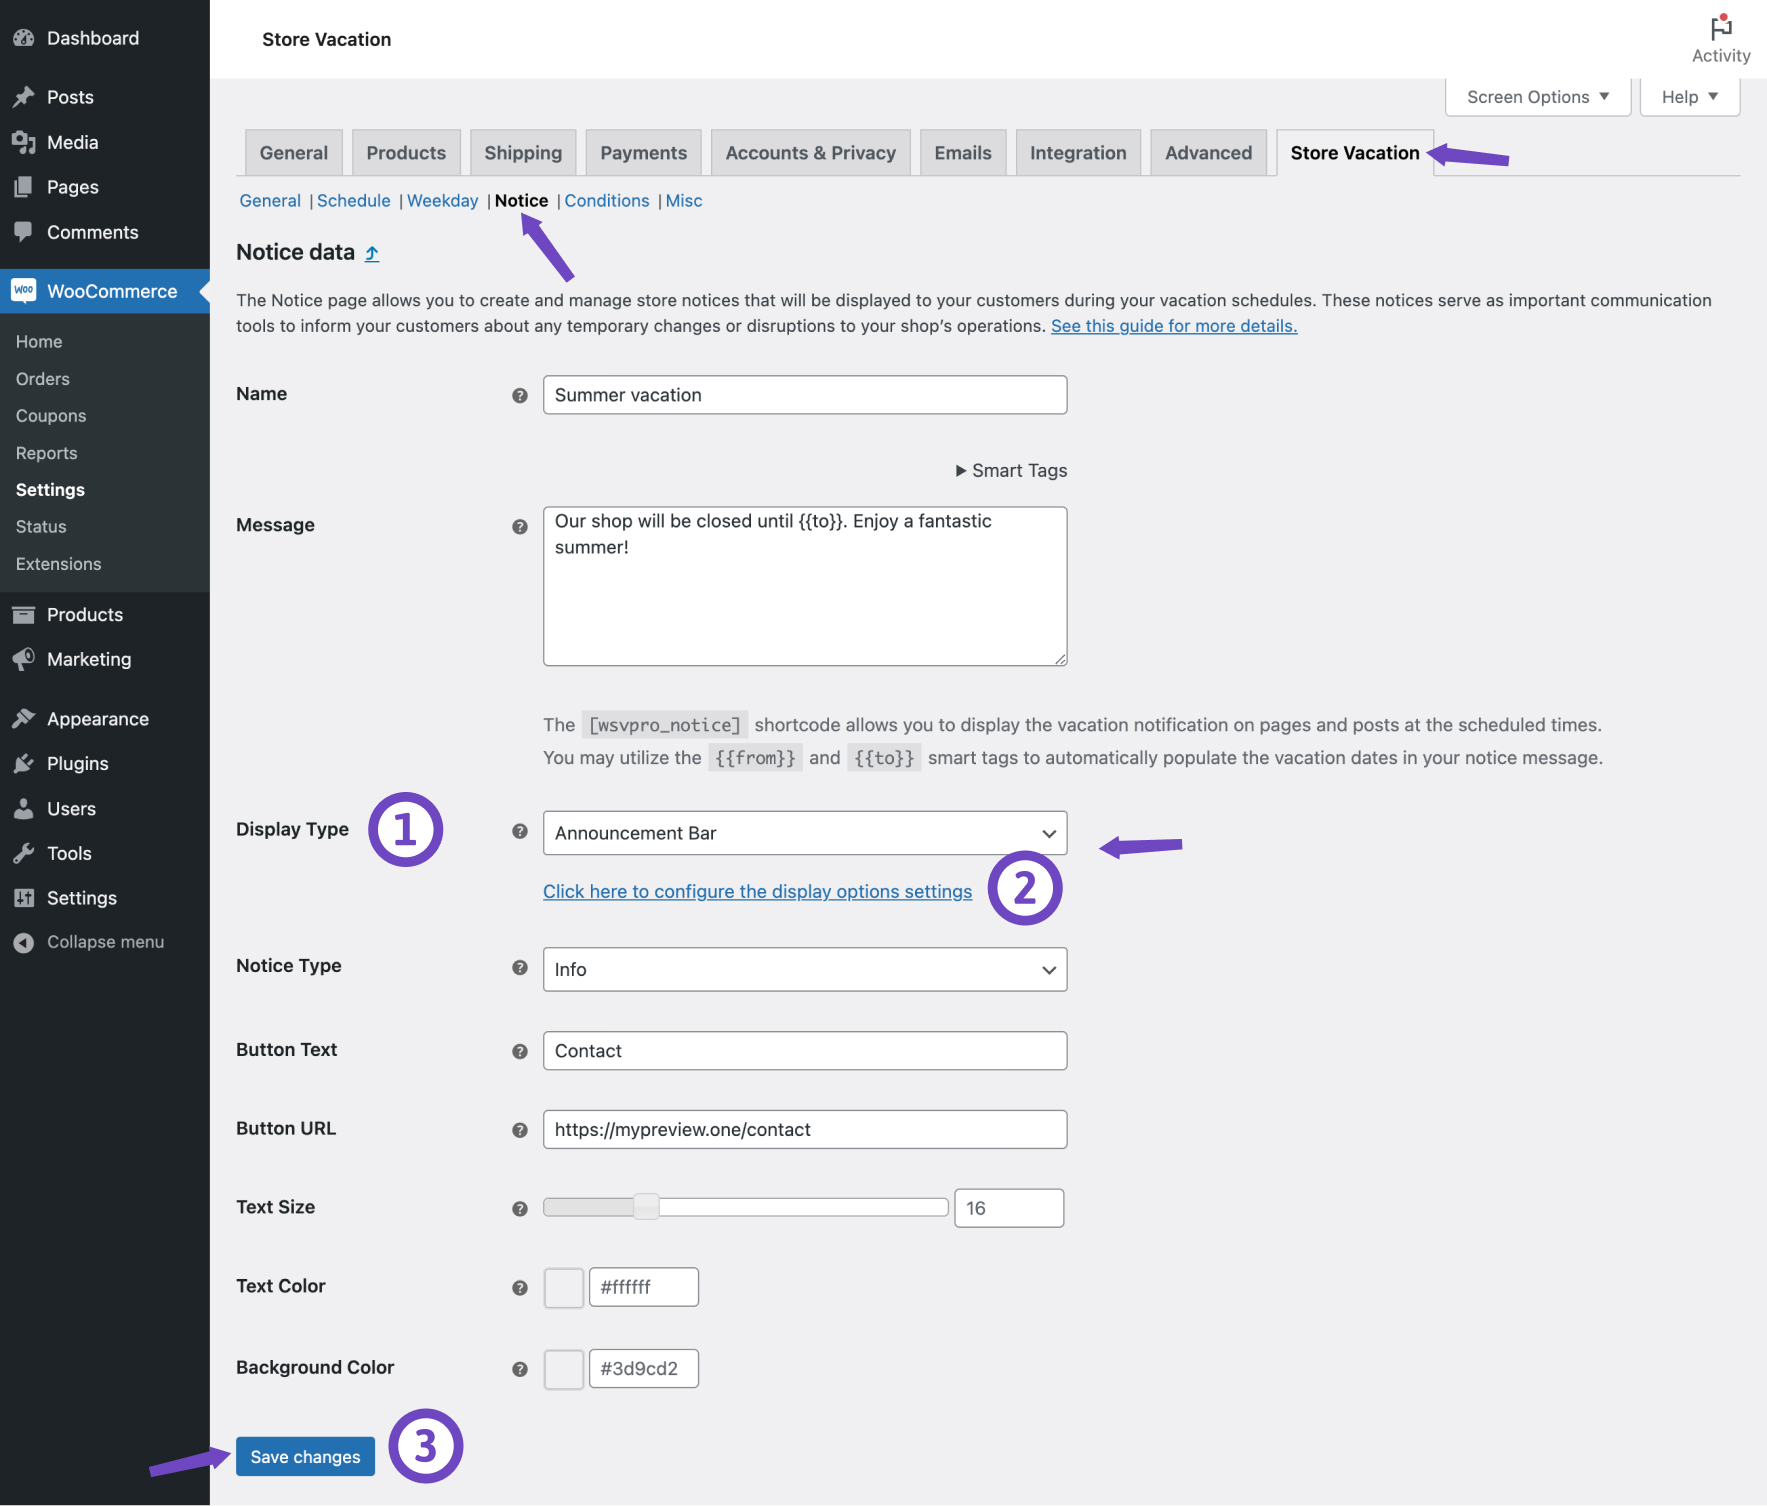
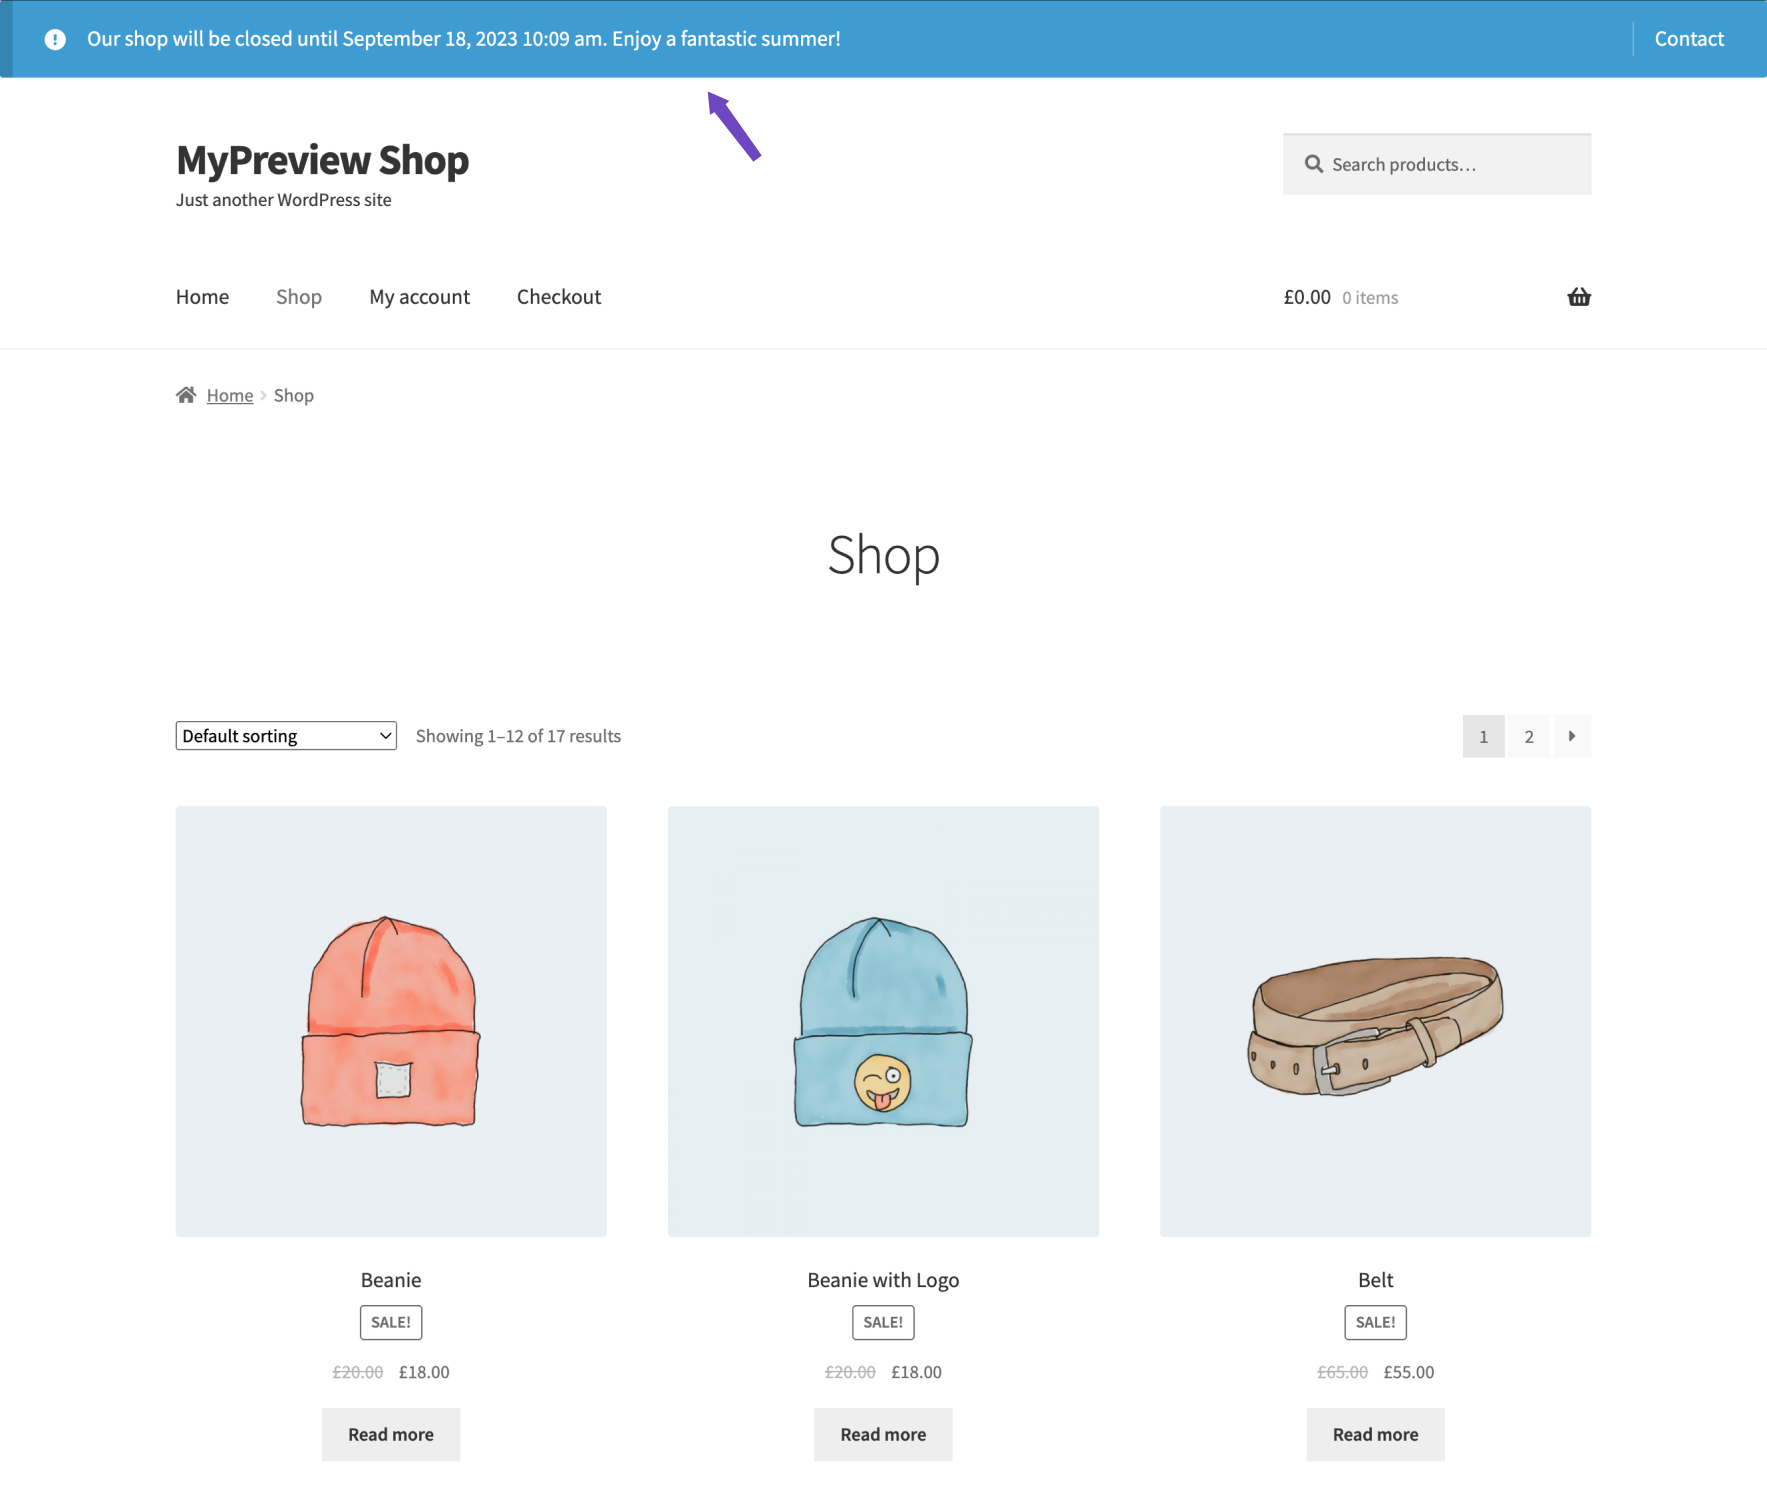
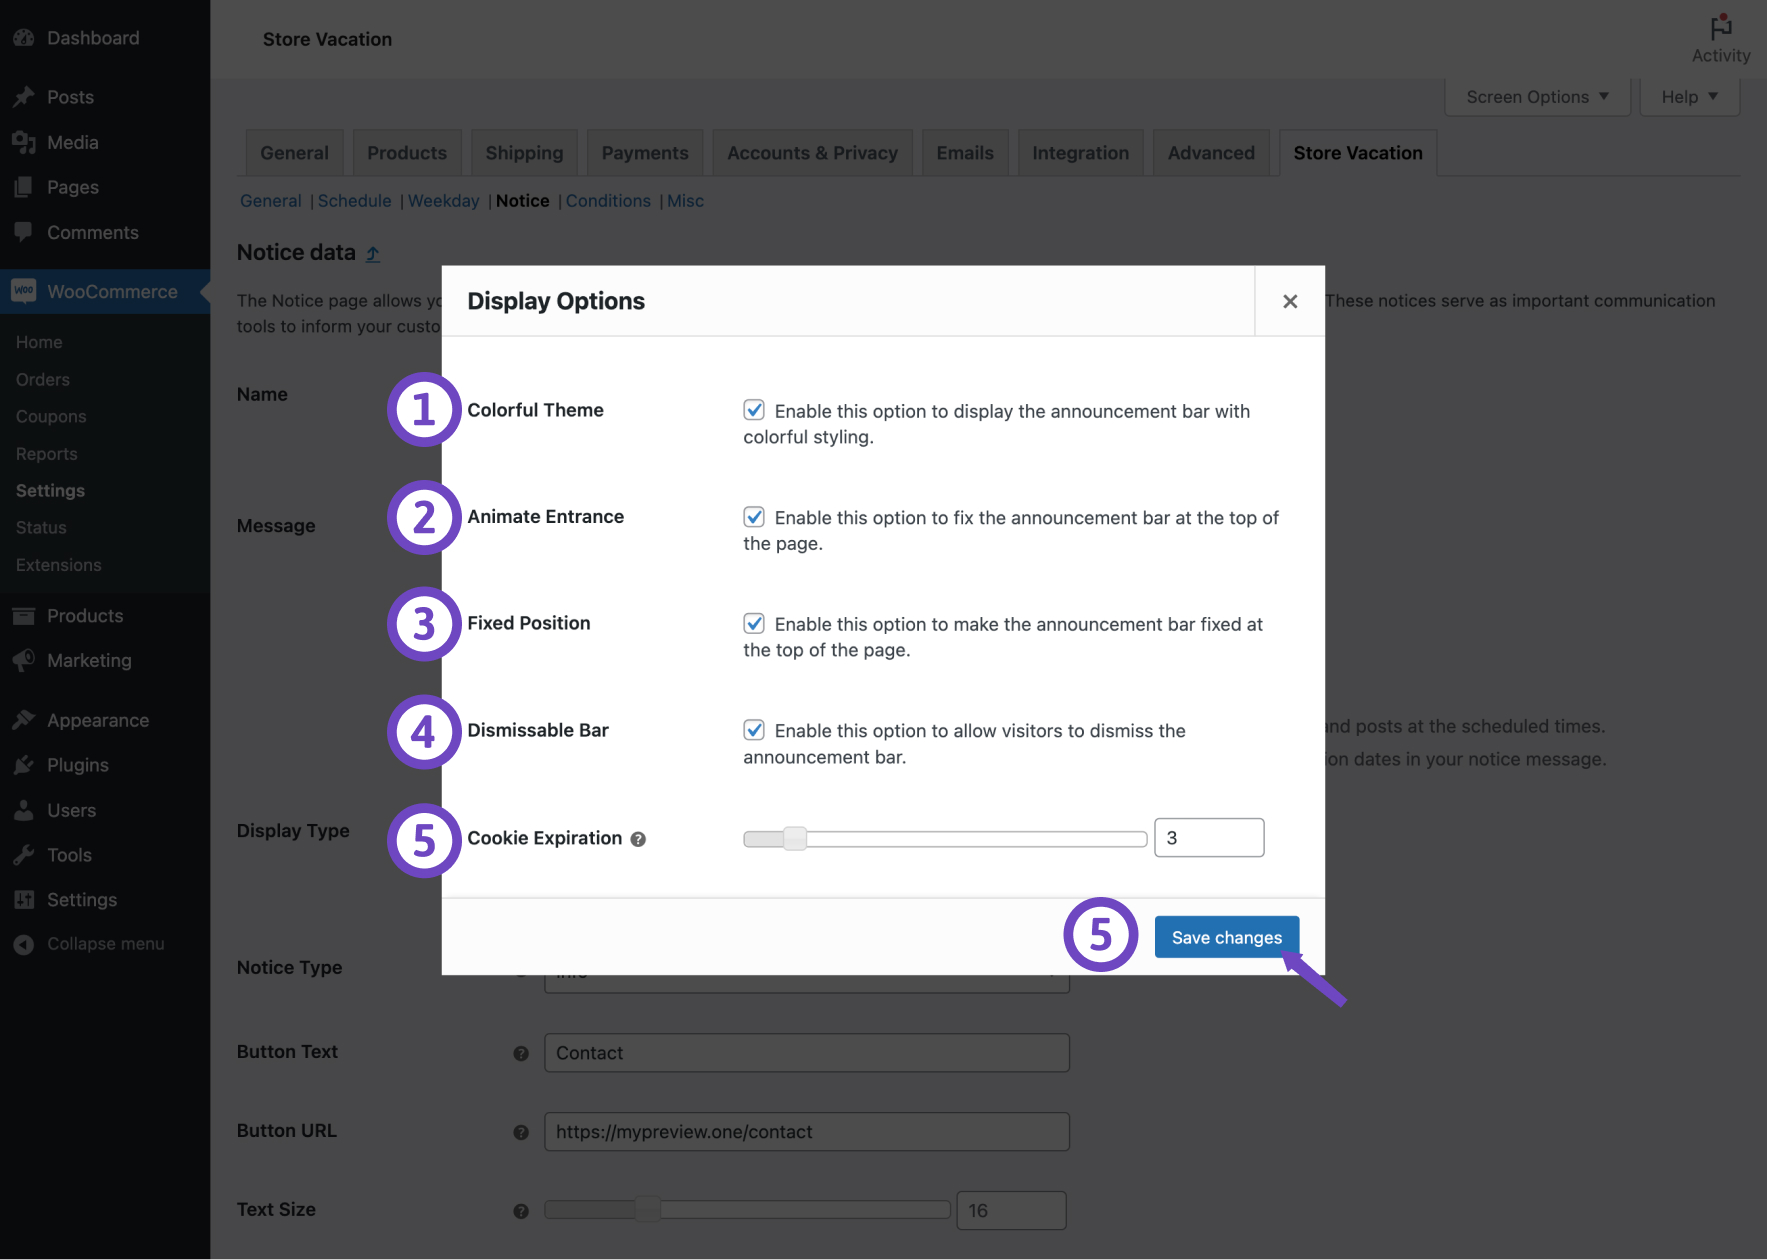
Now, here are some customization options for your Announcement Bar:
- Colorful Theme: Opting for this setting will introduce an eye-catching background animation with a variety of colors to your announcement bar, enhancing its visual appeal.
- Animate Entrance: When activated, this option will include a lively bounce animation as your notice bar appears upon page load, adding an engaging touch to your website.
- Fixed Position: Selecting this feature will affix the announcement bar firmly to the top of your webpage, ensuring it remains in view even as visitors scroll down, providing consistent visibility.
- Dismissable Bar: This option adds a close (x) button to the notice bar, allowing visitors to dismiss it. You can adjust how long the notice remains hidden for a user who clicks the close button using the Cookie Expiration field. However, without setting the Cookie Expiration, the message will reappear if the user refreshes the page.
- Cookie Expiration: This range slider permits you to set a cookie for the announcement bar, measured in hours. For instance, if you select a duration of 3 hours for this option while also enabling the Dismissable Bar checkbox, the bar will remain hidden for the respective user for a period of 3 hours after they click on the close (x) button.
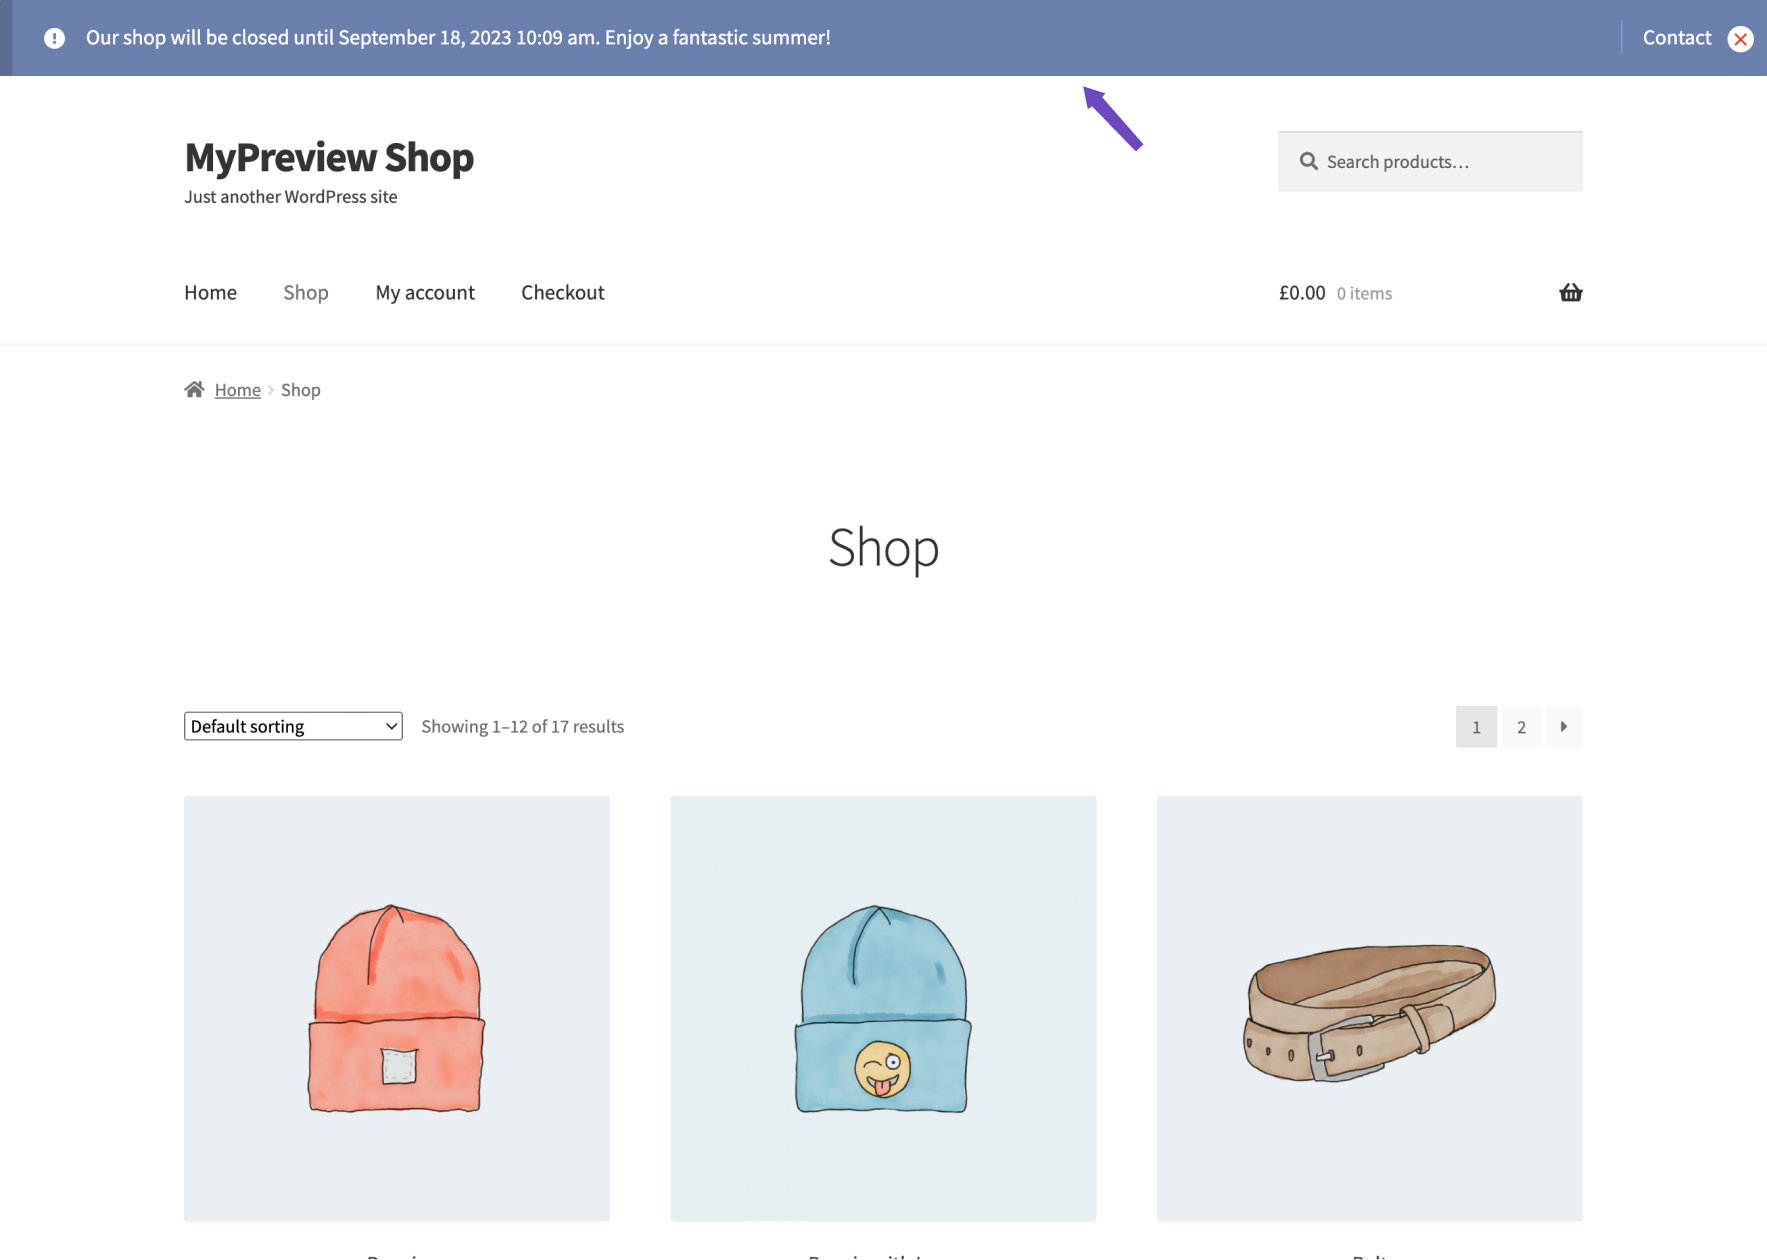
Notice type
↑ Back to topYou can update the notice type within WooCommerce’s built-in notice types. To choose the suitable notice type, it’s helpful to understand the definitions of each type in WooCommerce:
- Info: This is a general notice type commonly used for informational purposes, such as announcements or user guides.
- Success: This notice type commonly indicates a successful action. For example, it is used in WooCommerce when adding an item to the cart or receiving a shipping quote.
- Error: An error notice is triggered when something goes wrong. This message will typically appear on shop pages due to user error or code issues.
To update the notice type:
- Select a Notice Type from the options provided.
- Click on the Save changes button.
Notice color
↑ Back to topYou can override the color scheme of your vacation notices using the color picker controls provided by the plugin. This allows you to ensure that the notice’s color matches your store’s branding.
- Define a Text color using the color picker.
- Define a Background color using the color picker.
- Click on the Save changes button.
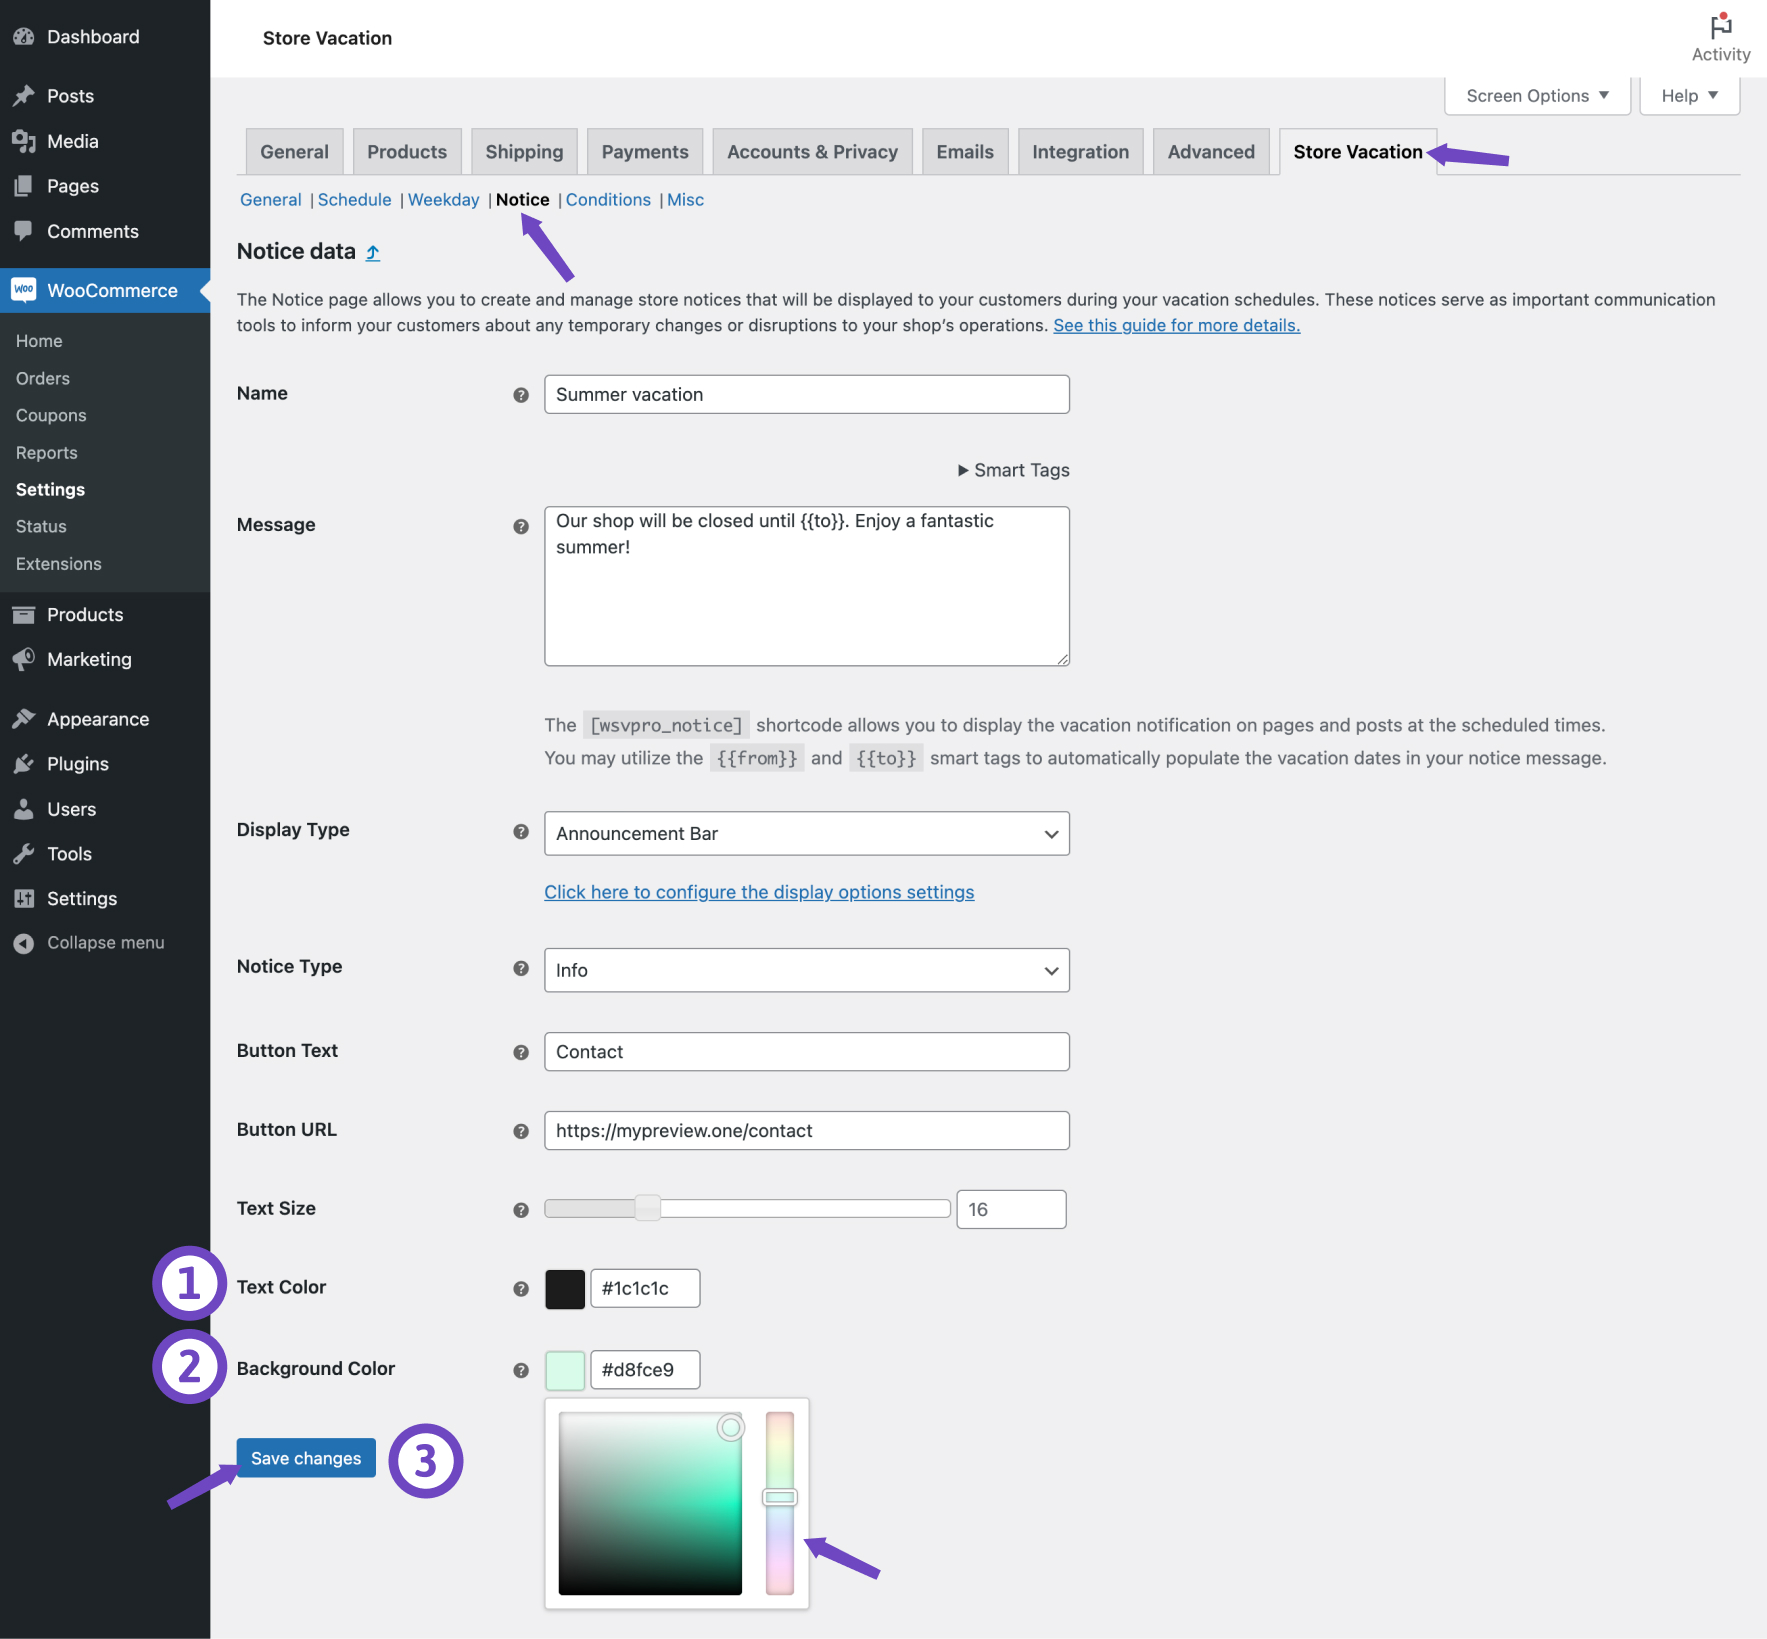
Notice text size
↑ Back to topAdjusting the font size of your vacation notices is also possible using the range slider controls provided by the extension. This way, you can ensure that the notice text is readable and aligns with your overall design.
- Use the range slider to adjust the Text Size as desired.
- Click on the Save changes button.
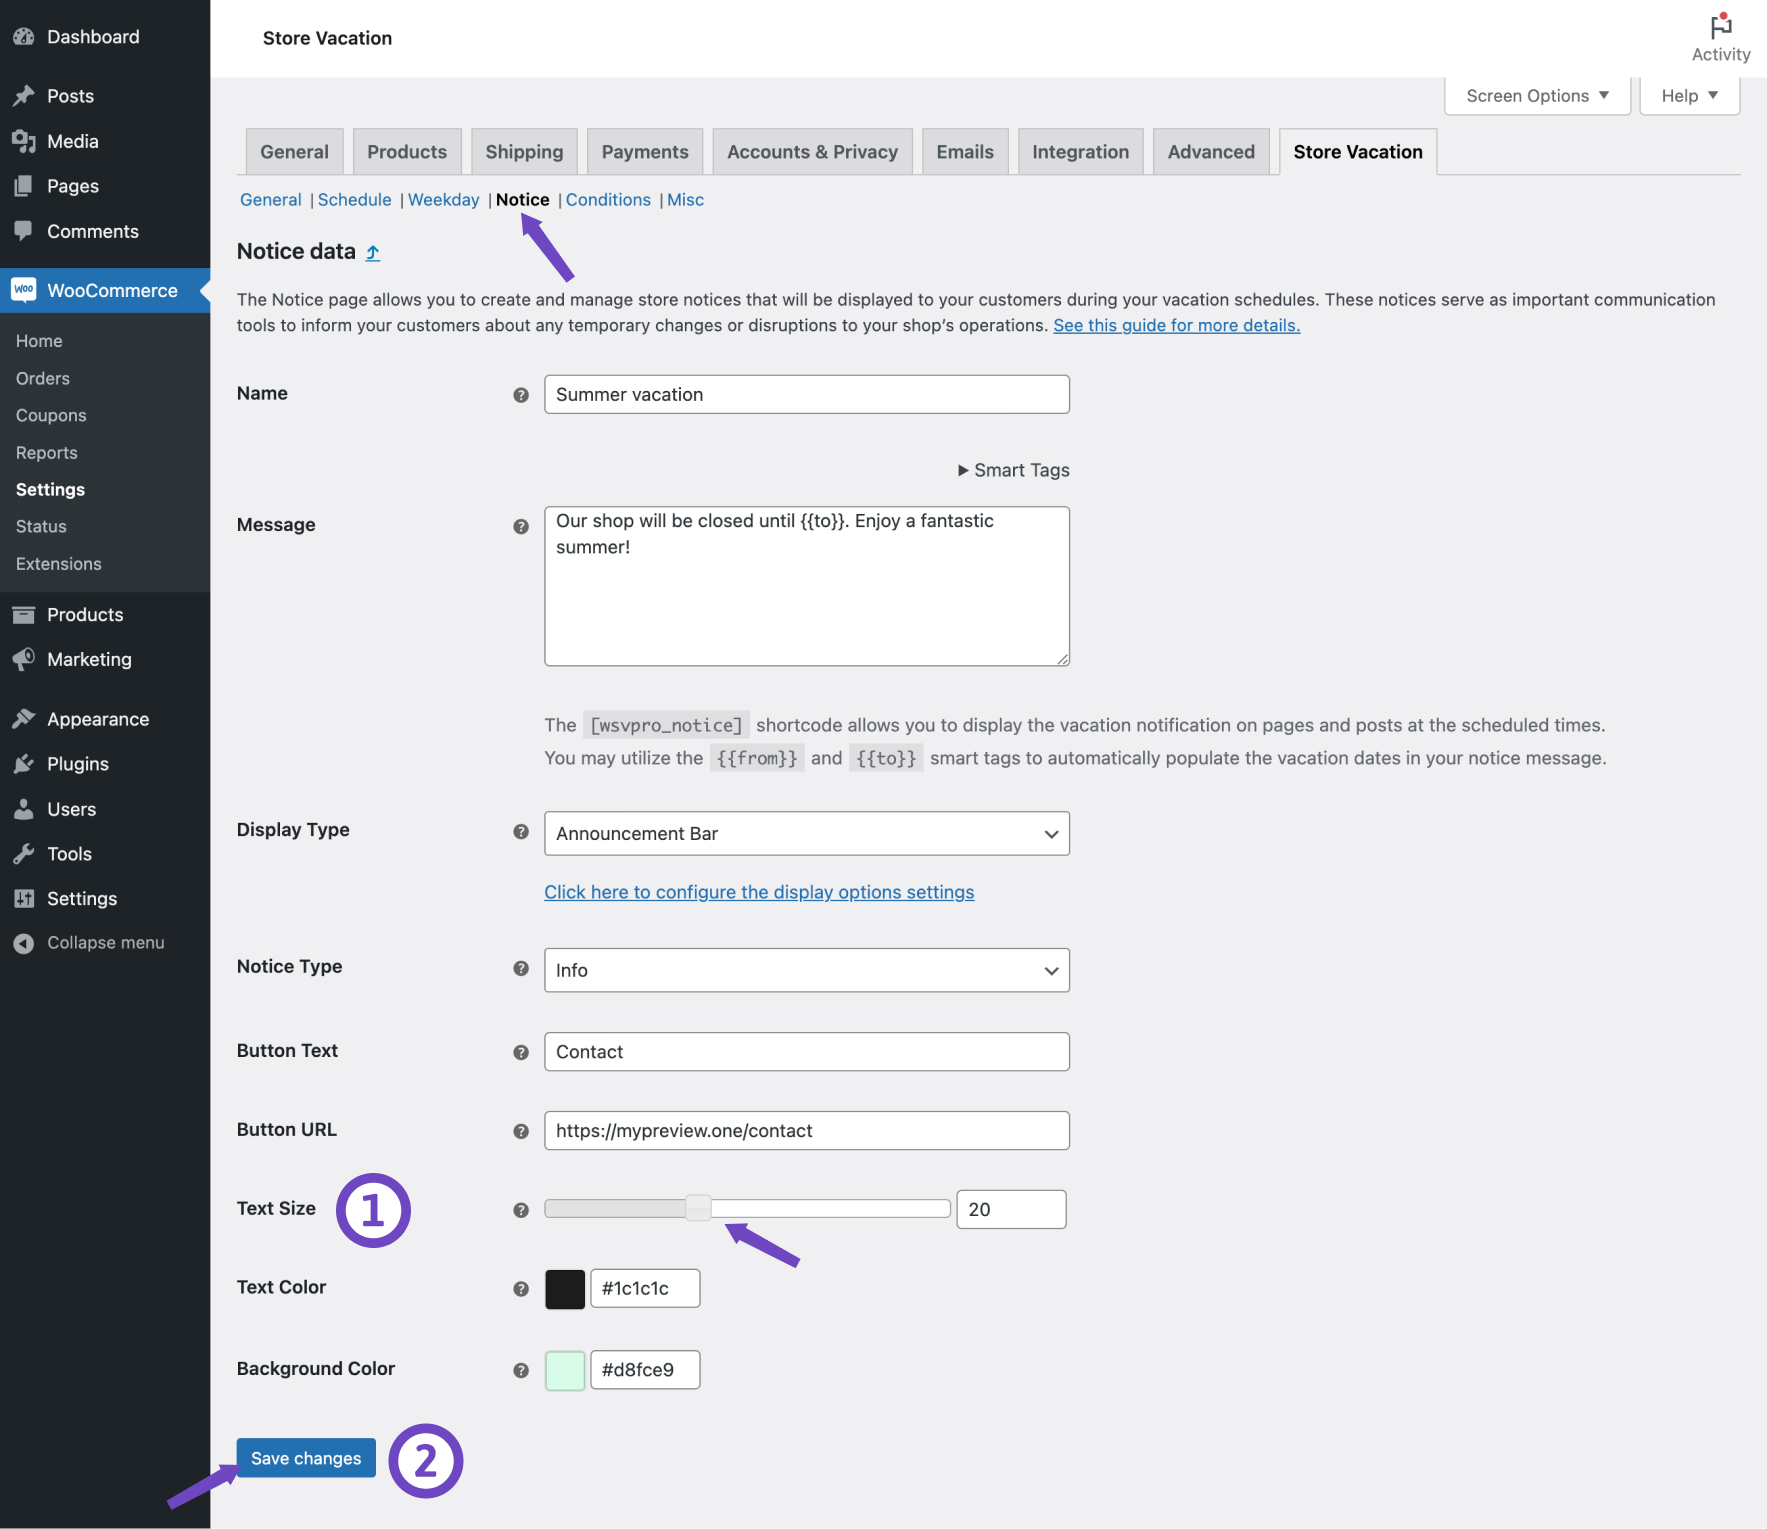
Vacation notice display
↑ Back to topThe vacation notice that the plugin generates is meant to be displayed on WooCommerce pages, such as the shop and product pages, during the period of your vacation. However, we understand that you may want to extend the visibility of your message to other pages on your website.
You can opt to add your message to other pages through the Store Vacation Notice block, Elementor widget, or the shortcode.
Notice block
↑ Back to topIf you have pages on your website where you want to display your vacation notice, you can use the Store Vacation Notice block to achieve this. In addition to the default WooCommerce pages, you can add this block to the editor of your desired page. Follow these simple steps to display your vacation notice on a specific page:
- Edit the page or post where you want to add the vacation notice block.
- Click on the (+) button to add a new block in the editor.
- Search for the Store Vacation Notice block and select it from the available block options.
- Click on the Update button to make the changes live on your page.
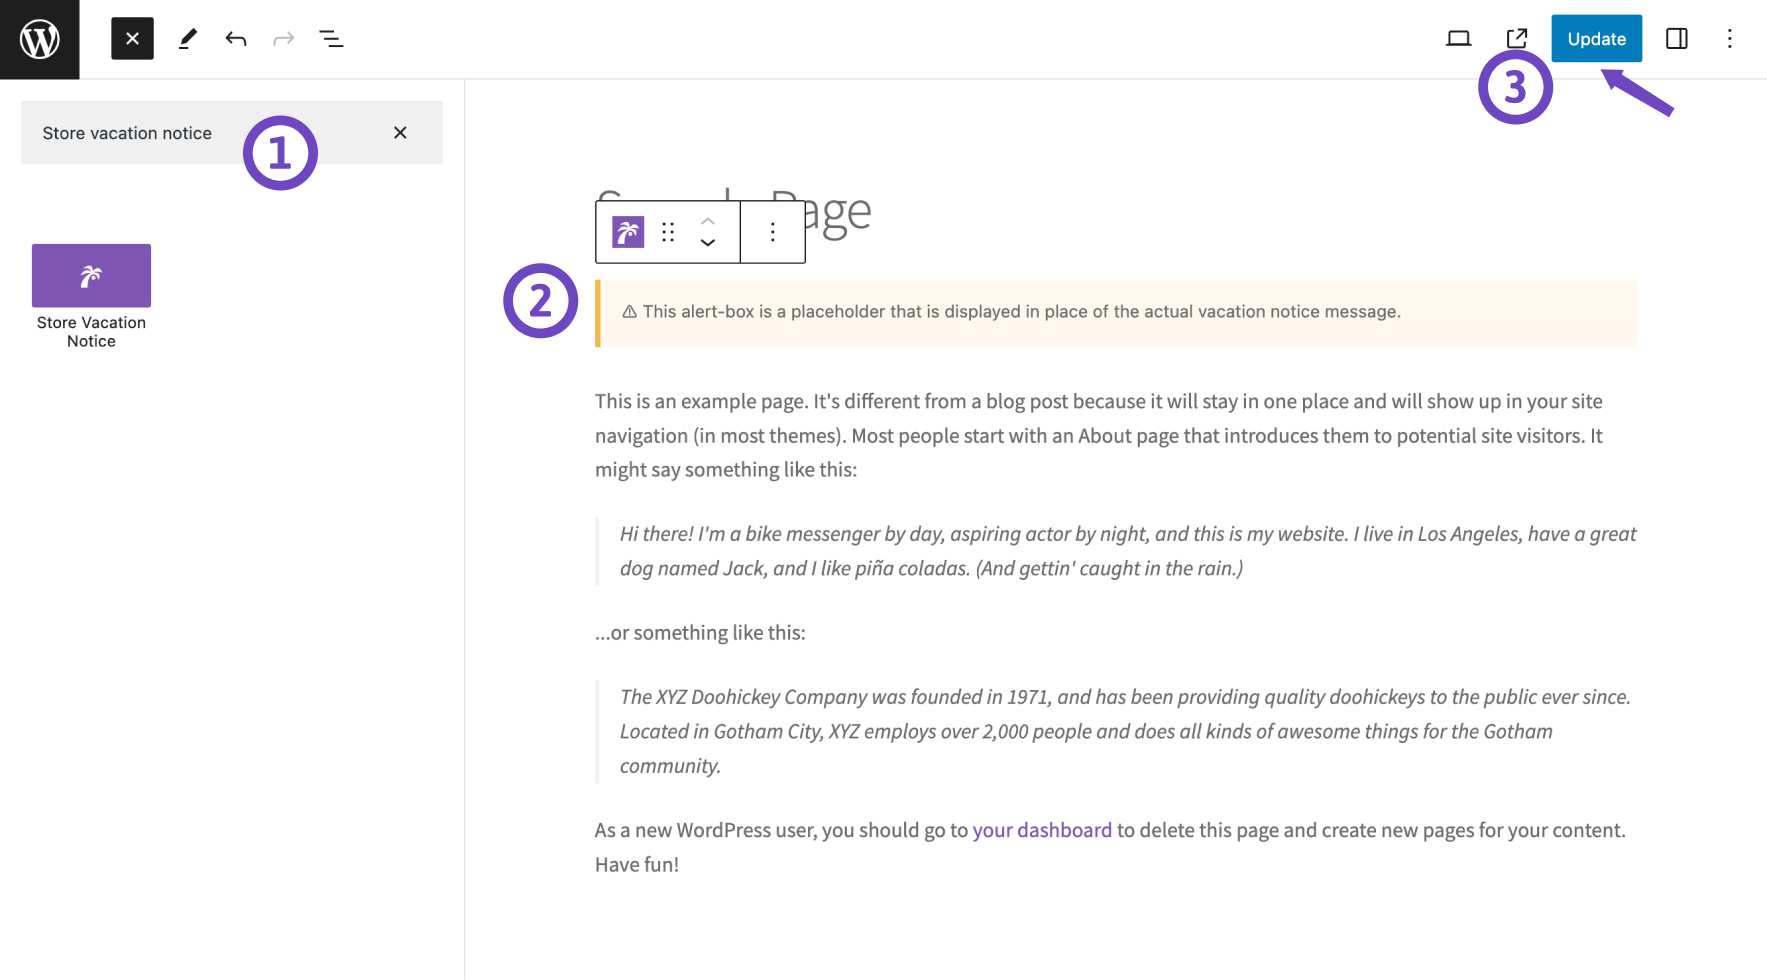
Elementor widget
↑ Back to topIf you use the Elementor page builder to design your website, you can integrate the Store Vacation Notice widget into your pages. To add the vacation notice widget to your page or post, follow these steps:
- Edit the page or post where you want to add the vacation notice block.
- In the Elementor editor, search for the Store Vacation Notice widget.
- Drag and drop the widget into the desired section of your page.
- Click on the Update button to make the changes live on your page.
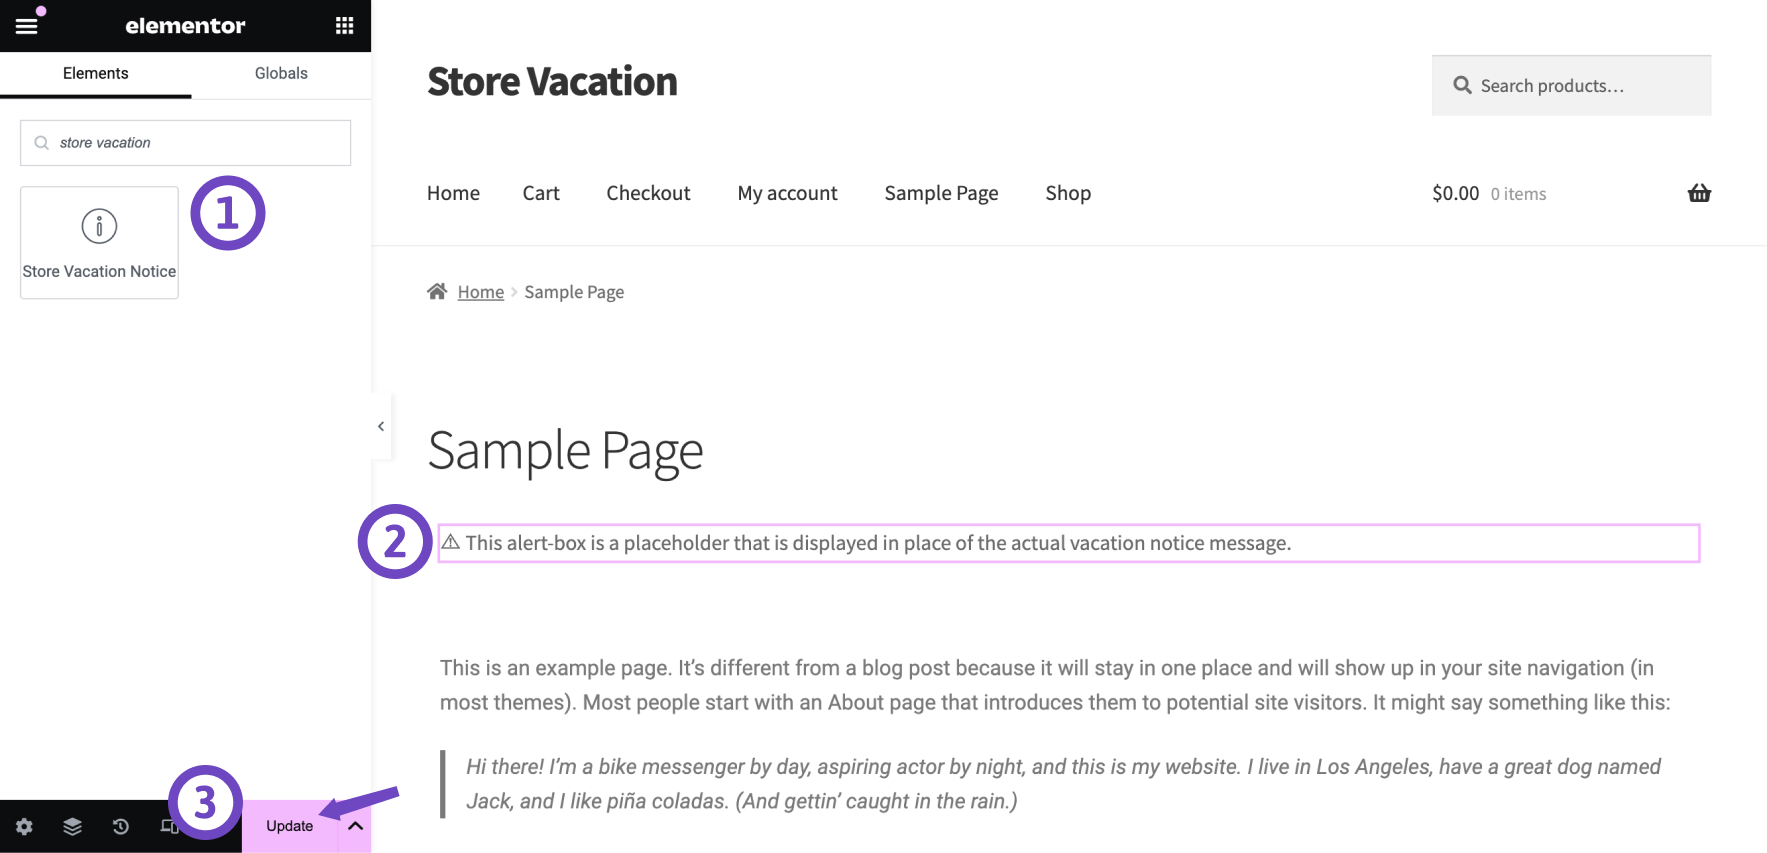
Shortcode
↑ Back to topIf you are using a page builder plugin without specific integrations for Store Vacation plugin, you can add the vacation notice to your pages using the [wsvpro_notice] shortcode.
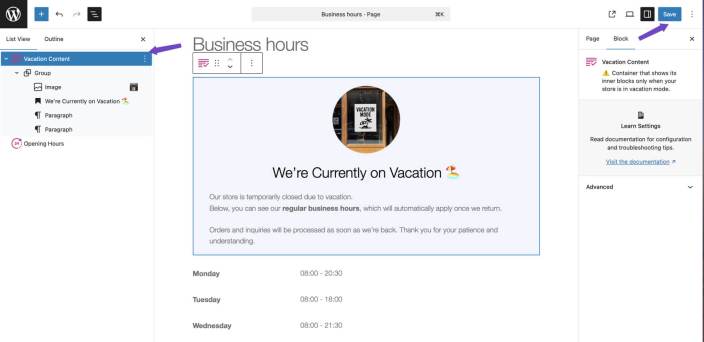
Vacation Content Block
↑ Back to topThe Vacation Content Block is a conditional wrapper block for WooCommerce that allows store owners to display custom content only during scheduled vacation periods. Any block placed inside the Vacation Content Block will automatically appear when the store is in vacation mode, and will remain hidden outside these periods. This feature provides flexibility to manage store communications while your store is temporarily closed.
Key Features
- Conditional display for vacation mode: Show content exclusively during active vacation schedules.
- Flexible block placement: Use on any page, post, or template part including header, footer, sidebar, or custom templates.
- Custom layouts using blocks: Insert core or third-party blocks inside the wrapper to create professional, tailored layouts.
- Targeted customer messaging: Display vacation notices, temporary instructions, or special information without affecting normal store pages.
How to use the vacation content block
- Go to the page, post, or template part where you want vacation-specific content.
- Add a Vacation Content Block from the block inserter.
- Insert any Gutenberg blocks (text, images, buttons, or third-party blocks) inside the Vacation Content Block.
- Save or update your content. The inserted blocks will display only during scheduled vacation periods.
Best Practices
- Global placement: Use template parts (header, footer, sidebar) to show vacation content across the site.
- Complex layouts: Combine multiple blocks inside the wrapper to create structured messages.
- Professional messaging: Keep vacation content concise and informative to maintain a professional storefront.
Store Opening Hours
↑ Back to topThe Opening Hours feature in your Store Vacation settings allows you to define and display your WooCommerce store’s business hours. You can also configure your store to automatically close during off-hours and display a notice to inform your customers when your store is not operating.
Follow these steps to configure your store’s business hours and manage store operations during off-hours:
- Go to WooCommerce > Settings > Store Vacation in your store’s WP Admin dashboard.
- In the current tab, find the Opening Hours section.
- Check the Show Opening Hours option to enable the ability to display your store hours on the front end using a block, widget, or shortcode.
- If you want your store to automatically close during non-operational hours, check the Close During Off-Hours option.
- If you wish to show a notice to customers when your store is closed, select a notice from the Closed Notice Message dropdown. This notice will appear on your shop pages during off-hours.
- Set business hours for each day:
- For each day that your store is open:
- Toggle the option to Open.
- Select the opening and closing times for the day.
- For days when your store is closed:
- Toggle the option to Closed.
- For each day that your store is open:
- Once you’ve configured your store hours, click the Save changes button to apply the settings.
These steps ensure that your store operates smoothly during business hours and provides clear communication to customers during off-hours.

Displaying store opening hours on your website
↑ Back to topThere are several ways to display your store’s opening hours on your website. However, before you proceed, ensure that you’ve checked the Show Opening Hours checkbox in the Opening Hours settings.
Using the Opening Hours block
If you are using the WordPress Block Editor (Gutenberg), you can display your store hours by inserting the Opening Hours block on the desired page.
- Edit the page where you want the hours displayed.
- Insert the Opening Hours block by clicking the “+” button and searching for the block.
- Once added, update the page to save the changes.

Using the Opening Hours widget
If your theme supports widgets, you can add the Opening Hours widget to any widget area, such as the shop sidebar or footer.
To add the widget:
- Go to Appearance > Widgets.
- Find the Opening Hours widget and add it to your desired widget area.
- Save the widget settings.

Using the Opening Hours shortcode
You can also display your store hours using the shortcode [wsvpro_opening_hours]. This method is particularly useful if you are using the Classic Editor or a page builder such as Divi or Elementor.
You can place the shortcode wherever you want the opening hours to appear, and the hours will automatically be displayed based on your frontend page.
Conditional logic
↑ Back to topConditional logic provides you the ability to establish dynamic rules for product availability when your store is in vacation mode. By customizing which products can be purchased, you can maintain control over your shop’s operations even when you’re away.
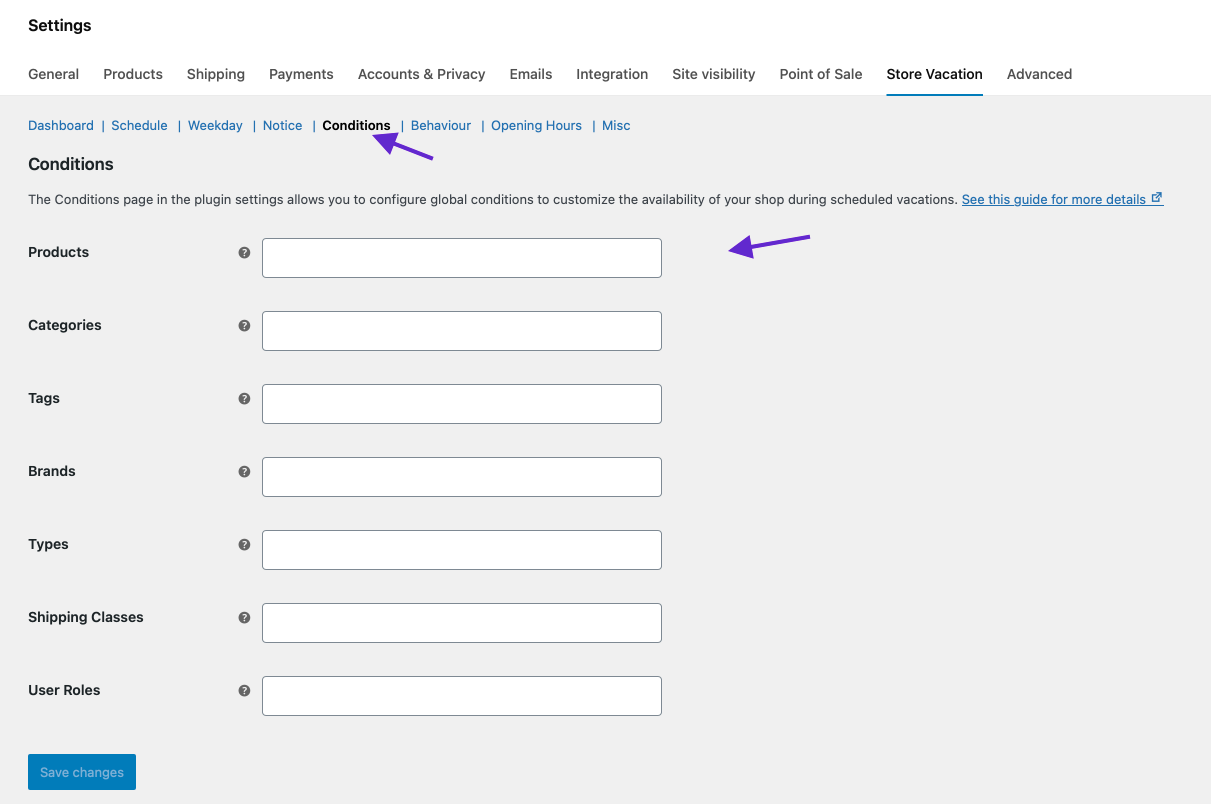
Setting global conditions
↑ Back to topGlobal rules apply universally to all schedules and weekdays. Here’s how to define them:
- Go to WooCommerce > Settings > Store Vacation.
- In the current tab, find the Conditions section.
- Choose the products you want to exclude from vacation mode. Customers can purchase these selected products during vacation mode.
- Click on the Save changes button.
Setting individual conditions
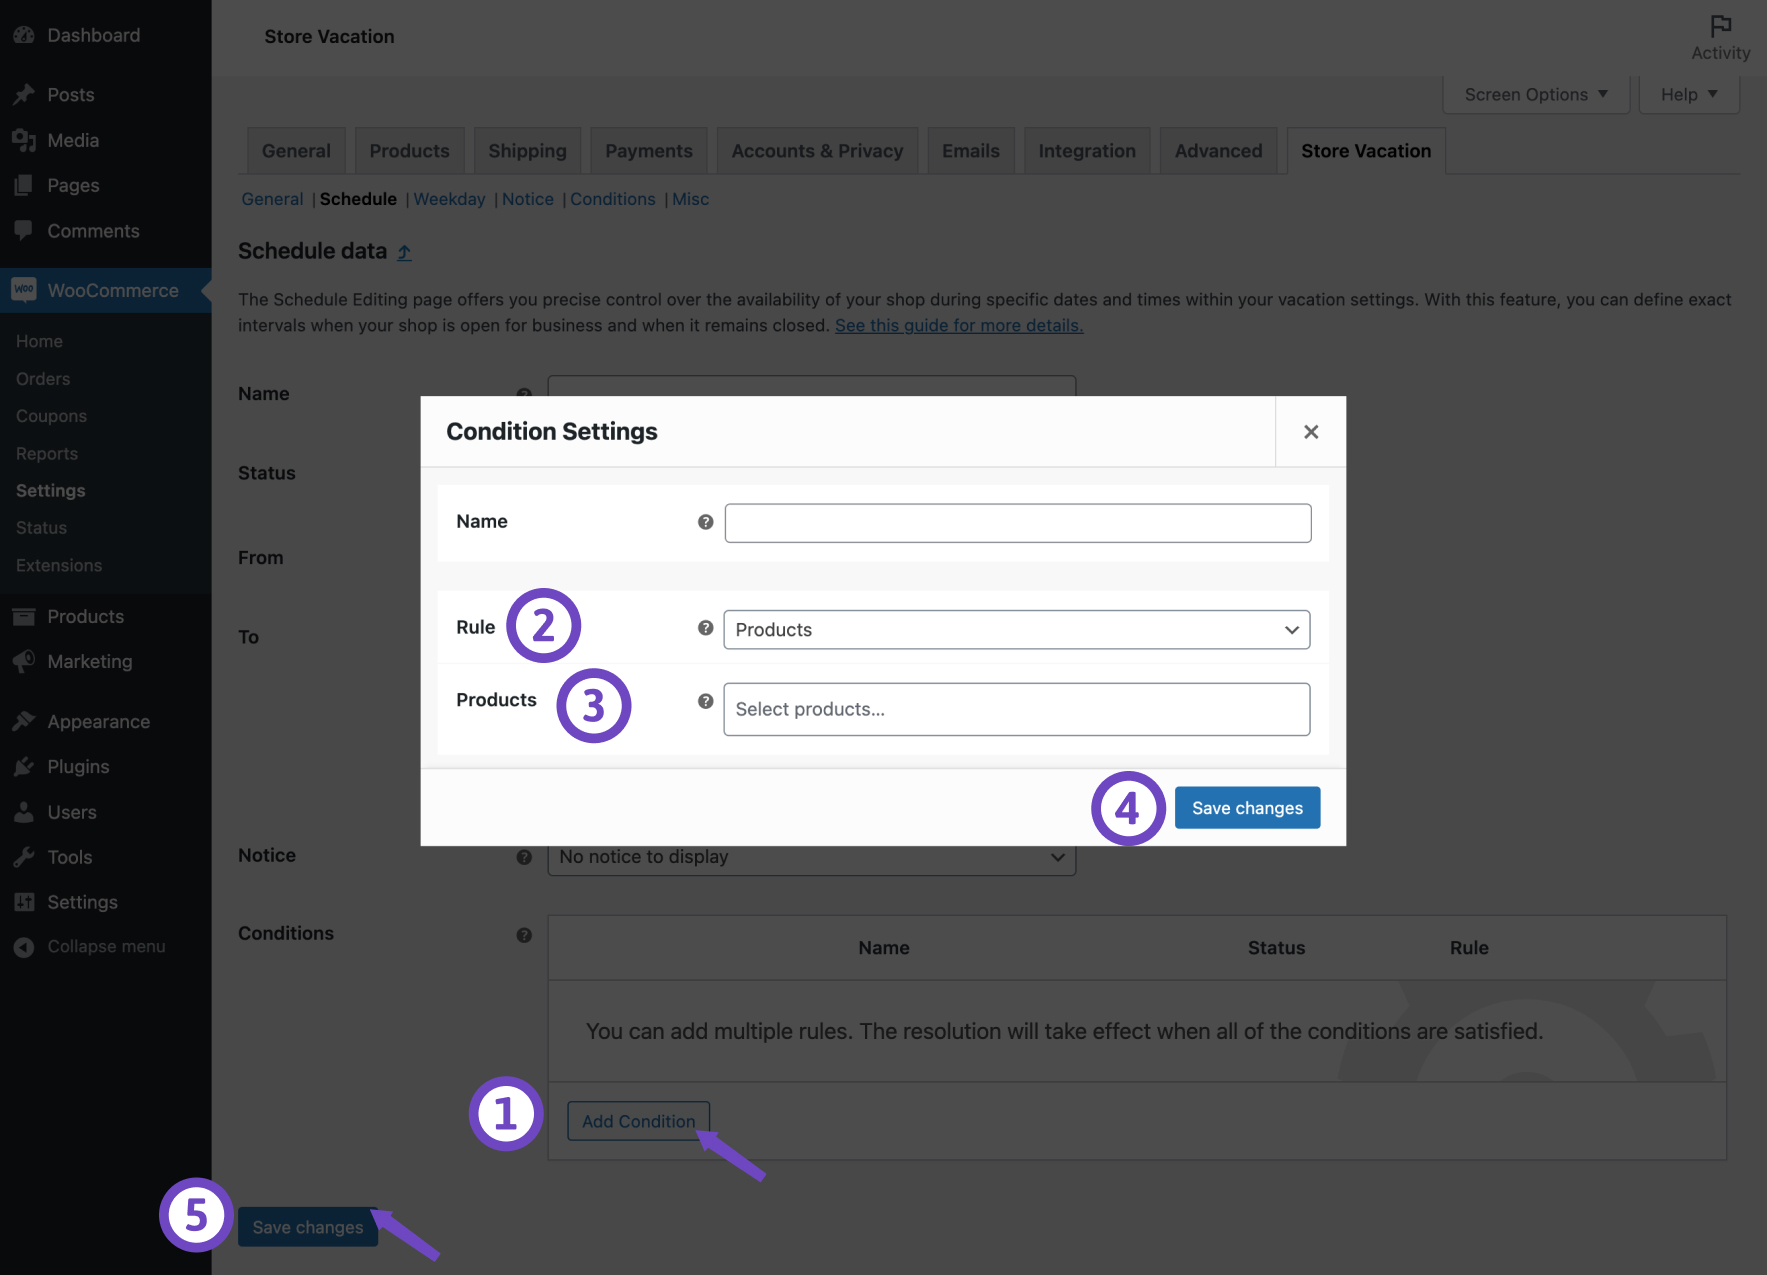
↑ Back to topIn addition to global settings, you can apply conditions for each schedule or weekday separately.
- Edit the desired Schedule or Weekday plan.
- Within the Conditions table, click on Add Condition button.
- Optionally, provide a descriptive Name for the condition.
- Use the drop-down field to specify a Rule for your vacation mode
- Depending on the selected rule, choose from the available options.
- Click on the Save changes button.
Examples of rules
↑ Back to topHere are some common scenarios where you might apply conditional logic:
- Products: Select individual products to keep available during vacation mode.
- Categories: Allow the purchase of items within certain categories.
- Tags: Allow the purchase of products that are tagged with specific labels.
- Types: Set rules to make certain types of products available during closing times.
- Shipping Classes: Allow products assigned to particular shipping classes to be purchasable.
- Brands: You have the option to permit the purchase of products from specific brands.
- User Roles: You can exclude specific user roles, like administrators or shop managers, from the vacation mode. This means that your shop will remain open for these user roles even during vacation mode.
Admin reminder’s email
↑ Back to topThe Admin Reminder Email feature helps WooCommerce store owners avoid surprises by sending a reminder email before the store automatically enters vacation mode. This ensures you (and your team) are notified in advance and have time to review settings, announcements, or last‑minute orders.
What This Feature Does
When enabled, Store Vacation will:
- Send an automated reminder email to the site admin (and other recipients)
- Deliver the email before the store enters Vacation Mode
- Allow full customization using WooCommerce’s native email system
This reminder is especially useful when vacation mode is scheduled days or hours ahead and you want an extra safety check before the store closes.
How to enable admin reminder email
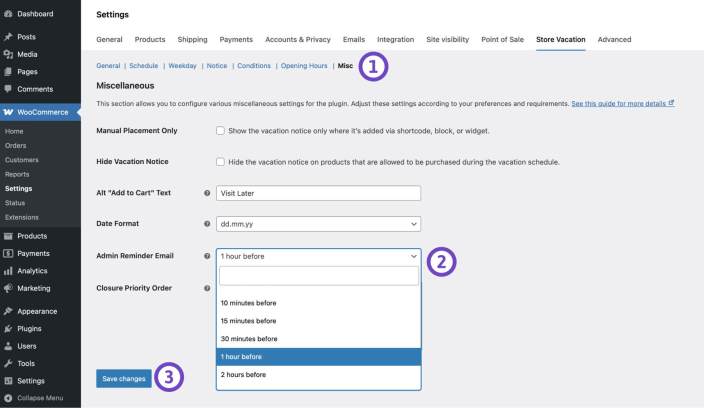
↑ Back to top- Go to WooCommerce > Settings > Store Vacation > Misc
- Find the Admin Reminder Email option
- Choose when the reminder should be sent:
- Disabled (default)
- 5 minutes before
- 10 minutes before
- 15 minutes before
- 30 minutes before
- 1 hour before
- 2 hours before
- 6 hours before
- 12 hours before
- 24 hours before
- Save changes
Once enabled, Store Vacation will automatically schedule and send the reminder email at the selected time before Vacation Mode begins.
Customizing the reminder email
↑ Back to topThe Admin Reminder Email fully integrates with WooCommerce → Settings → Emails, so it follows the same design and structure as your other WooCommerce emails.
Accessing the email settings
- Go to WooCommerce > Settings > Emails
- Locate Store Vacation – Admin Reminder in the Email notifications table
- Click Manage
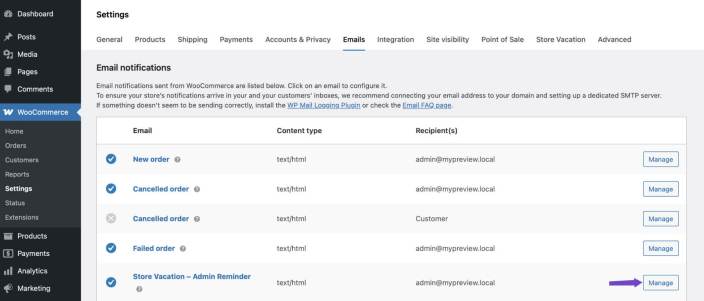
Available email customization options
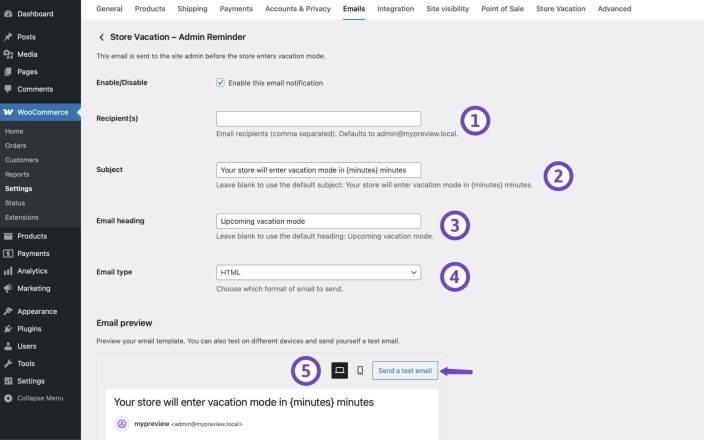
↑ Back to topFrom the email management screen, you can:
1. Recipients
- By default, the email is sent to the site admin email address
- You can add multiple recipients
- Common use cases:
- Shop Manager email
- Operations team
- Support team
Separate multiple email addresses with commas.
2. Email subject
Default subject:
- Your store will enter vacation mode in {minutes} minutes
- You may customize the subject
- Important: Use the {minutes} smart tag to display the remaining time correctly
Example:

Reminder: Store closing in {minutes} minutes
3. Email heading
Default heading:
- Upcoming vacation mode
- You can replace this with your own heading text
4. Email format
Choose how the email is sent:
- HTML
- Plain text
- Multipart
This works the same way as standard WooCommerce emails.
5. Preview & test email
From the Manage screen, you can:
- Preview the reminder email
- Send a test email to yourself
This helps you verify:
- Subject text
- Layout and branding
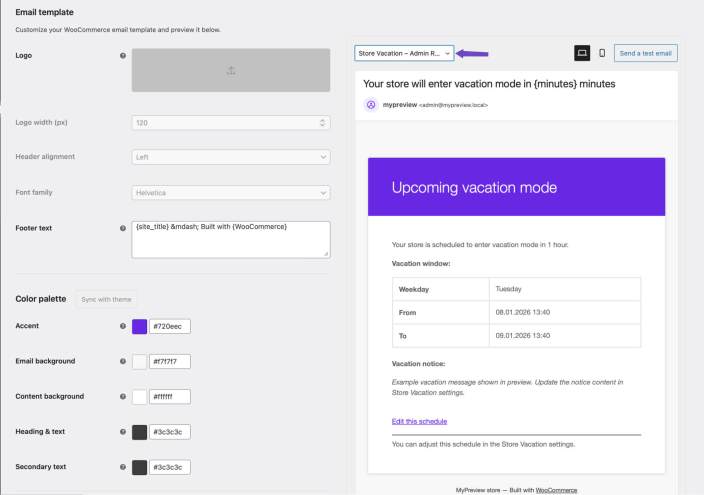
Email design & branding
↑ Back to topThe Admin Reminder Email automatically uses WooCommerce Email Sender settings, including:
- Header image / site logo
- Email color scheme
- Footer text
- From name and from email address
You can adjust these globally from:
WooCommerce > Settings > Emails > Email sender options
No extra configuration is required.
Advanced: custom email template
↑ Back to topIf you need full control over the email layout:
- Open WooCommerce > Settings > Emails > Store Vacation – Admin Reminder
- Copy the HTML email template
- Paste it into your theme:
yourtheme/woocommerce/emails/ - Modify the template as needed
This allows complete customization while keeping compatibility with WooCommerce updates.
Notes & Best Practices
– The reminder email is sent once per scheduled vacation and is not repeated.
– It is triggered based on your selected reminder time
– Make sure your site’s timezone is correctly configured in WordPress
– Always test the email after customization
Does the Admin Reminder Email send more than once?
No. The reminder email is sent once per scheduled vacation, based on the selected reminder time.
Does this email go to customers?
No. This email is sent only to store administrators or configured internal recipients.
Does it replace WooCommerce emails?
No. It uses WooCommerce’s email system and follows the same design and sender settings.
Behavior settings
↑ Back to topThe Behavior Settings page controls what customers can see and do while vacation mode is active.
From this page, you can:
- Choose whether shop and product pages remain visible.
- Keep the store fully purchasable while still displaying your vacation notice.
- Replace shop pages with custom content.
- Protect shop pages with a password or private link.
- Allow customers to add products to their cart while checkout is unavailable.
- Let customers save and restore their carts later.
- Record cart, checkout, shipping, and Checkout Protection activity for Vacation Reports.
- Track orders placed while vacation mode is active.
The customer experience summary beside the settings shows how your saved configuration affects visitors during an active vacation.
Features that require another setting first
Some options are available only when the current Behavior configuration makes them applicable.
| Goal | Enable or configure first | Configure next |
|---|---|---|
| Let customers save their cart | Allow Cart Building | Enable Save Cart for Later |
| Let logged-in customers email a saved-cart link | Allow Cart Building and Save Cart for Later | Enable Email Saved Cart Link |
| Record vacation activity | Record Cart Interactions | Save the settings, then open Reports |
Allow Cart Building and Save Cart for Later are intended for situations where vacation restrictions prevent checkout. They are not applicable when Bypass Restrictions makes purchasing available normally.
After changing Behavior settings, click Save changes. Dependent options and the customer experience summary update according to the saved configuration.
Customer experience summary
↑ Back to topThe sidebar on the Behavior Settings page summarizes what customers can do while vacation mode is active based on your saved settings.
Depending on your configuration, the summary may show:
- Whether shop and product pages remain visible.
- Whether purchasing is restricted or available normally.
- Whether customers can add restricted products to their cart.
- Whether Save Cart for Later is available.
- Whether selected visitors can purchase through Conditions or gated Bypass Restrictions.
- Whether Vacation Reports are enabled.
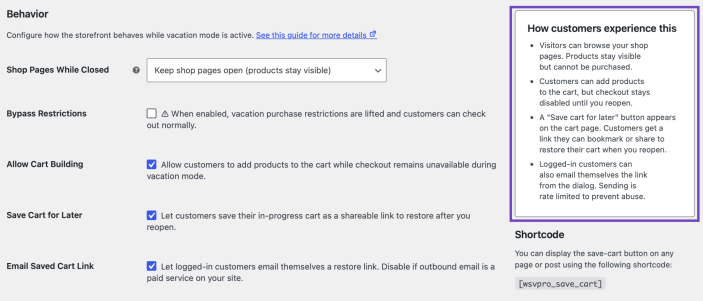
The summary reflects the effective customer experience, not simply whether a vacation Schedule, Weekday closure, Opening Hours period, or Force Close is active.
For example, an active vacation can still show the store as available for purchasing when Bypass Restrictions is enabled with Keep shop pages open.
After changing any Behavior options, click Save changes to refresh the customer experience summary.
The sidebar is informational only. It does not enable, disable, or change any settings.
Where to Find Behavior Settings
↑ Back to topTo access Behavior Settings:
- Go to WooCommerce > Settings
- Click the Store Vacation tab
- Open the Behavior section
Here you can configure how the storefront behaves during vacation mode.
Bypass Restrictions
↑ Back to topBypass Restrictions lets you keep your store open for normal purchases while vacation mode is active.
This is useful when you want to use Notice only, showing customers a vacation notice without blocking purchases.
With Keep default behavior selected and Bypass Restrictions enabled:
- Your vacation period remains active.
- Your selected vacation Notice is still shown to customers.
- Products remain visible and purchasable.
- Customers can add products to the cart and complete checkout normally.
- Allow Cart Building and Save Cart for Later are not needed because checkout remains available.
This setup is ideal when you want to inform customers about delayed fulfillment, shipping, or support while continuing to accept orders.
With Password-protect shop pages or Make shop pages accessible via a private link, Bypass Restrictions applies only to visitors who successfully unlock access.
Important
Checkout Protection takes priority over Bypass Restrictions. If Checkout Protection automatically closes the store, purchasing remains blocked until the incident is cleared.
Allow Cart Building
↑ Back to topThe Allow Cart Building option lets customers continue adding products to their cart while checkout is unavailable because of vacation restrictions.
This is useful when you want customers to keep browsing and preparing an order during a temporary closure instead of preventing all shopping activity. Customers can add products, update quantities, and remove items as usual, but they cannot complete checkout for products restricted by vacation mode.
Once purchasing becomes available again, customers can return to their cart and complete the order. You can also enable Save Cart for Later to give customers a dedicated link for restoring their selected products and quantities later.
To enable Allow Cart Building:
- Go to WooCommerce > Settings > Store Vacation > Behavior.
- Make sure your current Behavior configuration restricts purchasing during vacation mode.
- Enable Allow Cart Building.
- Click Save changes.
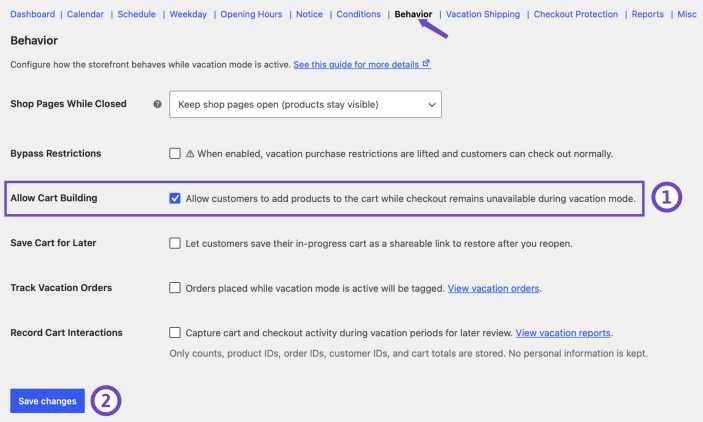
After the settings are saved, customers can add restricted products to their cart while vacation mode is active, but checkout remains unavailable for those products.
Allow Cart Building and Bypass Restrictions
Bypass Restrictions changes whether Allow Cart Building is needed.
When Bypass Restrictions makes checkout available normally, cart-building mode is not applicable because customers can already complete their purchases.
This applies in different ways depending on the selected shop-page mode:
- With Keep shop pages open, enabling Bypass Restrictions restores normal purchasing for all visitors during the active vacation.
- With Password-protect shop pages, Bypass Restrictions restores normal purchasing only for visitors who have successfully unlocked the protected pages.
- With Make shop pages accessible via a private link, Bypass Restrictions restores normal purchasing only for visitors who have unlocked access using the private link.
Visitors who have not unlocked password or private-link access remain subject to the protected storefront experience.
Store Vacation determines cart-building availability from the customer’s effective purchasing state rather than only from the saved Allow Cart Building option.
Use Allow Cart Building with Save Cart for Later
When Allow Cart Building is available and enabled, the Save Cart for Later option can also be enabled.
Save Cart for Later lets customers preserve their current cart through a restoration link. Customers can copy or bookmark the link, and logged-in customers can optionally email it to themselves.
This is helpful when the vacation period may last longer than the customer’s normal browser or cart session.
Save Cart is unavailable when Bypass Restrictions makes checkout normally available because customers no longer need to postpone the purchase.
For complete setup and placement instructions, see the Save Cart for Later section.
Using Allow Cart Building with Product Conditions
If Allow Cart Building is enabled and specific products are excluded from vacation mode through the Conditions settings, customers can still purchase those allowed products while the store is in vacation mode.
However, if a customer adds both restricted products and purchasable products to the cart at the same time, they will need to remove the restricted products before completing checkout.
For stores using the Checkout Block, a notice will appear on the checkout page and during the checkout process. For stores using the classic checkout shortcode, the error will appear after the customer clicks the Place Order button.
The notice will mention the restricted product by name and ask the customer to remove it from the cart before continuing with the available products.
For example:
Beanie cannot be purchased during vacation. Please remove it from your cart to continue checkout.
Notes
The Allow Cart Building option will not be available if you have selected Bypass Restrictions for Password-protect shop pages or Make shop pages accessible via a private link, because bypass restrictions allow permitted customers to access the store and complete purchases normally. In that setup, checkout is no longer restricted for those users, so Allow Cart Building is not needed.
Allow Cart Building During Checkout Protection
When Checkout Protection automatically closes the store because suspicious checkout activity is detected, its security closure takes priority over Allow Cart Building, product Conditions, and Bypass Restrictions.
Customers cannot use these purchasing exceptions to bypass an active Checkout Protection incident.
Important notes
- Allow Cart Building is intended for active vacation periods where checkout remains restricted.
- It is not applicable when Bypass Restrictions restores normal purchasing.
- In password and private-link modes, applicability can differ between visitors depending on whether they have unlocked access.
- Allow Cart Building does not reopen checkout or make restricted products purchasable.
- Product Conditions can still leave selected products available while other products remain restricted.
- Checkout Protection overrides cart-building and purchasing exceptions while an incident is active.
Save Cart for Later
↑ Back to topSave Cart for Later lets customers preserve the products and quantities in their cart through a signed restoration link while checkout is unavailable.
Customers can copy or bookmark the link and return to the same cart later. Logged-in customers can also email the saved-cart link to themselves when the email option is enabled.
This feature is useful during longer closures because customers do not have to rely on their existing browser session or rebuild their order after your store reopens.
Enable Save Cart for Later
- Go to WooCommerce > Settings > Store Vacation > Behavior.
- Enable Allow Cart Building.
- Enable Save Cart for Later.
- Optionally enable Email Saved Cart Link for logged-in customers.
- Click Save changes.
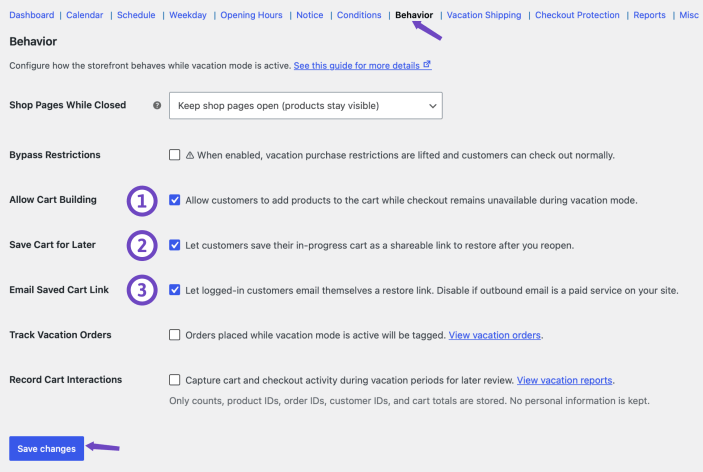
The options become available in this order:
- Save Cart for Later requires Allow Cart Building.
- Email Saved Cart Link requires Save Cart for Later.
The Save Cart action is displayed only when its requirements are currently met.
If Bypass Restrictions makes checkout normally available, Save Cart is not shown even if Allow Cart Building and Save Cart for Later were previously enabled.
Display the Save Cart Action
You can display the Save Cart action in different parts of your store depending on your theme, Cart setup, or page layout.
Classic Cart
When your store uses the classic WooCommerce Cart page, Store Vacation can display the Save Cart action automatically.
No block or shortcode is required for the standard Classic Cart placement.
Save Cart for Later Block
Use the Save Cart for Later block when you want to place the action manually in a block-based layout.
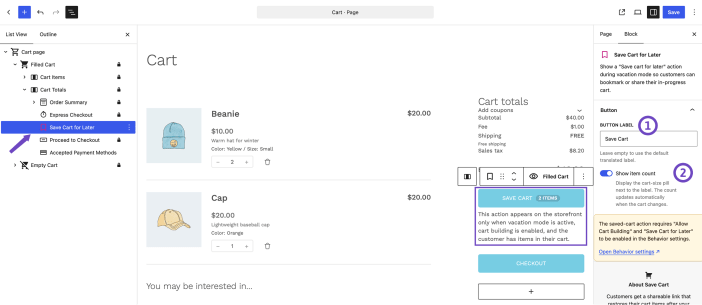
The block is not limited to the Cart page. You can add it anywhere your site layout supports blocks.
For example, you can place the Save Cart block in:
- The WooCommerce Cart Block layout.
- A custom page.
- A block-based template.
- Another suitable block area provided by your theme or WooCommerce.
The block automatically remains hidden when Save Cart is not currently available, such as when the cart is empty or checkout is available normally through Bypass Restrictions.
Shortcode
You can also display the Save Cart action in any location that supports WordPress shortcodes.
Use the basic shortcode:
[wsvpro_save_cart]You can customize the button label and choose whether to display the current cart item count with shortcode attributes.
For example:
[wsvpro_save_cart label="Save cart" show_item_count="yes"]Available attributes include:
- label: changes the text displayed on the Save Cart button.
- show_item_count: controls whether the current cart item count is shown. Use “yes” to display it or “no” to hide it.
For example, to display a shorter button without the item count:
[wsvpro_save_cart label="Save for later" show_item_count="no"]The shortcode can be used in:
- Pages.
- Posts.
- Widget or shortcode areas.
- Page-builder layouts.
- Custom templates that support WordPress shortcodes.
Like the Save Cart block, the shortcode remains hidden when Save Cart is not currently available, such as when the cart is empty or normal checkout is available through Bypass Restrictions.
Customize the Save Cart for Later Block
The Save Cart for Later block includes display settings that let you adjust how the action appears in each location where the block is used.
Button Label
Use the block settings to change the button label.
For example, instead of the default Save cart for later, you could use:
- Save my cart.
- Finish this order later.
- Save for after vacation.
The label is configured per block instance, so you can use different wording in different parts of your store.
Show Item Count
The block can optionally display the current number of items in the cart alongside the Save Cart action.
Enable the item-count option when you want customers to see how many cart items will be included in their saved cart.
Disable it when you prefer a simpler button without the count.
The item count updates as the customer changes the cart, including when products are added, removed, or quantities are updated.
How Customers Save and Restore a Cart
- The customer adds products to the cart while cart-building mode is available.
- The customer opens the Save Cart action from any location where the block, shortcode, or automatic Classic Cart action is displayed.
- They copy or bookmark the restoration link.
- A logged-in customer can optionally email the link to their account email address.
- The customer opens the saved link later.
- Store Vacation restores the available products and quantities to the cart.
The restoration link is refreshed when products are added, removed, or quantities are changed so that it reflects the customer’s latest cart.
Customize the Saved Cart Email
Store Vacation registers the saved-cart message as a standard WooCommerce customer email.
To customize it:
- Go to WooCommerce > Settings > Emails.
- Find Store Vacation – Saved Cart.
- Click Manage.
- Enable or disable the email notification.
- Customize the email subject and heading.
- Choose the email format.
- Click Save changes.
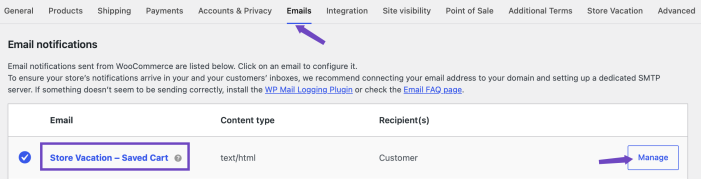
The email is sent only when a logged-in customer requests a copy of their own saved-cart link. Saved-cart email requests are rate-limited to help prevent repeated or abusive sending.
Important Notes
- Save Cart requires Allow Cart Building and Save Cart for Later to be enabled and applicable to the current customer.
- The Save Cart action remains hidden when the cart is empty.
- Save Cart is unavailable when Bypass Restrictions makes normal purchasing available.
- Guests can copy or bookmark a saved-cart link but cannot use Email Saved Cart Link.
- A logged-in customer’s saved-cart email is sent to the email address associated with their account.
- Products must still exist and remain available when the link is restored.
- Products that have been removed or are no longer available may not be restored.
- Saved-cart links preserve the product and quantity information required to rebuild the cart.
- The link does not store customer names, email addresses, billing addresses, shipping addresses, or payment details.
- Saved-cart links are signed to protect them from modification, but their cart payload is not encrypted.
- Enabling Save Cart for Later does not reopen checkout.
- Checkout Protection can temporarily make Save Cart unavailable while a security closure is active.
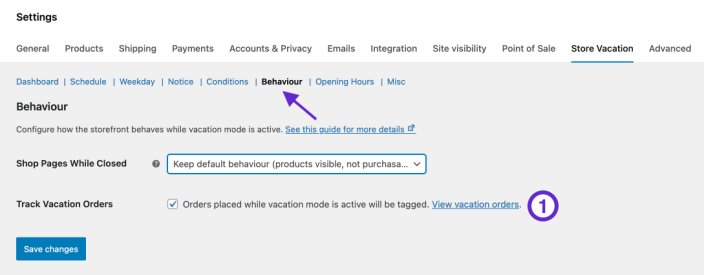
Track Vacation Orders
↑ Back to topThe Track Vacation Orders option allows you to identify and filter orders that were placed while vacation mode was active.
This is useful if some products remain purchasable due to conditions or exclusions configured in the plugin.
How to Enable
- Navigate to WooCommerce > Settings > Store Vacation > Behavior
- Enable the Track Vacation Orders checkbox
- Click Save Changes
Once enabled, orders placed during vacation mode will be marked so they can be filtered later.
How to View Vacation Orders
To see orders placed during vacation mode:
- Go to WooCommerce > Orders
- Open the order filters
- Select Vacation: Yes
- Apply the filter
You will then see a list of orders placed while vacation mode was active.
Important Notes
Orders are only tracked if Track Vacation Orders is enabled.
Tracking works when products are purchasable due to exclusion conditions, behavior settings and bypass access.
Enable Vacation Reports
↑ Back to topThe Record Cart Interactions option enables Vacation Reports and records supported customer activity while vacation mode is active.
Reports can include activity related to:
- Cart interactions.
- Saved carts.
- Checkout attempts.
- Shipping-rate changes.
- Checkout Protection triggers and clears.
To enable Vacation Reports:
- Go to WooCommerce > Settings > Store Vacation > Behavior.
- Enable Record Cart Interactions.
- Optionally configure Reports Retention.
- Click Save changes.
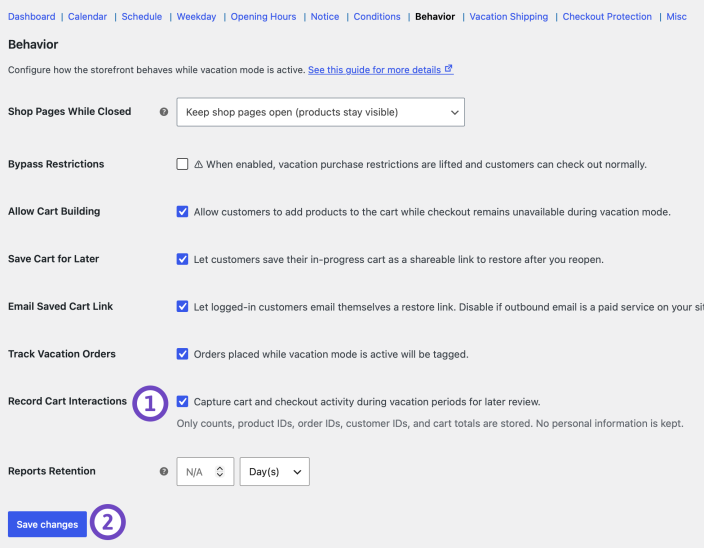
The Reports section becomes available after the Behavior settings have been saved. The Reports Retention option is available only while Record Cart Interactions is enabled.
See Vacation Reports for information about dashboard metrics, activity history, filters, CSV exports, retention, privacy, and troubleshooting.
Control Shop Page Access During Vacation Mode
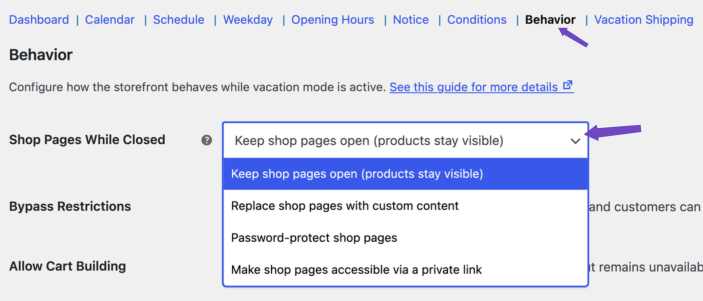
↑ Back to topThe Shop Pages While Closed setting controls what visitors can see and whether they can purchase while vacation mode is active.
You can keep your normal storefront visible, keep it fully open for orders while displaying a vacation notice, replace selected shop pages with custom content, require a password, or provide access through a private link.
The available shop-page modes are:
- Keep default behavior (products visible, not purchasable)
- Replace shop pages with custom content
- Password-protect shop pages
- Make shop pages accessible via a private link
Keep Shop Pages Open
The default option keeps your normal WooCommerce shop and product pages visible during vacation mode.
With Bypass Restrictions disabled:
- Products remain visible on the storefront.
- Customers can continue browsing your catalog.
- Products restricted by vacation mode cannot be purchased.
- Products excluded through Conditions may remain purchasable.
- You can enable Allow Cart Building to let customers prepare an order while checkout remains restricted.
This is suitable when you want your catalog to remain visible while temporarily preventing normal purchases.
Keep the Store Open for Orders with Bypass Restrictions
You can also enable Bypass Restrictions with the default shop-page mode.
When Bypass Restrictions is enabled:
- The vacation period remains active.
- Your configured vacation notice can still be displayed.
- Products remain visible.
- Add to cart works normally.
- Classic Checkout and Checkout Block remain available.
- Customers can place orders normally despite the active vacation.
- Allow Cart Building and Save Cart for Later are not needed and are therefore unavailable while purchasing is already open.
This configuration is useful when you want to inform customers about a vacation or fulfillment delay without stopping sales.
For example, you could display a notice explaining that orders placed during your vacation will be dispatched after you return while continuing to accept purchases normally.
Important
Checkout Protection overrides Bypass Restrictions. If Checkout Protection automatically closes the store, purchasing is blocked until the incident is cleared.
Replace Shop Pages with Custom Content
The Replace shop pages with custom content option replaces the normal content of selected WooCommerce shop pages while vacation mode is active.
You can use it to display a closure announcement, reopening information, contact details, or other content instead of showing product listings.
Configure Replacement Content
- Go to WooCommerce > Settings > Store Vacation > Behavior.
- In Shop Pages While Closed, select Replace shop pages with custom content.
- Under Apply To, select the pages whose normal content should be replaced:
- Shop page
- Product archives, including product categories, tags, and brands
- Single product pages
- Enter the content you want to display in the Replacement Content editor.
- Click Save changes.
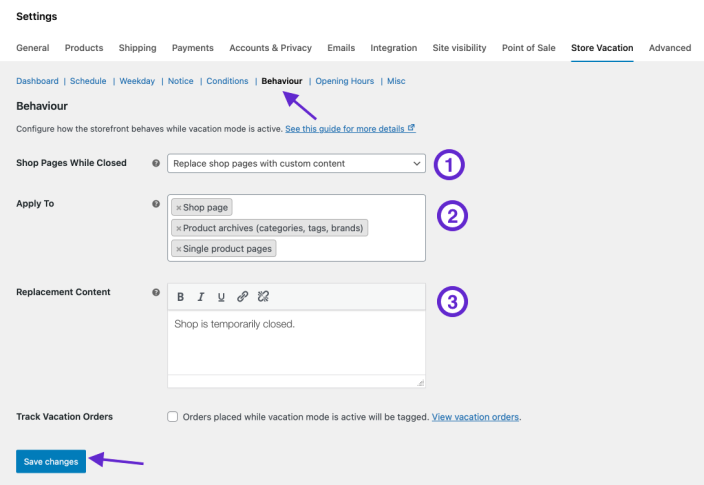
While vacation mode is active, the selected pages display your replacement content instead of their normal shop or product content.
Important
Allow Cart Building is not available when shop pages are replaced with custom content because customers cannot access the normal product interface on those pages.
Password-Protect Shop Pages
The Password-protect shop pages option restricts access to selected shop and product pages while vacation mode is active.
Visitors must enter the correct password before they can access the protected pages. You can decide whether authorized visitors only gain access to the storefront or can also bypass purchasing restrictions.
Configure Password Protection
- Go to WooCommerce > Settings > Store Vacation > Behavior.
- In Shop Pages While Closed, select Password-protect shop pages.
- Under Apply To, select the pages that should require a password:
- Shop Page
- Product archives, including product categories, tags, and brands
- Single Product Pages
- Enter the password visitors must use to unlock access.
If you leave this field empty, the existing password will remain unchanged. - Use Remember Access to choose how long the password should remain accepted for that visitor.
- Decide whether to enable Bypass Restrictions. When enabled:
- Visitors must still unlock the protected pages with the correct password.
- After access is unlocked, those visitors can purchase normally.
- Vacation purchasing restrictions are bypassed for the authorized visitor.
- Allow Cart Building and Save Cart for Later are not needed for that visitor because checkout is available normally.
- Optionally enable Track Vacation Orders if authorized visitors may place orders during vacation mode.
- Save changes
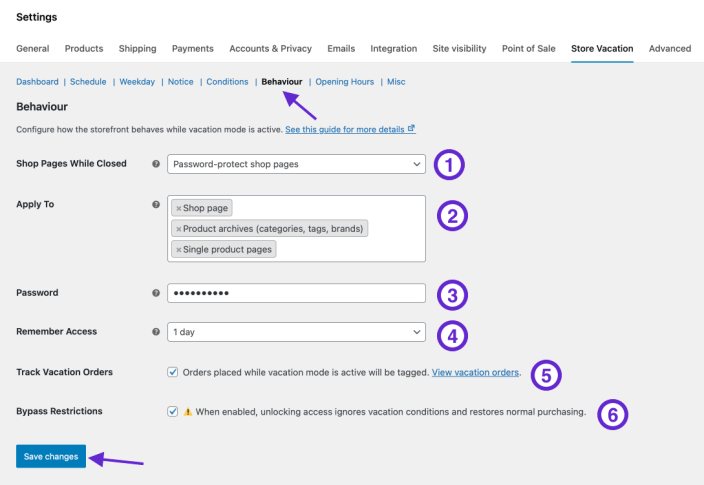
If a password has already been saved, leaving the Password field empty keeps the existing password unchanged.
Allow Access Through a Private Link
The Make shop pages accessible via a private link option keeps selected shop pages unavailable to the general public while allowing trusted visitors to unlock them through a URL containing a private token.
You can use the private link to give selected customers, staff members, or wholesale buyers access while vacation mode remains active.
Configure Private-Link Access
- Navigate to WooCommerce > Settings > Store Vacation > Behavior.
- In Shop Pages While Closed, select Make shop pages accessible via a private link.
- Select which pages the private link should unlock using the Apply To filed. This allows you to control exactly which areas of your store can be accessed through the private link.
- Shop Page
- Product Archives (categories, tags, brands)
- Single Product Pages
- Insert a Private Link Token, which will be included in the URL to unlock access.
- Configure how long the private link access should be remembered for returning visitors via Remember Access.
- Check Track Vacation Orders to mark any orders placed while vacation mode is active. Orders placed via private link access will be included, allowing easy filtering and management in WooCommerce > Orders.
- If you want visitors with the private link to ignore vacation restrictions and restore normal purchasing, enable Bypass Restrictions. When enabled:
- Visitors must first unlock access using the valid private link.
- Once unlocked, those visitors can purchase normally.
- Vacation purchasing restrictions are bypassed for the authorized visitor.
- Allow Cart Building and Save Cart for Later are not needed for that visitor because checkout is available normally.
- After configuring all options, click Save Changes to activate private link access during vacation mode.
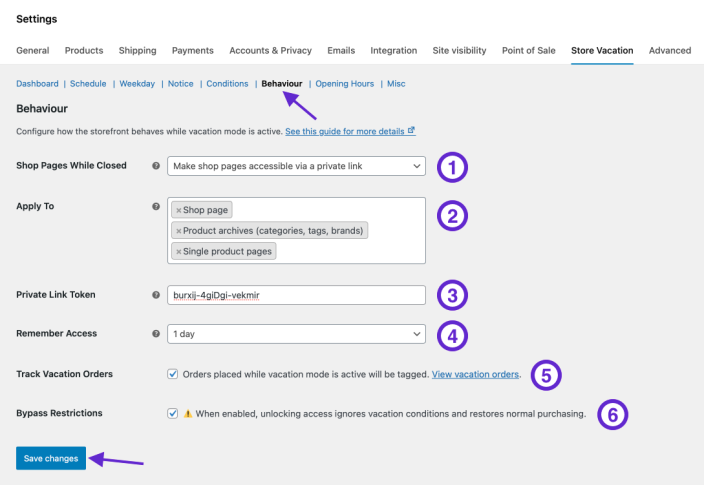
Add the private token to a covered shop, archive, or product URL using the sv_token parameter.
For example:
https://yourstore.com/shop/?sv_token=your-tokenShare the complete URL only with visitors who should receive access.
When the visitor opens the link:
- The pages selected under Apply To are unlocked.
- Access remains remembered for the period selected under Remember Access.
- Purchasing remains restricted unless Bypass Restrictions is enabled.
Vacation Shipping
↑ Back to topVacation Shipping lets you create one or more dedicated shipping options for customers while Store Vacation is active.
Use Vacation Shipping when you want to continue accepting orders during a vacation but need different delivery costs, fulfillment expectations, or shipping availability.
For example, you could temporarily offer a Vacation Delivery option that tells customers their orders will be dispatched after you return, while hiding delivery methods such as Express Shipping.
Each Vacation Shipping Option can have its own:
- Name.
- Cost.
- Applicable shipping zones.
- Checkout description.
- Email-description setting.
- Free Shipping behavior.
- Vacation scope.
- Enabled or disabled status.
This allows you to create different temporary shipping arrangements for different vacations or recurring closures.
Before You Begin
Vacation Shipping uses your existing WooCommerce shipping zones.
Before creating a Vacation Shipping Option, make sure the regions where you want to offer it are configured under:
WooCommerce > Settings > Shipping
You can then select those zones when configuring the option.
Add a Vacation Shipping Option
↑ Back to topTo create a Vacation Shipping Option:
- Go to WooCommerce > Settings > Store Vacation > Vacation Shipping.
- Click Add new.
- Enter a descriptive Name for the option.
- Enter the Cost before tax. Enter 0 if you want to offer the shipping option for free.
- Select one or more Applicable Zones.
- Enter an optional Description explaining the temporary shipping or fulfillment arrangement.
- Enable Show Description in Emails if the description should also appear in WooCommerce order emails.
- Configure Defer to Free Shipping.
- Use Applies During to choose which vacation periods can use this shipping option.
- Make sure the option is enabled.
- Click Save changes.
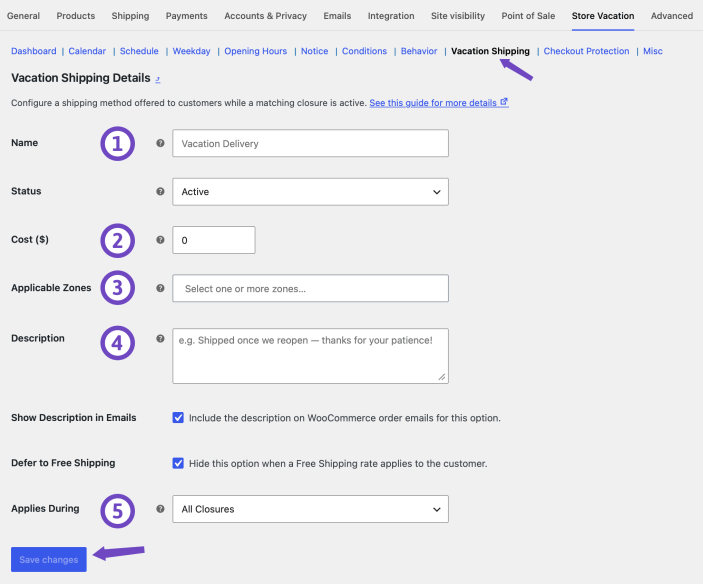
You can create multiple Vacation Shipping Options and configure each one independently.
Applies During
↑ Back to topThe Applies During setting controls which vacation periods can make a Vacation Shipping Option available.
Depending on your configuration, you can make the option apply to:
- All supported vacation closures.
- Selected Schedule closures.
- Selected Weekday closures.
This makes it possible to use different shipping options for different vacations.
For example:
- Holiday Delivery could apply only to your December holiday Schedule.
- Weekend Delivery could apply only to Saturday and Sunday Weekday closures.
- A general Vacation Shipping option could be available across all applicable closures.
A Vacation Shipping Option appears only when its configured vacation scope is currently active and the customer’s address matches one of its Applicable Zones.
Example: Offer Delayed Vacation Delivery
Suppose your store continues accepting orders during a one-week vacation, but fulfillment will not resume until August 6.
You could create a Vacation Shipping Option with:
- Name: Vacation Delivery
- Cost: $12
- Applicable Zones: United States
- Description: Orders will ship after August 6. Thank you for your patience.
- Applies During: Your one-week holiday Schedule
While that Schedule is active, customers in the selected shipping zone can see Vacation Delivery at checkout.
When the Schedule ends, the option stops being offered for that vacation automatically.
Create Multiple Vacation Shipping Options
↑ Back to topYou are not limited to a single Vacation Shipping method.
For example, during the same vacation you could offer:
- Vacation Standard Delivery — $8
- Priority Vacation Delivery — $15
- Local Vacation Pickup — Free
Each option can use different zones, costs, descriptions, and vacation scopes.
This is useful when your temporary fulfillment arrangements vary by region or when customers should be able to choose between different delivery services during the vacation.
Defer to Free Shipping
↑ Back to topDefer to Free Shipping controls whether an individual Vacation Shipping Option should remain available when WooCommerce Free Shipping is available for the customer’s package.
When Defer to Free Shipping is enabled, the Vacation Shipping Option is hidden when an applicable WooCommerce Free Shipping rate is available.
This helps avoid showing a paid vacation option alongside Free Shipping when the free method should take priority.
When the option is disabled, the Vacation Shipping Option can remain available alongside Free Shipping.
Defer to Free Shipping is configured separately for each Vacation Shipping Option, so different options can use different behavior.
Shipping Cost and Tax
↑ Back to topThe amount entered in Cost is the shipping cost before tax.
WooCommerce calculates any applicable shipping tax according to your store’s tax configuration.
Enter: 0
to create a free Vacation Shipping Option.
The final shipping amount shown to the customer may therefore depend on your WooCommerce tax settings.
Where the Description Appears
↑ Back to topThe optional Vacation Shipping description gives customers additional information about the temporary delivery arrangement.
The description can appear:
- Alongside the shipping option during Classic Checkout.
- Alongside the shipping option in the Checkout Block.
- In customer order details.
- On WooCommerce admin order screens.
- In WooCommerce order emails when Show Description in Emails is enabled.
For example:
Orders placed during our vacation will be dispatched when we return on August 6.
The description that applies when the order is placed is saved with the shipping item.
This means previously placed orders continue to display their original Vacation Shipping description even if you later edit, disable, or delete the Vacation Shipping Option.
Vacation Shipping and Hide Shipping Methods
↑ Back to topVacation Shipping Options and Hide Shipping Methods perform different jobs:
- Vacation Shipping Options add temporary delivery methods during applicable vacation periods.
- Hide Shipping Methods removes selected shipping methods during individual Schedule or Weekday closures.
You can use both features together.
For example, during a holiday Schedule you could:
- Hide Express Shipping.
- Hide your normal Standard Shipping method.
- Continue offering Free Shipping when customers qualify.
- Add a temporary Vacation Delivery option explaining that orders will be dispatched after your return.
You can also select an active Vacation Shipping Option itself under Hide Shipping Methods for a particular Schedule or Weekday closure.
This gives you control over both the temporary methods you add and the existing methods you temporarily remove.
See Hide Shipping Methods During Scheduled Closures for complete configuration instructions.
Shipping Zones
↑ Back to topEach Vacation Shipping Option can be limited to one or more WooCommerce shipping zones.
The customer’s shipping address must match one of the selected zones before the option can appear.
For example, you could create:
- UK Vacation Delivery for your United Kingdom zone.
- European Vacation Delivery for selected European zones.
- A separate International Vacation Delivery option for other regions.
If a Vacation Shipping Option has no applicable zone for the customer’s address, WooCommerce will not offer it at checkout.
Enable or Disable an Option
↑ Back to topEach Vacation Shipping Option has its own status.
Disable an option when you want to keep its configuration without making it available during vacation periods.
This is useful for seasonal or reusable delivery arrangements. For example, you can keep a Christmas Vacation Deliveryoption configured throughout the year and enable it again when needed.
Disabling one Vacation Shipping Option does not affect your other configured options.
Important Notes
↑ Back to top- You can create more than one Vacation Shipping Option.
- Each option has its own name, cost, zones, description, status, and vacation scope.
- Vacation Shipping Options appear only when an applicable vacation period is active.
- The customer’s shipping address must match one of the selected Applicable Zones.
- Applies During determines which vacation closures can use each option.
- Vacation Shipping Options can apply to all supported closures or be limited to selected Schedule or Weekday records.
- Each option can independently Defer to Free Shipping.
- Enter 0 in the Cost field to offer an option for free.
- WooCommerce applies shipping taxes according to your store’s tax settings.
- Vacation Shipping does not automatically remove your normal WooCommerce delivery methods.
- Use Hide Shipping Methods on a Schedule or Weekday closure when existing methods should be unavailable.
- Vacation Shipping Options themselves can also be selected under Hide Shipping Methods.
- The shipping description applied to an order is preserved with that order, so later configuration changes do not alter historical order information.
Why Does a Vacation Shipping Option Not Appear at Checkout?
If a configured option does not appear, check the following:
- Confirm that the Vacation Shipping Option is enabled.
- Confirm that Store Vacation currently has an applicable vacation period active.
- Check the option’s Applies During setting and make sure the current Schedule or Weekday closure is included.
- Confirm that at least one appropriate Applicable Zone has been selected.
- Confirm that the customer’s shipping address matches one of those zones.
- Check whether Defer to Free Shipping is hiding the option because WooCommerce Free Shipping is currently available.
- Check whether the active Schedule or Weekday closure includes this Vacation Shipping Option under Hide Shipping Methods.
- Confirm that the customer has entered enough address information for WooCommerce to calculate shipping rates.
- Confirm that WooCommerce shipping and tax settings are configured correctly for the selected zone.
If multiple vacation rules are active, the Vacation Shipping Option must still meet its configured Applies During scope and normal WooCommerce zone requirements before it can be displayed.
Checkout Protection
↑ Back to topCheckout Protection monitors unusual order and payment activity and can automatically close your WooCommerce checkout when a configured limit is reached.
A carding attack occurs when stolen payment details are repeatedly tested through an online checkout. This type of activity may produce a sudden burst of orders, repeated orders from the same source, or an unusual number of payment failures.
Checkout Protection acts as an emergency safeguard. When any enabled detection signal reaches its configured threshold, Store Vacation automatically activates Force Close and blocks additional purchases.
Checkout Protection works with both the classic WooCommerce checkout and the Checkout Block.
Important
Checkout Protection is an additional emergency safeguard. It complements rather than replaces fraud, carding, bot, and payment-security protection provided by your payment gateway or other security tools.
How Checkout Protection Settings Are Organized
↑ Back to topSome settings appear only after their related option has been enabled.
- Enabling Checkout Protection displays the detection and response settings.
- Enabling Rapid Order Rate displays its Threshold, Window, and Signal Source settings.
- Enabling Same-IP Clustering displays its Threshold and Window settings.
- Enabling Payment Failure Rate displays its Threshold and Window settings.
- At least one detection signal must be enabled before Checkout Protection can automatically close the store.
Enabling Checkout Protection without enabling any detection signals does not trigger automatic closures.
Enable Checkout Protection
↑ Back to topTo configure Checkout Protection:
- Go to WooCommerce > Settings > Store Vacation > Checkout Protection.
- Enable Checkout Protection.
- Enable one or more detection signals:
- Rapid Order Rate
- Same-IP Clustering
- Payment Failure Rate
- Configure the Threshold and Window for each enabled signal.
- For Rapid Order Rate, select which orders should be counted under Signal Source.
- Select a Customer Notice, or choose to inherit the notice configured for Force Close.
- Configure Auto-Clear After.
- Enable or disable administrator notifications.
- Optionally configure incident-history retention.
- Click Save changes.
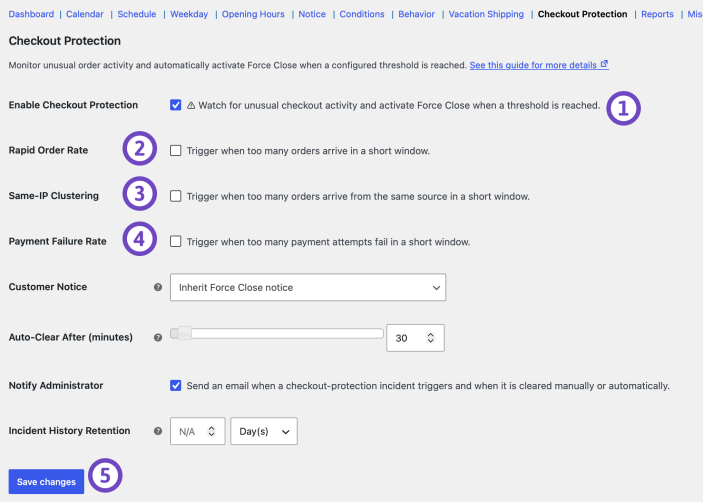
After saving, the Checkout Protection sidebar summarizes the configured signals and the response that will occur when a threshold is reached.
Understand Thresholds and Windows
↑ Back to topEach detection signal uses two values:
- Threshold: The number of matching events required to trigger Checkout Protection.
- Window: The rolling period, in seconds, during which those events must occur.
For example, a Threshold of 5 and a Window of 60 means Checkout Protection triggers when five matching events occur within a rolling 60-second period.
The window is rolling rather than fixed. Store Vacation evaluates recent activity whenever a relevant order or payment event occurs.
Each detection signal operates independently. When multiple signals are enabled, reaching the threshold for any one signal can activate Checkout Protection.
Important
There is no single threshold suitable for every WooCommerce store. Configure your thresholds above the busiest legitimate activity your store normally receives. Consider flash sales, product launches, seasonal traffic, email campaigns, payment-gateway interruptions, and other expected spikes.
Store Vacation may display an advisory when a selected configuration could be triggered easily by legitimate customer activity. Review these warnings before saving.
Rapid Order Rate
↑ Back to topRapid Order Rate detects an unusually large number of new orders created within a short period.
This can help identify automated checkout activity that creates orders faster than normal customers would typically place them.
When Rapid Order Rate is enabled, configure:
- Threshold: The number of orders required to trigger the signal.
- Window: The number of seconds in which those orders must arrive.
- Signal Source: Whether guest orders only or all orders should be counted.
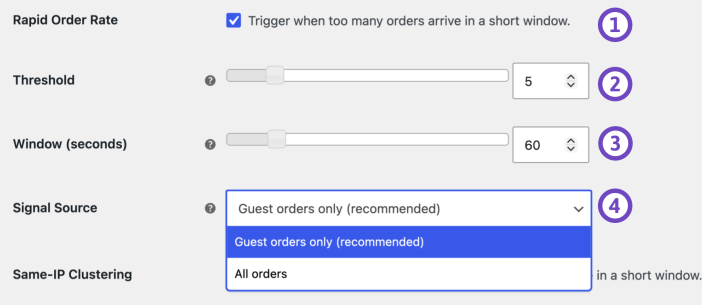
Choose the Signal Source
The available Signal Source options include:
- Guest orders only: Counts orders placed without a logged-in customer account.
- All orders: Counts both guest and logged-in customer orders.
Guest orders only may reduce the likelihood of legitimate returning customers contributing to an incident, but the appropriate setting depends on how customers normally purchase from your store.
Rapid Order Rate Example
Suppose you configure:
- Threshold: 8 orders
- Window: 60 seconds
- Signal Source: Guest orders only
Checkout Protection activates when eight guest orders are created within a rolling 60-second period.
Orders from logged-in customers do not count toward this signal when Guest orders only is selected.
Avoid False Positives
A legitimate promotion, product launch, flash sale, or email campaign may produce many orders in a short period.
Before enabling Rapid Order Rate:
- Review your busiest legitimate order periods.
- Decide whether guest orders only or all orders should be counted.
- Set the Threshold and Window above your expected normal peak.
- Review any advisory displayed beside the settings.
Same-IP Clustering
↑ Back to topSame-IP Clustering detects multiple orders originating from the same source within a short period.
Repeated orders from one source can indicate automated payment testing. However, legitimate customers can sometimes share the same public IP address, including:
- People on the same household connection.
- Customers using a company or university network.
- Visitors using shared mobile carrier networks.
- Customers behind shared proxies or network gateways.
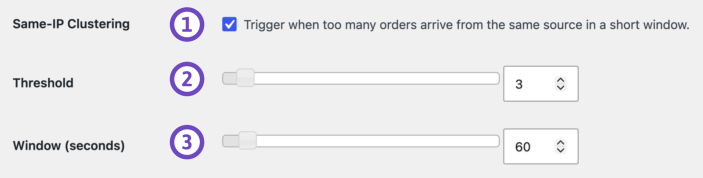
When Same-IP Clustering is enabled, configure:
- Threshold: The number of orders from the same source required to trigger the signal.
- Window: The number of seconds in which those orders must arrive.
Same-IP Clustering Example
Suppose you configure:
- Threshold: 4 orders
- Window: 90 seconds
Checkout Protection activates when four orders are created from the same detected source within a rolling 90-second period.
Orders from other sources do not contribute to that source’s count.
Privacy
Store Vacation does not store raw customer IP addresses in Checkout Protection observations.
Instead:
- The IP address is converted into an installation-specific salted hash.
- The hash is used to recognize repeated activity from the same source.
- The raw IP address is not stored as part of the detection observation.
Avoid False Positives
Use a threshold that accounts for shared networks and legitimate repeat purchases.
A very low threshold may trigger Checkout Protection when several genuine customers happen to use the same public network.
Payment Failure Rate
↑ Back to topPayment Failure Rate detects a burst of applicable failed payments within a short period.
A high failure rate can indicate stolen payment details being tested or automated checkout attempts. However, legitimate failures can also occur because of:
- Temporary payment gateway interruptions.
- Expired checkout sessions.
- Customers retrying declined payments.
- Bank authorization problems.
- Incorrect card details.
- Network or webhook delays.
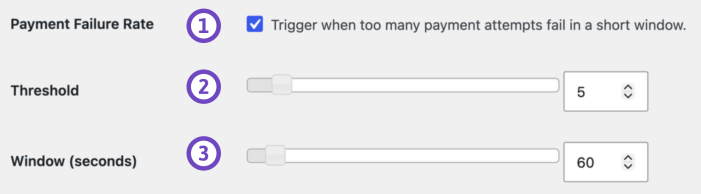
When Payment Failure Rate is enabled, configure:
- Threshold: The number of applicable payment failures required to trigger the signal.
- Window: The number of seconds in which those failures must occur.
Payment Failure Rate Example
Suppose you configure:
- Threshold: 6 payment failures
- Window: 120 seconds
Checkout Protection activates when six applicable payment failures occur within a rolling two-minute period.
Administrator-driven failures are excluded. For example, manually changing an order to Failed from the WooCommerce admin screen does not count toward the Checkout Protection signal.
Avoid False Positives
Configure the threshold high enough to account for ordinary declined transactions and temporary gateway problems.
Before using a strict threshold, review your normal payment-failure patterns and consider whether your payment gateway occasionally creates bursts of failed orders.
Configure the Checkout Protection Response
The response settings determine what happens after a detection signal reaches its configured threshold.
Customer Notice
The Customer Notice determines which Store Vacation notice customers see while Checkout Protection has automatically closed the store.
You can:
- Select a dedicated notice for Checkout Protection.
- Inherit the notice already configured for Force Close.
A dedicated Checkout Protection notice is used only while the security incident is active.
For example:
Checkout is temporarily unavailable. Please try again later.
Keep the message simple and customer-focused. You generally do not need to expose technical or security details about the detected activity.
Auto-Clear After
Auto-Clear After determines how long an active Checkout Protection incident remains in place before Store Vacation automatically clears it.
- Set a value greater than 0 to automatically clear the incident after that number of minutes.
- Set it to 0 when incidents should require manual clearing.
The automatic clear period can be configured for up to 480 minutes (8 hours).
When the incident is cleared, Store Vacation releases the Force Close state created by Checkout Protection.
The store may still remain unavailable when another closure is active, such as:
- A manually enabled Force Close.
- A Schedule.
- A Weekday closure.
- Opening Hours.
Important: Auto-Clear does not determine whether suspicious activity has actually stopped. It only determines when the Checkout Protection incident and its security-controlled Force Close are released.
Administrator Notifications
Checkout Protection can notify administrators when:
- An incident is triggered.
- An incident is cleared manually.
- An incident is cleared automatically.
These notifications provide an audit trail of when protection was activated and when it was removed.
Incident History Retention
↑ Back to topIncident-history retention controls how long Checkout Protection trigger and clear events remain available in Vacation Reports.
Removing old incident history does not delete WooCommerce orders or change the current Checkout Protection configuration.
Short-lived observations used for detection are managed separately from report history.
What Happens When Checkout Protection Triggers?
↑ Back to topWhen any enabled signal reaches its configured threshold:
- A Checkout Protection incident is created.
- Force Close is activated automatically.
- The Dashboard status changes to Auto-Closed.
- New purchases are blocked.
- Customers see the selected Checkout Protection notice or the inherited Force Close notice.
- An administrator notification can be sent.
- The active incident appears in the Checkout Protection sidebar and administrator notice.
- An automatic clear is scheduled when Auto-Clear After is configured.
Checkout Protection is intentionally stricter than a normal vacation closure.
While an incident is active, purchasing cannot be restored through:
- Global Conditions.
- Conditions assigned to Schedule or Weekday closures.
- Products excluded from vacation restrictions.
- Bypass Restrictions.
- Password-protected access.
- Private-link access.
- Allow Cart Building.
- Other product-level purchasing exceptions.
Checkout Protection takes priority because these exceptions could otherwise allow checkout to remain usable during the security incident.
Checkout Protection and Bypass Restrictions
↑ Back to topBypass Restrictions can normally keep checkout available during vacation mode.
For example, using Bypass Restrictions with Keep default behavior allows you to use Notice only while customers continue purchasing normally.
Checkout Protection overrides this behavior.
If Checkout Protection triggers:
- Bypass Restrictions is temporarily ineffective.
- Products cannot be purchased.
- Cart Building cannot reopen checkout.
- Password or private-link authorization cannot bypass the security closure.
- Product Conditions cannot make selected products purchasable.
Normal Bypass Restrictions behavior resumes after the Checkout Protection incident is cleared, provided another Store Vacation restriction does not prevent it.
Force Close During an Active Incident
↑ Back to topCheckout Protection uses Store Vacation’s existing Force Close system to block purchases.
While the incident is active:
- Force Close remains enabled.
- The Force Close control on the Dashboard is locked.
- The store displays an Auto-Closed status.
- Force Close cannot be manually disabled to bypass the incident.
- Conditions and product exceptions cannot reopen checkout.
- Customers remain unable to purchase until the Checkout Protection incident is cleared.
Do not try to reopen checkout by changing Behavior, Conditions, or product settings.
Instead, clear the Checkout Protection incident using its dedicated controls.
Review an Active Incident
↑ Back to topWhen Checkout Protection is active, the settings sidebar provides information about the incident, such as:
- Which detection signal triggered it.
- When it was triggered.
- How long the incident has been active.
- Whether an automatic clear is scheduled.
- When the incident is expected to clear automatically.
Before clearing an incident, consider reviewing:
- Recent WooCommerce orders.
- Failed orders.
- Payment gateway logs.
- Gateway fraud or carding tools.
- Other website security logs.
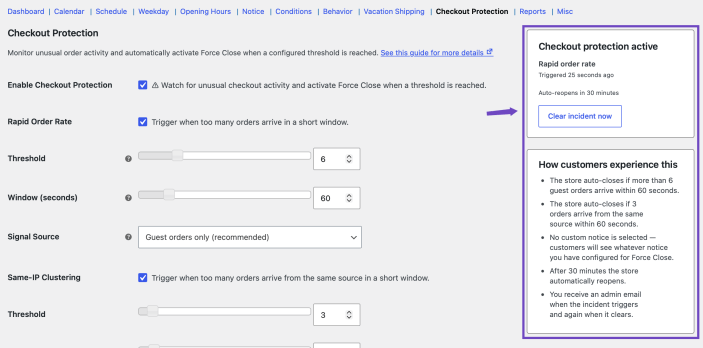
Checkout Protection detects unusual patterns. A triggered incident does not by itself prove that every affected checkout attempt was fraudulent.
Clear Checkout Protection Manually
↑ Back to topYou can manually clear an active incident from the Checkout Protection sidebar or the administrator notice.
To clear an incident:
- Go to WooCommerce > Settings > Store Vacation > Checkout Protection.
- Review the active incident information.
- Click the option to clear the incident.
- Confirm the action when prompted.
- Check the Dashboard status.
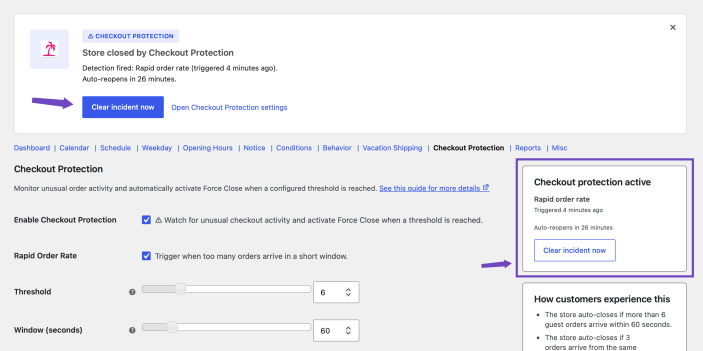
Clearing the incident releases the Force Close state controlled by Checkout Protection.
The store becomes purchasable again only when no other active Store Vacation configuration is preventing purchases.
Automatic Clearing
When Auto-Clear After is greater than 0, Store Vacation automatically clears the Checkout Protection incident after the configured cooldown period.
After the automatic clear:
- The Checkout Protection incident is cleared.
- Its Force Close state is released.
- An administrator clear notification can be sent.
- The clear event can be recorded in Vacation Reports.
- Another active vacation rule may continue affecting the store.
If Bypass Restrictions is configured, its normal purchasing behavior can resume after the incident clears.
Disable Checkout Protection
↑ Back to topDisabling Checkout Protection stops new activity from being evaluated by this feature and clears its active incident as part of the disable process.
To disable it:
- Go to WooCommerce > Settings > Store Vacation > Checkout Protection.
- Disable Checkout Protection.
- Click Save changes.
- Check the Dashboard status.
Disabling Checkout Protection does not disable fraud prevention or security controls provided by WooCommerce, your payment gateway, or other plugins.
Customize Checkout Protection Emails
↑ Back to topCheckout Protection registers administrator notifications with WooCommerce for incident activity, including trigger and clear events.
To customize the available Checkout Protection emails:
- Go to WooCommerce > Settings > Emails.
- Find the Checkout Protection trigger or clear email.
- Click Manage.
- Enable or disable the email.
- Configure the recipient when available.
- Customize the subject and heading.
- Select the email format.
- Click Save changes.
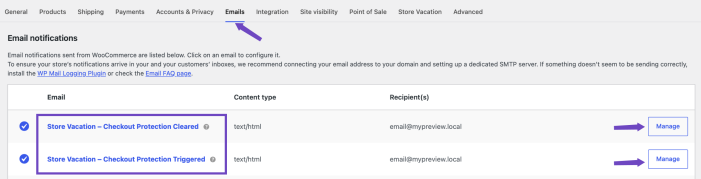
Checkout Protection administrator notifications must also be enabled in the feature settings for the emails to be dispatched.
Checkout Protection in Vacation Reports
When Vacation Reports are enabled, Checkout Protection can record incident activity including:
- Checkout Protection triggered events.
- Checkout Protection cleared events.
- The detection signal responsible for the incident.
- The observed event count.
- The configured Threshold.
- The configured Window.
- Incident duration.
- How the incident was cleared.
Use the event filters in Vacation Reports to review Checkout Protection activity separately from cart, saved-cart, checkout, and shipping events.
Report history follows the configured retention settings.
Privacy and Data Handling
Checkout Protection uses short-lived operational observations to identify suspicious patterns.
For Same-IP Clustering:
- Raw customer IP addresses are not stored in the Checkout Protection observation data.
- IP addresses are converted into installation-specific salted hashes.
- The hashes are used to identify repeated activity from the same source.
- The hashed value cannot be used as a direct replacement for the original IP address.
Operational observations are removed when they are no longer required for detection.
Checkout Protection trigger and clear events recorded in Vacation Reports follow the configured report and incident retention settings.
Troubleshooting Checkout Protection
↑ Back to topWhy Do I Not See Threshold or Window Settings?
Threshold and Window settings appear only after their corresponding detection signal is enabled.
First enable Checkout Protection, then enable one or more of:
- Rapid Order Rate.
- Same-IP Clustering.
- Payment Failure Rate.
Rapid Order Rate also displays the Signal Source setting.
Why Is Checkout Protection Enabled but Not Closing the Store?
Check the following:
- Confirm that at least one detection signal is enabled.
- Confirm that the signal reached its Threshold within its configured Window.
- If Rapid Order Rate uses Guest orders only, confirm the relevant orders were placed by guests.
- Confirm that your Checkout Protection settings were saved.
- For Same-IP Clustering, confirm Store Vacation can determine the request source.
- For Payment Failure Rate, remember that administrator-driven failures are excluded.
- Confirm that an incident is not already active.
Simply enabling Checkout Protection without enabling a signal does not cause the store to close.
Why Does the Dashboard Show Auto-Closed?
Auto-Closed means Checkout Protection has automatically activated Force Close because one of its configured detection signals reached its threshold.
Review the active incident under Checkout Protection before clearing it.
Why Is Force Close Locked?
Force Close is locked because an active Checkout Protection incident currently owns the automatic closure.
To regain manual control:
- Clear the Checkout Protection incident.
- Wait for Auto-Clear, if configured.
- Disable Checkout Protection.
Changing Behavior or Conditions cannot override the security closure.
Why Is Bypass Restrictions Not Working?
Checkout Protection overrides Bypass Restrictions while an incident is active.
This applies even when your normal Behavior configuration uses Notice only and keeps purchasing available during other vacation periods.
Clear the Checkout Protection incident before normal bypass behavior can resume.
Why Did the Store Not Reopen After Clearing the Incident?
Another Store Vacation rule or purchasing configuration may still be active.
Check:
- Manual Force Close.
- Schedule closures.
- Weekday closures.
- Opening Hours.
- Your current Behavior settings.
The Dashboard status can help identify the active vacation source and whether the storefront is currently purchasable.
Why Did Legitimate Activity Trigger Checkout Protection?
The Threshold or Window may be too strict for your store’s normal traffic.
Review:
- Your busiest legitimate order periods.
- Promotions and flash sales.
- Product launches.
- The selected Rapid Order Rate Signal Source.
- Customers sharing public networks.
- Normal payment-gateway failure patterns.
- Any advisory shown beside the Checkout Protection settings.
Adjust the Threshold or Window, or disable a detection signal that does not fit your store’s purchasing patterns.
Why Did I Not Receive an Administrator Email?
Confirm that:
- Administrator notifications are enabled in Checkout Protection.
- The corresponding WooCommerce Checkout Protection email is enabled.
- The email recipient is correct.
- WooCommerce emails are being delivered successfully.
- The incident was triggered or cleared after notification settings were enabled.
Vacation Report
↑ Back to topVacation Reports helps you understand how customers interact with your WooCommerce store while vacation mode is active.
You can review cart activity, saved-cart activity, completed checkouts, revenue, popular products, shipping-rate changes, and Checkout Protection incidents from one dashboard.
Reports can also be filtered by vacation period, event type, or date range and exported to CSV for further analysis.
Before you begin: The Reports section remains unavailable until Record Cart Interactions is enabled and saved under Behavior.
Enable Vacation Reports
↑ Back to topTo enable reporting:
- Go to WooCommerce > Settings > Store Vacation > Behavior.
- Enable Record Cart Interactions.
- Optionally configure Reports Retention to automatically remove old report data after a selected period.
- Click Save changes.
- Open the Reports section.
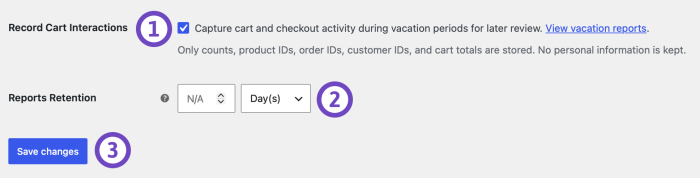
Vacation Reports begins recording supported activity after reporting is enabled.
It does not create historical report events for customer activity that occurred before Record Cart Interactions was enabled.
What Vacation Reports can record
↑ Back to topDepending on your Store Vacation configuration and customer activity, Reports can record events related to:
- Products added to the cart.
- Products removed from the cart.
- Cart quantity changes.
- Saved-cart activity.
- Saved-cart links emailed to logged-in customers.
- Completed checkouts.
- Revenue associated with recorded checkouts.
- Shipping methods hidden through Hide Shipping Methods.
- Vacation Shipping Options added to available shipping rates.
- Selected shipping methods.
- Checkout Protection incidents being triggered.
- Checkout Protection incidents being cleared.
Only activity that actually occurs is recorded.
For example:
- A hidden-shipping event is recorded only when WooCommerce calculates a shipping method that Store Vacation actually removes.
- A Vacation Shipping event is recorded only when an applicable Vacation Shipping Option is added to the customer’s available shipping rates.
- Checkout activity is recorded only when a customer can reach and complete the relevant checkout flow.
- Checkout Protection events are created only when an incident actually triggers or clears.
The events available for a particular vacation therefore depend on your Store Vacation configuration and what customers do while it is active.
Vacation Periods
↑ Back to topVacation Reports groups activity around recorded vacation periods.
A report period identifies the vacation context in which activity occurred, allowing events to remain associated with the relevant closure even after that period has ended.
Depending on your configuration, activity may be associated with vacation sources such as:
- Schedule closures.
- Weekday closures.
- Opening Hours.
- Force Close.
- Checkout Protection.
Use the Period filter to isolate activity associated with a particular recorded vacation period.
Report dates and periods use your WordPress site’s configured timezone.
Understand the Reports Dashboard
↑ Back to topSummary Metrics
The summary cards provide a quick overview of the report data matching your current filters.
Depending on the recorded activity, the cards can include:
- Events: Total number of matching report events.
- Checkouts: Number of completed checkouts recorded during vacation mode.
- Revenue: Revenue associated with the recorded completed checkouts.
- Customers: Number of unique customers represented by the matching report activity where customer information is available.

Changing the Period, Events, From, or To filters updates the summary metrics.
Activity Over Time
The Activity Over Time chart shows how recorded events are distributed across the selected date range.
Use the chart to identify increases or decreases in activity such as:
- Cart interactions.
- Saved-cart activity.
- Completed checkouts.
- Shipping-rate changes.
- Checkout Protection incidents.
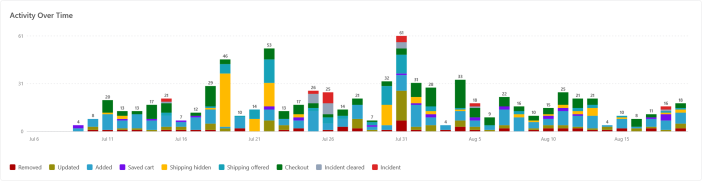
Dates are grouped according to your WordPress site’s timezone so that report activity corresponds with your store’s local operating dates.
Recent Activity
The Recent Activity table provides detailed information about individual report events.
Depending on the event type, a row may include information such as:
- Date and time.
- Event type.
- Vacation period.
- Closure type or source.
- Product information.
- Order information.
- Customer information when available.
- Cart value.
- Shipping method.
- Checkout Protection details.
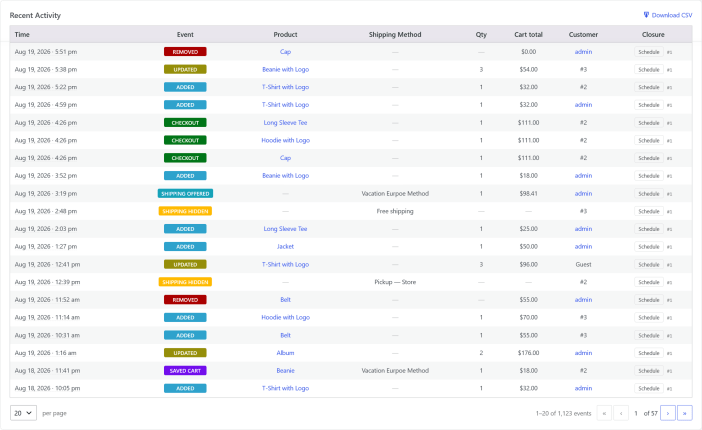
Use the pagination controls to review additional activity records when more events are available than can be shown on one page.
Top Products
The Top Products section shows products receiving the most recorded activity within the currently selected report scope.
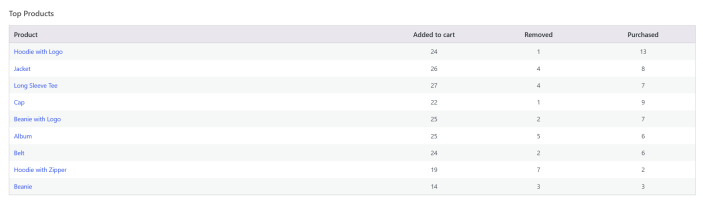
This can help you understand which products customers remained interested in while vacation mode was active.
For example, when Allow Cart Building is enabled, Top Products can help identify items customers frequently added to their carts while checkout was restricted.
The results follow the currently selected report filters.
Filter Vacation Reports
↑ Back to topUse the filters at the top of the Reports dashboard to narrow the displayed information.
Available filters include:
- Period: View activity associated with a specific vacation period.
- Events: Select one or more event types.
- From: Set the beginning of a custom date range.
- To: Set the end of a custom date range.
After choosing the required filters, click Apply.
Use Reset to remove the active filters and return to the full available report data.

Filters affect the dashboard metrics, activity chart, activity records, and exported report data.
Example: Review Activity During a Holiday Closure
↑ Back to topSuppose your store has a vacation scheduled from August 1 through August 6 and Allow Cart Building is enabled.
Select that vacation from the Period filter to review information such as:
- How many cart events occurred.
- Which products received the most activity.
- How many customers used Save Cart for Later.
- How many saved-cart links were emailed.
- Whether any permitted checkouts were completed.
- How much revenue was generated by those checkouts.
- Which normal shipping methods were hidden.
- Which Vacation Shipping Options were offered.
- Whether Checkout Protection triggered during the period.
This can help you understand customer demand during the closure and prepare for fulfillment after you return.
Reports When Purchasing Remains Open
↑ Back to topVacation Reports can also be useful when vacation mode is active but purchasing remains available.
For example, when Bypass Restrictions is enabled with Keep default behavior, you can use Notice only to inform customers about your vacation while allowing them to continue shopping and checking out normally.
If Vacation Reports is enabled, supported checkout, order, shipping, and other activity can still be recorded during that active vacation period.
This can help you measure how customers respond while you continue accepting orders during a vacation.
With password-protected or private-link modes, Bypass Restrictions may allow authorized visitors to complete checkout while other visitors remain restricted. Supported activity from those purchasing paths can also appear in Vacation Reports.
Vacation Reports and Allow Cart Building
↑ Back to topAllow Cart Building lets customers interact with their carts while checkout remains unavailable for restricted products.
When both Allow Cart Building and Vacation Reports are enabled, Reports can help show customer interest during a closure through activity such as:
- Products added to the cart.
- Products removed from the cart.
- Quantity changes.
- Saved-cart activity when Save Cart for Later is also enabled.
Allow Cart Building is not required for Vacation Reports themselves.
If purchasing remains available through Bypass Restrictions or another permitted purchasing path, Reports can still record supported checkout and shipping activity even though cart-building mode is not needed.
Vacation Reports and Save Cart for Later
↑ Back to topWhen Save Cart for Later is enabled and available to the customer, Vacation Reports can record supported saved-cart activity.
This can include saved-cart actions such as a logged-in customer requesting that their saved-cart link be emailed.
Saved-cart reporting can help you understand whether customers are preparing orders to return to after your vacation.
Save Cart is unavailable when the customer’s effective configuration already allows normal checkout through Bypass Restrictions or when Checkout Protection makes cart building unavailable.
Shipping Activity in Vacation Reports
↑ Back to topVacation Reports can record shipping-rate changes performed by Store Vacation during active vacation periods.
This includes activity from:
- Hide Shipping Methods.
- Vacation Shipping Options.
Hidden Shipping Methods
When a Schedule or Weekday closure uses Hide Shipping Methods, Store Vacation can record an event when a selected method is actually removed from the rates WooCommerce calculated for a customer.
No event is created merely because a shipping method is configured to be hidden. WooCommerce must first calculate that method as available during the relevant request.
Vacation Shipping Options
When a configured Vacation Shipping Option is applicable to the active vacation, shipping zone, and customer package, Store Vacation can record when that option is added to the available shipping rates.
The report can identify the relevant shipping method so you can review which temporary delivery options customers encountered during vacation mode.
Shipping events therefore reflect actual rate calculations rather than only your saved configuration.
Checkout Activity and Revenue
↑ Back to topVacation Reports can record completed checkout activity during an active vacation when your configuration allows purchases.
Purchasing may remain possible because of configurations such as:
- Bypass Restrictions with Keep default behavior.
- Password-protected access with Bypass Restrictions.
- Private-link access with Bypass Restrictions.
- Products excluded from vacation restrictions through Conditions.
Completed checkout events can contribute to the Checkouts and Revenue summary metrics.
This allows you to evaluate sales made during an active vacation even when the store was not fully closed to purchases.
Checkout Protection in Vacation Reports
↑ Back to topWhen Checkout Protection is enabled, Vacation Reports can record:
- Checkout Protection triggered events.
- Checkout Protection cleared events.
- The signal responsible for the incident.
- The observed event count.
- The configured Threshold.
- The configured Window.
- Incident duration.
- How the incident was cleared.
Use the Events filter to review Checkout Protection activity separately from cart, saved-cart, checkout, and shipping events.
Checkout Protection activity remains associated with the relevant report period so that you can review the security event in the context of the vacation activity around it.
Export Report Activity to CSV
↑ Back to topVacation Reports can export activity matching the currently selected filters to CSV.
To export report data:
- Apply the required Period, Events, From, or To filters.
- Click Download CSV.
- Keep the Reports page open while the export is prepared.
- The CSV download begins when the export is ready.

The export follows the currently active report filters.
Large exports are prepared in batches rather than requiring all report records to be generated in a single request.
You can open the downloaded CSV using spreadsheet software or use it for further reporting and analysis.
Clear All Report Data
↑ Back to topUse Clear All Data when you need to permanently remove the information stored by Vacation Reports.

Clearing report data removes:
- Recorded report events.
- Recorded report periods.
- Checkout Protection trigger and clear events stored in Vacation Reports.
It does not delete or change:
- WooCommerce orders.
- Products.
- Saved-cart restoration links.
- Schedule closures.
- Weekday closures.
- Opening Hours.
- Vacation Notices.
- Hide Shipping Methods configuration.
- Vacation Shipping Options.
- Checkout Protection configuration.
- Other Store Vacation settings.
Cleared report data cannot be recovered through Store Vacation.
Important
Clear All Data permanently removes the stored Vacation Reports history. Use CSV export first if you need to retain a copy of the report data.
Reports Retention
↑ Back to topThe Reports Retention setting controls how long Vacation Reports data is kept.
To configure report retention:
- Go to WooCommerce > Settings > Store Vacation > Behavior.
- Confirm that Record Cart Interactions is enabled.
- Configure the required retention period.
- Click Save changes.
Old report records are removed according to the configured retention setting.
Leave the retention setting empty when report data should be retained indefinitely.
Data removed through retention cleanup cannot be recovered through Store Vacation.
Checkout Protection may also have retention settings related to its incident history. See Checkout Protection for details about its operational and incident data.
Vacation Reports and Track Vacation Orders
↑ Back to topRecord Cart Interactions and Track Vacation Orders are separate Behavior options with different purposes.
Record Cart Interactions:
- Enables Vacation Reports.
- Records supported cart, saved-cart, checkout, shipping, and Checkout Protection activity.
- Provides dashboard metrics, filters, charts, activity records, and CSV exports.
Track Vacation Orders:
- Identifies qualifying WooCommerce orders placed while vacation mode is active.
- Does not by itself enable the Vacation Reports dashboard.
You can enable either setting independently or use both when you want detailed activity reporting and clear identification of orders placed during a vacation.
For example, when using Notice only with Bypass Restrictions, Track Vacation Orders can identify orders placed while the vacation is active, while Vacation Reports can provide broader information about checkout, revenue, shipping, and other supported activity.
Privacy and Stored Data
↑ Back to topVacation Reports stores the technical references and event data required to provide dashboard metrics and report details.
Depending on the event, this can include references to:
- Products.
- Orders.
- Registered customers.
- Shipping methods.
- Cart activity.
- Checkout activity.
- Checkout Protection incidents.
Report event rows do not duplicate customer names, email addresses, billing addresses, shipping addresses, or raw IP addresses.
When a registered customer, product, order, or other WooCommerce object appears in Reports or a CSV export, Store Vacation can retrieve its current display information from the existing WordPress and WooCommerce records using the stored reference.
Checkout Protection’s Same-IP Clustering uses installation-specific salted hashes rather than storing raw IP addresses in its detection observations.
Report timestamps are displayed according to the timezone configured under:
Settings > General
This keeps Vacation Reports dates aligned with the same site timezone used by Store Vacation schedules and other time-based rules.
Why Is My Reports Page Empty?
↑ Back to topEnabling Record Cart Interactions does not create report events by itself.
Reports begin displaying information only after supported activity occurs while a reportable vacation period is active.
Check the following:
- Confirm that Record Cart Interactions is enabled and the Behavior settings have been saved.
- Confirm that a Store Vacation period is currently active.
- Confirm that customers have performed supported actions during that period.
- Enable Allow Cart Building if you expect customers to add, remove, or change quantities for restricted products while checkout is unavailable.
- Confirm that Save Cart for Later is enabled and currently applicable if you expect saved-cart activity.
- Confirm that a purchasing path remains available if you expect completed checkout or revenue data.
- Check whether Bypass Restrictions makes normal purchasing available if you are using Notice only.
- Confirm that WooCommerce has calculated shipping rates if you expect Hide Shipping Methods or Vacation Shipping events.
- Confirm that Checkout Protection has actually triggered or cleared if you expect protection events.
- Check whether your active Period, Events, From, or To filters are excluding the recorded data.
A fully closed store with no cart building, no purchasable product exceptions, and no permitted checkout path may naturally produce little customer interaction data.
Why Do I Not See Shipping Events?
↑ Back to topShipping events are generated only when WooCommerce calculates shipping rates and Store Vacation actually changes the available rates.
Check that:
- The customer has entered enough shipping-address information.
- WooCommerce can match the customer to a shipping zone.
- The relevant shipping method would normally be available.
- An active Schedule or Weekday closure is configured to hide that method if you expect a hidden-rate event.
- A Vacation Shipping Option matches the active vacation and Applicable Zone if you expect an added-rate event.
- The Vacation Shipping Option is enabled.
- Defer to Free Shipping is not preventing the Vacation Shipping Option from appearing.
- The active report filters include the appropriate shipping event types.
Simply configuring Hide Shipping Methods or a Vacation Shipping Option does not generate a report event.
Why Do I Not See Checkout or Revenue Data?
↑ Back to topVacation mode may currently prevent all customers from completing checkout.
If you expect checkout activity, confirm that purchasing is permitted through a configuration such as:
- Bypass Restrictions with Keep default behavior.
- Password access with Bypass Restrictions.
- Private-link access with Bypass Restrictions.
- Product Conditions that leave selected products purchasable.
Also confirm that Checkout Protection is not currently active, because an active Checkout Protection incident blocks purchasing even when Bypass Restrictions or product exceptions would otherwise allow checkout.
Why Do I Not See Checkout Protection Events?
↑ Back to topCheck that:
- Checkout Protection is enabled.
- At least one detection signal is enabled.
- A signal actually reached its configured threshold.
- The incident triggered or cleared after Vacation Reports was enabled.
- Your Events filter includes Checkout Protection activity.
- Your selected date range or Period includes the incident.
Configuring Checkout Protection does not create report activity until an actual trigger or clear event occurs.
Why Is Old Report Data Missing?
↑ Back to topOld report records may have been removed because of your configured Reports Retention setting or because Clear All Data was used.
Check the retention configuration under:
WooCommerce > Settings > Store Vacation > Behavior
Records removed through automatic retention or Clear All Data cannot be restored through Store Vacation.
Misc settings
↑ Back to topThe miscellaneous (misc) settings section allows you to customize some global settings related to your store’s vacation management, ensuring consistency and control over key features.
Manual placement only
↑ Back to topBy default, the plugin automatically displays the vacation notice on your WooCommerce pages (such as the Shop page and single product pages) during vacation mode. The notice appears above the default WooCommerce notices area defined by your theme.
In most cases, this placement works well. However, if you are using a page builder (such as Elementor, Divi, or WPBakery) or a custom layout, the default location may not be ideal. In these situations, you can manually place the notice wherever you prefer using:
- Vacation Notice Block – insert it into pages or template parts.
- Elementor Widget – add the notice directly into your page builder layout.
- Shortcode – place the notice in any content area that supports shortcodes.
How to enable manual placement only
- Go to WooCommerce → Settings → Store Vacation → Misc.
- Locate the Manual Placement Only option.
- Tick the checkbox to enable it.
- Save your settings.
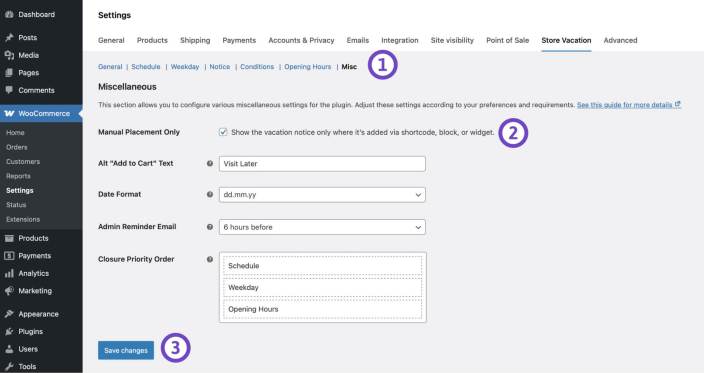
Once enabled:
- The default notice will no longer be displayed automatically.
- Only notices you manually add via block, widget, or shortcode will appear on your store.
Important
Make sure you have added the notice in the desired locations. If no manual placement is made, customers will not see any vacation message.
Hide vacation notice
↑ Back to topIf you have assigned a notice to your scheduled vacation or weekday closing plan, it will be displayed on WooCommerce pages such as the shop and single product pages. However, you can exclude certain products from being unavailable during these scheduled times by using the provided Conditions options.
This allows these products to remain purchasable during specified vacation schedules or weekday closing times. You can hide the vacation notice from single product pages that remain available for purchase using conditional logic.
Steps to Hide Vacation Notice for Purchasable Products:
- Navigate to WooCommerce > Settings > Store Vacation > Misc.
- Check the Hide Vacation Notice checkbox to prevent the notice from being displayed for purchasable products.
- Click on the Save changes button.

Cache refresh & reminder
↑ Back to topThe Cache Refresh & Reminder feature automatically refreshes cache when vacation schedules are updated in WooCommerce.
Caching systems can sometimes delay the display of vacation notices, store closures, or product availability changes. This feature ensures that the most recent vacation settings appear immediately on the storefront.
When enabled, the plugin will:
- Automatically refresh supported cache systems when vacation schedules change.
- Display an admin reminder notice after schedule updates.
- Provide a one-click manual cache clearing button in the admin notice.
This helps prevent situations where visitors see outdated store availability information due to caching.
How to enable cache refresh & reminder
Follow these steps to enable the feature:
- Go to WooCommerce > Settings > Store Vacation > Misc.
- Locate Cache Refresh & Reminder. Enable the checkbox.
- Click Save Changes.
Once enabled, the plugin will automatically handle cache refresh events when vacation schedules are created or updated.
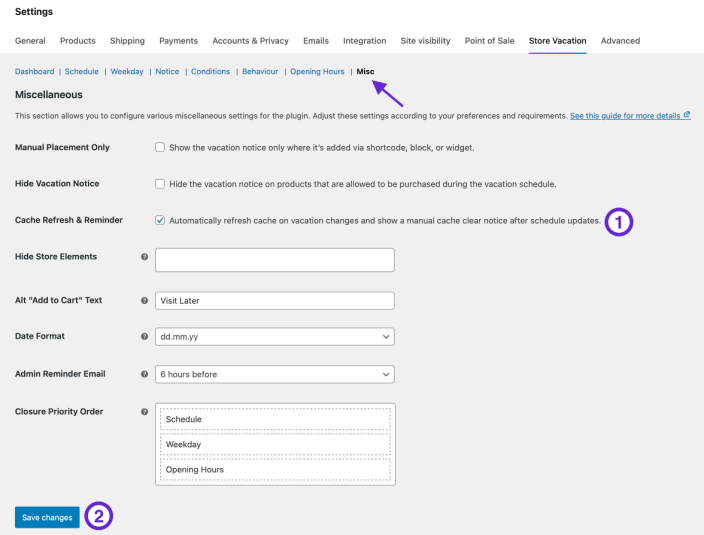
What happens when the feature is enabled
- Cache is automatically refreshed when:
- A vacation schedule is created
- A schedule is edited
- A schedule is removed
- An admin notice appears reminding you to clear cache manually if needed.
- The notice includes a one-click cache clear button.
This ensures your storefront immediately reflects changes to:
- Store availability
- Checkout behavior
- Vacation notices
- Product purchasing restrictions
Supported cache systems
The Cache Refresh feature is compatible with many popular caching plugins and built-in systems.
Supported caches include:
WooCommerce & WordPress
- WooCommerce transients
- WordPress object cache
Popular cache plugins
- W3 Total Cache
- WP Super Cache
- LiteSpeed Cache
- WP Rocket
- Autoptimize
- Breeze (Cloudways)
- WP Fastest Cache
- SiteGround Optimizer
- WP Engine caching
If your website uses one of these systems, cache refresh will happen automatically when vacation settings change.
When should you use this feature?
Enable Cache Refresh & Reminder if:
- Your website uses a caching plugin.
- Vacation notices or store closures appear late.
- Product purchase restrictions are not updating immediately.
- Your hosting platform uses server-level caching.
This feature helps ensure visitors always see the correct store status.
Status Badge
↑ Back to topThe Status Badge option displays your store’s current vacation status in the WordPress admin bar, making it easier to see when Store Vacation is affecting your store without opening the Dashboard.
The badge can appear in both the WordPress admin area and on the storefront while the WordPress admin bar is visible.
Enable the Status Badge
- Go to WooCommerce > Settings > Store Vacation > Misc.
- Enable Status Badge.
- Click Save changes.
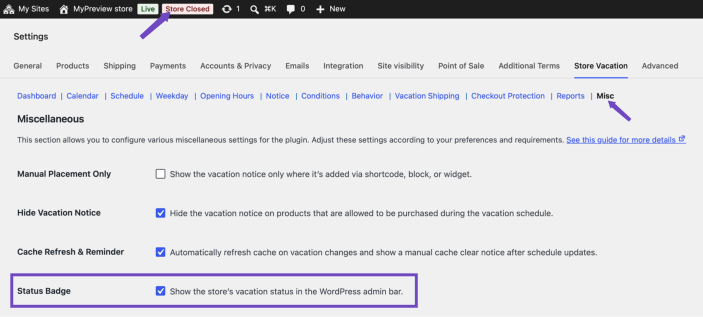
Status Badge is enabled by default.
Enabling this option does not change your store’s availability or vacation settings. It only controls whether Store Vacation displays the status indicator in the WordPress admin bar.
Status Badge States
The badge changes according to the current Store Vacation state.
Store Closed
Store Closed appears when an active vacation rule is preventing customers from purchasing.
This can include closures caused by:
- A Schedule.
- A Weekday schedule.
- Opening Hours.
- Force Close.
The badge links to the relevant Store Vacation settings so you can review the active closure.
Store Open
Store Open can appear when a vacation period is active but Bypass Restrictions keeps the store available for purchases.
For example, you can use Notice only with Bypass Restrictions to display a vacation notice while customers continue browsing, adding products to the cart, and checking out normally.
The Store Open badge helps distinguish this situation from a normal store state where no vacation period is active.
Auto-Closed
Auto-Closed appears when Checkout Protection has automatically closed the store after detecting suspicious checkout activity.
Click the badge to review the Checkout Protection settings and active incident.
When the Status Badge Appears
The Status Badge is designed to highlight Store Vacation states that may require your attention.
It is shown when a vacation or Store Vacation closure state is active, including when a vacation is active but Bypass Restrictions keeps purchasing available.
When your store is operating normally and no vacation period is active, no badge is displayed.
The badge is available only to users who can manage WooCommerce and when the WordPress admin bar is visible.
Disable the Status Badge
If you do not want Store Vacation status displayed in the WordPress admin bar:
- Go to WooCommerce > Settings > Store Vacation > Misc.
- Disable Status Badge.
- Click Save changes.
Disabling the badge does not disable Store Vacation, change an active Schedule, reopen the store, or affect Checkout Protection. It only removes the Store Vacation status indicator from the WordPress admin bar.
You can always review the current store status from the Store Vacation Dashboard.
Hide store elements
↑ Back to topThe Hide Store Elements option allows you to hide specific storefront components while vacation mode is active.
This feature is useful when your store remains visible for browsing but purchasing elements should be temporarily hidden.
You can hide:
- Product price
- Add to cart button
- Mini cart widget
- Mini cart block
These elements automatically disappear during the scheduled vacation period and return when the store reopens.
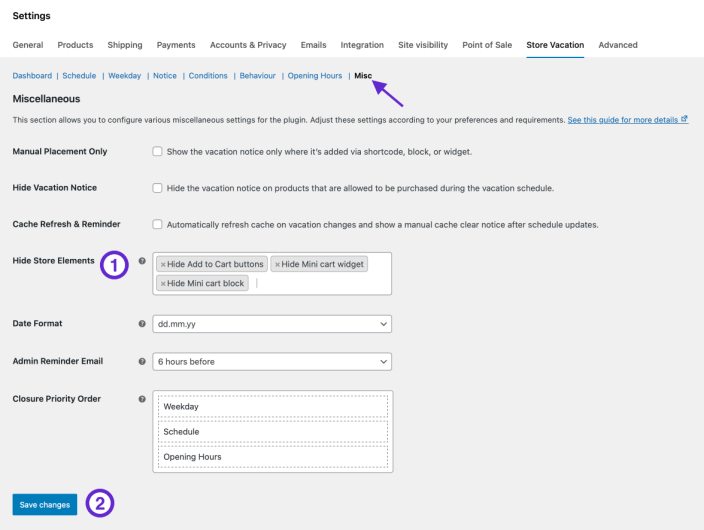
How to enable hide store elements
Follow these steps:
- Go to WooCommerce > Settings > Store Vacation > Misc.
- Find Hide Store Elements and select the elements you want to hide during vacation mode.
- Click Save Changes.
Available elements you can hide
- Product Price: Removes product price from product pages and shop listings.
- Add to Cart Button: Disables and hides the purchase button so customers cannot start checkout.
- Mini Cart Widget: Hides the classic mini cart widget commonly used in headers or sidebars.
- Mini Cart Block: Hides the modern mini cart block used in block-based themes.
How it works during vacation mode
- When vacation mode becomes active:
- Selected elements are hidden automatically.
- Customers can still browse products (unless checkout is disabled separately).
- The storefront layout remains clean and consistent.
- When the vacation period ends:
- All hidden elements automatically reappear.
- Store functionality returns to normal.
- No manual action is required.
Does this feature delete my prices?
No. Prices are only hidden visually during vacation mode. Product data remains unchanged.
Will the elements return automatically?
Yes. All elements reappear automatically after the vacation schedule ends.
Does this work with block themes?
Yes. Both Mini Cart Widget and Mini Cart Block are supported.
Do I need to clear cache manually?
In most cases no. If you enabled Cache Refresh & Reminder, the plugin will refresh supported caches automatically.
Update date format
↑ Back to topYou can customize the date format used throughout various date fields within the settings pages. This ensures the date format aligns with regional standards or personal preferences.
- Go to WooCommerce > Settings > Store Vacation > Misc.
- Choose a format from the Date Format dropdown that aligns with your country’s date conventions or your personal preference.
- Click the Save changes button to apply the selected date format.

Alt “Add to Cart” text
↑ Back to topYou have the option to display custom text for the Add to Cart button during vacation mode. By default, the button text will change to “Read more” when your shop is in vacation mode. However, you can customize it to a new text such as “Visit later” to better communicate with your customers.
Steps to Customize Add to Cart Button Text:
- Navigate to WooCommerce > Settings > Store Vacation > Misc.
- Enter your custom button text in the Alt “Add to Cart” Text field.
- Click on the Save changes button.

Closure priority order
↑ Back to topThis setting allows you to define the priority order for closure notices when conflicts arise between your Opening Hours, Weekdays, and Schedules. By adjusting the closure priority, you can ensure the appropriate notice displays at the right time on your shop pages.
To customize the closure priority order:
- Click and drag the items (Opening Hours, Weekdays, Schedules) in the list to move them up or down, depending on which should take precedence.
- Place the most important closure setting at the top of the list.
Once you’ve arranged the priorities, click the Save changes button to apply your updates.

Customize overview tables
↑ Back to topYou can customize the overview table to fit your unique needs and preferences. Here’s how you can personalize your schedule, weekday, or notice tables:
- Click on the Screen Options located at the top right corner of your screen.
- Inside this menu, you can toggle the visibility of columns and change the number of items displayed per page.
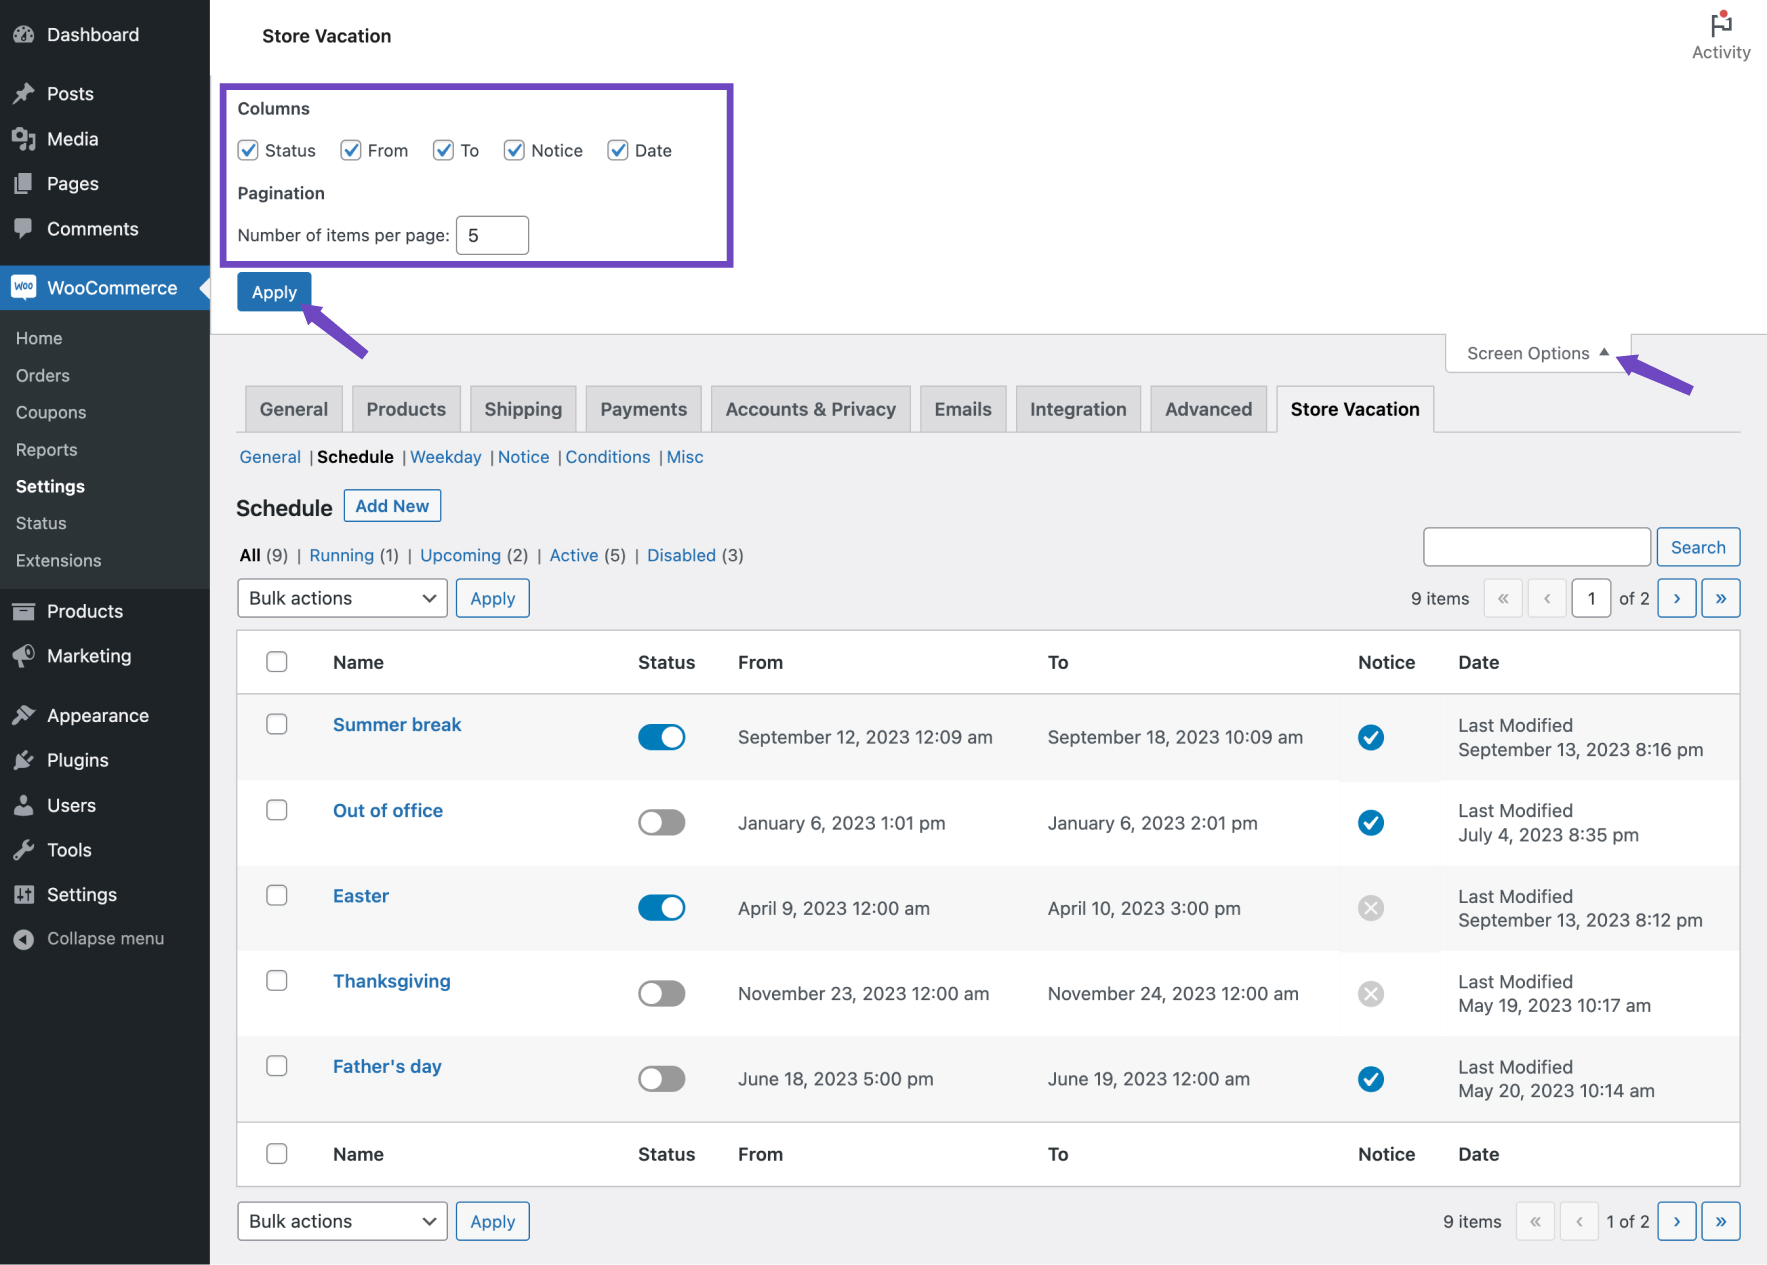
Updating your timezone
↑ Back to topIf you need to adjust your site’s time and date settings to align with a different timezone, follow these steps:
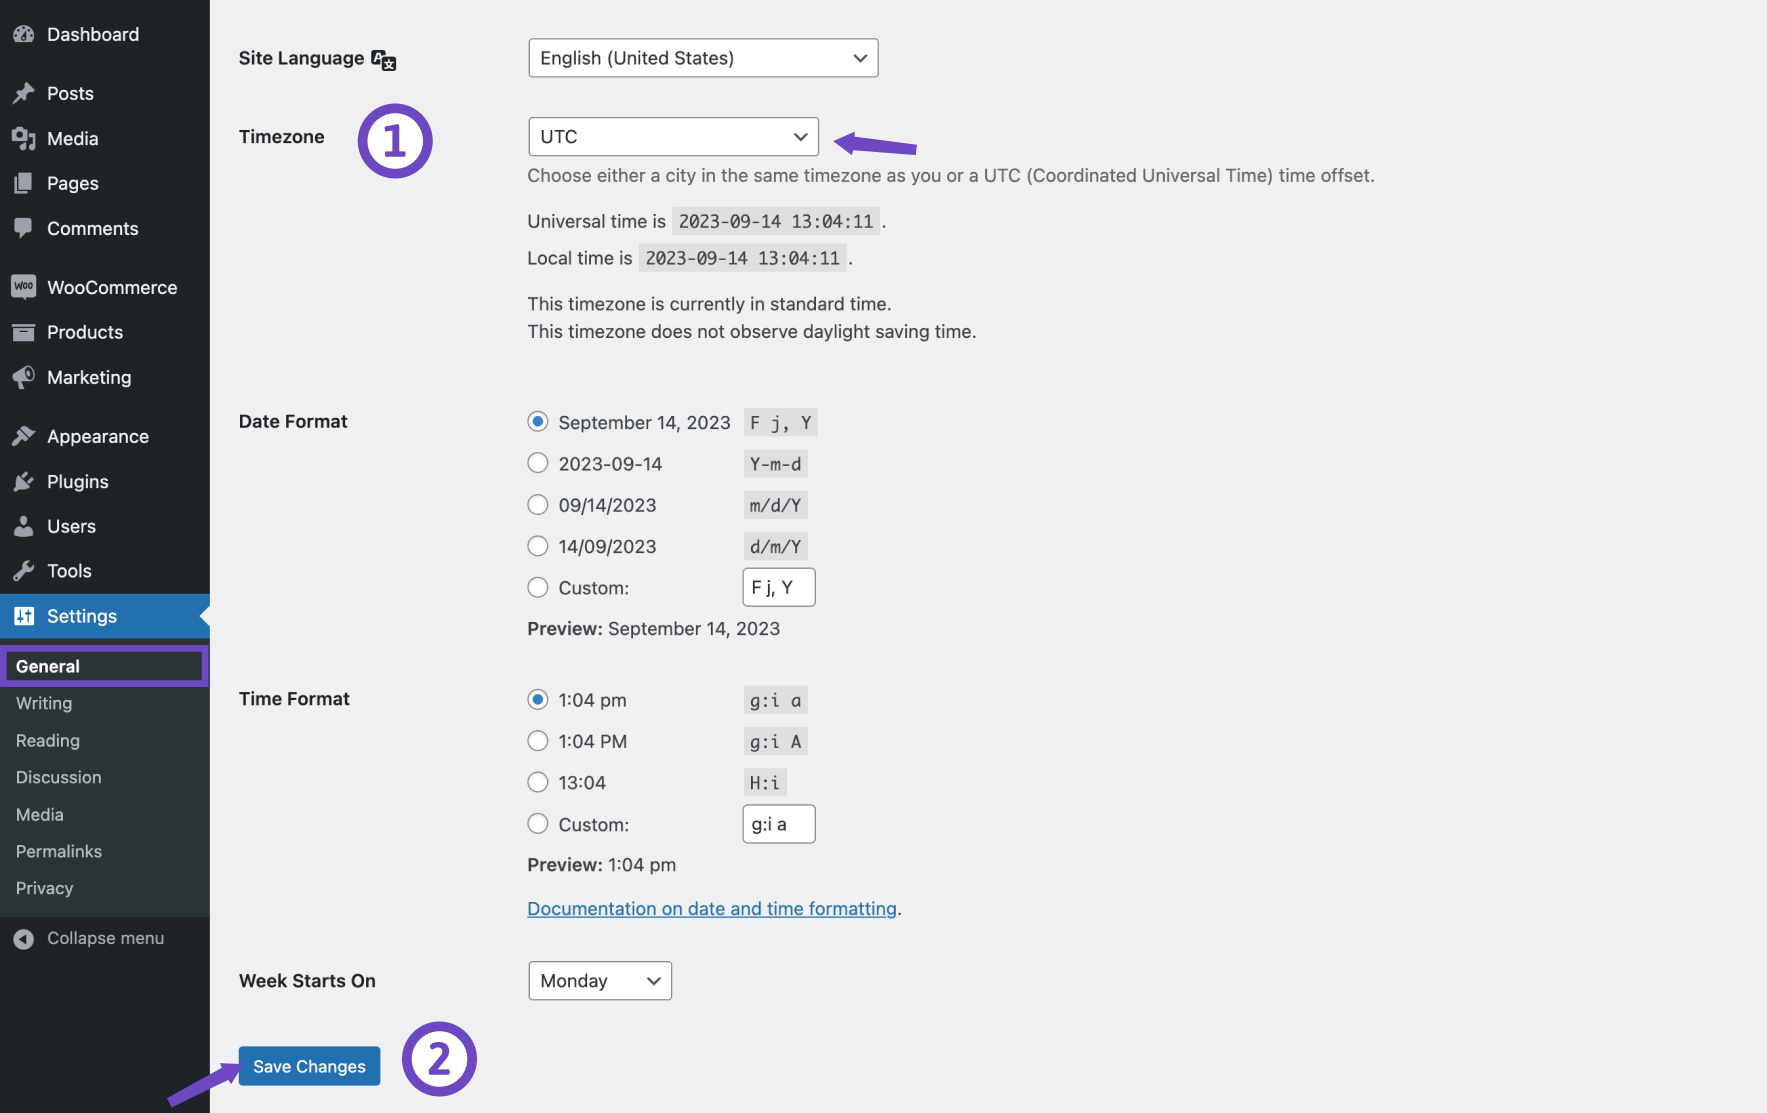
- Navigate to Settings > General.
- Choose your desired Timezone from the available options.
- Click on the Save changes button.
Import and export
↑ Back to topImport and export features enable you to transfer your extension settings to a different website. Your data will be stored in a JSON file, which can be imported into another WooCommerce store. Since shop managers have the ability to delete notices or schedules, we suggest regularly exporting your data manually as a backup.
Export
↑ Back to topBefore exporting your content, make sure your website is accessible to the public and not under maintenance or password protected. It’s also a good idea to tidy things up by removing unnecessary schedules and deleting unused notices to keep the export file small.
- Go to Tools > Export.
- Choose Store Vacation.
- Select the settings you want to export by ticking the checkboxes.
- Click on the Download Export File button.
- Wait for WordPress to process the export. Once done, you’ll get a JSON file to save on your computer.
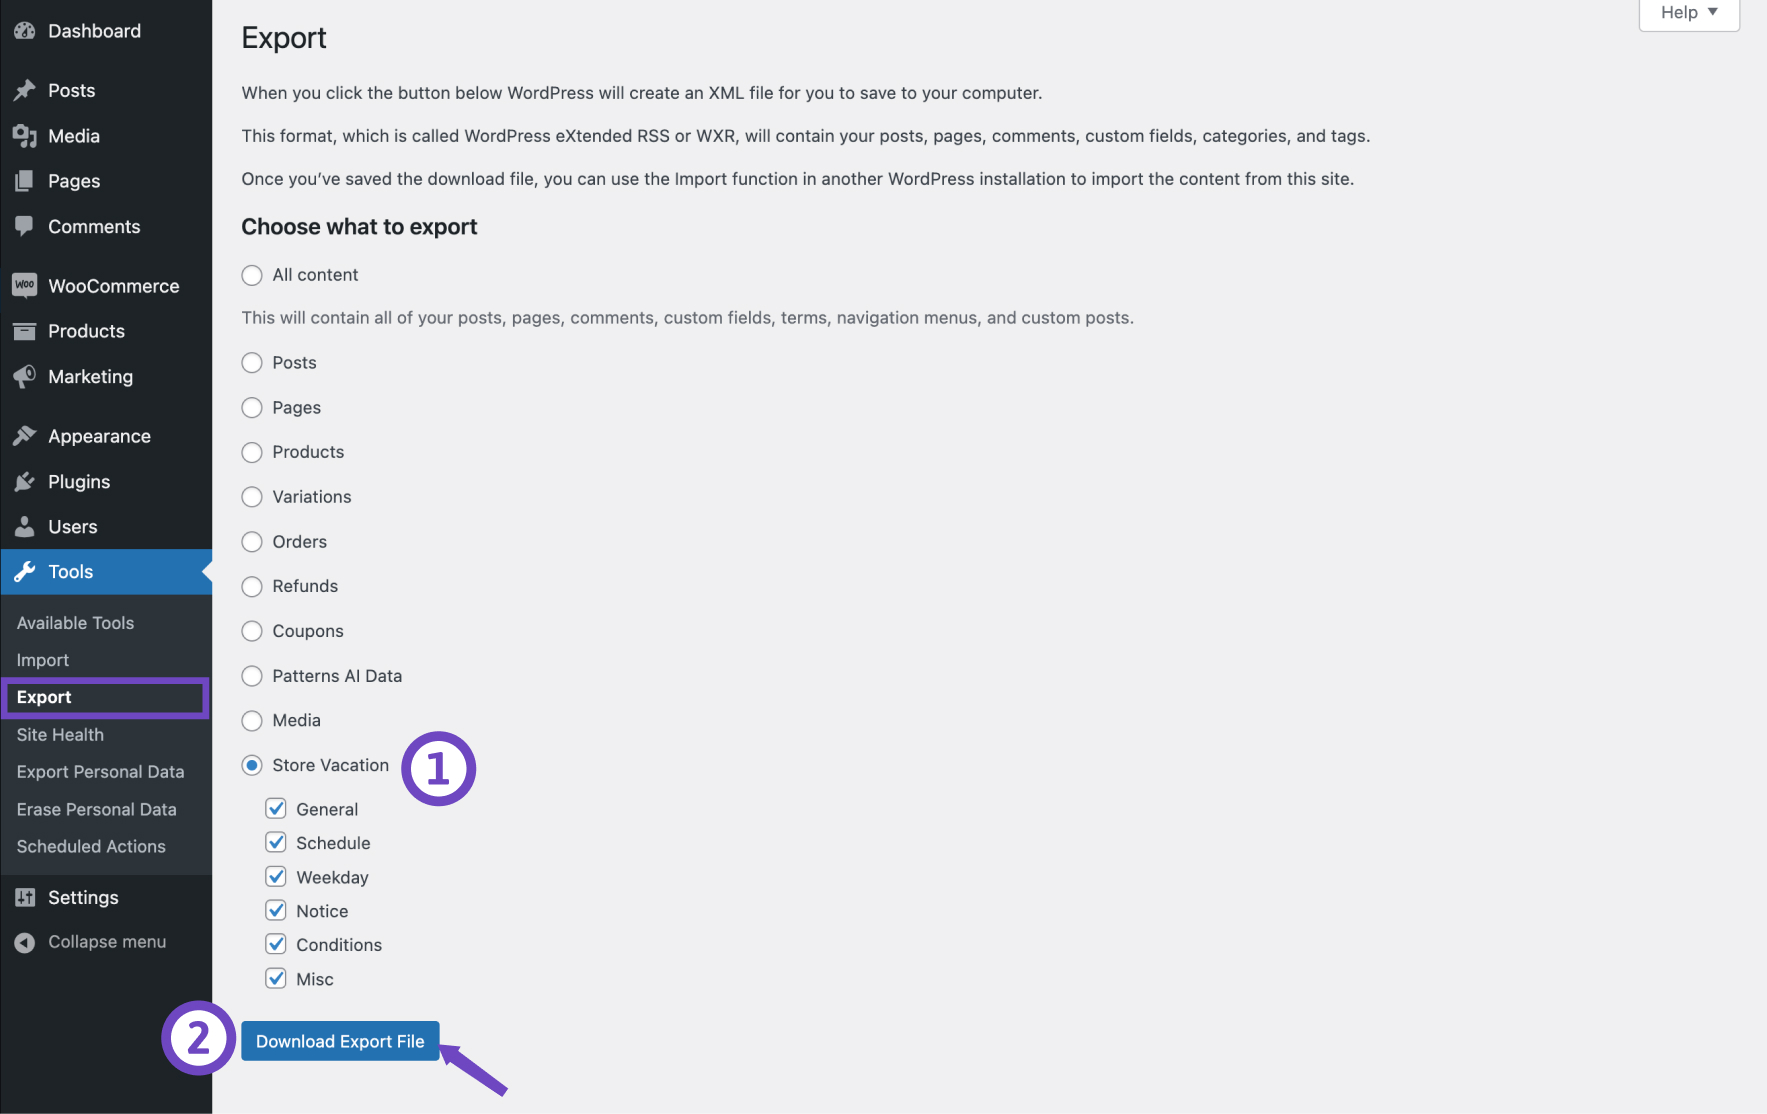
Only settings from the General and Conditions tabs will be overwritten during import. If you already have schedules on your store, they’ll stay as they are, and the plugin will match new notices to the appropriate schedules automatically.
Import
↑ Back to topBefore importing, make sure the exported file isn’t too big for your server to handle, as this might cause memory issues. If you encounter an error like Fatal error: Allowed memory size of 8388608 bytes exhausted, you may need to increase your server’s memory limit or split the settings into smaller files.
- Go to Tools > Import.
- Choose Store Vacation and click on Run Importer.
- Select the settings you want to import by ticking the checkboxes.
- Click on the Choose File and select the JSON file you exported before.
- Click on the Upload file and import button.
- Once the import is finished, you’ll see a success message.
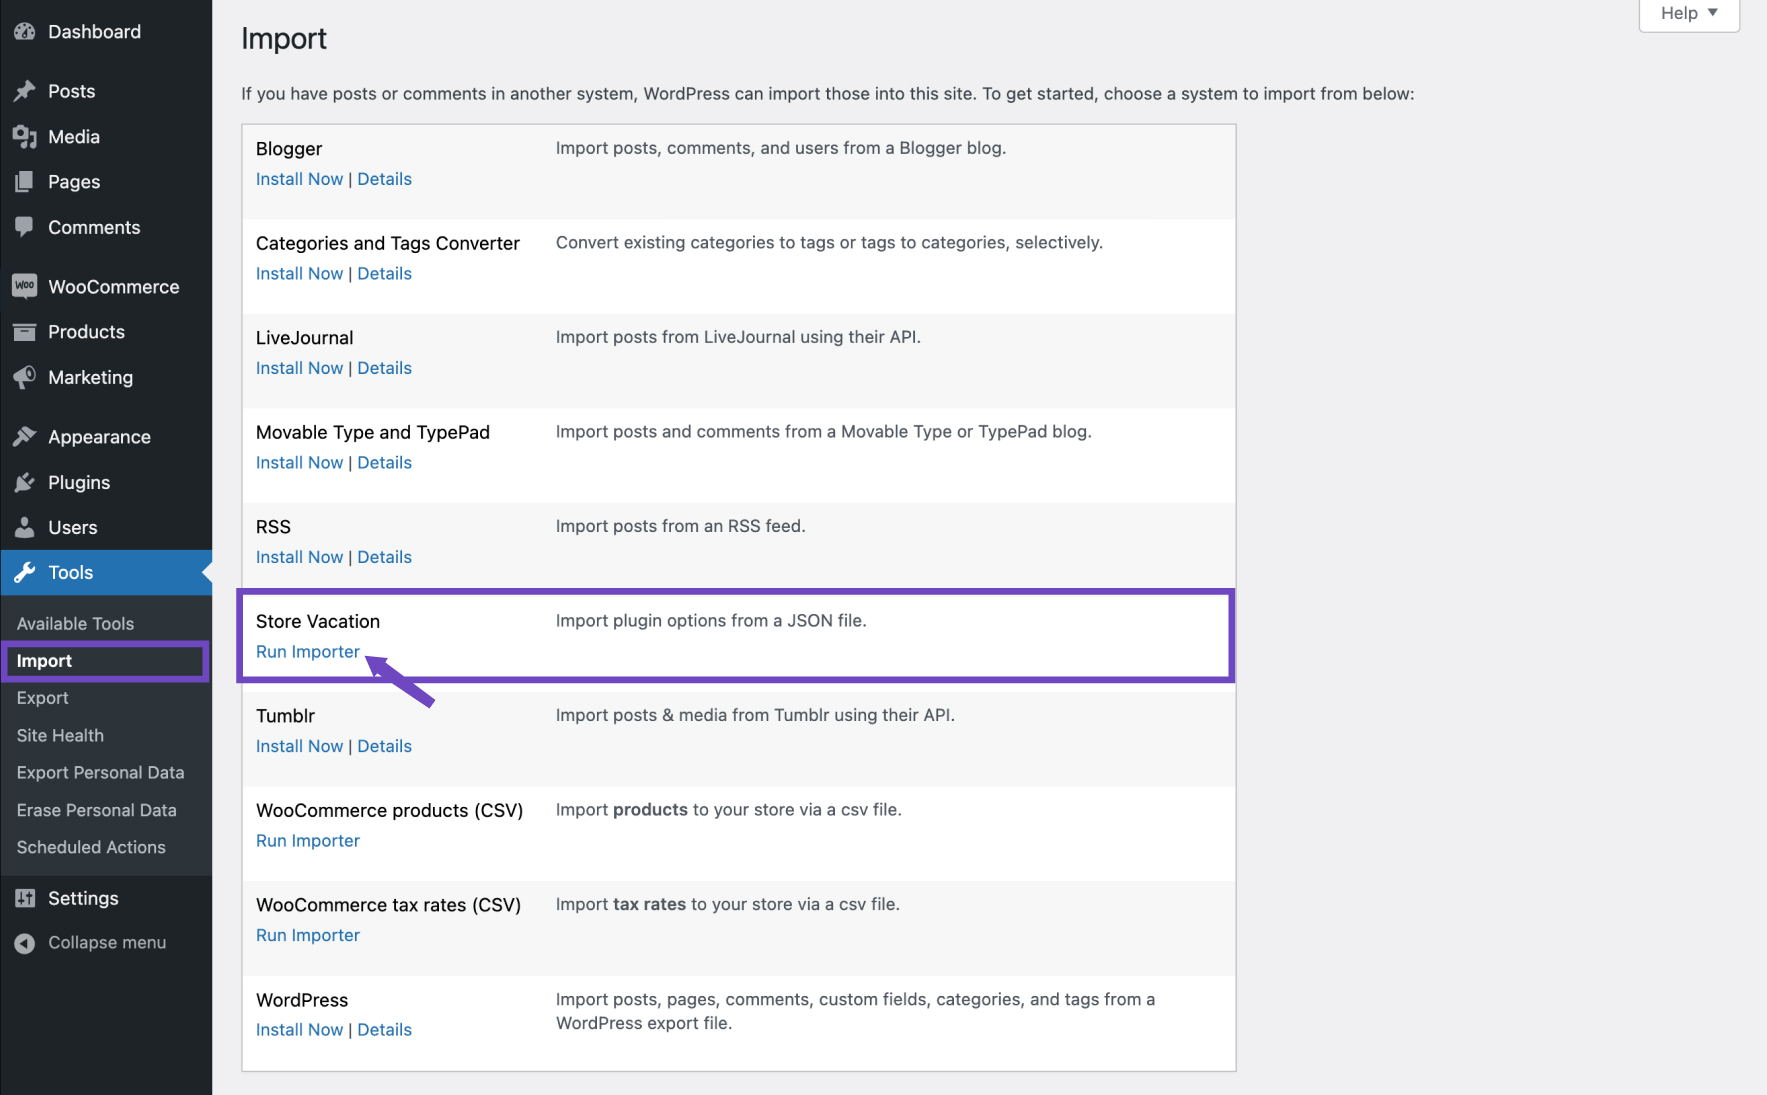
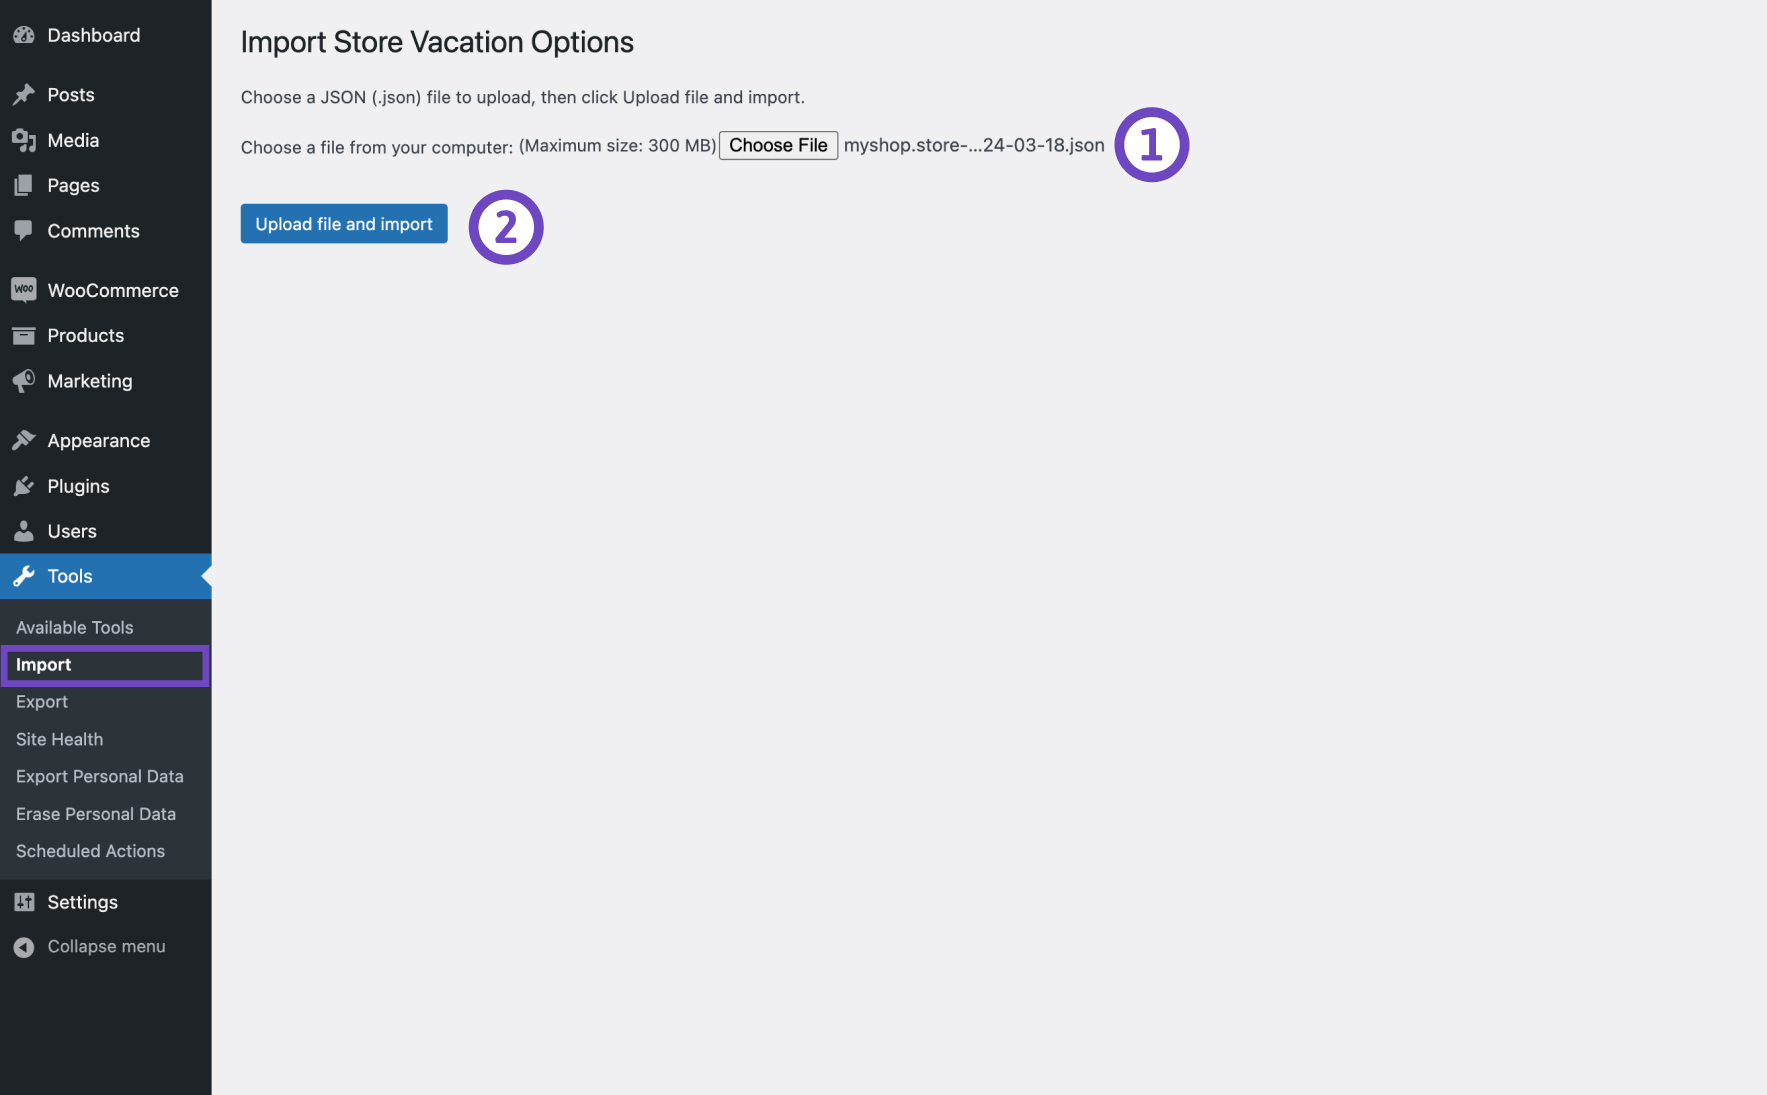
If the import fails, it might still create some content. Be careful of duplicate data if you try importing again after fixing the error. Check the extension’s settings page to remove any extra records if needed.
Upcoming Vacations dashboard widget
↑ Back to topThe Upcoming Vacations widget is available on your WordPress dashboard and provides a quick overview of your upcoming vacation schedules and weekday plans. This widget helps you stay informed about your scheduled store closures and ensures you can make any necessary preparations before taking a break.
How to enable the Upcoming Vacations widget:
- Navigate to your WordPress Dashboard.
- In the top-right corner, click on Screen Options.
- Check the box for the Upcoming Vacations to display it on your admin dashboard.
This widget is a useful tool to ensure you’re always aware of upcoming store closures and can plan accordingly.

Translating Store Vacation
↑ Back to topStore Vacation can be translated into multiple languages using popular multilingual plugins like WPML or Polylang. Here’s how to translate the plugin using each tool:
Using WPML
↑ Back to topTo translate Store Vacation Pro with the WPML Multilingual plugin, follow these steps:
- Go to WPML > String Translation in your WordPress dashboard.
- In the search bar, type admin_text__wsvpro_settings. This will help you find store vacation notices and other relevant strings to translate.
- From the list of strings, find the specific notice or setting that you want to translate.
- Click the Edit icon beneath the flag of the language you want to translate into, and enter the translation for that string.
For more detailed instructions, refer to the WPML documentation on translating strings.
Using Polylang
↑ Back to topTo translate strings with the Polylang plugin, follow these steps:
- Go to Languages > Translation in your WordPress dashboard.
- Use the dropdown menu to filter by plugins/store-vacation. This will display all the relevant strings for the Store Vacation plugin.
- In the Translations column, enter the translated strings for each language.
For more detailed instructions, refer to the Polylang documentation.
Developer resources
↑ Back to topStore Vacation provides two APIs for developers and integrations:
- A read-only REST API for retrieving Store Vacation configuration.
- A WordPress Abilities API integration for discovering, reading, and managing supported Store Vacation settings programmatically.
Warning: Programming code ahead
The following sections are intended for developers who are familiar with WordPress, WooCommerce, REST APIs, authentication, PHP, and JavaScript. If you are unfamiliar with custom development or resolving potential conflicts, consider working with a Woo Agency Partner.
REST API
↑ Back to topStore Vacation integrates with the WordPress REST API under the following namespace:
/wp-json/store-vacation/v1/The Store Vacation REST API is read-only. It can be used to retrieve:
- Vacation Schedules.
- Weekday schedules.
- Vacation Notices.
- Opening Hours.
- Vacation Shipping Options.
Creating, updating, or deleting Store Vacation settings is not supported through these REST routes. For programmatic write operations in Store Vacation 1.7.0, see the WordPress Abilities API section below.
Authentication and permissions
Store Vacation REST API requests use the WooCommerce settings-read permission.
The authenticated WordPress user associated with the request must have permission to manage WooCommerce settings.
All Store Vacation REST endpoints use standard WordPress/WooCommerce REST authentication mechanisms.
Single-resource requests return a 404 response when the requested resource does not exist.
Schedule REST API routes
↑ Back to topSchedules are one-time vacation periods with specific start and end dates and times.
Get schedules
Endpoint:
GET /wp-json/store-vacation/v1/scheduleBy default, the endpoint returns all configured schedules.
Use the optional funnel parameter to filter results:
| Value | Description |
|---|---|
all | Return every schedule. This is the default. |
active | Return enabled schedules. |
disabled | Return disabled schedules. |
running | Return schedules currently within their configured From and To period. |
upcoming | Return enabled schedules scheduled to begin in the future. |
For example:
GET https://your-domain.com/wp-json/store-vacation/v1/schedule?funnel=activeTo retrieve currently running schedules:
GET https://your-domain.com/wp-json/store-vacation/v1/schedule?funnel=runningTo retrieve upcoming schedules:
GET https://your-domain.com/wp-json/store-vacation/v1/schedule?funnel=upcomingNote
Use the funnel query parameter for Schedule filtering. Routes such as /schedule/active are not used by the current API.
Get a single schedule
Endpoint:
GET /wp-json/store-vacation/v1/schedule/{id}For example:
GET https://your-domain.com/wp-json/store-vacation/v1/schedule/123A Schedule response can include fields such as:
idnamestatusfromtonoticenotice_leadconditionsshipping_rulestimestamp
The notice value references a Store Vacation Notice ID.
The notice_lead, conditions, and shipping_rules values are returned as stringified JSON and should be decoded before working with their contents.
Although the Store Vacation interface calls the feature Hide Shipping Methods, the REST response retains the shipping_rules field name. It contains the configured shipping-rate IDs that should be hidden during that Schedule.
For example:
["flat_rate:1", "wsvpro_vacation:opt_a"]An empty configuration is returned as:
[]Weekday REST API routes
↑ Back to topWeekday schedules define recurring weekly vacation periods.
Get weekday schedules
Endpoint:
GET /wp-json/store-vacation/v1/weekdayThe optional funnel parameter supports:
| Value | Description |
|---|---|
all | Return every Weekday schedule. This is the default. |
active | Return enabled Weekday schedules. |
disabled | Return disabled Weekday schedules. |
running | Return Weekday schedules currently within their configured period. |
upcoming | Return enabled Weekday schedules that are next scheduled to run. |
For example:
GET https://your-domain.com/wp-json/store-vacation/v1/weekday?funnel=activeTo retrieve the currently running Weekday closure:
GET https://your-domain.com/wp-json/store-vacation/v1/weekday?funnel=runningGet a single weekday schedule
Endpoint:
GET /wp-json/store-vacation/v1/weekday/{id}For example:
GET https://your-domain.com/wp-json/store-vacation/v1/weekday/123A Weekday response can include:
idnamestatusweekdayfromtonoticenotice_leadconditionsshipping_rulestimestamp
The weekday value is an integer from 0 through 6 and follows the WordPress first-day-of-week configuration.
As with Schedules, notice_lead, conditions, and shipping_rules are returned as stringified JSON.
Notice REST API routes
↑ Back to topNotices are reusable customer messages that can be assigned to Schedules, Weekday closures, Opening Hours, Force Close, and other supported Store Vacation features.
Get all notices
Endpoint:
GET /wp-json/store-vacation/v1/noticeFor example:
GET https://your-domain.com/wp-json/store-vacation/v1/noticeGet a single notice
Endpoint:
GET /wp-json/store-vacation/v1/notice/{id}For example:
GET https://your-domain.com/wp-json/store-vacation/v1/notice/123A Notice can include fields such as:
idnamemessagenoticebtn_txtbtn_urltxt_sizetxt_colorbg_colortimestamp
The notice field on the Notice resource identifies the notice presentation type. It should not be confused with the notice field returned by Schedule or Weekday resources, where the value references a Notice ID.
Opening Hours REST API route
↑ Back to topOpening Hours is a single site-wide configuration rather than a collection of individual records.
Get Opening Hours
↑ Back to topEndpoint:
GET /wp-json/store-vacation/v1/opening-hoursFor example:
GET https://your-domain.com/wp-json/store-vacation/v1/opening-hoursThe response can include:
statusshould_closenoticefirst_day_of_weekclosed_labelweekdays
Unlike the stringified configuration fields returned by Schedule and Weekday resources, the Opening Hours weekdays field is returned as a resolved array.
There is no /opening-hours/{id} route because Opening Hours is a single configuration for the store.
Vacation Shipping REST API routes
↑ Back to topStore Vacation 1.7.0 adds REST API access to Vacation Shipping Options.
Get all Vacation Shipping Options
Endpoint:
GET /wp-json/store-vacation/v1/vacation-shippingFor example:
GET https://your-domain.com/wp-json/store-vacation/v1/vacation-shippingGet a single Vacation Shipping Option
Endpoint:
GET /wp-json/store-vacation/v1/vacation-shipping/{id}For example:
GET https://your-domain.com/wp-json/store-vacation/v1/vacation-shipping/123A Vacation Shipping Option can include:
idnamecostzonesdescriptionshow_description_emailhide_when_free_shippingconditioncondition_idsstatustimestamp
Applies During values
The condition field represents the Applies During setting and can contain:
all— applies to all supported closures.schedules— applies to Schedule closures.weekdays— applies to Weekday closures.
When condition is schedules or weekdays, the condition_ids array can limit the Vacation Shipping Option to specific records.
An empty condition_ids array means all closures of the selected type.
The zones field contains WooCommerce shipping zone IDs.
The hide_when_free_shipping value corresponds to the Defer to Free Shipping setting and is returned as yes or no.
JavaScript example
↑ Back to topWhen your JavaScript runs inside an authenticated WordPress admin context, you can use @wordpress/api-fetch to retrieve Store Vacation data.
For example, retrieve upcoming vacation Schedules:
import apiFetch from '@wordpress/api-fetch';

const fetchVacationSchedules = async () => {
	try {
		const schedules = await apiFetch( {
			path: '/store-vacation/v1/schedule?funnel=upcoming',
		} );

		console.log( schedules );
	} catch ( error ) {
		console.error( error );
	}
};

fetchVacationSchedules();
Do not embed WooCommerce consumer secrets or other private credentials in publicly delivered browser JavaScript.
External applications should use an appropriate authenticated WordPress or WooCommerce REST API method.
PHP example
↑ Back to topThe following example retrieves upcoming vacation Schedules using WooCommerce REST API credentials:
function mypreview_get_vacation_schedules() {

	$consumer_key    = 'your_consumer_key';
	$consumer_secret = 'your_consumer_secret';
	$endpoint        = 'https://your-domain.com/wp-json/store-vacation/v1/schedule?funnel=upcoming';

	$response = wp_remote_get(
		$endpoint,
		array(
			'headers' => array(
				'Authorization' => 'Basic ' . base64_encode( $consumer_key . ':' . $consumer_secret ),
				'Content-Type'  => 'application/json',
			),
		)
	);

	if ( is_wp_error( $response ) ) {
		return $response;
	}

	$status_code = wp_remote_retrieve_response_code( $response );

	if ( 200 !== $status_code ) {
		return new WP_Error(
			'store_vacation_api_error',
			'Store Vacation REST API request failed.',
			array( 'status' => $status_code )
		);
	}

	$response_body = wp_remote_retrieve_body( $response );

	return json_decode( $response_body, true );
}
REST API usage notes
↑ Back to top- All Store Vacation REST endpoints are prefixed with
/wp-json/store-vacation/v1/. - The Store Vacation REST API is read-only.
- Schedule and Weekday collections use the optional
funnelquery parameter. - Supported funnel values are
all,active,disabled,running, andupcoming. - Replace
{id}with the actual resource ID when retrieving an individual Schedule, Weekday, Notice, or Vacation Shipping Option. - Opening Hours is a singleton and does not use an ID.
- Missing individual resources return an HTTP
404response. - Schedule and Weekday
noticevalues cross-reference the Notice resource. - Schedule and Weekday
notice_lead,conditions, andshipping_rulesfields contain stringified JSON. - The REST API field
shipping_rulescorresponds to the Hide Shipping Methods configuration. - Requests must be authenticated with sufficient WooCommerce settings-read permission.
See WooCommerce REST API authentication for information about creating and using API credentials.
WordPress Abilities API
↑ Back to topStore Vacation 1.7.0 integrates with the WordPress Abilities API.
Unlike the Store Vacation REST API described above, which is intentionally read-only, Store Vacation abilities include both read and write operations.
Abilities can be used by authenticated programmatic clients, integrations, and compatible AI or automation tools to discover and manage supported Store Vacation functionality.
Store Vacation registers the Store Vacation ability category and 16 abilities covering:
- Current store status.
- Force Close.
- Schedules.
- Weekday closures.
- Opening Hours.
- Notices.
- Vacation Shipping Options.
The integration is available when the WordPress Abilities API is present. On supported WordPress versions, Store Vacation abilities are exposed through the standard WordPress Abilities REST API.
Every Store Vacation ability requires the authenticated user to have the manage_woocommerce capability.
Discover Store Vacation abilities
↑ Back to topWordPress exposes registered REST-visible abilities through:
GET /wp-json/wp-abilities/v1/abilitiesYou can retrieve the Store Vacation category through the standard Abilities API category endpoints or inspect individual Store Vacation abilities to discover their input and output schemas.
Each ability declares:
- A unique name.
- A human-readable label and description.
- An input JSON Schema.
- An output JSON Schema.
- Permission requirements.
- Behavioral annotations describing whether the ability is read-only, destructive, or idempotent.
Clients should use the registered schemas rather than assuming a fixed input structure.
Available Store Vacation abilities
↑ Back to topStore status and Force Close
| Ability | Purpose |
|---|---|
store-vacation/get-status | Get the current effective Store Vacation status. |
store-vacation/toggle-force-close | Enable or disable manual Force Close. |
Schedules
| Ability | Purpose |
|---|---|
store-vacation/list-schedules | List configured one-time vacation Schedules. |
store-vacation/create-schedule | Create a new one-time Schedule. |
store-vacation/delete-schedule | Delete a Schedule. |
Weekday closures
| Ability | Purpose |
|---|---|
store-vacation/list-weekdays | List recurring Weekday closures. |
store-vacation/create-weekday | Create a recurring Weekday closure. |
store-vacation/delete-weekday | Delete a Weekday closure. |
Opening Hours
↑ Back to top| Ability | Purpose |
|---|---|
store-vacation/get-opening-hours | Retrieve the Opening Hours configuration. |
store-vacation/update-opening-hours | Update the Opening Hours configuration. |
Notices
| Ability | Purpose |
|---|---|
store-vacation/list-notices | List Store Vacation Notices. |
store-vacation/create-notice | Create a reusable Notice. |
store-vacation/delete-notice | Delete a Notice. |
Vacation Shipping Options
| Ability | Purpose |
|---|---|
store-vacation/list-vacation-shipping-options | List Vacation Shipping Options. |
store-vacation/create-vacation-shipping-option | Create a Vacation Shipping Option. |
store-vacation/delete-vacation-shipping-option | Delete a Vacation Shipping Option. |
Get Store Status
↑ Back to topThe store-vacation/get-status ability returns the effective store status rather than simply reporting whether a vacation period exists.
Its output includes:
is_closed— whether a Store Vacation closure is active.is_anomaly— whether Checkout Protection caused the closure.is_bypass— whether Bypass Restrictions is configured for the active state.is_purchasable— whether the storefront can currently accept purchases.reason— information about the active vacation or closure source.
This distinction is important when Bypass Restrictions is enabled.
For example, a Schedule can be active while the store remains open for purchases in Notice only mode. In that situation, clients can distinguish the active vacation state from the store’s effective purchasing availability.
Run a read-only ability
↑ Back to topRead-only abilities use the HTTP GET method.
For example:
GET /wp-json/wp-abilities/v1/abilities/store-vacation/get-status/runAn authenticated request returns the current Store Vacation status.
Run a write ability
↑ Back to topAbilities that modify configuration use the HTTP method declared by their behavioral annotations.
For example, store-vacation/toggle-force-close accepts an enabled boolean.
To enable Force Close:
POST /wp-json/wp-abilities/v1/abilities/store-vacation/toggle-force-close/runWith the following JSON request body:
{
	"input": {
		"enabled": true
	}
}
Calling the same toggle state repeatedly is safe because the Force Close ability is idempotent.
Checkout Protection ownership is still respected. An ability cannot be used to bypass an active Checkout Protection security closure.
Delete abilities
↑ Back to topDestructive Store Vacation abilities use the HTTP DELETE method.
This includes deletion of supported:
- Schedules.
- Weekday closures.
- Notices.
- Vacation Shipping Options.
Use the ability’s published input schema to determine the required record identifier.
Ability authentication
↑ Back to topWordPress Abilities REST endpoints require an authenticated WordPress user.
For external applications, WordPress Application Passwords are one supported authentication method.
The authenticated user must also pass the individual ability’s permission callback. Store Vacation abilities require:
manage_woocommerceAuthentication alone does not grant permission to execute an ability.
PHP ability example
↑ Back to topDevelopers running code directly inside WordPress can retrieve a registered Store Vacation ability and execute it through the WordPress Abilities API.
For example:
function mypreview_get_store_vacation_status() {

	if ( ! function_exists( 'wp_get_ability' ) ) {
		return new WP_Error(
			'abilities_api_unavailable',
			'The WordPress Abilities API is not available.'
		);
	}

	$ability = wp_get_ability( 'store-vacation/get-status' );

	if ( ! $ability ) {
		return new WP_Error(
			'store_vacation_ability_unavailable',
			'The Store Vacation status ability is not registered.'
		);
	}

	return $ability->execute();
}
The Abilities API validates permissions, inputs, and outputs according to the ability’s registered configuration.
REST API or Abilities API?
↑ Back to topUse the Store Vacation REST API when an integration only needs to read configuration such as:
- Schedules.
- Weekday closures.
- Notices.
- Opening Hours.
- Vacation Shipping Options.
Use the WordPress Abilities API when an integration needs:
- The current effective store status.
- Bypass/purchasability information.
- Force Close control.
- Programmatic creation or deletion of Schedules.
- Programmatic creation or deletion of Weekday closures.
- Opening Hours updates.
- Programmatic Notice management.
- Programmatic Vacation Shipping Option management.
The Store Vacation REST API and WordPress Abilities API are complementary: the REST API provides a stable read-only resource interface, while abilities provide discoverable operations with explicit schemas and permissions.