NOTE
This product is no longer available on WooCommerce.com. This document has been left available for existing users, but will no longer be updated.
About Wish integration for WooCommerce
↑ Volver al principioTake advantage of the limitless possibilities available on the Wish marketplace for WooCommerce sellers. With 3 million items being sold every day, integrating Wish with your WooCommerce platform allows you to unlock the immense potential and offer your customers a smooth shopping experience.

Key features of the integration
↑ Volver al principio- Flawless bulk upload: Utilize the bulk upload feature of the integration to showcase all your products on Wish and strategically categorize them for exponential growth in reach.
- Product data validation: Validate your product details as per the prescribed norms of the marketplace and swiftly rectify any errors utilizing the Wish integration for WooCommerce.
- Auto order acknowledgment: Everytime an order is received on Wish, it will be automatically acknowledged and created on your WooCommerce dashboard.
- Automated inventory sync: Sync your inventory across both platforms in near real time with the help of schedulers and avoid overselling and underselling of products.
- Shipment submission: Provide your customers with all the necessary fulfillment and shipping information while they are on the move, allowing them to view your brand as a reputable one.
Getting started with Wish registration-
↑ Volver al principioTo start your registration process on Wish visit- https://merchant.wish.com/md/welcome-invite-only
You get the option to click on the Complete the Questionnaire tab.

After you click on the Complete the Questionnaire tab, there are several basic details that you need to fill in order to proceed ahead. Once done, wait for the confirmation and further guidance from the official Wish Team.
On the completion of the process, you will now have your seller panel Login credentials using which you can access your seller dashboard.
The next step is to create your store on Wish. Login to your Wish seller account and find the create my store button. Click on it and start filling out all your details like-
- Store Name,
- Email address,
- Country (where your shop is based),
- Payment info
- Desired payment gateway, etc
Congrats, your store is ready and you can start uploading your products on Wish.
Process for retrieving API credentials (Client ID, Secret Key)
↑ Volver al principioGo to the seller panel of Wish.com marketplace- Wish
The login page will be displayed, as shown in the image below:

Enter your login details, and click on the Login button.
In the upper right corner, click on the Account tab , a menu will appear as shown in the image below:

On clicking Settings, you are redirected to the API Settings, as shown in the image below:
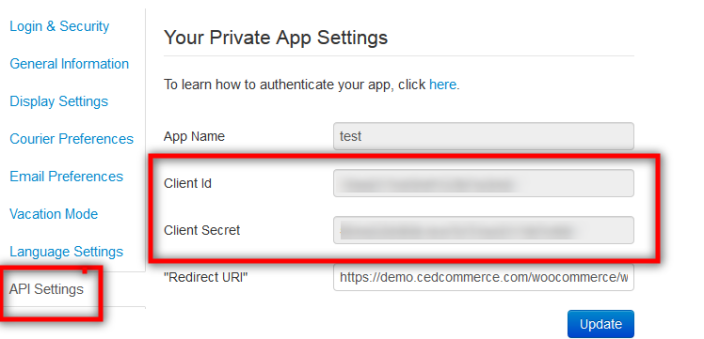
From the above-displayed image, copy the Client Id Value and Client Secret Value.
Once you have performed the above procedure, save these respective values in a text editor or a word file so that you can use it further during the configuration settings.
WooCommerce Wish Configuration
↑ Volver al principioOnce you have retrieved the API credentials, the owners of the store will use the API credentials during the configuration setting in their WooCommerce Admin panel.
Go to the WooCommerce Admin panel.
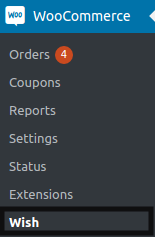
On the left navigation bar, click the Wish menu. The menu appears as shown in the image figure:
A Connection section will open where you have to fill some credentials as shown in the image below:

In the Wish Client ID box, fill the Client ID value, which you have copied from the Wish Sandbox account.
In the Wish, Client Secret box fills the Client Secret value, which you have copied from the Wish Sandbox account.
In the Redirect URI box, enter the Redirect URI.
In the Account list, select the Sandbox option for the testing mode and the Production option from the dropdown menu.
Click on the UPDATE button.
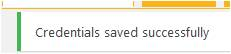
The entered credentials are saved, and a success message appears, as shown in the following figure:
Click on the VALIDATE button.
The Request for Permission page appears, as shown in the image below:

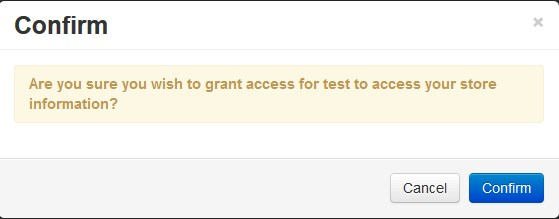
Click on the Confirm button.
A confirmation dialog box appears, as shown in the following figure:
Click on the Confirm button, after performing all the above procedure.
Settings
↑ Volver al principioTo perform settings on Wish, the admin has to follow some necessary steps:
Go to your WooCommerce admin panel, below the CedCommerce Menu, which is on the left navigation bar.
Click on the Wish section of the panel.
Click on the Settings
The settings section will appear on a page, as shown in the image below:

Here, are the two sections-
- Select the Product and Corresponding Meta Keys.
- Setting Information.
In Select Product and Corresponding Meta Keys section, you will enter a product name to get the attributes of the registered product name.
Note: Enter the initials of the product, and a list appears. Select the required one from the list.
In the Meta Field Key column, select the checkboxes associated with the required meta-keys.
Click on the SAVE META KEYS button.
It will Save the selected meta keys.
In Setting Information, the section you have to fill out the fields which are present there and some areas are having written REQUIRED over there are the mandatory fields which you need to fill must as shown in the image below:

Once you have performed all the above activities, click on SAVE to save your settings.
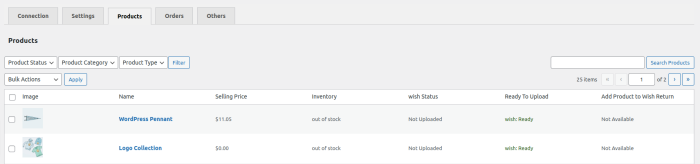
Product Management
↑ Volver al principioAdmin( merchant/store owners) can view all the product details such as the assigned profile name, product selling price, and the product inventory.
Thus, admin can perform the following tasks:
- Upload the selected products to Wish
- Update Inventory of the Selected Products on Wish
- Enable the selected products on Wish
- Disable the selected products on Wish
- Update the selected products on Wish
1) Uploading The Selected Product On Wish
In the right panel, click on the Products.
The products page will appear, as shown in the image below:

Select the checkboxes associated with the required products to upload.
Click the Arrow button next to the Bulk Actions field, click Upload, and then click the Apply button as shown in the image below:
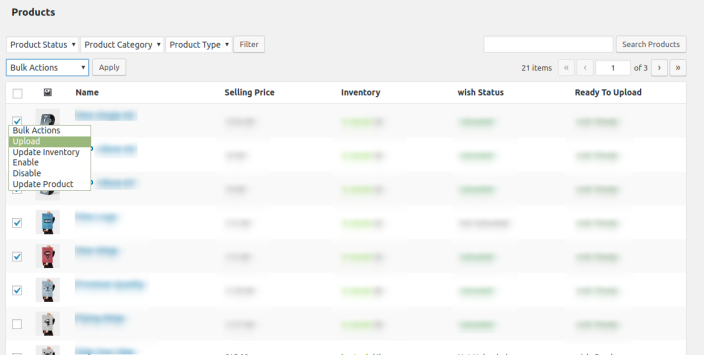
The selected products are uploaded, and a success message appears.
2) Updating Inventory
In the right panel, click on the Products.
The products page will appear, as shown in the image below:
Select the checkboxes that are associated with the required products to update the inventory of the selected products uploaded on Wish.
Click the Arrow button next to the Bulk Actions field, click Update Inventory, and then click the APPLY button as shown in the image below:

The inventories of the selected products are updated on Wish, and a success message appears.
3) Enabling The Selected Products
In the right panel, click on the Products.
The products page will appear as shown in the image below:
Select the checkboxes that are associated with the required products to update the price of the selected products uploaded on Wish.
Click the Arrow button next to the Bulk Actions field, click Update Price, and then click the APPLY button as shown in the image below:

The selected products are enabled on Wish .com, and a success message appears.
4) Disabling The Selected Products
In the right panel, click on the Products.
The products page will appear, as shown in the image below:
Select the checkboxes that are associated with the required products to enable them on Wish.com.
Click the Arrow button next to the Bulk Actions field, click Enable, and then click the APPLY button as shown in the image below:

The selected products are disabled on Wish.com, and a success message appears.
5) Updating Selected Products
In the right panel, click on the Manage Products.
The products page will appear, as shown in the image below:
Select the checkboxes that are associated with the required products to disable them on Wish.com.
Click the Arrow button next to the Bulk Actions field, click Disable, and then click the APPLY button as shown in the image below:

The selected products are updated on Wish.com, and a success message appears.
Wish return program
↑ Volver al principioWish integration for WooCommerce is accessible with a wish return program making the returns and refunds easy for merchants with US or European return addresses. Merchants can enroll their products to the Wish return program for returns or refunds and make the return process easier.
In the right panel, click on the Products.
The products page will appear.
Click the Add product to wish Return button next to the Ready to upload field, as shown in the image below:

A popup will appear where one needs to enter the length, weight, height, and width of the products to be enrolled.
In the “Return Warehouse Information” locations of the warehouses are assigned, as shown in the figure:

Bulk Action Management
↑ Volver al principioWith this feature, the admin can perform these several activities which are discussed below:
Bulk Product Upload: This feature uploads the selected products on Wish. Admin can choose the required categories and products to upload and exclude the products not to upload on Wish.
Bulk Uploading Of Products
↑ Volver al principioIn the right panel, click on the Bulk Upload.
The Bulk Upload page appears, as shown in the following figure:
In the Select Categories box, click to select the required categories from the list.
In the Select Products box, click to select the required products from the list of products upload.
In the Exclude Products box, click to select the products from the list to hold back from product upload.
Click the SAVE CHANGES button to save the changes.
Click the UPLOAD button to upload the selected categories and products on Wish.
The selected categories and the products are uploaded, and a success message appears on the page.
Order Management
↑ Volver al principioIn the right panel, click on the Orders.
The Order page appears, as shown in the following figure:
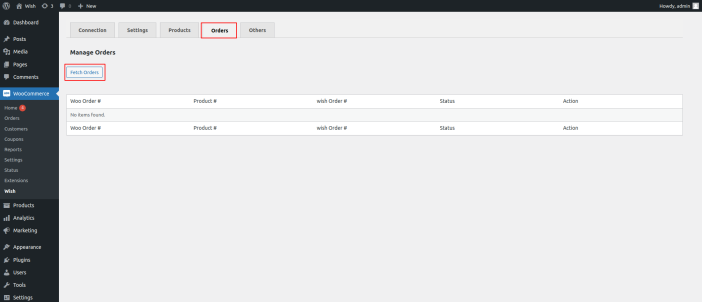
Click FETCH ORDERS to fetch your orders.
Order shipment
↑ Volver al principioIn the order shipment section you need to select the shipping carrier used, fill the tracking number and origin country code, as shown in the below image:

Managing Others
↑ Volver al principioAdmin has the facility for viewing and using these respective activities:
- Admin can use the information for auto acknowledgement of orders through cron.
- Admin can use the information during the WordPress schedule for price and inventory synchronization.
- Admin can also send error reports to a developer in case of any API failure or CRON failure.
Process For Using This Information-
↑ Volver al principioIn the right panel, Click OTHERS.

Under the AUTO ACKNOWLEDGE, perform the following steps based on requirements:
- Use the provided path displayed in the Location Of Cron File Order Sync box to locate the Cron File for Order Synchronization.
- In the Notification Mail Content That Will Be Send To Admin In Case Cron Fails box, enter the email content such as shown in the figure.
- Click the SAVE button.
Scroll down to the PRICE AND INVENTORY SYNCING section.
The section appears, as shown in the image below:

Under PRICE AND INVENTORY SYNCING, perform these steps based on requirements:
-
- In the Auto Sync Frequency list, select the required period to schedule the auto-synchronization of the Price and Inventory.
- In the Start Sync Now field, select the associated checkbox to start the inventory and price syncing process on Wish immediately.
- Click the SAVE button.
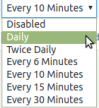
Under the AUTO PRODUCT UPLOAD, you can select the time interval from the dropdown for product upload at the scheduled time.
After selecting the time interval, click on save, as shown below in the image:

FAQ’S
↑ Volver al principio- Does Wish marketplace provide shipping and logistics services? And if it does, how does it work, and will there be additional costs?
Ans. Yes, Wish provides shipping and logistics services similar to Amazon. With multiple warehouses in the US and Europe that stock and deliver your products, Wish services can be termed Fulfilment by Wish.
The service charges for FBW include inbound, storage, shipping, service, and retrieval fees that vary by product weight, size, and warehouse.
2.Can I sync my pre-listed products in my WooCommerce store? If yes, then how will it be done?
Ans. Yes, you can sync your pre-listed products automatically in your WooCommerce store through the plugin. It will be done based on SKUs & UPC numbers.
3. Is there any possibility to list my products as variables on the Wish marketplace?
Ans. Yes, you can list your variable products on Wish through the plugin. There will be no problems while uploading the variable products on Wish. And it will be listed as a variable on the Wish marketplace.
4. What is the minimum time interval for the inventories and order sync? Is there any way to sync my WooCommerce orders to Wish for FBW?
Ans. The minimum time interval for syncing the inventory is 6 minutes. The stock will be updated on both platforms every 6 minutes. It can be real- sync, but it depends upon the response of your server.
Order will also be synced every 6 minutes from Wish to WooCommerce store, but currently, there is no API available for syncing the orders of the WooCommerce store on Wish.
5. Can I list all the WooCommerce products on Wish without any hassle, or do I have to upload them one by one?
Ans. No, you will not need to push or upload all the WooCommerce stores’ products on Wish one by one. There is a bulk option in the plugin; you just need to map all the same categories of products with a profile; after that, you can upload them in bulk.
6. Is there any option to increase or decrease the price of my WooCommerce products while uploading them on Wish?
Ans. Yes, of course, you can increase or decrease the price of your WooCommerce products while uploading them on Wish. There is a feature called Markup in the plugin; using markup; you can increase by a fixed value or by % while uploading the products from your WooCommerce store to Wish.
7. Can I set different shipping for multiple countries?
Ans. Yes, you can set different shipping values for all the other countries while uploading your products on your Wish store from your WooCommerce store.
8. Any extra features which you offer with support?
Ans. Yes, our free support extends for three months. This support will be available over your preferred mode of communication channels like Skype, Phone, email, and more.
An expert developer and a support member will always be available to resolve your issues.