Installation
↑ Back to top- Download the .zip file from your WooCommerce account.
- Go to: WordPress Admin > Plugins > Add New > Upload Plugin > Choose File (for the file you downloaded in step 1).
- Install Now and Activate Plugin.
More information at Install and Activate Plugins/Extensions.
Setup & Configuration
↑ Back to topAdd Tracking Options
↑ Back to topWe provide a range of options to customize the Add Tracking process. The following options are available in the tracking settings section:
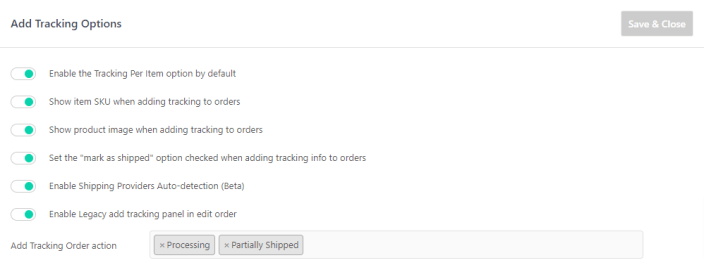
- Enable the Tracking Per Item by Default – This option allows you to select whether to show the products section open or closed in the add tracking lightbox by default.
- Show item SKU – This option will enable you to display the SKU for each item in the order in the add tracking lightbox.
- Display the product image when adding tracking to orders – This option allows you to display the product image for each item in the order in the add tracking lightbox.
- Set the “mark as shipped” option checked when adding tracking info to orders – This option allows you to automatically check the “mark as shipped” checkbox when adding tracking information to orders.
- Enable Shipping Providers Auto-detection (Beta) – This option allows you to enable the auto-detection of shipping providers when adding tracking information to orders. The plugin will automatically detect the shipping provider based on the tracking number that you enter.
- Enable Legacy add tracking panel when editing orders – This option allows you to enable the standard add tracking panel in the edit order admin, disabling the Lightbox add tracking model.
- Add Tracking Order Action– This option will allow you to choose which order status in your store to display the add tracking icon in the order actions menu. For example, you may choose to display the icon only when an order is in the “Processing” status.
Customer View
↑ Back to topWhen you add tracking info to orders and fulfill the orders, the tracking widget will be added to the order status emails, and will display on the Orders History in the my-account area and on the View Order details page.
To set up the customer view options, go to WooCommerce > Shipment Tracking > Settings, and open the Customer View panel:
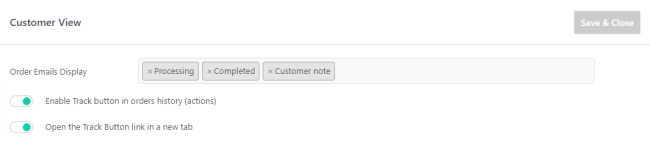
- Display tracking information on order emails – This option allows you to choose which order status email you would like to display the tracking information. The plugin will also detect custom order statuses that are set on the store.
- Display Track Button on Orders History – This option allows you to display the “Track” action button on the WooCommerce account area in the orders history list endpoint. This makes it easy for customers to track their shipments directly from their accounts.
- Open the tracking link in a new tab – This option allows you to set the button link to track the shipments on the shipping provider’s website to open in a new tab. In case multiple tracking numbers are added to an order, the tracking link will direct the customers to the View Order page.
Fulfillment WorkFlow
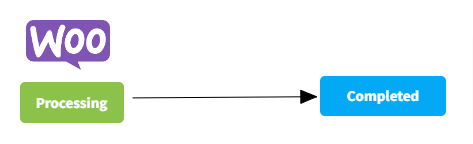
↑ Back to topWooCommerce Orders flow provides just a basic fulfillment workflow, once the order is paid, it gets the Processing status, and when you ship the order, you change the status to Completed, and the order email is sent to the customer. The definition of the Completed order status by WooCommerce is that the order is fulfilled, and no further action is required.
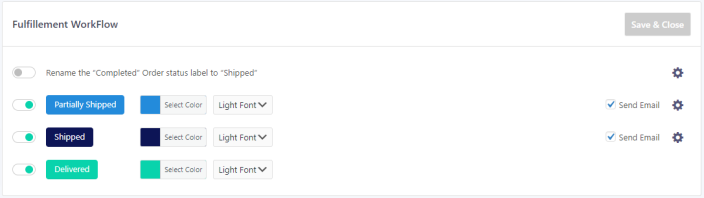
WooCommerce Fulfillment Workflow:
AST PRO Fulfillment Workflow:
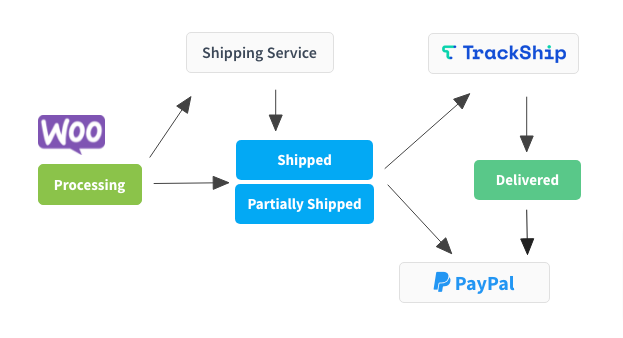
- Rename the “Completed” Order status to “Shipped” – By default, the Completed order status in WooCommerce means that the order is fulfilled and no further action is required. However, when you ship your orders, this order status means that the order has been shipped. You can choose to rename the Completed order status to Shipped to better reflect the order’s current status. This rename option will only change the order status label for display purposes in your store admin. The AST plugin does not change the order status slug (completed) and is compatible with any other plugin or custom code that uses the Completed order status.
- Enable Custom Order Status Partially Shipped – This option allows you to enable the custom order status Partially Shipped for orders that you ship in separate packages or from different locations. This provides a more accurate reflection of the order status and allows you to keep track of partially shipped orders in your store.
- Enable Custom Order Status Shipped – This option allows you to enable the custom order status Shipped for orders you ship. If you sell a mix of virtual and physical goods, you can keep the Completed order status for virtual orders and use the custom order status Shipped for orders you ship. This shipped status is only available if you choose not to rename the Completed to Shipped.
Please Note: If you choose to rename the Completed order status to Shipped, you will not be able to enable the Custom Shipped Status so you will not have two Shipped order Statuses.
Custom Order Status Options
- Edit the Background Color
- Edit the Font Color
- Enable Email Notifications
- Customize the email notifications
- Enable & customize the SMS Notifications (requires SMS for WooCommerce)
Fulfillment Dashboard
↑ Back to topThe Fulfillment Dashboard is a centralized location to manage the fulfillment process of your store’s orders. It provides an overview of the unfulfilled orders and helps you keep track of the fulfillment status.
You can select the order statuses you want to display to customize the dashboard. The dashboard will default display all orders in the Processing or Pending Payment status. However, you can include additional order statuses by selecting them from the Order Statuses to Display option.
This way, you can keep track of all orders that need to be fulfilled, regardless of their current status, and ensure that all orders are processed promptly.

Shipment Tracking API Settings
↑ Back to topThe shipment tracking REST API allows you to manage shipment tracking information, enabling you to create, view, and delete individual shipment tracking records. You can set up automated processes with the API by selecting the appropriate settings.
Navigate to WooCommerce > Shipment Tracking > Settings and open the Shipment tracking API panel:
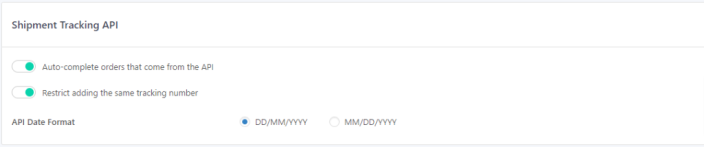
Shipment Tracking API Options
API Date Format – You can choose the date format that you use when updating the shipment tracking API endpoint from external sources.
AutoComplete Tracking Per Item orders – The AutoComplete Tracking Per Item orders option allows you to automatically change the order status to Shipped when updating shipment tracking from the API or importing from CSV files. When this option is enabled, you won’t have to manually change the order status for each order.
Restrict adding the same tracking number – The Restrict adding the same tracking number option restricts adding the same tracking number again with the shipment tracking API. This option helps prevent any duplicates in your tracking information and ensures that your tracking data is accurate.
Please note: The Shipment Tracking API in AST PRO allows you to import tracking information from external sources, such as a warehouse, shipping service, or drop-shipping service. With the Autocomplete option enabled in the settings, updating tracking information via the API or CSV will automatically change the order status to “Shipped” once all items in the order have been shipped. The “Partially Shipped” status and corresponding email will be skipped in this process.
PayPal Tracking
↑ Back to topThe PayPal Tracking integration for WooCommerce allows you to link your WooCommerce store to the PayPal Tracking API. This integration will automatically transfer the tracking number, shipping provider, and shipment status from WooCommerce to PayPal transactions when orders are marked as “Shipped/Completed”. This information will be displayed in the shipping section of the PayPal Transaction.
How it works
- Obtain your PayPal Tracking API keys:
- The first step is to obtain your PayPal Tracking API keys and enter them into the extension’s settings.
- Add tracking information to the order and change the order status:
- To export tracking information to PayPal transactions, you need to add the tracking information to an order in WooCommerce and change the order status to “Completed (Shipped)”.
- Export tracking information to PayPal:
- Once you have added the tracking information and changed the order status, the tracking information will be exported to the corresponding PayPal transaction. The tracking information will be displayed in the “Shipping Information” section of the PayPal transaction.
- Update shipment status with TrackShip:
- If you use TrackShip to track your orders, the shipment status on the PayPal transaction will be updated to “Delivered” once the order is delivered to the customer. This will happen automatically once the shipment status is updated in TrackShip.
- Delete tracking information from an order:
- If you delete the tracking information from an order after it has been shipped, the plugin will update PayPal and cancel the shipment. This is to ensure that the tracking information in PayPal is always accurate and up-to-date.
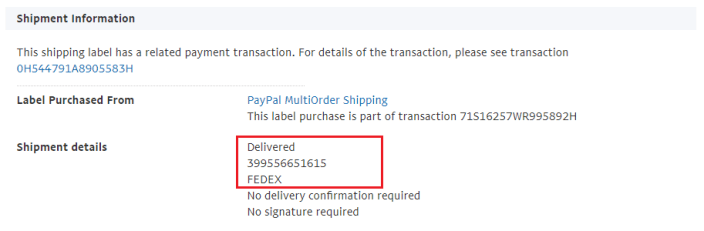
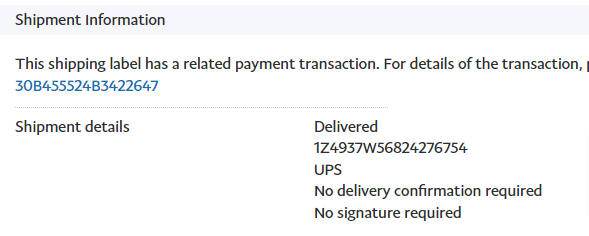
The Display of Tracking Information on PayPal Transactions
When you update an order with a tracking number and change the order status to Shipped (Completed), the tracking information is automatically exported to PayPal and can be viewed in the Shipping Details section of the corresponding PayPal transaction.
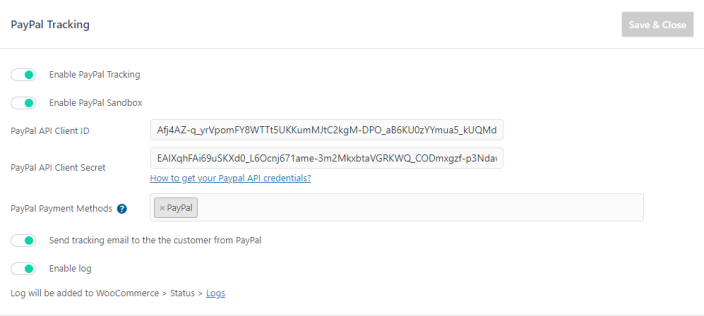
Settings
The PayPal Tracking settings can be found in the WooCommerce > Shipment Tracking > PayPal Tracking section of your store’s administration panel.
- Enable PayPal Tracking – Enable this option to synchronize tracking information between your store and PayPal transactions. When you fulfill an order and add tracking information, the tracking number, shipping provider, and date will be sent to the corresponding PayPal transaction. If you later delete the tracking information from an order, the plugin will update PayPal accordingly and cancel the shipment.
- Enable Sandbox – If you are using the PayPal Sandbox for testing purposes, enable this option.
- Client ID – Enter your PayPal REST API Client ID.
- Client Secret – Enter your PayPal REST API Client Secret. Information on how to obtain these keys can be found in the “How to get the PayPal Tracking API keys” section.
- PayPal Payment Methods – Select the PayPal payment methods for which you want to synchronize tracking information with the PayPal Tracking API.
- Send Email to Customer from PayPal – If you want to send an email notification to your customer when tracking information is added to their PayPal transaction, enable this option.
- Enable Logs – Enabling this option will save logs of any errors that may occur when syncing tracking information with the PayPal Tracking API. This can be helpful for troubleshooting any issues that may arise.
The PayPal Tracking integration with WooCommerce adds order notes in the order notes panel when the tracking information is exported to PayPal. Additionally, a new column labeled “PayPal Tracking” is added to the Orders Admin to display the status of the tracking export to PayPal. This allows you to easily keep track of the information sent to PayPal for each order.
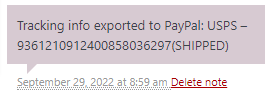
Orders List – The Orders List will display that the tracking information has been exported to PayPal.

TrackShip compatibility
The integration with TrackShip allows for automatic updates to the shipment status on PayPal transactions. When the shipment status changes in TrackShip, from On Hold to Delivered for example, the extension will reflect this change on the corresponding PayPal transaction in the shipping information section.
PayPal Transaction example:
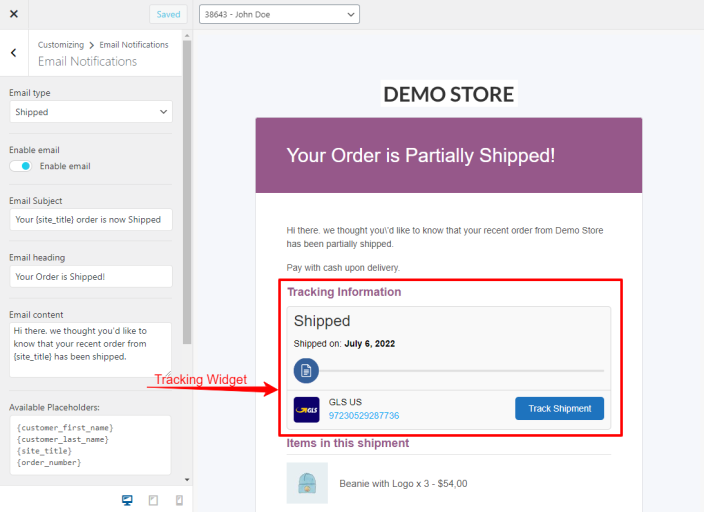
Customize the Email Notifications
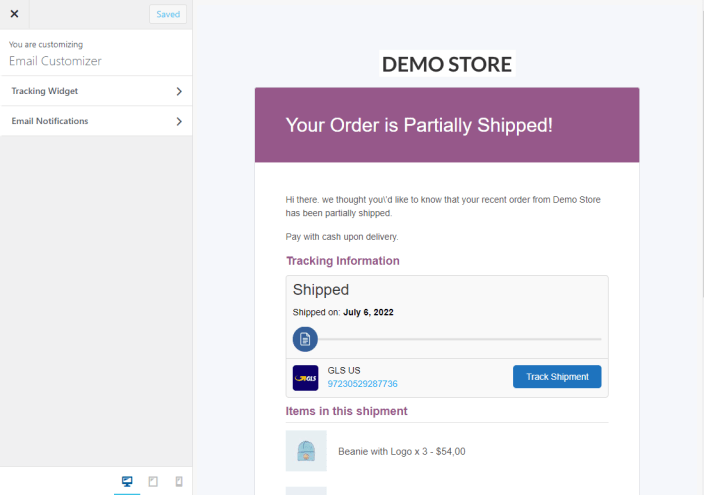
↑ Back to topCustomize the Tracking Widget
With the shipment of an order, the tracking information will be displayed on both the WooCommerce order emails and the “View Order” page in the customer accounts (Orders). The tracking info widget can be fully customized using Customizer, which provides a live preview.
To customize the tracking widget, click on the settings icon in the Fulfillment WorkFlow panel.
Customizer Options
Widget Header
- Hide tracking header – hide the tracking info widget header
- Tracking header text– tracking info widget header text
- Additional text after header – add a special message under the tracking widget header
Widget Style
- Display shipment status section
- Tracker type – tracking info widget tracker type – Progress Bar / Icons / Single Icon
- Background color – widget background color
- Border color – widget border-color
- Border radius – widget border-radius
- Padding – widget padding
- Hide shipping provider image – Choose if to show or hide the shipping provider image
Tracking Button
- Button Text – defaults to “Track Order”
- Button Size
- Button Color
- Button Font Color
- Button Radius
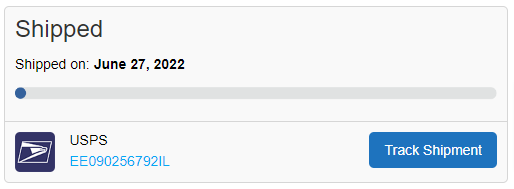
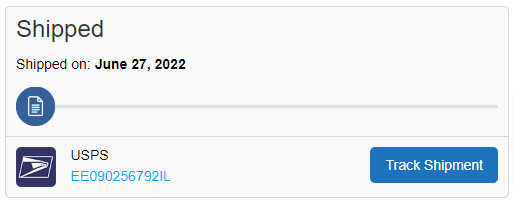
Tracking Info Widget examples:
Tracker type – Progress Bar
Tracker type – Icons

Tracker type – Single Icon
Customize the Email Notifications
The AST PRO comes with custom email templates and email customizer that allows you to fully customize the Shipping confirmation email notifications.
Customizer Options:
- Enable the Partially Shipped/Shipped Email – Choose if to enable the order status email notification to customers.
- Email Subject – the email subject line
- Email Heading
- Email content
- Shipping items Heading
- Display shipment item price
- Display product images
- Display shipping address
- Display billing address
Available variables:
- {customer_first_name}
- {customer_last_name}
- {site_title}
- {customer_company_name}
- {order_number}
Shipping providers
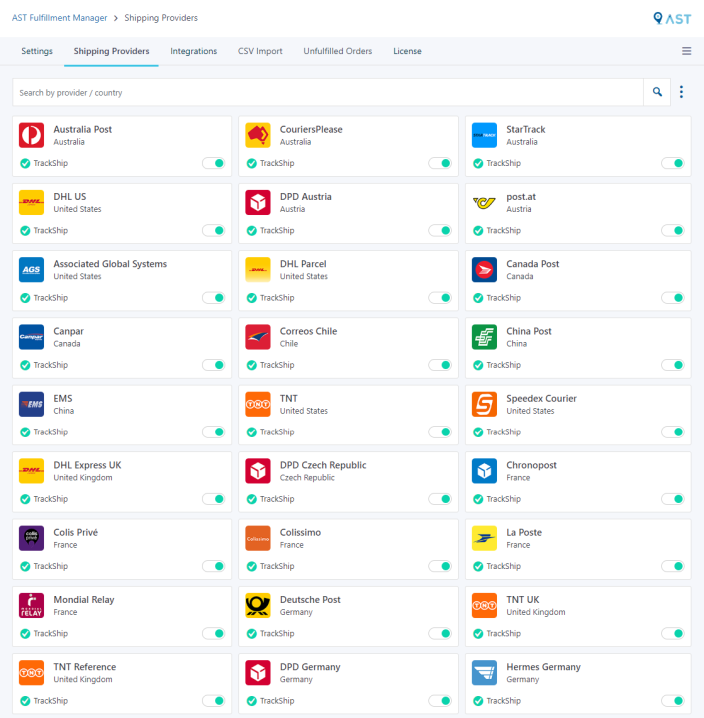
↑ Back to topAdvanced Shipment Tracking Pro comes with a list of more than 700 shipping carriers (provided by TrackShip), each shipping carrier has a predefined tracking link that you can use to fulfill your WooCommerce orders.
Shipping Carriers List Options
- Enable only the shipping carriers which they use to ship orders
- Set default carrier when adding tracking numbers to orders
- White label the shipping carriers create custom shipping providers,
- Map providers names to the names received from external shipping services that use the Shipment Tracking API
- Sync the carriers list with TrackShip’s API to keep the tracking links up-to-date
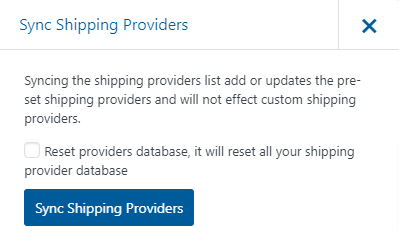
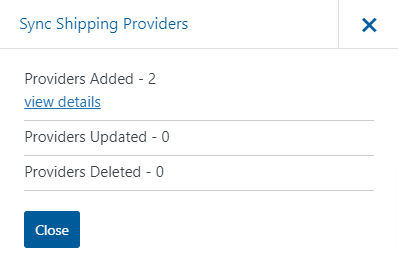
Sync The Shipping Providers
↑ Back to topYou can sync the shipping providers list with the latest updates in the shipping providers information (i.e name, tracking URL, logo image). To sync your providers list, click on the menu icon on the header and click on the sync providers link, this will open the sync popup.
The sync will update the shipping providers information without changing your list settings. When the sync process ends, it will display the updated providers and should not affect custom edits or custom providers that were added.
Add Custom Shipping Provider
↑ Back to topIf you can’t find your provider on the shipping providers list, you can add a custom shipping provider.
Navigate to WooCommerce > Shipment Tracking > Shipping Providers, and on the top right of the shipping providers list, click on the Menu icon and click on Add Custom Provider link to add a custom shipping provider.
You can add the following details to your custom provider:
- Provider Name – Name your custom shipping provider
- Shipping Country – Country list (option to choose global in case the service is available in more than one country)
- Logo Image – best to use 60px square jpg/png
- Tracking Page URL – link to the tracking page on the custom provider website.
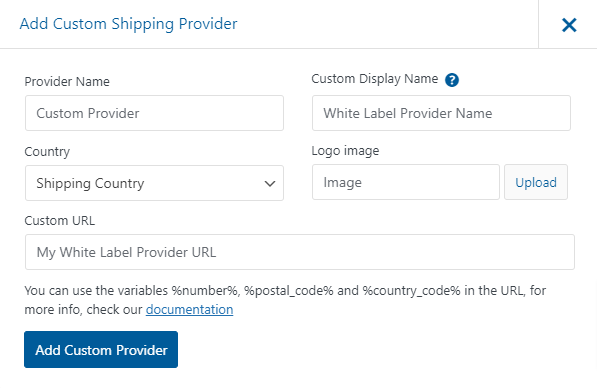
How to set custom tracking link
When you add tracking numbers to orders, AST uses the tracking number and the shipping provider’s tracking page URL to automatically generate a direct tracking link that is sent to the customers.
When you add a custom provider, you can use the Tracking number from the order as variables in the tracking URL to direct your customers to track their order on the carrier website.
Available parameters:
- %number% – tracking number
- %postal_code% – country code from the order
- %country_code% – postal code from the order
For example, if your carrier tracking page URL is:
- https://carrier.com?track=12345678
You can replace the tracking number in the URL with the tracking number variable:
- https://carrier.com?track=%number%
Map Shipping Provider Names
↑ Back to topWhen you use any third party services to generate the shipping labels and they update the tracking information with the Shipment Tracking API endpoint, they might send different provider names than the name on AST’s shipping providers list.
For example, your shipping company updates “USPS Priority” and the shipping provider name on AST is “USPS”.
In this scenario, we will not find a match when doing a lookup on the shipping providers list to generate the tracking link. However, you can edit the shipping providers and add aliases that will be mapped to that shipping provider when the tracking is updated by the API.
Please note: multiple name mapping is only available in AST PRO.
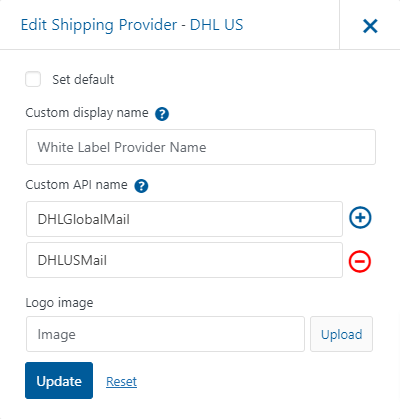
White Label Shipping Providers
↑ Back to topIn some cases, you do not want your customers to see the actual shipping provider that you’re using. AST lets you edit the shipping providers display name and image and to create your own white label shipping provider.
The custom name and image will display to the customers on the order emails and on the my-account area and if you’re connected to TrackShip, it will also display on the tracking page and on the shipment status emails.
Navigate to WooCommerce > Shipment Tracking > Shipping Providers
Click on the edit button from the actions column for the shipping provider you wish to edit, add your custom name and upload your custom image image. To revert back to the original name and image, open the editor, clear the edited values and save.
Custom Tracking Page URL
↑ Back to topYou can customize the shipping carrier tracking URL in case you want to direct to a different language or to a custom page. To customize the tracking link, click on the settings icon for the shipping provider and open the carrier edit, you will get the default tracking URL for the shipping provider.
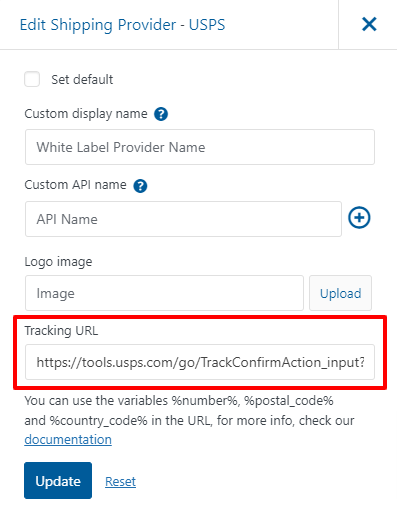
Available parameters to use in the custom URL
- %number% – tracking number
- %postal_code% – country code from the order
- %country_code% – postal code from the order
For example, if your carrier tracking page URL is:
- https://carrier.com?track=12345678
You can replace the tracking number in the URL with the tracking number variable:
- https://carrier.com?track=%number%
Add Tracking to Orders
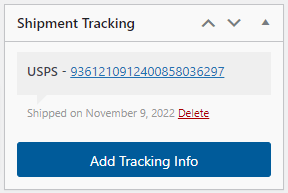
↑ Back to topWhether you’re shipping a single product, multiple products in the same parcel or multiple parcels for the same order, AST allows you quickly add the tracking information to the order and fulfil the orders in a few ways. After adding tracking info, it will display on the Shipment tracking columns on the orders list and you can click on the tracking number link to track the order.

Add tracking options
- Tracking Number – enter the tracking number
- Shipping Provider – this option will display the shipping providers that were enabled in the shipping providers list, Our auto-detection technology will automatically detect the shipping provider when you enter the tracking number.
- Shipping Date – defaults to current date
- Update the order status – you can set the order status as Completed =?(Shipped), Partially Shipped and trigger the email notifications to your customers.
Add Multiple Tracking Numbers
You can add multiple tracking numbers to the Same Order by clicking the add tracking info from the shipment tracking panel. Once added, the tracking info will display on the panel and you can clicking on the tracking number link to track the order.
Please note: if you add multiple tracking numbers to the order and you do not use the tracking per item, you should uncheck the “Send Email” option and use this option only when you add the last tracking number
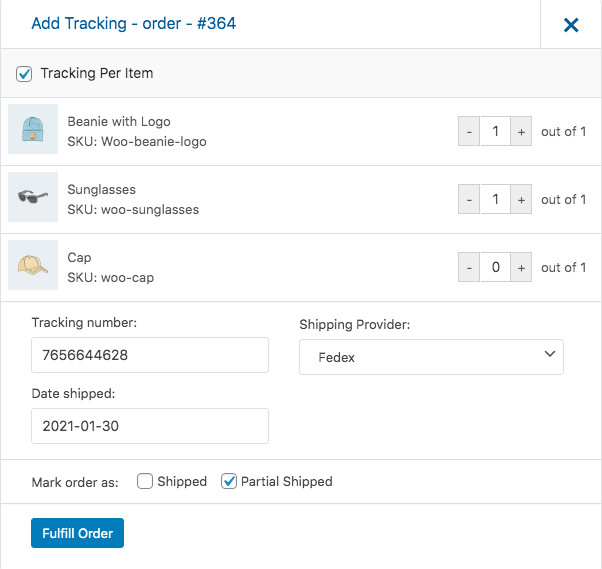
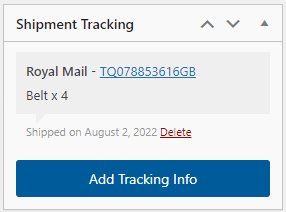
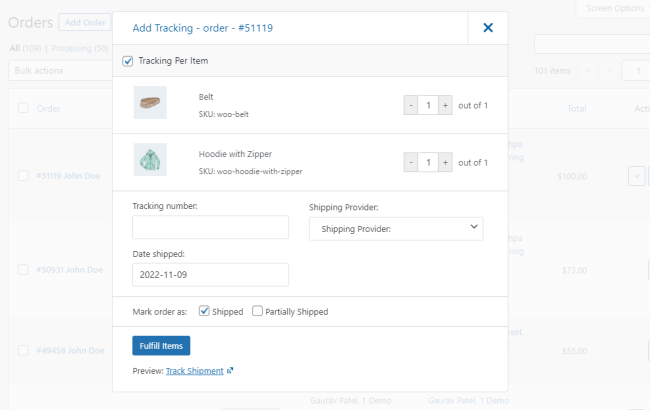
Add Tracking Per Item
If you’re using the AST PRO, you can add tracking numbers per item to your orders and attach different tracking numbers to specific line items and even attach tracking numbers to different quantities of the same line item. When you add the tracking number to orders with multiple products you can change the line items quantities when you add the tracking information to the order.
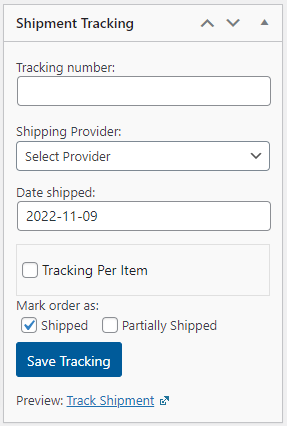
Add Tracking When Editing Orders
Go to WooCommerce admin and go to view and edit the order details. The Shipment Tracking panel will display on the sidebar and you can click on the “Add tracking” button to open the options.
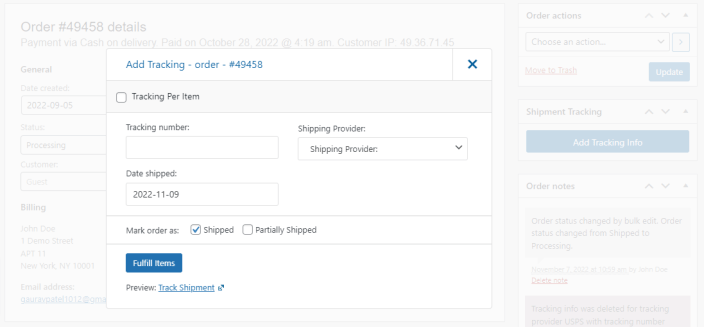
You can also add tracking numbers to orders when viewing your orders list and
Make sure that the Order Actions column is visible (screen options) and you’ll have the “Add Tracking” action button that opens the add tracking LightBox popup.
Add Tracking info Light Box:
Add Tracking info will be added to the Shipment Tracking Panel and a note will be added to the order notes:
Tracking info when adding tracking per item
Add tracking form the orders list
You can Quick add tracking numbers to orders when you are viewing your orders list and avoid the need to edit each order to add the tracking and fulfil the order. from the the Orders Actions columns on the WooCommerce orders list, click on the add tracking action button and the add tracking LightBox will open.
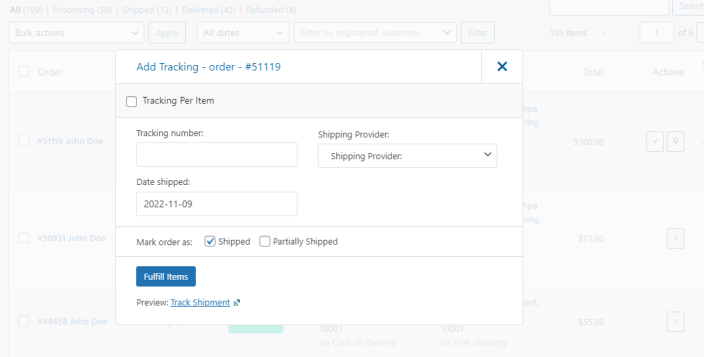
When you click on the Add tracking action button the Lightbox will open to quickly add tracking numbers to orders:
Please note: if the Shipment Tracking or the Order Actions columns does not show on your orders admin, you can enable them from the orders admin “Screen Options”.
Delete a tracking number
In case you added the wrong number and you need to update the tracking information, you can delete the tracking number and add a new tracking info.
If you already marked the order as shipped and the old tracking info was sent to the customer, you can notify your customers on the updated tracking numbers b by adding a customer order note.
Shipment Tracking API
↑ Back to topThe WooCommerce REST API provides a set of API endpoints for external applications to access and manage various parts of WooCommerce data. AST PRO expands upon the WooCommerce REST API by adding shipment tracking endpoints, allowing you to create, view, retrieve, and delete individual shipment tracking information for orders.
To utilize the shipment tracking endpoint, you must first generate a REST API key in your WooCommerce store. This key acts as an authorization for external systems to connect with your store’s API.
How To Get WooCommerce API Keys
To create API keys for your WooCommerce store, follow these steps:
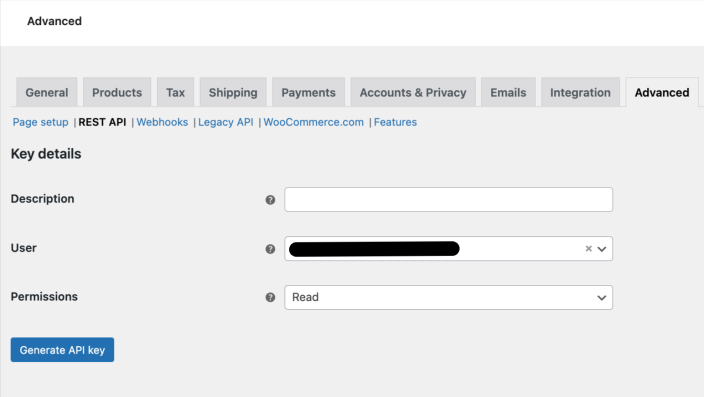
- Go to WooCommerce > Settings > Advanced > Rest API.
- Click on “Add Key”.
- On the Key Details screen, provide a Description for the API key.
- Choose the User you want to generate the key for in the dropdown (e.g. admin user).
- Set the level of access for the API key, such as Read/Write.
- Click on “Generate API Key” and WooCommerce will create the API keys for the selected user.
Shipment Tracking API Endpoint
The Shipment Tracking API endpoint provides support for the following methods:
- Adding Tracking Information and Order Fulfillment: This method allows you to add tracking information to your orders and fulfill them.
- Adding Item-Level Tracking Information and Order Fulfillment: This method allows you to add tracking information to specific items within an order and fulfill the order accordingly.
- Retrieving Tracking Information from Orders: This method enables you to retrieve tracking information for orders that have been fulfilled.
- Deleting Tracking Information from Orders: This method allows you to remove tracking information from orders if necessary.
- List of Shipping Providers: This method provides you with a list of available shipping providers to choose from.
Endpoint URL:
https://yourdomaon.com/wp-json/wc-shipment-tracking/v3/orders/<order_id>/shipment-trackings
Please note: Our shipment tracking endpoint is compatible with multiple versions of the WooCommerce API, including v1, v2, and v3. Although the documentation only showcases its usage with v1, it is also compatible with the older version of the AST PRO REST API endpoint (wc-ast-pro/v3).
Shipment Tracking API Properties
These are the available meta field that can be used when updating the Shipment Tracking API:
| ATTRIBUTE | TYPE | DESCRIPTION | PERMISSIONS |
|---|---|---|---|
| order_id | String | Unique identifier for order | read-only |
| tracking_number | String | Tracking number | Required |
| tracking_provider | String | Tracking provider name | Required |
| date_shipped | Date | Date when the package was shipped – default to the date/time that the tracking was added via the API | Optional |
| replace_tracking | Boolean | 0 – add the tracking info in addition to tracking info that was already added to the order. 1 – replace the current tracking numbers for the orders (Defaults to 0) | Optional |
| status_shipped | Integer | 0 – do not change the order status, 1 – change order status to “Shipped” (completed), 2 – change the order status to custom status “Partially Shipped” (Defaults to 0). | Optional |
| sku | String | Line item SKU – Add tracking per item | Optional |
| qty | Integer | Line item quantity – Add tracking per item | Optional |
Add Shipment tracking
This endpoint allows to add new tracking info to orders:
POST /wp-json/wc-shipment-tracking/v3/orders/<order_id>/shipment-trackings/

curl -X POST https://your-domain.com/wp-json/wc-shipment-tracking/v3/orders/<order_id>/shipment-tracking
	-u consumer_key:consumer_secret
	-H "Content-Type: application/json"
	-d '{
		"tracking_provider": "Fedex",
		"tracking_number": "12345678",
		"date_shipped": "2019-03-08",
		"status_shipped": 1,
		"replace_tracking": 1
	}'
//response example:
"Tracking ID: fb7170d97d0e628bc3b565999d07c6a9"
Add Shipment Tracking Per Item
Tracking per item with the API
If you use the Tracking Per Item Add-on, you can add tracking to the API endpoint to specific line items (products) using the product SKU and the quantity shipped properties.
For example, if you received an order of 5 items and want to send them in s packages with different tracking numbers:
Package 1 – tracking number – 123456
Products:
- t-shirt x 1
- blue-jeans x 1
Package 2 – tracking number – 456789
- t-shirt x 1
- blue-jeans x 2
Add tracking for Package One:
POST /wp-json/wc-shipment-tracking/v3/orders/<order_id>/shipment-trackings/
curl -X POST https://your-domain.com/wp-json/wc-ast-pro/v3/orders/<order_id>/shipment-trackings
	-u consumer_key:consumer_secret
	-H "Content-Type: application/json"
	-d '{
		"tracking_provider": "USPS",
		"tracking_number": "123456",
		"date_shipped": "2020-01-24",
		"status_shipped": 2,
    		"sku": t-shirt,blue-jeans,
  		"qty": 1,1
	}'
Add tracking for Package Two:
curl -X POST https://your-domain.com/wp-json/wc-shipment-tracking/v3/orders/<order_id>/shipment-trackings
	-u consumer_key:consumer_secret
	-H "Content-Type: application/json"
	-d '{
		"tracking_provider": "USPS",
		"tracking_number": "456879",
		"date_shipped": "2020-01-24",
		"status_shipped": 1,
    		"sku": t-shirt,blue-jeans,
  		"qty": 1,2
	}'
Get shipment tracking
With this endpoint, you can list all tracking info added to an order. You will need to pass the order id and you’ll get response with array of tracking numbers added to that order,
GET /wp-json/wc-shipment-tracking/v3/orders/<order_id>/shipment-trackings/

curl -X GET https://your-domain.com/wp-json/wc-shipment-tracking/v3/orders/<order_id>/shipment-trackings
  -u consumer_key:consumer_secret

  //JSON response:

  {
  "tracking_id": "feb9bde4475fda92cc9408607b7ecb66",
  "tracking_provider": "Fedex",
  "tracking_link": "http://www.fedex.com/Tracking?action=track&tracknumbers=12345678",
  "tracking_number": "12345678",
  "date_shipped": "2019-03-08",
  "_links": {
    "self": [
      {
        "href": "https://your-domain.com/wp-json/wc/v1/orders/340/shipment-trackings"
      }
    ],
    "collection": [
      {
        "href": "https://your-domain.com/wp-json/wc/v1/orders/340/shipment-trackings"
      }
    ],
    "up": [
      {
        "href": "https://your-domain.com/wp-json/wc/v1/orders/340"
      }
    ]
  }
}
Delete Shipment Tracking
You can delete tracking numbers from orders, you will need to pass the order id and the tracking_id for this tracking number:
DELETE /wp-json/wc-shipment-tracking/v3/orders/<order_id>/shipment-trackings/

curl -X DELETE https://your-domain.com/wp-json/wc-shipment-tracking/v3/orders/<order_id>/shipment-trackings/fa61d174a05d2f34323b51d92823947d
  -u consumer_key:consumer_secret

//response example:
"Tracking ID: fa61d174a05d2f34323b51d92823947d"
Get Shipping Providers
You can get all the active shipping providers for the order
GET /wp-json/wc-shipment-tracking/v3/orders/<order_id>/shipment-trackings/providers

curl -X GET https://your-domain.com/wp-json/wc-shipment-tracking/v3/orders/<order_id>/shipment-trackings/providers
    -u consumer_key:consumer_secret
JSON response example:
{
    "Austria": {
        "DPD Austria": "https://tracking.dpd.de/parcelstatus?locale=de_AT&query=%number%",
        "post.at": "http://www.post.at/sendungsverfolgung.php?pnum1=%number%"
    },
    "Australia": {
        "Australia Post": "http://auspost.com.au/track/track.html?id=%number%",
        "CouriersPlease": "https://www.couriersplease.com.au/tools-track/no/%number%"
    },
    "Canada": {
        "Canada Post": "https://www.canadapost.ca/track-reperage/en#/search?searchFor=%number%",
        "Canpar": "https://www.canpar.ca/en/track/tracking.jsp"
    },
    "Chile": {
        "Correos Chile": "https://www.correos.cl/web/guest/seguimiento-en-linea?codigos=%number%"
    },
    "China": {
        "China Post": "http://english.chinapost.com.cn/html1/folder/1408/3929-1.htm?content=%number%",
        "EMS": "https://www.ems.post/en/global-network/tracking"
    },
    "France": {
        "Chronopost": "https://www.chronopost.fr/fr/chrono_suivi_search?listeNumerosLT=%number%",
        "Colis Privé": "https://www.colisprive.com/moncolis/pages/detailColis.aspx?numColis=%number%"
    },
    "India": {
        "Delhivery": "https://www.delhivery.com/track/package/%number%"
    },
    "United States (US)": {
        "DHL US": "https://www.logistics.dhl/us-en/home/tracking/tracking-ecommerce.html?tracking-id=%number%",
        "Associated Global Systems": "https://tracking.agsystems.com/",
        "DHL Parcel": "https://www.logistics.dhl/us-en/home/tracking/tracking-ecommerce.html?tracking-id=%number%",
        "TNT": "https://www.tnt.com/express/en_us/site/tracking.html?searchType=con&cons=%number%",
        "Speedex Courier": "http://www.speedexcourier.com/",
        "UPS": "http://wwwapps.ups.com/WebTracking/track?track=yes&trackNums=%number%",
        "USPS": "https://tools.usps.com/go/TrackConfirmAction_input?qtc_tLabels1=%number%"
    }
}
API Request Errors
In the events of API request errors, AST uses conventional HTTP response codes in the 4XX and 5XX range to indicate the reason behind the error.
| Error Code | Error type | Sample Error Message |
|---|---|---|
| 400 | BadRequest | Missing parameter(s): tracking_number |
| 400 | BadRequest | Missing parameter(s): tracking_provider |
| 404 | Not Found | Invalid order ID |
| 404 | Not Found | Requests to resources that don’t exist or are missing |
| 401 | Unauthorized | Authentication or permission error, e.g. incorrect API keys |
| 500 | Internal Server Error | Server error |
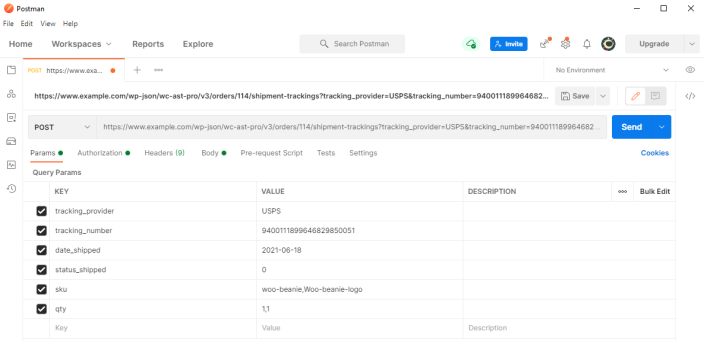
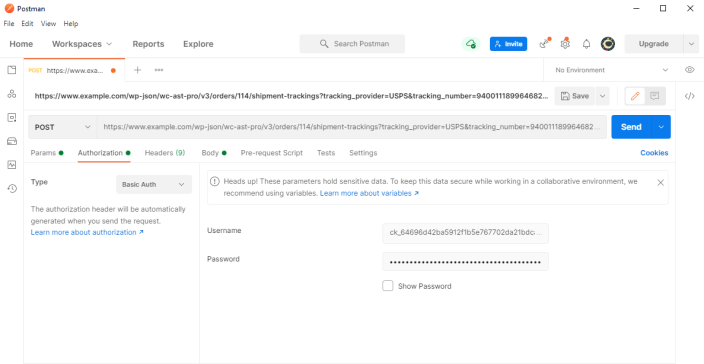
Postman example
Please check screenshot for setup in postman.
Create new request and set method Post. Insert URL and in the Body section insert all the tracking information.
Than go to the Authorization section and select Type Basic Auth. Use REST API Consumer key and consumer secret in the username and password field and click on Send.
CSV Import
↑ Back to topThe CSV import tool enables you to bulk import tracking information to orders from CSV files.
The CSV file consists of five mandatory columns, with column header names that must be followed exactly. In addition, there are two optional columns that may also be included. It is essential to ensure that all the mandatory columns are present in the file:
| ATTRIBUTE | TYPE | VALUE | DESCRIPTION |
|---|---|---|---|
| order_id | string | WooCommerce Order ID (i.e 12345) | compatible with a few Custom Order Numbers plugins |
| tracking_number | string | Tracking number | |
| tracking_provider | string | Shipping Provider Name | the name must match the provider name on the shipping providers list. |
| date_shipped | date | DD-MM-YYYY or MM-DD-YYYY | Date when the package was shipped. Optional – keep Blank to use the import date. |
| status_shipped | int | Do Not Change – 0 (null) Completed (Shipped)/Shipped – 1 Partially Shipped – 2 | Update the order status and send the shipping confirmation email |
| sku* | string | Line item (product) SKU | The product or variation SKU – The SKU must exactly match and be unique per product/variation |
| qty* | int | Line item (product) quantity | The quantity of the product SKU that was shipped |
*Please note: The Tracking Per Item feature is only available in the AST Pro version.
Please avoid using Excel when you create or edit the CSV files since it adds formatting and character encoding to the CSV files and that can cause issues with the import. We recommend using the following CSV editors:
- Google spreadsheets (Google Drive)
- Free spreadsheet app in OpenOffice
Example of CSV file:

You can download a sample CSV file:
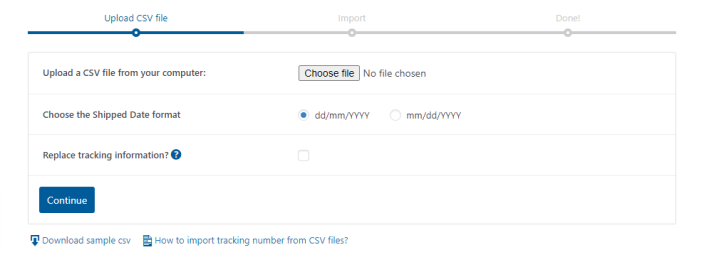
- Upload the CSV file from your computer
- Choose if you would like to override the existing tracking details for the orders or to add the tracking in addition to existing tracking numbers
- Choose the Date Format in the CSV file, you can choose between 2 formats – dd-mm-YYYY or mm-dd-YYYY
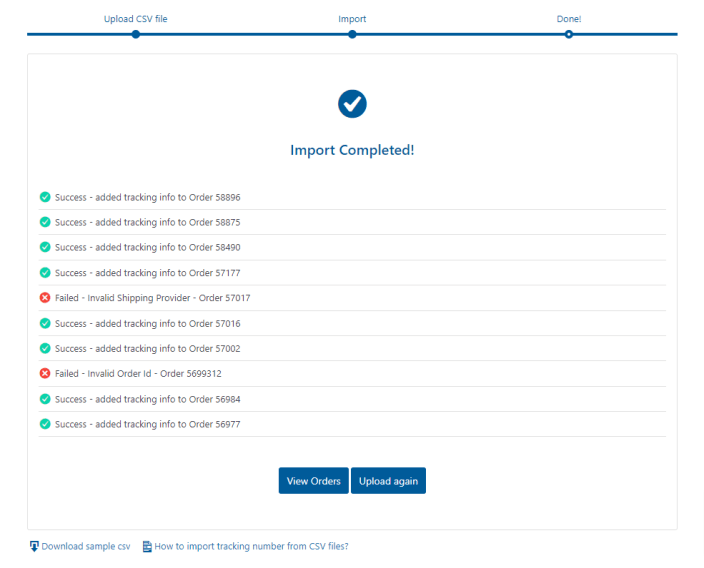
- Click continue to start the import process, once the import completes you will get a detailed report of any issues in the import.
Upload the CSV file, choose import settings, and click continue to start the import:
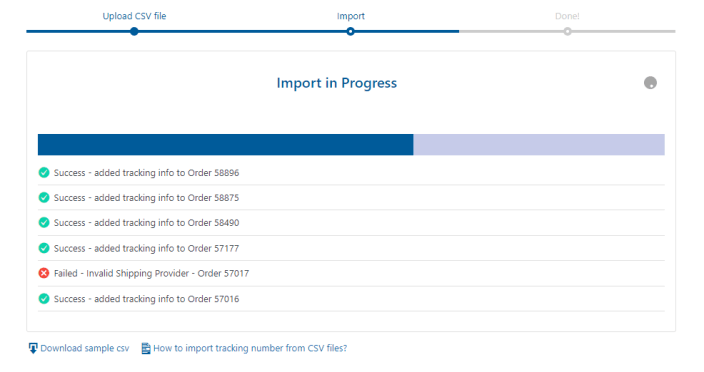
The import will begin and will display the status of the imported tracking numbers:
Once the import completes you will get a detailed report of any issues in the import:
Import Tracking per item from CSV
The AST PRO allows you to Import tracking numbers per item and adds 2 columns in the CSV file, the product SKU and the quantity shipped.
For example, if we received order #12345 with 4 items:
- T-shirt (TSHIRT) x 2
- Blue jeans (BJEANS) x 2
Let’s assume that you ship these products in 2 boxes, each has its own tracking number, one tracking number for the T-Shirts and one for the Blue Jeans:

When you ship the T-Shirts and the Blue Jeans as a set, each set in a package with different tracking number, the CSV File should be formatted this way:

You can download a sample CSV file for an example of the correct formatting:
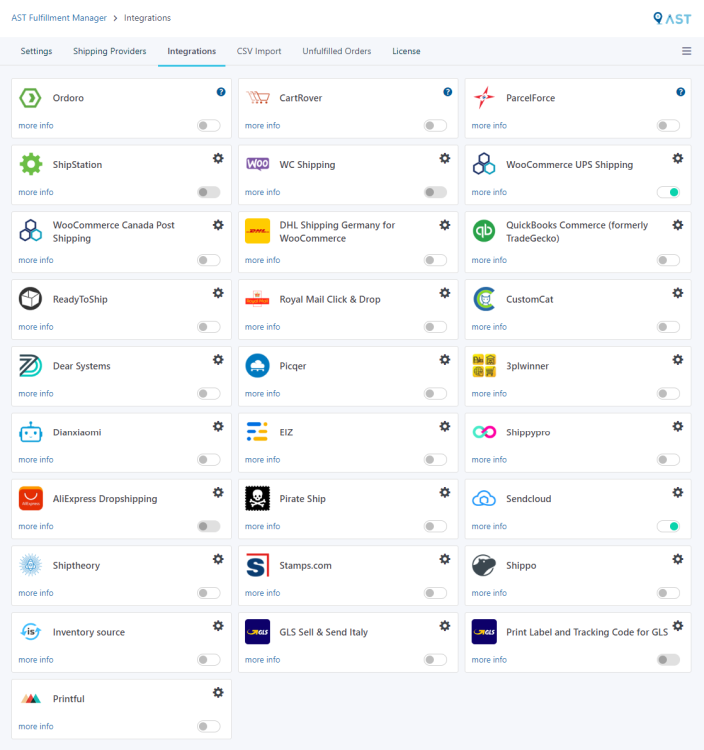
Integrations
↑ Back to topThe Advanced Shipment Tracking Pro comes with built-in integrations with shipping services to automate the fulfillment workflow.
In most cases, external shipping services use the WooCommerce REST API or a plugin to import the processing orders to their dashboards. When you generate a shipping label, they use the order notes API endpoint to update the tracking information back to WooCommerce orders and complete the order.
In this case, the tracking information is not added to the shipment tracking panel (order meta) and the tracking widget will not display on the shipping confirmation email. In most of the shipping services integrations, you can disable the option to Complete the order and then to manually copy & paste tracking informaton to the shipment tracking panel and Complete the orders but this requires you to do a lot of repititve work.
To avoid the manual work, we created integrations that automatically populate the tracking information to the shipment tracking order meta when generating labels and Completes the orders.
To enable integration, go to WooCommerce > Shipment Tracking > Integrations: